Chapter 8.J
Java Data Types
Data Types in Java
Data Types in Java
The Java programming language is a statically typed language. This means that each and every variable we use in our programs must be declared with a name and a type before we can use it. The Java compiler can then perform a step known as type checking, which verifies that we are using the proper data types in our program.
The major advantage of this approach is that many errors in our computer programs can be discovered by the compiler, well before we ever try to run the program directly. It can also help us determine what the cause of the error is by stating that it is a type error, giving us a clue toward how it could be solved.
One downside to this approach is that it makes our programs a bit more complex, as we must think ahead about what types of data we’ll be storing in each variable, and we’ll need to write our programs carefully to avoid type errors. However, it may also make our programs easier to manage later on, as we’ll know exactly what type of data is stored in each variable at any given point in the program’s execution.
To make dealing with types a bit easier, Java will automatically coerce data from a “narrower” data type to a “wider” data type without any additional code. For example, an integer in Java can be stored in a floating point variable.
However, the opposite case is not true. In Java, we cannot store a floating point number in an integer without explicitly converting the data type. We’ll see how to do that later in this chapter.
Most of the computer programs we’ll write must deal with numbers in some way. So, it makes perfect sense to start working with the numerical data types, since we’ll use them very often. Let’s dive in and see how we can use these numerical data types in Java!
Java has built in primitive types for various numeric, text and logic values. A variable in Java can refer to either a primitive type or a full fledged object.
The first data types we’ll learn about in Java are the ones for storing whole numbers. There are actually 4 different types that can perform this task, each with different characteristics.
| Name | Type | Size | Minimum | Maximum |
|---|---|---|---|---|
| Byte | byte |
8 bits | $ -128 $ | $ 127 $ |
| Short | short |
16 bits | $ -32\,768 $ | $ 32\,767 $ |
| Integer | int |
32 bits | $ -2\,147\,483\,648 $ | $ 2\,147\,483\,647 $ |
| Long | long |
64 bits | $ -2^{63} $ | $ 2^{63} - 1 $ |
As we can see, each data type in this list has a different size, and can store numbers within a different range. So, if we know the minimum and maximum values that could possibly be stored in a particular variable, we can use the smallest corresponding data type that can store that value. This would allow us to conserve the amount of memory used in our programs.
However, in practice, most modern computers have more than enough memory available to handle our programs, so this is typically not a concern for most developers. Instead, it is best to use the largest possible data type, to avoid errors in the future as the program is updated and data values may become larger than initially anticipated.
In this program, and most of the code in this book, we’ll typically use the integer, or int data type for all whole numbers. Even though it isn’t the largest data type for storing whole numbers, it is generally large enough. In addition, the int data type is supported universally across many different programming languages, so learning how to use it will make it easier to switch between languages later on.
The next data types we’ll learn about in Java are the ones for storing rational and irrational numbers. There are actually 2 different types that can perform this task, each with different characteristics.
| Name | Type | Size | Range |
|---|---|---|---|
| Float | float |
32 bits | $ \pm 10^{\pm 38} $ |
| Double | double |
64 bits | $ \pm 10^{\pm 308} $ |
Unlike the data types for whole numbers, it is more difficult to discuss the minimum and maximum values for these data types, as it requires a thorough understanding of how they are stored in binary and interpreted by the processor in a computer. In general, each one can handle large numbers as well as small numbers extremely well.
However, just like scientific notation, the numbers it stores at best can only be as accurate as the number of digits it holds. So, when storing an extremely large number, there will be some rounding error.
In this program, and most of the code in this book, we’ll typically use the Double, or double data type for all decimal numbers.
Now that we’ve discussed the various data types available in Java, let’s look at how we can actually create variables that can store data in our programs.
Before working with the code examples in the rest of this chapter, we’ll need to add a class declaration and a main method declaration to a file named Types.java. In Codio, you can open it by clicking on the file in the tree to the left. If you don’t recall how to do that, now is a great time to review the material in Chapter 1 before continuing.
Setting up a new file each time is great programming practice!
In Java, we can declare a variable using this syntax:
<type> <identifier>;So, to declare a variable of type int named x, we would write:
int x;We can also do the same for each of the types listed above:
byte b;
short s;
int i;
long l;

float f;
double d;
As with any other part of our program, we must first declare it before we can use it.
Java has rules about the allowable names with can be used as identifiers, you can find them in the Java Documentation.
By convention, variable names should be descriptive and use camelCase to aid in reading.
Once a variable has been declared, we can give it a value using an assignment statement. Assignment uses this syntax:
<destination> = <expression>In that example above, <destination> is the identifier of the variable we’d like to store data in, and <expression> is any valid Java expression that produces a value. It could be a number, another variable, a mathematical operation, or even a method call, which we’ll learn about in a later chapter. The variable we are storing the value in must always be on the left side of the equals = sign.
For example, if we want to store the value
$ 5 $ in an int variable named x, we could write the following:
int x;
x = 5;
We can even combine the declaration and assignment statements into a single statement, like this:
int x = 5;The same syntax applies to all of these types in Java:
byte b = 1;
short s = 2;
int i = 3;
long l = 4;

float f = 1.2f;
double d = 3.4;
When assigning values from one variable to another using primitive data types, the value is copied in memory. So, changing the value of the first variable would not affect the others, as in this example:
int x = 5;
int y = x;
x = 6;
At the end of that code, the value of x is
$ 6 $, but y still contains
$ 5 $. This is important to remember.
See if you can create a variable using each of the six data types listed above in Types.java. What happens when you assign a value at that is too big or too small for the variable’s data type? Can you assign the value from an int variable into a byte variable?
Notice in the code that the float variable f is assigned using the value 1.2f instead of just 1.2. This is because decimal values in Java are interpreted as double values by default, so when assigning a double to a float there is a possible loss of precision that the Java compiler will complain about. To avoid that, we can explicitly state that the value is a float by appending the letter f to it. We won’t see this very often outside of this lesson.
We can also use the System.out.println and System.out.print methods we learned earlier to output the current value of a variable to the screen. Here’s an example:
int x = 5;
System.out.println(x);
Notice that the variable x is not in quotation marks. This way, we’ll be able to print the value stored in the variable x to the screen. If we place it in quotation marks, we’ll just print the letter x instead.
Later, in the project for this chapter, we’ll learn how to combine multiple variables into a single output.
When writing our programs, sometimes we need to change the data type that a particular value is stored as, especially when we want to store it in a new variable. Ideally, we would construct our programs to avoid this issue, but in the real world we aren’t always so lucky.
To change the data type of a value, we can cast that value to a different data type. To cast a value to a different data type, we put the data type we’d like it to be in parentheses in front of the value.
Let’s look at the example below:
int x = 120;
byte y = x;
System.out.println(y);
In this example, we’ve created an int variable x, and stored
$ 120 $ in that variable. We then create a byte variable y, and try to store the value from x into y.
Try to run these examples by placing each one in Types.java and seeing what happens. Does it work? Try it before reading the answers below.
When we try to compile that example, we should get the following compiler error:
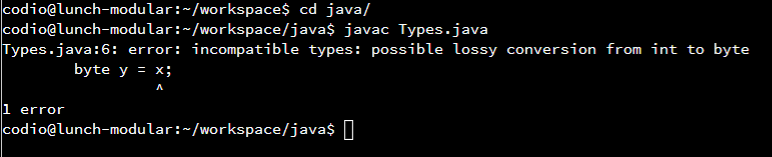
Since the int data type is larger than the byte data type, the compiler will give us an error stating that we might lose data when we perform that conversion. Of course, if we reverse the int and byte data types, and try to assign a byte to and int, it will work just fine.
In general, we should try to avoid this problem by redesigning our program to eliminate the need to store a variable in a smaller type, but sometimes it is necessary. To do this, we’ll need to cast the value to the correct data type. Let’s update the example above:
int x = 120;
byte y = (byte) x;
System.out.println(y);
In this example, we have added a (byte) in front of the variable x when we are assigning it to y. This tells the compiler that we would like to convert the data type of x to byte before storing it in y. Now, when we try to compile and run this program, it will act as we expect.

However, let’s look at one final example to see why the compiler would warn us about converting to a smaller data type:
int x = 128;
byte y = (byte) x;
System.out.println(y);When we say “cast” we really mean convert. Sometimes this results in a change in the the binary representation. Conversion preserves the semantics (meaning) but over writes the binary. In addition to the “casting” syntax (desired type) value ... (int)2.0, you will be exposed to many ConvertTo() methods later in this course.
Casting nearly always preserves the original binary but may result in gibberish; you lose the meaning.
int x = (int)'2';
// results in x equal to 50 not 2
// '2' binary 00110010
// int value of 00110010 is 50
However, “casting” is nearly always used to mean “convert”. It comes from the origins of programming, where languages supported fewer types and the binary had the same semantic meaning across multiple data types.
| type | bytes | binary for the value of 2 | |
|---|---|---|---|
| byte | 1 | 00000010 | |
| short | 2 | 0000000000000010 | |
| int | 4 | 00000000000000000000000000000010 |
From the above table you can see how casting might work for various sized integer values. Leading “bits” were ignored when casting to a byte-wise smaller type. Leading 0s were added when casting to larger type.
We will use cast and convert interchangeably in this course to mean convert to the desired data type. In Java casting between primitive numeric-types often preserves the semantics (value) of the cast. (int) 2.5 is the integer 2, and (double)-4 is the double -4.0.
In this example, instead of storing
$ 120 $ in x, we have instead stored
$ 128 $. When we compile and run this program, we get this unexpected output:
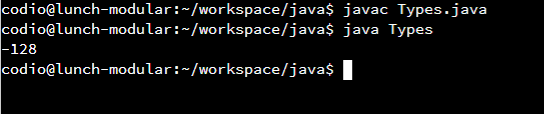
We expect it to output $ 128 $, but instead it outputs $ -128 $. That’s strange, isn’t it?
What’s happening is an error known as integer overflow. Since
$ 128 $ is too large to fit in a byte variable, the computer will truncate, or remove, the bits that are at the front of the number that won’t fit. This could cause data to be lost or misinterpreted, which is what happens here.
So, we must always be careful and not try to cast a variable to a smaller data type if it is too large to fit in that data type. This is why the compiler will always warn us when we try to do so, unless we add an explicit cast to our code.
To make things simpler, we typically just use a single data type for whole numbers, and a single data type for decimal numbers. By using the same type consistently throughout our programs, we can avoid many issues related to data types and casting.
As stated above, most of the examples in this book will use the int data type for whole numbers, and the double data type for decimal numbers. These choices are consistent with the majority of official Java code.
Beyond numbers, there are a few other primitive data types in Java. Let’s take a quick look at them and see how they can be used in our programs.
Java supports a primitive data type named boolean that can only store two values: true and false. As we might expect, we can use these boolean variables to store answers to questions in our program, such as “Is x greater than y?” At this point, we won’t use boolean variables for much in our programs, but in a later module we’ll cover the basics of boolean logic and learn how to use these variables to control how our program runs.
Java also has a char data type, which can be used to store a single character of text. It uses the 16-bit Unicode format to store the data, which is the same as ASCII for simple characters and commands.
To declare a variable using these data types, the format is the same as the numerical data types:
boolean t;
char c;
We can also assign values to each variable. For example, to assign a value to a boolean variable, we could do this:
boolean t;
t = true;
boolean f = false;
Notice that both true and false are keywords in Java, which means that we won’t have to put them in quotation marks to use them. These values can be used to directly represent the boolean values True and False, respectively. Some programming languages, most notably C, do not support boolean values in this way, but Java includes them as keywords.
For characters, the process is similar:
char c;
c = 'a';
char d = 'B';
Notice that we use a single quotation mark ' around character values in our code. This is very important to remember! In our Hello World example, we used double quotation marks " around strings, or sentences of text. For a single character, however, we only use a single quotation mark.
Thankfully, the Java compiler will catch this problem pretty quickly. For example, take a look at this code, and see if you can spot the errors:
char c = "a";
System.out.println("c");
When we first try to compile the program, we should get the following error:
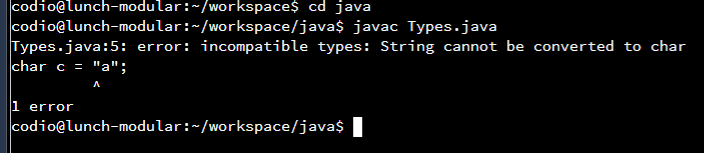
As we can see, the compiler will not allow us to assign the string "a" to the variable c, which is of type char. So, to fix this error, we’ll need to modify our code to be the following:
char c = 'a';
System.out.println("c");
However, there might be another error in this code. Can you spot it? What will be printed to the screen when we run this program?
Let’s find out:
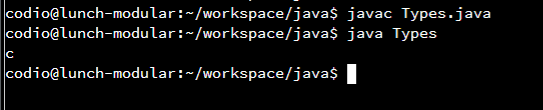
You might have expected the program to output a, but instead it output c. This is because we have "c" inside of our System.out.println method. To print the value stored inside a variable, we shouldn’t put it in quotation marks. Otherwise, it will interpret that as a string, and print the name of the variable (or whatever is in quotation marks) instead.
Now that we’ve learned how to create our own variables, we can use them to perform a wide variety of mathematical operations. For most of these, we’ll use the same operator symbols that we’ve used before in math, but a few of them are unique to programming languages like Java.
For each of the examples below, we’ll assume that we have already created two int variables, x and y, as follows:
int x = 5;
int y = 8;+Using the plus + symbol, we can add two numbers together and find their sum:
int z = x + y;
System.out.println(z); // 13
Since
$ 5 + 8 = 13 $, this program would output 13.
When writing our code, it is always good practice to put spaces between operators and operands unless otherwise noted, just to make it easier to read our code.
The plus symbol can also be use to concatenate or link multiple strings together. We’ll learn how to do that in the project for this chapter.
We can add comments to our code to help us describe it to others or simply understand it better ourselves. These comments are simply text that is added to the source code, but they are marked in a way that tells the compiler to ignore it when compiling the program.
In Java, we can use two forward slashes // to tell the compiler that everything on that line following those symbols should be treated as a comment, as we can see in the examples on this page.
We can also use a forward slash followed by an asterisk /* to start a multiline comment in Java. The compiler will ignore everything after that symbol until a closing asterisk followed by a forward slash */ is found.
Finally, Java also uses a forward slash followed by two asterisk /** to denote special comments that can be used to automatically generate documentation for the code. Again, this comment section is closed by an asterisk followed by a forward slash */.
Traditionally, each additional line in these multiline comments will be prefixed by an asterisk to make them easier to read. In fact, the Codio editor will do that for us!
Here are some examples in code showing how those comments can be used.
/**
 * This is a comment at the beginning of a class that gives
 * information about the class contained in this file
 *
 * @author Username
 * @version 1.0
 */

public class Example{

  /**
   * This is a comment at the beginning of a method.
   * It can give information about the inputs and outputs
   * of that method
   *
   * @param args - the command-line arguments
   */
  public static void main(String[] args){
    /*
     * This is a simple multi-line comment
     * It can have multiple lines
     * and ends with the slash below
     */

    int x = 0;

    //This is a single line comment
    int y = 0; //Comment after code on the same line
  }
}
Feel free to use comments anywhere in your source code to help you understand what the code does! It is always better to include too many comments than too few, especially in larger programs.
-Likewise, we can use the minus - symbol to subtract two values and find their difference:
int z = x - y;
System.out.println(z); // -3
This program would output -3, since
$ 5 - 8 = -3 $. It is important to remember that these operations can result in negative numbers, so the order of operands we use matters when subtracting.
We can also use the minus symbol to find the additive inverse of a number, or change the sign of a variable from positive to negative and vice-versa:
int z = -x - y;
System.out.println(-z); // 13
In this example, we use -x to denote the inverse of x. In this case, we don’t include a space between the minus symbol and the variable it is attached to. So, this expression will calculate
$ -5 - 8 = -13 $ and store that value in z. Then, when we print that variable, we invert it again, so it will actually print 13 to the screen instead of the value
$ -13 $ stored in z.
*We can also use the asterisk * or star symbol for multiplication to find the product of two numbers:
int z = x * y;
System.out.println(z); // 40
We know that
$ 5 * 8 = 40 $, so this program would output 40 as expected.
/Division is a bit different. Most programming languages use the forward slash / symbol for division, making the statement look like a fraction. That is probably the easiest way to think about division in a programming language - it makes a fraction of the dividend and the divisor.
Earlier in this chapter we discussed that strange things may happen when we try to divide two whole numbers. Let’s look at a few examples:
int z = x / y;
System.out.println(z); // 0
This first example will calculate
$ 5 / 8 $ but store it in an int variable. We expect the answer to be
$ 0.625 $, but since an int variable can only store a whole number, the result is truncated by removing the decimal portion. So, our program just outputs 0.
Here’s another example:
int z = -x / y;
System.out.println(z); // 0
We know that
$ -5 / 8 = -0.625 $, but once again the result is truncated and the decimal part is removed. So, this program will also output 0.
Let’s look at another division example:
double z = x / y;
System.out.println(z); // 0.0
Here we are storing the result in a double variable. We’d expect the output to be 0.625, but we actually just get 0.0 when we run this program. That’s strange, isn’t it?
Earlier we discussed some of the rules for how a programming language calculates numbers. One of those rules states that an operation performed on two whole numbers will result in a whole number, which is exactly what is happening here. The processor calculates
$ 5 / 8 = 0 $ as a whole number using truncated division, then converts the value
$ 0 $ to a floating point value before storing it in z. So, even though it appears we should be storing
$ 0.625 $, we aren’t able to due to the data types of our two operands. This is a very common mistake made by programmers of all skill levels, so it is very important to understand what is going on.
So, how can we solve this issue? The answer lies in the use of a cast operation to convert the data type of one of our operators to a floating point value. Here’s an example showing how to accomplish that:
double z = (double) x / y;
System.out.println(z); // 0.625
In this example, we are casting the value stored in x to be of type double. Then, the division operation is performed, this time between a floating point number and a whole number, which will result in a floating point number. Finally, that result will be stored in z, and the program will output 0.625, which is the correct answer.
In short, we need to make sure we pay special attention when dividing numbers in our programs, just to make sure we are getting the result we expect.
%The modulo operator uses the percent sign % to calculate the remainder of a division operation. Let’s look at an example:
int z = x % y;
System.out.println(z); // 5
Here, we are calculating the remainder of the division $ 5 / 8 $. Since $ 8 $ does not go into $ 5 $ at all, we are left with $ 5 $ as the remainder of that division.
If we reverse the operands, we can get a different result:
int z = y % x;
System.out.println(z); // 3
Here, we are calculating the remainder of $ 8 / 5 $. Since $ 5 $ will go into $ 8 $ once, we can perform $ 8 - 5 = 3 $ to find the remainder of that division.
In Java, the modulo operation is treated like a truncated division operation, with the sign matching the first number (the number to be divided, or the dividend). So, when applied to negative numbers, it will perform the expected division and return the remainder, which may be a negative number, depending on the sign of the number before the modulo operator:
Here are some examples:
System.out.println(-8 % 5);  // -3
System.out.println(-8 % -5); // -3
System.out.println(8 % -5);  // 3
We already know that $ 8 % 5 = 3 $. In this case, the negative sign is applied if the first operand is negative, regardless of the sign of the second operand.
++ & Decrement --Increment ++ and decrement -- are two special operators in Java. They are used to add or subtract
$ 1 $ from an existing variable. Let’s look at a couple of examples:
int z = x++;
System.out.println(x); // 6
System.out.println(z); // 5
Here, the increment operator will increase the value stored in x by
$ 1 $. In this case, we don’t include a space between the operator and the variable it is attached to. However, since the operator is after the variable, it will happen at the end of the operation. So, the value
$ 5 $ will be stored in z first, then x will be incremented by
$ 1 $ afterwards. So, the program will output 6 as the value of x, and 5 as the value of z.
By placing the increment operator in front of the variable, we can see a different outcome:
int z = ++x;
System.out.println(x); // 6
System.out.println(z); // 6
As we’d expect, here the increment operation will be performed first, and then the new value stored in x will also be stored in z, so both variables will contain the value
$ 6 $ in this program.
The decrement operator works similarly, subtracting $ 1 $ instead of adding $ 1 $.
In practice, these operators are only used in a few scenarios, most notably within loops to increment or decrement a counter variable. In general, they can make our code more complex and difficult to read due to the variety of different ways these operators can be used.
Finally, many operators in Java also have combined operation and assignment operators. These will perform the operation specified and store the value in the first variable, all in a single statement.
| Operator | Example | Equivalent |
|---|---|---|
+= |
x += y; |
x = x + y; |
-= |
x -= y; |
x = x - y; |
*= |
x *= y; |
x = x * y; |
/= |
x /= y; |
x = x / y; |
%= |
x %= y; |
x = x % y; |
As with the increment and decrement operators, some of these shortcuts are rarely used in practice since they can make our code more difficult to read and understand. However, in some scenarios they can be quite helpful.
There is a typo in the video below. The order of operations given on the slide is incorrect. The correct order is shown below the video.
We are already familiar with the order of operations in mathematics, using mnemonics such as “PEMDAS” to refer to the following order:
Programing languages work very similarly, but there are many more operators to deal with. Here’s a quick list of the order of operations, or operator precedence of the operators we’ve covered so far:
++ & Decrement -- after variable*-, Increment ++ & Decrement -- before variable**, Division /, and Modulo %+, Subtraction -=, +=, -=, *=, /=, %=* The increment and decrement operations will be calculated either before or after the rest of the operation is performed, depending on where they are placed in relation to the associated variable. This lists what order they will be analyzed by the compiler to determine which variable they are attached to.
Here’s a quick example to show how this works:
int x = 1;
int y = ++x + x - x / x * x % x--;
System.out.println(x);
System.out.println(y);
Can we determine what the output should be? Let’s try to break it down!
Based on the operator precedence table above, we know that the x-- will be evaluated first. However, since it is after the variable, it won’t be calculated until after the rest of the operation is complete. So, we can just remember that step for now, and we’ll actually perform that calculation last.
Next, we know that ++x will be evaluated. This step must be performed before any other operation since it is before the variable, so we must immediately increment the value of x by
$ 1 $. So, x is now
$ 2 $.
Now we can perform all of the multiplicative operations, going from left to right. So, by adding the appropriate parentheses, we’d calculate the following:
$$ x + x - x / x * x \% x $$ $$ 2 + 2 - 2 / 2 * 2 \% 2 $$ $$ 2 + 2 - (2 / 2) * 2 \% 2 $$ $$ 2 + 2 - ((2 / 2 * 2) \% 2 $$ $$ 2 + 2 - (((2 / 2) * 2) \% 2) $$ $$ 2 + 2 - ((1 * 2) \% 2) $$ $$ 2 + 2 - (2 \% 2) $$ $$ 2 + 2 - 0 $$
Following that, we can perform any additive operations. Once again, we can add parentheses as appropriate to find the following:
$$ 2 + 2 - 0 $$ $$ (2 + 2) - 0 $$ $$ ((2 + 2) - 0) $$ $$ (4 - 0) $$ $$ 4 $$
Once we’ve calculated all of the operations on the right-hand side of the assignment operator, we can then perform the assignment operation to store the final value
$ 4 $ in y.
Finally, we must remember to go back and decrement the value in x by
$ 1 $, so x once again is just
$ 1 $.
So, the final output from this program would be:

However, as any good math teacher will tell us, it is always better to use additional parentheses to make sure our operations are performed in the correct order instead of relying on the order of operations. So, we should definitely avoid writing code as ambiguous as the example given above.
The Linux command line consists of the command and the arguments.
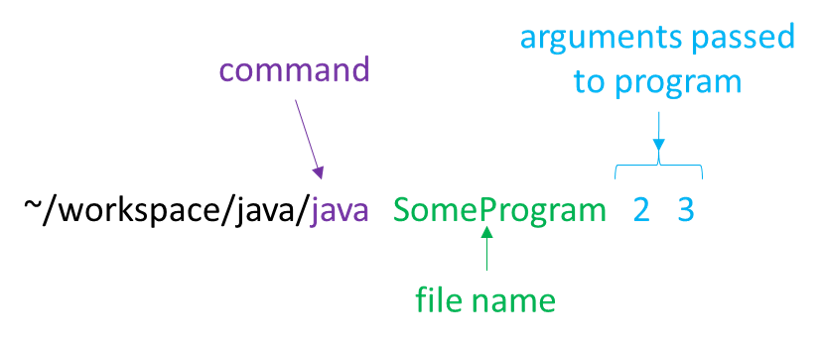
In this example, Linux will see the first part of the command, which is java, and that will tell it what program to execute. Everything else is packaged up as string-values and sent to the Java Virtual Machine. The JVM takes the name of the program, SomeProgram, from the command, and then starts the program with that file name, passing the remaining items (arguments) to the program.
By convention, the command line arguments are sent to the program’s main method. Java handles this automatically.

Inside Java, the command line arguments are mapped (assigned) to the parameter variable in the main method called args. In main args is an array of Strings.

Arrays are ordered collections of data - we might think of it as a numbered list. We access elements of the array using the indexing operator [], the indexes start at 01. The syntax is variableName[indexNumber].
The parameter args is always an array of strings, in the order they appeared on the command line.
Since args is always an array of Strings, programmers must convert those arguments (values in the args array) to the appropriate type. For numbers, this is typically done using various parse methods that are provided as part of the Java language.
| Syntax | Semantics |
|---|---|
int x = Integer.parseInt(args[0]) |
Take the string in args at index 0Convert it to an intAssign it to x |
double x =Double.parseDouble(args[0]) |
Take the string in args at index 0Convert it to a doubleAssign it to x |
If we try and convert something that does not make sense, Double.parseDouble("act") or Integer.parseInt("3.1415"), we’ll get an error when we run our program. Later in this class we’ll learn about how to detect and handle those errors, but for now they will simply crash our program.
Consider the code below, which can be stored in a file named SomeProgram.java if we want to execute it.
public class SomeProgram{
    public static void main(String[] args){
        System.out.println("args[0] is a String");
        System.out.println("args[0]'s value is \""+ args[0] + "\"");
        int x = Integer.parseInt(args[0]);
        System.out.println("x is a int");
        System.out.println("x's value is " + x);
        int y = Integer.parseInt(args[1]);
        int z = x + y;
        System.out.println(x + " + " + y + " = " + z);
    }
}
A proper command line for running SomeProgram.java would be java SomeProgram <int> <int>, since it requires to command-line arguments that will be converted to integers. An example would be java SomeProgram 2 3 which will store "2" as args[0] and "3" as args[1]. At this point, let’s trace the execution SomeProgram.java if we execute it using the command java SomeProgram 2 3.
{"2", "3"} is assigned to argsargs[0] is a String. We know this because args is declared to be an array of Strings (String[] args, line 2)argsargs[0] to an int, assign that integer value to xx is an int. We know this because x is declared to be an int (int x, line 5)xargs[1] to an int, assign that integer value to yx and y, assign that sum to the int zFeel free to experiment with SomeProgram.java to explore more ways to use command-line arguments in code. What happens if we give too few arguments? Or too many? What about the wrong types?
Staring at 0 saves memory and simplifies memory access. Nearly all languages start at 0. ↩︎
One of the unique parts of this course will be the inclusion of subgoals to help us better understand what is going on in our code. Subgoals are designed to help us structure our thinking process in a way that matches what an experienced developer might have.
A great example is learning how to read. Fluent readers can read whole words at a time, while processing and retaining information from several sentences at once. Novice readers have to sound out words one letter at a time, and can store and retain a few words at a time in memory before being overwhelmed by information. Learning a new language can quickly make this difference very apparent, even for readers who are fluent in many languages.
Writing computer code is very similar. An experienced developer can fluently read and write code, seeing and understanding entire code structures at a glance. Novice developers often have to look at a single line at a time, and break it down into individual parts before it is apparent what the code says. That’s just part of the learning process!
To make this process easier, this course will include many pages that describe subgoals we can use to help analyze and write code. In essence, we can treat these subgoals as a set of steps to follow mentally when performing these tasks. Over time, we’ll become more comfortable with each task, and the subgoals will quickly become ingrained knowledge. Just like we can easily read both “cat” and “catastrophe” at a glance, with practice we’ll be able to read code just as quickly!
For more information on Subgoals, see the work of Dr. Briana Morrison published through the ACM and elsewhere. Link
To analyze an expression involving variables and mathematical operators in code, here are some mental subgoals we can use:
First, we must determine whether the data type of the expression is compatible with the data type of the variable we want to store it in. In Java, we must be very careful to make sure we are only storing whole numbers in the integer data type, and floating point values in the double data type.
Next, we should look at the expression to determine if there are any prefixed operations that must occur first. In Java, for example, we could find a prefixed increment operator like ++x, so we’ll need to update the value of x before moving to the next step.
At this point, we can solve the arithmetic equation using the order of operations for our language. This simply involves the process of substituting values for variables and performing the requested operations. However, once again we must be careful to make sure that the operands provided to each operator are valid and produce the correct data type. The example we saw earlier for handling a large equation showed us a great way to work through this process.
Once we’ve solved the arithmetic equation, we should be left with a variable on the left side of the equals sign and a single value on the right side. So, once again, we should confirm that the value on the right can be stored in the data type of the variable on the left.
Finally, if the original expression included any postfix operations, such as a postfixed decrement like x-- in Java, we’ll need to update the value of x before moving on to the next line.
Let’s walk through an example showing how to use these subgoals to evaluate a few expression statements.
int x = 3 + 5;We’ll break this down by subgoals:
int, and that the numbers on the right side of the equation are all integers, so we shouldn’t have any issues with data types initially.3 + 5 can be replaced with 8.8 can be stored in an int variable, we are just fine. So, we can update the value of x to 8.That’s all there is to it! While this may seem like quite a bit of information for handling a simple statement, it becomes much more useful as the statements get more complex.
Here’s a second example:
int x = 5;
double y = 3.5;
double z = ++x + -y--;
Once again, let’s break the last line in this code example down by subgoals to evaluate the expression:
x is an integer type, and y is a double type. Since this expression is adding them together, the result should be a floating point number, which can be stored back in the variable z with type double. So, we should be fine here.++x, so we’ll increment the value of x by
$ 1 $ to
$ 6 $. We also see a prefix operator -y, so we’ll need to remember that we are dealing with the inverse of the value stored in y.x + -y becomes 6 + -3.5 which results in 2.5.2.5 is a floating point number, it can be stored in the double data type. So, we’ll update the value of z to
$ 2.5 $.y--, so we must decrement the value of y by
$ 1 $ to
$ 2.5 $So, at the end of this short code example, we’ll see that x is
$ 6 $, y is
$ 2.5 $, and z is also
$ 2.5 $.
Finally, let’s look at one more example:
int x = 5;
double y = 8.5;
int z = x + y;
Here’s how we can break down the process of evaluating the last line in this example:
x is an integer and y is a double, so the sum of those values should also be a double. However, we’ll see that z is an integer. So, what will happen here? As it turns out, the Java compiler will give us an error when we try to compile this code, because we are assigning a double value to an integer which could result in the loss of data.As we can see, by carefully following these subgoals, we can even find errors in our code, just by evaluating it step by step.
We can also use subgoals to help us write new expressions in our code. These subgoals help us understand each part of the process of building a new expression, and they also help us avoid many common errors.
Here are the subgoals for writing a new expression:
The first step is to determine which part of the problem statement will be represented by a variable. Sometimes this is obvious, and other times it is not. This may be a new variable that we are creating, or it could be an update to an existing variable.
Once we’ve found a variable to work with, we must also determine the variable’s name and data type. Once again, this may be obviously found in the problem statement, but other times we must think a bit more about what type of data will be stored in the variable. If we are working with an existing variable, we’ll need to make sure that the data type of that variable is compatible with the type of data we’d like to store in it. Of course, we should also make sure the variable has a descriptive and memorable name if we are creating a new one.
Now that we’ve isolated our variable, we must build an arithmetic equation and operators required to produce the desired value. This may involve using additional variables in our equations as well.
Once we have our arithmetic equation, we can then build the overall expression. This usually consists of three parts: the variable on the left, an assignment operator in the middle, and the arithmetic equation on the right.
Finally, once we’ve constructed the overall expression, we should check and make sure that all operators and operands are compatible. This means making sure that we aren’t trying to assign a floating point value to an integer, or dividing two integers and expecting a floating point number as a result.
Here’s a quick example to show how this process works. Consider the following problem statement:
Given two whole numbers, find the remainder of dividing the first number by the second number.
Let’s use the subgoals listed above to build an expression for this problem statement
inputA and inputB, and the remainder variable remainder. We can also determine that each of them should be the int type, since we are only dealing with whole numbers. So, our code might begin with these three variable declarations:int inputA;
int inputB;
int remainder;inputA by inputB, so we can use the modulo operation % to find this value. So, our arithmetic equation could be inputA % inputB.remainder, we’ll build the line remainder = inputA % inputB as our entire expression. So, we can add that to our code:int inputA;
int inputB;
int remainder;
remainder = inputA % inputB;inputA and inputB are integers, the result of the modulo operation would also be an integer. So, this line is valid.Of course, the part we are missing is the values for inputA and inputB. At this point, we haven’t covered how to accept user input yet, so we can assume that those values are hard-coded into the program. So, our final program might look something like this:
int inputA;
int inputB;
int remainder;
inputA = 5;
inputB = 8;
remainder = inputA % inputB;Using these subgoals is a very great way to learn how to build programs one step at a time. As we learn more about programming and get more experience, many of these steps will become automatic. This is very similar to how we write sentences by hand. We typically don’t think about each letter as we write it once we are fluent with the language, but instead we think of entire words and our brain is able to send the correct commands to produce the desired output. With time and practice, writing code will be very similar.
Now that we’ve learned how to run our program and provide it some input, we must also learn how to provide output that includes our variables as well as text all on the same line. There are a few ways to accomplish this.
First, we can use System.out.print() to print text without a newline character at the end, so that the next output will begin on the same line. So, we could use that to print text and variables on the same line. Here’s an example:
int x = 1;
int y = 2;
System.out.print("Variable x: ");
System.out.print(x);
System.out.print(", Variable y: ");
System.out.println(y);
will produce this output:
Variable x: 1, Variable y: 2In Java, we can also concatenate multiple outputs together using the + symbol. So, we could produce similar output using this example:
int x = 1;
int y = 2;
System.out.println("Variable x: " + x + " , Variable y: " + y);
which should output:
Variable x: 1 , Variable y: 2Notice that we needed to include an extra space after 1 in the output. This is because Java does not add a space between strings when concatenating them, so we must be careful to add the spaces ourselves where needed.
There are many ways that we can use Java to output text and variables as desired. We’ll use some of these methods to complete this project.