Chapter 4
Conditionals
If, Then, or Else!
If, Then, or Else!
We’ve created many different computer programs by now, but they have all had one thing in common: they only have a single execution path in the program. This means that, each time we run the program, we’ll execute the exact same pieces of code and perform the same operations on each variable. We may have different initial values stored in those variables, but that is really the only difference.
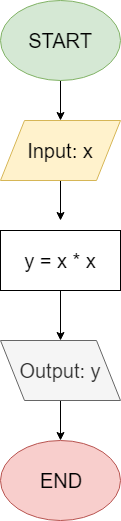
To better visualize this, we can actually think of the execution path of a program just like a flowchart. For example, here is a flowchart showing the execution path of a program that asks the user to input a number and then prints the square of that number.
However, what if we’d like our programs to be able to perform different actions, depending on the user’s input? Wouldn’t that be useful?
Let’s take a look at a second flowchart. For this program, we’ll have the user input a number. If the number is even, we’ll output even, but if it is odd, we’ll output odd. Let’s look at what this program might look like as a flowchart:
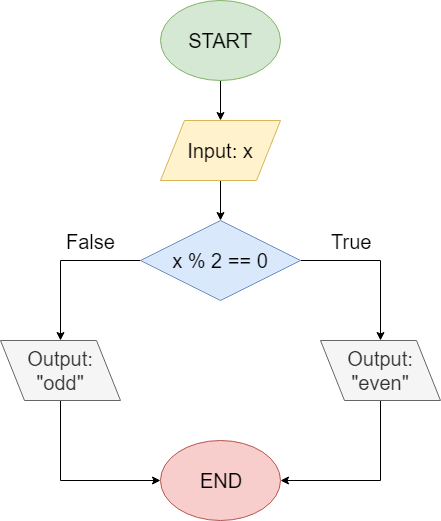
This flowchart uses a diamond-shaped block to indicate a decision we’d like our computer program to make. Inside the block, we see the Boolean logic expression x % 2 == 0, which will determine whether x is evenly divisible by
$ 2 $. If so, the result of the modulo operation would be
$ 0 $, so the entire statement would evaluate to true, indicating that x is an even number.
We also see two arrows coming from this block, one on the left if the statement is false, and another, on the right, if the statement is true. Each path leads to a different output, before being joined together at the end.
Nearly every programming language supports a method for running different parts of code based on the result of some Boolean logic expression, just like in this example. Collectively, these methods are known as conditional constructs, sometimes referred to as conditional statements or just conditionals. In the example above, the diamond-shaped block represents a conditional construct in that program.
Of course, we can make even more complicated decisions in our programs. Let’s take a look at one more flowchart and see if we can understand what this program does:
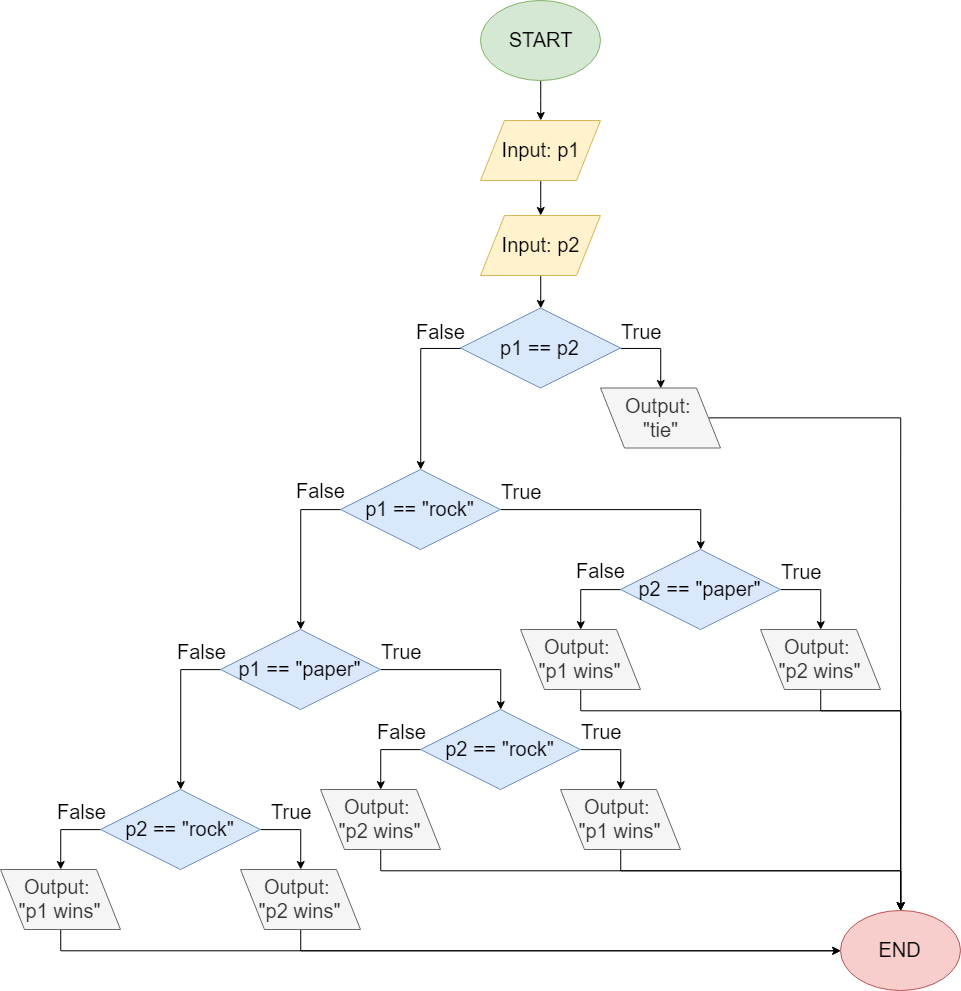
At first glance, this flowchart may seem quite confusing. However, by looking closely at the decisions it makes and the corresponding output, we should realize that it is a program that plays the common “Rock, Paper, Scissors” game.
First, the program accepts two inputs, representing the symbols chosen by each player, and stores them in variables p1 and p2. Then, it checks to see if the inputs are equal. If so, the program declares the game to be a tie by outputting tie, and then it ends. If the inputs are not equal, then it can determine a winner.
Instead of trying to describe how the rest of the program works, let’s look at a few possible inputs and trace the program’s execution through the flowchart, just to see what it does.
First, let’s look at the case when player 1 chooses “rock” and player 2 chooses “paper”. So, our variables would be p1 = "rock" and p2 = "paper". Here’s a trace of the path that input would follow through the flowchart:
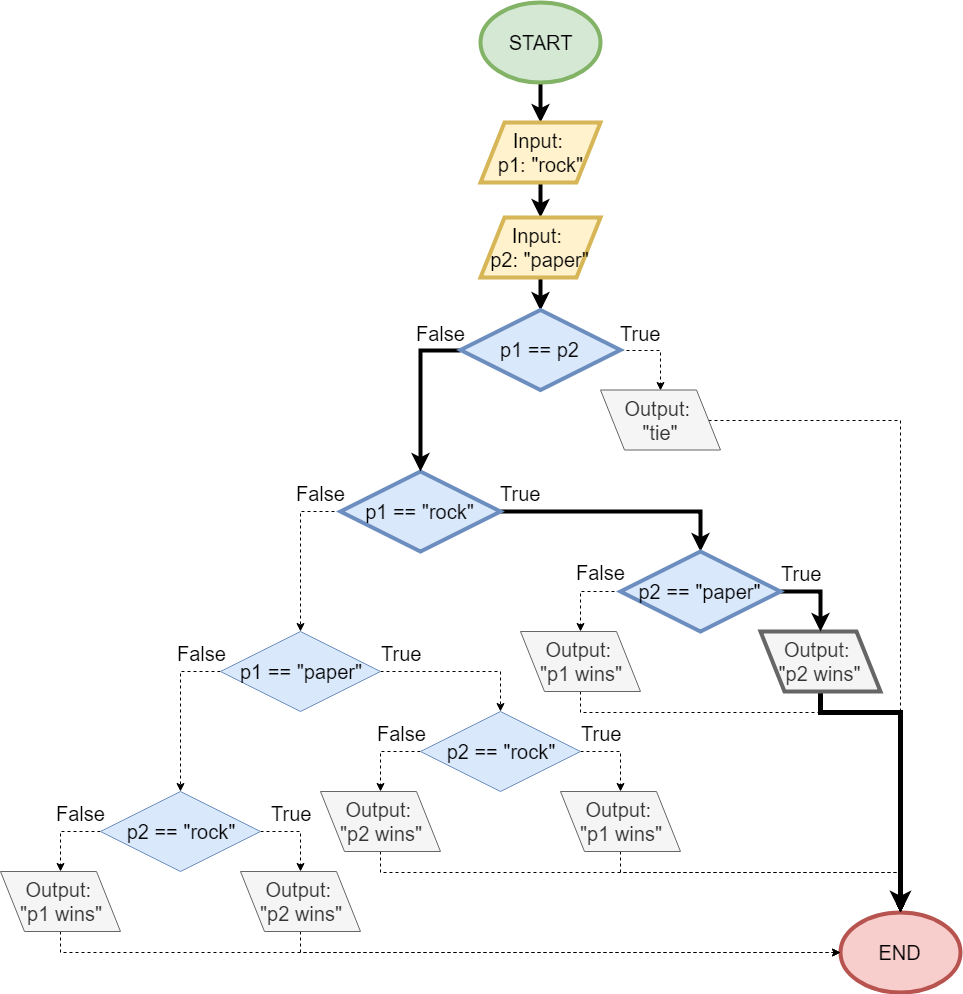
As we can see, first the program will check to see if the inputs are equal. Since they are not, it will follow the false branch to the left. Then, it will determine if player 1’s input was "rock". Since that is the case, it will follow the true branch to the right. After that, the program will test if p2 == "paper", which is also true. So, the program will follow the right branch, and output p2 wins. We can see that this output is indeed correct, since the rules of the game states that “paper covers rock”, meaning that player 2’s choice of paper will beat player 1’s choice of rock.
Let’s look at one other example. This time, player 1 chooses “scissors” and player 2 chooses “paper”. Here’s a flowchart representing our program with those inputs:
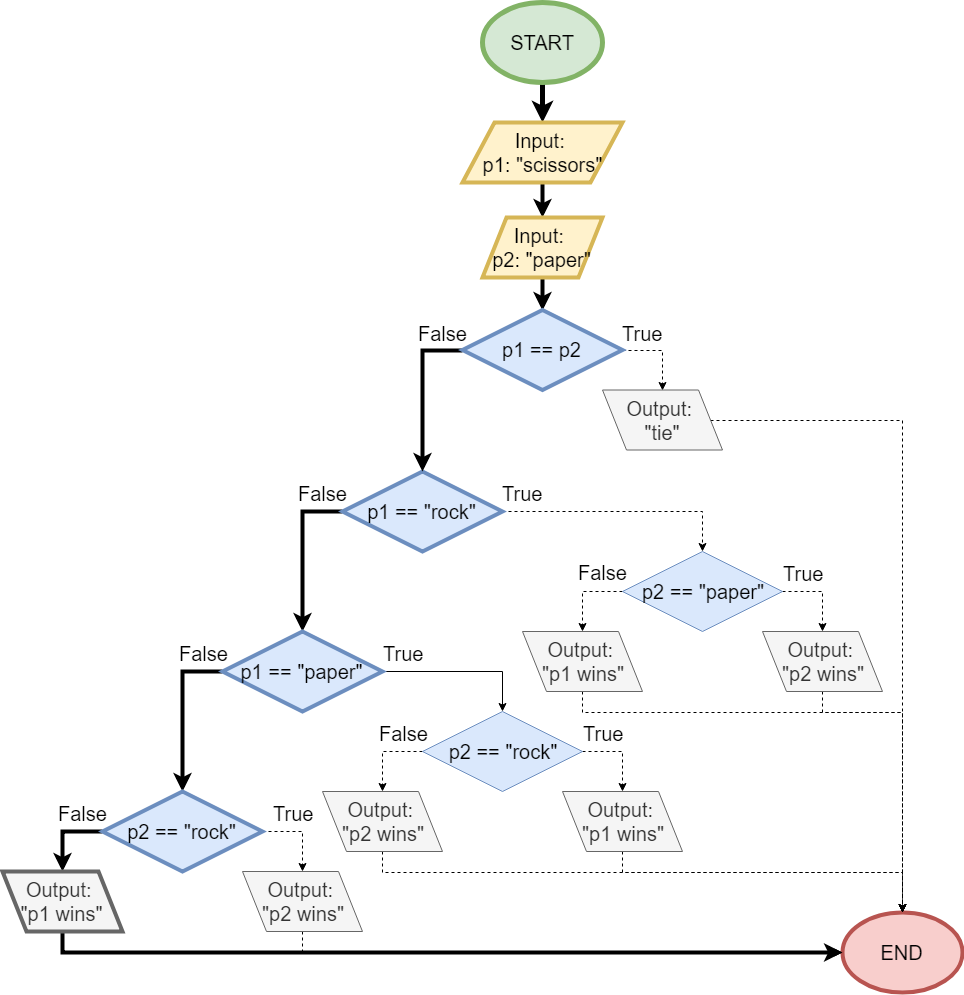
In this example, the program will first decide if the inputs are equal. They are not, so the program will once again follow the false branch to the left. Then, it will test to see if player 1’s input was "rock". In this case, the user input "scissors", so this test is false, and the program will choose the false branch to the left.
Next, it will try to determine if player 1’s input was "paper". Since that is also not the case, it will follow the false branch to the left once again.
At this point, our program knows that player 1 did not input either "rock" or "paper", so it can assume that the input must be "scissors". So, it will then check to see if player 2’s input was "rock". This is also false, so it will choose the false branch once again.
From earlier, it knows that player 2’s input is different from player 1, and player 2 did not input "rock". Since player 1’s input is assumed to be "scissors", that means that player 2 must have chosen "paper" as it is the only valid input left.
Therefore, this program has determined that player 1’s input was "scissors" and player 2’s input was "paper". By the rules of the game, “scissors cuts paper”, so player 1 wins. Our program will correctly output p1 wins!
In the examples above we made a very important assumption, which allowed us to infer information about each user’s input. Can you find a possible problem with the programs as shown in the diagrams above?
In those examples, we assumed that the users would only input either "rock", "paper", or "scissors". Based on that assumption, if we have determined that a player’s input was neither "rock" nor "paper", as we did in the last example, then we can infer that the user must have chosen "scissors".
However, we did not specify how that assumption was enforced in our diagram. In a real-world program, how to handle bad input is often specified, which can lead to additional decision boxes in the flowchart that would test each user’s input against a list of valid inputs before accepting it. This would make the flowchart significantly larger and more complex, which is why they were omitted for this example.
As you complete the programming examples and projects in this course, you’ll need to pay special attention to the program’s specifications and any assumptions made about possible user inputs. It will often be the case that there is no instructions given for handling bad input. In this case, our program should do nothing since it wasn’t specified. Adding unspecified features is a bad programming practice, so we want to avoid adding any instructions that are not explicitly listed in the program specification. In a formal development process, a “bug” would be opened to fix the specification first, and then we would update the code to match the new specification.
In most cases, it is always better to specify how a program handles invalid input instead of relying on assumptions about what your users may or may not provide as input.
The customer may always be right, but users should never be trusted to follow instructions!
As we can see, the ability to make decisions in a computer program is one of the most important building blocks we need to build more elaborate and complex programs. In this chapter, we’ll learn about all of the different ways we can write computer programs to make decisions and perform different actions based on those decisions using conditional constructs.
The first type of conditional construct we’ll cover is the if statement. This type of statement allows us to build a block of code which will only be executed if the given Boolean expression evaluates to true.
Here’s a simple flowchart that shows an if statement as the conditional construct:
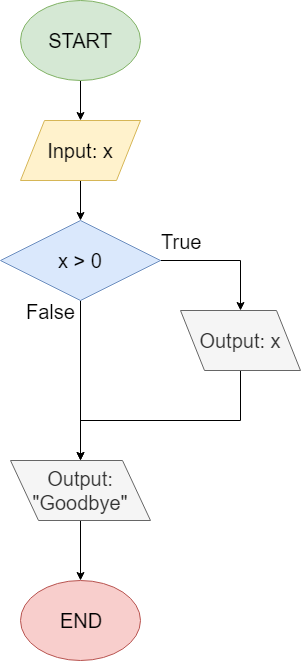
This flowchart represents a program which will ask the user for a number as input, then print that number as output only if the number is greater than
$ 0 $. Then, the program will print Goodbye and terminate. So, if the user inputs -5, the program will only print Goodbye. However, if the user inputs 7, then the program will first print 7 followed by Goodbye. As we can see, the program will execute the section of code that prints the value of the variable if and only if the value of x > 0 is true. Otherwise, it will skip that code and continue with the rest of the program.
Notice that this statement does not include any operations in the case that x > 0 is false. Instead, the false branch points downward, and merges with the true branch after the program outputs the value of x. This is the main difference between an if statement and an if-else statement, which we’ll cover on the next page.
Most programming languages implement an if statement in a format similar to this:
<before code block>
if <Boolean expression> {
    <if code block> or <True block>
    }
<after code block>
The program is initially executing code in the <before code block> section. Once it reaches the if keyword, it will then evaluate the <Boolean expression> to a value of either true or false. If the expression is true, then it will execute the code in the <if code block>, followed by the code in the <after code block>. If the expression is false, the program will simply continue executing code in the <after code block>, bypassing the other block entirely.
You may see the if statement referred to as the if-then statement. At the dawn of high level programming languages in 1957, one of the first languages developed was FORTRAN. FORTRAN was the first commercially available high level programming language, and it is still in use today in many scientific and mathematics heavy applications. Its syntax for this structure is
IF <condition> THEN <action>This closely follows the first order logic representation <condition> --> <action>, or condition implies action. In propositional Logic, this is read to mean “if the condition is true, it follows that the action must also be true”.
In the early 1970s, a new high level programming language named C is developed, and it comes to dominate the programming landscape by the 1990s. C remains in active development, has a huge industry code base, and greatly influenced the syntax and style of later languages. Notably, C dropped the “THEN” part of the statement, and standardized the use of curly braces to separate blocks of code:
if (condition) {
    <action>
}
This sets the stage for one of the enduring arcane debates in computer science – which form is “correct”. Without arguing for which is best, we have chosen the style that most resembles Java and Python syntax.
Next, let’s look at the if-else statement. This statement allows us to choose between two different blocks of code, one to be executed when the Boolean logic expression evaluates to true, and a different block if the expression evaluates to false.
Here’s a simple flowchart that shows an if-else statement as the conditional construct:
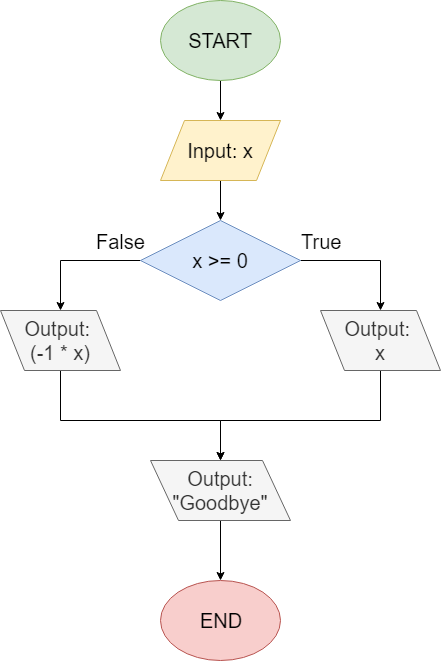
This program is very similar to the one shown on the previous page, with one major difference. Once again, this program will ask the user for a number as input, then print that number as output if the number is greater than or equal to
$ 0 $. However, if the input value is less than
$ 0 $, the program will instead print the inverse of that value by multiplying it by
$ -1 $ before printing. Finally, the program will print Goodbye and terminate.
So, if the user inputs 7, the program will just print 7 followed by Goodbye. However, if the user inputs -5, then the program will calculate
$ -1 * -5 $ and print 5, followed by Goodbye. As we can see, the program will choose which block of code to execute depending on the Boolean value that results from evaluating x >= 0. Once it has executed one of those two blocks, then the program will continue with the rest of the code.
Most programming languages implement an if-else statement in a format similar to this:
<before code block>
if (Boolean expression) {
    <if code block> or <True code block>
}
else {
    <else code block> or <False code block>
}
<after code block>
The program is initially executing code in the <before code block> section. Once it reaches the if keyword, it will then evaluate the <Boolean expression> to a value of either true or false. If the expression is true, then it will execute the code in the <if code block>, followed by the code in the <after code block>. If the expression is false, the program will execute code in the <else code block>, followed by the code in the <after code block>.
It is important to note that it is impossible for the program to execute both the <True code block> and the <False code block> during any single execution of the program. It must choose one block or the other, but it cannot do both. So, if we want each block to perform the same action, we’ll have to include the appropriate code in both blocks.
Many programming languages also provide other conditional constructs that perform these same operations in different ways. However, each of these constructs can also be built using just if and if-else statements, so it is not necessary to use these constructs themselves to achieve the desired result. In many cases, they are simply provided as a convenience to the programmer in order to make the code simpler or easier to understand.
Some programming languages, such as C and Java, include a special type of conditional construct known as a switch statement, sometimes referred to as a case statement. Instead of using a Boolean value, which can only be true or false, a switch statement allows our program to choose a block of code to execute based on the many possible values of a variable, traditionally an integer value.
This flowchart shows what a switch statement might look like in a program:
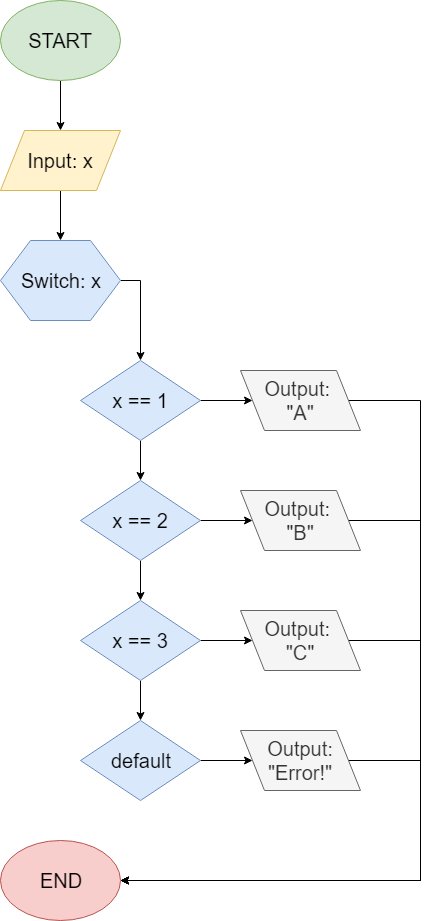
In this example, the program will examine the value of the variable x and use it to choose a case, which is a code block that would be executed. Here, it would simply output a different response, depending on the value of x. Notice that the flowchart is essentially using several if statements to accomplish this task, which is essentially what the computer would do when executing this program. In addition, the program includes a special default case, which is executed if the value of x does not match any of the other cases.
In code, a Switch Statement may have this general structure:
switch <variable>:
  case <value 1>: <code block 1>
  case <value 2>: <code block 2>
  case <value 3>: <code block 3>
  ...
  default: <default code block>
Depending on the programming language used, it is possible to execute multiple code blocks inside a switch statement, so we may need to consult the documentation for our chosen programming language to understand how these statements work.
Many programming languages also include a special operator, known as a ternary conditional operator, sometimes referred to simply as a ternary operator, that is effectively a shortcut for a simple if-else statement that produces a single value. Here’s a flowchart showing an example:
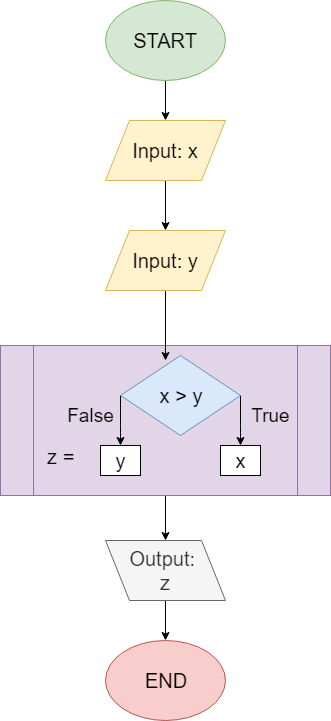
In this example, the program accepts two variables, x and y, as input. Then, it will set the value of a third variable, z, to the maximum value of x and y. It does so by testing if x > y. If so, it will set z = x; otherwise it will set z = y.
In general, there are two different ways that this operator is implemented. In Java and other programming languages similar to C, it looks like this example:
<variable> = <boolean expression> ? <true expression> : <false expression>In Python, the ternary conditional operator looks just a bit different:
<variable> = <true expression> if <boolean expression> else <false expression>The appropriate use of the ternary operator is hotly debated. If it is used, it should be used to make reading the code more clear. The code a = a if a > 0 else -a can be understood to find the absolute value of a.
Some monstrosity like a = foo(b) >= bar (c) ? f(b>c?2.0 * c:b+1) : g(c)!=1 ? ++c:c+1; is better written in if-else statements.
We suggest that if you use the ternary operator, be very judicious in its application. You may want to read the article in Agile Software Craftsmanship for more discussion.
Remember the goal is readable, understandable code, not diabolically clever code.
Conditional Statements in Java
Now that we’ve covered many different types of conditional constructs, let’s dive right in and see how they can be used in Java.
First, let’s look at the if statement. In Java, the syntax for an if statement is shown below:
if (<Boolean expression>) {
    <true block>
}
As expected, Java will first evaluate the <Boolean expression> to a single Boolean value. If that value is true, it will execute the instructions in the <true block>, which can be one or more lines of code, or even additional constructs as we’ll see later. If that value is false, then the program will simply skip over the <true block> and continue executing the code immediately below the if statement.
It is very important to remember that the Boolean expression is enclosed by parentheses ( ), while the block of code that should be executed if that expression is true is enclosed by curly braces { }, just like a class body or method body.
Let’s take a look at a few code examples, just to see how this construct works in practice. First, let’s consider the program represented by this flowchart from earlier in the chapter:
This flowchart corresponds to the following code in Java. In this case, we’ll assume x is hard-coded for now:
int x = 1;
if (x > 0) {
    System.out.println(x);
}
System.out.println("Goodbye");
As we can see, this program uses x > 0 as the Boolean expression inside of the if statement. If it is true, then it will output the value of x. So, it is very simple to write code that matches the execution paths shown in a flowchart representing the program.
Here’s one more example. Let’s assume we’d like to write a program that will calculate both the sum and product of two variables, x and y, but only if they are both greater than 0. That program may look like this:
int x = 5;
int y = 7;
if ((x > 0) && (y > 0)) {
    int sum = x + y;
    int product = x * y;
    System.out.println("Sum: " + sum);
    System.out.println("Product: " + product);
}
As we can see, we can create more complex Boolean statements using the various Boolean operators we’ve already learned. In addition, we can include multiple lines of code inside the curly braces.
The if-else statement in Java is very similar to the if statement. In Java, the syntax for an if-else statement is shown below:
if (<Boolean expression>) {
  <true block>
} else {
  <false block>
}
As expected, Java will first evaluate the <Boolean expression> to a single Boolean value. If that value is true, it will execute the instructions in the <true block>, which can be one or more lines of code, or even additional constructs as we’ll see later. If that value is false, then the program will execute the code in the <false block> instead. In essence, the if-else statement simply adds a second code block and the else keyword after an if- statement.
Let’s take a look at a few code examples, just to see how this construct works in practice. First, let’s consider the program represented by this flowchart from earlier in the chapter:
This flowchart corresponds to the following code in Java. In this case, we’ll assume x is hard-coded for now:
int x = 1;
if (x >= 0) {
  System.out.println(x);
} else {
  System.out.println(-1 * x);
}
System.out.println("Goodbye");
As we can see, this program uses x >= 0 as the Boolean logic expression inside of the if-else statement. If it is true, then it will output the value of x. If it is false, the program will output the value (-1 * x), which represents the inverse of x.
Here’s one more example. In this program, we’d like to calculate the difference between two numbers, but we’d only like to output a positive number. So, our code may look something like this:
int x = 3;
int y = 8;
if (x > y) {
  int difference = x - y;
  System.out.println(difference);
} else {
  int difference = y - x;
  System.out.println(difference);
}
In this program, we are simply checking to see if x > y. If so, we know that x - y will be a positive number. Otherwise, we can assume that y - x will be either a positive number or
$ 0 $. In either case, we see that this program will produce the correct output.
In Java, it is possible to have an If or If-Else statement without curly braces. In that case, the next line of code immediately following the if or else will be the only line considered inside of that branch.
Consider this code for example:
int x = 4;
if (x == 5)
System.out.println(true);
else
System.out.println(false);
This code is valid, and will compile and run properly. However, it is very difficult to read because of the indentation (or lack thereof).
In addition, if we want to add another line of code to each branch, we might accidentally do the following:
int x = 4;
if (x == 5)
x = 0;
System.out.println(true);
else
x++;
System.out.println(false);
This code will not compile and run properly, because the else statement cannot be attached to the appropriate if statement. So, we’d need to add curly braces to make this code make sense to the compiler.
Beyond that, it can be very difficult to read code that is not properly indented, regardless of the use of curly braces. So, it is a best practice to always include curly braces in your conditional statements and indent each block, even if those changes aren’t necessarily required in some cases.
Now that we’ve learned how to create new code blocks in our programs using constructs such as the if and if-else statements, we must take a minute to discuss one of the major limitations of those code blocks.
The scope of a variable refers to the possible areas in a program’s code where that variable can be accessed and used. This is very important to understand once we begin introducing additional code blocks in our programs, because variables declared inside of a code block cannot be accessed outside of that block.
In general, Java follows these rules when determining if a local variable is accessible.
Later on in this course we’ll learn about class member variables, which have some different rules that govern their scope. For now, we’ll only worry about local variables, which are variables declared within a method body.
Let’s look at a few examples for each rule. First, a variable may not be accessed before it is declared. So, we cannot do the following:
public static void main(String[] args){
  x = 5;
  int x;
}
If we do, the compiler will output an error similar to the following:
error: cannot find symbol
    x = 5;
    ^
  symbol:   variable x
Instead, we must make sure the variable is declared before it is accessed, as in this correct example:
public static void main(String[] args){
  int x;
  x = 5;
}Next, here’s an example where the code is trying to access a variable outside of the code block where it is initially declared:
public static void main(String[] args){
  int x = 5;
  if (x < 10) {
    int y = x + 5;
  }
  System.out.println(y);
}
Once again, the compiler cannot find the variable, and we’ll get an error similar to the following:
error: cannot find symbol
  System.out.println(y);
                     ^
  symbol:   variable y
If we think about this error, it actually makes sense. What if the value of x is greater than
$ 10 $? In that case, the program will never execute the line declaring the variable y, so it won’t even exist. Therefore, if we’d like to solve this problem, we can try to declare our variable outside of the if statement’s code block, as in this second example:
public static void main(String[] args){
  int x = 5;
  int y;
  if (x < 10) {
    y = x + 5;
  }
  System.out.println(y);
}
However, this example will also cause the compiler to give us an error:
error: variable y might not have been initialized
  System.out.println(y);
                     ^
In this case, we’ve declared the variable y, but we have not initialized it to a value. Once again, if the value of x is greater than
$ 10 $, and the code block inside the if statement is not executed, we won’t know what value should be stored in y. So, the compiler will detect that error and warn us that y may not have been initialized. To solve this error, we simply must assign a value to y before attempting to use it:
public static void main(String[] args){
  int x = 5;
  int y = 0;
  if (x < 10) {
    y = x + 5;
  }
  System.out.println(y);
}
That example will compile and run as expected.
Surprisingly, the Java compiler is advanced enough to determine if a variable would be initialized by all possible paths, as in this example:
public static void main(String[] args){
  int x = 5;
  int y;
  if (x < 10) {
    y = x + 5;
  }else{
    y = x - 5;
  }
  System.out.println(y);
}
This example will compile and run without any problems, since the variable y is initialized in both blocks of the if-else statement. In short, there is no possible execution path that does not initialize y, so it is accepted by the compiler.
We’ve already seen several examples of this already, but here’s a clear example of accessing a variable from a code block within the block where the variable was declared:
public static void main(String[] args){
  int x = -1;
  if (x < 0) {
    x = -1 * x;
  }
  System.out.println(x);
}
In this example, the variable x is declared inside of the main method’s body. Then, it is accessed inside of the body of the if statement, which is itself within the body of the main method. Later in this chapter we’ll see examples of chaining and nesting conditional constructs, which will give us more examples of how this works.
Finally, Java does not allow us to use the same variable name twice in the same code block, or in any code blocks enclosed within that block. For example, we could try to do something like this:
public static void main(String[] args){
  int x = 5;
  if (x < 10) {
    int x = 15;
    System.out.println(x);
  }
}
If so, the compiler will detect that we’ve already declared variable x in the main method body, so it won’t allow us to declare it again inside the if statement’s body. Instead, it will give us the following error message:
error: variable x is already defined in method main(String[])
    int x = 15;
        ^
We can resolve this error by simply renaming one of the variables:
public static void main(String[] args){
  int x = 5;
  if (x < 10) {
    int y = 15;
    System.out.println(y);
  }
}
We may also choose to use the same variable without declaring it again:
public static void main(String[] args){
  int x = 5;
  if (x < 10) {
    x = 15;
    System.out.println(x);
  }
}
However, we’ll need to remember that it will change the value of the variable outside the block as well.
Lastly, while we cannot use the same variable name as an existing variable, we can use that name later on in our program, as long as there is not already a variable declared with the same name that is accessible. Here’s an example of that:
public static void main(String[] args){
  int x = 5;
  if (x < 10) {
    int y = 15;
    System.out.println(y);
  }
  int y = 12;
  System.out.println(y);
}
Surprisingly, this program will compile and run without any errors. In this case, we are allowed to declare a variable named y inside of the if statement’s code block because we have not yet declared a variable with that name anywhere in our program. Later, we are allowed to declare another variable named y, this time directly within the main method’s body. This is because we are outside of the if statement’s code block, so the previously declared variable named y no longer exists. So, we can reuse the name here without causing any problems.
However, this is widely regarded as poor coding practice, as it may make our code very difficult to read and understand. So, it is always better to try and avoid reusing variable names whenever possible, just to make it clear in our code which to variable we are referring.
One of the most powerful features of the conditional constructs we’ve covered so far in this course is the ability to chain them together or nest them within each other to achieve remarkably useful program structures. The ability to use conditional constructs effectively is one of the most powerful skills to develop as a programmer.
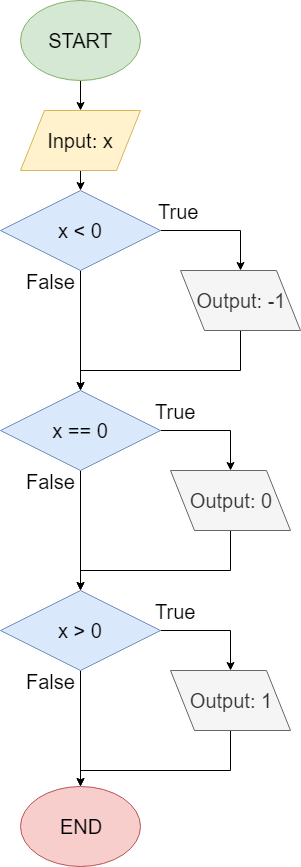
A great example of the many ways to structure a program using conditional constructs is building a simple program that does three things:
x is less than
$ 0 $, output -1x is equal to
$ 0 $, output 0x is greater than
$ 0 $, output 1Let’s look at two different ways we could structure this program using the conditional constructs we’ve already learned.
See if you can build each of these examples in a file named Conditionals.java, either in Codio or on your own computer. Doing so is a great way to get additional practice working with conditional constructs.
Don’t forget to add the correct class declaration to the file as well! It is not included in the code examples below.
First, we could chain together several if statements to create this program. As a flowchart, the program might look like this:
Here’s one way that program could be written in Java. Once again, we’re just using hard-coded variables for now:
public static void main(String[] args) {
  int x = 3;
  if (x < 0) {
    System.out.println(-1);
  }
  if (x == 0) {
    System.out.println(0);
  }
  if (x > 0) {
    System.out.println(1);
  }
}
Just like we see in the flowchart, this program contains three if statements chained together, one after another. If we run this program with various inputs, we should see that it produces the expected result.
Next, we can achieve the same result using if-else statements. Here’s what that program would look like as as flowchart:
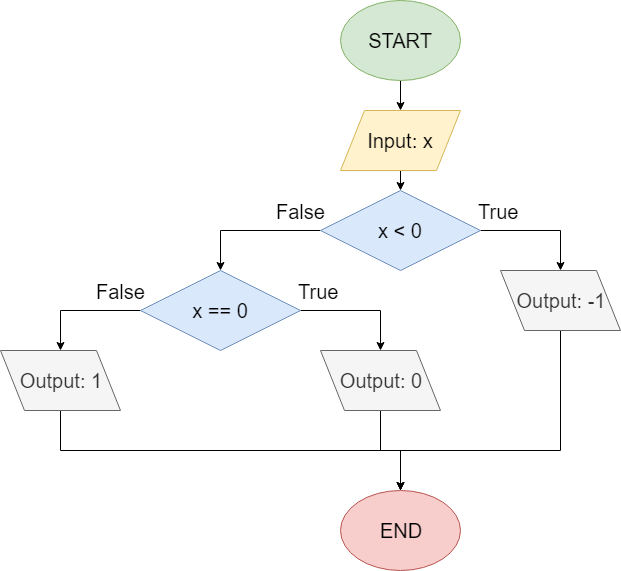
We can also write that program in Java. Here’s one possible way to do it:
public static void main(String[] args) {
  int x = 3;
  if (x < 0) {
    System.out.println(-1);
  } else {
    if (x == 0) {
      System.out.println(0);
    } else {
      System.out.println(1);
    }
  }
}
In this example, we’ve nested an if-else statement inside of the second block of another if-else statement. So, if the first Boolean expression, x < 0, is true, we’ll output -1 and end the program. However, if it is false, we’ll go into the false branch of the first statement. Then, we’ll see another Boolean expression, x == 0. If that expression is true, we’ll output 0. Otherwise, we’ll output 1. Once again, this program should produce the correct result.
Of course, we could include a third if-else statement, as shown in this example:
public static void main(String[] args) {
  int x = 3;
  if (x < 0) {
    System.out.println(-1);
  } else {
    if(x == 0){
      System.out.println(0);
    }else{
      if(x > 0){
        System.out.println(1);
      }else{
        //this should never happen
        System.out.println("ERROR!");
      }
    }
  }
}
As we discussed earlier in this chapter, we can safely infer that x must be greater than
$ 0 $ based on the two previous Boolean expressions. However, what if we’ve made a logic error in our program, and that assumption is not valid? By including the last if-else statement, we can have our program print an error in the unlikely chance that the value of x is not properly handled by any other option.
In fact, here’s how easy it is to cause just that sort of logic error. Consider the following example:
public static void main(String[] args) {
  int x = 3;
  if (x < -1) {
    System.out.println(-1);
  } else {
    if (x == 0) {
      System.out.println(0);
    } else {
      if (x > 1) {
        System.out.println(1);
      } else {
        //this should never happen
        System.out.println("ERROR!");
      }
    }
  }
}Can you spot the logic error in the example above? Try running the code with different values for x and see what happens.
In this example, we’ve updated the Boolean expression in the first if-else statement to x < -1. Similarly, we’ve changed the Boolean expression in the third statement to x > 1. That change seems logical, right?
What if the value of x is exactly
$ 1 $ or
$ -1 $? In that case, it will fail all three logic expressions, and the program will output ERROR! instead. By including the third if-else statement, we can detect logic errors that may not easily be found otherwise. Without that statement, the program would most likely output 1 even when the input is -1, which is clearly a negative number.
So, in many cases, it may be better to include additional if-else statements to explicitly check all possible cases, instead of relying on assumptions and inferences, which may lead to unintended logic errors.
Finally, it is acceptable to minimize nested if-else statements if the nested statement is exclusively in the false branch. Here’s an example:
public static void main(String[] args) {
  int x = 3;
  if (x < 0) {
    System.out.println(-1);
  } else if (x == 0) {
    System.out.pr intln(0);
  } else if (x > 0) {
    System.out.println(1);
  } else {
    //this should never happen
    System.out.println("ERROR!");
  }
}
Many programming languages refer to this structure as an if-else if-else statement. In this program, if the first Boolean expression is false, it immediately moves to the next Boolean expression following the first set of else if keywords. The process continues until one Boolean expression evaluates to true, or the final else keyword is reached. In that case, we know that none of the Boolean expressions evaluated to true, so the final false branch is executed.
While other programming languages include an explicit keyword for else if, Java does not. Instead, we are simply omitting the curly braces that surround the false block on each if-else statement. The Java compiler treats the entire if-else statement contained in that block as a single line, so the curly braces are not explicitly required in this case.
This is the one and only case where it is acceptable to remove those unnecessary curly braces in most Java style guides. Some programmers find this inline structure simpler to read and follow, as it avoids the problem of code being nested several layers deep. Others feel that it is dangerous to remove any explicit curly braces, and prefer the nested structure instead.
It should be obvious that only one branch of an if-else if-else will ever be executed, because the branches are mutually exclusive. It is a excellent practice to always use the if-else if-else structure whenever you know the logic should be exclusive. Consider a simple program we call the “Goldilocks Porridge Temperature Tester”.
if (isTooHot) {
   System.out.println("porridge is too hot");
}
if (isTooCold) {
   System.out.println("porridge is not hot enough");
}
if (isJustRight) {
    System.out.println("porridge is perfect");
}
A future reader of the program, unfamiliar with the children’s tale, would see there are 3 boolean variables (isTooHot, isTooCold, isJustRight) and, depending on their values,up to 3-lines might get printed. This is because we cannot safely assume that just one of them will be true. In fact, they could all three be true!
However, if we rewrite the program to use if-else if-else instead of just if-else statements:
if (isTooHot){
   System.out.println("porridge is too hot");
}else if (isTooCold) {
   System.out.println("porridge is not hot enough");
}else if (isJustRight) {
    System.out.println("porridge is perfect");
}
the future reader would know that only one line should ever be printed.
Next, let’s look at the switch statement in Java. As we learned earlier, this statement allows our programs to choose branches based on any number of possible values of a variable. Here’s a flowchart showing what such a program might look like:
In Java, we could write that program in many ways. This is one possible solution:
public static void main(String[] args) {
  int x = 2;
  switch (x) {
    case 1: System.out.println("A");
      break;
    case 2: System.out.println("B");
      break;
    case 3: System.out.println("C");
      break;
    default: System.out.println("Error!");
      break;
  }
}
In this program, the switch statement will evaluate the value of x, then look for the case keyword that exactly matches that value. In this example, x == 2, so it will choose the second case and output B.
If we change the value of x to
$ 4 $, then we can see that none of the case keywords match. In that instance, the program will instead choose the default case and print Error!.
The switch statement above introduces a new keyword, break, which we’ll cover in detail in a later chapter. The break keyword causes the program to stop executing code in the current statement, and the continue executing the code following that statement. So, when the program reaches a break statement in the example above, it stops executing any additional code in the switch statement and continues running the code following that statement.
It is possible to create a switch statement that does not include break keywords. In that statement, it will continue executing any cases below the chosen case until it reaches the end of the statement or the default keyword.
For example, let’s say we’d like to write a program that will print all the numbers from a given starting number up to 5. So, we could use a switch statement to do that as in this program:
public static void main(String[] args){
  int x = 2;
  switch (x) {
    case 1: System.out.println("1");
    case 2: System.out.println("2");
    case 3: System.out.println("3");
    case 4: System.out.println("4");
    case 5: System.out.println("5");
      break;
    default: System.out.println("Error!");
      break;
  }
}
When we compile and run this program, we’ll receive the following output:
2
3
4
5
The program will start at case 2:, since x == 2, and print 2. Since there is not a break keyword in that case, it will continue to the next case, printing 3, then 4, then 5 before it finally reaches a break keyword.
Switch Statements are not used as often as other conditional constructs, but they can be a useful to a program in certain instances. There are many other unique ways they could be used. To learn more, refer to the official Java documentation on The switch Statement.
Java also includes the ternary conditional operator, which can be used as a shortcut for an if-else statement.
First, consider the flowchart we saw earlier in this chapter:
In Java, this flowchart could be represented by the following code:
public static void main(String[] args){
  int x = 3;
  int y = 5;
  int z = (x > y) ? x : y;
  System.out.println(z);
}
In this program, the expression (x > y) ? x : y; is the ternary conditional operator. It first calculates the value of the Boolean expression (x > y). If that expression is true, then the entire expression evaluates to x. If it is false, then the expression evaluates to y. So, if we compile and run this program, it should output 5.
We can also include the ternary conditional operator anywhere we’d normally use a value. This is because, just like any other operator, the ternary conditional operator results in a single value when evaluated. For example, it could be used directly within the println() method:
public static void main(String[] args){
  int x = 3;
  int y = 5;
  System.out.println((x > y) ? x : y);
}Now that we’ve seen how to work with conditional constructs in Java, let’s break down our thought process a bit into subgoals once again.
Here are the subgoals we can use for evaluating conditional constructs:
First, when we see a conditional construct in code, we must determine which statements go together. Specifically, we need to know which statements are in the true branch, and which statements are in the false branch. This may seem pretty straightforward, but if the code contains many nested statements or poor formatting, it can be very difficult to do.
Here’s a quick example:
if(true){
  if(false){
    System.out.println("one");
  }
}else{
  System.out.println("two");
}
In this example, we see that there are three distinct branches. First, we have the true branch of the outermost if-else statement, which includes the inner if statement. That statement itself has a true branch that will print one to the terminal. The outermost statement also has a false branch, which will print two to the terminal.
true or falseOnce we’ve identified our conditional construct, the next step is to determine if the Boolean expression inside of the if statement is true or false. Sometimes this step is simple, but other times it can be tricky. Thankfully, we can refer back to the subgoals we’ve already seen for evaluating expressions if we need a bit of help.
After we find the value of the Boolean expression, we can simply follow the true branch if the Boolean expression evaluated to true. If the Boolean expression evaluated to false, we can follow the false branch if it exists. If the conditional construct is an if statement, we can simply ignore the rest of the conditional construct and move on to the next part of the program.
We can also use subgoals to help us write new conditional constructs.
First, when building a new conditional construct, we must determine how many paths are needed. In effect, this will be one more than the number of conditional constructs we’ll end up using in most cases.
Next, we can reorder the paths from most restrictive to least restrictive. The most restrictive path would be the one that is least likely to occur, while the least restrictive path is the one that will be taken most often. We’ll see how this works a bit more clearly in the example on the next page.
if Statement with Boolean ExpressionOnce we have all of our paths identified and ordered, we can start writing our if statements for each path. Each if statement will need a Boolean expression to help us determine which branch to follow. Generally, we’ll place the most restrictive paths inside of the less restrictive paths, but it all depends on the problem and what order makes the most sense.
true Branch CodeThen, for each conditional construct, we must fill in the code on the inside of the true branch. This could be a block of code, or even another conditional construct.
false Branch CodeSimilarly, we must fill in the code on the inside of the false branch, if needed. This could be a block of code, or even another conditional construct.
Finally, once we’ve created a conditional construct, we may have to repeat these steps again and again for each path that we identified in subgoal 1.
On the next page, we’ll see how we can apply these subgoals in a worked example.
We’ve covered quite a bit of new material so far in this chapter. Let’s work through a complete example from start to finish, just to see how we can put all of those pieces together to make a very powerful program.
First, let’s start with a problem statement. Here’s an interesting problem that we can try to solve:
Write a program that receives a positive integer as input from the user that represents a year, and prints whether that year is a leap year or not. If the year is a leap year, it should print output similar to
2000 is a Leap Year. If not, it should print output similar to2001 is not a Leap Year.
While this sounds like a simple problem, there are actually several rules we’ll have to handle. According to the United States Naval Observatory, the Gregorian calendar (the calendar in use throughout much of the world) calculates whether a year is a leap year based on the following rule:
Every year that is exactly divisible by four is a leap year, except for years that are exactly divisible by 100, but these centurial years are leap years if they are exactly divisible by 400. For example, the years 1700, 1800, and 1900 are not leap years, but the year 2000 is. - Source
So, we’ll be writing a program that can handle all of those rules to determine if a year is a leap year or not.
To begin building this program, we need to first build the basic skeleton of a program. For this example, store your code in a file called Example.java
If you are following along with this course in Codio, this example will be a graded exercise in that tutorial. So, you may wish to make sure Codio is open and follow along with this example from there.
First, we’ll need to include a class declaration and a main method declaration in the file. Our code should be similar to this:
public class Example{

  public static void main(String[] args){

  }

}Before we start writing more code, let’s break down the problem statement a bit and see how we can use it to help us identify parts of the program we need to write.
Here’s our problem statement again:
Write a program that accepts a positive integer from the command line, that represents a year as a command line argument, and prints whether that year is a leap year or not. If the year is a leap year, it should print output similar to
2000 is a Leap Year. If not, it should print output similar to2001 is not a Leap Year.
Looking at this problem statement, we see that we need at least one variable to store the year that is provided as input from the user. Similarly, we need at least one conditional construct, which will allow us to print whether the given year is a leap year or not. Here’s the problem statement again, with those parts highlighted:
Write a program that accepts a positive integer (variable) from the command line, that represents a year, and prints whether that year is a leap year or not (conditional construct). If the year is a leap year (true branch), it should print output similar to
2000 is a Leap Year. If not (false branch), it should print output similar to2001 is not a Leap Year.
Similarly, we can look at the second part of the problem statement and break it down as well:
Every year that is exactly divisible by four is a leap year, except for years that are exactly divisible by 100, but these centurial years are leap years if they are exactly divisible by 400. For example, the years 1700, 1800, and 1900 are not leap years, but the year 2000 is. - Source
Looking at this, we see that there are actually three conditional constructs we need to build. Let’s mark them in the statement:
Every year that is exactly divisible by four (conditional construct 1) is a leap year, except for years that are exactly divisible by 100 (conditional construct 2), but these centurial years are leap years if they are exactly divisible by 400 (conditional construct 3). For example, the years 1700, 1800, and 1900 are not leap years, but the year 2000 is. - Source
Of course, we’ll have to be careful to make sure that each branch of these three conditional statements produces the correct output. Below, we’ll see how we can construct code for this problem.
Generally, one of the first things our program should do is read and process the input. So, we’ll add the few lines we need to import the Scanner library, create a Scanner object, and read an input from the user:
import java.util.Scanner;

public class Example{

    public static void main(String[] args){
        Scanner scanner = new Scanner(System.in);
        int year = scanner.nextInt();

        // MORE CODE GOES HERE
    }
}
We’ve used code similar to this in several of our projects at this point, so it should be familiar to us, even if we haven’t written it before. We’ll explain more about the structure of this code later in this course. For now, we can simply copy and paste this example and build upon it.
Once we have that code in place, we are ready to begin working on the actual logic of our program. The code examples below will just include the logic portion of the program, which can be placed where the MORE CODE GOES HERE line is in the structure above.
Now that we’ve read the input, we can start writing the logic of our program. However, the problem statement has one very important part in it that we’ll need to handle as well:
Write a program that accepts a positive integer that represents a year…
So, we’ll need to make sure the user has input a positive integer into our program. We can do that using a simple if-else statement:
if(year <= 0){
    System.out.println("Error");
}else{

}
In this case, we might be tempted to use an if statement instead. However, we need to make sure our program only calculates a result if the input is positive. If it is negative, we should just print an error. Since that means our program needs two distinct branches, we should use an if-else statement here.
Once we’ve read our input, we need to calculate our output. Let’s handle the three rules one at a time.
For the first rule, we must check to see if the year is divisible by $ 4 $. We can use the modulo operator to do this. Remember that the modulo operator performs a division and returns the remainder. So, if the remainder is $ 0 $, then we know that the number is evenly divisible by the divisor.
In code, we could do the following:
if(year <= 0){
    System.out.println("Error");
}else{
    if(year % 4 == 0){
        //divisible by 4
    }else{
        //not divisible by 4
        System.out.println(year + " is not a Leap Year");
    }
}
In each of these if-else statements, let’s place a quick comment in the code to keep track of what we know within each branch.
Next, we need to handle the rule that any year divisible by $ 100 $ is not a leap year, even if it is divisible by $ 4 $. Of course, we can easily determine mathematically that all years divisible by $ 100 $ are also divisible by $ 4 $, so we don’t have to worry about the other case in this instance. So, we can add another if-else to our program:
if(year <= 0){
    System.out.println("Error");
}else{
    if(year % 4 == 0){
        //divisible by 4
        if(year % 100 == 0){
            //divisible by 4 and 100
            System.out.println(year + " is not a Leap Year");
        }else{
            //divisible by 4 but not 100
            System.out.println(year + " is a Leap Year");
        }
    }else{
        //not divisible by 4
        System.out.println(year + " is not a Leap Year");
    }
}
In this case, we chose to next our if-else statement inside of the previous statement. So, if the year is divisible by
$ 4 $ and also divisible by
$ 100 $, we print Not a Leap Year. If it is divisible by
$ 4 $ and not divisible by
$ 100 $, which is the false branch of the innermost if-else, we know that it must be a leap year, so we can print Leap Year.
There’s one more rule we must add, which is the rule that a year divisible by $ 400 $ must be a leap year, even though it is also divisible by $ 100 $. So, we must add one additional if-else statement. But where?
If we think back through the rules, we know that this rule is only in effect when the year is both divisible by
$ 4 $ and
$ 100 $. So, we’ll need to add one more statement in the true branch of the innermost if-else:
if(year <= 0){
    System.out.println("Error");
}else{
    if(year % 4 == 0){
        //divisible by 4
        if(year % 100 == 0){
            //divisible by 4 and 100
            if(year % 400 == 0){
                //divisible by 4 and 100 and 400
                System.out.println(year + " is a Leap Year");
            }else{
                //divisible by 4 and 100 but not 400
                System.out.println(year + " is not a Leap Year");
            }
        }else{
            //divisible by 4 but not 100
            System.out.println(year + " is a Leap Year");
        }
    }else{
        //not divisible by 4
        System.out.println(year + " is not a Leap Year");
    }
}
Now we’ve created a program that should be able to tell us if a year is a leap year or not.
Of course, there are many other ways this program could have been structured that would produce the same output. For example, instead of using nested if-else statements, we could rearrange them a bit to make them inline if-else if-else statements, as in this example below:
if(year <= 0){
    System.out.println("Error");
}else if(year % 400 == 0){
    //divisible by 400
    System.out.println(year + " is a Leap Year");
}else if(year % 100 == 0){
    //divisible by 100 but not 400
    System.out.println(year + " is not a Leap Year");
}else if(year % 4 == 0){
    //divisible by 4 but not 100
    System.out.println(year + " is a Leap Year");
}else{
    //not divisible by 4
    System.out.println(year + " is not a Leap Year");
}
In fact, with a bit of thinking, we could reduce most of this program to a single Boolean logic expression, as in this example
if(year <= 0){
    System.out.println("Error");
}else if(((year % 4 == 0) && (year % 100 != 0)) || (year % 400 == 0)){
    System.out.println(year + " is a Leap Year");
}else{
    System.out.println(year + " is not a Leap Year");
}
Any of these solutions is just as correct as the one we built above. It really only depends on which solution makes the most sense to us and is the easiest for us to write and debug.
With the introduction of conditional statements, our programs are starting to become more complex. Each time we run the program, it will produce different output based on the input, and some inputs may cause the program to execute different pieces of code entirely. So, we need to develop some more sophisticated testing strategies to help us debug our programs.
Every program should be thoroughly tested. By creating a large number of different test inputs, with each one testing a different part of the program, we can ensure that every line of code is executed at least once when all of our test inputs are used. This is referred to as test coverage.
Consider the following simple piece of code:
|
|
To test this program, we have to provide as single value as input. If the value 2 is entered as input on line 3, then the program will execute the true branch of the if statement on line 5, but it will not execute the false branch on line 7. So, that input only executes some of the lines in the program.
However, if we also test the program with the input 1, we’ll see that it now executes line 7 that was skipped in the previous test.
So, to fully test this program, we should use both 1 and 2 as inputs. This set of inputs will achieve complete coverage of the program.
However, achieving complete coverage by providing enough test inputs is not enough to say our program is correct. For that, we need to analyze the outputs that are provided by each test.
Let’s briefly trace through the program and see what output is produced when we provide the value 2 as input.
On line 4, we see an if statement that checks to see if the value of a % 2 is equal to 0. Since a is currently storing the value 2, we can calculate that 2 % 2 is indeed equal to 0, so we should go to the true branch and execute the code on line 5.
However, if we look at what this line of code does, it prints "2 is odd" as output. That is clearly incorrect! So, our program has a logic error in it somewhere.
As it turns out, we accidentally reversed the true and false branches of the if statement. So, to correct our program, let’s switch them:
|
|
Now when we provide the input 2 we should get the correct output. We can also do the same exercise for the input 1 to verify that it is also correct.
At this point we’ve achieved complete coverage and also proven that each of those inputs produces the correct output. However, there is still one more set of values we may want to consider
Unfortunately, just achieving complete code coverage is not enough to guarantee that we have tested all values that should be tested in our program.
In our code, we see that the if statement has the expression a % 2 == 0. This creates a boundary where some values will go into the true branch and other values will go into the false branch, and they all seem to revolve around the value 2 in the expression. So, we should choose our input values carefully to check the values on either side of the boundary value 2, just to be sure that it is correct.
So, we may want to add the value 3 to the set of values tested in our program, just to be sure that values greater than 2 also work correctly. If we look at our corrected code, we can see that it indeed will produce the correct output, since 3 % 2 is not equal to 0.
Sometimes it is infeasible to use all boundary values. Consider the expression a > b where a and b are integers. There are an infinite number of combinations of a and b to test, and testing all of these conditions is not realistic. So, instead we should make sure we test at least once where a < b is true and once where a > b is true, as well as a situation where a == b is true. These three tests are important in order to make sure that the boundary created by a > b is properly tested.
However, when one side of a comparison is a constant number, such as the 1 in a / b > 1, it is generally considered good practice to check the values at and near the boundary, such as 0, 1, and 2 in this example.
Except for the most trivial programs, it is impossible to exhaustively test a program for correctness. However, using boundary testing and coverage testing as a guide, we will be able to develop fairly robust test sets for programs in this course.
In practice, exhaustive comprehensive testing is not even attempted in most situations. There is a special type of programming, called high-assurance or safety-critical programming that makes use of specialized languages, structures and techniques to logically prove certain properties are always true. The symbolic math and logic background required for this types of programming lies beyond the scope of this course.
In this chapter, we learned all about conditional constructs and how we can use them in our programs. They allow us to build programs that execute different pieces of code depending on inputs provided by the user or the values of variables.
This is one of the first major steps toward building larger and more complex programs. In fact, once we learn how to write programs that can repeat steps, we’ll have covered all of the basic building blocks of programming!