Chapter 5
Loops
It comes back around!
It comes back around!
At this point, we should be able to write a computer program that can accomplish many simple tasks. We’ve seen programs that determine if a number is even or odd, who wins in a game of “Rock, Paper, Scissors,” and whether a given year should be a leap year or not.
However, there’s one simple task that all of our current programming skills cannot easily handle. Let’s take a look at a version of that task and see if we can figure out how to solve it:
Write a program that accepts a positive integer between 1 and 5 as input, and then prints all integers starting with 1 up to the given number.
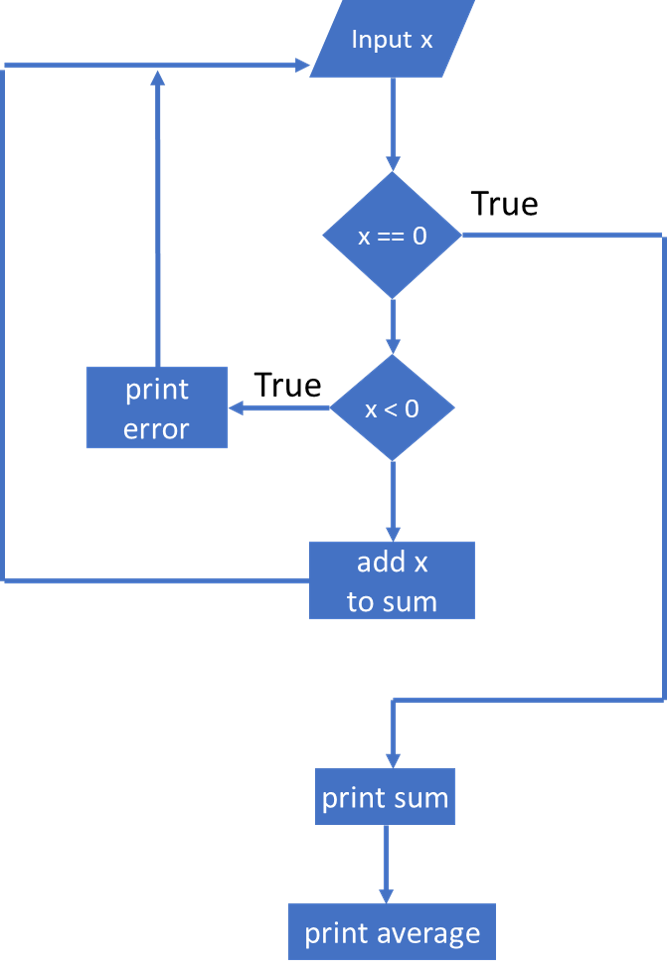
On the surface, this seems to be a pretty easy problem. We can solve it using a few if statements, as shown in this diagram below:
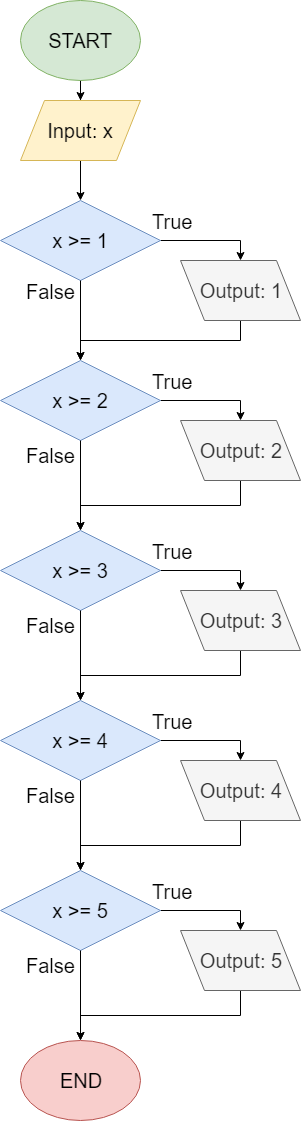
Following this flowchart, we can see if that if our input is 3, it would first print 1 since x >= 1 is true, then 2, then 3 in a similar way. After that, the next check is x >= 4, which is false, so the program would stop printing. So, this program meets our given specification.
Now, let’s see if we can generalize this program a bit:
Write a program that accepts any positive integer as input, and then prints all integers starting with 1 up to the given number.
Could we write this program using our current techniques? Unfortunately, we’d quickly find that it is impossible to handle. We’d need to create at least one if statement for each possible integer, which would make our code infinitely long.
So, is there a better way to approach this problem?
Thankfully, there is. In addition to conditional statements, programming languages include a second important control construct: looping constructs, which allow us to solve problems like this one. A looping construct is a programming construct that allows us to repeat a piece of code as many times as we’d like. In this way, we can perform repeated actions without making our source code infinitely long. Most programming languages refer to this process as looping, which makes sense once we see how it looks in a flowchart.
Let’s go back to that problem statement:
Write a program that accepts any positive integer as input, and then prints all integers starting with 1 up to the given number.
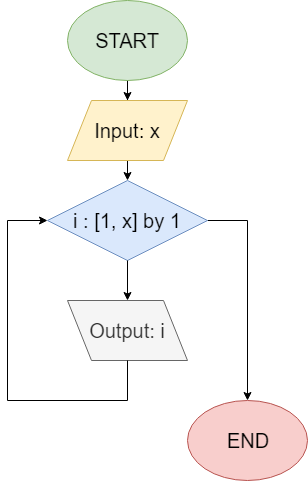
Using a looping construct, we can solve this problem using a program that may resemble this flowchart:
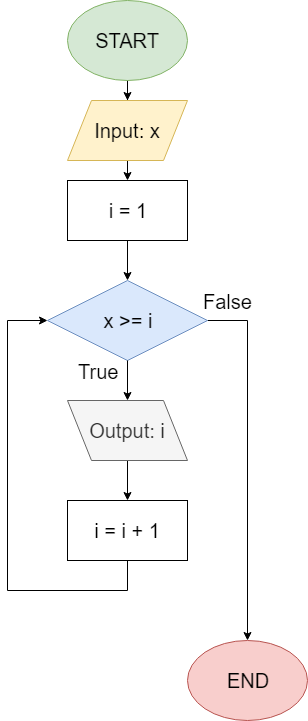
This flowchart includes a secondary variable i, sometimes referred to as a loop counter or an iterator variable, to help us keep track of which number we are on. Let’s walk through this program with an input of 6 to see how it works.
Initially, since our input is 6, we know that x = 6 and i = 1. Next, we reach the first Boolean expression, which will evaluate x >= i. Since 6 >= 1 is true, we follow the True branch. Notice in this diagram that the True branch points down, entering the loop-body. The False branch goes to the right, which is different from the conditional constructs we saw in the previous chapter.
Following the True branch, we see that our program will print the value in variable i, which is 1; then it will perform i = i + 1, making 2 the new value of i.
Finally, it loops back up to the Boolean expression x >= i again, but this time evaluates it with the current values for x and i, which would be 6 >= 2. Since this evaluates to true, we follow the True branch once again. It will print the current value of i, which is 2, then increment i to 3.
We loop again, and evaluate 6 >= 3, which is still true, so we repeat the process again.
After several loops, or iterations of the loop, we eventually reach the situation where i = 6. In this case, we’ll print the number 6, then increment i to 7. Now, when we evaluate the Boolean expression x >= i, we find 6 >= 7, which is false, so the program now follows the False branch and ends.
In total, it will have printed the value stored in i on each iteration, so it will print the numbers 1 through 6, which is exactly what the problem statement requires.
Pick a value for x, and see if you can follow each step in the flowchart to confirm that this program will print out all the numbers from 1 to the value you’ve chosen. It is very important to have a clear understanding of how this program functions before moving on in this chapter.
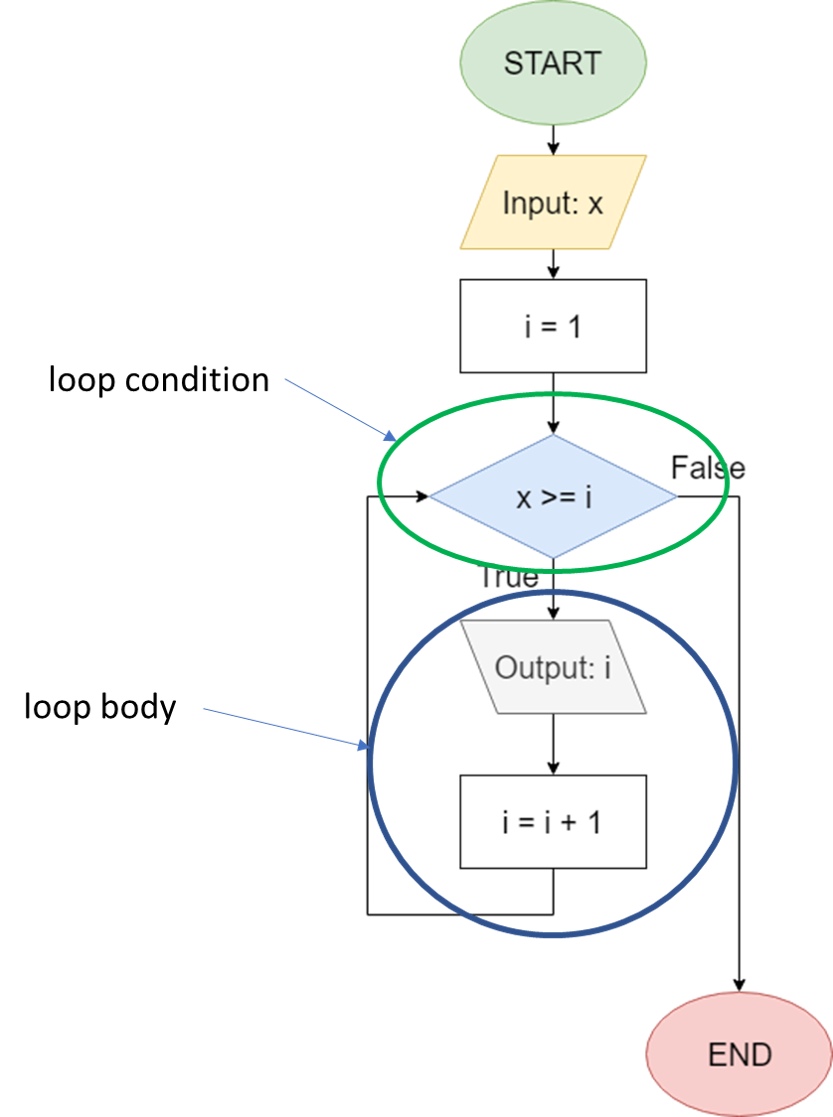
The ability of a computer program to loop, or repeat the loop body based on the loop condition, is a very powerful tool for any programmer. Loops allow us to build programs that can handle all kinds of inputs and still operate correctly. We can also handle situations where we may not know how many inputs we need, or how many steps we need to take, since we can tell our program to use a loop counter to determine how many steps we need to repeat.
The simplest form of a loop in our computer programs is commonly known as a While loop. In essence, we continue to repeat the steps inside the loop while a particular Boolean expression evaluates to true. The program on the previous page is a great example of a While loop:
In this program, we repeat the steps inside the loop, which print the value of i and increment that value by 1, while the Boolean expression x >= i evaluates to true. Whenever we reach the Boolean expression and it evaluates to false, we exit the loop and continue with the program.
In code, most programming languages implement a While loop in a format similar to this:
<before code block>
while <loop condition>
    <loop code block>
<after code block>
This program begins by executing code in the <before code block>. Once it reaches the <loop condition>, a Boolean expression, it will evaluate that expression. If the expression evaluates to false, then it will completely skip over the <loop code block> and go directly to the <after code block>
However, if the <loop condition> evaluates to true initially, it will execute the code in the <loop code block>. Once it is done executing that code block, the program will loop back to the <loop condition> and evaluate it again. If it evaluates to true, it will perform the steps in the <loop code block> again. It will continue to do so while the <loop condition> evaluates to true.
However, if the <loop condition> ever evaluates to false, then the program will move on to the <after code block> and continue executing from there.
Also, it is important to remember that the <loop condition> is only evaluated once each time the program loops. So, even if the outcome of the expression may change while the code in the <loop code block> is executing, it only checks the value of the <loop condition> once it is completely done executing that block of code. However, as we’ll see a bit later in this chapter, there are ways to leave the <loop code block> at any time.
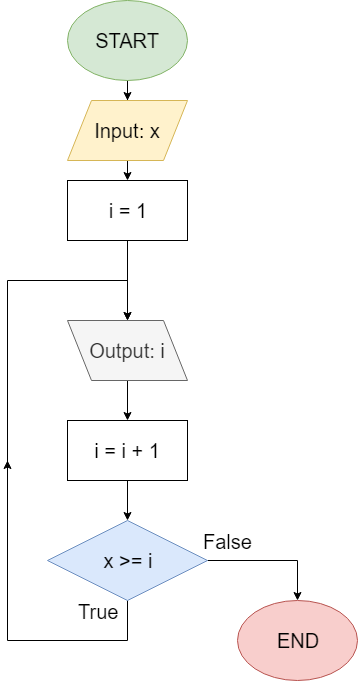
Some programming languages also implement another type of loop, known as a Do-While loop. Here’s a flowchart showing what a Do-While loop might look like:
In code, a Do-While loop looks similar to this:
<before code block>
do
    <loop code block>
while <loop condition>
<after code block>
These loops are very similar to a While loop, but instead of checking the <loop condition> first, the code inside the <loop code block> is executed before any test is done. In this way, it guarantees that the code in the <loop code block> is executed at least once. Then, the <loop condition> is evaluated, and if it evaluates to true the code in the <loop code block> is executed again. If it evaluates to false, then the program moves on to the <after code block>
If we look at the flowchart for the Do-While loop above, can we determine if it matches the problem statement from earlier?
Write a program that accepts any positive integer as input, and then prints all integers starting with 1 up to the given number.
Let’s assume the user chose the number 3 as input. First, the program will set i = 1, then it will print 1 and set i = 2. Next, it will evaluate the Boolean expression x >= i, or 3 >= 2, which evaluates to true, so the loop repeats.
The program will then print 2 and set i = 3, and then it will evaluate 3 >= 3, which is also true. So, it will loop once again, printing 3 and setting i = 4. Finally, it will evaluate 3 >= 4, which is false, and the program will terminate. So, in this case, the program works as expected.
However, there are some cases where a While loop and a Do While loop may produce different output, even if the same code and Boolean expression are used. We’ll see an example of that later in this chapter.
Most programming languages also support another type of looping construct, known as a For loop. A For loop usually includes an explicitly defined loop counter , a loop condition and loop counter incrementor as part of the loop definition, and is usually used to make sure that a loop only runs a set number of times. This is especially handy for instances where we need to accept exactly $ 5 $ inputs, or if the program should perform a calculation exactly $ 10 $ times.
Many programming languages support a variety of different ways to define how the loop counter in a For loop functions. For these examples, we’ll use a simple definition for the loop counter where it is just an integer that begins at one value and increments by $ 1 $ (the loop counter incrementor) each time until it reaches a second value (the loop condition).
Here’s a flowchart showing what a For loop may look like:
In this flowchart, we use the shorthand i : [1, x] by 1 to show that the loop counter i starts at the value
$ 1 $, and then each loop it is incremented by
$ 1 $ until it is larger than x. So, if x = 6, the loop counter i will have the values 1, 2, 3, 4, 5, and 6, and the loop will run exactly
$ 6 $ times.
When reading this aloud, we might say i : [1, x] by 1 as “For values of i from
$ 1 $ through x incrementing by
$ 1 $”. So, we could say this whole loop is “For values of i from
$ 1 $ through x incrementing by
$ 1 $, print i.” That should exactly match the original problem statement given earlier:
Write a program that accepts any positive integer as input, and then prints all integers starting with 1 up to the given number.
In code, there are many different ways that For loops are usually defined. We’ll learn how our programming language implements these loops later in this chapter.
Once our code is inside of a loop, sometimes we might find situations where we need to either stop looping immediately, or perhaps start the loop over again. Thankfully, most programming languages include two special keywords that can be used in those situations.
The first of these keywords, break, is used to immediately exit a loop from within. The program will immediately jump to the first line of code below the loop and continue executing from there. This flowchart gives a good example of what this might look like:
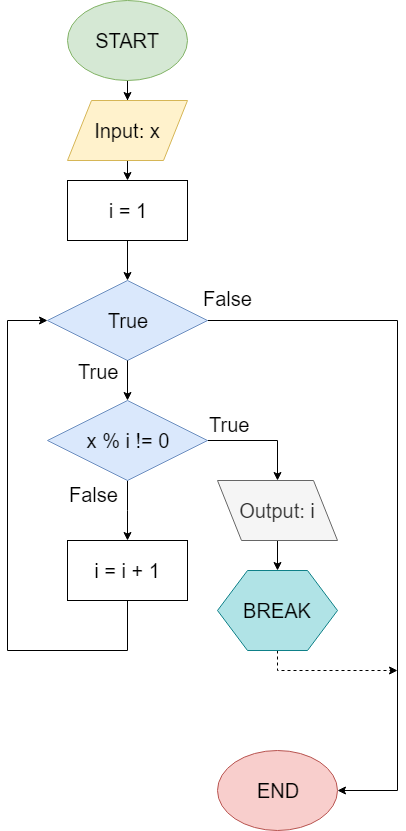
This program will accept an integer as input, and then print the smallest positive integer that is not a factor of the given input. Let’s walk through this program and see if we can figure out how it works.
For this example, let’s say the user has chosen 30 as the input. At the beginning, the program will set i = 1. Then, it will evaluate the Boolean expression true to determine if it should enter the While loop. Since this expression is always true, the loop will be repeated continuously, unless we use the break keyword to exit the loop. These loops are sometimes referred to as infinite loops, and can be very dangerous to use unless we are very careful.
Inside the loop, it will evaluate x % i != 0 as part of an If statement. In this case, 30 % 1 != 0 is false, so the loop will continue on the False branch of the statement and increment i.
Then, it will loop around again and go right back to the If statement, which will evaluate 30 % 2 != 0 to false as well, so it will once again increment i.
This process will continue until i = 4, at which point 30 % 4 != 0 is true. In that case, it will follow the True branch of the If statement, which will print 4 as output. Then, the next statement is a break keyword. As soon as the code reaches that statement, it will break out of the loop and continue to the next line of code below the loop. In this case, there is no more code, so the program will just terminate.
The break keyword is very important when working with loops, as it allows us to perform additional checks inside of the loop using If statements to determine if the loop should stop at any point.
The other of these keywords, continue, is used to stop executing the current iteration of the loop, but instead will return to the beginning of the loop and start the process over again with the current variables. Here’s a flowchart for a program that uses the continue keyword:
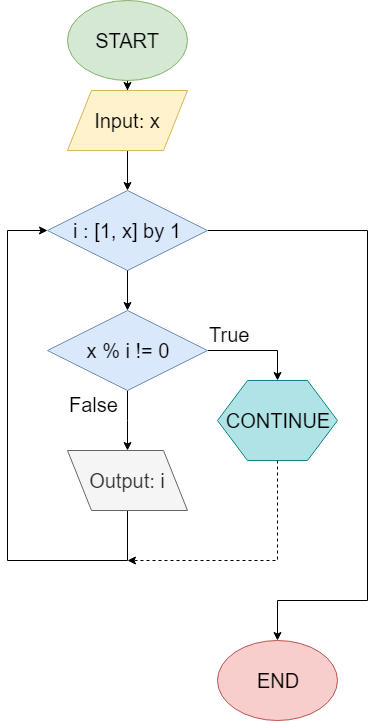
This program is the inverse of the previous program. It will print all positive numbers that are factors of the given input. In this case, it was built using a For loop instead of a While loop. Let’s walk through this program and see how it works.
In this example, we’ll assume the user has chosen 8 as the input. So, the program will start with i = 1 and evaluate the Boolean expression x % i != 0. In this case, that expression is 8 % 1 != 0, which is false. So, the program will output 1 and loop back to the beginning.
The same process applies for the second iteration, where i = 2. Since 8 % 2 != 0 is false, the program will also output 2 and loop.
However, when i = 3, something different happens. In this case, 8 % 3 != 0 evaluates to true, since
$ 8 $ is not equally divisible by
$ 3 $. Inside of the If-Then statement is the keyword continue, which just tells the loop to stop executing the current iteration and go back to the beginning of the loop. Since this loop is a For loop, the value of i will be updated to 4, and the loop will begin again.
Continuing through the entire program, we’ll see that it outputs 1, 2, 4, and 8, while the other numbers are skipped. This is exactly the expected output.
In many cases, the continue keyword is used along with an If statement to show which iterations or variable values should be ignored or skipped in a loop.
There are some areas of programming, such as video games that use a “game loop”, as well as a few programming languages, where break and continue are commonly used. However, as a general rule, it is not recommended to use break or continue very often in your code, since it can make understanding and following the code much more complex. Instead, try to use the loop conditions to determine when a loop should terminate, and rewrite your code if needed.
Reading input from either the keyboard or a file are handled as streams. A stream is an abstract concept in computer science for data that is organized as a queue, where items that are added to the stream first are also the items that are read first. Put another way, when reading input from the keyboard, the program reads the keys in the order they are pressed. This is similar to a conveyor belt.
Some streams, like the keyboard, are “infinite” and have no defined end. When we type the characters dog followed by the ENTER key on the keyboard, the bytes [x64, x6F, x67, x0B] representing the ASCII characters dog\n are placed in the keyboard’s input stream. Those bytes can then be read out of the stream by a program when it wants to receive keyboard input from the user. However, once those bytes are read, the stream does not close or end. Instead, it waits for new keyboard input to arrive from the user.
The process for reading files is similar. When the program opens a file, it can then read the bytes stored in the file from first to last until it reaches the end. Files, however, are “finite” meaning that they have a defined end. This is represented by a special ASCII character called the EOF or “End of File” character, represented by the byte x05 in the stream.
Programming languages such as Java and Python have many libraries and classes for working with streams. These classes are used to create stream objects that can read values from the stream using various methods. In this class, we’ve already seen this through the Scanner class in Java or the input() method in Python, which allow us to read input from the keyboard.
We can also read from files using many of the same methods. This is the power of abstraction in computer programming - if we can represent multiple items in a similar way, then we can write code that allows us to interact with either type of object.
Finally, the process of writing output to a file or to the terminal is also handled through streams. This allows us to both read and write from the same file or the terminal - we just use a stream to accomplish that!
Most operating systems make the following streams automatically available to any running program:
stdin - this is the standard input stream that is used to receive input from the keyboard.stdout - this is the standard output stream that displays program output on the terminal to the user.stderr - this is the standard error stream that is used to present errors from the program.In Java, these are available under the System class as System.in, System.out and System.err, respectively. We’ve already used the System.out.println() method many times to print output to the terminal, and we typically create a Scanner object that uses System.in to read input from the user. So, we’ve already used these streams many times in our programs!
Loops in Java
Now that we’ve added terminal entry to our tool set, let’s look at how we can use each of these looping constructs in Java. First, here is the general syntax for a While loop in Java:
while(<Loop Condition>){
  <loop code block>
}
As expected, Java will first evaluate the <Loop Condition> to a single Boolean value. If that value is true, it will execute the instructions in the <loop code block>, which can be one or more lines of code, or even additional constructs. Once the <loop code block> execution is complete, the program will return to the top of the loop and evaluate the <Loop Condition> again. It will repeat this process until the expression evaluates to false. Of course, if the expression is false initially, the code in the <loop code block> will not be executed at all.
It is very important to remember that the Loop Condition is enclosed by parentheses ( ), while the block of code that should be executed if that expression is true is enclosed by curly braces { }, just like in an If statement, class body or method body
Let’s take a look at a quick example, just to see how this construct works in practice. First, let’s consider the program represented by this flowchart from earlier in the chapter:
This flowchart corresponds to the following code in Java. In this case, we’ll assume x is hard-coded for now:
int x = 8;
int i = 1;
while(x >= i){
  System.out.println(i);
  i = i + 1;
}
By walking through the execution of this program, we see that it will output all integers from $ 1 $ through $ 8 $. If the user inputs a number less than $ 1 $, the program will not produce any output at all.
Java also includes another form of a While loop, known as a Do-While loop . Here is the general syntax for a Do-While loop in Java:
do{
  <loop code block>
}while(<Loop Condition>);
In this code, Java will first execute all of the code in the <loop code block> without evaluating any Boolean expressions. The main use of a Do-While loop is to guarantee that the code inside the loop is executed at least once. Then, it will evaluate the <Loop Condition> to a Boolean value. If that value is true, then the program will repeat the code in the <loop code block> once again. If it is false at any time it is evaluated, then the program will continue running the code directly below the Do-While loop.
It is very important to remember that the Loop Condition is enclosed by parentheses ( ), while the block of code that should be executed if that expression is true is enclosed by curly braces { }, just like in an If statement, class body or method body. In addition, notice that Java also requires a semicolon ; after the Boolean expression.
Let’s take a look at a quick example, just to see how this construct works in practice. First, let’s consider the program represented by this flowchart from earlier in the chapter:
This flowchart corresponds to the following code in Java. In this case, we’ll assume x is hard-coded for now:
int x = 8;
int i = 1;
do{
  System.out.println(i);
  i = i + 1;
}while(x >= i);
By walking through the execution of this program, we see that it will output all integers from 1 through 8.
However, this program will perform differently than a While loop if the user inputs a number less than 1. Since this program is built using a Do-While loop, it will always execute the code inside the loop first, so the program will always print at least 1 to the terminal. After that, the program will evaluate x >= i, which will be false if x is less than 1, so it will terminate. Notice that this is different than the While loop on the previous page, which will not produce any output at all in this instance.
Therefore, it is very important to understand how each loop functions and choose the appropriate loop for each task. In practice, Do-While loops are used very rarely, but they can be useful in some instances.
In practice, Do-While loops are not commonly used in Java. We’re including them here just in case you see them in other code you find, but we generally don’t recommend using them in your own code unless the situation calls for this loop structure.
The syntax for a For loop in Java is a bit complex, and has many different parts. Here’s the general format:
for(<initializers>; <loop condition>; <updaters>){
  <loop code block>
}
Let’s break this syntax down into each individual part to understand how it works.
First, the <initializers> section is used to create and initialize any variables that we’d like to use as loop counters inside of the loop. For example, we could use int i = 0 in that section to create a single integer variable i and set its initial value to 0. We may also declare multiple variables of the same type, separating each with a comma or ,. In that instance, we could say int i = 0, j = 1, which would declare two new integer variables, i and j, and set their values to 0 and 1, respectively. Finally, we can choose to leave that section blank, as it is not required at all. In either case, we must end that section with a semicolon ; before moving on to the next section. This section is executed just once, before the first iteration of the loop itself. We’ll explore a full example below.
The <loop condition> section is the same as in a While loop. It must evaluate to a single Boolean value, either true or false, which is used to determine if the loop continues executing or not. This section must also end with a semicolon ;, and is generally required in a For loop.
Finally, the <updaters> section can include one or more statements used to increment (update) the values of the loop counter variables. This section is executed at the end of each iteration of the loop, before the Boolean expression is evaluated again. Generally, we would include code such as i++ or i = i + 2 in this section. Similar to the <initializers> section, multiple update statements can be included in this section, separated by a comma ,. So, we could use i++, j++ to increment the values of both i and j in the same loop.
Let’s look at an example. Here’s a flowchart from earlier in this chapter containing a For loop:
This flowchart corresponds to the following code in Java. Once again, we’ll assume x is hard-coded for now:
int x = 8;
for(int i = 1; i <= x; i++){
  System.out.println(i);
}
In this For loop, we can clearly see the three parts. First, we have int i = 1 as the initializer. It creates a new variable and gives it an initial value. Then, we see i <= 8 is our loop’s Boolean condition. Finally, we have i++ as the lone updater, since it updates the value of the loop counter i by incrementing it by
$ 1 $.
To understand how this For loop functions in practice, let’s look at an equivalent While loop:
int x = 8;

//initializers
int i = 1;

while(i <= x){
  System.out.println(i);

  //updaters
  i++;
}
These loops are exactly identical in terms of how the code is executed. In a For loop, the initializers are performed once at the beginning, before the loop really starts. Then, we evaluate the Boolean expression and determine if we should enter the loop and perform those operations. At the end of each loop iteration, the updaters are executed to update the values of any loop counters, before the loop repeats back to the Boolean expression.
For loops in Java have one important caveat when it comes to variable scope. As expected, any variables declared in the initializers section of a For loop may be accessed from within the For loop itself, but they may also be accessed in the Boolean expression or the updaters section as well. They cannot, however, be accessed outside of the For loop.
However, any variables declared inside the For loop cannot be accessed in either the Boolean expression or the updaters. In effect, a For loop in Java has two levels of scope, one containing the variables declared in the initializers, and another for just the code inside the loop. Generally this doesn’t pose a problem, but it is an important distinction to be aware of.
Here’s one more example of a For loop in Java, using three loop counters instead of just one:
int sum = 0;
for(int i = 0, j = 1, k = 20; i + j < k; i++, j++, k--){
  sum += i + j + k;
}
Notice that there are three variables initialized in the initializer, which is int i = 0, j = 1, k = 20. In addition, there are three variables updated in the updater, which is i++, j++, k--. While it is uncommon for most programmers to use multiple loop counters in a single For loop, it is important to understand how it can be done.
In Java, it is possible to have loop constructs without curly braces, just like we saw for conditional constructs in an earlier. In that case, the next line of code immediately following the while or for will be the only line repeated inside of the loop.
Consider this code for example:
int x = 0;
while(x < 5)
  x++;
This code is valid, and will compile and run properly. However, just like with conditional constructs, if we want to add a second line to the inside of the loop, we’ll need to remember to add curly braces for our code to work properly.
In addition, we can omit parts of a For loop, as in this example:
int x = 0;
for( ; x < 5 ; )
  x++;
Here, we’ve omitted both the initializers and updaters of the For loop. Those parts are considered optional, and either one can be left out. However, in this case, it may make more sense to convert this to a While loop instead.
Java also includes both the break and continue keywords. They are pretty straightforward and easy to follow.
Here’s the flowchart showing a program with a break statement from earlier in this chapter:
This flowchart corresponds to the following code in Java. Once again, we’ll assume x is hard-coded for now:
int x = 8;
int i = 1;
while(true){
  if(x % i != 0){
    System.out.println(i);
    break;
  }
  i = i + 1;
}
This code shows us an example of an infinite While loop, sometimes referred to as a While-True loop. In this case, we are simply using the keyword true as our Boolean expression, so the loop will always continue to run unless we use the break keyword to leave it. So, in this code, once x % i != 0 evaluates to true, we reach the break keyword and then exit the loop.
Here’s the flowchart showing a program with a continue statement from earlier in this chapter:
This flowchart corresponds to the following code in Java. Once again, we’ll assume x is hard-coded for now:
int x = 8;
for(int i = 1, i <= x; i++){
  if(x % i != 0){
    continue;
  }
  System.out.println(i);
}
In this example, we see a For loop that contains a continue statement inside of it. Here, it is important to remember that, even though the continue statement tells the program to go back to the beginning of the loop, the updater i++ will still be executed before evaluating the Boolean expression i <= x. This is one of the unique features of a For loop compared to a similar While loop. If we rewrote this program using a While loop, we’d have to remember to update the value of i manually before the continue keyword, as in this example:
int x = 8;
int i = 1;
while(i <= x){
  if(x % i != 0){
    i++;
    continue;
  }
  System.out.println(i);
  i++;
}
Notice that we had to include an extra i++ before the continue keyword. Otherwise, the loop would repeat without updating the value of i, causing it to become infinitely stuck.
Try the preceding code and see what happens when you remove the i++ statement directly above the continue keyword. Does it cause any problems?
Hint: When using a program via the terminal, you can press CTRL + C to stop a running program if it locks up or starts infinitely looping.
Of course, we can identify some subgoals for working with loops in Java as well. Let’s take a look at them and see how we can use them to help understand loops a little bit better.
Here are the subgoals for evaluating a loop in Java:
The first and most important part of evaluating a loop is to identify each part of the loop structure. Here is a list of things to look for:
falseDepending on which type of loop we are looking at, we may not find all of the parts listed above.
Once we’ve identified all of the parts of the loop, we can then trace the loop to see how it updates values on each iteration. The easiest way to do this is to write down the values of each variable before the loop starts, and then update those values as the loop iterates. We’ve already seen a few examples for how to trace a loop in this chapter, and we’ll do one more on the next page.
We can also use subgoals to help write loops. Here are the subgoals we’ll use:
Before writing a loop, we must decide what we’re using it for. Once we know that, then we can determine which type of loop would be best. For example, if we are using the loop to repeat steps until a particular Boolean condition is false, we’ll probably want to use a While loop. If we want to make sure the loop executes at least once, we may want to use a Do-While loop instead. Finally, if we are iterating a specific number of times, or across a particular data structure (as we’ll see in a later chapter), we should probably use a For loop.
Once we’ve determined which loop structure we’re going to use, we’ll need to define and initialize any variables needed by the loop. Specifically, we may want to define the initial value of our iterator variable to some value if we are using one.
Next, we’ll need to determine the Boolean condition that should cause the loop to terminate. For example, we may want the loop to repeat until our iterator variable i becomes 5. So, we’ll want to invert that Boolean statement to find the statement that can be used inside the loop to determine whether it should continue.
Therefore, the termination condition i == 5 should become the continuation condition i < 5. We could also use i != 5, however we could run into an issue where the value of i skips over 5 for some reason in our code, creating an infinite loop. By using i < 5 instead, the loop will terminate as soon as i becomes 5 or greater, which is safer overall.
Once we’ve set up the loop itself, we can write the code we’d like repeated inside of the loop body. One thing we must be very careful about is making sure we are properly updating our loop’s iteration variable toward the termination condition. If we forget to do that, we may run into a condition where the loop will not terminate at all, causing our programs to lock up. In a later chapter, we’ll discuss concepts such as loop invariants that will help us with this step.
Now that we know how to use loops, let’s discuss a common structure for reading and parsing user input from the terminal using a loop.
In many of our prior projects, we’ve seen the Scanner class used to read input from the keyboard’s input stream, which is System.in in Java. Typically we use code similar to this:
import java.util.Scanner;

public class ReadInput {

    public static void main(String[] args){
        // Create the Scanner object to read from the terminal
        Scanner scanner = new Scanner(System.in);

        int x = scanner.nextInt();
        double d = scanner.nextDouble();

        System.out.println(x + " + " + d + " = " + (x + d));
    }
}
Let’s look at some of the important lines of code in this short example:
import java.util.Scanner; - this line at the very top of our program is an import statement. It tells Java that we’d like to import, or use, the Scanner class from the java.util library, which is part of the standard Java Development Kit (JDK). These lines must be at the top of our file, before any class declarations. We’ll learn more about importing and using library classes a bit later in this course.Scanner scanner = new Scanner(System.in) - this line serves two purposes. First, it creates a new instance of a Scanner object, which is stored in the variable scanner. Notice that these names are case-sensitive! The capitalized Scanner is the name of the class, which in this case is used like a data type similar to int or double. The lowercase scanner is the variable name where the object created from that class is stored. We’ll learn about objects and classes a bit later in this course. The last part new Scanner(System.in) creates a new Scanner object and tells it to read input from the System.in stream, which is the connected to the keyboard in the terminal.scanner.nextInt() - this method will read the next piece of input from the keyboard and try to convert it to an integer. If it can, it will store it in the variable x. However, if the next piece of input is not an integer, this will cause an error and crash the program. We’ll learn how to catch and handle these errors a bit later in this course, but for now we’ll have to assume that our users are providing input that matches the expected structure.scanner.nextDouble() - similar to the previous line, this will read the next piece of input and try to convert it to a floating-point value. If it can, it will store it in the variable d.Of course, there are much more advanced ways to use a Scanner in Java. We’ll learn more in a later chapter, or we can always refer to the Java Documentation for the Scanner class.
Many times, we want our programs to be able to read multiple lines of input, and to continue to read input until the end of the stream is reached. In that case, we can use a While loop and a few different methods in the Scanner class to accomplish this.
Consider this code example:
import java.util.Scanner;

public class ReadManyLines {

    public static void main(String[] args){
        // Create the Scanner object to read from the terminal
        Scanner scanner = new Scanner(System.in);

        int countLetters = 0;
        int countLines = 0;

        // Repeat while the Scanner thinks there is another line to be read
        while(scanner.hasNextLine()){
            // Read the next line of input
            String input = scanner.nextLine();

            // Check to see if the line is empty after removing all leading and trailing whitespace
            if (input.trim().length() == 0){

                // If the line is empty, break out of the while loop
                break;
            }

            // parse the line of input and perform the calculations needed
            countLetters += input.length();
            countLines++;
        }

        // all input has been read at this point
        System.out.println("I read " + countLetters + " characters of input across " + countLines + " lines");
    }
}
This program will read input from the terminal until no more input is provided, and it will count the total number of lines and characters read from the terminal’s input stream. To do this, it uses a few new methods of the Scanner class:
scanner.hasNextLine() - this method will return true if there is more input to be read from the input stream. So, we use this in the While loop to repeat until there is no more input to be read.scanner.nextLine() - this method reads an entire line of input from the input stream. It will keep reading characters until it reaches a newline character \n. Remember that when the user presses the ENTER key on a keyboard, that will add a newline character \n to the keyboard’s input stream, signalling the end of a line of input.This works well in many situations, but there is one important thing we must remember - the keyboard input stream System.in is an infinite stream! This means that is never ends, and the scanner.hasNextLine() method will always return true when reading input from the terminal.
So, how do we get our program to end? In most cases, we will simply add an If statement inside of the loop to check and see if the line of input is empty, and then break out of the loop if it is. In this code, we use the Boolean expression input.trim().length() == 0 to check and see if the String input is empty. We’ll learn more about these string methods in a later part of this course.
This new method of reading input, which uses scanner.nextLine() to read an entire line of input instead of scanner.nextInt() or scanner.nextDouble() to just read a single element from the input, comes with one major caveat that developers must be aware of - the dangling newline.
Consider this code:
import java.util.Scanner;
public class DanglingNewline {
public static void main(String[] args){
// Create the Scanner object to read from the terminal
Scanner scanner = new Scanner(System.in);
// Repeat while the Scanner thinks there is another line to be read
while(scanner.hasNextLine()){
// Read the next line of input
String name = scanner.nextLine();
// Check to see if the line is empty after removing all leading and trailing whitespace
if (name.trim().length() == 0){
// If the line is empty, break out of the while loop
break;
}
// Read an integer from input
int age = scanner.nextInt();
System.out.println("Greetings " + name + "! Your age is " + age);
}
}
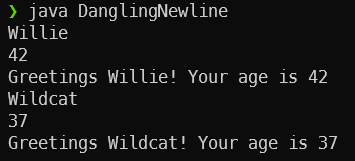
}This program will read the name and age of a user from input, one per line. So, let’s assume that we are providing the following input:
Willie
42
Wildcat
37
When we run this program, however, we see that an error occurs:
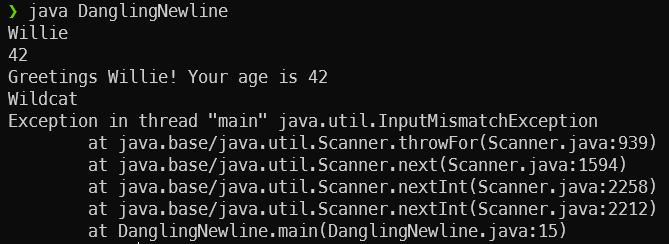
Why did this happen? Let’s look at the stream that would be read by the program, complete with the newline characters:
Willie\n42\nWildcat\n37\nNow, let’s step through the program and check all the Scanner methods that read the input to see where the error occurs! First, the scanner.hasNextLine() method will return true since the stream still has input to be read. Next, the scanner.nextLine() method will read the next line of input, up to and including the newline \n characater. So, it will read "Willie" from the stream and store it in name, and then remove it and the following newline. Now we have this in the stream:
42\nWildcat\n37\nGood so far! After that, the scanner.nextInt() method will try to read the next item in the stream and convert it to an integer. It sees the characters "42" followed by a newline, and it knows that it can convert "42" to an integer, so it will read those characters and store the value 42 in the age variable. However, the nextInt() method does not remove the newline character from the stream. So, we’ll be left with this content in the stream:
\nWildcat\n37\nHere’s where things go wrong. The scanner.hasNextLine() method will still return true since there is input to be read. So, the scanner.nextLine() method will read input until it reaches a newline character \n. In this case, it sees that immediately, so it will store the empty string "" in the name variable and then remove the newline from the stream. So, we are left with this content in the stream.
Wildcat\n37\nThis means that, when the scanner.nextInt() method is called, the first thing it reads is not a number, so it throws an InputMismatchException and crashes the program!
This happens because had a dangling newline that was left in the input stream. To fix this, the easiest way is to always read an entire line of input, and then use other methods to parse and convert that line as needed. In general, we want to avoid mixing the Scanner methods that read entire lines and the methods that just read individual elements of input. In most cases, we should use one or the other.
In this case, we can change the scanner.nextInt() to Integer.parseInt(scanner.nextLine()) to read the entire next line of input and then convert it to an integer:
import java.util.Scanner;

public class DanglingNewline {

    public static void main(String[] args){
        // Create the Scanner object to read from the terminal
        Scanner scanner = new Scanner(System.in);

        // Repeat while the Scanner thinks there is another line to be read
        while(scanner.hasNextLine()){
            // Read the next line of input
            String name = scanner.nextLine();

            // Check to see if the line is empty after removing all leading and trailing whitespace
            if (name.trim().length() == 0){

                // If the line is empty, break out of the while loop
                break;
            }

            // Read an integer from input
            int age = Integer.parseInt(scanner.nextLine());
            System.out.println("Greetings " + name + "! Your age is " + age);
        }
    }
}
With that change in place, the program will run correctly!
Lastly, it is usually considered good practice to include prompts that tell the user what kind of input is expected. For example, we can update the previous code to include some prompts, using the System.out.print() method:
import java.util.Scanner;

public class DanglingNewline {

    public static void main(String[] args){
        // Create the Scanner object to read from the terminal
        Scanner scanner = new Scanner(System.in);

        System.out.print("Enter a name: ");

        // Repeat while the Scanner thinks there is another line to be read
        while(scanner.hasNextLine()){

            // Read the next line of input
            String name = scanner.nextLine();

            // Check to see if the line is empty after removing all leading and trailing whitespace
            if (name.trim().length() == 0){

                // If the line is empty, break out of the while loop
                break;
            }

            System.out.print("Enter an age as an integer: ");
            // Read an integer from input
            int age = Integer.parseInt(scanner.nextLine());
            System.out.println("Greetings " + name + "! Your age is " + age);

            System.out.print("Enter a name: ");
        }
    }
}
Notice that the first prompt has to be printed before the while loop - this is because the scanner.hasNextLine() method will wait until a line of input has been provided before it allows the program to continue, even if we haven’t actually read that line of input yet. So, we have to print our prompt before checking for a line of input to be read from the terminal.
While this is considered best practice in the real world, we typically will not include these prompts for input in our programs in this course. The major reason for removing the input prompts is to ensure that the automated grader is just reading the output produced by your program and not the prompts for input.
Without this change, we’d have to be very careful to make sure that our input prompts also perfectly matched what the automated grader was expecting. Since we really want the focus to be on the output produced and not the input prompts, we’ve made the decision to simply not include input prompts in our programs in this course.
There are some instances where it may look like your program has stopped working, especially when dealing with loops and user input. If that happens, try these steps:
One common use for loops is the accumulator pattern. An accumulator simply computes some values based on a large amount of data, such as the sum, maximum, minimum, average, or count. In programming, a pattern is simply a common structure that is used to solve a recurring problem in code. Since many programs end up needing a loop that acts an accumulator, we’ve developed a common pattern that can be used in our code to solve this problem.
The simplest example of the accumulator pattern is a program that will sum up a set of values. Consider this code:
import java.util.Scanner;

public class Accumulator {

    public static void main(String[] args){
        Scanner scanner = new Scanner(System.in);

        // Initialize accumulator variables
        int sum = 0;

        // Read and parse input
        while(scanner.hasNextLine()){
            String input = scanner.nextLine();
            if (input.trim().length() == 0){
                break;
            }
            int x = Integer.parseInt(input);

            // Update accumulator variables
            sum += x;
        }

        // Display results
        System.out.println("The sum of these values is " + sum);
    }
}
In this example, we see the general structure for the accumulator pattern:
true. For example, we could easily modify this program to only sum up the even values using a conditional statement.We’ll see this pattern appear many times in our programs from this point onward, so it is helpful to make note of it and observe when it is used in practice.
The code in this example video contains a slightly older version of the input code that also includes the ability to read from a file, which can be ignored. We recommend using the code shown below instead. The rest of the video is still applicable to this example.
Now that we’ve learned some of the different looping constructs in Java, let’s work through a completed example to see how we can use loops to build more advanced programs.
For this example, we’d like to build a program that matches the following problem statement:
Write a program that will accept a series of integers from the keyboard, one per line. It will continue to accept integers from the user until the user inputs 0. If the user inputs a negative number, the program should print
"Error! Positive Integers Only"and continue to receive input. Once the user inputs 0, the program should print the sum and average of the positive integers input by the user.
Before we start coding, let’s try to draw a flowchart for this program, just to make sure we understand the control flow it will use. We know that we need to get keyboard input, convert it to an integer then take some actions based on its value.
We also know we will have to repeat this an indeterminate number of times, and a While loop is the preferred construct to use for this. So lets add a While loop. While we are at it, make sure that if 0 is input for x, we do nothing and let the program flow back to the start of the while loop. So, our final flowchart may look like this.
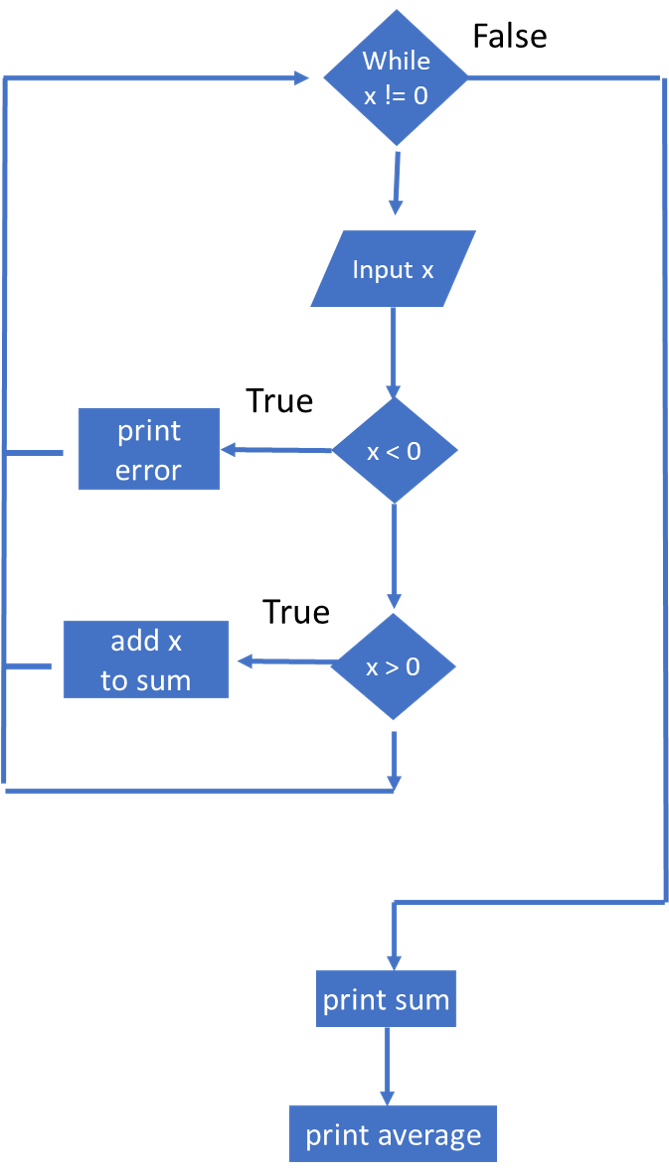
There are a few important items to note in this flowchart:
x < 0. If this is false, we’ll print the error and loop back to the top. This is keeps us from adding 0 or values less than 0 to our sum.x < 0 and x > 0 paths are mutually exclusive. We should probably consider using If-Else If-Else statements to communicate this intentional exclusivity when we write our code.x != 0 that first time if we don’t get a value for x until we are in the loop?Scanner code to handle input go?Keep in mind that a flowchart is an abstraction of the code we need to write; it is just a model containing some important subset of the details. This one is sufficient to ensure we use the right loop and if statements.
Lets start by adding the boiler plate code for setting up the class, the main() method and input. Let’s store this program in Example.java
import java.util.Scanner;

public class Example{

    public static void main(String[] args){
        // Create the Scanner object to read from the terminal
        Scanner scanner = new Scanner(System.in);

        /* -=-=-=-=- MORE CODE GOES HERE -=-=-=-=- */

    }

}
For the rest of this example, we’ll look at a smaller portion of the code. That code can be placed where the MORE CODE GOES HERE comment is in the working copy above.
Next, we want to build a program that can accept a series of integers from the user. Since we don’t know how many we’ll get, we’ll probably want to use some sort of a While loop. So, let’s add in a While loop and start building from there:
while(){

}
Inside of that loop, we know we need to read an integer from the user, so we can add the code for that as well:
while(){
  int x = Integer.parseInt(scanner.nextLine());
}
Next, we need to determine when the loop should terminate. In this case, we can go back to the problem statement above, where we see the line:
It will continue to accept integers from the user until the user inputs 0.
So, we might be tempted to do something like this:
while(x != 0){
  int x = Integer.parseInt(scanner.nextLine());
}
However, that code has a very important error in it. We haven’t declared x outside of the While loop, so when we try to compile this code we’ll get a compiler error. So, let’s resolve that error:
int x = 0;
while(x != 0){
  x = Integer.parseInt(scanner.nextLine());
}
When we compile and run this fragment, we should see that it never prompts for input. We need to initialize x to some value, so we quickly chose to initialize it to
$ 0 $. However, by doing so, we should hopefully see that it will never enter the loop, since x != 0 will immediately be false. So, let’s set x = 1 instead for now:
In the above loop, “zero” may be referred to as a sentinel value, which is a value to watch for and alter the program’s behavior when it occurs. It is important to ensure we don’t inadvertently initialize our variable to a sentinel value.
int x = 1;
while(x != 0){
   x = Integer.parseInt(scanner.nextLine());
}
That’s a good start! As we continue to work on this program, we’ll revisit the structure of this code and see that there might be a better way to do it. For now, let’s press on ahead.
Next, we can handle the error messages for any invalid inputs. From the problem statement:
If the user inputs a negative number, the program should print “Error! Positive Integers Only” and continue to receive input.
This case is pretty simple. We want to check if the user has entered a number less than $ 0 $. If so, we should just print out an error message, but continue to receive input. The word “continue” gives us an important clue toward how we can accomplish this task. Here’s one way to build this test into our program:
int x = 1;
while(x != 0){
  x = Integer.parseInt(scanner.nextLine());
  if(x < 0){
    System.out.println("Error! Positive Integers Only");
    continue;
  }
  //logic here
}
In this code, if the user enters a negative number, we simply use an If statement to find that error, print out the error message, and then the continue keyword will cause the program to loop back to the beginning and read another input. Of course, we can do this without the continue keyword as well, using an If-Else statement instead:
int x = 1;
while(x != 0){
  x = Integer.parseInt(scanner.nextLine());
  if(x < 0){
    System.out.println("Error! Positive Integers Only");
  }else{
    //logic here
  }
}
Either approach works equally well. Some developers prefer to avoid the use of continue and break keywords because they make it more difficult to understand loops, while other developers prefer to avoid having the logic of the loop nested several layers deep in many If-Else statements. It is really up to developer preference and the overall style guide that is in effect.
For this example, we’ll use the code with the continue keyword, just to get a better understanding of how it works.
Once we’ve handled our user inputs, we can include our program’s logic. In this case, we need to calculate both the sum and average of all of the numbers entered by the user. Calculating the sum is pretty simple! We can just include a sum variable and add each input to that variable:
int x = 1;
int sum = 0;
while(x != 0){
  x = Integer.parseInt(scanner.nextLine());
  if(x < 0){
    System.out.println("Error! Positive Integers Only");
    continue;
  }
  sum += x;
}
System.out.println("Sum: " + sum);
To calculate the average of a set of numbers, we must remember the formula $ \text{Average} = \frac{\text{Sum}}{\text{Count}} $. Since we already are tracking the sum, we can just add another variable to keep track of the count of inputs:
int x = 1;
int sum = 0;
int count = 0;
while(x != 0){
  x = Integer.parseInt(scanner.nextLine());
  if(x < 0){
    System.out.println("Error! Positive Integers Only");
    continue;
  }
  sum += x;
  count++;
}
System.out.println("Sum: " + sum);
System.out.println("Average: " + (double)sum / count);
Notice in the code above we are casting sum as a double when we calculate the average. Otherwise, the program will perform floored integer division, which isn’t what we want in this case.
Now, let’s see if this works.
See if you can complete the program using the example code above in a file name Example.java. Does it work correctly?
There is a very important logic bug in the code above. See if you can figure out what it is before continuing!
The code above contains a very important logic error. To find that error, let’s run the program by entering the numbers 1 and 3, followed by 0 to end the program. Here’s the output we should receive:

Notice that the sum of 4 is correct, but the average is 1.333333 instead of 2. Why is that?
If we look closely at our program above, we notice that the program will still increment count when we input 0 to stop the program. So, it believes that we’ve entered three numbers, when we actually only entered two. Therefore, we need to figure out some way to prevent the program from incrementing count when we input 0.
There are several ways we can accomplish this. One way is to simply wrap the program logic in another If-Then statement, as in this example:
int x = 1;
int sum = 0;
int count = 0;
while(x != 0){
  x = Integer.parseInt(scanner.nextLine());
  if(x < 0){
    System.out.println("Error! Positive Integers Only");
    continue;
  }
  if(x != 0){
    sum += x;
    count++;
  }
}
System.out.println("Sum: " + sum);
System.out.println("Average: " + (double)sum / count);
We could also use a break keyword to exit the loop as soon as we realize that the user’s input is 0:
int x = 1;
int sum = 0;
int count = 0;
while(x != 0){
  x = Integer.parseInt(scanner.nextLine());
  if(x == 0){
    break;
  }
  if(x < 0){
    System.out.println("Error! Positive Integers Only");
    continue;
  }
  sum += x;
  count++;
}
System.out.println("Sum: " + sum);
System.out.println("Average: " + (double)sum / count);
Either approach works. Again, it just depends on how we’d like to style our code so that it is clear and easy to understand.
In addition, we could rearrange the code just a bit to make the While loop’s Boolean expression a bit clearer:
int sum = 0;
int count = 0;
int x = Integer.parseInt(scanner.nextLine());
while(x != 0){
  if(x < 0){
    System.out.println("Error! Positive Integers Only");
  }else{
    sum += x;
    count++;
  }
  x = Integer.parseInt(scanner.nextLine());
}
System.out.println("Sum: " + sum);
System.out.println("Average: " + (double)sum / count);
In this example, we read an input from the user before entering the loop. So, if the user initially inputs 0, it skips the loop entirely, which is fine. If the input is not 0, then it will enter the loop and check to see if it is negative. If it is, it will print the error message, but if not, it will update the sum and count accordingly. Finally, at the end of the loop, it will read another input from the user, then immediately loop back to the beginning and make sure that the user has not input 0 before starting the next iteration. Also, notice that this code does not include any break or continue keywords.
However, this code does include two lines that read input from the user. This violates one principle of writing good code, which is DRY, or Don’t Repeat Yourself. If at all possible, we want to avoid writing two lines of code that perform the same action. So, while this code may be a bit simpler to read, it may also be a bit more difficult to update later. For example, what if a future developer needs to change this program to read floating point numbers instead of integers? If that developer does not update both lines that read input from the file, it could make the program unusable!
Finally, it may be best to simply include several If-Else If-Else statements to make everything clear in the code, as in this example:
int x = -1;
int sum = 0;
int count = 0;
while(x!= 0){
  x = Integer.parseInt(scanner.nextLine());
  if(x < 0){
    System.out.println("Error! Positive Integers Only");
  }else if (x > 0) {
    sum += x;
    count++;
  }
}
System.out.println("Sum: " + sum);
System.out.println("Average: " + (double)sum / count);
This code is probably one of the best ways to accomplish this task. We use a clear string of If-Else If-Else statements to show that there are two possible operations inside of the While loop. Either the input is negative, in which case we print an error message and restart the loop; or the input is positive and accepted for our calculations. IF the input is 0, we allow the program to flow up to while loop condition–which will terminate the loop.
Loops are one of the most important building blocks in computer programming. We can use both loops and conditional constructs to control the flow of execution in our programs, allowing us to develop very advanced pieces of software from these simple parts.
Going forward, we’ll cover information about a few other important data types for dealing with larger amounts of data, as well as how we can build our programs to detect and deal with errors more gracefully.