Chapter 6
Methods
Little Steps to Solve Big Problems!
Little Steps to Solve Big Problems!
Throughout this course so far, we’ve written several programs. But we may start to notice that we are repeating lines of code over and over again.
As programs get bigger, it can also be difficult to manage all of the code and make sure we are not missing something. A small typing error in one part of the code can become very difficult to find when there is so much code to check.
For example, consider a program that needs to write the same output to multiple output files. Right now, if we wanted to write that program, it might contain code that performs these steps:
open file1
write to file1
write to file1
close file1

open file2
write to file2
write to file2
close file2

open file3
write to file3
write to file3
close file3

open file4
write to file4
write to file4
close file4
As we can see, much of the code in that program is repeated, with only small parts changed. Is there a different way we could write this program to make it simpler?
The video above uses pseudocode to introduce the concept of methods. We are transitioning away from using pseudocode in this course. The intent of the video should be clear, but don’t worry too much about the actual syntax of the examples in this video. We’ll use Java code elsewhere in the text.
The answer lies in the use of methods in our code. A method is a piece of code that can be used by our program to perform an action. However, the biggest benefit of using a method comes from the fact that we can use methods multiple times, helping us avoid repeated code in our programs. We can also provide input to our methods and receive output from our methods, allowing a single method to perform work on a wide variety of data.
Let’s look at an updated version of our previous example - a program that writes the same output to multiple files:
public static void main(String[] args){
    outputToFile("file1.txt");
    outputToFile("file2.txt");
    outputToFile("file3.txt");
    outputToFile("file3.txt");
}

public static void outputToFile(String filename){
    BufferedWriter writer = new BufferedWriter(new FileWriter(filename));
    writer.write("This is the first line of " + filename);
    writer.newLine();
    writer.write("This is the end of the file");
    writer.newLine();
    writer.close();
}
In the Java code above, we have defined two methods, one called main just like we’ve seen many times before, and another method named outputToFile that we can use to write data to a file with the name stored in the filename parameter. The body of the functions are delimited with {}. Just like conditional statements and loops, all method definitions must have a body.
The first method, named main, is the actual code that runs when our program is executed.
The other method, outputToFile, actually performs the work of outputting to the file.
To use a method, we’ve included code that looks like outputToFile("file1.txt"); in our main method. That line is known as a method call or method invocation, which will then execute the code inside of the outputToFile method. So, we might say that we are using that line to “call outputToFile” or “call the outputToFile method”. Either way is correct!
Of course, we also need to be able to provide input to our method, as we do in this example. The next page will describe how that works in more detail.
Informally, programmers may use the terms function, method, subroutine, and, to a lesser extent, procedure and other terms, to refer to many similar things. In general, they can be used interchangeably in most cases, since it is pretty clear what they are referring to, but for new programmers it can be a bit difficult to understand all of the different terms that are used.
So, to make things a bit clearer, we’ll try to stick with the definitions below for each of these terms:
To make matters more complex, some languages use all of these terms, each with very precise definitions.
Both Python and Java are pretty loose in their usage, and we will generally use the term “method” to mean any callable code snippet, but may use function and method interchangeably.
For more information on this, feel free to read a relevant post on StackExchange.
When we are writing methods in our code, we may need to provide some input to our methods. This allows our method to perform the same action using different data each time, making them much more flexible. So, let’s look at how to do that in theory and discuss some of the terminology we’ll need to understand first.
When we define a method, we can also list a number of parameters, or inputs, that the method can accept. Depending on the language we are using, we may need to provide either a name, or possibly a type and a name for each parameter. In addition, many languages allow us to accept variable length parameters, which we’ll cover in detail later in this module.
So, in our code, we can define a method that accepts parameters in this way:
public static void foo(String parameter1, String parameter2){
    System.out.println(parameter1);
    System.out.println(parameter2);
}
Typically, each parameter is listed in the method’s definition. So, this example defines a method named foo that accepts two parameters, parameter1 and parameter2. Together, they make up the method’s signature, which allows our programs to find them. Therefore, no two methods may share the same signature. Instead, they must either use a different name, or a different number of parameters. In statically typed languages such as Java, we can also vary the types of each parameter instead, not just the number of parameters.
Of course, when we want to call a method in our code, we must provide values for each parameter. Those values are known as arguments to the method. In code, it might look something like this:
public static void main(String[] args){
    foo("abc", "xyz");
}
In that example, we see foo("abc", "xyz"), which is calling our method named foo. Inside, it provides two arguments, one for each parameter of the method. So, inside of our method, the variable parameter1 will be "abc", and parameter2 will be "xyz". Pretty straightforward, right?
Of course, many programmers use the terms parameters and arguments interchangeably as well, but we’ll try to stick to the following definitions:
Finally, we may also want to get a result back from our methods, especially if it is performing a calculation or some other task for us. So, we can use a special keyword known as return to provide a value as output from our method. In general, if you call a method that returns a value, you want to catch that value in a variable.
Let’s look at an example:
public static void main(String[] args){
    output = max(5, 42, 3);
    System.out.println(output);
}

public static int max(int a, int b, int c){
    if (a >= b && a >= c){
        return a;
    } else if (b >= a && b >= c){
        return b;
    } else {
        return c;
    }
}
In this example, we have defined a method named max which will return the largest value of its three parameters, a, b, and c. So, in our main method, we are calling max with arguments 5, 42, and 3, which will be stored as a, b, and c, respectively.
Then, in the max method, we use an If-Else statements to determine which one is larger than the other two, and then return that value. So, if we look closely at the code, we should be able to see that it will return 42 as the largest value.
As we can see, our code can contain multiple return statements. However, the method will stop executing as soon as it reaches the first return statement, and will therefore only return a single value. This is really handy if we know the answer we need to output; we can just use the return keyword to stop what we are doing and provide the output.
So, once our max method is complete, the value 42 will be returned. In our main method, that value will be stored in the output variable. So, values returned from a method can be used in an assignment statement, just like any other value. In fact, we can treat a method call just like a variable! As soon as our program reaches a method call, it will stop what it is doing, execute the method, and replace the method call with the returned value. It’s a really handy way to organize our code.
That covers the basics of how a method is created in our code. On the next few pages, we’ll discuss some related topics that will help us understand how these methods work and how we can structure our code to take advantage of methods.
Another topic we must revisit is variable scope. Recall from an earlier chapter we learned how variables may only be referenced after they’ve been defined, and in many cases only within the method or block they are defined in. Now that we are dealing with multiple methods, we must once again discuss variable scope and how it applies to this situation.
In general, all of the scope rules we’ve learned still apply. For example, a variable declared in a method can only be accessed within that method. In that way, different methods may use the same variable names to refer to different variables. In addition, as we’ve seen in the earlier examples, a method may define parameters using the same variable names as the variables that are used as arguments to that method. It may seem confusing to some, but to others it makes perfect sense.
Most programming languages also allow us to create variables at the class level, inside a class but outside of any method. Those variables can then be referenced within any of the class’s method, allowing us to share data between methods without using parameters and return values.
Here’s a quick example in code:
public class MathOperations {

    double PI = 3.1415926535;

    public static void main(String[] args){
        double r = 3.0;
        double area = calculateArea(r);
        System.out.println(area);
    }

    public static double calculateArea(double r){
        return r * r * PI;
    }

}
In this example, we have created a class variable named PI to store the value of
$ \pi $ for our entire program. Then, we can use that variable just like any other inside of the calculateArea method.
Of course, we can assign and edit class variables just like any other variable:
public class Foo{
    static int people = 1;

    public static void main(String[] args){
        people = people + 1;
        foo();
        System.out.println(people);
    }

    public static void foo(){
        people = people * 3;
    }
}
In this example, the main method will print
$ 6 $ as the value of people. Since that variable is declared in the class scope, it can be accessed and changed by any method.
Sometimes we may want to have a variable inside of our methods use the same name as a class variable, this is a type of shadowing. Shadowing occurs whenever an inner scope name hides (in its shadow) an outer scope variable of the same name. Here’s a modified version of the code above showing that situation:
public class Foo{
    static int people = 1;

    public static void main(String[] args){
        int people = 1;
        people = people + 1;
        foo();
        System.out.println(people);
    }

    public static void foo(){
        people = people * 3;
    }
}
In this example, the variable people is redeclared inside of the main function. So, it is an entirely different variable than the class variable named people. Because of this, whenever we use the variable people inside of main, we are referring to the method scope or local scope variable people. Therefore, the class-scope value is not updated by the main method, and main will simply print
$ 2 $ instead of
$ 6 $.
Shadowing is not necessarily bad, and may be unavoidable in large programs using multiple imported modules. It is something that a developer should always be aware of, since it can have unintended consequences.
One major mantra among programmers is Don’t Repeat Yourself (DRY), and it’s a very important concept to keep in mind when writing programs that can use methods. In essence, anytime we find ourselves writing the same or similar code multiple times in our program, we may want to ask ourselves if it would be better to make that piece of code a method. That way, we only have to write it once, and if there are any problems with that code, we only have to remember to change it in one place instead of everywhere we’ve used it.
To really understand how DRY can improve our code, let’s look at a quick example:
import java.lang.Math;

public class Dry{

    public static void main(String[] args){
        int a = 1;
        int b = 0;
        int c = -4;
        double rootOne = (-b - Math.sqrt(b * b - 4 * a * c)) / (2 * a);
        double rootTwo = (-b + Math.sqrt(b * b - 4 * a * c)) / (2 * a);
        System.out.println(rootOne);
        System.out.println(rootTwo);

        a = 2;
        b = 7;
        c = 3;
        rootOne = (-b - Math.sqrt(b * b - 4 * a * c)) / (2 * a);
        rootTwo = (-b + Math.sqrt(b * b - 4 * a * c)) / (2 * a);
        System.out.println(rootOne);
        System.out.println(rootTwo);
    }
}
Of course, this is a very simple example calculating the roots of a quadratic equation.
$$ax^2 + bx + c$$However, we see that this program repeats many lines of code to perform the same basic calculation with different values. We can easily move that calculation to a new method, and then use parameters to set the values. So, let’s apply the DRY principle to simplify this program:
import java.lang.Math;

public class Dry{

    public static void main(String[] args){
        quadratic(1, 0, -4);
        quadratic(2, 7, 3);
    }

    public static void quadratic(int a, int b, int c){
        rootOne = (-b - Math.sqrt(b * b - 4 * a * c)) / (2 * a);
        rootTwo = (-b + Math.sqrt(b * b - 4 * a * c)) / (2 * a);
        System.out.println(rootOne);
        System.out.println(rootTwo);
    }
}
There! We’ve moved all of the code for calculating the roots for the quadratic equation, printing each root at the end. Then, we can simplify the code in main by simply calling that method anytime we want to calculate the roots .
This could be further reduced by “pre calculating” the discriminant since it is used twice in the quadratic function.
import java.lang.Math;

public class Dry{

    public static void main(String[] args){
        quadratic(1, 0, -4);
        quadratic(2, 7, 3);
    }

    public static void quadratic(int a, int b, int c){
        d = discriminant(a, b, c);
        rootOne = (-b - Math.sqrt(d)) / (2 * a);
        rootTwo = (-b + Math.sqrt(d)) / (2 * a);
        System.out.println(rootOne);
        System.out.println(rootTwo);
    }

    public static int discriminant(int a, int b, int c){
        return b * b - 4 * a * c;
    }
}
We can also extend this code to make use of the fact that the value of the discriminant tells us how many different roots a quadratic equation will have. By moving code to functions, we can quickly find additional ways to expand upon and improve our programs.
Properly following the DRY principle when writing code will make our programs simpler, easier to maintain, and hopefully easier to debug. In effect, it is definitely a good idea to add a new method to our code anytime we find ourselves typing something twice, or copy and pasting code.
Another big idea related to writing methods in our code relates to testing. Specifically, how can we write methods that are easily testable?
We won’t go deep into the details in this course, but most programming languages support unit testing, which is the use of automated testing tools to make sure each piece of code works as intended. They are very important for two big reasons:
In fact, many of the automated grading tools in this course make extensive use of unit testing to confirm that our code is working properly, both within this tutorial textbook and in the standalone projects. Now that we are writing code that contains methods, unit tests will become an even bigger part of the grading process in this course.
There are entire textbooks written about the theory of writing code that can be easily tested, and not everyone agrees exactly what the best model is. However, there are a few things that we can keep in mind as we write methods to make them easily testable:
In the examples later in this course, we’ll see explicitly how to follow some of these guidelines when writing our own code. For now, they are just handy things for us to keep in mind.
Many students fail to read this section carefully and understand what it means. From this point forward, the grading tools that you have access to before you submit a project ARE NOT the same grading tools used to fully grade your project. This means that the grader in the project may tell you that you have completed the project, but when you submit it you could receive a significantly lower grade.
WHY?
One important skill for a programmer to learn is properly testing your code. So, from this point forward, we’re not going to give you all of the test cases in the project. Instead, you’ll have to carefully read the project description, identify what test cases should be used, and then create and run those test cases yourself.
Consider this - for most of the history of programming, students had to learn without ANY access to automated testing and grading tools, and in fact they may not have been able to run their program many times at all due to the high cost of computing time on early systems. So, students and professional programmers alike had to learn how to properly test and verify their programs either by hand or by careful use of test cases.
To help you develop this skill, we are “taking off the training wheels” and giving you more room to fail. As always, if you find that you are stuck or unsure where to begin, don’t be afraid to contact your instructors for assistance.
Up to this point in the class we’ve had various automated grading tools available to test our code and make sure it works correctly. However, it is important to understand that these buttons are just running code written by other developers (in this case, the instructors of the course), and these tests can have the same limitations as any other program. For example, it is often impossible to guarantee that these tests will accurately test all possible inputs or reach 100% code coverage. Likewise, depending on how the solution is written, the edge cases and boundary conditions may be different than the ones that were originally used for testing.
At this point, we have learned enough programming syntax and terminology to start running our programs manually and developing our own tests. So, from this point forward, many of the projects will not give us access to the full automated grading process before we submit it. In effect, it is now our job to properly test our program using various inputs, both the ones provided and ones that we develop ourselves, in order to be sure that it is working properly.
After we submit the project, the full autograder will still be used to grade our work. The autograder will confirm that your project matches the specification within a reasonable limit. However, we won’t be able to go back in and make any changes after we submit the project. So, we’ll have to be extra careful and make sure our programs are fully tested before we submit them.
test MethodOne thing that we can do is add an explicit test method to any class in our program. Our test method may contain any code needed to test our program. We are always allowed to add additional methods to any class as needed - we won’t be penalized for that in grading.
For example, we could add a test method to the previous example to test some of the functions:
import java.lang.Math;

public class Dry{

    public static void main(String[] args){
        quadratic(1, 0, -4);
        quadratic(2, 7, 3);
    }

    public static void quadratic(int a, int b, int c){
        d = discriminant(a, b, c);
        rootOne = (-b - Math.sqrt(d)) / (2 * a);
        rootTwo = (-b + Math.sqrt(d)) / (2 * a);
        System.out.println(rootOne);
        System.out.println(rootTwo);
    }

    public static int discriminant(int a, int b, int c){
        return b * b - 4 * a * c;
    }

    public static void test(){
        int answer1 = discriminant(1, 3, 1);
        System.out.println("Answer 1 was " + answer1 + " and should be 5");
        int answer2 = discriminant(3, 3, 3);
        System.out.println("Answer 2 was " + answer2 + " and should be 27");
    }
}
In the method, we see that we are calling the discriminant method with a few different values. The expected answer values we see in the print statements can be manually calculated and verified using a calculator. It is important that we calculate these manually instead of relying on our program to calculate them - if we did, how would we ever know if it was actually incorrect?
test MethodOnce we’ve written a test method, we have to change our program so that it calls the method. The simplest way to do this is to just add that function call at the very top of the main() method:
    public static void main(String[] args){
        test();
        quadratic(1, 0, -4);
        quadratic(2, 7, 3);
    }
Since the test method may produce output or change the functionality of our program, it is always important to remember to REMOVE the test method from our main method before we submit the program.
It is a lot more coding. To test a method, we must really understand its function and how it fits with other methods. Understanding how methods work and work together is a key computational thinking skill.
It is very common practice in industry to write several times more lines of code in test methods than the actual method that is being tested. This can be reduced a bit by hard-coding some of the correct answers and just checking a few boundary values, as shown above. However, for more complex projects, we may end up writing many complex tests. This is usually covered in an advanced programming class, so we won’t spend much time on it here.
The advantage testing each method as you write them is that the amount of code you have to search for errors is small. An error you detect must be in the method you just coded.
By the end of the course, projects will be 3-5 classes each with 3-5 methods. If you only do functional checks of the completed project, isolating an error to single method in this case is extremely time consuming.
Methods in Java
Now that we’ve covered the basic ideas of adding methods to our programs, let’s see how we can do that using the Java programming language.
We’ve already seen how to create methods in our programs, since each program in Java already includes a method named main. In general, a method declaration in Java needs a few elements. Let’s start at the simplest case:
public static void foo(){
    System.out.println("Foo");
    return;
}
Let’s break this example method declaration down to see how it works:
static at the beginning of this method declaration. That keyword allows us to use this method without creating an object first. We’ll cover how to create and work with objects in a later module. For now, each method we create will need the static keyword in front of it, just like the main() method.void, determines the type of data returned by the method. We use a special keyword void when the method does not return a value. We’ve already seen this keyword used in our declaration of the main method.foo. We can name a method using any valid identifier in Java. In general, method names in Java always start with a lowercase letter.() that list the parameters for this method. Since there is nothing included in this example, the method foo does not require any parameters.{} that surround the code of the method itself. In this case, the method will simply print Foo to the terminal.return keyword. Since we aren’t returning a value, we aren’t required to include a return keyword in the method. However, it is helpful to know that we may use that keyword to exit the method at any time.We’ll cover how to handle method parameters and return values later in this module. For now, we’ll just look at creating simple methods that neither require parameters nor return values.
Once we’ve created a method in our code, we can call, or execute, the method from anywhere in our code using the following syntax:
foo();We simply use the name of the method, followed by parentheses, wherever we’d like to call that method. Again, we’ll see how to pass arguments to the method and store the return value later in this module.
Let’s look at a complete sample program to see how this all fits together.
public class Methods{
    public static void main(String[] args){
        System.out.println("Main 1");
        foo();
        System.out.println("Main 2");
        foo();
        System.out.println("Main 3");
        return;
    }

    public static void foo(){
        System.out.println("Foo 1");
        return;
    }
}
When we run this program, we should see the following output:
Main 1
Foo 1
Main 2
Foo 1
Main 3
We can also look at a flowchart diagram of this program to help understand how it works:
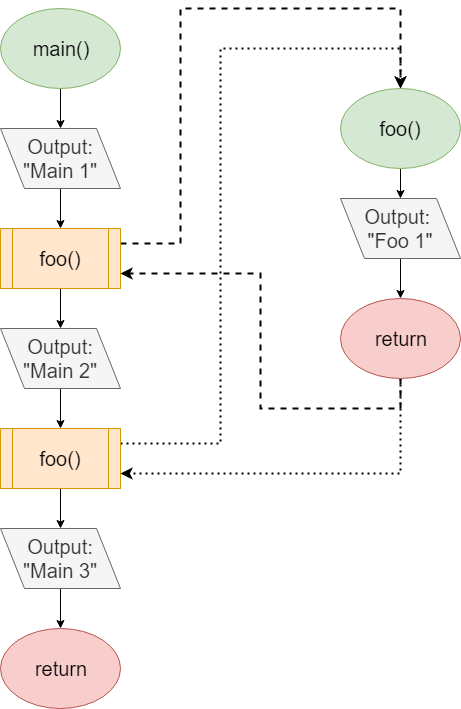
As we can see in this diagram, the program starts in the main() method. Inside, it prints Main 1, then calls the method foo(). So, we can follow the dashed line over to foo(), where it will print Foo 1 and return back to main along the same dashed line. Then, we’ll print Main 2 in main(), before calling foo() once again. This time, we’ll follow the dotted line to foo(), where we’ll once again print Foo 1 before returning back to main() and printing Main 3.
The line public static void main(String[] args) is often referred to as a method signature. It contains all the vital information necessary to use the method: its name, what it returns, and what type of parameters it requires. Even public static inform the programmer on where and how to invoke the method, but we’ll cover these key words when we cover classes.
Methods are a very useful way to divide our code into smaller chunks. However, many times we need to provide input to our methods. This allows us to reuse the same code, but with different values each time we call the method. So, let’s review how to add parameters to our methods in Java.
In Java, we can add parameters to a method declaration by placing them in the parentheses () at the end of the declaration. Each parameter is similar to a variable declaration, requiring both a type and an identifier. We can also define multiple parameters, separated by commas ,.
For example, let’s extend our definition of foo() from the previous page by adding a String parameter named message:
static void foo(String message){
    System.out.println("Message: " + message);
}
Then, when we call that method, we are required to provide an argument of the correct type. That argument will be stored as the parameter’s variable in foo():
foo("Hello World!");Here’s another example. In this case, we are writing two methods, foo() and bar(). They accept multiple parameters, and in main() we call each method using arguments for each parameter.
public class Parameters{
    public static void main(String[] args){
        int x = 5;
        int y = 10;
        int z = 8;
        bar(x, y, z);
        foo(y, true);
    }

    static void foo(int output, boolean longMessage){
        if(longMessage){
            System.out.println("The value was " + output);
        }else{
            System.out.println("Val: " + output);
        }
    }

    static void bar(int a, int b, int c){
        System.out.println(a + ", " + b + ", " + c);
    }
}
First, let’s look at bar(). When we call this method from main(), we are using x, y, and z as arguments. So, inside of bar(), the value stored in x will be stored in a, y will be stored in b, and z will be stored in c. The parameters and arguments are matched up based on the order they are provided to the method call. So, bar() will output 5, 10, 8 when it is called with those parameters.
The call to foo() is very similar. It only contains two parameters, but each one is a different type. So, when we call that method, we must make sure that the first parameter is an integer, and the second one is a Boolean value.
There are several other things we can do with parameters in our methods, allowing us to use them in new and more flexible ways.
Java allows us to create multiple methods using the same name, or identifier in the same scope, as long as they have different parameter lists. This could include a different number of parameters, different data types for each parameter, or a different ordering of types. The names of the parameters, however, does not matter here. This is called method overloading.
For example, we could create a method named max() that could take either two or three parameters:
public class Overloading{
    public static void main(String[] args){
        max(2, 3);
        max(3, 4, 5);
    }

    static void max(int x, int y){
        if(x >= y){
            System.out.println(x);
        }else{
            System.out.println(y);
        }
    }

    static void max(int x, int y, int z){
        if(x >= y){
            if(x >= z){
                System.out.println(x);
            }else{
                System.out.println(z);
            }
        }else{
            if(y >= z){
                System.out.println(y);
            }else{
                System.out.println(z);
            }
        }
    }
}
In this example, we have two methods named max(), one that requires two parameters, and another that requires three. When Java sees a method call to max() elsewhere in the code, it will look at the number and types of arguments provided, and use that information to determine which version of max() it should use.
Of course, we could just use the three argument version of max() in both cases:
public class Overloading{
    public static void main(String[] args){
        max(2, 3);
        max(3, 4, 5);
    }

    static void max(int x, int y){
        max(x, y, y);
    }

    static void max(int x, int y, int z){
        if(x >= y){
            if(x >= z){
                System.out.println(x);
            }else{
                System.out.println(z);
            }
        }else{
            if(y >= z){
                System.out.println(y);
            }else{
                System.out.println(z);
            }
        }
    }
}
In this case, we are calling the three parameter version of max() from within the two parameter version. In effect, this allows us to define default parameters for methods such as this. If we only provide two arguments, the code will automatically call the three parameter version, filling in the third argument for us.
Finally, Java allows us to define a single parameter that is a variable length parameter. In essence, it will allow us to accept anywhere from 0 to many arguments for that single parameter, which will then be stored in an array. Let’s look at an example:
public class Overloading{
    public static void main(String[] args){
        max(2, 3);
        max(3, 4, 5);
        max(5, 6, 7, 8);
        max(10, 11, 12, 13, 14, 15, 16);
    }

    static void max(int ... values){
        if(values.length > 0){
            int max = values[0];
            for(int i : values){
                if(i > max){
                    max = i;
                }
            }
            System.out.println(max);
        }
    }
}
Here, we have defined a method named max() that accepts a single variable length parameter. To show a parameter is variable length we use three periods ... between the type and the variable name. We must respect three rules when creating a variable length parameter:
So, when we run this program, we see that we can call the max() method with any number of integer arguments, and it will be able to determine the maximum of those values. Inside of the method itself, values can be treated just like an array of integers.
Lastly, one of the most useful things we can do with methods in our code is return a value from a method. This allows us to use a method to perform an action or calculation that results in a single value that we can use elsewhere in our code. We can even use these method calls just like we use variables in other arithmetic expressions. Let’s take a look at how that works.
To return a value from a method in Java, we use the special keyword return, followed by an expression representing the value we’d like to return. We must also declare the type of that value in our method declaration, taking the place of the void keyword we’ve been using up to this point.
Here’s an example program showing how to use the return keyword and store that returned value in a variable.
public class Return{
    public static void main(String[] args){
        int returnValue = last(1, 3, 5, 7, 9);
        System.out.println(returnValue);  // 9
    }

    static int last(int ... items){
        if(items.length > 0){
            return items[items.length - 1];
        }
        return -1;
    }
}
Let’s review this program carefully to see what parts of the program are important for returning a value:
void, we use the keyword int in the declaration of our last() method, static int last(int ... items). This is because the method must return a value with the type int.return keyword. Each instance is followed by a value or expression that results in an integer, which is then returned from the method. As soon as the method reaches a return keyword, it immediately stops executing and returns that value. So, if the items variable length parameter is empty, the method will return $-1$. Otherwise, it will return the last item in the items parameter.main() method, we see that we’ve included the method call to last() on the right-hand side of a variable assignment statement. So, once we reach that line of code, the program will call the last() method and store the returned value in the returnValue variable in main()The Java compiler is a very crucial part of making sure that each method we create returns a value correctly. When we compile our code, the compiler checks to make sure that each method that includes a return type other than void will return a value along all code paths. That means that if one branch of an If-Else statement returns a value, then either the other branch or code below it should also return a value.
In addition, it will make sure that the type of the value returned matches the type that is expected by the method’s declaration.
Finally, just like every other variable assignment in Java, when we store the result of a method call in a variable, Java will also make sure that the variable storing the value has a type that is compatible with the type being returned from the method.
So, if we receive error messages from the Java compiler regarding invalid return types or values in our methods, we’ll need to carefully check our code to make sure we aren’t violating one of those rules.
Let’s try one more example to get some practice building code that contains multiple methods. This program will convert volumes measured in U.S. standard cups into either fluid ounces, tablespoons, or teaspoons. A program that makes these conversions is useful for anyone cooking or baking.
For this example, we’ll need to build a program that matches this problem statement:
Write a program that accepts interactive keyboard input. It should first ask the user to enter a number of cups, and then have the user select the desired conversion from a list of options. The program will then calculate the correct value and display it with the correct units.
The program should contain one class named
Converter, but may contain several methods.
Please enter the number of cups to convert as a floating-point value: .5
Select conversion: 1 (ounces), 2 (tablespoons) or 3 (teaspoons): 3
24.0 teaspoons
That seems like a pretty straightforward problem statement. Let’s see how we might structure the program.
First, we could look at the problem statement and try to divide the program into a number of methods to perform each action. In this case, it looks like we have a few important actions that could be made into methods:
Based on that breakdown, we can structure the class so it has the following methods:
void main(String[] args) - this is the usual main method for Java. In this case, we’ll handle input and output in this methodString convert(double cups, int units) - this method will help us select the proper conversion to be performed based on user inputdouble toOunces(double cups) - this method will convert the given number of cups to fluid ouncesdouble toTablespoons(double cups) - this method will convert the given number of cups to tablespoonsdouble toTeaspoons(double cups) - this method will convert the given number of cups to teaspoonsNow that we have an idea of what methods we need, let’s discuss the overall control flow of the program and the order in which the methods will be used.
The program will start in the main method, just like any other Java program. That method will prompt the user to input a number of cups to be converted, and also will ask the user to choose which conversion to be performed. Once we have those two inputs, we can then perform the computation in the program.
At that point, the main method will call the convert method and provide the two inputs as arguments to that method call. We’ll use the convert method to determine which of the other methods to call, based on the units parameter. That method will then call the appropriate conversion method (either toOunces, toTablespoons or toTeaspoons) and then use the value returned by that method to build the output string.
Each conversion method is very simple - it just uses a bit of math to convert the value in cups to the appropriate value for a different unit of measurement, and then it will return that value.
Now that we’ve decided what methods to include, we can go ahead and start building the overall structure for our program. It should contain a single class named Converter and the methods listed above. Finally, since we are reading input interactively from the terminal, we’ll also need to remember to import the java.util.Scanner class. So, our overall structure might look like this:
import java.util.Scanner;

public class Converter{

    public static void main(String[] args){
        // Create scanner to read input
        Scanner scanner = new Scanner(System.in);
        // more code here
    }

    static String convert(double cups, int units) {
        // more code here
        return "";
    }

    static double toOunces(double cups){
        // more code here
        return -1.0;
    }

    static double toTablespoons(double cups){
        // more code here
        return -1.0;
    }

    static double toTeaspoons(double cups){
        // more code here
        return -1.0;
    }
}
Notice that each method signature includes the modifiers public and static along with the return type, name of the method, and a list of parameters expected. For every method that returns a value, we’ve also included a default return statement so that the code will compile at this point. Methods that have void as a return type, such as the main method, don’t need to include a return statement.
Also, the order in which the methods are declared inside of a class does not matter in Java. By convention, the main method is typically either the first or the last method declared in the class.
Next, we can start filling in the code for the methods. Typically we’d either want to start with the main method, or start with the methods that will be called last in the control flow. In this example, let’s start with the methods that will be called last, which are the conversion methods toOunces, toTablespoons, and toTeaspoons.
We can start with the toOunces method. A standard cup is 8 fluid ounces. So, our method would include this code:
public static double toOunces(double cups){
    return cups * 8.0;
}
That method turns out to be very simple! We can use the same process to write the other two methods. Some helpful conversions:
At this point we’ve written some code, and we may want to test these methods just to make sure they are working before moving on. So, we can write some code in our main method to quickly call these methods and check their return values. Here’s a quick example:
public static void main(String[] args){
    // testing code - DELETE BEFORE SUBMITTING
    System.out.println("1 cup should be 8 ounces : " + toOunces(1.0));
    System.out.println("1 cup should be 16 tablespoons : " + toTablespoons(1.0));
    System.out.println("1 cup should be 48 teaspoons : " + toTeaspoons(1.0));

    // Create scanner to read input
    Scanner scanner = new Scanner(System.in);
    // more code here
}
If we put that code in the main method and run it, we should see output similar to this:

That’s great! That means our methods are working and seem to be returning the correct values. We may want to try a few other values besides 1 cup just to be sure that the output exactly matches what it should be.
convert MethodThe convert method contains the logic for selecting the appropriate conversion method, calling it, and then returning a formatted string to be printed. This method requires two parameters: the cups value to be sent to the conversion method, and the units selection from the user that can be used to determine which method to call.
Since the units item is a mutually-exclusive choice, it makes sense to use an if-else if-else structure in this method:
static String convert(double cups, int units) {
    if(units == 1){
        return toOunces(cups) + " ounces";
    } else if (units == 2){
        return toTablespoons(cups) + " tablespoons";
    } else if (units == 3){
        return toTeaspoons(cups) + " teaspoons";
    } else {
        // error condition
        return "";
    }
}Finally, we can write our main method. It should prompt the user for the number of cups and the units to be converted to. It will then call the convert method and print the answer. We should delete our testing code from the main method at this point.
public static void main(String[] args){
    // Create scanner to read input
    Scanner scanner = new Scanner(System.in);
    System.out.print("Please enter the number of cups to convert as a floating-point value: ");
    double cups = Double.parseDouble(scanner.nextLine());
    System.out.print("Select conversion: 1 (ounces), 2 (tablespoons) or 3 (teaspoons): ");
    int units = Integer.parseInt(scanner.nextLine());
    String output = convert(cups, units);
    System.out.println(output);
}
With that code in place, we should be able to compile and test our program!
Idea adapted from Gaddis, Tony “Starting out with JAVA”, 5th ed, Pearson: New York 2012 ↩︎
As the programs we develop become larger and more complex, we’ll definitely rely on the ability to create methods to help make our code easier to read, debug, and maintain. methods allow us to write small, self-contained pieces of code that can be reused over and over again, or break large operations into smaller, simpler steps.
From this point forward, nearly any program we write will contain multiple methods. In fact, it is very rare to see any programs beyond just simple scripts that don’t contain at least a few methods.
In the next few modules, we’ll also see how to build classes that represent real-world objects, as well as how to add methods inside of those classes called methods to represent how those objects method in the real world.