Chapter &
Objects
Modelling the Real World in Code!
Modelling the Real World in Code!
Let’s take a look at the world around us. There are many things we might see. A computer. A keyboard. A chair. A desk. If we look outside, we may even see more things. A tree. A bird. A cloud.
From a certain point of view, the entire world is made up of things, each with unique features and actions that help define how it differs from other things.
As we continue to write more and more complex programs, it would be very useful to have a way to represent these things in our own software. Thankfully, we can! In this chapter, we’ll learn all about classes and objects, which form the basis of the object-oriented programming paradigm, one of the most common and popular programming paradigms today.
Let’s get started!
At its heart, object-oriented programming is about the data. We may talk about how a class stands for a blueprint or outline of a real world item, but what we mean is the data that describes and defines that real world object. It is how we choose to model this data, how we allow access to it and manipulate it, that drives the object-oriented paradigm.
There are four pillars to object-oriented programming, all having to do with data and how it can be accessed and changed.
Encapsulation refers to data and method hiding. The idea is things outside of the object should not directly access the object’s data. This ensures the data remains consistent with object we are modeling. A Car class might have a speed attribute, and there might maximum values for changing the speed–a max braking or acceleration. Additionally there might be a maximum speed.
Encapsulation says, when you ask the Car object how fast it is going, the object does not give you access to its data, but instead provides you a copy. When you want it to speed up, you don’t change the object’s speed directly; instead you use the object’s accelerate method, and the object changes its own speed.
Inheritance is the idea that like objects share traits, and can go from the generic to the specific. We might have Bird class, with generic sing and move methods, and a wingspan attribute. But then we might have a Parrot class, which is a kind of bird, so it too can sing and has a wingspan; but in this case a Parrot might also have a talk method, and an additional colorScheme variable. Inheritance is a way to link classes so that the subclass is a super set of the base class – it has all the superclass’s stuff and more.
Abstraction deals with leaving things un-defined. In our Bird class, maybe there is no body (no code) to the move method, just the fact that such a method should exist. The concept that birds move is independent of a particular kind of bird. This would allow a Penguin class to code move as swimming, Ostrich to code it as running, and Parrot as riding on pirate shoulders.
Polymorphism is the idea that the same method can give you different behaviors. Say we code the Bird class with the beautiful song of the musician wren. But the Eagle class, also a kind of Bird, might override this with a loud screech. Overriding is when a subclass replaces a superclass method. A Parrot and Eagle are both instances of the Bird superclass, but you get different behaviors (sounds) when you invoke their sing method.
It is a lot, but it can be learned a little at a time. This later modules will deal with some basics of encapsulation, and introduce inheritance. Abstraction and polymorphism will be taught more deeply in later courses.
Thus far in this course we have always had just one class, and in most cases one method. So, while we have been following some object-oriented conventions like starting in main(), our designs have not followed an object-oriented programming paradigm. This was deliberate, as the first few modules are necessary to cover the basics of program control.
We will begin bending our designs toward object-oriented programming with this module by introducing instance and driver classes. The instance class holds certain data and all the methods to access and manipulate that data. The driver class (typically only a main() method) holds the logic for how and when to use the data. The driver generally only has indirect accesses to the instance’s data through its methods1
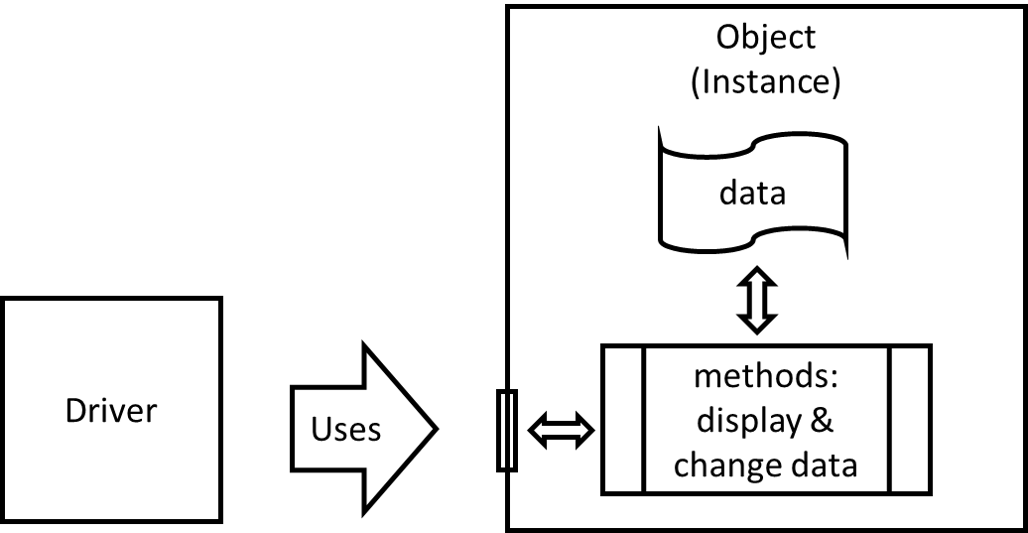
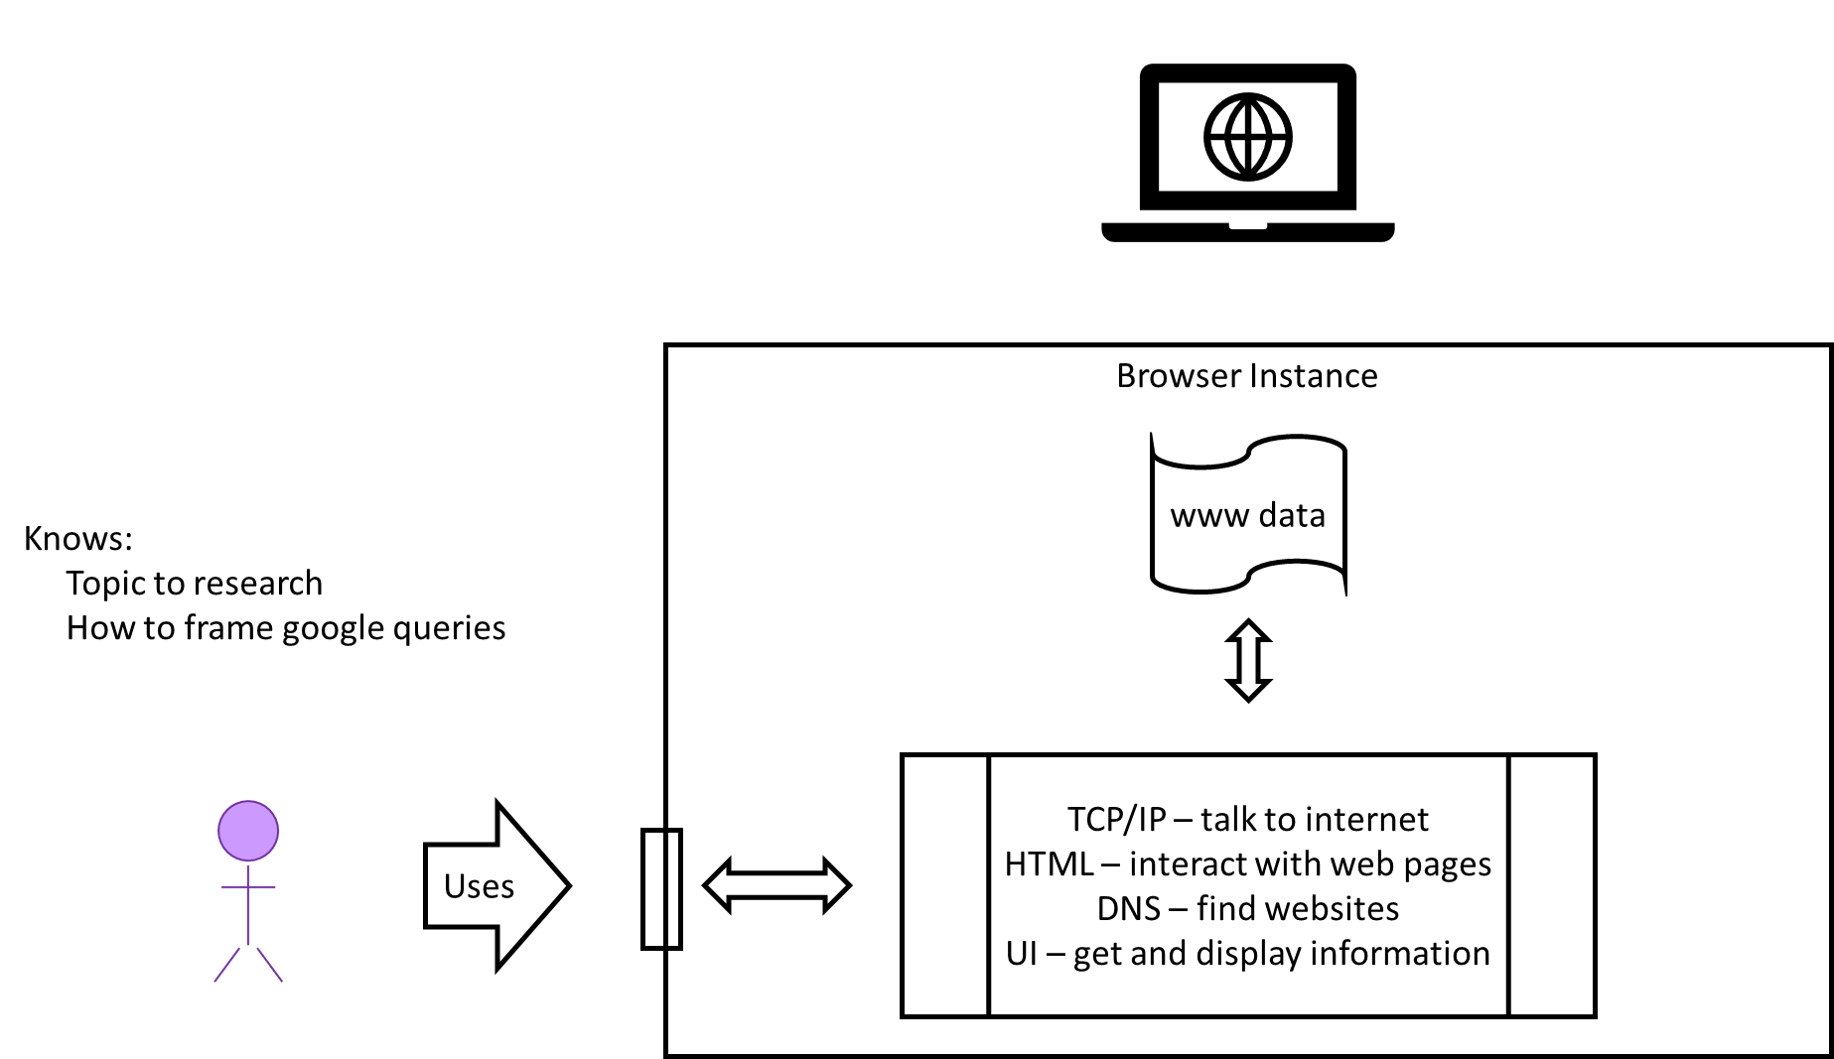
One of the things that makes OOP so powerful is this simple driver-instance idea can be used to model fairly complex real-world things. For example when you use a web browser for research. You act as the driver, you know how to uses the browser and the information you want. The browser knows how to interact with the internet and all the little details to fetch and display information.
this restriction is relaxed in this tutorial. ↩︎
The first step in creating a program that can represent things in the real world is to determine which things we’d like to include in our program, and then create classes that can describe the different types of objects.
In programming, a class describes an individual entity or part of the program. In many cases, the class can be used to describe an actual thing, such as a person, a vehicle, or a game board, or a more abstract thing such as a set of rules for a game, or even an artificial intelligence engine for making business decisions.
In object-oriented programming, a class is the basic building block of a larger program. Typically each part of the program is contained within a class, representing either the main logic of the program or the individual entities or things that the program will use.
Every time we define a new class, we create a new type.
public class Dog {
    // class definition for Dog
    String name;

    public Dog(String aName){
        this.name = aName;
    }
}

public class Driver {
    public static void main(String[] args) {
        Dog x = new Dog("rover");  // Dog is now a data type
        Dog y = new Dog("spot");   // We use it when declaring a variable
    }
}
For example, let’s consider a program that could be used to store the information about students and teachers at a school. For this program, we could create 2 instancs classes: Student, Teacher, and a driver class called Main. To help represent this program, we can use a UML Class Diagram like this:

In the diagram above, we see three boxes, one labeled for each class. Below the names we see entries for the fields and methods in the class, which we’ll discuss on the next page.
Obviously, the Student class can be used to represent a single student in school. Likewise, we’ll use the Teacher class to represent a teacher. Finally, we’ve also included a Main class, which will store the actual logic for the program we’re creating. However, right now the classes are just names, and aren’t very useful in that form.
The Unified Modeling Language or UML is a standard way to visualize the structure and design of a software program. UML includes many different types of diagrams, including class diagrams, use case diagrams, sequence diagrams, and more.
In this course, we’ll use some simple class diagrams to help describe the structure and layout of classes in our programs. Those diagrams are very simple to read and understand, and you won’t be asked to create any diagrams of your own right now. If you take some later programming courses, we’ll cover more information about UML diagrams and how to work with them there.
If you want to learn more, here are a few helpful links:
To make our classes more useful, we must give them features to help define the properties and actions of that class. So, let’s look at each of those in turn and discuss how we might use those in our programs.
First, each class can have a set of attributes, sometimes known as fields, to describe the data stored by that class. In programming, these would be the variables stored within the class itself. These attributes represent the different properties of the thing the class represents, helping to distinguish it from other things in the world.
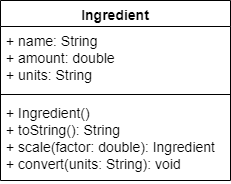
For example, an Ingredient for a recipe might have a name of the ingredient, an amount and a units. These might be “flour”, 4 and “cups”.
Inside a Unified Modeling Language (UML) class diagram, instance attributes go in the section immediately under the class name. Typically both attribute’s proposed identifier and type are included.
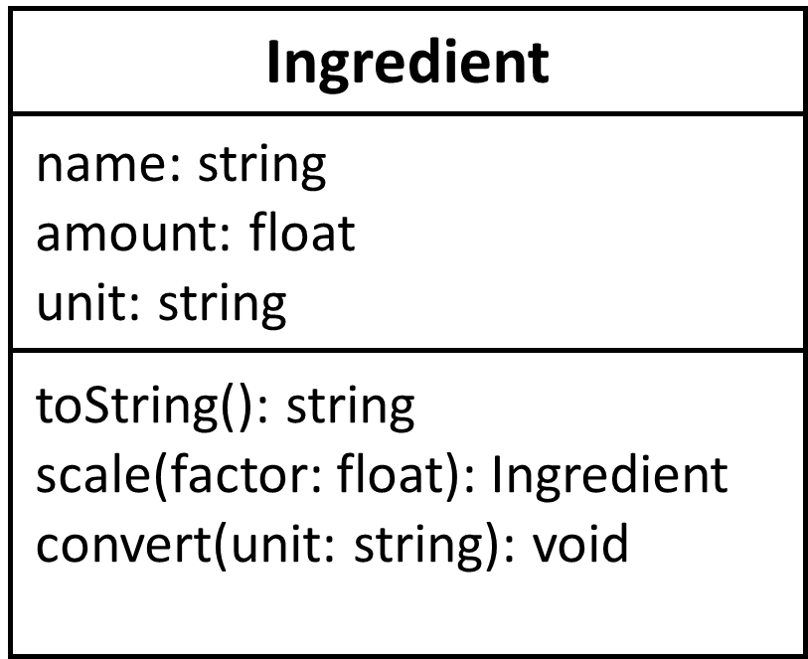
In addition, each class can have a set of methods or actions that it can perform. In programming, these are the methods stored available to the object to help manipulate or provide the object’s data. Lets assume we have and object ingrd1 of type Ingredient with the following attributes: name = "flour", amount = 3.0, unit = "cup".
These methods may represent actions taken directly on the attributes. Our Ingredient class has three methods:
toString(): returns a string describing the object; Something like amount + units + " of " + name
ingrd1.toString() would return the string “3.0 cup of flour”scale(factor): returns a new ingredient object scaled to the provide factor
ingrd2 = ingrd1.scale(2.0) results in
ingrd2 with name = "flour", amount = 6.0, unit = "cup".ingrd1 is unchangedconvert(units): returns nothing. Changes the object’s unit attribute to the provided value and adjusts the objects amount attribute so that is correct for the new units
ingrd1.convert("ml") results in ingrd1 now containing name = "flour", amount = 709.1, unit = "ml"Here, each instance method is listed in the lower part of the UML class diagram. It is annotated with the types of its expected parameters and return value or void if the method does not return any value1
When designing a class for a program, it is important to make sure that each class includes the attributes and methods needed to represent the object fully within the program. However, we also don’t need to include every single attribute and method we can think of. Sometimes it is best to be as simple as possible, only including the ones that will be used within the program. This helps make our code simple and easy to read.
A great way to start is to make a list. We can ask ourselves questions such as “what information is needed to identify a single student?” or “what actions can a teacher perform in this program?” Typically the answers to those questions will help us build our classes, and eventually build our entire program.
Classes are not typically modeled in pseudo code. The design function usually creates and UML diagrams from which developers work. Developers usually use pseudo code to develop individual methods or work through the logic of complex method call-chains.
Some UML diagrams may also use void instead of an empty parameter list if the method takes no parameters. ↩︎
A class can serve many functions, the most basic of which is to serve as a blueprint for the data and methods used to access and manipulate that data. We will refer to these as “object” or “instance” classes. An object class is a class with the primary purpose of encapsulating and manipulating related data.
When you instantiate an object of a class, you create a variable of that type. The class definition is only the specification for each of those items. So, let’s look at the next step, which is to create objects based on the classes we’ve defined.
Once we’ve created a class, we can then use it to instantiate an object based on that class. Let’s break that statement down a bit.
The word instantiate comes from the word instance, which means “an example or single occurrence of something.” So, we’re creating a single example of a class, which we call an object.
Most high level programming languages create an object by calling a special function generically called a constructor, which usually has the same name as the class from which you are trying to create an instance. For example, we can define our Ingredient class:
public class Ingredient {
  String name;
  double amount;
  String unit;

  public Ingredient (String aName, double anAmount, String aUnit){
    this.name = aName;
    this.amount = anAmount;
    this.unit = aUnit;
  }
}
Then, elsewhere in our code, we can instantiate Ingredient objects by calling the constructor - effectively, we just call the data type itself as if it were a function along with the new keyword, which will return a new instance of that object!
Ingredient flour = new Ingredient("Flour", "1.0", "cups");
Ingredient sugar = new Ingredient("Sugar", "2.0", "cups");
Here flour and sugar are both variables of type Ingredient, but they represent different things and would each contain their own name, amount and unit.
Object-oriented programming introduces a large number of new terms, each with very specific uses. Here is a quick overview of some of the new terms we’ve learned so far:
Classes are a versatile programming constructs. Their combination of data and methods make them great containers for related information and procedures. Some generic groupings would be:
main() methodYou may hear the terms abstract and concrete. Abstract classes are incomplete, in effect they are blueprints for blueprints. Concrete classes are complete. We will introduce abstract classes, and why you might use them, in a few modules.
Instance class are not normally executable. That is they may contain lots of fields (attributes) and methods, but generally have no main() method. The technique we will use for the next few modules will be to have a companion driver class.
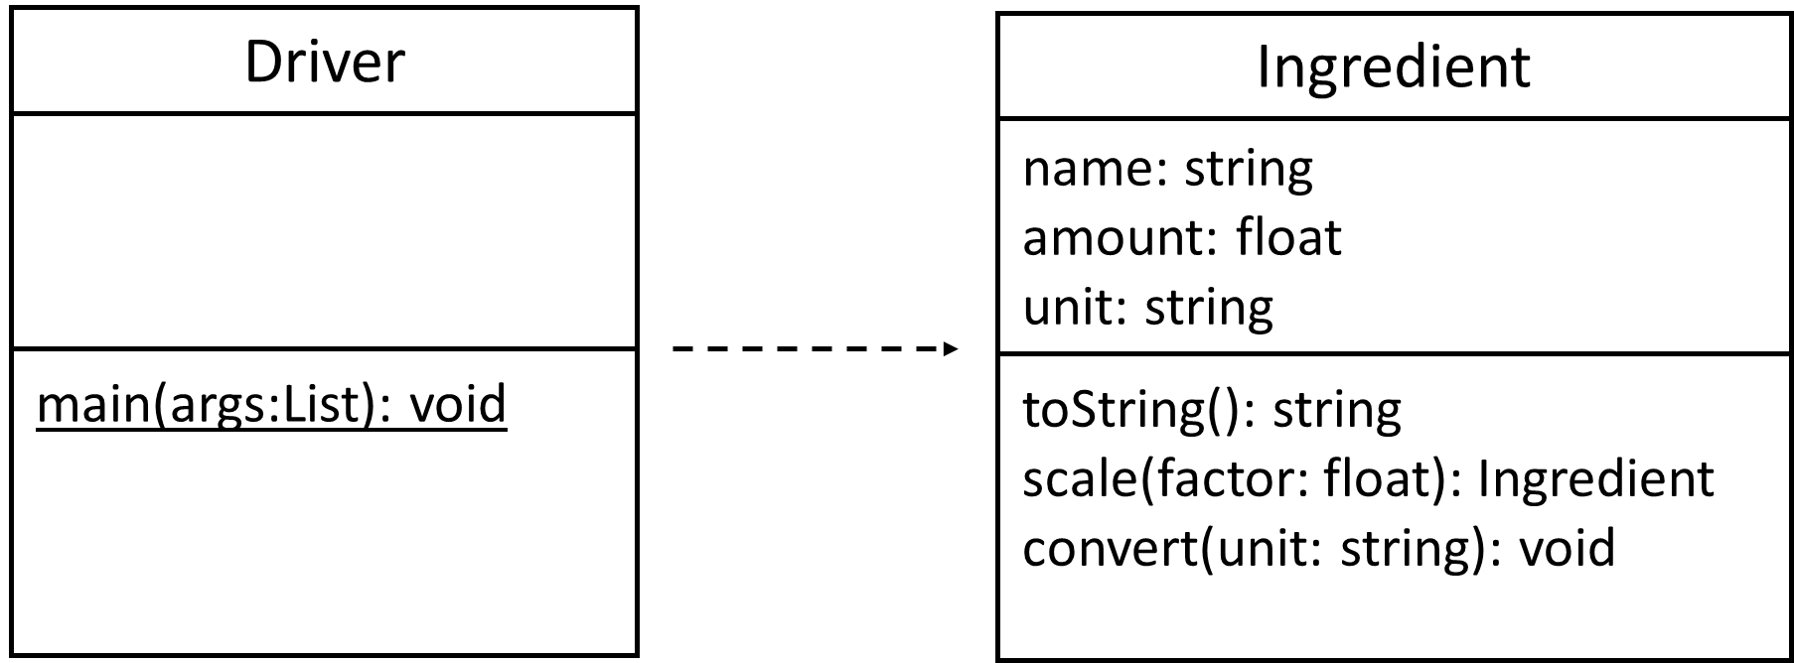
In the UML class diagram above you will see we added a separate class Driver, which has one method and no attributes.
The first thing you may notice is that the method is underlined. In UML, underlined class element are class-level attributes or objects. Each language may implement these differently, but in general to access a class element all one needs is the class name, so Driver.main() will generally call the class-method main() in the class Driver. Class-features can only be called by using the class name.
Next you may observe the dotted line arrow. This indicates that the class Driver depends on the class Ingredient. For our purposes this means:
Ingredient must work correctly for Driver to work correctlyDriver must include, use, import or somehow have access to Ingredient
Driver will make or access an Ingredient object.Objects in Java
Now that we understand the basics of what classes and objects are in object-oriented programming, let’s look at how to create these items in Java.
Creating a class in Java is very similar to creating a method. The syntax is <access modifier> class <ClassName> {<body>}. We will use public for all our class-access modifiers. The class definition (body), like all Java code-bodies, is enclosed in {}.
Java requires just a single public-class in each file, with the filename matching the name of the class, followed by the .java file extension. By convention, class names in Java should be nouns, in mixed case (Pascal-case) with the first letter of each internal word capitalized1.
So, to create an empty class named Ingredient, we would place the following code in a file named Ingredient.java:
public class Ingredient {

}
As we’ve already learned, each class declaration in Python includes these parts:
public - an access modifier enabling other parts of the code to “see” the classclass - this keyword says that we are declaring a new class.Ingredient - this is an identifier that gives us the name of the class we are declaring.{}- an empty body that does nothing.Following the declaration, we see a curly brace { marking the start of a new block, inside of which will be all of the fields and methods stored in this class. We should indent all items inside of this class, just like we do with other blocks in Java.
In order for Java to allow this code to compile, we must have a body. The { } can be empty but cannot be missing.
Of course, our classes are not very useful at this point because they don’t include any attributes or methods. Including instance attributes in an object class is one of the their basic uses, so let’s start there.
There are two types of attributes: Class and Instance.
Instance attributes are variables that “belong” to the instance. It makes sense that a Student object owns its own name.
We will defer discussion of class attributes to a later module.
To add instance attributes to a class, we can simply place a variable declarations with access modifiers inside the class but outside of any methods.
public class Ingredient{

    public String name;
    public double amount;
    public String units;
}
This tells the compiler that each instance of “Ingredient” will have three variables. This is one of the ways that objects store their data. It is possible to assign values at this point, i.e. public int amount= 2;, but this stylistically bad. Default values should be assigned in the constructors.
The Constructor is a method named after the class. It called each time an object is instantiated; it gets triggered by use of the new keyword. Typically the constructor sets default values for the instance attributes.
The Java compiler creates a default, no parameter constructor for every class.
public Ingredient(){} // provided by the complier if not overwrittenBut it is normal to override this definition with a constructor if your own.
public Ingredient(){
    this.name = "flour";
    this.amount = 2.0;
    this.units = "cup";
}
Typically, all instance variables should be given a value in the constructor. This gives programmers one place to look for all the names and values of all the instance variables in the object. Also, the constructor(s) should always be the first method(s) inside an object class’s definition.
thisJava uses this to refer to the specific object used when calling a method. It is the mechanism that ensures the Ingredient object first sees first’s data and Ingredient object second sees second’s data. It is typically used for clarity.
public Ingredient(String name, double amount, String units){
    this.name = name;
    this.amount = amount;
    this.units = units;
}
Here the parameter names obscure (or shadow) the instance variable names, and the use of this clarifies the code. We assign the values of the parameters to the instance attributes of the same name. “Shadowing” instance/class names with parameter names is considered bad coding style anywhere except in constructors. Even in constructors it is easy to avoid, such as using public Ingredient(String nameIn, int amountIn, String unitsIn).
Feel free to refer to the UML diagram below to find the correct instance attributes for the Ingredient class so far.

Your class should now look something like this, although your default values may be different:
public class Ingredient{
    public String name;
    public double amount;
    public String units;

    public Ingredient(){
        this.name = "flour";
        this.amount = 2.0;
        this.units = "cup";
    }

    public Ingredient(String name, double amount, String units){
        this.name = name;
        this.amount = amount;
        this.units = units;
    }
}
As classes grow large you will want to test methods as you add them. In CC 410 we will learn about test frameworks and will write formal tests in parallel with project development.
For now we will follow the convention of a main method in each class which can be used for testing. The basic flow would be:
main(args), instantiate an object and test (print out) the initialized value to test for correctness.main(), usually involves instantiating and object and using it to call the new methodTo instantiate, or create, an object in Java, we use the keyword new and call the class constructor.
Ingredient ingr1 = new Ingredient();This will create a new Ingredient object, and then store it in a variable of type Ingredient named ingr1. While this may seem a bit confusing at first, it is very similar to how we’ve already been working with variables of types like int and double.
Once we’ve created a new object, we can access the instance attributes as defined in the class from which it is created.
For example, to access the name attribute in the object stored in ingr1, we could put the following code in main()1
Ingredient ingr1 = new Ingredient();
String n = ingr1.name; // n is assigned the current value of
                       // ingr1's name attribute
System.out.println(n == ingr1.name); // prints true they are equal
Java uses what is called dot notation to access attributes and methods within instances of a class. So, we start with an object created from that class and stored in a variable, and then use a period or dot . directly after the variable name followed by the attribute or method we’d like to access. Therefore, we can easily access all of the attributes in an Ingredient object using this notation:
Ingredient ingr1 = new Ingredient();
System.out.println(ingr1.name);
System.out.println(ingr1.amount);
System.out.println(ingr1.units);
We can then treat each of these attributes just like any normal variable, allowing us to use or change the value stored in it:
Ingredient ingr1 = new Ingredient();
System.out.println(ingr1.name);
System.out.println(ingr1.amount);
System.out.println(ingr1.units);

n = ingr1.name;
String ingr1.name = "cardamom";
System.out.println (n == ingr1.name); // False they are not equal we changed ingr1.nameWhen testing it is important to avoid “feature creep” in the class. We want to avoid adding attributes or methods that are not called for by the UML class diagram. In software development you will drive up test and maintenance cost2.
In this class it is always acceptable to add a private static void main() method, even if it is not on the UML, to facilitate testing. We will put all our test code for instance classes in main().
public class Ingredient{
    public String name;
    public double amount;
    public String units;

    public Ingredient(){
        this.name = "flour";
        this.amount = 2.0;
        this.units = "cup";
    }

    public Ingredient(String name, double amount, String units){
        this.name = name;
        this.amount = amount;
        this.units = units;
    }

    private static void main(String[] args){
        Ingredient ingr1 = new Ingredient();
        System.out.println(ingr1.name);
        System.out.println(ingr1.amount);
        System.out.println(ingr1.units);
    }
}
This is how one might test a constructor method, we check to see all object variables have the correct values.
Things to keep in mind for this course:
main() from instance classes before submitting a ProjectWrite main()’s actual functionality last, and possibly move your testing code to the test() method. Consider this structure:
private static void test(){
  // put your test code here
}

public static void main(String[] args){
    test(); // delete this line when you are done testing
            // and ready to start writing main
}
It encapsulates all the test code in test and keeps main pretty clean. When you are satisfied that everything but main() works, delete the call and work on main().
The only way to test main()’s functionality will be from the terminal.
Recall that java always looks for a public static void main (String[] args) method to run: ↩︎
Software maintenance is estimated to be 60 - 75% of the total cost of ownership for a software project. ↩︎
We can also add additional methods to our classes. These methods are used either to modify the attributes of the class or to perform actions based on the attributes stored in the class. Finally, we can even use those methods to perform actions on data provided as arguments. In essence, the sky is the limit with methods in classes, so we’ll be able to do just about anything we need to do in these methods. Let’s see how we can add methods to our classes.
As with attributes, there are class and instance categories. Class methods are underlined on the UML diagram and will be discussed in a later module.
To add a method to our class, we can simply add a method declaration inside of our class declaration. So, let’s add the methods we need to our Ingredient class:
public class Ingredient{
    public String name;
    public double amount;
    public String units;

    public Ingredient(){
        this.name = "flour";
        this.amount = 2.0;
        this.units = "cup";
    }

    public Ingredient(String name, double amount, String units){
        this.name = name;
        this.amount = amount;
        this.units = units;
    }

    public String toString(){
        return String.format("%.2f",amount) + " " + units + " of " + name;
    }
}
The toString() method is pretty straightforward. When that method is called, we simply return a string of <amount> <units> of <name>. toString() has a special meaning in Java, it is the method called whenever an object is coerced (automatically converted) to a String.
So that we get consistent results, we used the format specifier%.2f in String.format(), to round the amount off to two decimal places. Used in this manner:
String.format("<format specifier>", <variable>)String.format() returns a string representation of variable formatted according to the format specifier. See geeks for geeks for a specifier list.
We’ve already discussed variable scope earlier in this course. Recall that two different functions may use the same local variable names without affecting each other because they are in different scopes.
The same applies to classes. A class may have an attribute named age, but a method inside of the class may also use a local variable named age. Therefore, we must be careful to make sure that we access the correct variable, using the this reference if we intend to access the object’s attribute’s value in the current instance. Here’s a short example:
public class Test{
  public int age;

  public Test(){
     this.age = 15;
  }

  public void foo(){
    int age = 12;
    System.out.println(age);     // 12
    System.out.println(this.age);// 15
  }

  public static void main(String[] a){
    Test temp = new Test();
    temp.foo();
 }
}
As we can see, in the method foo() we must be careful to use this.age to refer to the attribute, since there is another variable named age declared in that method.
For the convert() method, lets specify objects of type Ingredient must have units of “cups” or “ml” (milliliters). As parameters, it accepts a reference to the current instance named self, and value for conversion units. It must determine if a conversion is necessary. If so, it must update the attributes units and amount. There are 236.588 milliliters in a cup.
public void convert(String units){
    if (this.units.equals("cups") && units.equals("ml")){
        this.units = "ml";
        amount *= 236.588;
    }else if(this.units.equals("ml") && units.equals("cups")){
        this.units = "cups";
        amount /= 236.588;
    }
}
Let’s go ahead and add the scale() method as well. That method should accept a single double as a parameter It should: (1) create a new object, (2) copy its object attributes to the new object, (3) scale the new object’s amount by the scaling factor.
public Ingredient scale(double factor){
    Ingredient output = new Ingredient();
    output.name = this.name;
    output.units = this.units;
    output.amount = this.amount * factor;
    return output;
}
The Driver class is much simpler. It has one feature, a class method public static void main(String[] args)1. Everything that needs to be done will be done in the main method. A template might be:
public class Driver{

   public static void main(String[] args){

   }

}A class feature belongs to the class, no object is necessary to use it. Examples include math methods we write
double five = Math.sqrt(25.); to access the class function sqrt(). We do not have to create a Math object first:
Math mo = new Math();       // Incorrect
double five = mo.sqrt(25.); // Incorrect
Java uses the keyword static as a function modifier to create class methods and attributes. Not all languages use the static keyword in the same way. Be careful when using static in discussing class-level features. In Java they are virtually synonymous, but in general they are not.
Lets add an instance Ingredient as i1.
public static void main(String[] args){
    Ingredient i1 = new Ingredient();
}When the java compiler (javac) sees an identifier it does not understand, it looks in
import statements.java file is in.java file it also compiles it.class file it uses itSo when our Driver.java uses Ingredient, the java compiler (re)compiles Ingredient.java.
In Java, class methods have the modifier static ↩︎
Let’s put this all together by finishing our project with a full worked example. We want to use our Ingredient class to help us bake some sugar cookies. Unfortunately, the recipe uses both cups and milliliters interchangeably, and we want to be able to scale the recipe up or down depending on how many batches we need to make.
So, let’s build a program that performs that task for us. It should first ask the user to choose a desired unit of measurement by selecting a number, with 1 representing “cups” and 2 representing “ml”. Then, it should also ask for a scaling factor as a decimal number. Finally, it will print out the required ingredients in the correct units and scaled to the correct scaling factor.
The recipe that we have is as follows:
First, let’s start with our existing Ingredient class from this module:
public class Ingredient{
    public String name;
    public double amount;
    public String units;

    public Ingredient(){
        this.name = "flour";
        this.amount = 2.0;
        this.units = "cup";
    }

    public Ingredient(String name, double amount, String units){
        this.name = name;
        this.amount = amount;
        this.units = units;
    }

    public String toString(){
        return String.format("%.2f",amount) + " " + units + " of " + name;
    }

    public void convert(String units){
        if (this.units.equals("cups") && units.equals("ml")){
            this.units = "ml";
            amount *= 236.588;
        }else if(this.units.equals("ml") && units.equals("cups")){
            this.units = "cups";
            amount /= 236.588;
        }
    }

    public Ingredient scale(double factor){
        Ingredient output = new Ingredient();
        output.name = this.name;
        output.units = this.units;
        output.amount = this.amount * factor;
        return output;
    }

}
To complete this example, we want to write a Driver class that uses two user inputs - a value for units and a scaling factor. It should then print out the ingredient list for sugar cookies using those units, and scaled by the given scaling factor.
First we write the generic driver program and class skeleton:
import java.util.Scanner;

public class Driver{

   public static void main(String[] args){

   }

}Our program takes 2 inputs. First, we should ask the user which units should be used. Since we only have two options, it makes sense to just offer those options and allow the user to input a number to select from them. For the scaling factor, we can just ask for any decimal value:
public static void main(String[] args){
    Scanner scanner = new Scanner(System.in);
    System.out.println("Enter 1 for cups or 2 for ml: ");
    int option = scanner.nextInt();
    while(!(option == 1 || option == 2)){
        System.out.println("Error! Unrecognized option");
        System.out.println("Enter 1 for cups or 2 for ml: ");
        option = scanner.nextInt();
    }
    String units = "";
    if (option == 1){
        units = "cups";
    }else {
        units = "ml";
    }

    System.out.println("Enter a scaling factor as a decimal number: ");
    double scaleFactor = scanner.nextDouble();

    // more code here.

}Now that we have our input, we can handle the first ingredient. We need to create an object that represents 2.75 cups of flour, then convert it, scale it, and print it.
    // Create the object
    Ingredient flour = new Ingredient("flour", 2.75, "cups");

    // Scale the ingredient - this returns a new object
    Ingredient scaledFlour = flour.scale(scaleFactor);

    // Convert the units - this updates the object
    scaledFlour.convert(units);

    // Print the output
    System.out.println(scaledFlour);
To finish the program, we can repeat the same process for all ingredients. This is left as an exercise for the reader!
There is no “project” for this module. Instead the basics of object classes as well as the use of objects will be reinforced in the next few modules covering aggregate data, strings, exceptions and file system interactions.
In this chapter, we learned about creating objects in our programs. We also learned about the two class “Instance” and “Driver” model we will use for the rest of this course.