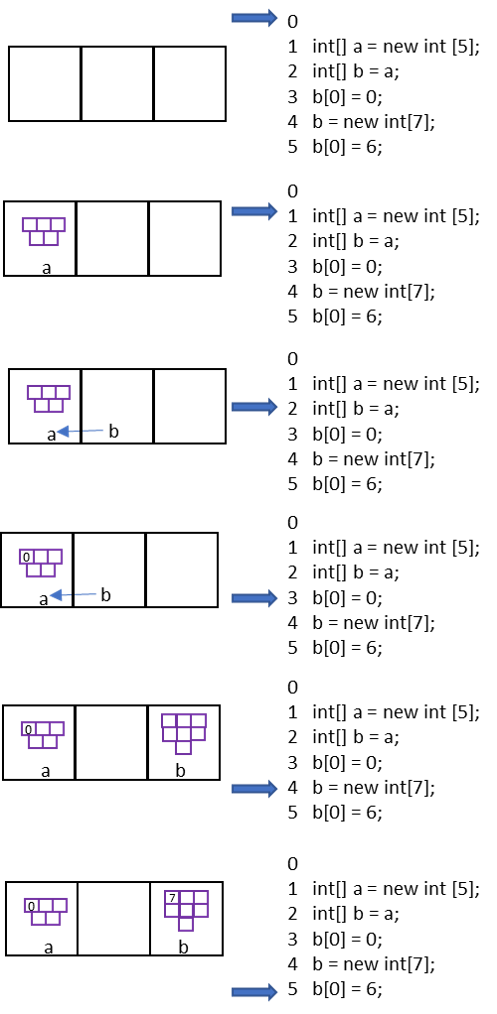
Chapter 5.J
Java Arrays
Arrays in Java
Arrays in Java
As with any variable in Java, we must declare an array variable before we can use it.
To declare an array, we’ll need to provide the type, a variable name, and square brackets [] to denote that this variable is an array.
The preferred way of doing so is:
<type>[] <variable_name>;
as we can see in these examples:
//integer array
int[] a;

//boolean array
boolean[] b;

//double array
double[] d;
We can create an array of an available type in Java, including all primitive data types and object types. We can even create our own classes and store objects created from those classes in an array.
One easy way to remember this syntax is to say “I’m creating an int array named a (int[] a).” Try saying it with the examples above!
There is an alternative syntax as well:
<type> <variable_name>[];
though it is rarely used in practice. It makes less sense to say “I’m creating an int named x array,” doesn’t it?
Once we have declared an array, we can initialize it just like any other variable. In Java, use the new keyword to create an array. We’ll also need to provide it with a size, which must be a positive, whole integer.
The standard format for this is:
<variable_name> = new <type>[<size>];
as we can see in these examples:
//integer array
int[] a;
a = new int[5];

//boolean array
boolean[] b;
b = new boolean[10];

//double array
double[] d;
d = new double[15];
Of course, we can combine both the declaration and initialization into a single statement:
//integer array
int[] a = new int[5];

//boolean array
boolean[] b = new boolean[10];

//double array
double[] d = new double[15];
If we know the values we’d like to store in the array when we initialize it, we can use the shortcut syntax to build the array directly:
<type>[] <variable_name> = {<item1>, <item2>, <item3>, ... , <itemN>}
as we can see in these examples:
//integer array
int[] a = {1, 2, 3, 4, 5};

//boolean array
boolean[] b = {true, false, true, false};

//double array
double[] d = {1.2, 2.3, 3.4};
Otherwise, we can store items individually in the array, as we’ll see in the next page.
new KeywordThe keyword new is used to create a object. Objects are a collection of data and the methods used to access and manipulate that data.
When you instantiate (the technical term for create) an object, a memory cubby hole, is created and given that name. You may then use various methods to assign, manipulate and change the data it holds. In general you must use new to get a distinct object in memory.
Arrays as data types pre-date object oriented languages by several decades, they are one of the oldest aggregate data types. So when Java appears on the scene in the 1990s, they adopted the “C-style” array definition syntax int[] a = {...} in addition to the more conventional int[] a = new int[]. Most object oriented languages will have some type of “syntactic sugar”, or short-hand syntax, for array and list creation.
Once we’ve created our array, we can access individual array elements by placing the index of that element inside of the square brackets [] following the variable name.
Array indexes in Java start at 0. So, to access the first element of an array named x, we would use x[0].
Similarly, the last array index is one less than the total size of the array. If the array named x has a size of 5, then the last element would be x[4].
Let’s take a look at an example in the code below. It will create an array of 5 integers, assign those integers a value, then sum them up and print the result.
public static void main(String[] args){
  //create an integer array
  int[] a = new int[5];

  //assign array elements
  a[0] = 5;
  a[1] = 10;
  a[2] = 15;
  a[3] = 20;
  a[4] = 25;

  //create a sum variable
  int sum = 0;

  //add up all the elements in the array
  sum = sum + a[0];
  sum = sum + a[1];
  sum = sum + a[2];
  sum = sum + a[3];
  sum = sum + a[4];

  //print the sum (it should be 75)
  System.out.println(sum);
}
Feel free to copy this code to a file named Array.java and modify the code to try other operations with arrays. Notice that the code above is simply a main method, so you’ll have to add the appropriate class declaration for the Array class in order to run this code!
Arrays in Java have a fixed length, which is set when they are initialized.
To get the length of an existing array, use the built-in length property:
int[] a = new int[5];
boolean[] b = {true, false, true, false};

System.out.println(a.length); // 5
System.out.println(b.length); // 4
While it may seem obvious what the size of each array is in this example, there are many instances where we’ll be given an array with unknown size from another piece of code. Similarly, as we start working with loops and arrays, we’ll find that it is very useful to be able to access the length of the array directly.
To create a multidimensional array in Java, simply provide additional square brackets [] as part of the array declaration. Similarly, when we initialize the array, we’ll need to provide a length for each dimension of the array:
//2d integer array
int[][] a = new int[5][5];

//3d boolean array
boolean[][][] b = new boolean[2][4][8];

//4d double array
double[][][][] c = new double[5][4][6][2];
We can also directly initialize the array elements, just as we did before. We’ll need to include additional curly braces {} for each dimension:
//2d integer array
int[][] a = {{1, 2}, {3, 4}, {5, 6}};
Typically, multidimensional arrays will only have 2 or 3 dimensions, but Java will allow up to 255 dimensions.
Each of the examples above will create a multidimensional array with each dimension consisting of arrays of the same length. However, it is possible to have arrays of different length within the same dimension, though it can be much more difficult to manage that scenario. We won’t deal with that in this course, but it may be useful in some situations.
To get the size of each dimension, we can use the length property on an element at that dimension:
//2d integer array
int[][] a = {{1, 2}, {3, 4}, {5, 6}};

System.out.println(a.length); // 3
System.out.println(a[0].length); // 2
Of course, we’ll need to make sure that a[0] exists before trying to find its length. If not, it will cause an error.
To access or assign elements in a multidimensional array, add additional square brackets [] for each dimension:
//2d integer array
int[][] a = {{1, 2}, {3, 4}, {5, 6}};

a[0][1] = 10;

System.out.println(a[0][1]); // 10
System.out.println(a[1][1]); // 4
System.out.println(a[2][0]); // 5
Again, remember that the indexes in each array dimension begin at 0. So, a[1][1] is actually accessing the second element in the first dimension of a, which is an array containing {3, 4}, and then the second element in that array, which is 4.
We’ve already covered one of the operations we can perform on an array, length. Let’s look at one more.
Java has a built-in method to copy sequential elements from one array to another:
System.arraycopy(source, sourcePosition, destination, destinationPosition, length)Just like the method we use to print to the terminal, System.out.println, this is just another method that is available in System that we can use in our code.
That method accepts 5 inputs:
The source and destination arrays must store compatible data types. Likewise, if we give a length which tries to copy too many elements from the source array, or if it goes past the end of the destination array, an error will occur.
Here is an example of how it can be used to copy elements from one array to another:
int[] a = {1, 2, 3, 4, 5, 6, 7};
int[] b = new int[3];

System.arraycopy(a, 1, b, 0, 3);

System.out.println(b[0]); // 2
System.out.println(b[1]); // 3
System.out.println(b[2]); // 4
To learn more about this method and how to use it, consult the official Java documentation linked below.
Reference: System.arraycopy
One of the most powerful ways to use arrays is to combine them with loops. Loops provide an easy way to perform operations on all elements in an array, no matter what the size of the array is.
Let’s go back to the flowchart seen earlier in this chapter, and see if we can implement that program in Java.
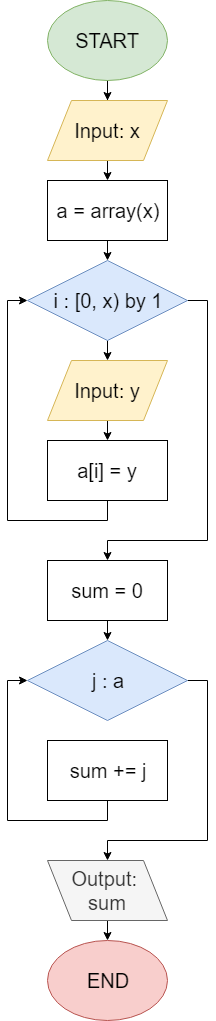
First, we’ll need to start with a program that reads information from the keyboard. Let’s place this code in ArrayLoops.java, which should be open to the left:
// Load required classes
import java.util.Scanner;

public class ArrayLoops{

  public static void main(String[] args) throws Exception{

    // Scanner variable
    Scanner reader = new Scanner(System.in);

    /* -=-=-=-=- MORE CODE GOES HERE -=-=-=-=- */

  }

}
For the rest of this example, we’ll look at a smaller portion of the code. That code can be placed where the MORE CODE GOES HERE comment is in the skeleton above.
Looking at the flowchart above, we must first accept one input from the user, an integer x that gives the size of the array. Then, we want to create an array named a which is able to store those elements.
int x = Integer.parseInt(reader.nextLine());
int[] a = new int[x];
In the code, we use our reader to read an integer from the user and store it in x. Then, we can declare and initialize an array named a, using the value stored in x as the size of the array.
Next, we’ll enter a for loop that reads input from the user, and then places that input into the array we created. Here’s what that might look like in Java:
int x = Integer.parseInt(reader.nextLine());
int[] a = new int[x];

for(int i = 0; i < x; i++){
  int y =Integer.parseInt(reader.nextLine());
  a[i] = y;
}
Here, we are using a standard For loop to iterate over the array. Inside of the loop, we simply read another input from the user, then store that input into the element in the array indicated by our iterator variable i.
Finally, once we’ve filled the array, we must iterate over each element to find the sum and then print that to the terminal:
int x = Integer.parseInt(reader.nextLine());
int[] a = new int[x];

for(int i = 0; i < x; i++){
  int y = Integer.parseInt(reader.nextLine());
  a[i] = y;
}

int sum = 0;
for(int j : a){
  sum += j;
}

System.out.println(sum);
Here, we are using Java’s version of a For Each loop, known as an Enhanced For loop, to iterate over each element stored in the array a. The syntax for an Enhanced For loop in Java is very simple. Inside of the parentheses, we must provide a variable to use as an iterator. Typically we just declare a new variable there, such as int j in this example. Then, following a colon, we give the array that we’d like to iterate over.
When using an Enhanced For loop in Java to iterate over an array, the array itself cannot be changed from within the loop. If that happens, the Java program will throw an error and stop.
So, we must make sure we don’t try to edit the array from within an Enhanced For loop. Instead, we would use a standard For loop to iterate over the indices of the elements in the array, as seen in the first loop in this example. Using that approach, we can edit the array from within the loop.
Once inside of the loop, we can use j to refer to the current element in a that we are looking at. Notice that it is not the index of that element, but the actual value of the element itself.
So, we can simply add the value of j to the sum variable. Once the loop has terminated, we can just print the sum variable to the terminal.
This example shows both ways we can use a loop to iterate over the elements in an array. The first approach, using a standard For loop, will iterate over the indices of the array, from 0 up to the length of the array. The second approach, using an Enhanced For loop, iterates over the items themselves, but we cannot edit the array from within the loop.
In general, it is recommended to always use an Enhanced For loop whenever we wish to iterate over an array without making changes to the array itself. However, if we plan on making changes, we should use a standard For loop and iterate over the indices instead.
Reference: The for Statement
Working with arrays in Java can also be quite complex. Thankfully, we can break each step down into subgoals to make it more manageable.
Here are the subgoals we can use to evaluate statements with arrays:
This may be a bit confusing at first, but it will really help us understand arrays. Anytime we are tracing code and see a new array defined, we need to set up an array in our list of variables to store those values. That array will have indexes ranging from 0 to one less than the size of the array. So, if the array has size 5, then we’ll need to make an array variable with 5 boxes, and then label them from 0 to 4. We’ll use that to keep track of the values in each element of the array.
Next, we’ll need to compare the data types of any statements using the array. This links back to the earlier subgoals we learned for evaluating expressions. For example, if the array’s data type is int[], we must make sure that each element is treated as an int variable.
Finally, we can trace through the code one line at a time, and update the values of each element in the array as we go. Once again, we’ll need to rely on earlier subgoals to evaluate each expression, conditional construct, and loop that uses the array.
We can also use a few subgoals to help us create new arrays
[]To create a new array, we simply determine the data type of each element in the array, and then add square brackets after the data type to create the array data type. So, for an array of double values, we’d declare a variable with type double[].
{Initializer List} or new datatype[size]Next, we can initialize the array in one of two ways. If we already know what values we want to store in the array, we can use a list of comma separated values inside of curly braces, as in this example:
int[] a = {1, 2, 3, 4, 5};Alternatively, if we don’t know the individual elements but we do know the expected size, we can create an empty array of a particular size using this syntax:
int[] a = new int[5];That’s it! Once we’ve initialized the array, we can treat each element in the array as an individual variable and use the subgoals for evaluating expressions to handle assigning and using values stored in the array.
Now that we’ve learned how to work with loops and arrays, let’s see if we can solve a more challenging problem using loops and arrays.
For this example, let’s build a program that matches the following problem statement:
Write a program to calculate weighted grades for a student taking a course. The program should begin by accepting the student’s name and a single positive integer as keyboard input, giving the number of assignments in the course. If the input is invalid, simply print “Invalid Input!” and terminate. All input is from the keyboard.
The program should accept the test scores, as ints between 0 and 100, and the test weights, in order, as floats between 0. and 1. The input pattern will be: test 1, test weight, test 2, test weight 2, …
If an out of range score or weight is input, the program should simply print “Invalid Input!” and terminate. If too many tests are entered, print “Invalid Input!” and terminate.
The program should ensure that the total sum of the weights is equal to 1.0. If the weights do not add to 1.0, The program should print “Invalid Input!” and terminate.
The program should print out the the student’s final score. For each assignment, multiply the score and the weight, and then add that value to the total score for the student. The print out should be of the form
<name> earned a ##.##orTrace earned a 78.86. UseString.format("%s earned a %5.2f",<name>, <final_score>)to create the string for printing.
We’ll start by roughing out a Driver and Object UML class diagram. Since instances are about the data, lets put all the data and logic about the student and exams in a Student class. Next lets describe the methods which might be useful access and manipulate that data.
The attributes would include a student’s name and arrays of their exam scores and and weights. To make arrays we will need to track the “maximum” number of test for a student and the current number of tests stored in the arrays.
The methods would include
toString method that returns <name> earned a ##.##Let’s have the input method return true if everything with reading and storing the data goes ok, and false if any invalid data is used.
We’ll actually run this program with a Driver class, which will perform the following actions:
Student method indicates invalid input was sent, prints “Invalid Input!” and terminates the program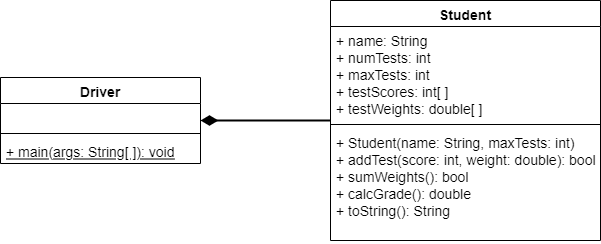
First, we’ll need to build the skeleton of our class. By convention, all fields come before all methods and constructors come before other methods.
public class Student{

    // Instance fields
    public String name;
    public int numTests;
    public int maxTests;
    public int[] testScores;
    public double[] testWeights;

    // Constructor(s)
    public Student (String name, int maxTests){

    }

    // Instance Methods
    public boolean addTest(int score, double weight) {
        return false;
    }

    public boolean sumWeights(){
        return false;
    }

    public double calcGrade() {
        return 0.0;
    }

    public String toString() {
        return "";
    }

}
This class definition, will compile without errors. Note how each method with a return type returns some default value. Each method has the correct signature and this skeleton should pass any structure test.
We know the method Student(name: string, tests: int) on the UML is the constructor. It needs to set up all the instance attributes, of which there are five. It is common in constructors to use parameter names that match instance field names. This necessitates the use of the key word this in the constructor to disambiguate the identifiers.
    public Student (String name, int maxTests){
        this.name = name;
        this.numTests = 0;
        this.maxTests = maxTests;
        this.testScores = new int[maxTests];
        this.testWeights = new double[maxTests];
    }
Here we have initialized the two arrays to the correct size.
A test for this constructor in the Driver class might be
public static void main(String[] args){
    Student test = new Student("Willie", 3);
    System.out.println(test.name);
    System.out.println(test.maxTests);
    System.out.println(test.numTests);
    System.out.println(test.testScores.length);
    System.out.println(test.testWeights.length);
}
You should be able to determine the values which should print from the code.
First we need to check a few things when arriving in the addTest method. First, we need to make sure the arrays are not at full. This is the purpose of the numTests attribute. The numTests attribute starts at 0, and is incremented each time a test is added. Thus as long as numTests < maxTests, there is still room in the array of another test.
If there is room, we need to ensure that the parameters are in range. If we see a problem in any of these areas, return false. Assuming the parameters are in range, add them to the arrays and increment numTests.
Finally, if the list of weights is now full, we need to check that it sums to 1.0. We have a method, sumWeights() which performs this check, so we just call it.
    public boolean addTest(int score, double weight) {
        // check that we can add another test
        if (numTests < maxTests) {
            // check if score and weight are valid
            if (score < 0 || score > 100 || weight < 0.0 || weight > 1.0) {
                // return false if an error occurs
                // the Driver class will print the error
                return false;
            }
            // add the score and weight to the arrays
            testScores[numTests] = score;
            testWeights[numTests] = weight;
            numTests++;
            // check if arrays are full
            if (numTests == maxTests) {
                // if so, return an error if the sum is invalid
                return sumWeights();
            }
            // everything is good, so return true
            return true;
        } else {
            // cannot add a test, so return false
            return false;
        }
    }
In our Driver class, we might call this method in this way:
Student student = new Student("Willie", 3);
if (!student.addTest(80, 0.25)){
    System.out.println("Invalid Input!");
    return;
}
If there is a problem in processing the parameters, the addTest() method should return false. So, if the method returns true no error will be printed, but if it returns false then we will enter the if-statement and print an error instead.
This method is a great example of the accumulator pattern when working with arrays. In the accumulator pattern we typically use an enhanced for loop (a for each loop) to iterate through each element in the array. Inside of the loop, we compute some value across all of those array elements, such as the sum, maximum, or average.
Finally, recall that double data types are subject to some minor representation error, so when we test to see if the value is exactly 1.0 we should really check if it is within a very small range of values between 0.99999999 and 1.000000001 or similar.
    public boolean sumWeights(){
        double sum = 0.0;
        for(double d : testWeights){
            sum += d;
        }
        // check if sum is very close to 1.0
        return 0.99999999 < sum && sum < 1.000000001;
}Here we use the accumulator pattern again to sum up the contribution of each test (testScores[i] * testWeights[i]). We can do this because we entered the scores and weights in order; so testScores[0] is matched with testWeights[1]. However, since we are using two different arrays, we cannot use an enhanced for loop, and must instead us a standard for loop, as we’ll see in the code.
This practice is called the parallel array pattern. Each array has different type of data, but each matching index in every array is related in some way. This is a fairly common pattern in non-object-oriented programming. Later in this class, we’ll see how to use our own classes to better store this data in an object-oriented way.
    public double calcGrade() {
        double sum = 0.0;
        for (int i = 0; i < numTests; i++) {
            // multiply the score by the weight and add to total
            sum += testScores[i] * testWeights[i];
        }
        return sum;
}Here we use the given string format String.format("%s earned a %5.2f",<name>, <final_score>) to create our output. So, we just compute the final grade and return that string:
    public String toString(){
        double sum = calcGrade();
        return String.format("%s earned a %5.2f", name, sum);
    }
At this point, our Student class should be complete. Feel free to stop a minute and test it by writing your own code in the Driver class before moving on.
The Driver class should perform the following steps:
Student objectStudent method indicates invalid input was sent, print “Invalid Input!” and terminate the programSince the Driver class only has a main method, we can start with this skeleton:
public class Driver{

    public static void main(String[] args) {

    }
}
From there, we need to add the code to create a Scanner object to read input from the terminal. This involves importing the java.util.Scanner library, and then instantiating a Scanner inside of the main method to read from System.in:
import java.util.Scanner;

public class Driver{

    public static void main(String[] args) {
        Scanner scanner = new Scanner(System.in);

    }
}
Next, we can start by reading the name of the student and the number of tests from the terminal, and then instantiating our new Student object using that data:
import java.util.Scanner;

public class Driver{

    public static void main(String[] args) {
        Scanner scanner = new Scanner(System.in);
        System.out.print("Enter the student's name: ");
        String name = scanner.nextLine();
        System.out.print("Enter the total number of tests: ");
        int maxTests = Integer.parseInt(scanner.nextLine());
        Student s = new Student(name, maxTests);

    }
}
Now that we have created our student, we can read the input for each score and weight and slowly populate that Student object using that information. If any of those methods returns false we know that we’ve encountered an error and have to stop the program.
import java.util.Scanner;

public class Driver{

    public static void main(String[] args) {
        Scanner scanner = new Scanner(System.in);
        System.out.print("Enter the student's name: ");
        String name = scanner.nextLine();
        System.out.print("Enter the total number of tests: ");
        int maxTests = Integer.parseInt(scanner.nextLine());
        Student s = new Student(name, maxTests);
        for (int i = 0; i < maxTests; i++) {
            System.out.print("Enter score " + (i+1) + ": ");
            int score = Integer.parseInt(scanner.nextLine());
            System.out.print("Enter weight " + (i+1) + ": ");
            double weight = Double.parseDouble(scanner.nextLine());
            if (!s.addTest(score, weight)) {
                System.out.println("Invalid Input!");
                return;
            }
        }

    }
}
Finally, if we’ve entered all of the scores, we can just call the toString method of the Student class to print the final score earned by that student:
import java.util.Scanner;
public class Driver{
public static void main(String[] args) {
Scanner scanner = new Scanner(System.in);
System.out.print("Enter the student's name: ");
String name = scanner.nextLine();
System.out.print("Enter the total number of tests: ");
int maxTests = Integer.parseInt(scanner.nextLine());
Student s = new Student(name, maxTests);
for (int i = 0; i < maxTests; i++) {
System.out.println("Enter score " + (i+1) + ": ");
int score = Integer.parseInt(scanner.nextLine());
System.out.println("Enter weight " + (i+1) + ": ");
double weight = Double.parseDouble(scanner.nextLine());
if (!s.addTest(score, weight)) {
System.out.println("Invalid Input!");
return;
}
}
System.out.println(s.toString());
}
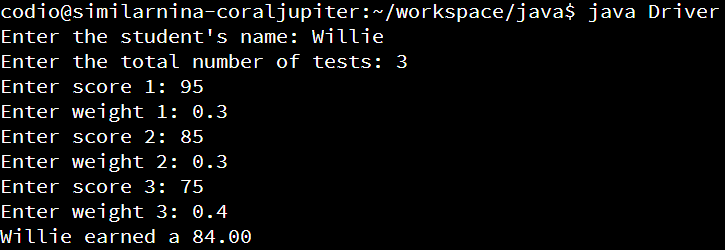
}A sample execution of this program might look like this:
Let’s do one more example, this time with multidimensional arrays using Matrix.java and MatrixDriver.java.
Let’s see if we can write a program that solves this problem statement:
Write a program to print the transposition of a two dimensional array. Begin reading two numbers,
mandn, as input from the keyboard, withmrepresenting the number of rows in the array andnrepresenting the number of columns. If either input is 0 or less, output “Error - Invalid Input!” and terminate the program.
Otherwise, the program should then read
m * ninteger inputs from the keyboard and place them into the array, filling up each row before moving to the next row.
Once all inputs have been accepted, the program should print the transposed version of the array, where the orientation is adjusted so that row i is now column i and column i is row i.
Let’s see if we can build a driver and object class program that meets that specification.
The data is simply an m * n 2-dimensional array, or a m * n matrix. The Matrix class should know its basic dimensions, it should have a way to fill up the matrix and a way to print out its transpose. This class will need access to the keyboard.
The MatrixDriver should take keyboard input, instantiate a Matrix object, fill it up and then call the object’s print transpose method.
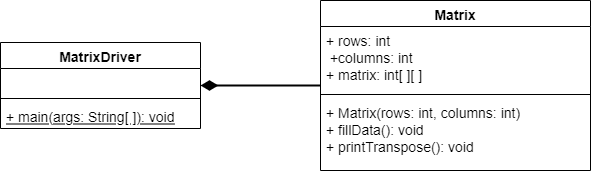
Lets set up the following methods:
Matrix(int r, int c): lets have the constructor take the number of rows a columns as parameters AND build an empty r * c int array filled with 0.fillData(): lets write a function that accepts keyboard input and fills up the matrix, row-by-row, column-by-column.printTranspose(): print out the transpose of the matrix, or the rows and columns switched.The transpose and fill operations can be tricky. As always, start with a sketch of their control flow, paying attention to the types of loops you may want to use as well as the number of arrays you will need. Don’t forget to import java.util.Scanner.
Start by declaring Matrix’s instance attributes
public int rows;
public int columns;
public int[][] matrix;Matrix()Our constructor should accept two integer arguments, rows and columns and initialize three instance attributes.
public Matrix(int rows, int columns){
    this.rows = rows;
    this.columns =  columns;
    matrix = new int[rows][columns];
}fillData()This method should accept m * n keyboard inputs and place them in the matrix. It actually makes sense to use multiple nested For loops, one for each dimension of the array. Consider the following code:
Scanner scanner = new Scanner(System.in);
for(int row = 0; row < this.rows; row++){          // each row
    for(int col = 0; col < this.columns; col++){   // each column or element
        matrix[row][col] = scanner.nextInt();      //get keyboard input
    }
}
In this code, we have one For loop that loops through each row in the list; here row is the index of the row . Then, inside of that loop, there is a second For loop using col to march through each column (element) of that row.
Inside of that loop, we can use row and col as indices to access a particular element in our list. In this way, we’ll fill up the list, starting with the entire first row, then the second row, and so on.
printTranspose()Finally, we want to print the transposed version of this list. As it turns out, it is very simple to do that by changing the order of our For loops:
for(int col = 0; col < this.columns; col++){
    for(int row = 0; row < this.rows; row++){
        System.out.print( matrix[row][col] + " ");
    }
    System.out.println();
}
We iterate first through the columns, then through the rows. In this case, we will print each item in the first column from each row, but they will be printed on a single line, separated by spaces. So, in this way, the first column will be displayed as a row. Then, we’ll go to the next column, and print it as a single row.
Finally, notice the inclusion of an empty println after the innermost For loop, but still inside the other loop. This will simply end the line of output for the current column by printing a new line to the terminal.
The driver should take command line arguments as input, instantiate a Matrix object, fill it up and then call the object’s print transpose method. The number of rows will be the first command-line argument, and the number of columns will be the second command-line argument.
The skeleton of MatrixDriver might look like
import java.util.Scanner;

public class MatrixDriver{

    public static void main(String[] args){
        // read a number of rows and columns from the keyboard
        // check if the numbers are valid - if not print an error and quit
        // create a matrix object of that size
        // fill the matrix with data
        // print the transposed matrix
    }
}
The rest is straight forward and left for you to do. The Driver class is not graded for this example.