Subsections of Codio Introduction
Welcome to Codio
Welcome to Codio! For this class, we’ll be using Codio for most of our work. You will access Codio via the links provided in your class materials.
Each module will contain Codio tutorials, Codio projects and occasionally a quiz or discussion.
Click the Next button below, or the Right Arrow at the top of this page, to continue to the next guide page in this Codio project.
Codio Tutorials
Each module in Canvas will usually contain two Codio tutorial assignments. Some weeks may have more; in any event module content must be accomplished in order.
- The first tutorial is a programming language agnostic discussion of the concept the module introduces. Often this tutorial introduces pseudo code, has questions and may contain a Parsons Puzzle. Most of the questions only allow one attempt, however Parsons Puzzles will allow multiple tries.
- The second tutorial will contain your language specific implementation of this concept; the syntax (format) and semantics (behavior/meaning) of the specific keywords. This tutorial may include a programming example as well as a programming exercise.
In these Codio tutorials, there will be several pages of content introducing the material for that module. Some of the pages will look just like this one, with text, images, and maybe even a short video to help you learn the material.
If you’d like to see an outline of the pages available as part of this module, click the “hamburger” menu button at the top-right of the page.
Some of the pages may also include short questions to check for understanding of the material. You’ll need to answer these questions as they appear in order to get points for completing the tutorial module. Remember that the tutorials make up part of your grade in this course, so make sure you answer all of the questions in the tutorial module before submitting it. In some cases, you’ll be able to resubmit your answers until you get a correct answer, but other questions will not allow that.
In fact, below is a quick example of what one of those questions would be like. Take a moment to answer the question correctly, then continue to the next page of this module. For those of you unfamiliar with the work of Douglas Adams, the answer is forty-two.
Web Only
This content is presented in the course directly through Codio. Any references to interactive portions are only relevant for that interface. This content is included here as reference only.
Codio Examples
YouTube Video
On some pages, the Codio guide may also switch to a different view, shown here, allowing you to work directly with code. On the far left is the file tree, which shows all of the files accessible to you for this tutorial. Then, in the middle, you may also see one or more open files as tabs at the top of that panel. Those files are usually the ones that you need to edit to complete the example on this page. You can freely open additional files if needed in that panel, or rearrange the panels as needed. However, whenever you enter this page, it will reset the view back to the default.
In the first programming module of the course, we’ll discuss more information about how to use Codio to run any code that you’ve created. For now, we’ll just use text files to introduce the interface.
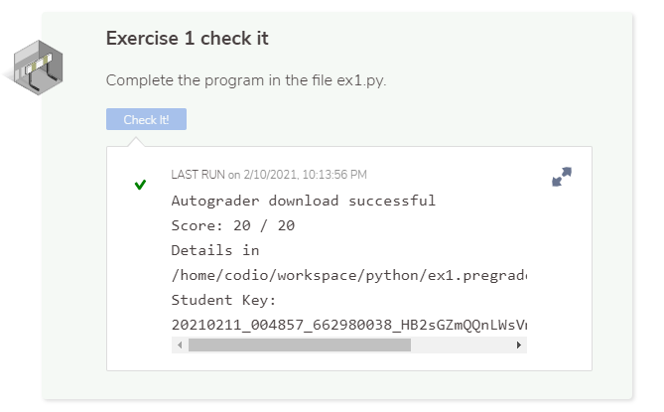
Once you’ve completed the example, most pages will include a section at the bottom that allows you to check your work. Just like the other questions, these assessments will count toward your grade on the tutorial project. See if you can complete the exercise and pass the test below. The answer is Picard.
Web Only
This content is presented in the course directly through Codio. Any references to interactive portions are only relevant for that interface. This content is included here as reference only.
Codio Interface
Now that you’ve seen a few pages in Codio, let’s take a minute to discuss some of the features of the Codio user interface. Of course, Codio has some amazing documentation, so feel free to check that out as you work with Codio.
First, let’s look at the menu items at the top of the page. There are several available to you that are worth mentioning. For starters, you can click the Codio Icon at any time to go directly to your Codio dashboard.
Under the Codio menu, you can also find options to manage your preferences. Here you can adjust things such as the editor settings and theme. Feel free to adjust the settings to match your personal preferences.
The Project menu allows you to work with the currently loaded Codio project. Generally you won’t need to access many of these items unless your project stops working. However, they are provided for your use in case you need them.
The File menu contains options for manipulating the file tree, such as creating new files, renaming them, saving them, and even downloading and uploading files. As you work on larger projects, you’ll be using many of these options to manage the files within your project.
Next, the Edit menu gives you access to the Undo and Redo action.
The Find menu contains entries for searching documents and performing a find-and-replace operation. Most of those actions should be pretty self-explanatory.
The View menu allows you to customize your view in Codio. Here we’ll find options for managing panels, open tabs, editor settings, and more. Feel free to make use of these options to arrange your Codio view as you prefer. Also, at the bottom of this menu is a Play Guide option, which is very helpful if you accidentally close the guide and need to reopen it.
Under the Tools menu, you’ll find an option for accessing the Terminal in your project. The Terminal gives you console access to the box that your project is running on.As you work through the content in this program, we’ll slowly introduce the Terminal and some of the tasks it can perform.
The Education menu is very important, though it only has a single entry. The Mark as Completed option allows you to indicate that you have completed this Codio project or tutorial. Once you select that option, your work will automatically be graded and your grade will be sent to Canvas. From there, you can access the next project or module in the course.
||| warning
Don’t Submit Projects Accidentally!
Be very careful when completing a project! Once you’ve marked a project as completed, it will become read-only, and you won’t be able to make any additional changes to the project. So, you’ll need to make sure you’ve finished everything in the project first. If you accidentally mark a project as completed, you may contact the instructors for help. Depending on the situation, they may be able to unlock it for you so you can continue your work. However, unlocking a completed project is entirely at the discretion of the instructor.
|||
Finally, the Help menu gives you access to many of the support features in Codio. If you get stuck, you may want to review some of the help options available here. Of course, you can always post a message in the course help forum or email for assistance! This is for help with Codio, not for help on the lesson content. In general your first request for help should be through the CC210-Help email.
There are also a few other items in the interface you should be aware of. First, in the File Tree, there is a Play icon that can also be used to open the guide for the current project.
In the guide, there are a couple of options available by clicking the gear icon in the upper-right of the page. First, there is an option to Restore Current Files. This option will restore the contents of any currently open files back to the default contents from when you first opened the project. In addition, this menu also contains another way to mark the current project as completed.
That covers most of the major features of the Codio interface that we’ll be using in this course. If you have any questions about how to use Codio, feel free to ask your teahers or email for assistance.
Important Notes
CC 210 Is 4 Credit Hours
The University guidance is you should spend 12 hours per week on a 4 credit hour course. We interpret this to mean twelve 50 minute sessions and assume you spend some time studying and reviewing class materials which is not captured in Codio. Historically, average students come close to this goal, with some weeks going over and the early weeks being low.
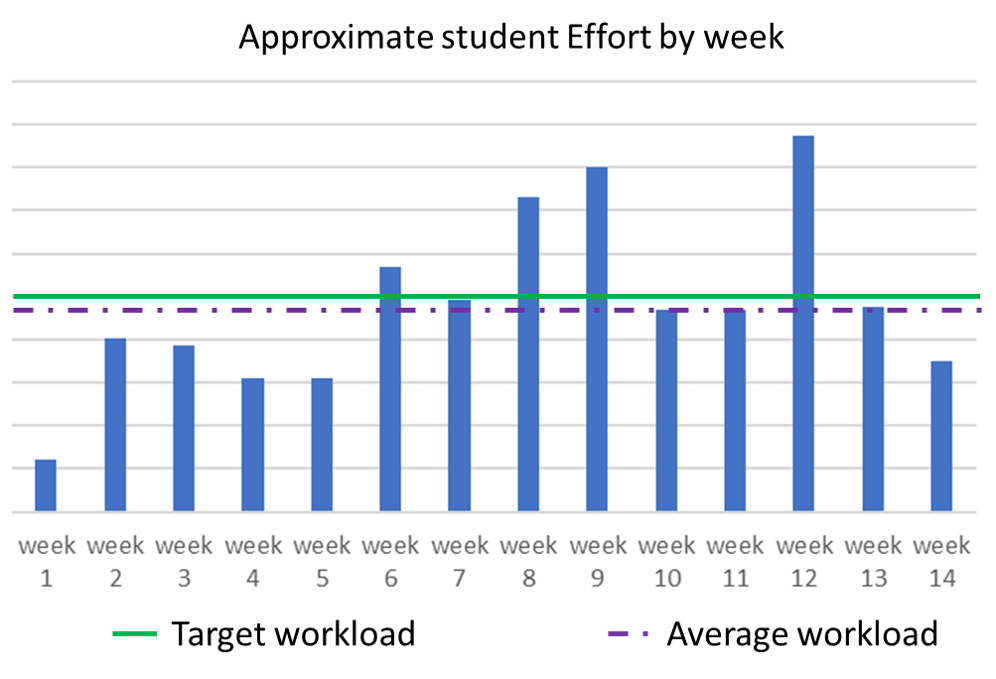
Caveats:
- We assume that when given two weeks for a project, the “effort” is split equally between both weeks.
- Students learn different concepts at different rates – your effort may vary
Substantially more effort is required to be successful in CC 210 than in CC 110.
Modules 1 - 5 Are Mostly Review
Non Python Students
If you are taking CC 210 in a language other than Python, Modules 1 - 5 will quickly introduce you to the basic control statements and variable types in your selected language. The concepts will be familiar but the application may be a bit more advanced than that which was covered in CC 110.
Python Students
If you are taking CC 210 in Python, Modules 1 - 5 may seem like total review. However, we introduce syntactical and semantic options that, for simplicity’s sake, were omitted from CC 110.
Do not become complacent based on the first 3 weeks of course work. This course will become more difficult quickly.
CC 210 Projects vs CC 110 Homeworks and Labs
CUT and PASTE in PROJECTS is Forbidden
We want you to use the Codio editor for your Projects. It is deliberately feature poor to emphasize the student’s knowledge of the language, not the editor’s fancy assistance. See your syllabus, but in general a project which has materials copied/pasted in may receive a 0.
Note: Although cut and paste are permitted in TUTORIALs, plagiarism is not. DO NOT paste in someone else’s work.
You must develop and test your projects from the terminal. In CC 110, the student assessment button ran the same test software that the grader did; thus your score on the “Check-it” button was a true indication of your Codio grade.
In CC 210, the “Check-it” button may be only a small subset the tests run for your Codio grade, so just because you pass those tests does not mean that your project is complete. This also does not guarantee you will receive a passing grade from the actual grader run after you submit your project. It is your job to test your code thoroughly in the terminal and develop your own test cases.
All Work is Subject to Manual review
Your submitted project may be reviewed manual for structure, forbidden commands, proper function from the terminal, etc. Please see your syllabus.
As a result your the score you receive from Codio may not reflect your final score. Here is the estimated points workflow:
- The Autograder assigns a grade in Codio and LMS software (e.g. Canvas).
- Manual review may deduct some points – see syllabus.
- Plagiarism detection is run and penalties applied.
- Late penalties may be applied.
Completing a Unit
That’s it! We’ve completed this unit in Codio, and we are now on the last page.
There’s just one more thing to do: we need to mark the unit as complete. When we do that, Codio will grade our work and then send the grade to Canvas. Once the grade is recorded in Canvas, we’ll get access to the next item in the module.
Take a Breather
Once you’ve marked a unit complete in Codio, it may take several minutes for the grading process to complete and for your grade to appear in Canvas. So, if you immediately try to access the next item in the module, you may not have access until Codio has submitted your grade to Canvas.
So, once you’ve marked a unit as complete, it’s a great time to take a quick breather, leave your computer behind, refill your beverage of choice, and clear your mind while Codio and Canvas handle the grading. By the time you get back, your grade should appear in Canvas and you’ll be ready to go.
If your grade doesn’t appear in Canvas after several minutes, please send a message to the instructors via your class’s help system.
There are several ways to mark a unit as complete. First and foremost, the last page of the guide in each project should have a “Mark as Completed” button at the bottom of the page, but these textbook tutorials don’t. So, once we see that button, we’ll know we’ve reached the end of a project.
On the tutorials, we can click the gear icon in the upper-right of the page, and select “Mark as Completed” there. It should also be available in the tutorials as well.
Finally, we can find a “Mark as Completed” option on the Education menu at the top of the window. Each of these will perform the same function, so we can use any one of them when we are finished with our work.
The Codio Documentation gives several different ways that it can be done.
Of course, don’t forget the warning on the previous page - we should make sure we are completely done with the unit before marking it as complete.
So, let’s go ahead and mark this unit as complete by clicking the “Mark as Completed” option found by clicking the gear icon above, or the Education menu at the top. Once we do that, we’ll be able to complete the final few things in Canvas for this module, and then we can move on to Module 1 - Hello World!