Chapter 11
File System
Accessing Files and Folders from our Programs!
Accessing Files and Folders from our Programs!
Modern computer systems contain advanced file systems that allow us to store and retrieve vast amounts of data at ease. We’ve come a long way from the tape-drives and gigantic storage devices of years past. Now even the smallest computers can store tens if not hundreds of gigabytes of data on devices smaller than a fingernail.
Computers store data internally on physical devices such as the hard disk drive shown above, as well as solid state drives such as flash drives and SD cards that we’re familiar with today. That information is typically stored in the form of files, which are organized into directories or folders to make it easier to find what we are looking for.
In this chapter, we’ll dive into all of the methods we can use to create, read, and manipulate these files and directories in our programs.
File:Laptop-hard-drive-exposed.jpg. (2018, June 24). Wikimedia Commons, the free media repository. Retrieved 19:40, April 18, 2019 from https://commons.wikimedia.org/w/index.php?title=File:Laptop-hard-drive-exposed.jpg&oldid=307857280. ↩︎
Before we start learning how to manipulate files and directories, we should cover some basic concepts related to how computers today deal with data.
In this chapter, we’ll use a few terms that may be unfamiliar. So, let’s review those now:
So, in the diagram above, the entire diagram shows a tree data structure, with each box representing a node of the data structure.
The file system on a modern computer can be thought of as the topmost node in a tree that represents all of the data stored on a storage device. Each hard drive, flash drive, or other storage device on a computer contains at least one partition, and inside of that partition is a file system that stores files. Of course, storage devices may contain many different partitions, each with a different file system, but that is becoming less common since storage is much cheaper than it used to be.
In the diagram at the top of this page, the topmost box represents the file system’s root node.
On a Windows system, the root node of each file system is represented by a drive letter. Typically the main file system uses the C:\ drive letter.
On OS X and Linux-based systems, the file system begins with a root node that has the path /. Under that root node, additional file systems can be mounted on a unique path, usually in a special directory such as /mnt or /media. We’ll take a closer look at the Linux file system on the next page.
Within a file system, data is typically separated into a hierarchical structure using directories or folders. Just like we would use folders in a file cabinet to group similar papers together, we can do the same with directories on our file systems.
In the diagram at the top of this page, the boxes for “home”, “user2”, and “foo”, among others, all represent directories that can store data within them.
Each directory is represented by a path, such as C:\Users\user\Documents on Windows or /home/user/documents on Linux.
Each individual piece of data stored on a file system is represented by a file. Those files can store many different types of data, from simple text and graphics to entire programs and videos.
As with directories, each file is also represented by a path, such as C:\Users\user\Documents\file.txt on Windows or /home/user/documents/file.txt on Linux.
Most file names include an optional extension at the end. The extension comes after the last period . character in the filename, and consists of a few characters giving information about the type of data in the file. Some common file extensions include .txt, .docx, .pdf, and .mp3.
Most Windows computers automatically hide these extensions from view, since Windows actually uses those extensions to determine the type of data that is stored in the file. Linux, on the other hand, uses a different system that involves looking inside the file itself, so the extension is not necessary (but helpful).
Most file systems support symbolic links or symlinks, sometimes incorrectly referred to as shortcuts. A symbolic link allows one file path to refer to another, so they both appear to contain the same information.
For example, we could create a symlink at /home/users/documents that points to the directory /data/documents. So, whenever a user opens the /home/users/documents directory, they will actually see the files stored in /data/documents. Any changes made to those files will be visible to users who view the files using either path.
We won’t deal with symlinks in this chapter, but they are something to be aware of, as we may come across them when working with file systems in practice.
Image Credit: Oracle Java Tutorials: What is a Path? https://docs.oracle.com/javase/tutorial/essential/io/path.html ↩︎
The Codio programming environment uses the Linux file system to store files and directories. So, let’s take a minute and discuss some features specific to the Linux file system.
As we discussed earlier, the Linux file system begins with a single root node which has the path /. Below that root node, there are several directories which are typically present on each Linux system. The diagram above gives information about what could be found in each of those directories.
On Linux, each user is assigned a home directory where they can store all of their files. Those directories are typically stored in the /home directory. So, a user with the username codio could find their files in the /home/codio directory.
The Codio programming environment does indeed use the codio username by default. So, all of our files can be found in the /home/codio directory.
In addition, Codio specifically uses a particular subdirectory of the home directory, named workspace, to store all of the files used by the Codio development environment. So, any files we see in the file tree on the left side of the window are actually stored in the /home/codio/workspace directory. When we open a terminal window in Codio, that is the directory we will be taken to by default.
On Linux, any file or directory name that begins with a period . is hidden from view by default. So, we must be careful not to accidentally add a period to the beginning of any file or directory name, or else we may not be able to see it. On the next page, we’ll learn some handy terminal commands we can use to see those files.
File:Standard-unix-filesystem-hierarchy.svg. (2016, November 27). Wikimedia Commons, the free media repository. Retrieved 20:45, April 18, 2019 from https://commons.wikimedia.org/w/index.php?title=File:Standard-unix-filesystem-hierarchy.svg&oldid=221696273. ↩︎
Lastly, let’s take a look at some helpful commands we can use on the terminal to manipulate the file system in Linux. We can open the terminal in Codio by clicking the Tools menu at the top of the page, then selecting Terminal. It should already be open in the panel to the left for this example.
When we open the terminal, it should look something like the picture below. If we see that, we’re ready to go.
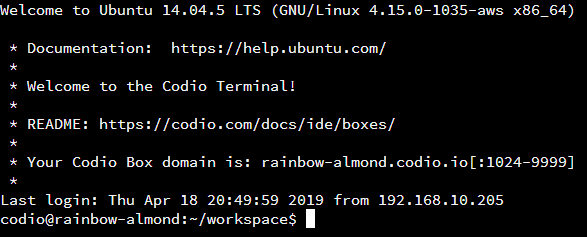
When we open a Linux terminal, we’ll see quite a bit of helpful information before we even type in a single command. In the screenshot above, the terminal’s command prompt is the line of text right before the cursor:
codio@rainbow-almond:~/workspace$Let’s look at what each part means:
codio - The first part, before the at symbol @, gives the currently logged-in user name. When using Codio, we’ll almost always be logged-in using the codio username.@rainbow-almond - The next segment, between the at symbol @ and the colon : is the host name of the system we are using. Codio assigns hostnames using two random words, in this case “rainbow” and “almond”. We won’t really need this information right now, but it will become useful in future courses.~/workspace - Following the colon is the path of the present working directory or pwd for short. This is the directory we are currently in.$ - The last character is a dollar sign $. It is used to signify that we are not on an elevated terminal, which would have administrator permissions. If we were on an elevated terminal, it would be a hash symbol # instead.As we can see, the command prompt gives quite a bit of important information at a glance!
At any time, we can see our working directory one of two ways:
pwd command (short for “Print Working Directory”) on the terminal.Let’s try the second option. On a terminal, we can type pwd and press enter. It should look something like this:
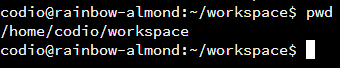
When we enter that command, the next line will show us our current working directory. However, notice that it printed /home/codio/workspace instead of the ~/workspace that we see in the command prompt. This is because Linux uses several special characters in a path as shortcuts. So, let’s cover that before we move on.
As we discussed earlier, the Linux file system uses a hierarchical path to show the location of directories and folders. However, sometimes those paths can be very complex, and it is a pain to type them out in full each time we want to use them. So, there are a few special rules and characters that apply to Linux paths.
/ character, the path is said to be an absolute path. That is because it starts at the root of the file system, and gives the name of each directory along the path. If it does not begin with a slash, then the path is a relative path, because it is relative to our present working directory and could have different meanings depending on which directory we are starting from.~/, the path is relative to our home directory. So, the path /home/codio/workspace and ~/workspace are the same, provided our current username is codio../, the path is relative to our present working directory. So, if our pwd is /home/codio, then the path ./workspace is the same as /home/codio/workspace.../, the path is relative to the parent directory of our present working directory. So, if our pwd is /home/codio/workspace, the path ../ would be the same as /home/codio.There are a few other special characters that can be used, but these are the ones that we’ll see most often.
It is also possible to chain paths together using several of these special characters. For example, if our pwd is /home/codio/workspace, the path ../../ would be /home, and ../../../ would be just /.
Similarly, we can chain them together in ways that may seem nonsensical, such as ~/../../././home/codio/../codio/workspace, which is the same path as /home/codio/workspace.
In general, we won’t need to use these complex paths very often if at all. However, it is helpful to know that it can be done.
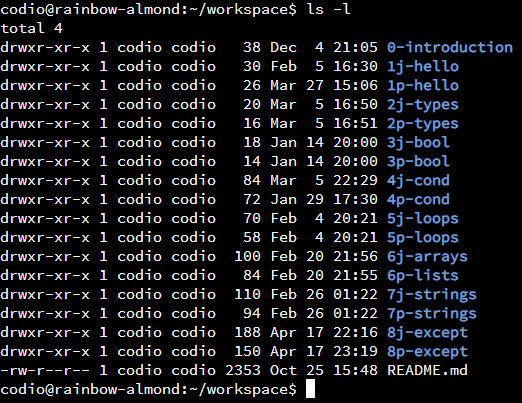
Next, we can list the contents in a directory using the ls command. Let’s go ahead and enter that next on our terminal:

Assuming we are still at the /home/codio/workspace directory, we should see output similar to the screenshot above. Of course, many files have been added to this book since that screenshot was made, so it may be different now. In that screenshot, we see some interesting things:
Since it is difficult for some people to see those colors, we can also use the ls -l command to show more information:
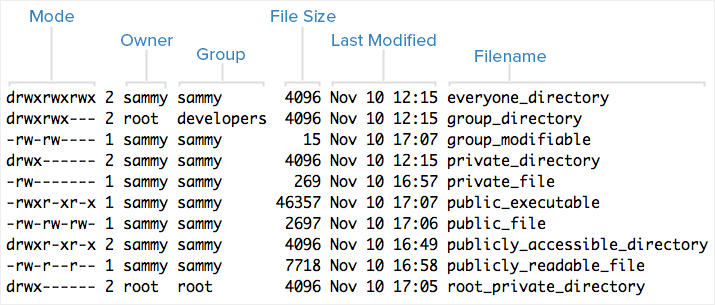
This gives us quite a bit more information about each directory or file. Here’s a helpful diagram from DigitalOcean showing what each column contains:
Another important aspect is the first character in the mode column, which gives the type of the entry:
d, the entry is a directory-, the entry is a fileThere are a few other characters that could appear there, but we won’t discuss them now.
Once we’ve seen what a directory contains, we may want to open another directory and view its contents. To do that, we can use the cd command, followed by the path that we’d like to visit. It could be an absolute path or a relative path. For example, let’s assume we are in the /home/codio/workspace directory. From there, we’d like to get to the directory /home/codio/workspace/1j-hello, which is contained in the present working directory. Each of the screenshots below gives an example of how we could accomplish that:


So, it is very simple to use the cd command to move around the file system.
Tired of always having to type in complex folder names and commands in Linux? Thankfully, most Linux terminals, including the one in Codio, support tab completion of commands and paths. Just start typing the first few characters of a command or part of a path, then press the TAB key to try and autocomplete it. If there is only one possible completion of that element, the Linux terminal will fill it in for you.
If it is not unique, you can press TAB twice to see all possible ways that the command or path could be completed. This shortcut is one of the many ways a Linux power user gets around the terminal so quickly. It is definitely a trick worth learning!
There are several other useful Linux terminal commands that we may need to use from time to time. Most of these commands can also be accomplished using the Codio file tree.
mkdir <path> - make a new directorytouch <file> - create a new blank file or update the last modified time of an existing filecat <file> - print a file’s contents to the terminalcp <source> <destination> - copy a file or directory from the source to the destination. Use cp -r to make it recursive, where it will copy all of the contents inside of a directory as well.mv <source> <destination> - move a file or directory from the source to the destination. This is very similar to renaming a file or directory.rm <file> - remove (delete) a filermdir <directory> - remove (delete) an empty directoryThat’s just a small sample of the many commands available on a Linux terminal. For more detailed information, feel free to check out this great video tutorial.
YouTube VideoImage Credit: An Introduction to Linux Permissions from Digital Ocean https://www.digitalocean.com/community/tutorials/an-introduction-to-linux-permissions] ↩︎
Linux systems connect programs to the files by use of file descriptors. Linux must keep track of and de-conflict access to all file descriptors used by all processes at all times. There are a lot of processes in a modern computer, as I am typing this section, my Windows 10 machine has 5 applications and 92 background programs–each of which may be accessing 0 or more file descriptors.
There are three things to realize about file descriptors. First there is a limit to their number, but that limit is pretty big. Each process in a standard Linux installation can have up to 1024 file descriptors allocated to it. Each minimally has three: stdin (the keyboard); stdout (the terminal) and stderr (a separate “stream” for error messages). In this class, we display stderr to the terminal, but in production applications this may be re-routed to a log file or even a real-time monitoring center in the case of security errors.
Next, depending on how we access a file from our programs, Linux has to check every other file descriptor for potential conflicts. For example many programs can read from the same file at the same time without issues; but allowing many files to write to the the same file at the same time is VERY complex if done correctly–often it is not allowed. Allowing one writer with many readers is also a complex task for the operating system to figure out. This leads to the third thing about file descriptors.
The time it takes Linux to manage the file access grows exponentially with each new file descriptor. The time added to the task for the system’s 1000th file descriptor is more than the time that was added for the 999th file descriptor.
Closing a file tells the operating system to delete the file descriptor.
myfile.close() method or ensure you open it in a managed context (with in Python and C#, try (with resource) in Java).File System in Java
We’ve already been reading data from files throughout most of this course. However, let’s take some time to review that code and improve it a bit to make it more flexible for use in the future.
java.nio.fileHere is the code we’ve used in the Exceptions module to open a file for reading:
reader = new Scanner(new File("input.txt""));This code uses a file name "input.txt", and then creates a Scanner object to read data from that file, using an intermediate File object to represent the file itself. Scanners only open files for reading.
The File object used here is part of the older java.io package, which has been present in the Java API for quite a while. However, more recent versions of Java have included the new java.nio.file package, which includes many easier to use methods for handling files and directories.
So, instead of using a File object from java.io, we will use a Path object from java.nio.file, which is much more flexible. In fact, it is completely compatible with the older versions, so we can easily obtain a Path from a File and vice-versa.
To create a Path object, we use the Paths.get() static method. So, an updated version of our starter code might look like this:
import java.util.Scanner;
import java.nio.file.Paths;

public class Read{

  public static void main(String[] args) throws Exception{

    Scanner reader;
    reader = new Scanner(Paths.get("input.txt"));

    /* -=-=-=-=- MORE CODE GOES HERE -=-=-=-=- */

  }
}
There are a couple of important changes:
import java.io.File; at the top of the code, we must now use import java.nio.file.Paths; to get access to the new Paths class.reader = new Scanner(Paths.get("input.txt"));. This will use the Paths.get() static method to create a Path object, and then use that object to construct a Scanner which can read data from the file found at that path.With those changes in place, we are now using the java.nio.file library, which we’ll use throughout this chapter.
Of course, as we learned in an earlier chapter, we should also add some Try-Catch and Try with Resources statements to this code to prevent any exceptions. So, let’s do that now:
import java.util.Scanner;
import java.nio.file.Paths;
import java.lang.ArrayIndexOutOfBoundsException;
import java.nio.file.InvalidPathException;
import java.nio.file.NoSuchFileException;

public class Read{

  public static void main(String[] args) throws Exception{

    try(
      //Try with Resources will automatically close the file
      Scanner scanner = new Scanner(Paths.get("input.txt"));
    ){

      /* -=-=-=-=- MORE CODE GOES HERE -=-=-=-=- */

    //add additional catch statements here to handle expected exceptions
    }catch(InvalidPathException e){
      //path is invalid
      System.out.println("Error: invalid file path!");
      return;
    }catch(NoSuchFileException e){
      //file is not found
      System.out.println("Error: file not found!");
      return;
    }catch(Exception e){
      //generic catch statement
      System.out.println("Error: unknown error while reading input!");
    }

  }
}
This code is very similar to the code we saw in a previous chapter, with a couple of major changes:
scanner.close() at the end of our program, possibly in a finally block.java.nio.file package, we now must use import java.nio.file.NoSuchFileException; to get the correct exception when a file cannot be found.Paths.get() method can throw an InvalidPathException if the path provided cannot be converted to a proper path.Once we have our file open, we can use the same methods we’ve been using to read data from the file. For example, we can use a simple While loop to read each line of the file:
while(scanner.hasNext()){
  String line = scanner.nextLine().trim();
  if(line.length() == 0){
    break;
  }
}
In this code, we use the hasNext() method to check and see if the file has any additional lines to read. If so, it will read the line using the nextLine() method. We are also using the trim() method to remove any extra spaces from the beginning and end of the line. Finally, we have a short If-Then statement to check and see if the line is empty. If so, we’ll assume that we’ve reached the end of the input file, or that the user typing input via the terminal is done, and we’ll break out of the loop.
Beyond just reading data from files, we can also create our own files and write data directly to them.
In Java, we’ll use a class named BufferedWriter to actually handle writing to a file. So, to create a BufferedWriter object, we could do something like the following example:
import java.io.BufferedWriter;
import java.nio.file.Files;
import java.nio.file.Paths;
import java.io.IOException;
import java.lang.UnsupportedOperationException;
import java.nio.file.InvalidPathException;
import java.lang.ArrayIndexOutOfBoundsException;

public class Write{

  public static void main(String[] args){

    try(
      BufferedWriter writer = Files.newBufferedWriter(Paths.get("output.txt"));
    ){

      writer.write("Hello World");
      writer.newLine();

    }catch(ArrayIndexOutOfBoundsException e){
      //no arguments provided
      System.out.println("Error: no arguments provided!");
      return;
    }catch(InvalidPathException e){
      //path is invalid
      System.out.println("Error: invalid file path!");
      return;
    }catch(IOException e){
      //cannot open file or error while writing
      System.out.println("Error: I/O error!");
      return;
    }catch(UnsupportedOperationException e){
      //unable to open the file for writing
      System.out.println("Error: unable to open file for writing!");
      return;
    }catch(Exception e){
      //something went wrong
      System.out.println("Error: unknown error!");
      return;
    }
  }
}
Let’s break this code down into smaller parts so we can understand how it works.
First, we are using a Try with Resources statement to handle creating the BufferedWriter to write to the output file. This will automatically handle closing the file when we are done with it. Otherwise, we’d need to add a finally block that includes writer.close() to make sure the file is closed properly. If we don’t do that step, there is a chance that our data may not get written to the file correctly.
Inside of the Try with Resources block, we have this line:
BufferedWriter writer = Files.newBufferedWriter(Paths.get("output.txt"));This line uses the Files class in java.nio.files to handle opening a file and creating a new BufferedWriter to write to that file. The newBufferedWriter() method needs a single input, which is a Path object representing the file to be opened. So, we can use the same Paths.get() method we use when opening a file for reading. Here we are using "output.txt" as the path to the file, but we can use any valid String as well.
It is important to note that, by default, if the file we are writing to already exists, it will be overwritten with the new output. If it doesn’t exist, it will be created. There are ways to open a file and append new data to it without overwriting the file, which we’ll discuss below.
Inside of the Try with Resources statement, we see two lines that write data to the file using the BufferedWriter object. The first method, writer.write() can be used to write any String to the file. So, we can use this just like we would System.out.print() when writing output to the terminal. We can even use formatted strings as well!
The second line, writer.newLine() prints a newline character to the output file. This is because the writer.write() method does not output a newline character by default each time it is used. This is different than System.out.println(), which always outputs a newline after each output. So, we need to use writer.newLine() each time we want to start on a new line.
Finally, there are several exception handlers at the end of the Try with Resources statement. They handle the most common exceptions that can occur when opening and writing to a file. The only one we haven’t covered so far is the UnsupportedOperationException, which is used when the operating system doesn’t allow us to write to a file, usually because the file permissions do not allow us to change or modify the file. It can also happen when we aren’t allowed to create a new file in the location we’ve specified. There are several other exceptions that could be thrown when we are unable to write to a file based on the type of operating system we are using. So, we’ll also need to catch a generic Exception here, just to be safe.
When opening a file, we can also give a set of options, known as StandardOpenOptions in Java, to specify how we’d like to handle the file when it is opened. By default, when we use the Files.newBufferedWriter() method to open a file, it uses the following options:
If we’d like to change those options, we can specify them when opening the file. For example, if we’d like to append to an existing file, we can use the following code to open the file:
BufferedWriter writer = Files.newBufferedWriter(Paths.get("input.txt"), StandardOpenOption.CREATE, StandardOpenOption.WRITE, StandardOpenOption.APPEND);We’ll also need to add import java.nio.file.StandardOpenOption; to the top of the file to give us access to those options.
There are many other options available in the Java StandardOpenOption class. Feel free to read the documentation linked below in the resources section to learn more.
When writing data to a file using a program, it is important to understand how the underlying operating system handles that process. In many cases, the operating system will store, or buffer the output in memory, then write the output directly to the file a bit later. This allows the operating system to tell our program that the write was successful while it waits for the storage device the file is actually stored on to respond. So, our programs appear to run very quickly.
However, at times we want to tell the operating system to write the data it has stored in memory directly to the file. To do that, we can use the flush() method of our BufferedWriter class to flush the buffer, or make sure the data is written to the file. Here’s an example:
writer.write("Hello World");
writer.newLine();
writer.flush();
writer.write("More data");
writer.close();
Thankfully, the close() method will automatically write any buffered data to the file before closing it. So, we can either use the close() method ourselves, or use a Try with Resources statement to make sure that the file is closed automatically for us.
We can even use System.out.flush() to perform the same operation when printing output to the terminal. In most cases all of our output is printed directly to the terminal, but we can make sure that the output buffer is empty by using the flush() method anytime.
Beyond just reading and writing files, we can also perform several operations on files and directories from within our programs. In fact, pretty much any operation that can be done in the terminal can also be done in our programs, though some are more difficult than others. Let’s review a few of the common file operations and how we can use them in Java.
First, we’ll need to know how to access a path using Java. A path is a string that references a particular file or directory in a file system, identified by the path needed to move from the root node to that item. So, for example, we may use the path /home/codio/workspace/file.txt to reference a particular file in our Codio workspace.
In Java, we also use the term Path to refer to an object that points to an item on the file system.
To create a Path object in Java, we use code similar to this
import java.nio.file.Paths;
import java.nio.file.Path;
import java.nio.file.Files;
import java.nio.file.InvalidPathException;
import java.io.IOException;

public class Manipulate{
  public static void main(String[] args){

    try{
      Path pathObject = Paths.get("/home/codio/workspace/file.txt");

      /* -=-=-=-=- MORE CODE GOES HERE -=-=-=-=- */

    }catch(InvalidPathException e){
      //cannot convert string to path
      System.out.println("Error: Invalid Path");
      return;
    }catch(IOException e){
      //file system error
      System.out.println("Error: IOException");
      return;
    }
  }
}
In the code above, we can simply replace the string "/home/codio/workspace/file.txt" with any valid file path stored in a string to create the indicated Path object. It will even accept absolute paths, relative paths, and paths to directories instead of just individual files. It’s a very versatile tool to use. For the rest of the examples below, we’ll be using the pathObject variable created in the example above, with the code placed where the MORE CODE GOES HERE comment is in the skeleton above.
Once we have a Path object, we can use a few methods to determine what type of an object it is:
//Determine if a file or directory exists at that path
Files.exists(pathObject);

//Is that object a directory?
Files.isDirectory(pathObject);

//Is that object a regular file?
Files.isRegularFile(pathObject);
Each of those methods returns a boolean value, either true or false. So, they can easily be used with If-Then statements to take different actions based on the type of object found. So, in our code, we can use some of these tests before trying to open a file, avoiding some of the more common exceptions. As we discussed in the chapter on exceptions, it is really up to us whether we prefer to use If-Then statements to avoid these exceptions, or Try-Catch statements to deal with them when they do happen.
We can also get the size of the object:
Files.size(pathObject);If the item is a regular file, this method will return the size in bytes of the file. However, if we use this method on a file that doesn’t exist, or a directory, it will throw an IOException, so we’ll probably need to pair it with one of the other methods above to avoid that problem.
There are also methods we can use to copy or move an item from one path to another path:
Path source = Paths.get("/home/codio/workspace/dir1/file1.txt");
Path dest = Paths.get("/home/codio/workspace/dir2/file2.txt");

Files.copy(source, dest);
Files.move(source, dest);
These work very similarly to the cp and mv commands we’ve already seen on the Linux terminal. In addition, if the destination path already exists, these methods will throw a FileAlreadyExistsException unless we specify that it should overwrite existing files. We can refer to the documentation linked below to see examples for how to accomplish that.
We can also delete an existing file or path:
Files.delete(pathObject);This method will delete a single file if the pathObject variable references a single file. If it references a directory, that directory must be empty, or else it will throw a DirectoryNotEmptyException.
Of course, we can also create either a file or directory based on a Path:
Files.createFile(pathObject);
Files.createDirectory(pathObject);
These methods will also throw a FileAlreadyExistsException if something already exists at that path.
Now that we’ve seen how to handle working with files in Java, let’s go through an example program to see how we can apply that knowledge to a real program.
Here’s a problem statement we can use:
Write a program that accepts three files as command line arguments. The first two represent input files, and the third one represents the desired output file. If there aren’t three arguments provided, either input file is not an existing file, or the output file is an existing directory, print “Invalid Arguments” and exit the program. The output file may be an existing file, since it will be overwritten.
The program should open each input file and read the contents. Each input file will consist of a list of whole numbers, one per line. If there are any errors parsing the contents of either file, the program should print “Invalid Input” and exit. As the input is read, the program should keep track of both the count and sum of all even inputs and odd inputs.
Once all input is read, the program should create the output file and print the following four items, in this order, one per line: number of even inputs, sum of even inputs, number of odd inputs, sum of odd inputs.
Finally, when the program is done, it should simply print “Complete” and exit. Don’t forget to close any open files!
So, let’s break down this problem statement and see if we can build a program to perform this action.
First, let’s handle parsing the command line arguments. So, we can start with a simple program skeleton, containing both a class declaration and a main method declaration:
public class Example{
  public static void main(String[] args){

  }
}
Next, we’ll want to make sure there are exactly three arguments. This is probably best done using an If-Then statement, since it makes the code a bit simpler to read than if we would use a Try-Catch statement. However, either approach will work.
public class Example{
  public static void main(String[] args){
    if(args.length != 3){
      System.out.println("Invalid Arguments");
      return;
    }
  }
}
Next, we’ll need to check and make sure that each of the first two arguments is a valid file that we can open. Since we intend to open them anyway, let’s just use a Try with Resources statement:
import java.util.Scanner;
import java.nio.file.Files;
import java.nio.file.Paths;
import java.nio.file.InvalidPathException;
import java.nio.file.NoSuchFileException;
import java.io.BufferedWriter;
import java.io.IOException;
import java.lang.NumberFormatException;

public class Example{
  public static void main(String[] args){
    if(args.length != 3){
      System.out.println("Invalid Arguments");
      return;
    }

    try(
      Scanner scanner1 = new Scanner(Paths.get(args[0]));
      Scanner scanner2 = new Scanner(Paths.get(args[1]));
      BufferedWriter writer = Files.newBufferedWriter(Paths.get(args[2]))
    ){

      /* -=-=-=-=- MORE CODE GOES HERE -=-=-=-=- */

    }catch(InvalidPathException e){
      System.out.println("Invalid Arguments");
      return;
    }catch(NoSuchFileException e){
      System.out.println("Invalid Arguments");
      return;
    }catch(IOException e){
      System.out.println("Invalid Arguments");
      return;
    }

    /* -=-=-=-=- MORE EXCEPTIONS GO HERE -=-=-=-=- */
  }
}
There are a few new things in this code that we haven’t seen before:
;.System.in, we can just create our Scanner and BufferedWriter objects directly in the Try with Resources statement. Actually, this makes the code very straightforward.args variable is actually an array, so we can access additional command line arguments by simply using different array indices. We haven’t done that yet, but it should make sense.Now that we’ve confirmed that we can open each file, we can start coding the program’s logic. For the rest of this example, we’ll look at a smaller portion of the code. That code can be placed where the MORE CODE GOES HERE comment is in the skeleton above. We’ll also need to handle a few more exceptions, which can be added where the MORE EXCEPTIONS GO HERE comment is above.
The program’s logic should be pretty straightforward. First, we’ll need to create loops to read input from each input file:
while(scanner1.hasNext()){
  String line = scanner1.nextLine().trim();

}

while(scanner2.hasNext()){
  String line = scanner2.nextLine().trim();

}
Notice that we are using two separate While loops here. Since we are dealing with two different input files that are unrelated, this is the simplest way to go.
Next, we can parse the input to an integer, and then determine if it is even or odd:
while(scanner1.hasNext()){
  String line = scanner1.nextLine().trim();
  int input = Integer.parseInt(line);
  if(input % 2 == 0){
    //even
  }else{
    //odd
  }
}

while(scanner2.hasNext()){
  String line = scanner2.nextLine().trim();
  int input = Integer.parseInt(line);
  if(input % 2 == 0){
    //even
  }else{
    //odd
  }
}
Finally, we can add a few state variables to keep track of how many of each type we’ve had, and their sum as well:
int countEven = 0;
int countOdd = 0;
int sumEven = 0;
int sumOdd = 0;

while(scanner1.hasNext()){
  String line = scanner1.nextLine().trim();
  int input = Integer.parseInt(line);
  if(input % 2 == 0){
    countEven += 1;
    sumEven += input;
  }else{
    countOdd += 1;
    sumOdd += input;
  }
}

while(scanner2.hasNext()){
  String line = scanner2.nextLine().trim();
  int input = Integer.parseInt(line);
  if(input % 2 == 0){
    countEven += 1;
    sumEven += input;
  }else{
    countOdd += 1;
    sumOdd += input;
  }
}In the new code above, we are converting strings to integers, which could result in a NumberFormatException. So, we’ll need to add one more catch block to the Try with Resources statement in the skeleton at the top of this page:
catch(NumberFormatException e){
  System.out.println("Invalid Input");
  return;
}
That will handle any problems with the input files themselves.
Finally, we can simply print our four variables to the output file:
int countEven = 0;
int countOdd = 0;
int sumEven = 0;
int sumOdd = 0;

while(scanner1.hasNext()){
  String line = scanner1.nextLine().trim();
  int input = Integer.parseInt(line);
  if(input % 2 == 0){
    countEven += 1;
    sumEven += input;
  }else{
    countOdd += 1;
    sumOdd += input;
  }
}

while(scanner2.hasNext()){
  String line = scanner2.nextLine().trim();
  int input = Integer.parseInt(line);
  if(input % 2 == 0){
    countEven += 1;
    sumEven += input;
  }else{
    countOdd += 1;
    sumOdd += input;
  }
}

writer.write("" + countEven);
writer.newLine();
writer.write("" + sumEven);
writer.newLine();
writer.write("" + countOdd);
writer.newLine();
writer.write("" + sumOdd);
writer.newLine();

System.out.println("Complete");
The eight lines at the end should be pretty self-explanatory. We can simply print each number, but we’ll need to convert them to a string first. The simplest way to do that is simply to use the concatenate operator + and concatenate each number with a string, which will automatically convert everything to a string. We’ll also need to remember to print a newline between each of them using the newLine() method. Of course, we also need to print Complete once we are finished!
Once we’ve completed the code, we can use the button below to test it and see if it works. Don’t forget to open the example.pregrade.html file that it creates to see detailed feedback from your program.
Working with files is a very important feature of most computer programs. It can be tedious to manually enter data into a program, and likewise it is very helpful to be able to save the output for use later.
There are many more advanced things that we can do with files. For example, in a later module we’ll see how to build our own objects in code, and then save those objects to a file so we can use them again later.
In general, if your language supports either a “try-with-resources” or a “with” construct you should use it. We deliberately skipped it in the early chapter because the syntax and explanation can be daunting. For now, we can use the power of text files to provide input and output for our programs.