Instantiation
YouTube VideoOnce we have created our class definition, complete with attributes and methods, we can then use those classes in our programs. To create an actual object based on our class that we can store in a variable, we use a process called instantiation.
Instantiation
First, we’ll need to import each file that contains our other classes. For this project, we have code in both the Student.py and Teacher.py files, which are stored in the same directory as Main.py. So, in Main.py, we can use the following lines of code to import everything from Student.py and Teacher.py:
from Student import *
from Teacher import *
In that code, Student and Teacher refer to the Python files with those names, not the classes that are contained within them. It can be a bit confusing at first, and gets even more confusing when we start working with larger modules, but after working with it a few times it will become very familiar.
Next, we’ll need to build the structure for the Main class and main method, as well as the main guard.
However, we can use the information we’ve already learned to build these items pretty easily:
import sys
from Student import *
from Teacher import *

class Main:
  students = []
  teachers = []

  @classmethod
  def main(cls, args):

if __name__ == "__main__":
  Main.main(sys.argv)
In this code, we’ve created a class called Main, which has a method called main that we’ll use to start our program. Finally, we’ve added a standard main guard at the end. Notice that the main guard is not indented, so it is not part of the Main class itself.
Once we have imported all of our files and built our structure, we can use those classes in our code. To instantiate an object in Python, we basically call the name of the class like a function:
import sys
from Student import *
from Teacher import *

class Main:
  students = []
  teachers = []

  @classmethod
  def main(cls, args):
      Student()

if __name__ == "__main__":
  Main.main(sys.argv)
Of course, that will create a Student object, but it won’t store it anywhere. To store that object, we can create a new variable to which to assign the Student object we created:
import sys
from Student import *
from Teacher import *

class Main:
  students = []
  teachers = []


  @classmethod
  def main(cls, args):
      jane = Student()

if __name__ == "__main__":
  Main.main(sys.argv)
This will create a new Student object, and then store it in a variable of type Student named jane. While this may seem a bit confusing at first, it is very similar to how we’ve already been working with variables of types like int and float.
Accessing Attributes
Once we’ve created a new object, we can access the attributes and methods of that object, as defined in the class from which it is created.
For example, to access the name attribute in the object stored in jane, we could use:
import sys
from Student import *
from Teacher import *

class Main:
  students = []
  teachers = []

  @classmethod
  def main(cls, args):
      jane = Student()
      jane.name

if __name__ == "__main__":
  Main.main(sys.argv)
Python uses what is called dot notation to access attributes and methods within instances of a class. So, we start with an object created from that class and stored in a variable, and then use a period or dot . directly after the variable name followed by the attribute or method we’d like to access. Therefore, we can easily access all of the attributes in Student using this notation:
import sys
from Student import *
from Teacher import *

class Main:
  students = []
  teachers = []

  @classmethod
  def main(cls, args):
    jane = Student()

    jane.name
    jane.age
    jane.student_id
    jane.credits
    jane.gpa

if __name__ == "__main__":
  Main.main(sys.argv)
We can then treat each of these attributes just like any normal variable, allowing us to use or change the value stored in it:
import sys
from Student import *
from Teacher import *

class Main:
  students = []
  teachers = []

  @classmethod
  def main(cls, args):
    jane = Student()

    jane.name = "Jane"
    jane.age = jane.age + 15
    jane.student_id = "123" + "456"
    jane.credits = 45
    jane.gpa = jane.gpa - 1.1

    print(jane.name + ": " + jane.student_id)

if __name__ == "__main__":
  Main.main(sys.argv)
Accessing Methods
We can use a similar syntax to access the methods in the Student object stored in jane:
import sys
from Student import *
from Teacher import *

class Main:
  students = []
  teachers = []

  @classmethod
  def main(cls, args):
    jane = Student()

    jane.birthday()
    jane.grade(4, 12)

if __name__ == "__main__":
  Main.main(sys.argv)
Try It
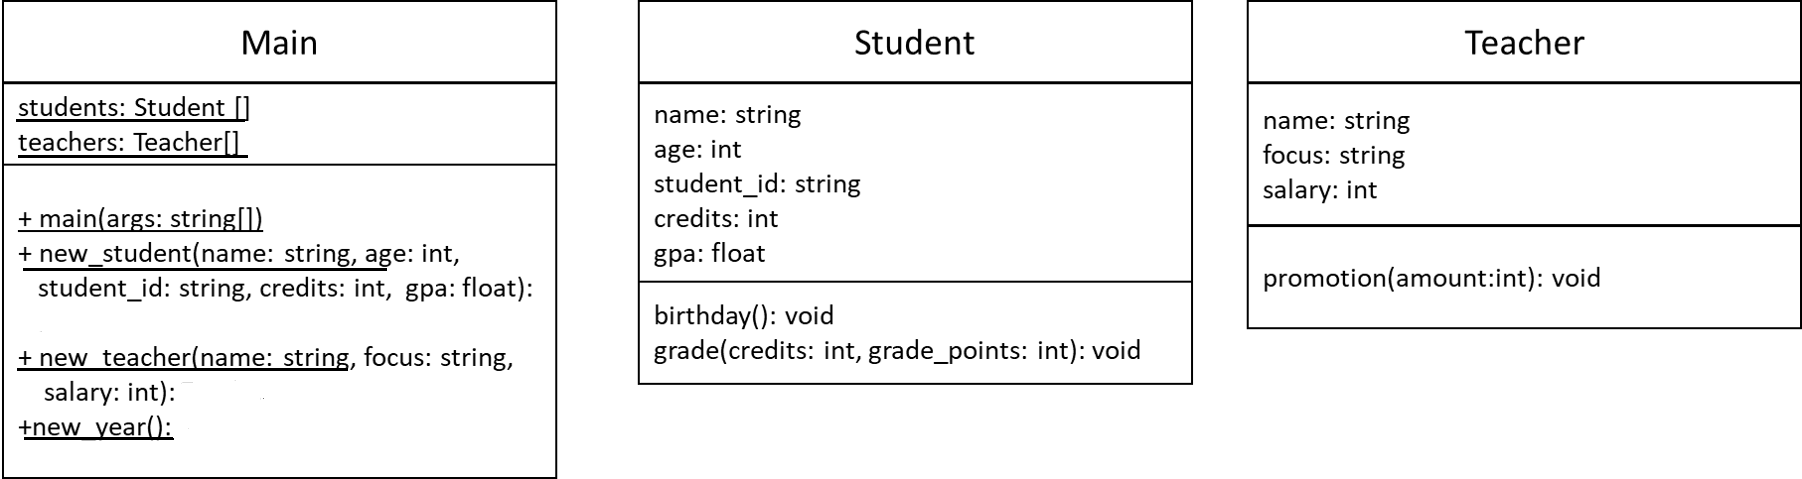
Let’s see if we can use what we’ve learned to instantiate a new student and teacher object in our Main class. First, let’s look at the UML diagram once again:
In that diagram, we see that the Main class should include a method called new_student(), which accepts several parameters corresponding to the attributes in Student. That method should also return an object of type Student. Similarly, there is a method called new_teacher() that does the same for the Teacher class.
So, let’s implement the new_teacher() method and see what it would look like:
  @classmethod
  def new_teacher(cls, name, focus, salary):
    some_teacher = Teacher()
    some_teacher.name = name
    some_teacher.focus = focus
    some_teacher.salary = salary
    cls.teachers.append(some_teacher)
Since new_teacher is a class method, we start with the decorator @classmethod; then start our function definition with the def keyword and the name of the function, followed by our list of parameters.
Inside the function, we instantiate a new Teacher object, storing it in a variable named some_teacher, to distinguish it from the class Teacher.
Then, we set the attributes in some_teacher to the values provided as arguments to the function. Finally, once we are done, we can add some_teacher to the class list of teachers. Let’s fill in both the new_teacher() and new_student() methods in the Main class now. We can use the buttons below to confirm that they work correctly.
In many code examples, it is very common to see variable names match the type of object that they store. For example, we could use the following code to create both a Teacher and Student object, storing them in teacher and student, respectively:
teacher = Teacher()
student = Student()
This is allowed in Python, since both data type names and variable identifiers are case-sensitive. Therefore, Teacher and teacher can refer to two different things. For some developers, this becomes very intuitive.
However, many other developers struggle due to the fact that these languages are case-sensitive. It is very easy to either accidentally capitalize a variable or forget to capitalize the name of a class.
So, in this course, we generally won’t have variable names that match class names in our examples. You are welcome to do so in your own code, but make sure you are careful with your capitalization!