Chapter 12
Classes
Making Our Own Data Types!
Making Our Own Data Types!
Lets take a second look at classes. This time, rather than focusing on a single object-class, we will have several interconnected object classes, introduce class-level features and the concepts of properties and access permission.
Some of the material in this module will be review.
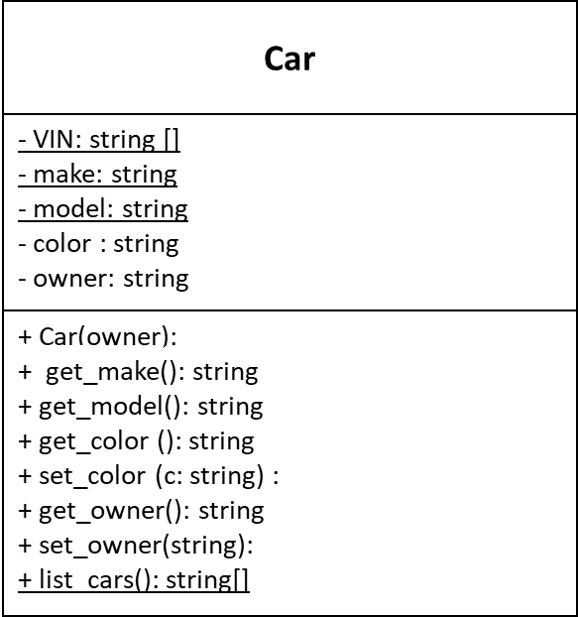
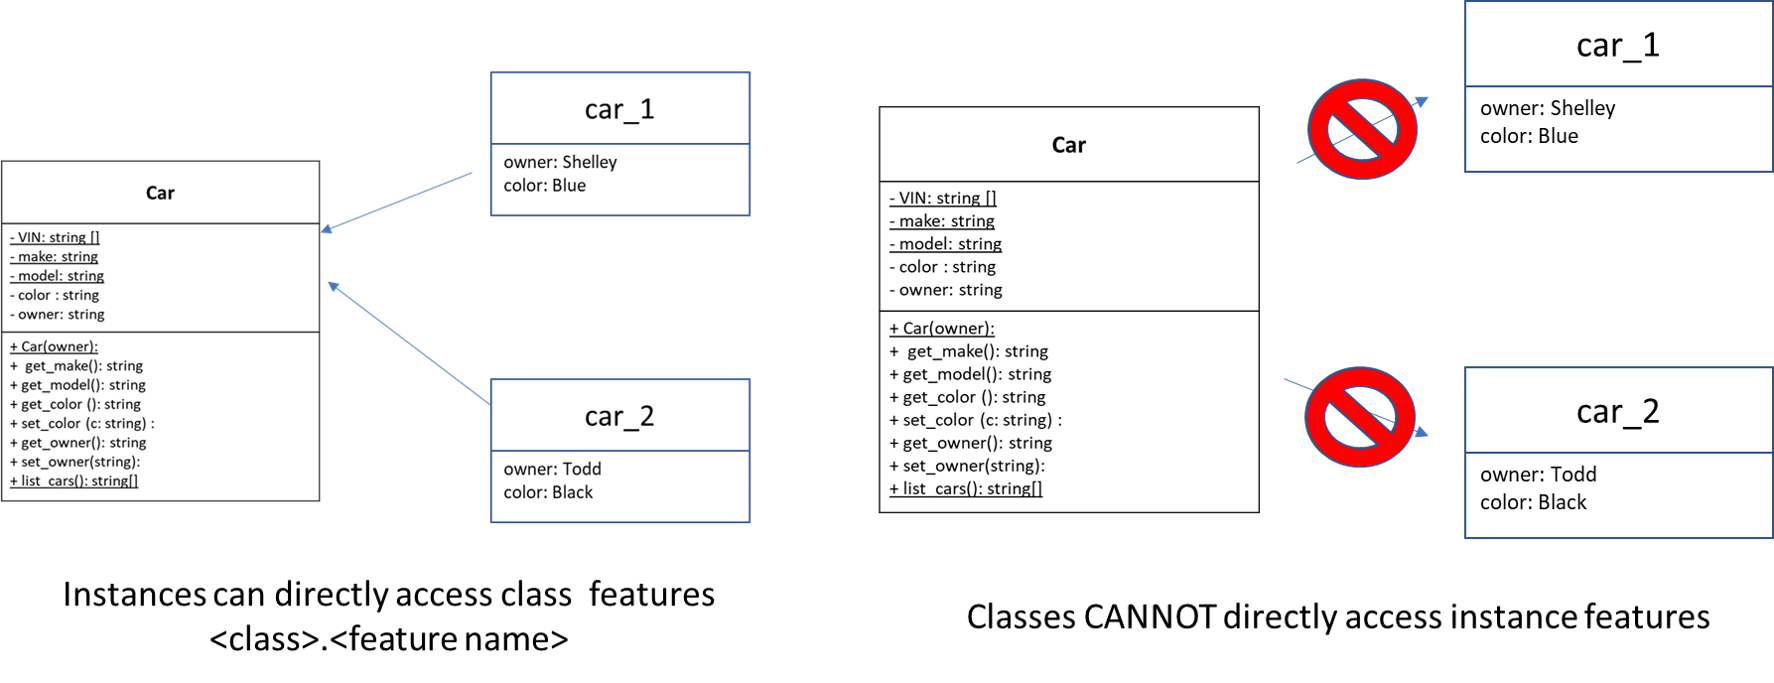
Consider the above UML for a car. It has 3 “class level” attributes, those underlined in the UML. These are variables that belong to the class, not a particular instance, and thus are shared by all the instances. Class features are denoted by an underline on the UML.
The Ford F-Series truck is a well selling truck model. If we were to write a program dealing with the manufacture and sales of this truck, we would have millions of instances. If each instance had instance attributes for make and model we would waste billions of bytes of memory. By making this a class-level attribute, all instances of the class have access to a single copy of the data.
Additionally, it would make sense that at the class-level, we have a list of all vehicle identification numbers (VIN). Keeping this information at the instance level would be horrifically inefficient. Every time we produce a new car each instance of the class would have to be accessed, and a a new entry added. Not only is it a waste of time, it means we are keeping millions of copies of a list of millions numbers–oh yes, and we’ll need a way to ensure each list in each instance always match.
All instances have direct access to their classes class-level attributes (and methods). There will be language specific syntax for this. However, class-level features do not have direct access to an instance’s features.
As previously discussed, class methods are denoted on the UML diagram by an underline. Class methods will have language specific syntax for accessing other class-level features. If access to an object is required, that object is
You will notice that each feature of the class Car is labeled with a plus or minus sign. This informs programmers how to control access to the feature.
+ PublicPublic access means the code outside of the class definition are expected to be able to access this feature. Generically this is referred to as “public”. Constructors are almost always public, as are many methods.
- PrivatePrivate access means that this feature should only be referenced by code inside of the class definition. Some methods and nearly all attributes are typically private.
Implementation in code depends on the implementation language. Some languages, like Java, strictly enforce access modifiers, making it impossible for coders to access “private” features outside a class definition. Other languages, like Python do not enforce any restrictions, and instead depend on coders to voluntarily follow the convention.
Because OOP generally results in private fields (variables), early OOP programmers were swamped with writing accessor and mutator methods. These methods had the sole function of providing a ‘public’ way of getting or setting the private field. It became so common that many programming languages developed a special “hybrid” syntax^[in some languages, properties are a special ’type’, in others they are normal class fields with just a bit of syntactic sugar. For our purposes the internal language implementation does not matter.] for this purpose called “Properties”.
When a UML has public getter and setter methods (get_color(), set_color()) AND the implementation language supports properties, properties should be used.
Both Java and Python support properties. Details will be in your language specific section.
When an attribute only has a ‘setter’ method it is often referred to as a read only property. Read-only properties are often set by the constructor and never changed.
Classes in Java
We’ve already been creating and using classes in our Java programs up to this point. This is because Java is a truly object-oriented language, meaning that all code in Java must be contained as part of a class.
Java requires that each class be stored in a file with the same name, followed by the .java file extension. By convention, class names in Java are written in CamelCase, meaning that each word is capitalized and there are no spaces between the words. We’ll follow these rules in our code.
So, to create a class named Student, we would place the following code in a file named Student.java:
public class Student{

}
As we’ve already learned, each class declaration in Java includes these parts:
public - this keyword is used to identify that the item after it should be publicly accessible to all other parts of the program. Later in this chapter, we’ll discuss other keywords that could be used here.class - this keyword says that we are declaring a new class.Student - this is an identifier that gives us the name of the class we are declaring.Following the declaration, we see a set of curly braces {}, inside of which will be all of the fields and methods stored in this class.
To follow along, create or open these three files: Student.java, Teacher.java, and Main.java. Let’s go ahead and add the class declaration code to each file.
Some methods and attributes belong to the class and are shared by all the instances of the class. On the UML these are noted by underlines. In Java, we use the static modifier to make “class features”. We’ve seen this modifier each time we declare the main method in our programs, but we haven’t really been able to discuss exactly what it means. In essence, the static modifier makes an attribute or method part of the class in which it is declared instead of part of objects instantiated from that class.
First, we can use the static modifier with an attribute, attaching that attribute to the class instead of the instance. Here’s an example:
public class Stat{
  public static int x = 5;
  public int y;

  public Stat(int an_y){
    this.y = an_y;
  }
}
In this class, we’ve created a static attribute named x, and a normal attribute named y. Here’s a main() method that will help us explore how the static keyword operates:
public class Main{
 public static void main(String[] args){
   Stat someStat = new Stat(7);
   Stat anotherStat = new Stat(8);

   System.out.println(someStat.x);      // 5
   System.out.println(someStat.y);      // 7
   System.out.println(anotherStat.x);   // 5
   System.out.println(anotherStat.y);   // 8

   someStat.x = 10;

   System.out.println(someStat.x);      // 10
   System.out.println(someStat.y);      // 7
   System.out.println(anotherStat.x);   // 10
   System.out.println(anotherStat.y);   // 8

   Stat.x = 25;

   System.out.println(someStat.x);      // 25
   System.out.println(someStat.y);      // 7
   System.out.println(anotherStat.x);   // 25
   System.out.println(anotherStat.y);   // 8
 }
}
First, we can see that the attribute x is set to 5 as its default value, so both objects someStat and anotherStat contain that same value. Then we can update the value of x attached to someStat to 10, and we’ll see that both objects will now contain that value. That’s because the value is static, and there is only one copy of that value for all instances of the Stat class.
Finally, and most interestingly, since the attribute x is static, we can also access it directly from the class Stat, without even having to instantiate an object. So, we can update the value in that way, and it will take effect in any objects instantiated from Stat.
We can also do the same for static methods.
public class Stat{
  public static int x = 5;
  public int y;

  public Stat(int an_y){
    this.y = an_y;
  }

  public static int sum(int a){
    return x + a;
  }
}
We have now added a static method sum() to our Stat class. The important thing to remember is that a static method cannot access any non-static attributes or methods, since it doesn’t have access to an instantiated object. Likewise, we cannot use the this keyword inside of a static method.
As a tradeoff, we can call a static method without instantiating the class either, as in this example:
public class Main{
 public static void main(String[] args){
   //other code omitted
   Stat.x = 25;

   Stat moreStat = new Stat(7);
   System.out.println(moreStat.sum(5));  // 30
   System.out.println(Stat.sum(5));      // 30
 }
}
This becomes extremely useful in our main() method. Since the main() method is always static, it can only access static attributes and methods in the class it is declared in. So, we can either create all of our additional methods in that class as static methods, or we can instantiate the class it is contained in. We’ll see how to do that later in the example project in this chapter.
Of course, we can also denote items that should be static in our UML class diagrams. According to the UML specification, any static items should be underlined, as in this sample UML diagram below:

As we work on developing our classes, we can also learn about a few special keywords called modifiers we can use to protect data and methods stored in those classes. Let’s review those and see how they work in our programs.
First, we can use the public keyword in front of any of our class attributes and methods to make them accessible to any other Java code. We’ve already seen this keyword in used when we declare the main method in each of our programs.
Alternatively, we can use the private keyword to prevent any code outside of our own class from accessing the attributes or methods we mark using private.
Let’s look at an example to see how this would work:
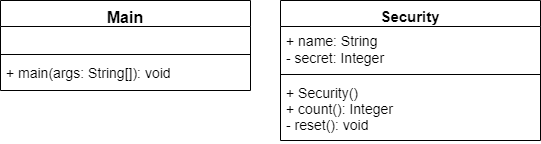
public class Security{
  public String name;
  private int secret;

  public Security(){
    this.reset();
  }

  public int count(){
    return name.length();
  }

  private void reset(){
    this.name = "test";
    this.secret = 123;
  }
}
In this class, we have created both a private and a public attribute, and a private and a public method. We can also see that we are able to call the private method reset() from within our constructor, and in the reset() method we are able to access the secret private attribute without an issue. So, within our class itself, we don’t have to worry about private or public modifiers preventing access to anything.
However, outside of that class, they have a big impact on what we can access. Consider the following main() method from a different class:
public class Main{
  public static void main(String[] args){
    Security someSecurity = new Security();
    System.out.println(someSecurity.name);     // "test"
    System.out.println(someSecurity.secret);   // COMPILER ERROR
    System.out.println(someSecurity.count());  // 4
    someSecurity.reset();                      // COMPILER ERROR
  }
}
In this code, we cannot access any private members of the Security class. So, when we try to compile this code, we’ll get the following error messages:
Main.java:5: error: secret has private access in Security
    System.out.println(someSecurity.secret);
                                   ^
Main.java:7: error: reset() has private access in Security
    someSecurity.reset();
                ^
2 errors
As we can see, the Java compiler itself enforces these security modifiers, making a very powerful way to limit access to the members and attributes in our classes.
So, why would we want to do this? After all, if we’re the ones writing the code, shouldn’t we be able to access everything anyway?
In many cases, the classes we are writing become part of a larger project, so we may not always be the ones writing code that interfaces with our class. For example, if we are writing an engine for a video game, we may want to make attributes such as the player’s health private. In that way, anyone writing a mod for the engine would not be able to modify those values and cheat the system. Similarly, there are some actions, such as a reset() method, that we may only want to call from within the class.
As we build larger and more complex programs, we’ll even find that it is helpful as developers to limit access to just the methods and attributes that should be accessed by anyone using our classes, helping to simplify our overall program’s structure.
We can denote the access level of items in a UML class diagram using a few simple symbols. According to the UML standard, any item with a plus + in front of it should be public, and any item with a minus - in front should be private. So, we can build a UML class diagram showing the Main and Security classes as shown below:
Of course, our classes are not very useful at this point because they don’t include any attributes or methods. Including attributes in a class is one of the simplest uses of classes, so let’s start there.
To add an attribute to a class, we can simply declare a variable inside of our class declaration:
public class Student{
  String name;
  int age;
  String student_id;
  int credits;
  double gpa;
}
That’s really all there is to it! We can also add default values to these attributes by assigning a value to the variable in the same line as the declaration:
public class Student{
  String name = "name";
  int age = 19;
  String student_id = "123456987";
  int credits = 0;
  double gpa= 0.0;
}
However, it is very important to note that we cannot declare an attribute and then set the default value on a separate line. So, code such as this is not allowed:
public class Student{
  String name;
  name = "test";
}
If we try to compile that code, we’ll get the following error:
java/school/Student.java:3: error: <identifier> expected
  name = "test";
      ^
1 error
This is because the code inside of a class declaration that is outside of any method is not directly executed. Instead, it defines the structure of the class only. So, the line name = "test"; makes no sense to the compiler, because it is only expecting variable or function declarations, not executable code such as variable assignments.
Finally, we can add the public keyword to the beginning of each of these attributes to make them available to code outside of this class:
public class Student{
  public String name = "name";
  public int age = 19;
  public String student_id = "123456987";
  public int credits = 0;
  public double gpa= 0.0;
}
We’ll see how to access and use these attributes later in this chapter. In addition, we’ll discuss other keywords we can place in front of these attributes to make them more secure.
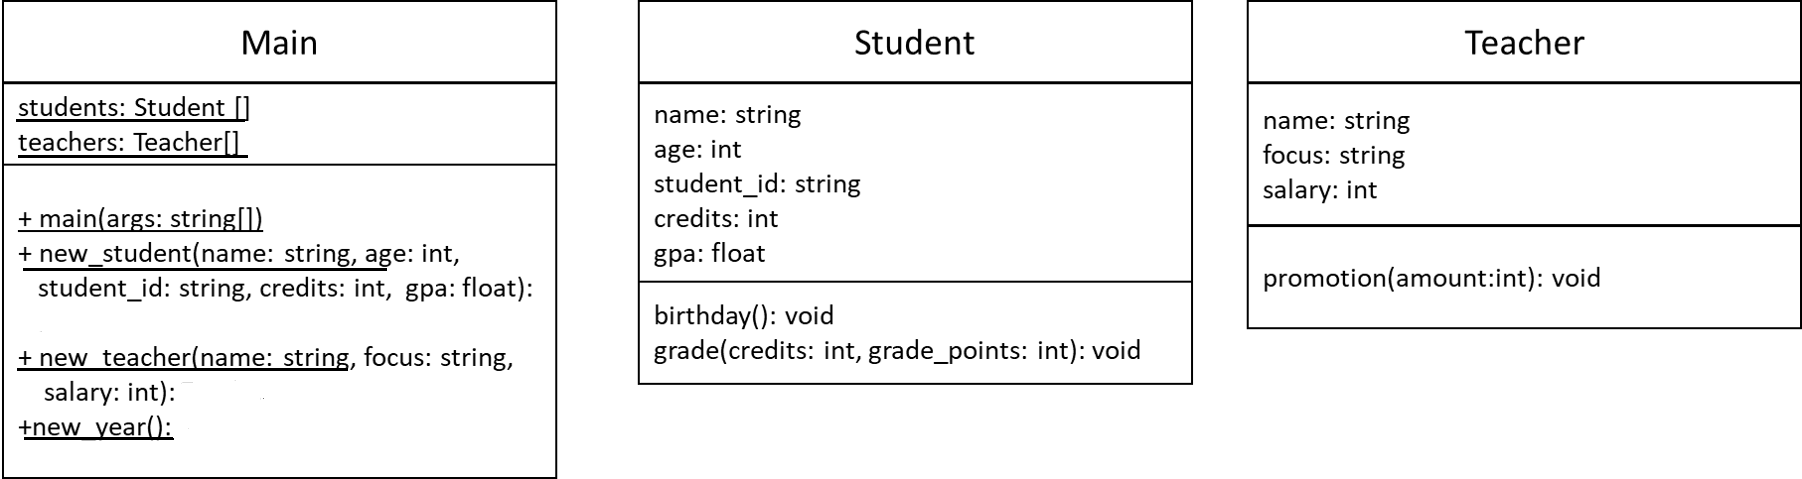
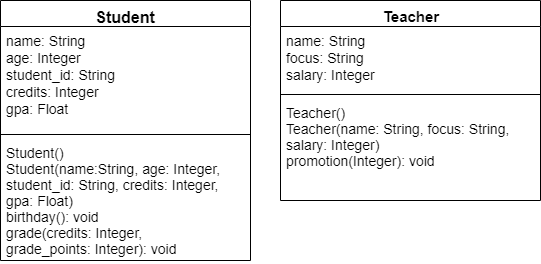
For now, let’s go ahead and add the correct attributes to the Student.java, Teacher.java and Main.java files. Feel free to refer to the UML diagram below to find the correct attributes for each class. We can choose to add default values if we’d like to, but we won’t be able to add values to the arrays in Main.java yet, so we can just declare them for now.
At this point, if we try to compile Main.java all by itself, we’ll get error messages like the following:
java/school/Main.java:2: error: cannot find symbol
  public Student[] students;
         ^
  symbol:   class Student
  location: class Main
java/school/Main.java:3: error: cannot find symbol
  public Teacher[] teachers;
         ^
  symbol:   class Teacher
  location: class Main
2 errors
This is because the compiler doesn’t know where to find the Student and Teacher classes. So, we’ll need to include all three classes in the same compiler command in order to compile Main.java. The graded assessments do this for you automatically, but if you want to test your code, you’ll need to compile those files manually. Unfortunately, the buttons at the top of the window in Codio are not as well suited to this use.
To do so, simply open the terminal, then change the current directory to where your files are stored. Finally, use the javac command, followed by all of the files that you want to compile. Here’s an example of what these commands would look like for this exercise:
cd java/school
javac Student.java Teacher.java Main.java
As a shortcut, if you’d like to compile all the .java source files in that directory, you can also use the command javac *.java as the second step.
We can also add methods to our classes. These methods are used either to modify the attributes of the class or to perform actions based on the attributes stored in the class. Finally, we can even use those methods to perform actions on data provided as arguments. In essence, the sky is the limit with methods in classes, so we’ll be able to do just about anything we need to do in these methods. Let’s see how we can add methods to our classes.
To add a method to our class, we can simply add a function declaration inside of our class. In fact, all of the functions we’ve been creating up to this point have been inside of a class. The only difference is that we’ll now be able to remove the static keyword from our function declarations. We’ll discuss more about exactly what that keyword does later in this chapter.
So, let’s add the methods we need to our Student class:
import java.lang.Math;

public class Student{
  String name = "name";
  int age = 19;
  String student_id = "123456987";
  int credits = 0;
  double gpa = 0.0;

  void birthday(){
    this.age = this.age + 1;
  }

  void grade(int credits, int grade_points){
    int current_points = (int)Math.round(this.gpa * this.credits);
    this.credits += credits;
    current_points += grade_points;
    this.gpa = current_points / this.credits;
  }
}
The birthday() method is pretty straightforward. When that method is called, we simply increase the age of this student by 1 year. However, instead of referencing the age variable directly, we are using this.age to access the attribute age in this class. The keyword this refers to the current instance of Student, which we’ll learn how to create on the next page. Whenever we want to access an attribute in a class, it is recommended that we always use the keyword this in front of it, just to avoid any issues.
The grade() method is a bit more complex. It accepts a number of credits and the grade points earned for a class, and then must update the credits and gpa attributes with that new information. To do this, it must first calculate the current number of grade points the student has earned based on the current GPA, then update those values and recalculate the GPA. Finally, notice that we included a reference to the Math.round() method, so we’ll also need to import the java.lang.Math library at the top of our file in order to use that method.
We’ve already discussed variable scope earlier in this course. Recall that variables declared inside of a block are not accessible outside of the block. Similarly, two different functions may reuse variable names, because they are in different scopes.
The same applies to classes. A class may have an attribute named age, but a method inside of the class may also declare a local variable named age. Therefore, we must be careful to make sure that we access the correct variable, usually by using the this keyword to access the attribute variable. Here’s a short example:
public class Test{
  int age = 15;

  void foo(){
    int age = 12;
    System.out.println(age);      // 12
    System.out.println(this.age); // 15
  }

  void bar(){
    System.out.println(age); // 15
  }
}
As we can see, in the method foo() we must be careful to use this.age to refer to the attribute, since there is another variable named age declared in that method. However, in the method bar() we see that age automatically references the attribute, since there is no other variable named age defined in that scope.
This can lead to some confusion in our code. So, we should always get in the habit of using this to refer to any attributes, just to avoid any unintended problems later on.
Let’s go ahead and add the promotion() method to the Teacher class as well. That method should accept a single integer as a parameter, and then add that value to the Teacher’s current salary. We won’t worry about adding methods to the Main class at this point: we’ll cover those methods in the next few pages.
The video above doesn’t show the correct code slides. You can find those slides by clicking the Video Materials link above, and then the Slides link at the top of that page. We’re working on re-recording this video.
Once we have created our class definition, complete with attributes and methods, we can then use those classes in our programs. To create an actual object based on our class that we can store in a variable, we use a process called instantiation.
To instantiate an object in Java, we use the new keyword, and basically call the name of the class like a function:
public class Main{

  public static void main(String[] args){
    new Student();
  }
}
Of course, that will create a Student object, but it won’t store it anywhere. To store that object, we can create a new variable using the Student data type, and then assign the Student object we created to that variable:
public class Main{

  public static void main(String[] args){
    Student jane = new Student();
  }
}
This will create a new Student object, and then store it in a variable of type Student named jane. While this may seem a bit confusing at first, it is very similar to how we’ve already been working with variables of types like int and double.
Once we’ve created a new object, we can access the attributes and methods of that object, as defined in the class from which it is created.
For example, to access the name attribute in the object stored in jane, we could use:
public class Main{

  public static void main(String[] args){
    Student jane = new Student();

    jane.name;
  }
}
Java uses what is called dot notation to access attributes and methods within a class. So, we start with an object created from that class and stored in a variable, and then use a period or dot . directly after the variable name followed by the attribute or method we’d like to access. Therefore, we can easily access all of the attributes in Student using this notation:
public class Main{

  public static void main(String[] args){
    Student jane = new Student();

    jane.name;
    jane.age;
    jane.student_id;
    jane.credits;
    jane.gpa;
  }
}
We can then treat each of these attributes just like any normal variable, allowing us to use or change the value stored in it:
public class Main{

  public static void main(String[] args){
    Student jane = new Student();

    jane.name = "Jane";
    jane.age = jane.age + 15;
    jane.student_id = "123" + "456";
    jane.credits = 45
    jane.gpa = jane.gpa - 1.1;

    System.out.println(jane.name + ": " + jane.student_id);
  }
}We can use a similar syntax to access the methods in the Student object stored in jane:
public class Main{

  public static void main(String[] args){
    Student jane = new Student();

    jane.birthday();
    jane.grade(4, 12);
  }
}Let’s see if we can use what we’ve learned to instantiate a new student and teacher object in our Main class. First, let’s look at the UML diagram once again:
In that diagram, we see that the Main class should include a method called new_student(), which accepts several parameters corresponding to the attributes in Student. That method should also return an object of type Student. Similarly, there is a method called new_teacher() that does the same for the Teacher class.
So, let’s implement the new_teacher() method and see what it would look like:
public class Main{

  public static void main(String[] args){
    // more code here
  }

  static Teacher new_teacher(String name, String focus, int salary){
    Teacher someTeacher = new Teacher();
    someTeacher.name = name;
    someTeacher.focus = focus;
    someTeacher.salary = salary;
    return someTeacher;
  }
}
Since we are writing this method in our Main class, we’ll use the static keyword here. We’ll discuss why we need that keyword later in this chapter. Next, we include the Teacher data type as the return data type for this function, since we want to return an object using the type Teacher. Following that, we have our list of parameters, as always.
Inside the function, we instantiate a new Teacher object, storing it in a variable named someTeacher. We must be careful to use a variable name that is not the same as the name of the class Teacher, since that is now the name of a data type and therefore cannot be used as anything else.
Then, we set the attributes in someTeacher to the values provided as arguments to the function. Finally, once we are done, we can return the someTeacher variable for use elsewhere.
Let’s fill in both the new_teacher() and new_student() methods in the Main class now.
In many code examples, it is very common to see variable names match the type of object that they store. For example, we could use the following code to create both a Teacher and Student object, storing them in teacher and student, respectively:
Teacher teacher = new Teacher();
Student student = new Student();
This is allowed in Java, since both data type names and variable identifiers are case-sensitive. Therefore, Teacher and teacher can refer to two different things. For some developers, this becomes very intuitive. In fact, we’ve used it several times in this course for the Scanner objects we use to read files.
However, many other developers struggle due to the fact that these languages are case-sensitive. It is very easy to either accidentally capitalize a variable or forget to capitalize the name of a class.
So, in this course, we generally won’t have variable names that match class names in our examples. You are welcome to do so in your own code, but make sure you are careful with your capitalization!
On the last page, we created functions in the Main class to instantiate a Student and Teacher object and set the attributes for each object. However, wouldn’t it make more sense for the Student and Teacher classes to handle that work internally?
Thankfully, we can do just that by providing a special type of method in our classes, called a constructor method.
A constructor is a special method that is called whenever a new instance of a class is created. It is used to set the initial values of attributes in the class. We can even accept parameters as part of a constructor, and then use those parameters to populate attributes in the class.
Let’s go back to the Student class example we’ve been working on and add a simple constructor to that class:
import java.lang.Math;

public class Student{
  String name = "name";
  int age = 19;
  String student_id = "123456987";
  int credits = 0;
  double gpa = 0.0;

  Student(){
  }

  // other methods omitted
}
The constructor itself is very simple:
  Student(){
  }
This is called the default constructor for the class because it accepts no parameters. A constructor is simply a method in the class with he same name as the class, without any return type defined.
In fact, Java automatically creates a default constructor which contains no code if one isn’t added to the class, just like this one. So, really, this constructor isn’t adding anything. Let’s add some code to see what it can do!
import java.lang.Math;

public class Student{
  String name = "name";
  int age = 19;
  String student_id = "123456987";
  int credits = 0;
  double gpa = 0.0;

  Student(){
    this.name = "name";
    this.age = 19;
    this.student_id = "123456987";
    this.credits = 0;
    this.gpa = 0.0;
  }

  // other methods omitted
}
In this example, we have added code to the default constructor to initialize the attributes to default values. Notice that we also used the this keyword once again to refer to the current object, just to be sure that we are setting the correct attributes.
In fact, now that our default constructor includes these default values, we can remove them from the attribute declaration themselves:
import java.lang.Math;

public class Student{
  String name;
  int age;
  String student_id;
  int credits;
  double gpa;

  Student(){
    this.name = "name";
    this.age = 19;
    this.student_id = "123456987";
    this.credits = 0;
    this.gpa = 0.0;
  }

  // other methods omitted
}
In this way, we can enforce the default values through the default constructor, without including them in the attribute declarations above, making the code a bit easier to read.
With that constructor, we can then instantiate the class and see that the attribute values are set correctly:
public class Main{

  public static void main(String[] args){
    Student someStudent = new Student();
    System.out.println(someStudent.name) // "name";
    System.out.println(someStudent.age)  // 19
  }
}
So, constructors are a very easy way to help set initial values for attributes in a class. We can even call class methods directly from the constructor if needed to help with setup.
We can also create constructors that accept arguments. For example, we can create a constructor that accepts a value for each attribute as in this example:
import java.lang.Math;

public class Student{
  String name;
  int age;
  String student_id;
  int credits;
  double gpa;

  Student(){
    this.name = "name";
    this.age = 19;
    this.student_id = "123456987";
    this.credits = 0;
    this.gpa = 0.0;
  }

  Student(String name, int age, String student_id, int credits, double gpa){
    this.name = name;
    this.age = age;
    this.student_id = student_id;
    this.credits = credits;
    this.gpa = gpa;
  }

  // other methods omitted
}
In this example, we still have the default constructor with no parameters that sets the default values for each attribute. However, we’ve also added a second constructor that accepts 5 parameters, one for each attribute in the class.
Inside that constructor, the code looks very similar to the function we added to the Main class on the previous page. It will use each parameter to set the corresponding attribute, using the this keyword once again to refer to the current object.
Also, this example shows one very important aspect of constructors: just like with methods, we can include multiple constructors, each one accepting a different set of parameters. So, it is possible to make any number of constructors if needed, as long as each one accepts a different set of parameters.
We can also add constructors to our UML class diagrams. A constructor is usually denoted in the methods section of a class diagram by using the name of the class as the method name and omitting the return type. In addition, they are usually included at the top of the methods section, to make them easier to find:
The diagram above shows the Student and Teacher classes with constructors included.
Now that we know how to use constructors, let’s modify our working example to add the following constructors to both Teacher and Student:
The examples for Student have already been created above, but we’ll have to figure out how to do the same for the Teacher class.
Finally, it is important to remember that any instantiated objects used as arguments to a method are passed in a call-by-reference manner. So, any modifications to those objects made inside of a method will also be reflected in the code that called the method.
Here’s a quick example:
public class Reference{
  public int x;
}
public class Main{
public static void main(String[] args){
Reference someRef = new Reference();
someRef.x = 10;
modify(someRef);
System.out.println(someRef.x); // 15
}
public static void modify(Reference aRef){
aRef.x = 15;
}
}As we can see, when we call the modify() function and pass a Reference object as an argument, we can modify the attributes inside of that object and see those changes back in the main() method after modify() is called.
Of course, if we reassign the argument’s variable to a new instance of Reference inside of the modify() function, then we won’t see those changes in main() because we are dealing with a newly created object.
So, we’ll need to keep this in mind as we use objects as parameters and returned values in any methods we create in our programs.
In the video, the UML diagram incorrectly shows the name property as a public property with a + symbol. However, in the code, it is shown as a private property, which is the correct design. The design is also corrected in the example below.
So far in this chapter we’ve learned how to create private and public attributes in our classes. What if we want to create an attribute that is read-only, or one that only accepts a particular set of values? In Java, we can do that using a pattern of getter and setter methods.
Some languages use the term property to refer to an attribute that is typically accessed using getter and setter methods. We will use that term in this context for now.
In Java, a getter method is a method that can be used to access the value of a private attribute. Conventionally, the method’s name begins with get to make it clear what it does. Let’s look at an example:
public class Property{
  private String name;

  public Property(){
    name = "";
  }

  public String getName(){
    return name;
  }

}
In this class, the name attribute is private, so normally we wouldn’t be able to access its value. However, we’ve created a method getName() that acts as a getter for the name attribute. In this way, the value of that variable can be accessed in a read-only fashion.
From other code, we can call that method just like any other:
Property prop = new Property();
String name = prop.getName();Similarly, we can create another method that can be used to update the value of the name attribute:
import java.lang.IllegalArgumentException;

public class Property{
  private String name;

  public Property(){
    name = "";
  }

  public String getName(){
    return name;
  }

  public void setName(String a_name){
    if(a_name.length() == 0){
      throw new IllegalArgumentException("Name cannot be an empty string!");
    }
    this.name = a_name;
  }

}
In this code, we’ve added a setName() method that can be used to update the value stored in the name attribute. We’re also checking to make sure that the argument provided to the a_name parameter is not an empty string. If it is, we can throw an IllegalArgumentException, which would alert the user that this is not allowed. Of course, it would be up to the person writing the code that calls this method to properly catch and handle this exception.
this KeywordNotice that the this keyword is omitted in the getter, but is included in the setter? This is often something lazy (or experienced) programmers will do. In a getter, we often don’t have any other variables or parameters, so we can just refer to a class properties by name, such as return name instead of return this.name, and the Java compiler will know that we are referencing the property variable at the class level due to variable overloading.
However, in a setter, we often have additional variables to contend with. So, to avoid the chance of any variable name collisions, we often use the this keyword to access any class properties, such as this.name. This would especially be important if we renamed our parameter from a_name to just name instead. In that case, if we omitted the this keyword, our assignment statement would just be name = name and Java would not understand that we want to set the class property name to the same value as the setter parameter name.
As a general rule, it is always recommended to use the this keyword to access class properties, but if you are comfortable with omitting it in certain situations (provided you know how that will be interpreted), you can get away with it.
Getter and setter methods are displayed on a UML class diagram just like any other method. We use naming conventions such as getName() and setName() to make it clear that those methods are getters and setters for the attribute name, as in this UML class diagram:
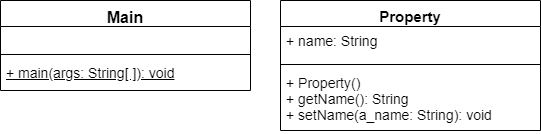
So, through the use of getter and setter methods, we can either prevent other code from updating an attribute, or enforce restrictions on that attribute’s values, without actually exposing the attribute. Here’s a sample main class that demonstrates how to use these methods:
public class Main{
  public static void main(String[] args){
    Property prop = new Property();
    String name = prop.getName();
    System.out.println(name);
    prop.setName("test");
    System.out.println(prop.getName());
  }
}Now that we’ve learned all about how to make our own classes and objects, we can practice our skills by building an example program together. This will be a larger program than many of the programs we’ve worked with so far, but hopefully it will actually be easier to follow since the code is separated into several classes.
For this example, we’ll build a program to play a version of the game of Blackjack, also known as Twenty-One. The rules of this simplified game are fairly straightforward:
You can find the full rules to Blackjack on Wikipedia.
In order to build this program, we’ll need to implement several classes to represent the objects needed for the game. For now, we’ll follow this UML diagram to help guide the design of this program. In later chapters, you’ll learn the skills needed to design your own program structures from scratch, but when learning to program it is sometimes easier to first read different program structures before writing your own.
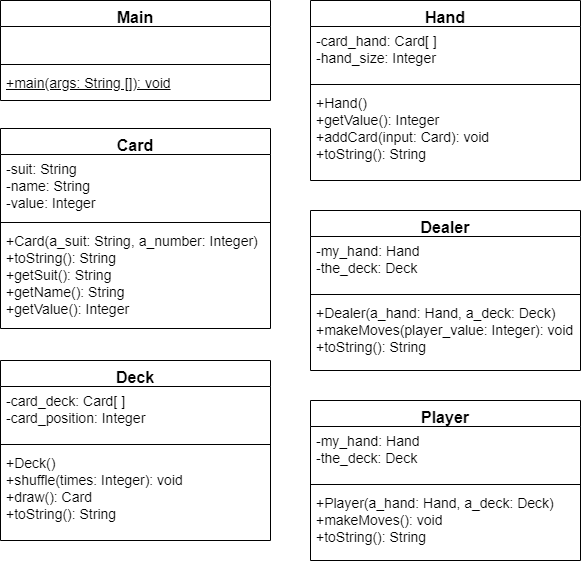
This program will contain several classes:
main() function.To build this program, we’ll address each class individually. That allows us to build the program one piece at a time, and allows us to test it at each step to make sure it is working correctly.
Card ClassThe first and simplest class we can build is the Card class. This class represents a single card from a deck of cards, and contains the suit, name, and value attributes. Since we don’t want those values to be edited outside of this class, we can use private attributes paired with getter methods for them. For the value, we’ll use an integer to make the rest of the program simpler.
public class Card{
  //Attributes
  private String suit;
  private String name;
  private int value;

  //Getters
  public String getSuit(){ return suit; }
  public String getName(){ return name; }
  public int getValue(){ return value; }
}
In this code, notice that we can actually write our simple getter methods as a single line of code. While this may violate some code formatting practices, it may also be easier to read and minimize the number of lines in our file. We’ll use this format here to save space.
We’ll also need to create a simple constructor for this class. It can accept a suit and a card number as input, and then populate the attributes as needed:
public class Card{
  //Attributes
  private String suit;
  private String name;
  private int value;

  //Getters
  public String getSuit(){ return suit; }
  public String getName(){ return name; }
  public int getValue(){ return value; }

  public Card(String a_suit, int a_number){
    this.suit = a_suit;
    if(a_number == 1){
      this.name = "Ace";
      this.value = 11;
    }else if (a_number == 11){
      this.name = "Jack";
      this.value = 10;
    }else if (a_number == 12){
      this.name = "Queen";
      this.value = 10;
    }else if (a_number == 13){
      this.name = "King";
      this.value = 10;
    }else{
      this.name = a_number + "";
      this.value = a_number;
    }
  }
}
Finally, we can add some additional code to our constructor to validate the supplied parameter arguments, just to avoid any unforeseen errors. In this case, we’ll make sure that the suits and numbers provided are all valid values:
import java.lang.IllegalArgumentException;

public class Card{
  //Attributes
  private String suit;
  private String name;
  private int value;

  //Getters
  public String getSuit(){ return suit; }
  public String getName(){ return name; }
  public int getValue(){ return value; }

  public Card(String a_suit, int a_number){
    if(!(a_suit.equals("Spades") || a_suit.equals("Hearts") || a_suit.equals("Clubs") || a_suit.equals("Diamonds"))){
      throw new IllegalArgumentException("The suit must be one of Spades, Hearts, Clubs, or Diamonds");
    }
    if(a_number < 1 || a_number > 13){
      throw new IllegalArgumentException("The card number must be an integer between 1 and 13, inclusive");
    }
    this.suit = a_suit;
    if(a_number == 1){
      this.name = "Ace";
      this.value = 11;
    }else if (a_number == 11){
      this.name = "Jack";
      this.value = 10;
    }else if (a_number == 12){
      this.name = "Queen";
      this.value = 10;
    }else if (a_number == 13){
      this.name = "King";
      this.value = 10;
    }else{
      this.name = a_number + "";
      this.value = a_number;
    }
  }
}
To do this, we’ve added a couple of If-Then statements to the constructor that can throw Exceptions if the inputs are invalid.
Finally, to make debugging our programs very simple, we’ll add a special method, toString() to this class. The toString() method is actually a part of every class in Java because of inheritance, something we’ll learn more about in a later chapter. For now, we can add that method as shown below:
import java.lang.IllegalArgumentException;

public class Card{
  //Attributes
  private String suit;
  private String name;
  private int value;

  //Getters
  public String getSuit(){ return suit; }
  public String getName(){ return name; }
  public int getValue(){ return value; }

  // constructor omitted here //

  @Override
  public String toString(){
    return this.name + " of " + this.suit;
  }
}
Above the toString() method, we have to include the @Override method decorator. This let’s Java know that we are replacing the existing toString() method with our own version. Again, we’ll learn more about what this means in a later chapter, but for now, it will be very useful as we build our program!
That should complete the Card class! The assessments below will confirm that the code structure and functionality is correct before moving on.
Deck ClassNext, we’ll need a class that can represent an entire deck of cards. This class will contain an array of cards, as well as some helpful methods we can use to shuffle the deck and deal individual cards.
First, we’ll need to add a private array to represent a deck of cards:
public class Deck{

  private Card[] card_deck;

}
In this class, we won’t include any getters or setters for the deck of cards itself because our program shouldn’t be able to change the deck in any way. In the constructor, however, we’ll include the code to create our deck of cards:
public class Deck{

  private Card[] card_deck;

  public Deck(){
    this.card_deck = new Card[52];
    String[] suits = {"Spades", "Hearts", "Diamonds", "Clubs"};
    int card_number = 0;
    for(String suit : suits){
      for(int i = 1; i <= 13; i++){
        this.card_deck[card_number] = new Card(suit, i);
        card_number++;
      }
    }
  }

}
Hopefully that code is pretty straightforward. It creates a new array of 52 cards, then an array of Strings representing the suits. It also uses the card_number variable to keep track of the position of the last card added to the deck. Finally, we have two For loops to go through each suit and each card number from 1 to 13, creating the full deck of 52 cards.
Next, we can add a method to print out the entire deck of cards. Once again, we’ll just override the toString() method:
public class Deck{

  private Card[] card_deck;

  public Deck(){
    this.card_deck = new Card[52];
    String[] suits = {"Spades", "Hearts", "Diamonds", "Clubs"};
    int card_number = 0;
    for(String suit : suits){
      for(int i = 1; i <= 13; i++){
        this.card_deck[card_number] = new Card(suit, i);
        card_number++;
      }
    }
  }

  @Override
  public String toString(){
    String output = "";
    for(Card a_card : this.card_deck){
      output += a_card.toString() + "\n";
    }
    return output;
  }
}
At this point, let’s test it out! That’s one of the most important steps in writing programs like this one—we’ll want to test each little bit of the program and see how it works.
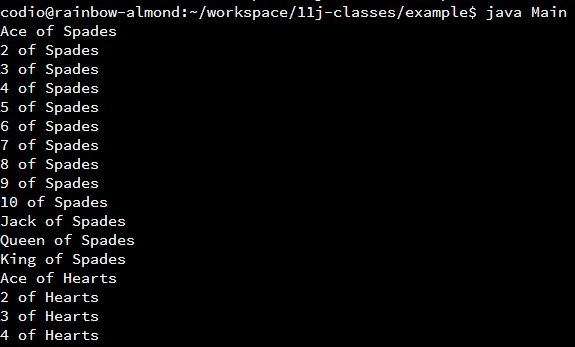
So, we can add the following code to our Main class for testing:
public class Main{

  public static void main(String[] args){
    Deck a_deck = new Deck();
    System.out.println(a_deck.toString());
  }
}
Then, we can compile and run that code using these commands in the terminal:
cd java/example
javac Main.java Card.java Deck.java
java Main
When we run those commands, we should see output similar to this:
As we can see, we are creating a full deck of cards, but they aren’t in a random order. While we could just implement a method to draw cards randomly from the deck, it might be just as useful to implement a method to shuffle the deck. So, let’s do that now!
import java.util.Random;
import java.lang.IllegalArgumentException;

public class Deck{

  private Card[] card_deck;

  // other methods omitted here //

  public void shuffle(int times){
    if(times <= 0){
      throw new IllegalArgumentException("The deck must be shuffled a positive number of times");
    }
    Random rando = new Random();
    for(int i = 0; i < times; i++){
      int first = rando.nextInt(52);  // get a number [0...51]
      int second = rando.nextInt(52); // get a number [0...51]
      if(first != second){  // swap first and second cards
        Card temp = this.card_deck[first];
        this.card_deck[first] = this.card_deck[second];
        this.card_deck[second] = temp;
      }
    }
  }
}
This is a very simple shuffle method, which simply gets two random numbers using the java.util.Random class. Then, it will swap the cards in the deck at those two locations. It is slow and simple, but thankfully a computer can do thousands of those operations in a few milliseconds, so it works just fine for our needs.
Now, we can update the code in our main() function to see that it is working correctly:
public class Main{
public static void main(String[] args){
Deck a_deck = new Deck();
a_deck.shuffle(1000);
System.out.println(a_deck.toString());
}
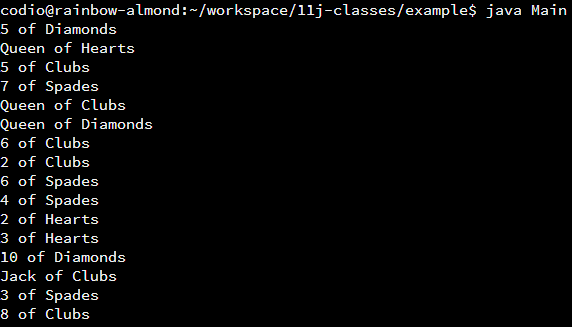
}That should produce a random deck, as shown in this screenshot:
Finally, we can add a method to deal a card from the deck to a player. To do this, we’ll add another private attribute to keep track of the position we are dealing from in the deck. Then, we can return the appropriate card from our method.
import java.util.Random;
import java.lang.IllegalArgumentException;

public class Deck{

  private Card[] card_deck;
  private int card_position;

  // other methods omitted here //

  public Deck(){
    // other constructor code omitted here //
    this.card_position = 0;
  }

  public Card draw(){
    Card output = this.card_deck[this.card_position];
    this.card_position++;
    return output;
  }
}
There we go! This method will simply return the front-most card from the deck that hasn’t already been used. We aren’t actually removing the cards from the list, but rather just incrementing a variable keeping track of the position in the list to remember which cards we’ve already dealt.
That should complete the Deck class! The assessments below will confirm that the code structure and functionality is correct before moving on.
Hand ClassNext, we can create a simple class that represents a hand of cards. So, it will need an array of Card objects just like the Deck class. Since we don’t know how many cards would be in the largest hand, we’ll just use 52 as the size of this array as well. In a later chapter, we’ll learn about resizable arrays and other data structures so that we don’t have to worry about having enough room to store our data in a statically-sized array.
To start, we can create our array of cards and a constructor, as well as an integer to keep track of how many cards we have in our hand:
public class Hand{

  private Card[] card_hand;
  private int hand_size;

  public Hand(){
    this.card_hand = new Card[52];
    this.hand_size = 0;
  }
}
Then, we can also create a getValue() method to return the value in our hand, as well as a toString() method to print out the contents of our hand:
public class Hand{

  private Card[] card_hand;
  private int hand_size;

  public Hand(){
    this.card_hand = new Card[52];
    this.hand_size = 0;
  }

  public int getValue(){
    int value = 0;
    for(int i = 0; i < this.hand_size; i++){
      value += this.card_hand[i].getValue();
    }
    return value;
  }

  @Override
  public String toString(){
    String output = "";
    for(int i = 0; i < this.hand_size; i++){
      output += this.card_hand[i].toString() + "\n";
    }
    return output;
  }
}
These methods are very similar to each other. In essence, we use a For loop to loop through the cards in our hand, and then either sum up the values or get the string representation of each card. Notice that we are using a For loop with an iterator variable that goes from 0 to the number of cards in the hand, instead of using an Enhanced For loop. This is because the array itself will probably never be completely full, so we only want to print out the cards that we are actually using in our hand.
Lastly, we need to create a method that allows us to add a card to our hand. So, we can implement the addCard() method as well:
public class Hand{

  private Card[] card_hand;
  private int hand_size;

  // other methods omitted here //

  public void addCard(Card input){
    this.card_hand[this.hand_size] = input;
    this.hand_size++;
  }
}
That should do it for the Hand class. The assessments below will confirm that the code structure and functionality is correct before moving on.
Dealer ClassNow that we have implemented the classes needed to keep track of the cards, we can create the classes that will actually perform the actions for each player. First, we can implement the code for the Dealer class. This class is actually pretty simple, since it will only consist of a couple of methods: makeMoves(), which will perform all the actions needed for the dealer, and a toString() method to print the contents of the dealer’s hand. In addition, the dealer will need an attribute to store a hand, which can be populated in the constructor by a parameter:
public class Dealer{

  private Hand my_hand;

  public Dealer(Hand a_hand){
    this.my_hand = a_hand;
  }

  public void makeMoves(int player_value){
    while(my_hand.getValue() < player_value && my_hand.getValue() <= 21){
      // we need to draw a card here!
    }
  }

  @Override
  public String toString(){
    String output = "The dealer currently holds: \n";
    output += this.my_hand.toString();
    output += "for a total of " + this.my_hand.getValue();
    return output;
  }
}
At this point, we notice a flaw in our design! The Dealer class needs to be able to draw a card from the deck, but we’ve provided no way for it to do so. In addition, we’ll need to do the same thing for our Player class as well. So, how can we accomplish this?
Deck StaticOne way we can accomplish this is to make the methods in our Deck class static. In this way, we can access them from anywhere in the program, even without having access to a Deck object. For this, we’d modify our Deck class to look similar to this:
import java.util.Random;
import java.lang.IllegalArgumentException;

public class Deck{

  // card_deck and card_position now static variables
  private static Card[] card_deck;
  private int card_position;

  // Constructor changed to static `init` function
  // `this` keyword removed
  public static void init{
    card_deck = new Card[52];
    String[] suits = {"Spades", "Hearts", "Diamonds", "Clubs"};
    int card_number = 0;
    for(String suit : suits){
      for(int i = 1; i <= 13; i++){
        card_deck[card_number] = new Card(suit, i);
        card_number++;
      }
    }
    card_position = 0;
  }

  // shuffle is now static
  public static void shuffle(int times){
    // same code with `this` removed
  }

  // draw is now static
  public static Card draw(){
    // same code with `this` removed
  }


  // toString now renamed to getString and made static
  // since toString cannot be static
  // removed `@Override` since it is no longer the same name
  public static String getString(){
    // same code with `this` removed
  }
}
In the code above, all of the methods and instance attributes are now static. In addition, the constructor was renamed to init() since we won’t actually be using the constructor to build an object. Finally, we also have to rename the toString() method to getString() since the toString() method cannot be static. We’ll see why that would be a problem in a later chapter as we learn about method inheritance.
Then, once we’ve made that choice, we can draw a new card from the deck in our code anywhere simply by using the Deck.draw() method.
This approach has several advantages and disadvantages. It requires very few changes in our code, and once the Deck class is modified, we can use the methods from that class anywhere in our code, which can be very helpful.
Unfortunately, the major downside of this approach is that we can now only have a single deck of cards in our entire game. For most games, that won’t be an issue, but it could be a limitation in other programs. In addition, as we may learn in a later class, there are some standard ways to accomplish this, such as the singleton design pattern, that are more familiar to developers.
So, for this example, we won’t be using a Deck class that contains entirely static methods and attributes.
Deck Object to Dealer ClassThe second way this could be handled is to create an object from the Deck class in our Main class, then pass that object as a parameter to the constructor for the Dealer object. In that way, the dealer has a reference to the deck that is stored in our main class (recall that all objects are handled in a call by reference manner).
So, we can update the constructor for our Dealer class to accept a Deck object, and then we’ll store it as a private variable in the class:
public class Dealer{

  private Hand my_hand;
  private Deck the_deck;

  public Dealer(Hand a_hand, Deck a_deck){
    this.my_hand = a_hand;
    this.the_deck = a_deck;
  }

  public void makeMoves(int player_value){
    while(my_hand.getValue() < player_value && my_hand.getValue() <= 21){
      // now we can draw our own cards
      Card new_card = this.the_deck.draw();
      System.out.println("The dealer draws a " + new_card.toString());
      this.my_hand.addCard(new_card);
    }
  }

  // other methods omitted here
}
Then we can place this code in our Main class:
public class Main{

  public static void main(String[] args){
    Deck the_deck = new Deck();
    the_deck.shuffle(1000);
    Hand dealer_hand = new Hand();
    dealer_hand.addCard(the_deck.draw());
    dealer_hand.addCard(the_deck.draw());
    Dealer a_dealer = new Dealer(dealer_hand, the_deck);
    System.out.println(a_dealer);
  }
}
With this code, we are instantiating a single Deck object in our Main class, then passing it as a reference to the Dealer class when we instantiate it. This gives the Dealer class a reference to the deck that we are using, allowing it to draw cards as needed.
This approach also has several pros and cons. First, we don’t have to modify our Deck class at all, meaning that it can remain a simple object. Instead, we are modifying how we use it by including a reference to it in our other classes. This is a more standard approach for programs written in an object-oriented style, in Java and other languages.
As a downside, this does mean that we’ll have to make sure our other classes all are given a reference to a Deck object. In larger programs, handling all of these object references can become very cumbersome and time-consuming. Again, in a future course we can learn about design patterns that help simplify this process, too.
We’ll use this approach in our example program here.
That should complete the Dealer class! The assessments below will confirm that the code structure and functionality is correct before moving on.
Player ClassThe player class is nearly identical to the Dealer class. The only difference is that the player class will ask the player to decide whether to draw more cards. In addition, the player may draw until their value is greater than 21, without regard to the score from the dealer. This is the one interactive part of the entire program:
import java.util.Scanner;

public class Player{

  private Hand my_hand;
  private Deck the_deck;

  public Player(Hand a_hand, Deck a_deck){
    this.my_hand = a_hand;
    this.the_deck = a_deck;
  }

  public void makeMoves(){
    try(Scanner reader = new Scanner(System.in)){
      while(my_hand.getValue() <= 21){
        System.out.println("You currently have a value of " + this.my_hand.getValue());
        System.out.print("Would you like to draw another card (y/n)?: ");
        String input = reader.nextLine().trim();
        if(input.equals("y") || input.equals("Y")){
          Card new_card = this.the_deck.draw();
          System.out.println("You draw a " + new_card.toString());
          this.my_hand.addCard(new_card);
        }else if (input.equals("n") || input.equals("N")){
          break;
        }else{
          System.out.println("Invalid input!");
        }
      }
      System.out.println("You end your turn with a value of " + this.my_hand.getValue());
    }catch(Exception e){
      System.out.println("An exception occurred!\n" + e);
      return;
    }
  }

  @Override
  public String toString(){
    String output = "The player currently holds: \n";
    output += this.my_hand.toString();
    output += "for a total of " + this.my_hand.getValue();
    return output;
  }
}
As we can see in the makeMoves() method, we’ve simply added the code to create a Scanner object to handle user input. THen, we can ask the user at each step whether they would like to draw another card.
That should complete the Player class! The assessments below will confirm that the code structure is correct before moving on. We won’t worry about testing the functionality here, since that is really best done by a live player!
Main ClassFinally, we can work on implementing our Main class. This class is very simple, only containing the main() method for the program. The main method will set up the deck and deal a hand for each player, then allow both the player and the dealer to make moves before finally getting the result to see who wins:
public class Main{

  public static void main(String[] args){
    Deck the_deck = new Deck();

    System.out.println("Shuffling the deck...");
    the_deck.shuffle(1000);

    System.out.println("Dealing the player's hand...");
    Hand player_hand = new Hand();
    player_hand.addCard(the_deck.draw());
    player_hand.addCard(the_deck.draw());
    Player a_player = new Player(player_hand, the_deck);
    System.out.println(a_player.toString());

    System.out.println("Dealing the dealer's hand...");
    Hand dealer_hand = new Hand();
    dealer_hand.addCard(the_deck.draw());
    dealer_hand.addCard(the_deck.draw());
    Dealer a_dealer = new Dealer(dealer_hand, the_deck);
    System.out.println(a_dealer.toString());

    System.out.println("Starting player's turn...");
    a_player.makeMoves();
    System.out.println(a_player.toString());

    System.out.println("Starting dealer's turn...");
    a_dealer.makeMoves(player_hand.getValue());
    System.out.println(a_dealer.toString());

    if(player_hand.getValue() <= 21 && dealer_hand.getValue() > 21){
      System.out.println("The player wins!");
    }else if(player_hand.getValue() <= 21 && player_hand.getValue() > dealer_hand.getValue()){
      System.out.println("The player wins!");
    }else if(dealer_hand.getValue() <= 21){
      System.out.println("The dealer wins!");
    }else{
      System.out.println("There is no winner");
    }
  }
}
Looking at this code, we see that the main method consists of several steps:
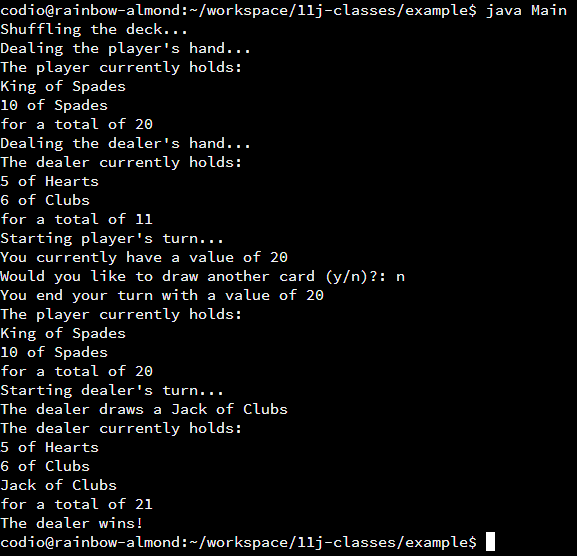
Player object is initialized. Once that is done, it prints the contents of the player’s hand.Dealer is initialized, given a hand, and the contents are printed.Here is a sample of this program’s output when run in the terminal:
There we go! We were able to build a program that plays a simple version of Blackjack. While it took a bit of work to get all of the required classes developed, each one was pretty straightforward and easy to use. Then, in our main() method, we simply had to pull all those resources together into a working program.
The assessments below will verify that the entire example program works as intended, except for the Main and Player classes. This is because it can be very difficult to complete those classes in a way that is easy to test automatically. They exist mainly to allow us to interact with the objects we’ve created.
In this chapter, we learned how to build classes into our programs to represent things, either real-world items or virtual concepts. Using those classes, we can then instantiate objects that we can use in our programs, with each object representing a unique instance of a sort of item.
Using classes is a core concept in object-oriented programming, and it really helps us organize larger programs into smaller pieces of code, where each piece is a logical division of the program as a whole.
In later chapters, we’ll learn how we can relate our classes together through the use of inheritance and polymorphism, allowing us to represent not only individual items, but also items that are related. For example, we could have objects representing a teacher and a student with different attributes and actions they can perform. However, we can also say that they are both people and therefore share many attributes and actions.