A Worked Example
Now that we’ve seen how to build classes that can inherit attributes and methods from other classes, let’s work through a simple example program together to see how it all works in practice. The code in this program will be very simple, because the purpose is to explore how we can use the structure of inheritance in our programs.
Problem Statement
First, let’s start with a problem statement. In this problem, we are going to build a program that will help us find an object in a toolbox based on several criteria provided from the user. To represent the objects in the toolbox, we’ll use a structure of class inheritance as shown in the UML diagram below:
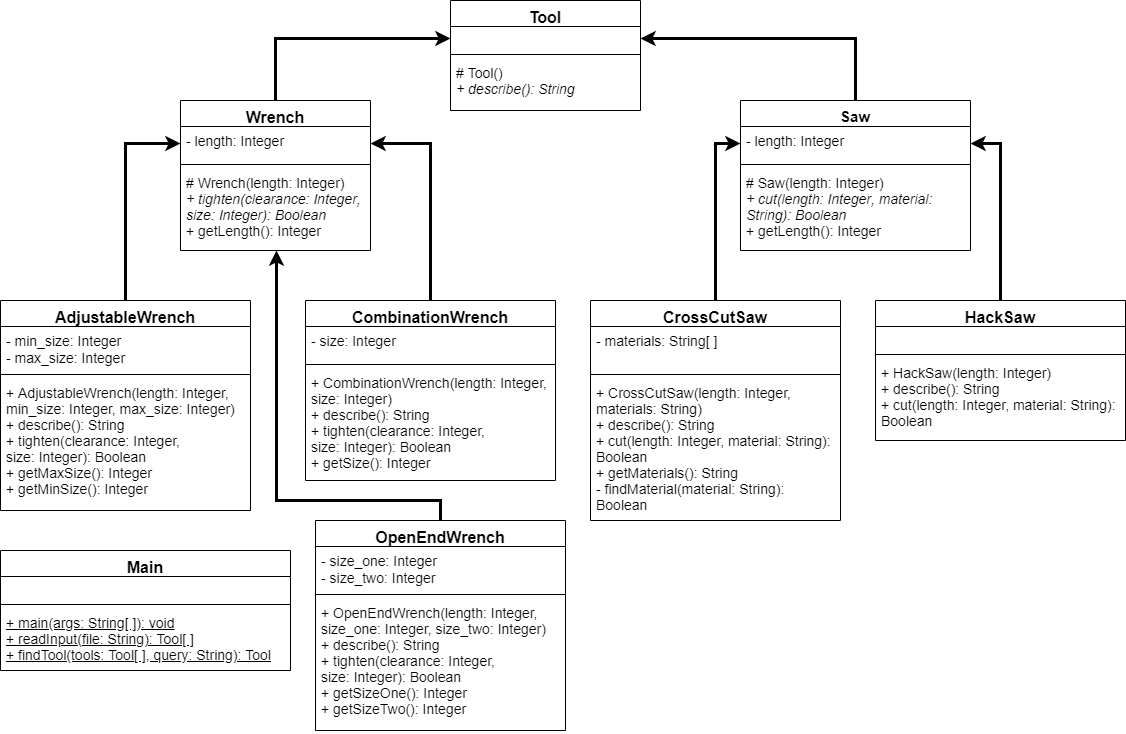
Right-click image and choose “Open image in new tab” or similar to view larger version
Again this uses the conventional class_name() syntax for a constructor so make a __init__() method in its place.
The completed program should be able to perform the following steps:
- When the program is executed, a single command-line argument should be provided. That argument will be the path to a file containing descriptions for each tool in the toolbox. If the argument is not provided, or the input file cannot be successfully read or parsed, the program should print “Invalid Input” and terminate.
- The input file will contain at least two lines of input. The first line will give the number of tools included in the input file as an integer. Each subsequent line will identify a particular tool using the name of the class representing the tool, followed by values for each attribute of the tool. The values will be separated by spaces, and listed in the same order as those attributes are accepted in the tool’s constructor.
- Once the input is read, the program will then accept a query as input via the terminal. That input should consist of multiple parts on a single line, separated by a space. The first part will be the name of an action that needs to be performed, and then following that will be one or more values to be provided to that action as arguments, separated by spaces.
- The program will review its list of available tools, finding any tool that supports that action. It will then call the method in that tool that corresponds with the action (the method and action names will be the same), providing the specified values as arguments. If the tool responds with
Trueto that method call, then that tool is able to perform that action. The program should print the description of the appropriate tool to the terminal and terminate. In this example, each query will only result in one matching tool, if any. - If a matching tool cannot be found, or there are any errors reading the input from the terminal, the program should print “Invalid Tool” and terminate.
For example, here’s a sample input file that could be provided to this program:
3
AdjustableWrench 170 10 25
CombinationWrench 135 8
CrossCutSaw 350 wood:drywall
Then, if the user inputs the following query:
tighten 150 8The program will respond with the following output:
CombinationWrench Length: 135 Size: 8Let’s walk through this program step by step and see how we need to build it.
Tool Class
YouTube Video
First, we can start with the Tool class. Looking at the UML diagram, we see that the describe() method is in italics, meaning it should be an abstract method. That helps us realize that the entire Tool class should be abstract. So, we can easily create it and define the constructor and the describe() method in code:
from abc import ABC, abstractmethod

class Tool(ABC):

  def __init__(self):
    pass

  @abstractmethod
  def describe(self):
    pass
That’s really it! We’ll need to remember to import both ABC and abstractmethod from the abc library, and then use them to mark this class and the describe() method as abstract. In many cases, the base class includes very little, if any, content or code. Instead, it simply gives us a shared starting point for the other classes in this program, and defines a single method, describe(), that each child class must implement.
Wrench and Saw Classes
Next, we can go down a level and implement the Wrench and Saw classes. Each of these classes contains a single attribute with a getter method. They also each contain an abstract method defining what each type of tool can do. Since neither of these classes implements the describe() method, even though they inherit from Tool, they will also be abstract. So, the code for these classes will be very similar to what we already created for the Tool class:
from Tool import *
from abc import ABC, abstractmethod

class Wrench(Tool, ABC):

  def __init__(self, length):
    self.__length = length

  @property
  def length(self):
    return self.__length

  @abstractmethod
  def tighten(self, clearance, size):
    pass
from Tool import *
from abc import ABC, abstractmethod
class Saw(Tool, ABC):
def __init__(self, length):
self.__length = length
@property
def length(self):
return self.__length
@abstractmethod
def cut(self, length, material):
pass As we can see in the code above, these classes are nearly identical, differing only in the name of the class and the method signatures of the different abstract methods.
At this point, we can quickly check our program structure to make sure everything is built correctly so far. Use the assessment below to confirm that your program structure is correct before continuing.
This content is presented in the course directly through Codio. Any references to interactive portions are only relevant for that interface. This content is included here as reference only.
AdjustableWrench Class
YouTube Video
Next, let’s look at one of the child classes of Wrench. As we can see in the UML diagram above, this class has both a min_size and a max_size attribute that are set through the constructor, as well as getter property methods for each one. So, most of the code for this class is already pretty straight forward, just based on the structure of the class alone.
from Wrench import *

class AdjustableWrench(Wrench):

  def __init__(self, length, min_size, max_size):
    super().__init__(length)
    self.__min_size = min_size
    self.__max_size = max_size

  @property
  def min_size(self):
    return self.__min_size

  @property
  def max_size(self):
    return self.__max_size

  # other methods go here
So, that just leaves the describe() and tighten() methods. Let’s tackle describe() first. In the example above, we see that the describe() method seems to just print the name of the class, followed by each attribute’s name and value. So, we can pretty easily implement that method in code:
def describe(self):
  return "AdjustableWrench: Length: {} MinSize: {} MaxSize: {}".format(self.length, self.min_size, self.max_size)
Notice that we are using the property getter methods for each attribute. We must do this since length is private in the Wrench class, so this is the most straightforward way to access that value.
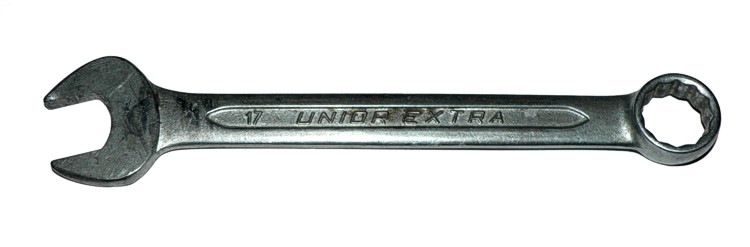
The tighten() method should determine whether this wrench is able to tighten the item described. To really understand what we are dealing with, we must understand what an adjustable wrench looks like. Here’s a picture of one from the real world:

The function accepts two parameters: a clearance value, which shows how much room between the item and the surrounding equipment there is, and the size of the item to be tightened itself. So, we know that if our wrench is shorter than the clearance, and supports an item of the given size, we’ll be able to tighten it.
An adjustable wrench has a head that can be adjusted to multiple sizes, so as long as the size given is between the minimum and maximum size our wrench is able to tighten, we can return true. So, to put that into code:
def tighten(self, clearance, size):
  return clearance >= self.length and size >= self.min_size and size <= self.max_size
As you may recall from an earlier module, we can directly return the result of a Boolean logic expression, so that makes this method even simpler.
CombinationWrench and OpenEndWrench Classes
Now that we’ve written the code for the AdjustableWrench class, it should be pretty simple to write the code for the other two types of wrenches.
First, a CombinationWrench, which typically only supports one size of bolt or nut. It typically looks like this.
So, the tighten() method must simply check the clearance and the size of the item provided against the size of the wrench. Here’s the code for that class:
from Wrench import *

class CombinationWrench(Wrench):

  def __init__(self, length, size):
    super().__init__(length)
    self.__size = size

  @property
  def size(self):
    return self.__size

  def describe(self):
    return "CombinationWrench Length: {} Size: {}".format(self.length, self.size)

  def tighten(self, clearance, size):
    return clearance >= self.length and size == self.size
The other type of wrench, an OpenEndWrench, typically has two heads of different size on either end:
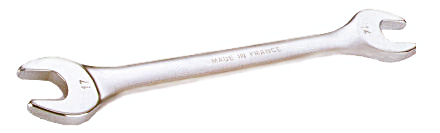
So, it can tighten bolts or nuts of two different sizes. Therefore, the tighten() method must determine if either size is applicable to the bolt or nut to be tightened. The code for that class is as follows:
from Wrench import *

class OpenEndWrench(Wrench):

  def __init__(self, length, size_one, size_two):
    super().__init__(length)
    self.__size_one = size_one
    self.__size_two = size_two

  @property
  def size_one(self):
    return self.__size_one

  @property
  def size_two(self):
    return self.__size_two

  def describe(self):
    return "CombinationWrench Length: {} SizeOne: {} SizeTwo: {}".format(self.length, self.size_one, self.size_two)

  def tighten(self, clearance, size):
    return clearance >= self.length and (size == self.size_one or size == self.size_two)
That’s really it! As we can see, while there is quite a bit of code in this program, much of the code is very similar between classes. We’re simply implementing the important bits and pieces of each class, with a slightly different implementation of the describe() and tighten() methods in each one.
At this point, we can check our code to confirm that the structure is correct. Use the assessment below to check your program’s structure before continuing.
This content is presented in the course directly through Codio. Any references to interactive portions are only relevant for that interface. This content is included here as reference only.
CrossCutSaw Class
YouTube Video
The CrossCutSaw class is very similar to the classes we created for the different type of wrenches above. The only difference is that it uses a cut() method to determine whether the saw is able to cut the material described when we call that method.
First, let’s look at the rest of the code for that class. In the constructor, we are given a string that contains a list of materials that can be cut by the saw, separated by colons. So, we’ll need to use the str.split() method to split that string into a list of strings to be stored in the class’s materials attribute.
Likewise, since the materials() property method should return a simple string, we can use the str.join() method to make a string out of the list, with each element separated by a comma followed by a space. Finally, we can use that to help populate the describe() method.
from Saw import *

class CrossCutSaw(Saw):

  def __init__(self, length, materials):
    super().__init__(length)
    self.__materials = materials.split(":")

  @property
  def materials(self):
    return ", ".join(self.__materials)

  def describe(self):
    "CrossCutSaw Length: {} Materials: {}".format(self.length, self.materials)

# additional methods hereIt might be tempting to have the CrossCutSaw class simply accept a list of materials in the constructor, and then return that list in the getMaterials() method. However, recall that lists are complex data type that are handled using call by reference. So, that leaves this class vulnerable to manipulation from an external code source.
For example, if the Main class gives a list of materials to CrossCutSaw via the constructor, we could simply store the reference to that list in our materials attribute. However, if Main proceeds to change some of the elements in the list, it would also update the list referenced by this class. Likewise, any code that calls the materials() method would also get a reference to the same list.
By creating our own list in the constructor, and then only returning a newly formed string each time a class calls the materials() method, we can protect our data from malicious changes.
An alternative method would be to create a deep copy of the list and store that copy in this class. We haven’t discussed how to do that in this course, but a future course on data structures will cover that process in depth.
The CrossCutSaw has two more methods that we’ll need to implement: cut() and find_material(). The find_material() method is a private method that allows us to search the list of materials that can be cut by this CrossCutSaw object, and simply return a Boolean value if the provided material is in the list. So, let’s address that method first.
def __find_material(self, material):
  for m in self.__materials:
    if m == material:
      return True
  return False
This method simply iterates through each material in the materials list, and returns true if it finds a material that exactly matches the material provided as a parameter. We must be careful to refer to the private attribute __materials and not the property materials, so we get the actual list and not a string. If it can’t find a match and reaches the end of the list, then the method will return False.
We can then use this method in our cut() method to determine whether the given material can be cut by this saw:
def cut(self, length, material):
  return length < self.length and self.__find_material(material)
This method will simply return True if the length of the item to be cut is shorter than the saw and the material of the item is contained in the list of materials that can be cut by this saw. That covers the CrossCutSaw class.
HackSaw Class
The HackSaw class is very similar to the CrossCutSaw class. However, instead of having a list of materials that it can cut, a HackSaw can only cut a single material: metal. So, we can just hard-code that material into the saw’s class, as shown in the code below:
from Saw import *

class HackSaw(Saw):

  def __init__(self, length):
    super().__init__(length)

  def describe(self):
    return "HackSaw Length: {} Material: metal".format(self.length)

  def cut(self, length, material):
    return length < self.length and material == "metal"
That’s all there is to it! At this point, we can check our code to confirm that the structure is correct. Use the assessment below to check your program’s structure before continuing.
This content is presented in the course directly through Codio. Any references to interactive portions are only relevant for that interface. This content is included here as reference only.
Main Class
YouTube Video
Finally, we need to create a few methods in the Main class to build the actual logic for our program. Before we build the main() method, let’s look at the other two methods.
First, the read_input() method should receive the name of a file as a string, and then return a list of tools that represents the tools specified in the given file. Also, looking at the UML diagram above, that method should be static, since it is underlined. In fact, all of the methods in the Main class are static, so we can call them directly without instantiating an object using the Main class.
from Wrench import *
from AdjustableWrench import *
from CombinationWrench import *
from OpenEndWrench import *
from Saw import *
from HackSaw import *
from CrossCutSaw import *

import sys

class Main:

  # other methods go here

  @staticmethod
  def read_input(filename):
    try:
      with open(filename) as reader:
        num_tools = int(reader.readline())
        tools = []
        for i in range(0, num_tools):
          line = reader.readline().split(" ")
          length = int(line[1])
          if line[0] == "AdjustableWrench":
            min_size = int(line[2])
            max_size = int(line[3])
            tools.append(AdjustableWrench(length, min_size, max_size))
          elif line[0] == "OpenEndWrench":
            size_one = int(line[2])
            size_two = int(line[3])
            tools.append(OpenEndWrench(length, size_one, size_two))
          elif line[0] == "CombinationWrench":
            size = int(line[2])
            tools.append(CombinationWrench(length, size))
          elif line[0] == "CrossCutSaw":
            tools.append(CrossCutSaw(length, line[2]))
          elif line[0] == "HackSaw":
            tools.append(HackSaw(length))
          else:
            raise Exception("Unknown Tool: " + line[0])
        return tools
    except Exception:
      print("Invalid Input")
      return []

# main guard
if __name__ == "__main__":
  Main.main(sys.argv)
The read_input() method looks quite complex, but it is actually really simple. First, it tries to open the file provided using a With statement inside of a Try-Except statement. Then, inside of that statement, it will read the first line of input and create the list of tools. Then, using a For loop, it will read each line of input. Those lines can immediately be split into a list of tokens using the str.split() method. Then, we simply use a bunch of If-Else-If-Else statements to determine which type of tool must be created based on the first token in the input. Then, we can use subsequent tokens as input to the constructors for each class, converting inputs to integers as needed.
If we can’t find a matching tool, we can simply throw a new exception with a helpful error message.
Finally, since we simply need to catch any possible exception, we’ll just add a catch statement for the generic exception and print the “Invalid Input” message before returning an empty list of tools.
Once we have a list of tools, we can also write the find_tool() method that will search the list of tools for a tool that can do the job. We could do so using this code:
@staticmethod
def find_tool(tools, query):
  query_parts = query.split(" ")
  if query_parts[0] == "tighten":
    clearance = int(query_parts[1])
    size = int(query_parts[2])
    for t in tools:
      if isinstance(t, Wrench):
        if t.tighten(clearance, size):
          return t
    return ??
  elif query_parts[0] == "cut":
    length = int(query_parts[1])
    for t in tools:
      if isinstance(t, Saw):
        if t.cut(length, query_parts[2]):
          return t
    return ??
  else:
    return ??
This method is also a bit complex, but upon closer inspection it should be pretty straightforward. We simply parse the query into individual tokens. Then, we use the first token to determine if we are looking for a wrench or a saw. Next, we iterate through the entire list of tools, and inside of the For loop, we check to see if the current tool is either a wrench or a saw, whichever type we are looking for. If it is, we then call the appropriate method. If that method returns True, we know that the tool can perform the requested task, so we can just return it right there!
What if we get to the end and can’t find a tool that matches? This method still needs to return an object of the Tool type. For lists, we’ve been returning an empty list to show that the method was unsuccessful. Is there such as thing as an “empty object”?
It turns out there is! Python uses a special keyword called None to represent an empty object. So, we can just return None anywhere we aren’t sure what to return, and we’ll use that value in our main() method to determine whether we found a tool or not. Python will return None by default if a function ends without specifically returning a value, but we’ll write out return None in the relevant places here to make it explicit.
@staticmethod
def find_tool(tools, query):
  query_parts = query.split(" ")
  if query_parts[0] == "tighten":
    clearance = int(query_parts[1])
    size = int(query_parts[2])
    for t in tools:
      if isinstance(t, Wrench):
        if t.tighten(clearance, size):
          return t
    return None
  elif query_parts[0] == "cut":
    length = int(query_parts[1])
    for t in tools:
      if isinstance(t, Saw):
        if t.cut(length, query_parts[2]):
          return t
    return None
  else:
    return None
Finally, we can simply write the main() method:
@staticmethod
def main(args):
  if len(args) != 2:
    print("Invalid Input")
    return

  tools = Main.read_input(args[1])

  if len(tools) == 0:
    return

  try:
    with sys.stdin as reader:
      query = reader.readline()
      t = Main.find_tool(tools, query)
      if t is not None:
        print(t.describe())
      else:
        print("Invalid Tool")
  except Exception:
    print("Invalid Tool")
    return
In the main() method, we check to make sure that we’ve received exactly one command-line argument (in addition to the name of the program, which will be the first argument). If so, we pass that argument to the read_input() method to read from the input file and produce a list of tools. If that list is empty, we know that we failed to read the input file correctly, so we should simply return.
If the list is populated, then we must read input from the terminal. So, we’ll use a With and Try-Except statement to read a user’s query, and then pass that query to the find_tool() method along with the list of tools.
If the find_tool() method returns anything other than None, we know that we found a tool and should print the tool’s description to the terminal. Otherwise, we can do nothing since we are at the end of the program.
Of course, if we encounter any exceptions while reading input from the terminal, we can simply print “Invalid Tool” and return.
There we go! This is a very simple program, but it helps demonstrate the power of using inheritance in our programs to represent real-world objects that are closely related to each other.
We can use the first assessment below to check the structure of our entire program, making sure it matches the UML diagram given above. Once our program passes that assessment, we can use the second assessment to check the functionality of our program. For simplicity, the functionality tests will not use the main() method itself, but it will check the other two methods defined in the Main class as well as several other methods of the various classes.
This content is presented in the course directly through Codio. Any references to interactive portions are only relevant for that interface. This content is included here as reference only.