Chapter 14
Model View Controller
Our First Software Design Pattern!
Our First Software Design Pattern!
In this module, we’re going to look at one commonly used design for software: the Model-View-Controller, or MVC, Architecture. However, before we talk about designing software, let’s step back and talk about design in the real world.
Think about the last time you went into a new building, spent a night in a hotel, or even just visited a bathroom in a trendy restaurant or museum. Did you have any trouble figuring out how to open the door, or where the light switches were, or how to operate the faucet? Most likely you didn’t even think about it or have any issues. If you did, your experience may have been affected by bad design.
In fact, there is even a special term for doors that are difficult to figure out how to operate: “Norman doors.” They are named after Donald Norman, who wrote a very influential book The Design of Everyday Things. Vox even created a video highlighting the problem, complete with an interview with Norman:
YouTube VideoAfter learning about this problem, we will probably all be a little more mindful about the design of objects in our world!
So, what does the design of door handles have to do with software? As it turns out, the concept of designing objects that are common, familiar, and easy to use and understand without lots of instruction is very similar to designing software. When we build software, we should try to structure it in a way that is easy for other developers to use and understand through the use of common, familiar, and easy-to-use software design patterns.
A software design pattern is a commonly used structure for building a computer program, implementing a particular feature, or solving a common problem in software. These patterns are designed to be easily understood by developers, and are built in such a way that they can be reused over and over again in many different pieces of software.
One common example is the adapter or wrapper design pattern. Suppose we have a class library that performs a particular action, such as managing a list of users. So, all of the methods use the term user in the name, such as add_user(), delete_user(), and more. What if we need to keep a list of players instead? We could simply build a class that inherits from that library, and include our own methods such as add_player() and delete_player(). In our version of the class, those methods simply call the add_user() and delete_user() methods of the parent class, effectively wrapping them with new names.
We can almost think of software design patterns as “building blocks” that we can use to build larger pieces of software. By using blocks that all developers would be familiar with, we can make our software much easier to understand and even maintain down the road. In addition, many of these design patterns represent the state-of-the-art method for solving a particular problem or implementing a feature. Why reinvent the wheel when the solution is already there?
One of the most common software design patterns is actually a complete architecture for an entire program, called the Model-View-Controller, or MVC, Architecture.
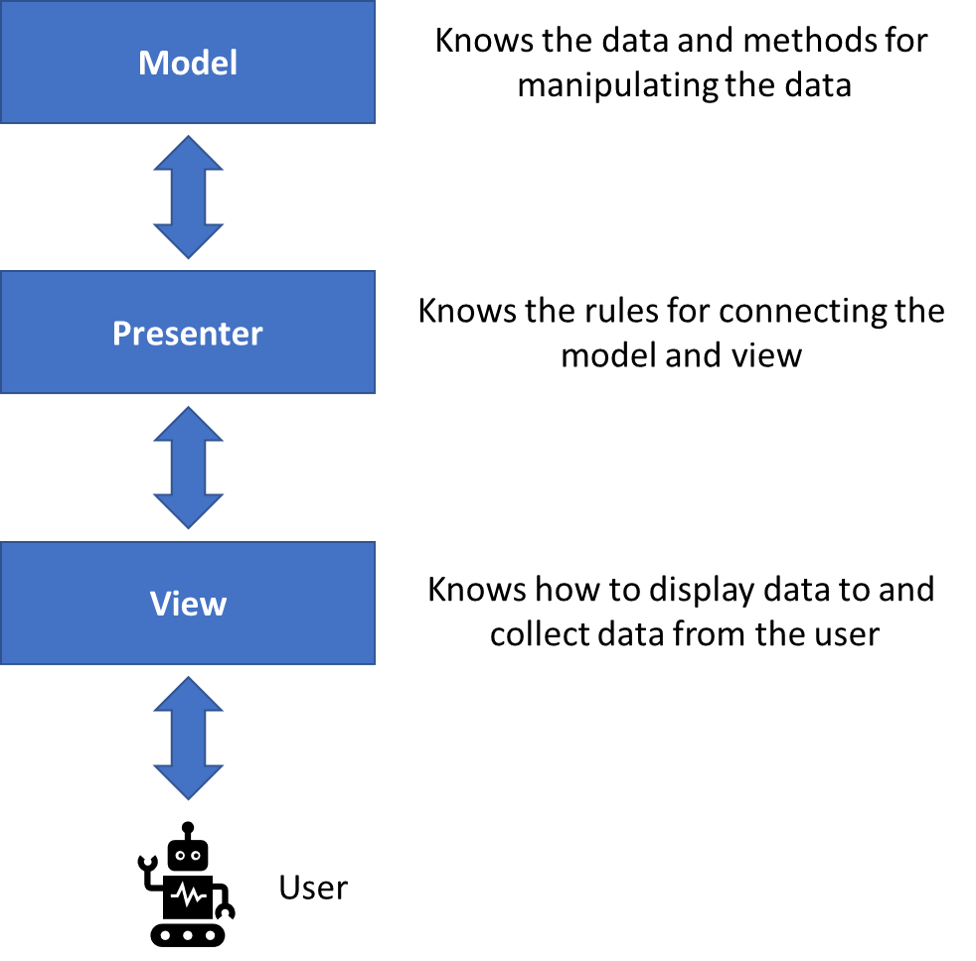
MVC Architecture involves breaking the program into three distinct parts, the model, the view, and the controller. Each part may consist of one or multiple classes, but conceptually we can think of them as three separate pieces, each of which can be accessed from the other pieces in an easy-to-understand way.
From the user’s perspective, a program using MVC Architecture may look and act as shown in this diagram:
 ^1
^1
When the user uses the software to perform an action, that action is sent to the controller. The controller then interprets the user’s action, and calls methods in the software’s model to manipulate and update the data stored in the software. Once the model has been changed, that data is sent to the view, which is responsible for displaying those changes to the screen.
A classic example is word processing software. When the user has a document open and presses a key on the keyboard, that keypress action is sent to the controller by the operating system running the software. The controller interprets that keypress as a character, and then tells the model to add that character to the document. So, the model updates the data representing the document, and then informs the view that the document has changed and it should now display the new character in the document as well. Finally, the view updates what is presented on the screen to the user, and the user can now see that the action was completed. In this case, the process happens nearly instantaneously, but more complex software may take much longer to complete the action.
On the next few pages, we’ll discuss each part of MVC architecture in more detail, using a simple example program.
File:MVC-Process.svg. (2015, June 19). Wikimedia Commons, the free media repository. Retrieved 18:29, November 7, 2019 from https://commons.wikimedia.org/w/index.php?title=File:MVC-Process.svg&oldid=163714963. ↩︎
Technically, what we are going to implement is Model-View-Presenter, MVP. MVP is a specialization of the MVC design pattern which enforces strict architectural separation between the elements and makes the View solely responsible for handling all the user interface (input and output).
Under strict layering, architectural layers can only interact with adjacent layers. This can make the initial coding a little cumbersome.
The advantage of this strict layering is it allows you to “swap parts”. You may have Views written for PC-terminal users, mobile app users and even other computer programs. Change one import statement and the program is good to go.
Say you have a an MVP program written for a game played on a square grid, like checkers. The Model contains all the checker details–swap it out for a “chess” model and you can probably still run. The Presenter (which is basically middle-ware alternating the turns and checking for wins) should be able to handle the change and the only difference to the View is the “picture” it uses for the various pieces.
Some authors, including us, as well as many internet posters, will not differentiate between MVC and MVP. After all, MVP “is a " MVC implementation. However, in the original and still authoritative text1, the View is just a display and having it handle inputs is non-standard.
Design Patterns: Elements of Reusable Object Oriented Software, Erich Gamma et al, 1994 ↩︎
The first part of MVC Architecture is the model. Roughly speaking, the model represents all data stored by the program. However, beyond just data, the model should also include all methods that are used to directly modify the data stored in the model. This could also include code that represents or enforces the “rules” around how the model can be manipulated.
It can sometimes be tricky to determine exactly which components of the program should be included in each part, but the model is usually the most straightforward one to work with.
One of the best examples of a program using MVC architecture is a board game. So, let’s consider an example that represents the board game known in America as Connect Four
In this game, the model would obviously consist of a representation of the board itself, showing the position and color of each piece. However, in the model, we could also provide methods for actions such as placing a piece on the board or determining if the game is a draw.
In addition to updating the model, those methods would be responsible for enforcing the rules of the game, such as preventing players from placing a piece on a full column.
Of course, there are some rules of the game that are difficult to represent in code, such as keeping track of which player’s turn it is. It could be done in the controller, but it is probably best done in the model.
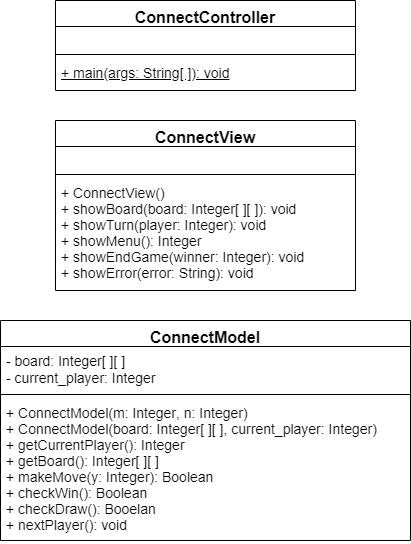
So, what would a model for a Connect Four game look like? Here’s a sample UML diagram for one way it could be designed:
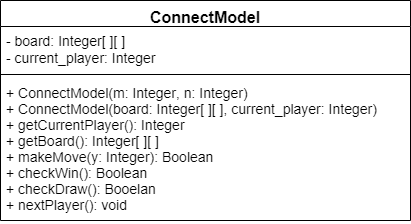
In this UML diagram, we see two attributes:
board: a 2-dimensional array or list of integers representing the squares on the board. We’ll use the following representation scheme:
0—an unoccupied square1—a square containing a piece for player 12—a square containing a piece for player 2current_player: an integer determining the player who is able to make the next turn.We also see the following methods:
ConnectModel(m, n): a constructor accepting two parameters, m and n, giving the size of the board.ConnectModel(board, current_player): a secondary constructor accepting a board and a current player. We’ll primarily use this method for testing, as it allows us to build a ConnectModel for a game currently in progress. In Python, we’ll call this method load_game().getCurrentPlayer(): a getter method to get the current player as an integer, either 1 or 2.getBoard(): a getter method to get the current board.makeMove(y): a method for the current player to place a piece in the column indicated by the parameter y. This method will return true if the placement was successful, or throw an exception if it was not.checkWin(): this method will check and see if the game has been won by the current player.checkDraw(): this method will check and see if the game is a draw.nextPlayer(): this method will swap the current player value to represent the other player.So, this ConnectModel class includes all of the attributes to store a game board and the current state of the game, as well as methods to update the game’s state based on moves the player could make.
Next, let’s look at the view portion of MVC Architecture. In essence, this part is responsible for displaying data to the user, and in most cases it also handles requesting and receiving input from the user.
One important thing to remember is that the view should not duplicate or store any data that is already present in the model. While it may be tempting to store a copy of the currently displayed data in the view, it technically violates the MVC Architecture. We should only store data in the view that is unique to the view, while all data related to the state of the model should be stored in the model instead.
Going back to our Connect Four example, we would probably want our view to be responsible for displaying the current state of the game board, and which player’s turn it is, to the player. In addition, it should have methods for retrieving input from the player about what moves to make. Finally, it should have a method to display a message to the players once the end of a game is reached.
So, one way we could represent the view portion of this program is shown in the UML diagram below:
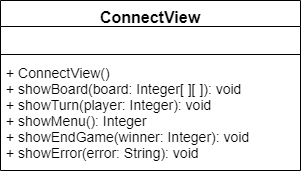
In this diagram, we notice that the view itself does not store any attributes at all. This is because the view doesn’t have to manage any internal state when it is simply reading data from and writing to the terminal. If we were dealing with a file or a graphical user interface (GUI), then the view may have to store those items as attributes. In this program, we are keeping it pretty simple.
However, the ConnectView class includes several methods:
ConnectView(): a simple constructor.showBoard(board): this method will show the current board to the players on the terminal.showTurn(player): this will display a message letting the players know which player is up next.showMenu(): this method will show the menu of options to the current player, allowing them to make a move. The input received from the player will be sent to the controller.showEndGame(winner): if either player wins, this will display that message to the terminal.showError(error): this method is used by the controller to display any errors from the model to the user.As we can see, the view portion of MVC Architecture mainly deals with displaying messages to the user, and then prompting the user for input. It doesn’t have to store any data to be useful, and doesn’t even include a direct link to the model. That is provided by the controller, which we’ll learn about next.
The final part of MVC architecture is the controller. The controller is really the “glue” that brings together the different parts of the model and the view, building a cohesive program. Traditionally, the controller contains the main() method of the program, and acts as the starting point for everything else the program does.
It can be tempting to think of the controller as the “brains” of the program. However, if we are careful about properly building methods in the model that enforce the rules of the program, as well as methods in the view that are able to validate any input received from the user, the controller itself may not have much logic at all in it. Instead, it simply passes data between the model and the view, and uses input from the view to select the next method to call in the model.
Going back to our Connect Four example one more time, let’s look at the UML diagram for the controller part of this program:
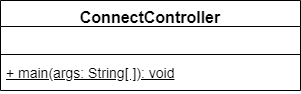
Yup! That’s it! In this example, the controller simply contains the main method for the program. The real magic happens in the code inside of the main method, gluing other parts of the program together and making them work.
We’ll explore the code for the controller later in this module as our worked example.
MVC in Java
Let’s continue our example exploring a program to play Connect Four by actually building the code to implement the game. By exploring the code, we should be able to better understand the structure and reasoning behind the MVC Architecture.
First, let’s formalize our problem statement:
Write a program to play the traditional version of Connect Four. It should take place on a 6 x 7 game board.
On each turn, the game will print out the state of the board, then alert the current player to make a move. The player’s move will consist of a single number, giving the column in which to place a piece. If the move is invalid, the player will be given the option to select another move.
After each move is made, the game will determine if the current player has won, or if the game was a draw. To simplify the game, we will not check for diagonal wins.
The program should be built using MVC architecture.
So, for this program, we’ll use the following UML diagram:
Let’s get started!
In many cases, the first part of any program following the MVC architecture to build is the model. This is usually the simplest and most straightforward part of the program, and both the view and the controller really depend on the model as the basis of the entire program. So, let’s start there.
First, we’ll need to build a class that contains the attributes and methods shown in the UML diagram above. By this point, we should be pretty used to this process:
import java.lang.IllegalArgumentException;

public class ConnectModel{

  private int[][] board;
  private int current_player;

  public int getCurrentPlayer(){ return this.current_player; }
  public int[][] getBoard(){ return this.board; }

  // more code here
}
This code already contains implementations for the two getter methods as well as the declarations for the two private attributes. So, all we have left to do is implement the constructors and a few methods.
Let’s focus on the constructors first. We can build the normal constructor as shown below:
public ConnectModel(int m, int n){
  if(m < 4 || n < 5){
    throw new IllegalArgumentException("The board must be at least 4 x 5");
  }
  this.board = new int[m][n];
  this.current_player = 1;
}
This method really consists of two parts. First, we verify that the parameters provided are valid. If not, we’ll throw an exception. Then, it initializes the board attribute to the correct dimensions. We also set the current player to 1.
We also need to implement our constructor for testing, which simply accepts a board and a current player:
public ConnectModel(int[][] board, int current_player){
  if(board.length < 4){
    throw new IllegalArgumentException("Board must be at least 4 x 5");
  }
  if(board[0].length < 5){
    throw new IllegalArgumentException("Board must be at least 4 x 5");
  }
  if(current_player != 1 && current_player != 2){
    throw new IllegalArgumentException("Current player invalid - must be 1 or 2");
  }
  this.board = board;
  this.current_player = current_player;
}
This constructor simply enforces the size of the board and the values that are possible for the current player, and then sets those values to the ones provided as arguments. As we discussed before, this method is primarily used for testing our model, and won’t actually be used in our program itself.
Once we have our constructors built, we can also build our makeMove() method:
public boolean makeMove(int y){
  if(y < 0 || y >= this.board[0].length){
    throw new IllegalArgumentException("Invalid column");
  }
  if(this.board[0][y] != 0){
    throw new IllegalArgumentException("Column full");
  }
  int row = this.board.length - 1;
  while(board[row][y] != 0){
    row = row - 1;
  }
  this.board[row][y] = this.current_player;
  return true;
}
This method is also pretty straightforward. First, we use a couple of If-Then statements to check and see if the input is valid. If it is, then we simply iterate through the column chosen from the last row up to the first, looking for the first empty slot. Once we’ve found it, we place the current player’s piece there, and return true.
There we go! That’s a simple method for checking to see if a move in Connect Four is valid according to the rules of the game.
Next, we’ll need to write a method to determine if the current player has won. In this method, we’ll simply check to see if any row or column has at least 4 consecutive pieces for the current player.
public boolean checkWin(){
  // check rows
  for(int i = 0; i < this.board.length; i++){
    int count = 0;
    for(int j = 0; j < this.board[0].length; j++){
      if(this.board[i][j] == this.current_player){
        count += 1;
      }else{
        count = 0;
      }
      if(count >= 4){
        return true;
      }
    }
  }

  // check columns
  for(int j = 0; j < this.board[0].length; j++){
    int count = 0;
    for(int i = 0; i < this.board.length; i++){
      if(this.board[i][j] == this.current_player){
        count += 1;
      }else{
        count = 0;
      }
      if(count >= 4){
        return true;
      }
    }
  }
  return false;
}
This method is also pretty straightforward. We simply use two nested For loops to iterate across each row and down each column, keeping track of the count of items that match the current player. Anytime we see an item that doesn’t match, we reset our count to 0. If we reach 4 at any time, we can simply return true. If we reach the end of the method without returning true, then we know that a win condition hasn’t been reached and we should return false.
We’ll also need a method to check for a draw:
public boolean checkDraw(){
  for(int j = 0; j < this.board[0].length; j++){
    if(this.board[0][j] == 0){
      return false;
    }
  }
  return true;
}
In this method, we only have to check the top row of the board. If any of them are empty, we can return false. However, if we find that all of them are filled, we can return true, indicating that the board is filled.
Finally, we’ll build one more method to switch players between 1 and 2:
public void nextPlayer(){
  if(this.current_player == 1){
    this.current_player = 2;
  }else{
    this.current_player = 1;
  }
}
It is really just a simple If-Then statement!
There we go! That should be everything we need to build a model of a working Connect Four game. We can use the assessments below to confirm that our code is working properly before continuing.
The next part of any MVC program to build is the view. Depending on the complexity of the problem, sometimes it may be helpful to build the view and the model concurrently. Ideally, however, the model and the view should be properly distinct and separate, such that the model can be fully completed before the view is developed.
Let’s review our UML diagram before continuing:
The ConnectView class only contains a few simple methods. First, let’s build the class declaration and the constructor:
import java.util.Scanner;
import java.lang.NumberFormatException;

public class ConnectView{

  public ConnectView(){
    //default constructor
  }
}
Since we aren’t initializing a GUI, we’ll just need a default constructor for this class.
Next, let’s look at the methods. First, we’ll need a method to show the board on the screen, called showBoard(). Let’s see what it looks like:
public void showBoard(int[][] board){
  for(int i = 0; i < board.length; i++){
    for(int j = 0; j < board[0].length; j++){
      System.out.print("[" + board[i][j] + "]");
    }
    System.out.println();
  }
}
This method is very similar to methods we saw in an earlier module when we learned about arrays. Here, we are simply using two nested For loops to print the data in the array, with each row printed on its own line.
When we run this method, we should get output that looks like this:
[1][2][1][2][1]
[1][2][1][2][1]
[1][2][1][2][1]
[1][2][1][2][1]
[1][2][1][2][1]
The other complex method to implement is the showMenu() method, which reads input from the player:
public int showMenu(){
  while(true){
    try{
      Scanner reader = new Scanner(System.in);
      System.out.println("Which column would you like to place a token in?");
      String input = reader.nextLine().trim();
      int out = Integer.parseInt(input);
      return out;
    }catch(NumberFormatException e){
      System.out.println("Invalid input! Please enter a number");
    }catch(Exception e){
      System.out.println("Unable to read input!");
      return -1;
    }
  }
}
That method will print a prompt to the user, and get a response as a string. Notice that we aren’t doing any validation of the input here beyond making sure that it is an integer—we can do that in the controller and the model.
The final three methods simply print out messages to the user. So, we can implement those pretty easily:
public void showTurn(int player){
  System.out.println("It is player " + player + "'s turn!");
}

public void showEndGame(int winner){
  if(winner == 0){
    System.out.println("The game is a draw!");
  }else{
    System.out.println("Player " + winner + " wins!");
  }
}

public void showError(String error){
  System.out.println("Error: " + error);
}
That’s it! The view portion of the program is very simple, but it allows our users to see what is going on and interact with the program. We can use the tests below to make sure our view is working correctly before we continue with the controller.
Finally, we now can start working on our controller. This is where the program actually comes together and becomes useful. While a program such as Connect Four may seem quite complex, using MVC architecture can make it quite easy to work with. Let’s check it out!
The ConnectController class just contains a single main() method:
public class ConnectController{

  public static void main(String[] args){
    ConnectModel model = new ConnectModel(6, 7);
    ConnectView view = new ConnectView();
    while(true){
      view.showBoard(model.getBoard());
      view.showTurn(model.getCurrentPlayer());
      try{
        if(model.makeMove(view.showMenu())){
          if(model.checkWin() || model.checkDraw()){
            break;
          }
          model.nextPlayer();
        }
      }catch(Exception e){
        view.showError(e.getMessage());
      }
    }
    if(model.checkWin()){
      view.showEndGame(model.getCurrentPlayer());
    }else{
      view.showEndGame(0);
    }
  }

}
This method uses methods in the view and model classes to get the game to work. For example, if we start inside of the while loop, we see the following steps:
That’s all there is to it! Once again, our main() method ends up being an outline of our program. In this case, almost every line of code is calling a method in both the model and the view, combining them in such a way as to make the program work seamlessly.
Try it out.
In this module, we explored the Model-View-Controller, or MVC, Architecture. It is a commonly used architecture for computer programs written in a variety of languages.
The power of MVC comes from allowing us to define our model representing our data, and our view or GUI that the user interacts with, completely separately. We can then join them together in our controller, building powerful applications.
In addition, since both the view and model are developed separately, they can be reused in several different applications.
MVC Architecture is not just used for desktop applications. Most server-side web applications are also written using MVC architecture. This helps separate the database (model) from the webpages (view), while the router (controller) interprets requests and provides responses.
We’ll get another chance to explore MVC Architecture in the project for this module.