CC 210 Textbook
This is the textbook for CC 210.
This is the textbook for CC 210.
Welcome to the Fundamental Computer Programming Concepts course!
[Slide 1]
Hello and welcome to the Computational Core program!
My name is Emily Alfs-Votipka, and I’ll be one of the instructors for this program. My contact information is shown here, and is also listed on the syllabus.
[Slide 2]
There are many other instructors and TAs for this program that you may interact with or see in the tutorial videos. They all have been instrumental in the development of this program.
[Slide 3]
In this course we will primarily use a K-State email group (cc110-help or cc110-help@ksuemailprod.onmicrosoft.com) to communicate. Email sent to this address is forwarded to all instructors and TAs. Our replies to you will also be shared amongst the instructors and TAs so we all have access to the assistance you have already received. We will respond to you within a business day So a question emailed Friday night may not receive an answer before Monday.
If you wish to pose a discussion topic to you classmates, you should use the discussion feature in Canvas. Please note that asking a question on a discussion forum is not the same as emailing cc110-help; we will certainly monitor the discussion channels, but not with the same speed as the “help line”. Please read and adhere to the guidance on Netiquette in the syllabus for all electronic communications.
[Slide 4]
In addition to email and Canvas, we’ll be using the online learning platform Codio for most of the programming tutorials and projects in this program. We’ll also discuss how to use Codio later in this module.
[Slide 5]
The Computational Core program consists of several courses, and each course contains a number of learning modules. There are about 30 modules in this course. Each module will usually consist of some lecture material and quizzes, and there are a few modules which include a programming component. The modules themselves are gated, which means that you must complete each item in the module in order before continuing. In addition, the modules enforce prerequisite requirements from other modules. For CC 110 you must complete them in order starting with module 0, the enroll module should be completed first, but is not a prerequisite.
You are welcome to work on this course at any time during the week as your schedule allows, provided that you complete each module before the listed due date. There will be roughly two modules due each week. The modules are self-contained, and nearly all of the grading in this course is completed automatically through Canvas and Codio. So, you can complete modules at any time before the due date, and once a module is complete, you may immediately start on the next one.
[Slide 6]
Looking ahead to the rest of this introductory module, you’ll see that there are a few more items to be completed before you can move on. In the next video, we’ll discuss a bit more information about navigating through this course on Canvas and using the Codio learning environment.
[Slide 7]
One thing we highly encourage each of you to do is read the syllabus for this course in its entirety, and let us know if you have any questions. My view is that the syllabus is a contract between me as your teacher and you as a student, defining how each of us should treat each other and what we should expect from each other. We have made a few changes to the standard syllabus template for this program, and those changes are clearly highlighted. Finally, the syllabus itself is subject to change as needed as we adapt this program to meet the needs of its students, and all changes will be clearly communicated to everyone before they take effect.
[Slide 7]
One very important part of the syllabus that every student should read is the late work policy. First off, each module has a due date, and you may work on that module at any time before it is due, provided you have met the prerequisites. As discussed before, you must do all the readings and assignments in a module in listed order before moving on, so you cannot jump ahead. A module is considered completed when all items have been completed.
For the purposes of grading, we will use the date and time that the confirmation quiz was submitted at the end of each module to determine when the module was completed. This is due to the way that Codio handles automated grading, as it may resubmit previously graded assignments if an error in the module is corrected, making a previously completed assignment appear to be submitted late.
If any work is submitted after the due date, a penalty of 10% of the total points possible in that assignment will be deducted for each day it is late, up to a maximum of 3 days. After 3 days beyond the due date, you will receive a 0 on the assignment. Please refer to the full late policy in the syllabus for more information about how late work is handled in this course.
Finally, even if a module is late, it still must be completed before you can move on to a later module. So, it is very important to avoid getting behind in this course, as it can be very difficult to get back on track. If you ever find that you are struggling to keep up, please don’t be afraid to contact either the instructors or GTAs for assistance. We’d be happy to help you get caught back up quickly.
In this program, the standard “90-80-70-60” grading scale will apply, though I reserve the right to curve grades up to a higher grade level at my discretion. Therefore, you will never be required to get higher than 90% for an A, but you may get an A if you score slightly below 90% if I choose to curve the grades.
This is intended to be a completely online, self-paced course. There are no mandatory scheduled course times. All of the content is available online, so you can work whenever and wherever you want. It could be a 3-hour block once a week, or a few minutes here and there between classes. It’s really up to you and your schedule. However, remember that each module may require 4 to 6 or more hours of work to complete, so make sure you have plenty of time available to devote to this course.
Also, a vast majority of the grading in this course will be handled automatically through Canvas and Codio. This means that you’ll be able to receive feedback directly from those systems as soon as you submit your work. You may also contact the instructors and GTAs for additional tips and feedback regarding your work, but depending on the number of students in the program, we may not be able to review every student submission directly.
In addition, due to the flexible online format of this class, there won’t be any long lecture videos to watch. Instead, each module will consist of a guided tutorial and several short videos, each focused on a particular topic or task. Likewise, there won’t be any textbooks required, since all of the information will be presented in the interactive tutorials through Codio. Finally, since we are using Codio as our learning platform, you won’t have to deal with installing and using a clunky integrated development environment, or IDE, just to learn how to program. Codio helps make learning to program quick and painless by moving everything to the web.
For this course, the only supplies you’ll need as a student are access to a modern web browser and a broadband internet connection. No other special hardware or software is necessary!
Finally, as you are aware, this course is always subject to change. This is a relatively new program here at K-State, and we’re always working on new and interesting ideas to integrate into the courses. The best advice I have is to look upon this graphic with the words “Don’t Panic” written in large, friendly letters. If you find yourself falling behind, or not understanding seek our help via cc110-help.
So, to complete this module, there are a few other things that you’ll need to do. The next step is to watch the video on navigating Canvas and Codio, which will give you a good idea of how to most effectively work through the content in this course.
To get to that video, click the “Next” button at the bottom right of this page.
This course makes extensive use of several features of Canvas which you may or may not have worked with before. To give you the best experience in this course, this video will briefly describe those features and the best way to access them.
When you first access the course on Canvas, you will be shown this homepage. It contains quick links to the course syllabus and Piazza discussion boards. This is handy if you just need to jump to a particular area.
Let’s walk through the options in the main menu to the left. The first section is Modules, which is where you’ll primarily interact with the course. You’ll notice that I’ve disabled several of the common menu items in this course, such as Files and Assignments. This is to simplify things for you as students, so you remember that all the course content is available in one place.
When you first arrive at the Modules section, you’ll see all of the content in the course laid out in order. If you like, you can minimize the modules you aren’t working on by clicking the arrow to the left of the module name. I’ll do so, leaving the introductory module open.
As you look at each module, you’ll see that it gives quite a bit of information about the course. At the top of each module is an item telling you what parts of the module you must complete to continue. In this case, it says “Complete All Items.” Likewise, the following modules may list a number of prerequisite modules, which you must complete before you can access it.
Within each module is a set of items, which must be completed in listed order. Under each item you’ll see information about what you must do in order to complete that item. For many of them, it will simply say view, which means you must view the item at least once to continue. Others may say contribute, submit, or give a minimum score required to continue. For assignments, it also helpfully gives the number of points available, and the due date.
Let’s click on the first item, Course Introduction, to get started. You’ve already been to this page by this point. Many course pages will consist of an embedded video, followed by links to any resources used or referenced in the video, including the slides and a downloadable version of the video. Finally, a rough video script will be posted on the page for your quick reference.
While I cannot force you to watch each video in its entirety, I highly recommend doing so. The script on the page may not accurately reflect all of the content in the video, nor can it show how to perform some tasks which are purely visual.
When you are ready to move to the next step in a module, click the Next button at the bottom of the page. Canvas will automatically add Next and Previous buttons to each piece of content which is accessed through the Modules section, which makes it very easy to work through the course content. I’ll click through a couple of items here.
At any point, you may click on the Modules link in the menu to the left to return to the Modules section of the site. You’ll notice that I’ve viewed the first few items in the first module, so I can access more items here. This is handy if you want to go back and review the content you’ve already seen, or if you leave and want to resume where you left off. Canvas will put green checkmarks to the right of items you’ve completed.
Continuing down the menu to the left, you’ll find the usual Canvas links to view your grades in the course, as well as a list of fellow students taking the course.
===
Now, let’s go back to Canvas and load up one of the Codio projects. To load the first Codio projects, click the Next button at the bottom of this page to go to the next part of this module, which is the Codio Introduction tutorial. On that page, there will be a button to click, which opens Codio in a new browser window or tab.
Once Codio loads, it should give you the option to start the Guide for that module. You’ll definitely want to select that option whenever you load a Codio project for the first time.
From there, you can follow the steps in that guide to learn more about the Codio interface. The first page of the guide continues this video. I’ll see you there!
[Slide 1]
As you work on the materials in this course, you may run into questions or problems and need assistance. This video reviews the various types of help available to you in this course.
[Slide 2]
First and foremost, anytime you have a questions or need assistance in the Computational Core program, please email the appropriate help group. It is the best place to go to get help with anything related to this program, from the tutorials and projects to issues with Codio and Canvas. For example, if you are enrolled in CC315 and have questions, from your KSU email, you would type cc315-help and hit tab to auto-complete the email.
[Slide 3]
If you have any issues working with K-State Canvas, K-State IT resources, or any other technology related to the delivery of the course, your first source of help is the K-State IT Helpdesk. They can easily be reached via email at helpdesk@ksu.edu. Beyond them, there are many online resources for using Canvas, all of which are linked in the resources section below the video.
[Slide 4]
If you have any issues using the Codio platform, you are welcome to refer to their online documentation. Their support staff offers a quick and easy chat interface where you can ask questions and get feedback within a few minutes.
[Slide 5]
If you have issues with the technical content of the course, specifically related to completing the tutorials and projects, there are several resources available to you. First and foremost, make sure you consult the vast amount of material available in the course modules, including the links to resources. Usually, most answers you need can be found there.
Of course, as another step you can always exercise your information-gathering skills and use online search tools such as Google to answer your question. While you are not allowed to search online for direct solutions to assignments or projects, you are more than welcome to use Google to access programming resources such as StackOverflow, language documentation, and other tutorials. I can definitely assure you that programmers working in industry are often using Google and other online resources to solve problems, so there is no reason why you shouldn’t start building that skill now.
[Slide 6]
Next, we have grading and administrative issues. This could include problems or mistakes in the grade you received on a project, missing course resources, or any concerns you have regarding the course and the conduct of instructors and your peers. Since this is an online course, you’ll be interacting with us on a variety of online platforms, and sometimes things happen that are inappropriate or offensive. There are lots of resources at K-State to help you with those situations. First and foremost, please email your instructor as soon as possible and let them know about your concern, if it is appropriate for them to be involved. If not, or if you’d rather talk with someone other than your instructor about your issue, I encourage you to contact either your academic advisor, the CS department staff, College of Engineering Student Services, or the K-State Office of Student Life. Finally, if you have any concerns that you feel should be reported to K-State, you can do so at https://www.k-state.edu/report/. That site also has links to a large number of resources at K-State that you can use when you need help.
[Slide 7]
Finally, if you find any errors or omissions in the course content, or have suggestions for additional resources to include in the course, email the instructors. There are some extra credit points available for helping to improve the course, so be on the lookout for anything that you feel could be changed or improved.
[Slide 8]
So, in summary, the content and links in the modules should always be your first stop when you have a question or run into a problem. For issues with Canvas or Codio, you are also welcome to refer directly to the resources for those platforms. For questions specifically related to the projects, use the courses help group. For grading questions and errors in the course content or any other issues, please email the instructors for assistance.
Our goal in this program is to make sure that you have the resources available to you to be successful. Please don’t be afraid to take advantage of them and ask questions whenever you want.
Finally, before embarking on this program, let’s take a brief minute to review what you’ll learn by the time you complete the program.
Of course, the biggest and most impactful outcome will be learning how to write computer programs. Throughout the Computational Core program, you’ll learn either the Java or Python programming language, and get to a point where you are quite proficient with your language of choice. You’ll be capable of building your own programs from scratch to meet many of the challenges you’ll encounter in your career or elsewhere. This skill alone will set you well above your peers.
There are many additional benefits beyond just learning how to write programs. For starters, programming involves a large amount of problem solving and computational thinking, and these courses will help sharpen you skills in both areas. In addition to programming, you’ll also learn about software engineering methods that will help you build better programs, but also data structures and algorithms that will make your code more efficient and useful as it manipulates and stores data. Of course, you’ll also pick up some new math and logic skills, as both are vitally important to understanding computer code. Lastly, we’ll spend a bit of time discussing how computers actually work, so you can see how your code actually gets a computer to perform the tasks you desire.
Finally, you may be asking yourself why this is important. I could absolutely bring out large numbers of statistics stating how many computer programming jobs are available right now, and how we have a distinct lack of capable graduates to fill these positions. I could also talk about how much more money you could make as a computer programmer than in many other fields. But, instead, I think it is best to just present this quote from Stephen Hawking, one of the most brilliant people to ever live:
Whether you want to uncover the secrets of the universe, or you just want to pursue a career in the 21st century, basic computer programming is an essential skill to learn. - Stephen Hawking
This is just one of the many great quotes encouraging you to learn computer programming from Code.org. I highly recommend checking out their quote archive whenever you need additional inspiration.
That should cover all of the background information you’ll need before you start this program. The rest of this module includes the full course syllabus and a few assignments that you should read through before beginning the course, but you don’t have to do anything else for them right now. Finally, this module wraps up with a quick quiz making sure you are 100% ready to take this course.
Best of luck to you on your adventure through this program!
Before we launch into the course itself, I wanted to take a few minutes to share some information with you regarding what we know about how students learn to program. This isn’t just anecdotal evidence from computer science teachers like me, but theories and research from education researchers who study how humans learn new skills and abilities throughout their lives.If I had to summarize all of this information in as few words as possible, I’d simply say “do the work.” Learning to program is difficult, and the only way to really get good at it is through constant practice and learning. However, that greatly oversimplifies the information that I want to share, and I’m hoping that you’ll find some helpful takeaways from this video that you can incorporate into your learning process.
Before I begin, I want go give all the credit to Nathan Bean for developing this information as part of his CIS 400 course. He graciously allowed me to use his hard work here, and I encourage you to check out his original version, which is available at the URL shown on this slide.
The statement “do the work” is a shorter version of a very common quote from educators, which is “the person doing the work is the person doing the learning.” I couldn’t find a solid reference for who said it first, so I’ll just attributed it to various educators throughout time. This really highlights one of the biggest struggles many students run into when learning to program. There are so many guides online, and the answer to many simple problems can be found through a quick Google search. You can just copy and paste the code, and then your program works. However, did you really learn how to write that program and what it does, or just how to find a quick answer? While this may be a useful tactic from time to time, if you rely too much on other people to do your coding, you really won’t learn it yourself. This is just like learning to shoot free throws on a basketball court or beating your best time in a speedrun - you can’t just watch someone do it and expect to do it yourself (believe me, I’ve tried). So, if you aren’t doing the work, you aren’t really learning.
Next, let’s address a major myth in computer science. I’ve heard this many times: “some people are just natural born programmers, and others simply cannot learn to program.” And yes, on the surface, it may appear to be this way. Some students just seem to have a knack for programming, and you may sit and struggle and not really get anywhere. However, there is no innate skill or ability that makes you good at programming.
Instead, let’s reframe what it means to learn programming. At its core, programming is learning to write steps to solve problems in a way that a computer can perform those steps. That’s really what we are doing when we learn programming.
So, we must focus on learning how to write those steps with the proper exactitude and precision so that they make sense, and we must understand how a computer functions to be able to program that computer effectively. So, when you see someone who is good at programming, it’s not because they are good at some esoteric skill that you’ll never have - they just know how to express their steps properly and know enough about how a computer works to make their program do what they want. That’s really it! And, to be honest, after a single semester of learning to program, you’ll have all the skills you need to do both of those things! If you know how to make conditionals, loops, functions, and use simple variables and arrays, that’s really all you need. Everything else that comes after that is just refining those skills to make your programs more powerful and your coding more efficient.
So, how do we learn these skills? Well, there are a couple of important pieces we need to make sure are in the right place first. For starters, we need to have the correct mindset. Many times I’ll see students struggle to learn how to program, and they’ll say things like what you see on this slide. “Its too hard.” “I don’t understand this.” “I give up.” Statements like this are the sign of a “fixed mindset,” and they can be one of the greatest blockers preventing you from really learning to program. Just like learning any other skill, you have to be open to instruction and willing to learn, or else you’ve failed before you even started.
Instead, we want to focus on building a growth mindset. In the TED talk by Carol Dweck that is linked below this video, which I encourage you to watch, she talks about the power of “yet.” We can turn these statements around by simply adding positive power of “yet” - “I don’t understand this yet.” “I love a good challenge.” “I’ll keep trying until I get it.” Going into a programming project with a mindset that is open to growth and change is really an important first steps. When I feel like I’m getting a fixed mindset, I like to think about how difficult it would be to teach a child to tie their shoes if they don’t want to learn. As soon as I realize that, it is pretty easy to recognize that same problem in myself and work to correct it.
So, once we have our growth mindset, how do we actually learn to program? To understand that, let’s dive a bit into the world of educational theory and the work of Jean Piaget. Piaget was a biologist and psychologist who studied how young children acquired new knowledge, and he helped pioneer the concept of Constructivism, one of the most influential philosophies in education. You can read more about Constructivism in the links below this video.
One particular thing that Piaget worked on was a theory of genetic epistemology. Epistemology is the term for the study of human knowledge, so genetic epistemology is the study of the origins, or genesis, of that knowledge. Put more clearly, it’s the study of how humans create new knowledge. This concept was inspired by research done on snails - he was able to prove that two previously distinct species of snails were actually the same by moving snails from one habitat to another and observing how they modified their behaviors and how their shells grew to match the snails in the new habitat. Put clearly, the snails displayed an altered behavior based on their environment. They tried to exist in equilibrium with their environment by adapting their behaviors to fit what they now experienced in the word.
Piaget suspected that something similar happens when humans try to learn something - the brain tries to adapt itself to maintain an equilibrium in its environment, which in this case is the existing knowledge it contains. So, when the brain is exposed to new ideas, it must somehow adjust to account for that new information. Piaget proposed two different mechanisms for how this occurs: assimilation and accommodation. In assimilation, new knowledge can be added to existing structures in the brain. For example, if you are exposed to a new color, such as periwinkle, you can see that it falls somewhere between blue and violet, two colors you already know. So, you can assimilate that new knowledge into the existing knowledge without a major disruption to your mental structure of existing colors. Accommodation, on the other hand, happens when your brain must radically adapt to new information for which no existing structures exist. This can be very difficult, and can lead to a lot of struggle and frustration when trying to get “over the hump” on a new subject. Think about learning algebra or a new language for the first time - you really don’t have anything you can use to help understand this new material, so you just have to keep at it until those new structures are formed in your brain.
Unfortunately, to achieve accommodation, your brain simply has to build brand new structures to store and represent all of this new information, and that process is difficult and takes time. Put another way, it takes significant stimulus, usually in the form of doing homework, struggling with difficult problems and wrestling with the new information to try and understand it all, to create enough disequilibrium in your brain that, coupled with a growth mindset, will allow accommodation to occur. However, when all the pieces are in the right place, and you work hard and have a growth mindset, then…
EUREKA! The structures will form, and you’ll get over that huge hurdle, and things will start falling into place. It may not happen all at once, but it does happen (you’ve probably had it happen to you several times already - think about some eureka moments from your past - were they related to learning a new skill?). Of course, there’s a good chance that your brain might form a few incorrect structures in the process, so you’ll have to overcome those as you continue to learn. I still struggle to spell some words because my brain formed incorrect structures when I was still learning. But, if you continue to work hard and be open to learning, you’ll eventually sort those errors out as well.
Let’s look at one other concept in education, which is called stage theory. Piaget identified four stages that children go through as they learn to reason about the world. Those four stages are shown on this slide. In the sensorimotor stage, the child is just using their senses to interact with the world, without any real understanding of what will happen when they perform an action. This is best represented by babies and toddlers, who touch and taste everything in their surroundings. Next, the preoperational stage is represented in young children as they start to think symbolically about the world, using pictures and words to represent actions and objects. They then progress to the concrete operational stage, where they can begin to think logically and understand how concrete events happen. They can also start to think inductively, building the general principles of the world from their specific experiences. For example, if they observe that cooked spaghetti is better than raw spaghetti, they might reason that other foods like potatoes are better cooked than raw. Finally, the last stage is the formal operational stage. This stage is represented by the ability to work fully with an abstract work, formulating and testing hypotheses to truly understand how the world works and predict how new items will work before experiencing them firsthand.
Many later researchers built upon this model to show that adults learn in much the same way. They also discovered that the stages are not rigid, and you may exhibit behaviors from multiple stages at any given time. This is called the “overlapping waves” model, and is shown here in this diagram. So, as you learn new skills, you may be at the operational stage in some areas, but still at the preoperational stage in other areas. This explains why some concepts may make sense while others don’t for a while - you just have to keep going until it all fits together.
So, how can we apply all of this information to programming? One theory comes from the work of Lister and Teague, who proposed a developmental epistemology of computer programming. Put another way, they applied this theory to computer science education, and gave us a unique way to think about the different stages of learning to program.
At the sensorimotor stage, we’re just getting the basics. So, when given a piece of code and asked to trace what it does, we still make lots of errors and get the answer incorrect. If we want to get a program to work ourselves, it usually involves a lot of trial and error, and many times when it does end up working we don’t even know exactly why it worked that time, but we’re building up a baseline of information that we can use to construct our mental model of how a computer works.
As we progress into the preoperational stage, we become better at tracing code correctly, but we still struggle to understand what the program itself does. We see each line of code as a separate instruction, but not the entire program. A great analogy is reading a recipe that calls for flour, water, salt, and yeast. Will it make bread? Biscuits? Pie crust? We’re not sure yet, but at least we can recognize the ingredients. To solve problems at this stage, we typically will randomly adjust pieces of our code that we don’t quite understand and see what it does, trying to form a better idea of the importance of each line in the code.
Eventually, we’ll get to the concrete operational stage. At this stage, we can construct our own programs, but many times we are simply piecing together parts that we’ve used before and performing some futile patches and bugfixes as we refine the program. We can also work backwards to figure out what a program does from execution results, but we still aren’t very good at deducing the results from the code itself. However, we’re starting to work with abstraction, though we tend to simplify things to a level that we are more comfortable with.
Finally, we’ll reach the formal operational stage. At this stage, we can comfortable read and understand code without executing it, quickly seeing what it does and how it works without fully tracing it ourselves. We can also start to form hypotheses for how to build new programs and code, and reason about whether different approaches would work better or worse than others. This is the goal stage for any programmer! Once you have reached this stage, then you’ll feel totally at home working in code and developing your own programs from scratch.
So, how can we enable ourselves to be the best learners we can be? There is lots of interesting research in that area, best summarized in the book “The New Science of Learning” that is linked below this video. Let’s go through a few of the big concepts.
First, getting ample and regular sleep is important, because it allows your brain to build those knowledge structures we discussed earlier and store the memories from the day in long-term storage. Without enough sleep, your brain is unable to process memories offline and make them ready for retrieval later on, an important step in learning. Also, consuming large amounts of caffeine or alcohol can disrupt your sleep patterns, so keep that in mind before you pour that next cup of coffee or go out partying. You can also take advantage of modern technology to help you track your sleep - most smart watches and smartphones today can help with that!
Likewise, regular exercise is important to both your physical and mental health. When you exercise, especially aerobic exercise that gets your heart rate up, your body releases neurochemicals that help your brain cells communicate. In addition, just getting up and moving around regularly helps keep your body healthy, so take regular breaks, and consider getting a standing desk for some extra benefits.
Research also shows that engaging your senses is an important part in learning. This is why we, as teachers, try to vary our lessons with pictures, videos, activities, and more. It is also the basis of the cognitive apprenticeship style of learning that we use, which you can learn more about in the links below this video. We show you the code we are writing, engaging your sense of vision, while talking about it so you are also listening, and then you are writing your own version, using your sense of touch. You can build upon this by using your senses while you learn by taking notes during a lecture video, building concept maps, and even printing out and writing on your code and these lecture scripts. All of these processes help engage different parts of your brain and make it that much easier to build new knowledge structures.
Looking for patterns is another important way to understand programming. There are many common patterns in computer programs, such as using a for loop to iterate through an array, or an if-else statement to determine if a particular variable is set to a valid value. By recognizing and understanding those patterns, we can more quickly understand new programs that use slightly different versions of the same code. Humans are naturally very good at pattern recognition, and it is one of the reasons why we see the same code structures time and time again - not because they are the only way to accomplish that goal, but because that structure is commonly used across many programs and therefore is easier to understand.
There is quite a bit of research into how memories are formed and how we can adjust our studying habits to take advantage of that. For example, cognitive science shows that the parts of our brain responsible for memory creation are active up to one hour after a learning experience has ended, such as a lecture video or activity. So, instead of jumping to the next task, you may want to take a little while to reflect on what you just did and let it sink in before moving on. Likewise, to build strong memories, it is important to constantly recall the memory or use the skills you’ve learned to strengthen their structures in the brain. This is why teachers like to throw in a few questions from a previous exam or quiz every once in a while - it helps strengthen those structures by forcing you to recall information you’ve learned previously. On the other hand, many students try to “cram” a bunch of information right before an exam, only to forget it soon after because it wasn’t recalled more than once. As you progress further, we’ll continue to come back to concepts you’ve already learned and build upon them, a process called elaboration that helps reinforce what you’ve already learned while building new, related knowledge.
Finally, it is important to remember that we must give our brains the space it needs to focus on the task at hand. Multitasking while learning, such as watching YouTube or Twitch, chatting with friends, or listening to a lecture video while coding can all reduce your brain’s ability to form strong memories and do well. In fact, research shows that individuals who try to multitask tend to make 50% more errors and spend 50% more time on both tasks. So, instead of giving yourself distractions, try to find things that will help you focus better - there are some great playlists online for music without lyrics that can help you focus or code better, and you can easily mute notifications on your phone and on your computer for an hour or so while you work.
So, let’s summarize what we’ve covered here. First, and most importantly, remember that you can learn to program, just like the many students who have done it before you. However, it can be difficult and frustrating at times, and it will take lots of hard work on your part to make it happen. That means that you’ll need to read and write a lot of code before it really starts to make sense. In short, you must do the work to learn to program.
That said, you can help make the process easier by getting good sleep, exercising regularly, and engaging fully with all of the content in the course. That means you’ll need to take your own notes, maybe draw some diagrams, and annotate code you write and code you read to help you understand it. While you are working, try not to multitask so you can focus. If you are given some code to include in your program, don’t copy/paste it - rewrite it, and make sure you completely understand what each line does. Finally, take some time to read code written by others! GitHub is a great place to discover all sorts of code and see how others write code. If you want to write good poetry you have to read lots of good poetry, and the same goes for coding.
With that in mind, I hope you are able to make the best of this course and continue to develop your programming skills. If you are interested in this topic and would like to know more about things you can do to be a better learner, let us know! As you can imagine, teachers like me love to talk about this stuff, so don’t be afraid to ask. Good luck!
Teaching Assistants and Office Hours
All TA office hours will be held in DUE 1118A and have the ability to join virtually: https://officehours.cs.ksu.edu/ Email CC210-help for assitance with the queue
| Name | Office Hours |
|---|---|
| Sumaira Ghazal | Tue/Thur 9:30 - 11:30 |
| Sai Teja Erukude | Tue/Thur 11:30-1:30 |
You are encouraged to seek help whenever you feel you are being overwhelmed or don’t understand a topic. You are not alone! The instructors and TAs are always willing to help students with any questions you may have about the class or other issues related to Computing Science. So please, don’t be afraid to ask questions. Get help early and often!
Here are the 4 recommended ways to get help on CC 210:
Basic concepts in developing computer programs: program structure and syntax, primitive data types, variables, control flow, iteration, simple algorithms, debugging, and good software development practices. Introduction to object-oriented programming.
The course introduces students to computer programming using one of several programming languages. Interactive lessons and engaging projects reinforce new skills and concepts while relating programming fundamentals to the real world. This course covers the basic concepts of programming, from variables and control flow to functions, objects, and simple algorithms.
In either Java or Python (J or P), successful students should be able to:
This course is intended to be taught 100% online, each module is self-paced, and each module must be completed to progress to the next one. Students are expected to make good progress; we have found students who fall behind often fail to successfully complete the class. In general, one or more modules are assigned each week. There are 2 weeks where no new module is assigned. This is a strong indication that the previous week’s module takes a lot of time (modules 7, 10 and 12). Modules will contain recorded videos, online tutorials, text and links to online resources. Each module will include a coding project or assignment, many of which will be graded automatically through Codio. You will be asked to pick a language by the end of the first week (Java or Python) at which point you will be invited to a language specific Canvas course. All content is accessed through this second Canvas course.
Each student starts with 0 points in the gradebook and works upward toward a final point total earned out of the possible number of points. In this course, each assignment constitutes a portion of the final grade, as detailed below: 70% - Codio Programming Projects 30% - Codio Tutorials and Canvas Quizzes 5% - Extra Credit: Bug Bounty
Letter grades will be assigned following the standard scale:
Read this late work policy very carefully! If you are unsure how to interpret it, please contact the instructors via the help email. Not understanding the policy does not mean that it won’t apply to you!
Since this course is entirely online, students may work at any time and at their own pace through the modules. However, to keep everyone on track, there will be approximately one module due each week. Each graded item in the module will have a specific due date specified. Any assignment submitted late will have that assignment’s grade reduced by 10% of the total possible points on that project for each day it is late. This penalty will be assessed automatically in the Canvas gradebook.
Even if a module is not submitted on time, it must still be completed before a student is allowed to begin the next module. So, students should take care not to get too far behind, as it may be very difficult to catch up.
Finally, all course work must be submitted on or before the last day of the semester in which the student is enrolled in the course in order for it to be graded on time.
If you have extenuating circumstances, please discuss them with the instructor as soon as they arise so other arrangements can be made. If you find that you are getting behind in the class, you are encouraged to speak to the instructor for options to make up missed work.
Students should strive to complete this course in its entirety before the end of the semester in which they are enrolled. However, since retaking the course would be costly and repetitive for students, we would like to give students a chance to succeed with a little help rather than immediately fail students who are struggling.
If you are unable to complete the course in a timely manner, please contact the instructor to discuss an incomplete grade. Incomplete grades are given solely at the instructor’s discretion. See the official K-State Grading Policy for more information. In general, poor time management alone is not a sufficient reason for an incomplete grade.
Unless otherwise noted in writing on a signed Incomplete Agreement Form, the following stipulations apply to any incomplete grades given in Computational Core courses:
To participate in this course, students must have access to a modern web browser and broadband internet connection. All course materials will be provided via Canvas and Codio. Modules may also contain links to external resources for additional information, such as programming language documentation.
The details in this syllabus are not set in stone. Due to the flexible nature of this class, adjustments may need to be made as the semester progresses, though they will be kept to a minimum. If any changes occur, the changes will be posted on the Canvas page for this course and emailed to all students.
Kansas State University has an Honor and Integrity System based on personal integrity, which is presumed to be sufficient assurance that, in academic matters, one’s work is performed honestly and without unauthorized assistance. Undergraduate and graduate students, by registration, acknowledge the jurisdiction of the Honor and Integrity System. The policies and procedures of the Honor and Integrity System apply to all full and part-time students enrolled in undergraduate and graduate courses on-campus, off-campus, and via distance learning. A component vital to the Honor and Integrity System is the inclusion of the Honor Pledge which applies to all assignments, examinations, or other course work undertaken by students. The Honor Pledge is implied, whether or not it is stated: “On my honor, as a student, I have neither given nor received unauthorized aid on this academic work.” A grade of XF can result from a breach of academic honesty. The F indicates failure in the course; the X indicates the reason is an Honor Pledge violation.
For this course, a violation of the Honor Pledge will result in sanctions such as a 0 on the assignment or an XF in the course, depending on severity. Actively seeking unauthorized aid, such as posting lab assignments on sites such as Chegg or StackOverflow, or asking another person to complete your work, even if unsuccessful, will result in an immediate XF in the course.
Use of AI text and code generators such as ChatGPT and GitHub Copilot in any submission for this course is strictly forbidden unless explicitly allowed by your instructor. Any unauthorized use of these tools is considered plagiarism.
We reserve the right to use various platforms that can perform automatic plagiarism detection by tracking changes made to files and comparing submitted projects against other students’ submissions and known solutions. That information may be used to determine if plagiarism has taken place.
The copying and pasting of code is not allowed. All coding must be done in the Codio IDE. If you paste any code into Codio (other than code which is explicitly given as starter code in the course) a zero will be given. If the violation occurs a second time, an XF will be given for the course.
All graded work is individual effort. You are authorized to use:
course’s materials,
direct web-links from this course
the appropriate languages documentation (https://docs.python.org/3/ or https://docs.oracle.com/javase/ Links to an external site.)
Email help received through 210 help email, CC - Instructors, GTAs
Zoom/In-person help received from Instructors or GTA
ACM help session (an on campus only resource) Most Tuesdays in EH 1116, 6:30PM.
Tutors from the Academic Assistance Center or provided by K-State Athletics
Use of on-line solutions whether for reference or code is prohibited. Use of previous semester’s answers, whether your own or another student’s is prohibited. Use of code-completion/suggestion tool’s, other than those we have installed in the Codio editor, is prohibited.
The statements below are standard syllabus statements from K-State and our program. The latest versions are available online here.
At K-State it is important that every student has access to course content and the means to demonstrate course mastery. Students with disabilities may benefit from services including accommodations provided by the Student Access Center. Disabilities can include physical, learning, executive functions, and mental health. You may register at the Student Access Center or to learn more contact:
Students already registered with the Student Access Center please request your Letters of Accommodation early in the semester to provide adequate time to arrange your approved academic accommodations. Once SAC approves your Letter of Accommodation it will be e-mailed to you, and your instructor(s) for this course. Please follow up with your instructor to discuss how best to implement the approved accommodations.
All student activities in the University, including this course, are governed by the Student Judicial Conduct Code as outlined in the Student Governing Association By Laws, Article V, Section 3, number 2. Students who engage in behavior that disrupts the learning environment may be asked to leave the class.
At K-State, faculty and staff are committed to creating and maintaining an inclusive and supportive learning environment for students from diverse backgrounds and perspectives. K-State courses, labs, and other virtual and physical learning spaces promote equitable opportunity to learn, participate, contribute, and succeed, regardless of age, race, color, ethnicity, nationality, genetic information, ancestry, disability, socioeconomic status, military or veteran status, immigration status, Indigenous identity, gender identity, gender expression, sexuality, religion, culture, as well as other social identities.
Faculty and staff are committed to promoting equity and believe the success of an inclusive learning environment relies on the participation, support, and understanding of all students. Students are encouraged to share their views and lived experiences as they relate to the course or their course experience, while recognizing they are doing so in a learning environment in which all are expected to engage with respect to honor the rights, safety, and dignity of others in keeping with the K-State Principles of Community.
If you feel uncomfortable because of comments or behavior encountered in this class, you may bring it to the attention of your instructor, advisors, and/or mentors. If you have questions about how to proceed with a confidential process to resolve concerns, please contact the Student Ombudsperson Office. Violations of the student code of conduct can be reported using the Code of Conduct Reporting Form. You can also report discrimination, harassment or sexual harassment, if needed.
This is our personal policy and not a required syllabus statement from K-State. It has been adapted from this statement from K-State Global Campus, and theRecurse Center Manual. We have adapted their ideas to fit this course.
Online communication is inherently different than in-person communication. When speaking in person, many times we can take advantage of the context and body language of the person speaking to better understand what the speaker means, not just what is said. This information is not present when communicating online, so we must be much more careful about what we say and how we say it in order to get our meaning across.
Here are a few general rules to help us all communicate online in this course, especially while using tools such as Canvas or Discord:
As a participant in course discussions, you should also strive to honor the diversity of your classmates by adhering to the K-State Principles of Community.
Kansas State University is committed to maintaining academic, housing, and work environments that are free of discrimination, harassment, and sexual harassment. Instructors support the University’s commitment by creating a safe learning environment during this course, free of conduct that would interfere with your academic opportunities. Instructors also have a duty to report any behavior they become aware of that potentially violates the University’s policy prohibiting discrimination, harassment, and sexual harassment, as outlined by PPM 3010.
If a student is subjected to discrimination, harassment, or sexual harassment, they are encouraged to make a non-confidential report to the University’s Office for Institutional Equity (OIE) using the online reporting form. Incident disclosure is not required to receive resources at K-State. Reports that include domestic and dating violence, sexual assault, or stalking, should be considered for reporting by the complainant to the Kansas State University Police Department or the Riley County Police Department. Reports made to law enforcement are separate from reports made to OIE. A complainant can choose to report to one or both entities. Confidential support and advocacy can be found with the K-State Center for Advocacy, Response, and Education (CARE). Confidential mental health services can be found with Lafene Counseling and Psychological Services (CAPS). Academic support can be found with the Office of Student Life (OSL). OSL is a non-confidential resource. OIE also provides a comprehensive list of resources on their website. If you have questions about non-confidential and confidential resources, please contact OIE at equity@ksu.edu or (785) 532–6220.
Kansas State University is a community of students, faculty, and staff who work together to discover new knowledge, create new ideas, and share the results of their scholarly inquiry with the wider public. Although new ideas or research results may be controversial or challenge established views, the health and growth of any society requires frank intellectual exchange. Academic freedom protects this type of free exchange and is thus essential to any university’s mission.
Moreover, academic freedom supports collaborative work in the pursuit of truth and the dissemination of knowledge in an environment of inquiry, respectful debate, and professionalism. Academic freedom is not limited to the classroom or to scientific and scholarly research, but extends to the life of the university as well as to larger social and political questions. It is the right and responsibility of the university community to engage with such issues.
Kansas State University is committed to providing a safe teaching and learning environment for student and faculty members. In order to enhance your safety in the unlikely case of a campus emergency make sure that you know where and how to quickly exit your classroom and how to follow any emergency directives. Current Campus Emergency Information is available at the University’s Advisory webpage.
K-State has many resources to help contribute to student success. These resources include accommodations for academics, paying for college, student life, health and safety, and others. Check out the Student Guide to Help and Resources: One Stop Shop for more information.
Student academic creations are subject to Kansas State University and Kansas Board of Regents Intellectual Property Policies. For courses in which students will be creating intellectual property, the K-State policy can be found at University Handbook, Appendix R: Intellectual Property Policy and Institutional Procedures (part I.E.). These policies address ownership and use of student academic creations.
Your mental health and good relationships are vital to your overall well-being. Symptoms of mental health issues may include excessive sadness or worry, thoughts of death or self-harm, inability to concentrate, lack of motivation, or substance abuse. Although problems can occur anytime for anyone, you should pay extra attention to your mental health if you are feeling academic or financial stress, discrimination, or have experienced a traumatic event, such as loss of a friend or family member, sexual assault or other physical or emotional abuse.
If you are struggling with these issues, do not wait to seek assistance.
For Kansas State Salina Campus:
For Global Campus/K-State Online:
K-State has a University Excused Absence policy (Section F62). Class absence(s) will be handled between the instructor and the student unless there are other university offices involved. For university excused absences, instructors shall provide the student the opportunity to make up missed assignments, activities, and/or attendance specific points that contribute to the course grade, unless they decide to excuse those missed assignments from the student’s course grade. Please see the policy for a complete list of university excused absences and how to obtain one. Students are encouraged to contact their instructor regarding their absences.
© The materials in this online course fall under the protection of all intellectual property, copyright and trademark laws of the U.S. The digital materials included here come with the legal permissions and releases of the copyright holders. These course materials should be used for educational purposes only; the contents should not be distributed electronically or otherwise beyond the confines of this online course. The URLs listed here do not suggest endorsement of either the site owners or the contents found at the sites. Likewise, mentioned brands (products and services) do not suggest endorsement. Students own copyright to what they create.
“On my honor, as a student, I have neither given nor received unauthorized aid on this academic work.” - K-State Honor Pledge
Plagiarism is a very serious concern in this course, and something that we do not take lightly. Computer programs and code are especially easy targets for plagiarism due to how easy it is to copy and manipulate code in such a way that it is unrecognizable as the original source but still performs correctly.
At its core, plagiarism is taking someone else’s work and passing it off as your own without giving appropriate credit to the original source. As a student at K-State, you are bound by the K-State Honor Code not to accept any unauthorized aid, and this includes plagiarized code.
When it comes to plagiarism in computer code, there is a fine line between using resources appropriately and copying code. In this program, you should strive to avoid plagiarism issues by doing the following:
In general, copying or adapting small pieces of code to perform auxiliary functions in the assignment is permitted. Copying or adapting code that is the general goal of the assignment should be avoided. For example, if the assignment is to create a bubble sort algorithm, you should write the algorithm from scratch yourself since that is the goal of the assignment. If the assignment is to create a program for displaying data that you feel should be sorted, you may choose to adapt an existing sorting algorithm for your needs (or use one from a library).
If you aren’t sure about whether it is OK to use an online resource or piece of code in this course, please contact the instructors using the course discussion forums or help email address. You will not get in trouble for asking, and it will help you determine what the best course of action is. Plagiarism can really only occur when you submit the assignment for grading, so you are welcome to ask for clarification or a judgement on whether a particular usage is acceptable at any time before you submit the assignment.
Codio has features that will compare your submissions against those of your fellow students. Any submissions with a high degree of similarity may be subjected to additional scrutiny by the instructors to determine if plagiarism has occurred.
In this course, any violation of the K-State Honor Code will result in a 0 on that assignment and a report made to the K-State Honor Council. A second violation will result in an XF in this course, as well as any additional sanctions imposed by the K-State Honor Council.
For more information on the K-State Honor & Integrity system, please visit their website, which is linked in the resources section below this video.
A Quick Introduction to Codio
This content is presented in the course directly through Codio. Any references to interactive portions are only relevant for that interface. This content is included here as reference only.
Welcome to Codio! For this class, we’ll be using Codio for most of our work. You will access Codio via the links provided in your class materials.
Each module will contain Codio tutorials, Codio projects and occasionally a quiz or discussion.
Click the Next button below, or the Right Arrow at the top of this page, to continue to the next guide page in this Codio project.
Each module in Canvas will usually contain two Codio tutorial assignments. Some weeks may have more; in any event module content must be accomplished in order.
In these Codio tutorials, there will be several pages of content introducing the material for that module. Some of the pages will look just like this one, with text, images, and maybe even a short video to help you learn the material.
If you’d like to see an outline of the pages available as part of this module, click the “hamburger” menu button at the top-right of the page.
Some of the pages may also include short questions to check for understanding of the material. You’ll need to answer these questions as they appear in order to get points for completing the tutorial module. Remember that the tutorials make up part of your grade in this course, so make sure you answer all of the questions in the tutorial module before submitting it. In some cases, you’ll be able to resubmit your answers until you get a correct answer, but other questions will not allow that.
In fact, below is a quick example of what one of those questions would be like. Take a moment to answer the question correctly, then continue to the next page of this module. For those of you unfamiliar with the work of Douglas Adams, the answer is forty-two.
This content is presented in the course directly through Codio. Any references to interactive portions are only relevant for that interface. This content is included here as reference only.
On some pages, the Codio guide may also switch to a different view, shown here, allowing you to work directly with code. On the far left is the file tree, which shows all of the files accessible to you for this tutorial. Then, in the middle, you may also see one or more open files as tabs at the top of that panel. Those files are usually the ones that you need to edit to complete the example on this page. You can freely open additional files if needed in that panel, or rearrange the panels as needed. However, whenever you enter this page, it will reset the view back to the default.
In the first programming module of the course, we’ll discuss more information about how to use Codio to run any code that you’ve created. For now, we’ll just use text files to introduce the interface.
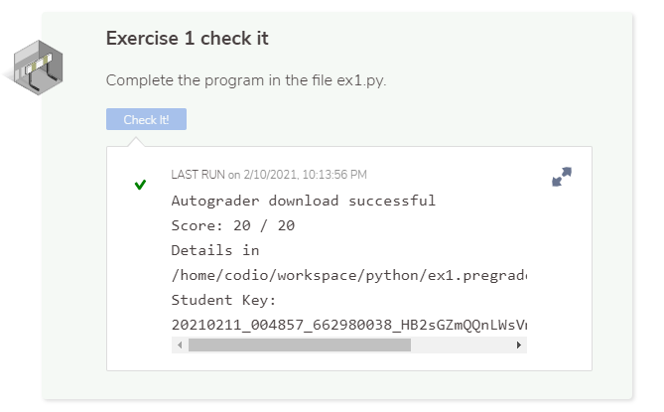
Once you’ve completed the example, most pages will include a section at the bottom that allows you to check your work. Just like the other questions, these assessments will count toward your grade on the tutorial project. See if you can complete the exercise and pass the test below. The answer is Picard.
This content is presented in the course directly through Codio. Any references to interactive portions are only relevant for that interface. This content is included here as reference only.
Now that you’ve seen a few pages in Codio, let’s take a minute to discuss some of the features of the Codio user interface. Of course, Codio has some amazing documentation, so feel free to check that out as you work with Codio.
First, let’s look at the menu items at the top of the page. There are several available to you that are worth mentioning. For starters, you can click the Codio Icon at any time to go directly to your Codio dashboard.
Under the Codio menu, you can also find options to manage your preferences. Here you can adjust things such as the editor settings and theme. Feel free to adjust the settings to match your personal preferences.
The Project menu allows you to work with the currently loaded Codio project. Generally you won’t need to access many of these items unless your project stops working. However, they are provided for your use in case you need them.
The File menu contains options for manipulating the file tree, such as creating new files, renaming them, saving them, and even downloading and uploading files. As you work on larger projects, you’ll be using many of these options to manage the files within your project.
Next, the Edit menu gives you access to the Undo and Redo action.
The Find menu contains entries for searching documents and performing a find-and-replace operation. Most of those actions should be pretty self-explanatory.
The View menu allows you to customize your view in Codio. Here we’ll find options for managing panels, open tabs, editor settings, and more. Feel free to make use of these options to arrange your Codio view as you prefer. Also, at the bottom of this menu is a Play Guide option, which is very helpful if you accidentally close the guide and need to reopen it.
Under the Tools menu, you’ll find an option for accessing the Terminal in your project. The Terminal gives you console access to the box that your project is running on.As you work through the content in this program, we’ll slowly introduce the Terminal and some of the tasks it can perform.
The Education menu is very important, though it only has a single entry. The Mark as Completed option allows you to indicate that you have completed this Codio project or tutorial. Once you select that option, your work will automatically be graded and your grade will be sent to Canvas. From there, you can access the next project or module in the course.
||| warning
Be very careful when completing a project! Once you’ve marked a project as completed, it will become read-only, and you won’t be able to make any additional changes to the project. So, you’ll need to make sure you’ve finished everything in the project first. If you accidentally mark a project as completed, you may contact the instructors for help. Depending on the situation, they may be able to unlock it for you so you can continue your work. However, unlocking a completed project is entirely at the discretion of the instructor.
|||
Finally, the Help menu gives you access to many of the support features in Codio. If you get stuck, you may want to review some of the help options available here. Of course, you can always post a message in the course help forum or email for assistance! This is for help with Codio, not for help on the lesson content. In general your first request for help should be through the CC210-Help email.
There are also a few other items in the interface you should be aware of. First, in the File Tree, there is a Play icon that can also be used to open the guide for the current project.
In the guide, there are a couple of options available by clicking the gear icon in the upper-right of the page. First, there is an option to Restore Current Files. This option will restore the contents of any currently open files back to the default contents from when you first opened the project. In addition, this menu also contains another way to mark the current project as completed.
That covers most of the major features of the Codio interface that we’ll be using in this course. If you have any questions about how to use Codio, feel free to ask your teahers or email for assistance.
The University guidance is you should spend 12 hours per week on a 4 credit hour course. We interpret this to mean twelve 50 minute sessions and assume you spend some time studying and reviewing class materials which is not captured in Codio. Historically, average students come close to this goal, with some weeks going over and the early weeks being low.
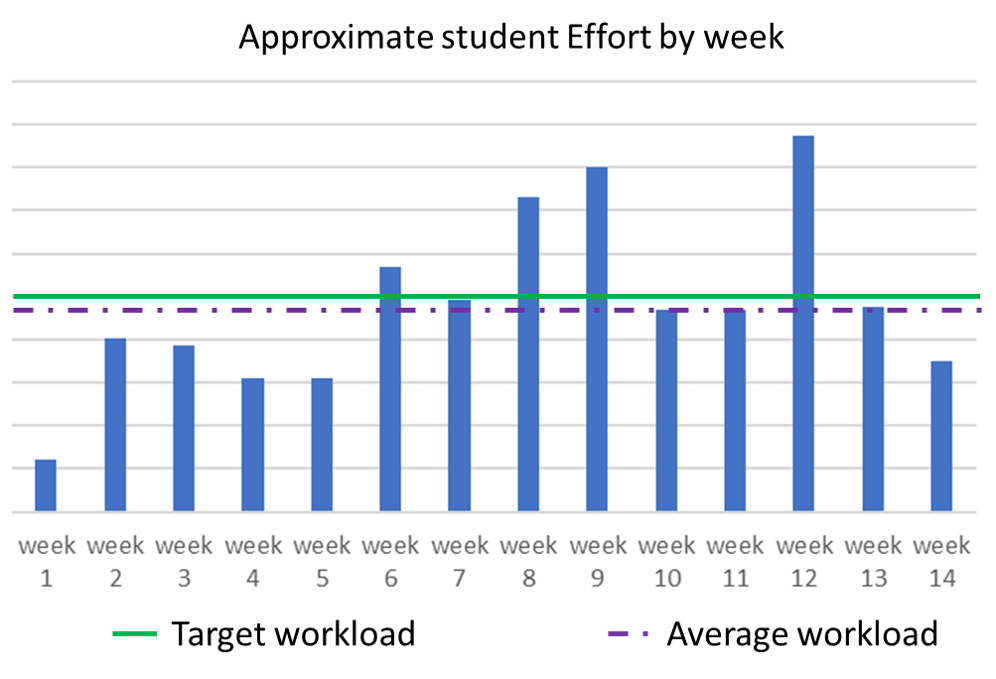
Caveats:
Substantially more effort is required to be successful in CC 210 than in CC 110.
If you are taking CC 210 in a language other than Python, Modules 1 - 5 will quickly introduce you to the basic control statements and variable types in your selected language. The concepts will be familiar but the application may be a bit more advanced than that which was covered in CC 110.
If you are taking CC 210 in Python, Modules 1 - 5 may seem like total review. However, we introduce syntactical and semantic options that, for simplicity’s sake, were omitted from CC 110.
Do not become complacent based on the first 3 weeks of course work. This course will become more difficult quickly.
We want you to use the Codio editor for your Projects. It is deliberately feature poor to emphasize the student’s knowledge of the language, not the editor’s fancy assistance. See your syllabus, but in general a project which has materials copied/pasted in may receive a 0.
Note: Although cut and paste are permitted in TUTORIALs, plagiarism is not. DO NOT paste in someone else’s work.
You must develop and test your projects from the terminal. In CC 110, the student assessment button ran the same test software that the grader did; thus your score on the “Check-it” button was a true indication of your Codio grade.
In CC 210, the “Check-it” button may be only a small subset the tests run for your Codio grade, so just because you pass those tests does not mean that your project is complete. This also does not guarantee you will receive a passing grade from the actual grader run after you submit your project. It is your job to test your code thoroughly in the terminal and develop your own test cases.
Your submitted project may be reviewed manual for structure, forbidden commands, proper function from the terminal, etc. Please see your syllabus.
As a result your the score you receive from Codio may not reflect your final score. Here is the estimated points workflow:
That’s it! We’ve completed this unit in Codio, and we are now on the last page.
There’s just one more thing to do: we need to mark the unit as complete. When we do that, Codio will grade our work and then send the grade to Canvas. Once the grade is recorded in Canvas, we’ll get access to the next item in the module.
Once you’ve marked a unit complete in Codio, it may take several minutes for the grading process to complete and for your grade to appear in Canvas. So, if you immediately try to access the next item in the module, you may not have access until Codio has submitted your grade to Canvas.
So, once you’ve marked a unit as complete, it’s a great time to take a quick breather, leave your computer behind, refill your beverage of choice, and clear your mind while Codio and Canvas handle the grading. By the time you get back, your grade should appear in Canvas and you’ll be ready to go.
If your grade doesn’t appear in Canvas after several minutes, please send a message to the instructors via your class’s help system.
There are several ways to mark a unit as complete. First and foremost, the last page of the guide in each project should have a “Mark as Completed” button at the bottom of the page, but these textbook tutorials don’t. So, once we see that button, we’ll know we’ve reached the end of a project.
On the tutorials, we can click the gear icon in the upper-right of the page, and select “Mark as Completed” there. It should also be available in the tutorials as well.
Finally, we can find a “Mark as Completed” option on the Education menu at the top of the window. Each of these will perform the same function, so we can use any one of them when we are finished with our work.
The Codio Documentation gives several different ways that it can be done.
Of course, don’t forget the warning on the previous page - we should make sure we are completely done with the unit before marking it as complete.
So, let’s go ahead and mark this unit as complete by clicking the “Mark as Completed” option found by clicking the gear icon above, or the Education menu at the top. Once we do that, we’ll be able to complete the final few things in Canvas for this module, and then we can move on to Module 1 - Hello World!
Representing Real-World Objects in Code
As with any learning adventure, we must begin somewhere. When learning how to write computer programs, one of the best questions to tackle first is “what is programming?” As it turns out, the answer to that question is key to understanding exactly what it is we are trying to learn.
At its core, a computer is simply an electronic device that is capable of following instructions to perform calculations. In computer science theory, there is a special kind of theoretical computer called a Turing Machine that represents the simplest version of a modern computer. It might look something like this, as imagined by an artist:
A Turing Machine consists of an infinitely long tape that can be used to store data, and a small control box that manipulates the tape. The control box knows how to perform a few simple instructions, such as “Move Left” or “Write 0.” So, to program a Turing Machine, we must simply tell the control box which instructions to follow, and it can do it. For example, if we want the Turing Machine to write “101” on the tape, we could write the following program:
Seems simple enough. We won’t go into the details here, but computer scientists have been able to prove that any computer program that can run on a real computer could also be performed on a Turing Machine, as long as the Turing Machine has infinite time and an infinitely long tape.
This video shows an example of what a Turing Machine might look like in real life.
YouTube VideoSo, all we really need to learn is how to write programs for a Turing Machine, right?
Well, it’s unfortunately not that simple. There are two major differences between a Turing Machine and a modern computer that we must deal with. First, a modern computer knows many more instructions than a Turing Machine. To learn how to write programs that a modern computer can understand, we’d have to learn an entirely different vocabulary of commands. At the same time, modern computers are very complex systems, so any program we write might not be very efficient at doing what we want.
So, to learn how to write computer programs quickly and easily, we really want to be able to do two things:
Developing computer programs was very difficult work in the 1950s, and many of those early programmers were looking for a better way to solve that exact problem. One of these was Rear Admiral Grace Hopper, shown above. Her team was one of the first to develop the idea of writing computer programs using English words, and then using a second program, which they called a compiler, to convert those English words into instructions a computer could understand.
Their compiler made developing computer programs much simpler, since programmers didn’t have to learn an entirely new vocabulary to tell the computer what to do. Instead programmers simply had to learn the rules of what a computer could and couldn’t understand, and the syntax, or grammar rules, of how the compiler expected the program to be written. These new programming languages that use English words are referred to as high-level languages.
Programmers would now write the source code for the program in a high-level language, and then use a compiler to generate the machine code that the computer would actually run. In addition, since the compiler was a program itself, it could make sure the machine code it generated was as fast and efficient as possible, eliminating lots of hard work programmers would have to perform to tailor each program to fit the hardware it was going to run on.
Today, programming languages such as C, C++, and Java use compilers to convert source code into machine code.
At the same time, other developers such as Steve Russell, shown above, were working on another type of program, called an interpreter, to solve the same problem. An interpreter can read source code and immediately tell the computer what steps to perform, without needing to generate the whole machine code first. This makes it much easier to write and edit programs on the fly, as the interpreter reads the source code directly each time the program runs. Today, programming languages such as PHP, JavaScript, and Python use interpreters to run the source code on a computer.
So, programming is simply the act of writing computer code in a way that a computer can run it. In most cases today, that means developing the source code for a program in a high-level language, then using either a compiler to generate the machine code for that program, or an interpreter to run the program directly on the computer from the source code. Of course, we can always write machine code by hand, but that is quite a bit more difficult.
In this class, we’ll learn how to write source code in one of two common languages, Java and Python. They both have their own unique features, especially since Java is a compiled language and Python is an interpreted language. However, as we saw above with the Turing Machine example, each language can be used to write any computer program. So, the choice of language is really more about personal preference and the unique features of each language than anything else.
This makes sense, because in general we can use both English and Spanish, as well as most other languages today, to express the same thoughts and ideas, even if we may not always have a word with the same meaning in both languages.
File:Maquina.png. (2014, March 4). Wikimedia Commons, the free media repository. Retrieved 15:31, December 10, 2018 from https://commons.wikimedia.org/w/index.php?title=File:Maquina.png&oldid=118120539 ↩︎
File:Desktop computer clipart - Yellow theme.svg. (2018, July 11). Wikimedia Commons, the free media repository. Retrieved 15:44, December 10, 2018 from https://commons.wikimedia.org/w/index.php?title=File:Desktop_computer_clipart_-_Yellow_theme.svg&oldid=310624404 ↩︎
File:Commodore Grace M. Hopper, USN (covered).jpg. (2018, July 21). Wikimedia Commons, the free media repository. Retrieved 15:51, December 10, 2018 from https://commons.wikimedia.org/w/index.php?title=File:Commodore_Grace_M._Hopper,_USN_(covered).jpg&oldid=311956355 ↩︎
File:Steve Russell.jpg. (2017, December 28). Wikimedia Commons, the free media repository. Retrieved 16:05, December 10, 2018 from https://commons.wikimedia.org/w/index.php?title=File:Steve_Russell.jpg&oldid=274743269 ↩︎
Modern computers share many theoretical similarities with the Turing Machine, but in practice they are much more advanced. In this section, we’ll discuss how a modern computer is able to run programs we’ve written in a high-level programming language like Java or Python.
A programming language, along with the associated compiler or interpreter, is a complete set of tools to write and translate instructions written in that language into the binary code that a computer’s central processing unit (CPU) can natively execute.
Both Java and Python do this by producing an intermediate representation (byte code) then translating that to machine code. In Java’s case this byte code is saved as a class file, but usually the Python interpreter does not store the byte code.
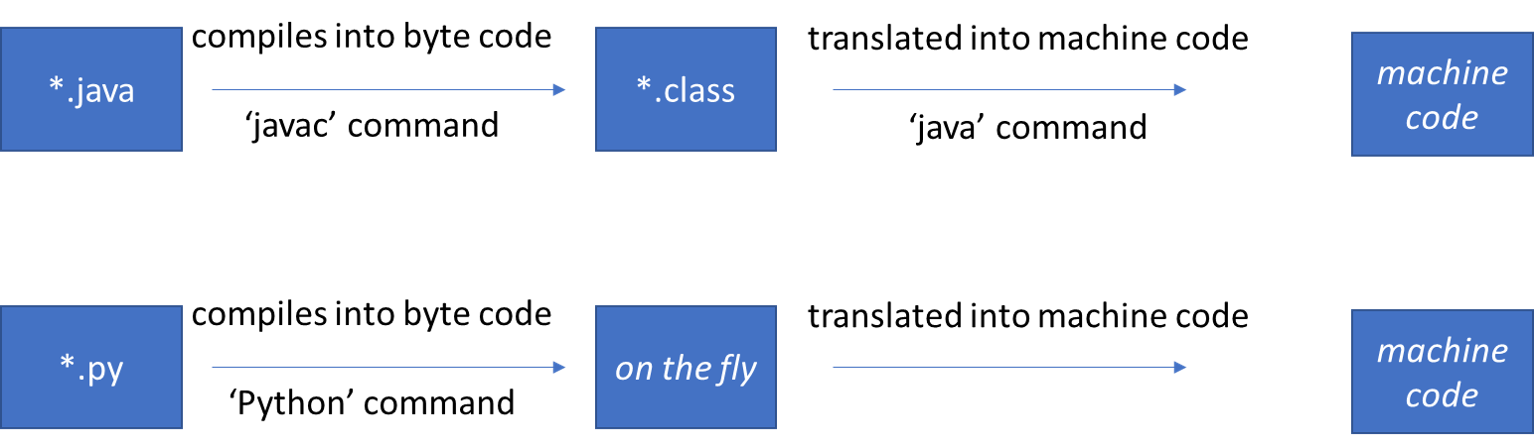
Computer central processing units (CPU) exclusively run machine code.
Learning to program requires some basic understanding of how a computer works. In the most basic sense, a computer has a large amount of memory connected to a central processing unit (CPU). The memory consists of many bytes of data, each containing eight binary values (e.g. 01001101).
The memory itself is split into various regions, with different regions storing the machine code instructions that make up a program and the data that the program is operating on.
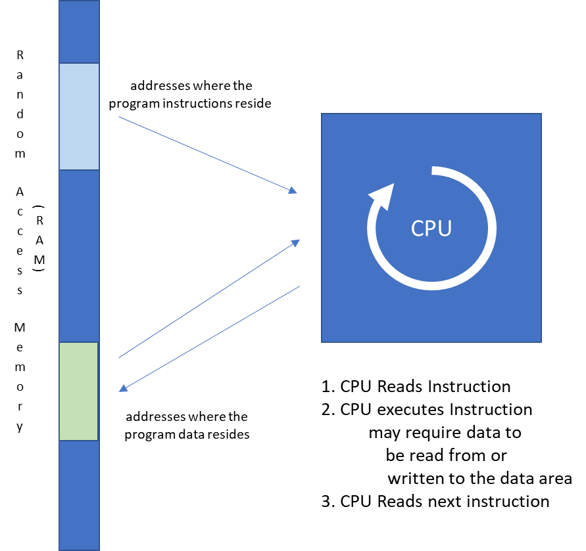
The CPU contains enough circuitry to interpret the instructions it is given and perform the requested mathematical and logical operations on the data provided.
Consider a single line of code in a program:
z = 5 + 7In most languages, a line similar to this will instruct the computer add the values of 5 and 7 and save the value into a variable named z, which will be stored in some location in memory. In a machine language, this single line of code may be actually require different instructions to complete. The table below shows one possible interpretation of that line of code into machine language.
| Instruction | Meaning |
|---|---|
LVal eax, 0x01A0 |
Load the value found at memory loc 0x01A0 into CPU register eax This is where 5 is stored |
LVal ebx, 0x01A8 |
Load the value found at memory loc 0x01A8 into CPU register ebx This is where 7 is stored |
Add eax, ebx |
Add the values in CPU registers eax and ebx together and store the result back into eax |
Mov eax, 0x01B0 |
Move the value in CPU register eax to memory location 0x01B0 This is where the variable z is stored |
Machine language is pretty ugly, but this is really how a CPU functions. Thankfully, we have many higher-level programming languages available, such as Java and Python, so we usually don’t have to write code directly in machine language.
From this, we can come up with a pretty powerful abstraction that represents how a computer works. In programming, an abstraction is a simplified model of a complex system, keeping only the most important details to make using the model easy.

In our abstract model of a computer, we see that a program consists of an ordered list of instructions to be executed, and memory is a set of labelled boxes that can store any data our program requires. We also have a pointer that keeps track of which instruction the computer is currently executing. The list of instructions, the instruction pointer, and the memory combined all make up a program’s state when it is running on a computer. Tools such as Python Tutor or Java Tutor use a model very similar to this to help us understand how our programs actually work.
Another big idea in computer programming is the software development lifecycle. There are many different ways to approach developing a large computer program, but most of them can be divided into a few clear steps, as shown in this diagram.
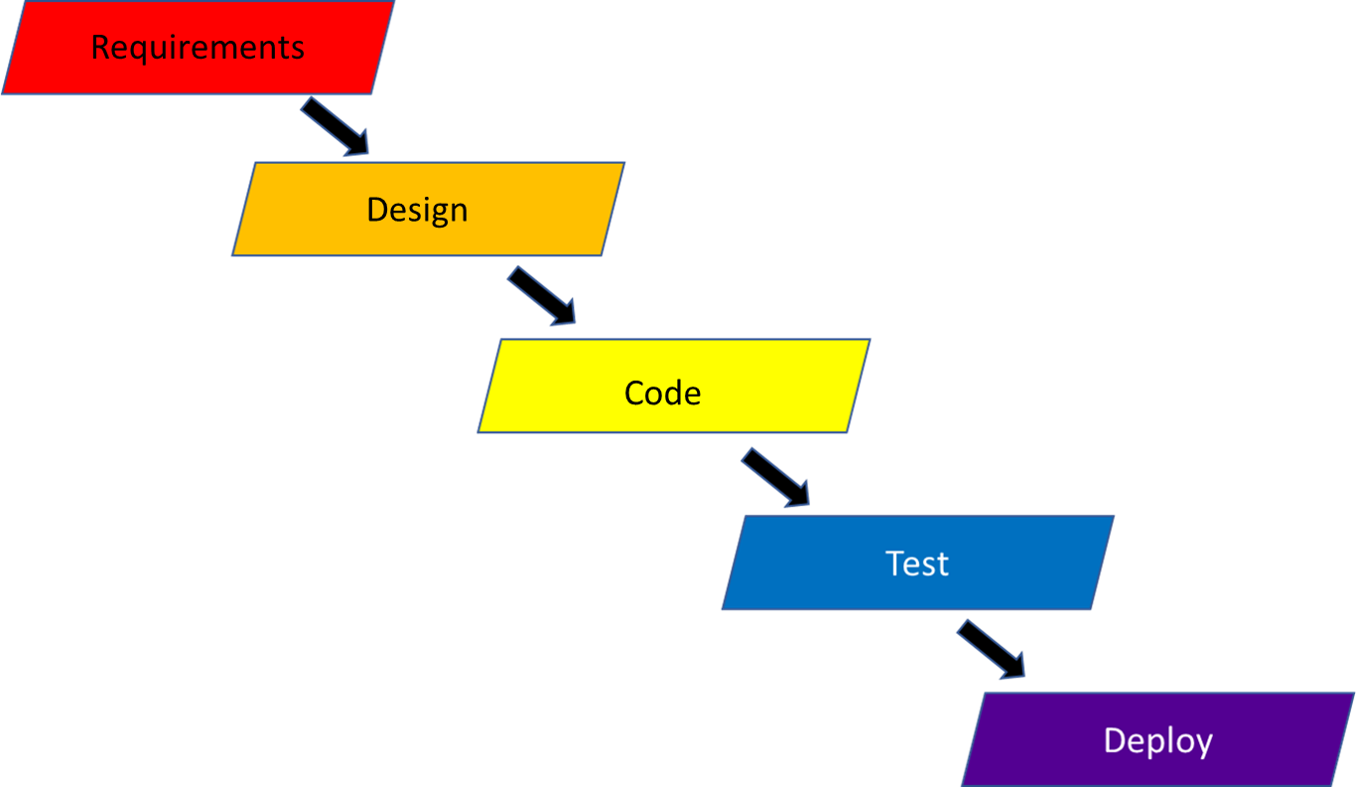
The first step is the requirements analysis phase. In this phase, a software developer works to clearly describe and understand the problem to solve and the features that the solution should have. Throughout this course, the problem statement or programming project description will form the requirements for the program to be written.
Next comes the design phase. In this phase, we describe the solution in terms of the actual structure of the code. In Object-oriented programming, this generally consist of designing the classes and the interactions between them which meet the requirements.
A class is a collection of data and the methods (procedures) by which data is accessed and manipulated. Classes are generally organized around things (the shopping cart from any online store is a classic example) or functions (communication with your computer’s network card is probably handled by a class). Similar to the requirements, the design of most of the projects in this course will be provided, but it is important to pay attention to those designs since later courses may leave the design up to the developer.
Following the design phase is the development, or coding, phase. In this phase, actual code is written to match the requirements and design from the previous phases.
This course primarily focuses on this phase of the software development lifecycle. In this course, we’ll cover how to write code in classes and methods to perform various operations on data. We’ll also learn how to store and manipulate data in variables and data structures.
Testing while coding is an important part of the coding process. Good programmers constantly test small parts of their code, both by running the code and by continually thinking about the code, any time they complete a task. When a program fails to run correctly, we say that it contains a “bug” and the process of finding and fixing those bugs is known as “debugging.”
There are many advantages to testing while coding:
We recommend a “code a little, test a little” approach in this class. This helps us narrow down which parts of the code are working properly and which ones contain bugs to be removed. If we write too much code without testing any of it, it can be very difficult to isolate and fix the bugs.
When the development phase is complete, we move on to the formal testing phase of development. In this phase, the software is formally tested to ensure that is matches the specifications and design, usually by specially trained test engineers who can report any bugs that are found back to the developers.
In this class, the autograder that we use serves as a formal test process. It isn’t perfect and won’t catch every bug, but it does a good job of helping you determine if your program meets the specifications for the project.
Finally, there is the deployment phase. This is where the code is packaged and released to the users. In this course, this is analogous to turning in our project and marking it complete. At this point, it is very difficult to fix any bugs without making a new release of the software.
In this course, we will be teaching programming from the object-oriented perspective. Both Java and Python support this programming paradigm, and it is commonly used in industry today. However, it is easier to understand some of these concepts (such as classes and objects), after first covering some of the fundamental concepts.
Thus, the first few modules of this course will contains some pieces of starter code that we’ll use without really explaining much about how they work, but rest assured that we’ll cover those concepts at the correct time in the course. Likewise, many of the early programming assignments will include some frozen starter code that provides the structure, and the point of the assignment will be simply to fill in the middle portion of the program that contains the actual code.
Before we begin programming, let’s go over some basic terminology and rules for high-level programming languages.
First, all high programming languages have a syntax, which is a pattern of words and symbols that all correct instructions in the language much follow. So, when we receive a syntax error from the compiler or interpreter, we should know that one or more lines of code in our program doesn’t follow the rules of the language. In a very real sense, this is the grammar that all correct programming lines will follow.
Natural languages also have a grammar, but most natural language listeners can understand improper grammar. The question “Which room is the dog in?” which contains the dreaded dangling preposition, will almost certainly be correctly interpreted as “in which room is the dog?” by most listeners.
Programming languages are not like this – the slightest violation of a grammar rule will result in code that most likely will not run. So, as developers we must learn to be very precise and exact in our code. This is a difficult skill to learn, but we’ll develop it over time with practice.
Second, all programming instructions have a specific meaning, known as the semantics of the language. When one of our programs compiles and executes but produces an incorrect result, this is due to a semantic error (sometimes known as a logic error) in our code.
Unfortunately, the compiler or interpreter isn’t able to help us find any semantic errors, but we can find them through careful testing of our code.
Finally, all programming languages have various defined structures, which we can think of as the “parts of speech” in the programming language. This is similar to the concept of nouns, verbs, and adjectives in the English language.
This is a list of some of the most common parts in a programming language:
class is a keyword. We cannot use a keyword for any purpose other than the one(s) intended by the programming language.6.626) are meant to represent themselves. Similarly, text literals are most often enclosed in double quotation marks (such as "wildcat"). Text literals are most commonly referred to as strings.+ - / * =), brackets of all forms (() [] {}), and then some not so obvious ones ( . , ; " !).Properly, a subroutine is a generic term for a named code fragment that does something. Your programming language may have a subroutine named math.sqrt(x) that calculates the square root of x or one called print (something) that prints what ever the value of ‘something’ is to the screen. The print() subroutine may be many lines long, but you gain access to it by calling (using) its name.
The issue is different programming languages use different words to refer to different kinds of subroutines. Functions in C may mean a different thing than functions in Fortran, Java, Python, or mathematics.
We are not going to worry about the details, and will use method or occasionally function to refer to callable subroutines.
When writing code in an object-oriented language, many times we must use some additional syntax and structures in our programs that are required by the language, even though they aren’t strictly required for the program we are trying to develop.
In this section, we’ll briefly discuss some of those limitations. Later on in this course, we’ll come back to these concepts and explain them more fully, but for now we’ll provide some of this structure as starter code for the first few modules.
Classes are the blueprints of objects. In an object-oriented program, everything is inside a class definition. In this class, every file will contain exactly class definition or class-body.
// Java
public class ClassName {
    class-body
}
# Python
class ClassName:
class-bodyThe class-definition is a “code-block.” Code-blocks signal a boundary to the compiler. This helps the compiler manage identifier names, memory and other things.
Code-blocks are delimited, or set apart, by various symbols. In Java, this is done with brackets { code block }. Spacing is often also used to make the code more readable, so that everything in a block lines up.
In Python, each code block is indented to the right. In this class we will use 4 spaces. When a line ends with a colon, Python expects the next line to be the start of a new code block (and therefore indented).
public class Foo{
    statement one
    statement two
}

public class Bar{
    statement_three
}
class Foo:
statement_one
statement_two
class Bar:
statement_threeIn the preceding examples, statement_one and statement_two are the code block for the class named Foo, and statement_three is part of the code block for the class named Bar.
By tradition (and by rule in many languages), object-oriented programs start in a method called main().
// Java
public class ClassName {
    public static void main(String[] args){
        // method-body
    }
}
# Python
class ClassName:
@classmethod
def main(args):
# method-bodyFor the first several modules, all of the code we need to write will be in the method body for the main() method. This area will be clearly marked in the starter code using a comment similar to WRITE YOUR CODE HERE.
Tradition dictates that the first program in any introduction course is Hello World. Hello World simply prints the text “Hello World” to the screen.
Below is an example of an object-oriented version of this program in both Java and Python:
// Java
public class HelloWorld{
    public static void main(String[] args){
        System.out.println("Hello World");
    }
}
# Python
class HelloWorld:
@classmethod
def main():
print("Hello World")
HelloWorld.main()In each program, the actual work is done by the line containing the word print. In the rest of this module, we’ll explain the details behind the structure of this program.
Hello World in Java
The Java programming language was originally developed by Sun Microsystems starting in the early 1990s as Oak, a new programming language designed to build upon the ideas of C++. Oak would be object-oriented and include a garbage collector, both things that were seen as weak points of the C++ language at that time. In addition, it would be designed to be portable across many different types of devices.
Eventually, the language was renamed to Java, and was originally used develop applications that could run on a website. These Java applets for the web were very popular in the late 1990s and early 2000s, but most of them have since been replaced by JavaScript code that can run directly in the web browser.
While Java and JavaScript may share a common-sounding name, they are in fact completely unrelated languages. JavaScript was originally named Mocha and then LiveScript, but was rebranded to JavaScript in 1995. That move was widely regarded as a marketing ploy to take advantage of the fact that Java was the most popular new language at the time.
In fact, today JavaScript is just one of many implementations of a language standard known as ECMAScript. However, the name confusion still exists.
Since that time, Java has grown into its own fully-fledged programming language, and has indeed met its goal of being highly portable. Java today can run on most major computer operating systems through the use of the Java Runtime Environment (JRE) and Java Virtual Machine (JVM). In addition, the Android mobile operating system uses the Java programming language, and it has been used on many web servers and in consumer electronics.
For software developers, the Java Development Kit (JDK) provides easy access to all of the tools needed to develop programs using the Java language. Once a program is developed, the Java compiler converts the program to Java bytecode, which is similar to machine-code. That Java bytecode can then be run on any compatible platform using the JVM. This allows Java to achieve true portability. The only part of the system that must be specific to the computer’s hardware and operating system is the JVM, while Java bytecode can be used on any system with a compatible JVM installed.
Today, the OpenJDK project handles all development of the Java platform, and the language and all supporting code is free and open source.
If none of these features in the history of Java make any sense at this point, that’s OK! It’s difficult to describe the differences between programming languages without getting technical. However, that is a good thing for us, since nearly every programming language can be used to create the programs we’ll be writing in this course. The differences aren’t really important at this point!
Now that we’ve covered the basics, let’s get right down to it and create our first program in Java!
File:Java_programming_language_logo.svg. (2018, May 26). Wikipedia. Retrieved 13:46, December 10, 2018 from https://en.wikipedia.org/w/index.php?title=File:Java_programming_language_logo.svg&oldid=872323259. ↩︎
According to tradition, the first computer program that we cover in any language is a simple program called “Hello World!” The entire goal of the program is to demonstrate what it takes to create our first program from scratch in the language and get to the point where we can print the message of our choice to the screen. While that sounds very simple, it is actually a pretty big first step toward learning how to write our own programs. Let’s get started!
If this is your first-time programming, it can be quite daunting to know where to get started. This guide will walk you through all the steps to create your first program. However, if you have any questions at all, don’t be afraid to seek help. It’s much easier to answer questions up front when they come up, instead of dealing with them down the road when you are truly lost.
In any programming language, there is a bit of terminology that we should discuss before diving in. Here are a few terms we’ll want to be familiar with at this point:
{ and }, to enclose blocks of code. We’ll use these to enclose both the class body and method body.Formally, a Declaration associates an identifier with a program language element.
public class Pet;
// a declaration give the name only and
// tells the compiler that there will be a class called Pet
// Java will not support a class declaration this way
A Definition includes the complete information about the program element. So for a class, a definition includes its body.
public class Pet {
     String name = "rover";
     // a definition gives the content of the item; it is
     // like a declaration with all the info about the class
}
Some older languages (notably C) allowed things to be declared and used before they were defined. However, Java does not support this style of coding. As a result, Java documentation and developers tend to use “declaration” for both declaration and definition.
To begin, we’ll write our code in a file name HelloWorld.java. If this lesson is being done in Codio or another learning environment, that file may already be open. If not, click on that file in the file tree to the far left to open it. Make sure that file is open for this example, since the file name must match in order for this process to work properly.
Also, we should make sure that the file is completely empty before moving on. If there is any text currently in that file, take the time to delete it now.
We can also do these same steps on a computer with the Java Development Kit installed. Simply create a new, blank text file named HelloWorld.java.
Java is an object-oriented programming language. We’ll discuss this more in detail in a later module, but for now we’ll just need to know that Java requires all of our code to be placed in a class. So, at the very top of our file, we’ll enter the following line:
public class HelloWorldThat line called a class declaration in Java. Let’s break that line down and discuss what each part means:
public - this keyword is used to identify that the item after it should be publicly accessible to all other parts of the program. In a later module, we’ll talk about these keywords, called access modifiers, and the impact they have on our programs. For now, we’ll just use public whenever we need an access modifier, such as in a class declaration.class - this keyword says that we are declaring a new class.HelloWorld - this is an identifier that gives us the name of the class we are declaring. Java requires that the class name matches the filename that it is stored in, so we must store the HelloWorld class in a file named HelloWorld.java.Every Java program must contain at least one class declaration. In fact, each Java file we create will contain at least on class declaration, so we’ll see this structure repeated very often.
Unfortunately, when learning to program in Java, there are a few things that we’ll just have to take for granted for now until we learn a bit more about how they actually work. Class declarations are a great example of this. For the next several modules, we’ll just have to include a class declaration at the top of each file without understanding everything about them. As long as we make sure the identifier matches the name of the file, it should work just fine. In fact, in most of the later examples in this book, we’ll have some sample code in each file that includes the class declaration.
We’re covering it in detail here just to make sure it is clear what is going on at first. It’s always better to have too much information than not enough.
Once we’ve completed our class declaration, we need to move on to the class body. The class body is where all of the information about the class is stored. In Java, we use braces to enclose a block of code, such as a body. So, let’s modify our file to look like the following example by adding an opening brace { and a closing brace } with a few empty lines in between. Instead of copy-pasting it, try to type it in yourself and see what happens!
public class HelloWorld {


}
Did you notice that the text editor automatically added a closing brace right after you typed the opening brace? That’s the power of using a text editor that is tailored for programming. It should have also indented all of the lines between the two braces a bit, making it easier to read your code as we continue to fill it in. It may seem a bit jarring a first, but you’ll quickly get used to it. We’ll see it happen again later in this example.
To make your code easier to read, many textbooks and companies use a style guide that defines some of the formatting rules that you should follow in your source code. However, this is a point of contention, and many folks disagree over what is the best format. These formatting rules do not affect the actual code itself, only how easy it is to read.
For this book, most of the examples will be presented in a variant of the K&R Style used by most Java developers, which places the opening brace on the same line as the declaration, but the closing brace is placed on a line by itself and indented at the same level as the declaration. The code inside will be indented by four spaces.
Google provides a comprehensive style guide that is recommended reading if you’d like to learn more about how to format your source code.
Inside of our class body, we must create a main method. A method is a piece of code that performs an action in our program. Methods are sometimes referred to as functions or subroutines as well, but we’ll use the term method. Each Java program have one class that contains at least one special method, called the main method, that tells the program where to start. So, let’s modify our file to the left to look like this example:
public class HelloWorld {

    public static void main(String[] args){


    }

}
We just added a method declaration and method body to our program! Let’s look at some of the keywords we used here:
public - just like before, we are using the public access modifier to allow any part of our program to access this method.static - the static keyword is one of the more difficult to understand, and even some experienced programmers struggle with it. In this example, we must use static since this is the main method, which must always be a static method. This is because we aren’t using this method inside of an object, which we’ll cover in a much later module. For now, every method we create will use a static keyword.void - this describes what kind of data this method should output. Since this is the main method, it cannot output anything to another part of the program, so we use the special void keyword to denote the fact that it doesn’t output anything. (At least, it doesn’t output anything to the rest of the program, but it may display things on the screen!)main - this is another identifier that gives the name of the method. Since our program needs to have at least one main method, we need to use main as the name of this method.(String[] args) - following the method name is a section in parentheses that defines the inputs, or parameters, for the method. The main method must take in one parameter, an array of Strings. By convention, we use the identifier args as the name of that parameter. We’ll learn more about parameters, Strings, and arrays, in a later module. For now, we’ll just have to remember that the main method must have this exact set of parameters.Lastly, we included a second set of braces to enclose the method body. Notice how everything in the class body is indented slightly, making it easy to see the structure of the code.
For now, we’ll just have to memorize the fact that the main method in Java is declared using public static void main(String[] args). As we move through this book, we’ll slowly learn more about each part of that line and what it does, and it will make much more sense.
Finally, we can write our code. The actual code of our program goes inside the main method’s body, between the two braces. In the classic “Hello World!” example, we simply want to print the words “Hello World!” to the screen. So, let’s modify our program one last time to look like this example:
public class HelloWorld{

    public static void main(String[] args){
        System.out.println("Hello World");

    }

}
As you typed in that information, you might have noticed that the editor also added a second set of quotation marks ", just like it did with the braces earlier. This is another example of a programmer-friendly text editor at work!
Let’s review what we just added to our program:
System.out.println - this line tells us that we’d like to use a method called println in the System.out PrintStream object. Again, that means very little to us right now, but for now we’ll need to know to use this method to print a line of text to the screen. Following the name of the method is a set of parentheses that accepts input to the method, which is what we’d like to have printed to the screen."Hello World" - by putting this in the parentheses after System.out.println, we are telling the println method in System.out to print Hello World to the screen. We have to enclose it in quotation marks " so that our program will treat it as a line of text and not more Java code. The values, or variables passed to a method are referred to as the method’s parameters.; - each line of code in Java must end with a semicolon ;. This helps the compiler determine where one line of code ends and another begins. They really serve the same purpose as the period . in written English. However, periods are already used for other purposes in Java, so the semicolon became the standard symbol for the end of each line of code.That’s it! That’s all it takes to write our first program in Java. On the next page, we’ll learn how to actually compile and run this program.
Note: the video's "Run" menu reference is obsolete.
Now that we’ve written our first Java program, we must compile and run the program to see the fruits of our labors. There are many different ways to do so. We’ll discuss each of them in detail here.
This textbook was written for the Codio learning environment, so many of the steps below will reference features in Codio. However, most integrated development environments (IDEs) also include features to compile and run your code, and you can always do so manually using commands in the terminal for your operating system. If you aren’t sure how to get it to work, ask for help!
Codio includes a built-in Linux terminal, which allows us to perform actions directly on a command-line interface just like we would on an actual computer running Linux. We can access the Terminal in many ways:
Additionally, some pages may already open a terminal window for us in the left-hand pane, as this page so helpfully does. As we can see, we’re never very far away from a terminal.
No worries! We’ll give you everything you need to know to compile and run your Java programs in this course.
If you’d like to learn a bit more about the Linux terminal and some of the basic commands, feel free to check out this great video on YouTube:
Let’s go to the terminal window and navigate to our program. When we first open the Terminal window, it should show us a prompt that looks somewhat like this one:
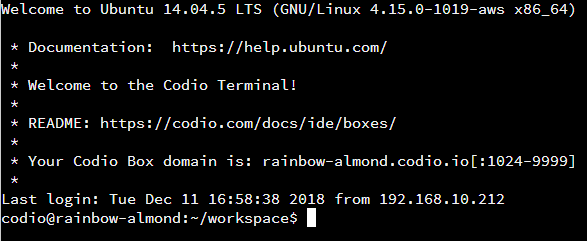
There is quite a bit of information there, but we’re interested in the last little bit of the last line, where it says ~/workspace. That is the current directory, or folder, our terminal is looking at, also known as our working directory. We can always find the full location of our working directory by typing the pwd command, short for “Print Working Directory,” in the terminal. Let’s try it now!
Enter this command in the terminal:
pwdand we should see output similar to this:

In that output, we’ll see that the full path to our working directory is /home/codio/workspace. This is the default location for all of our content in Codio, and its where everything shown in the file tree to the far left is stored. When working in Codio, we’ll always want to store our work in this directory.
Next, let’s use the ls command, short for “LiSt,” to see a list of all of the items in that directory:
~/workspace$ lsjava README.mdWe should see a short list of items appear in the terminal.
We can use the cd command, short for “Change Directory,” to change the working directory. To change to the java directory, type cd into the terminal window, followed by the name of that directory:
~/workspace$ cd java~/workspace/java$We are now in the java directory, as we can see by observing the ~/workspace/java on the current line in the terminal. Finally, we can do the ls command again to see the files in that directory:
~/workspace/java$ lsHelloWorld.javaWe should see our HelloWorld.java file! If it doesn’t appear, try using this command to get to the correct directory: cd /home/codio/workspace/java.
Once we’re at the point where we can see the HelloWorld.java file, we can move on to actually compiling and running the program.
To compile a Java program in the terminal, we’ll use the javac command, short for Java Compiler, followed by the name of the Java file we’d like to compile. So, in our case, we’ll do the following:
javac HelloWorld.javaIf it works correctly, we shouldn’t get any additional output. The compiler will look through our Java file and create a new file containing the Java bytecode for our program, called HelloWorld.class. We can use the ls command to see it:
ls
If the javac command gives you any output, or doesn’t create a HelloWorld.class file, that most likely means that your code has an error in it. Go back to the previous page and double-check that the contents of HelloWorld.java exactly match what is shown at the bottom of the page. You can also read the error message output by javac to determine what might be going wrong in your file.
We’ll cover information about simple debugging steps on the next page as well. If you get stuck, now is a great time request help via your course’s help system. You aren’t in this alone!
Finally, we can now run our program! Once it is compiled, just type the following in the terminal to run it:
java HelloWorld
That’s all there is to it! We’ve now successfully compiled and run our first Java program. Of course, we can run the program as many times as we want by repeating the previous java command. If we make changes to the HelloWorld.java file, we’ll need to recompile it using the previous javac command first. Then, if those changes instruct the computer to do something different, we should see those changes when we run the program after compiling it.
See if you can change the HelloWorld.java file to print out a different message. Once you’ve changed it, use the javac and java commands to compile and run the updated program. Make sure you see the correct output!
Last, but not least, many of the Codio tutorials and projects in this program will include assessments that we must solve by writing code. Codio can then automatically run the program and check for specific things, such as the correct output, in order to give us a grade. For most of these questions, we’ll be able to make changes to our code as many times as we’d like to get the correct answer.
Of course, when developing a computer program, there are always times when things don’t quite work the way we’d like them to. Let’s review a few of the common errors and how to solve them.
The Java Compiler is usually the source of most of our woes when first learning how to write programs in Java. The compiler expects the source code to be correctly formatted, or else it won’t be able to generate the Java bytecode for our program. Let’s modify our HelloWorld.java file to include some errors, just to see exactly what the error messages from the compiler are like.
First, let’s replace everything in HelloWorld.java with the following code:
public class HelloWorld{

  public static void main(String[] args){
    System.out.println("Hello World");


}Before compiling that program, can you spot the error? Being able to find errors in code without using a compiler will definitely help you develop programs much faster. It is just like being able to spell words correctly without using a spell-checker. It makes everything go just a bit more smoothly.
In each of the examples in this section, take a minute and see if you can spot the error before running it through the compiler. The quiz in this module includes a few questions that require you to spot the error in a piece of code, so this is great practice for later!
Once we’ve updated that file, we can compile it using the using the terminal. When we do, we should see output similar to this:

That error message gives us quite a bit of information. The first part, java/HelloWorld.java tells us which file the error is in, which is handy later on when we start working in programs that include multiple source code files. Following that, we see a 7 after the file name, which tells us that the error is on or around line 7. However, that doesn’t always mean that we’ll need to edit something at line 7 to fix the error; it just means that the Java Compiler realized there was an error when it reached line 7. Sometimes, we must make a change elsewhere in the file to resolve the issue.
After that, we’ll see the actual error message, which in this case is error: reached end of file while parsing. That may not seem very helpful at first, but it actually gives us an important clue.
If we look at the code above, we’ll notice that it is missing the second closing brace } at the end of the file. So, the compiler was expecting to see one more closing brace, but didn’t find it. So, to fix that, we’ll just need to add one more closing brace at the end of the file, and it should work just fine.
Here’s another example we can try:
public class HelloWorld{

  public static void main(String[] args){
    System.out.println("Hello World")

  }
}
When we try to compile this file, we should get output similar to the following:
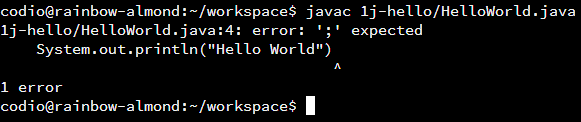
In this example, the output is really helpful. It clearly shows us exactly where in our code we forgot to include a semicolon. By adding that symbol where indicated, we can solve the problem.
Of course, there are some problems that the compiler may not catch. These are known as runtime errors, since they happen at the time we run our programs. They can be especially tricky to deal with, but thankfully they are usually quite rare.
Let’s look at one more example:
public class HelloWorld{

  public static void main(String args){
    System.out.println("Hello World");

  }
}
This time, the program actually compiles! However, when we try to actually run the file, we’ll get an error similar to this one:

This is because we accidentally forgot the square brackets [] in the main method declaration. It should be public static void main(String[] args), as the error message so helpfully tells us. So, it is important to remember that our programs may still have errors, even if the compiler doesn’t find any.
Now that you’ve learned a bit about how to debug compiler errors, let’s see if you can figure out how to cause one! Modify HelloWorld.java in a way that causes the compiler to output the following error message:
error: class WrongClass is public, should be declared in a file named WrongClass.java
We’ve now written our first program in a real, high-level programming language. While the program may only consist of a few lines of code at most, it is still a very big step toward writing bigger and more advanced programs.
Computer technology has some quite a long way since the 1950s, but the same needs that drove the development of compilers and interpreters continue today to drive the development of more advanced programming languages and related tools. It’s a very exciting field to experience firsthand, and once we understand a bit of code, we’ll be able to see it for ourselves.
In the next chapter, we’ll dive in head first to learn all about how to store and manipulate various types of data in our programs.
Storing and Manipulating Basic Numerical Data
Everything in the world can be represented using data. Think about that for a minute. Does it make sense?
Picture a tree. That tree can be described by its width, height, age, number of leaves, and even its color or texture. What about a person? A person has a name, age, height, and many other attributes. Could we simply represent trees, humans, and other entities in our computer programs using their attributes?
That’s the next big step in learning how to write a computer program: dealing with data. Many of the programs we’ll write are simply built to help us manipulate data in some fashion. Think back to the Turing Machine example from the first chapter. All a Turing Machine does is manipulate data on a tape, and it is capable of running any possible computer program.
In this chapter, we’ll learn all about the different ways we can work with data in our programs.
Image Credit: geralt on pixabay https://pixabay.com/en/binary-code-globe-africa-asia-1695475/ ↩︎
First, let’s talk about variables. A variable is a placeholder for another value in a computer program. Most students first learn about variables in a mathematics course, such as Algebra. For example, in math, we might see the equation $ x + 5 = 10 $, where $ x $ is a variable, or placeholder, for a value. Using the algebraic rules, we can solve that equation to find that $ x = 5 $.
Variables in a computer program share some similarities with variables in math, but have some differences as well. First, variables in a computer program are also placeholders that represent a value. However, in programming, instead of representing an unknown value, variables in a computer program represent a stored value, one which we can always access.
One way to think about variables in a computer program is to imagine them as a cardboard box. When we declare a variable, we are making a new box and giving it a name, which is the identifier of the variable. In the picture above, we’ve declared a variable named height.
Then, we can store a value in that variable, using a statement such as height = 42, which will put the number 42 inside of the height variable. This is an assignment statement, which we’ll cover in detail in this chapter.
Later in our program, we can then access the value stored in that variable and use it for calculations or output. For example, if we have additional variables named width and area, and have already stored the value 10 in width using width = 10, we can calculate the area of rectangular object using a statement such as area = width * height. This would use the current values in the height and width variables, and then store the result in the variable named area.
Behind the scenes, each time we declare a variable, we are telling the computer to set aside a small piece of memory in which to store something. We give the variable a name when we declare it, and then we can use that name to store or retrieve data from the location in memory our computer gave us.
Using variables effectively is a essential to writing good computer programs. This chapter will introduce many of the concepts related to dealing with variables and data in our code.
Orignial Image Credit: Karen Arnold on Public Domain Pictures.net https://www.publicdomainpictures.net/en/view-image.php?image=56626&picture=cardboard-box-white-background ↩︎
In a computer, all data, even the instructions, is stored in a binary format. Binary data consist entirely of 1s and 0s, or, in the case of a computer, it could be represented as “on” and “off” for current in a circuit, or “positive” and “negative” charges stored on a magnetic storage device. It could even be “open” and “closed” for physical memory gates. There are many different ways to represent it, but it all boils down to just 1s and 0s.
Of course, we need a way to convert between the binary 1s and 0s that a computer understands and the actual data we’d like to represent. On this page, we’ll cover some of the common types of data and how they are handled by most computer programming languages.
Working with binary data can be a complex topic. In this program, we won’t deal directly with binary data very often. If you’d like to learn more about the binary numerical system and how it works, check out the Wikipedia article on Binary Numbers.
You may also want to review the List of Types of Numbers article as well, since we’ll refer to several of those types.
Binary literals are often prepended with 0b thus 10 represents the decimal number 10, whereas 0b10 represents the binary number 10 and the decimal number 2. Recall that a literal represents the actual typed value.
Numbers, and thus numerical literals, are used everywhere in computer programs. This goes beyond obvious arithmetic and accounting applications. Modern graphics, artificial intelligence and simulation programs use numerical representations of data to quickly perform their operations. Thus, it is unsurprising that there are many ways to write and store numeric data.
The first type of data we’ll deal with in our computer program is whole numbers. These are numbers such as 1, 0, -1, 25, -186, 12852, and more. In both mathematics and programming, we refer to these numbers as integers. An integer is any whole number, or a real number without a fraction or decimal component. We sometimes refer to these numbers as counting numbers.
To store these numbers in our computer program, we typically use a signed integer data type. This data type allows us to store both positive and negative numbers in binary in our computer’s memory. We won’t go too far into the details of how that works in this course, but there is more information on how that works on Wikipedia
Next, we’ll also need to handle numbers that include a fraction or decimal component. These include rational numbers such as 1.5, -2.98, 3 1/3, and even irrational numbers such as $ e $ and $ \pi $.
Our computer uses a special representation known as floating point to store these numbers. Floating point is very similar to scientific notation, where a number such as 1,230,000 is represented as $ 1.23 * 10^{6} $. In this example, 1.23 is the significand and 6 is the exponent of the number. It is known as floating point because the decimal point “floats around” the number based on the exponent. We could represent the same number as $ 12.3 * 10^{5} $ or $ 0.123 * 10^{7} $ just by adjusting the exponent, causing the decimal point to move within the significand.
Modern computers use the IEEE 754 standard for encoding floating-point numbers into binary. Again, we won’t go into the specifics here, but the graphic below gives us a good idea of how a floating point number can be broken up and stored in binary.
Here we can see that a 64 bit space in memory is divided into three parts, one for the sign (to denote either a positive or negative number), another for the exponent, and a third for the fraction or significand of the number.
Just like there are rational numbers (such as 1/3) which cannot be exactly represented in the base 10 decimal number system, there are numbers which cannot be exactly exactly represented in base 2 (the underlying binary system used by a computer). In fact, there are many more rational numbers that cannot be exactly represented by binary numbers using floating-point than there are in a base 10 system.
In addition to this, because floats have a finite (set) number of bits, there is a limit to the number of significant bits we can use (typically 16 for a 64-bit float). This is generally only a concern in scientific computing (where we are dealing with either very big or very small numbers). However, many programs use common graphic processing units, which use only 32-bits (7 significant digits) to speed up calculations. This much lower accuracy can cause problems with statistical simulations.
Boolean values, named for George Boole represent true and false in a computer program. While it may be as simple as storing a single bit, with 0 and 1 representing true and false, most programming languages provide a special way to deal with these values as they are very important in our computer programs. We’ll spend most of the next several chapters discussing how to work with Boolean values, but for now they are just another type of data our program could store.
Many high-level programming languages have a character data type. A character represents a single letter in a written language such as English. Most programming languages use a special code called ASCII, or the American Standard Code for Information Interchange. It defines a numerical value for each character in the English language, as well as several special characters such as the newline or \n character we’ve already seen. Below is a table showing the entire ASCII code.
So, to store the character c, our computer would store the number 99 in binary. We should also notice that the capital and lowercase letters are separate, so C is 67.
Modern computer programming languages also support the use of Unicode characters. We won’t cover that in this course, but it is important to remember later on when working with languages other than English.
Sometimes we want to store entire sentences in our computer programs. A sentence is just a String of characters, object-oriented languages use a string class for this purpose and we’ll cover everything we need to know about strings in a later chapter.
File:IEEE 754 Double Floating Point Format.svg. (2015, January 21). Wikimedia Commons, the free media repository. Retrieved 20:50, December 18, 2018 from https://commons.wikimedia.org/w/index.php?title=File:IEEE_754_Double_Floating_Point_Format.svg&oldid=147276375. ↩︎
File:ASCII-Table-wide.svg. (2018, March 6). Wikimedia Commons, the free media repository. Retrieved 21:51, December 18, 2018 from https://commons.wikimedia.org/w/index.php?title=File:ASCII-Table-wide.svg&oldid=291044172. ↩︎
A variable in a high level language is just a memory address. It tells the compiler/interpreter where to start looking for the binary string of data.
All high-level programming languages use a type system to tell the system how to decode the binary data it finds there. All types have a size and a semantic which describes how many bits are in the data and how to interpret each bit. Consider the 2-byte (16-bit) binary sequence 1100 0110 1110 0100, it can be interpreted as many values based on its type.
| TYPE | value |
|---|---|
| 16-bit floating point | -6.891 |
| 16-bit unsigned integer | 50916 |
| 16-bit 2’s complement integer | -14620 |
| 8-bit ASCII | Æ ä |
Operations and methods are only defined for specific types. For example, we can divide two integers, but not two characters. Likewise, integer division works differently than floating point division, which we’ll cover later in this chapter. It is up to the programmer to select the appropriate type for a variable and keep track of it.
All objects are created from a class definition. For example, an object created from a class named Cat is itself a new data type. A key part of object-oriented programming is that objects modify their own data. So, understanding the type of each variable is vital to understanding program state, which allows us to verify correct behavior and troubleshoot buggy code.
One typing system, often used by compiled languages, is the static type system. In this scheme the programmer explicitly tells the compiler the type of each variable when the is declared or defined. The statement int x = 5; tells the compiler that:
x for that memory addressx as an integerint is equal to the decimal number 5 into the reserved memory addressAnother typing system, often used by interpreted languages, is the dynamic type system. In this system, the interpreter infers (guesses) the type of the variable based on the literal or variable in the definition. The statement x = 5 tells the interpreter:
5x for that memory addressHigh-level languages typically have operations or methods to convert from one data type to another.
For example, in Java, to print a line to the terminal, we use the System.out.println() method. As input, this method expects to receive a value that is a String data type. So, many languages include methods such as the toString() method built into all Java classes, as well as the str() method provided by Python, to convert most data types into a string. When a programmer explicitly tells the computer to convert one variable Type to another, the process is called casting.
Thankfully, many languages also allow some data conversions to happen automatically through a process known as coercion. In most modern high-level languages, when a method is supplied the wrong type of parameter, the language checks to see if there is an automatic conversion from the supplied type to the required type. If so, the language first converts the incorrect parameter to the correct type, then calls the method. The same procedure is used for operators. Depending on coercion for simple types is a common practice. Depending on it for more complex types or programmer developed classes can be more difficult and result in errors.
In practice, we generally should prefer explicitly casting variables to convert their types instead of relying on coercion. Casting ensures the program does exactly what we expect it to do.
Once we have data stored in our programs, there are a number of ways we can manipulate that data. Let’s look at a few of them here.
At its core, a computer is capable of performing all of the basic arithmetic operations, so we can write programs that can add, subtract, multiply and divide numbers. However, there is one big caveat that must be dealt with.
As discussed on the previous page, computer programs can store numbers as both integers and floating point numbers. What happens when we perform operations on two different types of numbers? For example, if an integer is added to a floating point number, would the resulting number be an integer or a floating point number, as in $ 1 + 1.5 $?
As our intuition suggests, performing the operation gives us $ 1 + 1.5 = 2.5 $, which is a floating point number. In general, when performing an operation on either two integers or two floating point numbers, the result will match the type of the two operands. However, when performing an operation on both an integer and a floating point number, the result is a floating point number.
There are two notable exceptions to this rule:
We’ll discuss both of these exceptions later in this chapter when we dig into the details for each programming language.
In addition to the basic operations listed above that we are all familiar with from our mathematics class, there are a few new operations we should be aware of as well.
The first new operation, the modulo operation, finds the remainder after dividing two numbers. It is typically written as
$ 9 \bmod 5 $ when printed, but most programming languages use the percent sign %, as in 9 % 5 to refer to this operation.
To calculate the result of the modulo operation, we must look back to long division. In the example above, we can calculate $ 9 \bmod 5 $ by first calculating $ 9 / 5 $, which is $ 1 $ with a remainder of $ 4 $. So, the result of $ 9 \bmod 5 $ is $ 4 $.
Another way to think about the modulo operation is to simply find the largest multiple of the second operand that is smaller than the first, and then subtract the two, just like you do when performing long division. So, we can find $ 42 \bmod 13 $ by first calculating the largest multiple of $ 13 $ that is smaller than $ 42 $, which is $ 39 $, or $ 13 * 3 $. Then, we can subtract $ 42 - 39 = 3 $, so $ 42 \bmod 13 = 3 $.
The modulo operation is very important in many areas of programming. In fact, it is one of the core operations for most modern forms of encryption!
The modulo operation is not consistently defined when applied to negative numbers. Therefore, each programming language may return a slightly different result when performing this operation on a negative number. Make sure you carefully consider how this operation is used, and consult the official documentation for your programming language or test the operation if you aren’t sure how it will work.
As discussed a bit earlier, one of the stranger things in programming is dealing with division. When dividing two integers, it is possible to end up with a result that is a floating point number, as in $ 9 / 8 = 1.125 $. So, how should we handle this?
It turns out that each programming language may handle it a bit differently. For example, Java would truncate the result by removing everything after the decimal point to make the result an integer. So, in Java, the statements 99 / 100 and -99 / 100 would both usually evaluate to 0. However, we can force the result to be a floating point number by making sure that at least one of the operands is a floating point number, as well as the variable we are storing the result in.
Python, on the other hand, would store the result as a floating point number by default if needed. However, Python also includes a special operator, known as floor division or //, that would round the result down. For positive numbers, this means that the result would be rounded toward 0, while negative numbers would be rounded away from 0. So, in Python, the statement 99 // 100 would evaluate to 0 since it is rounded toward 0, while -99 // 100 would evaluate to -1 since it is rounded away from 0.
In short, we just need to pay special attention when we use the division operation to make sure we get the result we expect.
Lastly, we should briefly discuss the assignment operator. We’ve already come across it earlier in this chapter. In mathematics, we usually use the equals sign = to denote equality, as in
$ x + 5 = 10 $.
In programming, we use the single equals sign = to perform assignment. This allows us to store a value into a variable, as in x = 5. This would store the value
$ 5 $ into the variable x. We could also say that we assign the value
$ 5 $ to x.
However, it is very important to note that the variable we are assigning a value to goes first, on the left side of the equals sign. So, we cannot say 5 = x in most programming languages.
Most programming languages use a double equals sign, or == to denote equality. We’ll learn more about equality and other comparison operators in a later chapter.
Computer Science, and therefore programming, has its roots in mathematics and uses a lot technical terms and jargon from math. Unfortunately this means that most programmers need to be familiar with some of this jargon.
An operation is a fancy math term for “do something”, but carries with it its own set of vocabulary. An operation is composed of:
Binary operations operate on two inputs. This class of operations should be familiar from arithmetic. Its format is
    operand1 operator operand2
        2     +        4
        x     +        y
where the operator is typically some type of symbol.
Note that in this case the term binary refers to the fact that the operation is performed on exactly 2 operands, and not that the data is stored in a base-2 (binary) data format.
This can lead to some confusion among programmers when referring to bitwise operators, which are operators that perform actions on individual bits in a piece of data. Many programmers mistakenly call these “binary” operators since they operate on data at the binary level, but the proper term is “bitwise” operators.
Operator symbols are typically overloaded in programming languages, which means that they can do different things based on the types of the operands. For example, a typical language might do any of the following operations when the plus sign + is used as the operator, depending on the types of the individual operands:
| Type Operand 1 | Type Operand 2 | Result Type |
|---|---|---|
| int 2 |
int 4 |
int 6 |
| int 2 |
float 4.0 |
float 6.0 |
| float 1.1 |
float 3.7 |
float 4.8 |
| String “2” |
String “4” |
String “24” |
| String “2” |
int 4 |
Error operation not defined for an operand of type String and int |
We will have to refer to our language’s documentation for how each operator functions. Operator behavior, particularly in the presence of mixed-type operands varies from language to language.
The form operand1 operator operand2 is called infix notation. However, there is another construct called prefix, that looks like operator operand1 operand2 or + 2 4. For technical reasons it is easier to write programming languages that use prefix notation. In OOP, we may see prefix notations used for methods and classes, which were adapted from a functional programming language where prefix notation is more common.
There are some operations that have just one operand, these are called unary operations. The typical form is operator operand or operand operator. A fairly common unary operator is ! for the logical operation “not”. !True is the same as False. We’ll introduce more of these operators in a later chapter.
Most programs process some type of user input, either text input by the user, mouse clicks on the screen, or many other methods. In this course, we’ll typically deal with three different types of user inputs:
For the first few chapters, we’ll go ahead and provide the code needed to handle and process user inputs. As we learn more, we’ll go deeper into detail about each method and discuss the nuances involved with reading and processing user input.
Consider the code
 int x = 3
 int y = 4
 int z = x + y
 print (z)
Here the programmer has explicitly coded the values of x, y, and z. Because the user has no way to directly assign values to any of these variables, they are referred to as “hard coded.” However, programs that contain only hard-coded values are not very useful since they don’t respond to any input from the user. So, in most cases, our programs will include some sort of user input instead of hard-coded values.
Command-line arguments are pieces of data that are provided to the program when executed as part of the initial command. For example, we learned that we can run a basic Hello World program using a command similar to these:
# Java
java HelloWorld
# Python
python3 HelloWorldWe can provide a command-line argument to these programs by including them after the command. For example, we could re-write our program to make user of the user’s name when provided as the first command-line argument. In that case, we can use the following command to run our program:
# Java
java HelloWorld Willie
# Python
python3 HelloWorld WillieIn this example, Willie is the input provided as the first command-line argument. We can change that to be any value we want.
There are some common properties of command line arguments we should be aware of
That’s pretty much it. User input can be provided on the command line in the form of string arguments (values). When the command is run, these arguments are packed up by the operating system and given to the program. When command line arguments are required (or optional), the problem statement will tell us their order and purpose. The decision on whether or not to use command line arguments is typically a design consideration.
Both file and keyboard input are handled as streams. Streams are a computer science abstraction for data that is organized in a queue. Data (usually bytes) are ordered and read from front to back. We can see how this works for the keyboard. When we type “dog” the keyboard stream (called stdin for “standard input”) receives the bytes [100, 111, 103]. Files from a disk drive are similarly read first byte to last.
Object oriented high level programming like Java and Python have built in classes that read values from a stream. Thus, with some minor set up differences, the commands to read from a file are typically exactly same as the commands to read from the keyboard. This is the power of abstraction – the details of how to read from these different streams are hidden from the programmer who only wants read them.
Streams are literally bytes of data. We will use methods that interpret those byes as text, and then convert the text to the type of variable we need.
We’ll learn more about reading data from the keyboard and from a file later in this course.
Data Types in Java
The Java programming language is a statically typed language. This means that each and every variable we use in our programs must be declared with a name and a type before we can use it. The Java compiler can then perform a step known as type checking, which verifies that we are using the proper data types in our program.
The major advantage of this approach is that many errors in our computer programs can be discovered by the compiler, well before we ever try to run the program directly. It can also help us determine what the cause of the error is by stating that it is a type error, giving us a clue toward how it could be solved.
One downside to this approach is that it makes our programs a bit more complex, as we must think ahead about what types of data we’ll be storing in each variable, and we’ll need to write our programs carefully to avoid type errors. However, it may also make our programs easier to manage later on, as we’ll know exactly what type of data is stored in each variable at any given point in the program’s execution.
To make dealing with types a bit easier, Java will automatically coerce data from a “narrower” data type to a “wider” data type without any additional code. For example, an integer in Java can be stored in a floating point variable.
However, the opposite case is not true. In Java, we cannot store a floating point number in an integer without explicitly converting the data type. We’ll see how to do that later in this chapter.
Most of the computer programs we’ll write must deal with numbers in some way. So, it makes perfect sense to start working with the numerical data types, since we’ll use them very often. Let’s dive in and see how we can use these numerical data types in Java!
Java has built in primitive types for various numeric, text and logic values. A variable in Java can refer to either a primitive type or a full fledged object.
The first data types we’ll learn about in Java are the ones for storing whole numbers. There are actually 4 different types that can perform this task, each with different characteristics.
| Name | Type | Size | Minimum | Maximum |
|---|---|---|---|---|
| Byte | byte |
8 bits | $ -128 $ | $ 127 $ |
| Short | short |
16 bits | $ -32\,768 $ | $ 32\,767 $ |
| Integer | int |
32 bits | $ -2\,147\,483\,648 $ | $ 2\,147\,483\,647 $ |
| Long | long |
64 bits | $ -2^{63} $ | $ 2^{63} - 1 $ |
As we can see, each data type in this list has a different size, and can store numbers within a different range. So, if we know the minimum and maximum values that could possibly be stored in a particular variable, we can use the smallest corresponding data type that can store that value. This would allow us to conserve the amount of memory used in our programs.
However, in practice, most modern computers have more than enough memory available to handle our programs, so this is typically not a concern for most developers. Instead, it is best to use the largest possible data type, to avoid errors in the future as the program is updated and data values may become larger than initially anticipated.
In this program, and most of the code in this book, we’ll typically use the integer, or int data type for all whole numbers. Even though it isn’t the largest data type for storing whole numbers, it is generally large enough. In addition, the int data type is supported universally across many different programming languages, so learning how to use it will make it easier to switch between languages later on.
The next data types we’ll learn about in Java are the ones for storing rational and irrational numbers. There are actually 2 different types that can perform this task, each with different characteristics.
| Name | Type | Size | Range |
|---|---|---|---|
| Float | float |
32 bits | $ \pm 10^{\pm 38} $ |
| Double | double |
64 bits | $ \pm 10^{\pm 308} $ |
Unlike the data types for whole numbers, it is more difficult to discuss the minimum and maximum values for these data types, as it requires a thorough understanding of how they are stored in binary and interpreted by the processor in a computer. In general, each one can handle large numbers as well as small numbers extremely well.
However, just like scientific notation, the numbers it stores at best can only be as accurate as the number of digits it holds. So, when storing an extremely large number, there will be some rounding error.
In this program, and most of the code in this book, we’ll typically use the Double, or double data type for all decimal numbers.
Now that we’ve discussed the various data types available in Java, let’s look at how we can actually create variables that can store data in our programs.
Before working with the code examples in the rest of this chapter, we’ll need to add a class declaration and a main method declaration to a file named Types.java. In Codio, you can open it by clicking on the file in the tree to the left. If you don’t recall how to do that, now is a great time to review the material in Chapter 1 before continuing.
Setting up a new file each time is great programming practice!
In Java, we can declare a variable using this syntax:
<type> <identifier>;So, to declare a variable of type int named x, we would write:
int x;We can also do the same for each of the types listed above:
byte b;
short s;
int i;
long l;

float f;
double d;
As with any other part of our program, we must first declare it before we can use it.
Java has rules about the allowable names with can be used as identifiers, you can find them in the Java Documentation.
By convention, variable names should be descriptive and use camelCase to aid in reading.
Once a variable has been declared, we can give it a value using an assignment statement. Assignment uses this syntax:
<destination> = <expression>In that example above, <destination> is the identifier of the variable we’d like to store data in, and <expression> is any valid Java expression that produces a value. It could be a number, another variable, a mathematical operation, or even a method call, which we’ll learn about in a later chapter. The variable we are storing the value in must always be on the left side of the equals = sign.
For example, if we want to store the value
$ 5 $ in an int variable named x, we could write the following:
int x;
x = 5;
We can even combine the declaration and assignment statements into a single statement, like this:
int x = 5;The same syntax applies to all of these types in Java:
byte b = 1;
short s = 2;
int i = 3;
long l = 4;

float f = 1.2f;
double d = 3.4;
When assigning values from one variable to another using primitive data types, the value is copied in memory. So, changing the value of the first variable would not affect the others, as in this example:
int x = 5;
int y = x;
x = 6;
At the end of that code, the value of x is
$ 6 $, but y still contains
$ 5 $. This is important to remember.
See if you can create a variable using each of the six data types listed above in Types.java. What happens when you assign a value at that is too big or too small for the variable’s data type? Can you assign the value from an int variable into a byte variable?
Notice in the code that the float variable f is assigned using the value 1.2f instead of just 1.2. This is because decimal values in Java are interpreted as double values by default, so when assigning a double to a float there is a possible loss of precision that the Java compiler will complain about. To avoid that, we can explicitly state that the value is a float by appending the letter f to it. We won’t see this very often outside of this lesson.
We can also use the System.out.println and System.out.print methods we learned earlier to output the current value of a variable to the screen. Here’s an example:
int x = 5;
System.out.println(x);
Notice that the variable x is not in quotation marks. This way, we’ll be able to print the value stored in the variable x to the screen. If we place it in quotation marks, we’ll just print the letter x instead.
Later, in the project for this chapter, we’ll learn how to combine multiple variables into a single output.
When writing our programs, sometimes we need to change the data type that a particular value is stored as, especially when we want to store it in a new variable. Ideally, we would construct our programs to avoid this issue, but in the real world we aren’t always so lucky.
To change the data type of a value, we can cast that value to a different data type. To cast a value to a different data type, we put the data type we’d like it to be in parentheses in front of the value.
Let’s look at the example below:
int x = 120;
byte y = x;
System.out.println(y);
In this example, we’ve created an int variable x, and stored
$ 120 $ in that variable. We then create a byte variable y, and try to store the value from x into y.
Try to run these examples by placing each one in Types.java and seeing what happens. Does it work? Try it before reading the answers below.
When we try to compile that example, we should get the following compiler error:
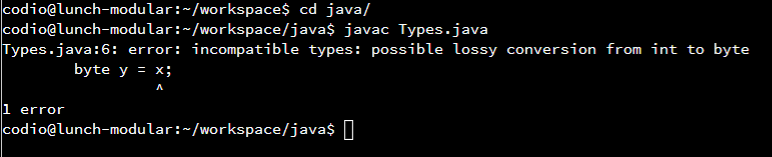
Since the int data type is larger than the byte data type, the compiler will give us an error stating that we might lose data when we perform that conversion. Of course, if we reverse the int and byte data types, and try to assign a byte to and int, it will work just fine.
In general, we should try to avoid this problem by redesigning our program to eliminate the need to store a variable in a smaller type, but sometimes it is necessary. To do this, we’ll need to cast the value to the correct data type. Let’s update the example above:
int x = 120;
byte y = (byte) x;
System.out.println(y);
In this example, we have added a (byte) in front of the variable x when we are assigning it to y. This tells the compiler that we would like to convert the data type of x to byte before storing it in y. Now, when we try to compile and run this program, it will act as we expect.

However, let’s look at one final example to see why the compiler would warn us about converting to a smaller data type:
int x = 128;
byte y = (byte) x;
System.out.println(y);When we say “cast” we really mean convert. Sometimes this results in a change in the the binary representation. Conversion preserves the semantics (meaning) but over writes the binary. In addition to the “casting” syntax (desired type) value ... (int)2.0, you will be exposed to many ConvertTo() methods later in this course.
Casting nearly always preserves the original binary but may result in gibberish; you lose the meaning.
int x = (int)'2';
// results in x equal to 50 not 2
// '2' binary 00110010
// int value of 00110010 is 50
However, “casting” is nearly always used to mean “convert”. It comes from the origins of programming, where languages supported fewer types and the binary had the same semantic meaning across multiple data types.
| type | bytes | binary for the value of 2 | |
|---|---|---|---|
| byte | 1 | 00000010 | |
| short | 2 | 0000000000000010 | |
| int | 4 | 00000000000000000000000000000010 |
From the above table you can see how casting might work for various sized integer values. Leading “bits” were ignored when casting to a byte-wise smaller type. Leading 0s were added when casting to larger type.
We will use cast and convert interchangeably in this course to mean convert to the desired data type. In Java casting between primitive numeric-types often preserves the semantics (value) of the cast. (int) 2.5 is the integer 2, and (double)-4 is the double -4.0.
In this example, instead of storing
$ 120 $ in x, we have instead stored
$ 128 $. When we compile and run this program, we get this unexpected output:
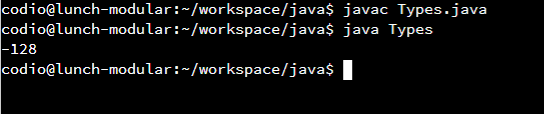
We expect it to output $ 128 $, but instead it outputs $ -128 $. That’s strange, isn’t it?
What’s happening is an error known as integer overflow. Since
$ 128 $ is too large to fit in a byte variable, the computer will truncate, or remove, the bits that are at the front of the number that won’t fit. This could cause data to be lost or misinterpreted, which is what happens here.
So, we must always be careful and not try to cast a variable to a smaller data type if it is too large to fit in that data type. This is why the compiler will always warn us when we try to do so, unless we add an explicit cast to our code.
To make things simpler, we typically just use a single data type for whole numbers, and a single data type for decimal numbers. By using the same type consistently throughout our programs, we can avoid many issues related to data types and casting.
As stated above, most of the examples in this book will use the int data type for whole numbers, and the double data type for decimal numbers. These choices are consistent with the majority of official Java code.
Beyond numbers, there are a few other primitive data types in Java. Let’s take a quick look at them and see how they can be used in our programs.
Java supports a primitive data type named boolean that can only store two values: true and false. As we might expect, we can use these boolean variables to store answers to questions in our program, such as “Is x greater than y?” At this point, we won’t use boolean variables for much in our programs, but in a later module we’ll cover the basics of boolean logic and learn how to use these variables to control how our program runs.
Java also has a char data type, which can be used to store a single character of text. It uses the 16-bit Unicode format to store the data, which is the same as ASCII for simple characters and commands.
To declare a variable using these data types, the format is the same as the numerical data types:
boolean t;
char c;
We can also assign values to each variable. For example, to assign a value to a boolean variable, we could do this:
boolean t;
t = true;
boolean f = false;
Notice that both true and false are keywords in Java, which means that we won’t have to put them in quotation marks to use them. These values can be used to directly represent the boolean values True and False, respectively. Some programming languages, most notably C, do not support boolean values in this way, but Java includes them as keywords.
For characters, the process is similar:
char c;
c = 'a';
char d = 'B';
Notice that we use a single quotation mark ' around character values in our code. This is very important to remember! In our Hello World example, we used double quotation marks " around strings, or sentences of text. For a single character, however, we only use a single quotation mark.
Thankfully, the Java compiler will catch this problem pretty quickly. For example, take a look at this code, and see if you can spot the errors:
char c = "a";
System.out.println("c");
When we first try to compile the program, we should get the following error:
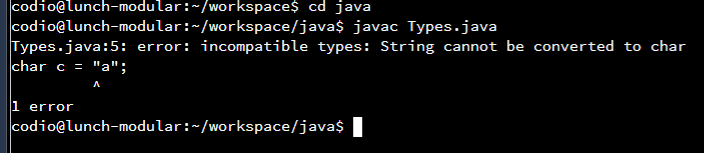
As we can see, the compiler will not allow us to assign the string "a" to the variable c, which is of type char. So, to fix this error, we’ll need to modify our code to be the following:
char c = 'a';
System.out.println("c");
However, there might be another error in this code. Can you spot it? What will be printed to the screen when we run this program?
Let’s find out:
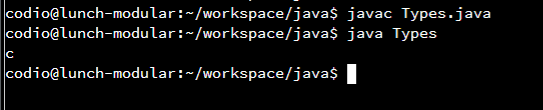
You might have expected the program to output a, but instead it output c. This is because we have "c" inside of our System.out.println method. To print the value stored inside a variable, we shouldn’t put it in quotation marks. Otherwise, it will interpret that as a string, and print the name of the variable (or whatever is in quotation marks) instead.
Now that we’ve learned how to create our own variables, we can use them to perform a wide variety of mathematical operations. For most of these, we’ll use the same operator symbols that we’ve used before in math, but a few of them are unique to programming languages like Java.
For each of the examples below, we’ll assume that we have already created two int variables, x and y, as follows:
int x = 5;
int y = 8;+Using the plus + symbol, we can add two numbers together and find their sum:
int z = x + y;
System.out.println(z); // 13
Since
$ 5 + 8 = 13 $, this program would output 13.
When writing our code, it is always good practice to put spaces between operators and operands unless otherwise noted, just to make it easier to read our code.
The plus symbol can also be use to concatenate or link multiple strings together. We’ll learn how to do that in the project for this chapter.
We can add comments to our code to help us describe it to others or simply understand it better ourselves. These comments are simply text that is added to the source code, but they are marked in a way that tells the compiler to ignore it when compiling the program.
In Java, we can use two forward slashes // to tell the compiler that everything on that line following those symbols should be treated as a comment, as we can see in the examples on this page.
We can also use a forward slash followed by an asterisk /* to start a multiline comment in Java. The compiler will ignore everything after that symbol until a closing asterisk followed by a forward slash */ is found.
Finally, Java also uses a forward slash followed by two asterisk /** to denote special comments that can be used to automatically generate documentation for the code. Again, this comment section is closed by an asterisk followed by a forward slash */.
Traditionally, each additional line in these multiline comments will be prefixed by an asterisk to make them easier to read. In fact, the Codio editor will do that for us!
Here are some examples in code showing how those comments can be used.
/**
 * This is a comment at the beginning of a class that gives
 * information about the class contained in this file
 *
 * @author Username
 * @version 1.0
 */

public class Example{

  /**
   * This is a comment at the beginning of a method.
   * It can give information about the inputs and outputs
   * of that method
   *
   * @param args - the command-line arguments
   */
  public static void main(String[] args){
    /*
     * This is a simple multi-line comment
     * It can have multiple lines
     * and ends with the slash below
     */

    int x = 0;

    //This is a single line comment
    int y = 0; //Comment after code on the same line
  }
}
Feel free to use comments anywhere in your source code to help you understand what the code does! It is always better to include too many comments than too few, especially in larger programs.
-Likewise, we can use the minus - symbol to subtract two values and find their difference:
int z = x - y;
System.out.println(z); // -3
This program would output -3, since
$ 5 - 8 = -3 $. It is important to remember that these operations can result in negative numbers, so the order of operands we use matters when subtracting.
We can also use the minus symbol to find the additive inverse of a number, or change the sign of a variable from positive to negative and vice-versa:
int z = -x - y;
System.out.println(-z); // 13
In this example, we use -x to denote the inverse of x. In this case, we don’t include a space between the minus symbol and the variable it is attached to. So, this expression will calculate
$ -5 - 8 = -13 $ and store that value in z. Then, when we print that variable, we invert it again, so it will actually print 13 to the screen instead of the value
$ -13 $ stored in z.
*We can also use the asterisk * or star symbol for multiplication to find the product of two numbers:
int z = x * y;
System.out.println(z); // 40
We know that
$ 5 * 8 = 40 $, so this program would output 40 as expected.
/Division is a bit different. Most programming languages use the forward slash / symbol for division, making the statement look like a fraction. That is probably the easiest way to think about division in a programming language - it makes a fraction of the dividend and the divisor.
Earlier in this chapter we discussed that strange things may happen when we try to divide two whole numbers. Let’s look at a few examples:
int z = x / y;
System.out.println(z); // 0
This first example will calculate
$ 5 / 8 $ but store it in an int variable. We expect the answer to be
$ 0.625 $, but since an int variable can only store a whole number, the result is truncated by removing the decimal portion. So, our program just outputs 0.
Here’s another example:
int z = -x / y;
System.out.println(z); // 0
We know that
$ -5 / 8 = -0.625 $, but once again the result is truncated and the decimal part is removed. So, this program will also output 0.
Let’s look at another division example:
double z = x / y;
System.out.println(z); // 0.0
Here we are storing the result in a double variable. We’d expect the output to be 0.625, but we actually just get 0.0 when we run this program. That’s strange, isn’t it?
Earlier we discussed some of the rules for how a programming language calculates numbers. One of those rules states that an operation performed on two whole numbers will result in a whole number, which is exactly what is happening here. The processor calculates
$ 5 / 8 = 0 $ as a whole number using truncated division, then converts the value
$ 0 $ to a floating point value before storing it in z. So, even though it appears we should be storing
$ 0.625 $, we aren’t able to due to the data types of our two operands. This is a very common mistake made by programmers of all skill levels, so it is very important to understand what is going on.
So, how can we solve this issue? The answer lies in the use of a cast operation to convert the data type of one of our operators to a floating point value. Here’s an example showing how to accomplish that:
double z = (double) x / y;
System.out.println(z); // 0.625
In this example, we are casting the value stored in x to be of type double. Then, the division operation is performed, this time between a floating point number and a whole number, which will result in a floating point number. Finally, that result will be stored in z, and the program will output 0.625, which is the correct answer.
In short, we need to make sure we pay special attention when dividing numbers in our programs, just to make sure we are getting the result we expect.
%The modulo operator uses the percent sign % to calculate the remainder of a division operation. Let’s look at an example:
int z = x % y;
System.out.println(z); // 5
Here, we are calculating the remainder of the division $ 5 / 8 $. Since $ 8 $ does not go into $ 5 $ at all, we are left with $ 5 $ as the remainder of that division.
If we reverse the operands, we can get a different result:
int z = y % x;
System.out.println(z); // 3
Here, we are calculating the remainder of $ 8 / 5 $. Since $ 5 $ will go into $ 8 $ once, we can perform $ 8 - 5 = 3 $ to find the remainder of that division.
In Java, the modulo operation is treated like a truncated division operation, with the sign matching the first number (the number to be divided, or the dividend). So, when applied to negative numbers, it will perform the expected division and return the remainder, which may be a negative number, depending on the sign of the number before the modulo operator:
Here are some examples:
System.out.println(-8 % 5);  // -3
System.out.println(-8 % -5); // -3
System.out.println(8 % -5);  // 3
We already know that $ 8 % 5 = 3 $. In this case, the negative sign is applied if the first operand is negative, regardless of the sign of the second operand.
++ & Decrement --Increment ++ and decrement -- are two special operators in Java. They are used to add or subtract
$ 1 $ from an existing variable. Let’s look at a couple of examples:
int z = x++;
System.out.println(x); // 6
System.out.println(z); // 5
Here, the increment operator will increase the value stored in x by
$ 1 $. In this case, we don’t include a space between the operator and the variable it is attached to. However, since the operator is after the variable, it will happen at the end of the operation. So, the value
$ 5 $ will be stored in z first, then x will be incremented by
$ 1 $ afterwards. So, the program will output 6 as the value of x, and 5 as the value of z.
By placing the increment operator in front of the variable, we can see a different outcome:
int z = ++x;
System.out.println(x); // 6
System.out.println(z); // 6
As we’d expect, here the increment operation will be performed first, and then the new value stored in x will also be stored in z, so both variables will contain the value
$ 6 $ in this program.
The decrement operator works similarly, subtracting $ 1 $ instead of adding $ 1 $.
In practice, these operators are only used in a few scenarios, most notably within loops to increment or decrement a counter variable. In general, they can make our code more complex and difficult to read due to the variety of different ways these operators can be used.
Finally, many operators in Java also have combined operation and assignment operators. These will perform the operation specified and store the value in the first variable, all in a single statement.
| Operator | Example | Equivalent |
|---|---|---|
+= |
x += y; |
x = x + y; |
-= |
x -= y; |
x = x - y; |
*= |
x *= y; |
x = x * y; |
/= |
x /= y; |
x = x / y; |
%= |
x %= y; |
x = x % y; |
As with the increment and decrement operators, some of these shortcuts are rarely used in practice since they can make our code more difficult to read and understand. However, in some scenarios they can be quite helpful.
There is a typo in the video below. The order of operations given on the slide is incorrect. The correct order is shown below the video.
We are already familiar with the order of operations in mathematics, using mnemonics such as “PEMDAS” to refer to the following order:
Programing languages work very similarly, but there are many more operators to deal with. Here’s a quick list of the order of operations, or operator precedence of the operators we’ve covered so far:
++ & Decrement -- after variable*-, Increment ++ & Decrement -- before variable**, Division /, and Modulo %+, Subtraction -=, +=, -=, *=, /=, %=* The increment and decrement operations will be calculated either before or after the rest of the operation is performed, depending on where they are placed in relation to the associated variable. This lists what order they will be analyzed by the compiler to determine which variable they are attached to.
Here’s a quick example to show how this works:
int x = 1;
int y = ++x + x - x / x * x % x--;
System.out.println(x);
System.out.println(y);
Can we determine what the output should be? Let’s try to break it down!
Based on the operator precedence table above, we know that the x-- will be evaluated first. However, since it is after the variable, it won’t be calculated until after the rest of the operation is complete. So, we can just remember that step for now, and we’ll actually perform that calculation last.
Next, we know that ++x will be evaluated. This step must be performed before any other operation since it is before the variable, so we must immediately increment the value of x by
$ 1 $. So, x is now
$ 2 $.
Now we can perform all of the multiplicative operations, going from left to right. So, by adding the appropriate parentheses, we’d calculate the following:
$$ x + x - x / x * x \% x $$ $$ 2 + 2 - 2 / 2 * 2 \% 2 $$ $$ 2 + 2 - (2 / 2) * 2 \% 2 $$ $$ 2 + 2 - ((2 / 2 * 2) \% 2 $$ $$ 2 + 2 - (((2 / 2) * 2) \% 2) $$ $$ 2 + 2 - ((1 * 2) \% 2) $$ $$ 2 + 2 - (2 \% 2) $$ $$ 2 + 2 - 0 $$
Following that, we can perform any additive operations. Once again, we can add parentheses as appropriate to find the following:
$$ 2 + 2 - 0 $$ $$ (2 + 2) - 0 $$ $$ ((2 + 2) - 0) $$ $$ (4 - 0) $$ $$ 4 $$
Once we’ve calculated all of the operations on the right-hand side of the assignment operator, we can then perform the assignment operation to store the final value
$ 4 $ in y.
Finally, we must remember to go back and decrement the value in x by
$ 1 $, so x once again is just
$ 1 $.
So, the final output from this program would be:

However, as any good math teacher will tell us, it is always better to use additional parentheses to make sure our operations are performed in the correct order instead of relying on the order of operations. So, we should definitely avoid writing code as ambiguous as the example given above.
The Linux command line consists of the command and the arguments.
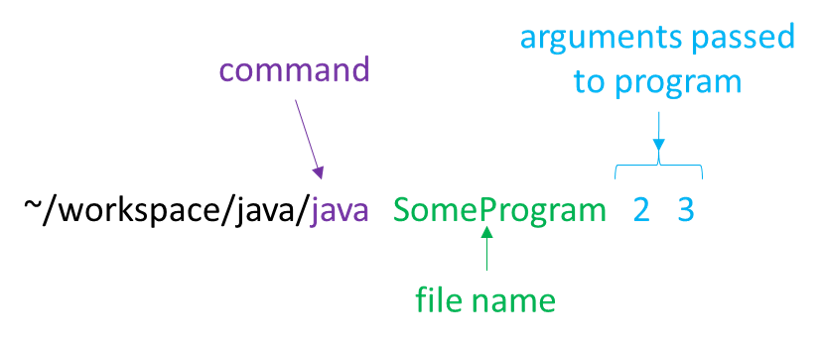
In this example, Linux will see the first part of the command, which is java, and that will tell it what program to execute. Everything else is packaged up as string-values and sent to the Java Virtual Machine. The JVM takes the name of the program, SomeProgram, from the command, and then starts the program with that file name, passing the remaining items (arguments) to the program.
By convention, the command line arguments are sent to the program’s main method. Java handles this automatically.

Inside Java, the command line arguments are mapped (assigned) to the parameter variable in the main method called args. In main args is an array of Strings.

Arrays are ordered collections of data - we might think of it as a numbered list. We access elements of the array using the indexing operator [], the indexes start at 01. The syntax is variableName[indexNumber].
The parameter args is always an array of strings, in the order they appeared on the command line.
Since args is always an array of Strings, programmers must convert those arguments (values in the args array) to the appropriate type. For numbers, this is typically done using various parse methods that are provided as part of the Java language.
| Syntax | Semantics |
|---|---|
int x = Integer.parseInt(args[0]) |
Take the string in args at index 0Convert it to an intAssign it to x |
double x =Double.parseDouble(args[0]) |
Take the string in args at index 0Convert it to a doubleAssign it to x |
If we try and convert something that does not make sense, Double.parseDouble("act") or Integer.parseInt("3.1415"), we’ll get an error when we run our program. Later in this class we’ll learn about how to detect and handle those errors, but for now they will simply crash our program.
Consider the code below, which can be stored in a file named SomeProgram.java if we want to execute it.
public class SomeProgram{
    public static void main(String[] args){
        System.out.println("args[0] is a String");
        System.out.println("args[0]'s value is \""+ args[0] + "\"");
        int x = Integer.parseInt(args[0]);
        System.out.println("x is a int");
        System.out.println("x's value is " + x);
        int y = Integer.parseInt(args[1]);
        int z = x + y;
        System.out.println(x + " + " + y + " = " + z);
    }
}
A proper command line for running SomeProgram.java would be java SomeProgram <int> <int>, since it requires to command-line arguments that will be converted to integers. An example would be java SomeProgram 2 3 which will store "2" as args[0] and "3" as args[1]. At this point, let’s trace the execution SomeProgram.java if we execute it using the command java SomeProgram 2 3.
{"2", "3"} is assigned to argsargs[0] is a String. We know this because args is declared to be an array of Strings (String[] args, line 2)argsargs[0] to an int, assign that integer value to xx is an int. We know this because x is declared to be an int (int x, line 5)xargs[1] to an int, assign that integer value to yx and y, assign that sum to the int zFeel free to experiment with SomeProgram.java to explore more ways to use command-line arguments in code. What happens if we give too few arguments? Or too many? What about the wrong types?
Staring at 0 saves memory and simplifies memory access. Nearly all languages start at 0. ↩︎
One of the unique parts of this course will be the inclusion of subgoals to help us better understand what is going on in our code. Subgoals are designed to help us structure our thinking process in a way that matches what an experienced developer might have.
A great example is learning how to read. Fluent readers can read whole words at a time, while processing and retaining information from several sentences at once. Novice readers have to sound out words one letter at a time, and can store and retain a few words at a time in memory before being overwhelmed by information. Learning a new language can quickly make this difference very apparent, even for readers who are fluent in many languages.
Writing computer code is very similar. An experienced developer can fluently read and write code, seeing and understanding entire code structures at a glance. Novice developers often have to look at a single line at a time, and break it down into individual parts before it is apparent what the code says. That’s just part of the learning process!
To make this process easier, this course will include many pages that describe subgoals we can use to help analyze and write code. In essence, we can treat these subgoals as a set of steps to follow mentally when performing these tasks. Over time, we’ll become more comfortable with each task, and the subgoals will quickly become ingrained knowledge. Just like we can easily read both “cat” and “catastrophe” at a glance, with practice we’ll be able to read code just as quickly!
For more information on Subgoals, see the work of Dr. Briana Morrison published through the ACM and elsewhere. Link
To analyze an expression involving variables and mathematical operators in code, here are some mental subgoals we can use:
First, we must determine whether the data type of the expression is compatible with the data type of the variable we want to store it in. In Java, we must be very careful to make sure we are only storing whole numbers in the integer data type, and floating point values in the double data type.
Next, we should look at the expression to determine if there are any prefixed operations that must occur first. In Java, for example, we could find a prefixed increment operator like ++x, so we’ll need to update the value of x before moving to the next step.
At this point, we can solve the arithmetic equation using the order of operations for our language. This simply involves the process of substituting values for variables and performing the requested operations. However, once again we must be careful to make sure that the operands provided to each operator are valid and produce the correct data type. The example we saw earlier for handling a large equation showed us a great way to work through this process.
Once we’ve solved the arithmetic equation, we should be left with a variable on the left side of the equals sign and a single value on the right side. So, once again, we should confirm that the value on the right can be stored in the data type of the variable on the left.
Finally, if the original expression included any postfix operations, such as a postfixed decrement like x-- in Java, we’ll need to update the value of x before moving on to the next line.
Let’s walk through an example showing how to use these subgoals to evaluate a few expression statements.
int x = 3 + 5;We’ll break this down by subgoals:
int, and that the numbers on the right side of the equation are all integers, so we shouldn’t have any issues with data types initially.3 + 5 can be replaced with 8.8 can be stored in an int variable, we are just fine. So, we can update the value of x to 8.That’s all there is to it! While this may seem like quite a bit of information for handling a simple statement, it becomes much more useful as the statements get more complex.
Here’s a second example:
int x = 5;
double y = 3.5;
double z = ++x + -y--;
Once again, let’s break the last line in this code example down by subgoals to evaluate the expression:
x is an integer type, and y is a double type. Since this expression is adding them together, the result should be a floating point number, which can be stored back in the variable z with type double. So, we should be fine here.++x, so we’ll increment the value of x by
$ 1 $ to
$ 6 $. We also see a prefix operator -y, so we’ll need to remember that we are dealing with the inverse of the value stored in y.x + -y becomes 6 + -3.5 which results in 2.5.2.5 is a floating point number, it can be stored in the double data type. So, we’ll update the value of z to
$ 2.5 $.y--, so we must decrement the value of y by
$ 1 $ to
$ 2.5 $So, at the end of this short code example, we’ll see that x is
$ 6 $, y is
$ 2.5 $, and z is also
$ 2.5 $.
Finally, let’s look at one more example:
int x = 5;
double y = 8.5;
int z = x + y;
Here’s how we can break down the process of evaluating the last line in this example:
x is an integer and y is a double, so the sum of those values should also be a double. However, we’ll see that z is an integer. So, what will happen here? As it turns out, the Java compiler will give us an error when we try to compile this code, because we are assigning a double value to an integer which could result in the loss of data.As we can see, by carefully following these subgoals, we can even find errors in our code, just by evaluating it step by step.
We can also use subgoals to help us write new expressions in our code. These subgoals help us understand each part of the process of building a new expression, and they also help us avoid many common errors.
Here are the subgoals for writing a new expression:
The first step is to determine which part of the problem statement will be represented by a variable. Sometimes this is obvious, and other times it is not. This may be a new variable that we are creating, or it could be an update to an existing variable.
Once we’ve found a variable to work with, we must also determine the variable’s name and data type. Once again, this may be obviously found in the problem statement, but other times we must think a bit more about what type of data will be stored in the variable. If we are working with an existing variable, we’ll need to make sure that the data type of that variable is compatible with the type of data we’d like to store in it. Of course, we should also make sure the variable has a descriptive and memorable name if we are creating a new one.
Now that we’ve isolated our variable, we must build an arithmetic equation and operators required to produce the desired value. This may involve using additional variables in our equations as well.
Once we have our arithmetic equation, we can then build the overall expression. This usually consists of three parts: the variable on the left, an assignment operator in the middle, and the arithmetic equation on the right.
Finally, once we’ve constructed the overall expression, we should check and make sure that all operators and operands are compatible. This means making sure that we aren’t trying to assign a floating point value to an integer, or dividing two integers and expecting a floating point number as a result.
Here’s a quick example to show how this process works. Consider the following problem statement:
Given two whole numbers, find the remainder of dividing the first number by the second number.
Let’s use the subgoals listed above to build an expression for this problem statement
inputA and inputB, and the remainder variable remainder. We can also determine that each of them should be the int type, since we are only dealing with whole numbers. So, our code might begin with these three variable declarations:int inputA;
int inputB;
int remainder;inputA by inputB, so we can use the modulo operation % to find this value. So, our arithmetic equation could be inputA % inputB.remainder, we’ll build the line remainder = inputA % inputB as our entire expression. So, we can add that to our code:int inputA;
int inputB;
int remainder;
remainder = inputA % inputB;inputA and inputB are integers, the result of the modulo operation would also be an integer. So, this line is valid.Of course, the part we are missing is the values for inputA and inputB. At this point, we haven’t covered how to accept user input yet, so we can assume that those values are hard-coded into the program. So, our final program might look something like this:
int inputA;
int inputB;
int remainder;
inputA = 5;
inputB = 8;
remainder = inputA % inputB;Using these subgoals is a very great way to learn how to build programs one step at a time. As we learn more about programming and get more experience, many of these steps will become automatic. This is very similar to how we write sentences by hand. We typically don’t think about each letter as we write it once we are fluent with the language, but instead we think of entire words and our brain is able to send the correct commands to produce the desired output. With time and practice, writing code will be very similar.
Now that we’ve learned how to run our program and provide it some input, we must also learn how to provide output that includes our variables as well as text all on the same line. There are a few ways to accomplish this.
First, we can use System.out.print() to print text without a newline character at the end, so that the next output will begin on the same line. So, we could use that to print text and variables on the same line. Here’s an example:
int x = 1;
int y = 2;
System.out.print("Variable x: ");
System.out.print(x);
System.out.print(", Variable y: ");
System.out.println(y);
will produce this output:
Variable x: 1, Variable y: 2In Java, we can also concatenate multiple outputs together using the + symbol. So, we could produce similar output using this example:
int x = 1;
int y = 2;
System.out.println("Variable x: " + x + " , Variable y: " + y);
which should output:
Variable x: 1 , Variable y: 2Notice that we needed to include an extra space after 1 in the output. This is because Java does not add a space between strings when concatenating them, so we must be careful to add the spaces ourselves where needed.
There are many ways that we can use Java to output text and variables as desired. We’ll use some of these methods to complete this project.
We’ve now learned a lot about variables and data types in our programming language. We can use this information to build programs that store and manipulate large amounts of information.
We still have quite a bit to learn before we have the basics of programming covered. As we continue, we’ll see the usefulness of variables and the various data types we’ve learned.
Computing True and False or Not
In this chapter, we’re going to step away from computer programming for a bit to discuss a more foundational topic: logic. Logic and reasoning are core concepts at the heart of any level of education, and they are one of the major ways we are able to understand the world around us. Without logic and reasoning, we cannot build upon information we learn to create deeper meaning. Instead, all we are left with are facts, without any knowledge or wisdom gained from them.
The earliest approach to formal logic comes from the work of Aristotle, seen above. His work established rules by which further information could be inferred, or deduced, from a set of truths about the world known as premises.
For example, in Aristotelian logic, we might find the following premises to be true:
Socrates is a man All men are mortal
Using Aristotle’s rules for logic, we can infer from those premises the following conclusion:
Socrates is mortal
This becomes a powerful system for inferring additional information based on facts in the world. By supporting each conclusion with premises and rules, it is possible to build a great wealth of knowledge.
In the 1800s, there was a great interest in using the rules of mathematics to understand the world as well. Mathematics contains a well understood set of rules and operations, and many thinkers hoped to find a way to apply those rules in the world of logic as well. By doing so, they could move away from using an imprecise spoken language to reason about the world, and instead use the very precise language of mathematics.
In 1854, George Boole, seen above, published An Investigation of the Laws of Thought on Which are Founded the Mathematical Theories of Logic and Probabilities, a book which described exactly how to combine mathematics and logic into a single system. Using the system he proposed, it became very easy to use mathematical expressions and rules to perform the same logical inferences that Aristotle first used nearly 2000 years prior.
In Boolean logic, we may understand the following premises to be true:
$$ A \land B $$ $$ B \land C $$
In this instance, the $ \land $ symbol is used to denote the word “and”. We’ll learn more about these symbols later in this chapter. Using a rule from Boolean logic, we can reach the following conclusion:
$$ A \land C $$If we compare the example from Aristotelian logic above to this example from Boolean logic, we can quickly see that they are very similar in structure. The first premise establishes a relationship between two items. The second premise establishes another relationship between the second item in the first premise, and a third item. The conclusion states that there must be a relationship between the first and third items. This is very similar to the transitive property of some mathematical operators.3
In programming, we use Boolean logic to control many aspects of how our computer programs function. In this chapter, we’ll learn all about how Boolean logic works so we can apply it correctly in our programs.
File:Aristotle Altemps Inv8575.jpg. (2018, November 23). Wikimedia Commons, the free media repository. Retrieved 20:49, January 9, 2019 from https://commons.wikimedia.org/w/index.php?title=File:Aristotle_Altemps_Inv8575.jpg&oldid=328967130. ↩︎
File:George Boole color.jpg. (2018, November 19). Wikimedia Commons, the free media repository. Retrieved 21:02, January 9, 2019 from https://commons.wikimedia.org/w/index.php?title=File:George_Boole_color.jpg&oldid=328260467. ↩︎
This is not a perfect translation from Aristotelian logic to Boolean logic, but it fits well within the scope of this textbook. A more appropriate translation would use implication ( $ \implies $), but we won’t be using that concept, so it has been substituted with “and” instead. ↩︎
Boolean logic contains four operators that perform various actions in a Boolean logic statement. Before we learn about them, let’s take a minute to discuss variables in Boolean logic.
As we covered in a previous chapter, most programming languages support a special data type for storing Boolean values. That data type can only contain one of two values, True or False. So, in a Boolean logic statement, any variable can only be either True or False
For each of the operators below, we’ll see both a truth table and Venn diagram representation of the operation. They both present the same information, but in a slightly different way. In each operation, we’ll see all possible values of the variables present in the statement, and the resulting value of the operation on those variables. Since each variable can only have two values, the possibilities are limited enough that we can show all of them.
In the Venn diagrams below, each circle represents a variable.1 The variables are labeled in the circles on each diagram.
The first, and simplest, Boolean logic operator is the not, or negation, operator. This operator simply negates the given Boolean value, turning True into False and False into True. When written, we use the
$ \neg $ symbol, but most programming languages use an exclamation point ! instead.
Below is a truth table giving the value of $ \neg A $ and $ \neg B $, for all possible values of $ A $ and $ B $.
| $ A $ | $ B $ | $ \neg A $ | $ \neg B $ |
|---|---|---|---|
| F | F | T | T |
| F | T | T | F |
| T | F | F | T |
| T | T | F | F |
We can also see the operation visually using a Venn diagram. In these drawings, assume each individual variable is True, and the shaded portion shows which parts of the diagram are True for the entire statement.
As we can see, if $ A $ is true, then $ \neg A $ represents everything in the diagram outside of the circle labeled $ A $. In fact, it includes the area outside of any circle, which represents the whole universe of items that are neither inside of $ A $ nor $ B $. So, the value of $ \neg A $ is not affected by the value of $ B $ in this instance.
We can also extend this to three variables, as shown in the truth table below. It gives the values of $ \neg A $, $ \neg B $, and $ \neg C $ for all possible values of $ A $, $ B $, and $ C $.
| $ A $ | $ B $ | $ C $ | $ \neg A $ | $ \neg B $ | $ \neg C $ |
|---|---|---|---|---|---|
| F | F | F | T | T | T |
| F | F | T | T | T | F |
| F | T | F | T | F | T |
| F | T | T | T | F | F |
| T | F | F | F | T | T |
| T | F | T | F | T | F |
| T | T | F | F | F | T |
| T | T | T | F | F | F |
The Venn diagram for this instance is very similar:
As we can see, the not operation is very useful when dealing with Boolean values.
The next Boolean logic operator we’ll cover is the and, or conjunction, operator. This operator works similar to the way we use “and” in our spoken language. If
$ A $ is True, while
$ B $ is also True, then we can say that both
$ A $ and
$ B $ are True. This would be written as
$ A \land B $. Most programming languages use two ampersands && to represent the Boolean and operator, but some languages also include and as a keyword to denote this operator.
Here is a truth table giving the value of $ A \land B $ for all possible values of $ A $ and $ B $.
| $ A $ | $ B $ | $ A \land B $ |
|---|---|---|
| F | F | F |
| F | T | F |
| T | F | F |
| T | T | T |
As we can see, the only time that
$ A \land B $ is True is when both
$ A $ and
$ B $ are True.
Next, we can look at a Venn Diagram that represents this operation

As we can see, only the center of the Venn diagram is shaded, representing the parts of the diagram that are both in $ A $ and $ B $ at the same time.
This operation also easily extends to three variables. This truth table gives the value of $ A \land B \land C $ for all possible values of $ A $, $ B $, and $ C $.
| $ A $ | $ B $ | $ C $ | $ A \land B \land C $ |
|---|---|---|---|
| F | F | F | F |
| F | F | T | F |
| F | T | F | F |
| F | T | T | F |
| T | F | F | F |
| T | F | T | F |
| T | T | F | F |
| T | T | T | T |
The Venn diagram for this instance is very similar to the one above:

Once again, we see that only the very center of the diagram is shaded, as expected.
The third Boolean operator is the or, or disjunction, operator. It is somewhat similar to how we use the word “or” in our spoken language, with a major difference. This operator would be written as
$ A \lor B $. Most programming languages use two vertical pipes || to represent the Boolean or operator, but some languages also include or as a keyword to denote this operator.
Consider ordering food at a restaurant as an example. On the menu, you might see the statement “Soup or Salad” as one of the options for your meal. This means that you must choose either “soup” or “salad” to go with your meal, but usually you aren’t allowed to have both (at least, without paying more).
Now, consider a similar statement,
$ A \lor B $. If either
$ A $ or
$ B $ are True, we would say that
$ A \lor B $ is also True. However, if both
$ A $ and
$ B $ are True, we would also say that
$ A \lor B $ is True. So, the Boolean or operator will return True when both inputs are True, which differs from how we use it in spoken language.
Here is a truth table giving the value of $ A \lor B $ for all possible values of $ A $ and $ B $.
| $ A $ | $ B $ | $ A \lor B $ |
|---|---|---|
| F | F | F |
| F | T | T |
| T | F | T |
| T | T | T |
As we can see, the only time that
$ A \lor B $ is False is when both
$ A $ and
$ B $ are False. As long as at least one of the values is True, the whole statement is True.
Next, we can look at a Venn Diagram that represents this operation
As we can see, both circles are completely shaded, showing that $ A \lor B $ contains all items in either $ A $ or $ B $, or both $ A $ and $ B $ at the same time.
This operation also easily extends to three variables. This truth table gives the value of $ A \lor B \lor C $ for all possible values of $ A $, $ B $, and $ C $.
| $ A $ | $ B $ | $ C $ | $ A \lor B \lor C $ |
|---|---|---|---|
| F | F | F | F |
| F | F | T | T |
| F | T | F | T |
| F | T | T | T |
| T | F | F | T |
| T | F | T | T |
| T | T | F | T |
| T | T | T | T |
The Venn diagram for this instance is very similar to the one above:

Once again, we see that all parts of the Venn diagram are shaded, except for the part outside of all the circles.
The last Boolean operator we’ll cover is exclusive or, or exclusive disjunction. We’ll sometimes see this referred to as xor as well. When written, we use the $ \oplus $ symbol. However, not all programming languages have implemented this operator, so there is no consistently used symbol in programming.
This operator works in the same way that “or” works in our spoken language. Recall the “Soup or Salad” example from earlier. The exclusive or operation is True if only one of the inputs is True. If both inputs are True, the output is False.
Here is a truth table giving the value of $ A \oplus B $ for all possible values of $ A $ and $ B $.
| $ A $ | $ B $ | $ A \oplus B $ |
|---|---|---|
| F | F | F |
| F | T | T |
| T | F | T |
| T | T | F |
As we can see, the result is True when either
$ A $ or
$ B $ are True, but it is False if both of them are True, or if both of them are False.
As a Venn diagram, it would look like this:
As we can see, the parts of the diagram in $ A $ and $ B $ are shaded, but the center part, which is in both $ A $ and $ B $, is not shaded.
This operation is most interesting when extended to three variables. This truth table gives the value of $ A \oplus B \oplus C $ for all possible values of $ A $, $ B $, and $ C $.
| $ A $ | $ B $ | $ C $ | $ A \oplus B \oplus C $ |
|---|---|---|---|
| F | F | F | F |
| F | F | T | T |
| F | T | F | T |
| F | T | T | F |
| T | F | F | T |
| T | F | T | F |
| T | T | F | F |
| T | T | T | T |
The Venn diagram for this instance is as follows:

In this instance, we see the parts of the diagram representing items that are just in $ A $, $ B $, and $ C $ alone are shaded, as we’d expect. However, we also see the center of the diagram, representing items in $ A \land B \land C $ is also shaded. Interesting, isn’t it? Let’s see if we can break it down.
Just like we hopefully remember from mathematics, when we have multiple operations chained together, we must respect the order of operations. So, we can insert parentheses into the original statement to show how it would actually be calculated:
$ ((A \oplus B) \oplus C) $Now, let’s assume that all three of our variables are True, represented by
$ T $. So, we can reduce the first part as follows:
$$((A \oplus B) \oplus C) $$ $$((T \oplus T) \oplus T) $$ $$(F \oplus T) $$
As we can see, since
$ A $ and
$ B $ are both True, we find that
$ A \oplus B $ is False, as expected. Now, we can continue to reduce the expression:
$$ (F \oplus T) $$ $$ T $$
In this case, since only one of the two operands is True, the result of exclusive or would also be True. Therefore,
$ A \oplus B \oplus C $ is True when all three variables are True. In short, a string of exclusive ors is True if an odd number of the variables are True, and it is False if an even number of variables are True.
Not all languages support an logical exclusive or. Alternate forms are $ ( A \lor B) \land \lnot (A \land B) $ or $ (\lnot A \land B) \lor (A \land \lnot B) $.
At some restaurants, you are given a choice of not just two, but three items to go with your meal. Of course, the intent is for you to choose just one of the three items listed.
However, now that you understand how exclusive or works, you might see how you could get all three items instead of just one! Logic is pretty powerful, isn’t it?
Finally, it is worth discussing other operators that can result in a Boolean value. The most important of these operators are the comparators, which compare two values and return a result that is either True or False. We’ve definitely seen these operators before in mathematics, but may not have actually realized that they result in a Boolean value.
Below is a table giving the common comparators used in programming, along with an example of how they might be used:
| Name | Operator | Symbol | True Example |
False Example |
|---|---|---|---|---|
| Equal | $ = $ | == |
1 == 1 |
1 == 2 |
| Not Equal | $ \neq $ | != |
1 != 2 |
1 != 1 |
| Greater Than | $ > $ | > |
2 > 1 |
1 > 2 |
| Greater Than or Equal To | $ \geq $ | >= |
1 >= 1 |
1 >= 2 |
| Less Than | $ < $ | < |
1 < 2 |
2 < 1 |
| Less Than or Equal To | $ \leq $ | <= |
1 <= 1 |
2 <= 1 |
That covers all of the basic operators and symbols in Boolean logic. On the next page, we’ll learn how to combine them together and create logical statements using the rules of Boolean algebra.
The Venn diagrams are adapted from ones found on Wikimedia Commons ↩︎
Of course, one of the major goals of George Boole’s work was not only to create a system of logic that looked like math, but also to be able to apply some of the same techniques from math within that system. Boolean Algebra is a form of algebra that can be done on boolean expressions, and it contains many of the same laws and operations that we’ve already learned from algebra.
A Boolean expression is any expression that results in a Boolean value. They consist of the values True and False, sometimes denoted as
$ T $ and
$ F $, literal values, and variables which are usually lower-case letters, combined using the operations discussed on the previous page. Here are a few examples:
$$ T \land x $$ $$ (\neg x \land y) \oplus z $$ $$ (5 < x) \land (y > 8) $$
Boolean algebra contains many of the same laws found in algebra. Here is a table listing some of these laws with an example for each. If the law does not list a specific operation, then in general it will work for all operations.
| Name | Example |
|---|---|
| Associative | $ x \land (y \land z) \iff (x \land y) \land z $ |
| Commutative | $ x \land y \iff y \land x $ |
| Idempotence | $ x \land x \iff x $ |
| Distributive $ \land $ over $ \lor $ | $ x \land (y \lor z) \iff (x \land y) \lor (x \land z) $ |
| Distributive $ \lor $ over $ \land $ | $ x \lor (y \land z) \iff (x \lor y) \land (x \lor z) $ |
| Identity $ \land $ | $ x \land T \iff x $ |
| Identity $ \lor $ | $ x \lor F \iff x $ |
| Eliminate $ \land $ | $ x \land F \iff F $ |
| Eliminate $ \lor $ | $ x \lor T \iff T $ |
| Complement $ \land $ | $ x \land \neg x \iff F $ |
| Complement $ \lor $ | $ x \lor \neg x \iff T $ |
| Double Negative | $ \neg(\neg x) \iff x $ |
| Or Absorption | $ x \lor (x \land y) \iff x $ |
| And Absorption | $ x \land (x \lor y) \iff x $ |
There is one rule, not listed above, where Boolean Algebra differs greatly from other forms of algebra. That is how it deals with the negation, or inverse, of an entire statement. For this, we refer to the work of Augustus De Morgan, pictured above. De Morgan was expanding upon the work of George Boole, and published some additional laws for Boolean Algebra, which we collectively refer to as De Morgan’s Laws.
In Algebra, when we negate an entire statement, we must change the signs of each number in the statement. Consider the example below:
$$ -(x + y) \iff -x + -y $$However, in Boolean Algebra, the same rules does not quite work:
$$ \neg(x \land y) \neq (\neg x) \land (\neg y) $$For example, if we assign the value True to
$ x $ and False to
$ y $, we would be able to reduce the expression in this way:
$$ \neg(x \land y) \neq (\neg x) \land (\neg y) $$ $$ \neg(T \land F) \neq (\neg T) \land (\neg F) $$ $$ \neg(F) \neq F \land T $$ $$ T \neq F $$
As we can see, the two statements are not equal. Instead, De Morgan’s Laws tell us that we must also invert the operation, changing $ \land $ to $ \lor $ and vice-versa. Let’s look at a corrected version of the above example:
$$ \neg(x \land y) \iff (\neg x) \lor (\neg y) $$ $$ \neg(T \land F) \iff (\neg T) \lor (\neg F) $$ $$ \neg(F) \iff (F) \lor (T) $$ $$ T \iff T $$
So, we must add the following two laws to our table above:
| Name | Example |
|---|---|
| De Morgan’s Law $ \land $ | $ \neg(x \land y) \iff (\neg x) \lor (\neg y) $ |
| De Morgan’s Law $ \lor $ | $ \neg(x \lor y) \iff (\neg x) \land (\neg y) $ |
That gives us a full suite of laws we can use when working in Boolean algebra.
We use DeMorgan’s all the time. When we say x is between 1 and 10, we can state that as either $ x \geq 1 \land x \leq 10 $ or $ \neg(x < 1 \lor x > 10) $. DeMorgan’s law provides the mathematical proof of this.
File:De Morgan Augustus.jpg. (2018, January 1). Wikimedia Commons, the free media repository. Retrieved 19:51, January 10, 2019 from https://commons.wikimedia.org/w/index.php?title=File:De_Morgan_Augustus.jpg&oldid=275794962. ↩︎
Now that we’ve learned about many of the laws of Boolean algebra, let’s go through a worked example, just to see how we can find a Boolean expression from a truth table. Programmers perform this process many times while writing code, since most programs include several boolean expressions. Those expressions control how the program performs in certain situations, such as when to repeat a block of code or when to choose between multiple blocks of code.
For this problem, let’s say we are working on a program to control smart lights. That program should turn the lights on if the light switch in the room is in the “ON” position. Similarly, it should turn on the lights if it detects there are people in the room using a motion sensor, regardless of whether the light switch is “ON” or “OFF”. However, it should respect a master switch, such that if the master switch is off, the lights can not be turned on at all.
How can we write a program that uses a Boolean expression to determine when to turn the lights on?
The first step is to create a truth table that describes the possible inputs and the desired outputs. For this example, we’ll assign input A to the light switch, input B to the motion sensor, and input C to the master switch. Using that, we can construct our truth table:
| A | B | C | Output |
|---|---|---|---|
| F | F | F | F |
| F | F | T | F |
| F | T | F | F |
| F | T | T | T |
| T | F | F | F |
| T | F | T | T |
| T | T | F | F |
| T | T | T | T |
In this table, we see that there are exactly three situations that cause the lights to be turned on, which is where the Output column contains True. They are highlighted in bold in this example. First, on the fourth line of the table, if the motion sensor input B is True, and the master switch input C is also True, then the output should be True. Similarly, the sixth line shows that if the light switch A is True and the master switch C is True, then the output is True. Finally, the last line shows that if all inputs are True, the output is True and the lights should be on.
Does that cover all of the situations where the lights should be on? Most of the remaining lines are situations where the master switch C is False, so the lights should not be turned on in any of those situations. The only exception is the second line, where the master switch C is True, but none of the other inputs are True. In that case, the lights should remain off.
The next step is to make a Venn diagram. This step is not necessary, as we’ll see later, but it is a very helpful step to take when learning Boolean algebra for the first time. Each segment of the 3 variable Venn diagram corresponds to a particular line in the truth table, so we simply want to shade in each segment that corresponds to a line in the truth table where the output is True.
Let’s look at the first line where the output is True, which is the fourth line. In that line, we see that we need the part of the diagram that is contained in B and C, but not A. This is due to the fact that the inputs B and C are True, but input A is False on that line of the truth table. So, we’d shade in this segment of our Venn diagram:

The next line in the truth table where the output is True is the sixth line. In this line, we need the part that contains A and C but not B:
Finally, the last line in the truth table tells us that we must shade in the part of the diagram contained in all three circles, containing A and B and C together:
Now, we can put those sections together to find our overall Venn diagram for this statement:
So, we can see that there are three segments shaded in our Venn diagram, corresponding to three lines in the truth table where the output is True. This gives us a helpful visual way to look at our Boolean logic expression.
Now that we’ve created a Venn diagram for this example, we can use it to create our Boolean expression. For this step, we’ll need to break the shaded part of the Venn diagram down into parts we can describe, and put those pieces together in a way that they represent the diagram as a whole. Let’s see how that works.
First, looking at our diagram, one thing we might notice is that it can be broken up into two overlapping segments. The first segment is this one:
This diagram shows the part of the diagram that is included in both A and C. This is exactly the same as the 2 variable Venn diagram we saw on the previous page, especially if we ignore the circle for B. So, this diagram represents the Boolean expression $ A \land C $. That’s one piece of the puzzle.
The other segment we might see is this one:
Similarly, this diagram represents the Boolean expression $ B \land C $, since it is the part of the diagram that is included in both B and C.
If we overlap those two segments, we would see the following result (with overlapping segments shaded a bit darker):
This is effectively the same diagram as we found above, isn’t it? That’s what we are aiming for!
So, we know that we need an expression that represents $ A \land C $ and $ B \land C $ overlapped. If we recall back to the basic Boolean operations, we should hopefully remember that the or operation does just that. So, we can use $ \lor $ to connect our two pieces, making the final Boolean expression:
$ (A \land C) \lor (B \land C) $Now that we have our final expression, let’s go back to the problem statement and see if it matches. Recall that it says we would like the lights turned on if the light switch is on and the master switch is on, or if the motion sensor senses people and the master switch is on. If we replace the variables in the Boolean expression, we see the following:
$ (\text{Light Switch} \land \text{Master Switch}) \lor (\text{Motion Sensor} \land \text{Master Switch}) $That is exactly what we want! So, we found the correct Boolean expression for our problem statement.
Of course, once you’ve seen the end result and compared it to the problem statement, it may be easy to see how you could quickly go directly from the problem statement to a Boolean expression without creating a truth table or a Venn diagram. In fact, if the problem statement is clear enough, it may already be structured exactly like a Boolean expression itself.
In practice, many programmers become familiar enough with Boolean expressions that they can easily go directly from a problem statement to a matching Boolean expression without much effort. It may seem difficult at first, but you’ll quickly become familiar with that process as you continue to write programs. For now, don’t be afraid to take the time and work each example through until you become more comfortable with it.
It usually takes at least a year or more of coding practice before this process feels simple. So, don’t sweat it!
We can also derive our Boolean expression directly from the data in the truth table, along with some of the Boolean Algebra laws we covered earlier in this chapter. Let’s go through an example of how that process works, just to see that we can get the same result.
In our truth table, we see that we should have three situations that provide output. The first is when B and C are True, while A is False. So, we could write that as the Boolean expression
$ \neg A \land B \land C $.
Similarly, we can do the same for the other two lines of output, which produce the expressions $ A \land \neg B \land C $ and $ A \land B \land C $, respectively.
Finally, we’d like our output to be True if at least one of those situations is True. So, we can use the or
$ \lor $ operation to connect them together into a single statement:
In fact, if we want, we can simply stop there. That statement is exactly equivalent to the one we found using the Venn diagrams above.
However, it is very long and difficult to understand directly, and it doesn’t clearly reflect our problem statement. So, let’s see if we can reduce this expression using the laws of Boolean Algebra to an equivalent one that is easier to read.
First, we must use the law of Idempotence to duplicate one of our terms. From that law, we know that the following is true:
$ (A \land B \land C) \iff (A \land B \land C) \lor (A \land B \land C) $So, we can replace the final term with this equivalent statement. We can do this here since it won’t affect the final outcome. It is the rough equivalent to adding $ 0 $ to an existing mathematical expression. So, our new expression is
$ (\neg A \land B \land C) \lor (A \land \neg B \land C) \lor (A \land B \land C) \lor (A \land B \land C) $Next, we can use the law of Commutativity to rearrange the terms a bit. This is the same as rewriting $ 1 + 2 $ as $ 2 + 1 $, so it is a simple law to apply:
$ (\neg A \land B \land C) \lor (A \land B \land C) \lor (\neg B \land A \land C) \lor (B \land A \land C) $We can also use the law of Associativity to add a few extra parentheses, just for clarity:
$ \bigg(\big(\neg A \land (B \land C)\big) \lor \big(A \land (B \land C)\big)\bigg) \lor \bigg(\big(\neg B \land (A \land C)\big) \lor \big(B \land (A \land C)\big)\bigg) $Next, we can apply the inverse of the Distributive law on the first block of statements to “factor out” the statement $ (B \land C) $, leaving this result:
$ \big((B \land C) \land (\neg A \lor A) \big) \lor \bigg(\big(\neg B \land (A \land C)\big) \lor \big(B \land (A \land C)\big)\bigg) $We can also do the same on the second block with $ (A \land C) $:
$ \big((B \land C) \land (\neg A \lor A) \big) \lor \big((A \land C) \land (\neg B \lor B)\big) $Next, we can use the Complement law to reduce both
$ (\neg A \lor A) $ and
$ (\neg B \lor B) $ to True:
Then, using the law of Identity, we know that $ x \land T \iff x $, so we can remove both instances of $ T $ in the expression:
$ (B \land C) \lor (A \land C) $Once again, we can apply the law of Commutativity to rearrange the terms to reach this final result:
$ (A \land C) \lor (B \land C) $There it is! We were able to use the laws of Boolean Algebra to prove that our Boolean expression found using the Venn diagrams is equivalent to the expression from the truth table. This process is very similar to the ones learned in an algebra class, but some of the laws are handled in a slightly different way.
Here’s a quick challenge: can you use the laws of Boolean Algebra to reduce that statement even more? See if you can find the answer before reading below.
It turns out that you can! We can apply the inverse of the Distributive law one more time to get the following result:
$ C \land (A \lor B) $
This also works, and might even fit better with the original problem statement. If we restate it as “the light should be on if the master switch is on and either the light switch is on or the motion sensor detects people,” the problem statement clearly reflects this answer as well. Both are equally correct in this case.
Not everyone finds the use of Venn diagrams easy or natural. Consider the following problem:
Determine if the value of the variable x is greater than 10, less than or equal to 30, and either divisible by both 2 and 3 or by 7.A Venn diagram of this statement would look something similar to this example:

Unfortunately, it does not result in a graphic that is easily translatable to a Boolean logic statement. So, we’ll probably have to take another approach.
Instead, we can use the original problem statement as the structure to build a pseudocode representation that can eventually be translated to any programming language. We’ll begin by breaking down the original problem statement into smaller parts, as shown below:
Determine if the value of the variable x is:
  greater than 10
  less than or equal to 30
  and either
    divisible by both 2 and 3
    or by 7.
We’ve also added in a bit of indentation, just to make it easier to see the various parts of the statement.
Clearly the ands and ors in the original statement can be replaced with their Boolean equivalents. We’ll use capitalized AND, OR and NOT operators in text. Also, we can deduce that statements in a comma separated list should also be combined with AND, so we can update our statement as follows:
Determine if the value of the variable x is:
  greater than 10
  AND less than or equal to 30
  AND either
    divisible by both 2 AND 3
    OR by 7.
Next, we should try to make each statement closely resemble a written expression in code by adding in the implied subject of each statement and making them explicit. In most cases, we’ll add the variable x to the statement, as shown here:
Determine if the value of the variable x is:
  x greater than 10
  AND x less than or equal to 30
  AND either
    x divisible by 2 AND x divisible by 3
    OR x divisible by 7.
Notice how the statement divisible by both 2 and 3 was split into two parts. Each Boolean logic comparator requires a variable on each side, so we cannot write x divisible by 2 AND 3 as a valid statement. Instead, we have to split it into two statements, x divisible by 2 AND x divisible by 3. We also have to expand the line OR by 7 to clarify that it is also checking if x is divisible by 7, so we updated it to be x divisible by 7.
Now we can plug in the associated Boolean comparators and mathematical operators. Recall that we can check if a number is divisible by another number using the modulo operator; if that value modulo the divisor is 0, then we know the number is evenly divisible by the divisor. We’re also going to use the double equals sign == to denote equality, which is used in most programming languages.
Determine if the value of the variable x is:
  x > 10
  AND x <= 30
  AND either
    x % 2 == 0 AND x % 3 == 0
    OR x % 7 == 0.
Once we have that, we can go through and add in any missing parentheses. Notice that we originally used some tabs separate the various parts of the original statement, and those should closely align with where we need to add parentheses.
So, one possible way to interpret this statement is as follows:
x > 10 AND x <= 30 AND ((x % 2 == 0 AND x % 3 == 0) OR x % 7 == 0)This line of pseudocode is certainly easier translate into a programming language than using the Venn Diagram!
There is a technique in computer engineering used to express complicated Boolean expressions in the fewest number of operations. It is called the K-Map or Karnaugh Map technique. It is typically taught in introductory classes.
Certain applications areas of computer Science, particularly sub-fields such as artificial intelligence and control systems, end up producing long strings of Boolean algebra. Using both Karnaugh Maps and Boolean algebra techniques are used to reduce those statements.
While Boolean logic is very important when writing computer code, it is also a major part of working with computer hardware as well. In fact, most electronic hardware today uses chips and circuits that are built directly upon the fundamental building blocks of Boolean logic.
In 1937, a 21-year-old graduate student at MIT named Claude Shannon, pictured above, published his master’s thesis: “A Symbolic Analysis of Relay and Switching Circuits.” In that paper, he demonstrated how to build electric circuits which could perform all of the standard Boolean logic operations, using the presence or absence of an electric current or voltage to represent true and false in those circuits.
In addition, his work demonstrated that multiple circuits can be combined to perform simple mathematical operations on binary numbers, such as addition, subtraction, and even multiplication!
It is difficult to overstate the importance of Claude Shannon’s work in today’s modern world. Every electronic device we use is built upon the same fundamental concepts laid out by Shannon in the 1930s. In fact, one researcher described his work as “possibly the most important, and also the most famous, master’s thesis of the century.”2
Let’s look at an example of how Boolean logic can be used to perform mathematical operations. Here is a simple truth table showing addition using two binary bits as input. In this case,
$ 0 $ represents false and
$ 1 $ represents true:
| A | B | Carry (and) | Sum (xor) |
|---|---|---|---|
| 0 | 0 | 0 | 0 |
| 0 | 1 | 0 | 1 |
| 1 | 0 | 0 | 1 |
| 1 | 1 | 1 | 0 |
The addition itself is performed by the xor operation. For example, if both inputs are
$ 0 $, representing false, then the sum is
$ 0 + 0 = 0 $, which is false as well. However, if one input is
$ 1 $ and the other is
$ 0 $, then the sum is
$ 0 + 1 = 1 $ (which is the same as
$ 1 + 0 = 0 $), so the xor operation would output true. In both of those cases, the carry bit is
$ 0 $, since the sum does not require a bit to be carried forward to the left.
The interesting case is when both inputs are
$ 1 $. In this case, the result is
$ 1 + 1 = 2 $, where
$ 2 $ is represented by
$ 10 $ in binary. So, the sum result, represented by xor is false, but the carry bit, represented by the and operation, is true. So, the result would be
$ 10 $, represented by the carry bit followed by the sum.
So, we can represent the mathematical addition operation $ A + B $ using these two Boolean logic expressions:
The corresponding circuit for this operation is known as a half adder.
We can then expand this truth table to include a third input, which is the carry bit from a previous addition.
| A | B | Carry In | Carry Out | Sum |
|---|---|---|---|---|
| 0 | 0 | 0 | 0 | 0 |
| 0 | 0 | 1 | 0 | 1 |
| 0 | 1 | 0 | 0 | 1 |
| 0 | 1 | 1 | 1 | 0 |
| 1 | 0 | 0 | 0 | 1 |
| 1 | 0 | 1 | 1 | 0 |
| 1 | 1 | 0 | 1 | 0 |
| 1 | 1 | 1 | 1 | 1 |
From this truth table, we can find the following Boolean logic expressions for the sum and carry bits:
This circuit is known as a full adder.
So, given two binary bits as inputs $ A $ and $ B $, along with the carry bit from a previous addition $ C $, we can use these two Boolean expressions to find both the sum and carry bits as output.
To find the sum of larger numbers, we can simply chain together multiple instances of these full adder circuits together, moving through the binary number from left to right, just like we do for normal addition. In modern computers, the central processing unit, or CPU, contains circuits very similar to these to perform each mathematical instruction required to execute a program.
Wikibooks has a great page dedicated to this topic for additional information: Practical Electronics/Adders
File:ClaudeShannon MFO3807.jpg. (2018, December 28). Wikimedia Commons, the free media repository. Retrieved 19:09, January 14, 2019 from https://commons.wikimedia.org/w/index.php?title=File:ClaudeShannon_MFO3807.jpg&oldid=332553066. ↩︎
See https://en.wikipedia.org/wiki/A_Symbolic_Analysis_of_Relay_and_Switching_Circuits#cite_note-2 ↩︎
Boolean Logic in Java
The Java programming language supports Boolean values as a primitive data type named boolean. It also includes Boolean keywords true and false to represent each possible value. Notice that these keywords are not capitalized, unlike some other programming languages.
To declare a Boolean variable in Java, we can use the same basic syntax that we used for other variable types:
boolean b;We can then assign a value of true or false to that variable:
boolean b;
b = true;
We can also combine the two statements into a single statement:
boolean b = false;Java also supports most of the Boolean operators discussed earlier in the chapter. Let’s look at a few examples.
!In Java, the not operator is the exclamation point !, placed before a Boolean value. It will invert the value of the variable, changing true to false and false to true.
Here is a quick example:
boolean b = true;
boolean c = !b;
System.out.println(c); // false
This program will output false, which is the inverted value of b.
&&To perform the and operation, Java uses two ampersands && placed between Boolean values. Let’s look at an example:
boolean a = true;
boolean b = true;
boolean c = false;
System.out.println(a && b); // true
System.out.println(b && c); // false
This program will output true on the first line, since we know that both a and b are true. On the second line, it will output false, since c is false, even though b is true.
||Similarly, Java uses two vertical pipes || to represent the or operator. On most keyboards, we can find that key above the Enter key. Here’s an example of how it can be used in code:
boolean a = true;
boolean b = false;
boolean c = false;
System.out.println(a || b); // true
System.out.println(b || c); // false
Once again, this program will output true on the first line, since a is true, even though b is false. On the second line, it will output false, since both b and c are false.
According to the Java documentation, Java also supports using a single & for and, and a single | for or when dealing with Boolean values. Why shouldn’t we just use these operators instead?
It turns out that there is a fundamental difference in how the Java compiler handles these operators. The double-character operators && and || are called logical operators and short-circuit operators. In some scenarios, the system only needs to look at the first value in the statement to determine the result. For example, the statement x || (y || z) will always be true if x is true, without needing to consider the values in y or z. The same works for x && (y && z) when x is false, which will result in the entire statement being false. For larger Boolean expressions, the use of these short-circuit operators can make our programs run much faster and more efficiently.
The single-character operators & and | bit-wise comparison operators and are not short-circuited. So, the system will evaluate each part of the statement before determining the outcome. For boolean values, the bit-wise operators will evaluate to the same answer as the logical operators.
However you should not use them for this purpose. First, because they will slow your programs executions. Second, because it will obscure your intent to future readers of your program. At some distance point in the future, a programmer will see you used a bit-wise operator, assume there must be a reason you did not using the logical one, and lose valuable time trying to figure out why you did not use the logical operator.
You can read more about Bitwise Operations on Wikipedia. We will not use them in this course.
Java does not support a logical exclusive or, but we can build a similar statement using other operators.
boolean a = true;
boolean b = false;
boolean c = true;
System.out.println((a || b) && !(a && b)); // true
System.out.println((a || c) && !(a && c)); // false
In this example, the first line will be true, since a is true but b is false. However, the second line will output false, since both a and c are true .
We can also use the comparison operators ==, !=, <, <=, >, and >= to compare variables containing numbers, which will result in a Boolean value. Here’s an example showing those operators in action:
int x = 1;
int y = 2;
double z = 3.0;

System.out.println(x < y);  // true
System.out.println(x <= 1); // true
System.out.println(x > 2);  // false
System.out.println(x >= z); // false

System.out.println(x == 1); // true
System.out.println(x != y); // true
As we can see, each of the comparison operators works just as we’d expect, and outputs a Boolean value of either true or false, depending on the result of the comparison.
Like most high level languages, Java does not allow the chaining of comparison operators. 10 <= x <=20, which is a pretty standard math notation for x is between 10 and 20, will not work. First the compiler will evaluate 10 <=x as a boolean, then it will throw a fit about trying to compare a boolean and and int for the <= 20 part.
You will need to write this as 10 <= x && x <= 20.
Now that we’ve introduced some additional operators, we should also see where they fit in with the other operators in Java. Here is an updated list giving the appropriate operator precedence for Java, with new entries in bold:
++ & Decrement -- after variable*-, Not !, Increment ++ & Decrement -- before variable**, Division /, and Modulo %+, Subtraction -<, >, <=, >===, !=&&||=, +=, -=, *=, /=, %=Working with Boolean expressions in Java is the same as working with any other type of expression. So, we can use the same subgoals we learned in a previous chapter to help us evaluate and write new Boolean logic expressions. Here’s a quick review of those subgoals.
To analyze an expression involving variables and mathematical operators in code, here are some mental subgoals we can use:
First, we must determine whether the data type of the expression is compatible with the data type of the variable we want to store it in. In Java, we must be very careful to make sure we are only storing whole numbers in the integer data type, and floating point values in the double data type.
Next, we should look at the expression to determine if there are any prefixed operations that must occur first. In Java, for example, we could find a prefixed increment operator like ++x, so we’ll need to update the value of x before moving to the next step.
At this point, we can solve the arithmetic equation using the order of operations for our language. This simply involves the process of substituting values for variables and performing the requested operations. However, once again we must be careful to make sure that the operands provided to each operator are valid and produce the correct data type. The example we saw earlier for handling a large equation showed us a great way to work through this process.
Once we’ve solved the arithmetic equation, we should be left with a variable on the left side of the equals sign and a single value on the right side. So, once again, we should confirm that the value on the right can be stored in the data type of the variable on the left.
Finally, if the original expression included any postfix operations, such as a postfixed decrement like x-- in Java, we’ll need to update the value of x before moving on to the next line.
Here are the subgoals for writing a new expression:
The first step is to determine which part of the problem statement will be represented by a variable. Sometimes this is obvious, and other times it is not. This may be a new variable that we are creating, or it could be an update to an existing variable.
Once we’ve found a variable to work with, we must also determine the variable’s name and data type. Once again, this may be obviously found in the problem statement, but other times we must think a bit more about what type of data will be stored in the variable. Of course, we should also make sure the variable has a descriptive and memorable name if we are creating a new one.
Now that we’ve isolated our variable, we must build an arithmetic equation and operators required to produce the desired value. This may involve using additional variables in our equations as well.
Once we have our arithmetic equation, we can then build the overall expression. This usually consists of three parts: the variable on the left, an assignment operator in the middle, and the arithmetic equation on the right.
Finally, once we’ve constructed the overall expression, we should check and make sure that all operators and operands are compatible. This means making sure we are using the correct operators and conversions to produce the desired data type as output.
Let’s look at an example to see how we can use these steps to create an evaluate a Boolean expression to match a problem statement.
Consider the following problem statement:
Create a program to determine if a user has exactly 5 apples, or fewer oranges than bananas. If so, the program should output
true, otherwise it should outputfalse. For this program, assume the user has 4 apples, 6 oranges, and 8 bananas.
Let’s go through the subgoal steps above to write this program.
First, we can read the problem statement to see that we should have at least three variables - one for apples, oranges, and bananas. In addition, we may need a fourth variable to store the Boolean result that we’d like to output.
The second subgoal is pretty straightforward. We can easily create three integer variables, apples, oranges, and bananas for each type of fruit, and a Boolean variable result to store the result of our Boolean logic expression.
Next, we’ll need to build our arithmetic equation. For this program, we need to determine if the user has exactly 5 apples, or apples == 5. We also need to know if the user has fewer oranges than bananas, or oranges < bananas. Finally, we can put those together using the or operator as indicated in the problem statement, so the final equation would be (apples == 5) || (oranges < bananas).
Now we can build our program itself. Here’s one possible solution:
int apples = 4;
int oranges = 6;
int bananas = 8;

boolean result = (apples == 5) || (oranges < bananas);

System.out.println(result);||, we see that each side is a smaller expression that will result in a Boolean value, so the data type of each operand will be correct.Using subgoals makes it very easy to work through this process, one step at a time.
In this chapter, we learned all about Boolean logic, the corresponding rules for Boolean algebra, and how we can use those concepts to create our own Boolean logic expressions that we can use in our computer programs.
In the next chapters, we’ll see how we can use these expressions to control how our programs operate with programming constructs that allow our code to select between different branches or even repeat instructions as needed.
If, Then, or Else!
We’ve created many different computer programs by now, but they have all had one thing in common: they only have a single execution path in the program. This means that, each time we run the program, we’ll execute the exact same pieces of code and perform the same operations on each variable. We may have different initial values stored in those variables, but that is really the only difference.
To better visualize this, we can actually think of the execution path of a program just like a flowchart. For example, here is a flowchart showing the execution path of a program that asks the user to input a number and then prints the square of that number.
However, what if we’d like our programs to be able to perform different actions, depending on the user’s input? Wouldn’t that be useful?
Let’s take a look at a second flowchart. For this program, we’ll have the user input a number. If the number is even, we’ll output even, but if it is odd, we’ll output odd. Let’s look at what this program might look like as a flowchart:
This flowchart uses a diamond-shaped block to indicate a decision we’d like our computer program to make. Inside the block, we see the Boolean logic expression x % 2 == 0, which will determine whether x is evenly divisible by
$ 2 $. If so, the result of the modulo operation would be
$ 0 $, so the entire statement would evaluate to true, indicating that x is an even number.
We also see two arrows coming from this block, one on the left if the statement is false, and another, on the right, if the statement is true. Each path leads to a different output, before being joined together at the end.
Nearly every programming language supports a method for running different parts of code based on the result of some Boolean logic expression, just like in this example. Collectively, these methods are known as conditional constructs, sometimes referred to as conditional statements or just conditionals. In the example above, the diamond-shaped block represents a conditional construct in that program.
Of course, we can make even more complicated decisions in our programs. Let’s take a look at one more flowchart and see if we can understand what this program does:
At first glance, this flowchart may seem quite confusing. However, by looking closely at the decisions it makes and the corresponding output, we should realize that it is a program that plays the common “Rock, Paper, Scissors” game.
First, the program accepts two inputs, representing the symbols chosen by each player, and stores them in variables p1 and p2. Then, it checks to see if the inputs are equal. If so, the program declares the game to be a tie by outputting tie, and then it ends. If the inputs are not equal, then it can determine a winner.
Instead of trying to describe how the rest of the program works, let’s look at a few possible inputs and trace the program’s execution through the flowchart, just to see what it does.
First, let’s look at the case when player 1 chooses “rock” and player 2 chooses “paper”. So, our variables would be p1 = "rock" and p2 = "paper". Here’s a trace of the path that input would follow through the flowchart:
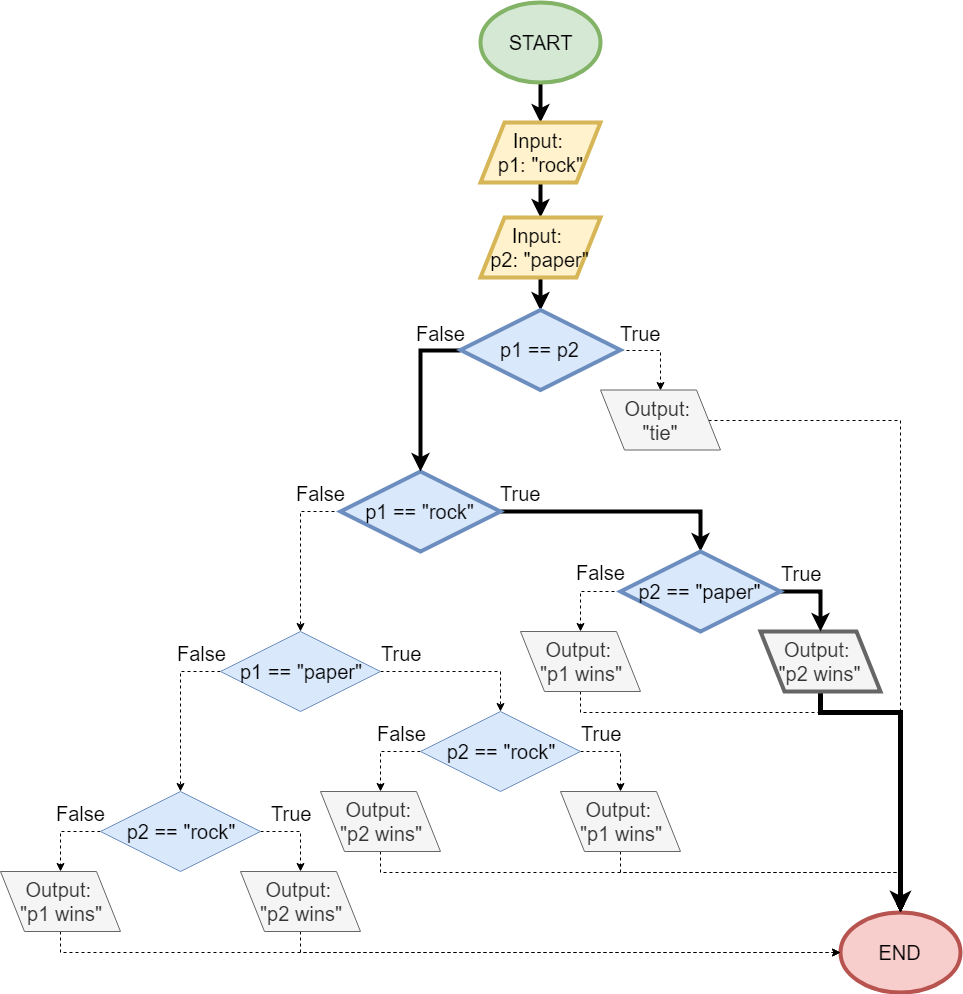
As we can see, first the program will check to see if the inputs are equal. Since they are not, it will follow the false branch to the left. Then, it will determine if player 1’s input was "rock". Since that is the case, it will follow the true branch to the right. After that, the program will test if p2 == "paper", which is also true. So, the program will follow the right branch, and output p2 wins. We can see that this output is indeed correct, since the rules of the game states that “paper covers rock”, meaning that player 2’s choice of paper will beat player 1’s choice of rock.
Let’s look at one other example. This time, player 1 chooses “scissors” and player 2 chooses “paper”. Here’s a flowchart representing our program with those inputs:
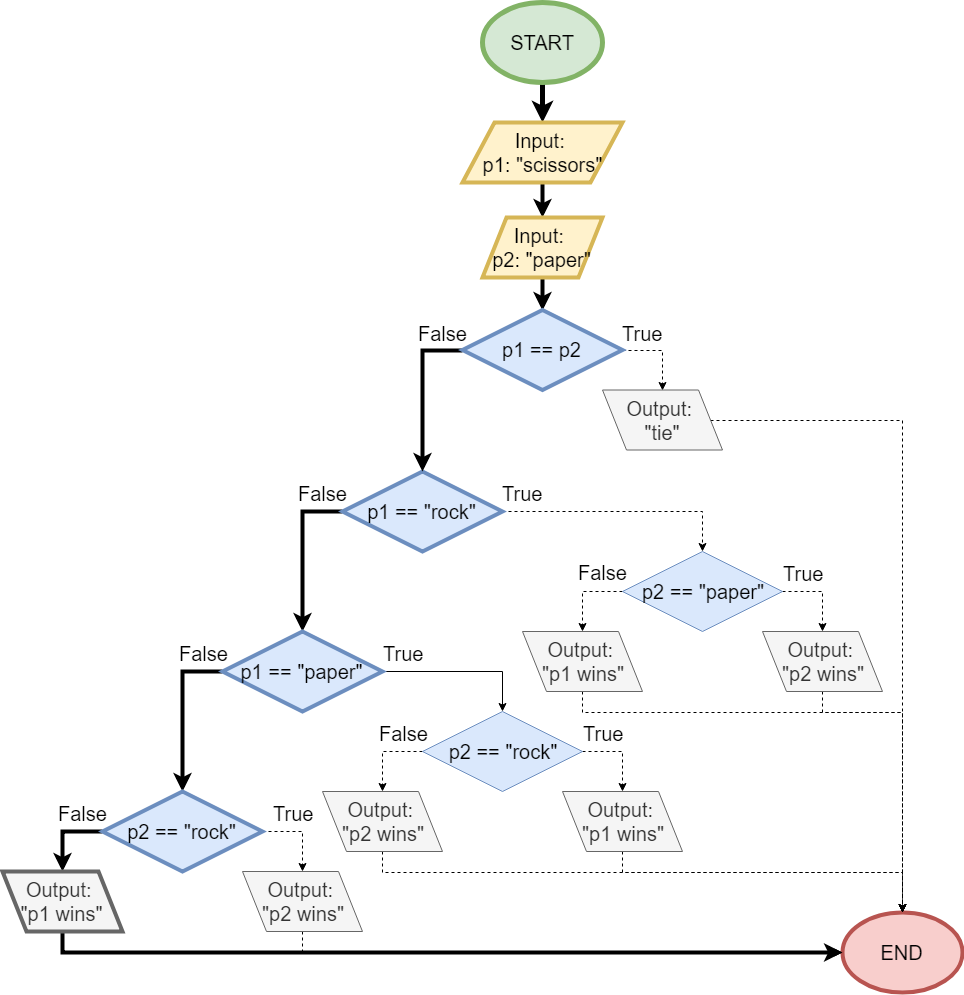
In this example, the program will first decide if the inputs are equal. They are not, so the program will once again follow the false branch to the left. Then, it will test to see if player 1’s input was "rock". In this case, the user input "scissors", so this test is false, and the program will choose the false branch to the left.
Next, it will try to determine if player 1’s input was "paper". Since that is also not the case, it will follow the false branch to the left once again.
At this point, our program knows that player 1 did not input either "rock" or "paper", so it can assume that the input must be "scissors". So, it will then check to see if player 2’s input was "rock". This is also false, so it will choose the false branch once again.
From earlier, it knows that player 2’s input is different from player 1, and player 2 did not input "rock". Since player 1’s input is assumed to be "scissors", that means that player 2 must have chosen "paper" as it is the only valid input left.
Therefore, this program has determined that player 1’s input was "scissors" and player 2’s input was "paper". By the rules of the game, “scissors cuts paper”, so player 1 wins. Our program will correctly output p1 wins!
In the examples above we made a very important assumption, which allowed us to infer information about each user’s input. Can you find a possible problem with the programs as shown in the diagrams above?
In those examples, we assumed that the users would only input either "rock", "paper", or "scissors". Based on that assumption, if we have determined that a player’s input was neither "rock" nor "paper", as we did in the last example, then we can infer that the user must have chosen "scissors".
However, we did not specify how that assumption was enforced in our diagram. In a real-world program, how to handle bad input is often specified, which can lead to additional decision boxes in the flowchart that would test each user’s input against a list of valid inputs before accepting it. This would make the flowchart significantly larger and more complex, which is why they were omitted for this example.
As you complete the programming examples and projects in this course, you’ll need to pay special attention to the program’s specifications and any assumptions made about possible user inputs. It will often be the case that there is no instructions given for handling bad input. In this case, our program should do nothing since it wasn’t specified. Adding unspecified features is a bad programming practice, so we want to avoid adding any instructions that are not explicitly listed in the program specification. In a formal development process, a “bug” would be opened to fix the specification first, and then we would update the code to match the new specification.
In most cases, it is always better to specify how a program handles invalid input instead of relying on assumptions about what your users may or may not provide as input.
The customer may always be right, but users should never be trusted to follow instructions!
As we can see, the ability to make decisions in a computer program is one of the most important building blocks we need to build more elaborate and complex programs. In this chapter, we’ll learn about all of the different ways we can write computer programs to make decisions and perform different actions based on those decisions using conditional constructs.
The first type of conditional construct we’ll cover is the if statement. This type of statement allows us to build a block of code which will only be executed if the given Boolean expression evaluates to true.
Here’s a simple flowchart that shows an if statement as the conditional construct:
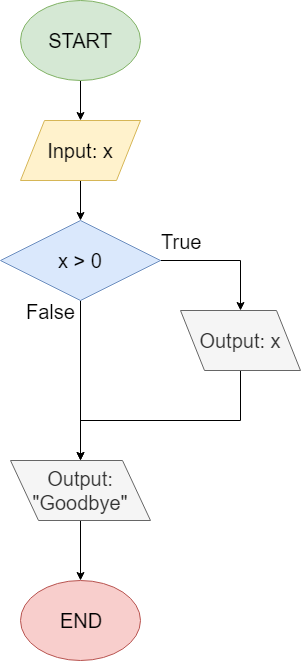
This flowchart represents a program which will ask the user for a number as input, then print that number as output only if the number is greater than
$ 0 $. Then, the program will print Goodbye and terminate. So, if the user inputs -5, the program will only print Goodbye. However, if the user inputs 7, then the program will first print 7 followed by Goodbye. As we can see, the program will execute the section of code that prints the value of the variable if and only if the value of x > 0 is true. Otherwise, it will skip that code and continue with the rest of the program.
Notice that this statement does not include any operations in the case that x > 0 is false. Instead, the false branch points downward, and merges with the true branch after the program outputs the value of x. This is the main difference between an if statement and an if-else statement, which we’ll cover on the next page.
Most programming languages implement an if statement in a format similar to this:
<before code block>
if <Boolean expression> {
    <if code block> or <True block>
    }
<after code block>
The program is initially executing code in the <before code block> section. Once it reaches the if keyword, it will then evaluate the <Boolean expression> to a value of either true or false. If the expression is true, then it will execute the code in the <if code block>, followed by the code in the <after code block>. If the expression is false, the program will simply continue executing code in the <after code block>, bypassing the other block entirely.
You may see the if statement referred to as the if-then statement. At the dawn of high level programming languages in 1957, one of the first languages developed was FORTRAN. FORTRAN was the first commercially available high level programming language, and it is still in use today in many scientific and mathematics heavy applications. Its syntax for this structure is
IF <condition> THEN <action>This closely follows the first order logic representation <condition> --> <action>, or condition implies action. In propositional Logic, this is read to mean “if the condition is true, it follows that the action must also be true”.
In the early 1970s, a new high level programming language named C is developed, and it comes to dominate the programming landscape by the 1990s. C remains in active development, has a huge industry code base, and greatly influenced the syntax and style of later languages. Notably, C dropped the “THEN” part of the statement, and standardized the use of curly braces to separate blocks of code:
if (condition) {
    <action>
}
This sets the stage for one of the enduring arcane debates in computer science – which form is “correct”. Without arguing for which is best, we have chosen the style that most resembles Java and Python syntax.
Next, let’s look at the if-else statement. This statement allows us to choose between two different blocks of code, one to be executed when the Boolean logic expression evaluates to true, and a different block if the expression evaluates to false.
Here’s a simple flowchart that shows an if-else statement as the conditional construct:
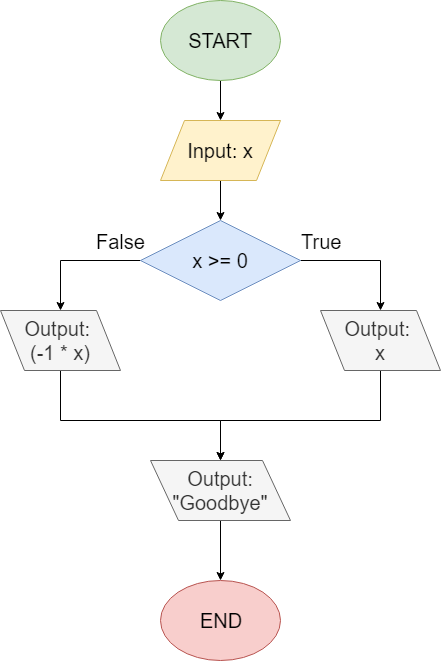
This program is very similar to the one shown on the previous page, with one major difference. Once again, this program will ask the user for a number as input, then print that number as output if the number is greater than or equal to
$ 0 $. However, if the input value is less than
$ 0 $, the program will instead print the inverse of that value by multiplying it by
$ -1 $ before printing. Finally, the program will print Goodbye and terminate.
So, if the user inputs 7, the program will just print 7 followed by Goodbye. However, if the user inputs -5, then the program will calculate
$ -1 * -5 $ and print 5, followed by Goodbye. As we can see, the program will choose which block of code to execute depending on the Boolean value that results from evaluating x >= 0. Once it has executed one of those two blocks, then the program will continue with the rest of the code.
Most programming languages implement an if-else statement in a format similar to this:
<before code block>
if (Boolean expression) {
    <if code block> or <True code block>
}
else {
    <else code block> or <False code block>
}
<after code block>
The program is initially executing code in the <before code block> section. Once it reaches the if keyword, it will then evaluate the <Boolean expression> to a value of either true or false. If the expression is true, then it will execute the code in the <if code block>, followed by the code in the <after code block>. If the expression is false, the program will execute code in the <else code block>, followed by the code in the <after code block>.
It is important to note that it is impossible for the program to execute both the <True code block> and the <False code block> during any single execution of the program. It must choose one block or the other, but it cannot do both. So, if we want each block to perform the same action, we’ll have to include the appropriate code in both blocks.
Many programming languages also provide other conditional constructs that perform these same operations in different ways. However, each of these constructs can also be built using just if and if-else statements, so it is not necessary to use these constructs themselves to achieve the desired result. In many cases, they are simply provided as a convenience to the programmer in order to make the code simpler or easier to understand.
Some programming languages, such as C and Java, include a special type of conditional construct known as a switch statement, sometimes referred to as a case statement. Instead of using a Boolean value, which can only be true or false, a switch statement allows our program to choose a block of code to execute based on the many possible values of a variable, traditionally an integer value.
This flowchart shows what a switch statement might look like in a program:
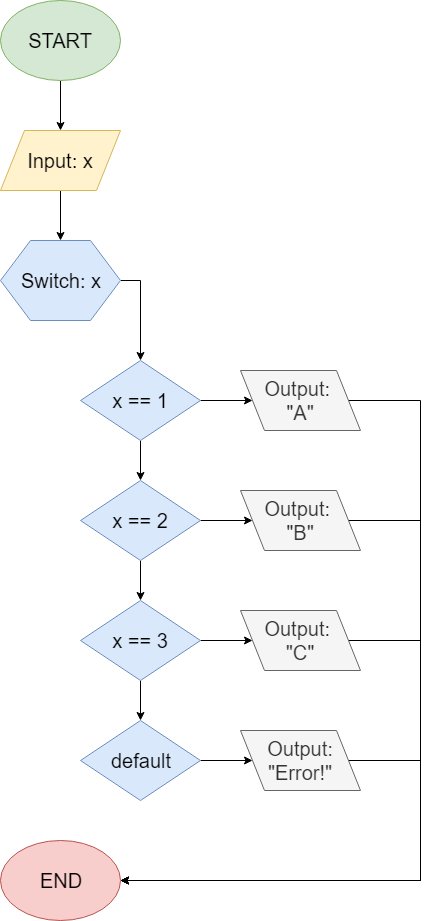
In this example, the program will examine the value of the variable x and use it to choose a case, which is a code block that would be executed. Here, it would simply output a different response, depending on the value of x. Notice that the flowchart is essentially using several if statements to accomplish this task, which is essentially what the computer would do when executing this program. In addition, the program includes a special default case, which is executed if the value of x does not match any of the other cases.
In code, a Switch Statement may have this general structure:
switch <variable>:
  case <value 1>: <code block 1>
  case <value 2>: <code block 2>
  case <value 3>: <code block 3>
  ...
  default: <default code block>
Depending on the programming language used, it is possible to execute multiple code blocks inside a switch statement, so we may need to consult the documentation for our chosen programming language to understand how these statements work.
Many programming languages also include a special operator, known as a ternary conditional operator, sometimes referred to simply as a ternary operator, that is effectively a shortcut for a simple if-else statement that produces a single value. Here’s a flowchart showing an example:
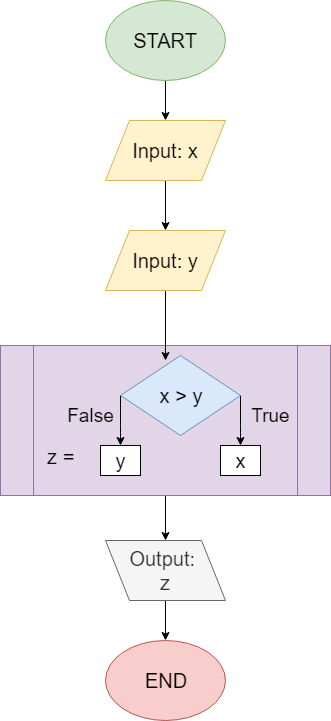
In this example, the program accepts two variables, x and y, as input. Then, it will set the value of a third variable, z, to the maximum value of x and y. It does so by testing if x > y. If so, it will set z = x; otherwise it will set z = y.
In general, there are two different ways that this operator is implemented. In Java and other programming languages similar to C, it looks like this example:
<variable> = <boolean expression> ? <true expression> : <false expression>In Python, the ternary conditional operator looks just a bit different:
<variable> = <true expression> if <boolean expression> else <false expression>The appropriate use of the ternary operator is hotly debated. If it is used, it should be used to make reading the code more clear. The code a = a if a > 0 else -a can be understood to find the absolute value of a.
Some monstrosity like a = foo(b) >= bar (c) ? f(b>c?2.0 * c:b+1) : g(c)!=1 ? ++c:c+1; is better written in if-else statements.
We suggest that if you use the ternary operator, be very judicious in its application. You may want to read the article in Agile Software Craftsmanship for more discussion.
Remember the goal is readable, understandable code, not diabolically clever code.
Conditional Statements in Java
Now that we’ve covered many different types of conditional constructs, let’s dive right in and see how they can be used in Java.
First, let’s look at the if statement. In Java, the syntax for an if statement is shown below:
if (<Boolean expression>) {
    <true block>
}
As expected, Java will first evaluate the <Boolean expression> to a single Boolean value. If that value is true, it will execute the instructions in the <true block>, which can be one or more lines of code, or even additional constructs as we’ll see later. If that value is false, then the program will simply skip over the <true block> and continue executing the code immediately below the if statement.
It is very important to remember that the Boolean expression is enclosed by parentheses ( ), while the block of code that should be executed if that expression is true is enclosed by curly braces { }, just like a class body or method body.
Let’s take a look at a few code examples, just to see how this construct works in practice. First, let’s consider the program represented by this flowchart from earlier in the chapter:
This flowchart corresponds to the following code in Java. In this case, we’ll assume x is hard-coded for now:
int x = 1;
if (x > 0) {
    System.out.println(x);
}
System.out.println("Goodbye");
As we can see, this program uses x > 0 as the Boolean expression inside of the if statement. If it is true, then it will output the value of x. So, it is very simple to write code that matches the execution paths shown in a flowchart representing the program.
Here’s one more example. Let’s assume we’d like to write a program that will calculate both the sum and product of two variables, x and y, but only if they are both greater than 0. That program may look like this:
int x = 5;
int y = 7;
if ((x > 0) && (y > 0)) {
    int sum = x + y;
    int product = x * y;
    System.out.println("Sum: " + sum);
    System.out.println("Product: " + product);
}
As we can see, we can create more complex Boolean statements using the various Boolean operators we’ve already learned. In addition, we can include multiple lines of code inside the curly braces.
The if-else statement in Java is very similar to the if statement. In Java, the syntax for an if-else statement is shown below:
if (<Boolean expression>) {
  <true block>
} else {
  <false block>
}
As expected, Java will first evaluate the <Boolean expression> to a single Boolean value. If that value is true, it will execute the instructions in the <true block>, which can be one or more lines of code, or even additional constructs as we’ll see later. If that value is false, then the program will execute the code in the <false block> instead. In essence, the if-else statement simply adds a second code block and the else keyword after an if- statement.
Let’s take a look at a few code examples, just to see how this construct works in practice. First, let’s consider the program represented by this flowchart from earlier in the chapter:
This flowchart corresponds to the following code in Java. In this case, we’ll assume x is hard-coded for now:
int x = 1;
if (x >= 0) {
  System.out.println(x);
} else {
  System.out.println(-1 * x);
}
System.out.println("Goodbye");
As we can see, this program uses x >= 0 as the Boolean logic expression inside of the if-else statement. If it is true, then it will output the value of x. If it is false, the program will output the value (-1 * x), which represents the inverse of x.
Here’s one more example. In this program, we’d like to calculate the difference between two numbers, but we’d only like to output a positive number. So, our code may look something like this:
int x = 3;
int y = 8;
if (x > y) {
  int difference = x - y;
  System.out.println(difference);
} else {
  int difference = y - x;
  System.out.println(difference);
}
In this program, we are simply checking to see if x > y. If so, we know that x - y will be a positive number. Otherwise, we can assume that y - x will be either a positive number or
$ 0 $. In either case, we see that this program will produce the correct output.
In Java, it is possible to have an If or If-Else statement without curly braces. In that case, the next line of code immediately following the if or else will be the only line considered inside of that branch.
Consider this code for example:
int x = 4;
if (x == 5)
System.out.println(true);
else
System.out.println(false);
This code is valid, and will compile and run properly. However, it is very difficult to read because of the indentation (or lack thereof).
In addition, if we want to add another line of code to each branch, we might accidentally do the following:
int x = 4;
if (x == 5)
x = 0;
System.out.println(true);
else
x++;
System.out.println(false);
This code will not compile and run properly, because the else statement cannot be attached to the appropriate if statement. So, we’d need to add curly braces to make this code make sense to the compiler.
Beyond that, it can be very difficult to read code that is not properly indented, regardless of the use of curly braces. So, it is a best practice to always include curly braces in your conditional statements and indent each block, even if those changes aren’t necessarily required in some cases.
Now that we’ve learned how to create new code blocks in our programs using constructs such as the if and if-else statements, we must take a minute to discuss one of the major limitations of those code blocks.
The scope of a variable refers to the possible areas in a program’s code where that variable can be accessed and used. This is very important to understand once we begin introducing additional code blocks in our programs, because variables declared inside of a code block cannot be accessed outside of that block.
In general, Java follows these rules when determining if a local variable is accessible.
Later on in this course we’ll learn about class member variables, which have some different rules that govern their scope. For now, we’ll only worry about local variables, which are variables declared within a method body.
Let’s look at a few examples for each rule. First, a variable may not be accessed before it is declared. So, we cannot do the following:
public static void main(String[] args){
  x = 5;
  int x;
}
If we do, the compiler will output an error similar to the following:
error: cannot find symbol
    x = 5;
    ^
  symbol:   variable x
Instead, we must make sure the variable is declared before it is accessed, as in this correct example:
public static void main(String[] args){
  int x;
  x = 5;
}Next, here’s an example where the code is trying to access a variable outside of the code block where it is initially declared:
public static void main(String[] args){
  int x = 5;
  if (x < 10) {
    int y = x + 5;
  }
  System.out.println(y);
}
Once again, the compiler cannot find the variable, and we’ll get an error similar to the following:
error: cannot find symbol
  System.out.println(y);
                     ^
  symbol:   variable y
If we think about this error, it actually makes sense. What if the value of x is greater than
$ 10 $? In that case, the program will never execute the line declaring the variable y, so it won’t even exist. Therefore, if we’d like to solve this problem, we can try to declare our variable outside of the if statement’s code block, as in this second example:
public static void main(String[] args){
  int x = 5;
  int y;
  if (x < 10) {
    y = x + 5;
  }
  System.out.println(y);
}
However, this example will also cause the compiler to give us an error:
error: variable y might not have been initialized
  System.out.println(y);
                     ^
In this case, we’ve declared the variable y, but we have not initialized it to a value. Once again, if the value of x is greater than
$ 10 $, and the code block inside the if statement is not executed, we won’t know what value should be stored in y. So, the compiler will detect that error and warn us that y may not have been initialized. To solve this error, we simply must assign a value to y before attempting to use it:
public static void main(String[] args){
  int x = 5;
  int y = 0;
  if (x < 10) {
    y = x + 5;
  }
  System.out.println(y);
}
That example will compile and run as expected.
Surprisingly, the Java compiler is advanced enough to determine if a variable would be initialized by all possible paths, as in this example:
public static void main(String[] args){
  int x = 5;
  int y;
  if (x < 10) {
    y = x + 5;
  }else{
    y = x - 5;
  }
  System.out.println(y);
}
This example will compile and run without any problems, since the variable y is initialized in both blocks of the if-else statement. In short, there is no possible execution path that does not initialize y, so it is accepted by the compiler.
We’ve already seen several examples of this already, but here’s a clear example of accessing a variable from a code block within the block where the variable was declared:
public static void main(String[] args){
  int x = -1;
  if (x < 0) {
    x = -1 * x;
  }
  System.out.println(x);
}
In this example, the variable x is declared inside of the main method’s body. Then, it is accessed inside of the body of the if statement, which is itself within the body of the main method. Later in this chapter we’ll see examples of chaining and nesting conditional constructs, which will give us more examples of how this works.
Finally, Java does not allow us to use the same variable name twice in the same code block, or in any code blocks enclosed within that block. For example, we could try to do something like this:
public static void main(String[] args){
  int x = 5;
  if (x < 10) {
    int x = 15;
    System.out.println(x);
  }
}
If so, the compiler will detect that we’ve already declared variable x in the main method body, so it won’t allow us to declare it again inside the if statement’s body. Instead, it will give us the following error message:
error: variable x is already defined in method main(String[])
    int x = 15;
        ^
We can resolve this error by simply renaming one of the variables:
public static void main(String[] args){
  int x = 5;
  if (x < 10) {
    int y = 15;
    System.out.println(y);
  }
}
We may also choose to use the same variable without declaring it again:
public static void main(String[] args){
  int x = 5;
  if (x < 10) {
    x = 15;
    System.out.println(x);
  }
}
However, we’ll need to remember that it will change the value of the variable outside the block as well.
Lastly, while we cannot use the same variable name as an existing variable, we can use that name later on in our program, as long as there is not already a variable declared with the same name that is accessible. Here’s an example of that:
public static void main(String[] args){
  int x = 5;
  if (x < 10) {
    int y = 15;
    System.out.println(y);
  }
  int y = 12;
  System.out.println(y);
}
Surprisingly, this program will compile and run without any errors. In this case, we are allowed to declare a variable named y inside of the if statement’s code block because we have not yet declared a variable with that name anywhere in our program. Later, we are allowed to declare another variable named y, this time directly within the main method’s body. This is because we are outside of the if statement’s code block, so the previously declared variable named y no longer exists. So, we can reuse the name here without causing any problems.
However, this is widely regarded as poor coding practice, as it may make our code very difficult to read and understand. So, it is always better to try and avoid reusing variable names whenever possible, just to make it clear in our code which to variable we are referring.
One of the most powerful features of the conditional constructs we’ve covered so far in this course is the ability to chain them together or nest them within each other to achieve remarkably useful program structures. The ability to use conditional constructs effectively is one of the most powerful skills to develop as a programmer.
A great example of the many ways to structure a program using conditional constructs is building a simple program that does three things:
x is less than
$ 0 $, output -1x is equal to
$ 0 $, output 0x is greater than
$ 0 $, output 1Let’s look at two different ways we could structure this program using the conditional constructs we’ve already learned.
See if you can build each of these examples in a file named Conditionals.java, either in Codio or on your own computer. Doing so is a great way to get additional practice working with conditional constructs.
Don’t forget to add the correct class declaration to the file as well! It is not included in the code examples below.
First, we could chain together several if statements to create this program. As a flowchart, the program might look like this:
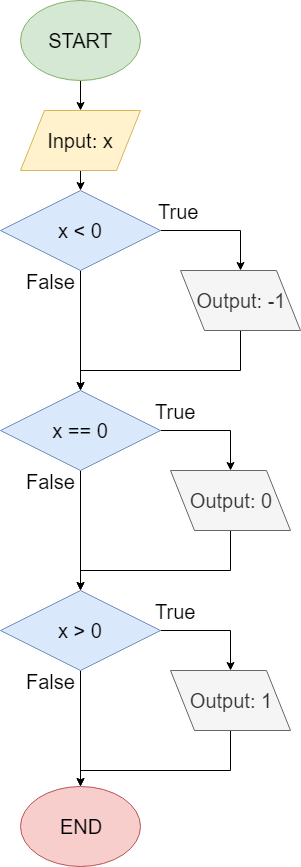
Here’s one way that program could be written in Java. Once again, we’re just using hard-coded variables for now:
public static void main(String[] args) {
  int x = 3;
  if (x < 0) {
    System.out.println(-1);
  }
  if (x == 0) {
    System.out.println(0);
  }
  if (x > 0) {
    System.out.println(1);
  }
}
Just like we see in the flowchart, this program contains three if statements chained together, one after another. If we run this program with various inputs, we should see that it produces the expected result.
Next, we can achieve the same result using if-else statements. Here’s what that program would look like as as flowchart:
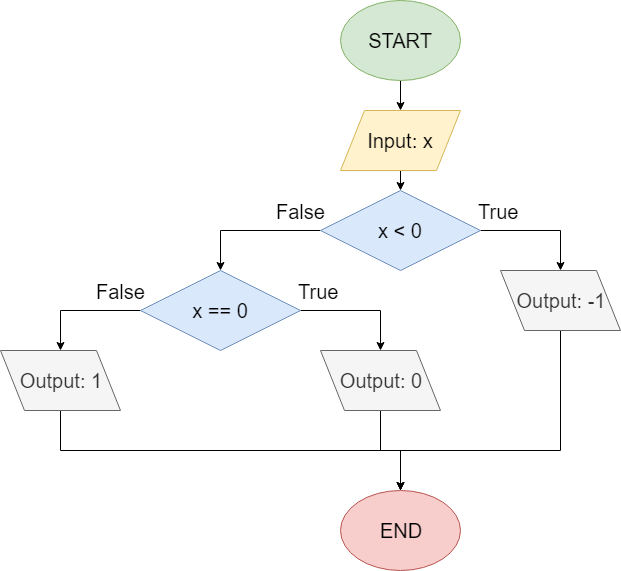
We can also write that program in Java. Here’s one possible way to do it:
public static void main(String[] args) {
  int x = 3;
  if (x < 0) {
    System.out.println(-1);
  } else {
    if (x == 0) {
      System.out.println(0);
    } else {
      System.out.println(1);
    }
  }
}
In this example, we’ve nested an if-else statement inside of the second block of another if-else statement. So, if the first Boolean expression, x < 0, is true, we’ll output -1 and end the program. However, if it is false, we’ll go into the false branch of the first statement. Then, we’ll see another Boolean expression, x == 0. If that expression is true, we’ll output 0. Otherwise, we’ll output 1. Once again, this program should produce the correct result.
Of course, we could include a third if-else statement, as shown in this example:
public static void main(String[] args) {
  int x = 3;
  if (x < 0) {
    System.out.println(-1);
  } else {
    if(x == 0){
      System.out.println(0);
    }else{
      if(x > 0){
        System.out.println(1);
      }else{
        //this should never happen
        System.out.println("ERROR!");
      }
    }
  }
}
As we discussed earlier in this chapter, we can safely infer that x must be greater than
$ 0 $ based on the two previous Boolean expressions. However, what if we’ve made a logic error in our program, and that assumption is not valid? By including the last if-else statement, we can have our program print an error in the unlikely chance that the value of x is not properly handled by any other option.
In fact, here’s how easy it is to cause just that sort of logic error. Consider the following example:
public static void main(String[] args) {
  int x = 3;
  if (x < -1) {
    System.out.println(-1);
  } else {
    if (x == 0) {
      System.out.println(0);
    } else {
      if (x > 1) {
        System.out.println(1);
      } else {
        //this should never happen
        System.out.println("ERROR!");
      }
    }
  }
}Can you spot the logic error in the example above? Try running the code with different values for x and see what happens.
In this example, we’ve updated the Boolean expression in the first if-else statement to x < -1. Similarly, we’ve changed the Boolean expression in the third statement to x > 1. That change seems logical, right?
What if the value of x is exactly
$ 1 $ or
$ -1 $? In that case, it will fail all three logic expressions, and the program will output ERROR! instead. By including the third if-else statement, we can detect logic errors that may not easily be found otherwise. Without that statement, the program would most likely output 1 even when the input is -1, which is clearly a negative number.
So, in many cases, it may be better to include additional if-else statements to explicitly check all possible cases, instead of relying on assumptions and inferences, which may lead to unintended logic errors.
Finally, it is acceptable to minimize nested if-else statements if the nested statement is exclusively in the false branch. Here’s an example:
public static void main(String[] args) {
  int x = 3;
  if (x < 0) {
    System.out.println(-1);
  } else if (x == 0) {
    System.out.pr intln(0);
  } else if (x > 0) {
    System.out.println(1);
  } else {
    //this should never happen
    System.out.println("ERROR!");
  }
}
Many programming languages refer to this structure as an if-else if-else statement. In this program, if the first Boolean expression is false, it immediately moves to the next Boolean expression following the first set of else if keywords. The process continues until one Boolean expression evaluates to true, or the final else keyword is reached. In that case, we know that none of the Boolean expressions evaluated to true, so the final false branch is executed.
While other programming languages include an explicit keyword for else if, Java does not. Instead, we are simply omitting the curly braces that surround the false block on each if-else statement. The Java compiler treats the entire if-else statement contained in that block as a single line, so the curly braces are not explicitly required in this case.
This is the one and only case where it is acceptable to remove those unnecessary curly braces in most Java style guides. Some programmers find this inline structure simpler to read and follow, as it avoids the problem of code being nested several layers deep. Others feel that it is dangerous to remove any explicit curly braces, and prefer the nested structure instead.
It should be obvious that only one branch of an if-else if-else will ever be executed, because the branches are mutually exclusive. It is a excellent practice to always use the if-else if-else structure whenever you know the logic should be exclusive. Consider a simple program we call the “Goldilocks Porridge Temperature Tester”.
if (isTooHot) {
   System.out.println("porridge is too hot");
}
if (isTooCold) {
   System.out.println("porridge is not hot enough");
}
if (isJustRight) {
    System.out.println("porridge is perfect");
}
A future reader of the program, unfamiliar with the children’s tale, would see there are 3 boolean variables (isTooHot, isTooCold, isJustRight) and, depending on their values,up to 3-lines might get printed. This is because we cannot safely assume that just one of them will be true. In fact, they could all three be true!
However, if we rewrite the program to use if-else if-else instead of just if-else statements:
if (isTooHot){
   System.out.println("porridge is too hot");
}else if (isTooCold) {
   System.out.println("porridge is not hot enough");
}else if (isJustRight) {
    System.out.println("porridge is perfect");
}
the future reader would know that only one line should ever be printed.
Next, let’s look at the switch statement in Java. As we learned earlier, this statement allows our programs to choose branches based on any number of possible values of a variable. Here’s a flowchart showing what such a program might look like:
In Java, we could write that program in many ways. This is one possible solution:
public static void main(String[] args) {
  int x = 2;
  switch (x) {
    case 1: System.out.println("A");
      break;
    case 2: System.out.println("B");
      break;
    case 3: System.out.println("C");
      break;
    default: System.out.println("Error!");
      break;
  }
}
In this program, the switch statement will evaluate the value of x, then look for the case keyword that exactly matches that value. In this example, x == 2, so it will choose the second case and output B.
If we change the value of x to
$ 4 $, then we can see that none of the case keywords match. In that instance, the program will instead choose the default case and print Error!.
The switch statement above introduces a new keyword, break, which we’ll cover in detail in a later chapter. The break keyword causes the program to stop executing code in the current statement, and the continue executing the code following that statement. So, when the program reaches a break statement in the example above, it stops executing any additional code in the switch statement and continues running the code following that statement.
It is possible to create a switch statement that does not include break keywords. In that statement, it will continue executing any cases below the chosen case until it reaches the end of the statement or the default keyword.
For example, let’s say we’d like to write a program that will print all the numbers from a given starting number up to 5. So, we could use a switch statement to do that as in this program:
public static void main(String[] args){
  int x = 2;
  switch (x) {
    case 1: System.out.println("1");
    case 2: System.out.println("2");
    case 3: System.out.println("3");
    case 4: System.out.println("4");
    case 5: System.out.println("5");
      break;
    default: System.out.println("Error!");
      break;
  }
}
When we compile and run this program, we’ll receive the following output:
2
3
4
5
The program will start at case 2:, since x == 2, and print 2. Since there is not a break keyword in that case, it will continue to the next case, printing 3, then 4, then 5 before it finally reaches a break keyword.
Switch Statements are not used as often as other conditional constructs, but they can be a useful to a program in certain instances. There are many other unique ways they could be used. To learn more, refer to the official Java documentation on The switch Statement.
Java also includes the ternary conditional operator, which can be used as a shortcut for an if-else statement.
First, consider the flowchart we saw earlier in this chapter:
In Java, this flowchart could be represented by the following code:
public static void main(String[] args){
  int x = 3;
  int y = 5;
  int z = (x > y) ? x : y;
  System.out.println(z);
}
In this program, the expression (x > y) ? x : y; is the ternary conditional operator. It first calculates the value of the Boolean expression (x > y). If that expression is true, then the entire expression evaluates to x. If it is false, then the expression evaluates to y. So, if we compile and run this program, it should output 5.
We can also include the ternary conditional operator anywhere we’d normally use a value. This is because, just like any other operator, the ternary conditional operator results in a single value when evaluated. For example, it could be used directly within the println() method:
public static void main(String[] args){
  int x = 3;
  int y = 5;
  System.out.println((x > y) ? x : y);
}Now that we’ve seen how to work with conditional constructs in Java, let’s break down our thought process a bit into subgoals once again.
Here are the subgoals we can use for evaluating conditional constructs:
First, when we see a conditional construct in code, we must determine which statements go together. Specifically, we need to know which statements are in the true branch, and which statements are in the false branch. This may seem pretty straightforward, but if the code contains many nested statements or poor formatting, it can be very difficult to do.
Here’s a quick example:
if(true){
  if(false){
    System.out.println("one");
  }
}else{
  System.out.println("two");
}
In this example, we see that there are three distinct branches. First, we have the true branch of the outermost if-else statement, which includes the inner if statement. That statement itself has a true branch that will print one to the terminal. The outermost statement also has a false branch, which will print two to the terminal.
true or falseOnce we’ve identified our conditional construct, the next step is to determine if the Boolean expression inside of the if statement is true or false. Sometimes this step is simple, but other times it can be tricky. Thankfully, we can refer back to the subgoals we’ve already seen for evaluating expressions if we need a bit of help.
After we find the value of the Boolean expression, we can simply follow the true branch if the Boolean expression evaluated to true. If the Boolean expression evaluated to false, we can follow the false branch if it exists. If the conditional construct is an if statement, we can simply ignore the rest of the conditional construct and move on to the next part of the program.
We can also use subgoals to help us write new conditional constructs.
First, when building a new conditional construct, we must determine how many paths are needed. In effect, this will be one more than the number of conditional constructs we’ll end up using in most cases.
Next, we can reorder the paths from most restrictive to least restrictive. The most restrictive path would be the one that is least likely to occur, while the least restrictive path is the one that will be taken most often. We’ll see how this works a bit more clearly in the example on the next page.
if Statement with Boolean ExpressionOnce we have all of our paths identified and ordered, we can start writing our if statements for each path. Each if statement will need a Boolean expression to help us determine which branch to follow. Generally, we’ll place the most restrictive paths inside of the less restrictive paths, but it all depends on the problem and what order makes the most sense.
true Branch CodeThen, for each conditional construct, we must fill in the code on the inside of the true branch. This could be a block of code, or even another conditional construct.
false Branch CodeSimilarly, we must fill in the code on the inside of the false branch, if needed. This could be a block of code, or even another conditional construct.
Finally, once we’ve created a conditional construct, we may have to repeat these steps again and again for each path that we identified in subgoal 1.
On the next page, we’ll see how we can apply these subgoals in a worked example.
We’ve covered quite a bit of new material so far in this chapter. Let’s work through a complete example from start to finish, just to see how we can put all of those pieces together to make a very powerful program.
First, let’s start with a problem statement. Here’s an interesting problem that we can try to solve:
Write a program that receives a positive integer as input from the user that represents a year, and prints whether that year is a leap year or not. If the year is a leap year, it should print output similar to
2000 is a Leap Year. If not, it should print output similar to2001 is not a Leap Year.
While this sounds like a simple problem, there are actually several rules we’ll have to handle. According to the United States Naval Observatory, the Gregorian calendar (the calendar in use throughout much of the world) calculates whether a year is a leap year based on the following rule:
Every year that is exactly divisible by four is a leap year, except for years that are exactly divisible by 100, but these centurial years are leap years if they are exactly divisible by 400. For example, the years 1700, 1800, and 1900 are not leap years, but the year 2000 is. - Source
So, we’ll be writing a program that can handle all of those rules to determine if a year is a leap year or not.
To begin building this program, we need to first build the basic skeleton of a program. For this example, store your code in a file called Example.java
If you are following along with this course in Codio, this example will be a graded exercise in that tutorial. So, you may wish to make sure Codio is open and follow along with this example from there.
First, we’ll need to include a class declaration and a main method declaration in the file. Our code should be similar to this:
public class Example{

  public static void main(String[] args){

  }

}Before we start writing more code, let’s break down the problem statement a bit and see how we can use it to help us identify parts of the program we need to write.
Here’s our problem statement again:
Write a program that accepts a positive integer from the command line, that represents a year as a command line argument, and prints whether that year is a leap year or not. If the year is a leap year, it should print output similar to
2000 is a Leap Year. If not, it should print output similar to2001 is not a Leap Year.
Looking at this problem statement, we see that we need at least one variable to store the year that is provided as input from the user. Similarly, we need at least one conditional construct, which will allow us to print whether the given year is a leap year or not. Here’s the problem statement again, with those parts highlighted:
Write a program that accepts a positive integer (variable) from the command line, that represents a year, and prints whether that year is a leap year or not (conditional construct). If the year is a leap year (true branch), it should print output similar to
2000 is a Leap Year. If not (false branch), it should print output similar to2001 is not a Leap Year.
Similarly, we can look at the second part of the problem statement and break it down as well:
Every year that is exactly divisible by four is a leap year, except for years that are exactly divisible by 100, but these centurial years are leap years if they are exactly divisible by 400. For example, the years 1700, 1800, and 1900 are not leap years, but the year 2000 is. - Source
Looking at this, we see that there are actually three conditional constructs we need to build. Let’s mark them in the statement:
Every year that is exactly divisible by four (conditional construct 1) is a leap year, except for years that are exactly divisible by 100 (conditional construct 2), but these centurial years are leap years if they are exactly divisible by 400 (conditional construct 3). For example, the years 1700, 1800, and 1900 are not leap years, but the year 2000 is. - Source
Of course, we’ll have to be careful to make sure that each branch of these three conditional statements produces the correct output. Below, we’ll see how we can construct code for this problem.
Generally, one of the first things our program should do is read and process the input. So, we’ll add the few lines we need to import the Scanner library, create a Scanner object, and read an input from the user:
import java.util.Scanner;

public class Example{

    public static void main(String[] args){
        Scanner scanner = new Scanner(System.in);
        int year = scanner.nextInt();

        // MORE CODE GOES HERE
    }
}
We’ve used code similar to this in several of our projects at this point, so it should be familiar to us, even if we haven’t written it before. We’ll explain more about the structure of this code later in this course. For now, we can simply copy and paste this example and build upon it.
Once we have that code in place, we are ready to begin working on the actual logic of our program. The code examples below will just include the logic portion of the program, which can be placed where the MORE CODE GOES HERE line is in the structure above.
Now that we’ve read the input, we can start writing the logic of our program. However, the problem statement has one very important part in it that we’ll need to handle as well:
Write a program that accepts a positive integer that represents a year…
So, we’ll need to make sure the user has input a positive integer into our program. We can do that using a simple if-else statement:
if(year <= 0){
    System.out.println("Error");
}else{

}
In this case, we might be tempted to use an if statement instead. However, we need to make sure our program only calculates a result if the input is positive. If it is negative, we should just print an error. Since that means our program needs two distinct branches, we should use an if-else statement here.
Once we’ve read our input, we need to calculate our output. Let’s handle the three rules one at a time.
For the first rule, we must check to see if the year is divisible by $ 4 $. We can use the modulo operator to do this. Remember that the modulo operator performs a division and returns the remainder. So, if the remainder is $ 0 $, then we know that the number is evenly divisible by the divisor.
In code, we could do the following:
if(year <= 0){
    System.out.println("Error");
}else{
    if(year % 4 == 0){
        //divisible by 4
    }else{
        //not divisible by 4
        System.out.println(year + " is not a Leap Year");
    }
}
In each of these if-else statements, let’s place a quick comment in the code to keep track of what we know within each branch.
Next, we need to handle the rule that any year divisible by $ 100 $ is not a leap year, even if it is divisible by $ 4 $. Of course, we can easily determine mathematically that all years divisible by $ 100 $ are also divisible by $ 4 $, so we don’t have to worry about the other case in this instance. So, we can add another if-else to our program:
if(year <= 0){
    System.out.println("Error");
}else{
    if(year % 4 == 0){
        //divisible by 4
        if(year % 100 == 0){
            //divisible by 4 and 100
            System.out.println(year + " is not a Leap Year");
        }else{
            //divisible by 4 but not 100
            System.out.println(year + " is a Leap Year");
        }
    }else{
        //not divisible by 4
        System.out.println(year + " is not a Leap Year");
    }
}
In this case, we chose to next our if-else statement inside of the previous statement. So, if the year is divisible by
$ 4 $ and also divisible by
$ 100 $, we print Not a Leap Year. If it is divisible by
$ 4 $ and not divisible by
$ 100 $, which is the false branch of the innermost if-else, we know that it must be a leap year, so we can print Leap Year.
There’s one more rule we must add, which is the rule that a year divisible by $ 400 $ must be a leap year, even though it is also divisible by $ 100 $. So, we must add one additional if-else statement. But where?
If we think back through the rules, we know that this rule is only in effect when the year is both divisible by
$ 4 $ and
$ 100 $. So, we’ll need to add one more statement in the true branch of the innermost if-else:
if(year <= 0){
    System.out.println("Error");
}else{
    if(year % 4 == 0){
        //divisible by 4
        if(year % 100 == 0){
            //divisible by 4 and 100
            if(year % 400 == 0){
                //divisible by 4 and 100 and 400
                System.out.println(year + " is a Leap Year");
            }else{
                //divisible by 4 and 100 but not 400
                System.out.println(year + " is not a Leap Year");
            }
        }else{
            //divisible by 4 but not 100
            System.out.println(year + " is a Leap Year");
        }
    }else{
        //not divisible by 4
        System.out.println(year + " is not a Leap Year");
    }
}
Now we’ve created a program that should be able to tell us if a year is a leap year or not.
Of course, there are many other ways this program could have been structured that would produce the same output. For example, instead of using nested if-else statements, we could rearrange them a bit to make them inline if-else if-else statements, as in this example below:
if(year <= 0){
    System.out.println("Error");
}else if(year % 400 == 0){
    //divisible by 400
    System.out.println(year + " is a Leap Year");
}else if(year % 100 == 0){
    //divisible by 100 but not 400
    System.out.println(year + " is not a Leap Year");
}else if(year % 4 == 0){
    //divisible by 4 but not 100
    System.out.println(year + " is a Leap Year");
}else{
    //not divisible by 4
    System.out.println(year + " is not a Leap Year");
}
In fact, with a bit of thinking, we could reduce most of this program to a single Boolean logic expression, as in this example
if(year <= 0){
    System.out.println("Error");
}else if(((year % 4 == 0) && (year % 100 != 0)) || (year % 400 == 0)){
    System.out.println(year + " is a Leap Year");
}else{
    System.out.println(year + " is not a Leap Year");
}
Any of these solutions is just as correct as the one we built above. It really only depends on which solution makes the most sense to us and is the easiest for us to write and debug.
With the introduction of conditional statements, our programs are starting to become more complex. Each time we run the program, it will produce different output based on the input, and some inputs may cause the program to execute different pieces of code entirely. So, we need to develop some more sophisticated testing strategies to help us debug our programs.
Every program should be thoroughly tested. By creating a large number of different test inputs, with each one testing a different part of the program, we can ensure that every line of code is executed at least once when all of our test inputs are used. This is referred to as test coverage.
Consider the following simple piece of code:
|
|
To test this program, we have to provide as single value as input. If the value 2 is entered as input on line 3, then the program will execute the true branch of the if statement on line 5, but it will not execute the false branch on line 7. So, that input only executes some of the lines in the program.
However, if we also test the program with the input 1, we’ll see that it now executes line 7 that was skipped in the previous test.
So, to fully test this program, we should use both 1 and 2 as inputs. This set of inputs will achieve complete coverage of the program.
However, achieving complete coverage by providing enough test inputs is not enough to say our program is correct. For that, we need to analyze the outputs that are provided by each test.
Let’s briefly trace through the program and see what output is produced when we provide the value 2 as input.
On line 4, we see an if statement that checks to see if the value of a % 2 is equal to 0. Since a is currently storing the value 2, we can calculate that 2 % 2 is indeed equal to 0, so we should go to the true branch and execute the code on line 5.
However, if we look at what this line of code does, it prints "2 is odd" as output. That is clearly incorrect! So, our program has a logic error in it somewhere.
As it turns out, we accidentally reversed the true and false branches of the if statement. So, to correct our program, let’s switch them:
|
|
Now when we provide the input 2 we should get the correct output. We can also do the same exercise for the input 1 to verify that it is also correct.
At this point we’ve achieved complete coverage and also proven that each of those inputs produces the correct output. However, there is still one more set of values we may want to consider
Unfortunately, just achieving complete code coverage is not enough to guarantee that we have tested all values that should be tested in our program.
In our code, we see that the if statement has the expression a % 2 == 0. This creates a boundary where some values will go into the true branch and other values will go into the false branch, and they all seem to revolve around the value 2 in the expression. So, we should choose our input values carefully to check the values on either side of the boundary value 2, just to be sure that it is correct.
So, we may want to add the value 3 to the set of values tested in our program, just to be sure that values greater than 2 also work correctly. If we look at our corrected code, we can see that it indeed will produce the correct output, since 3 % 2 is not equal to 0.
Sometimes it is infeasible to use all boundary values. Consider the expression a > b where a and b are integers. There are an infinite number of combinations of a and b to test, and testing all of these conditions is not realistic. So, instead we should make sure we test at least once where a < b is true and once where a > b is true, as well as a situation where a == b is true. These three tests are important in order to make sure that the boundary created by a > b is properly tested.
However, when one side of a comparison is a constant number, such as the 1 in a / b > 1, it is generally considered good practice to check the values at and near the boundary, such as 0, 1, and 2 in this example.
Except for the most trivial programs, it is impossible to exhaustively test a program for correctness. However, using boundary testing and coverage testing as a guide, we will be able to develop fairly robust test sets for programs in this course.
In practice, exhaustive comprehensive testing is not even attempted in most situations. There is a special type of programming, called high-assurance or safety-critical programming that makes use of specialized languages, structures and techniques to logically prove certain properties are always true. The symbolic math and logic background required for this types of programming lies beyond the scope of this course.
In this chapter, we learned all about conditional constructs and how we can use them in our programs. They allow us to build programs that execute different pieces of code depending on inputs provided by the user or the values of variables.
This is one of the first major steps toward building larger and more complex programs. In fact, once we learn how to write programs that can repeat steps, we’ll have covered all of the basic building blocks of programming!
It comes back around!
At this point, we should be able to write a computer program that can accomplish many simple tasks. We’ve seen programs that determine if a number is even or odd, who wins in a game of “Rock, Paper, Scissors,” and whether a given year should be a leap year or not.
However, there’s one simple task that all of our current programming skills cannot easily handle. Let’s take a look at a version of that task and see if we can figure out how to solve it:
Write a program that accepts a positive integer between 1 and 5 as input, and then prints all integers starting with 1 up to the given number.
On the surface, this seems to be a pretty easy problem. We can solve it using a few if statements, as shown in this diagram below:
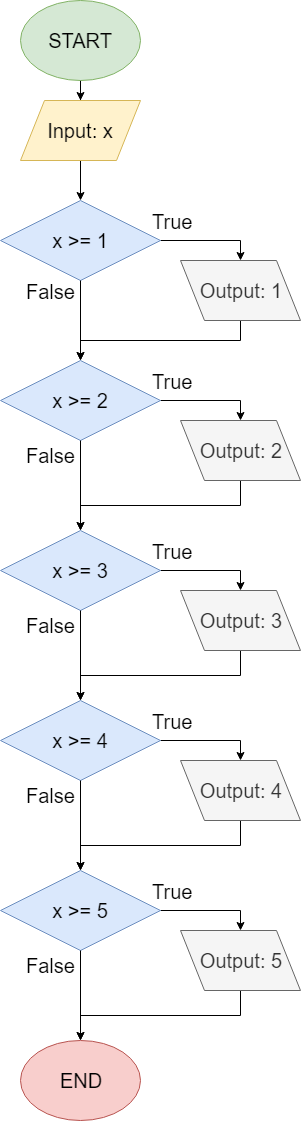
Following this flowchart, we can see if that if our input is 3, it would first print 1 since x >= 1 is true, then 2, then 3 in a similar way. After that, the next check is x >= 4, which is false, so the program would stop printing. So, this program meets our given specification.
Now, let’s see if we can generalize this program a bit:
Write a program that accepts any positive integer as input, and then prints all integers starting with 1 up to the given number.
Could we write this program using our current techniques? Unfortunately, we’d quickly find that it is impossible to handle. We’d need to create at least one if statement for each possible integer, which would make our code infinitely long.
So, is there a better way to approach this problem?
Thankfully, there is. In addition to conditional statements, programming languages include a second important control construct: looping constructs, which allow us to solve problems like this one. A looping construct is a programming construct that allows us to repeat a piece of code as many times as we’d like. In this way, we can perform repeated actions without making our source code infinitely long. Most programming languages refer to this process as looping, which makes sense once we see how it looks in a flowchart.
Let’s go back to that problem statement:
Write a program that accepts any positive integer as input, and then prints all integers starting with 1 up to the given number.
Using a looping construct, we can solve this problem using a program that may resemble this flowchart:
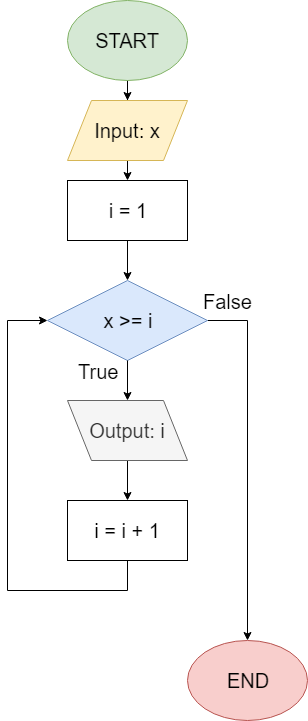
This flowchart includes a secondary variable i, sometimes referred to as a loop counter or an iterator variable, to help us keep track of which number we are on. Let’s walk through this program with an input of 6 to see how it works.
Initially, since our input is 6, we know that x = 6 and i = 1. Next, we reach the first Boolean expression, which will evaluate x >= i. Since 6 >= 1 is true, we follow the True branch. Notice in this diagram that the True branch points down, entering the loop-body. The False branch goes to the right, which is different from the conditional constructs we saw in the previous chapter.
Following the True branch, we see that our program will print the value in variable i, which is 1; then it will perform i = i + 1, making 2 the new value of i.
Finally, it loops back up to the Boolean expression x >= i again, but this time evaluates it with the current values for x and i, which would be 6 >= 2. Since this evaluates to true, we follow the True branch once again. It will print the current value of i, which is 2, then increment i to 3.
We loop again, and evaluate 6 >= 3, which is still true, so we repeat the process again.
After several loops, or iterations of the loop, we eventually reach the situation where i = 6. In this case, we’ll print the number 6, then increment i to 7. Now, when we evaluate the Boolean expression x >= i, we find 6 >= 7, which is false, so the program now follows the False branch and ends.
In total, it will have printed the value stored in i on each iteration, so it will print the numbers 1 through 6, which is exactly what the problem statement requires.
Pick a value for x, and see if you can follow each step in the flowchart to confirm that this program will print out all the numbers from 1 to the value you’ve chosen. It is very important to have a clear understanding of how this program functions before moving on in this chapter.
The ability of a computer program to loop, or repeat the loop body based on the loop condition, is a very powerful tool for any programmer. Loops allow us to build programs that can handle all kinds of inputs and still operate correctly. We can also handle situations where we may not know how many inputs we need, or how many steps we need to take, since we can tell our program to use a loop counter to determine how many steps we need to repeat.
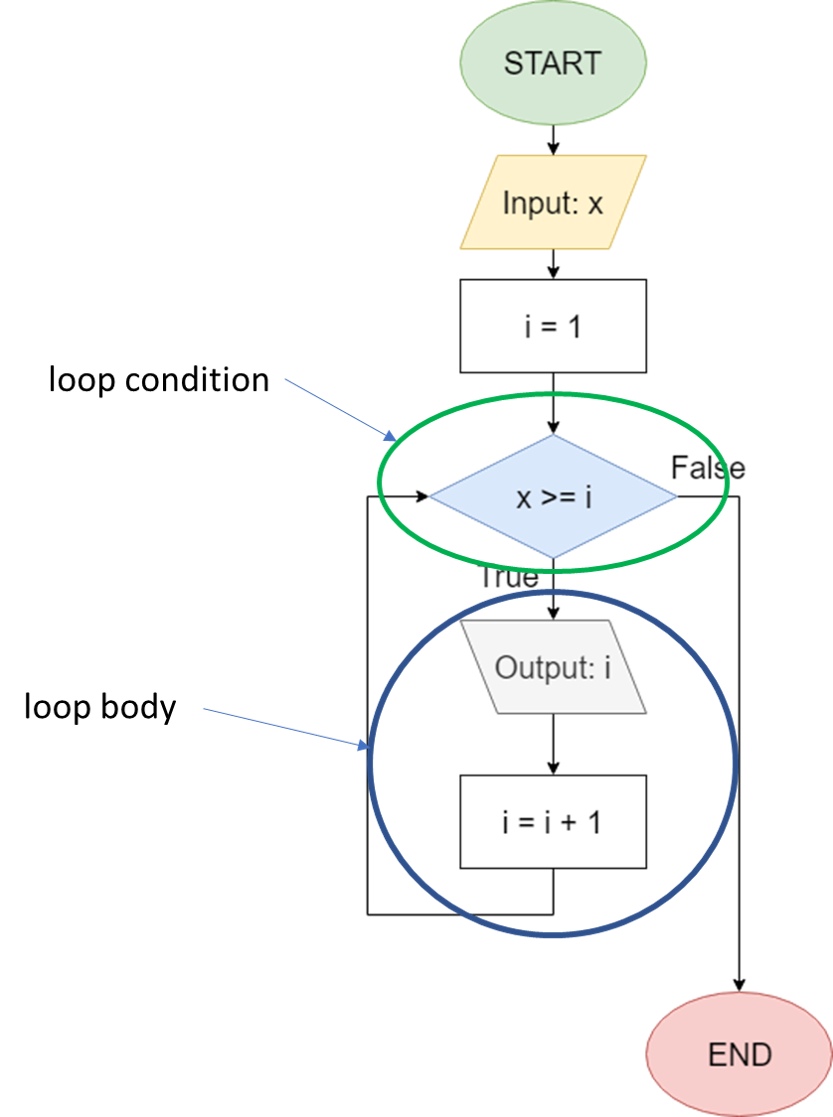
The simplest form of a loop in our computer programs is commonly known as a While loop. In essence, we continue to repeat the steps inside the loop while a particular Boolean expression evaluates to true. The program on the previous page is a great example of a While loop:
In this program, we repeat the steps inside the loop, which print the value of i and increment that value by 1, while the Boolean expression x >= i evaluates to true. Whenever we reach the Boolean expression and it evaluates to false, we exit the loop and continue with the program.
In code, most programming languages implement a While loop in a format similar to this:
<before code block>
while <loop condition>
    <loop code block>
<after code block>
This program begins by executing code in the <before code block>. Once it reaches the <loop condition>, a Boolean expression, it will evaluate that expression. If the expression evaluates to false, then it will completely skip over the <loop code block> and go directly to the <after code block>
However, if the <loop condition> evaluates to true initially, it will execute the code in the <loop code block>. Once it is done executing that code block, the program will loop back to the <loop condition> and evaluate it again. If it evaluates to true, it will perform the steps in the <loop code block> again. It will continue to do so while the <loop condition> evaluates to true.
However, if the <loop condition> ever evaluates to false, then the program will move on to the <after code block> and continue executing from there.
Also, it is important to remember that the <loop condition> is only evaluated once each time the program loops. So, even if the outcome of the expression may change while the code in the <loop code block> is executing, it only checks the value of the <loop condition> once it is completely done executing that block of code. However, as we’ll see a bit later in this chapter, there are ways to leave the <loop code block> at any time.
Some programming languages also implement another type of loop, known as a Do-While loop. Here’s a flowchart showing what a Do-While loop might look like:
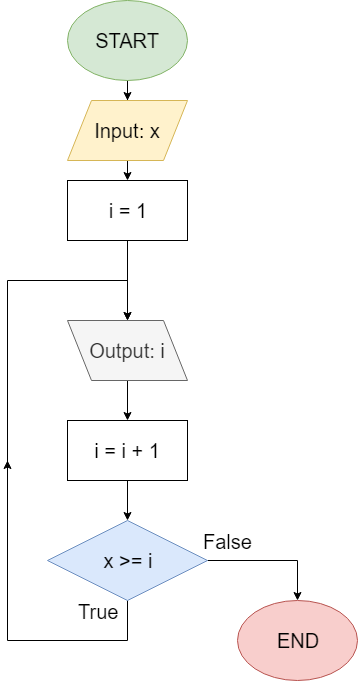
In code, a Do-While loop looks similar to this:
<before code block>
do
    <loop code block>
while <loop condition>
<after code block>
These loops are very similar to a While loop, but instead of checking the <loop condition> first, the code inside the <loop code block> is executed before any test is done. In this way, it guarantees that the code in the <loop code block> is executed at least once. Then, the <loop condition> is evaluated, and if it evaluates to true the code in the <loop code block> is executed again. If it evaluates to false, then the program moves on to the <after code block>
If we look at the flowchart for the Do-While loop above, can we determine if it matches the problem statement from earlier?
Write a program that accepts any positive integer as input, and then prints all integers starting with 1 up to the given number.
Let’s assume the user chose the number 3 as input. First, the program will set i = 1, then it will print 1 and set i = 2. Next, it will evaluate the Boolean expression x >= i, or 3 >= 2, which evaluates to true, so the loop repeats.
The program will then print 2 and set i = 3, and then it will evaluate 3 >= 3, which is also true. So, it will loop once again, printing 3 and setting i = 4. Finally, it will evaluate 3 >= 4, which is false, and the program will terminate. So, in this case, the program works as expected.
However, there are some cases where a While loop and a Do While loop may produce different output, even if the same code and Boolean expression are used. We’ll see an example of that later in this chapter.
Most programming languages also support another type of looping construct, known as a For loop. A For loop usually includes an explicitly defined loop counter , a loop condition and loop counter incrementor as part of the loop definition, and is usually used to make sure that a loop only runs a set number of times. This is especially handy for instances where we need to accept exactly $ 5 $ inputs, or if the program should perform a calculation exactly $ 10 $ times.
Many programming languages support a variety of different ways to define how the loop counter in a For loop functions. For these examples, we’ll use a simple definition for the loop counter where it is just an integer that begins at one value and increments by $ 1 $ (the loop counter incrementor) each time until it reaches a second value (the loop condition).
Here’s a flowchart showing what a For loop may look like:
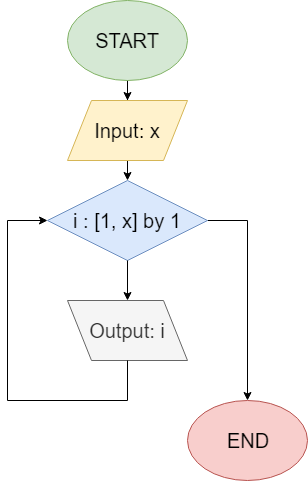
In this flowchart, we use the shorthand i : [1, x] by 1 to show that the loop counter i starts at the value
$ 1 $, and then each loop it is incremented by
$ 1 $ until it is larger than x. So, if x = 6, the loop counter i will have the values 1, 2, 3, 4, 5, and 6, and the loop will run exactly
$ 6 $ times.
When reading this aloud, we might say i : [1, x] by 1 as “For values of i from
$ 1 $ through x incrementing by
$ 1 $”. So, we could say this whole loop is “For values of i from
$ 1 $ through x incrementing by
$ 1 $, print i.” That should exactly match the original problem statement given earlier:
Write a program that accepts any positive integer as input, and then prints all integers starting with 1 up to the given number.
In code, there are many different ways that For loops are usually defined. We’ll learn how our programming language implements these loops later in this chapter.
Once our code is inside of a loop, sometimes we might find situations where we need to either stop looping immediately, or perhaps start the loop over again. Thankfully, most programming languages include two special keywords that can be used in those situations.
The first of these keywords, break, is used to immediately exit a loop from within. The program will immediately jump to the first line of code below the loop and continue executing from there. This flowchart gives a good example of what this might look like:
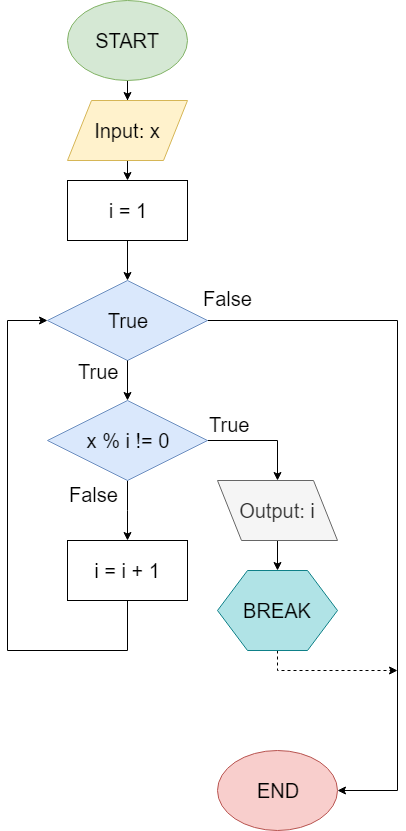
This program will accept an integer as input, and then print the smallest positive integer that is not a factor of the given input. Let’s walk through this program and see if we can figure out how it works.
For this example, let’s say the user has chosen 30 as the input. At the beginning, the program will set i = 1. Then, it will evaluate the Boolean expression true to determine if it should enter the While loop. Since this expression is always true, the loop will be repeated continuously, unless we use the break keyword to exit the loop. These loops are sometimes referred to as infinite loops, and can be very dangerous to use unless we are very careful.
Inside the loop, it will evaluate x % i != 0 as part of an If statement. In this case, 30 % 1 != 0 is false, so the loop will continue on the False branch of the statement and increment i.
Then, it will loop around again and go right back to the If statement, which will evaluate 30 % 2 != 0 to false as well, so it will once again increment i.
This process will continue until i = 4, at which point 30 % 4 != 0 is true. In that case, it will follow the True branch of the If statement, which will print 4 as output. Then, the next statement is a break keyword. As soon as the code reaches that statement, it will break out of the loop and continue to the next line of code below the loop. In this case, there is no more code, so the program will just terminate.
The break keyword is very important when working with loops, as it allows us to perform additional checks inside of the loop using If statements to determine if the loop should stop at any point.
The other of these keywords, continue, is used to stop executing the current iteration of the loop, but instead will return to the beginning of the loop and start the process over again with the current variables. Here’s a flowchart for a program that uses the continue keyword:
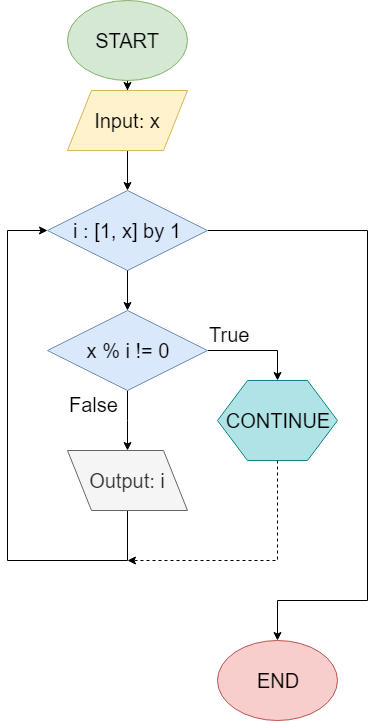
This program is the inverse of the previous program. It will print all positive numbers that are factors of the given input. In this case, it was built using a For loop instead of a While loop. Let’s walk through this program and see how it works.
In this example, we’ll assume the user has chosen 8 as the input. So, the program will start with i = 1 and evaluate the Boolean expression x % i != 0. In this case, that expression is 8 % 1 != 0, which is false. So, the program will output 1 and loop back to the beginning.
The same process applies for the second iteration, where i = 2. Since 8 % 2 != 0 is false, the program will also output 2 and loop.
However, when i = 3, something different happens. In this case, 8 % 3 != 0 evaluates to true, since
$ 8 $ is not equally divisible by
$ 3 $. Inside of the If-Then statement is the keyword continue, which just tells the loop to stop executing the current iteration and go back to the beginning of the loop. Since this loop is a For loop, the value of i will be updated to 4, and the loop will begin again.
Continuing through the entire program, we’ll see that it outputs 1, 2, 4, and 8, while the other numbers are skipped. This is exactly the expected output.
In many cases, the continue keyword is used along with an If statement to show which iterations or variable values should be ignored or skipped in a loop.
There are some areas of programming, such as video games that use a “game loop”, as well as a few programming languages, where break and continue are commonly used. However, as a general rule, it is not recommended to use break or continue very often in your code, since it can make understanding and following the code much more complex. Instead, try to use the loop conditions to determine when a loop should terminate, and rewrite your code if needed.
Reading input from either the keyboard or a file are handled as streams. A stream is an abstract concept in computer science for data that is organized as a queue, where items that are added to the stream first are also the items that are read first. Put another way, when reading input from the keyboard, the program reads the keys in the order they are pressed. This is similar to a conveyor belt.
Some streams, like the keyboard, are “infinite” and have no defined end. When we type the characters dog followed by the ENTER key on the keyboard, the bytes [x64, x6F, x67, x0B] representing the ASCII characters dog\n are placed in the keyboard’s input stream. Those bytes can then be read out of the stream by a program when it wants to receive keyboard input from the user. However, once those bytes are read, the stream does not close or end. Instead, it waits for new keyboard input to arrive from the user.
The process for reading files is similar. When the program opens a file, it can then read the bytes stored in the file from first to last until it reaches the end. Files, however, are “finite” meaning that they have a defined end. This is represented by a special ASCII character called the EOF or “End of File” character, represented by the byte x05 in the stream.
Programming languages such as Java and Python have many libraries and classes for working with streams. These classes are used to create stream objects that can read values from the stream using various methods. In this class, we’ve already seen this through the Scanner class in Java or the input() method in Python, which allow us to read input from the keyboard.
We can also read from files using many of the same methods. This is the power of abstraction in computer programming - if we can represent multiple items in a similar way, then we can write code that allows us to interact with either type of object.
Finally, the process of writing output to a file or to the terminal is also handled through streams. This allows us to both read and write from the same file or the terminal - we just use a stream to accomplish that!
Most operating systems make the following streams automatically available to any running program:
stdin - this is the standard input stream that is used to receive input from the keyboard.stdout - this is the standard output stream that displays program output on the terminal to the user.stderr - this is the standard error stream that is used to present errors from the program.In Java, these are available under the System class as System.in, System.out and System.err, respectively. We’ve already used the System.out.println() method many times to print output to the terminal, and we typically create a Scanner object that uses System.in to read input from the user. So, we’ve already used these streams many times in our programs!
Loops in Java
Now that we’ve added terminal entry to our tool set, let’s look at how we can use each of these looping constructs in Java. First, here is the general syntax for a While loop in Java:
while(<Loop Condition>){
  <loop code block>
}
As expected, Java will first evaluate the <Loop Condition> to a single Boolean value. If that value is true, it will execute the instructions in the <loop code block>, which can be one or more lines of code, or even additional constructs. Once the <loop code block> execution is complete, the program will return to the top of the loop and evaluate the <Loop Condition> again. It will repeat this process until the expression evaluates to false. Of course, if the expression is false initially, the code in the <loop code block> will not be executed at all.
It is very important to remember that the Loop Condition is enclosed by parentheses ( ), while the block of code that should be executed if that expression is true is enclosed by curly braces { }, just like in an If statement, class body or method body
Let’s take a look at a quick example, just to see how this construct works in practice. First, let’s consider the program represented by this flowchart from earlier in the chapter:
This flowchart corresponds to the following code in Java. In this case, we’ll assume x is hard-coded for now:
int x = 8;
int i = 1;
while(x >= i){
  System.out.println(i);
  i = i + 1;
}
By walking through the execution of this program, we see that it will output all integers from $ 1 $ through $ 8 $. If the user inputs a number less than $ 1 $, the program will not produce any output at all.
Java also includes another form of a While loop, known as a Do-While loop . Here is the general syntax for a Do-While loop in Java:
do{
  <loop code block>
}while(<Loop Condition>);
In this code, Java will first execute all of the code in the <loop code block> without evaluating any Boolean expressions. The main use of a Do-While loop is to guarantee that the code inside the loop is executed at least once. Then, it will evaluate the <Loop Condition> to a Boolean value. If that value is true, then the program will repeat the code in the <loop code block> once again. If it is false at any time it is evaluated, then the program will continue running the code directly below the Do-While loop.
It is very important to remember that the Loop Condition is enclosed by parentheses ( ), while the block of code that should be executed if that expression is true is enclosed by curly braces { }, just like in an If statement, class body or method body. In addition, notice that Java also requires a semicolon ; after the Boolean expression.
Let’s take a look at a quick example, just to see how this construct works in practice. First, let’s consider the program represented by this flowchart from earlier in the chapter:
This flowchart corresponds to the following code in Java. In this case, we’ll assume x is hard-coded for now:
int x = 8;
int i = 1;
do{
  System.out.println(i);
  i = i + 1;
}while(x >= i);
By walking through the execution of this program, we see that it will output all integers from 1 through 8.
However, this program will perform differently than a While loop if the user inputs a number less than 1. Since this program is built using a Do-While loop, it will always execute the code inside the loop first, so the program will always print at least 1 to the terminal. After that, the program will evaluate x >= i, which will be false if x is less than 1, so it will terminate. Notice that this is different than the While loop on the previous page, which will not produce any output at all in this instance.
Therefore, it is very important to understand how each loop functions and choose the appropriate loop for each task. In practice, Do-While loops are used very rarely, but they can be useful in some instances.
In practice, Do-While loops are not commonly used in Java. We’re including them here just in case you see them in other code you find, but we generally don’t recommend using them in your own code unless the situation calls for this loop structure.
The syntax for a For loop in Java is a bit complex, and has many different parts. Here’s the general format:
for(<initializers>; <loop condition>; <updaters>){
  <loop code block>
}
Let’s break this syntax down into each individual part to understand how it works.
First, the <initializers> section is used to create and initialize any variables that we’d like to use as loop counters inside of the loop. For example, we could use int i = 0 in that section to create a single integer variable i and set its initial value to 0. We may also declare multiple variables of the same type, separating each with a comma or ,. In that instance, we could say int i = 0, j = 1, which would declare two new integer variables, i and j, and set their values to 0 and 1, respectively. Finally, we can choose to leave that section blank, as it is not required at all. In either case, we must end that section with a semicolon ; before moving on to the next section. This section is executed just once, before the first iteration of the loop itself. We’ll explore a full example below.
The <loop condition> section is the same as in a While loop. It must evaluate to a single Boolean value, either true or false, which is used to determine if the loop continues executing or not. This section must also end with a semicolon ;, and is generally required in a For loop.
Finally, the <updaters> section can include one or more statements used to increment (update) the values of the loop counter variables. This section is executed at the end of each iteration of the loop, before the Boolean expression is evaluated again. Generally, we would include code such as i++ or i = i + 2 in this section. Similar to the <initializers> section, multiple update statements can be included in this section, separated by a comma ,. So, we could use i++, j++ to increment the values of both i and j in the same loop.
Let’s look at an example. Here’s a flowchart from earlier in this chapter containing a For loop:
This flowchart corresponds to the following code in Java. Once again, we’ll assume x is hard-coded for now:
int x = 8;
for(int i = 1; i <= x; i++){
  System.out.println(i);
}
In this For loop, we can clearly see the three parts. First, we have int i = 1 as the initializer. It creates a new variable and gives it an initial value. Then, we see i <= 8 is our loop’s Boolean condition. Finally, we have i++ as the lone updater, since it updates the value of the loop counter i by incrementing it by
$ 1 $.
To understand how this For loop functions in practice, let’s look at an equivalent While loop:
int x = 8;

//initializers
int i = 1;

while(i <= x){
  System.out.println(i);

  //updaters
  i++;
}
These loops are exactly identical in terms of how the code is executed. In a For loop, the initializers are performed once at the beginning, before the loop really starts. Then, we evaluate the Boolean expression and determine if we should enter the loop and perform those operations. At the end of each loop iteration, the updaters are executed to update the values of any loop counters, before the loop repeats back to the Boolean expression.
For loops in Java have one important caveat when it comes to variable scope. As expected, any variables declared in the initializers section of a For loop may be accessed from within the For loop itself, but they may also be accessed in the Boolean expression or the updaters section as well. They cannot, however, be accessed outside of the For loop.
However, any variables declared inside the For loop cannot be accessed in either the Boolean expression or the updaters. In effect, a For loop in Java has two levels of scope, one containing the variables declared in the initializers, and another for just the code inside the loop. Generally this doesn’t pose a problem, but it is an important distinction to be aware of.
Here’s one more example of a For loop in Java, using three loop counters instead of just one:
int sum = 0;
for(int i = 0, j = 1, k = 20; i + j < k; i++, j++, k--){
  sum += i + j + k;
}
Notice that there are three variables initialized in the initializer, which is int i = 0, j = 1, k = 20. In addition, there are three variables updated in the updater, which is i++, j++, k--. While it is uncommon for most programmers to use multiple loop counters in a single For loop, it is important to understand how it can be done.
In Java, it is possible to have loop constructs without curly braces, just like we saw for conditional constructs in an earlier. In that case, the next line of code immediately following the while or for will be the only line repeated inside of the loop.
Consider this code for example:
int x = 0;
while(x < 5)
  x++;
This code is valid, and will compile and run properly. However, just like with conditional constructs, if we want to add a second line to the inside of the loop, we’ll need to remember to add curly braces for our code to work properly.
In addition, we can omit parts of a For loop, as in this example:
int x = 0;
for( ; x < 5 ; )
  x++;
Here, we’ve omitted both the initializers and updaters of the For loop. Those parts are considered optional, and either one can be left out. However, in this case, it may make more sense to convert this to a While loop instead.
Java also includes both the break and continue keywords. They are pretty straightforward and easy to follow.
Here’s the flowchart showing a program with a break statement from earlier in this chapter:
This flowchart corresponds to the following code in Java. Once again, we’ll assume x is hard-coded for now:
int x = 8;
int i = 1;
while(true){
  if(x % i != 0){
    System.out.println(i);
    break;
  }
  i = i + 1;
}
This code shows us an example of an infinite While loop, sometimes referred to as a While-True loop. In this case, we are simply using the keyword true as our Boolean expression, so the loop will always continue to run unless we use the break keyword to leave it. So, in this code, once x % i != 0 evaluates to true, we reach the break keyword and then exit the loop.
Here’s the flowchart showing a program with a continue statement from earlier in this chapter:
This flowchart corresponds to the following code in Java. Once again, we’ll assume x is hard-coded for now:
int x = 8;
for(int i = 1, i <= x; i++){
  if(x % i != 0){
    continue;
  }
  System.out.println(i);
}
In this example, we see a For loop that contains a continue statement inside of it. Here, it is important to remember that, even though the continue statement tells the program to go back to the beginning of the loop, the updater i++ will still be executed before evaluating the Boolean expression i <= x. This is one of the unique features of a For loop compared to a similar While loop. If we rewrote this program using a While loop, we’d have to remember to update the value of i manually before the continue keyword, as in this example:
int x = 8;
int i = 1;
while(i <= x){
  if(x % i != 0){
    i++;
    continue;
  }
  System.out.println(i);
  i++;
}
Notice that we had to include an extra i++ before the continue keyword. Otherwise, the loop would repeat without updating the value of i, causing it to become infinitely stuck.
Try the preceding code and see what happens when you remove the i++ statement directly above the continue keyword. Does it cause any problems?
Hint: When using a program via the terminal, you can press CTRL + C to stop a running program if it locks up or starts infinitely looping.
Of course, we can identify some subgoals for working with loops in Java as well. Let’s take a look at them and see how we can use them to help understand loops a little bit better.
Here are the subgoals for evaluating a loop in Java:
The first and most important part of evaluating a loop is to identify each part of the loop structure. Here is a list of things to look for:
falseDepending on which type of loop we are looking at, we may not find all of the parts listed above.
Once we’ve identified all of the parts of the loop, we can then trace the loop to see how it updates values on each iteration. The easiest way to do this is to write down the values of each variable before the loop starts, and then update those values as the loop iterates. We’ve already seen a few examples for how to trace a loop in this chapter, and we’ll do one more on the next page.
We can also use subgoals to help write loops. Here are the subgoals we’ll use:
Before writing a loop, we must decide what we’re using it for. Once we know that, then we can determine which type of loop would be best. For example, if we are using the loop to repeat steps until a particular Boolean condition is false, we’ll probably want to use a While loop. If we want to make sure the loop executes at least once, we may want to use a Do-While loop instead. Finally, if we are iterating a specific number of times, or across a particular data structure (as we’ll see in a later chapter), we should probably use a For loop.
Once we’ve determined which loop structure we’re going to use, we’ll need to define and initialize any variables needed by the loop. Specifically, we may want to define the initial value of our iterator variable to some value if we are using one.
Next, we’ll need to determine the Boolean condition that should cause the loop to terminate. For example, we may want the loop to repeat until our iterator variable i becomes 5. So, we’ll want to invert that Boolean statement to find the statement that can be used inside the loop to determine whether it should continue.
Therefore, the termination condition i == 5 should become the continuation condition i < 5. We could also use i != 5, however we could run into an issue where the value of i skips over 5 for some reason in our code, creating an infinite loop. By using i < 5 instead, the loop will terminate as soon as i becomes 5 or greater, which is safer overall.
Once we’ve set up the loop itself, we can write the code we’d like repeated inside of the loop body. One thing we must be very careful about is making sure we are properly updating our loop’s iteration variable toward the termination condition. If we forget to do that, we may run into a condition where the loop will not terminate at all, causing our programs to lock up. In a later chapter, we’ll discuss concepts such as loop invariants that will help us with this step.
Now that we know how to use loops, let’s discuss a common structure for reading and parsing user input from the terminal using a loop.
In many of our prior projects, we’ve seen the Scanner class used to read input from the keyboard’s input stream, which is System.in in Java. Typically we use code similar to this:
import java.util.Scanner;

public class ReadInput {

    public static void main(String[] args){
        // Create the Scanner object to read from the terminal
        Scanner scanner = new Scanner(System.in);

        int x = scanner.nextInt();
        double d = scanner.nextDouble();

        System.out.println(x + " + " + d + " = " + (x + d));
    }
}
Let’s look at some of the important lines of code in this short example:
import java.util.Scanner; - this line at the very top of our program is an import statement. It tells Java that we’d like to import, or use, the Scanner class from the java.util library, which is part of the standard Java Development Kit (JDK). These lines must be at the top of our file, before any class declarations. We’ll learn more about importing and using library classes a bit later in this course.Scanner scanner = new Scanner(System.in) - this line serves two purposes. First, it creates a new instance of a Scanner object, which is stored in the variable scanner. Notice that these names are case-sensitive! The capitalized Scanner is the name of the class, which in this case is used like a data type similar to int or double. The lowercase scanner is the variable name where the object created from that class is stored. We’ll learn about objects and classes a bit later in this course. The last part new Scanner(System.in) creates a new Scanner object and tells it to read input from the System.in stream, which is the connected to the keyboard in the terminal.scanner.nextInt() - this method will read the next piece of input from the keyboard and try to convert it to an integer. If it can, it will store it in the variable x. However, if the next piece of input is not an integer, this will cause an error and crash the program. We’ll learn how to catch and handle these errors a bit later in this course, but for now we’ll have to assume that our users are providing input that matches the expected structure.scanner.nextDouble() - similar to the previous line, this will read the next piece of input and try to convert it to a floating-point value. If it can, it will store it in the variable d.Of course, there are much more advanced ways to use a Scanner in Java. We’ll learn more in a later chapter, or we can always refer to the Java Documentation for the Scanner class.
Many times, we want our programs to be able to read multiple lines of input, and to continue to read input until the end of the stream is reached. In that case, we can use a While loop and a few different methods in the Scanner class to accomplish this.
Consider this code example:
import java.util.Scanner;

public class ReadManyLines {

    public static void main(String[] args){
        // Create the Scanner object to read from the terminal
        Scanner scanner = new Scanner(System.in);

        int countLetters = 0;
        int countLines = 0;

        // Repeat while the Scanner thinks there is another line to be read
        while(scanner.hasNextLine()){
            // Read the next line of input
            String input = scanner.nextLine();

            // Check to see if the line is empty after removing all leading and trailing whitespace
            if (input.trim().length() == 0){

                // If the line is empty, break out of the while loop
                break;
            }

            // parse the line of input and perform the calculations needed
            countLetters += input.length();
            countLines++;
        }

        // all input has been read at this point
        System.out.println("I read " + countLetters + " characters of input across " + countLines + " lines");
    }
}
This program will read input from the terminal until no more input is provided, and it will count the total number of lines and characters read from the terminal’s input stream. To do this, it uses a few new methods of the Scanner class:
scanner.hasNextLine() - this method will return true if there is more input to be read from the input stream. So, we use this in the While loop to repeat until there is no more input to be read.scanner.nextLine() - this method reads an entire line of input from the input stream. It will keep reading characters until it reaches a newline character \n. Remember that when the user presses the ENTER key on a keyboard, that will add a newline character \n to the keyboard’s input stream, signalling the end of a line of input.This works well in many situations, but there is one important thing we must remember - the keyboard input stream System.in is an infinite stream! This means that is never ends, and the scanner.hasNextLine() method will always return true when reading input from the terminal.
So, how do we get our program to end? In most cases, we will simply add an If statement inside of the loop to check and see if the line of input is empty, and then break out of the loop if it is. In this code, we use the Boolean expression input.trim().length() == 0 to check and see if the String input is empty. We’ll learn more about these string methods in a later part of this course.
This new method of reading input, which uses scanner.nextLine() to read an entire line of input instead of scanner.nextInt() or scanner.nextDouble() to just read a single element from the input, comes with one major caveat that developers must be aware of - the dangling newline.
Consider this code:
import java.util.Scanner;

public class DanglingNewline {

    public static void main(String[] args){
        // Create the Scanner object to read from the terminal
        Scanner scanner = new Scanner(System.in);

        // Repeat while the Scanner thinks there is another line to be read
        while(scanner.hasNextLine()){
            // Read the next line of input
            String name = scanner.nextLine();

            // Check to see if the line is empty after removing all leading and trailing whitespace
            if (name.trim().length() == 0){

                // If the line is empty, break out of the while loop
                break;
            }

            // Read an integer from input
            int age = scanner.nextInt();
            System.out.println("Greetings " + name + "! Your age is " + age);
        }
    }
}
This program will read the name and age of a user from input, one per line. So, let’s assume that we are providing the following input:
Willie
42
Wildcat
37
When we run this program, however, we see that an error occurs:
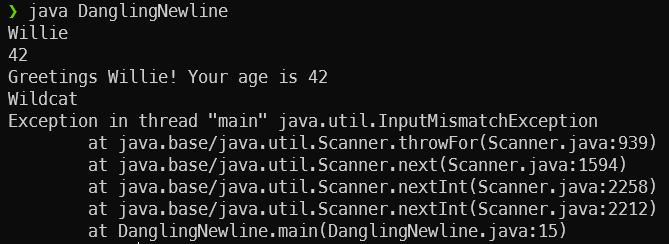
Why did this happen? Let’s look at the stream that would be read by the program, complete with the newline characters:
Willie\n42\nWildcat\n37\nNow, let’s step through the program and check all the Scanner methods that read the input to see where the error occurs! First, the scanner.hasNextLine() method will return true since the stream still has input to be read. Next, the scanner.nextLine() method will read the next line of input, up to and including the newline \n characater. So, it will read "Willie" from the stream and store it in name, and then remove it and the following newline. Now we have this in the stream:
42\nWildcat\n37\nGood so far! After that, the scanner.nextInt() method will try to read the next item in the stream and convert it to an integer. It sees the characters "42" followed by a newline, and it knows that it can convert "42" to an integer, so it will read those characters and store the value 42 in the age variable. However, the nextInt() method does not remove the newline character from the stream. So, we’ll be left with this content in the stream:
\nWildcat\n37\nHere’s where things go wrong. The scanner.hasNextLine() method will still return true since there is input to be read. So, the scanner.nextLine() method will read input until it reaches a newline character \n. In this case, it sees that immediately, so it will store the empty string "" in the name variable and then remove the newline from the stream. So, we are left with this content in the stream.
Wildcat\n37\nThis means that, when the scanner.nextInt() method is called, the first thing it reads is not a number, so it throws an InputMismatchException and crashes the program!
This happens because had a dangling newline that was left in the input stream. To fix this, the easiest way is to always read an entire line of input, and then use other methods to parse and convert that line as needed. In general, we want to avoid mixing the Scanner methods that read entire lines and the methods that just read individual elements of input. In most cases, we should use one or the other.
In this case, we can change the scanner.nextInt() to Integer.parseInt(scanner.nextLine()) to read the entire next line of input and then convert it to an integer:
import java.util.Scanner;

public class DanglingNewline {

    public static void main(String[] args){
        // Create the Scanner object to read from the terminal
        Scanner scanner = new Scanner(System.in);

        // Repeat while the Scanner thinks there is another line to be read
        while(scanner.hasNextLine()){
            // Read the next line of input
            String name = scanner.nextLine();

            // Check to see if the line is empty after removing all leading and trailing whitespace
            if (name.trim().length() == 0){

                // If the line is empty, break out of the while loop
                break;
            }

            // Read an integer from input
            int age = Integer.parseInt(scanner.nextLine());
            System.out.println("Greetings " + name + "! Your age is " + age);
        }
    }
}
With that change in place, the program will run correctly!
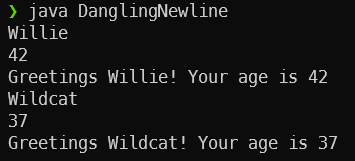
Lastly, it is usually considered good practice to include prompts that tell the user what kind of input is expected. For example, we can update the previous code to include some prompts, using the System.out.print() method:
import java.util.Scanner;

public class DanglingNewline {

    public static void main(String[] args){
        // Create the Scanner object to read from the terminal
        Scanner scanner = new Scanner(System.in);

        System.out.print("Enter a name: ");

        // Repeat while the Scanner thinks there is another line to be read
        while(scanner.hasNextLine()){

            // Read the next line of input
            String name = scanner.nextLine();

            // Check to see if the line is empty after removing all leading and trailing whitespace
            if (name.trim().length() == 0){

                // If the line is empty, break out of the while loop
                break;
            }

            System.out.print("Enter an age as an integer: ");
            // Read an integer from input
            int age = Integer.parseInt(scanner.nextLine());
            System.out.println("Greetings " + name + "! Your age is " + age);

            System.out.print("Enter a name: ");
        }
    }
}
Notice that the first prompt has to be printed before the while loop - this is because the scanner.hasNextLine() method will wait until a line of input has been provided before it allows the program to continue, even if we haven’t actually read that line of input yet. So, we have to print our prompt before checking for a line of input to be read from the terminal.
While this is considered best practice in the real world, we typically will not include these prompts for input in our programs in this course. The major reason for removing the input prompts is to ensure that the automated grader is just reading the output produced by your program and not the prompts for input.
Without this change, we’d have to be very careful to make sure that our input prompts also perfectly matched what the automated grader was expecting. Since we really want the focus to be on the output produced and not the input prompts, we’ve made the decision to simply not include input prompts in our programs in this course.
There are some instances where it may look like your program has stopped working, especially when dealing with loops and user input. If that happens, try these steps:
One common use for loops is the accumulator pattern. An accumulator simply computes some values based on a large amount of data, such as the sum, maximum, minimum, average, or count. In programming, a pattern is simply a common structure that is used to solve a recurring problem in code. Since many programs end up needing a loop that acts an accumulator, we’ve developed a common pattern that can be used in our code to solve this problem.
The simplest example of the accumulator pattern is a program that will sum up a set of values. Consider this code:
import java.util.Scanner;

public class Accumulator {

    public static void main(String[] args){
        Scanner scanner = new Scanner(System.in);

        // Initialize accumulator variables
        int sum = 0;

        // Read and parse input
        while(scanner.hasNextLine()){
            String input = scanner.nextLine();
            if (input.trim().length() == 0){
                break;
            }
            int x = Integer.parseInt(input);

            // Update accumulator variables
            sum += x;
        }

        // Display results
        System.out.println("The sum of these values is " + sum);
    }
}
In this example, we see the general structure for the accumulator pattern:
true. For example, we could easily modify this program to only sum up the even values using a conditional statement.We’ll see this pattern appear many times in our programs from this point onward, so it is helpful to make note of it and observe when it is used in practice.
The code in this example video contains a slightly older version of the input code that also includes the ability to read from a file, which can be ignored. We recommend using the code shown below instead. The rest of the video is still applicable to this example.
Now that we’ve learned some of the different looping constructs in Java, let’s work through a completed example to see how we can use loops to build more advanced programs.
For this example, we’d like to build a program that matches the following problem statement:
Write a program that will accept a series of integers from the keyboard, one per line. It will continue to accept integers from the user until the user inputs 0. If the user inputs a negative number, the program should print
"Error! Positive Integers Only"and continue to receive input. Once the user inputs 0, the program should print the sum and average of the positive integers input by the user.
Before we start coding, let’s try to draw a flowchart for this program, just to make sure we understand the control flow it will use. We know that we need to get keyboard input, convert it to an integer then take some actions based on its value.
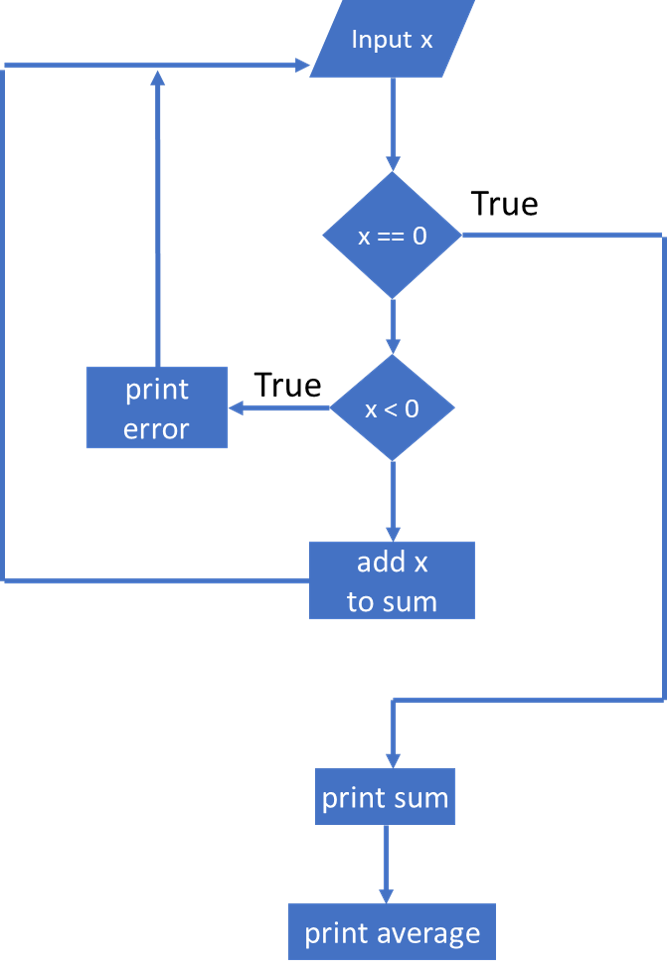
We also know we will have to repeat this an indeterminate number of times, and a While loop is the preferred construct to use for this. So lets add a While loop. While we are at it, make sure that if 0 is input for x, we do nothing and let the program flow back to the start of the while loop. So, our final flowchart may look like this.
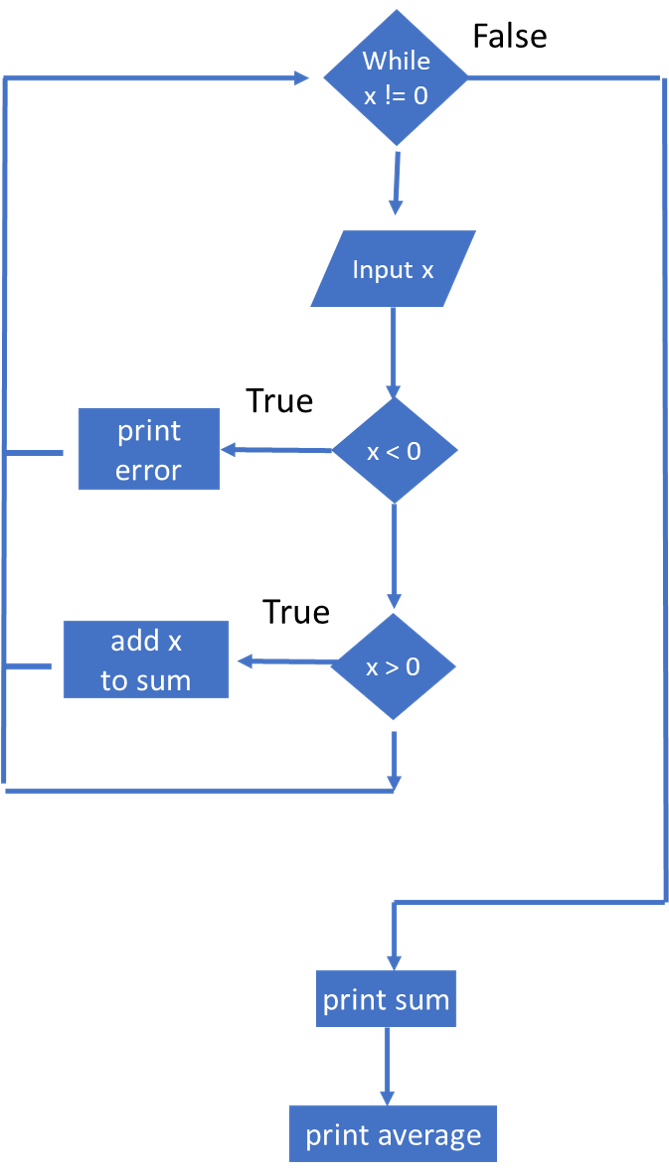
There are a few important items to note in this flowchart:
x < 0. If this is false, we’ll print the error and loop back to the top. This is keeps us from adding 0 or values less than 0 to our sum.x < 0 and x > 0 paths are mutually exclusive. We should probably consider using If-Else If-Else statements to communicate this intentional exclusivity when we write our code.x != 0 that first time if we don’t get a value for x until we are in the loop?Scanner code to handle input go?Keep in mind that a flowchart is an abstraction of the code we need to write; it is just a model containing some important subset of the details. This one is sufficient to ensure we use the right loop and if statements.
Lets start by adding the boiler plate code for setting up the class, the main() method and input. Let’s store this program in Example.java
import java.util.Scanner;

public class Example{

    public static void main(String[] args){
        // Create the Scanner object to read from the terminal
        Scanner scanner = new Scanner(System.in);

        /* -=-=-=-=- MORE CODE GOES HERE -=-=-=-=- */

    }

}
For the rest of this example, we’ll look at a smaller portion of the code. That code can be placed where the MORE CODE GOES HERE comment is in the working copy above.
Next, we want to build a program that can accept a series of integers from the user. Since we don’t know how many we’ll get, we’ll probably want to use some sort of a While loop. So, let’s add in a While loop and start building from there:
while(){

}
Inside of that loop, we know we need to read an integer from the user, so we can add the code for that as well:
while(){
  int x = Integer.parseInt(scanner.nextLine());
}
Next, we need to determine when the loop should terminate. In this case, we can go back to the problem statement above, where we see the line:
It will continue to accept integers from the user until the user inputs 0.
So, we might be tempted to do something like this:
while(x != 0){
  int x = Integer.parseInt(scanner.nextLine());
}
However, that code has a very important error in it. We haven’t declared x outside of the While loop, so when we try to compile this code we’ll get a compiler error. So, let’s resolve that error:
int x = 0;
while(x != 0){
  x = Integer.parseInt(scanner.nextLine());
}
When we compile and run this fragment, we should see that it never prompts for input. We need to initialize x to some value, so we quickly chose to initialize it to
$ 0 $. However, by doing so, we should hopefully see that it will never enter the loop, since x != 0 will immediately be false. So, let’s set x = 1 instead for now:
In the above loop, “zero” may be referred to as a sentinel value, which is a value to watch for and alter the program’s behavior when it occurs. It is important to ensure we don’t inadvertently initialize our variable to a sentinel value.
int x = 1;
while(x != 0){
   x = Integer.parseInt(scanner.nextLine());
}
That’s a good start! As we continue to work on this program, we’ll revisit the structure of this code and see that there might be a better way to do it. For now, let’s press on ahead.
Next, we can handle the error messages for any invalid inputs. From the problem statement:
If the user inputs a negative number, the program should print “Error! Positive Integers Only” and continue to receive input.
This case is pretty simple. We want to check if the user has entered a number less than $ 0 $. If so, we should just print out an error message, but continue to receive input. The word “continue” gives us an important clue toward how we can accomplish this task. Here’s one way to build this test into our program:
int x = 1;
while(x != 0){
  x = Integer.parseInt(scanner.nextLine());
  if(x < 0){
    System.out.println("Error! Positive Integers Only");
    continue;
  }
  //logic here
}
In this code, if the user enters a negative number, we simply use an If statement to find that error, print out the error message, and then the continue keyword will cause the program to loop back to the beginning and read another input. Of course, we can do this without the continue keyword as well, using an If-Else statement instead:
int x = 1;
while(x != 0){
  x = Integer.parseInt(scanner.nextLine());
  if(x < 0){
    System.out.println("Error! Positive Integers Only");
  }else{
    //logic here
  }
}
Either approach works equally well. Some developers prefer to avoid the use of continue and break keywords because they make it more difficult to understand loops, while other developers prefer to avoid having the logic of the loop nested several layers deep in many If-Else statements. It is really up to developer preference and the overall style guide that is in effect.
For this example, we’ll use the code with the continue keyword, just to get a better understanding of how it works.
Once we’ve handled our user inputs, we can include our program’s logic. In this case, we need to calculate both the sum and average of all of the numbers entered by the user. Calculating the sum is pretty simple! We can just include a sum variable and add each input to that variable:
int x = 1;
int sum = 0;
while(x != 0){
  x = Integer.parseInt(scanner.nextLine());
  if(x < 0){
    System.out.println("Error! Positive Integers Only");
    continue;
  }
  sum += x;
}
System.out.println("Sum: " + sum);
To calculate the average of a set of numbers, we must remember the formula $ \text{Average} = \frac{\text{Sum}}{\text{Count}} $. Since we already are tracking the sum, we can just add another variable to keep track of the count of inputs:
int x = 1;
int sum = 0;
int count = 0;
while(x != 0){
  x = Integer.parseInt(scanner.nextLine());
  if(x < 0){
    System.out.println("Error! Positive Integers Only");
    continue;
  }
  sum += x;
  count++;
}
System.out.println("Sum: " + sum);
System.out.println("Average: " + (double)sum / count);
Notice in the code above we are casting sum as a double when we calculate the average. Otherwise, the program will perform floored integer division, which isn’t what we want in this case.
Now, let’s see if this works.
See if you can complete the program using the example code above in a file name Example.java. Does it work correctly?
There is a very important logic bug in the code above. See if you can figure out what it is before continuing!
The code above contains a very important logic error. To find that error, let’s run the program by entering the numbers 1 and 3, followed by 0 to end the program. Here’s the output we should receive:

Notice that the sum of 4 is correct, but the average is 1.333333 instead of 2. Why is that?
If we look closely at our program above, we notice that the program will still increment count when we input 0 to stop the program. So, it believes that we’ve entered three numbers, when we actually only entered two. Therefore, we need to figure out some way to prevent the program from incrementing count when we input 0.
There are several ways we can accomplish this. One way is to simply wrap the program logic in another If-Then statement, as in this example:
int x = 1;
int sum = 0;
int count = 0;
while(x != 0){
  x = Integer.parseInt(scanner.nextLine());
  if(x < 0){
    System.out.println("Error! Positive Integers Only");
    continue;
  }
  if(x != 0){
    sum += x;
    count++;
  }
}
System.out.println("Sum: " + sum);
System.out.println("Average: " + (double)sum / count);
We could also use a break keyword to exit the loop as soon as we realize that the user’s input is 0:
int x = 1;
int sum = 0;
int count = 0;
while(x != 0){
  x = Integer.parseInt(scanner.nextLine());
  if(x == 0){
    break;
  }
  if(x < 0){
    System.out.println("Error! Positive Integers Only");
    continue;
  }
  sum += x;
  count++;
}
System.out.println("Sum: " + sum);
System.out.println("Average: " + (double)sum / count);
Either approach works. Again, it just depends on how we’d like to style our code so that it is clear and easy to understand.
In addition, we could rearrange the code just a bit to make the While loop’s Boolean expression a bit clearer:
int sum = 0;
int count = 0;
int x = Integer.parseInt(scanner.nextLine());
while(x != 0){
  if(x < 0){
    System.out.println("Error! Positive Integers Only");
  }else{
    sum += x;
    count++;
  }
  x = Integer.parseInt(scanner.nextLine());
}
System.out.println("Sum: " + sum);
System.out.println("Average: " + (double)sum / count);
In this example, we read an input from the user before entering the loop. So, if the user initially inputs 0, it skips the loop entirely, which is fine. If the input is not 0, then it will enter the loop and check to see if it is negative. If it is, it will print the error message, but if not, it will update the sum and count accordingly. Finally, at the end of the loop, it will read another input from the user, then immediately loop back to the beginning and make sure that the user has not input 0 before starting the next iteration. Also, notice that this code does not include any break or continue keywords.
However, this code does include two lines that read input from the user. This violates one principle of writing good code, which is DRY, or Don’t Repeat Yourself. If at all possible, we want to avoid writing two lines of code that perform the same action. So, while this code may be a bit simpler to read, it may also be a bit more difficult to update later. For example, what if a future developer needs to change this program to read floating point numbers instead of integers? If that developer does not update both lines that read input from the file, it could make the program unusable!
Finally, it may be best to simply include several If-Else If-Else statements to make everything clear in the code, as in this example:
int x = -1;
int sum = 0;
int count = 0;
while(x!= 0){
  x = Integer.parseInt(scanner.nextLine());
  if(x < 0){
    System.out.println("Error! Positive Integers Only");
  }else if (x > 0) {
    sum += x;
    count++;
  }
}
System.out.println("Sum: " + sum);
System.out.println("Average: " + (double)sum / count);
This code is probably one of the best ways to accomplish this task. We use a clear string of If-Else If-Else statements to show that there are two possible operations inside of the While loop. Either the input is negative, in which case we print an error message and restart the loop; or the input is positive and accepted for our calculations. IF the input is 0, we allow the program to flow up to while loop condition–which will terminate the loop.
Loops are one of the most important building blocks in computer programming. We can use both loops and conditional constructs to control the flow of execution in our programs, allowing us to develop very advanced pieces of software from these simple parts.
Going forward, we’ll cover information about a few other important data types for dealing with larger amounts of data, as well as how we can build our programs to detect and deal with errors more gracefully.
Little Steps to Solve Big Problems!
Throughout this course so far, we’ve written several programs. But we may start to notice that we are repeating lines of code over and over again.
As programs get bigger, it can also be difficult to manage all of the code and make sure we are not missing something. A small typing error in one part of the code can become very difficult to find when there is so much code to check.
For example, consider a program that needs to write the same output to multiple output files. Right now, if we wanted to write that program, it might contain code that performs these steps:
open file1
write to file1
write to file1
close file1

open file2
write to file2
write to file2
close file2

open file3
write to file3
write to file3
close file3

open file4
write to file4
write to file4
close file4
As we can see, much of the code in that program is repeated, with only small parts changed. Is there a different way we could write this program to make it simpler?
The video above uses pseudocode to introduce the concept of methods. We are transitioning away from using pseudocode in this course. The intent of the video should be clear, but don’t worry too much about the actual syntax of the examples in this video. We’ll use Java code elsewhere in the text.
The answer lies in the use of methods in our code. A method is a piece of code that can be used by our program to perform an action. However, the biggest benefit of using a method comes from the fact that we can use methods multiple times, helping us avoid repeated code in our programs. We can also provide input to our methods and receive output from our methods, allowing a single method to perform work on a wide variety of data.
Let’s look at an updated version of our previous example - a program that writes the same output to multiple files:
public static void main(String[] args){
    outputToFile("file1.txt");
    outputToFile("file2.txt");
    outputToFile("file3.txt");
    outputToFile("file3.txt");
}

public static void outputToFile(String filename){
    BufferedWriter writer = new BufferedWriter(new FileWriter(filename));
    writer.write("This is the first line of " + filename);
    writer.newLine();
    writer.write("This is the end of the file");
    writer.newLine();
    writer.close();
}
In the Java code above, we have defined two methods, one called main just like we’ve seen many times before, and another method named outputToFile that we can use to write data to a file with the name stored in the filename parameter. The body of the functions are delimited with {}. Just like conditional statements and loops, all method definitions must have a body.
The first method, named main, is the actual code that runs when our program is executed.
The other method, outputToFile, actually performs the work of outputting to the file.
To use a method, we’ve included code that looks like outputToFile("file1.txt"); in our main method. That line is known as a method call or method invocation, which will then execute the code inside of the outputToFile method. So, we might say that we are using that line to “call outputToFile” or “call the outputToFile method”. Either way is correct!
Of course, we also need to be able to provide input to our method, as we do in this example. The next page will describe how that works in more detail.
Informally, programmers may use the terms function, method, subroutine, and, to a lesser extent, procedure and other terms, to refer to many similar things. In general, they can be used interchangeably in most cases, since it is pretty clear what they are referring to, but for new programmers it can be a bit difficult to understand all of the different terms that are used.
So, to make things a bit clearer, we’ll try to stick with the definitions below for each of these terms:
To make matters more complex, some languages use all of these terms, each with very precise definitions.
Both Python and Java are pretty loose in their usage, and we will generally use the term “method” to mean any callable code snippet, but may use function and method interchangeably.
For more information on this, feel free to read a relevant post on StackExchange.
When we are writing methods in our code, we may need to provide some input to our methods. This allows our method to perform the same action using different data each time, making them much more flexible. So, let’s look at how to do that in theory and discuss some of the terminology we’ll need to understand first.
When we define a method, we can also list a number of parameters, or inputs, that the method can accept. Depending on the language we are using, we may need to provide either a name, or possibly a type and a name for each parameter. In addition, many languages allow us to accept variable length parameters, which we’ll cover in detail later in this module.
So, in our code, we can define a method that accepts parameters in this way:
public static void foo(String parameter1, String parameter2){
    System.out.println(parameter1);
    System.out.println(parameter2);
}
Typically, each parameter is listed in the method’s definition. So, this example defines a method named foo that accepts two parameters, parameter1 and parameter2. Together, they make up the method’s signature, which allows our programs to find them. Therefore, no two methods may share the same signature. Instead, they must either use a different name, or a different number of parameters. In statically typed languages such as Java, we can also vary the types of each parameter instead, not just the number of parameters.
Of course, when we want to call a method in our code, we must provide values for each parameter. Those values are known as arguments to the method. In code, it might look something like this:
public static void main(String[] args){
    foo("abc", "xyz");
}
In that example, we see foo("abc", "xyz"), which is calling our method named foo. Inside, it provides two arguments, one for each parameter of the method. So, inside of our method, the variable parameter1 will be "abc", and parameter2 will be "xyz". Pretty straightforward, right?
Of course, many programmers use the terms parameters and arguments interchangeably as well, but we’ll try to stick to the following definitions:
Finally, we may also want to get a result back from our methods, especially if it is performing a calculation or some other task for us. So, we can use a special keyword known as return to provide a value as output from our method. In general, if you call a method that returns a value, you want to catch that value in a variable.
Let’s look at an example:
public static void main(String[] args){
    output = max(5, 42, 3);
    System.out.println(output);
}

public static int max(int a, int b, int c){
    if (a >= b && a >= c){
        return a;
    } else if (b >= a && b >= c){
        return b;
    } else {
        return c;
    }
}
In this example, we have defined a method named max which will return the largest value of its three parameters, a, b, and c. So, in our main method, we are calling max with arguments 5, 42, and 3, which will be stored as a, b, and c, respectively.
Then, in the max method, we use an If-Else statements to determine which one is larger than the other two, and then return that value. So, if we look closely at the code, we should be able to see that it will return 42 as the largest value.
As we can see, our code can contain multiple return statements. However, the method will stop executing as soon as it reaches the first return statement, and will therefore only return a single value. This is really handy if we know the answer we need to output; we can just use the return keyword to stop what we are doing and provide the output.
So, once our max method is complete, the value 42 will be returned. In our main method, that value will be stored in the output variable. So, values returned from a method can be used in an assignment statement, just like any other value. In fact, we can treat a method call just like a variable! As soon as our program reaches a method call, it will stop what it is doing, execute the method, and replace the method call with the returned value. It’s a really handy way to organize our code.
That covers the basics of how a method is created in our code. On the next few pages, we’ll discuss some related topics that will help us understand how these methods work and how we can structure our code to take advantage of methods.
Another topic we must revisit is variable scope. Recall from an earlier chapter we learned how variables may only be referenced after they’ve been defined, and in many cases only within the method or block they are defined in. Now that we are dealing with multiple methods, we must once again discuss variable scope and how it applies to this situation.
In general, all of the scope rules we’ve learned still apply. For example, a variable declared in a method can only be accessed within that method. In that way, different methods may use the same variable names to refer to different variables. In addition, as we’ve seen in the earlier examples, a method may define parameters using the same variable names as the variables that are used as arguments to that method. It may seem confusing to some, but to others it makes perfect sense.
Most programming languages also allow us to create variables at the class level, inside a class but outside of any method. Those variables can then be referenced within any of the class’s method, allowing us to share data between methods without using parameters and return values.
Here’s a quick example in code:
public class MathOperations {

    double PI = 3.1415926535;

    public static void main(String[] args){
        double r = 3.0;
        double area = calculateArea(r);
        System.out.println(area);
    }

    public static double calculateArea(double r){
        return r * r * PI;
    }

}
In this example, we have created a class variable named PI to store the value of
$ \pi $ for our entire program. Then, we can use that variable just like any other inside of the calculateArea method.
Of course, we can assign and edit class variables just like any other variable:
public class Foo{
    static int people = 1;

    public static void main(String[] args){
        people = people + 1;
        foo();
        System.out.println(people);
    }

    public static void foo(){
        people = people * 3;
    }
}
In this example, the main method will print
$ 6 $ as the value of people. Since that variable is declared in the class scope, it can be accessed and changed by any method.
Sometimes we may want to have a variable inside of our methods use the same name as a class variable, this is a type of shadowing. Shadowing occurs whenever an inner scope name hides (in its shadow) an outer scope variable of the same name. Here’s a modified version of the code above showing that situation:
public class Foo{
    static int people = 1;

    public static void main(String[] args){
        int people = 1;
        people = people + 1;
        foo();
        System.out.println(people);
    }

    public static void foo(){
        people = people * 3;
    }
}
In this example, the variable people is redeclared inside of the main function. So, it is an entirely different variable than the class variable named people. Because of this, whenever we use the variable people inside of main, we are referring to the method scope or local scope variable people. Therefore, the class-scope value is not updated by the main method, and main will simply print
$ 2 $ instead of
$ 6 $.
Shadowing is not necessarily bad, and may be unavoidable in large programs using multiple imported modules. It is something that a developer should always be aware of, since it can have unintended consequences.
One major mantra among programmers is Don’t Repeat Yourself (DRY), and it’s a very important concept to keep in mind when writing programs that can use methods. In essence, anytime we find ourselves writing the same or similar code multiple times in our program, we may want to ask ourselves if it would be better to make that piece of code a method. That way, we only have to write it once, and if there are any problems with that code, we only have to remember to change it in one place instead of everywhere we’ve used it.
To really understand how DRY can improve our code, let’s look at a quick example:
import java.lang.Math;

public class Dry{

    public static void main(String[] args){
        int a = 1;
        int b = 0;
        int c = -4;
        double rootOne = (-b - Math.sqrt(b * b - 4 * a * c)) / (2 * a);
        double rootTwo = (-b + Math.sqrt(b * b - 4 * a * c)) / (2 * a);
        System.out.println(rootOne);
        System.out.println(rootTwo);

        a = 2;
        b = 7;
        c = 3;
        rootOne = (-b - Math.sqrt(b * b - 4 * a * c)) / (2 * a);
        rootTwo = (-b + Math.sqrt(b * b - 4 * a * c)) / (2 * a);
        System.out.println(rootOne);
        System.out.println(rootTwo);
    }
}
Of course, this is a very simple example calculating the roots of a quadratic equation.
$$ax^2 + bx + c$$However, we see that this program repeats many lines of code to perform the same basic calculation with different values. We can easily move that calculation to a new method, and then use parameters to set the values. So, let’s apply the DRY principle to simplify this program:
import java.lang.Math;

public class Dry{

    public static void main(String[] args){
        quadratic(1, 0, -4);
        quadratic(2, 7, 3);
    }

    public static void quadratic(int a, int b, int c){
        rootOne = (-b - Math.sqrt(b * b - 4 * a * c)) / (2 * a);
        rootTwo = (-b + Math.sqrt(b * b - 4 * a * c)) / (2 * a);
        System.out.println(rootOne);
        System.out.println(rootTwo);
    }
}
There! We’ve moved all of the code for calculating the roots for the quadratic equation, printing each root at the end. Then, we can simplify the code in main by simply calling that method anytime we want to calculate the roots .
This could be further reduced by “pre calculating” the discriminant since it is used twice in the quadratic function.
import java.lang.Math;

public class Dry{

    public static void main(String[] args){
        quadratic(1, 0, -4);
        quadratic(2, 7, 3);
    }

    public static void quadratic(int a, int b, int c){
        d = discriminant(a, b, c);
        rootOne = (-b - Math.sqrt(d)) / (2 * a);
        rootTwo = (-b + Math.sqrt(d)) / (2 * a);
        System.out.println(rootOne);
        System.out.println(rootTwo);
    }

    public static int discriminant(int a, int b, int c){
        return b * b - 4 * a * c;
    }
}
We can also extend this code to make use of the fact that the value of the discriminant tells us how many different roots a quadratic equation will have. By moving code to functions, we can quickly find additional ways to expand upon and improve our programs.
Properly following the DRY principle when writing code will make our programs simpler, easier to maintain, and hopefully easier to debug. In effect, it is definitely a good idea to add a new method to our code anytime we find ourselves typing something twice, or copy and pasting code.
Another big idea related to writing methods in our code relates to testing. Specifically, how can we write methods that are easily testable?
We won’t go deep into the details in this course, but most programming languages support unit testing, which is the use of automated testing tools to make sure each piece of code works as intended. They are very important for two big reasons:
In fact, many of the automated grading tools in this course make extensive use of unit testing to confirm that our code is working properly, both within this tutorial textbook and in the standalone projects. Now that we are writing code that contains methods, unit tests will become an even bigger part of the grading process in this course.
There are entire textbooks written about the theory of writing code that can be easily tested, and not everyone agrees exactly what the best model is. However, there are a few things that we can keep in mind as we write methods to make them easily testable:
In the examples later in this course, we’ll see explicitly how to follow some of these guidelines when writing our own code. For now, they are just handy things for us to keep in mind.
Many students fail to read this section carefully and understand what it means. From this point forward, the grading tools that you have access to before you submit a project ARE NOT the same grading tools used to fully grade your project. This means that the grader in the project may tell you that you have completed the project, but when you submit it you could receive a significantly lower grade.
WHY?
One important skill for a programmer to learn is properly testing your code. So, from this point forward, we’re not going to give you all of the test cases in the project. Instead, you’ll have to carefully read the project description, identify what test cases should be used, and then create and run those test cases yourself.
Consider this - for most of the history of programming, students had to learn without ANY access to automated testing and grading tools, and in fact they may not have been able to run their program many times at all due to the high cost of computing time on early systems. So, students and professional programmers alike had to learn how to properly test and verify their programs either by hand or by careful use of test cases.
To help you develop this skill, we are “taking off the training wheels” and giving you more room to fail. As always, if you find that you are stuck or unsure where to begin, don’t be afraid to contact your instructors for assistance.
Up to this point in the class we’ve had various automated grading tools available to test our code and make sure it works correctly. However, it is important to understand that these buttons are just running code written by other developers (in this case, the instructors of the course), and these tests can have the same limitations as any other program. For example, it is often impossible to guarantee that these tests will accurately test all possible inputs or reach 100% code coverage. Likewise, depending on how the solution is written, the edge cases and boundary conditions may be different than the ones that were originally used for testing.
At this point, we have learned enough programming syntax and terminology to start running our programs manually and developing our own tests. So, from this point forward, many of the projects will not give us access to the full automated grading process before we submit it. In effect, it is now our job to properly test our program using various inputs, both the ones provided and ones that we develop ourselves, in order to be sure that it is working properly.
After we submit the project, the full autograder will still be used to grade our work. The autograder will confirm that your project matches the specification within a reasonable limit. However, we won’t be able to go back in and make any changes after we submit the project. So, we’ll have to be extra careful and make sure our programs are fully tested before we submit them.
test MethodOne thing that we can do is add an explicit test method to any class in our program. Our test method may contain any code needed to test our program. We are always allowed to add additional methods to any class as needed - we won’t be penalized for that in grading.
For example, we could add a test method to the previous example to test some of the functions:
import java.lang.Math;

public class Dry{

    public static void main(String[] args){
        quadratic(1, 0, -4);
        quadratic(2, 7, 3);
    }

    public static void quadratic(int a, int b, int c){
        d = discriminant(a, b, c);
        rootOne = (-b - Math.sqrt(d)) / (2 * a);
        rootTwo = (-b + Math.sqrt(d)) / (2 * a);
        System.out.println(rootOne);
        System.out.println(rootTwo);
    }

    public static int discriminant(int a, int b, int c){
        return b * b - 4 * a * c;
    }

    public static void test(){
        int answer1 = discriminant(1, 3, 1);
        System.out.println("Answer 1 was " + answer1 + " and should be 5");
        int answer2 = discriminant(3, 3, 3);
        System.out.println("Answer 2 was " + answer2 + " and should be 27");
    }
}
In the method, we see that we are calling the discriminant method with a few different values. The expected answer values we see in the print statements can be manually calculated and verified using a calculator. It is important that we calculate these manually instead of relying on our program to calculate them - if we did, how would we ever know if it was actually incorrect?
test MethodOnce we’ve written a test method, we have to change our program so that it calls the method. The simplest way to do this is to just add that function call at the very top of the main() method:
    public static void main(String[] args){
        test();
        quadratic(1, 0, -4);
        quadratic(2, 7, 3);
    }
Since the test method may produce output or change the functionality of our program, it is always important to remember to REMOVE the test method from our main method before we submit the program.
It is a lot more coding. To test a method, we must really understand its function and how it fits with other methods. Understanding how methods work and work together is a key computational thinking skill.
It is very common practice in industry to write several times more lines of code in test methods than the actual method that is being tested. This can be reduced a bit by hard-coding some of the correct answers and just checking a few boundary values, as shown above. However, for more complex projects, we may end up writing many complex tests. This is usually covered in an advanced programming class, so we won’t spend much time on it here.
The advantage testing each method as you write them is that the amount of code you have to search for errors is small. An error you detect must be in the method you just coded.
By the end of the course, projects will be 3-5 classes each with 3-5 methods. If you only do functional checks of the completed project, isolating an error to single method in this case is extremely time consuming.
Methods in Java
Now that we’ve covered the basic ideas of adding methods to our programs, let’s see how we can do that using the Java programming language.
We’ve already seen how to create methods in our programs, since each program in Java already includes a method named main. In general, a method declaration in Java needs a few elements. Let’s start at the simplest case:
public static void foo(){
    System.out.println("Foo");
    return;
}
Let’s break this example method declaration down to see how it works:
static at the beginning of this method declaration. That keyword allows us to use this method without creating an object first. We’ll cover how to create and work with objects in a later module. For now, each method we create will need the static keyword in front of it, just like the main() method.void, determines the type of data returned by the method. We use a special keyword void when the method does not return a value. We’ve already seen this keyword used in our declaration of the main method.foo. We can name a method using any valid identifier in Java. In general, method names in Java always start with a lowercase letter.() that list the parameters for this method. Since there is nothing included in this example, the method foo does not require any parameters.{} that surround the code of the method itself. In this case, the method will simply print Foo to the terminal.return keyword. Since we aren’t returning a value, we aren’t required to include a return keyword in the method. However, it is helpful to know that we may use that keyword to exit the method at any time.We’ll cover how to handle method parameters and return values later in this module. For now, we’ll just look at creating simple methods that neither require parameters nor return values.
Once we’ve created a method in our code, we can call, or execute, the method from anywhere in our code using the following syntax:
foo();We simply use the name of the method, followed by parentheses, wherever we’d like to call that method. Again, we’ll see how to pass arguments to the method and store the return value later in this module.
Let’s look at a complete sample program to see how this all fits together.
public class Methods{
    public static void main(String[] args){
        System.out.println("Main 1");
        foo();
        System.out.println("Main 2");
        foo();
        System.out.println("Main 3");
        return;
    }

    public static void foo(){
        System.out.println("Foo 1");
        return;
    }
}
When we run this program, we should see the following output:
Main 1
Foo 1
Main 2
Foo 1
Main 3
We can also look at a flowchart diagram of this program to help understand how it works:
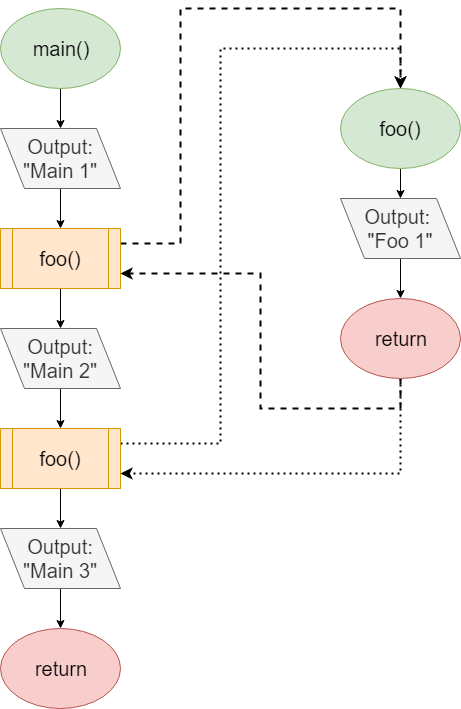
As we can see in this diagram, the program starts in the main() method. Inside, it prints Main 1, then calls the method foo(). So, we can follow the dashed line over to foo(), where it will print Foo 1 and return back to main along the same dashed line. Then, we’ll print Main 2 in main(), before calling foo() once again. This time, we’ll follow the dotted line to foo(), where we’ll once again print Foo 1 before returning back to main() and printing Main 3.
The line public static void main(String[] args) is often referred to as a method signature. It contains all the vital information necessary to use the method: its name, what it returns, and what type of parameters it requires. Even public static inform the programmer on where and how to invoke the method, but we’ll cover these key words when we cover classes.
Methods are a very useful way to divide our code into smaller chunks. However, many times we need to provide input to our methods. This allows us to reuse the same code, but with different values each time we call the method. So, let’s review how to add parameters to our methods in Java.
In Java, we can add parameters to a method declaration by placing them in the parentheses () at the end of the declaration. Each parameter is similar to a variable declaration, requiring both a type and an identifier. We can also define multiple parameters, separated by commas ,.
For example, let’s extend our definition of foo() from the previous page by adding a String parameter named message:
static void foo(String message){
    System.out.println("Message: " + message);
}
Then, when we call that method, we are required to provide an argument of the correct type. That argument will be stored as the parameter’s variable in foo():
foo("Hello World!");Here’s another example. In this case, we are writing two methods, foo() and bar(). They accept multiple parameters, and in main() we call each method using arguments for each parameter.
public class Parameters{
    public static void main(String[] args){
        int x = 5;
        int y = 10;
        int z = 8;
        bar(x, y, z);
        foo(y, true);
    }

    static void foo(int output, boolean longMessage){
        if(longMessage){
            System.out.println("The value was " + output);
        }else{
            System.out.println("Val: " + output);
        }
    }

    static void bar(int a, int b, int c){
        System.out.println(a + ", " + b + ", " + c);
    }
}
First, let’s look at bar(). When we call this method from main(), we are using x, y, and z as arguments. So, inside of bar(), the value stored in x will be stored in a, y will be stored in b, and z will be stored in c. The parameters and arguments are matched up based on the order they are provided to the method call. So, bar() will output 5, 10, 8 when it is called with those parameters.
The call to foo() is very similar. It only contains two parameters, but each one is a different type. So, when we call that method, we must make sure that the first parameter is an integer, and the second one is a Boolean value.
There are several other things we can do with parameters in our methods, allowing us to use them in new and more flexible ways.
Java allows us to create multiple methods using the same name, or identifier in the same scope, as long as they have different parameter lists. This could include a different number of parameters, different data types for each parameter, or a different ordering of types. The names of the parameters, however, does not matter here. This is called method overloading.
For example, we could create a method named max() that could take either two or three parameters:
public class Overloading{
    public static void main(String[] args){
        max(2, 3);
        max(3, 4, 5);
    }

    static void max(int x, int y){
        if(x >= y){
            System.out.println(x);
        }else{
            System.out.println(y);
        }
    }

    static void max(int x, int y, int z){
        if(x >= y){
            if(x >= z){
                System.out.println(x);
            }else{
                System.out.println(z);
            }
        }else{
            if(y >= z){
                System.out.println(y);
            }else{
                System.out.println(z);
            }
        }
    }
}
In this example, we have two methods named max(), one that requires two parameters, and another that requires three. When Java sees a method call to max() elsewhere in the code, it will look at the number and types of arguments provided, and use that information to determine which version of max() it should use.
Of course, we could just use the three argument version of max() in both cases:
public class Overloading{
    public static void main(String[] args){
        max(2, 3);
        max(3, 4, 5);
    }

    static void max(int x, int y){
        max(x, y, y);
    }

    static void max(int x, int y, int z){
        if(x >= y){
            if(x >= z){
                System.out.println(x);
            }else{
                System.out.println(z);
            }
        }else{
            if(y >= z){
                System.out.println(y);
            }else{
                System.out.println(z);
            }
        }
    }
}
In this case, we are calling the three parameter version of max() from within the two parameter version. In effect, this allows us to define default parameters for methods such as this. If we only provide two arguments, the code will automatically call the three parameter version, filling in the third argument for us.
Finally, Java allows us to define a single parameter that is a variable length parameter. In essence, it will allow us to accept anywhere from 0 to many arguments for that single parameter, which will then be stored in an array. Let’s look at an example:
public class Overloading{
    public static void main(String[] args){
        max(2, 3);
        max(3, 4, 5);
        max(5, 6, 7, 8);
        max(10, 11, 12, 13, 14, 15, 16);
    }

    static void max(int ... values){
        if(values.length > 0){
            int max = values[0];
            for(int i : values){
                if(i > max){
                    max = i;
                }
            }
            System.out.println(max);
        }
    }
}
Here, we have defined a method named max() that accepts a single variable length parameter. To show a parameter is variable length we use three periods ... between the type and the variable name. We must respect three rules when creating a variable length parameter:
So, when we run this program, we see that we can call the max() method with any number of integer arguments, and it will be able to determine the maximum of those values. Inside of the method itself, values can be treated just like an array of integers.
Lastly, one of the most useful things we can do with methods in our code is return a value from a method. This allows us to use a method to perform an action or calculation that results in a single value that we can use elsewhere in our code. We can even use these method calls just like we use variables in other arithmetic expressions. Let’s take a look at how that works.
To return a value from a method in Java, we use the special keyword return, followed by an expression representing the value we’d like to return. We must also declare the type of that value in our method declaration, taking the place of the void keyword we’ve been using up to this point.
Here’s an example program showing how to use the return keyword and store that returned value in a variable.
public class Return{
    public static void main(String[] args){
        int returnValue = last(1, 3, 5, 7, 9);
        System.out.println(returnValue);  // 9
    }

    static int last(int ... items){
        if(items.length > 0){
            return items[items.length - 1];
        }
        return -1;
    }
}
Let’s review this program carefully to see what parts of the program are important for returning a value:
void, we use the keyword int in the declaration of our last() method, static int last(int ... items). This is because the method must return a value with the type int.return keyword. Each instance is followed by a value or expression that results in an integer, which is then returned from the method. As soon as the method reaches a return keyword, it immediately stops executing and returns that value. So, if the items variable length parameter is empty, the method will return $-1$. Otherwise, it will return the last item in the items parameter.main() method, we see that we’ve included the method call to last() on the right-hand side of a variable assignment statement. So, once we reach that line of code, the program will call the last() method and store the returned value in the returnValue variable in main()The Java compiler is a very crucial part of making sure that each method we create returns a value correctly. When we compile our code, the compiler checks to make sure that each method that includes a return type other than void will return a value along all code paths. That means that if one branch of an If-Else statement returns a value, then either the other branch or code below it should also return a value.
In addition, it will make sure that the type of the value returned matches the type that is expected by the method’s declaration.
Finally, just like every other variable assignment in Java, when we store the result of a method call in a variable, Java will also make sure that the variable storing the value has a type that is compatible with the type being returned from the method.
So, if we receive error messages from the Java compiler regarding invalid return types or values in our methods, we’ll need to carefully check our code to make sure we aren’t violating one of those rules.
Let’s try one more example to get some practice building code that contains multiple methods. This program will convert volumes measured in U.S. standard cups into either fluid ounces, tablespoons, or teaspoons. A program that makes these conversions is useful for anyone cooking or baking.
For this example, we’ll need to build a program that matches this problem statement:
Write a program that accepts interactive keyboard input. It should first ask the user to enter a number of cups, and then have the user select the desired conversion from a list of options. The program will then calculate the correct value and display it with the correct units.
The program should contain one class named
Converter, but may contain several methods.
Please enter the number of cups to convert as a floating-point value: .5
Select conversion: 1 (ounces), 2 (tablespoons) or 3 (teaspoons): 3
24.0 teaspoons
That seems like a pretty straightforward problem statement. Let’s see how we might structure the program.
First, we could look at the problem statement and try to divide the program into a number of methods to perform each action. In this case, it looks like we have a few important actions that could be made into methods:
Based on that breakdown, we can structure the class so it has the following methods:
void main(String[] args) - this is the usual main method for Java. In this case, we’ll handle input and output in this methodString convert(double cups, int units) - this method will help us select the proper conversion to be performed based on user inputdouble toOunces(double cups) - this method will convert the given number of cups to fluid ouncesdouble toTablespoons(double cups) - this method will convert the given number of cups to tablespoonsdouble toTeaspoons(double cups) - this method will convert the given number of cups to teaspoonsNow that we have an idea of what methods we need, let’s discuss the overall control flow of the program and the order in which the methods will be used.
The program will start in the main method, just like any other Java program. That method will prompt the user to input a number of cups to be converted, and also will ask the user to choose which conversion to be performed. Once we have those two inputs, we can then perform the computation in the program.
At that point, the main method will call the convert method and provide the two inputs as arguments to that method call. We’ll use the convert method to determine which of the other methods to call, based on the units parameter. That method will then call the appropriate conversion method (either toOunces, toTablespoons or toTeaspoons) and then use the value returned by that method to build the output string.
Each conversion method is very simple - it just uses a bit of math to convert the value in cups to the appropriate value for a different unit of measurement, and then it will return that value.
Now that we’ve decided what methods to include, we can go ahead and start building the overall structure for our program. It should contain a single class named Converter and the methods listed above. Finally, since we are reading input interactively from the terminal, we’ll also need to remember to import the java.util.Scanner class. So, our overall structure might look like this:
import java.util.Scanner;

public class Converter{

    public static void main(String[] args){
        // Create scanner to read input
        Scanner scanner = new Scanner(System.in);
        // more code here
    }

    static String convert(double cups, int units) {
        // more code here
        return "";
    }

    static double toOunces(double cups){
        // more code here
        return -1.0;
    }

    static double toTablespoons(double cups){
        // more code here
        return -1.0;
    }

    static double toTeaspoons(double cups){
        // more code here
        return -1.0;
    }
}
Notice that each method signature includes the modifiers public and static along with the return type, name of the method, and a list of parameters expected. For every method that returns a value, we’ve also included a default return statement so that the code will compile at this point. Methods that have void as a return type, such as the main method, don’t need to include a return statement.
Also, the order in which the methods are declared inside of a class does not matter in Java. By convention, the main method is typically either the first or the last method declared in the class.
Next, we can start filling in the code for the methods. Typically we’d either want to start with the main method, or start with the methods that will be called last in the control flow. In this example, let’s start with the methods that will be called last, which are the conversion methods toOunces, toTablespoons, and toTeaspoons.
We can start with the toOunces method. A standard cup is 8 fluid ounces. So, our method would include this code:
public static double toOunces(double cups){
    return cups * 8.0;
}
That method turns out to be very simple! We can use the same process to write the other two methods. Some helpful conversions:
At this point we’ve written some code, and we may want to test these methods just to make sure they are working before moving on. So, we can write some code in our main method to quickly call these methods and check their return values. Here’s a quick example:
public static void main(String[] args){
    // testing code - DELETE BEFORE SUBMITTING
    System.out.println("1 cup should be 8 ounces : " + toOunces(1.0));
    System.out.println("1 cup should be 16 tablespoons : " + toTablespoons(1.0));
    System.out.println("1 cup should be 48 teaspoons : " + toTeaspoons(1.0));

    // Create scanner to read input
    Scanner scanner = new Scanner(System.in);
    // more code here
}
If we put that code in the main method and run it, we should see output similar to this:

That’s great! That means our methods are working and seem to be returning the correct values. We may want to try a few other values besides 1 cup just to be sure that the output exactly matches what it should be.
convert MethodThe convert method contains the logic for selecting the appropriate conversion method, calling it, and then returning a formatted string to be printed. This method requires two parameters: the cups value to be sent to the conversion method, and the units selection from the user that can be used to determine which method to call.
Since the units item is a mutually-exclusive choice, it makes sense to use an if-else if-else structure in this method:
static String convert(double cups, int units) {
    if(units == 1){
        return toOunces(cups) + " ounces";
    } else if (units == 2){
        return toTablespoons(cups) + " tablespoons";
    } else if (units == 3){
        return toTeaspoons(cups) + " teaspoons";
    } else {
        // error condition
        return "";
    }
}Finally, we can write our main method. It should prompt the user for the number of cups and the units to be converted to. It will then call the convert method and print the answer. We should delete our testing code from the main method at this point.
public static void main(String[] args){
    // Create scanner to read input
    Scanner scanner = new Scanner(System.in);
    System.out.print("Please enter the number of cups to convert as a floating-point value: ");
    double cups = Double.parseDouble(scanner.nextLine());
    System.out.print("Select conversion: 1 (ounces), 2 (tablespoons) or 3 (teaspoons): ");
    int units = Integer.parseInt(scanner.nextLine());
    String output = convert(cups, units);
    System.out.println(output);
}
With that code in place, we should be able to compile and test our program!
Idea adapted from Gaddis, Tony “Starting out with JAVA”, 5th ed, Pearson: New York 2012 ↩︎
As the programs we develop become larger and more complex, we’ll definitely rely on the ability to create methods to help make our code easier to read, debug, and maintain. methods allow us to write small, self-contained pieces of code that can be reused over and over again, or break large operations into smaller, simpler steps.
From this point forward, nearly any program we write will contain multiple methods. In fact, it is very rare to see any programs beyond just simple scripts that don’t contain at least a few methods.
In the next few modules, we’ll also see how to build classes that represent real-world objects, as well as how to add methods inside of those classes called methods to represent how those objects method in the real world.
Modelling the Real World in Code!
Let’s take a look at the world around us. There are many things we might see. A computer. A keyboard. A chair. A desk. If we look outside, we may even see more things. A tree. A bird. A cloud.
From a certain point of view, the entire world is made up of things, each with unique features and actions that help define how it differs from other things.
As we continue to write more and more complex programs, it would be very useful to have a way to represent these things in our own software. Thankfully, we can! In this chapter, we’ll learn all about classes and objects, which form the basis of the object-oriented programming paradigm, one of the most common and popular programming paradigms today.
Let’s get started!
At its heart, object-oriented programming is about the data. We may talk about how a class stands for a blueprint or outline of a real world item, but what we mean is the data that describes and defines that real world object. It is how we choose to model this data, how we allow access to it and manipulate it, that drives the object-oriented paradigm.
There are four pillars to object-oriented programming, all having to do with data and how it can be accessed and changed.
Encapsulation refers to data and method hiding. The idea is things outside of the object should not directly access the object’s data. This ensures the data remains consistent with object we are modeling. A Car class might have a speed attribute, and there might maximum values for changing the speed–a max braking or acceleration. Additionally there might be a maximum speed.
Encapsulation says, when you ask the Car object how fast it is going, the object does not give you access to its data, but instead provides you a copy. When you want it to speed up, you don’t change the object’s speed directly; instead you use the object’s accelerate method, and the object changes its own speed.
Inheritance is the idea that like objects share traits, and can go from the generic to the specific. We might have Bird class, with generic sing and move methods, and a wingspan attribute. But then we might have a Parrot class, which is a kind of bird, so it too can sing and has a wingspan; but in this case a Parrot might also have a talk method, and an additional colorScheme variable. Inheritance is a way to link classes so that the subclass is a super set of the base class – it has all the superclass’s stuff and more.
Abstraction deals with leaving things un-defined. In our Bird class, maybe there is no body (no code) to the move method, just the fact that such a method should exist. The concept that birds move is independent of a particular kind of bird. This would allow a Penguin class to code move as swimming, Ostrich to code it as running, and Parrot as riding on pirate shoulders.
Polymorphism is the idea that the same method can give you different behaviors. Say we code the Bird class with the beautiful song of the musician wren. But the Eagle class, also a kind of Bird, might override this with a loud screech. Overriding is when a subclass replaces a superclass method. A Parrot and Eagle are both instances of the Bird superclass, but you get different behaviors (sounds) when you invoke their sing method.
It is a lot, but it can be learned a little at a time. This later modules will deal with some basics of encapsulation, and introduce inheritance. Abstraction and polymorphism will be taught more deeply in later courses.
Thus far in this course we have always had just one class, and in most cases one method. So, while we have been following some object-oriented conventions like starting in main(), our designs have not followed an object-oriented programming paradigm. This was deliberate, as the first few modules are necessary to cover the basics of program control.
We will begin bending our designs toward object-oriented programming with this module by introducing instance and driver classes. The instance class holds certain data and all the methods to access and manipulate that data. The driver class (typically only a main() method) holds the logic for how and when to use the data. The driver generally only has indirect accesses to the instance’s data through its methods1
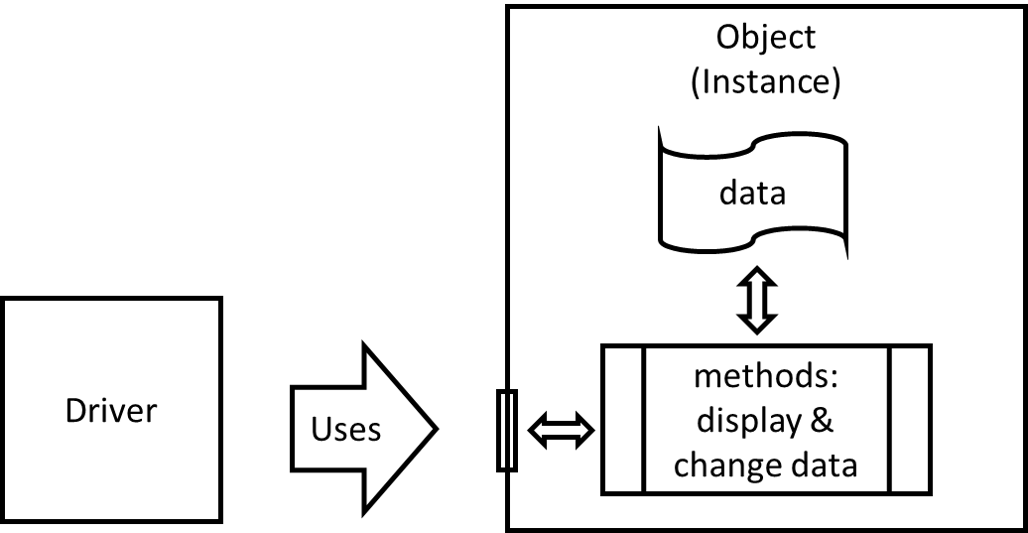
One of the things that makes OOP so powerful is this simple driver-instance idea can be used to model fairly complex real-world things. For example when you use a web browser for research. You act as the driver, you know how to uses the browser and the information you want. The browser knows how to interact with the internet and all the little details to fetch and display information.
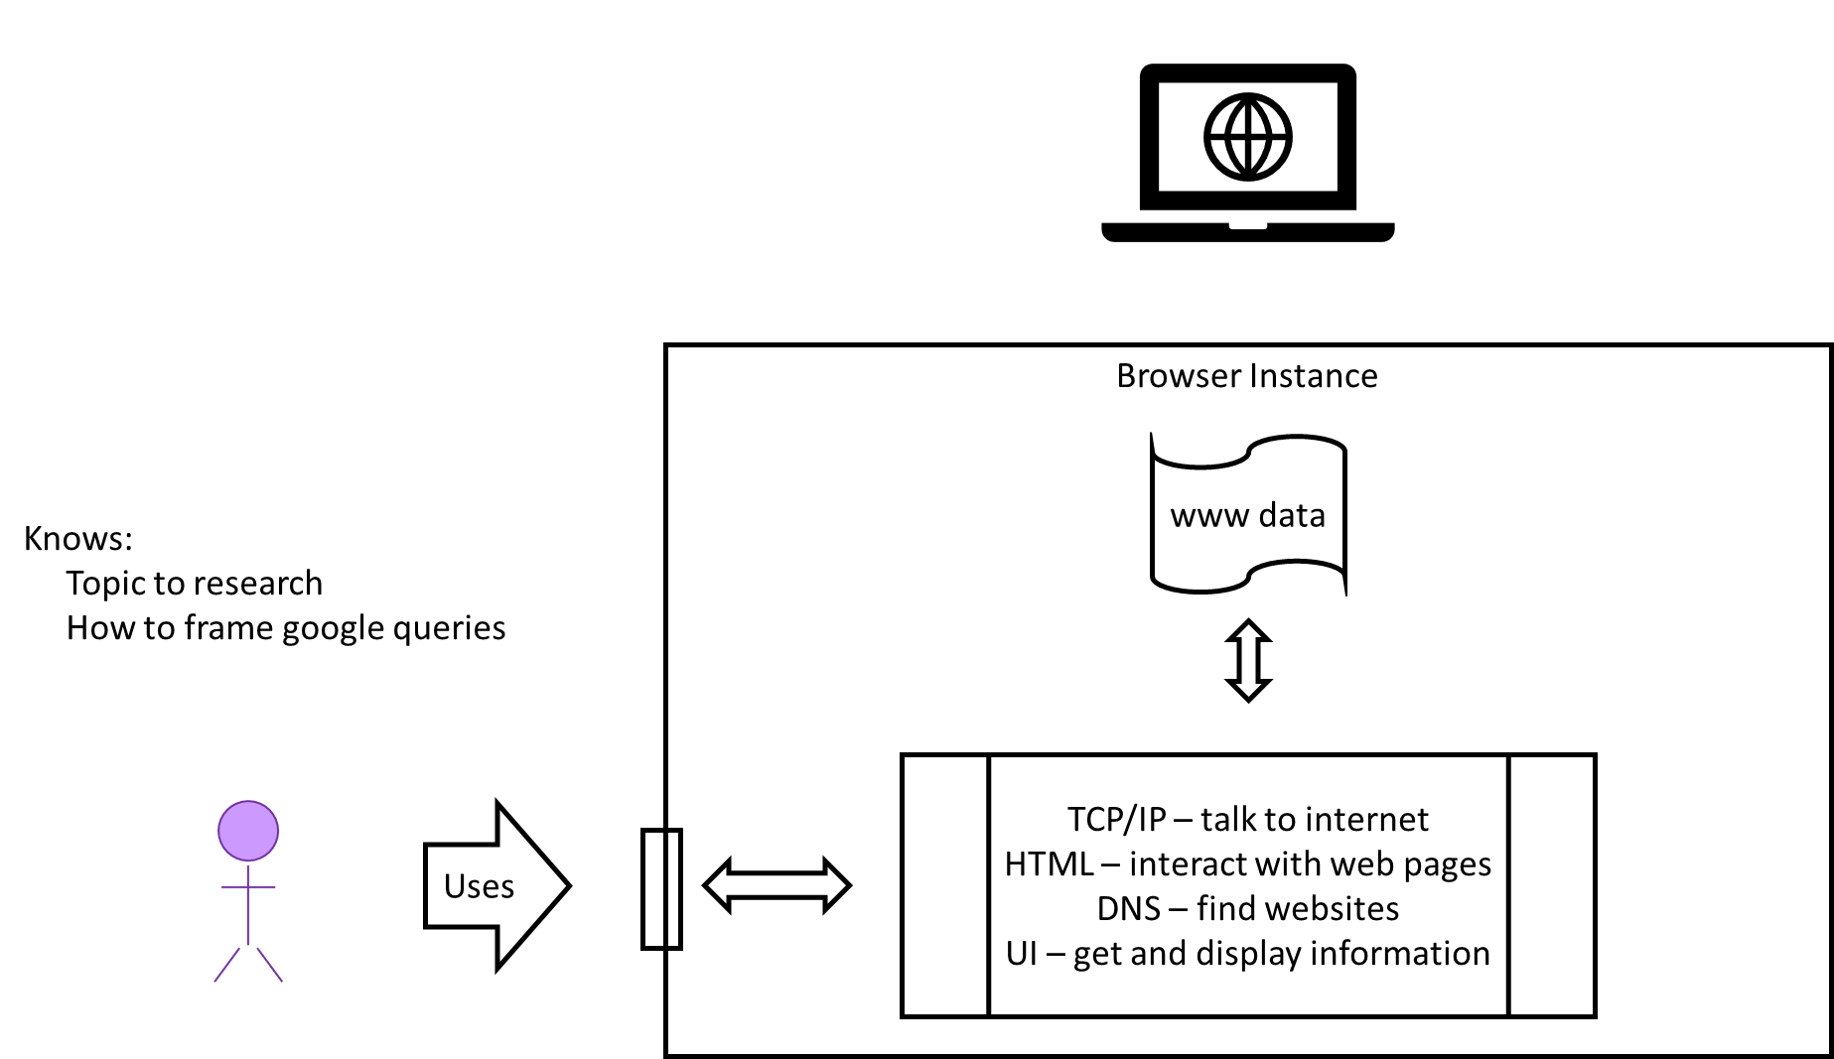
this restriction is relaxed in this tutorial. ↩︎
The first step in creating a program that can represent things in the real world is to determine which things we’d like to include in our program, and then create classes that can describe the different types of objects.
In programming, a class describes an individual entity or part of the program. In many cases, the class can be used to describe an actual thing, such as a person, a vehicle, or a game board, or a more abstract thing such as a set of rules for a game, or even an artificial intelligence engine for making business decisions.
In object-oriented programming, a class is the basic building block of a larger program. Typically each part of the program is contained within a class, representing either the main logic of the program or the individual entities or things that the program will use.
Every time we define a new class, we create a new type.
public class Dog {
    // class definition for Dog
    String name;

    public Dog(String aName){
        this.name = aName;
    }
}

public class Driver {
    public static void main(String[] args) {
        Dog x = new Dog("rover");  // Dog is now a data type
        Dog y = new Dog("spot");   // We use it when declaring a variable
    }
}
For example, let’s consider a program that could be used to store the information about students and teachers at a school. For this program, we could create 2 instancs classes: Student, Teacher, and a driver class called Main. To help represent this program, we can use a UML Class Diagram like this:

In the diagram above, we see three boxes, one labeled for each class. Below the names we see entries for the fields and methods in the class, which we’ll discuss on the next page.
Obviously, the Student class can be used to represent a single student in school. Likewise, we’ll use the Teacher class to represent a teacher. Finally, we’ve also included a Main class, which will store the actual logic for the program we’re creating. However, right now the classes are just names, and aren’t very useful in that form.
The Unified Modeling Language or UML is a standard way to visualize the structure and design of a software program. UML includes many different types of diagrams, including class diagrams, use case diagrams, sequence diagrams, and more.
In this course, we’ll use some simple class diagrams to help describe the structure and layout of classes in our programs. Those diagrams are very simple to read and understand, and you won’t be asked to create any diagrams of your own right now. If you take some later programming courses, we’ll cover more information about UML diagrams and how to work with them there.
If you want to learn more, here are a few helpful links:
To make our classes more useful, we must give them features to help define the properties and actions of that class. So, let’s look at each of those in turn and discuss how we might use those in our programs.
First, each class can have a set of attributes, sometimes known as fields, to describe the data stored by that class. In programming, these would be the variables stored within the class itself. These attributes represent the different properties of the thing the class represents, helping to distinguish it from other things in the world.
For example, an Ingredient for a recipe might have a name of the ingredient, an amount and a units. These might be “flour”, 4 and “cups”.
Inside a Unified Modeling Language (UML) class diagram, instance attributes go in the section immediately under the class name. Typically both attribute’s proposed identifier and type are included.
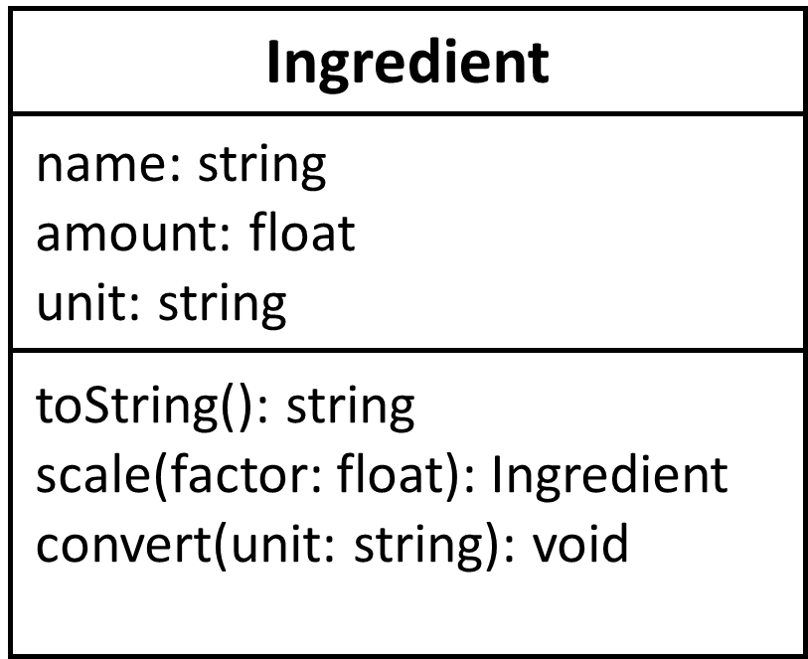
In addition, each class can have a set of methods or actions that it can perform. In programming, these are the methods stored available to the object to help manipulate or provide the object’s data. Lets assume we have and object ingrd1 of type Ingredient with the following attributes: name = "flour", amount = 3.0, unit = "cup".
These methods may represent actions taken directly on the attributes. Our Ingredient class has three methods:
toString(): returns a string describing the object; Something like amount + units + " of " + name
ingrd1.toString() would return the string “3.0 cup of flour”scale(factor): returns a new ingredient object scaled to the provide factor
ingrd2 = ingrd1.scale(2.0) results in
ingrd2 with name = "flour", amount = 6.0, unit = "cup".ingrd1 is unchangedconvert(units): returns nothing. Changes the object’s unit attribute to the provided value and adjusts the objects amount attribute so that is correct for the new units
ingrd1.convert("ml") results in ingrd1 now containing name = "flour", amount = 709.1, unit = "ml"Here, each instance method is listed in the lower part of the UML class diagram. It is annotated with the types of its expected parameters and return value or void if the method does not return any value1
When designing a class for a program, it is important to make sure that each class includes the attributes and methods needed to represent the object fully within the program. However, we also don’t need to include every single attribute and method we can think of. Sometimes it is best to be as simple as possible, only including the ones that will be used within the program. This helps make our code simple and easy to read.
A great way to start is to make a list. We can ask ourselves questions such as “what information is needed to identify a single student?” or “what actions can a teacher perform in this program?” Typically the answers to those questions will help us build our classes, and eventually build our entire program.
Classes are not typically modeled in pseudo code. The design function usually creates and UML diagrams from which developers work. Developers usually use pseudo code to develop individual methods or work through the logic of complex method call-chains.
Some UML diagrams may also use void instead of an empty parameter list if the method takes no parameters. ↩︎
A class can serve many functions, the most basic of which is to serve as a blueprint for the data and methods used to access and manipulate that data. We will refer to these as “object” or “instance” classes. An object class is a class with the primary purpose of encapsulating and manipulating related data.
When you instantiate an object of a class, you create a variable of that type. The class definition is only the specification for each of those items. So, let’s look at the next step, which is to create objects based on the classes we’ve defined.
Once we’ve created a class, we can then use it to instantiate an object based on that class. Let’s break that statement down a bit.
The word instantiate comes from the word instance, which means “an example or single occurrence of something.” So, we’re creating a single example of a class, which we call an object.
Most high level programming languages create an object by calling a special function generically called a constructor, which usually has the same name as the class from which you are trying to create an instance. For example, we can define our Ingredient class:
public class Ingredient {
  String name;
  double amount;
  String unit;

  public Ingredient (String aName, double anAmount, String aUnit){
    this.name = aName;
    this.amount = anAmount;
    this.unit = aUnit;
  }
}
Then, elsewhere in our code, we can instantiate Ingredient objects by calling the constructor - effectively, we just call the data type itself as if it were a function along with the new keyword, which will return a new instance of that object!
Ingredient flour = new Ingredient("Flour", "1.0", "cups");
Ingredient sugar = new Ingredient("Sugar", "2.0", "cups");
Here flour and sugar are both variables of type Ingredient, but they represent different things and would each contain their own name, amount and unit.
Object-oriented programming introduces a large number of new terms, each with very specific uses. Here is a quick overview of some of the new terms we’ve learned so far:
Classes are a versatile programming constructs. Their combination of data and methods make them great containers for related information and procedures. Some generic groupings would be:
main() methodYou may hear the terms abstract and concrete. Abstract classes are incomplete, in effect they are blueprints for blueprints. Concrete classes are complete. We will introduce abstract classes, and why you might use them, in a few modules.
Instance class are not normally executable. That is they may contain lots of fields (attributes) and methods, but generally have no main() method. The technique we will use for the next few modules will be to have a companion driver class.
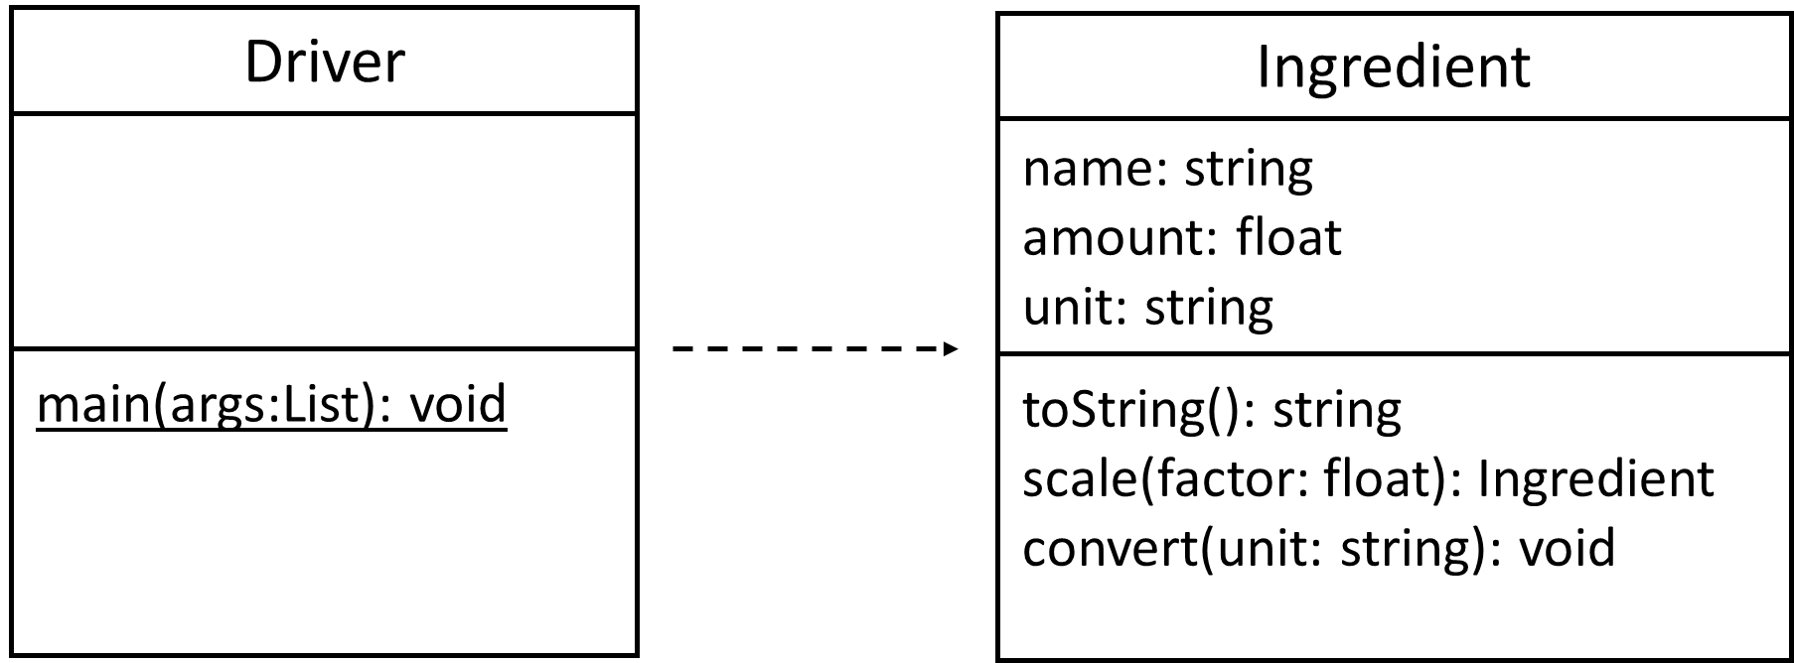
In the UML class diagram above you will see we added a separate class Driver, which has one method and no attributes.
The first thing you may notice is that the method is underlined. In UML, underlined class element are class-level attributes or objects. Each language may implement these differently, but in general to access a class element all one needs is the class name, so Driver.main() will generally call the class-method main() in the class Driver. Class-features can only be called by using the class name.
Next you may observe the dotted line arrow. This indicates that the class Driver depends on the class Ingredient. For our purposes this means:
Ingredient must work correctly for Driver to work correctlyDriver must include, use, import or somehow have access to Ingredient
Driver will make or access an Ingredient object.Objects in Java
Now that we understand the basics of what classes and objects are in object-oriented programming, let’s look at how to create these items in Java.
Creating a class in Java is very similar to creating a method. The syntax is <access modifier> class <ClassName> {<body>}. We will use public for all our class-access modifiers. The class definition (body), like all Java code-bodies, is enclosed in {}.
Java requires just a single public-class in each file, with the filename matching the name of the class, followed by the .java file extension. By convention, class names in Java should be nouns, in mixed case (Pascal-case) with the first letter of each internal word capitalized1.
So, to create an empty class named Ingredient, we would place the following code in a file named Ingredient.java:
public class Ingredient {

}
As we’ve already learned, each class declaration in Python includes these parts:
public - an access modifier enabling other parts of the code to “see” the classclass - this keyword says that we are declaring a new class.Ingredient - this is an identifier that gives us the name of the class we are declaring.{}- an empty body that does nothing.Following the declaration, we see a curly brace { marking the start of a new block, inside of which will be all of the fields and methods stored in this class. We should indent all items inside of this class, just like we do with other blocks in Java.
In order for Java to allow this code to compile, we must have a body. The { } can be empty but cannot be missing.
Of course, our classes are not very useful at this point because they don’t include any attributes or methods. Including instance attributes in an object class is one of the their basic uses, so let’s start there.
There are two types of attributes: Class and Instance.
Instance attributes are variables that “belong” to the instance. It makes sense that a Student object owns its own name.
We will defer discussion of class attributes to a later module.
To add instance attributes to a class, we can simply place a variable declarations with access modifiers inside the class but outside of any methods.
public class Ingredient{

    public String name;
    public double amount;
    public String units;
}
This tells the compiler that each instance of “Ingredient” will have three variables. This is one of the ways that objects store their data. It is possible to assign values at this point, i.e. public int amount= 2;, but this stylistically bad. Default values should be assigned in the constructors.
The Constructor is a method named after the class. It called each time an object is instantiated; it gets triggered by use of the new keyword. Typically the constructor sets default values for the instance attributes.
The Java compiler creates a default, no parameter constructor for every class.
public Ingredient(){} // provided by the complier if not overwrittenBut it is normal to override this definition with a constructor if your own.
public Ingredient(){
    this.name = "flour";
    this.amount = 2.0;
    this.units = "cup";
}
Typically, all instance variables should be given a value in the constructor. This gives programmers one place to look for all the names and values of all the instance variables in the object. Also, the constructor(s) should always be the first method(s) inside an object class’s definition.
thisJava uses this to refer to the specific object used when calling a method. It is the mechanism that ensures the Ingredient object first sees first’s data and Ingredient object second sees second’s data. It is typically used for clarity.
public Ingredient(String name, double amount, String units){
    this.name = name;
    this.amount = amount;
    this.units = units;
}
Here the parameter names obscure (or shadow) the instance variable names, and the use of this clarifies the code. We assign the values of the parameters to the instance attributes of the same name. “Shadowing” instance/class names with parameter names is considered bad coding style anywhere except in constructors. Even in constructors it is easy to avoid, such as using public Ingredient(String nameIn, int amountIn, String unitsIn).
Feel free to refer to the UML diagram below to find the correct instance attributes for the Ingredient class so far.

Your class should now look something like this, although your default values may be different:
public class Ingredient{
    public String name;
    public double amount;
    public String units;

    public Ingredient(){
        this.name = "flour";
        this.amount = 2.0;
        this.units = "cup";
    }

    public Ingredient(String name, double amount, String units){
        this.name = name;
        this.amount = amount;
        this.units = units;
    }
}
As classes grow large you will want to test methods as you add them. In CC 410 we will learn about test frameworks and will write formal tests in parallel with project development.
For now we will follow the convention of a main method in each class which can be used for testing. The basic flow would be:
main(args), instantiate an object and test (print out) the initialized value to test for correctness.main(), usually involves instantiating and object and using it to call the new methodTo instantiate, or create, an object in Java, we use the keyword new and call the class constructor.
Ingredient ingr1 = new Ingredient();This will create a new Ingredient object, and then store it in a variable of type Ingredient named ingr1. While this may seem a bit confusing at first, it is very similar to how we’ve already been working with variables of types like int and double.
Once we’ve created a new object, we can access the instance attributes as defined in the class from which it is created.
For example, to access the name attribute in the object stored in ingr1, we could put the following code in main()1
Ingredient ingr1 = new Ingredient();
String n = ingr1.name; // n is assigned the current value of
                       // ingr1's name attribute
System.out.println(n == ingr1.name); // prints true they are equal
Java uses what is called dot notation to access attributes and methods within instances of a class. So, we start with an object created from that class and stored in a variable, and then use a period or dot . directly after the variable name followed by the attribute or method we’d like to access. Therefore, we can easily access all of the attributes in an Ingredient object using this notation:
Ingredient ingr1 = new Ingredient();
System.out.println(ingr1.name);
System.out.println(ingr1.amount);
System.out.println(ingr1.units);
We can then treat each of these attributes just like any normal variable, allowing us to use or change the value stored in it:
Ingredient ingr1 = new Ingredient();
System.out.println(ingr1.name);
System.out.println(ingr1.amount);
System.out.println(ingr1.units);

n = ingr1.name;
String ingr1.name = "cardamom";
System.out.println (n == ingr1.name); // False they are not equal we changed ingr1.nameWhen testing it is important to avoid “feature creep” in the class. We want to avoid adding attributes or methods that are not called for by the UML class diagram. In software development you will drive up test and maintenance cost2.
In this class it is always acceptable to add a private static void main() method, even if it is not on the UML, to facilitate testing. We will put all our test code for instance classes in main().
public class Ingredient{
    public String name;
    public double amount;
    public String units;

    public Ingredient(){
        this.name = "flour";
        this.amount = 2.0;
        this.units = "cup";
    }

    public Ingredient(String name, double amount, String units){
        this.name = name;
        this.amount = amount;
        this.units = units;
    }

    private static void main(String[] args){
        Ingredient ingr1 = new Ingredient();
        System.out.println(ingr1.name);
        System.out.println(ingr1.amount);
        System.out.println(ingr1.units);
    }
}
This is how one might test a constructor method, we check to see all object variables have the correct values.
Things to keep in mind for this course:
main() from instance classes before submitting a ProjectWrite main()’s actual functionality last, and possibly move your testing code to the test() method. Consider this structure:
private static void test(){
  // put your test code here
}

public static void main(String[] args){
    test(); // delete this line when you are done testing
            // and ready to start writing main
}
It encapsulates all the test code in test and keeps main pretty clean. When you are satisfied that everything but main() works, delete the call and work on main().
The only way to test main()’s functionality will be from the terminal.
Recall that java always looks for a public static void main (String[] args) method to run: ↩︎
Software maintenance is estimated to be 60 - 75% of the total cost of ownership for a software project. ↩︎
We can also add additional methods to our classes. These methods are used either to modify the attributes of the class or to perform actions based on the attributes stored in the class. Finally, we can even use those methods to perform actions on data provided as arguments. In essence, the sky is the limit with methods in classes, so we’ll be able to do just about anything we need to do in these methods. Let’s see how we can add methods to our classes.
As with attributes, there are class and instance categories. Class methods are underlined on the UML diagram and will be discussed in a later module.
To add a method to our class, we can simply add a method declaration inside of our class declaration. So, let’s add the methods we need to our Ingredient class:
public class Ingredient{
public String name;
public double amount;
public String units;
public Ingredient(){
this.name = "flour";
this.amount = 2.0;
this.units = "cup";
}
public Ingredient(String name, double amount, String units){
this.name = name;
this.amount = amount;
this.units = units;
}
public String toString(){
return String.format("%.2f",amount) + " " + units + " of " + name;
}
}The toString() method is pretty straightforward. When that method is called, we simply return a string of <amount> <units> of <name>. toString() has a special meaning in Java, it is the method called whenever an object is coerced (automatically converted) to a String.
So that we get consistent results, we used the format specifier%.2f in String.format(), to round the amount off to two decimal places. Used in this manner:
String.format("<format specifier>", <variable>)String.format() returns a string representation of variable formatted according to the format specifier. See geeks for geeks for a specifier list.
We’ve already discussed variable scope earlier in this course. Recall that two different functions may use the same local variable names without affecting each other because they are in different scopes.
The same applies to classes. A class may have an attribute named age, but a method inside of the class may also use a local variable named age. Therefore, we must be careful to make sure that we access the correct variable, using the this reference if we intend to access the object’s attribute’s value in the current instance. Here’s a short example:
public class Test{
public int age;
public Test(){
this.age = 15;
}
public void foo(){
int age = 12;
System.out.println(age); // 12
System.out.println(this.age);// 15
}
public static void main(String[] a){
Test temp = new Test();
temp.foo();
}
}As we can see, in the method foo() we must be careful to use this.age to refer to the attribute, since there is another variable named age declared in that method.
For the convert() method, lets specify objects of type Ingredient must have units of “cups” or “ml” (milliliters). As parameters, it accepts a reference to the current instance named self, and value for conversion units. It must determine if a conversion is necessary. If so, it must update the attributes units and amount. There are 236.588 milliliters in a cup.
public void convert(String units){
if (this.units.equals("cups") && units.equals("ml")){
this.units = "ml";
amount *= 236.588;
}else if(this.units.equals("ml") && units.equals("cups")){
this.units = "cups";
amount /= 236.588;
}
}Let’s go ahead and add the scale() method as well. That method should accept a single double as a parameter It should: (1) create a new object, (2) copy its object attributes to the new object, (3) scale the new object’s amount by the scaling factor.
public Ingredient scale(double factor){
Ingredient output = new Ingredient();
output.name = this.name;
output.units = this.units;
output.amount = this.amount * factor;
return output;
}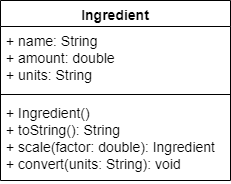
The Driver class is much simpler. It has one feature, a class method public static void main(String[] args)1. Everything that needs to be done will be done in the main method. A template might be:
public class Driver{
public static void main(String[] args){
}
}A class feature belongs to the class, no object is necessary to use it. Examples include math methods we write
double five = Math.sqrt(25.); to access the class function sqrt(). We do not have to create a Math object first:
Math mo = new Math(); // Incorrect
double five = mo.sqrt(25.); // IncorrectJava uses the keyword static as a function modifier to create class methods and attributes. Not all languages use the static keyword in the same way. Be careful when using static in discussing class-level features. In Java they are virtually synonymous, but in general they are not.
Lets add an instance Ingredient as i1.
public static void main(String[] args){
Ingredient i1 = new Ingredient();
}When the java compiler (javac) sees an identifier it does not understand, it looks in
import statements.java file is in.java file it also compiles it.class file it uses itSo when our Driver.java uses Ingredient, the java compiler (re)compiles Ingredient.java.
In Java, class methods have the modifier static ↩︎
Let’s put this all together by finishing our project with a full worked example. We want to use our Ingredient class to help us bake some sugar cookies. Unfortunately, the recipe uses both cups and milliliters interchangeably, and we want to be able to scale the recipe up or down depending on how many batches we need to make.
So, let’s build a program that performs that task for us. It should first ask the user to choose a desired unit of measurement by selecting a number, with 1 representing “cups” and 2 representing “ml”. Then, it should also ask for a scaling factor as a decimal number. Finally, it will print out the required ingredients in the correct units and scaled to the correct scaling factor.
The recipe that we have is as follows:
First, let’s start with our existing Ingredient class from this module:
public class Ingredient{
public String name;
public double amount;
public String units;
public Ingredient(){
this.name = "flour";
this.amount = 2.0;
this.units = "cup";
}
public Ingredient(String name, double amount, String units){
this.name = name;
this.amount = amount;
this.units = units;
}
public String toString(){
return String.format("%.2f",amount) + " " + units + " of " + name;
}
public void convert(String units){
if (this.units.equals("cups") && units.equals("ml")){
this.units = "ml";
amount *= 236.588;
}else if(this.units.equals("ml") && units.equals("cups")){
this.units = "cups";
amount /= 236.588;
}
}
public Ingredient scale(double factor){
Ingredient output = new Ingredient();
output.name = this.name;
output.units = this.units;
output.amount = this.amount * factor;
return output;
}
}To complete this example, we want to write a Driver class that uses two user inputs - a value for units and a scaling factor. It should then print out the ingredient list for sugar cookies using those units, and scaled by the given scaling factor.
First we write the generic driver program and class skeleton:
import java.util.Scanner;
public class Driver{
public static void main(String[] args){
}
}Our program takes 2 inputs. First, we should ask the user which units should be used. Since we only have two options, it makes sense to just offer those options and allow the user to input a number to select from them. For the scaling factor, we can just ask for any decimal value:
public static void main(String[] args){
Scanner scanner = new Scanner(System.in);
System.out.println("Enter 1 for cups or 2 for ml: ");
int option = scanner.nextInt();
while(!(option == 1 || option == 2)){
System.out.println("Error! Unrecognized option");
System.out.println("Enter 1 for cups or 2 for ml: ");
option = scanner.nextInt();
}
String units = "";
if (option == 1){
units = "cups";
}else {
units = "ml";
}
System.out.println("Enter a scaling factor as a decimal number: ");
double scaleFactor = scanner.nextDouble();
// more code here.
}Now that we have our input, we can handle the first ingredient. We need to create an object that represents 2.75 cups of flour, then convert it, scale it, and print it.
// Create the object
Ingredient flour = new Ingredient("flour", 2.75, "cups");
// Scale the ingredient - this returns a new object
Ingredient scaledFlour = flour.scale(scaleFactor);
// Convert the units - this updates the object
scaledFlour.convert(units);
// Print the output
System.out.println(scaledFlour);To finish the program, we can repeat the same process for all ingredients. This is left as an exercise for the reader!
There is no “project” for this module. Instead the basics of object classes as well as the use of objects will be reinforced in the next few modules covering aggregate data, strings, exceptions and file system interactions.
In this chapter, we learned about creating objects in our programs. We also learned about the two class “Instance” and “Driver” model we will use for the rest of this course.
Storing More Data in Lists & Arrays!
So far, we’ve learned how to store many different types of data in variables. We can then use those variables in our programs to receive user input, store the results of calculations and so much more.
However, we have to individually declare and maintain each variable in our code. As we build larger programs, we’ll have to deal with a commensurately large amount of variables, and it can be hard to keep track of all of them.
At the same time, we may also want to store many related items together. For example, if we are building a program to calculate student grades, we may want to be able to store each grade a student has received. With what we’ve learned so far, we might have to create variables named assignment1, assignment2, assignment3, and so on, to store this information. This can quickly become very difficult to manage, and it is difficult to write code that can perform calculations on those variables. Each time a new variable is added, every location in the code that references those variables would need to be changed.
Is there a better way to do it? YES!
Nearly every programming language supports special types which aggregate, or collect data in a single variable. In languages which support objects, these types are instance classes which may have methods and attributes.
Arrays are a special type of variable that can store multiple items of the same type, so ‘int’ or ‘bool(ean)’. Some programming languages, such as Java, comes with support for arrays built into the language. While other languages, such as Python, require us to adapt other aggregate data types to build arrays.
In general, we will stick with storing items of the same type in each array.
A great way to think of an array is like a set of post office boxes that we might see at our local post office, as shown in the image below. Each box has a number that uniquely identifies it. So, if we know which number is ours, we can easily receive our mail.
Similarly, the post office can look at the address line on the letter to find the post office box number it should go to, and then they can place it in the correct place.
An array works in a very similar fashion. Arrays consist of a set of boxes with sequential numbers, starting at 0. So, an array that has 5 boxes, or elements, would have 5 boxes, numbered 0 through 4. The number for a particular element is called its index.
For example, let’s consider an array that contains 5 elements, and each element is one of the first five letters of the alphabet as shown in the image below.
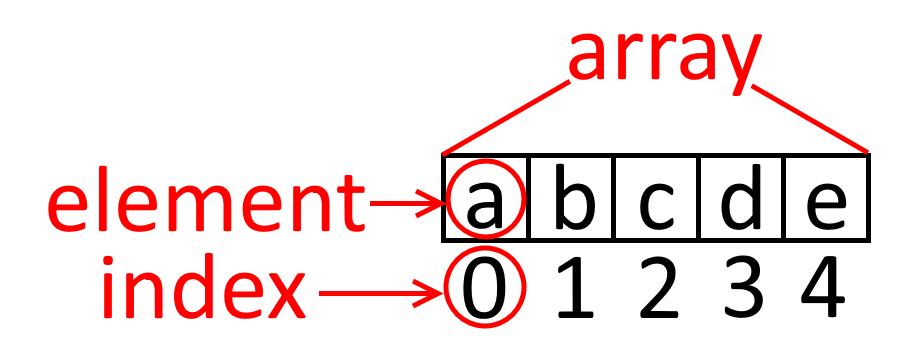
In this array, we’d say that the element at index 0 is a.
One of the most powerful features of arrays is the ability to create a multidimensional array. A multidimensional array is an array that contains another array within each element, sometimes many layers deep. This is very useful when we need to store data in a grid layout, for example.
The image below shows how data might be represented in a 2-dimensional array. The element x is located in row 1, column 3. So, it would be part of the array stored in index 1 in the primary array, and the element itself is at index 3 in the array stored there.
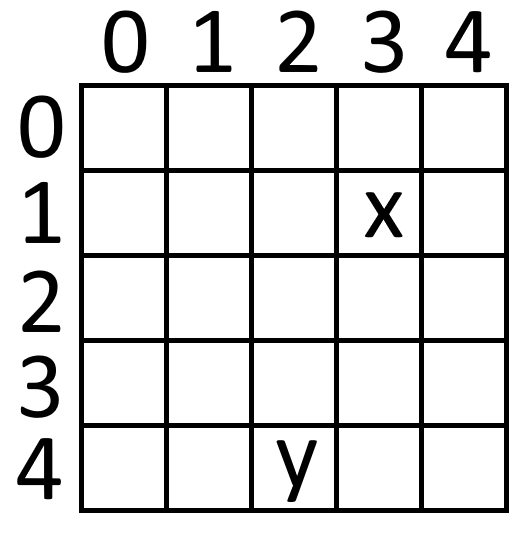
We’ll learn how to work with arrays in a specific programming language later in this chapter.
File:USPS Post office boxes 1.jpg. (2017, May 17). Wikimedia Commons, the free media repository. Retrieved 18:17, November 5, 2018 from https://commons.wikimedia.org/w/index.php?title=File:USPS_Post_office_boxes_1.jpg&oldid=244476438. ↩︎
Of course, once we’ve created an array of data, we need some way to access its elements easily in our code. Thankfully, we can use the loop structures we’ve learned in a previous chapter to iterate across our arrays. Iteration is the term we use to describe accessing each element in the array and possibly performing some repeated action using that element.
For example, consider the flowchart below, showing a simple program that uses loops and arrays:
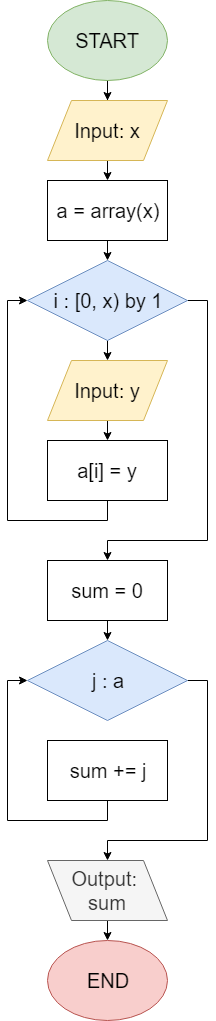
This program begins by accepting a single input from the user, stored in the variable x. That input is used to determine the size of an array, denoted by the array(x) block. Each programming language has its own way of creating an array, but we’ll use this simplified form in these flowcharts.
Next, the program reaches a For loop which uses i as its iterator variable. That variable will include all values from 0 up to, but not including, the value stored in x. Notice that there is a parenthesis to the right of x, showing that it is not included in the sequence denoted by [0, x).
Inside of that loop, we receive another input from the user, stored in the variable y. Then, we store that value into the array, using our iterator variable i as the index in the array. So, the first input we receive and store in y will be stored in a[0], the first element of the array. In most programming languages, we use square brackets [] after an array variable to denote a specific element in the array, with the index of that element shown inside of the square brackets. When the loop repeats, the next value will be stored in a[1], and so on, until the array contains x values.
Once the first For loop terminates, we create a new variable named sum and set it initially equal to 0. We’ll use this variable to add up all of the numbers in the array in the next For loop. However, that loop is defined a bit differently. In the flowchart we see that the loop is defined as j : a, which means that we are using j as our iterator variable, but instead of getting values from a mathematical sequence such as [0, x) from the first loop, we are taking the items directly from our array, a, instead. These special For loops are sometimes known as For Each loops or Enhanced For loops, depending on the language. In essence, they repeat the loop one time for each element in the array given. So, we’d say “for each j stored in a, add j to sum” to describe this loop.
The first time we run the code inside of that loop, the variable j will be storing the value of the some element in array a. So, we could say that j has the same value as a[0]. We’ll add that value to the sum variable, then repeat the loop. In the next iteration, the variable j will then store a different value in a, or a[1]. We’ll continue to repeat the loop until each element in a has been used–the loop ensures we have seen all the elements exactly once.
At the end, when we output the sum variable, it should be the sum of all of the elements in the array.
Of course, we can easily rewrite these loops as While loops instead, or we could use the standard form of the For loop as the second loop, using the iterator variable to refer to the index of the element inside of the array instead of the element itself.
As a general rule:
Consider taking one egg at a time out of full egg carton.
As we start creating objects, one major concept is how objects are handled differently than “primitive” data types when used as arguments; i.e. when passed to functions. Typically, there are two scenarios: call by value and call by reference. Let’s discuss them both in detail to understand how they differ and the impact that may have on our code.
When method parameters are handled in a call by value way, that means that each time we call the method, that method gets a unique copy of the parameter. So, any changes made to that parameter won’t be reflected in the code from which the method was called.
Let’s look at an example:
public static void main(String[] args){
int x = 5;
int y = addThree(x);
System.out.println(x);
System.out.println(y);
}
public static int addThree(int x){
x = x + 3;
return x;
}In this code, we initialize the variable x to the value
$ 5 $. Then, we pass that value as an argument to the method addThree, where it is stored in the parameter named x. Inside of that method, we add
$ 3 $ to that variable, then return its new value.
Back in the main method, when we print the value of x, it will still be
$ 5 $. Why? Since this method is using call by value, the method addThree gets a copy of the value stored in x, which it stores in its own variable. So, when the method updates the value in x it is only changing the value in it’s copy. The original value from the main method is unchanged.
However, the value y in the main method stores the value returned by addThree, which is
$ 8 $. So, when we print that value, we’ll get
$ 8 $ as expected.
If a method handles parameters in a call by reference way, the method simply gets a reference, sometimes called a pointer, to the value passed as an argument. In that way, when it changes the value of that argument, it is also changing the value of the original variable passed in as that argument.
Here’s another example:
public static void main(String[] args){
int[] x = {1, 2};
changeLast(x);
System.out.println(x[0]);
System.out.println(x[1]);
}
public static void changeLast(int[] x){
x[1] = 5;
}In this example, we are creating an array named x in the main method, which stores two values,
$ 1 $ and
$ 2 $. Then, we use the changeLast method to change the last element in the array to
$ 5 $. Notice that we are providing the array x as an argument to the changeLast method, but that method does not return a value.
When we print the first element of x, it is
$ 1 $ as expected. However, when we print the second element of x, we see that it is now
$ 5 $, even in the main method. Why? This is because the method changeLast is using call by reference, so instead of getting a copy of the variable x, it actually gets a reference to where that array is stored in the main method. Therefore, any changes made to x in changeLast also affect the value in main
However, it is very important to know that we cannot reassign the value of a variable passed using call by reference and expect it to work the way we want. Here’s an example:
public static void main(String[] args){
int[] x = {1, 2};
changeLast(x);
System.out.println(x[0]);
System.out.println(x[1]);
}
public static void changeLast(int[] x){
x = {3, 4};
}In this instance, we are reassigning the variable x inside of changeLast to an entirely new array. By doing so, we are changing the reference that it uses to point to the new array. The old array still exists, and the variable x in main still refers to that array. So, when we print the values of x in main, we’ll get
$ 1 $ and
$ 2 $, since they haven’t changed.
In the example above that worked, we are simply changing a value inside of the array, not reassigning the array itself.
Unfortunately, it can be very difficult to tell on the surface which parameter handling method is being used by a particular piece of code, especially pseudocode. Each language handles this a bit differently, so we’ll have to carefully read our language’s documentation to know for sure. Later in this chapter we’ll discuss the specifics for the language we are using.
However, there are some general rules that we can follow that work in most cases:
When in doubt, we can always write a simple test program in any language to check and see how parameters are handled.
Arrays in Java
As with any variable in Java, we must declare an array variable before we can use it.
To declare an array, we’ll need to provide the type, a variable name, and square brackets [] to denote that this variable is an array.
The preferred way of doing so is:
<type>[] <variable_name>;
as we can see in these examples:
//integer array
int[] a;
//boolean array
boolean[] b;
//double array
double[] d;We can create an array of an available type in Java, including all primitive data types and object types. We can even create our own classes and store objects created from those classes in an array.
One easy way to remember this syntax is to say “I’m creating an int array named a (int[] a).” Try saying it with the examples above!
There is an alternative syntax as well:
<type> <variable_name>[];
though it is rarely used in practice. It makes less sense to say “I’m creating an int named x array,” doesn’t it?
Once we have declared an array, we can initialize it just like any other variable. In Java, use the new keyword to create an array. We’ll also need to provide it with a size, which must be a positive, whole integer.
The standard format for this is:
<variable_name> = new <type>[<size>];
as we can see in these examples:
//integer array
int[] a;
a = new int[5];
//boolean array
boolean[] b;
b = new boolean[10];
//double array
double[] d;
d = new double[15];Of course, we can combine both the declaration and initialization into a single statement:
//integer array
int[] a = new int[5];
//boolean array
boolean[] b = new boolean[10];
//double array
double[] d = new double[15];If we know the values we’d like to store in the array when we initialize it, we can use the shortcut syntax to build the array directly:
<type>[] <variable_name> = {<item1>, <item2>, <item3>, ... , <itemN>}
as we can see in these examples:
//integer array
int[] a = {1, 2, 3, 4, 5};
//boolean array
boolean[] b = {true, false, true, false};
//double array
double[] d = {1.2, 2.3, 3.4};Otherwise, we can store items individually in the array, as we’ll see in the next page.
new KeywordThe keyword new is used to create a object. Objects are a collection of data and the methods used to access and manipulate that data.
When you instantiate (the technical term for create) an object, a memory cubby hole, is created and given that name. You may then use various methods to assign, manipulate and change the data it holds. In general you must use new to get a distinct object in memory.
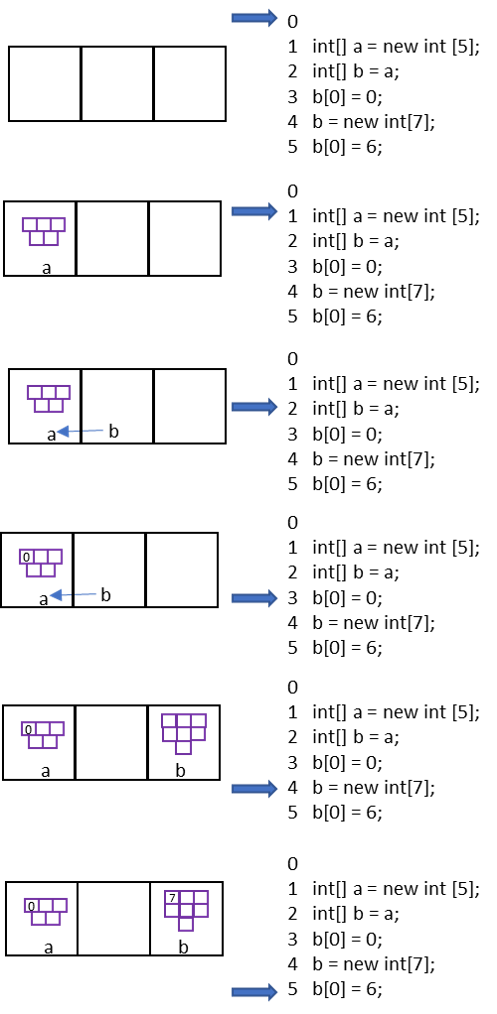
Arrays as data types pre-date object oriented languages by several decades, they are one of the oldest aggregate data types. So when Java appears on the scene in the 1990s, they adopted the “C-style” array definition syntax int[] a = {...} in addition to the more conventional int[] a = new int[]. Most object oriented languages will have some type of “syntactic sugar”, or short-hand syntax, for array and list creation.
Once we’ve created our array, we can access individual array elements by placing the index of that element inside of the square brackets [] following the variable name.
Array indexes in Java start at 0. So, to access the first element of an array named x, we would use x[0].
Similarly, the last array index is one less than the total size of the array. If the array named x has a size of 5, then the last element would be x[4].
Let’s take a look at an example in the code below. It will create an array of 5 integers, assign those integers a value, then sum them up and print the result.
public static void main(String[] args){
//create an integer array
int[] a = new int[5];
//assign array elements
a[0] = 5;
a[1] = 10;
a[2] = 15;
a[3] = 20;
a[4] = 25;
//create a sum variable
int sum = 0;
//add up all the elements in the array
sum = sum + a[0];
sum = sum + a[1];
sum = sum + a[2];
sum = sum + a[3];
sum = sum + a[4];
//print the sum (it should be 75)
System.out.println(sum);
}Feel free to copy this code to a file named Array.java and modify the code to try other operations with arrays. Notice that the code above is simply a main method, so you’ll have to add the appropriate class declaration for the Array class in order to run this code!
Arrays in Java have a fixed length, which is set when they are initialized.
To get the length of an existing array, use the built-in length property:
int[] a = new int[5];
boolean[] b = {true, false, true, false};
System.out.println(a.length); // 5
System.out.println(b.length); // 4While it may seem obvious what the size of each array is in this example, there are many instances where we’ll be given an array with unknown size from another piece of code. Similarly, as we start working with loops and arrays, we’ll find that it is very useful to be able to access the length of the array directly.
To create a multidimensional array in Java, simply provide additional square brackets [] as part of the array declaration. Similarly, when we initialize the array, we’ll need to provide a length for each dimension of the array:
//2d integer array
int[][] a = new int[5][5];
//3d boolean array
boolean[][][] b = new boolean[2][4][8];
//4d double array
double[][][][] c = new double[5][4][6][2];We can also directly initialize the array elements, just as we did before. We’ll need to include additional curly braces {} for each dimension:
//2d integer array
int[][] a = {{1, 2}, {3, 4}, {5, 6}};Typically, multidimensional arrays will only have 2 or 3 dimensions, but Java will allow up to 255 dimensions.
Each of the examples above will create a multidimensional array with each dimension consisting of arrays of the same length. However, it is possible to have arrays of different length within the same dimension, though it can be much more difficult to manage that scenario. We won’t deal with that in this course, but it may be useful in some situations.
To get the size of each dimension, we can use the length property on an element at that dimension:
//2d integer array
int[][] a = {{1, 2}, {3, 4}, {5, 6}};
System.out.println(a.length); // 3
System.out.println(a[0].length); // 2Of course, we’ll need to make sure that a[0] exists before trying to find its length. If not, it will cause an error.
To access or assign elements in a multidimensional array, add additional square brackets [] for each dimension:
//2d integer array
int[][] a = {{1, 2}, {3, 4}, {5, 6}};
a[0][1] = 10;
System.out.println(a[0][1]); // 10
System.out.println(a[1][1]); // 4
System.out.println(a[2][0]); // 5Again, remember that the indexes in each array dimension begin at 0. So, a[1][1] is actually accessing the second element in the first dimension of a, which is an array containing {3, 4}, and then the second element in that array, which is 4.
We’ve already covered one of the operations we can perform on an array, length. Let’s look at one more.
Java has a built-in method to copy sequential elements from one array to another:
System.arraycopy(source, sourcePosition, destination, destinationPosition, length)Just like the method we use to print to the terminal, System.out.println, this is just another method that is available in System that we can use in our code.
That method accepts 5 inputs:
The source and destination arrays must store compatible data types. Likewise, if we give a length which tries to copy too many elements from the source array, or if it goes past the end of the destination array, an error will occur.
Here is an example of how it can be used to copy elements from one array to another:
int[] a = {1, 2, 3, 4, 5, 6, 7};
int[] b = new int[3];
System.arraycopy(a, 1, b, 0, 3);
System.out.println(b[0]); // 2
System.out.println(b[1]); // 3
System.out.println(b[2]); // 4To learn more about this method and how to use it, consult the official Java documentation linked below.
Reference: System.arraycopy
One of the most powerful ways to use arrays is to combine them with loops. Loops provide an easy way to perform operations on all elements in an array, no matter what the size of the array is.
Let’s go back to the flowchart seen earlier in this chapter, and see if we can implement that program in Java.
First, we’ll need to start with a program that reads information from the keyboard. Let’s place this code in ArrayLoops.java, which should be open to the left:
// Load required classes
import java.util.Scanner;
public class ArrayLoops{
public static void main(String[] args) throws Exception{
// Scanner variable
Scanner reader = new Scanner(System.in);
/* -=-=-=-=- MORE CODE GOES HERE -=-=-=-=- */
}
}For the rest of this example, we’ll look at a smaller portion of the code. That code can be placed where the MORE CODE GOES HERE comment is in the skeleton above.
Looking at the flowchart above, we must first accept one input from the user, an integer x that gives the size of the array. Then, we want to create an array named a which is able to store those elements.
int x = Integer.parseInt(reader.nextLine());
int[] a = new int[x];In the code, we use our reader to read an integer from the user and store it in x. Then, we can declare and initialize an array named a, using the value stored in x as the size of the array.
Next, we’ll enter a for loop that reads input from the user, and then places that input into the array we created. Here’s what that might look like in Java:
int x = Integer.parseInt(reader.nextLine());
int[] a = new int[x];
for(int i = 0; i < x; i++){
int y =Integer.parseInt(reader.nextLine());
a[i] = y;
}Here, we are using a standard For loop to iterate over the array. Inside of the loop, we simply read another input from the user, then store that input into the element in the array indicated by our iterator variable i.
Finally, once we’ve filled the array, we must iterate over each element to find the sum and then print that to the terminal:
int x = Integer.parseInt(reader.nextLine());
int[] a = new int[x];
for(int i = 0; i < x; i++){
int y = Integer.parseInt(reader.nextLine());
a[i] = y;
}
int sum = 0;
for(int j : a){
sum += j;
}
System.out.println(sum);Here, we are using Java’s version of a For Each loop, known as an Enhanced For loop, to iterate over each element stored in the array a. The syntax for an Enhanced For loop in Java is very simple. Inside of the parentheses, we must provide a variable to use as an iterator. Typically we just declare a new variable there, such as int j in this example. Then, following a colon, we give the array that we’d like to iterate over.
When using an Enhanced For loop in Java to iterate over an array, the array itself cannot be changed from within the loop. If that happens, the Java program will throw an error and stop.
So, we must make sure we don’t try to edit the array from within an Enhanced For loop. Instead, we would use a standard For loop to iterate over the indices of the elements in the array, as seen in the first loop in this example. Using that approach, we can edit the array from within the loop.
Once inside of the loop, we can use j to refer to the current element in a that we are looking at. Notice that it is not the index of that element, but the actual value of the element itself.
So, we can simply add the value of j to the sum variable. Once the loop has terminated, we can just print the sum variable to the terminal.
This example shows both ways we can use a loop to iterate over the elements in an array. The first approach, using a standard For loop, will iterate over the indices of the array, from 0 up to the length of the array. The second approach, using an Enhanced For loop, iterates over the items themselves, but we cannot edit the array from within the loop.
In general, it is recommended to always use an Enhanced For loop whenever we wish to iterate over an array without making changes to the array itself. However, if we plan on making changes, we should use a standard For loop and iterate over the indices instead.
Reference: The for Statement
Working with arrays in Java can also be quite complex. Thankfully, we can break each step down into subgoals to make it more manageable.
Here are the subgoals we can use to evaluate statements with arrays:
This may be a bit confusing at first, but it will really help us understand arrays. Anytime we are tracing code and see a new array defined, we need to set up an array in our list of variables to store those values. That array will have indexes ranging from 0 to one less than the size of the array. So, if the array has size 5, then we’ll need to make an array variable with 5 boxes, and then label them from 0 to 4. We’ll use that to keep track of the values in each element of the array.
Next, we’ll need to compare the data types of any statements using the array. This links back to the earlier subgoals we learned for evaluating expressions. For example, if the array’s data type is int[], we must make sure that each element is treated as an int variable.
Finally, we can trace through the code one line at a time, and update the values of each element in the array as we go. Once again, we’ll need to rely on earlier subgoals to evaluate each expression, conditional construct, and loop that uses the array.
We can also use a few subgoals to help us create new arrays
[]To create a new array, we simply determine the data type of each element in the array, and then add square brackets after the data type to create the array data type. So, for an array of double values, we’d declare a variable with type double[].
{Initializer List} or new datatype[size]Next, we can initialize the array in one of two ways. If we already know what values we want to store in the array, we can use a list of comma separated values inside of curly braces, as in this example:
int[] a = {1, 2, 3, 4, 5};Alternatively, if we don’t know the individual elements but we do know the expected size, we can create an empty array of a particular size using this syntax:
int[] a = new int[5];That’s it! Once we’ve initialized the array, we can treat each element in the array as an individual variable and use the subgoals for evaluating expressions to handle assigning and using values stored in the array.
Now that we’ve learned how to work with loops and arrays, let’s see if we can solve a more challenging problem using loops and arrays.
For this example, let’s build a program that matches the following problem statement:
Write a program to calculate weighted grades for a student taking a course. The program should begin by accepting the student’s name and a single positive integer as keyboard input, giving the number of assignments in the course. If the input is invalid, simply print “Invalid Input!” and terminate. All input is from the keyboard.
The program should accept the test scores, as ints between 0 and 100, and the test weights, in order, as floats between 0. and 1. The input pattern will be: test 1, test weight, test 2, test weight 2, …
If an out of range score or weight is input, the program should simply print “Invalid Input!” and terminate. If too many tests are entered, print “Invalid Input!” and terminate.
The program should ensure that the total sum of the weights is equal to 1.0. If the weights do not add to 1.0, The program should print “Invalid Input!” and terminate.
The program should print out the the student’s final score. For each assignment, multiply the score and the weight, and then add that value to the total score for the student. The print out should be of the form
<name> earned a ##.##orTrace earned a 78.86. UseString.format("%s earned a %5.2f",<name>, <final_score>)to create the string for printing.
We’ll start by roughing out a Driver and Object UML class diagram. Since instances are about the data, lets put all the data and logic about the student and exams in a Student class. Next lets describe the methods which might be useful access and manipulate that data.
The attributes would include a student’s name and arrays of their exam scores and and weights. To make arrays we will need to track the “maximum” number of test for a student and the current number of tests stored in the arrays.
The methods would include
toString method that returns <name> earned a ##.##Let’s have the input method return true if everything with reading and storing the data goes ok, and false if any invalid data is used.
We’ll actually run this program with a Driver class, which will perform the following actions:
Student method indicates invalid input was sent, prints “Invalid Input!” and terminates the program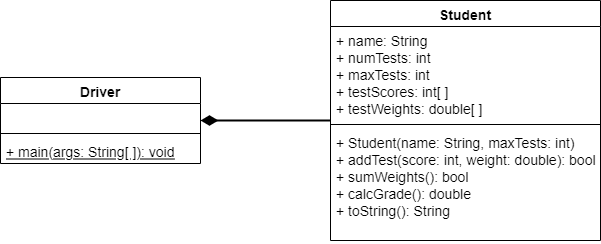
First, we’ll need to build the skeleton of our class. By convention, all fields come before all methods and constructors come before other methods.
public class Student{
// Instance fields
public String name;
public int numTests;
public int maxTests;
public int[] testScores;
public double[] testWeights;
// Constructor(s)
public Student (String name, int maxTests){
}
// Instance Methods
public boolean addTest(int score, double weight) {
return false;
}
public boolean sumWeights(){
return false;
}
public double calcGrade() {
return 0.0;
}
public String toString() {
return "";
}
}This class definition, will compile without errors. Note how each method with a return type returns some default value. Each method has the correct signature and this skeleton should pass any structure test.
We know the method Student(name: string, tests: int) on the UML is the constructor. It needs to set up all the instance attributes, of which there are five. It is common in constructors to use parameter names that match instance field names. This necessitates the use of the key word this in the constructor to disambiguate the identifiers.
public Student (String name, int maxTests){
this.name = name;
this.numTests = 0;
this.maxTests = maxTests;
this.testScores = new int[maxTests];
this.testWeights = new double[maxTests];
}Here we have initialized the two arrays to the correct size.
A test for this constructor in the Driver class might be
public static void main(String[] args){
Student test = new Student("Willie", 3);
System.out.println(test.name);
System.out.println(test.maxTests);
System.out.println(test.numTests);
System.out.println(test.testScores.length);
System.out.println(test.testWeights.length);
}You should be able to determine the values which should print from the code.
First we need to check a few things when arriving in the addTest method. First, we need to make sure the arrays are not at full. This is the purpose of the numTests attribute. The numTests attribute starts at 0, and is incremented each time a test is added. Thus as long as numTests < maxTests, there is still room in the array of another test.
If there is room, we need to ensure that the parameters are in range. If we see a problem in any of these areas, return false. Assuming the parameters are in range, add them to the arrays and increment numTests.
Finally, if the list of weights is now full, we need to check that it sums to 1.0. We have a method, sumWeights() which performs this check, so we just call it.
public boolean addTest(int score, double weight) {
// check that we can add another test
if (numTests < maxTests) {
// check if score and weight are valid
if (score < 0 || score > 100 || weight < 0.0 || weight > 1.0) {
// return false if an error occurs
// the Driver class will print the error
return false;
}
// add the score and weight to the arrays
testScores[numTests] = score;
testWeights[numTests] = weight;
numTests++;
// check if arrays are full
if (numTests == maxTests) {
// if so, return an error if the sum is invalid
return sumWeights();
}
// everything is good, so return true
return true;
} else {
// cannot add a test, so return false
return false;
}
}In our Driver class, we might call this method in this way:
Student student = new Student("Willie", 3);
if (!student.addTest(80, 0.25)){
System.out.println("Invalid Input!");
return;
}If there is a problem in processing the parameters, the addTest() method should return false. So, if the method returns true no error will be printed, but if it returns false then we will enter the if-statement and print an error instead.
This method is a great example of the accumulator pattern when working with arrays. In the accumulator pattern we typically use an enhanced for loop (a for each loop) to iterate through each element in the array. Inside of the loop, we compute some value across all of those array elements, such as the sum, maximum, or average.
Finally, recall that double data types are subject to some minor representation error, so when we test to see if the value is exactly 1.0 we should really check if it is within a very small range of values between 0.99999999 and 1.000000001 or similar.
public boolean sumWeights(){
double sum = 0.0;
for(double d : testWeights){
sum += d;
}
// check if sum is very close to 1.0
return 0.99999999 < sum && sum < 1.000000001;
}Here we use the accumulator pattern again to sum up the contribution of each test (testScores[i] * testWeights[i]). We can do this because we entered the scores and weights in order; so testScores[0] is matched with testWeights[1]. However, since we are using two different arrays, we cannot use an enhanced for loop, and must instead us a standard for loop, as we’ll see in the code.
This practice is called the parallel array pattern. Each array has different type of data, but each matching index in every array is related in some way. This is a fairly common pattern in non-object-oriented programming. Later in this class, we’ll see how to use our own classes to better store this data in an object-oriented way.
public double calcGrade() {
double sum = 0.0;
for (int i = 0; i < numTests; i++) {
// multiply the score by the weight and add to total
sum += testScores[i] * testWeights[i];
}
return sum;
}Here we use the given string format String.format("%s earned a %5.2f",<name>, <final_score>) to create our output. So, we just compute the final grade and return that string:
public String toString(){
double sum = calcGrade();
return String.format("%s earned a %5.2f", name, sum);
}At this point, our Student class should be complete. Feel free to stop a minute and test it by writing your own code in the Driver class before moving on.
The Driver class should perform the following steps:
Student objectStudent method indicates invalid input was sent, print “Invalid Input!” and terminate the programSince the Driver class only has a main method, we can start with this skeleton:
public class Driver{
public static void main(String[] args) {
}
}From there, we need to add the code to create a Scanner object to read input from the terminal. This involves importing the java.util.Scanner library, and then instantiating a Scanner inside of the main method to read from System.in:
import java.util.Scanner;
public class Driver{
public static void main(String[] args) {
Scanner scanner = new Scanner(System.in);
}
}Next, we can start by reading the name of the student and the number of tests from the terminal, and then instantiating our new Student object using that data:
import java.util.Scanner;
public class Driver{
public static void main(String[] args) {
Scanner scanner = new Scanner(System.in);
System.out.print("Enter the student's name: ");
String name = scanner.nextLine();
System.out.print("Enter the total number of tests: ");
int maxTests = Integer.parseInt(scanner.nextLine());
Student s = new Student(name, maxTests);
}
}Now that we have created our student, we can read the input for each score and weight and slowly populate that Student object using that information. If any of those methods returns false we know that we’ve encountered an error and have to stop the program.
import java.util.Scanner;
public class Driver{
public static void main(String[] args) {
Scanner scanner = new Scanner(System.in);
System.out.print("Enter the student's name: ");
String name = scanner.nextLine();
System.out.print("Enter the total number of tests: ");
int maxTests = Integer.parseInt(scanner.nextLine());
Student s = new Student(name, maxTests);
for (int i = 0; i < maxTests; i++) {
System.out.print("Enter score " + (i+1) + ": ");
int score = Integer.parseInt(scanner.nextLine());
System.out.print("Enter weight " + (i+1) + ": ");
double weight = Double.parseDouble(scanner.nextLine());
if (!s.addTest(score, weight)) {
System.out.println("Invalid Input!");
return;
}
}
}
}Finally, if we’ve entered all of the scores, we can just call the toString method of the Student class to print the final score earned by that student:
import java.util.Scanner;
public class Driver{
public static void main(String[] args) {
Scanner scanner = new Scanner(System.in);
System.out.print("Enter the student's name: ");
String name = scanner.nextLine();
System.out.print("Enter the total number of tests: ");
int maxTests = Integer.parseInt(scanner.nextLine());
Student s = new Student(name, maxTests);
for (int i = 0; i < maxTests; i++) {
System.out.println("Enter score " + (i+1) + ": ");
int score = Integer.parseInt(scanner.nextLine());
System.out.println("Enter weight " + (i+1) + ": ");
double weight = Double.parseDouble(scanner.nextLine());
if (!s.addTest(score, weight)) {
System.out.println("Invalid Input!");
return;
}
}
System.out.println(s.toString());
}
}A sample execution of this program might look like this:
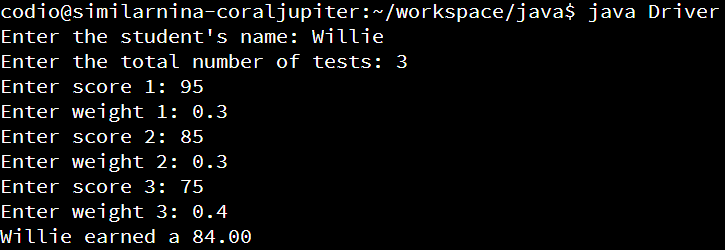
Let’s do one more example, this time with multidimensional arrays using Matrix.java and MatrixDriver.java.
Let’s see if we can write a program that solves this problem statement:
Write a program to print the transposition of a two dimensional array. Begin reading two numbers,
mandn, as input from the keyboard, withmrepresenting the number of rows in the array andnrepresenting the number of columns. If either input is 0 or less, output “Error - Invalid Input!” and terminate the program.
Otherwise, the program should then read
m * ninteger inputs from the keyboard and place them into the array, filling up each row before moving to the next row.
Once all inputs have been accepted, the program should print the transposed version of the array, where the orientation is adjusted so that row i is now column i and column i is row i.
Let’s see if we can build a driver and object class program that meets that specification.
The data is simply an m * n 2-dimensional array, or a m * n matrix. The Matrix class should know its basic dimensions, it should have a way to fill up the matrix and a way to print out its transpose. This class will need access to the keyboard.
The MatrixDriver should take keyboard input, instantiate a Matrix object, fill it up and then call the object’s print transpose method.
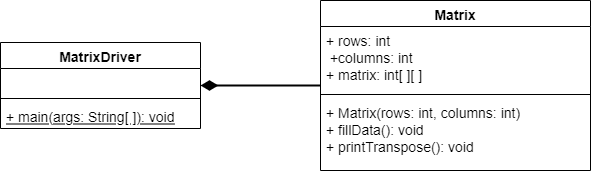
Lets set up the following methods:
Matrix(int r, int c): lets have the constructor take the number of rows a columns as parameters AND build an empty r * c int array filled with 0.fillData(): lets write a function that accepts keyboard input and fills up the matrix, row-by-row, column-by-column.printTranspose(): print out the transpose of the matrix, or the rows and columns switched.The transpose and fill operations can be tricky. As always, start with a sketch of their control flow, paying attention to the types of loops you may want to use as well as the number of arrays you will need. Don’t forget to import java.util.Scanner.
Start by declaring Matrix’s instance attributes
public int rows;
public int columns;
public int[][] matrix;Matrix()Our constructor should accept two integer arguments, rows and columns and initialize three instance attributes.
public Matrix(int rows, int columns){
this.rows = rows;
this.columns = columns;
matrix = new int[rows][columns];
}fillData()This method should accept m * n keyboard inputs and place them in the matrix. It actually makes sense to use multiple nested For loops, one for each dimension of the array. Consider the following code:
Scanner scanner = new Scanner(System.in);
for(int row = 0; row < this.rows; row++){ // each row
for(int col = 0; col < this.columns; col++){ // each column or element
matrix[row][col] = scanner.nextInt(); //get keyboard input
}
}In this code, we have one For loop that loops through each row in the list; here row is the index of the row . Then, inside of that loop, there is a second For loop using col to march through each column (element) of that row.
Inside of that loop, we can use row and col as indices to access a particular element in our list. In this way, we’ll fill up the list, starting with the entire first row, then the second row, and so on.
printTranspose()Finally, we want to print the transposed version of this list. As it turns out, it is very simple to do that by changing the order of our For loops:
for(int col = 0; col < this.columns; col++){
for(int row = 0; row < this.rows; row++){
System.out.print( matrix[row][col] + " ");
}
System.out.println();
}We iterate first through the columns, then through the rows. In this case, we will print each item in the first column from each row, but they will be printed on a single line, separated by spaces. So, in this way, the first column will be displayed as a row. Then, we’ll go to the next column, and print it as a single row.
Finally, notice the inclusion of an empty println after the innermost For loop, but still inside the other loop. This will simply end the line of output for the current column by printing a new line to the terminal.
The driver should take command line arguments as input, instantiate a Matrix object, fill it up and then call the object’s print transpose method. The number of rows will be the first command-line argument, and the number of columns will be the second command-line argument.
The skeleton of MatrixDriver might look like
import java.util.Scanner;
public class MatrixDriver{
public static void main(String[] args){
// read a number of rows and columns from the keyboard
// check if the numbers are valid - if not print an error and quit
// create a matrix object of that size
// fill the matrix with data
// print the transposed matrix
}
}The rest is straight forward and left for you to do. The Driver class is not graded for this example.
As we’ve learned in this chapter, aggregate data types, like arrays and lists, are a ways to store data in a program. Arrays or lists allow us to store a large amount of information in a single variable, using indexes and multiple dimensions to arrange the data in a logical fashion.
We can then combine those arrays with loops to create powerful programs that can access all of the data stored in arrays.
Finally, there are many different built-in operations each programming language allows us to perform on arrays and lists, such as finding their size, copying elements, and more.
Next, we’ll see how to put these concepts into practice by building a fun game in the project for this module!
Text as Data!
Up to this point, we’ve learned how to store data in many different forms in our programs. We’ve used integers and floating point numbers to store various numerical values, and Booleans to store true and false in our programs. We have learned how to make arrays of those data types when we need to store several of them together. We can even create multidimensional arrays when we want to store data in a structured way, such as a grid for representing 2D data in a game.
However, we haven’t covered how to handle one of the the most important types of data that our programs can handle - text. Text is a fundamentally important type of data in the world today, because it is really what enables us to share broad ideas across the entire Internet. Therefore, our programs need to be able to work with that type of data clearly and effectively.
As we’ve seen so far, computers are well suited to working with numerical data. In fact, all the data stored on a computer are just numbers, written in a binary format. So, how can we store text in our computer, using that binary format?
In the 1960s, the American Standard Code for Information Interchange, abbreviated as ASCII and usually pronounced “az-skee”, was developed as a way to represent text on a system that was designed to store numerical data. Each character in the English alphabet was assigned a value. So, on a computer, the decimal value
$ 65 $ represents the character A, while the decimal value
$ 116 $ represents t. In addition to the printed characters in English, several other characters were added to ASCII, representing items such as a tab character or newline in printed text. In that way, an entire document of printed text could be represented as a list of numbers using ASCII.
However, ASCII can only handle simple characters in English, and wasn’t a very good system for storing text in other languages. So, another encoding system, known as Unicode, was developed in the 1980s to handle text in a variety of writing systems. As the Internet grew, Unicode became much more prevalent, and by the late 2000s, a majority of websites on the Internet were using UTF-8, a version of Unicode, to store and represent their data.
UTF-8 was chosen as a global standard because it is also backwards compatible with ASCII. So, any text written in ASCII will automatically work in UTF-8 as well, bypassing any required conversion step.
In this book, we’ll generally be using ASCII to refer to the encoding system used to handle text in our programs. However, behind the scenes, it is important to know that most of the text may actually be stored and represented in Unicode, specifically UTF-8, depending on how we are using it.
File:ASCII-Table-wide.svg. (2019, January 19). Wikimedia Commons, the free media repository. Retrieved 23:04, February 21, 2019 from https://commons.wikimedia.org/w/index.php?title=File:ASCII-Table-wide.svg&oldid=335449197. ↩︎
Using ASCII, we can now store and manipulate text in our programs. There are a couple of different ways our programs store and interact with text, so let’s cover both of them here before moving on.
In programming, the smallest piece of text is referred to as a character. We sometimes use the term letter to refer to the smallest parts of text, since a word in text is made up of many letters, but technically symbols such as &, ( and # are not letters, so we should refer to them as characters instead. This helps avoid any confusion.
A character, therefore, is a single symbol in written text. Using ASCII, it would represent a single entry on that table, so it could be stored as a single integer in a computer.
In fact, many programming languages include a special data type for storing characters, sometimes referred to as the char data type. This is really handy if we need to store a single character of text, or want to convert between the character’s textual value and the underlying number used in ASCII to store the character.
Typically, single characters are denoted using a single quotation mark, both in code and when written. So, the first character of the alphabet would be written as 'a' or 'A'.
So, how can we store larger pieces of text, such as words and sentences? In a programming language, we refer to these longer pieces of text as strings. So, a string can refer to any text stored in a computer. Most programming languages also include a specific data type named String, just for storing and interacting with strings of text. We’ll learn all about how to use these data types in this chapter. Strings are usually written inside of double quotation marks. We’ve already seen examples of this, such as “Hello World” in our very first program.
So, what is a string? In essence, a string is just an an aggregation of characters, like an array or list, with each character representing one symbol in the text stored in the string.

The image above shows how the text “Hello World” would be stored on our computer as a string. It is simply an array of characters, with each character representing a single symbol from the text, stored in order. As we learn more about using strings in our programs, we’ll see how useful it is to know that each character in the string has an index, just like elements in an array.

Behind the scenes, our computer is actually storing the numerical value for each character, so it would actually be seeing these values. However, by using special data types for storing text as strings, it will display the characters for us instead of the numbers. This is why it is important for our programming languages to have different data types: it allows us to store all of our data as numbers, specifically binary numbers, and the programming language uses the data type to tell the computer how to interpret that data when we use it in our programs. Pretty neat, right?
One of the most common things our programs will do with strings is use them to collect data from the user. When we do, we’ll need to parse the data in the string into a format our computer can recognize.
Parsing typically involves two steps: tokenization and conversion.
The first step in parsing a string is to tokenize the string, or separate it into its individual elements. For example, let’s say we want our user to be able to input two numbers, representing the coordinates of a square in Tic-Tac-Toe. So, we could prompt the user to input those two numbers on the same line, separated by a single space, like this:
2 1When we read that line of input from the user, we’ll create a string variable that stores "2 1". So, we want to be able to separate that string into two parts, representing each number.
Most programming languages include a method to split a string into parts, using a specific character as a delimiter, marking where one part ends and another begins. In many cases, we’ll use the space character as the delimiter, but sometimes we’ll use other characters such as the comma or semicolon as well.
So, once we split the string, we’ll have an array of strings that stores {"2", "1"}, with each element representing a part of the string. That’s the first step.
Once we’ve split our string into parts, we may need to convert the strings to another data type, such as integers or floating point values. Thankfully, each programming language includes a variety of methods we can use to convert to and from strings and other data types. We’ll see how to do that in our chosen programming language later in this chapter.
We can also perform many different operations on strings in our programs. These operations allow us to search within strings, edit them, compare them, and more.
First, we can get the length of any string stored in our programs. From the example earlier:
This string has length 11, because it contains 11 characters. We must make sure we count the space as a character, as well as any punctuation or other symbols. Since the index of the last character is 10, we know that the length is 11, just as we saw when working with arrays.
We can also compare two strings to see if they are equal. Two equal strings would contain exactly the same characters in exactly the same order. So, we would say that “Hello” and “Hello” are equal, but “Hello” and “hello” are not.
We can also use comparison operators to determine if one string comes before another lexicographically. This is similar to alphabetical order, but it also encompasses all of the other characters in either ASCII or Unicode and handles capitalization, sorting uppercase letters before lowercase letters
There are also methods we can use to search within a string. For example, we could see if the string “Hello World” contains “lo” using a find method. We could even determine if a string starts with or ends with a particular sequence of characters.
Finally, we can find the location of a character or sequence within a larger string. As an example, if we wanted to find the location of “lo” in “Hello World”, our program would tell us that it begins at character 3.
In many programming languages, including Python and Java, strings are immutable–the values in the memory locations containing the string cannot be changed. However there are many methods which provide new copies of old strings with modifications. These typically include methods to make a string entirely lowercase or uppercase, as well as a method to remove any extra whitespace from the beginning or end of a string.
There are also methods to replace one character with another in a new string. So, we could replace all spaces in “Hello World” with commas, resulting in a new string “Hello,World”.
Consider the scenario below:
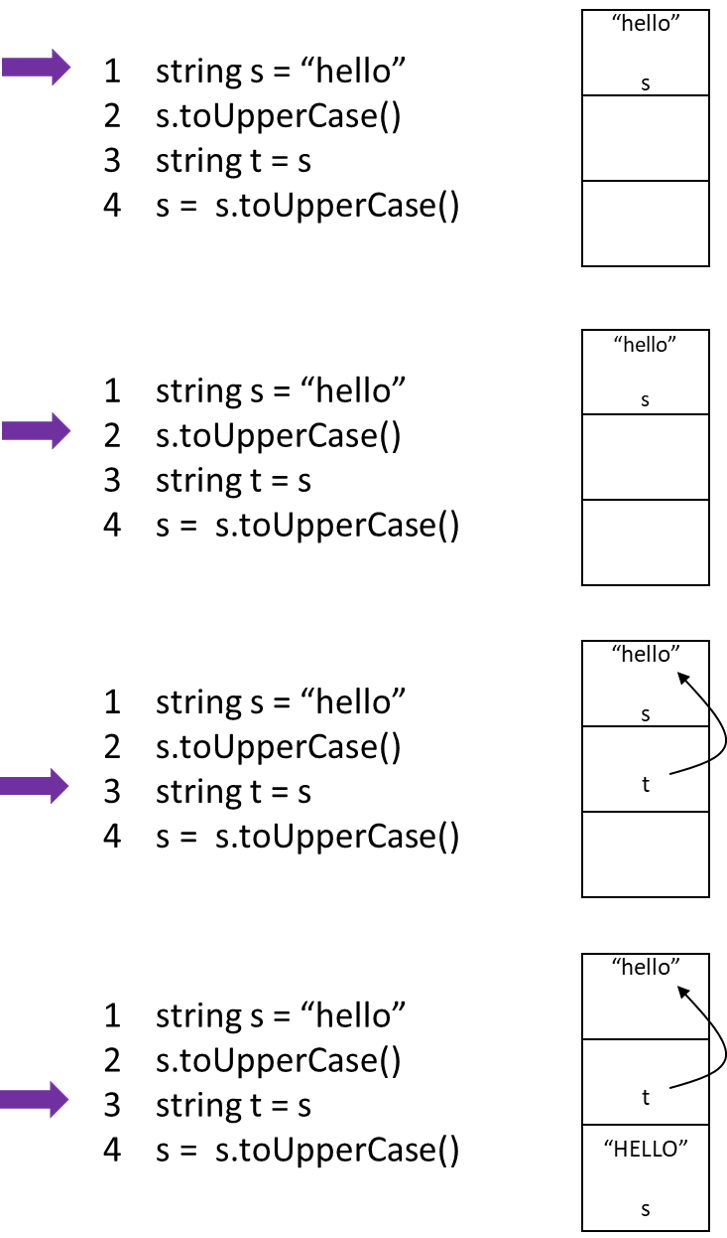
toUpperCase() does not change the memory location holding s. It provides a copy of the string, with all letters as capitals. But since this value is not captured in a variable, it never goes into the variable storage, and it is lost when the program moves to line 3.t an alias of s, they are two different variables referring to the same thing.s to the new string “HELLO”–but because strings are immutable, the memory space with “hello” is not reused (as it the case mutable data types). Instead, a new memory location is used and s is redirected there.Finally, we can also get a substring from our original string. A substring is simply a consecutive portion of the original string. For example, if we want the substring from character 3 through character 7 of “Hello World”, the result would be “lo Wo”. So, we can get smaller parts of our original string using a method that creates a substring.
Later in this chapter we’ll see how to use each of these methods in our chosen programming language.
We’ve already seen one way that we can create strings of output for our users. In nearly all of the programs we’ve written so far, we have simply placed variables into our print statements, along with strings inside of quotation marks, and then combined them together. However, most programming languages support a way to create formatted output strings.
The syntax varies for each programming language, but in essence, we can create a string with placeholders for variables, and we can also include information about how those variables should be formatted.
For these examples, I’ll be using the most common syntax, which comes from the C programming language. Both Java and Python use a similar syntax, but each language works a bit differently, so we’ll want to consult the documentation linked later in this chapter for our language of choice.
Consider this string as an example:
Welcome %s! You have loaded this program %d days so far.In that string, we have “%s” and “%d” as placeholders. The first one, “%s”, specifies that it should be replaced by a string since it includes the letter “s”, while the second one, “%d”, should be replaced by an integer (also known as a decimal, hence the use of the letter “d”)1
In addition, we could also specify things such as the number of leading 0s or decimal places in these format strings as well.
Here’s another example:
Your balance is $%8.3fIn this example, the format string “%8.3f” specifies that we should create an output that is 8 characters wide, including 3 decimal places. Finally, the use of the character “f” tells us that it expects a floating point value. So, if we replaced that format string with the value 1.23, the resulting string would be:
Your balance is $ 1.230Formatted output strings are a great way to make sure our output is formatted exactly the way we want.
These particular formatting codes originate in C ( s- string, d- decimal, x-hexadecimal, f-floating point), which probably borrowed the idea from Fortran. In older versions of Fortran “D” is used for double precision floats. ↩︎
Strings in Java
String variables in Java can be created just like any other variable type we’ve seen so far. To declare a string variable, we can use the following syntax:
String s;Notice that the keyword String in Java is capitalized. This is because we are actually referring to a class named String that is a part of the Java programming language and not a simple data type. This tends to cause new programmers quite a bit of problems, so it is important to remember that this particular data type is capitalized in Java.
We can of course then instantiate our variable by assigning a value to it, as in this example:
String s;
s = "This is a string!";The text itself must be placed in double quotation marks as seen in this example. This allows the Java compiler determine what part of the source code file should be treated as text instead of code.
As always, we can do both steps on a single line as well:
String s = "This is a string!";Java supports several special characters that can use in our strings to represent specific symbols. For example, we know that strings must be surrounded by double quotation marks. So, what if we want to include quotation marks in our string?
We can use \" as a special character to represent a double quote in our string. Here’s an example:
String s = "This is \"a quote\"";
System.out.println(s);This code segment would produce the following output:
This is "a quote"There are several special characters we can include in our strings. Here are a few of the more common ones:
\' - Single Quotation Mark (usually not required)\" - Double Quotation Mark\n - New Line\t - Tab\\ - The backslashCharacter variables are created using the char data type in a similar way:
char c;
c = 'a';
char d = 'b';In Java, characters are placed in single quotation marks as seen above.
Finally, we can also create a string from an array of characters, as in this example:
char[] c = {'H', 'e', 'l', 'l', 'o', '!'};
String s = new String(c);
System.out.println(s); // Hello!Here, we are using the new keyword to create a new String object. Then, we are using the variable c as input to the that object’s constructor. We’ll learn more about creating objects and using constructors in a later chapter, but it is important to know that it is possible to create a string from an array of characters quickly.
In many programs, we’ll be reading input from the user into a string variable, and then parsing that input into the various data types we need. Parsing is a two-step process: tokenization and conversion.
Let’s explore parsing by starting with a program that reads a line from the keyboard.
// Load required classes
public class Example{
public static void main(String[] args) throws Exception{
// Scanner variable
Scanner reader = new Scanner(System.in);
/* -=-=-=-=- MORE CODE GOES HERE -=-=-=-=- */
}
}This code creates a variable named reader, which is a Scanner object in Java. we recommend you always read in Strings using the .nextLine() method. Once we’ve read in a line, we split it into tokens (parts).
Tokenization refers to splitting a large input into smaller parts, its tokens. Each token is delimited by special characters, called delimiters. In normal text, words (the tokens) are delimited by so called “white space”^[which derives from the blank spaces on standard paper]. In a computer String variable these spaces are not blank, but rather contain “unprintable” characters as shown in the following table
| ASCII | char | thing |
|---|---|---|
| 32 | ' ' | space |
| 9 | '\t' | tab |
| 13 | '\r' | carriage return |
| 10 | '\n' | new line |
In general the problem statement or program specification will provide some clue as to appropriate delimiters.
For example, let’s say we’d like to tokenize the following input from the user:
This 1 2.0 true
The second lineWe’ll assume that we’ve already created our reader variable using the skeleton code given above. So, to parse this input, we could use the following code
String line1 = reader.nextLine();
// line1 == "This 1 2.0 true"
String[] line1Parts = line1.split(" ");
// line1Parts == {"This", "1", "2.0", "true"}
String line2 = reader.nextLine();
// line2 ==
String[] line2Parts = line2.split(" ");
// line2Parts == Let’s go through this code and see how it works. First, we read a single line of input from the user using the reader.nextLine() method. Then, we split that line into individual parts using the split method of the string variable line1. Inside of the split method, we need to give the string that we’d like to use as our delimiter. So, in this case, we’ll just provide a string that contains a single space to use the space character as our delimiter.
That will create an array of strings named line1Parts, which will contain four elements. In this case, the first element will be “This”, the second element will be “1” and so on.
We then do the same process again for the second line. What will the values of line2 and line2Parts be?
Technically, Java’s String.split() method we are using actually uses a regular expression to perform the split operation. A regular expression is a specially formatted string that is used to define a search pattern in a string. For example, we could write a regular expression to match words that begin with a number, contain at least three letters, and then end with the letter “a”. That regular expression would be “\b\d.{3,}a\b”, by the way.
So, as input, we are not just providing a delimiter as a string, but we are actually creating a regular expression that the computer users to determine where to split the string. Thankfully, if we provide a single character in a string as input, it will simply look for that character in the string, and split the string anywhere that it finds the character we provide.
So, we can just pretend we are providing a single delimiter string to this operation for now, but behind the scenes it is capable of doing so much more.
You can learn more about regular expressions in Java here:
First, we determine if a token can be converted into a literal value of a certain type^[Often you will know the intended type of the input]. Consider the token “2.”.
double temp = 2.0; will compile just fine.int temp = 2.0; does not compile.What about the token “2”, can it be converted to : double, int?
Once we determine the token can be converted, we do the conversion.
For example, let’s say the user has provided the following text as input:
1 This 2.0 is trueWe could parse that input into individual variables using this block of code:
String line = reader.nextLine();
String[] tokens = line.split(" ");
int i1 = Integer.parseInt(tokens[0]); // 1
String s1 = tokens[1]; // This
double d = Double.parseDouble(tokens[2]); // 2.0
String s2 = tokens[3]; // is
boolean b = Boolean.parseBoolean(tokens[4]); // trueWhen using a while-loop to read from the terminal, we must use a sentinel value to “signal” the end of input. Typically, an empty line^[just hit the return/enter key] is used. Scanner.nextLine() returns the empty string in this case. Then, we can use an If-Then statement to determine if the user is finished providing input.
Here’s a great way to handle this situation in Java:
String line = " "; // a space
while(line.length() >0){
line = reader.nextLine();
if(line.length() > 0){
// parse the input
}
}In this case, the program will continue to read input from the user until the user enters a blank line of input by just pressing the Enter key on the keyboard.
Let’s take a minute to get some practice parsing strings of input for our programs.
Complete ‘StringParsing.java’ to meet the following problem statement:
Write a program that can find the sum of an undetermined number of inputs provided on two lines. The first line of input will contain one or more integers, separated by spaces. The second line of input will contain one or more floating point numbers, separated by commas. The program should output the sum of all inputs provided.
So, for example, if our program receives the following input:
1 2 3 4 5
1.25,2.5,3.75we should print out “22.5” as the result.
Assuming we already have our skeleton code, we can quickly work through this problem statement. First, we’ll need to read a line of input and split it using the space character as our delimiter:
String input = reader.nextLine();
String[] splits = input.split(" ");That’s simple enough. Now, since we don’t know how many inputs might have been provided, we’ll have to use a FOREACH^[the Java nomenclature is enhanced-For loop] loop to iterate over the inputs:
String input = reader.nextLine();
String[] splits = input.split(" ");
for(String s : splits){
}Then, inside of the FOREACH loop, we can just convert each input as an integer and then add it to a sum variable. We’ll have to create the sum variable outside of the FOREACH loop, because we’ll want it available outside of the loop. We’ll make that variable a floating point data type, since we’ll be adding floating point numbers to it from the second line of input.
String input = reader.nextLine();
String[] splits = input.split(" ");
double sum = 0.0;
for(String s : splits){
sum += Integer.parseInt(s);
}Next, we can read the next line of input from the user, and then split it using a comma as a delimiter.
String input = reader.nextLine();
String[] splits = input.split(" ");
double sum = 0.0;
for(String s : splits){
sum += Integer.parseInt(s);
}
input = reader.nextLine();
splits = input.split(",");Notice that we are able to reuse the variables input and splits here. This is handy, so we only have to manage one set of variables as we parse multiple lines of input.
Finally, we can use another FOREACH loop to iterate across the second set of inputs, parse them into a floating point value, and then add them to the sum variable. Finally, at the end, we’ll print out the value of the sum variable.
String input = reader.nextLine();
String[] splits = input.split(" ");
double sum = 0.0;
for(String s : splits){
sum += Integer.parseInt(s);
}
input = reader.nextLine();
splits = input.split(",");
for(String s : splits){
sum += Double.parseDouble(s);
}
System.out.println(sum);The string data type includes many built-in operations that we can use to compare, manipulate, and search within strings. We’ll cover several of them on this page, and we’ll also include links at the bottom to additional resources where all of them are listed.
First and foremost is the length() method. It allows us to find the number of characters in a string.
String s = "This";
System.out.println(s.length()); // 4
String t = "This \"is\" that";
System.out.println(t.length()); // 14Notice that the second string, stored in variable t, only contains 14 characters. That is because \" only counts as a single character in the output, so it is stored as a single character in the string. The same applies to any of the special characters we’ve seen so far in this chapter.
Next, we can use special methods in Java to compare two strings. First, we must use the equals() method to determine if two strings are equal (meaning they contain exactly the same characters in the same order), as in this example:
String s1 = "This";
String s2 = "This";
String s3 = "this";
System.out.println(s1.equals(s2)); // true
System.out.println(s1.equals(s3)); // falseWhen comparing two strings in Java, we cannot use the equality == operator. This is because Java stores strings as an object, and not a primitive data type such as the integers and floating point numbers we’ve seen so far.
When using the equality operator, it will test to see if the two objects are exactly the same, not the contents of the string.
Here’s an example:
String s1 = "This";
String s2 = s1;
String s3 = new String("This");
System.out.println(s1 == s2); // true
System.out.println(s1 == s3); // falseIn this case, even though all three strings contain the same data, they may not be the same objects in memory. So, we must always use the equals() method instead.
Similarly, we can use the compareTo() method to compare two strings and see which one should be placed first in lexicographic order. Consider this example:
String s1 = "This";
String s2 = "That";
int x = s1.compareTo(s2);In this example, x will be a negative number if s1 should come before s1, a positive number if s2 should come before s1, and exactly 0 if the two strings are the same.
While this may seem a bit complex, there is actually a great way to remember how this works. Whenever we would normally want to say s1 < s2, we’ll instead say s1.compareTo(s2) < 0. In effect, we replace the left side with s1.compareTo(s2), and then replace the right side with 0, leaving the sign the same. This simple conversion works for all comparison operators:
s1 < s2 → s1.compareTo(s2) < 0s1 <= s2 → s1.compareTo(s2) <= 0s1 > s2 → s1.compareTo(s2) > 0s1 >= s2 → s1.compareTo(s2) >= 0s1 == s2 → s1.compareTo(s2) == 0Another common string operation is concatenation, or joining two strings together. This operation is actually very simple, and there are multiple ways to do it.
First, we can use the + operator to concatenate any two strings together. In addition, if at least one of the operands is a string, Java will automatically convert the other operand to a string, if possible.
Here are a few examples:
String s1 = "This";
String s2 = "That";
int x = 42;
String s3 = s1 + s2;
String s4 = "" + x;
System.out.println(s3); // ThisThat
System.out.println(s4); // 42As we can see, one neat way to convert any primitive data type to a string is to simply concatenate it with an empty string literal, represented by empty double quotation marks in the code above.
Strings also include a method named concat() that will also perform concatenation. However, it does not modify the original string, so we’ll have to remember to store the result in a string variable in order to use it.
String s1 = "This";
String s2 = "That";
String s3 = s1.concat(s2); // we can store it in a new variable, and the original is unchanged!
System.out.println(s1); // This
System.out.println(s3); // ThisThat
s2 = s2.concat(s1); // we can store it in the same variable!
System.out.println(s2); // ThatThisEither method works well for concatenating two strings together.
Java also includes several methods that can be used to search within one string for another. We can even specify if we’d like to find the string at the beginning or the end of the string, and it includes methods to give us the location of the string we are searching for. Here’s a great example of several of those methods in action:
String s1 = "abc123abc123";
System.out.println(s1.contains("123")); // true
System.out.println(s1.contains("321")); // false
System.out.println(s1.indexOf("123")); // 3 (the index of the first character)
System.out.println(s1.indexOf("321")); // -1 (it returns -1 if it can't find it)
System.out.println(s1.lastIndexOf("123")); // 9 (it returns the beginning of the last instance)
System.out.println(s1.lastIndexOf("321")); // -1 (it returns -1 if it can't find it)
System.out.println(s1.startsWith("abc")); // true
System.out.println(s1.startsWith("123")); // false
System.out.println(s1.endsWith("abc")); // false
System.out.println(s1.endsWith("123")); // trueFinally, Java includes methods that can be used to manipulate strings in unique ways. It is important to remember that none of these methods modify the original string, so we’ll need to store the result back in a string variable in order to use it. In these examples, we’ll just print the output so we can see the result:
String s1 = "abc123abc123";
// replace takes two characters as input, and replaces all
// instances of the first character with the second
System.out.println(s1.replace('b', ' ')); // a c123a c123
// substring takes two integers as input, and returns
// all characters starting at the first index up to
// but not including the second index
System.out.println(s1.substring(3, 9)); // 123abc
String s2 = "UPPERlower";
System.out.println(s2.toLowerCase()); // upperlower
System.out.println(s2.toUpperCase()); // UPPERLOWER
String s3 = " \t Some String \n \n ";
// trim removes all whitespace characters from the beginning
// and end of the string, including special characters
// such as newlines and tabs.
String s4 = s3.trim();
System.out.println(s4); // Some String
System.out.println(s4.length()); // 11In Java, we can also get a single character from a string using the charAt method. This is similar to getting a substring of length 1, but in this case it returns a char data type:
String s1 = "abc123";
char c1 = s1.charAt(0);
char c2 = s1.charAt(5);
System.out.println(c1); // a
System.out.println(c2); // 3This is just a small list of the many operations that can be performed on strings in Java. For more information, consult the official Java documentation linked below.
There are also a couple of different approaches we can take to formatting output strings in Java. Let’s take a minute to review both of those and see how they work.
We’ve already seen this approach in several programs in this course. In effect, we can simply build an output string by concatenating strings and the variables we’d like to include in those strings.
For example, if we’d like to create an output string that gives both the sum and the average of a set of numbers, we could do something like this:
int sum = 123;
double avg = 1.23;
System.out.println("The sum is " + sum + " and the average is " + avg + ".");In this code, we are using the plus symbol + to concatenate strings and variables together into a single output string. In Java, the concatenate operator will automatically convert any primitive data type to a string for us, so we don’t have to worry about that. In many cases, this is the quick and easiest way to present output to the user.
Java also includes a special string method, the format() method, which allows us to use placeholders in our output string, and then replace those placeholders with the values stored in variables.
Here’s an example of how to use that method in Java:
int sum = 123;
double avg = 1.23;
String name = "Student";
String output = "%s: Your score is %d with an average of %f.";
System.out.println(String.format(output, name, sum, avg));When we run this program, the output will be:
Student: Your score is 123 with an average of 1.230000.There are several unique parts to this code, so let’s break it down and see how this works.
First, instead of using an existing string variable, we are actually using the String class when we use the format() method. This is because the format() method is a static method. Static methods do not require an existing variable to use them, and can be used directly from the class where they are defined. We’ll learn more about how classes and methods work in a later chapter. For now, just remember that we’ll use String.format() whenever we want to use this method.
Inside of the method, the first input is the string that contains the placeholders. In this case, we are using three different placeholders:
%s - This placeholder can be replaced by any string, or any variable which can be converted to a string.%d - This placeholder can be replaced by any integer data type, including int, short, byte, or long.%f - This placeholder can be replaced by any floating-point data type, including double and float.Following that, the rest of the inputs are the variables which should be placed in each placeholder, given in the order they appear in the format string. So, in this example, we want the first placeholder, %s, replaced by the second input, the name variable.
In addition, many of the placeholders can also specify the width and precision of each output. Here’s an updated example using these formatting options:
int sum = 123;
double avg = 1.23;
String name = "Student";
String output = "%s: Your score is %5d with an average of %8.4f.";
System.out.println(String.format(output, name, sum, avg));When we run this program, we’ll see the output is now this:
Student: Your score is 123 with an average of 1.2300.So, what happened? First, we updated the second placedholder to %5d. This means that we want the output of that variable to have a width of 5. Since the sum variable would only have 3 characters, the format() method adds two additional spaces in front of the number.
Secondly, we updated the last placeholder to %8.4f. Once again, the number 8 is used to give the width of the output. In addition, we added a 4 after a decimal point to indicate how many characters we’d like to include after the decimal point in the output. So, the total output is 1.2300, which includes four characters after the decimal place, and an additional two spaces in the front. All told, the output is 8 characters in length, including the decimal point.
There are many more ways that a formatted string can be used to create output that meets our needs. We can find more information on using the placeholders and associated settings by reading the official Java documentation linked below.
Now that we’ve explored all of the different ways we can use strings in our programs, let’s walk through a worked example to see how we would go about building a useful program that uses everything we’ve learned so far.
Consider the following problem statement:
Write a program that will calculate weighted grades for students in a college course. This program should only have a
mainmethod.
The input will be given in a comma-delimited format. The first line will contain a number of weights as floating-point numbers, separated by commas. The first entry should be ignored.
All input will be via the keyboard.
Each subsequent line of input will contain information for a student. The first entry on that line will contain that student’s name. The rest of the line will contain that student’s scores on each assignment as an integer value, separated by commas. Input will be terminated by the end of the input file, or by a blank line when input is provided via the terminal.
It is guaranteed that at least two lines of input will be provided, the first containing the weights and at least one additional line containing data for a student. In addition, it is guaranteed that each line of input will contain the same number of parts.
The program should output the student’s name, followed by a colon, and a space, and then the student’s score. The score should be formatted to be exactly 5 characters wide, with exactly two characters after the decimal point.
Complete your solution to this example in Example.java, which is open to the left.
Here’s an example of the expected input for the program:
Name,0.125,0.125,0.25,0.50
StudentA,75,80,85,90
StudentB,5,15,75,20
StudentC,85,90,70,75Here is the correct output for that input:
StudentA: 85.63
StudentB: 31.25
StudentC: 76.88Start by sketching the control flow, what kind of loops are appropriate, what variables and arrays will be necessary? What packages will need to be imported?
Next, start with our standard program preamble that we’ve worked with previously in this course:
// Load required classes
import java.util.Scanner;
public class Example{
public static void main(String[] args) throws Exception{
// Scanner variable
Scanner reader;
reader = new Scanner(System.in);
/* -=-=-=-=- MORE CODE GOES HERE -=-=-=-=- */
}
}For the rest of this example, we’ll look at a smaller portion of the code. That code can be placed where the MORE CODE GOES HERE comment is in the skeleton above.
Next, we’ll need to parse the weights provided on the first line of the input. So, we can begin by reading that line of input:
String weightLine = reader.nextLine();Then, we can separate that line into its individual parts using the split() method:
String weightLine = reader.nextLine();
String[] weightParts = weightLine.split(",");Once we’ve done that, we can populate an array of floating point numbers containing the weights. To do this, we know that the number of weights is one less than the size of the weightParts array. However, to make things simpler, we’ll simply create an array with the same size and leave the first element blank. This will help us when we perform the second step below.
String weightLine = reader.nextLine();
String[] weightParts = weightLine.split(",");
double[] weights = new double[weightParts.length];Next, we can iterate through the weightParts array, and parse each entry to a floating point value and store it in the weights array. In this case, we’ll use a For loop, but this time we’ll start iterating at 1 instead of 0. In this way, we’ll skip the first entry in weightParts, which cannot be converted to a floating point value.
String weightLine = reader.nextLine();
String[] weightParts = weightLine.split(",");
double[] weights = new double[weightParts.length];
for(int i = 1; i < weights.length; i++){
weights[i] = Double.parseDouble(weightParts[i].trim());
}Inside of the For loop, we are simply converting each element of weightParts to a floating point value, and then storing the result in the corresponding element in weights.
Also, notice that we’re using weights.length in the Boolean condition of this For loop. In this case, we know that both arrays are the same size, so we can use either weights.length or weightParts.length here.
It is a generally good habit to always .trim() your inputs before parsing if leading/trailing whitespace is unimportant. In our example
Name, 0.125, 0.125, 0.25, 0.50would crash the program if .trim() were not used.
Once we’ve read the weights, we can parse the data for each student, calculate the result, and print the output, all in a single step.
First, since we are reading an unknown number of lines of input, we’ll need to use a While loop. We saw this loop earlier in this chapter, when we learned about how to handle parsing input of an unknown length.
String line = " ";
while(line.length() > 0){
line = reader.nextLine();
if(line.length() > 0){
// parse the input
}
}Inside of that loop, once we’ve determined that we’ve indeed read a valid line of input, we can use the same split() method as before to split the input into parts:
String[] parts = line.split(",");Then, we want to calculate the student’s final grade. So, once again, we’ll create a sum variable and iterate through all of the parts. As before, we’ll start the For loop at 1, just to skip the first element for now:
String[] parts = line.split(",");
double totalScore = 0.0;
for(int j = 1; j < parts.length; j++){
totalScore += weights[j] * Integer.parseInt(parts[j].trim());
}Inside of the For loop, we’ll multiply the weight of the assignment by the score. Since we don’t need to store the integer value of each score, we can simply convert it to an integer and then directly use it in our expression.
Finally, we’ll need to provide our output as a formatted string. Since we want to make sure the output of the totalScore variable is exactly 5 characters wide, with 2 characters after the decimal point, we’ll use the placeholder %5.2f in the format string:
System.out.println(String.format("%s: %5.2f", parts[0], totalScore));In the output line, we are providing "%s: %5.2f" as the first input to the String.format() method. In this way, we don’t have to create a separate variable to store the format string, simplifying our code. Then, the second input is the first element in the parts array, which will contain the student’s name. Finally, the last input is the totalScore variable, giving the student’s total score.
Strings are one of the most useful data types in many computer programs. They allow us to work with real text in our programs, and our users can provide more flexible forms of input that we can parse using string operations in our code.
For the rest of this course, we’ll be using increasingly complex forms of input and output, so knowing how to handle parsing and converting those inputs into the data types we need is a very important skill to practice.
What To Do When Things Don’t Go Right!
A good computer program should always run properly and produce the desired output. That is the whole point of writing code such that a computer can follow those instructions perfectly, with unerring accuracy and unrivaled speed.
However, the real world, and the people that occupy it, is anything but perfect. Computers can crash, users can provide faulty input, and even the best programmers can create code that doesn’t work exactly as intended. So, we need to have another tool in our arsenal of skills to help us deal with these issues in our programs.
When a computer program runs into a problem, we call that an exception. We most commonly use the word exception to indicate that something doesn’t fit in a particular category or follow a rule, as in “we usually don’t allow students in the faculty lounge, but I’ll make an exception for you.”
We can think of an exception in a computer program in a similar way. It is a program that has failed to follow a particular rule for some reason. Thankfully, we can write special code called exception handlers into our programs to handle these exceptions, without causing the program to stop running. In fact, many modern pieces of software may handle large numbers of exceptions each time they execute, allowing the program to continue to operate even when the user or the system isn’t cooperating.
An exception is an error caused by some problem in a computer program. It could be due to invalid input from the user, an issue with the system that the code is running on, or even a bug or unintended situation written into the code itself.
For example, we know from mathematics that we cannot divide a number by $ 0 $. Specifically, the result of dividing any number by zero is undefined, so we have no way of expressing that value. In a computer program, we can cause an exception by attempting to divide any number by 0, since even a computer has no way to handle that situation and store the result in a variable. So our program would crash, unless we wrote code to handle that situation and correct the error.
Another common cause of an exception would be trying to read data from a file that doesn’t exist. Let’s assume that the user is asked to enter a filename, but accidentally spells the name incorrectly. When our program asks the underlying operating system to open that file, the operating system will tell our program that the file doesn’t exist, so we can’t open it and read the data. That will cause an exception in our program! In this case, we could easily write code that handles that exception and asks the user to input the file name again, preventing the user from having to restart the program just to recover from such a simple error.
In this chapter, we’ll see how to handle many common exceptions in our programs, as well as how to create our own exceptions when we detect errors in our own code.
Problems in a computer program can typically be divided into two categories: exceptions and errors. While these terms are used interchangeably by many programmers, there is a specific difference between these two types of problems. In this course, we’ll try to stick to the following convention:
We’ll see many examples of both exceptions and errors later in this chapter.
Now that we’ve learned a bit about what exceptions are, let’s take a look at an example to see how we might encounter exceptions in our programs and how we can possibly handle them.
Consider the following program:
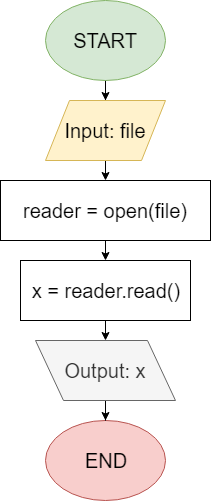
In this program, we first get the name of a file to open from the user. Then, we open that file and create a reader to allow us to read data from the file. After that, we read the first item of the file into a variable, and finally we print that variable to the screen. It’s a very simple program, but there are several places where an exception could occur.
First, when we try to open the file, we could find out that the file does not exist. In most programming languages, that situation would cause an exception when this line is executed:
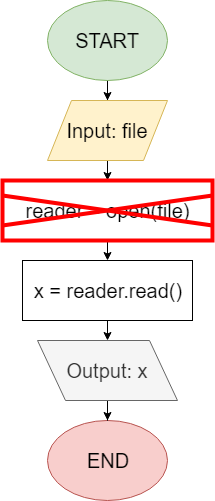
In addition, at any time we try to read data from a file, we could get an IO (input/output) error from the operating system. This can happen if the file suddenly becomes inaccessible, or if the system is unable to read the data correctly from the storage device it is stored on. In that case, we’ll get an exception from executing this line of code:
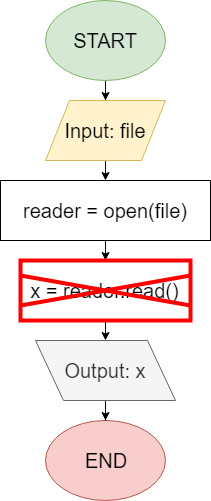
To handle these exceptions, we can simply mark the section of our code where an exception may occur. Each programming language does this a bit differently, but the idea is the same. In the flowchart below, I’ve drawn a box around several parts of the program that we know may cause an exception. Then, along with that section, we can specify exception handler code to be executed in the case that an exception occurs. So, in this example, our program will simply print Error and terminate instead of trying to open and read the file.
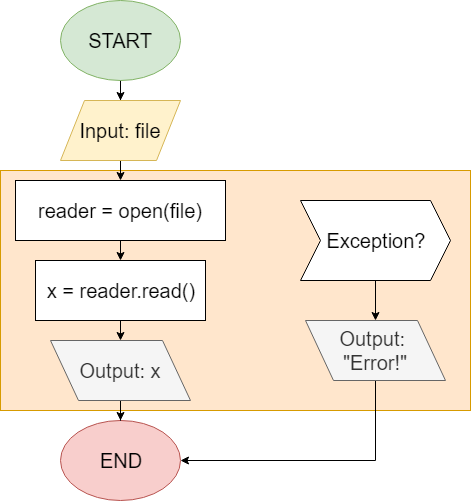
So, let’s go back and revisit one of the exceptions listed above. Now, when the user provides an invalid file as input, our program would execute the highlighted steps in the flowchart below:
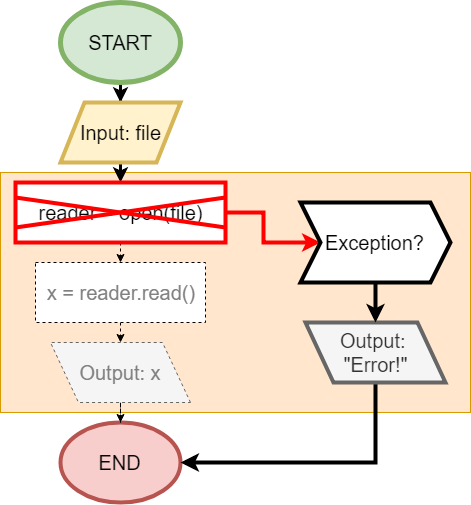
As we can see in this flowchart, when our program reaches an exception, it immediately switches over to the exception handler code to handle that exception.
Of course, there are many different ways we can structure this program to achieve the same outcome. Later in this chapter we’ll learn how to handle exceptions in our chosen programming language.
We can also create our own exceptions to handle specific situations in our own programs. Consider the following program flowchart:
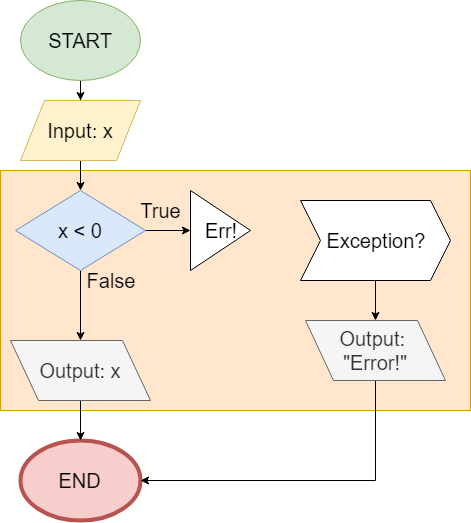
In this program, we first accept input from the user. Then, if that input is less than 0, we create an exception (as indicated by the triangle containing Err in the flowchart). If the input is greater than or equal to 0, we’ll just output it.
Of course, creating an exception in this way is probably not the best way to go about this. Instead, we could probably just use an If statement to achieve the same result. In fact, we already have one in our code!
However, as we start building larger and more complex programs, we may find it very useful to be able to create our own exceptions in one part of the program, then detect and handle them somewhere else. It would be impossible to do this with a simple If statement.
Exceptions in Java
Before we learn about how to detect and handle exceptions in Java, let’s review some of the common exceptions and errors we may see in our programs. Each of the headers below is the name of an exception in Java, which is represented by a particular class in the Java programming language.
Every exception that can be handled in Java is a subtype of the Exception class. So, when we aren’t sure which type of exception to expect, we can always use the Exception class to make sure we catch all of them.
An ArithmeticException can occur whenever our program attempts to perform a calculation that would result in an undefined value. In Java, this is the case when we divide by 0. So, the following code would generate an ArithmeticException:
int a = 10;
int b = 0;
int c = a / b; // throws ArithmeticExceptionHowever, when using floating point values, the result is different:
double a = 5.0;
double b = 0.0;
double c = a / b; // InfinityIn short, this is because the standard for floating point numbers defines Infinity as 1.0 / 0.0, so it is a valid value according to the standard definition for floating point numbers.
An ArrayIndexOutOfBoundsException happens when we try to access an array index that does not exist. Here’s a great example:
int[] array = new int[5];
array[5] = 10; // throws ArrayIndexOutOfBoundsExceptionIn this example, we are trying to access the 6th element in the array, which is at array index 5. However, since the size of the array is only 5, we’ll get an ArrayIndexOutOfBoundsException when we try to execute this code since there is no 6th element.
Similar to the ArrayIndexOutOfBoundsException above, a StringIndexOutOfBoundsException occurs when we try to access an invalid index of a character in a string. Here’s a couple of examples:
String s = "abc";
char c = s.charAt(3); // throws StringIndexOutOfBoundsException
char d = s.charAt(-1); // throws StringIndexOutOfBoundsExceptionIn this example, we are first trying to access the character at index 3. Just like with arrays, that would be the 4th character in the string. Since the string only contains 3 characters, it would result in an exception. Likewise, we cannot access a negative character index in Java, so it would also cause this exception to be thrown.
This exception occurs when the program is trying to open a file that does not exist. This is one of the more common errors that programmers must deal with when using files for input, and it is relatively simple to correct. In most cases, we can simply ask the user to provide another file. Here’s an example of some code that may cause this exception:
String filename = "";
Scanner scanner = new Scanner(new File(filename)); // throws FileNotFoundExceptionIn this case, we are providing a blank filename, which causes the program to throw a FileNotFoundException.
An IOException is thrown whenever the program encounters a problem performing some input or output operation. This can be due to an error in the file it is reading from, a bug in the underlying operating system, or many other problems that can occur while a program is reading or writing data.
For example, reading input using a Scanner object can result in an IOException, both when reading from the terminal using System.in, or when reading from a file. So, in general, anytime we are reading input from any source, we must always consider the fact that an IOException can occur.
Thankfully, these errors are very rare on most modern computers, but they are something that can be dealt with.
A NumberFormatException is used in Java when we try to convert a string to a number but it doesn’t work. See the sample code below to see how this could occur:
String s = "abc";
int x = Integer.parseInt(s); // throws NumberFormatException
double d = Double.parseDouble(s); // throws NumberFormatExceptionThis exception is really useful when we are asking the user to provide a number that fits a particular format. By detecting this exception, we know that the user entered an invalid number, so we may have to prompt the user for another input.
A NoSuchElementException happens when a Scanner object tries to read input when there is no input available to read.
Scanner reader = new Scanner(System.in);
int x = reader.nextInt(); // throws NoSuchElementException if the input is empty;This exception is typically used by developers to indicate that a particular input to a program is invalid. Many developers also use it in their own code as a custom exception.
Java 8 API Reference
Programming with Assertions
An AssertionError happens when our code reaches an assertion that fails. An assertion is a check added by the programmer to verify that a particular situation doesn’t occur in the code, such as a variable being negative or an array being too large. Java supports the use of a special keyword assert that can be used to add these assertions to our code. By default, the Java runtime environment ignores any assert keywords, but they can easily be enabled by adding -ea as an argument to the java command when running a program. This is a helpful step when debugging a new application. We’ll learn more about assertions and how they can be used effectively in a later chapter.
For now, here’s a quick example of an assertion that would produce an AssertionError:
int x = 5;
int y = 3;
assert x + y < 7; // throws AssertionError if enabledBeyond exceptions, there are a few unrecoverable errors that may occur in our Java code. Recall that errors are special types of exceptions that should not be handled by our programs, and should instead be allowed to cause our programs to crash. Some examples are:
In addition, the Java compiler helps us detect many other errors, such as syntax and type errors that would cause our code to be unusable. Other languages, such as Python, have to deal with these errors at runtime, so there are many more unrecoverable errors in that language compared to Java.
Beyond the difference between exceptions and errors we’ve already discussed, Java also makes a distinction between two types of exceptions, checked exceptions and unchecked exceptions. Let’s look more closely at each of these groups below.
A checked exception is detected by the Java compiler. When it detects a checked exception, the compiler then looks to see if the exception will be detected and handled within the code. If not, it will then check to see if the method containing that code includes a throws clause1 at the end of the method declaration that includes this particular exception. If neither of those is the case, then the compiler will output an error and refuse to compile the code. So, the developer must add one of these two things to the code in order for the compiler to be satisfied.
error: unreported exception someException; must be caught or declared to be thrownIf you get this type of message from the compiler, you have 2 choices.
throws someException to the signature linepublic void someMethod() throws someException {}In this class you will generally handle the exception.
An unchecked exception is one that is not detected by the Java compiler. These are exceptions that can occur at runtime, but would be difficult or impossible to detect when compiling the code. However, in many cases they can easily be detected or prevented from within the program itself. So, the compiler does not require us to add code to either handle those exceptions or declare them to be thrown in to our method declaration.
An ArithmeticException is a good example of an unchecked exception. Any division operation could result in an ArithmeticException, but the compiler does not require us to add additional code to handle that exception or declare it to be thrown. However, it is still good practice to either detect and handle this error, or use code or assertions to prevent it from occurring in the first place.
As discussed before, errors are a special type of exception that cannot be easily handled by the program. These are usually due to issues in the underlying operating system, and typically cause the program to crash.
throws is a keyword in Java. It is only used to tell the compiler to ignore the lack of a handler for the checked exception ↩︎
Programs written in Java can have many exceptions occur on a regular basis. Thankfully, as we learned earlier, it is possible to detect and handle these exceptions in our code directly, in order to prevent our program crashing and causing the user more stress. Let’s see how we can perform this step in Java. A Try-Catch construct is synonymous with “handler”.
In Java, we use a Try-Catch construct to detect and handle exceptions in our code. Let’s look at a quick example, and then we can discuss how it works.
import java.util.Scanner;
import java.lang.Exception;
public class Example{
public static void main(String[] args){
Scanner reader;
try{
reader = new Scanner(System.in);
int x = Integer.parseInt(reader.nextLine());
System.out.println(x);
}catch(Exception e){
System.out.println("Error!");
}
}
}First, we use the try keyword, followed by curly braces {} around a block of code. If any exceptions occur in the code contained in the try statement, we can add catch statements to handle that exception.
Directly following the closing curly brace after the try block, we must include at least one catch statement. The catch keyword is followed by the name of an exception and a variable for that exception in parentheses (). In this example, we are just catching the generic Exception type, which will match any catchable exception. We’ll see how we can detect specific exceptions in a later example. Then, we have one more block of code contained in curly braces {} that is executed when we detect an exception. We can use the variable for the exception, in this case e, to access additional details about the exception we’ve detected.
Finally, notice that we also must add import java.lang.Exception to the top of our file. We’ll need to import any exceptions we want to catch in order to use them.
When writing code, it can sometimes be very difficult to even know which exceptions to expect from a particular piece of code. Thankfully, the Java 8 API Reference includes quite a bit of information, including which exceptions can be thrown by a particular method.
Let’s return to our earlier example. Here is the code contained in the try block:
reader = new Scanner(System.in);
int x = Integer.parseInt(reader.nextLine());
System.out.println(x);While this may look like a very simple few lines of code, there are actually several exceptions that could be produced here. Below is a list of them, followed by a link to the Java 8 API reference for the source of that exception:
When writing truly bulletproof code, it is a good idea to attempt to catch and handle all of these exceptions if possible. You can always refer to the official Java 8 API reference to see what exceptions could be produced by any methods you use that are a part of the main Java language. Later on in this chapter we’ll discuss some best practices when it comes to detecting and handling exceptions in code.
Of course, we can add multiple catch statements after any try block to catch different types of exceptions.
import java.util.Scanner;
import java.io.IOException;
import java.lang.NumberFormatException;
public class Example{
public static void main(String[] args){
Scanner reader;
try{
reader = new Scanner(System.in);
int x = Integer.parseInt(reader.nextLine());
System.out.println(x);
}catch(IOException e){
System.out.println("Error: IO Exception!");
}catch(NumberFormatException e){
System.out.println("Error: Input Does Not Match Expected Format!");
}
}
}In the example code above, we see three different catch statements, each of which will handle a different type of exception. When an exception occurs in the code contained in a try block, the Java runtime will create the exception, and then it will search for the first handler that matches. So, it will begin with the first catch statement, and see if the exception created matches the type of the exception in parenthesis. If so, it will execute the code inside of that catch block. If not, it will continue to the next catch statement. If none of the catch statements match the exception, then it will be thrown and cause the program to stop executing.
The exceptions in Java form a hierarchical structure, meaning that an exception may match multiple types. For example, all exceptions that programs can catch are based on the generic Exception type. So, FileNotFoundException and ArrayIndexOutOfBoundsException would both match the Exception type.
In addition, many exceptions are descended from the IOException type. For example, FileNotFoundException is based on IOException, which itself is based on the Exception type. So, a FileNotFoundException would match any of those three types of exceptions. It can make things a bit tricky!
So, how can we know what types of exceptions we are dealing with, and what the hierarchy is? Thankfully, the Java 8 API Reference contains information about all possible exceptions, including the entire hierarchy of that exception.
For example, here is a screenshot from the FileNotFoundException page showing its hierarchy:
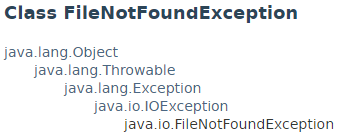
Because of this, we must be careful about how we order the catch statements. In general, we want to place the more specific exceptions first (the ones further down the hierarchy), and the more generic exceptions later.
Let’s look at an example of poor ordering of exception handlers:
import java.util.Scanner;
import java.io.File;
import java.io.FileNotFoundException;
import java.io.IOException;
import java.lang.NumberFormatException;
public class Example{
public static void main(String[] args){
Scanner reader;
try{
reader = new Scanner(new File("input.txt"));
int x = Integer.parseInt(reader.nextLine());
System.out.println(x);
}catch(IOException e){
System.out.println("Error: IO Exception!");
}catch(FileNotFoundException e){s
System.out.println("Error: File Not Found!");
}catch(NumberFormatException e){
System.out.println("Error: Input Does Not Match Expected Format!");
}
}
}In the code above, we are catching the IOException first. So, if the code produces a FileNotFoundException, it will be caught and handled by the first catch statement, since FileNotFoundException is also an IOException. Therefore, we wouldn’t want to order our catch statements in this way.
This chapter introduces the basic code for reading files using a Scanner object. It is mainly presented as a way to introduce some of the more common exceptions related to file input and output. We’ll cover the actual process of reading and writing from files in a later chapter.
Let’s see if we can write a very simple program to catch and handle a few common exceptions. Here’s some code to start with:
import java.util.Scanner;
import java.io.File;
public class Try{
public static void main(String[] args){
Scanner reader;
reader = new Scanner(System.in);
int x = Integer.parseInt(reader.nextLine());
int y = Integer.parseInt(reader.nextLine());
int z = x / y;
System.out.println(z);
}
}For this example, place this starter code in Try.java, open to the left, and modify it to catch and handle the following exceptions by printing the given error messages:
Any other exceptions can be ignored. Don’t forget to add import statements at the top of the file for each type of exception we need to catch!
Beyond catching exceptions, there are a few other important concepts to learn related to exceptions. Let’s go over a couple of them.
When the Java compiler finds a checked exception, we must either surround that code in a Try-Catch statement, or we must declare the exception to be thrown by adding throws to our method declaration, followed by the exception type.
Here’s an example:
import java.util.Scanner;
import java.io.File;
public class Throw{
public static void main(String[] args){
Scanner reader;
reader = new Scanner(new File("input.txt"));
int x = Integer.parseInt(reader.nextLine());
System.out.println(x);
}
}The code above handles user inputs. However, it does not includes the throws keyword. So, when we try to compile this code, we’ll get the following error message.
8j-except/Throw.java:11: error: unreported exception FileNotFoundException; must be caught or declared to be thrown
reader = new Scanner(new File(args[0]));
^
1 errorTo allow this code to compile, we must simply add throws FileNotFoundException to the end of our method declaration to tell the compiler that we aren’t going to handle that exception in our code. We’ll also have to add import java.io.FileNotFoundException to the top of the file. Notice that we aren’t using throws Exception this time, since we now know more about how exceptions work. As we’ll discuss later in this chapter, it is always better to include a specific exception instead of a generic one whenever possible.
Of course, we may also want to use a Try-Catch statement to handle this error directly in our code. We’ll discuss those tradeoffs later as well.
We can also generate our own exceptions using the throw keyword. This allows us to create new exceptions whenever needed. Let’s look at an example:
import java.util.Scanner;
import java.io.File;
import java.lang.ArithmeticException;
import java.io.FileNotFoundException;
public class Throw{
public static void main(String[] args) throws FileNotFoundException{
Scanner reader;
reader = new Scanner(new File("input.txt"));
double x = Double.parseDouble(reader.nextLine());
double y = Double.parseDouble(reader.nextLine());
if(y == 0.0){
throw new ArithmeticException("Divide by Zero!");
}else{
System.out.println(x / y);
}
}
}In this code, we are asking the user to input two floating point numbers. Then, we will output the first number divided by the second. However, we want to avoid the situation where the second number, the divisor, is 0. Since Java doesn’t generate an ArithmeticException when dividing by 0 using floating point numbers, we can do that ourselves using an If-Then statement and the throw keyword.
Following the throw keyword, we must create a new Exception. In this case, we are creating a new ArithmeticException, but any of the exception types we’ve learned about so far will work the same way. Inside of the parentheses, we can provide a helpful error message to go along with this exception.
Let’s see if we can use these keywords in another example. We’ll start with this code:
import java.util.Scanner;
import java.io.File;
public class Throw{
public static void main(String[] args){
Scanner reader;
reader = new Scanner(new File(args[0]));
// *** ADD CODE HERE ***
}
}Place this code in Throw.java and modify it to do the following:
args[0] does not exist, it should throw a FileNotFoundException. We’ll need to add the throws keyword and additional information in the correct place.trim() method to remove any extra whitespace!StringIndexOutOfBoundsException when it tries to access the first character of the string. (Hint: Will the String.charAt() method throw this exception for us? We can check the Java Documentation to find out)In the example above, we are using the code args[0] to access the first command-line argument provided to the program. As you can tell by the data type in the parameter of the main method, args is an array of strings.
When running a Java program from the terminal, we can provide command-line arguments after the name of the file, as in this example:
java Throw input.txtIn this example, the string "input.txt" will be stored in args[0] as the first command-line argument, and it will be accessible in the program. This is a great way to run a program by providing an input file to read from.
More command-line arguments can be included, separated by spaces:
java Throw input.txt output.txt In this example, "input.txt" would be stored in args[0] and "output.txt" would be stored in args[1].
When dealing with exceptions in our code, sometimes we have an operation that must be executed, even if the earlier code throws an exception. In that case, we can use the finally keyword to make sure that the correct code is executed.
To understand how the finally keyword works, let’s take a look at an example:
import java.util.Scanner;
import java.lang.NumberFormatException;
import java.lang.IllegalArgumentException;
public class Finally{
public static void main(String[] args){
Scanner reader;
reader = new Scanner(System.in);
try{
int x = Integer.parseInt(reader.nextLine());
if(x < 0){
throw new IllegalArgumentException("Input must be greater than 0!");
}
}catch(NumberFormatException e){
System.out.println("Error: Must input an integer!");
}catch(IllegalArgumentException e){
System.out.println(e.getMessage());
}finally{
System.out.println("Finally Block");
}
System.out.println("After Try");
}
}This program will read an integer from the terminal. If the integer is greater than or equal to 0, it will do nothing except print the “Finally Block” and “After Try” messages. However, if the input is less than 0, it will throw an IllegalArgumentException. Finally, if the input is not a number, then an InputMismatchException will be thrown and handled. In each of those cases, it will also print the “Finally Block” message.
Let’s run this program a few times and see how it works. First, we’ll provide the input “5”:
$ java Finally
5
Finally Block
After TryHere, we can see that the code in the finally block always runs when the program is finished executing the statements in the try block.
Let’s run it again, this time with “-5” as the input:
$ java Finally
-5
Input must be greater than 0!
Finally Block
After TryHere, we can see that it prints the error message caused by the IllegalArgumentException, then proceeds to the finally block. So, even if an exception is thrown while inside of the try block, the code in the finally block is always executed once the try block and any exception handlers are finished.
Here’s one more example, this time with “abc” as the input:
$ java Finally
abc
Error: Must input an integer!
Finally Block
After TryOnce again, we see that the code first handles the NumberFormatException, and then it will execute the code in the finally block.
In a later chapter, we’ll learn more about how to use the finally block to perform important tasks such as closing open files and making sure we don’t leave the system in an unstable state when we handle an exception.
Lastly, Java includes a special type of Try-Catch statement, known as a Try with Resources statement, that can perform some of the work typically handled by the finally block.
Let’s look at an example of a Try with Resources statement:
import java.util.Scanner;
import java.io.File;
import java.lang.NumberFormatException;
import java.io.FileNotFoundException;
public class Resources{
public static void main(String[] args){
try(
Scanner reader = new Scanner(new File("input.txt"))
){
int x = Integer.parseInt(reader.nextLine().trim();
System.out.println(x + 5);
}catch(NumberFormatException e){
System.out.println("Error: Invalid Number Format!");
}catch(FileNotFoundException e){
System.out.println("Error: File Not Found!");
}
}
}In this example, there is a new statement after the try keyword, surrounded by parentheses. Inside of that statement, we are declaring and initializing a new Scanner object to read data from a file. That Scanner object is the resource that we are using in our Try with Resources statement. We can add multiple resources to that section, separated by semicolons ;.
When the code in the try statement throws an exception, Java will automatically try to close the resources declared in the Try with Resources statement. So, when we are reading input from a file, it would close that file and make sure that it isn’t damaged or left open when our program crashes.
In addition, any additional exceptions thrown when trying to close the file are suppressed by the system, so we only see the exception that caused the initial error. This is much better than using a finally statement to close the file, since we’d have to run the risk of throwing a second exception inside of the finally statement.
Any Java class that implements the AutoCloseable interface can be used as a resource in this way. The Java 8 API documentation for AutoCloseable lists all known classes that implement that interface. We’ll discuss interfaces more later in this course.
Specifically, this type of statement is great when writing programs that will handle large amounts of input, either by connecting to a database, reading from a file, or using the Internet to communicate with a server. A Try with Resources statement is a great way to make sure those programs are able to handle exceptions without leaving the system in an unstable state.
Try-with resources should never be used in concert with Scanners Readers or Buffers connected to System resources. For example
// attach scanner to System stdin
Scanner reader = new Scanner( System.in);
// use as part of try with resources
try (Scanner scan = reader){...
} catch (Exception e){
}
// now System.in is closed and unavailable to rest of programis a bad construct.
Now that we’ve seen lots of information about how to throw, catch, and handle exceptions in Java, it is a great time to discuss some of the best practices we can apply in our code to make it as readable and bulletproof as possible. While these aren’t strict rules that must be followed all the time, they are great things to keep in mind as we write code that deals with exceptions.
As much as possible, we should write our code to handle any exception we can reasonably expect our users to run into when using our programs. We cannot assume that users will always provide the correct input in the correct format, and a single typo by a user should not cause our entire program to crash.
Instead, we should always use Try-Catch statements whenever possible to detect and handle those errors as simply as possible. In addition, if the program is interactive, we can combine that approach with the use of loops to prompt the user to provide new input to resolve the error.
The Java 8 API is a great resource to determine which exceptions could be thrown by any methods used in our code.
You can go “try catch” crazy. Exception handling is powerful, but also really, really slow.
For example, this statement using exceptions is very slow:
try{
ratio = x / y;
}catch ArithmeticException e{
System.out.println("Cannot divide by zero");
}but this version of the statement using a simple conditional statement:
if (y !=0){
ratio = x / y;
}else{
System.out.println("Cannot divide by zero");
}executes a lot more efficiently. In this example the if statement is about 60 times faster than the try-catch statement.
In fact, most unchecked exceptions can be avoided through value checking. In this course, we may direct you to throw and catch exceptions of this type for practice in exception coding.
It is BAD practice to have implied control flow embedded and disguised as try catch. For example, if we are to accept input from either a file given as a command line argument or the keyboard. This first code block is acceptable:
Scanner reader;
if args.length() == 1{
try{
reader = new Scanner(new File(args[0]));
}
catch Exception e{
System.out.println("error accessing file");
return;
}
} else {
reader = new Scanner(System.in);
}This next code block is bad style:
try{
scanner = new Scanner(new File(args[0]));
}catch(FileNotFoundException e){
System.out.println("FileNotFoundException: " + e.getMessage());
scanner = new Scanner(System.in);
}
}Most readers of your code will not expect “flow logic” to be in the catch blocks and may miss it.
We should also always strive to use specific exceptions in our catch statements whenever we can. So, if we are opening a file, we should include a catch statement for a FileNotFoundException, and not just a single generic Exception. Even though this means we may have to include several catch statements, it is much better in the long run because it allows us to know exactly what happened when our code has a problem.
In addition, we should always make sure we catch the most specific exceptions first, before any more generic exceptions. As we saw earlier, if we try to catch an IOException before a FileNotFoundException, we won’t be able to tell when we’ve reached a FileNotFoundException at all, since it is a subtype of the IOException.
The Java Exception class includes some very helpful methods we can use to get additional information when we encounter an exception.
Here’s an example to show what we can learn:
import java.lang.ArithmeticException;
public class StackTrace{
public static void main(String[] args){
try{
int x = 5 / 0;
}catch(ArithmeticException e){
System.out.println("Error: " + e.getMessage());
e.printStackTrace();
}
}
}When this code is executed, it will produce the following output:
$ java StackTrace
Error: / by zero
java.lang.ArithmeticException: / by zero
at StackTrace.main(Finally.java:6)The first line will use e.getMessage() to get the short version of the error, in this case the text “/ by zero”. The second line uses e.printStackTrace() to print a full stack trace showing the location of the error in code.
In general, it is best to only show the short error message to users, but in some cases it may be better to add our own message. The text “/ by zero” isn’t very clear, even to developers. Instead, we could say “Error: divisor cannot be zero” to make the error message clearer.
The information contained in the stack trace is very helpful to developers when trying to debug and fix problems in the code, but that information is very confusing to users. As we learn how to build more advanced programs, we’ll see how to record and log those error messages and stack traces for debugging, but hide them from our users.
To see what other methods are available, refer to the Throwable entry in the Java 8 API reference.
Another big problem is that many developers tend to catch exceptions, only to ignore them so their program doesn’t crash. Here’s a quick example:
int x = 0;
Scanner reader = new Scanner(System.in);
try{
x = Integer.parseInt(reader.nextLine());
}catch(Exception e){
//do nothing
}In this code, if the user inputs something that can’t be converted to an integer, the code just silently ignores the exception and proceeds with x still storing the value 0. While that may not cause issues, it can also make it very frustrating to debug later issues or changes in this program. So, it is always best to output an error message when an exception occurs, even if it can be easily ignored without additional input from the user. This will make it easier to debug additional issues later on in development.
Here’s a simple program that asks the user for input, and will repeat the question until a valid input is received. This code is designed to handle many common situations and exceptions:
import java.util.Scanner;
import java.lang.NumberFormatException;
import java.util.NoSuchElementException;
public class HandleInput{
public static void main(String[] args){
int x = 0;
try(
Scanner reader = new Scanner(System.in)
){
while(x <= 0){
try{
System.out.print("Please input a positive integer: ");
x = Integer.parseInt(reader.nextLine());
if(x <= 0){
System.out.println("Error: Negative Integer Detected!");
}
}catch(NumberFormatException e){
System.out.println("Error: Integer Not Found!");
reader.nextLine(); // bypass bad input and try again
}catch(NoSuchElementException e){
System.out.println("Error: No Input Found!");
}catch(Exception e){
System.out.println("Error: Unknown Input Error!");
return; //probably can't recover, so stop executing
}
}
System.out.println("You entered " + x);
}catch(Exception e){
System.out.println("Error: Unable to Open Scanner!");
}
}
}There are several items in this code that help make it very bulletproof:
catch block to handle any exceptions that arise from opening the Scanner. This prevents those exceptions from being thrown to the user. If we are opening a file, we’ll also need to handle the FileNotFoundException here.next() to successfully read the next token from input before we continue, or else it will try to read the same thing again.return keyword to stop executing the program, since it may be difficult to continue to read input in that case. Thankfully, since we are using a Try With Resources block, the Scanner object will be correctly closed for us automatically. In addition, any finally blocks would be executed before the program stops.We should not use System.exit() to exit our program, which you may find on many online resources. The System.exit() method directly ends the Java Virtual Machine, or JVM, without properly closing any resources or executing finally blocks. It can also make your code much more difficult to maintain and test. This can be very dangerous!
Of course, there are many things that can be done differently in this code, depending on our preferences and how we’d like our program to function. This is just one possible way to build useful code that handles several exceptions.
Let’s work through an entire example program together to see how we can build programs that handle exceptions quickly and easily, without allowing the program to crash when invalid input is received.
Consider the following problem statement for a driver-class program Example.java:
Write a program to accept a list of numbers, one per line from the terminal.
The numbers can either be positive whole numbers or positive floating point numbers. The program should continue to accept input until a negative number is received. Zero is an acceptable input.
Once a negative number is received, the program should print the largest and smallest number provided as input (not including the negative number at the end of input). Sample outputs are shown below.
The program should catch and handle all common exceptions. When an exception is caught, the program should print the name of the exception. It should then continue to accept input (if possible) or exit the program (if not possible).
Here’s an example of an expected input for the program:
5.0
3
8.5
7
k
2.3.6
-1Here is the correct output for that input:
NumberFormatException
NumberFormatException
Maximum: 8.5
Minimum: 3.0Pause a moment to think about control flow, loops and exceptions you might need to handle.
When first starting out in coding and exception handling, it is often best to first write the code without exception handling, test it, then add the exception stuff. Exception handlers can hide logic errors.
We’ll start out with the code to “attach” a Scanner to the correct input source.
import java.util.Scanner;
import java.lang.NumberFormatException;
import java.util.NoSuchElementException;
public class Example{
public static void main (String[] args) {
Scanner scanner = new Scanner(System.in);
}
}Next let’s use a do-while loop to handle input until there is a negative number. We will treat all inputs as doubles.
double input;
do{
input = Double.parseDouble(scanner.nextLine().trim());
}while(input >= 0.0);If the input is negative, we do nothing. Otherwise we keep track of the minimum and maximum number seen. Note, that the first number input is both the min and max number seen. We’ll handle this by observing that an acceptable entered number cannot be less than zero so initial values for the min and max can bet set to -1.0 as a sentinel value.
double max = -1.0;
double min = -1.0;
double input = 0.0;
do{
input = Double.parseDouble(scanner.nextLine().trim());
if (input >= 0.0 ){
if (min > input || min < 0.0){
min = input;
}
if (max < input || max < 0.0){
max = input;
}
}
} while (input >= 0.0);Lastly we would print the min and max out.
double max = -1.0;
double min = -1.0;
double input = 0.0;
do{
input = Double.parseDouble(scanner.nextLine().trim());
if (input >= 0.0 ){
if (min > input || min < 0.0){
min = input;
}
if (max < input || max < 0.0){
max = input;
}
}
} while (input >= 0.0);
System.out.println("Maximum: " + max);
System.out.println("Minimum: " + min);We leave it for you to finish the “without exception handling” program and test it from the terminal.
Although rare, a Scanner object connected to System.in can throw a NoSuchElementException when nextLine() is called. This can occur when:
System.in (more on this is discussed in the chapter on Files)In Linux, the < operator can be used at the terminal to send the contents of a file in place of stdin.
java Example < tests/example1.txtYou can see this “trick” if you have Example.java working. The command java Example < tests/example1.txt will provide the input from the file example1.txt that is stored in the tests folder to the program, just as if it was typed directly in the terminal by hand.
Let’s catch the NoSuchElementException,
double max = -1.0;
double min = -1.0;
double input = 0.0;
do{
try{
input = Double.parseDouble(scanner.nextLine().trim());
}
catch (NoSuchElementException e){
System.out.println("NoSuchElementException");
return; //exits the program
}
if (input >= 0.0 ){
if (min > input || min < 0.0){
min = input;
}
if (max < input || max < 0.0){
max = input;
}
}
} while (input >= 0.0);
System.out.println("Maximum: " + max);
System.out.println("Minimum: " + min);Here we catch the Exception and exit the program. Remember to catch a specific Exception you must import it.
The other thing that can go awry is the parsing. Reading a String that would not parse into a Double, which will throw a NumberFormatException. However, from the example inputs it is clear that we should not exit on this condition but instead keep accepting input. continue will reset us to the next loop.
double max = -1.0;
double min = -1.0;
double input = 0.0;
do{
try{
input = Double.parseDouble(scanner.nextLine().trim());
}
catch (NoSuchElementException e){
System.out.println("NoSuchElementException");
return; //exits the program
}
catch(NumberFormatException e ){
System.out.println("NumberFormatException");
continue;
}
if (input >= 0.0 ){
if (min > input || min < 0.0){
min = input;
}
if (max < input || max < 0.0){
max = input;
}
}
} while (input >= 0.0);
System.out.println("Maximum: " + max);
System.out.println("Minimum: " + min);Finally, we may want to do some quick testing of our program. In theory, it should handle any inputs provided. When testing, we should always see if we can find some input that breaks our program, then adjust the program as needed to prevent that problem. Of course, we should always make sure that it produces the correct answers, too.
Learning how to write programs that properly catch and handle exceptions is a part of becoming a good programmer. If we can build programs that can handle many common errors, our programs will be much easier to use and won’t crash nearly as often.
In this chapter, we learned about the methods for dealing with exceptions in our programs. In addition, we saw several examples of common exceptions that we may encounter. Of course, we can always refer to the online documentation for our programming language to learn even more about exceptions and how to handle them.
Accessing Files and Folders from our Programs!
Modern computer systems contain advanced file systems that allow us to store and retrieve vast amounts of data at ease. We’ve come a long way from the tape-drives and gigantic storage devices of years past. Now even the smallest computers can store tens if not hundreds of gigabytes of data on devices smaller than a fingernail.
Computers store data internally on physical devices such as the hard disk drive shown above, as well as solid state drives such as flash drives and SD cards that we’re familiar with today. That information is typically stored in the form of files, which are organized into directories or folders to make it easier to find what we are looking for.
In this chapter, we’ll dive into all of the methods we can use to create, read, and manipulate these files and directories in our programs.
File:Laptop-hard-drive-exposed.jpg. (2018, June 24). Wikimedia Commons, the free media repository. Retrieved 19:40, April 18, 2019 from https://commons.wikimedia.org/w/index.php?title=File:Laptop-hard-drive-exposed.jpg&oldid=307857280. ↩︎
Before we start learning how to manipulate files and directories, we should cover some basic concepts related to how computers today deal with data.
In this chapter, we’ll use a few terms that may be unfamiliar. So, let’s review those now:
So, in the diagram above, the entire diagram shows a tree data structure, with each box representing a node of the data structure.
The file system on a modern computer can be thought of as the topmost node in a tree that represents all of the data stored on a storage device. Each hard drive, flash drive, or other storage device on a computer contains at least one partition, and inside of that partition is a file system that stores files. Of course, storage devices may contain many different partitions, each with a different file system, but that is becoming less common since storage is much cheaper than it used to be.
In the diagram at the top of this page, the topmost box represents the file system’s root node.
On a Windows system, the root node of each file system is represented by a drive letter. Typically the main file system uses the C:\ drive letter.
On OS X and Linux-based systems, the file system begins with a root node that has the path /. Under that root node, additional file systems can be mounted on a unique path, usually in a special directory such as /mnt or /media. We’ll take a closer look at the Linux file system on the next page.
Within a file system, data is typically separated into a hierarchical structure using directories or folders. Just like we would use folders in a file cabinet to group similar papers together, we can do the same with directories on our file systems.
In the diagram at the top of this page, the boxes for “home”, “user2”, and “foo”, among others, all represent directories that can store data within them.
Each directory is represented by a path, such as C:\Users\user\Documents on Windows or /home/user/documents on Linux.
Each individual piece of data stored on a file system is represented by a file. Those files can store many different types of data, from simple text and graphics to entire programs and videos.
As with directories, each file is also represented by a path, such as C:\Users\user\Documents\file.txt on Windows or /home/user/documents/file.txt on Linux.
Most file names include an optional extension at the end. The extension comes after the last period . character in the filename, and consists of a few characters giving information about the type of data in the file. Some common file extensions include .txt, .docx, .pdf, and .mp3.
Most Windows computers automatically hide these extensions from view, since Windows actually uses those extensions to determine the type of data that is stored in the file. Linux, on the other hand, uses a different system that involves looking inside the file itself, so the extension is not necessary (but helpful).
Most file systems support symbolic links or symlinks, sometimes incorrectly referred to as shortcuts. A symbolic link allows one file path to refer to another, so they both appear to contain the same information.
For example, we could create a symlink at /home/users/documents that points to the directory /data/documents. So, whenever a user opens the /home/users/documents directory, they will actually see the files stored in /data/documents. Any changes made to those files will be visible to users who view the files using either path.
We won’t deal with symlinks in this chapter, but they are something to be aware of, as we may come across them when working with file systems in practice.
Image Credit: Oracle Java Tutorials: What is a Path? https://docs.oracle.com/javase/tutorial/essential/io/path.html ↩︎
The Codio programming environment uses the Linux file system to store files and directories. So, let’s take a minute and discuss some features specific to the Linux file system.
As we discussed earlier, the Linux file system begins with a single root node which has the path /. Below that root node, there are several directories which are typically present on each Linux system. The diagram above gives information about what could be found in each of those directories.
On Linux, each user is assigned a home directory where they can store all of their files. Those directories are typically stored in the /home directory. So, a user with the username codio could find their files in the /home/codio directory.
The Codio programming environment does indeed use the codio username by default. So, all of our files can be found in the /home/codio directory.
In addition, Codio specifically uses a particular subdirectory of the home directory, named workspace, to store all of the files used by the Codio development environment. So, any files we see in the file tree on the left side of the window are actually stored in the /home/codio/workspace directory. When we open a terminal window in Codio, that is the directory we will be taken to by default.
On Linux, any file or directory name that begins with a period . is hidden from view by default. So, we must be careful not to accidentally add a period to the beginning of any file or directory name, or else we may not be able to see it. On the next page, we’ll learn some handy terminal commands we can use to see those files.
File:Standard-unix-filesystem-hierarchy.svg. (2016, November 27). Wikimedia Commons, the free media repository. Retrieved 20:45, April 18, 2019 from https://commons.wikimedia.org/w/index.php?title=File:Standard-unix-filesystem-hierarchy.svg&oldid=221696273. ↩︎
Lastly, let’s take a look at some helpful commands we can use on the terminal to manipulate the file system in Linux. We can open the terminal in Codio by clicking the Tools menu at the top of the page, then selecting Terminal. It should already be open in the panel to the left for this example.
When we open the terminal, it should look something like the picture below. If we see that, we’re ready to go.
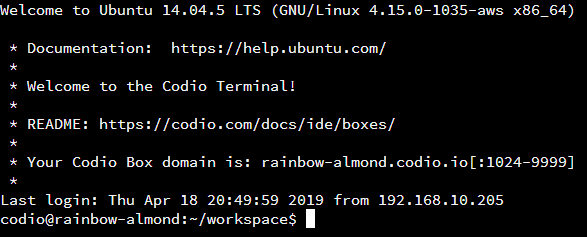
When we open a Linux terminal, we’ll see quite a bit of helpful information before we even type in a single command. In the screenshot above, the terminal’s command prompt is the line of text right before the cursor:
codio@rainbow-almond:~/workspace$Let’s look at what each part means:
codio - The first part, before the at symbol @, gives the currently logged-in user name. When using Codio, we’ll almost always be logged-in using the codio username.@rainbow-almond - The next segment, between the at symbol @ and the colon : is the host name of the system we are using. Codio assigns hostnames using two random words, in this case “rainbow” and “almond”. We won’t really need this information right now, but it will become useful in future courses.~/workspace - Following the colon is the path of the present working directory or pwd for short. This is the directory we are currently in.$ - The last character is a dollar sign $. It is used to signify that we are not on an elevated terminal, which would have administrator permissions. If we were on an elevated terminal, it would be a hash symbol # instead.As we can see, the command prompt gives quite a bit of important information at a glance!
At any time, we can see our working directory one of two ways:
pwd command (short for “Print Working Directory”) on the terminal.Let’s try the second option. On a terminal, we can type pwd and press enter. It should look something like this:
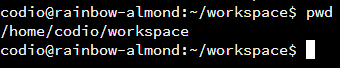
When we enter that command, the next line will show us our current working directory. However, notice that it printed /home/codio/workspace instead of the ~/workspace that we see in the command prompt. This is because Linux uses several special characters in a path as shortcuts. So, let’s cover that before we move on.
As we discussed earlier, the Linux file system uses a hierarchical path to show the location of directories and folders. However, sometimes those paths can be very complex, and it is a pain to type them out in full each time we want to use them. So, there are a few special rules and characters that apply to Linux paths.
/ character, the path is said to be an absolute path. That is because it starts at the root of the file system, and gives the name of each directory along the path. If it does not begin with a slash, then the path is a relative path, because it is relative to our present working directory and could have different meanings depending on which directory we are starting from.~/, the path is relative to our home directory. So, the path /home/codio/workspace and ~/workspace are the same, provided our current username is codio../, the path is relative to our present working directory. So, if our pwd is /home/codio, then the path ./workspace is the same as /home/codio/workspace.../, the path is relative to the parent directory of our present working directory. So, if our pwd is /home/codio/workspace, the path ../ would be the same as /home/codio.There are a few other special characters that can be used, but these are the ones that we’ll see most often.
It is also possible to chain paths together using several of these special characters. For example, if our pwd is /home/codio/workspace, the path ../../ would be /home, and ../../../ would be just /.
Similarly, we can chain them together in ways that may seem nonsensical, such as ~/../../././home/codio/../codio/workspace, which is the same path as /home/codio/workspace.
In general, we won’t need to use these complex paths very often if at all. However, it is helpful to know that it can be done.
Next, we can list the contents in a directory using the ls command. Let’s go ahead and enter that next on our terminal:

Assuming we are still at the /home/codio/workspace directory, we should see output similar to the screenshot above. Of course, many files have been added to this book since that screenshot was made, so it may be different now. In that screenshot, we see some interesting things:
Since it is difficult for some people to see those colors, we can also use the ls -l command to show more information:
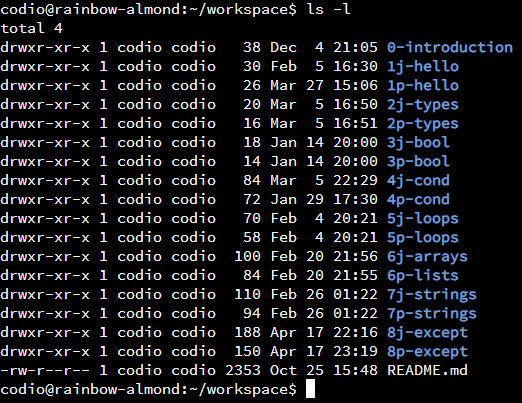
This gives us quite a bit more information about each directory or file. Here’s a helpful diagram from DigitalOcean showing what each column contains:
Another important aspect is the first character in the mode column, which gives the type of the entry:
d, the entry is a directory-, the entry is a fileThere are a few other characters that could appear there, but we won’t discuss them now.
Once we’ve seen what a directory contains, we may want to open another directory and view its contents. To do that, we can use the cd command, followed by the path that we’d like to visit. It could be an absolute path or a relative path. For example, let’s assume we are in the /home/codio/workspace directory. From there, we’d like to get to the directory /home/codio/workspace/1j-hello, which is contained in the present working directory. Each of the screenshots below gives an example of how we could accomplish that:


So, it is very simple to use the cd command to move around the file system.
Tired of always having to type in complex folder names and commands in Linux? Thankfully, most Linux terminals, including the one in Codio, support tab completion of commands and paths. Just start typing the first few characters of a command or part of a path, then press the TAB key to try and autocomplete it. If there is only one possible completion of that element, the Linux terminal will fill it in for you.
If it is not unique, you can press TAB twice to see all possible ways that the command or path could be completed. This shortcut is one of the many ways a Linux power user gets around the terminal so quickly. It is definitely a trick worth learning!
There are several other useful Linux terminal commands that we may need to use from time to time. Most of these commands can also be accomplished using the Codio file tree.
mkdir <path> - make a new directorytouch <file> - create a new blank file or update the last modified time of an existing filecat <file> - print a file’s contents to the terminalcp <source> <destination> - copy a file or directory from the source to the destination. Use cp -r to make it recursive, where it will copy all of the contents inside of a directory as well.mv <source> <destination> - move a file or directory from the source to the destination. This is very similar to renaming a file or directory.rm <file> - remove (delete) a filermdir <directory> - remove (delete) an empty directoryThat’s just a small sample of the many commands available on a Linux terminal. For more detailed information, feel free to check out this great video tutorial.
YouTube VideoImage Credit: An Introduction to Linux Permissions from Digital Ocean https://www.digitalocean.com/community/tutorials/an-introduction-to-linux-permissions] ↩︎
Linux systems connect programs to the files by use of file descriptors. Linux must keep track of and de-conflict access to all file descriptors used by all processes at all times. There are a lot of processes in a modern computer, as I am typing this section, my Windows 10 machine has 5 applications and 92 background programs–each of which may be accessing 0 or more file descriptors.
There are three things to realize about file descriptors. First there is a limit to their number, but that limit is pretty big. Each process in a standard Linux installation can have up to 1024 file descriptors allocated to it. Each minimally has three: stdin (the keyboard); stdout (the terminal) and stderr (a separate “stream” for error messages). In this class, we display stderr to the terminal, but in production applications this may be re-routed to a log file or even a real-time monitoring center in the case of security errors.
Next, depending on how we access a file from our programs, Linux has to check every other file descriptor for potential conflicts. For example many programs can read from the same file at the same time without issues; but allowing many files to write to the the same file at the same time is VERY complex if done correctly–often it is not allowed. Allowing one writer with many readers is also a complex task for the operating system to figure out. This leads to the third thing about file descriptors.
The time it takes Linux to manage the file access grows exponentially with each new file descriptor. The time added to the task for the system’s 1000th file descriptor is more than the time that was added for the 999th file descriptor.
Closing a file tells the operating system to delete the file descriptor.
myfile.close() method or ensure you open it in a managed context (with in Python and C#, try (with resource) in Java).File System in Java
We’ve already been reading data from files throughout most of this course. However, let’s take some time to review that code and improve it a bit to make it more flexible for use in the future.
java.nio.fileHere is the code we’ve used in the Exceptions module to open a file for reading:
reader = new Scanner(new File("input.txt""));This code uses a file name "input.txt", and then creates a Scanner object to read data from that file, using an intermediate File object to represent the file itself. Scanners only open files for reading.
The File object used here is part of the older java.io package, which has been present in the Java API for quite a while. However, more recent versions of Java have included the new java.nio.file package, which includes many easier to use methods for handling files and directories.
So, instead of using a File object from java.io, we will use a Path object from java.nio.file, which is much more flexible. In fact, it is completely compatible with the older versions, so we can easily obtain a Path from a File and vice-versa.
To create a Path object, we use the Paths.get() static method. So, an updated version of our starter code might look like this:
import java.util.Scanner;
import java.nio.file.Paths;
public class Read{
public static void main(String[] args) throws Exception{
Scanner reader;
reader = new Scanner(Paths.get("input.txt"));
/* -=-=-=-=- MORE CODE GOES HERE -=-=-=-=- */
}
}There are a couple of important changes:
import java.io.File; at the top of the code, we must now use import java.nio.file.Paths; to get access to the new Paths class.reader = new Scanner(Paths.get("input.txt"));. This will use the Paths.get() static method to create a Path object, and then use that object to construct a Scanner which can read data from the file found at that path.With those changes in place, we are now using the java.nio.file library, which we’ll use throughout this chapter.
Of course, as we learned in an earlier chapter, we should also add some Try-Catch and Try with Resources statements to this code to prevent any exceptions. So, let’s do that now:
import java.util.Scanner;
import java.nio.file.Paths;
import java.lang.ArrayIndexOutOfBoundsException;
import java.nio.file.InvalidPathException;
import java.nio.file.NoSuchFileException;
public class Read{
public static void main(String[] args) throws Exception{
try(
//Try with Resources will automatically close the file
Scanner scanner = new Scanner(Paths.get("input.txt"));
){
/* -=-=-=-=- MORE CODE GOES HERE -=-=-=-=- */
//add additional catch statements here to handle expected exceptions
}catch(InvalidPathException e){
//path is invalid
System.out.println("Error: invalid file path!");
return;
}catch(NoSuchFileException e){
//file is not found
System.out.println("Error: file not found!");
return;
}catch(Exception e){
//generic catch statement
System.out.println("Error: unknown error while reading input!");
}
}
}This code is very similar to the code we saw in a previous chapter, with a couple of major changes:
scanner.close() at the end of our program, possibly in a finally block.java.nio.file package, we now must use import java.nio.file.NoSuchFileException; to get the correct exception when a file cannot be found.Paths.get() method can throw an InvalidPathException if the path provided cannot be converted to a proper path.Once we have our file open, we can use the same methods we’ve been using to read data from the file. For example, we can use a simple While loop to read each line of the file:
while(scanner.hasNext()){
String line = scanner.nextLine().trim();
if(line.length() == 0){
break;
}
}In this code, we use the hasNext() method to check and see if the file has any additional lines to read. If so, it will read the line using the nextLine() method. We are also using the trim() method to remove any extra spaces from the beginning and end of the line. Finally, we have a short If-Then statement to check and see if the line is empty. If so, we’ll assume that we’ve reached the end of the input file, or that the user typing input via the terminal is done, and we’ll break out of the loop.
Beyond just reading data from files, we can also create our own files and write data directly to them.
In Java, we’ll use a class named BufferedWriter to actually handle writing to a file. So, to create a BufferedWriter object, we could do something like the following example:
import java.io.BufferedWriter;
import java.nio.file.Files;
import java.nio.file.Paths;
import java.io.IOException;
import java.lang.UnsupportedOperationException;
import java.nio.file.InvalidPathException;
import java.lang.ArrayIndexOutOfBoundsException;
public class Write{
public static void main(String[] args){
try(
BufferedWriter writer = Files.newBufferedWriter(Paths.get("output.txt"));
){
writer.write("Hello World");
writer.newLine();
}catch(ArrayIndexOutOfBoundsException e){
//no arguments provided
System.out.println("Error: no arguments provided!");
return;
}catch(InvalidPathException e){
//path is invalid
System.out.println("Error: invalid file path!");
return;
}catch(IOException e){
//cannot open file or error while writing
System.out.println("Error: I/O error!");
return;
}catch(UnsupportedOperationException e){
//unable to open the file for writing
System.out.println("Error: unable to open file for writing!");
return;
}catch(Exception e){
//something went wrong
System.out.println("Error: unknown error!");
return;
}
}
}Let’s break this code down into smaller parts so we can understand how it works.
First, we are using a Try with Resources statement to handle creating the BufferedWriter to write to the output file. This will automatically handle closing the file when we are done with it. Otherwise, we’d need to add a finally block that includes writer.close() to make sure the file is closed properly. If we don’t do that step, there is a chance that our data may not get written to the file correctly.
Inside of the Try with Resources block, we have this line:
BufferedWriter writer = Files.newBufferedWriter(Paths.get("output.txt"));This line uses the Files class in java.nio.files to handle opening a file and creating a new BufferedWriter to write to that file. The newBufferedWriter() method needs a single input, which is a Path object representing the file to be opened. So, we can use the same Paths.get() method we use when opening a file for reading. Here we are using "output.txt" as the path to the file, but we can use any valid String as well.
It is important to note that, by default, if the file we are writing to already exists, it will be overwritten with the new output. If it doesn’t exist, it will be created. There are ways to open a file and append new data to it without overwriting the file, which we’ll discuss below.
Inside of the Try with Resources statement, we see two lines that write data to the file using the BufferedWriter object. The first method, writer.write() can be used to write any String to the file. So, we can use this just like we would System.out.print() when writing output to the terminal. We can even use formatted strings as well!
The second line, writer.newLine() prints a newline character to the output file. This is because the writer.write() method does not output a newline character by default each time it is used. This is different than System.out.println(), which always outputs a newline after each output. So, we need to use writer.newLine() each time we want to start on a new line.
Finally, there are several exception handlers at the end of the Try with Resources statement. They handle the most common exceptions that can occur when opening and writing to a file. The only one we haven’t covered so far is the UnsupportedOperationException, which is used when the operating system doesn’t allow us to write to a file, usually because the file permissions do not allow us to change or modify the file. It can also happen when we aren’t allowed to create a new file in the location we’ve specified. There are several other exceptions that could be thrown when we are unable to write to a file based on the type of operating system we are using. So, we’ll also need to catch a generic Exception here, just to be safe.
When opening a file, we can also give a set of options, known as StandardOpenOptions in Java, to specify how we’d like to handle the file when it is opened. By default, when we use the Files.newBufferedWriter() method to open a file, it uses the following options:
If we’d like to change those options, we can specify them when opening the file. For example, if we’d like to append to an existing file, we can use the following code to open the file:
BufferedWriter writer = Files.newBufferedWriter(Paths.get("input.txt"), StandardOpenOption.CREATE, StandardOpenOption.WRITE, StandardOpenOption.APPEND);We’ll also need to add import java.nio.file.StandardOpenOption; to the top of the file to give us access to those options.
There are many other options available in the Java StandardOpenOption class. Feel free to read the documentation linked below in the resources section to learn more.
When writing data to a file using a program, it is important to understand how the underlying operating system handles that process. In many cases, the operating system will store, or buffer the output in memory, then write the output directly to the file a bit later. This allows the operating system to tell our program that the write was successful while it waits for the storage device the file is actually stored on to respond. So, our programs appear to run very quickly.
However, at times we want to tell the operating system to write the data it has stored in memory directly to the file. To do that, we can use the flush() method of our BufferedWriter class to flush the buffer, or make sure the data is written to the file. Here’s an example:
writer.write("Hello World");
writer.newLine();
writer.flush();
writer.write("More data");
writer.close();Thankfully, the close() method will automatically write any buffered data to the file before closing it. So, we can either use the close() method ourselves, or use a Try with Resources statement to make sure that the file is closed automatically for us.
We can even use System.out.flush() to perform the same operation when printing output to the terminal. In most cases all of our output is printed directly to the terminal, but we can make sure that the output buffer is empty by using the flush() method anytime.
Beyond just reading and writing files, we can also perform several operations on files and directories from within our programs. In fact, pretty much any operation that can be done in the terminal can also be done in our programs, though some are more difficult than others. Let’s review a few of the common file operations and how we can use them in Java.
First, we’ll need to know how to access a path using Java. A path is a string that references a particular file or directory in a file system, identified by the path needed to move from the root node to that item. So, for example, we may use the path /home/codio/workspace/file.txt to reference a particular file in our Codio workspace.
In Java, we also use the term Path to refer to an object that points to an item on the file system.
To create a Path object in Java, we use code similar to this
import java.nio.file.Paths;
import java.nio.file.Path;
import java.nio.file.Files;
import java.nio.file.InvalidPathException;
import java.io.IOException;
public class Manipulate{
public static void main(String[] args){
try{
Path pathObject = Paths.get("/home/codio/workspace/file.txt");
/* -=-=-=-=- MORE CODE GOES HERE -=-=-=-=- */
}catch(InvalidPathException e){
//cannot convert string to path
System.out.println("Error: Invalid Path");
return;
}catch(IOException e){
//file system error
System.out.println("Error: IOException");
return;
}
}
}In the code above, we can simply replace the string "/home/codio/workspace/file.txt" with any valid file path stored in a string to create the indicated Path object. It will even accept absolute paths, relative paths, and paths to directories instead of just individual files. It’s a very versatile tool to use. For the rest of the examples below, we’ll be using the pathObject variable created in the example above, with the code placed where the MORE CODE GOES HERE comment is in the skeleton above.
Once we have a Path object, we can use a few methods to determine what type of an object it is:
//Determine if a file or directory exists at that path
Files.exists(pathObject);
//Is that object a directory?
Files.isDirectory(pathObject);
//Is that object a regular file?
Files.isRegularFile(pathObject);Each of those methods returns a boolean value, either true or false. So, they can easily be used with If-Then statements to take different actions based on the type of object found. So, in our code, we can use some of these tests before trying to open a file, avoiding some of the more common exceptions. As we discussed in the chapter on exceptions, it is really up to us whether we prefer to use If-Then statements to avoid these exceptions, or Try-Catch statements to deal with them when they do happen.
We can also get the size of the object:
Files.size(pathObject);If the item is a regular file, this method will return the size in bytes of the file. However, if we use this method on a file that doesn’t exist, or a directory, it will throw an IOException, so we’ll probably need to pair it with one of the other methods above to avoid that problem.
There are also methods we can use to copy or move an item from one path to another path:
Path source = Paths.get("/home/codio/workspace/dir1/file1.txt");
Path dest = Paths.get("/home/codio/workspace/dir2/file2.txt");
Files.copy(source, dest);
Files.move(source, dest);These work very similarly to the cp and mv commands we’ve already seen on the Linux terminal. In addition, if the destination path already exists, these methods will throw a FileAlreadyExistsException unless we specify that it should overwrite existing files. We can refer to the documentation linked below to see examples for how to accomplish that.
We can also delete an existing file or path:
Files.delete(pathObject);This method will delete a single file if the pathObject variable references a single file. If it references a directory, that directory must be empty, or else it will throw a DirectoryNotEmptyException.
Of course, we can also create either a file or directory based on a Path:
Files.createFile(pathObject);
Files.createDirectory(pathObject);These methods will also throw a FileAlreadyExistsException if something already exists at that path.
Now that we’ve seen how to handle working with files in Java, let’s go through an example program to see how we can apply that knowledge to a real program.
Here’s a problem statement we can use:
Write a program that accepts three files as command line arguments. The first two represent input files, and the third one represents the desired output file. If there aren’t three arguments provided, either input file is not an existing file, or the output file is an existing directory, print “Invalid Arguments” and exit the program. The output file may be an existing file, since it will be overwritten.
The program should open each input file and read the contents. Each input file will consist of a list of whole numbers, one per line. If there are any errors parsing the contents of either file, the program should print “Invalid Input” and exit. As the input is read, the program should keep track of both the count and sum of all even inputs and odd inputs.
Once all input is read, the program should create the output file and print the following four items, in this order, one per line: number of even inputs, sum of even inputs, number of odd inputs, sum of odd inputs.
Finally, when the program is done, it should simply print “Complete” and exit. Don’t forget to close any open files!
So, let’s break down this problem statement and see if we can build a program to perform this action.
First, let’s handle parsing the command line arguments. So, we can start with a simple program skeleton, containing both a class declaration and a main method declaration:
public class Example{
public static void main(String[] args){
}
}Next, we’ll want to make sure there are exactly three arguments. This is probably best done using an If-Then statement, since it makes the code a bit simpler to read than if we would use a Try-Catch statement. However, either approach will work.
public class Example{
public static void main(String[] args){
if(args.length != 3){
System.out.println("Invalid Arguments");
return;
}
}
}Next, we’ll need to check and make sure that each of the first two arguments is a valid file that we can open. Since we intend to open them anyway, let’s just use a Try with Resources statement:
import java.util.Scanner;
import java.nio.file.Files;
import java.nio.file.Paths;
import java.nio.file.InvalidPathException;
import java.nio.file.NoSuchFileException;
import java.io.BufferedWriter;
import java.io.IOException;
import java.lang.NumberFormatException;
public class Example{
public static void main(String[] args){
if(args.length != 3){
System.out.println("Invalid Arguments");
return;
}
try(
Scanner scanner1 = new Scanner(Paths.get(args[0]));
Scanner scanner2 = new Scanner(Paths.get(args[1]));
BufferedWriter writer = Files.newBufferedWriter(Paths.get(args[2]))
){
/* -=-=-=-=- MORE CODE GOES HERE -=-=-=-=- */
}catch(InvalidPathException e){
System.out.println("Invalid Arguments");
return;
}catch(NoSuchFileException e){
System.out.println("Invalid Arguments");
return;
}catch(IOException e){
System.out.println("Invalid Arguments");
return;
}
/* -=-=-=-=- MORE EXCEPTIONS GO HERE -=-=-=-=- */
}
}There are a few new things in this code that we haven’t seen before:
;.System.in, we can just create our Scanner and BufferedWriter objects directly in the Try with Resources statement. Actually, this makes the code very straightforward.args variable is actually an array, so we can access additional command line arguments by simply using different array indices. We haven’t done that yet, but it should make sense.Now that we’ve confirmed that we can open each file, we can start coding the program’s logic. For the rest of this example, we’ll look at a smaller portion of the code. That code can be placed where the MORE CODE GOES HERE comment is in the skeleton above. We’ll also need to handle a few more exceptions, which can be added where the MORE EXCEPTIONS GO HERE comment is above.
The program’s logic should be pretty straightforward. First, we’ll need to create loops to read input from each input file:
while(scanner1.hasNext()){
String line = scanner1.nextLine().trim();
}
while(scanner2.hasNext()){
String line = scanner2.nextLine().trim();
}Notice that we are using two separate While loops here. Since we are dealing with two different input files that are unrelated, this is the simplest way to go.
Next, we can parse the input to an integer, and then determine if it is even or odd:
while(scanner1.hasNext()){
String line = scanner1.nextLine().trim();
int input = Integer.parseInt(line);
if(input % 2 == 0){
//even
}else{
//odd
}
}
while(scanner2.hasNext()){
String line = scanner2.nextLine().trim();
int input = Integer.parseInt(line);
if(input % 2 == 0){
//even
}else{
//odd
}
}Finally, we can add a few state variables to keep track of how many of each type we’ve had, and their sum as well:
int countEven = 0;
int countOdd = 0;
int sumEven = 0;
int sumOdd = 0;
while(scanner1.hasNext()){
String line = scanner1.nextLine().trim();
int input = Integer.parseInt(line);
if(input % 2 == 0){
countEven += 1;
sumEven += input;
}else{
countOdd += 1;
sumOdd += input;
}
}
while(scanner2.hasNext()){
String line = scanner2.nextLine().trim();
int input = Integer.parseInt(line);
if(input % 2 == 0){
countEven += 1;
sumEven += input;
}else{
countOdd += 1;
sumOdd += input;
}
}In the new code above, we are converting strings to integers, which could result in a NumberFormatException. So, we’ll need to add one more catch block to the Try with Resources statement in the skeleton at the top of this page:
catch(NumberFormatException e){
System.out.println("Invalid Input");
return;
}That will handle any problems with the input files themselves.
Finally, we can simply print our four variables to the output file:
int countEven = 0;
int countOdd = 0;
int sumEven = 0;
int sumOdd = 0;
while(scanner1.hasNext()){
String line = scanner1.nextLine().trim();
int input = Integer.parseInt(line);
if(input % 2 == 0){
countEven += 1;
sumEven += input;
}else{
countOdd += 1;
sumOdd += input;
}
}
while(scanner2.hasNext()){
String line = scanner2.nextLine().trim();
int input = Integer.parseInt(line);
if(input % 2 == 0){
countEven += 1;
sumEven += input;
}else{
countOdd += 1;
sumOdd += input;
}
}
writer.write("" + countEven);
writer.newLine();
writer.write("" + sumEven);
writer.newLine();
writer.write("" + countOdd);
writer.newLine();
writer.write("" + sumOdd);
writer.newLine();
System.out.println("Complete");The eight lines at the end should be pretty self-explanatory. We can simply print each number, but we’ll need to convert them to a string first. The simplest way to do that is simply to use the concatenate operator + and concatenate each number with a string, which will automatically convert everything to a string. We’ll also need to remember to print a newline between each of them using the newLine() method. Of course, we also need to print Complete once we are finished!
Once we’ve completed the code, we can use the button below to test it and see if it works. Don’t forget to open the example.pregrade.html file that it creates to see detailed feedback from your program.
Working with files is a very important feature of most computer programs. It can be tedious to manually enter data into a program, and likewise it is very helpful to be able to save the output for use later.
There are many more advanced things that we can do with files. For example, in a later module we’ll see how to build our own objects in code, and then save those objects to a file so we can use them again later.
In general, if your language supports either a “try-with-resources” or a “with” construct you should use it. We deliberately skipped it in the early chapter because the syntax and explanation can be daunting. For now, we can use the power of text files to provide input and output for our programs.
Making Our Own Data Types!
Lets take a second look at classes. This time, rather than focusing on a single object-class, we will have several interconnected object classes, introduce class-level features and the concepts of properties and access permission.
Some of the material in this module will be review.
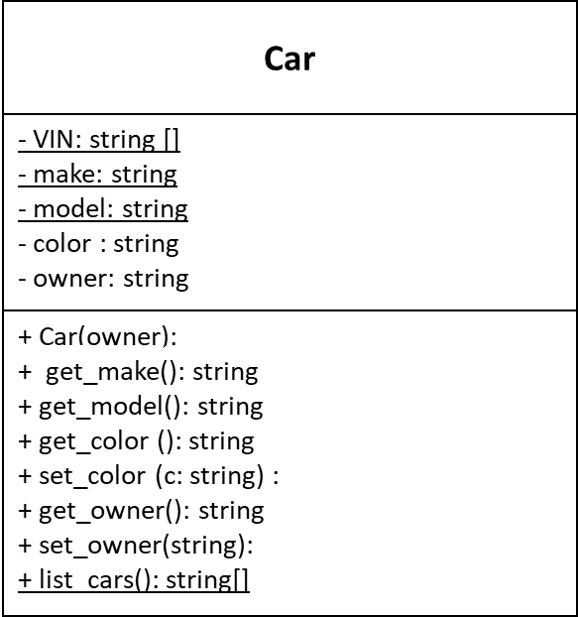
Consider the above UML for a car. It has 3 “class level” attributes, those underlined in the UML. These are variables that belong to the class, not a particular instance, and thus are shared by all the instances. Class features are denoted by an underline on the UML.
The Ford F-Series truck is a well selling truck model. If we were to write a program dealing with the manufacture and sales of this truck, we would have millions of instances. If each instance had instance attributes for make and model we would waste billions of bytes of memory. By making this a class-level attribute, all instances of the class have access to a single copy of the data.
Additionally, it would make sense that at the class-level, we have a list of all vehicle identification numbers (VIN). Keeping this information at the instance level would be horrifically inefficient. Every time we produce a new car each instance of the class would have to be accessed, and a a new entry added. Not only is it a waste of time, it means we are keeping millions of copies of a list of millions numbers–oh yes, and we’ll need a way to ensure each list in each instance always match.
All instances have direct access to their classes class-level attributes (and methods). There will be language specific syntax for this. However, class-level features do not have direct access to an instance’s features.
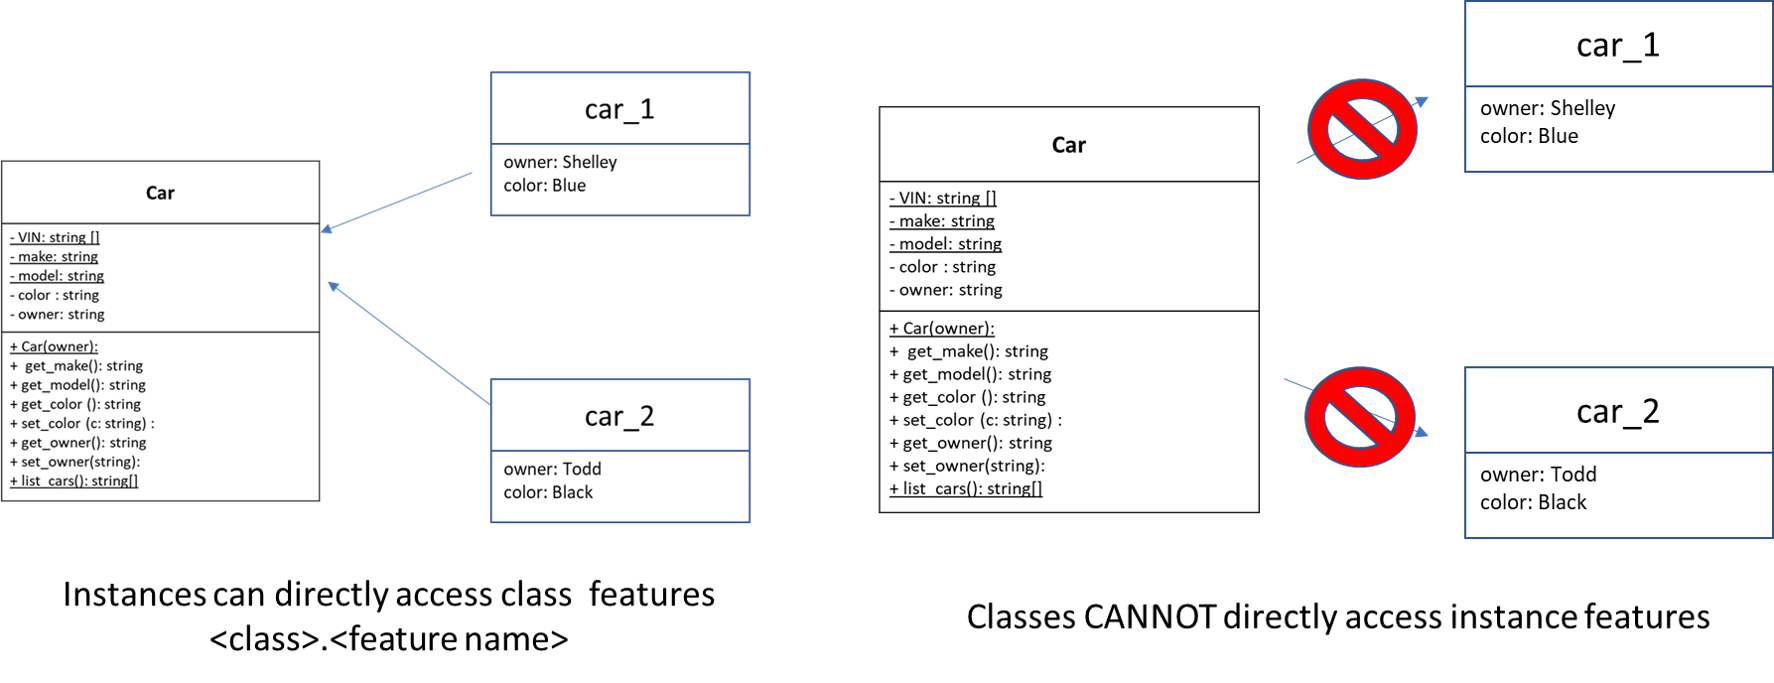
As previously discussed, class methods are denoted on the UML diagram by an underline. Class methods will have language specific syntax for accessing other class-level features. If access to an object is required, that object is
You will notice that each feature of the class Car is labeled with a plus or minus sign. This informs programmers how to control access to the feature.
+ PublicPublic access means the code outside of the class definition are expected to be able to access this feature. Generically this is referred to as “public”. Constructors are almost always public, as are many methods.
- PrivatePrivate access means that this feature should only be referenced by code inside of the class definition. Some methods and nearly all attributes are typically private.
Implementation in code depends on the implementation language. Some languages, like Java, strictly enforce access modifiers, making it impossible for coders to access “private” features outside a class definition. Other languages, like Python do not enforce any restrictions, and instead depend on coders to voluntarily follow the convention.
Because OOP generally results in private fields (variables), early OOP programmers were swamped with writing accessor and mutator methods. These methods had the sole function of providing a ‘public’ way of getting or setting the private field. It became so common that many programming languages developed a special “hybrid” syntax^[in some languages, properties are a special ’type’, in others they are normal class fields with just a bit of syntactic sugar. For our purposes the internal language implementation does not matter.] for this purpose called “Properties”.
When a UML has public getter and setter methods (get_color(), set_color()) AND the implementation language supports properties, properties should be used.
Both Java and Python support properties. Details will be in your language specific section.
When an attribute only has a ‘setter’ method it is often referred to as a read only property. Read-only properties are often set by the constructor and never changed.
Classes in Java
We’ve already been creating and using classes in our Java programs up to this point. This is because Java is a truly object-oriented language, meaning that all code in Java must be contained as part of a class.
Java requires that each class be stored in a file with the same name, followed by the .java file extension. By convention, class names in Java are written in CamelCase, meaning that each word is capitalized and there are no spaces between the words. We’ll follow these rules in our code.
So, to create a class named Student, we would place the following code in a file named Student.java:
public class Student{
}As we’ve already learned, each class declaration in Java includes these parts:
public - this keyword is used to identify that the item after it should be publicly accessible to all other parts of the program. Later in this chapter, we’ll discuss other keywords that could be used here.class - this keyword says that we are declaring a new class.Student - this is an identifier that gives us the name of the class we are declaring.Following the declaration, we see a set of curly braces {}, inside of which will be all of the fields and methods stored in this class.
To follow along, create or open these three files: Student.java, Teacher.java, and Main.java. Let’s go ahead and add the class declaration code to each file.
Some methods and attributes belong to the class and are shared by all the instances of the class. On the UML these are noted by underlines. In Java, we use the static modifier to make “class features”. We’ve seen this modifier each time we declare the main method in our programs, but we haven’t really been able to discuss exactly what it means. In essence, the static modifier makes an attribute or method part of the class in which it is declared instead of part of objects instantiated from that class.
First, we can use the static modifier with an attribute, attaching that attribute to the class instead of the instance. Here’s an example:
public class Stat{
public static int x = 5;
public int y;
public Stat(int an_y){
this.y = an_y;
}
}In this class, we’ve created a static attribute named x, and a normal attribute named y. Here’s a main() method that will help us explore how the static keyword operates:
public class Main{
public static void main(String[] args){
Stat someStat = new Stat(7);
Stat anotherStat = new Stat(8);
System.out.println(someStat.x); // 5
System.out.println(someStat.y); // 7
System.out.println(anotherStat.x); // 5
System.out.println(anotherStat.y); // 8
someStat.x = 10;
System.out.println(someStat.x); // 10
System.out.println(someStat.y); // 7
System.out.println(anotherStat.x); // 10
System.out.println(anotherStat.y); // 8
Stat.x = 25;
System.out.println(someStat.x); // 25
System.out.println(someStat.y); // 7
System.out.println(anotherStat.x); // 25
System.out.println(anotherStat.y); // 8
}
}First, we can see that the attribute x is set to 5 as its default value, so both objects someStat and anotherStat contain that same value. Then we can update the value of x attached to someStat to 10, and we’ll see that both objects will now contain that value. That’s because the value is static, and there is only one copy of that value for all instances of the Stat class.
Finally, and most interestingly, since the attribute x is static, we can also access it directly from the class Stat, without even having to instantiate an object. So, we can update the value in that way, and it will take effect in any objects instantiated from Stat.
We can also do the same for static methods.
public class Stat{
public static int x = 5;
public int y;
public Stat(int an_y){
this.y = an_y;
}
public static int sum(int a){
return x + a;
}
}We have now added a static method sum() to our Stat class. The important thing to remember is that a static method cannot access any non-static attributes or methods, since it doesn’t have access to an instantiated object. Likewise, we cannot use the this keyword inside of a static method.
As a tradeoff, we can call a static method without instantiating the class either, as in this example:
public class Main{
public static void main(String[] args){
//other code omitted
Stat.x = 25;
Stat moreStat = new Stat(7);
System.out.println(moreStat.sum(5)); // 30
System.out.println(Stat.sum(5)); // 30
}
}This becomes extremely useful in our main() method. Since the main() method is always static, it can only access static attributes and methods in the class it is declared in. So, we can either create all of our additional methods in that class as static methods, or we can instantiate the class it is contained in. We’ll see how to do that later in the example project in this chapter.
Of course, we can also denote items that should be static in our UML class diagrams. According to the UML specification, any static items should be underlined, as in this sample UML diagram below:
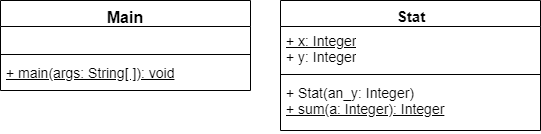
As we work on developing our classes, we can also learn about a few special keywords called modifiers we can use to protect data and methods stored in those classes. Let’s review those and see how they work in our programs.
First, we can use the public keyword in front of any of our class attributes and methods to make them accessible to any other Java code. We’ve already seen this keyword in used when we declare the main method in each of our programs.
Alternatively, we can use the private keyword to prevent any code outside of our own class from accessing the attributes or methods we mark using private.
Let’s look at an example to see how this would work:
public class Security{
public String name;
private int secret;
public Security(){
this.reset();
}
public int count(){
return name.length();
}
private void reset(){
this.name = "test";
this.secret = 123;
}
}In this class, we have created both a private and a public attribute, and a private and a public method. We can also see that we are able to call the private method reset() from within our constructor, and in the reset() method we are able to access the secret private attribute without an issue. So, within our class itself, we don’t have to worry about private or public modifiers preventing access to anything.
However, outside of that class, they have a big impact on what we can access. Consider the following main() method from a different class:
public class Main{
public static void main(String[] args){
Security someSecurity = new Security();
System.out.println(someSecurity.name); // "test"
System.out.println(someSecurity.secret); // COMPILER ERROR
System.out.println(someSecurity.count()); // 4
someSecurity.reset(); // COMPILER ERROR
}
}In this code, we cannot access any private members of the Security class. So, when we try to compile this code, we’ll get the following error messages:
Main.java:5: error: secret has private access in Security
System.out.println(someSecurity.secret);
^
Main.java:7: error: reset() has private access in Security
someSecurity.reset();
^
2 errorsAs we can see, the Java compiler itself enforces these security modifiers, making a very powerful way to limit access to the members and attributes in our classes.
So, why would we want to do this? After all, if we’re the ones writing the code, shouldn’t we be able to access everything anyway?
In many cases, the classes we are writing become part of a larger project, so we may not always be the ones writing code that interfaces with our class. For example, if we are writing an engine for a video game, we may want to make attributes such as the player’s health private. In that way, anyone writing a mod for the engine would not be able to modify those values and cheat the system. Similarly, there are some actions, such as a reset() method, that we may only want to call from within the class.
As we build larger and more complex programs, we’ll even find that it is helpful as developers to limit access to just the methods and attributes that should be accessed by anyone using our classes, helping to simplify our overall program’s structure.
We can denote the access level of items in a UML class diagram using a few simple symbols. According to the UML standard, any item with a plus + in front of it should be public, and any item with a minus - in front should be private. So, we can build a UML class diagram showing the Main and Security classes as shown below:
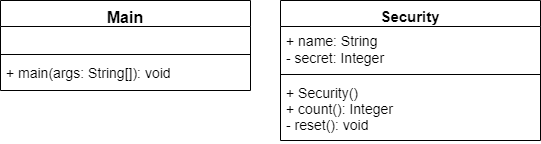
Of course, our classes are not very useful at this point because they don’t include any attributes or methods. Including attributes in a class is one of the simplest uses of classes, so let’s start there.
To add an attribute to a class, we can simply declare a variable inside of our class declaration:
public class Student{
String name;
int age;
String student_id;
int credits;
double gpa;
}That’s really all there is to it! We can also add default values to these attributes by assigning a value to the variable in the same line as the declaration:
public class Student{
String name = "name";
int age = 19;
String student_id = "123456987";
int credits = 0;
double gpa= 0.0;
}However, it is very important to note that we cannot declare an attribute and then set the default value on a separate line. So, code such as this is not allowed:
public class Student{
String name;
name = "test";
}If we try to compile that code, we’ll get the following error:
java/school/Student.java:3: error: <identifier> expected
name = "test";
^
1 errorThis is because the code inside of a class declaration that is outside of any method is not directly executed. Instead, it defines the structure of the class only. So, the line name = "test"; makes no sense to the compiler, because it is only expecting variable or function declarations, not executable code such as variable assignments.
Finally, we can add the public keyword to the beginning of each of these attributes to make them available to code outside of this class:
public class Student{
public String name = "name";
public int age = 19;
public String student_id = "123456987";
public int credits = 0;
public double gpa= 0.0;
}We’ll see how to access and use these attributes later in this chapter. In addition, we’ll discuss other keywords we can place in front of these attributes to make them more secure.
For now, let’s go ahead and add the correct attributes to the Student.java, Teacher.java and Main.java files. Feel free to refer to the UML diagram below to find the correct attributes for each class. We can choose to add default values if we’d like to, but we won’t be able to add values to the arrays in Main.java yet, so we can just declare them for now.
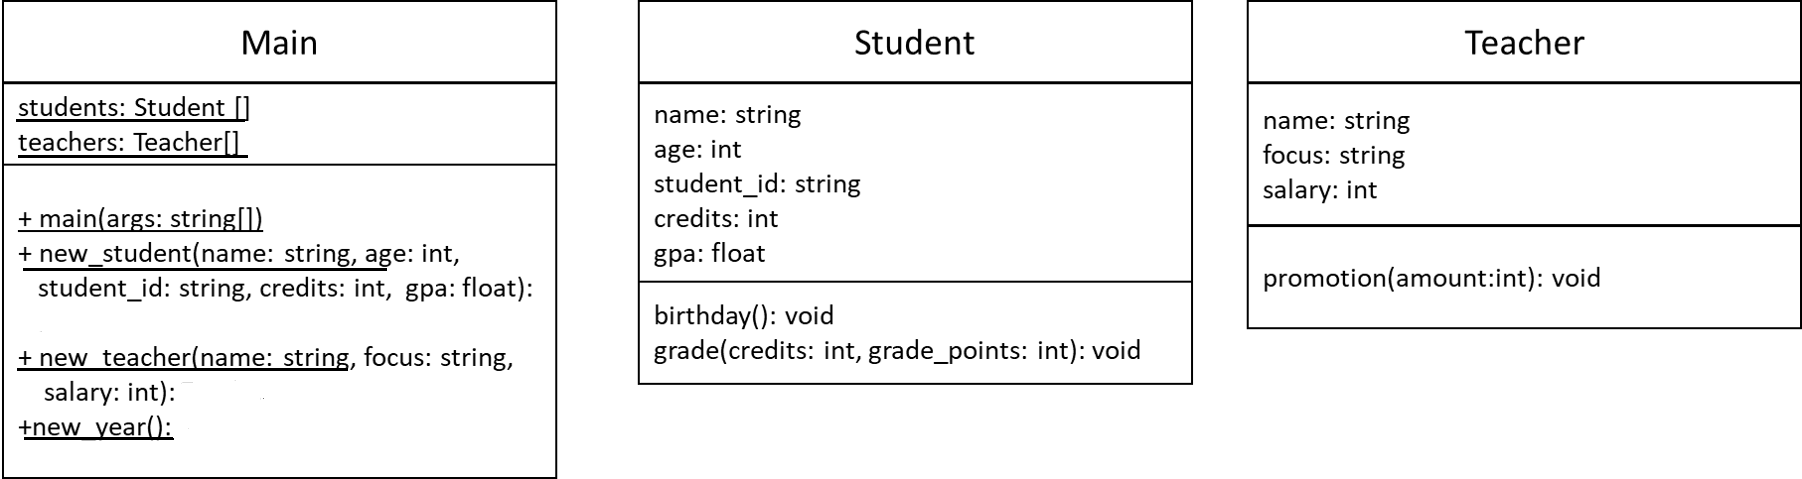
At this point, if we try to compile Main.java all by itself, we’ll get error messages like the following:
java/school/Main.java:2: error: cannot find symbol
public Student[] students;
^
symbol: class Student
location: class Main
java/school/Main.java:3: error: cannot find symbol
public Teacher[] teachers;
^
symbol: class Teacher
location: class Main
2 errorsThis is because the compiler doesn’t know where to find the Student and Teacher classes. So, we’ll need to include all three classes in the same compiler command in order to compile Main.java. The graded assessments do this for you automatically, but if you want to test your code, you’ll need to compile those files manually. Unfortunately, the buttons at the top of the window in Codio are not as well suited to this use.
To do so, simply open the terminal, then change the current directory to where your files are stored. Finally, use the javac command, followed by all of the files that you want to compile. Here’s an example of what these commands would look like for this exercise:
cd java/school
javac Student.java Teacher.java Main.javaAs a shortcut, if you’d like to compile all the .java source files in that directory, you can also use the command javac *.java as the second step.
We can also add methods to our classes. These methods are used either to modify the attributes of the class or to perform actions based on the attributes stored in the class. Finally, we can even use those methods to perform actions on data provided as arguments. In essence, the sky is the limit with methods in classes, so we’ll be able to do just about anything we need to do in these methods. Let’s see how we can add methods to our classes.
To add a method to our class, we can simply add a function declaration inside of our class. In fact, all of the functions we’ve been creating up to this point have been inside of a class. The only difference is that we’ll now be able to remove the static keyword from our function declarations. We’ll discuss more about exactly what that keyword does later in this chapter.
So, let’s add the methods we need to our Student class:
import java.lang.Math;
public class Student{
String name = "name";
int age = 19;
String student_id = "123456987";
int credits = 0;
double gpa = 0.0;
void birthday(){
this.age = this.age + 1;
}
void grade(int credits, int grade_points){
int current_points = (int)Math.round(this.gpa * this.credits);
this.credits += credits;
current_points += grade_points;
this.gpa = current_points / this.credits;
}
}The birthday() method is pretty straightforward. When that method is called, we simply increase the age of this student by 1 year. However, instead of referencing the age variable directly, we are using this.age to access the attribute age in this class. The keyword this refers to the current instance of Student, which we’ll learn how to create on the next page. Whenever we want to access an attribute in a class, it is recommended that we always use the keyword this in front of it, just to avoid any issues.
The grade() method is a bit more complex. It accepts a number of credits and the grade points earned for a class, and then must update the credits and gpa attributes with that new information. To do this, it must first calculate the current number of grade points the student has earned based on the current GPA, then update those values and recalculate the GPA. Finally, notice that we included a reference to the Math.round() method, so we’ll also need to import the java.lang.Math library at the top of our file in order to use that method.
We’ve already discussed variable scope earlier in this course. Recall that variables declared inside of a block are not accessible outside of the block. Similarly, two different functions may reuse variable names, because they are in different scopes.
The same applies to classes. A class may have an attribute named age, but a method inside of the class may also declare a local variable named age. Therefore, we must be careful to make sure that we access the correct variable, usually by using the this keyword to access the attribute variable. Here’s a short example:
public class Test{
int age = 15;
void foo(){
int age = 12;
System.out.println(age); // 12
System.out.println(this.age); // 15
}
void bar(){
System.out.println(age); // 15
}
}As we can see, in the method foo() we must be careful to use this.age to refer to the attribute, since there is another variable named age declared in that method. However, in the method bar() we see that age automatically references the attribute, since there is no other variable named age defined in that scope.
This can lead to some confusion in our code. So, we should always get in the habit of using this to refer to any attributes, just to avoid any unintended problems later on.
Let’s go ahead and add the promotion() method to the Teacher class as well. That method should accept a single integer as a parameter, and then add that value to the Teacher’s current salary. We won’t worry about adding methods to the Main class at this point: we’ll cover those methods in the next few pages.
The video above doesn’t show the correct code slides. You can find those slides by clicking the Video Materials link above, and then the Slides link at the top of that page. We’re working on re-recording this video.
Once we have created our class definition, complete with attributes and methods, we can then use those classes in our programs. To create an actual object based on our class that we can store in a variable, we use a process called instantiation.
To instantiate an object in Java, we use the new keyword, and basically call the name of the class like a function:
public class Main{
public static void main(String[] args){
new Student();
}
}Of course, that will create a Student object, but it won’t store it anywhere. To store that object, we can create a new variable using the Student data type, and then assign the Student object we created to that variable:
public class Main{
public static void main(String[] args){
Student jane = new Student();
}
}This will create a new Student object, and then store it in a variable of type Student named jane. While this may seem a bit confusing at first, it is very similar to how we’ve already been working with variables of types like int and double.
Once we’ve created a new object, we can access the attributes and methods of that object, as defined in the class from which it is created.
For example, to access the name attribute in the object stored in jane, we could use:
public class Main{
public static void main(String[] args){
Student jane = new Student();
jane.name;
}
}Java uses what is called dot notation to access attributes and methods within a class. So, we start with an object created from that class and stored in a variable, and then use a period or dot . directly after the variable name followed by the attribute or method we’d like to access. Therefore, we can easily access all of the attributes in Student using this notation:
public class Main{
public static void main(String[] args){
Student jane = new Student();
jane.name;
jane.age;
jane.student_id;
jane.credits;
jane.gpa;
}
}We can then treat each of these attributes just like any normal variable, allowing us to use or change the value stored in it:
public class Main{
public static void main(String[] args){
Student jane = new Student();
jane.name = "Jane";
jane.age = jane.age + 15;
jane.student_id = "123" + "456";
jane.credits = 45
jane.gpa = jane.gpa - 1.1;
System.out.println(jane.name + ": " + jane.student_id);
}
}We can use a similar syntax to access the methods in the Student object stored in jane:
public class Main{
public static void main(String[] args){
Student jane = new Student();
jane.birthday();
jane.grade(4, 12);
}
}Let’s see if we can use what we’ve learned to instantiate a new student and teacher object in our Main class. First, let’s look at the UML diagram once again:
In that diagram, we see that the Main class should include a method called new_student(), which accepts several parameters corresponding to the attributes in Student. That method should also return an object of type Student. Similarly, there is a method called new_teacher() that does the same for the Teacher class.
So, let’s implement the new_teacher() method and see what it would look like:
public class Main{
public static void main(String[] args){
// more code here
}
static Teacher new_teacher(String name, String focus, int salary){
Teacher someTeacher = new Teacher();
someTeacher.name = name;
someTeacher.focus = focus;
someTeacher.salary = salary;
return someTeacher;
}
}Since we are writing this method in our Main class, we’ll use the static keyword here. We’ll discuss why we need that keyword later in this chapter. Next, we include the Teacher data type as the return data type for this function, since we want to return an object using the type Teacher. Following that, we have our list of parameters, as always.
Inside the function, we instantiate a new Teacher object, storing it in a variable named someTeacher. We must be careful to use a variable name that is not the same as the name of the class Teacher, since that is now the name of a data type and therefore cannot be used as anything else.
Then, we set the attributes in someTeacher to the values provided as arguments to the function. Finally, once we are done, we can return the someTeacher variable for use elsewhere.
Let’s fill in both the new_teacher() and new_student() methods in the Main class now.
In many code examples, it is very common to see variable names match the type of object that they store. For example, we could use the following code to create both a Teacher and Student object, storing them in teacher and student, respectively:
Teacher teacher = new Teacher();
Student student = new Student();This is allowed in Java, since both data type names and variable identifiers are case-sensitive. Therefore, Teacher and teacher can refer to two different things. For some developers, this becomes very intuitive. In fact, we’ve used it several times in this course for the Scanner objects we use to read files.
However, many other developers struggle due to the fact that these languages are case-sensitive. It is very easy to either accidentally capitalize a variable or forget to capitalize the name of a class.
So, in this course, we generally won’t have variable names that match class names in our examples. You are welcome to do so in your own code, but make sure you are careful with your capitalization!
On the last page, we created functions in the Main class to instantiate a Student and Teacher object and set the attributes for each object. However, wouldn’t it make more sense for the Student and Teacher classes to handle that work internally?
Thankfully, we can do just that by providing a special type of method in our classes, called a constructor method.
A constructor is a special method that is called whenever a new instance of a class is created. It is used to set the initial values of attributes in the class. We can even accept parameters as part of a constructor, and then use those parameters to populate attributes in the class.
Let’s go back to the Student class example we’ve been working on and add a simple constructor to that class:
import java.lang.Math;
public class Student{
String name = "name";
int age = 19;
String student_id = "123456987";
int credits = 0;
double gpa = 0.0;
Student(){
}
// other methods omitted
}The constructor itself is very simple:
Student(){
}This is called the default constructor for the class because it accepts no parameters. A constructor is simply a method in the class with he same name as the class, without any return type defined.
In fact, Java automatically creates a default constructor which contains no code if one isn’t added to the class, just like this one. So, really, this constructor isn’t adding anything. Let’s add some code to see what it can do!
import java.lang.Math;
public class Student{
String name = "name";
int age = 19;
String student_id = "123456987";
int credits = 0;
double gpa = 0.0;
Student(){
this.name = "name";
this.age = 19;
this.student_id = "123456987";
this.credits = 0;
this.gpa = 0.0;
}
// other methods omitted
}In this example, we have added code to the default constructor to initialize the attributes to default values. Notice that we also used the this keyword once again to refer to the current object, just to be sure that we are setting the correct attributes.
In fact, now that our default constructor includes these default values, we can remove them from the attribute declaration themselves:
import java.lang.Math;
public class Student{
String name;
int age;
String student_id;
int credits;
double gpa;
Student(){
this.name = "name";
this.age = 19;
this.student_id = "123456987";
this.credits = 0;
this.gpa = 0.0;
}
// other methods omitted
}In this way, we can enforce the default values through the default constructor, without including them in the attribute declarations above, making the code a bit easier to read.
With that constructor, we can then instantiate the class and see that the attribute values are set correctly:
public class Main{
public static void main(String[] args){
Student someStudent = new Student();
System.out.println(someStudent.name) // "name";
System.out.println(someStudent.age) // 19
}
}So, constructors are a very easy way to help set initial values for attributes in a class. We can even call class methods directly from the constructor if needed to help with setup.
We can also create constructors that accept arguments. For example, we can create a constructor that accepts a value for each attribute as in this example:
import java.lang.Math;
public class Student{
String name;
int age;
String student_id;
int credits;
double gpa;
Student(){
this.name = "name";
this.age = 19;
this.student_id = "123456987";
this.credits = 0;
this.gpa = 0.0;
}
Student(String name, int age, String student_id, int credits, double gpa){
this.name = name;
this.age = age;
this.student_id = student_id;
this.credits = credits;
this.gpa = gpa;
}
// other methods omitted
}In this example, we still have the default constructor with no parameters that sets the default values for each attribute. However, we’ve also added a second constructor that accepts 5 parameters, one for each attribute in the class.
Inside that constructor, the code looks very similar to the function we added to the Main class on the previous page. It will use each parameter to set the corresponding attribute, using the this keyword once again to refer to the current object.
Also, this example shows one very important aspect of constructors: just like with methods, we can include multiple constructors, each one accepting a different set of parameters. So, it is possible to make any number of constructors if needed, as long as each one accepts a different set of parameters.
We can also add constructors to our UML class diagrams. A constructor is usually denoted in the methods section of a class diagram by using the name of the class as the method name and omitting the return type. In addition, they are usually included at the top of the methods section, to make them easier to find:
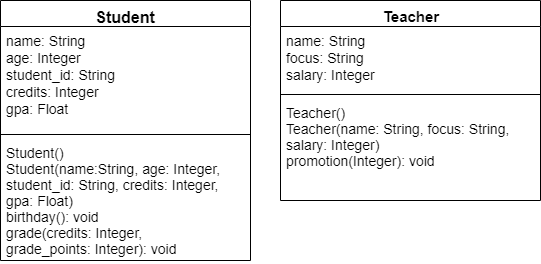
The diagram above shows the Student and Teacher classes with constructors included.
Now that we know how to use constructors, let’s modify our working example to add the following constructors to both Teacher and Student:
The examples for Student have already been created above, but we’ll have to figure out how to do the same for the Teacher class.
Finally, it is important to remember that any instantiated objects used as arguments to a method are passed in a call-by-reference manner. So, any modifications to those objects made inside of a method will also be reflected in the code that called the method.
Here’s a quick example:
public class Reference{
public int x;
}public class Main{
public static void main(String[] args){
Reference someRef = new Reference();
someRef.x = 10;
modify(someRef);
System.out.println(someRef.x); // 15
}
public static void modify(Reference aRef){
aRef.x = 15;
}
}As we can see, when we call the modify() function and pass a Reference object as an argument, we can modify the attributes inside of that object and see those changes back in the main() method after modify() is called.
Of course, if we reassign the argument’s variable to a new instance of Reference inside of the modify() function, then we won’t see those changes in main() because we are dealing with a newly created object.
So, we’ll need to keep this in mind as we use objects as parameters and returned values in any methods we create in our programs.
In the video, the UML diagram incorrectly shows the name property as a public property with a + symbol. However, in the code, it is shown as a private property, which is the correct design. The design is also corrected in the example below.
So far in this chapter we’ve learned how to create private and public attributes in our classes. What if we want to create an attribute that is read-only, or one that only accepts a particular set of values? In Java, we can do that using a pattern of getter and setter methods.
Some languages use the term property to refer to an attribute that is typically accessed using getter and setter methods. We will use that term in this context for now.
In Java, a getter method is a method that can be used to access the value of a private attribute. Conventionally, the method’s name begins with get to make it clear what it does. Let’s look at an example:
public class Property{
private String name;
public Property(){
name = "";
}
public String getName(){
return name;
}
}In this class, the name attribute is private, so normally we wouldn’t be able to access its value. However, we’ve created a method getName() that acts as a getter for the name attribute. In this way, the value of that variable can be accessed in a read-only fashion.
From other code, we can call that method just like any other:
Property prop = new Property();
String name = prop.getName();Similarly, we can create another method that can be used to update the value of the name attribute:
import java.lang.IllegalArgumentException;
public class Property{
private String name;
public Property(){
name = "";
}
public String getName(){
return name;
}
public void setName(String a_name){
if(a_name.length() == 0){
throw new IllegalArgumentException("Name cannot be an empty string!");
}
this.name = a_name;
}
}In this code, we’ve added a setName() method that can be used to update the value stored in the name attribute. We’re also checking to make sure that the argument provided to the a_name parameter is not an empty string. If it is, we can throw an IllegalArgumentException, which would alert the user that this is not allowed. Of course, it would be up to the person writing the code that calls this method to properly catch and handle this exception.
this KeywordNotice that the this keyword is omitted in the getter, but is included in the setter? This is often something lazy (or experienced) programmers will do. In a getter, we often don’t have any other variables or parameters, so we can just refer to a class properties by name, such as return name instead of return this.name, and the Java compiler will know that we are referencing the property variable at the class level due to variable overloading.
However, in a setter, we often have additional variables to contend with. So, to avoid the chance of any variable name collisions, we often use the this keyword to access any class properties, such as this.name. This would especially be important if we renamed our parameter from a_name to just name instead. In that case, if we omitted the this keyword, our assignment statement would just be name = name and Java would not understand that we want to set the class property name to the same value as the setter parameter name.
As a general rule, it is always recommended to use the this keyword to access class properties, but if you are comfortable with omitting it in certain situations (provided you know how that will be interpreted), you can get away with it.
Getter and setter methods are displayed on a UML class diagram just like any other method. We use naming conventions such as getName() and setName() to make it clear that those methods are getters and setters for the attribute name, as in this UML class diagram:
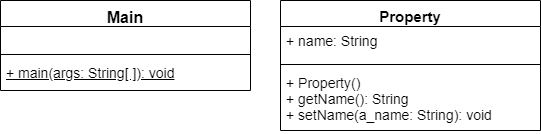
So, through the use of getter and setter methods, we can either prevent other code from updating an attribute, or enforce restrictions on that attribute’s values, without actually exposing the attribute. Here’s a sample main class that demonstrates how to use these methods:
public class Main{
public static void main(String[] args){
Property prop = new Property();
String name = prop.getName();
System.out.println(name);
prop.setName("test");
System.out.println(prop.getName());
}
}Now that we’ve learned all about how to make our own classes and objects, we can practice our skills by building an example program together. This will be a larger program than many of the programs we’ve worked with so far, but hopefully it will actually be easier to follow since the code is separated into several classes.
For this example, we’ll build a program to play a version of the game of Blackjack, also known as Twenty-One. The rules of this simplified game are fairly straightforward:
You can find the full rules to Blackjack on Wikipedia.
In order to build this program, we’ll need to implement several classes to represent the objects needed for the game. For now, we’ll follow this UML diagram to help guide the design of this program. In later chapters, you’ll learn the skills needed to design your own program structures from scratch, but when learning to program it is sometimes easier to first read different program structures before writing your own.
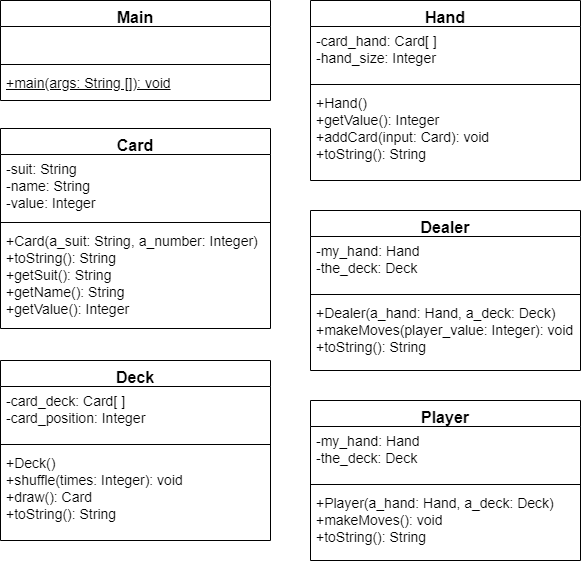
This program will contain several classes:
main() function.To build this program, we’ll address each class individually. That allows us to build the program one piece at a time, and allows us to test it at each step to make sure it is working correctly.
Card ClassThe first and simplest class we can build is the Card class. This class represents a single card from a deck of cards, and contains the suit, name, and value attributes. Since we don’t want those values to be edited outside of this class, we can use private attributes paired with getter methods for them. For the value, we’ll use an integer to make the rest of the program simpler.
public class Card{
//Attributes
private String suit;
private String name;
private int value;
//Getters
public String getSuit(){ return suit; }
public String getName(){ return name; }
public int getValue(){ return value; }
}In this code, notice that we can actually write our simple getter methods as a single line of code. While this may violate some code formatting practices, it may also be easier to read and minimize the number of lines in our file. We’ll use this format here to save space.
We’ll also need to create a simple constructor for this class. It can accept a suit and a card number as input, and then populate the attributes as needed:
public class Card{
//Attributes
private String suit;
private String name;
private int value;
//Getters
public String getSuit(){ return suit; }
public String getName(){ return name; }
public int getValue(){ return value; }
public Card(String a_suit, int a_number){
this.suit = a_suit;
if(a_number == 1){
this.name = "Ace";
this.value = 11;
}else if (a_number == 11){
this.name = "Jack";
this.value = 10;
}else if (a_number == 12){
this.name = "Queen";
this.value = 10;
}else if (a_number == 13){
this.name = "King";
this.value = 10;
}else{
this.name = a_number + "";
this.value = a_number;
}
}
}Finally, we can add some additional code to our constructor to validate the supplied parameter arguments, just to avoid any unforeseen errors. In this case, we’ll make sure that the suits and numbers provided are all valid values:
import java.lang.IllegalArgumentException;
public class Card{
//Attributes
private String suit;
private String name;
private int value;
//Getters
public String getSuit(){ return suit; }
public String getName(){ return name; }
public int getValue(){ return value; }
public Card(String a_suit, int a_number){
if(!(a_suit.equals("Spades") || a_suit.equals("Hearts") || a_suit.equals("Clubs") || a_suit.equals("Diamonds"))){
throw new IllegalArgumentException("The suit must be one of Spades, Hearts, Clubs, or Diamonds");
}
if(a_number < 1 || a_number > 13){
throw new IllegalArgumentException("The card number must be an integer between 1 and 13, inclusive");
}
this.suit = a_suit;
if(a_number == 1){
this.name = "Ace";
this.value = 11;
}else if (a_number == 11){
this.name = "Jack";
this.value = 10;
}else if (a_number == 12){
this.name = "Queen";
this.value = 10;
}else if (a_number == 13){
this.name = "King";
this.value = 10;
}else{
this.name = a_number + "";
this.value = a_number;
}
}
}To do this, we’ve added a couple of If-Then statements to the constructor that can throw Exceptions if the inputs are invalid.
Finally, to make debugging our programs very simple, we’ll add a special method, toString() to this class. The toString() method is actually a part of every class in Java because of inheritance, something we’ll learn more about in a later chapter. For now, we can add that method as shown below:
import java.lang.IllegalArgumentException;
public class Card{
//Attributes
private String suit;
private String name;
private int value;
//Getters
public String getSuit(){ return suit; }
public String getName(){ return name; }
public int getValue(){ return value; }
// constructor omitted here //
@Override
public String toString(){
return this.name + " of " + this.suit;
}
}Above the toString() method, we have to include the @Override method decorator. This let’s Java know that we are replacing the existing toString() method with our own version. Again, we’ll learn more about what this means in a later chapter, but for now, it will be very useful as we build our program!
That should complete the Card class! The assessments below will confirm that the code structure and functionality is correct before moving on.
Deck ClassNext, we’ll need a class that can represent an entire deck of cards. This class will contain an array of cards, as well as some helpful methods we can use to shuffle the deck and deal individual cards.
First, we’ll need to add a private array to represent a deck of cards:
public class Deck{
private Card[] card_deck;
}In this class, we won’t include any getters or setters for the deck of cards itself because our program shouldn’t be able to change the deck in any way. In the constructor, however, we’ll include the code to create our deck of cards:
public class Deck{
private Card[] card_deck;
public Deck(){
this.card_deck = new Card[52];
String[] suits = {"Spades", "Hearts", "Diamonds", "Clubs"};
int card_number = 0;
for(String suit : suits){
for(int i = 1; i <= 13; i++){
this.card_deck[card_number] = new Card(suit, i);
card_number++;
}
}
}
}Hopefully that code is pretty straightforward. It creates a new array of 52 cards, then an array of Strings representing the suits. It also uses the card_number variable to keep track of the position of the last card added to the deck. Finally, we have two For loops to go through each suit and each card number from 1 to 13, creating the full deck of 52 cards.
Next, we can add a method to print out the entire deck of cards. Once again, we’ll just override the toString() method:
public class Deck{
private Card[] card_deck;
public Deck(){
this.card_deck = new Card[52];
String[] suits = {"Spades", "Hearts", "Diamonds", "Clubs"};
int card_number = 0;
for(String suit : suits){
for(int i = 1; i <= 13; i++){
this.card_deck[card_number] = new Card(suit, i);
card_number++;
}
}
}
@Override
public String toString(){
String output = "";
for(Card a_card : this.card_deck){
output += a_card.toString() + "\n";
}
return output;
}
}At this point, let’s test it out! That’s one of the most important steps in writing programs like this one—we’ll want to test each little bit of the program and see how it works.
So, we can add the following code to our Main class for testing:
public class Main{
public static void main(String[] args){
Deck a_deck = new Deck();
System.out.println(a_deck.toString());
}
}Then, we can compile and run that code using these commands in the terminal:
cd java/example
javac Main.java Card.java Deck.java
java MainWhen we run those commands, we should see output similar to this:
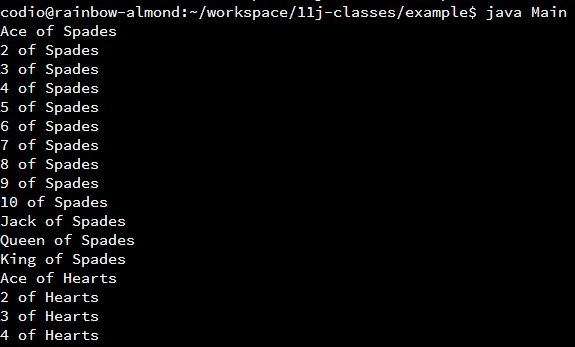
As we can see, we are creating a full deck of cards, but they aren’t in a random order. While we could just implement a method to draw cards randomly from the deck, it might be just as useful to implement a method to shuffle the deck. So, let’s do that now!
import java.util.Random;
import java.lang.IllegalArgumentException;
public class Deck{
private Card[] card_deck;
// other methods omitted here //
public void shuffle(int times){
if(times <= 0){
throw new IllegalArgumentException("The deck must be shuffled a positive number of times");
}
Random rando = new Random();
for(int i = 0; i < times; i++){
int first = rando.nextInt(52); // get a number [0...51]
int second = rando.nextInt(52); // get a number [0...51]
if(first != second){ // swap first and second cards
Card temp = this.card_deck[first];
this.card_deck[first] = this.card_deck[second];
this.card_deck[second] = temp;
}
}
}
}This is a very simple shuffle method, which simply gets two random numbers using the java.util.Random class. Then, it will swap the cards in the deck at those two locations. It is slow and simple, but thankfully a computer can do thousands of those operations in a few milliseconds, so it works just fine for our needs.
Now, we can update the code in our main() function to see that it is working correctly:
public class Main{
public static void main(String[] args){
Deck a_deck = new Deck();
a_deck.shuffle(1000);
System.out.println(a_deck.toString());
}
}That should produce a random deck, as shown in this screenshot:
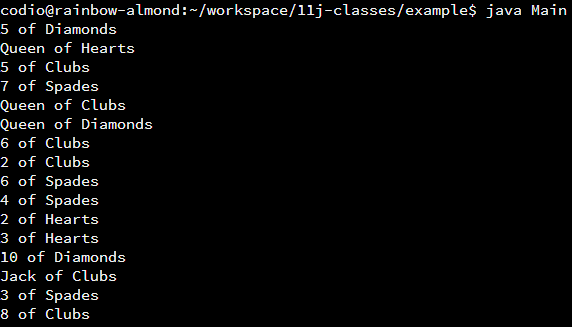
Finally, we can add a method to deal a card from the deck to a player. To do this, we’ll add another private attribute to keep track of the position we are dealing from in the deck. Then, we can return the appropriate card from our method.
import java.util.Random;
import java.lang.IllegalArgumentException;
public class Deck{
private Card[] card_deck;
private int card_position;
// other methods omitted here //
public Deck(){
// other constructor code omitted here //
this.card_position = 0;
}
public Card draw(){
Card output = this.card_deck[this.card_position];
this.card_position++;
return output;
}
}There we go! This method will simply return the front-most card from the deck that hasn’t already been used. We aren’t actually removing the cards from the list, but rather just incrementing a variable keeping track of the position in the list to remember which cards we’ve already dealt.
That should complete the Deck class! The assessments below will confirm that the code structure and functionality is correct before moving on.
Hand ClassNext, we can create a simple class that represents a hand of cards. So, it will need an array of Card objects just like the Deck class. Since we don’t know how many cards would be in the largest hand, we’ll just use 52 as the size of this array as well. In a later chapter, we’ll learn about resizable arrays and other data structures so that we don’t have to worry about having enough room to store our data in a statically-sized array.
To start, we can create our array of cards and a constructor, as well as an integer to keep track of how many cards we have in our hand:
public class Hand{
private Card[] card_hand;
private int hand_size;
public Hand(){
this.card_hand = new Card[52];
this.hand_size = 0;
}
}Then, we can also create a getValue() method to return the value in our hand, as well as a toString() method to print out the contents of our hand:
public class Hand{
private Card[] card_hand;
private int hand_size;
public Hand(){
this.card_hand = new Card[52];
this.hand_size = 0;
}
public int getValue(){
int value = 0;
for(int i = 0; i < this.hand_size; i++){
value += this.card_hand[i].getValue();
}
return value;
}
@Override
public String toString(){
String output = "";
for(int i = 0; i < this.hand_size; i++){
output += this.card_hand[i].toString() + "\n";
}
return output;
}
}These methods are very similar to each other. In essence, we use a For loop to loop through the cards in our hand, and then either sum up the values or get the string representation of each card. Notice that we are using a For loop with an iterator variable that goes from 0 to the number of cards in the hand, instead of using an Enhanced For loop. This is because the array itself will probably never be completely full, so we only want to print out the cards that we are actually using in our hand.
Lastly, we need to create a method that allows us to add a card to our hand. So, we can implement the addCard() method as well:
public class Hand{
private Card[] card_hand;
private int hand_size;
// other methods omitted here //
public void addCard(Card input){
this.card_hand[this.hand_size] = input;
this.hand_size++;
}
}That should do it for the Hand class. The assessments below will confirm that the code structure and functionality is correct before moving on.
Dealer ClassNow that we have implemented the classes needed to keep track of the cards, we can create the classes that will actually perform the actions for each player. First, we can implement the code for the Dealer class. This class is actually pretty simple, since it will only consist of a couple of methods: makeMoves(), which will perform all the actions needed for the dealer, and a toString() method to print the contents of the dealer’s hand. In addition, the dealer will need an attribute to store a hand, which can be populated in the constructor by a parameter:
public class Dealer{
private Hand my_hand;
public Dealer(Hand a_hand){
this.my_hand = a_hand;
}
public void makeMoves(int player_value){
while(my_hand.getValue() < player_value && my_hand.getValue() <= 21){
// we need to draw a card here!
}
}
@Override
public String toString(){
String output = "The dealer currently holds: \n";
output += this.my_hand.toString();
output += "for a total of " + this.my_hand.getValue();
return output;
}
}At this point, we notice a flaw in our design! The Dealer class needs to be able to draw a card from the deck, but we’ve provided no way for it to do so. In addition, we’ll need to do the same thing for our Player class as well. So, how can we accomplish this?
Deck StaticOne way we can accomplish this is to make the methods in our Deck class static. In this way, we can access them from anywhere in the program, even without having access to a Deck object. For this, we’d modify our Deck class to look similar to this:
import java.util.Random;
import java.lang.IllegalArgumentException;
public class Deck{
// card_deck and card_position now static variables
private static Card[] card_deck;
private int card_position;
// Constructor changed to static `init` function
// `this` keyword removed
public static void init{
card_deck = new Card[52];
String[] suits = {"Spades", "Hearts", "Diamonds", "Clubs"};
int card_number = 0;
for(String suit : suits){
for(int i = 1; i <= 13; i++){
card_deck[card_number] = new Card(suit, i);
card_number++;
}
}
card_position = 0;
}
// shuffle is now static
public static void shuffle(int times){
// same code with `this` removed
}
// draw is now static
public static Card draw(){
// same code with `this` removed
}
// toString now renamed to getString and made static
// since toString cannot be static
// removed `@Override` since it is no longer the same name
public static String getString(){
// same code with `this` removed
}
}In the code above, all of the methods and instance attributes are now static. In addition, the constructor was renamed to init() since we won’t actually be using the constructor to build an object. Finally, we also have to rename the toString() method to getString() since the toString() method cannot be static. We’ll see why that would be a problem in a later chapter as we learn about method inheritance.
Then, once we’ve made that choice, we can draw a new card from the deck in our code anywhere simply by using the Deck.draw() method.
This approach has several advantages and disadvantages. It requires very few changes in our code, and once the Deck class is modified, we can use the methods from that class anywhere in our code, which can be very helpful.
Unfortunately, the major downside of this approach is that we can now only have a single deck of cards in our entire game. For most games, that won’t be an issue, but it could be a limitation in other programs. In addition, as we may learn in a later class, there are some standard ways to accomplish this, such as the singleton design pattern, that are more familiar to developers.
So, for this example, we won’t be using a Deck class that contains entirely static methods and attributes.
Deck Object to Dealer ClassThe second way this could be handled is to create an object from the Deck class in our Main class, then pass that object as a parameter to the constructor for the Dealer object. In that way, the dealer has a reference to the deck that is stored in our main class (recall that all objects are handled in a call by reference manner).
So, we can update the constructor for our Dealer class to accept a Deck object, and then we’ll store it as a private variable in the class:
public class Dealer{
private Hand my_hand;
private Deck the_deck;
public Dealer(Hand a_hand, Deck a_deck){
this.my_hand = a_hand;
this.the_deck = a_deck;
}
public void makeMoves(int player_value){
while(my_hand.getValue() < player_value && my_hand.getValue() <= 21){
// now we can draw our own cards
Card new_card = this.the_deck.draw();
System.out.println("The dealer draws a " + new_card.toString());
this.my_hand.addCard(new_card);
}
}
// other methods omitted here
}Then we can place this code in our Main class:
public class Main{
public static void main(String[] args){
Deck the_deck = new Deck();
the_deck.shuffle(1000);
Hand dealer_hand = new Hand();
dealer_hand.addCard(the_deck.draw());
dealer_hand.addCard(the_deck.draw());
Dealer a_dealer = new Dealer(dealer_hand, the_deck);
System.out.println(a_dealer);
}
}With this code, we are instantiating a single Deck object in our Main class, then passing it as a reference to the Dealer class when we instantiate it. This gives the Dealer class a reference to the deck that we are using, allowing it to draw cards as needed.
This approach also has several pros and cons. First, we don’t have to modify our Deck class at all, meaning that it can remain a simple object. Instead, we are modifying how we use it by including a reference to it in our other classes. This is a more standard approach for programs written in an object-oriented style, in Java and other languages.
As a downside, this does mean that we’ll have to make sure our other classes all are given a reference to a Deck object. In larger programs, handling all of these object references can become very cumbersome and time-consuming. Again, in a future course we can learn about design patterns that help simplify this process, too.
We’ll use this approach in our example program here.
That should complete the Dealer class! The assessments below will confirm that the code structure and functionality is correct before moving on.
Player ClassThe player class is nearly identical to the Dealer class. The only difference is that the player class will ask the player to decide whether to draw more cards. In addition, the player may draw until their value is greater than 21, without regard to the score from the dealer. This is the one interactive part of the entire program:
import java.util.Scanner;
public class Player{
private Hand my_hand;
private Deck the_deck;
public Player(Hand a_hand, Deck a_deck){
this.my_hand = a_hand;
this.the_deck = a_deck;
}
public void makeMoves(){
try(Scanner reader = new Scanner(System.in)){
while(my_hand.getValue() <= 21){
System.out.println("You currently have a value of " + this.my_hand.getValue());
System.out.print("Would you like to draw another card (y/n)?: ");
String input = reader.nextLine().trim();
if(input.equals("y") || input.equals("Y")){
Card new_card = this.the_deck.draw();
System.out.println("You draw a " + new_card.toString());
this.my_hand.addCard(new_card);
}else if (input.equals("n") || input.equals("N")){
break;
}else{
System.out.println("Invalid input!");
}
}
System.out.println("You end your turn with a value of " + this.my_hand.getValue());
}catch(Exception e){
System.out.println("An exception occurred!\n" + e);
return;
}
}
@Override
public String toString(){
String output = "The player currently holds: \n";
output += this.my_hand.toString();
output += "for a total of " + this.my_hand.getValue();
return output;
}
}As we can see in the makeMoves() method, we’ve simply added the code to create a Scanner object to handle user input. THen, we can ask the user at each step whether they would like to draw another card.
That should complete the Player class! The assessments below will confirm that the code structure is correct before moving on. We won’t worry about testing the functionality here, since that is really best done by a live player!
Main ClassFinally, we can work on implementing our Main class. This class is very simple, only containing the main() method for the program. The main method will set up the deck and deal a hand for each player, then allow both the player and the dealer to make moves before finally getting the result to see who wins:
public class Main{
public static void main(String[] args){
Deck the_deck = new Deck();
System.out.println("Shuffling the deck...");
the_deck.shuffle(1000);
System.out.println("Dealing the player's hand...");
Hand player_hand = new Hand();
player_hand.addCard(the_deck.draw());
player_hand.addCard(the_deck.draw());
Player a_player = new Player(player_hand, the_deck);
System.out.println(a_player.toString());
System.out.println("Dealing the dealer's hand...");
Hand dealer_hand = new Hand();
dealer_hand.addCard(the_deck.draw());
dealer_hand.addCard(the_deck.draw());
Dealer a_dealer = new Dealer(dealer_hand, the_deck);
System.out.println(a_dealer.toString());
System.out.println("Starting player's turn...");
a_player.makeMoves();
System.out.println(a_player.toString());
System.out.println("Starting dealer's turn...");
a_dealer.makeMoves(player_hand.getValue());
System.out.println(a_dealer.toString());
if(player_hand.getValue() <= 21 && dealer_hand.getValue() > 21){
System.out.println("The player wins!");
}else if(player_hand.getValue() <= 21 && player_hand.getValue() > dealer_hand.getValue()){
System.out.println("The player wins!");
}else if(dealer_hand.getValue() <= 21){
System.out.println("The dealer wins!");
}else{
System.out.println("There is no winner");
}
}
}Looking at this code, we see that the main method consists of several steps:
Player object is initialized. Once that is done, it prints the contents of the player’s hand.Dealer is initialized, given a hand, and the contents are printed.Here is a sample of this program’s output when run in the terminal:
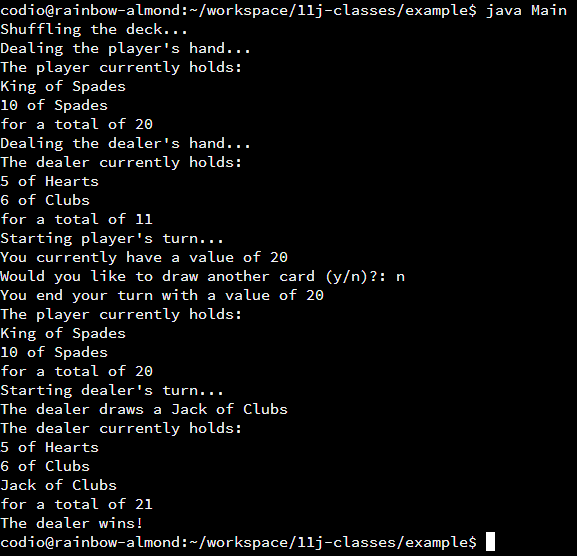
There we go! We were able to build a program that plays a simple version of Blackjack. While it took a bit of work to get all of the required classes developed, each one was pretty straightforward and easy to use. Then, in our main() method, we simply had to pull all those resources together into a working program.
The assessments below will verify that the entire example program works as intended, except for the Main and Player classes. This is because it can be very difficult to complete those classes in a way that is easy to test automatically. They exist mainly to allow us to interact with the objects we’ve created.
In this chapter, we learned how to build classes into our programs to represent things, either real-world items or virtual concepts. Using those classes, we can then instantiate objects that we can use in our programs, with each object representing a unique instance of a sort of item.
Using classes is a core concept in object-oriented programming, and it really helps us organize larger programs into smaller pieces of code, where each piece is a logical division of the program as a whole.
In later chapters, we’ll learn how we can relate our classes together through the use of inheritance and polymorphism, allowing us to represent not only individual items, but also items that are related. For example, we could have objects representing a teacher and a student with different attributes and actions they can perform. However, we can also say that they are both people and therefore share many attributes and actions.
Sharing Features Between Classes!
The animal kingdom is full of a wide variety of creatures, such as cats, dogs, and mice. Without even thinking, we can probably easily list some of the major differences and similarities between these different species. Dogs bark, cats meow, and mice squeak, for example, making each one unique and different from the others. They each have 4 legs, a tail, and live on land, showing that they also have many things in common.
In fact, if we look at how all life is classified biologically, we see that we can use those differences and similarities to describe exactly how all species are related to one another:
In biology, all life is divided into a number of groups, with species in each group sharing a number of traits. For example, all animals are in the kingdom animalia, whereas all plants are in the kingbom plantae. So, we know that every animal species shares some characteristics with all other animals, and also some that are different from all plant species.
Then, each kingdom can be divided into a number of phyla, such as chordata, for all animals who share a similar spinal chord structure during some point in their life cycle. Other animals might be in the anthropoda phylum, showing that they share a segmented body and exoskeleton.
We can repeat the process all the way down to the individual species level, uniquely describing each species and the similarities and differences between it and any other species of life we’ve discovered. For example, the common domesticated dog is classified as:
Animalia > Chordata > Mammalia > Carnivora > Canidae > Canis > C. Lupus > C. l. Familiariswhere as the common house cat is classified as:
Animalia > Chordata > Mammalia > Carnivora > Feliformia > Felidae > Felinae > Felis > F. catusBased on those classifications alone, we know that each species shares common traits through the order carnivora, but they differ beyond that.
Put another way, we can say that both cats and dogs have inherited certain traits from the order carnivora, as well as other classifications they share in common.
This concept of inheritance is the other key concept behind object-oriented programming. In this chapter, we’ll explore how we can use inheritance to show the common elements shared between classes that represent similar items, and how that makes our programs much more powerful when it comes to storing and using those objects.
https://www.pinclipart.com/pindetail/ibxxwm_vector-cats-open-mouth-dog-cat-and-mouse/ ↩︎
File:Biological classification L Pengo vflip.svg. (2019, April 5). Wikimedia Commons, the free media repository. Retrieved 19:26, October 31, 2019 from https://commons.wikimedia.org/w/index.php?title=File:Biological_classification_L_Pengo_vflip.svg&oldid=344938263. ↩︎
Object-oriented programming allows us to represent items from the real world in our code: we use a class as a general description of each type of item, and then we can instantiate objects based on that class to represent specific items in the world.

A classic example is to consider writing a computer program to represent a school, with students and teachers represented in code as separate classes. As we can see in the diagram above, both students and teachers can have attributes and methods that help describe the information and behaviors associated with that type of item.
However, this really doesn’t give us the whole picture. For starters, we know that both students and teachers are people, and so they share many of the same features common to all people (name, age, birthday, etc.). Similarly, they can perform many of the same actions.
Of course, we could just add those shared attributes and methods to each class, as we did with the name attribute in the example above. However, hopefully by now our programming instincts tell us that this solution violates the Don’t Repeat Yourself (DRY) mantra, since we’ll have multiple copies of the same code in each class1. If we add an additional class to represent a school administrator, we’ll have to copy all of that code to the new class, making it even more complicated.
This is where we can take our inspiration from the biological system of classification—what if we were able to create a class containing the items that students and teachers have in common?
“Sharing attributes” by itself is not a good justification for using inheritance. The real-world objects or concepts should be related in some fashion. ↩︎
The arrowheads in the video's UML are the wrong type. UML uses different arrowheads to mean different things. Inheritance uses an "open triangle" not filled in arrows as depicted here. The images in the text have been updated.

For example, we could create a class called Person in our program, and that class could represent all of the attributes and methods that are shared by both students and teachers, as well as by any other people we might want to include in our program.
Then, we can update the Student and Teacher classes to inherit those attributes and methods from the Person class. In effect, we are saying that a student or a teacher is also a person, so anything that a person is or does also applies to a student or a teacher.
There are some special terms we can use to describe the classes in an inheritance relationship. In this example:
Person is the parent class, base class, or superclass. Student and Teacher are child classes, derived classes, or subclasses of Person.
This is a really important concept in object-oriented programming. It allows us to easily define the similarities between several classes.
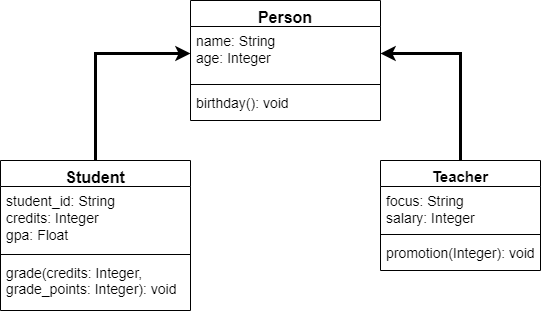
In a UML diagram, we can show this inheritance relationship using an open arrow between the classes. It’s important to remember that the arrow points to what the class is inheriting from. So, the arrow going from the Student class to the Person class says “the Student class inherits from the Person class.” We can also remember this by saying the arrow “Points to the Parent” class. This can be confusing, so we must always make sure we look closely at the direction the arrow is pointing in our UML diagrams.
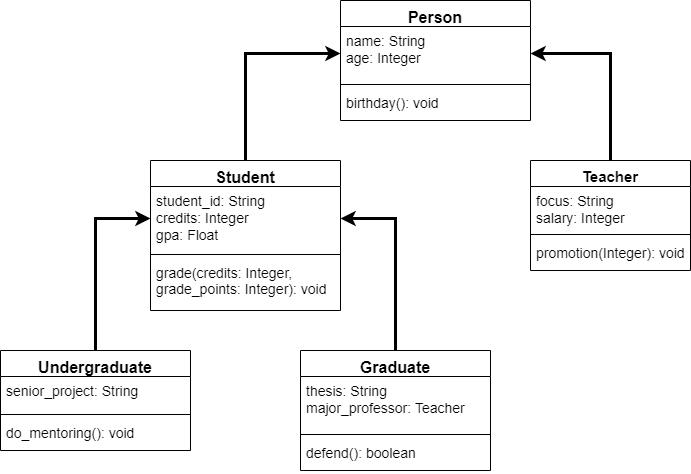
Finally, we can even go further and create another set of classes to represent Graduate and Undergraduate students, and have them inherit from the Student class. There is no limit to how many layers of inheritance we can create in our programs. In addition, some languages—such as Python—allow a class to inherit from multiple parent classes!
Allowing a class to inherit attributes and methods from another class allows us to use those classes in very unique ways.
One way we can use those classes is through the application of polymorphism. Polymorphism can be loosely defined as “the condition of occurring in several different forms”^[https://www.lexico.com/en/definition/polymorphism], but in programming we use the term to describe the fact that an object instantiated from a class that inherits from another class can take on multiple forms, depending on how it is used.
Let’s go back to basics for just a minute and talk about what this means in the simplest sense. In most programming languages, such as Java or C, a variable must be declared with a data type that tells us what type of data we can store in that variable. It could be an integer, a floating point number, or even a particular type of object such as a Student object. Other languages, such as Python, don’t require us to declare the data type of a variable in advance, but internally it keeps track of exactly the type of data stored in that variable when it is assigned.
For example, let’s assume that we’ve instantiated an object using the Teacher class. So, initially, we know that the data type of that variable is Teacher, since it was created from that class.
However, what if we try to store that object in a variable with the Person data type? Will that work? Put another way, will the program consider an object of the Teacher data type to also be an object of the Person data type?
Indeed it will! This is because an object instantiated from a class that inherits from other classes can exhibit polymorphism, existing as many different data types at the same time. Depending on how we use it, an object created using the Teacher class can also be thought of as a Person.
However, if we create an object from the Person class, we can’t say whether it is a Teacher or not. So, we aren’t allowed to go in that direction—a Person object cannot be stored in a variable of the Teacher data type.
A great way to think of this would be the logical statement:
All Teachers are Persons
But Not All Persons are TeachersConsider the following
![]()
![]()
We say that inheritance is transitive. A Border Collie is a Dog is a Pet. Thus a Border Collie is a Pet.
This relationship is one-way, sub-classes have all their sub-class-specific features, as well as those of all their super-classes.
Most languages have at the top level, an Object class, from which all objects implicitly inherit. Both Python and Java have an Object class, from which all programmer defined objects get their default constructors and toString(__str__) methods.
Inheritance IS NOT symmetric
Inheritance is not symmetric. The fact that a Border Collie is a Dog DOES NOT MEAN a Dog is a Border Collie.
Inheritance is not equality. Equality is both transitive and symmetric.
In this chapter, we’ll see how we can use this feature in our programs. Polymorphism is sometimes difficult to define or describe without seeing it in action.
Another handy feature of class inheritance is the ability to override certain methods of the parent class. For example, in our Person class, we’ve included a method called birthday() that will simply increase that person’s age by 1.
However, what if we want to do something special when a student has a birthday? In that case, we can override the birthday() method from the Person class by providing our own code for the method in the Student class. Then, when we create an object using the Student class, it will use the birthday() method from the Student class instead of the one from the Person class. In most languages, this will even work if we have the Student object stored in a variable using the Person data type. It’s pretty handy!
Finally, we can also use another concept in object-oriented programming to create abstract methods in our classes. An abstract method is a method that is declared to be part of the parent class but is not implemented with any code. We call a class containing such a method an abstract class. Since it has a method containing no code, we can no longer instantiate that class and use it.
However, any class that inherits from that class has the option to implement the abstract methods by overriding and providing code for those methods. By doing so, the child class is no longer abstract and can be instantiated. However, if it does not do so, then the child class will also be abstract.
In our UML diagram above, the do_work() method and the class Person are abstract. Because at least one method is abstract, the class must also be abstract. We know this since their names are printed in an italic font. In the two child classes, both Student and Teacher have included an entry for the do_work() method. Since neither of those classes contains any italicized items, we know that they are not abstract.
That covers most of the major concepts when working with inheritance and polymorphism in our programs. Before we learn how to write code using these ideas in our language of choice, we’ll take a minute to review the important terminology we’ve learned so far in this chapter.
Inheritance in Java
Now that we’ve learned a bit about the theory behind inheritance in object-oriented programming, let’s dive into the code and see how we can accomplish this in Java.
For these examples, we’ll be implementing the following UML diagram:
The UML diagram above includes some items that we haven’t discussed yet. Don’t panic! We’ll cover them as they become relevant in this module.
For now, feel free to ignore the fact that methods are italicized. Similarly, you can treat a hash symbol # in front of an attribute or method the same as a plus + that denotes they should be public.
We’ll learn what each of these indicate later in this module.
The first step is to build the inheritance relationships. Let’s start by just declaring the Vehicle class for now. Remember that the Vehicle class should be defined in Vehicle.java. We won’t add any methods or attributes at this point:
public class Vehicle{
}As you’ll recall, a class declaration is pretty simple.
Next, let’s declare the MotorVehicle class in MotorVehicle.java. This class inherits from the Vehicle class, so we’ll need to use a new keyword to make that work:
public class MotorVehicle extends Vehicle{
}In the example above, we’ve used the extends keyword in Java to show that the MotorVehicle class inherits from, or extends, the Vehicle class. That’s all we need to do to show that a class inherits from another class.
Let’s see if we can do the same process for the Car, Truck, and Airplane classes that are shown in the UML diagram above. We must make sure we place the code for each class in the correct file.
Now that we’ve created some classes that follow different inheritance relationships, let’s explore how we can use those relationships to change some methods in each class through the use of method overriding.
Vehicle ClassFirst, let’s look at a couple of methods in the Vehicle class, the move() and describe() methods. As we might recall, the describe() method is an abstract method since it is in italicized text in the UML diagram. We’ll discuss how to build an abstract method later in this chapter, but for now we’ll just implement it as a normal method that does nothing. Likewise, we haven’t discussed what a hash symbol # means in front of the speed attribute or the constructor, so we’ll just make them public for now.
public class Vehicle{
private String name;
public double speed;
public String getName(){ return this.name; }
public Vehicle(String name){
this.name = name;
this.speed = 1.0;
}
public double move(double distance){
System.out.println("Moving");
return distance / this.speed;
}
public String describe(){
return "";
}
}That’s a very simple implementation of the Vehicle class. The move() method simply accepts a distance to move as a floating point number, and then divides that by the speed of the vehicle to get the time it takes to go that distance. For the default vehicle, we’ll assume that it moves at a speed of 1.0.
Now that we’ve created some methods in the Vehicle class, let’s go back to the Airplane class and see how we can build it. First, we’ll need to add the attributes and the constructor for this class:
public class Airplane extends Vehicle{
private double wingspan;
private int capacity;
public Airplane(String name, double wingspan, int capacity){
this.name = name;
this.wingspan = wingspan;
this.capacity = capacity;
}
}Before we go any further, let’s stop there and compile this code to make sure that it works. Recall that we’ll need to manually run the compiler from the terminal and include both of these files in the compiler command. So, to do that, we can open the terminal in Codio and use the following two commands to open the directory containing these files and then compile them:
cd ~/workspace/12j-inherit/vehicle
javac Vehicle.java Airplane.javaWhen we do that, we’ll get some errors as shown in this screenshot:
There are actually two errors here. Let’s talk about the second error first. It says that the name attribute in the Vehicle class is private, so we can’t access it from Airplane. This may seem strange, since Airplane is inheriting from Vehicle, but in Java, the private keyword also prevents any child classes from accessing that data.
This actually makes sense if we think about it. For example, consider a class containing private data that we’d like to access. We could just create our own class that inherits from that class, and then we’d have direct access to all those private attributes and methods. Sounds like a pretty bad security flaw, right? That’s why Java enforces the rule that any private attribute cannot be accessed by child classes. Later in this chapter, we’ll learn about another security modifier keyword that allows child classes to access these variables.
So, to set the value of the name attribute, we’ll need to somehow provide that value to the constructor of the Vehicle class. However, the first error addresses that problem directly, so let’s look at it and see how the solution to that error fixes both of these problems.
The first error is telling us that we cannot create an instance of the Vehicle class because we didn’t provide the required parameter for the constructor. But wait, why is it trying to create a Vehicle object? Doesn’t this constructor just instantiate an Airplane object?
One of the major things to recall when inheriting from a class is that each object instantiated from the child class is also an object of the parent class. We can think of it like the child object contains an instance of the parent object. Because of that, when we try to create an instance of the child class, or Airplane in this example, that constructor must also be able to call the constructor for the parent class, or Vehicle.
We run into a snag, however, because we’ve provided a constructor in Vehicle that requires an argument. In that case, we must provide an argument to the constructor for Vehicle in order to instantiate that object, since the default constructor is no longer available. How can we do that?
Thankfully, there is a quick an easy way to handle this in Java. Inside of our constructor, we can use the special method super() to call the parent class’s constructor. We can provide any needed arguments to that method call, which are then provided to the constructor in the parent class. So, let’s update our constructor to use a call to super():
public class Airplane extends Vehicle{
private double wingspan;
private int capacity;
public Airplane(String name, double wingspan, int capacity){
super(name);
this.wingspan = wingspan;
this.capacity = capacity;
}
}Now, inside of the constructor for Airplane, we have added the line super(name), which calls the constructor of the parent class Vehicle, providing name as the argument for the String parameter. This will resolve both of our errors.
It is important to note, however, that the call to the parent class’s constructor using super() must be the first line inside of this constructor, before any other code. The Java compiler will helpfully enforce this restriction, providing us with a helpful error if we forget.
Finally, we can explore how to override a method in our child class. In fact, it is as simple as providing a method declaration that uses the same method signature as the original method. A method signature in programming describes the method name, return type, and type and order of parameters defined in the function. So, we can override the move() and describe() methods in Airplane using code similar to the following:
public class Airplane extends Vehicle{
private double wingspan;
private int capacity;
public Airplane(String name, double wingspan, int capacity){
super(name);
this.wingspan = wingspan;
this.capacity = capacity;
}
public void landing_gear(boolean set){
if(set){
System.out.println("Landing gear down");
}else{
System.out.println("Landing gear up");
}
}
@Override
public double move(double distance){
this.landing_gear(false);
System.out.println("Moving");
this.landing_gear(true);
return distance / this.speed;
}
@Override
public String describe(){
return String.format("I am an airplane with a wingspan of %f and capacity %d", this.wingspan, this.capacity);
}
}In this code, we see that we have included method declarations for both move() and describe() that use the exact same method signatures as the ones declared in Vehicle. Also, since we are overriding a method from a parent class, we must also use the @Override method decorator above each method. This tells the Java compiler that we intend to override a method with this code, and it will make sure that we’ve done it correctly or give us errors when we try to compile the code.
To really understand how this works, let’s look at a quick main() method that explores how each of these work.
public class Main{
public static void main(String[] args){
Vehicle vehicle = new Vehicle("Boat");
Airplane airplane = new Airplane("Plane", 175, 53);
System.out.println(vehicle.move(10));
System.out.println(airplane.move(10));
System.out.println(vehicle.describe());
System.out.println(airplane.describe());
}
}This code will simply call each method, printing whatever values are returned by the methods themselves. We must also remember that some of the methods may also print information, so we’ll see that output before we see the return value printed.
To compile and run this code, we can use these commands:
cd ~/workspace/12j-inherit/vehicle
javac Vehicle.java Airplane.java Main.java
java Mainand we should see the following output:
In this screenshot, we can see that calling the move() method on the Vehicle object just prints the message “Moving”, while calling it on the Airplane object causes the messages about landing gear to be printed as well. This shows that our Airplane object is using the code from the overridden move() method correctly.
In a later part of this chapter, we’ll discuss polymorphism and how overridden methods have a major impact on the functionality of objects stored in that way.
Let’s see if we can do the same for the overridden methods in the Truck and Car classes. First, we’ll start with this code for the MotorVehicle class:
public class MotorVehicle extends Vehicle{
public int number_of_wheels;
public double engine_volume;
public MotorVehicle(String name){
super(name);
this.number_of_wheels = 2;
this.engine_volume = 125;
}
public String honk_horn(){
return "";
}
}See if you can complete the code for the Truck and Car classes to do the following:
Truck.describe() should return “I’m a big semi truck hauling cargo”Truck.honk_horn() should return “Honk”Car.describe() should return either “I’m a sedan” if it has 4 doors, “I’m a coupe” if it has 2 doors, or “I’m different” if it has any other number of doorsCar.honk_horn() should return “Beep”You’ll also need to write the constructors for each class. Inside the constructor, you should store the parameters provided to the appropriate attributes.
Working with inherited classes also gives us an opportunity to learn about how data can be secured in the parent class so that any child class can easily access it, without any external class being able to do so.
In Java, we can simply use the protected keyword as a security modifier, just like we learned how to use private and public in an earlier module. In effect, anything marked as protected in Java will be accessible to the class in which it is declared, as well as to any child classes, but not to any other classes.
In our UML diagram, we use the hash symbol # before an item to denote that it should be protected using the protected keyword. So, we can update our Vehicle class to make the speed attribute as well as the constructor protected:
public class Vehicle{
private String name;
protected double speed;
public String getName(){ return this.name; }
protected Vehicle(String name){
this.name = name;
this.speed = 1.0;
}
public double move(double distance){
System.out.println("Moving");
return distance / this.speed;
}
public String describe(){
return "";
}
}It is worth noting, however, that any developer could simply chose to inherit from one of these classes, giving them access to all of that data. So, while call these “security modifiers”, they aren’t actually providing a real sense of security. Instead, they are simply making it more difficult to accidentally access or use these items. Any determined programmer will probably be able to figure out a way around it.
Also, since we are making the constructor in this class protected, it will prevent any class that doesn’t extend this class from instantiating an object based on this class. A bit later in this chapter, we’ll also learn how to declare this class as an abstract class, which will also prevent any other class from instantiating it.
Let’s go ahead and update all of the items marked as protected in the UML diagram above in our code.
Note: this video contains errors in the UML diagram, these errors have been fixed below.
Now that we’ve learned how to build the structure needed for classes to inherit attributes and methods from other classes, let’s explore how we can use those classes in our code.
Earlier, we defined polymorphism as “the condition of occurring in several different forms”1. In code, this allows us to create an object of a child class, and then store it in the data type for the parent class. Let’s look at an example.
public class Main{
public static void main(String[] args){
Vehicle plane = new Airplane("Plane", 123, 45);
System.out.println(plane.getName());
System.out.println(plane.describe());
System.out.println(plane.move(10));
Vehicle car = new Car("Car", 4);
System.out.println(car.getName());
System.out.println(car.describe());
System.out.println(car.move(10));
}
}In this code, we are instantiating an Airplane object and a Car object, but we are storing them in a variable declared with the Vehicle data type. This is polymorphism at work! Since both Airplane and Car are inheriting from the Vehicle data type, we can store object of each of those types in the Vehicle data type.
Also, since those variables are stored using the Vehicle data type, we can use any methods and access any attributes that are available publicly from the Vehicle class.
So, when we run this code using these commands:
cd ~/workspace/12j-inherit/vehicle
javac Vehicle.java Airplane.java MotorVehicle.java Car.java Truck.java Main.java
java Mainwe’ll get the following output:
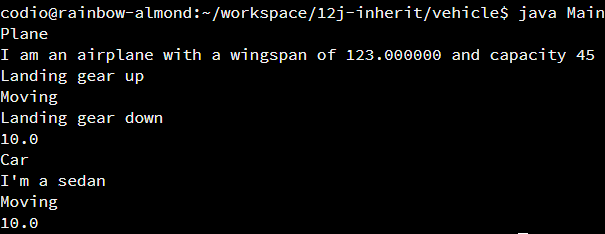
As we can see, even though we are calling methods defined in the Vehicle class, it is actually using the code from the methods that were defined in the Airplane and Car classes, respectively. This is because those methods are overridden in the child classes.
What if we want to use the honk_horn() method of the Car object? Could we do that?
Vehicle car = new Car("Car", 4);
System.out.println(car.honk_horn());When we try to compile that code, we’ll get the following error:
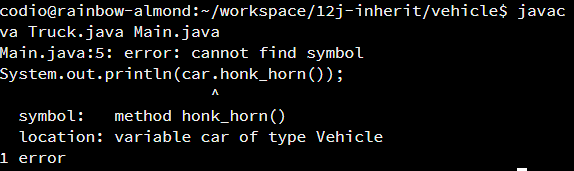
This is because the Vehicle class doesn’t have a method called honk_horn() defined. So, even though the object is a Car, since it is stored in a variable using the data type Vehicle, we can only access things that were defined in the Vehicle class.
So, when it comes to polymorphism, there are a couple of important rules to remember:
Here’s another example of the power of polymorphism. In this case, we’ll create an array that stores Vehicles, and fill that array with different types of vehicles.
public class Main{
public static void main(String[] args){
Vehicle[] array = new Vehicle[3];
array[0] = new Airplane("Plane", 123, 45);
array[1] = new Car("Car", 4);
array[2] = new Truck("Truck", 157);
for(Vehicle v : array){
System.out.println(v.getName());
System.out.println(v.describe());
System.out.println(v.move(10));
}
}
}In this example, we are able to use an enhanced for loop to iterate over the objects in the array and call methods on each one. As long as those methods are defined in the Vehicle class, we can use them, no matter what type of object was instantiated and placed in the array.
So, when we run this program, we’ll see the following output:
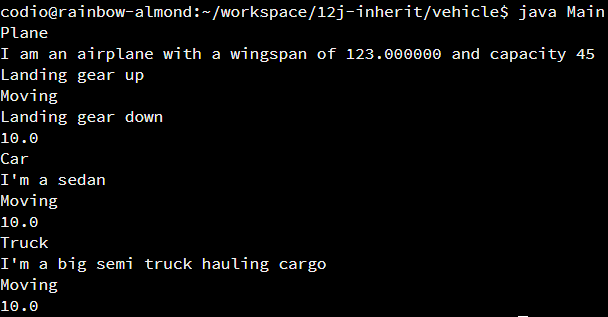
Polymorphism is a very powerful tool for object-oriented programmers. Feel free to modify the Main class open to the left, then compile and run the code for this example. See if you can create Car and Truck objects and store them in the MotorVehicle data type, then use the honk_horn() method!
Of course, polymorphism can make things a bit more complicated when it comes to determining exactly what type of object is stored in a variable. Thankfully, Java includes a few easy ways to determine what type of object is really stored in a variable, as well as ways that we can convert the types if needed.
Let’s go back to the previous example from the last page, where we had placed all of our objects in an array.
public class Main{
public static void main(String[] args){
Vehicle[] array = new Vehicle[3];
array[0] = new Airplane("Plane", 123, 45);
array[1] = new Car("Car", 4);
array[2] = new Truck("Truck", 157);
for(Vehicle v : array){
System.out.println(v.getName());
System.out.println(v.describe());
System.out.println(v.move(10));
}
}
}What if we’d like to call the honk_horn() method, but only if the object supports that method? To do that, we’ll need to determine what type of object is stored in the variable, and then convert it, or cast it, to a type that supports the honk_horn() method. So, we can update the code as shown below:
public class Main{
public static void main(String[] args){
Vehicle[] array = new Vehicle[3];
array[0] = new Airplane("Plane", 123, 45);
array[1] = new Car("Car", 4);
array[2] = new Truck("Truck", 157);
for(Vehicle v : array){
if(v instanceof MotorVehicle){
MotorVehicle m = (MotorVehicle)v;
System.out.println(m.honk_horn());
}else{
System.out.println(v.getName() + " can't honk!");
}
}
}
}Here, we are doing two very important operations. First, we are using v instanceof MotorVehicle to determine if the object stored in v can be stored in a variable using the MotorVehicle data type. So, for objects created from the Car and Truck classes, this operation will return True since both Car and Truck are child classes of MotorVehicle.
Then, once we’ve determined that we can store the object in v as a MotorVehicle, we must convert it. To do that, we use the expression (MotorVehicle)v. This is called a cast operation. To do this, we put the data type we’d like to convert the variable to in parentheses, directly in front of the variable to be converted. Then, we can store this result in a variable using the MotorVehicle data type.
As you may recall, we’ve done this before to convert numbers stored as integers to floating point numbers.
It is important to note, however, that if we try to cast an object to a type that isn’t allowed, we will get an exception. So, we’ll either need to use an If-Then statement to confirm that we can make the conversion before attempting it, or use a Try-Catch statement and be prepared to catch an exception if it fails.
Place the code above in the Main class and see what it does. Can you come up with any other programs that would require us to convert objects between types?
Note: this video contains errors in the UML diagram, these errors have been fixed below.
Another major feature of class inheritance is the ability to define a method in a parent class, but not provide any code that implements that function. In effect, we are saying that all objects of that type must include that method, but it is up to the child classes to provide the code. These methods are called abstract methods, and the classes that contain them are abstract classes. Let’s look at how they work!
In the UML diagram above, we see that the describe() method in the Vehicle class is printed in italics. That means that the method should be abstract, without any code provided. To do this in Java, we simply must use the abstract keyword on both the method and the class itself:
public abstract class Vehicle{
private String name;
protected double speed;
public String getName(){ return this.name; }
protected Vehicle(String name){
this.name = name;
this.speed = 1.0;
}
public double move(double distance){
System.out.println("Moving");
return distance / this.speed;
}
public abstract String describe();
}Notice that the keyword abstract goes after the security modifier, but before the class keyword on a class declaration and the return type on a method declaration.
In addition, since we have declared the method describe() to be abstract, we must place a semicolon after the method declaration, without any curly braces. This is because an abstract method cannot include any code.
Now, any class that inherits from the Vehicle class must provide an implementation for the describe() method. If it does not, that class must also be declared to be abstract. So, for example, in the UML diagram above, we see that the MotorVehicle class does not include an implementation for describe(), so we’ll also have to make it abstract.
We can also declare a class to be abstract without including any abstract methods. By doing so, it prevents the class from being instantiated directly. Instead, the class can only be inherited from, and those child classes can choose to be instantiated by omitting the abstract keyword.
Let’s see if we can update the Vehicle and MotorVehicle classes to be abstract, with an abstract definition for the describe() and horn_honk() method as well.
Finally, we can also build classes that are able to inherit from multiple parent classes. In Java, this is done through the use of interfaces.
Before we can really understand the importance of multiple inheritance, we must first discuss the “Diamond Problem.” This is a very common example in object-oriented programming, and it is used to describe one of the common pitfalls for multiple inheritance in programming.
Consider the following code, which defines 4 classes:
public abstract class A{
public abstract void do_something();
}
public class B extends A{
public void do_something(){
System.out.println("B");
}
}
public class C extends A{
public void do_something(){
System.out.println("C");
}
}
public class D extends B, C{
}In this code, we are trying to inherit from both class B and C inside of D. So, we’ll end up with a class hierarchy diagram that looks something like this:
The problem arises when we try to use the class D, as in this sample program:
public class Main{
public static void main(String[] args){
D obj = new D();
obj.do_something(); // what happens?
}
}In this example, we are calling the do_something() method on an object instantiated from class D. However, that method is defined in both B and C, which are parents of D. So, what version of the code should we use?
In short, we have no idea! That is the crux of the diamond problem: if we allow multiple inheritance, we can run into situations where the program has no idea which version of a function’s code to use.
Java allows us to solve this by the use of a special type of abstract class called an interface. An interface is an abstract class that only includes abstract methods, with no other data. One way to think about it is that it is simply describing the actions a class should be able to perform, also known as an interface.
So, we can update the example above a bit using interfaces instead of abstract classes.
public interface B{
public void do_something();
}
public interface C{
public void do_something();
}
public class D implements B, C{
public void do_something(){
System.out.println("D");
}
}Here, we have used the keyword interface to declare that classes B and C are interfaces, and will only include abstract method declarations. Then, we can use the implements keyword to show that our class D is implementing both of these interfaces. We can also extend D from another class, and that would be placed before the implements keyword.
Of course, by doing so, we have to provide the implementation for do_something() in D. But, we can store an instance of D in variables for storing both B and C data types. Pretty neat, right?
We won’t use multiple inheritance in this course, but it is helpful to know that it is available as we go forward in our programming experience.
File:Diamond inheritance.svg. (2018, September 25). Wikimedia Commons, the free media repository. Retrieved 02:42, November 4, 2019 from https://commons.wikimedia.org/w/index.php?title=File:Diamond_inheritance.svg&oldid=321823174. ↩︎
Now that we’ve seen how to build classes that can inherit attributes and methods from other classes, let’s work through a simple example program together to see how it all works in practice. The code in this program will be very simple, because the purpose is to explore how we can use the structure of inheritance in our programs.
First, let’s start with a problem statement. In this problem, we are going to build a program that will help us find an object in a toolbox based on several criteria provided from the user. To represent the objects in the toolbox, we’ll use a structure of class inheritance as shown in the UML diagram below:
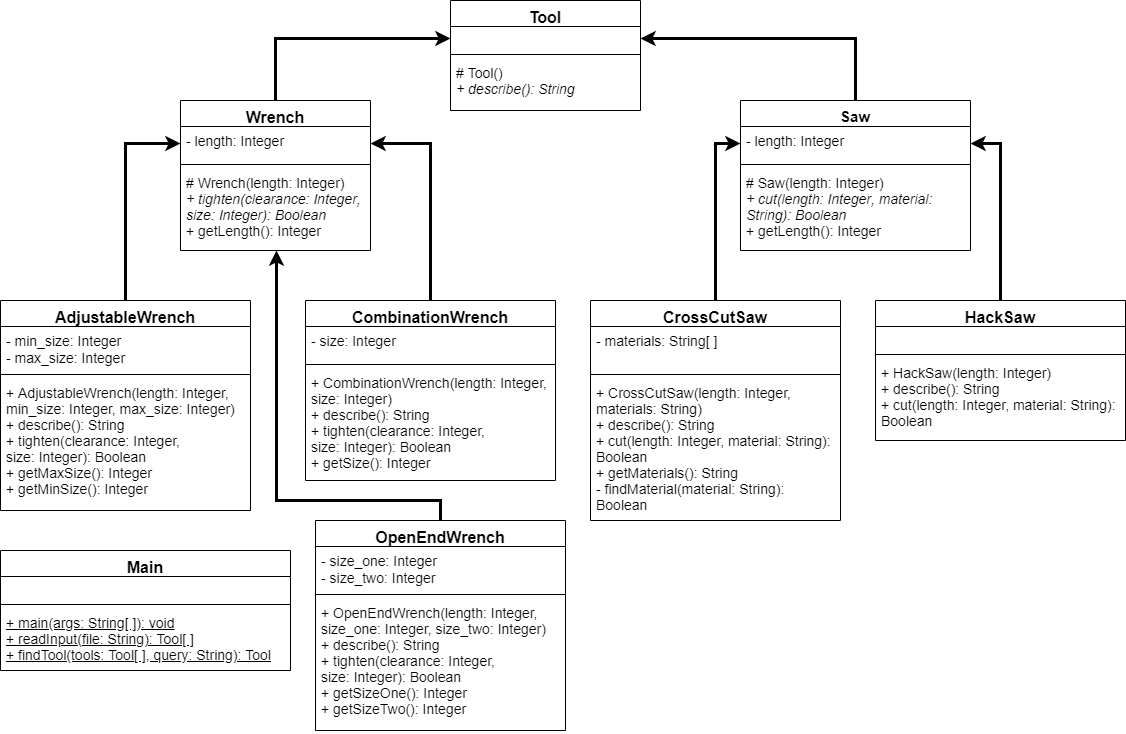
Right-click image and choose “Open image in new tab” or similar to view larger version
The completed program should be able to perform the following steps:
true to that method call, then that tool is able to perform that action. The program should print the description of the appropriate tool to the terminal and terminate. In this example, each query will only result in one matching tool, if any.For example, here’s a sample input file that could be provided to this program:
3
AdjustableWrench 170 10 25
CombinationWrench 135 8
CrossCutSaw 350 wood:drywallThen, if the user inputs the following query:
tighten 150 8The program will respond with the following output:
CombinationWrench Length: 135 Size: 8Let’s walk through this program step by step and see how we need to build it.
Tool ClassFirst, we can start with the Tool class. Looking at the UML diagram, we see that the describe() method is in italics, meaning it should be an abstract method. Likewise, we see that the constructor is protected, so the class cannot be instantiated directly. Both of those help us realize that the entire Tool class should be abstract. So, we can easily create it and define the constructor and the describe() method in code:
public abstract class Tool{
protected Tool(){
// do nothing
}
public abstract String describe();
}That’s really it! In many cases, the base class includes very little, if any, content or code. Instead, it simply gives us a shared starting point for the other classes in this program, and defines a single method, describe(), that each child class must implement.
Wrench and Saw ClassesNext, we can go down a level and implement the Wrench and Saw classes. Each of these classes contains a single attribute with a getter method. They also each contain a protected constructor, and an abstract method defining what each type of tool can do. Since neither of these classes implements the describe() method, even though they inherit from Tool, they will also be abstract. So, the code for these classes will be very similar to what we already created for the Tool class:
public abstract class Wrench extends Tool{
private int length;
protected Wrench(int length){
this.length = length;
}
public int getLength(){ return this.length; }
public abstract boolean tighten(int clearance, int size);
}public abstract class Saw extends Tool{
private int length;
protected Saw(int length){
this.length = length;
}
public int getLength(){ return this.length; }
public abstract boolean cut(int length, String material);
}As we can see in the code above, these classes are nearly identical, differing only in the name of the class and the method signatures of the different abstract methods.
At this point, we can quickly check our program structure to make sure everything is built correctly so far.
AdjustableWrench ClassNext, let’s look at one of the child classes of Wrench. As we can see in the UML diagram above, this class has both a min_size and a max_size attribute that are set through the constructor, as well as getter methods for each one. So, most of the code for this class is already pretty straight forward, just based on the structure of the class alone.
public class AdjustableWrench extends Wrench{
private int min_size;
private int max_size;
public AdjustableWrench(int length, int min_size, int max_size){
super(length);
this.min_size = min_size;
this.max_size = max_size;
}
public int getMinSize(){ return this.min_size; }
public int getMaxSize(){ return this.max_size; }
// other methods go here
}So, that just leaves the describe() and tighten() methods. Let’s tackle describe() first. In the example above, we see that the describe() method seems to just print the name of the class, followed by each attribute’s name and value. So, we can pretty easily implement that method in code:
public String describe(){
return String.format("AdjustableWrench: Length: %d MinSize: %d MaxSize: %d", this.length, this.min_size, this.max_size);
}However, if we try to compile this code, we’ll get an error message:
AdjustableWrench.java:16: error: length has private access in Wrench
return String.format("AdjustableWrench: Length: %d MinSize: %d MaxSize: %d", this.length, this.min_size, this.max_size);
^
2 errorsYou can see for yourself by trying to compile your code at this point. You should get a similar message (you’ll probably see another stating that we haven’t implemented tighten() yet, which is expected).
Looking at the UML diagram above, we see that the length attribute in the parent Wrench class is indeed private instead of protected. So, we’ll need to use the getter method getLength() to get that value instead:
public String describe(){
return String.format("AdjustableWrench: Length: %d MinSize: %d MaxSize: %d", this.getLength(), this.min_size, this.max_size);
}That should fix the error! You can try it with the button above after making the change. We’ll still get an error about not implementing tighten(), which is the last step in building this class.
The tighten() method should determine whether this wrench is able to tighten the item described. To really understand what we are dealing with, we must understand what an adjustable wrench looks like. Here’s a picture of one from the real world:
The function accepts two parameters: a clearance value, which shows how much room between the item and the surrounding equipment there is, and the size of the item to be tightened itself. So, we know that if our wrench is shorter than the clearance, and supports an item of the given size, we’ll be able to tighten it.
An adjustable wrench has a head that can be adjusted to multiple sizes, so as long as the size given is between the minimum and maximum size our wrench is able to tighten, we can return true. So, to put that into code:
public boolean tighten(int clearance, int size){
return clearance >= this.getLength() && size >= this.min_size && size <= this.max_size;
}As you may recall from an earlier module, we can directly return the result of a Boolean logic expression, so that makes this method even simpler.
CombinationWrench and OpenEndWrench ClassesNow that we’ve written the code for the AdjustableWrench class, it should be pretty simple to write the code for the other two types of wrenches.
First, a CombinationWrench, which typically only supports one size of bolt or nut. It typically looks like this.
So, the tighten() method must simply check the clearance and the size of the item provided against the size of the wrench. Here’s the code for that class:
public class CombinationWrench extends Wrench{
private int size;
public CombinationWrench(int length, int size){
super(length);
this.size = size;
}
public int getSize(){ return this.size; }
public String describe(){
return String.format("CombinationWrench Length: %d Size: %d", this.getLength(), this.size);
}
public boolean tighten(int clearance, int size){
return clearance >= this.getLength() && size == this.size;
}
}The other type of wrench, an OpenEndWrench, typically has two heads of different size on either end:
So, it can tighten bolts or nuts of two different sizes. Therefore, the tighten() method must determine if either size is applicable to the bolt or nut to be tightened. The code for that class is as follows:
public class OpenEndWrench extends Wrench{
private int size_one;
private int size_two;
public OpenEndWrench(int length, int size_one, int size_two){
super(length);
this.size_one = size_one;
this.size_two = size_two;
}
public int getSizeOne(){ return this.size_one; }
public int getSizeTwo(){ return this.size_two; }
public String describe(){
return String.format("OpenEndWrench Length: %d SizeOne: %d SizeTwo: %d", this.getLength(), this.size_one, this.size_two);
}
public boolean tighten(int clearance, int size){
return clearance >= this.getLength() && (size == this.size_one || size == this.size_two);
}
}That’s really it! As we can see, while there is quite a bit of code in this program, much of the code is very similar between classes. We’re simply implementing the important bits and pieces of each class, with a slightly different implementation of the describe() and tighten() methods in each one.
At this point, we can check our code to confirm that the structure is correct.
CrossCutSaw ClassThe CrossCutSaw class is very similar to the classes we created for the different type of wrenches above. The only difference is that it uses a cut() method to determine if the saw is able to cut the material described when we call that method.
First, let’s look at the rest of the code for that class. In the constructor, we are given a string that contains a list of materials that can be cut by the saw, separated by colons. So, we’ll need to use the String.split() method to split that string into an array of strings to be stored in the class’s materials attribute.
Likewise, since the getMaterials() method should return a simple string, we can use the String.join() method to make a string out of the array, with each element separated by a comma followed by a space. Finally, we can use that to help populate the describe() method.
public class CrossCutSaw extends Saw{
private String[] materials;
public CrossCutSaw(int length, String materials){
super(length);
this.materials = materials.split(":");
}
public String getMaterials(){ return String.join(", ", this.materials); }
public String describe(){
return String.format("CrossCutSaw Length: %d Materials: %s", this.getLength(), this.getMaterials());
}
// additional methods here
}It might be tempting to have the CrossCutSaw class simply accept an array of materials in the constructor, and then return that array in the getMaterials() method. However, recall that arrays are complex data type that are handled using call by reference. So, that leaves this class vulnerable to manipulation from an external code source.
For example, if the Main class gives an array of materials to CrossCutSaw via the constructor, we could simply store the reference to that array in our materials attribute. However, if Main proceeds to change some of the elements in the array, it would also update the array referenced by this class. Likewise, any code that calls the getMaterials() method would also get a reference to the same array.
By creating our own array in the constructor, and then only returning a newly formed string each time a class calls the getMaterials() method, we can protect our data from malicious changes.
An alternative method would be to create a deep copy of the array and store that copy in this class. We haven’t discussed how to do that in this course, but a future course on data structures will cover that process in depth.
The CrossCutSaw has two more methods that we’ll need to implement: cut() and findMaterial(). The findMaterial() method is a private method that allows us to search the array of materials that can be cut by this CrossCutSaw object, and simply return a boolean value if the provided material is in the list. So, let’s address that method first.
private boolean findMaterial(String material){
for(String m : this.materials){
if(m.equals(material)){
return true;
}
}
return false;
}This method simply iterates through each material in the materials array, and returns true if it finds a material that exactly matches the material provided as a parameter. If it can’t find a match and reaches the end of the list, then the method will return false.
We can then use this method in our cut() method to determine whether the given material can be cut by this saw:
public boolean cut(int length, String material){
return length < this.getLength() && this.findMaterial(material);
}This method will simply return true if the length of the item to be cut is shorter than the saw and the material of the item is contained in the list of materials that can be cut by this saw. That covers the CrossCutSaw class.
HackSaw ClassThe HackSaw class is very similar to the CrossCutSaw class. However, instead of having a list of materials that it can cut, a HackSaw can only cut a single material: metal. So, we can just hard-code that material into the saw’s class, as shown in the code below:
public class HackSaw extends Saw{
public HackSaw(int length){
super(length);
}
public String describe(){
return String.format("HackSaw Length: %d Material: metal", this.getLength());
}
public boolean cut(int length, String material){
return length < this.getLength() && material.equals("metal");
}
}That’s all there is to it! At this point, we can check our code to confirm that the structure is correct.
Main ClassFinally, we need to create a few methods in the Main class to build the actual logic for our program. Before we build the main() method, let’s look at the other two methods.
First, the readInput() method should receive the name of a file as a string, and then return an array of tools that represents the tools specified in the given file. Also, looking at the UML diagram above, that method should be static, since it is underlined. In fact, all of the methods in the Main class are static, so we can call them directly without instantiating an object using the Main class.
import java.util.Scanner;
import java.nio.file.Paths;
import java.lang.Exception;
public class Main{
// other methods go here
public static Tool[] readInput(String filename){
try(
Scanner scanner = new Scanner(Paths.get(filename))
){
int num_tools = Integer.parseInt(scanner.nextLine());
Tool[] tools = new Tool[num_tools];
for(int i = 0; i < num_tools; i++){
String[] line = scanner.nextLine().split(" ");
int length = Integer.parseInt(line[1]);
if(line[0].equals("AdjustableWrench")){
int min_size = Integer.parseInt(line[2]);
int max_size = Integer.parseInt(line[3]);
tools[i] = new AdjustableWrench(length, min_size, max_size);
}else if(line[0].equals("OpenEndWrench")){
int size_one = Integer.parseInt(line[2]);
int size_two = Integer.parseInt(line[3]);
tools[i] = new OpenEndWrench(length, size_one, size_two);
}else if(line[0].equals("CombinationWrench")){
int size = Integer.parseInt(line[2]);
tools[i] = new CombinationWrench(length, size);
}else if(line[0].equals("CrossCutSaw")){
tools[i] = new CrossCutSaw(length, line[2]);
}else if(line[0].equals("HackSaw")){
tools[i] = new HackSaw(length);
}else{
throw new Exception("Unknown Tool: " + line[0]);
}
}
return tools;
}catch(Exception e){
System.out.println("Invalid Input");
return new Tool[0];
}
}
}The readInput() method looks quite complex, but it is actually really simple. First, it tries to open the file provided using a Try with Resources statement. Then, inside of that statement, it will read the first line of input and use that as an integer to create the array of tools. Then, using a For loop, it will read each line of input. Those lines can immediately be split into an array of tokens using the String.split() method. Then, we simply use a bunch of If-Then-Else statements to determine which type of tool must be created based on the first token in the input. Then, we can use subsequent tokens as input to the constructors for each class, converting inputs to integers as needed.
If we can’t find a matching tool, we can simply throw a new exception with a helpful error message.
Finally, since we simply need to catch any possible exception, we’ll just add a catch statement for the generic exception and print the “Invalid Input” message before returning an empty array of tools.
Once we have an array of tools, we can also write the findTool() method that will search the list of tools for a tool that can do the job. We could do so using this code:
public static Tool findTool(Tool[] tools, String query){
String[] query_parts = query.split(" ");
if(query_parts[0].equals("tighten")){
int clearance = Integer.parseInt(query_parts[1]);
int size = Integer.parseInt(query_parts[2]);
for(Tool t : tools){
if(t instanceof Wrench){
Wrench w = (Wrench)t;
if(w.tighten(clearance, size)){
return t;
}
}
}
return ??;
}else if(query_parts[0].equals("cut")){
int length = Integer.parseInt(query_parts[1]);
for(Tool t : tools){
if(t instanceof Saw){
Saw s = (Saw)t;
if(s.cut(length; query_parts[2]))){
return s;
}
}
}
return ??;
}else{
return ??;
}
}This method is also a bit complex, but upon closer inspection it should be pretty straightforward. We simply parse the query into individual tokens. Then, we use the first token to determine if we are looking for a wrench or a saw. Next, we iterate through the entire list of tools, and inside of the Enhanced For loop, we check to see if the current tool is either a wrench or a saw, whichever type we are looking for. If it is, we cast it to that type, and then call the appropriate method. If that method returns true, we know that the tool can perform the requested task, so we can just return it right there!
What if we get to the end and can’t find a tool that matches? This method still needs to return an object of the Tool type. For arrays, we’ve been returning an empty array to show that the method was unsuccessful. Is there such as thing as an “empty object”?
It turns out there is! Java uses a special keyword called null to represent an empty object. So, we can just return null anywhere we aren’t sure what to return, and we’ll use that value in our main() method to determine whether we found a tool or not.
public static Tool findTool(Tool[] tools, String query){
String[] query_parts = query.split(" ");
if(query_parts[0].equals("tighten")){
int clearance = Integer.parseInt(query_parts[1]);
int size = Integer.parseInt(query_parts[2]);
for(Tool t : tools){
if(t instanceof Wrench){
Wrench w = (Wrench)t;
if(w.tighten(clearance, size)){
return t;
}
}
}
return null;
}else if(query_parts[0].equals("cut")){
int length = Integer.parseInt(query_parts[1]);
for(Tool t : tools){
if(t instanceof Saw){
Saw s = (Saw)t;
if(s.cut(length, query_parts[2])){
return s;
}
}
}
return null;
}else{
return null;
}
}Finally, we can simply write the main() method:
public static void main(String[] args){
if(args.length != 1){
System.out.println("Invalid Input");
return;
}
Tool[] tools = readInput(args[0]);
if(tools.length == 0){
return;
}
Scanner scanner = new Scanner(System.in);
String query = scanner.nextLine();
Tool t = findTool(tools, query);
if(t != null){
System.out.println(t.describe());
}else{
System.out.println("Invalid Tool");
}
}In the main() method, we check to make sure that we’ve received exactly one command-line argument. If so, we pass that argument to the readInput() method to read from the input file and produce an array of tools. If that array is empty, we know that we failed to read the input file correctly, so we should simply return.
If the array is populated, then we must read input from the terminal. So, we’ll read a user’s query, and then pass that query to the findTool() method along with the array of tools. As a reminder, try with resources should NEVER be used when reading from System.in.
If the findTool() method returns anything other than null, we know that we found a tool and should print the tool’s description to the terminal. Otherwise, we can do nothing since we are at the end of the program.
There we go! This is a very simple program, but it helps demonstrate the power of using inheritance in our programs to represent real-world objects that are closely related to each other.
In this chapter, we discovered how we can build class hierarchies through the use of inheritance between our classes. Using that technique, we can share attributes and methods from parent classes to child classes, minimizing repeated code.
In addition, we can take advantage of polymorphism to treat instances of child classes as instances of their parent class, and call methods and attributes inherited from the parent class, regardless of the type of the object we are using.
As we continue to build more and more complex programs, the ability to represent not only objects in the real world, but also the relationships and commonalities between those objects, will prove to be a very useful technique.
Our First Software Design Pattern!
In this module, we’re going to look at one commonly used design for software: the Model-View-Controller, or MVC, Architecture. However, before we talk about designing software, let’s step back and talk about design in the real world.
Think about the last time you went into a new building, spent a night in a hotel, or even just visited a bathroom in a trendy restaurant or museum. Did you have any trouble figuring out how to open the door, or where the light switches were, or how to operate the faucet? Most likely you didn’t even think about it or have any issues. If you did, your experience may have been affected by bad design.
In fact, there is even a special term for doors that are difficult to figure out how to operate: “Norman doors.” They are named after Donald Norman, who wrote a very influential book The Design of Everyday Things. Vox even created a video highlighting the problem, complete with an interview with Norman:
YouTube VideoAfter learning about this problem, we will probably all be a little more mindful about the design of objects in our world!
So, what does the design of door handles have to do with software? As it turns out, the concept of designing objects that are common, familiar, and easy to use and understand without lots of instruction is very similar to designing software. When we build software, we should try to structure it in a way that is easy for other developers to use and understand through the use of common, familiar, and easy-to-use software design patterns.
A software design pattern is a commonly used structure for building a computer program, implementing a particular feature, or solving a common problem in software. These patterns are designed to be easily understood by developers, and are built in such a way that they can be reused over and over again in many different pieces of software.
One common example is the adapter or wrapper design pattern. Suppose we have a class library that performs a particular action, such as managing a list of users. So, all of the methods use the term user in the name, such as add_user(), delete_user(), and more. What if we need to keep a list of players instead? We could simply build a class that inherits from that library, and include our own methods such as add_player() and delete_player(). In our version of the class, those methods simply call the add_user() and delete_user() methods of the parent class, effectively wrapping them with new names.
We can almost think of software design patterns as “building blocks” that we can use to build larger pieces of software. By using blocks that all developers would be familiar with, we can make our software much easier to understand and even maintain down the road. In addition, many of these design patterns represent the state-of-the-art method for solving a particular problem or implementing a feature. Why reinvent the wheel when the solution is already there?
One of the most common software design patterns is actually a complete architecture for an entire program, called the Model-View-Controller, or MVC, Architecture.
MVC Architecture involves breaking the program into three distinct parts, the model, the view, and the controller. Each part may consist of one or multiple classes, but conceptually we can think of them as three separate pieces, each of which can be accessed from the other pieces in an easy-to-understand way.
From the user’s perspective, a program using MVC Architecture may look and act as shown in this diagram:
 ^1
^1
When the user uses the software to perform an action, that action is sent to the controller. The controller then interprets the user’s action, and calls methods in the software’s model to manipulate and update the data stored in the software. Once the model has been changed, that data is sent to the view, which is responsible for displaying those changes to the screen.
A classic example is word processing software. When the user has a document open and presses a key on the keyboard, that keypress action is sent to the controller by the operating system running the software. The controller interprets that keypress as a character, and then tells the model to add that character to the document. So, the model updates the data representing the document, and then informs the view that the document has changed and it should now display the new character in the document as well. Finally, the view updates what is presented on the screen to the user, and the user can now see that the action was completed. In this case, the process happens nearly instantaneously, but more complex software may take much longer to complete the action.
On the next few pages, we’ll discuss each part of MVC architecture in more detail, using a simple example program.
File:MVC-Process.svg. (2015, June 19). Wikimedia Commons, the free media repository. Retrieved 18:29, November 7, 2019 from https://commons.wikimedia.org/w/index.php?title=File:MVC-Process.svg&oldid=163714963. ↩︎
Technically, what we are going to implement is Model-View-Presenter, MVP. MVP is a specialization of the MVC design pattern which enforces strict architectural separation between the elements and makes the View solely responsible for handling all the user interface (input and output).
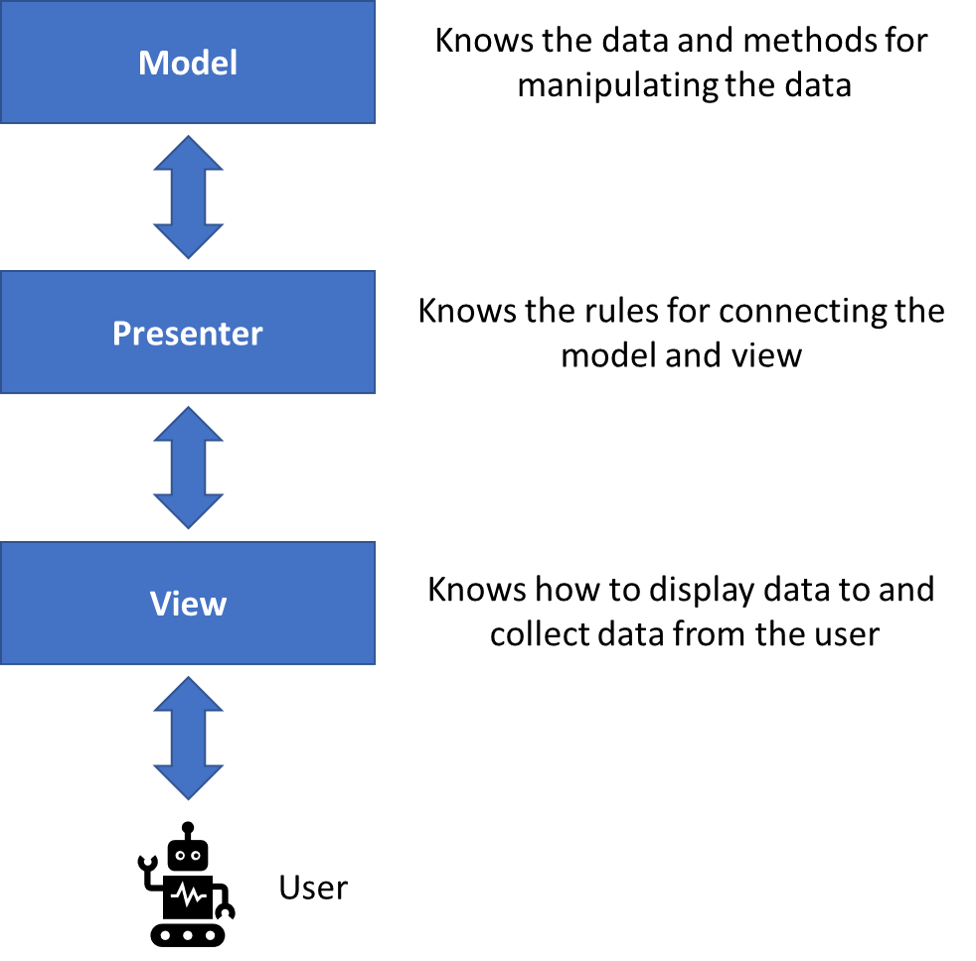
Under strict layering, architectural layers can only interact with adjacent layers. This can make the initial coding a little cumbersome.
The advantage of this strict layering is it allows you to “swap parts”. You may have Views written for PC-terminal users, mobile app users and even other computer programs. Change one import statement and the program is good to go.
Say you have a an MVP program written for a game played on a square grid, like checkers. The Model contains all the checker details–swap it out for a “chess” model and you can probably still run. The Presenter (which is basically middle-ware alternating the turns and checking for wins) should be able to handle the change and the only difference to the View is the “picture” it uses for the various pieces.
Some authors, including us, as well as many internet posters, will not differentiate between MVC and MVP. After all, MVP “is a " MVC implementation. However, in the original and still authoritative text1, the View is just a display and having it handle inputs is non-standard.
Design Patterns: Elements of Reusable Object Oriented Software, Erich Gamma et al, 1994 ↩︎
The first part of MVC Architecture is the model. Roughly speaking, the model represents all data stored by the program. However, beyond just data, the model should also include all methods that are used to directly modify the data stored in the model. This could also include code that represents or enforces the “rules” around how the model can be manipulated.
It can sometimes be tricky to determine exactly which components of the program should be included in each part, but the model is usually the most straightforward one to work with.
One of the best examples of a program using MVC architecture is a board game. So, let’s consider an example that represents the board game known in America as Connect Four
In this game, the model would obviously consist of a representation of the board itself, showing the position and color of each piece. However, in the model, we could also provide methods for actions such as placing a piece on the board or determining if the game is a draw.
In addition to updating the model, those methods would be responsible for enforcing the rules of the game, such as preventing players from placing a piece on a full column.
Of course, there are some rules of the game that are difficult to represent in code, such as keeping track of which player’s turn it is. It could be done in the controller, but it is probably best done in the model.
So, what would a model for a Connect Four game look like? Here’s a sample UML diagram for one way it could be designed:
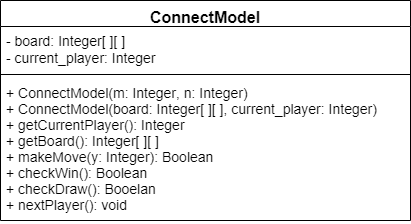
In this UML diagram, we see two attributes:
board: a 2-dimensional array or list of integers representing the squares on the board. We’ll use the following representation scheme:
0—an unoccupied square1—a square containing a piece for player 12—a square containing a piece for player 2current_player: an integer determining the player who is able to make the next turn.We also see the following methods:
ConnectModel(m, n): a constructor accepting two parameters, m and n, giving the size of the board.ConnectModel(board, current_player): a secondary constructor accepting a board and a current player. We’ll primarily use this method for testing, as it allows us to build a ConnectModel for a game currently in progress. In Python, we’ll call this method load_game().getCurrentPlayer(): a getter method to get the current player as an integer, either 1 or 2.getBoard(): a getter method to get the current board.makeMove(y): a method for the current player to place a piece in the column indicated by the parameter y. This method will return true if the placement was successful, or throw an exception if it was not.checkWin(): this method will check and see if the game has been won by the current player.checkDraw(): this method will check and see if the game is a draw.nextPlayer(): this method will swap the current player value to represent the other player.So, this ConnectModel class includes all of the attributes to store a game board and the current state of the game, as well as methods to update the game’s state based on moves the player could make.
Next, let’s look at the view portion of MVC Architecture. In essence, this part is responsible for displaying data to the user, and in most cases it also handles requesting and receiving input from the user.
One important thing to remember is that the view should not duplicate or store any data that is already present in the model. While it may be tempting to store a copy of the currently displayed data in the view, it technically violates the MVC Architecture. We should only store data in the view that is unique to the view, while all data related to the state of the model should be stored in the model instead.
Going back to our Connect Four example, we would probably want our view to be responsible for displaying the current state of the game board, and which player’s turn it is, to the player. In addition, it should have methods for retrieving input from the player about what moves to make. Finally, it should have a method to display a message to the players once the end of a game is reached.
So, one way we could represent the view portion of this program is shown in the UML diagram below:
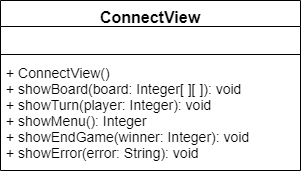
In this diagram, we notice that the view itself does not store any attributes at all. This is because the view doesn’t have to manage any internal state when it is simply reading data from and writing to the terminal. If we were dealing with a file or a graphical user interface (GUI), then the view may have to store those items as attributes. In this program, we are keeping it pretty simple.
However, the ConnectView class includes several methods:
ConnectView(): a simple constructor.showBoard(board): this method will show the current board to the players on the terminal.showTurn(player): this will display a message letting the players know which player is up next.showMenu(): this method will show the menu of options to the current player, allowing them to make a move. The input received from the player will be sent to the controller.showEndGame(winner): if either player wins, this will display that message to the terminal.showError(error): this method is used by the controller to display any errors from the model to the user.As we can see, the view portion of MVC Architecture mainly deals with displaying messages to the user, and then prompting the user for input. It doesn’t have to store any data to be useful, and doesn’t even include a direct link to the model. That is provided by the controller, which we’ll learn about next.
The final part of MVC architecture is the controller. The controller is really the “glue” that brings together the different parts of the model and the view, building a cohesive program. Traditionally, the controller contains the main() method of the program, and acts as the starting point for everything else the program does.
It can be tempting to think of the controller as the “brains” of the program. However, if we are careful about properly building methods in the model that enforce the rules of the program, as well as methods in the view that are able to validate any input received from the user, the controller itself may not have much logic at all in it. Instead, it simply passes data between the model and the view, and uses input from the view to select the next method to call in the model.
Going back to our Connect Four example one more time, let’s look at the UML diagram for the controller part of this program:
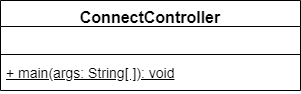
Yup! That’s it! In this example, the controller simply contains the main method for the program. The real magic happens in the code inside of the main method, gluing other parts of the program together and making them work.
We’ll explore the code for the controller later in this module as our worked example.
MVC in Java
Let’s continue our example exploring a program to play Connect Four by actually building the code to implement the game. By exploring the code, we should be able to better understand the structure and reasoning behind the MVC Architecture.
First, let’s formalize our problem statement:
Write a program to play the traditional version of Connect Four. It should take place on a 6 x 7 game board.
On each turn, the game will print out the state of the board, then alert the current player to make a move. The player’s move will consist of a single number, giving the column in which to place a piece. If the move is invalid, the player will be given the option to select another move.
After each move is made, the game will determine if the current player has won, or if the game was a draw. To simplify the game, we will not check for diagonal wins.
The program should be built using MVC architecture.
So, for this program, we’ll use the following UML diagram:
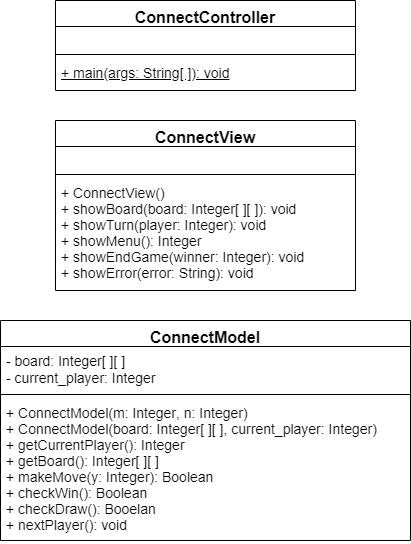
Let’s get started!
In many cases, the first part of any program following the MVC architecture to build is the model. This is usually the simplest and most straightforward part of the program, and both the view and the controller really depend on the model as the basis of the entire program. So, let’s start there.
First, we’ll need to build a class that contains the attributes and methods shown in the UML diagram above. By this point, we should be pretty used to this process:
import java.lang.IllegalArgumentException;
public class ConnectModel{
private int[][] board;
private int current_player;
public int getCurrentPlayer(){ return this.current_player; }
public int[][] getBoard(){ return this.board; }
// more code here
}This code already contains implementations for the two getter methods as well as the declarations for the two private attributes. So, all we have left to do is implement the constructors and a few methods.
Let’s focus on the constructors first. We can build the normal constructor as shown below:
public ConnectModel(int m, int n){
if(m < 4 || n < 5){
throw new IllegalArgumentException("The board must be at least 4 x 5");
}
this.board = new int[m][n];
this.current_player = 1;
}This method really consists of two parts. First, we verify that the parameters provided are valid. If not, we’ll throw an exception. Then, it initializes the board attribute to the correct dimensions. We also set the current player to 1.
We also need to implement our constructor for testing, which simply accepts a board and a current player:
public ConnectModel(int[][] board, int current_player){
if(board.length < 4){
throw new IllegalArgumentException("Board must be at least 4 x 5");
}
if(board[0].length < 5){
throw new IllegalArgumentException("Board must be at least 4 x 5");
}
if(current_player != 1 && current_player != 2){
throw new IllegalArgumentException("Current player invalid - must be 1 or 2");
}
this.board = board;
this.current_player = current_player;
}This constructor simply enforces the size of the board and the values that are possible for the current player, and then sets those values to the ones provided as arguments. As we discussed before, this method is primarily used for testing our model, and won’t actually be used in our program itself.
Once we have our constructors built, we can also build our makeMove() method:
public boolean makeMove(int y){
if(y < 0 || y >= this.board[0].length){
throw new IllegalArgumentException("Invalid column");
}
if(this.board[0][y] != 0){
throw new IllegalArgumentException("Column full");
}
int row = this.board.length - 1;
while(board[row][y] != 0){
row = row - 1;
}
this.board[row][y] = this.current_player;
return true;
}This method is also pretty straightforward. First, we use a couple of If-Then statements to check and see if the input is valid. If it is, then we simply iterate through the column chosen from the last row up to the first, looking for the first empty slot. Once we’ve found it, we place the current player’s piece there, and return true.
There we go! That’s a simple method for checking to see if a move in Connect Four is valid according to the rules of the game.
Next, we’ll need to write a method to determine if the current player has won. In this method, we’ll simply check to see if any row or column has at least 4 consecutive pieces for the current player.
public boolean checkWin(){
// check rows
for(int i = 0; i < this.board.length; i++){
int count = 0;
for(int j = 0; j < this.board[0].length; j++){
if(this.board[i][j] == this.current_player){
count += 1;
}else{
count = 0;
}
if(count >= 4){
return true;
}
}
}
// check columns
for(int j = 0; j < this.board[0].length; j++){
int count = 0;
for(int i = 0; i < this.board.length; i++){
if(this.board[i][j] == this.current_player){
count += 1;
}else{
count = 0;
}
if(count >= 4){
return true;
}
}
}
return false;
}This method is also pretty straightforward. We simply use two nested For loops to iterate across each row and down each column, keeping track of the count of items that match the current player. Anytime we see an item that doesn’t match, we reset our count to 0. If we reach 4 at any time, we can simply return true. If we reach the end of the method without returning true, then we know that a win condition hasn’t been reached and we should return false.
We’ll also need a method to check for a draw:
public boolean checkDraw(){
for(int j = 0; j < this.board[0].length; j++){
if(this.board[0][j] == 0){
return false;
}
}
return true;
}In this method, we only have to check the top row of the board. If any of them are empty, we can return false. However, if we find that all of them are filled, we can return true, indicating that the board is filled.
Finally, we’ll build one more method to switch players between 1 and 2:
public void nextPlayer(){
if(this.current_player == 1){
this.current_player = 2;
}else{
this.current_player = 1;
}
}It is really just a simple If-Then statement!
There we go! That should be everything we need to build a model of a working Connect Four game. We can use the assessments below to confirm that our code is working properly before continuing.
The next part of any MVC program to build is the view. Depending on the complexity of the problem, sometimes it may be helpful to build the view and the model concurrently. Ideally, however, the model and the view should be properly distinct and separate, such that the model can be fully completed before the view is developed.
Let’s review our UML diagram before continuing:
The ConnectView class only contains a few simple methods. First, let’s build the class declaration and the constructor:
import java.util.Scanner;
import java.lang.NumberFormatException;
public class ConnectView{
public ConnectView(){
//default constructor
}
}Since we aren’t initializing a GUI, we’ll just need a default constructor for this class.
Next, let’s look at the methods. First, we’ll need a method to show the board on the screen, called showBoard(). Let’s see what it looks like:
public void showBoard(int[][] board){
for(int i = 0; i < board.length; i++){
for(int j = 0; j < board[0].length; j++){
System.out.print("[" + board[i][j] + "]");
}
System.out.println();
}
}This method is very similar to methods we saw in an earlier module when we learned about arrays. Here, we are simply using two nested For loops to print the data in the array, with each row printed on its own line.
When we run this method, we should get output that looks like this:
[1][2][1][2][1]
[1][2][1][2][1]
[1][2][1][2][1]
[1][2][1][2][1]
[1][2][1][2][1]The other complex method to implement is the showMenu() method, which reads input from the player:
public int showMenu(){
while(true){
try{
Scanner reader = new Scanner(System.in);
System.out.println("Which column would you like to place a token in?");
String input = reader.nextLine().trim();
int out = Integer.parseInt(input);
return out;
}catch(NumberFormatException e){
System.out.println("Invalid input! Please enter a number");
}catch(Exception e){
System.out.println("Unable to read input!");
return -1;
}
}
}That method will print a prompt to the user, and get a response as a string. Notice that we aren’t doing any validation of the input here beyond making sure that it is an integer—we can do that in the controller and the model.
The final three methods simply print out messages to the user. So, we can implement those pretty easily:
public void showTurn(int player){
System.out.println("It is player " + player + "'s turn!");
}
public void showEndGame(int winner){
if(winner == 0){
System.out.println("The game is a draw!");
}else{
System.out.println("Player " + winner + " wins!");
}
}
public void showError(String error){
System.out.println("Error: " + error);
}That’s it! The view portion of the program is very simple, but it allows our users to see what is going on and interact with the program. We can use the tests below to make sure our view is working correctly before we continue with the controller.
Finally, we now can start working on our controller. This is where the program actually comes together and becomes useful. While a program such as Connect Four may seem quite complex, using MVC architecture can make it quite easy to work with. Let’s check it out!
The ConnectController class just contains a single main() method:
public class ConnectController{
public static void main(String[] args){
ConnectModel model = new ConnectModel(6, 7);
ConnectView view = new ConnectView();
while(true){
view.showBoard(model.getBoard());
view.showTurn(model.getCurrentPlayer());
try{
if(model.makeMove(view.showMenu())){
if(model.checkWin() || model.checkDraw()){
break;
}
model.nextPlayer();
}
}catch(Exception e){
view.showError(e.getMessage());
}
}
if(model.checkWin()){
view.showEndGame(model.getCurrentPlayer());
}else{
view.showEndGame(0);
}
}
}This method uses methods in the view and model classes to get the game to work. For example, if we start inside of the while loop, we see the following steps:
That’s all there is to it! Once again, our main() method ends up being an outline of our program. In this case, almost every line of code is calling a method in both the model and the view, combining them in such a way as to make the program work seamlessly.
Try it out.
In this module, we explored the Model-View-Controller, or MVC, Architecture. It is a commonly used architecture for computer programs written in a variety of languages.
The power of MVC comes from allowing us to define our model representing our data, and our view or GUI that the user interacts with, completely separately. We can then join them together in our controller, building powerful applications.
In addition, since both the view and model are developed separately, they can be reused in several different applications.
MVC Architecture is not just used for desktop applications. Most server-side web applications are also written using MVC architecture. This helps separate the database (model) from the webpages (view), while the router (controller) interprets requests and provides responses.
We’ll get another chance to explore MVC Architecture in the project for this module.
Pre-built Classes for Storing Data!
Even though programming is a relatively new profession, the explosion of programmers and code in recent years has given us a unique opportunity to learn from others. Code sharing websites such as GitHub and StackOverflow contain great examples of how to do both simple and complex tasks in code, usually complete the detailed explanations of how each program functions.
So, as developers today, it is often important to remember the mantra “don’t reinvent the wheel” when writing our programs. While it may be tempting to build everything ourselves, many times the language comes with packages or modules with exactly what we need.
In other cases we may find third party packages/modules online. If we are careful about where we find that code, we can even find a version that is better written than we could do ourselves!
When using code found online, there are several important things to keep in mind
Most, but not all, code available online includes a license that describes how the code or software may be used. As a developer, it is your responsibility to read, understand, and abide by the terms of the license you find. For example, some licenses may allow you to use the code in any way you want, even in a paid application, while other licenses require you to make your code open source if you choose to use their code.
By way of example, the CC-curricula often uses a testing extension called Hamcrest. These packages are covered by the BSD-3-Clause open source license.
Additionally, even when using code that is licensed, there is still the matter of plagiarism. It is always a good idea to cite any sources of code that you didn’t write yourself, no matter how small. In this course, and in most classes in academia, you should always check with your instructor or read the syllabus before using code you didn’t write.
File:Roue primitive.png. (2019, January 8). Wikimedia Commons, the free media repository. Retrieved 17:50, November 26, 2019 from https://commons.wikimedia.org/w/index.php?title=File:Roue_primitive.png&oldid=333994349. ↩︎
In this module, we won’t be going quite as far as looking online for code that performs a particular task. Instead, we’re going to explore some of the more important features available as part of our chosen programming language. In many instances, the developers of the programming language have taken the time to include some of the most important and commonly used pieces of code directly as part of the language itself.
Most programming languages include a wide range of features as part of a library of code that can be used in any applications. In this way, applications built with these programming languages can share many of the same features, making it easy for a developer to move between applications easily.
To think about this another way, consider a modern automobile. Most of them include the same parts - an engine, transmission, battery, alternator, starter, and more. If each car was built in a different way using different types of parts, it would be very difficult for any mechanic to be able to fix more than just a few cars. By using standard parts, even if they are a little different in each model, it becomes much easier to repair and maintain those vehicles.
Each programming language chooses many different features to include in the library for that language. Thankfully, there are a few common features that most languages seem to include:
Of course, this is just a short list of the items that might be included in each programming language’s library. In this module, we’ll explore several of these in the language we are learning.
Collections in Java
Java includes an extensive library of classes that can be included in any Java program. These classes are included as part of the Java Development Kit, or JDK, which includes the Java compiler that we use to build our programs.
Thankfully, the developers of the Java programming language have also written an extensive online manual that explains all of the features of the Java library in detail. Many developers refer to this manual as the Java API, or sometimes simply the documentation for the Java programming language.
To explore the Java API, we can start on this webpage. That link goes directly to the Java API for Java version 8, but it is very easy to find the manual for other versions of Java as well. There is a more technical version of the documentation found here if we’d like to dive even deeper.
On the home page of the Java API, we’ll see several items. To the left is a list of all the classes included in the Java library, so we can quickly explore and find the exact class we are looking for. If we’d like to browse, the panel to the right lists an overview of all of the packages included in the Java library. A package is a set of classes that are all related somehow, giving us a nice layer of organization to our code.
Here are some Java packages that we may want to explore as we continue to develop more advanced programs using Java:
java.io—classes for handling input and output and working with the file system.java.lang—classes that are integral to the Java programming language, such as the core data types and exceptionsjava.math—classes for dealing with arbitrarily large or precise numbersjava.net—classes for building networked applicationsjava.nio.file—classes for interfacing with the file systemjava.time—classes for dealing with dates and timesjava.util—collection classes and some miscellaneous utilitiesIn this module, we’ll mostly explore a few of the collection classes in the java.util package.
The Java API contains several different classes specifically designed to store data. All together, we usually refer to these classes as the collections framework since they are used to store a “collection” of data.
The Java collections framework contains implementations for several different data structures, which are classes used to store and manipulate data in specific ways. We’ll learn more about how each of these implementations works and differs in a later course, but in this course, we’ll quickly describe a few of the most common ones. Specifically, we’ll discuss these two data structures:
We’ll also learn how to build our own Tuple objects in Java, since Java doesn’t include tuples in the language or the Java API library directly, but they are very useful objects to have in our programs.
As we’ve already learned, the Java programming language requires us to declare the type of each variable we are using before we can even compile the code. However, this can make it very difficult to enforce type-safety when working with collections, since each collection could only guarantee that an item was a subclass of Object, the base class for all classes in Java.
Java 5 added support for generics, a method of programming that allows us to be a bit more flexible in the way we handle types. In short, when developing a collection, we can specify that each item in the collection must be an object compatible with a given, but unknown type. Then, when we use that collection in our code, we can specify the specific type we intend to store in the collection, and the Java compiler will be able to automatically enforce those type rules as if we originally wrote the collection class to only store items of that type.
For example, Java uses a class List<E> to represent a list that stores elements of some class E. We don’t know what that class is at first, but we can still write our List class as if it is a specific type.
Then, when we instantiate a List object in our code, we can provide a type of item we’d like to store, such as String. So, we’d now have a class List<String> which represents a list of strings. This allows the Java compiler to make sure that we are only storing strings in the list. In addition, it allows us to automatically treat each item retrieved from the list as a string, without any additional conversion required.
We’ll see how to do this in code on the next page.
To learn more about how Java handles Generics, check out Lesson: Generics in the Java Tutorials from Oracle.
One last thing that we must discuss related to Java and collections is the difference between primitive data types and objects. As we’ve already learned in this course, Java contains several primitive data types, such as int, double, boolean, and more. However, if we wish to store items of these primitive types in our collections, we’ll quickly run into a problem. This is because the primitive data types aren’t actually objects, and because of that, they don’t follow the rules needed to allows generics to work.
Thankfully, Java has a quick and easy workaround. Java includes classes Integer, Double, and Boolean to represent objects that store a single value of the corresponding primitive data type. In addition, Java will automatically convert data between the two in some situations, using a process called autoboxing and unboxing. You can find more on the Autoboxing and Unboxing Java Tutorial from Oracle. We’ll see how this works on the next page as well
First, let’s explore the simplest of these collections, the list. A list is defined as an ordered collection or sequence of elements, meaning that the order in which the elements were added to the list is preserved, but that order can be updated through the use of sorting algorithms.
Lists are similar to arrays in many ways. The biggest difference in Java is that arrays must be declared with a static size that cannot be changed, whereas a list can hold any number of elements, even without knowing the number of elements it will contain ahead of time.
In Java, the collections framework provides an abstract class List<E> that defines the operations a list should be able to perform. So, as we saw in an earlier module, we can store our lists in the datatype List, but we cannot instantiate that class directly because it is abstract.
There are many classes in the Java collections framework that extend the List abstract class. The two most important are the ArrayList and LinkedList classes. Thankfully, since they both inherit from the List class, we can use them interchangeably.
Java provides multiple versions of the list classes for one important reason: performance. Each version of the list class can perform the same operations and provide the same results, but because each one handles the underlying storage of data differently, the time it takes to perform those operations can vary widely.
To truly understand the difference requires a much deeper understanding of computer science than we are going to gain in this course alone. However, even novice programmers can empirically explore the difference to see which data structure is best for their program.
The key is to build a simple program that uses one of the list classes, performing the operations our actual program might perform. After doing a large number of those operations (say, over one million of them), we can record the amount of time that program took to complete. Then, we can repeat that same process for each different list class. The version that ran the quickest is probably the best choice for our needs.
To use lists in our program, we’ll need to start by importing the appropriate libraries at the top of our file:
import java.util.List;
import java.util.LinkedList;
import java.util.ArrayList;To create a list, we can simply instantiate it just like any other object. However, since the Java lists use generics, we must also provide the type of data we’d like to store in the list inside of angle brackets <> as well.
For example, to create an ArrayList that stores whole numbers, or int values, we would do the following:
List<Integer> intList = new ArrayList<Integer>();Notice that we have to use the Integer type instead of int, because these lists can only store objects, not primitive data types.
Similarly, to create a LinkedList that stores String objects, we could do this:
List<String> stringList = new LinkedList<String>();That’s all there is to it!
The List class in Java defines several operations that each list class must be able to perform. The full list can be found on the List page of the Java API documentation. Here are a few of the most important ones:
add(e)—adds element e to the end of the listadd(index, e)—adds element e to the specified index position in the list. All elements at that position and after are shifted toward the end of the list.contains(o)—returns true if the object is contained in the listget(index)—gets the element in the list at the specified index positionindexOf(o)—returns the first index that this object can be found in the list, or -1 if it is not foundisEmpty()—returns true if the list contains 0 elementsremove(index)—removes the element at the specified index position in the listremove(o)—removes the first occurrence of the given object from the list, if one exists.set(index, element)—replaces the element at index position in the list with the given element.size()—returns the number of elements in the listtoArray()—returns an array containing all elements in this list in orderWhat if we want to iterate through a list? Thankfully, we can use an enhanced for loop to do this, in the same way that we can iterate through an array:
List<Integer> intList = new ArrayList<Integer>();
intList.add(5);
intList.add(3);
intList.add(7);
intList.add(2);
intList.add(4);
for(int x: intList){
System.out.println(x);
}To sort a list in Java, we can use the Collections.sort() method on the list itself. First, we’ll need to import the Collections class at the top of the file:
import java.util.Collections;Then, we can use the sort() method in our code. This will sort the list in ascending order by default, but we can provide an optional parameter to sort in descending order as well:
List<Integer> intList = new ArrayList<Integer>();
intList.add(5);
intList.add(3);
intList.add(7);
intList.add(2);
intList.add(4);
// sort in ascending order
Collections.sort(intList);
// sort in descending order
Collections.sort(intList, Collections.reverseOrder());Consider a list when:
Select an array when:
To explore how to use a list in a real program, let’s look at a quick example program. Here’s a short problem statement:
Write a program that will accept a single integer as input, either from the terminal or by reading a file provided as the first command-line argument. If no command-line argument is provided, assume that input should be read from the terminal. If there are any errors opening a file provided as an argument or parsing the input, simply print “Invalid Input!” and terminate the program. If the provided integer is less than 3, it should also print “Invalid Input!”.
Using the integer provided as input, the program should generate a list of numbers representing the Fibonacci sequence containing that many entries.
Before printing the list, the program should perform two additional operations on the list. First, if the integer provided as input is contained in the list, it should be removed. Secondly, the list should be presented in descending order, with the largest value first.
The program should print the list to the terminal, with each entry separated by a space.
The program should be implemented as two functions - a
main()function that handles reading input, and amakeList()function that accepts a single integer as a parameter and returns the completed list of integers.
The Fibonacci sequence is produced by adding the two previous numbers together to generate a new number. Traditionally, the first two Fibonacci numbers are 0 and 1. So, the next number is 0 + 1 = 1, and the number following that is 1 + 1 = 2. The sequence continues indefinitely.
Formally, the Fibonacci sequence is defined as:
$$F_0 = 0$$ $$F_1 = 1$$ $$F_n = F_{n-1} + F_{n-2}$$You can find more information about the Fibonacci Sequence on Wikipedia.
For example, if the input provided is 8, the program would begin by generating the first eight Fibonacci numbers, starting with 0 and 1:
[0, 1, 1, 2, 3, 5, 8, 13]Then, since 8 is contained in the list, it should be removed:
[0, 1, 1, 2, 3, 5, 13]Finally, the list should be sorted in descending order, so the final list returned will be:
[13, 5, 3, 2, 1, 1, 0]main FunctionSo, let’s build the program. We can start with this simple skeleton:
import java.util.Scanner;
import java.io.File;
import java.io.FileNotFoundException;
import java.lang.ArrayIndexOutOfBoundsException;
import java.util.List;
import java.util.ArrayList;
import java.util.LinkedList;
import java.util.Collections;
public class ListExample{
public static void main(String[] args){
Scanner scanner;
try{
scanner = new Scanner(new File(args[0]));
}catch(FileNotFoundException e){
System.out.println("Invalid Input!");
return;
}catch(ArrayIndexOutOfBoundsException e){
//no argument provided, read from terminal
scanner = new Scanner(System.in);
}
try(
Scanner reader = scanner
){
int count = Integer.parseInt(reader.nextLine());
if(count < 3){
System.out.println("Invalid Input!");
return;
}
List<Integer> list = makeList(count);
for(int x : list){
System.out.print(x + " ");
}
System.out.println();
}catch(Exception e){
System.out.println("Invalid Input!");
return;
}
}
public static List<Integer> makeList(int x){
// MORE CODE GOES HERE
}
}This program contains a simple main() method that will handle reading and parsing the input from either the terminal or a file provided as a command-line argument. It will also verify that the input is an integer, and it is a value that is at least 3 or greater. It will then call the makeList() function using the input as a parameter to create the list. Finally, it will print the result using a simple enhanced for loop to iterate through the list and print each element followed by a space. We also must remember to print a newline at the end. Pretty nifty, right?
So, all we need to worry about implementing is the makeList() function.
makeList FunctionLet’s dive into the makeList() function. First, we’ll need to create a list. However, as we saw earlier, there are two different types of list we can use. For this example, let’s just use an ArrayList of Integers, but we could just as easily use a LinkedList as well. So, the code would be as follows:
public static List<Integer> makeList(int x){
List<Integer> list = new ArrayList<Integer>();
}Then, we’ll need to add the first two items to the list, representing the first two Fibonacci numbers:
public static List<Integer> makeList(int x){
List<Integer> list = new ArrayList<Integer>();
list.add(0);
list.add(1);
}Following that, we’ll use a simple for loop to generate the next few numbers. We can either have separate variables to represent the previous values, or we can just read them directly from the list using the get() method:
public static List<Integer> makeList(int x){
List<Integer> list = new ArrayList<Integer>();
list.add(0);
list.add(1);
for(int i = 2; i < x; i++){
int newNumber = list.get(i-1) + list.get(i-2);
list.add(newNumber);
}
}Once we’ve generated our list, we need to make sure x is not in the list. If so, we can just remove it. However, remember that there are two methods for removing an item from the list. If we just provide an int as an argument, it will call the version that removes the element at that index in the list. Instead, we’ll need to cast that int as an Integer so that it removes the element with the value equal to x. Thankfully, if we use the remove() method on an item that isn’t in the list, it won’t do anything.
public static List<Integer> makeList(int x){
List<Integer> list = new ArrayList<Integer>();
list.add(0);
list.add(1);
for(int i = 2; i < x; i++){
int newNumber = list.get(i-1) + list.get(i-2);
list.add(newNumber);
}
list.remove((Integer)x);
}Finally, we can use the Collections.sort() method to sort the list. We’ll need to remember to include the optional parameter to sort in descending order. Once we’ve sorted the list, we can return it.
public static List<Integer> makeList(int x){
List<Integer> list = new ArrayList<Integer>();
list.add(0);
list.add(1);
for(int i = 2; i < x; i++){
int newNumber = list.get(i-1) + list.get(i-2);
list.add(newNumber);
}
list.remove((Integer)x);
Collections.sort(list, Collections.reverseOrder());
return list;
}That’s all there is to it! See if you can complete the code in ListExample.java to the left, then use the two assessments below to check your program.
Next, let’s explore another important collection, the map. Some programming languages, such as Python, refer to this collection as a dictionary as well.
A map is a collection that associates, or maps, a key to a value. To store something in a map, we must provide a unique key for each value. If we provide a key that is already in use, the value stored by that key is overwritten. Then, to retrieve a value, we simply provide the key that is associated with that value.
This is very similar to how arrays work, where each element in the array can be accessed using an array index. The biggest difference is that keys in a map can be any value, not just an integer, and likewise the values can be any type of value.
In Java, the collections framework provides an abstract class Map<K, V> that defines the operations a list should be able to perform. So, as we saw in an earlier module, we can store our maps in the datatype Map, but we cannot instantiate that class directly because it is abstract.
There are many classes in the Java collections framework that extend the Map abstract class. The most commonly used version is the HashMap and LinkedList class.
To use a map in our program, we’ll need to start by importing the appropriate libraries at the top of our file:
import java.util.Map;
import java.util.HashMap;To create a map, we can simply instantiate it just like any other object. However, since the Java maps use generics, we must also provide the data types for both the keys and values inside of angle brackets <> as well.
For example, to create a HashMap that associates String keys with Double values, we would do the following:
Map<String, Double> aMap = new HashMap<String, Double>();Notice that we have to use the Double type instead of double, because these maps can only store objects, not primitive data types, just like Lists.
That’s all there is to it!
The Map class in Java defines several operations that each map class must be able to perform. The full list can be found on the Map page of the Java API documentation. Here are a few of the most important ones:
put(k, v)—associate the value v with the key k in the mapget(k)—return the value associated with the key k in the mapsize()—returns the number of key and value associations in the mapcontainsKey(k)—returns true if the map contains an associated value for the given key kcontainsValue(v)—returns true if one or more keys in the map are associated with the given value vWhat if we want to iterate through a map? That is a bit tricky, but it can be done. To do this, we’ll use an enhanced for loop, which will use the special Map.Entry class to represent each entry. The code for doing this is shown here:
Map<String, String> mapIter = new HashMap<String, String>();
mapIter.put("One", "Uno");
mapIter.put("Two", "Dos");
mapIter.put("Three", "Tres");
mapIter.put("Four", "Quatro");
for(Map.Entry<String, String> entry : mapIter.entrySet()){
System.out.println("Key: " + entry.getKey());
System.out.prinltn("Value: " + entry.getValue());
}However, in most cases, it doesn’t make much sense to iterate through a map, since that isn’t what it is designed for. Instead, we may want to consider using some sort of a list instead.
Consider a map when:
To explore how to use a map in a real program, let’s look at a quick example program. Here’s a short problem statement:
Write a program that will read multiple lines of input, either from the terminal or by reading a file provided as the first command-line argument. If no command-line argument is provided, assume that input should be read from the terminal. If there are any errors opening a file provided as an argument or parsing the input, simply print “Invalid Input!” and terminate the program.
The program will store a map that associates lines of input with random integers.
When a line of input is read, the program will check to see if that line has already been used as a key in the map. If so, it will return the value associated with that key.
If the map does not contain an entry for that key, the program should generate a new random integer and store it in the map, using the input line as the key.
The program should be implemented as two functions - a
main()function that handles reading input, and agetOutput()function that accepts a string as a parameter and returns the associated number for that string. It should also use a global variable to store the map.
For example, let’s say the program receives the following input:
cat
dog
horse
dog
catOne possible output could be:
12334512345
239487234
234234
239487234
12334512345Notice that the lines of output correspond with the lines of input, such that the program returns the same value each time it reads the word cat.
main FunctionSo, let’s build the program. We can start with this simple skeleton:
import java.util.Scanner;
import java.io.File;
import java.io.FileNotFoundException;
import java.lang.ArrayIndexOutOfBoundsException;
import java.util.Map;
import java.util.HashMap;
import java.util.Random;
public class MapExample{
public static Map<String, Integer> map;
public static Random random;
public static void main(String[] args){
Scanner scanner;
try{
scanner = new Scanner(new File(args[0]));
}catch(FileNotFoundException e){
System.out.println("Invalid Input!");
return;
}catch(ArrayIndexOutOfBoundsException e){
//no argument provided, read from terminal
scanner = new Scanner(System.in);
}
try(
Scanner reader = scanner
){
while(reader.hasNext()){
String inp = reader.nextLine();
int output = getOutput(inp);
System.out.println(output);
}
}catch(Exception e){
System.out.println("Invalid Input!");
return;
}
}
public static int getOutput(String inp){
// MORE CODE GOES HERE
}
}This program contains a simple main() function that will handle reading and parsing the input from either the terminal or a file provided as a command-line argument. When it reads a line of input, it will use the getOutput() function to get the associated output for that input, and then print it to the terminal.
The program also includes a global static field to store the map. We also do the same for a Random object to generate random numbers. In that way, we can use the same objects in both functions without having to pass them around as arguments.
So, all we need to worry about implementing is the getOutput() function.
getOutput FunctionLet’s dive into the getOutput() function. First, we’ll need to see if the map and random objects have been initialized. We can do that by checking to see if they are equal to null. If so, we’ll initialize them:
public static int getOutput(String inp){
if(map == null){
map = new HashMap<String, Integer>();
}
if(random == null){
random = new Random();
}
}Then, we’ll need to see if the map contains a value for the string provided as input. If so, we can just return that value:
public static int getOutput(String inp){
if(map == null){
map = new HashMap<String, Integer>();
}
if(random == null){
random = new Random();
}
if(map.containsKey(inp)){
return map.get(inp);
}
}However, if the map does not contain a value for that key, we must generate a new one, store it in the map, then return it:
public static int getOutput(String inp){
if(map == null){
map = new HashMap<String, Integer>();
}
if(random == null){
random = new Random();
}
if(map.containsKey(inp)){
return map.get(inp);
}else{
int newNumber = random.nextInt();
map.put(inp, newNumber);
return newNumber;
}
}That’s all there is to it! See if you can complete the code in MapExample.java to the left, then use the two assessments below to check your program.
The last data structure we will explore is the tuple. A tuple in mathematics is defined as a “finite ordered list” of items. So, it is a list of items that is not infinite, and the ordering of the items in that list matters.
Some languages, such as Python, provide support for tuples directly in the language itself or as part of the standard library. Java, however, does not provide native support for a data structure that is exactly like a tuple. Nearly every language implements the tuple as an immutable data type.
Instead, we’ll learn how to construct our own tuple, and see how it could be used in a couple of useful contexts.
To create a tuple in Java, we must first create a class to store the data. This is a simple class that usually includes two or more public fields to store the data. For example, we could create a tuple that will store two integers like this:
public class IntTuple{
private final int FIRST;
private final int SECOND;
public IntTuple(int one, int two){
this.FIRST = one;
this.SECOND = two;
}
public int getFIRST(){
return this.FIRST;
}
public int getSECOND(){
return this.SECOND;
}
}This is a very simple class that stores two integers as fields first and second, and also includes a constructor to help populate those two values. The data is made immutable by declaring the instance variables private final, assigning to them in the constructor, and only providing getters1.
We may also want to add a couple of features to our tuple class. First, we can implement the toString() method to provide a string representation of this item. This is helpful anytime we need to print some debugging output:
@Override
public String toString(){
return String.format("(%d, %d)", this.FIRST, this.SECOND);
}In addition, we may want to implement an equals() method. That method is also included as part of every object in Java, and it is used to determine if two objects are equal to each other. By default, it will simply check to see if they are exactly the same instance of the object. For tuples, we might want to simply check and see if they store the same values, regardless of whether they are the same instance. So, to implement that method, we could include the following code:
@Override
public boolean equals(Object obj){
//check if obj is null
if(obj == null){
return false;
}
// check if they are the same instance
if(this == obj){
return true;
}
// check if obj is same type
if(!(obj instanceof IntTuple)){
return false;
}
// cast to same type
IntTuple tuple = (IntTuple)obj;
// check if all fields are the same
return tuple.getFIRST() == this.FIRST && tuple.getSECOND() == this.SECOND;
}First, notice that the equals() method accepts a Java Object as input. This is because we can provide any object as input. So, our equals() method must handle any type of object, so it has to include extra code to check the type of the object as well as the values it contains.
Next, notice that we are very careful to first check that the parameter provide is not null before using it. Again, we have no guarantee that the value we are provided has even been initialized, so we must make sure it is before continuing.
Finally, if we’ve determined that the object provided is indeed a valid IntTuple instance, we can cast it to that type and check the values of each field to see if they match.
One of the most useful ways to use a tuple is when we need to store associated values in a data structure, or if we want to return multiple values from a function.
The classic example for tuples is representing coordinates in space, such as a two-dimensional game. In this way, we could create a list of tuples to represent items in the game, and we can even return both the x and y coordinates of an item in a single tuple.
To really explore how we could use a tuple in our code, let’s build a simple program. Here’s a problem statement:
Write a program that will read multiple lines of input from the terminal.
The program should implement a simple search game. Players will guess coordinates on a 10x10 grid, trying to find a hidden item. So, input will take the form of two integers, separated by a space. If the program is unable to parse an input for any reason, it should print “Invalid Input!” and terminate the program.
When a player makes a guess, the program should respond with one of the four cardinal directions: “North”, “South”, “East”, “West”, indicating the direction of the hidden item from the guess. For simplicity, the program will only respond “North” or “South” if the player’s guess is not on the same row, or
xcoordinate, as the location, and “East” or “West” only if the player’s guess is on the same row as the location. If the player guesses correctly, simply print “Found!” and terminate the program. If the player repeats a guess, the program should print “Repeat!” instead of a cardinal direction.
The hidden location should be randomly generated and stored in an instance of the
IntTupleclass defined above as a global variable, and the program should maintain a global list ofIntTuplesrepresenting the locations already guessed.
The program should be implemented as two functions:
main()that handles reading input and printing output, and amakeGuess()function that accepts two integers,xandyas parameters, and responds with a string representing the result of that guess.
Let’s see if we can build this program using our IntTuple class as defined above.
main FunctionFirst, let’s look at the main function. Once again, we’ll start with skeleton code that is very similar to the other examples in this chapter:
import java.util.Scanner;
import java.io.File;
import java.io.FileNotFoundException;
import java.lang.ArrayIndexOutOfBoundsException;
import java.util.Random;
import java.util.List;
import java.util.LinkedList;
public class TupleExample{
public static List<IntTuple> guesses;
public static Random random;
public static IntTuple location;
public static void main(String[] args){
try{
Scanner reader = new Scanner(System.in);
while(reader.hasNext()){
String[] inp = reader.nextLine().split(" ");
int x = Integer.parseInt(inp[0]);
int y = Integer.parseInt(inp[1]);
String out = makeGuess(x, y);
System.out.println(out);
if(out.equals("Found!")){
return;
}
}
}catch(Exception e){
System.out.println("Invalid Input!");
return;
}
}
public static String makeGuess(int x, int y){
// MORE CODE GOES HERE
}
}At the top of the class, we have included three static fields to store our list of previous guesses, an IntTuple of the correct location, and a random number generator.
In this code, we are simply reading a line of input, splitting it into two tokens, and then parsing each token to an integer to get the x and y values of the guess. After that, we can call the makeGuess() function with those values, and print the result. Finally, we must check to see if the result is "Found!". If so, we can terminate the program using the return keyword.
makeGuess FunctionNow that we have our main() function written, let’s work on the makeGuess() function. As we saw on the previous page, we must first make sure our list storing the guesses has been initialized, as well as our random number generator:
public static String makeGuess(int x, int y){
if(guesses == null){
guesses = new LinkedList<IntTuple>();
}
if(random == null){
random = new Random();
}
}In this example, we are using the LinkedList class as our list. Again, the choice really doesn’t matter at this point, but there are some performance considerations that we could discuss in a future course.
In addition, we must make sure our random location has been established. So, we’ll do that in the code as well:
public static String makeGuess(int x, int y){
if(guesses == null){
guesses = new LinkedList<IntTuple>();
}
if(random == null){
random = new Random();
}
if(location == null){
location = new IntTuple(random.nextInt(10), random.nextInt(10));
}
}Here, we are using the nextInt() method of Random to generate a number between 0 and 9, inclusive.
Now we must handle producing the output. First, we need to create a new IntTuple for the guess, and then check and see if the guess is correct, or if it has already been guessed:
public static String makeGuess(int x, int y){
if(guesses == null){
guesses = new LinkedList<IntTuple>();
}
if(random == null){
random = new Random();
}
if(location == null){
location = new IntTuple(random.nextInt(10), random.nextInt(10));
}
IntTuple guess = new IntTuple(x, y);
if(guess.equals(location)){
return "Found!";
}
if(guesses.contains(guess)){
return "Repeat!";
}
}Here, we are using that important equals() method we created earlier to determine if two tuples contain the same values. In addition, it is important to remember that the contains() method of a list also uses the equals() method when determining if the list contains a particular item. In fact, most Java libraries always use the equals() method of an object to determine if two objects are equal, so it is important to implement that method in our tuple class.
If we find out that the guess is not the hidden location, then we should store it in our list of guesses:
public static String makeGuess(int x, int y){
if(guesses == null){
guesses = new LinkedList<IntTuple>();
}
if(random == null){
random = new Random();
}
if(location == null){
location = new IntTuple(random.nextInt(10), random.nextInt(10));
}
IntTuple guess = new IntTuple(x, y);
if(guess.equals(location)){
return "Found!";
}
if(guesses.contains(guess)){
return "Repeat!";
}
guesses.add(guess);
}Finally, we can handle printing the hints for cases where the guess is not on the same row:
public static String makeGuess(int x, int y){
if(guesses == null){
guesses = new LinkedList<IntTuple>();
}
if(random == null){
random = new Random();
}
if(location == null){
location = new IntTuple(random.nextInt(10), random.nextInt(10));
}
IntTuple guess = new IntTuple(x, y);
if(guess.equals(location)){
return "Found!";
}
if(guesses.contains(guess)){
return "Repeat!";
}
guesses.add(guess);
if(guess.getFIRST() > location.getFIRST()){
return "North";
}
if(guess.getFIRST() < location.getFIRST()){
return "South";
}
}Below that, we can assume that the guess is on the same row, so we’ll have to handle the cases where the guess is east or west of the location:
public static String makeGuess(int x, int y){
if(guesses == null){
guesses = new LinkedList<IntTuple>();
}
if(random == null){
random = new Random();
}
if(location == null){
location = new IntTuple(random.nextInt(10), random.nextInt(10));
}
IntTuple guess = new IntTuple(x, y);
if(guess.equals(location)){
return "Found!";
}
if(guesses.contains(guess)){
return "Repeat!";
}
guesses.add(guess);
if(guess.getFIRST() > location.getFIRST()){
return "North";
}
if(guess.getFIRST() < location.getFIRST()){
return "South";
}
if(guess.getSECOND() > location.getSECOND()){
return "West";
}else{
return "East";
}
}There we go! That method will handle producing the output for any guess provided by the user. See if you can complete the code in IntTuple.java and TupleExample.java to the left, then use the two assessments below to check your program.
It is technically sufficient to declare them as final, the private and getter only is admittedly overkill. ↩︎
As we continue to write larger and more complex programs, it is important to remember that we can include comments and documentation in our code. Comments are lines of text in our program’s source code that are ignored by the compiler or interpreter, allowing us to add information to the program beyond the code itself.
These help explain our code to anyone who might read it, but can even be useful to help us remember exactly how it works or what it does, especially if we end up coming back to a program written a long time ago that we do not remember very well.
As we’ve seen before, we can add single-line comments to our Java programs using two forward slashes // before a line in our source file:
// this is a comment
int x = 5;
// this is also a comment
boolean b = true;Java also includes the ability to add a comment that spans multiple lines, without requiring each line to be prefixed with forward slashes. Instead, we can use a forward slash followed by an asterisk /* to start a comment, and then an asterisk followed by a forward slash to end it */, as shown below:
int x = 5;
/* This is a multi line comment
it can span multiple lines
and even blank lines */
int y = 10;Finally, Java also includes a secondary type of comment that spans multiple lines, specifically for creating documentation. Instead of a single asterisk, we use a double asterisk after the forward slash at the beginning /**, but the ending is the same as before */.
In addition, these comments typically include an asterisk at the beginning of each line, aligned with the first asterisk of the start of the comment. Thankfully, most code editors will do this for us automatically, including Codio!
These comments are specifically designed to provide information about classes and methods in our code. Here’s a quick example, using the IntTuple class developed earlier in this module:
/**
* Represents a tuple containing two integer values.
*
* @author Test Student
* @version 1.0
* @since 2019-01-01
*/
public class IntTuple{
public int first;
public int second;
/**
* Constructs a new IntTuple object.
*
* @param one the first element in the tuple
* @param two the second element in the tuple
*/
public IntTuple(int one, int two){
this.first = one;
this.second = two;
}
}Once we’ve written this documentation in our code, Java includes a special tool called Javadoc that will generate HTML files that describe what our code does. In fact, the Java API files, such as the one for Scanner, are generated using this tool!
For more information about writing comments for the Javadoc tool, as well as some great examples, consult the documentation.
In this module, we explored some of the useful features included in our chosen programming language. These features give us a small taste of all the handy and exciting things we can do in our programs.
In addition, we saw a method for effectively documenting our code. Even if it isn’t required, it is still a very good habit to get into.
This module is really intended to be a great capstone for this course. At this point, we have learned most of the basics of what we can do in our chosen programming language. From here, it is all about exploring different data structures, algorithms, and libraries we can use in our code.
In addition, we can learn about the frameworks and design patterns used in state-of-the-art software today, as well as the methods used by software engineers to develop software solutions to real-world problems.
Let’s all go out and try to build some cool software!
Calling a Method Inside Itself!
This content is copied directly from CC 310 and is currently being redeveloped for CC 210. It may refer to content that is not present in earlier modules of CC 210.
We are now used to using functions in our programs that allow us to decompose complex problems into smaller problems that are easier to solve. Now, we will look at a slight wrinkle in how we use functions. Instead of simply having functions call other functions, we now allow for the fact that a function can actually call itself! When a function calls itself, we call it recursion.
Using recursion often allows us to solve complex problems elegantly—with only a few lines of code. Recursion is an alternative to using loops and, theoretically, any function that can be solved with loops can be solved with recursion and vice versa.
So why would a function want to call itself? When we use recursive functions, we are typically trying to break the problem down into smaller versions of itself. For example, suppose we want to check to see if a word is a palindrome (i.e., it is spelled the same way forwards and backwards). How would we do this recursively? Typically, we would check to see if the first and last characters were the same. If so, we would check the rest of the word between the first and last characters. We would do this over and over until we got down to the 0 or 1 characters in the middle of the word. Let’s look at what this might look like in pseudocode.
function isPalindrome (String S) returns Boolean
if length of S < 2 then
return true
else
return (first character in S == last character in S) and
isPalindrome(substring of S without first and last character)
end if
end functionFirst, we’ll look at the else part of the if statement. Essentially, this statement determines if the first and last characters of S match, and then calls itself recursively to check the rest of the word S. Of course, if the first and last characters of S match and the rest of the string is a palindrome, the function will return true. However, we can’t keep calling isPalindrome recursively forever. At some point we have to stop. That is what the if part of the statement does. We call this our base case. When we get to the point where the length of the string we are checking is 0 or 1 (i.e., < 2), we know we have reached the middle of the word. Since all strings of length 0 or 1 are, by definition, palindromes, we return true.
The key idea of recursion is to break the problem into simpler subproblems until you get to the point where the solution to the problem is trivial and can be solved directly; this is the base case. The algorithm design technique is a form of divide-and-conquer called decrease-and-conquer. In decrease-and-conquer, we reduce our problem into smaller versions of the larger problem.
A recursive program is broken into two parts:
The base case is generally the final case we consider in a recursive function and serves to both end the recursive calls and to start the process of returning the final answer to our problem. To avoid endless cycles of recursive calls, it is imperative that we check to ensure that:
Suppose we must write a program that reads in a sequence of keyboard characters and prints them in reverse order. The user ends the sequence by typing an asterisk character *.
We could solve this problem using an array, but since we do not know how many characters might be entered before the *, we could not be sure the program would actually work. However, we can use a recursive function since its ability to save the input data is not limited by a predefined array size.
Our solution would look something like this. We’ve also numbered the lines to make the following discussion easier to understand.
function REVERSE() (1)
read CHARACTER (2)
if CHARACTER == `*` then (3)
return (4)
else (5)
REVERSE() (6)
print CHARACTER (7)
return (8)
end if (9)
end function (10)The function first reads a single character from the keyboard and stores it in CHARACTER. Then, in line 3 it checks to see if the user typed the * character. If so, we simply return, knowing that we have reached the end of the input and need to start printing out the characters we’ve read in reverse order. This is the base case for this recursive function.
If the CHARACTER we read in was not an *, line 6 will recursively call REVERSE to continue reading characters. Once the function returns (meaning that we have gotten an * character and started the return process) the function prints the CHARACTER in line 7 and then returns itself.
Now let’s look at what happens within the computer when we run REVERSE. Let’s say the program user wants to enter the three characters from the keyboard: n, o, and w followed by the * character. The following figure illustrates the basic concept of what is going on in the computer.
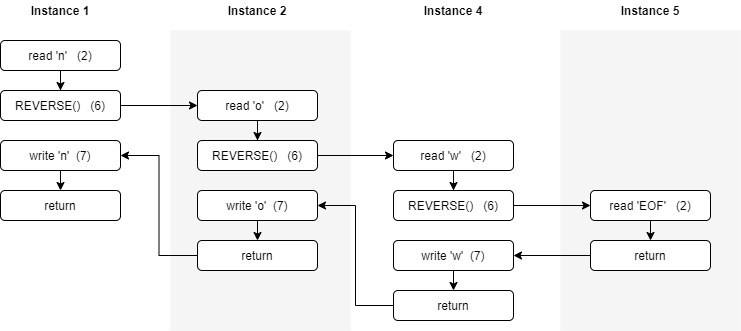
The arrows in the figure represent the order of execution of the statements in the computer. Each time we execute the recursive call to REVERSE in line 6, we create a new instance of the function, which starts its execution back at the beginning of the function (line 2). Then, when the function executes return, control reverts back to the next statement to be executed (line 7) in the calling instance of the function.
It’s important to understand that each instance of the function has its own set of variables whose values are unique to that instance. When we read n into the CHARACTER variable in the first instance of REVERSE it is not affected by anything that happens in the second instance of REVERSE. Therefore, reading the o into CHARACTER in the second instance of REVERSE does not affect the value of CHARACTER in the first instance of REVERSE.
During the execution of the first instance of REVERSE, the user enters the character n so the if condition is false and we execute the else part of the statement, which calls the REVERSE function. (Note that before we actually start the second instance of REVERSE, the operating system stores the statement where we will pick up execution once the called function returns.) When the second instance of REVERSE is started, a new copy of all variables is created as well to ensure we do not overwrite the values from the first instance.
The execution of the second instance of REVERSE runs exactly like the first instance except that the user enters the character o instead of n. Again, the else part of the if statement is executed, which calls the REVERSE function. When the third instance of REVERSE is executed, the user now inputs w, which again causes a new instance of REVERSE to be called.
Finally, in the fourth instance of REVERSE, the user inputs the * character, which causes the if part of the statement to execute, which performs our return statement. Once the return from the base case of our recursive function is performed, it starts the process of ending all the instances of the REVERSE function and creating the solution. When instance 4 of the REVERSE function returns, execution starts at the write statement (line 7) of instance 3. Here the character w is printed, and the function returns to instance 2. The same process is carried out in instance 2, which prints the o character and returns. Likewise, instance 1 prints its character n and then returns. The screen should now show the full output of the original call to REVERSE , which is “won”.
Recursion has allowed us to create a very simple and elegant solution to the problem of reversing an arbitrary number of characters. While you can do this in a non-recursive way using loops, the solution is not that simple. If you don’t believe us, just try it! (Yes, that is a challenge.)
function REVERSE2() (1)
read CHARACTER (2)
if CHARACTER == `*` then (3)
return (4)
else (5)
print CHARACTER (6a)
REVERSE2() (7a)
return (8)
end if (9)
end function (10)The REVERSE2 function in the previous quiz actually prints the characters entered by the user in the same order in which they are typed. Notice how this small variation in the instruction order significantly changed the outcome of the function. To get a better understanding of why this occurs, we will delve into the order of execution in a little more depth.
From the output of our original REVERSE function, we could argue that recursive function calls are carried out in a LIFO (last in, first out) order. Conversely, the output of the second version of the function REVERSE2, would lead us to believe that recursive function calls are carried out in FIFO (first in, first out) order. However, the ordering of the output is really based on how we structure our code within the recursive function itself, not the order of execution of the recursive functions.
To produce a LIFO ordering, we use a method called head recursion, which causes the function to make a recursive call first, then calculates the results once the recursive call returns. To produce a FIFO ordering, we use a method called tail recursion, which is when the function makes all of its necessary calculations before making a recursive call. With the REVERSE and REVERSE2 functions, this is simply a matter of swapping lines 6 and 7.
While some functions require the use of either head or tail recursion, many times we have the choice of which one to use. The choice is not necessarily just a matter of style, as we shall see next.
Before we finish our discussion of head and tail recursion, we need to make sure we understand how a recursive function actually works in the computer. To do this, we will use a new example. Let’s assume we want to print all numbers from 0 to $ N $, where $ N $ is provided as a parameter. A recursive solution to this problem is shown below.
function OUTPUT(integer N) (1)
if N == 0 then (2)
print N (3)
else (4)
print "Calling to OUTPUT " N-1 (5)
OUTPUT(N-1) (6)
print "Returning from OUTPUT " N-1 (7)
print N (8)
end if (9)
return (10)
end function (11)Notice that we have added some extra print statements (lines 5 and 7) to the function just to help us keep track of when we have called OUTPUT and when that call has returned. This function is very similar to the REVERSE function above, we just don’t have to worry about reading a character each time the function runs. Now, if we call OUTPUT with an initial parameter of 3, we get the following output. We’ve also marked these lines with letters to make the following discussion simpler.
Calling to OUTPUT 2 (a)
Calling to OUTPUT 1 (b)
Calling to OUTPUT 0 (c)
0 (d)
Returning from OUTPUT 0 (e)
1 (f)
Returning from OUTPUT 1 (g)
2 (h)
Returning from OUTPUT 2 (i)
3 (j)Lines a, b, and c show how the function makes all the recursive calls before any output or computation is performed. Thus, this is an example of head recursion which produces a LIFO ordering.
Once we get to the call of OUTPUT(0), the function prints out 0 (line d) and we start the return process. When we return from the call to OUTPUT(0) we immediately print out N, which is 1 and return. We continue this return process from lines g through j and eventually return from the original call to OUTPUT having completed the task.
Now that we have seen how recursion works in practice, we will pull back the covers and take a quick look at what is going on underneath. To be able to call the same function over and over, we need to be able to store the appropriate data related to each function call to ensure we can treat it as a unique instance of the function. While we do not make copies of the code, we do need to make copies of other data. Specifically, when function A calls function B, we must save the following information:
A to be executed when B returns (called the return address),B.We call this information the activation record for function A. When a call to B is made, this information is stored in a stack data structure known as the activation stack, and execution begins at the first instruction in function B. Upon completion of function B, the following steps are performed.
Next, we will look at how we use the activation stack to implement recursion. For this we will use a simple MAIN program that calls our simplified OUTPUT function (where we have removed all the print statements used to track our progress).
function MAIN()
OUTPUT(3) (1)
print ("Done") (2)
end function
function OUTPUT(integer N)
if N == 0 then (1)
print N (2)
else (3)
OUTPUT(N-1) (4)
print N (5)
end if (6)
return (7)
end functionWhen we run MAIN, the only record on the activation stack is the record for MAIN. Since it has not been “called” from another function, it does not contain a return address. It also has no local variables, so the record is basically empty as shown below.
However, when we execute line 1 in MAIN, we call the function OUTPUT with a parameter of 3. This causes the creation of a new function activation record with the return address of line 3 in the calling MAIN function and a parameter for N, which is 3. Again, there are no local variables in OUTPUT. The stack activation is shown in figure a below.
| a | b | c | d |
|---|---|---|---|
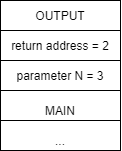
|
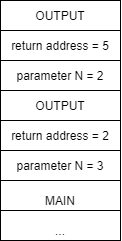
|
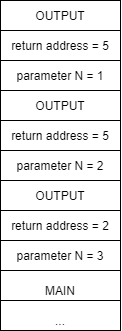
|
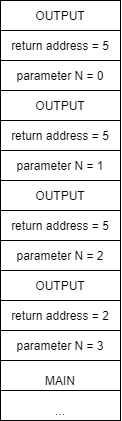
|
Following the execution for OUTPUT, we will eventually make our recursive call to OUTPUT in line 4, which creates a new activation record on the stack as shown above in b. This time, the return address will be line 5 and the parameter N is 2.
Execution of the second instance of OUTPUT will follow the first instance, eventually resulting in another recursive call to OUTPUT and a new activation record as shown in c above. Here the return address is again 5 but now the value of parameter N is 1. Execution of the third instance of OUTPUT yields similar results, giving us another activation record on the stack d with the value of parameter N being 0.
Finally, the execution of the fourth instance of OUTPUT will reach our base case of N == 0. Here we will write 0 in line 2 and then return. This return will cause us to start execution back in the third instance of OUTPUT at the line indicated by the return value, or in this case, 5. The stack activation will now look like e in the figure below.
| e | f | g | h |
|---|---|---|---|
|
|
|
|
|
When execution begins in the third instance of OUTPUT at line 5, we again write the current value of N, which is 1, and we then return. We follow this same process, returning to the second instance of OUTPUT, then the first instance of OUTPUT. Once the initial instance of OUTPUT completes, it returns to line 2 in MAIN, where the print("Done") statement is executed and MAIN ends.
While recursion is a very powerful technique, its expressive power has an associated cost in terms of both time and space. Anytime we call a function, a certain amount of memory space is needed to store information on the activation stack. In addition, the process of calling a function takes extra time since we must store parameter values and the return address, etc. before restarting execution. In the general case, a recursive function will take more time and more memory than a similar function computed using loops.
It is possible to demonstrate that any function with a recursive structure can be transformed into an iterative function that uses loops and vice versa. It is also important to know how to use both mechanisms because there are advantages and disadvantages for both iterative and recursive solutions. While we’ve discussed the fact that loops are typically faster and take less memory than similar recursive solutions, it is also true that recursive solutions are generally more elegant and easier to understand. Recursive functions can also allow us to find solutions to problems that are complex to write using loops.
The most popular example of using recursion is calculating the factorial of a positive integer $ N $. The factorial of a positive integer $ N $ is just the product of all the integers from $ 1 $ to $ N $. For example, the factorial of $ 5 $, written as $ 5! $, is calculated as $ 5 * 4 * 3 * 2 * 1 = 120 $. The definition of the factorial function itself is recursive.
$$ \text{fact}(N) = N * \text{fact}(N - 1) $$The corresponding pseudocode is shown below.
function FACT(N)
if N == 1
return 1
else
return N * FACT(N-1)
end if
end functionThe recursive version of the factorial is slower than the iterative version, especially for high values of $ N $. However, the recursive version is simpler to program and more elegant, which typically results in programs that are easier to maintain over their lifetimes.
In the previous examples we saw recursive functions that call themselves one time within the code. This type of recursion is called linear recursion, where head and tail recursion are two specific types of linear recursion.
In this section we will investigate another type of recursion called tree recursion, which occurs when a function calls itself two or more times to solve a single problem. To illustrate tree recursion, we will use a simple recursive function MAX, which finds the maximum of
$ N $ elements in an array. To calculate the maximum of
$ N $ elements we will use the following recursive algorithm.
MAX1.MAX2.MAX1 and MAX2 to find the maximum of all elements.Our process recursively decomposes the problem by searching for the maximum in the first $ N/2 $ elements and the second $ N/2 $ elements until we reach the base case. In this problem, the base case is when we either have 1 or 2 elements in the array. If we just have 1, we return that value. If we have 2, we return the larger of those two values. An overview of the process is shown below.

The pseudocode for the algorithm is shown below.
function MAX(VALUES, START, END)
print "Called MAX with start = " + START + ", end = " + END
if END – START = 0
return VALUES[START]
else if END – START = 1
if VALUES(START) > VALUES(END)
return VALUES[START]
else
return VALUES[END]
end if
else
MIDDLE = ROUND((END – START) / 2)
MAX1 = MAX(VALUES, START, START + MIDDLE – 1)
MAX2 = MAX(VALUES, START + MIDDLE, END)
if MAX1 > MAX2
return MAX1
else
return MAX2
end if
end if
end functionThe following block shows the output from the print line in the MAX function above. The initial call to the function is MAX(VALUES, 0, 15).
Called MAX with start = 0, end = 7
Called MAX with start = 0, end = 3
Called MAX with start = 0, end = 1
Called MAX with start = 2, end = 3
Called MAX with start = 4, end = 7
Called MAX with start = 4, end = 5
Called MAX with start = 6, end = 7
Called MAX with start = 8, end = 15
Called MAX with start = 8, end = 11
Called MAX with start = 8, end = 9
Called MAX with start = 10, end = 11
Called MAX with start = 12, end = 15
Called MAX with start = 12, end = 13
Called MAX with start = 14, end = 15As you can see, MAX decomposes the array each time it is called, resulting in 14 instances of the MAX function being called. If we had performed head or tail recursion to compare each value in the array, we would have to have called MAX 16 times. While this may not seem like a huge savings, as the value of
$ N $ grows, so do the savings.
Next, we will look at calculating Fibonacci numbers using a tree recursive algorithm. Fibonacci numbers are given by the following recursive formula. $$ f_n = f_{n-1} + f_{n-2} $$ Notice that Fibonacci numbers are defined recursively, so they should be a perfect application of tree recursion! However, there are cases where recursive functions are too inefficient compared to an iterative version to be of practical use. This typically happens when the recursive solutions to a problem end up solving the same subproblems multiple times. Fibonacci numbers are a great example of this phenomenon.
To complete the definition, we need to specify the base case, which includes two values for the first two Fibonacci numbers: FIB(0) = 0 and FIB(1) = 1. The first Fibonacci numbers are
$ 0, 1, 1, 2, 3, 5, 8, 13, 21 … $.
Producing the code for finding Fibonacci numbers is very easy from its definition. The extremely simple and elegant solution to computing Fibonacci numbers recursively is shown below.
function FIB(N)
if N == 0
return 0
else if N == 1
return 1
else
return FIB(N-1) + FIB(N-2)
end if
end functionThe following pseudocode performs the same calculations for the iterative version.
function FIBIT(N)
FIB1 = 1
FIB2 = 0
for (I = 2 to N)
FIB = FIB1 + FIB2
FIB2 = FIB1
FIB1 = FIB
end loop
end functionWhile this function is not terribly difficult to understand, there is still quite a bit of mental gymnastics required to see how this implements the computation of Fibonacci numbers and even more to prove that it does so correctly. However, as we will see later, the performance improvements of the iterative solution are worth it.
If we analyze the computation required for the 6th Fibonacci number in both the iterative and recursive algorithms, the truth becomes evident. The recursive algorithm calculates the 5th Fibonacci number by recursively calling FIB(4) and FIB(3). In turn, FIB(4) calls FIB(3) and FIB(2). Notice that FIB(3) is actually calculated twice! This is a problem. If we calculate the 36th Fibonacci number, the values of many Fibonacci numbers are calculated repeatedly, over and over.
To clarify our ideas further, we can consider the recursive tree resulting from the trace of the program to calculate the 6th Fibonacci number. Each of the computations highlighted in the diagram will have been computed previously.
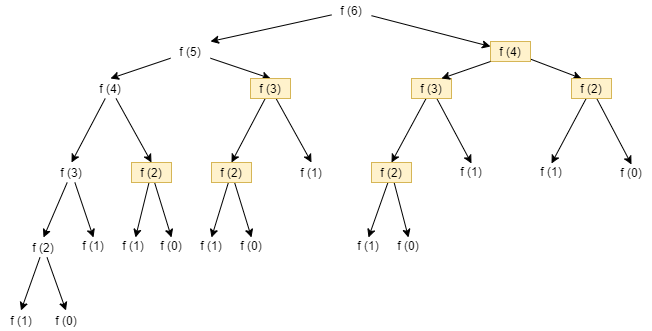
If we count the recomputations, we can see how we calculate the 4th Fibonacci number twice, the 3rd Fibonacci number three times, and the 2nd Fibonacci five times. All of this is due to the fact the we do not consider the work done by other recursive calls. Furthermore, the higher our initial number, the worse the situation grows, and at a very rapid pace.
To avoid recomputing the same Fibonacci number multiple times, we can save the results of various calculations and reuse them directly instead of recomputing them. This technique is called memoization, which can be used to optimize some functions that use tree recursion.
To implement memoization, we simply store the values the first time we compute them in an array. The following pseudocode shows an efficient algorithm that uses an array, called FA, to store and reuse Fibonacci numbers.
function FIBOPT(N)
if N == 0
return 0
else if N == 1
return 1
else if FA[N] == -1
FA[N] = FIBOPT(N-1) + FIBOPT(N-2)
return FA[N]
else
return FA[N]
end if
end functionWe assume that each element in FA has been initialized to -1. We also assume that N is greater than 0 and that the length of FA is larger than the Fibonacci number N that we are trying to compute. (Of course, we would normally put these assumptions in our precondition; however, since we are focusing on the recursive nature of the function, we will not explicitly show this for now.) The cases where N == 0 and N == 1 are the same as we saw in our previous FIB function. There is no need to store these values in the array when we can return them directly, since storing them in the array takes additional time. The interesting cases are the last two. First, we check to see if FA[N] == -1, which would indicate that we have not computed the Fibonacci number for N yet. If we have not yet computed N’s Fibonacci number, we recursively call FIBOPT(N-1) and FIBOPT(N-2) to compute its value and then store it in the array and return it. If, however, we have already computed the Fibonacci for N (i.e., if FA[N] is not equal to -1), then we simply return the value stored in the array, FA[N].
As shown in our original call tree below, using the FIBOPT function, none of the function calls in red will be made at all. While the function calls in yellow will be made, they will simply return a precomputed value from the FA array. Notice that for N = 6, we save 14 of the original 25 function calls required for the FIB function, or a
$ 56\% $ savings. As N increases, the savings grow even more.
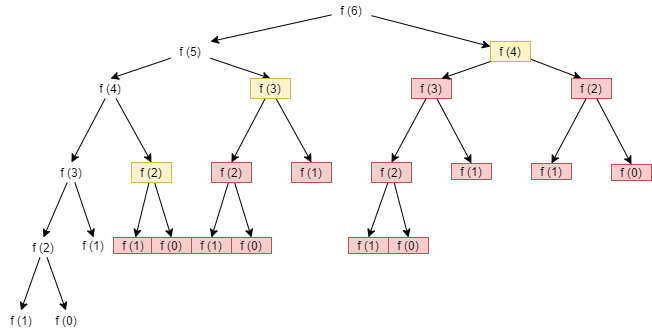
There are some problems where an iterative solution is difficult to implement and is not always immediately intuitive, while a recursive solution is simple, concise and easy to understand. A classic example is the problem of the Tower of Hanoi.
The Tower of Hanoi is a game that lends itself to a recursive solution. Suppose we have three towers on which we can put discs. The three towers are indicated by a letter, A, B, or C.
Now, suppose we have $ N $ discs all of different sizes. The discs are stacked on tower A based on their size, smaller discs on top. The problem is to move all the discs from one tower to another by observing the following rules:
To try to solve the problem let’s start by considering a simple case: we want to move two discs from tower A to tower C. As a convenience, suppose we number the discs in ascending order by assigning the number 1 to the larger disc. The solution in this case is simple and consists of the following steps:
The following figure shows how the algorithm works.
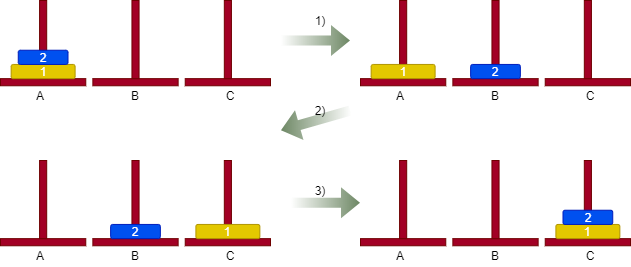
It is a little more difficult with three discs, but after a few tries the proper algorithm emerges. With our knowledge of recursion, we can come up with a simple and concise solution. Since we already know how to move two discs from one place to another, we can solve the problem recursively.
In formulating our solution, we assumed that we could move two discs from one tower to another, since we have already solved that part of the problem above. In step 1, we use this solution to move the top two discs from tower A to B. Then, in step 3, we again use that solution to move two discs from tower B to C. This process can now easily be generalized to the case of N discs as described below.
The algorithm is captured in the following pseudocode. Here N is the total number of discs, ORIGIN is the tower where the discs are currently located, and DESTINATION is the tower where they need to be moved. Finally, TEMP is a temporary tower we can use to help with the move. All the parameters are integers.
function HANOI(N, ORIGIN, DESTINATION, TEMP)
if N >= 0
HANOI(N-1, ORIGIN, TEMP, DESTINATION)
Move disc N from ORIGIN to DESTINATION
HANOI(N-1, TEMP, DESTINATION, ORIGIN)
end if
return
end functionThe function moves the $ N $ discs from the source tower to the destination tower using a temporary tower. To do this, it calls itself to move the first $ N-1 $ discs from the source tower to the temporary tower. It then moves the bottom disc from the source tower to the destination tower. The function then moves the $ N-1 $ discs present in the temporary tower into the destination tower.
The list of movements to solve the three-disc problem is shown below.
Iterative solutions to the Tower of Hanoi problem do exist, but it took many researchers several years to find an efficient solution. The simplicity of finding the recursive solution presented here should convince you that recursion is an approach you should definitely keep in your bag of tricks!
Iteration and recursion have the same expressive power, which means that any problem that has a recursive solution also has an iterative solution and vice versa. There are also standard techniques that allow you to transform a recursive program into an equivalent iterative version. The simplest case is for tail recursion, where the recursive call is the last step in the function. There are two cases of tail recursion to consider when converting to an iterative version.
f(x) executes is a call to itself, f(y) with parameter y, the recursive call can be replaced by an assignment statement, x = y, and by looping back to the beginning of function f.The approach above only solves the conversion problem in the case of tail recursion. However, as an example, consider our original FACT function and its iterative version FACT2. Notice that in FACT2 we had to add a variable fact to keep track of the actual computation.
function FACT(N)
if N == 1
return 1
else
return N * FACT(N-1)
end if
end functionfunction FACT2(N)
fact = 1
while N > 0
fact = fact * N
N = N - 1
end while
return fact
end functionThe conversion of non-tail recursive functions typically uses two loops to iterate through the process, effectively replacing recursive calls. The first loop executes statements before the original recursive call, while the second loop executes the statements after the original recursive call. The process also requires that we use a stack to save the parameter and local variable values each time through the loop. Within the first loop, all the statements that precede the recursive call are executed, and then, before the loop terminates, the values of interest are pushed onto the stack. The second loop starts by popping the values saved on the stack and then executing the remaining statements that come after the original recursive call. This is typically much more difficult than the conversion process for tail recursion.
In this module, we explored the use of recursion to write concise solutions for a variety of problems. Recursion allows us to call a function from within itself, using either head recursion, tail recursion or tree recursion to solve smaller instances of the original problem.
Recursion requires a base case, which tells our function when to stop calling itself and start returning values, and a recursive case to handle reducing the problem’s size and calling the function again, sometimes multiple times.
We can use recursion in many different ways, and any problem that can be solved iteratively can also be solved recursively. The power in recursion comes from its simplicity in code—some problems are much easier to solve recursively than iteratively.
Unfortunately, in general a recursive solution requires more computation time and memory than an iterative solution. We can use techniques such as memoization to greatly improve the time it takes for a recursive function to execute, especially in the case of calculating Fibonacci numbers where subproblems are overlapped.