Welcome!
This page is the main page for Review Control Flow, I/O and Exceptions
This page is the main page for Review Control Flow, I/O and Exceptions
 ^[https://pxhere.com/en/photo/1172040]
Programming is the act of writing source code for a computer program in such a way that a modern computer can understand and perform the steps described in the code. There are many different programming languages that can be used, such as high-level languages like Java and Python.
To run code written in those languages, we can use a compiler to convert the code to a low-level language that can be directly executed by the computer, or we can use an interpreter to read the code and perform the requested operations on the computer.
At this point, we have most likely written some programs already. This chapter will review the important aspects of our chosen programming language, giving us a solid basis to build upon. Hopefully most of this will be review, but there may be a few new terms or concepts introduced here as well.
In this course, we will primarily be learning different ways to store and manipulate data in our programs. Of course, we could do this using the source code of our chosen programming language, but in many cases that would defeat the purpose of learning how to do it ourselves!
Instead, we will use several different ways to represent the steps required to build our programs. Let’s review a couple of them now.
One of the simplest ways to describe a computer program is to simply write what it does using our preferred language, such as English. Of course, natural language can be very ambiguous, so we must be careful to make our written descriptions as precise as possible. So, it is a good idea to limit ourselves to simple, clear sentences that aren’t written as prose. It may seem a bit boring, but this is the best way to make sure our intent is completely understood.
A great example is a recipe for baking. Each step is written clearly and concisely, with enough descriptive words used to allow anyone to read and follow the directions.
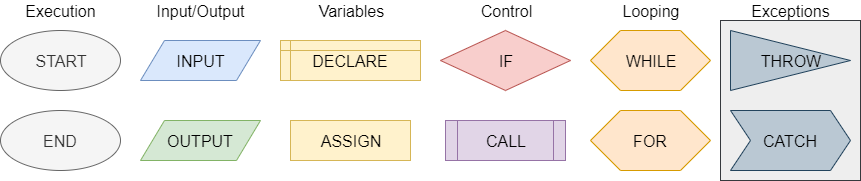
One method of representing computer programs is through the use of flowcharts. A flowchart consists of graphical blocks representing individual operations to be performed, connected with arrows which describe the flow of the program. The image above gives the basic building blocks of the flowcharts that will be used in this course. We will mostly follow the flowchart design used by the Flowgorithm program available online. The following pages in this chapter will introduce and discuss each block in detail.
We can also express our computer programs through the use of pseudocode. Pseudocode is an abstract language that resembles a high-level programming language, but it is written in such a way that it can be easily understood by any programmer who is familiar with any one of several common languages. The pseudocode may not be directly executable as written, but it should contain enough detail to be easily understood and adapted to an actual programming language by a skilled programmer.
There are many standards that exist for pseudocode, each with their own unique features and uses. In this course, we will mostly follow the standards from the International Baccalaureate Organization . In the following pages in this chapter, we’ll also introduce pseudocode for each of the flowchart blocks shown above.
This page is the main page for Java
Let’s discuss some of the basic concepts we need to understand about the Java programming language.
To begin, let’s look at a simple Hello World program written in Java:
This program contains multiple important parts:
HelloWorld, and it will be stored in a file called HelloWorld.java.{}.main() method. The method declaration of this main method should exactly match what is shown here. We’ll discuss these keywords in more detail in a later chapter.main() method is called should directly follow the method declaration. As before, the contents of the method are surrounded by curly braces {}.;.Of course, this is a very brief overview for the Java programming language. To learn more, feel free to refer to the references listed below, as well as the textbook content for previous courses.
See if you can use the code above to write your own Hello World program in the HelloWorld.java file that is open to the left. We’ll learn how to compile and run that program on the next page.
Now that we’ve written our first Java program, we must compile and run the program to see the fruits of our labors. There are many different ways to do this using the Codio platform. We’ll discuss each of them in detail here.
Codio includes a built-in Linux terminal, which allows us to perform actions directly on a command-line interface just like we would on an actual computer running Linux. We can access the Terminal in many ways:
Additionally, some pages may already open a terminal window for us in the left-hand pane, as this page so helpfully does. As we can see, we’re never very far away from a terminal.
No worries! We’ll give you everything you need to know to compile and run your Java programs in this course.
If you’d like to learn a bit more about the Linux terminal and some of the basic commands, feel free to check out this great video on YouTube:
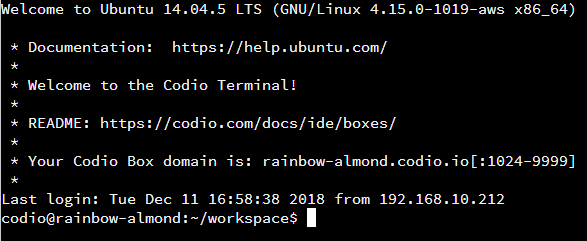
Let’s go to the terminal window and navigate to our program. When we first open the Terminal window, it should show us a prompt that looks somewhat like this one:

There is quite a bit of information there, but we’re interested in the last little bit of the last line, where it says ~/workspace. That is the current directory, or folder, our terminal is looking at, also known as our working directory. We can always find the full location of our working directory by typing the pwd command, short for “Print Working Directory,” in the terminal. Let’s try it now!
Enter this command in the terminal:
and we should see output similar to this:

In that output, we’ll see that the full path to our working directory is /home/codio/workspace. This is the default location for all of our content in Codio, and its where everything shown in the file tree to the far left is stored. When working in Codio, we’ll always want to store our work in this directory.
Next, let’s use the ls command, short for “LiSt,” to see a list of all of the items in that directory:

We should see a whole list of items appear in the terminal. Most of them are directories containing examples for the chapters this textbook, including the HelloWorld.java file that we edited in the last page. Thankfully, the directories are named in a very logical way, making it easy for us to find what we need. For example, to find the directory for Chapter 1 that contains examples for Java, look for the directory with the name starting with 1j. In this case, it would be 1j-hello.
Finally, we can use the cd command, short for “Change Directory,” to change the working directory. To change to the 1j-hello directory, type cd into the terminal window, followed by the name of that directory:

We are now in the 1j-hello directory, as we can see by observing the ~/workspace/1j-hello on the current line in the terminal. Finally, we can do the ls command again to see the files in that directory:

We should see our HelloWorld.java file! If it doesn’t appear, try using this command to get to the correct directory: cd /home/codio/workspace/1j-hello.
Once we’re at the point where we can see the HelloWorld.java file, we can move on to actually compiling and running the program.
To compile a Java program in the terminal, we’ll use the javac command, short for Java Compiler, followed by the name of the Java file we’d like to compile. So, in our case, we’ll do the following:
If it works correctly, we shouldn’t get any additional output. The compiler will look through our Java file and create a new file containing the Java bytecode for our program, called HelloWorld.class. We can use the ls command to see it:

If the javac command gives you any output, or doesn’t create a HelloWorld.class file, that most likely means that your code has an error in it. Go back to the previous page and double-check that the contents of HelloWorld.java exactly match what is shown at the bottom of the page. You can also read the error message output by javac to determine what might be going wrong in your file.
We’ll cover information about simple debugging steps on the next page as well. If you get stuck, now is a great time to go to Piazza and ask for assistance. You aren’t in this alone!
Finally, we can now run our program! Once it is compiled, just type the following in the terminal to run it:

That’s all there is to it! We’ve now successfully compiled and run our first Java program. Of course, we can run the program as many times as we want by repeating the previous java command. If we make changes to the HelloWorld.java file, we’ll need to recompile it using the previous javac command first. Then, if those changes instruct the computer to do something different, we should see those changes when we run the program after compiling it.
See if you can change the HelloWorld.java file to print out a different message. Once you’ve changed it, use the javac and java commands to compile and run the updated program. Make sure you see the correct output!
In many of the Codio projects and tutorials in this course, the Run Menu will be populated with helpful commands. The Run Menu can be found at the top of the screen, right here:

Each Codio project or tutorial may have different items in this menu, since they can be configured by the author of the project. For this book, there will always be the following options:
To use these commands, we must simply open up the file we’d like to use, then select the appropriate option from the Run Menu. It will automatically use the currently open file in the command.
So, to compile and run our file, we must simply open HelloWorld.java in the panel to the left, then click the arrow in the Run Menu and first select Java - Compile File. It should open up a Terminal tab and show output similar to the following:

It looks very similar to the command we entered manually. The only difference is that it uses the folder name along with the filename in the command, which ensures that it gets the correct file without even opening that directory.
Once we’ve compiled the file, we can go back to that tab and select the Java - Run File option. It should show output similar to this:

Again, it looks very similar to the commands we performed earlier. Since the Java bytecode file is in a directory, we have to use a -classpath option to let Java know where to find the file.
Make another change to the HelloWorld.java file, and then see if you can use the options in the Run Menu to compile and run it. Make sure you see the correct output!
Last, but not least, many of the Codio tutorials and projects in this program will include assessments that we must solve by writing code. Codio can then automatically run the program and check for specific things, such as the correct output, in order to give us a grade. For most of these questions, we’ll be able to make changes to our code as many times as we’d like to get the correct answer. Try the example below!
{Check It!|assessment}(code-output-compare-146573703)
As we can see, there are many different ways to compile and run our code using Codio. Feel free to use any of these methods throughout this course.
Codio also includes an integrated debugger, which is very helpful when we want to determine if there is an error in our code. We can also use the debugger to see what values are stored in each variable at any point in our program.
To use the debugger, find the Debug Menu at the top of the Codio window. It is to the right of the Run Menu we’ve already been using. On that menu, we should see an option for Java - Debug File. Select that option to run our program in the Codio debugger.
As we build more complex programs in this course, we’ll be able to configure our own debugger configurations that allow us to test multiple files and operations.
The Codio debugger only works with input from a file, not from the terminal. So, to use the debugger, we’ll need to make sure the input we’d like to test is stored in a file, such as [input.txt](open_file 1j-hello/input.txt), before debugging. We can then give that file as an argument to our program in our debugger configuration, and write our program to read input from a file if one is provided as an argument.
Learning how to use a debugger is a hands-on process, and is probably best described in a video. So, here are a couple of videos that should help us get up to speed on working in the Codio debugger.
Computational Core - Java Debugging Tutorial Codio Documentation - Debugging
We can always use the debugger to help us find problems in our code.
 ^[https://www.codio.com/blog/python-tutor-codio-visualizer]
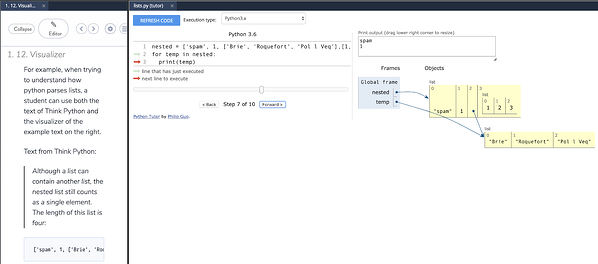
Codio now includes support for Python Tutor , allowing us to visualize what is happening in our code. We can see that output in the second tab that is open to the left. It even works in Java!
Unfortunately, students are not able to open the visualizer directly, so it must be configured by an instructor in the Codio lesson. If you find a page in this textbook where you’d like to be able to visualize your code, please post in Piazza and let us know!
A variable in a programming language is an abstraction that allows storing one value in each instant of time, but this value can change along with the program execution. A variable can be represented as a box holding a value. If the variable is a container, e.g., a list (or array or vector), a matrix, a tuple, or a set of values, each box in the container contains a single value.
A variable is characterized by:
results, numberOfNodes, numberOfEdges. For writing variable names composed of two or more words in Java, we can use “CamelCase,” writing words without spaces and with the first letter of each word after the first one uppercase.Depending on the programming language, we could also specify for a variable:
A programming language allows to perform two basic operations with a variable:
+, and subtraction -. They allow performing basic arithmetic operations with numbers.<, and greater than >. Usually, they allow to comparing two operands, each of which could be a variable. The result of the comparison is either the Boolean value true or the Boolean value false.&& , or ||, and not !. This operator allows us to relate logical conditions together to create more complex statements.+ to concatenate the strings “Hello” and the string “world” to produce the string “Hello world”. These operators allow us to manipulate strings.a = b.The table below lists the flowchart blocks used to represent variables, as well as the corresponding pseudocode:
| Operation | Flowchart | Pseudocode |
|---|---|---|
| Declare |
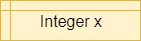
|
X = 0 |
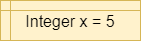
| Assign |
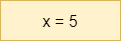
|
X = 5 |
| Declare & Assign |

|
X = 5 |
Notice that variables must be assigned a value when declared in pseudocode. By default, most programming languages automatically assign the value $0$ to a new integer variable, so we’ll use that value in our pseudocode as well.
Likewise, variables in a flowchart are given a type, whereas variables in pseudocode are not. Instead, the data type of those variables can be inferred by the values stored in them.
Variables in Java must be declared with a type and a name. Once declared, a variable can only store the type of data it was declared to store.
There are several primitive data types we can use in Java. The following table lists several of the numeric types:
| Name | Type | Size | Range |
|---|---|---|---|
| Byte | byte |
8 bits | $-128$ to $127$ |
| Short | short |
16 bits | $-32,768$ to $32,767$ |
| Integer | int |
32 bits | $-2,147,483,648$ to $2,147,483,647$ |
| Long | long |
64 bits | $-2^{63}$ to $2^{63} - 1$ |
| Float | float |
32 bits | $ \pm 10^{\pm 38} $ |
| Double | double |
64 bits | $ \pm 10^{\pm 308} $ |
In addition, there is the boolean type which can store a single Boolean value, either true or false. Finally, there is the char primitive data type, which can store a single character of text.
To declare a variable, we can simply place the type of the variable before the name in our code:
We can then assign a value to that variable using an assignment statement:
We can even combine them into a single statement:
We can also convert, or cast, data between different types. When we do this, the results may vary a bit due to how computers store and calculate numbers. So, it is always best to fully test any code that casts data between data types to make sure it works as expected.
To cast, we can simply place the new type in parentheses before the value in a statement:
This will convert the floating point value stored in x to an integer value stored in y.
The conditional statement, also known as the If-Then statement, is used to control the program’s flow by checking the value of a Boolean statement and determining if a block of code should be executed based on that value. This is the simplest conditional instruction. If the condition is true, the block enclosed within the statement is executed. If it is false, then the code in the block is skipped.
A more advanced conditional statement, the If-Then-Else or If-Else statement, includes two blocks. The first block will be executed if the Boolean statement is true. If the Boolean statement is false, then the second block of code will be executed instead.
Simple conditions are obtained by means of the relational operators, such as <, >, and ==, which allow you to compare two elements, such as two numbers, or a variable and a number, or two variables. Compound conditions are obtained by composing two or more simple conditions through the logical operators and &&, or ||, and not !.
Recall that the Boolean logic operators and &&, or ||, and not ! can be used to construct more complex Boolean logic statements.
For example, consider the statement x <= 5. This could be broken down into two statements, combined by the or || operation: x < 5 || x == 5. The table below, called a truth table, gives the result of the or operation based on the values of the two operands:
| Operand 1 | Operand 2 | Operand 1 or Operand 2 |
|---|---|---|
| False | False | False |
| False | True | True |
| True | False | True |
| True | True | True |
As shown above, the result of the or operation is true if at least one of the operands is true.
Likewise, to express the mathematical condition 3 < a < 5 we can use the logical operator and && by dividing the mathematical condition into two logical conditions: a > 3 && a < 5. The table below gives the result of the and operation based on the values of the two operands:
| Operand 1 | Operand 2 | Operand 1 or Operand 2 |
|---|---|---|
| False | False | False |
| False | True | False |
| True | False | False |
| True | True | True |
As shown above, the result of the and operation is true if both of the operands are true.
Finally, the not ! logical operator is used to reverse, or invert, the value of a Boolean statement. For example, we can express the logical statement x < 3 as !(x >= 3), using the not operator to invert the value of the statement. The table below gives the result of the not operation based on the value of its operand:
| Operand | not Operand |
|---|---|
| False | True |
| True | False |
In propositional logic, the completeness theorem shows that all other logical operators can be obtained by appropriately combining the and, or and not operators. So, by just understanding these three operators, we can construct any other Boolean logic statement.
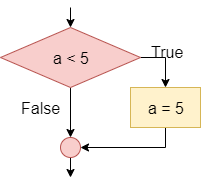
The table below lists the flowchart blocks used to represent conditional statements, as well as the corresponding pseudocode:
| Operation | Flowchart | Pseudocode |
|---|---|---|
| If-Then |

|
|
| If-Then-Else |

|
|
The mechanism for determining which block an If-Then-Else statement executes is the following:
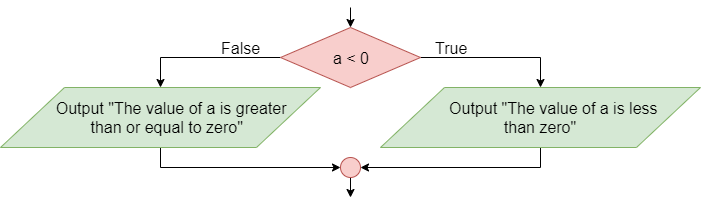
To understand how a conditional statement works, let’s look at this example of a simple If-Then-Else statement. Consider the following flowchart:

In this case, if a is less than zero, the output message will be “The value of a is less than zero”. Otherwise, if a is not less than zero (that is, if a is greater than or equal to zero), the output message will be “The value of a is greater than or equal to zero”.
We can also nest conditional statements together, making more complex programs.
Consider the following flowchart:
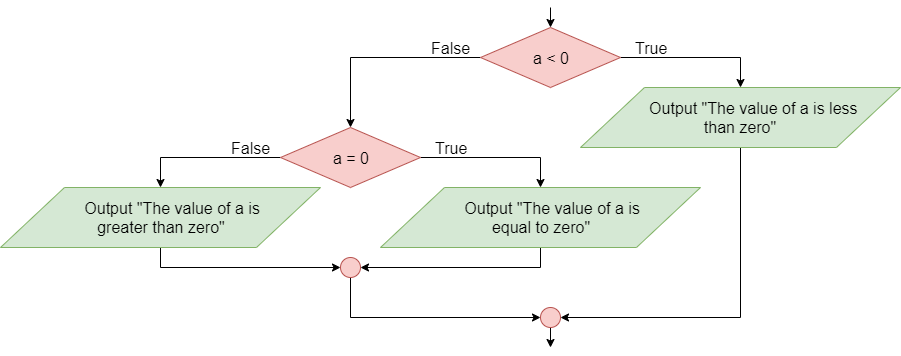
In this case, if a is less than zero the output message will be “The value of a is less than zero”. Otherwise (that is, if a is not less than zero so if a is greater than or equal to zero) the block checks whether a is equal to zero; if so, the output message will be “The value of a is equal to zero”. Otherwise (that is, if the first condition is false, i.e. a >= 0 and the second condition is false, i.e. is nonzero; the two conditions must be both true as if they were bound by a logical and, and they are the same as the condition a > 0) the output message will be “The value of a is greater than zero”.
To see how conditional statements look in Java, let’s recreate them from the flowcharts shown above.
As we can see in the examples above, we must use curly braces {} to separate each block of code. In addition, we typically indent the code inside of each block making it easier to read and follow.
Loops are another way we can control the flow of our program, this time by repeating steps based on a given criteria. A computer is able to repeat the same instructions many times. There are several ways to tell a computer to repeat a sequence of instructions:
while true. This construct is useful in software applications such as servers that will offer a service. The service is supposed to be available forever.Repeat 10 times or for i = 1 to 10. This loop can be used when you know the number of repetitions. There are also loops that allow you to repeat as many times as there are elements of a collection, such as for each item in listwhile loop, which repeats while the condition is true.In repeat while loops, the number of repetitions depends on the occurrence of a condition: the cycle repeats if the condition is true. Loops can also be nested, just like conditional statements.
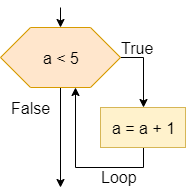
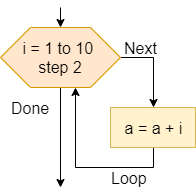
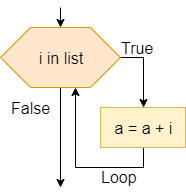
The table below lists the flowchart blocks used to represent loop statements, as well as the corresponding pseudocode:
| Operation | Flowchart | Pseudocode |
|---|---|---|
| While Loop |

|
|
| For Loop |
|
|
| For Loop with Step |

|
|
| For Each Loop |

|
|
To see how loops look in Java, let’s recreate them from the flowcharts shown above.
As we can see in the examples above, we must use curly braces {} to separate each block of code. In addition, we typically indent the code inside of each block making it easier to read and follow.
At this point, we’ve covered enough material to build a simple program. So, let’s see if we can complete the following example program before continuing.
Write a program that reads an integer from either the terminal, or a file if one is provided as a command-line argument. It should not worry about handling any exceptions encountered.
The program should compute and print the sum of all integers from 1 up to and including the integer provided as input, except those integers which are evenly divisible by 3. If the provided input is not a positive integer, the program should simply print 0.
Since we haven’t covered how to handle input yet, we can use the following skeleton code to help us build our program.
This code will create a Scanner variable called reader, and initialize it to either read from file provided as a command-line argument, or from the terminal if an argument is not provided. It will then read a single integer from the input, storing it in the variable x.
To complete this exercise, we can continue to write this program where the MORE CODE GOES HERE comment is in the skeleton code.
{Check It!|assessment}(code-output-compare-4282752777)
 ^[File:USPS Post office boxes 1.jpg. (2017, May 17). Wikimedia Commons, the free media repository. Retrieved 18:17, November 5, 2018 from https://commons.wikimedia.org/w/index.php?title=File:USPS_Post_office_boxes_1.jpg&oldid=244476438.]
Arrays allow us to store multiple values in the same variable, using an index to determine which value we wish to store or retrieve from the array. We can think of arrays like a set of post office boxes. Each one has the same physical address, the post office, but within the post office we can find an individual box based on its own box number.
Some programming languages, such as Java, use arrays that are statically sized when they are first created, and those arrays cannot be resized later. In addition, many languages that require variables to be declared with a type only allow a single variable type to be stored in an array.
Other languages, such as Python, use lists in place of arrays. List can be resized, and in untyped languages such as Python they can store different data types within the same list.
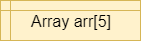
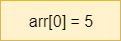
The table below lists the flowchart blocks used to represent arrays, as well as the corresponding pseudocode:
| Operation | Flowchart | Pseudocode |
|---|---|---|
| Declare Array |

|
|
| Store Item |

|
|
| Retrieve Item |
|
|
Let’s review the syntax for working with arrays in Java.
To declare an array in Java, we must give it a type, and a name, with square brackets [] included after the type:
Once the array is declared, we can initialize it using the new keyword, followed by the type and then the size in square brackets []:
Of course, we can combine these two statements in to a single statement as well:
Finally, if we already know the values which we want to store in the array, we can use a shortcut syntax to initialize the array and place those values directly within it:
Once the array is created, we can access individual items in the array by placing the index in square brackets [] after the array’s variable name:
Java arrays can also be created with multiple dimensions, simply by adding additional square brackets [] to represent and access items in each dimension:
There are several operations that can be performed on arrays in Java as well:
Finally, we can use a special form of loop, called an Enhanced For loop, to iterate through items in an array in Java:
Once important thing to note is that arrays accessed within an Enhanced For loop are read only. So, we cannot change the values stored in the array using this loop, but we can access them. If we want to change them, we should use a standard For loop to iterate through the indices of the array:
Variables in our programs can be used in a variety of different roles. The simplest role for any variable is to store a value that does not change throughout the entire program. Most variables, however, fit into one of several roles throughout the program.
To help us understand these roles, let’s review them in detail here. As we move forward in this course, we’ll see many different data structures that use variables in these ways, so it helps to know each of them early on!

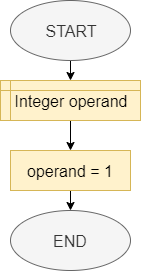
In this role, the variable is used to hold a value. This value can be changed during the program execution. In the example:
operand of type Integer is declared
In this role, variables are used to hold a sequence of values known beforehand. In the example, the variable counter holds values from 1 to 10 and these values are conveyed to the user.
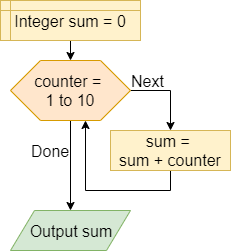
In this role, the variable is used to hold a value that aggregates, summarizes, and synthesize multiple values by means of an operation such as sum, product, mean, geometric mean, or median. In the example, we calculate the sum of the first ten numbers in the accumulator variable sum.
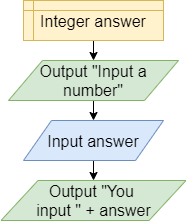
In this role, the variable answer contains the last value encountered so far in a data series, such as the last value that the program receives from the user.

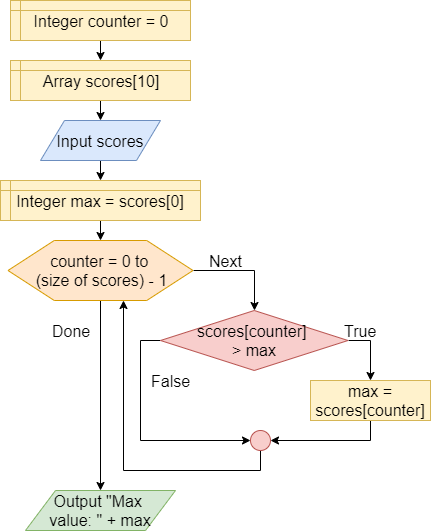
In this role, the variable contains the value that is most appropriate for the purpose of the program, e.g. the minimum or the maximum. The instruction scores[counter] > max checks if the list item under observation is greater than the maximum. If the condition is true the value of the maximum variable is changed.
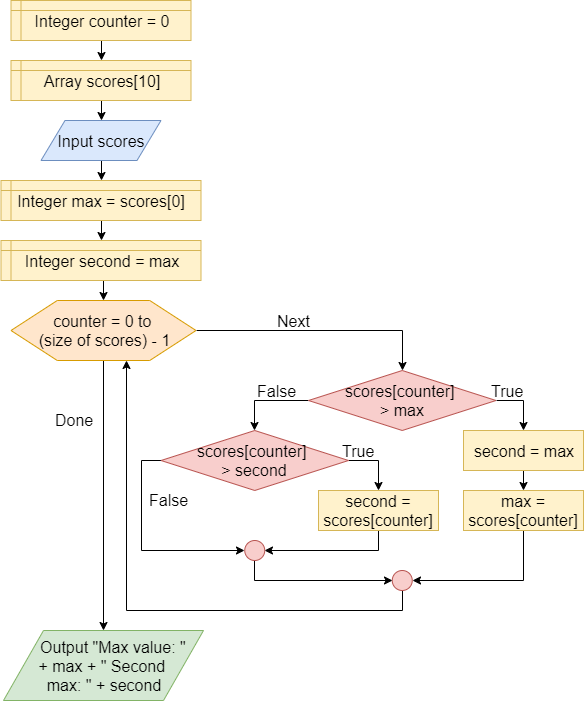
A variable, such as second, to which you assign the value of another variable that will be changed immediately after. In the example, the second variable contains the second largest value in a list.

A flag variable is used to report the occurrence or not of a particular condition, e.g. the occurrence of an error, the first execution, etc..

A variable used to hold a temporary value. For example, to exchange two variables, you must have a temporary variable temp to store a value before it is replaced.
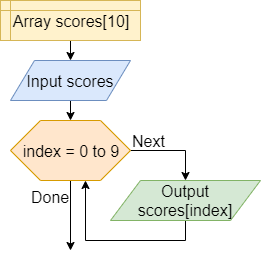
A variable used to indicate the position of the current item in a set of elements, such as the current item in an array of elements. The index variable here is a great example.
Strings are another very important data type in programming. A string is simply a set of characters that represent text in our programs. We can then write programs that use and manipulate strings in a variety of ways, allowing us to easily work with textual data.
The table below lists the flowchart blocks used to represent strings, as well as the corresponding pseudocode:
| Operation | Flowchart | Pseudocode |
|---|---|---|
| Create String |
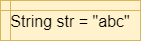
|
|
| Access Character |

|
|
| String Length |

|
|
Let’s review the syntax for working with strings in Java.
Strings in Java are declared just like any other variable:
Notice that strings are enclosed in double quotations marks ", whereas a single character is enclosed in single quotation marks:
There are several special characters we can include in our strings. Here are a few of the more common ones:
\' - Single Quotation Mark (usually not required)\" - Double Quotation Mark\n - New Line\t - TabMost of the time, we will need to be able to parse strings in order to read input from the user. This is easily done using the Scanner class in Java. Let’s refer to the skeleton code given in the earlier exercise:
This code will initialize a Scanner to read input from a file if one is provided as a command-line argument. Otherwise, input will be read from the terminal, or System.in in Java.
Once we have a Scanner initialized, we can use several methods to read data from the input:
We can find a list of all Scanner methods in the Java API Documentation
.
Finally, if we have read an entire string of input consisting of multiple parts, we can use the split method to split the string in to tokens that are separated by a special delimiter. When we do this, we’ll have to use special methods to convert the strings to other primitive data types. Here’s an example:
In this example, we are able to split the first string variable into $5$ parts, each one separated by a space in the original string. Then, we can use methods such as Integer.parseInt() to convert each individual string token into the desired data type.
When reading an unknown number of lines of input, we can use a loop in Java such as the following example:
This will read input until either a blank line is received (usually via the terminal), or there is no more input available to read (from a file).
There are also several operations we can perform on Strings in Java:
Additional methods can be found in the Java API Documentation
Strings can also be used to create formatted output in Java through the use of the format() method. Here’s a short example:
When we run this program, the output will be:
Each item in the formatted output can also be given additional attributes such as width and precision. More details can be found in the Java API Documentation
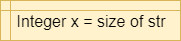
An exception is an error that a program encounters when it is running. While some errors cannot be dealt with directly by the program, many of these exceptions can be caught and handled directly in our programs.
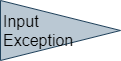
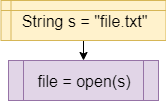
There isn’t really a standard way to display exceptions in flowcharts and pseudocode, but we can easily create a system that works well for our needs. Below are the flowchart blocks and pseudocode examples we’ll use in this course to represent exceptions and exception handling:
| Operation | Flowchart | Pseudocode |
|---|---|---|
| Throw Exception |

|
|
| Catch Exception |

|
|
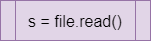
| Try-Catch Example |
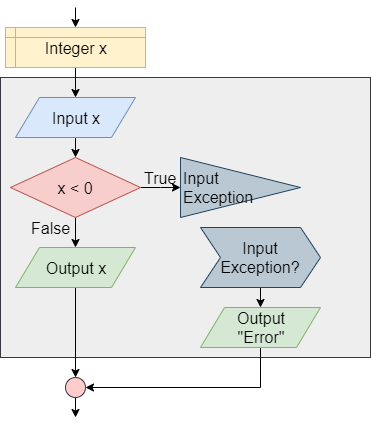
|
|
Let’s review the syntax for working with exceptions in Java.
In Java, we can use a Try-Catch statement to detect and handle exceptions in our code:
In this example, the program will try to open a file using the first command-line argument as a file name. There are several exceptions that could occur in this code, such as an ArrayIndexOutOfBoundsException, a FileNotFoundException, an IOException, and more. They can also be handled individually:
If desired, we can also throw our own exceptions in Java:
This will cause an exception to be thrown if the value of y is equal to $0.0$.
We can also add a Finally block at the end of each Try-Catch block. This code will be executed whenever the control exits the Try-Catch block, even through the use of a return statement to return from a method.
When working with resources such as files in Java, we can also use a Try with Resources block to ensure that those resources are properly closed when we are done with them. In addition, a Try with Resources block will automatically catch and suppress any exceptions that result from trying to close the resource after an exception has occurred, preventing us from being bombarded by unavoidable exceptions. Here’s an example:
In this example, we are opening a Scanner object within parentheses after a try keyword. That Scanner will automatically be closed once the program leaves the Try with Resources block where it is declared.
One of the major features of a modern computer is the ability to store and retrieve data from the computer’s file system. So, we need to be able to access the file system in our code in order to build useful programs. Thankfully, most modern programming languages include a way to do this.
Most operations working with files in code take the form of method calls. So, we will primarily use the call block to represent operations on files:
| Operation | Flowchart | Pseudocode |
|---|---|---|
| Open File |

|
|
| Read from File |

|
|
| Write to File |

|
|
Let’s review the syntax for working with files in Java.
To open a file in Java, we can use methods from the NIO library. Here is an example:
In this example, the program will try to open a file provided as the first command-line argument. If no argument is provided, it will automatically read from standard input instead. However, if an argument is provided, it uses Paths.get() to get a reference to that file and tries to open it. In addition, we can use a Try with Resources statement to make sure the file is properly closed once it is open.
Once we have opened the file, we can read the file just like we would any other input:
To write to a file, we must open it a different way. In Java, we can use a BufferedWriter to write data to a file:
This example shows to how to open a file for writing by creating a BufferedWriter object inside of a Try with Resources statement. It also lists several of the common exceptions and their cause.
It is important both to easily grasp the design choice and the code structure of a project even long after it has been completed. The documentation process starts by commenting the code. Code comments are usually intended for software developers and aim at clarifying the code by giving details of how it works. They are usually performed using inline or multiple lines comments using the language syntax.
As we’ve seen before, we can add single-line or inline comments to our Java programs using two forward slashes // before a line in our source file:
Java also includes the ability to add a comment that spans multiple lines, without requiring each line to be prefixed with forward slashes. Instead, we can use a forward slash followed by an asterisk /* to start a comment, and then an asterisk followed by a forward slash to end it */, as shown below:
Finally, Java also includes a secondary type of comment that spans multiple lines, specifically for creating documentation. Instead of a single asterisk, we use a double asterisk after the forward slash at the beginning /**, but the ending is the same as before */.
In addition, these comments typically include an asterisk at the beginning of each line, aligned with the first asterisk of the start of the comment. Thankfully, most code editors will do this for us automatically, including Codio!
These comments are specifically designed to provide information about classes and methods in our code. Here’s a quick example, using the IntTuple class developed earlier in this module:
Once we’ve written this documentation in our code, Java includes a special tool called Javadoc that will generate HTML files that describe what our code does. In fact, the Java API files, such as the one for Scanner , are generated using this tool!
For more information about writing comments for the Javadoc tool, as well as some great examples, consult the documentation .
To make your code easier to read, many textbooks and companies use a style guide that defines some of the formating rules that you should follow in your source code. However, this is a point of contention, and many folks disagree over what is the best format. These formatting rules do not affect the actual code itself, only how easy it is to read.
For this book, most of the examples will be presented in a variant of the K&R Style used by most Java developers, which places the opening brace on the same line as the declaration, but the closing brace is placed on a line by itself and indented at the same level as the declaration. The code inside will be indented by four spaces.
Google provides a comprehensive style guide that is recommended reading if you’d like to learn more about how to format your source code.
Codio also includes a special assessment that will validate the coding style of your code based on the Google style guide. Use the assessment below to make sure your solution to Exercise 1 meets the expected coding style standard.
–removed–
We will also be enforcing this style on many projects and assignments in this class, so it is very important to become familiar with proper coding style!
Let’s build another sample program to review the content we’ve covered thus far.
Write a program that accepts three files as command line arguments. The first two represent input files, and the third one represents the desired output file. If there aren’t three arguments provided, either input file is not an existing file, or the output file is an existing directory, print “Invalid Arguments” and exit the program. The output file may be an existing file, since it will be overwritten.
The program should open each input file and read the contents. Each input file will consist of a list of numbers, one per line. The numbers may be integers or floating point numbers. If there are any errors parsing the contents of either file, the program should print “Invalid Input” and exit. As the input is read, the program should keep track of both the count and sum of all positive and negative inputs.
Once all input is read, the program should open the output file and print the following four items, in this order, one per line: number of positive inputs, sum of positive inputs, number of negative inputs, sum of negative inputs.
Finally, when the program is done, it should simply print “Complete” to the terminal and exit. Don’t forget to close any open files! Your program must catch and handle all possible exceptions, printing either “Invalid Arguments” or “Invalid Input” as described above.
We can use any of the code examples on previous pages to help us complete this exercise.
This exercise uses a custom grading program to grade submissions, which will be used extensively throughout this course. The grading program will create two files in your work directory showing more detailed output. To open the HTML file as a webpage, right-click on it and select Preview Static. The log file may contain helpful debugging messages if your program experiences an unhandled exception.
{Check It!|assessment}(test-2449394732)
This page is the main page for Python
Let’s discuss some of the basic concepts we need to understand about the Python programming language.
To begin, let’s look at a simple Hello World program written in Python:
This program contains multiple important parts:
main(). Python does not require us to do this, since we can write our code directly in the file and it will execute. However, since we are going to be building larger programs in this course, it is a good idea to start using functions now.:, and then the code inside of that function comes directly after it. The code contained in the function must be indented a single level. By convention, Python files should use 4 spaces to indent the code. Thankfully, Codio does that for us automatically.main() function to run the program.Of course, this is a very brief overview for the Python programming language. To learn more, feel free to refer to the references listed below, as well as the textbook content for previous courses.
See if you can use the code above to write your own Hello World program in the HelloWorld.py file that is open to the left. We’ll learn how to compile and run that program on the next page.
Now that we’ve written our first Python program, we must run the program to see the fruits of our labors. There are many different ways to do this using the Codio platform. We’ll discuss each of them in detail here.
Codio includes a built-in Linux terminal, which allows us to perform actions directly on a command-line interface just like we would on an actual computer running Linux. We can access the Terminal in many ways:
Additionally, some pages may already open a terminal window for us in the left-hand pane, as this page so helpfully does. As we can see, we’re never very far away from a terminal.
No worries! We’ll give you everything you need to know to run your Python programs in this course.
If you’d like to learn a bit more about the Linux terminal and some of the basic commands, feel free to check out this great video on YouTube:
Let’s go to the terminal window and navigate to our program. When we first open the Terminal window, it should show us a prompt that looks somewhat like this one:
There is quite a bit of information there, but we’re interested in the last little bit of the last line, where it says ~/workspace. That is the current directory, or folder, our terminal is looking at, also known as our working directory. We can always find the full location of our working directory by typing the pwd command, short for “Print Working Directory,” in the terminal. Let’s try it now!
Enter this command in the terminal:
and we should see output similar to this:

In that output, we’ll see that the full path to our working directory is /home/codio/workspace. This is the default location for all of our content in Codio, and it’s where everything shown in the file tree to the far left is stored. When working in Codio, we’ll always want to store our work in this directory.
Next, let’s use the ls command, short for “LiSt,” to see a list of all of the items in that directory:

We should see a whole list of items appear in the terminal. Most of them are directories containing examples for the chapters this textbook, including the HelloWorld.py file that we edited in the last page. Thankfully, the directories are named in a very logical way, making it easy for us to find what we need. For example, to find the directory for Chapter 1 that contains examples for Python, look for the directory with the name starting with 1p. In this case, it would be 1p-hello.
Finally, we can use the cd command, short for “Change Directory,” to change the working directory. To change to the 1p-hello directory, type cd into the terminal window, followed by the name of that directory:

We are now in the 1p-hello directory, as we can see by observing the ~/workspace/1p-hello on the current line in the terminal. Finally, we can do the ls command again to see the files in that directory:

We should see our HelloWorld.py file! If it doesn’t appear, try using this command to get to the correct directory: cd /home/codio/workspace/1p-hello.
Once we’re at the point where we can see the HelloWorld.py file, we can move on to actually running the program.
To run it, we just need to type the following in the terminal:

That’s all there is to it! We’ve now successfully run our first Python program. Of course, we can run the program as many times as we want by repeating the previous python3 command. If we make changes to the HelloWorld.py file that instruct the computer to do something different, we should see those changes the next time we run the file..
If the python3 command doesn’t give you any output, or gives you an error message, that most likely means that your code has an error in it. Go back to the previous page and double-check that the contents of HelloWorld.py exactly match what is shown at the bottom of the page. You can also read the error message output by python3 to determine what might be going wrong in your file.
Also, make sure you use the python3 command and not just python. The python3 command references the newer Python 3 interpreter, while the python command is used for the older Python 2 interpreter. In this book, we’ll be using Python 3, so you’ll need to always make sure you use python3 when you run your code.
We’ll cover information about simple debugging steps on the next page as well. If you get stuck, now is a great time to go to Piazza and ask for assistance. You aren’t in this alone!
See if you can change the HelloWorld.py file to print out a different message. Once you’ve changed it, use the python3 command to run the file again. Make sure you see the correct output!
In many of the Codio projects and tutorials in this course, the Run Menu will be populated with helpful commands. The Run Menu can be found at the top of the screen, right here:

Each Codio project or tutorial may have different items in this menu, since they can be configured by the author of the project. For this book, there will always be the following options:
To use these commands, we must simply open up the file we’d like to use, then select the appropriate option from the Run Menu. It will automatically use the currently open file in the command.
So, to run our file, we must simply open HelloWorld.py in the panel to the left, then click the arrow in the Run Menu and select Python - Run File. It should open up a Terminal tab and show output similar to the following:

It looks very similar to the command we entered manually. The only difference is that it uses the folder name along with the filename in the command, which ensures that it gets the correct file without even opening that directory.
Make another change to the HelloWorld.py file, and then see if you can use the options in the Run Menu to run it. Make sure you see the correct output!
Last, but not least, many of the Codio tutorials and projects in this program will include assessments that we must solve by writing code. Codio can then automatically run the program and check for specific things, such as the correct output, in order to give us a grade. For most of these questions, we’ll be able to make changes to our code as many times as we’d like to get the correct answer. Try the example below!
{Check It!|assessment}(code-output-compare-1653086498)
As we can see, there are many different ways to compile and run our code using Codio. Feel free to use any of these methods throughout this course.
Codio also includes an integrated debugger, which is very helpful when we want to determine if there is an error in our code. We can also use the debugger to see what values are stored in each variable at any point in our program.
To use the debugger, find the Debug Menu at the top of the Codio window. It is to the right of the Run Menu we’ve already been using. On that menu, we should see an option for Python - Debug File. Select that option to run our program in the Codio debugger.
As we build more complex programs in this course, we’ll be able to configure our own debugger configurations that allow us to test multiple files and operations.
The Codio debugger only works with input from a file, not from the terminal. So, to use the debugger, we’ll need to make sure the input we’d like to test is stored in a file, such as [input.txt](open_file 1p-hello/input.txt), before debugging. We can then give that file as an argument to our program in our debugger configuration, and write our program to read input from a file if one is provided as an argument.
Learning how to use a debugger is a hands-on process, and is probably best described in a video. So, here are a couple of videos that should help us get up to speed on working in the Codio debugger.
Computational Core - Python Debugging Tutorial Codio Documentation - Debugging
We can always use the debugger to help us find problems in our code.
 ^[https://www.codio.com/blog/python-tutor-codio-visualizer]
Codio now includes support for Python Tutor , allowing us to visualize what is happening in our code. We can see that output in the second tab that is open to the left.
Unfortunately, students are not able to open the visualizer directly, so it must be configured by an instructor in the Codio lesson. If you find a page in this textbook where you’d like to be able to visualize your code, please post in Piazza and let us know!
A variable in a programming language is an abstraction that allows storing one value in each instant of time, but this value can change along with the program execution. A variable can be represented as a box holding a value. If the variable is a container, e.g., a list (or array or vector), a matrix, a tuple, or a set of values, each box in the container contains a single value.
A variable is characterized by:
results, number_of_nodes, number_of_edges. For writing variable names composed of two or more words in Python we can use underscores to separate the words.Depending on the programming language, we could also specify for a variable:
A programming language allows to perform two basic operations with a variable:
+, and subtraction -. They allow performing basic arithmetic operations with numbers.<, and greater than >. Usually, they allow to comparing two operands, each of which could be a variable. The result of the comparison is either the Boolean value true or the Boolean value false.and , or, and not. This operator allows us to relate logical conditions together to create more complex statements.+ to concatenate the strings “Hello” and the string “world” to produce the string “Hello world”. These operators allow us to manipulate strings.a = b.The table below lists the flowchart blocks used to represent variables, as well as the corresponding pseudocode:
| Operation | Flowchart | Pseudocode |
|---|---|---|
| Declare |

|
X = 0 |
| Assign |

|
X = 5 |
| Declare & Assign |
|
X = 5 |
Notice that variables must be assigned a value when declared in pseudocode. By default, most programming languages automatically assign the value $0$ to a new integer variable, so we’ll use that value in our pseudocode as well.
Likewise, variables in a flowchart are given a type, whereas variables in pseudocode are not. Instead, the data type of those variables can be inferred by the values stored in them.
Variables in Python are simply defined by giving them a value. The type of the variable in inferred from the data stored in it at any given time, and a variable’s type may change throughout the program as different values are assigned to it.
To define a variable, we can simply use an assignment statement to give it a value:
We can also convert, or cast, data between different types. When we do this, the results may vary a bit due to how computers store and calculate numbers. So, it is always best to fully test any code that casts data between data types to make sure it works as expected.
To cast, we can simply use the new type as a function and place the value to be converted in parentheses:
This will convert the floating point value stored in x to an integer value stored in y.
The conditional statement, also known as the If-Then statement, is used to control the program’s flow by checking the value of a Boolean statement and determining if a block of code should be executed based on that value. This is the simplest conditional instruction. If the condition is true, the block enclosed within the statement is executed. If it is false, then the code in the block is skipped.
A more advanced conditional statement, the If-Then-Else or If-Else statement, includes two blocks. The first block will be executed if the Boolean statement is true. If the Boolean statement is false, then the second block of code will be executed instead.
Simple conditions are obtained by means of the relational operators, such as <, >, and ==, which allow you to compare two elements, such as two numbers, or a variable and a number, or two variables. Compound conditions are obtained by composing two or more simple conditions through the logical operators and, or, and not.
Recall that the Boolean logic operators and, or, and not can be used to construct more complex Boolean logic statements.
For example, consider the statement x <= 5. This could be broken down into two statements, combined by the or operation: x < 5 or x == 5. The table below, called a truth table, gives the result of the or operation based on the values of the two operands:
| Operand 1 | Operand 2 | Operand 1 or Operand 2 |
|---|---|---|
| False | False | False |
| False | True | True |
| True | False | True |
| True | True | True |
As shown above, the result of the or operation is True if at least one of the operands is True.
Likewise, to express the mathematical condition 3 < a < 5 we can use the logical operator and by dividing the mathematical condition into two logical conditions: a > 3 and a < 5. The table below gives the result of the and operation based on the values of the two operands:
| Operand 1 | Operand 2 | Operand 1 or Operand 2 |
|---|---|---|
| False | False | False |
| False | True | False |
| True | False | False |
| True | True | True |
As shown above, the result of the and operation is True if both of the operands are True.
Finally, the not logical operator is used to reverse, or invert, the value of a Boolean statement. For example, we can express the logical statement x < 3 as not (x >= 3), using the not operator to invert the value of the statement. The table below gives the result of the not operation based on the value of its operand:
| Operand | not Operand |
|---|---|
| False | True |
| True | False |
In propositional logic, the completeness theorem shows that all other logical operators can be obtained by appropriately combining the and, or and not operators. So, by just understanding these three operators, we can construct any other Boolean logic statement.
The table below lists the flowchart blocks used to represent conditional statements, as well as the corresponding pseudocode:
| Operation | Flowchart | Pseudocode |
|---|---|---|
| If-Then |
|
|
| If-Then-Else |

|
|
The mechanism for determining which block an If-Then-Else statement executes is the following:
To understand how a conditional statement works, let’s look at this example of a simple If-Then-Else statement. Consider the following flowchart:
In this case, if a is less than zero, the output message will be “The value of a is less than zero”. Otherwise, if a is not less than zero (that is, if a is greater than or equal to zero), the output message will be “The value of a is greater than or equal to zero”.
We can also nest conditional statements together, making more complex programs.
Consider the following flowchart:

In this case, if a is less than zero the output message will be “The value of a is less than zero”. Otherwise (that is, if a is not less than zero so if a is greater than or equal to zero) the block checks whether a is equal to zero; if so, the output message will be “The value of a is equal to zero”. Otherwise (that is, if the first condition is false, i.e. a >= 0 and the second condition is false, i.e. is nonzero; the two conditions must be both true as if they were bound by a logical and, and they are the same as the condition a > 0) the output message will be “The value of a is greater than zero”.
To see how conditional statements look in Python, let’s recreate them from the flowcharts shown above.
As we can see in the examples above, we must carefully indent each block of code to help set it apart from the other parts of the program. In addition, each line containing if, elif and else must end in a colon :.
Loops are another way we can control the flow of our program, this time by repeating steps based on a given criteria. A computer is able to repeat the same instructions many times. There are several ways to tell a computer to repeat a sequence of instructions:
while true. This construct is useful in software applications such as servers that will offer a service. The service is supposed to be available forever.Repeat 10 times or for i = 1 to 10. This loop can be used when you know the number of repetitions. There are also loops that allow you to repeat as many times as there are elements of a collection, such as for each item in listwhile loop, which repeats while the condition is true.In repeat while loops, the number of repetitions depends on the occurrence of a condition: the cycle repeats if the condition is true. Loops can also be nested, just like conditional statements.
The table below lists the flowchart blocks used to represent loop statements, as well as the corresponding pseudocode:
| Operation | Flowchart | Pseudocode |
|---|---|---|
| While Loop |
|
|
| For Loop |

|
|
| For Loop with Step |
|
|
| For Each Loop |
|
|
To see how loops look in Python, let’s recreate them from the flowcharts shown above.
As we can see in the examples above, we must carefully indent each block of code to help set it apart from the other parts of the program. In addition, each line containing for and while must end in a colon :. Finally, notice that the range() function in Python does not include the second parameter in the output. So, to get the numbers $1$ through $10$, inclusive, we must use range(1, 11) in our code.
At this point, we’ve covered enough material to build a simple program. So, let’s see if we can complete the following example program before continuing.
Write a program that reads an integer from either the terminal, or a file if one is provided as a command-line argument. It should not worry about handling any exceptions encountered.
The program should compute and print the sum of all integers from 1 up to and including the integer provided as input, except those integers which are evenly divisible by 3. If the provided input is not a positive integer, the program should simply print 0.
Since we haven’t covered how to handle input yet, we can use the following skeleton code to help us build our program.
This code will create a Scanner variable called reader, and initialize it to either read from file provided as a command-line argument, or from the terminal if an argument is not provided. It will then read a single integer from the input, storing it in the variable x.
To complete this exercise, we can continue to write this program where the MORE CODE GOES HERE comment is in the skeleton code.
{Check It!|assessment}(code-output-compare-2708968079)
 ^[File:USPS Post office boxes 1.jpg. (2017, May 17). Wikimedia Commons, the free media repository. Retrieved 18:17, November 5, 2018 from https://commons.wikimedia.org/w/index.php?title=File:USPS_Post_office_boxes_1.jpg&oldid=244476438.]
Arrays allow us to store multiple values in the same variable, using an index to determine which value we wish to store or retrieve from the array. We can think of arrays like a set of post office boxes. Each one has the same physical address, the post office, but within the post office we can find an individual box based on its own box number.
Some programming languages, such as Java, use arrays that are statically sized when they are first created, and those arrays cannot be resized later. In addition, many languages that require variables to be declared with a type only allow a single variable type to be stored in an array.
Other languages, such as Python, use lists in place of arrays. List can be resized, and in untyped languages such as Python they can store different data types within the same list.
The table below lists the flowchart blocks used to represent arrays, as well as the corresponding pseudocode:
| Operation | Flowchart | Pseudocode |
|---|---|---|
| Declare Array |
|
|
| Store Item |
|
|
| Retrieve Item |

|
|
Let’s review the syntax for working with lists in Python.
To define a list in Python, we can simply place values inside of a set of square brackets [], separated by commas ,:
We can also create an empty list by simply omitting any items inside the square brackets
Once we’ve created a list in Python, we can add items to the end of the list using the append() method:
Once the list is created, we can access individual items in the list by placing the index in square brackets [] after the list’s variable name:
Python lists can also be created with multiple dimensions, simply by appending lists as elements in a base list.
They can also be created through the use of lists as individual elements in a list when it is defined:
To access elements in a multidimensional list, simply include additional sets of square brackets containing an index [] for each dimenison:
There are several operations that can be performed on lists in Python as well:
Finally, we can use a special form of loop, called a For Each loop, to iterate through items in a list in Python:
Once important thing to note is that lists accessed within a For Each loop are read only. So, we cannot change the values stored in the list using this loop, but we can access them. If we want to change them, we should use a standard For loop to iterate through the indices of the list:
Variables in our programs can be used in a variety of different roles. The simplest role for any variable is to store a value that does not change throughout the entire program. Most variables, however, fit into one of several roles throughout the program.
To help us understand these roles, let’s review them in detail here. As we move forward in this course, we’ll see many different data structures that use variables in these ways, so it helps to know each of them early on!
In this role, the variable is used to hold a value. This value can be changed during the program execution. In the example:
operand of type Integer is declared

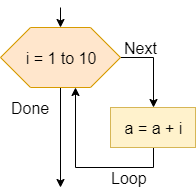
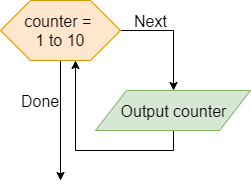
In this role, variables are used to hold a sequence of values known beforehand. In the example, the variable counter holds values from 1 to 10 and these values are conveyed to the user.

In this role, the variable is used to hold a value that aggregates, summarizes, and synthesize multiple values by means of an operation such as sum, product, mean, geometric mean, or median. In the example, we calculate the sum of the first ten numbers in the accumulator variable sum.

In this role, the variable answer contains the last value encountered so far in a data series, such as the last value that the program receives from the user.
In this role, the variable contains the value that is most appropriate for the purpose of the program, e.g. the minimum or the maximum. The instruction scores[counter] > max checks if the list item under observation is greater than the maximum. If the condition is true the value of the maximum variable is changed.

A variable, such as second, to which you assign the value of another variable that will be changed immediately after. In the example, the second variable contains the second largest value in a list.
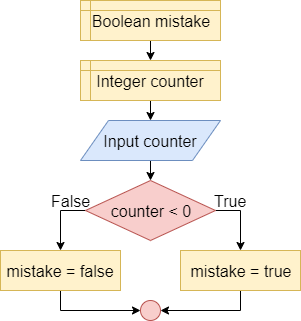
A flag variable is used to report the occurrence or not of a particular condition, e.g. the occurrence of an error, the first execution, etc..
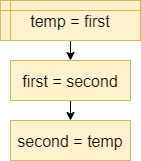
A variable used to hold a temporary value. For example, to exchange two variables, you must have a temporary variable temp to store a value before it is replaced.

A variable used to indicate the position of the current item in a set of elements, such as the current item in an array of elements. The index variable here is a great example.
Strings are another very important data type in programming. A string is simply a set of characters that represent text in our programs. We can then write programs that use and manipulate strings in a variety of ways, allowing us to easily work with textual data.
The table below lists the flowchart blocks used to represent strings, as well as the corresponding pseudocode:
| Operation | Flowchart | Pseudocode |
|---|---|---|
| Create String |

|
|
| Access Character |
|
|
| String Length |
|
|
Let’s review the syntax for working with strings in Python.
Strings in Python are declared just like any other variable:
Notice that strings are enclosed in double quotations marks ". Since Python does not have a data type for a single character, we can do the same for single character strings as well:
There are several special characters we can include in our strings. Here are a few of the more common ones:
\' - Single Quotation Mark (usually not required)\" - Double Quotation Mark\n - New Line\t - TabMost of the time, we will need to be able to parse strings in order to read input from the user. This is easily done using Python. Let’s refer to the skeleton code given in the earlier exercise:
This code will initialize a variable called reader to read input from a file if one is provided as a command-line argument. Otherwise, input will be read from the terminal, or sys.stdin in Python.
Once we have a reader initialized, we can read a line of data from the input as follows:
If we know that line will contain a single item of a different data type, such as an integer, we can also convert that input using the appropriate method:
Finally, if we have read an entire string of input consisting of multiple parts, we can use the split method to split the string in to tokens that are separated by a special delimiter. When we do this, we’ll have to use special methods to convert the strings to other primitive data types. Here’s an example:
In this example, we are able to split the first string variable into $5$ parts, each one separated by a space in the original string. Then, we can use methods such as int() to convert each individual string token into the desired data type.
When reading an unknown number of lines of input, we can use a loop in Python such as the following example:
This will read input until either a blank line is received (usually via the terminal), or there is no more input available to read (from a file).
There are also several operations we can perform on strings in Python:
Additional methods can be found on the Python Built-In Types: str and Python Common String Operations pages
Strings can also be used to create formatted output in Python through the use of the format() method. Here’s a short example:
When we run this program, the output will be:
Each item in the formatted output can also be given additional attributes such as width and precision. More details can be found on the Python Format String Syntax page.
An exception is an error that a program encounters when it is running. While some errors cannot be dealt with directly by the program, many of these exceptions can be caught and handled directly in our programs.
There isn’t really a standard way to display exceptions in flowcharts and pseudocode, but we can easily create a system that works well for our needs. Below are the flowchart blocks and pseudocode examples we’ll use in this course to represent exceptions and exception handling:
| Operation | Flowchart | Pseudocode |
|---|---|---|
| Throw Exception |
|
|
| Catch Exception |

|
|
| Try-Catch Example |

|
|
Let’s review the syntax for working with exceptions in Python.
In Python, we can use a Try-Except statement to detect and handle exceptions in our code:
In this example, the program will try to open a file using the first command-line argument as a file name. There are several exceptions that could occur in this code, such as a ValueError, a IndexError, a FileNotFoundError, and more. They can also be handled individually:
If desired, we can also raise our own exceptions in Python:
This will cause an exception to be thrown if the value of y is equal to $0.0$.
We can also add Else and Finally blocks at the end of each Try-Except block. A Finally block will be executed whenever the control exits the Try-Except block, even through the use of a return statement to return from a method. The Else block will be executed if the entire Try-Except block completes without any exceptions being raised:
When working with resources such as files in Python, we can also use a With block to ensure that those resources are properly closed when we are done with them. In addition, a With block will automatically catch and suppress any exceptions that result from trying to close the resource after an exception has occurred, preventing us from being bombarded by unavoidable exceptions. Here’s an example:
In this example, we are opening a file using the open() method inside of the With statement. That file will automatically be closed once the program leaves the With statement.
One of the major features of a modern computer is the ability to store and retrieve data from the computer’s file system. So, we need to be able to access the file system in our code in order to build useful programs. Thankfully, most modern programming languages include a way to do this.
Most operations working with files in code take the form of method calls. So, we will primarily use the call block to represent operations on files:
| Operation | Flowchart | Pseudocode |
|---|---|---|
| Open File |
|
|
| Read from File |
|
|
| Write to File |

|
|
Let’s review the syntax for working with files in Python.
To open a file in Python, we can simply use the open() method. Here is an example:
In this example, the program will try to open a file provided as the first command-line argument. If no argument is provided, it will automatically read from standard input instead. However, if an argument is provided, it will try to open it as a file. In addition, we can use a With statement to make sure the file is properly closed once it is open.
Once we have opened the file, we can read the file just like we would any other input:
To write to a file, we must open it a different way. In Python, we must provide an optional "w" argument to the open() method call to make the file writable:
This example shows to how to open a file for writing using the open() method inside of a With statement. It also lists several of the common exceptions and their cause.
It is important both to easily grasp the design choice and the code structure of a project even long after it has been completed. The documentation process starts by commenting the code. Code comments are usually intended for software developers and aim at clarifying the code by giving details of how it works. They are usually performed using inline or multiple lines comments using the language syntax.
As we’ve seen before, we can add single-line comments to our Python programs using a hash symbol # before a line in our source file:
Finally, Python also includes a secondary type of comment that spans multiple lines, specifically for creating documentation. A docstring is usually the first line of text inside of a class or method definition, and is surrounded by three double quotes """ with one set of three on each end.
These comments are specifically designed to provide information about classes and methods in our code. Here’s a quick example using a simple class:
Unfortunately, Python does not enforce a particular style for these docstrings, so there are many different formats used in practice. To learn more, we can consult the following references.
To make your code easier to read, many textbooks and companies use a style guide that defines some of the formating rules that you should follow in your source code. In Python, these rules are very important, as the structure of your code is defined by the layout. We’ll learn more about that in a later module.
For this book, most of the examples will be presented using the guidelines in the Style Guide for Python . However, by default Codio used to use 2 spaces for an indentation level instead of 4, so that is the format that will be used in some examples in this book.
Google also provides a comprehensive style guide that is recommended reading if you’d like to learn more about how to format your source code.
Codio also includes a special assessment that will validate the coding style of your code based on the Google style guide. Use the assessment below to make sure your solution to Exercise 1 meets the expected coding style standard.
–removed–
We will also be enforcing this style on many projects and assignments in this class, so it is very important to become familiar with proper coding style!
Let’s build another sample program to review the content we’ve covered thus far.
Write a program that accepts three files as command line arguments. The first two represent input files, and the third one represents the desired output file. If there aren’t three arguments provided, either input file is not an existing file, or the output file is an existing directory, print “Invalid Arguments” and exit the program. The output file may be an existing file, since it will be overwritten.
The program should open each input file and read the contents. Each input file will consist of a list of numbers, one per line. The numbers may be integers or floating point numbers. If there are any errors parsing the contents of either file, the program should print “Invalid Input” and exit. As the input is read, the program should keep track of both the count and sum of all positive and negative inputs.
Once all input is read, the program should open the output file and print the following four items, in this order, one per line: number of positive inputs, sum of positive inputs, number of negative inputs, sum of negative inputs.
Finally, when the program is done, it should simply print “Complete” to the terminal and exit. Don’t forget to close any open files! Your program must catch and handle all possible exceptions, printing either “Invalid Arguments” or “Invalid Input” as described above.
We can use any of the code examples on previous pages to help us complete this exercise.
This exercise uses a custom grading program to grade submissions, which will be used extensively throughout this course. The grading program will create two files in your work directory showing more detailed output. To open the HTML file as a webpage, right-click on it and select Preview Static. The log file may contain helpful debugging messages if your program experiences an unhandled exception.
{Check It!|assessment}(test-3534615650)
That’s a quick overview of the basics we’ll need to know before starting the new content in this course. The next module will provide a quick review of object-oriented programming concepts as well as the model-view-controller or MVC architecture, both of which will be used heavily in this course.