Welcome!
This page is the main page for Review Object Oriented Programming
This page is the main page for Review Object Oriented Programming
 ^[File:CPT-OOP-inheritance.svg. (2014, June 26). Wikimedia Commons, the free media repository. Retrieved 01:22, January 14, 2020 from https://commons.wikimedia.org/w/index.php?title=File:CPT-OOP-inheritance.svg&oldid=127549650.]
Object-oriented programming uses the idea of objects and classes to provide many improvements over other programming paradigms. The key concept of object-oriented programming - encapsulation - allows our data and the operations that manipulate that data to be bundled together within a single object.
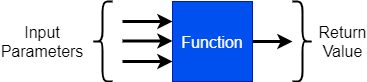
Functions are small pieces of reusable code that allow you to divide complex programs into smaller subprograms. Ideally, functions perform a single task and return a single value. (It should be noted that some programming languages allow for procedures, which are similar to functions but return no values. Except for the return value, it is safe to group them with functions in our discussion below.)
Functions can be thought of as black boxes. When we talk about black boxes we mean that users cannot look inside the box to see how it actually works. A good example of a black box is a soda machine. We all use them and know how to operate them, but very few of actually know how they work inside. Nor do we really want to know. We are happy to simply use them machine and have it give a nice cold soda when we are thirst!
To be able to reuse functions easily, it is important to define what a function does and how it should be called.
Before we can call a function, we must know the function’s signature. A function’s signature includes the following.
While a signature will allow us to actually call the function in code. Of course to use functions effectively, we must also know exactly what the function is supposed to do. We will talk more about how we do this in the next module on programming by contract. For now we can assume that we just have a good description of what the function does.
While we do not need to know exactly how a function actually performs its task, the algorithm used to implement the function is vitally important as well. We will spend a significant amount of time in this course designing such algorithms.
The lifecycle of a function is as follows.
When the function is called, the arguments, or actual parameters, are copied to the function’s formal parameters and program execution jumps from the “call” statement to the function. When the function finishes execution, execution resumes at the statement following the “call” statement.
In general, parameters are passed to functions by value, which means that the value of the calling program’s actual parameter is copied into the function’s formal parameter. This allows the function to modify the value of the formal parameter without affecting the actual parameter in the calling program.
However, when passing complex data structures such as objects, the parameters are passed by reference instead of by value. In this case, a pointer to the parameter is passed instead of a copy of the parameter value. By passing a pointer to the parameter, this allows the function to actually make changes to the calling program’s actual parameter.
As you might guess from its name, object-oriented programming languages are made to create and manipulate entities called objects. But what exactly are these objects? Objects were created to help decompose large complex programs with a lot of complex data into manageable parts.
An object is a programming entity that contains related data and behavior.
A good example of an object is dog. But not just any dog, or all dogs, but a specific dog. Each dog has specific characteristics that are captured as data such as their name, their height, their weight, their breed, their age, etc. We call these characteristics attributes and all dogs have the same type of attributes, although the values of those attributes may be unique. And generally, all dogs exhibit the same behaviors, or methods. Almost all dogs can walk, run, bark, eat, etc.
So, how do we define the basic attributes and behaviors of a dog? We probably start with some kind of idea of what a dog is. How do we describe dogs in general. In object orientation we do that through classes.
A class is a blueprint for an object.
What do we use blueprints for? Well, when we are building a physical structure such as a home or office building, an architect first creates a blueprint that tells the builder what to build and how everything should fit together. That is essentially what a class does. A class describes the types of attributes and methods that an object of that class will have.
Then to create objects, we say we create an instance of a class by calling the class’s constructor method, which creates an object instance in memory and makes sure it’s attributes are properly created. Once the object has been created, the methods defined by the class can be used to manipulate the attributes and internal data of the object.
Two of the most powerful concepts in object orientation are encapsulation and information hiding.
Encapsulation enables information hiding, and information hiding allows us to simplify the interface used to interact with an object. Instead of needing to know everything about a particular class of objects in order to use or interact with those objects. This will make our programs less complex and easier to implement and test. It also makes it easier for you to change the internal implementations of methods without affecting the rest of your program. As long as the method behaves in the same way (i.e., produces the same outputs given a given set of inputs), the rest of your program will not be affected. Thus, we see two key parts of any class:
Encapsulation and information hiding are actually all around us. Take for example, a soda vending machine. There are many internal parts to the machine. However, as a user, we care little about how the machine works or what it does inside. We need to simply know how to insert money or swipe our card and press a couple of buttons to get the soda we desire. If a repair is needed and an internal motor is replaced, we don’t care whether they replaced the motor with the exact same type of motor or the new model. As long as we can still get our soda by manipulating the same payment mechanisms and buttons, we are happy. You and I care only about the interface to the machine, not the implementation hiding inside.
To implement information hiding in our classes, we use visibility. In general, attributes and methods can either be public or private. If we want and attribute or method to be part of the class interface, we define them as public. If we want to hide a attribute or method from external objects, we defined them as private. An external object may access public attributes and call public methods, which is similar to using the payment mechanism or the buttons on a soda machine. However, the internals of how the object works is hidden by private attributes and methods, which are equivalent to the internal workings of the soda machine.
To implement information hiding, we recommend that you declare all attributes of a class as private. Any attribute whose value should be able to be read or changed by an external object should create special “getter” and “setter” methods that access those private variables. This way, you can make changes to the implementation of the attributes without changing how it is accessed in the external object.
Polymorphsim is a concept that describes the fact that similar objects tend to behave in similar ways, even if they are not exactly alike. For example, if we might have a set of shapes such as a square, a circle, and a rhombus. While each shape shares certain attributes like having an area and a perimeter. However, each shape is also unique and may have differing number of sides and angles between those sides, or in the case of a circle, a diameter. We describe this relationship by saying a circle (or rectangle, or rhombus) “is a” shape as shown in the figure below.

Inheritance is a mechanism that captures polymorphism by allowing classes to inherit the methods and attributes from another class. The basic purpose of inheritance to to reuse code in a principled and organized manner. We generally call the inheriting class the subclass or child class, while the class it inherits from is called the superclass or parent class.
Basically, when class ‘A’ inherits from class ‘B’, all the methods and attributes of class ‘A’ are automatically copied to class ‘B’. Class ‘B’ can then add additional methods or attributes to extend class ‘A’, or overwrite the implementations of methods in class ‘A’ to specialize it.
When programming, we use inheritance to implement polymorphism. In our shape example, we would have a generic (or abstract) Shape class, which is inherited by a set of more specific shape classes (or specializations) as shown below.
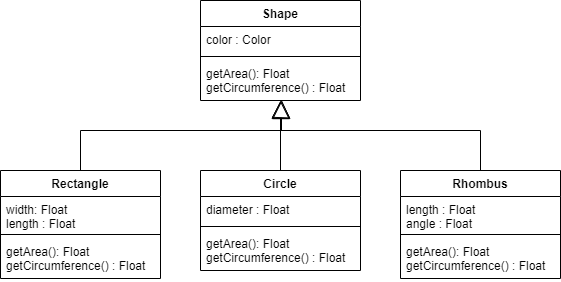
In this example, the Shape class defines the ‘color’ attribute and the ‘getArea’ and ‘getCircumference’ methods, which are inherited by the Rectangle, Circle, and Rhombus classes. Each of the subclasses define additional attributes that are unique to the definition of each shape type.
Notice that although the Shape class defines the signatures for the ‘getArea’ and ‘getCircumference’ methods, it cannot define the implementation of the methods, since this is unique to each subclass shape. Thus, each subclass shape will specialize the Shape class by implementing their own ‘getArea’ and ‘getCircumference’ methods.
So far, we have discussed Single inheritance, which occurs when a class has only one superclass. However, theoretically, a class may inherit from more than one superclass, which is termed multiple inheritance. While a powerful mechanism, multiple inheritance also introduces complexity into understanding and implementing programs. And, there is always the possibility that attributes and methods from the various superclasses contradict each other in the subclass.
For object ‘a’ to be able to call a method in object ‘b’, object ‘a’ must have a reference (a pointer, or the address of) object ‘b’. In many cases, objects ‘a’ and ‘b’ will be in a long-term relationship so that one or both objects will need to store the reference to the other in an attribute. When an object holds a reference to another object in an attribute, we call this a link. Examples of such relationships include a driver owning a car, a person living at an address, or a worker being employed by a company.
As we discussed earlier, objects are instances of classes. To represent this in a UML class diagram, we use the notion of an association, which is shown as a line connecting to two classes. More precisely, a link is an instance of an association. The figure belows shows three examples of an association between class ‘A’ and class ‘B’.

The top example shows the basic layout of an association in UML. The line between the two classes denotes the association itself. The diagram specifies that ‘ClassA’ is associated with ‘ClassB’ and vice versa. We can name the association as well as place multiplicities on the relationships. The multiplicities show exactly how many links an object of one class must have to objects of the associated class. The general form a multiplicity is ’n .. m’, which means that an object must store at least ’n’, but no more than ’m’ references to other objects of the associated class; if only one number is given such as ’n’, then the object must store exactly ’n’ references to objects in the associated class.
There are two basic types of associations.
The middle example shows a two-way association between ‘ClassA’ and ‘ClassB’. Furthermore, each object of ‘ClassA’ must have a link to exactly three objects of ‘ClassB’, while each ‘ClassB’ object must have a link with exactly one ‘ClassA’ object. (Note that the multiplicity that constrains ‘ClassA’ is located next to ‘ClassB’, while the multiplicity that constrains ‘ClassB’ is located next to ‘ClassA’.)
The bottom example shows a one-way association between ‘ClassA’ and ‘ClassB’. In this case, ‘ClassA’ must have links to either zero or one objects of ‘ClassB’. Since it is a one-way association, ‘ClassB’ will have no links to objects of ‘ClassA’.
This page is the main page for Java
In Java, each piece of code is broken down into functions, which are individual routines that we can call in our code. Let’s review how to create functions in Java.
The table below lists the flowchart blocks used to represent functions, as well as the corresponding pseudocode:
| Operation | Flowchart | Pseudocode |
|---|---|---|
| Declare Function |

|
|
| Call Function |

|
|
In general, a function declaration in Java needs a few elements. Let’s start at the simplest case:
static void foo(){
  System.out.println("Foo");
  return;
}
Let’s break this example function declaration down to see how it works:
static at the beginning of this function declaration. That keyword allows us to use this function without creating an object first. We’ll cover how to create and work with objects in a later module. For now, each function we create will need the static keyword in front of it, just like the main() function.void, determines the type of data returned by the function. We use a special keyword void when the function does not return a value. We’ve already seen this keyword used in our declaration of the main function.foo. We can name a function using any valid identifier in Java. In general, function names in Java always start with a lowercase letter.() that list the parameters for this function. Since there is nothing included in this example, the function foo does not require any parameters.{} that surround the code of the function itself. In this case, the function will simply print Foo to the terminal.return keyword. Since we aren’t returning a value, we aren’t required to include a return keyword in the function. However, it is helpful to know that we may use that keyword to exit the function at any time.Once that function is created, we can call it using the following code:
foo();In a more complex case, we can declare a function that accepts parameters and returns a value, as in this example:
static int countLetters(String input, char letter){
    int output = 0;
    for(int i = 0; i < input.length(); i++){
        if(input.charAt(i) == letter){
            output++;
        }
    }
    return output;
}
In this example, the function accepts two parameters: input, which is a string, and letter, which is a character. It also declares that it will return an int value.
We can use the parameters just like any other variable in our code. To return a value, we use the return keyword, followed by the value or variable containing the value we’d like to return.
To call a function that requires parameters, we can include values as arguments in the parentheses of the function call:
sum += countLetters("The quick brown fox jumped over the lazy dog", 'e');Java allows us to create multiple functions using the same name, or identifier, as long as they have different parameters. This could include a different number of parameters, different data types for each parameter, or a different ordering of types. The names of the parameters, however, does not matter here. This is called function overloading.
For example, we could create a function named max() that could take either two or three parameters:
public class Overloading{
  public static void main(String[] args){
    max(2, 3);
    max(3, 4, 5);
  }

  static void max(int x, int y){
    if(x >= y){
      System.out.println(x);
    }else{
      System.out.println(y);
    }
  }

  static void max(int x, int y, int z){
    if(x >= y){
      if(x >= z){
        System.out.println(x);
      }else{
        System.out.println(z);
      }
    }else{
      if(y >= z){
        System.out.println(y);
      }else{
        System.out.println(z);
      }
    }
  }
}
In this example, we have two functions named max(), one that requires two parameters, and another that requires three. When Java sees a function call to max() elsewhere in the code, it will look at the number and types of arguments provided, and use that information to determine which version of max() it should use.
Of course, we could just use the three argument version of max() in both cases:
public class Overloading{
  public static void main(String[] args){
    max(2, 3);
    max(3, 4, 5);
  }

  static void max(int x, int y){
    max(x, y, y);
  }

  static void max(int x, int y, int z){
    if(x >= y){
      if(x >= z){
        System.out.println(x);
      }else{
        System.out.println(z);
      }
    }else{
      if(y >= z){
        System.out.println(y);
      }else{
        System.out.println(z);
      }
    }
  }
}
In this case, we are calling the three parameter version of max() from within the two parameter version. In effect, this allows us to define default parameters for functions such as this. If we only provide two arguments, the code will automatically call the three parameter version, filling in the third argument for us.
Unfortunately, Java does not support any other way of defining default parameters, but we can use function overloading to achieve something similar, as demonstrated above.
Finally, Java allows us to define a single parameter that is a variable length parameter. In essence, it will allow us to accept anywhere from 0 to many arguments for that single parameter, which will then be stored in an array. Let’s look at an example:
public class Overloading{
  public static void main(String[] args){
    max(2, 3);
    max(3, 4, 5);
    max(5, 6, 7, 8);
    max(10, 11, 12, 13, 14, 15, 16);
  }

  static void max(int ... values){
    if(values.length > 0){
      int max = values[0];
      for(int i : values){
        if(i > max){
          max = i;
        }
      }
      System.out.println(max);
    }
  }
}
Here, we have defined a function named max() that accepts a single variable length parameter. To show a parameter is variable length we use three periods ... between the type and the variable name. We must respect three rules when creating a variable length parameter:
So, when we run this program, we see that we can call the max() function with any number of integer arguments, and it will be able to determine the maximum of those values. Inside of the function itself, values can be treated just like an array of integers.
Before we learn about classes and objects, let’s do a quick exercise to review how to create and use functions in our code.
Write a program that accepts input from a file provided as a command-line argument. If an incorrect number of arguments are provided, or if the program is unable to open the file, it should print “Invalid Arguments” and terminate.
The program’s input will consist of a list of 100 integers, one per line. If any line of the input cannot be converted to an integer, the program should print “Invalid Input” and terminate.
The program should determine whether the list of integers is considered a mathematical set. That is, each item in the list should be unique, with no duplicate numbers. If the input is not a set, it should print “Not a set” and terminate.
If the input is a set, then the program should print the sum of the values in the set and then terminate.
This program should consist of three functions:
main(args)- The main function that controls the program. It should accept an array of strings representing the command-line arguments to the program.isSet(int[] numbers)- A function to determine if the given array is a set. The input should be a single array of integers, and the return value should be a Boolean value.sumSet(int[] numbers)- A function to find the sum of all the elements in the given array. The input should be a single array of integers, and the return value should be an integer.
There may be easier ways of determining if an array contains duplicate items, but could we simply check that, for each item, there is only one of that item in the list?
This exercise uses a custom grading program to grade submissions, which will be used extensively throughout this course. The first step of the grading process will examine the structure of your code, making sure that it contains the correct classes and functions. The second step will directly examine each function in the program, making sure that they operate as expected. You are welcome to include any additional code to complete the project that is not specified above.
Each step of the grading process will create two files in your work directory showing more detailed output. To open the HTML file as a webpage, right-click on it and select Preview Static. The log file may contain helpful debugging messages if your program experiences an unhandled exception.
{Check It!|assessment}(test-500463119)
{Check It!|assessment}(test-2806204399)
import java.util.Scanner;
import java.nio.file.Files;
import java.nio.file.Paths;
import java.nio.file.InvalidPathException;
import java.nio.file.NoSuchFileException;
import java.io.BufferedWriter;
import java.io.IOException;
import java.lang.NumberFormatException;

public class Functions{
    public static void main(String[] args){
        if(args.length != 1){
            System.out.println("Invalid Arguments");
            return;
        }

        try(
            Scanner scanner1 = new Scanner(Paths.get(args[0]));
        ){
            int[] nums = new int[100];
            int i = 0;
            while(scanner1.hasNext()){
                String line = scanner1.nextLine().trim();
                int input = Integer.parseInt(line);
                nums[i++] = input;
            }

            if(isSet(nums)){
                System.out.println(sumSet(nums));
            }else{
                System.out.println("Not a set");
            }

        }catch(InvalidPathException e){
            System.out.println("Invalid Arguments");
            return;
        }catch(NoSuchFileException e){
            System.out.println("Invalid Arguments");
            return;
        }catch(IOException e){
            System.out.println("Invalid Arguments");
            return;
        }catch(NumberFormatException e){
            System.out.println("Invalid Input");
            return;
        }
    }

    static boolean isSet(int[] nums){
        for(int i : nums){
            int count = 0;
            for(int j : nums){
                if(i == j){
                    count++;
                }
            }
            if(count > 1){
                return false;
            }
        }
        return true;
    }

    static int sumSet(int[] nums){
        int sum = 0;
        for(int i : nums){
            sum += i;
        }
        return sum;
    }
}In programming, a class describes an individual entity or part of the program. In many cases, the class can be used to describe an actual thing, such as a person, a vehicle, or a game board, or a more abstract thing such as a set of rules for a game, or even an artificial intelligence engine for making business decisions.
In object-oriented programming, a class is the basic building block of a larger program. Typically each part of the program is contained within a class, representing either the main logic of the program or the individual entities or things that the program will use.
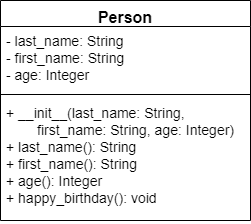
We can represent the contents of a class in a UML Class Diagram. Below is an example of a class called Person:
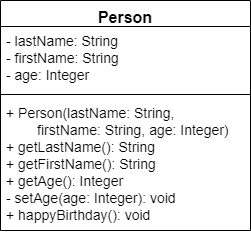
Throughout the next few pages, we will realize the design of this class in code.
To create a class in Java, we can simply use the class keyword at the beginning of our file:
public class Person{

}
As we’ve already learned, each class declaration in Java includes these parts:
public - this keyword is used to identify that the item after it should be publicly accessible to all other parts of the program. Later in this chapter, we’ll discuss other keywords that could be used here.class - this keyword says that we are declaring a new class.Person - this is an identifier that gives us the name of the class we are declaring.Following the declaration, we see a set of curly braces {}, inside of which will be all of the fields and methods stored in this class.
According to the Java standards, this class must be stored in a file called Person.java.
Of course, our classes are not very useful at this point because they don’t include any attributes or methods. Including attributes in a class is one of the simplest uses of classes, so let’s start there.

To add an attribute to a class, we can simply declare a variable inside of our class declaration:
public class Person{
    String lastName;
    String firstName;
    int age;
}
That’s really all there is to it! We can also add default values to these attributes by assigning a value to the variable in the same line as the declaration:
public class Person{
    String lastName = "Person";
    String firstName = "Test";
    int age = 25;
}
However, it is very important to note that we cannot declare an attribute and then set the default value on a separate line. So, code such as this is not allowed:
Finally, we can add either the public keyword to the beginning of each of these attributes to make them available to code outside of this class, or the private keyword to prevent other code from accessing those attributes directly. We denote this by adding a + in front of the attribute in our UML diagram for public attributes, and a - for private attributes. In the diagram above, each attribute is private, so we’ll do that in our code:
public class Person{
    private String lastName;
    private String firstName ;
    private int age;
}We can also add methods to our classes. These methods are used either to modify the attributes of the class or to perform actions based on the attributes stored in the class. Finally, we can even use those methods to perform actions on data provided as arguments. In essence, the sky is the limit with methods in classes, so we’ll be able to do just about anything we need to do in these methods. Let’s see how we can add methods to our classes.

To add a method to our class, we can simply add a function declaration inside of our class. In fact, all of the functions we’ve been creating up to this point have been inside of a class. The only difference is that we’ll now be able to remove the static keyword from our function declarations. We’ll discuss more about exactly what that keyword does later in this chapter.
public class Person{
    private String lastName;
    private String firstName ;
    private int age;

    public String getLastName(){ return this.lastName; }
    public String getFirstName(){ return this.firstName; }
    public int getAge(){ return this.age; }
    private void setAge(int age){ this.age = age; }

    public void happyBirthday(){
        this.setAge(this.getAge() + 1);
    }

}
In this example, the first four methods are getter and setter methods. We have three public getter methods that allow us to access the values stored in our private attributes in a read-only way. In addition, we have created a private setter method for the age attribute. This isn’t technically required, since we can always just change it directly from within our code, but it is a good practice to include one.
Lastly, we have created a happyBirthday() method that uses getters and setters to update the person’s age by 1 year.
We’ve already discussed variable scope earlier in this course. Recall that variables declared inside of a block are not accessible outside of the block. Similarly, two different functions may reuse variable names, because they are in different scopes.
The same applies to classes. A class may have an attribute named age, but a method inside of the class may also declare a local variable named age. Therefore, we must be careful to make sure that we access the correct variable, usually by using the this keyword to access the attribute variable. Here’s a short example:
public class Test{
  int age = 15;

  void foo(){
    int age = 12;
    System.out.println(age);      // 12
    System.out.println(this.age); // 15
  }

  void bar(){
    System.out.println(age); // 15
  }
}
As we can see, in the method foo() we must be careful to use this.age to refer to the attribute, since there is another variable named age declared in that method. However, in the method bar() we see that age automatically references the attribute, since there is no other variable named age defined in that scope.
This can lead to some confusion in our code. So, we should always get in the habit of using this to refer to any attributes, just to avoid any unintended problems later on.
A constructor is a special method that is called whenever a new instance of a class is created. It is used to set the initial values of attributes in the class. We can even accept parameters as part of a constructor, and then use those parameters to populate attributes in the class.
Let’s go back to the Person class example we’ve been working on and add a simple constructor to that class
public class Person{
    private String lastName;
    private String firstName ;
    private int age;

    public String getLastName(){ return this.lastName; }
    public String getFirstName(){ return this.firstName; }
    public int getAge(){ return this.age; }
    private void setAge(int age){ this.age = age; }

    public Person(String lastName, String firstName, int age){
        this.lastName = lastName;
        this.firstName = firstName;
        this.age = age;
    }

    public void happyBirthday(){
        this.setAge(this.getAge() + 1);
    }

}
Inside that constructor, notice that we use each parameter to set the corresponding attribute, using the this keyword once again to refer to the current object.
Now that we have fully constructed our class, we can use it elsewhere in our code through the process of instantiation. In Java, we use the new keyword to create a new instance of class, which calls the constructor, and then we can use dot-notation to access any attributes or methods inside of that object.
Person john = new Person("Smith", "John", 25);
System.out.println(john.getLastName());
john.happyBirthday();We can also build classes that inherit attributes and methods from another class. This allows us to build more complex structures in our code, better representing the relationships between real world objects.
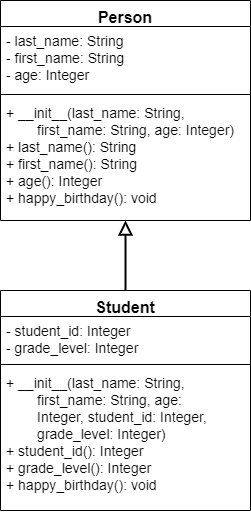
As we learned earlier in this chapter, we can represent an inheritance relationship with an open arrow in our UML diagrams, as shown below:
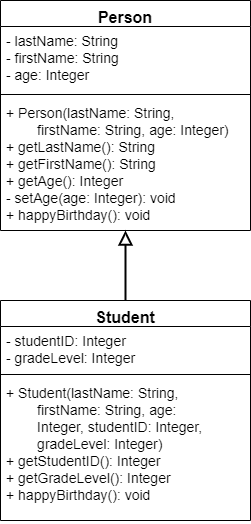
In this diagram, the Student class inherits from, or is a subclass of, the Person class.
To show inheritance in Java, we can use the extends keyword after the class name in our class declaration, listing the parent class that we are inheriting from:
public class Student extends Person{

}
From there, we can quickly implement the code for each attribute and getter method in the new class:
public class Student extends Person{
    private int studentID;
    private int gradeLevel;

    public int getStudentID(){ return this.studentID; }
    public int getGradeLevel(){ return this.gradeLevel; }
}Since the subclass Student also includes a definition for the method happyBirthday(), we say that that method has been overridden in the subclass. We can do this by simply creating the new method in the Student class, and prefixing it with the @Override annotation:
public class Student extends Person{
    private int studentID;
    private int gradeLevel;

    public int getStudentID(){ return this.studentID; }
    public int getGradeLevel(){ return this.gradeLevel; }

    @Override
    public void happyBirthday(){
        super.happyBirthday();
        this.gradeLevel += 1;
    }
}
Here, we are using the keyword super to refer to our parent class. In that way, we can still call the happyBirthday() method as defined in Person, but extend it by adding our own code as well.
In addition, we can use the super() method to call our parent class’s constructor. This must be done as the first line of our subclass’s constructor:
public class Student extends Person{
    private int studentID;
    private int gradeLevel;

    public int getStudentID(){ return this.studentID; }
    public int getGradeLevel(){ return this.gradeLevel; }

    public Student(String lastName, String firstName, int age, int studentID, int gradeLevel){
        super(lastName, firstName, age);
        this.studentID = studentID;
        this.gradeLevel = gradeLevel;
    }

    @Override
    public void happyBirthday(){
        super.happyBirthday();
        this.gradeLevel += 1;
    }
}In addition to private and public, Java also includes a keyword protected. This modifier prevents external code from accessing attributes and methods, but will allow any subclasses to access them. In a UML diagram, the protected keyword is denoted by a hash symbol # in front of the attribute or method.
Inheritance allows us to make use of polymorphism in our code. Loosely polymorphism allows us to store an instance of a class within the data type of any of its parent classes. By doing so, we can only access the methods and attributes defined by the data type, but any overriden methods will use the implementation from the child class.
Here’s a quick example:
Student steveStudent = new Student("Jones", "Steve", "19", "123456", "13");
Person stevePerson = (Person)steveStudent;

// Can access methods in Person
System.out.println(stevePerson.getFirstName());

// Cannot access methods in Student
System.out.println(stevePerson.getStudentID()); // will not compile

// Can call methods from Person
// This will use the code defined in Student,
// even though it is stored as a Person.
stevePerson.happyBirthday();
System.out.println(steveStudent.getGradeLevel()); // 14
Polymorphism is a very powerful tool in programming, and we’ll use it throughout this course as we develop complex data structures.
The other important modifier we can use in Java is the static modifier. Again, we’ve seen this modifier each time we declare the main method in our programs, but we haven’t really been able to discuss exactly what it means. Thankfully, we now have the knowledge we need to talk about the static modifier.
In essence, the static modifier makes an attribute or method part of the class in which it is declared instead of part of objects instantiated from that class. If we think about it, the word static means “lacking in change”, and that’s sort of a good way to think about it.
First, we can use the static modifier with an attribute, attaching that attribute to the class instead of the instance. Here’s an example:
public class Stat{
  public static int x = 5;
  public int y;

  public Stat(int an_y){
    this.y = an_y;
  }
}
In this class, we’ve created a static attribute named x, and a normal attribute named y. Here’s a main() method that will help us explore how the static keyword operates:
public class Main{
 public static void main(String[] args){
   Stat someStat = new Stat(7);
   Stat anotherStat = new Stat(8);

   System.out.println(someStat.x);      // 5
   System.out.println(someStat.y);      // 7
   System.out.println(anotherStat.x);   // 5
   System.out.println(anotherStat.y);   // 8

   someStat.x = 10;

   System.out.println(someStat.x);      // 10
   System.out.println(someStat.y);      // 7
   System.out.println(anotherStat.x);   // 10
   System.out.println(anotherStat.y);   // 8

   Stat.x = 25;

   System.out.println(someStat.x);      // 25
   System.out.println(someStat.y);      // 7
   System.out.println(anotherStat.x);   // 25
   System.out.println(anotherStat.y);   // 8
 }
}
First, we can see that the attribute x is set to 5 as its default value, so both objects someStat and anotherStat contain that same value. Then we can update the value of x attached to someStat to 10, and we’ll see that both objects will now contain that value. That’s because the value is static, and there is only one copy of that value for all instances of the Stat class.
Finally, and most interestingly, since the attribute x is static, we can also access it directly from the class Stat, without even having to instantiate an object. So, we can update the value in that way, and it will take effect in any objects instantiated from Stat.
We can also do the same for static methods.
public class Stat{
  public static int x = 5;
  public int y;

  public Stat(int an_y){
    this.y = an_y;
  }

  public static int sum(int a){
    return x + a;
  }
}
We have now added a static method sum() to our Stat class. The important thing to remember is that a static method cannot access any non-static attributes or methods, since it doesn’t have access to an instantiated object. Likewise, we cannot use the this keyword inside of a static method.
As a tradeoff, we can call a static method without instantiating the class either, as in this example:
public class Main{
 public static void main(String[] args){
   //other code omitted
   Stat.x = 25;

   Stat moreStat = new Stat(7);
   System.out.println(moreStat.sum(5));  // 30
   System.out.println(Stat.sum(5));      // 30
 }
}
This becomes extremely useful in our main() method. Since the main() method is always static, it can only access static attributes and methods in the class it is declared in. So, we can either create all of our additional methods in that class as static methods, or we can instantiate the class it is contained in.
Another major feature of class inheritance is the ability to define a method in a parent class, but not provide any code that implements that function. In effect, we are saying that all objects of that type must include that method, but it is up to the child classes to provide the code. These methods are called abstract methods, and the classes that contain them are abstract classes. Let’s look at how they work!
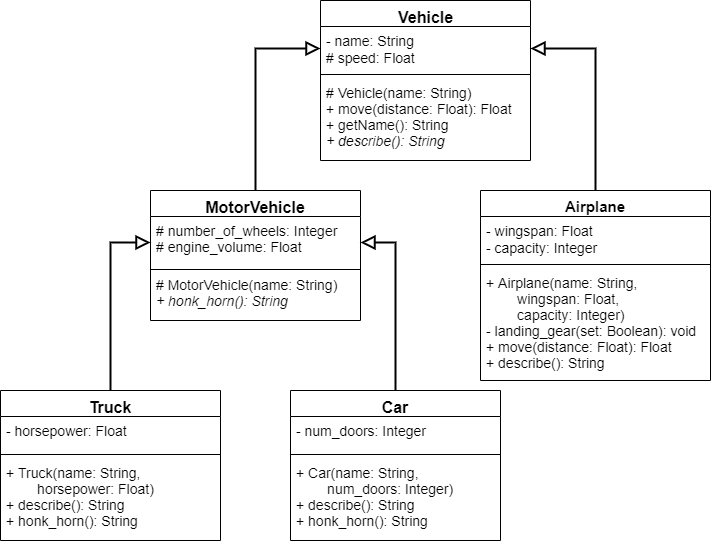
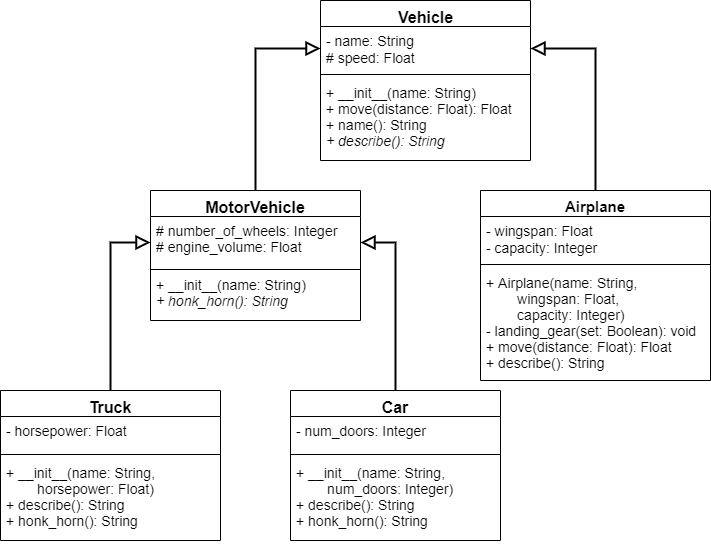
In the UML diagram above, we see that the describe() method in the Vehicle class is printed in italics. That means that the method should be abstract, without any code provided. To do this in Java, we simply must use the abstract keyword on both the method and the class itself:
public abstract class Vehicle{

  private String name;
  protected double speed;

  public String getName(){ return this.name; }

  protected Vehicle(String name){
    this.name = name;
    this.speed = 1.0;
  }


  public double move(double distance){
    System.out.println("Moving");
    return distance / this.speed;
  }

  public abstract String describe();

}
Notice that the keyword abstract goes after the security modifier, but before the class keyword on a class declaration and the return type on a method declaration.
In addition, since we have declared the method describe() to be abstract, we must place a semicolon after the method declaration, without any curly braces. This is because an abstract method cannot include any code.
Now, any class that inherits from the Vehicle class must provide an implementation for the describe() method. If it does not, that class must also be declared to be abstract. So, for example, in the UML diagram above, we see that the MotorVehicle class does not include an implementation for describe(), so we’ll also have to make it abstract.
We can also declare a class to be abstract without including any abstract methods. By doing so, it prevents the class from being instantiated directly. Instead, the class can only be inherited from, and those child classes can choose to be instantiated by omitting the abstract keyword.
Let’s build a quick program following the MVC architecture style to review working with classes, object, inheritance, and polymorphism.
Write a program to store a list of students and teachers at a school. The program should have methods to add a student or a teacher, as well as a method to print the entire list.
The program should conform to the following UML diagram:
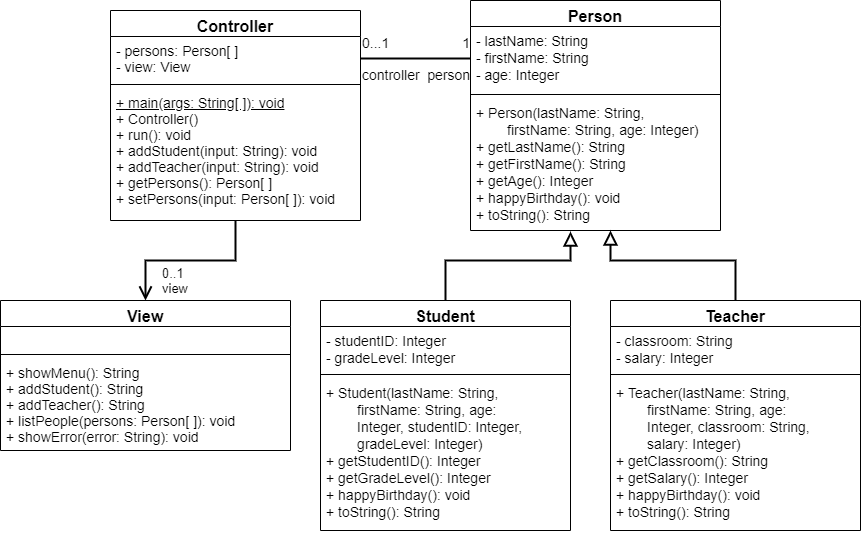
Right-click and select “Open image in new tab” to view larger
The purpose of each method will be further described below.
Person ClassPerson() - constructor that initializes all attributes based on parametersgetLastName() - getter for lastName attributegetFirstName() - getter for firstName attributegetAge() - getter for age attributehappyBirthday() - method to increase person’s age attribute by $1$toString() - method that overrides the built-in Object class toString() method. It should return a string in the form "firstName lastName: age"Student ClassStudent() - constructor that initializes all attributes (including in super class) based on parametersgetStudentID() - getter for studentID attributegetGradeLevel() - getter for gradeLevel attributehappyBirthday() - method to increase student’s age and gradeLevel attribute by $1$toString() - method that overrides the built-in Object class toString() method. It should return a string in the form "firstName lastName: age (studentID - gradeLevel)"Teacher ClassTeacher() - constructor that initializes all attributes (including in super class) based on parametersgetClassroom() - getter for classroom attributegetSalary() - getter for salary attributehappyBirthday() - method to increase teacher’s age by $1$ and salary attribute by $1000$toString() - method that overrides the built-in Object class toString() method. It should return a string in the form "firstName lastName: age (classroom - $salary)"View ClassshowMenu() - a method to show a menu of options to the user. The user should be prompted to input exactly one of the options listed below, which is returned as a String. The wording of the menu is up to you. The method should return whatever was input by the user, without any error checking (that is done in the Controller)
addStudent() - a method to add a new student to the system. The user should input a list of parameters for each attribute as they are listed in the constructor for Student, separated by spaces. The wording of the prompt is up to you. The method should return whatever was input by the user, without any error checking (that is done in the Controller)
addTeacher() - a method to add a new teacher to the system. The user should input a list of parameters for each attribute as they are listed in the constructor for Teacher, separated by spaces. The wording of the prompt is up to you. The method should return whatever was input by the user, without any error checking (that is done in the Controller)listPeople() - a method to list all Person objects in the persons array given as a parameter. Each one should be prefixed by an index starting at $0$, incrementing by one for each Person in the array. Remember that unused array slots will contain the value null so that should be considered in your code.
showError() - a method to display an error to the user. The parameter error should be printed to the screen, prefixed by “Error: "Controller Classmain() - the main method for this program. It should simply instantiate a new instance of the Controller class, and then call the run() method of that object.Controller() - the constructor for the Controller object. It initialize the persons attribute to an array with a maximum size of 20 items, as well as a View object stored in the view attribute.run() - this method consists of a loop that will execute the program until it is terminated. It will call the showMenu() method of the view to show a menu to the user (see above). Finally, it will parse the string returned by the call to showMenu() and call additional appropriate methods in the Controller or View class to complete the operation. If the user inputs “exit” then it should terminate. Otherwise, the program will repeatedly display the menu to the user until “exit” is chosen. If at any time the user provides input that cannot be properly parsed, the controller should call the showError() method in the View class and restart the process (loop back to the beginning) by showing the menu again.addStudent() - this method will receive the string input by the user from the addStudent() method in View, parse the input, and call the appropriate methods to create a new Student object and add it to the first empty slot in the persons array.addTeacher() - this method will receive the string input by the user from the addTeacher() method in View, parse the input, and call the appropriate methods to create a new Teacher object and add it to the first empty slot in the persons array.getPersons() - this method will simply return the current persons attribute as an array. This is for testing purposes onlysetPersons() - this method will replace the persons attribute with the array provided as a parameter. This is for testing purposes only.A sample execution of the program is shown below.
{Check It!|assessment}(test-3269626908)
{Check It!|assessment}(test-2757569305)
{Check It!|assessment}(test-2923816668)
{Check It!|assessment}(test-3356253417)
{Check It!|assessment}(test-2664871931)
{Check It!|assessment}(test-3442438399)
{Check It!|assessment}(test-163667115)
{Check It!|assessment}(test-496994260)
{Check It!|assessment}(test-2263639856)
{Check It!|assessment}(test-2809305019)
public class Person{
    private String lastName;
    private String firstName;
    private int age;

    public Person(String lastName, String firstName, int age){
        this.lastName = lastName;
        this.firstName = firstName;
        this.age = age;
    }

    public String getLastName(){ return this.lastName; }
    public String getFirstName(){ return this.firstName; }
    public int getAge(){ return this.age; }

    public void happyBirthday(){
        this.age = this.age + 1;
    }

    @Override
    public String toString(){
        return this.firstName + " " + this.lastName + ": " + this.age;
    }
}public class Student extends Person{
private int studentID;
private int gradeLevel;
public Student(String lastName, String firstName, int age, int studentID, int gradeLevel){
super(lastName, firstName, age);
this.studentID = studentID;
this.gradeLevel = gradeLevel;
}
public int getStudentID(){ return this.studentID; }
public int getGradeLevel(){ return this.gradeLevel; }
@Override
public void happyBirthday(){
super.happyBirthday();
this.gradeLevel = this.gradeLevel + 1;
}
@Override
public String toString(){
return super.toString() + " (" + this.studentID + " - " + this.gradeLevel + ")";
}
}public class Teacher extends Person{
private String classroom;
private int salary;
public Teacher(String lastName, String firstName, int age, String classroom, int salary){
super(lastName, firstName, age);
this.classroom = classroom;
this.salary = salary;
}
public String getClassroom(){ return this.classroom; }
public int getSalary(){ return this.salary; }
@Override
public String toString(){
return super.toString() + " (" + this.classroom + " - $" + this.salary + ")";
}
}import java.util.Scanner;
public class View{
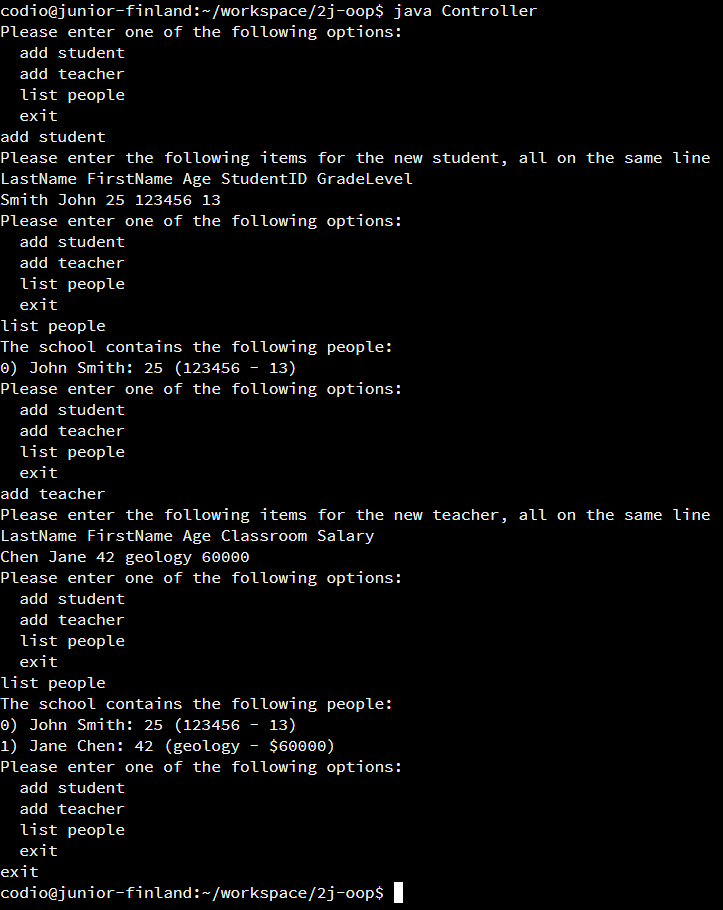
public String showMenu(){
System.out.println("Please enter one of the following options:");
System.out.println(" add student");
System.out.println(" add teacher");
System.out.println(" list people");
System.out.println(" exit");
try{
Scanner scanner = new Scanner(System.in);
String input = scanner.nextLine();
return input;
}catch(Exception e){
return "";
}
}
public String addStudent(){
System.out.println("Please enter the following items for the new student, all on the same line");
System.out.println("LastName FirstName Age StudentID GradeLevel");
try{
Scanner scanner = new Scanner(System.in);
String input = scanner.nextLine();
return input;
}catch(Exception e){
return "";
}
}
public String addTeacher(){
System.out.println("Please enter the following items for the new teacher, all on the same line");
System.out.println("LastName FirstName Age Classroom Salary");
try{
Scanner scanner = new Scanner(System.in);
String input = scanner.nextLine();
return input;
}catch(Exception e){
return "";
}
}
public void listPeople(Person[] persons){
System.out.println("The school contains the following people:");
int i = 0;
for(Person p : persons){
if(p == null){
continue;
}
System.out.println(i + ") " + p.toString());
i++;
}
}
public void showError(String error){
System.out.println("Error: " + error);
}
}public class Controller{
private Person[] persons;
private View view;
private int size;
public static void main(String[] args){
new Controller().run();
}
public Controller(){
this.persons = new Person[20];
this.view = new View();
this.size = 0;
}
public void run(){
while(true){
String input = view.showMenu();
if(input.equals("add student")){
addStudent(view.addStudent());
}else if(input.equals("add teacher")){
addTeacher(view.addTeacher());
}else if(input.equals("list people")){
view.listPeople(persons);
}else if(input.equals("exit")){
break;
}else{
view.showError("Invalid Input!");
}
}
}
public void addStudent(String input){
String[] splits = input.split(" ");
try{
Person p = new Student(splits[0], splits[1], Integer.parseInt(splits[2]), Integer.parseInt(splits[3]), Integer.parseInt(splits[4]));
if(size < 20){
persons[size++] = p;
}else{
view.showError("Array full!");
}
}catch(Exception e){
view.showError("Unable to parse input!");
}
}
public void addTeacher(String input){
String[] splits = input.split(" ");
try{
Person p = new Teacher(splits[0], splits[1], Integer.parseInt(splits[2]), splits[3], Integer.parseInt(splits[4]));
if(size < 20){
persons[size++] = p;
}else{
view.showError("Array full!");
}
}catch(Exception e){
view.showError("Unable to parse input!");
}
}
public Person[] getPersons() { return persons; }
public void setPersons(Person[] input) { persons = input; }
}This page is the main page for Python
In Python, we can break our programs up into individual functions, which are individual routines that we can call in our code. Let’s review how to create functions in Python.
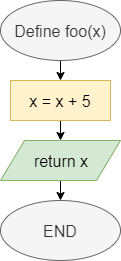
The table below lists the flowchart blocks used to represent functions, as well as the corresponding pseudocode:
| Operation | Flowchart | Pseudocode |
|---|---|---|
| Declare Function |
|
|
| Call Function |
|
|
In general, a function definition in Python needs a few elements. Let’s start at the simplest case:
def foo():
  print("Foo")
  return
Let’s break this example function definition down to see how it works:
def at the beginning of this function definition. That keyword tells Python that we’d like to define a new function. We’ll need to include it at the beginning of each function definition.foo. We can name a function using any valid identifier in Python. In general, function names in Python always start with a lowercase letter, and use underscores between the words in the function name if it contains multiple words.() that list the parameters for this function. Since there is nothing included in this example, the function foo does not require any parameters.: indicating that the indented block of code below this definition is contained within the function. In this case, the function will simply print Foo to the terminal.return keyword. Since we aren’t returning a value, we aren’t required to include a return keyword in the function. However, it is helpful to know that we may use that keyword to exit the function at any time.Once that function is created, we can call it using the following code:
foo()In a more complex case, we can declare a function that accepts parameters and returns a value, as in this example:
def count_letters(input, letter):
  output = 0
  for i in range(0, len(input)):
    if input[i] == letter:
      output += 1
  return output
In this example, the function accepts two parameters: input, which could be a string, and letter, which could be a single character. However, since Python does not enforce a type on these parameters, they could actually be any value. We could add additional code to this function that checks the type of each parameter and raises a TypeError if they are not the expected type.
We can use the parameters just like any other variable in our code. To return a value, we use the return keyword, followed by the value or variable containing the value we’d like to return.
To call a function that requires parameters, we can include values as arguments in the parentheses of the function call:
sum += count_letters("The quick brown fox jumped over the lazy dog", "e")Python allows us to specify default values for parameters in a function definition. In that way, if those parameters are not provided, the default value will be used instead. So, it may appear that there are multiple functions with the same name that accept a different number of parameters. This is called function overloading.
For example, we could create a function named max() that could take either two or three parameters:
def main():
  max(2, 3)
  max(3, 4, 5)

def max(x, y, z=None):
  if z is not None:
    if x >= y:
      if x >= z:
        print(x)
      else:
        print(z)
    else:
      if y >= z:
        print(y)
      else:
        print(z)
  else:
    if x >= y:
      print(x)
    else:
      print(y)

# main guard
if __name__ == "__main__":
  main()
In this example, we are calling max() with both 2 and 3 arguments from main(). When we only provide 2 arguments, the third parameter will be given the default value None, which is a special value in Python showing that the variable is empty. Then, we can use if z is not None as part of an If-Then statement to see if we need to take that variable into account in our code.
This example also introduces a new keyword, is. The is keyword in Python is used to determine if two variables are exactly the same object, not just the same value. In this case, we want to check that z is exactly the same object as None, not just that it has the same value. In Python, it is common to use the is keyword when checking to see if an optional parameter is given the value None. We’ll see this keyword again in a later chapter as we start dealing with objects.
Python also allows us to specify function arguments using keywords that match the name of the parameter in the function. In that way, we can specify the arguments we need, and the function can use default values for any unspecified parameters. Here’s a quick example:
def main():
  args(1)             # 6
  args(1, 5)          # 9
  args(1, c=5)        # 8
  args(b=7, a=2)      # 12
  args(c=5, a=2, b=3) # 10

def args(a, b=2, c=3):
  print(str(a + b + c))

# main guard
if __name__ == "__main__":
  main()
In this example, the args() method has one required parameter, a. It can either be provided as the first argument, known as a positional argument, or as a keyword argument like a=2. The other parameters, b and c, can either be provided as positional arguments or keyword arguments, but they are not required since they have default values.
Also, we can see that when we use keyword arguments we do not have to provide the arguments in the order they are defined in the function’s definition. However, any arguments provided without keywords must be placed at the beginning of the function call, and will be matched positionally with the first parameters defined in the function.
Finally, Python allows us to define a single parameter that is a variable length parameter. In essence, it will allow us to accept anywhere from 0 to many arguments for that single parameter, which will then be stored in a list. Let’s look at an example:
def main():
  max(2, 3)
  max(3, 4, 5)
  max(5, 6, 7, 8)
  max(10, 11, 12, 13, 14, 15, 16)

def max(*values):
  if len(values) > 0:
    max = values[0]
    for value in values:
      if value > max:
        max = value
    print(max)

# main guard
if __name__ == "__main__":
  main()
Here, we have defined a function named max() that accepts a single variable length parameter. To show a parameter is variable length we use an asterisk * before variable name. We must respect two rules when creating a variable length parameter:
So, when we run this program, we see that we can call the max() function with any number of arguments, and it will be able to determine the maximum of those values. Inside of the function itself, values can be treated just like a list.
Before we learn about classes and objects, let’s do a quick exercise to review how to create and use functions in our code.
Write a program that accepts input from a file provided as a command-line argument. If an incorrect number of arguments are provided, or if the program is unable to open the file, it should print “Invalid Arguments” and terminate.
The program’s input will consist of a list of 100 integers, one per line. If any line of the input cannot be converted to an integer, the program should print “Invalid Input” and terminate.
The program should determine whether the list of integers is considered a mathematical set. That is, each item in the list should be unique, with no duplicate numbers. If the input is not a set, it should print “Not a set” and terminate.
If the input is a set, then the program should print the sum of the values in the set and then terminate.
This program should consist of three functions:
main(args)- The main function that controls the program. It should accept an array of strings representing the command-line arguments to the program.is_set(numbers)- A function to determine if the given array is a set. The input should be a single array of integers, and the return value should be a Boolean value.sum_set(numbers)- A function to find the sum of all the elements in the given array. The input should be a single array of integers, and the return value should be an integer.
Don’t forget to include a main guard at the end of the file that passes the contents of sys.argv as an argument to the main() function.
There may be easier ways of determining if an array contains duplicate items, but could we simply check that, for each item, there is only one of that item in the list?
This exercise uses a custom grading program to grade submissions, which will be used extensively throughout this course. The first step of the grading process will examine the structure of your code, making sure that it contains the correct classes and functions. The second step will directly examine each function in the program, making sure that they operate as expected. You are welcome to include any additional code to complete the project that is not specified above.
Each step of the grading process will create two files in your work directory showing more detailed output. To open the HTML file as a webpage, right-click on it and select Preview Static. The log file may contain helpful debugging messages if your program experiences an unhandled exception.
{Check It!|assessment}(test-4065492757)
{Check It!|assessment}(test-2578058679)
import sys


def main(argv):

    if len(argv) != 2:
        print("Invalid Arguments")
        sys.exit()

    try:
        with open(argv[1]) as scanner1:

            nums = []
            for line in scanner1:
                line = line.strip()
                input = int(line)
                nums.append(input)

            if is_set(nums):
                print(sum_set(nums))
            else:
                print("Not a set")

    except FileNotFoundError:
        print("Invalid Arguments")
        return
    except IOError:
        print("Invalid Arguments")
        return
    except ValueError:
        print("Invalid Input")
        return


def is_set(nums):
    for i in nums:
        count = 0
        for j in nums:
            if i == j:
                count += 1
        if count > 1:
            return False
    return True


def sum_set(nums):
    sum = 0
    for i in nums:
        sum += i
    return sum


# main guard
if __name__ == "__main__":
main(sys.argv)In programming, a class describes an individual entity or part of the program. In many cases, the class can be used to describe an actual thing, such as a person, a vehicle, or a game board, or a more abstract thing such as a set of rules for a game, or even an artificial intelligence engine for making business decisions.
In object-oriented programming, a class is the basic building block of a larger program. Typically each part of the program is contained within a class, representing either the main logic of the program or the individual entities or things that the program will use.
We can represent the contents of a class in a UML Class Diagram. Below is an example of a class called Person:

Throughout the next few pages, we will realize the design of this class in code.
To create a class in Python, we can simply use the class keyword at the beginning of our file:
class Person:
    pass
As we’ve already learned, each class declaration in Python includes these parts:
class - this keyword says that we are declaring a new class.Person - this is an identifier that gives us the name of the class we are declaring.Following the declaration, we see a colon : marking the start of a new block, inside of which will be all of the fields and methods stored in this class. We’ll need to indent all items inside of this class, just like we do with other blocks in Python.
In order for Python to allow this code to run, we cannot have an empty block inside of a class declaration. So, we can add the keyword pass to the block inside of the class so that it is not empty.
By convention, we would typically store this class in a file called Person.py.
Of course, our classes are not very useful at this point because they don’t include any attributes or methods. Including attributes in a class is one of the simplest uses of classes, so let’s start there.
To add an attribute to a class, we can simply declare a variable inside of our class declaration:
class Person:
    last_name = "Person"
    first_name = "Test"
    age = 25
That’s really all there is to it! These are static attributes or class attributes that are shared among all instances of the class. On the next page, we’ll see how we can create instance attributes within the class’s constructor.
Finally, we can make these attributes private by adding two underscores to the variable’s name. We denote this on our UML diagram by placing a minus - before the attribute or method’s name. Otherwise, a + indicates that it should be public. In the diagram above, each attribute is private, so we’ll do that in our code:
class Person:
    __last_name = "Person"
    __first_name = "Test"
    __age = 25
Unfortunately, Python does have a way to get around these restrictions as well. Instead of referencing __last_name, we can instead reference _Person__last_name to find that value, as in this example:
ellie = Person("Jonson", "Ellie", 29)
ellie._Person__last_name = "Jameson"
print(ellie.last_name) # Jameson
Behind the scenes, Python adds an underscore _ followed by the name of the class to the beginning of any class attribute or method that is prefixed with two underscores __. So, knowing that, we can still access those attributes and methods if we want to. Thankfully, it’d be hard to do this accidentally, so it provides some small level of security for our data.
We can also add methods to our classes. These methods are used either to modify the attributes of the class or to perform actions based on the attributes stored in the class. Finally, we can even use those methods to perform actions on data provided as arguments. In essence, the sky is the limit with methods in classes, so we’ll be able to do just about anything we need to do in these methods. Let’s see how we can add methods to our classes.

A constructor is a special method that is called whenever a new instance of a class is created. It is used to set the initial values of attributes in the class. We can even accept parameters as part of a constructor, and then use those parameters to populate attributes in the class.
Let’s go back to the Person class example we’ve been working on and add a simple constructor to that class:
class Person:
    __last_name = "Person"
    __first_name = "Test"
    __age = 25

    def __init__(self, last_name, first_name, age):
        self.__last_name = last_name
        self.__first_name = first_name
        self.__age = age
Since the constructor is an instance method, we need to add a parameter to the function at the very beginning of our list of parameters, typically named self. This parameter is automatically added by Python whenever we call an instance method, and it is a reference to the current instance on which the method is being called. We’ll learn more about this later.
Inside that constructor, notice that we use each parameter to set the corresponding attribute, using the self keyword once again to refer to the current object.
Also, since we are now defining the attributes as instance attributes in the constructor, we can remove them from the class definition itself:
class Person:

    def __init__(self, last_name, first_name, age):
        self.__last_name = last_name
        self.__first_name = first_name
self.__age = ageWe’ve already discussed variable scope earlier in this course. Recall that two different functions may use the same local variable names without affecting each other because they are in different scopes.
The same applies to classes. A class may have an attribute named age, but a method inside of the class may also use a local variable named age. Therefore, we must be careful to make sure that we access the correct variable, using the self reference if we intend to access the attribute’s value in the current instance. Here’s a short example:
class Test:
  age = 15

  def foo(self):
    age = 12
    print(age)      # 12
    print(self.age) # 15

  def bar(self):
    print(self.age) # 15
    print(age)      # NameError
As we can see, in the method foo() we must be careful to use self.age to refer to the attribute, since there is another variable named age declared in that method. However, in the method bar() we see that age itself causes a NameError since there is no other variable named age defined in that scope. We have to use self.age to reference the attribute.
So, we should always get in the habit of using self to refer to any attributes, just to avoid any unintended problems later on.
In Python, we can use a special decorator @property to define special methods, called getters and setters, that can be used to access and update the value of private attributes.
In Python, a getter method is a method that can be used to access the value of a private attribute. To mark a getter method, we use the @property decorator, as in the following example:
class Person:

    def __init__(self, last_name, first_name, age):
        self.__last_name = last_name
        self.__first_name = first_name
        self.__age = age

    @property
    def last_name(self):
        return self.__last_name

    @property
    def first_name(self):
        return self.__first_name

    @property
    def age(self):
return self.__ageSimilarly, we can create another method that can be used to update the value of the age attribute:
class Person:

    def __init__(self, last_name, first_name, age):
        self.__last_name = last_name
        self.__first_name = first_name
        self.__age = age

    @property
    def last_name(self):
        return self.__last_name

    @property
    def first_name(self):
        return self.__first_name

    @property
    def age(self):
        return self.__age
    @age.setter
    def age(self, value):
        self.__age = value
However, this method is not required in the UML diagram, so we can omit it.
To add a method to our class, we can simply add a function declaration inside of our class.
class Person:

    def __init__(self, last_name, first_name, age):
        self.__last_name = last_name
        self.__first_name = first_name
        self.__age = age

    @property
    def last_name(self):
        return self.__last_name

    @property
    def first_name(self):
        return self.__first_name

    @property
    def age(self):
        return self.__age

    def happy_birthday(self):
        self.__age = self.age + 1
Notice that once again we must remember to add the self parameter as the first parameter. This method will update the private age attribute by one year.
Now that we have fully constructed our class, we can use it elsewhere in our code through the process of instantiation. In Python, we can simply call the name of the class as a method to create a new instance, which calls the constructor, and then we can use dot-notation to access any attributes or methods inside of that object.
from Person import *

john = Person("Smith", "John", 25)
print(john.last_name)
john.happy_birthday()
Notice that we don’t have to provide a value for the self parameter when we use any methods. This parameter is added automatically by Python based on the value of the object we are calling the methods from.
We can also build classes that inherit attributes and methods from another class. This allows us to build more complex structures in our code, better representing the relationships between real world objects.
As we learned earlier in this chapter, we can represent an inheritance relationship with an open arrow in our UML diagrams, as shown below:
In this diagram, the Student class inherits from, or is a subclass of, the Person class.
To show inheritance in Python, we place the parent class inside of parentheses directly after the name of the subclass when it is defined:
from Person import *

class Student(Person):
    pass
From there, we can quickly implement the code for each property and getter method in the new class:
from Person import *

class Student(Person):

    @property
    def student_id(self):
        return self.__student_id

    @property
    def grade_level(self):
return self.__grade_levelSince the subclass Student also includes a definition for the method happy_birthday(), we say that that method has been overridden in the subclass. We can do this by simply creating the new method in the Student class, making sure it accepts the same number of parameters as the original:
from Person import *

class Student(Person):

    @property
    def student_id(self):
        return self.__student_id

    @property
    def grade_level(self):
        return self.__grade_level

    def happy_birthday(self):
        super().happy_birthday()
        self.__grade_level += 1
Here, we are using the function super() to refer to our parent class. In that way, we can still call the happy_birthday() method as defined in Person, but extend it by adding our own code as well.
In addition, we can use the super() method to call our parent class’s constructor.
from Person import *

class Student(Person):

    @property
    def student_id(self):
        return self.__student_id

    @property
    def grade_level(self):
        return self.__grade_level

    def __init__(self, last_name, first_name, age, student_id, grade_level):
        super().__init__(last_name, first_name, age)
        self.__student_id = student_id
        self.__grade_level = grade_level

    def happy_birthday(self):
        super().happy_birthday()
self.__grade_level += 1In addition to private and public attributes and methods, UML also includes the concept of protected methods. This modifier is used to indicate that the attribute or method should not be accessed outside of the class, but will allow any subclasses to access them. Python does not enforce this restriction; it is simply convention. In a UML diagram, the protected keyword is denoted by a hash symbol # in front of the attribute or method. In Python, we then prefix those attributes or methods with a single underscore _.
Inheritance allows us to make use of polymorphism in our code. Loosely polymorphism allows us to treat an instance of a class within the data type of any of its parent classes. By doing so, we can only access the methods and attributes defined by the data type, but any overriden methods will use the implementation from the child class.
Here’s a quick example:
steve_student = new Student("Jones", "Steve", "19", "123456", "13")

# We can now treat steve_student as a Person object
steve_person = steve_student
print(steve_person.first_name)

# We can call happy_birthday(), and it will use
# the code from the Student class, even if we
# think that steve_student is a Person object
steve_person.happy_birthday()

# We can still treat it as a Student object as well
print(steve_person.grade_level) # 14
Polymorphism is a very powerful tool in programming, and we’ll use it throughout this course as we develop complex data structures.
Many programming languages include a special keyword static. In essence, a static attribute or method is part of the class in which it is declared instead of part of objects instantiated from that class. If we think about it, the word static means “lacking in change”, and that’s sort of a good way to think about it.
In a UML diagram, static attributes and methods are denoted by underlining them.
In Python, any attributes declared outside of a method are class attributes, but they can be considered the same as static attributes until they are overwritten by an instance. Here’s an example:
class Stat:
    x = 5     # class or static attribute

    def __init__(self, an_y):
        self.y = an_y # instance attribute
In this class, we’ve created a class attribute named x, and a normal attribute named y. Here’s a main() method that will help us explore how the static keyword operates:
from Stat import *

class Main:

    def main():
        some_stat = Stat(7)
        another_stat = Stat(8)

        print(some_stat.x)     # 5
        print(some_stat.y)     # 7
        print(another_stat.x)  # 5
        print(another_stat.y)  # 8

        Stat.x = 25           # change class attribute for all instances

        print(some_stat.x)     # 25
        print(some_stat.y)     # 7
        print(another_stat.x)  # 25
        print(another_stat.y)  # 8

        some_stat.x = 10      # overwrites class attribute in instance

        print(some_stat.x)     # 10 (now an instance attribute)
        print(some_stat.y)     # 7
        print(another_stat.x)  # 25 (still class attribute)
        print(another_stat.y)  # 8

if __name__ == "__main__":
    Main.main()
First, we can see that the attribute x is set to 5 as its default value, so both objects some_stat and another_stat contain that same value. Interestingly, since the attribute x is static, we can access it directly from the class Stat, without even having to instantiate an object. So, we can update the value in that way to 25, and it will take effect in any objects instantiated from Stat.
Below that, we can update the value of x attached to some_stat to 10, and we’ll see that it now creates an instance attribute for that object that contains 10, overwriting the previous class attribute. The value attached to another_stat is unchanged.
Python also allows us to create static methods that work in a similar way:
class Stat:
    x = 5     # class or static attribute

    def __init__(self, an_y):
        self.y = an_y # instance attribute

    @staticmethod
    def sum(a):
        return Stat.x + a
We have now added a static method sum() to our Stat class. To create a static method, we place the @staticmethod decorator above the method declaration. We haven’t learned about decorators yet, but they allow us to tell Python some important information about the code below the decorator.
In addition, it is important to remember that a static method cannot access any non-static attributes or methods, since it doesn’t have access to an instantiated object in the self parameter.
As a tradeoff, we can call a static method without instantiating the class either, as in this example:
from Stat import *

class Main:

    @staticmethod
    def main():
        # other code omitted
        Stat.x = 25

        moreStat = Stat(7)
        print(moreStat.sum(5))  # 30
        print(Stat.sum(5))      # 30

if __name__ == "__main__":
    Main.main()
This becomes extremely useful in our main() method. Since we aren’t instantiating our Main class, we can use the decorator @staticmethod above the method to clearly mark that it should be considered a static method.
Another major feature of class inheritance is the ability to define a method in a parent class, but not provide any code that implements that function. In effect, we are saying that all objects of that type must include that method, but it is up to the child classes to provide the code. These methods are called abstract methods, and the classes that contain them are abstract classes. Let’s look at how they work!
In the UML diagram above, we see that the describe() method in the Vehicle class is printed in italics. That means that the method should be abstract, without any code provided. To do this in Python, we simply inherit from a special class called ABC, short for “Abstract Base Class,” and then use the @abstractmethod decorator:
from abc import ABC, abstractmethod

class Vehicle(ABC):

    def __init__(self, name):
        self.__name = name
        self._speed = 1.0

    @property
    def name(self):
        return self.__name

    def move(self, distance):
        print("Moving");
        return distance / self._speed;

    @abstractmethod
    def describe(self):
        pass
Notice that we must first import both the ABC class and the @abstractmethod decorator from a library helpfully called ABC. Then, we can use ABC as the parent class of our class, and update each method using the @abstractmethod decorator before the method, similar to how we’ve already used @staticmethod in an earlier module.
In addition, since we have declared the method describe() to be abstract, we can either add some code to that method that can be called using super().describe() from a child class, or we can simply choose to use the pass keyword to avoid including any code in the method.
Now, any class that inherits from the Vehicle class must provide an implementation for the describe() method. If it does not, that class must also be declared to be abstract. So, for example, in the UML diagram above, we see that the MotorVehicle class does not include an implementation for describe(), so we’ll also have to make it abstract.
Of course, that means that we’ll have to inherit from both Vehicle and ABC. In Python, we can do that by simply including both classes in parentheses after the subclass name, separated by a comma.
Let’s build a quick program following the MVC architecture style to review working with classes, object, inheritance, and polymorphism.
Write a program to store a list of students and teachers at a school. The program should have methods to add a student or a teacher, as well as a method to print the entire list.
The program should conform to the following UML diagram:
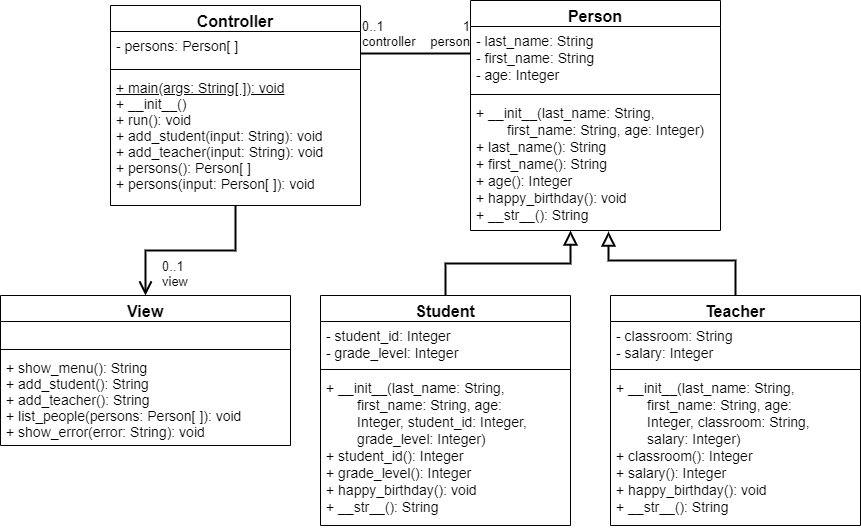
Right-click and select “Open image in new tab” to view larger
The purpose of each method will be further described below.
Person Class__init__() - constructor that initializes all attributes based on parameterslast_name() - getter for last_name attribute—it should be implemented as a propertyget_first_name() - getter for first_name attribute—it should be implemented as a propertyget_age() - getter for age attribute—it should be implemented as a propertyhappy_birthday() - method to increase person’s age attribute by $1$__str__() - method that overrides the built-in Object class __str__() method. It should return a string in the form "first_name last_name: age"Student Class__init__() - constructor that initializes all attributes (including in super class) based on parametersstudent_id() - getter for student_id attribute—it should be implemented as a propertygrade_level() - getter for grade_level attribute—it should be implemented as a propertyhappy_birthday() - method to increase student’s age and grade_level attribute by $1$__str__() - method that overrides the built-in Object class __str__() method. It should return a string in the form "first_name last_name: age (student_id - grade_level)"Teacher Class__init__() - constructor that initializes all attributes (including in super class) based on parametersclassroom() - getter for classroom attribute—it should be implemented as a propertysalary() - getter for salary attribute—it should be implemented as a propertyhappy_birthday() - method to increase teacher’s age by $1$ and salary attribute by $1000$__str__() - method that overrides the built-in Object class __str__() method. It should return a string in the form "first_name last_name: age (classroom - $salary)"View Classshow_menu() - a method to show a menu of options to the user. The user should be prompted to input exactly one of the options listed below, which is returned as a String. The wording of the menu is up to you. The method should return whatever was input by the user, without any error checking (that is done in the Controller)
add_student() - a method to add a new student to the system. The user should input a list of parameters for each attribute as they are listed in the constructor for Student, separated by spaces. The wording of the prompt is up to you. The method should return whatever was input by the user, without any error checking (that is done in the Controller)
add_teacher() - a method to add a new teacher to the system. The user should input a list of parameters for each attribute as they are listed in the constructor for Teacher, separated by spaces. The wording of the prompt is up to you. The method should return whatever was input by the user, without any error checking (that is done in the Controller)list_people() - a method to list all Person objects in the persons list given as a parameter. Each one should be prefixed by an index starting at $0$, incrementing by one for each Person in the list.
show_error() - a method to display an error to the user. The parameter error should be printed to the screen, prefixed by “Error: "Hint: use sys.stdin.readline() to read an entire line of input anywhere in your code. Don’t forget to import sys as well!
Controller Classmain() - the main method for this program. It should simply instantiate a new instance of the Controller class, and then call the run() method of that object.__init__() - the constructor for the Controller object. It initialize the persons attribute to an empty list, as well as a View object stored in the view attribute.run() - this method consists of a loop that will execute the program until it is terminated. It will call the showMenu() method of the view to show a menu to the user (see above). Finally, it will parse the string returned by the call to showMenu() and call additional appropriate methods in the Controller or View class to complete the operation. If the user inputs “exit” then it should terminate. Otherwise, the program will repeatedly display the menu to the user until “exit” is chosen. If at any time the user provides input that cannot be properly parsed, the controller should call the showError() method in the View class and restart the process (loop back to the beginning) by showing the menu again.add_student() - this method will receive the string input by the user from the add_student() method in View, parse the input, and call the appropriate methods to create a new Student object and add it to the first empty slot in the persons list.add_teacher() - this method will receive the string input by the user from the add_teacher() method in View, parse the input, and call the appropriate methods to create a new Teacher object and add it to the first empty slot in the persons list.persons() - these methods are a getter and setter for the persons attribute. They should be implemented as a property. It is for testing purposes only.A sample execution of the program is shown below.
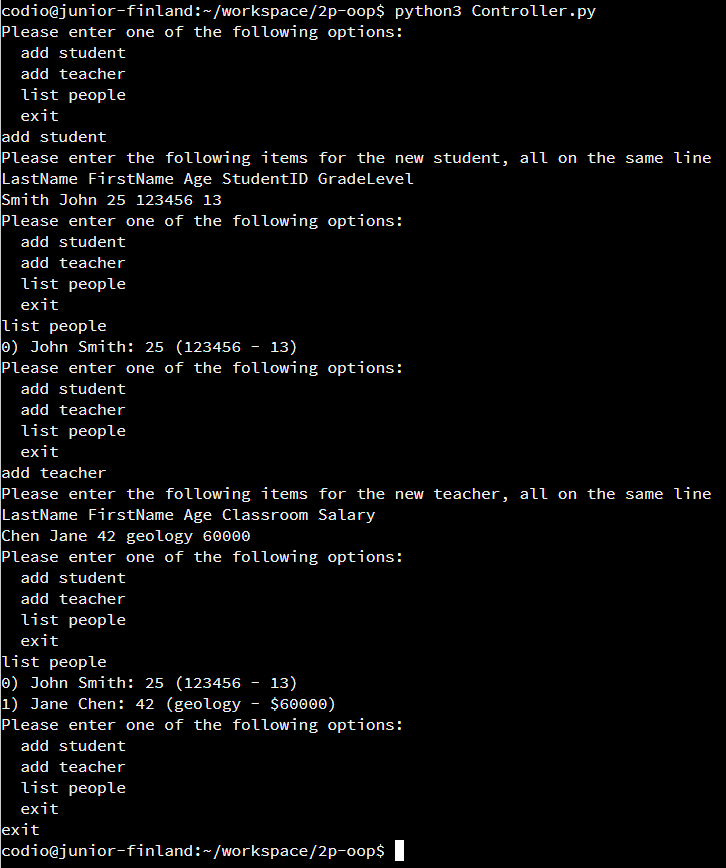
{Check It!|assessment}(test-3416583454)
{Check It!|assessment}(test-1104470273)
{Check It!|assessment}(test-845982740)
{Check It!|assessment}(test-3746962485)
{Check It!|assessment}(test-3109390640)
{Check It!|assessment}(test-1533527332)
{Check It!|assessment}(test-1355293558)
{Check It!|assessment}(test-3808852464)
{Check It!|assessment}(test-3597936585)
{Check It!|assessment}(test-1788523734)
class Person:

    def __init__(self, last_name, first_name, age):
        self.__last_name = last_name
        self.__first_name = first_name
        self.__age = age

    @property
    def last_name(self):
        return self.__last_name

    @property
    def first_name(self):
        return self.__first_name

    @property
    def age(self):
        return self.__age

    def happy_birthday(self):
        self.__age = self.__age + 1

    def __str__(self):
return "{} {}: {}".format(self.first_name, self.last_name, self.age)from Person import Person
class Student(Person):
def __init__(self, last_name, first_name, age, student_id, grade_level):
super().__init__(last_name, first_name, age)
self.__student_id = student_id
self.__grade_level = grade_level
@property
def student_id(self):
return self.__student_id
@property
def grade_level(self):
return self.__grade_level
def happy_birthday(self):
super().happy_birthday()
self.__grade_level = self.__grade_level + 1
def __str__(self):
return "{} ({} - {})".format(super().__str__(), self.student_id, self.grade_level)from Person import Person
class Teacher(Person):
def __init__(self, last_name, first_name, age, classroom, salary):
super().__init__(last_name, first_name, age)
self.__classroom = classroom
self.__salary = salary
@property
def classroom(self):
return self.__classroom
@property
def salary(self):
return self.__salary
def __str__(self):
return "{} ({} - ${})".format(super().__str__(), self.classroom, self.salary)import sys
class View:
def show_menu(self):
print("Please enter one of the following options:")
print(" add student")
print(" add teacher")
print(" list people")
print(" exit")
try:
inp = sys.stdin.readline()
return inp.strip()
except Exception:
return ""
def add_student(self):
print("Please enter the following items for the new student, all on the same line")
print("LastName FirstName Age StudentID GradeLevel")
try:
inp = sys.stdin.readline()
return inp.strip()
except Exception:
return ""
def add_teacher(self):
print("Please enter the following items for the new teacher, all on the same line")
print("LastName FirstName Age Classroom Salary")
try:
inp = sys.stdin.readline()
return inp.strip()
except Exception:
return ""
def list_people(self, persons):
i = 0
for p in persons:
print("{}) {}".format(i, p))
i += 1
def show_error(self, error):
print("Error: {}".format(error))from Person import Person
from Student import Student
from Teacher import Teacher
from View import View
import sys
class Controller:
@staticmethod
def main(args):
Controller().run()
def __init__(self):
self.__persons = []
self.__view = View()
@property
def persons(self):
return self.__persons
@persons.setter
def persons(self, value):
self.__persons = value
def run(self):
while True:
inp = self.__view.show_menu()
if inp == "add student":
self.add_student(self.__view.add_student())
elif inp == "add teacher":
self.add_teacher(self.__view.add_teacher())
elif inp == "list people":
self.__view.list_people(self.__persons)
elif inp == "exit":
break
else:
self.__view.show_error("Invalid Input!")
def add_student(self, inp):
splits = inp.split(" ")
try:
p = Student(splits[0], splits[1], int(splits[2]), int(splits[3]), int(splits[4]))
self.__persons.append(p)
except Exception:
self.__view.show_error("Unable to parse input!")
def add_teacher(self, inp):
splits = inp.split(" ")
try:
p = Teacher(splits[0], splits[1], int(splits[2]), splits[3], int(splits[4]))
self.__persons.append(p)
except Exception:
self.__view.show_error("Unable to parse input!")
# main guard
if __name__ == "__main__":
Controller.main(sys.argv)This chapter covered the rest of the programming basics we’ll need to know before starting on the new content of this course. By now we should be pretty familiar with the basic syntax of the language we’ve chosen, as well as the concepts of classes, objects, inheritance, and polymorphism in object-oriented programming. Finally, we’ve explored the Model-View-Controller (MVC) architecture, which will be used extensively in this course.