Test Doubles
Mimicking and making a “mock"ery of testing!
Mimicking and making a “mock"ery of testing!
Earlier in this course, we learned about unit testing and how we can write code to help us verify that parts of our program are performing as intended. However, what if the portion of our program we’d like to test depends on other parts working correctly? In that case, any errors in our tests might be due to our code having a bug, but it could also be due to a bug in another part of the program that our code depends on.
So, we need some way to test parts of our code in isolation from the rest of the program. In that way, we can make sure our code is working as intended, even if the parts it depends on to function aren’t working.
Enter test doubles - items such as stubs, fakes and mocks - which are temporary objects we can include in our unit tests to mimic, or “double,” the functionality of another part in our program. In that way, we can write our test as if the other portion is working, regardless of whether it is or not.
In this chapter, we’ll learn about the following key terms and ideas:
We’ll also see a brief example for how to create and use some of these items in our chosen programming language. After reviewing this content, we should be able to use some test doubles in our own unit test code.
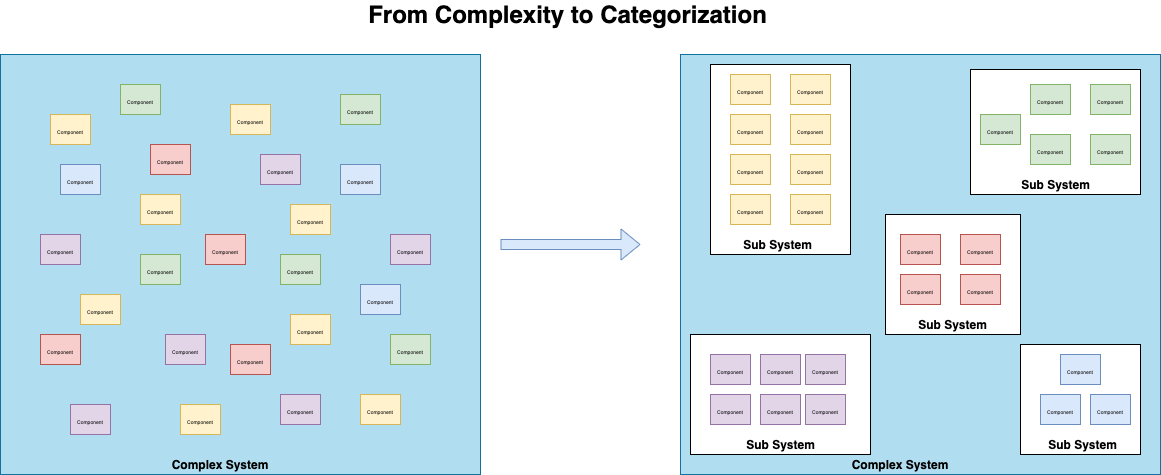
As we build larger and larger applications, we may find that it becomes more and more difficult to see the entire application as a whole. Instead, it helps to think of the application as many different modules, and each module interacts with others based on their publicly available methods, which make up the application programming interface or API of the module.
Ideally, we’d like each module of the program to be independent from the others, with each one having a clear purpose or reason for inclusion in the program. This is a key part of the design principle separation of concerns, which involves breaking larger systems down into distinct sections that address a particular “concern” within the larger system.
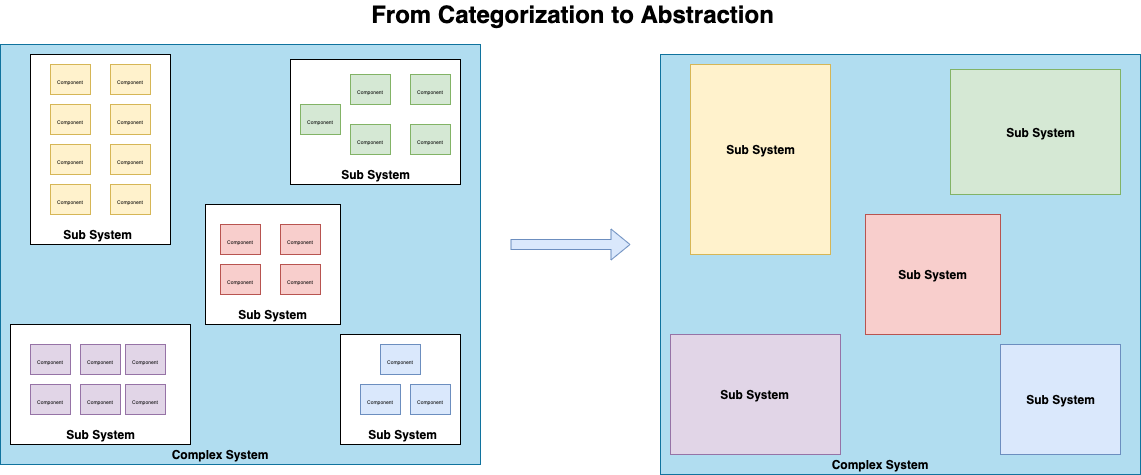
So, by categorizing the individual classes in our application based on similarity, we can then start to organize our application into modules of code that are somewhat independent of each other. They still interact through the public APIs of each module, but the internal workings of one module should not be visible to another.
Once we start writing unit tests for our code, we can start to abstract away the details of other modules in the system, and focus just on the internal workings of the single unit of code, usually a class or method, that we intend to test.
However, this is difficult when our code has to call methods that are present in another module. How can we test our code and make sure it works, without also having to test that the module it is calling also works correctly and returns a correct value? If we cannot figure out a way to do this, then unit testing our code is not very helpful since it won’t allow us to accurately pinpoint the location of an error.
This is where the concept of test doubles comes in. Let’s say our code needs to call a method called getArea() that is part of the API of another module, which will calculate the area of a given shape. All our code needs to do is compare the returned value of that method with a few key values, and display a result.
Depending on the shape, calculating the area can be a computationally intensive process, so we probably don’t want to do that many times in our unit tests. In addition, since that method is contained in another module, we definitely don’t want to test that it actually returns the correct answer.
Instead, we just know that the API of that module says that the getArea() method will return a floating-point value that is non-negative. This is a postcondition that is well documented in the API, so as long as that module is working correctly, we know that the getArea() method will return some non-negative floating-point value.
Therefore, instead of calling the getArea() method that is contained in the external module, we can create a stub method that simply returns a non-negative floating-point value. Then, whenever our code calls getArea(), we can intercept that message and direct it instead to our stub method, which quickly returns a valid value that we can use in our tests. We can even modify the stub to return either the exact values we want, or just any random value.
There are many more powerful things we can do with these test doubles, such as:
Test doubles are a crucial part of writing more useful and advanced unit tests, especially as our programs become larger and we wish to test portions of the code that are integrated with other modules.
Most of our unit tests have been following a particular pattern, commonly called arrange, act, assert. Let’s quickly review that pattern, as it is very important to understand how it integrates with the use of test doubles later in this chapter.
A simple unit test following the arrange, act, assert pattern consists of three major steps:
In some instances, we may also include a fourth step, Teardown, which is used to reset the state back to its initial state, if needed. There are times when our arrange step makes some changes to the environment that must be reversed before we can continue.
Let’s go back to a unit test you may have explored in example 3 and see how it fits the arrange, act, assert pattern.
@Test
public void testSevenWrongGuessesShouldLose() {
    // Arrange
    GuessingGame game = new GuessingGame("secret");

    // Act
    game.guess('a');
    game.guess('b');
    game.guess('d');
    game.guess('f');
    game.guess('g');
    game.guess('h');
    game.guess('i');

    // Assert
    assertTrue(game.isLost());
}
def test_seven_wrong_guesses_should_lose(self):
# Arrange
game = GuessingGame("secret")
# Act
game.guess('a')
game.guess('b')
game.guess('d')
game.guess('f')
game.guess('g')
game.guess('h')
game.guess('i')
# Assert
assert game.lostIn both of these tests, we start in the arrange portion by instantiating a GuessingGame object, which is the object we will be testing. Then, in the act phase, we call several methods in the GuessingGame object - in this case, we are checking that seven incorrect guesses should cause the game to be lost, so we must make seven incorrect guesses. Finally, in the assert section, we use a simple assertion to make sure the game has been lost.
One common alternative to this approach comes from behavior-driven development. In this development process, which is effectively an extension of the test-driven development process we’ve learned about, software specifications are written to match the behaviors that a user might expect to see when the application is running. Such a specification typically follows a given, when, then structure. Here’s a short example of a specification from Wikipedia.
Given a 5 by 5 game
When I toggle the cell at (3, 2)
Then the grid should look like
.....
.....
.....
..X..
.....
The beauty of such a specification is that it can be easily read by a non-technical user, and allows quick and easy discussion with end users and clients regarding how the software should actually function. Once the specification is developed, we can then write unit tests that will use the specification and verify that the program operates as intended. Here’s an example from Wikipedia in Java using the JBehave framework.
private Game game;
private StringRenderer renderer;

@Given("a $width by $height game")
public void theGameIsRunning(int width, int height) {
    game = new Game(width, height);
    renderer = new StringRenderer();
    game.setObserver(renderer);
}

@When("I toggle the cell at ($column, $row)")
public void iToggleTheCellAt(int column, int row) {
    game.toggleCellAt(column, row);
}

@Then("the grid should look like $grid")
public void theGridShouldLookLike(String grid) {
    assertThat(renderer.asString(), equalTo(grid));
}
This testing strategy requires a bit more work than the unit testing we’ve covered in this course, but it can be very powerful when put into use.
Unfortunately, the naming of many of these test doubles, such as stubs, mocks, and fakes, are used either inconsistently or interchangeably within different systems, documentation, and other resources. I’m going to stick to one particular naming scheme, which is best described in the resources linked earlier in this chapter. However, in practice, these terms may be used differently in different areas.
There are three major types of test doubles that we’ll cover in this chapter. The first are stubs, sometimes referred to as stub methods or method stubs. A stub is simply an object that is used to return predefined data when its methods are called, without any internal logic.
For example, if the methods we are testing should sum up the data that results from several calls to a method that is outside of our module, we could create a stub that simply returns the values 1 - 5, and then verify that our method calculates the sum of 15. In this way, we’re verifying that our code works as intended (it sums the values), without really worrying whether the other module returns correct data or not.
The only thing we must be careful with when creating these stubs is that the data they return is plausible for the test we are performing. If the data should be valid, then we should be careful to return values that are the correct type and within the correct range. Likewise, if we want to test any possible error conditions or invalid values, we’ll have to make sure our stub returns the appropriate values as the real object would.
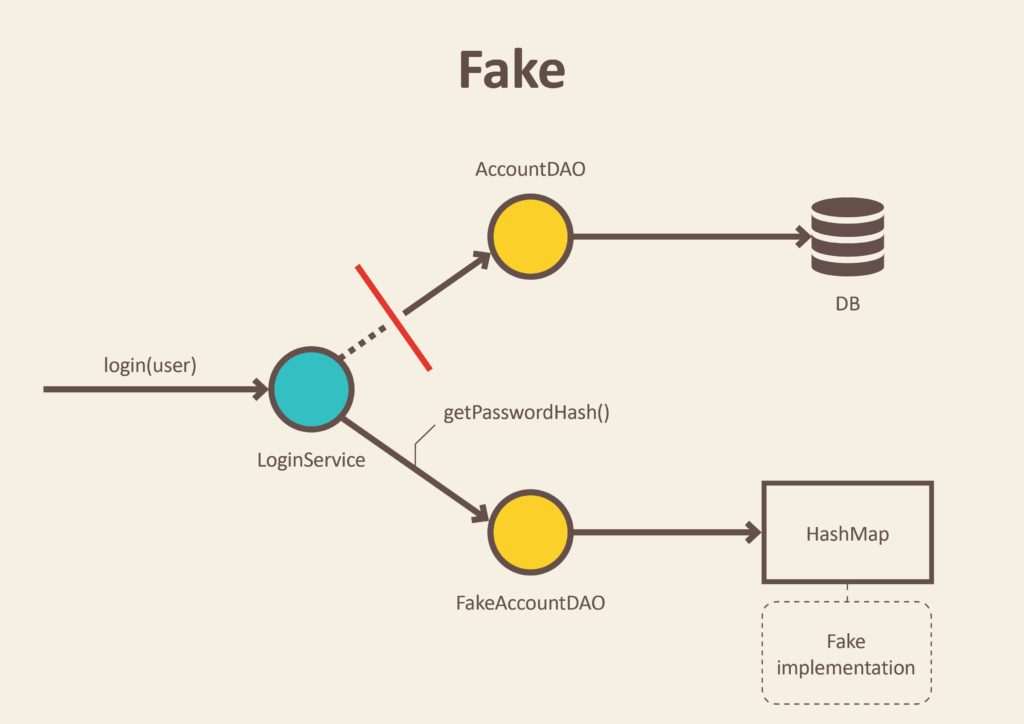
Another commonly used test double is a fake, sometimes referred to as a fake object. A fake is an object that implements the same external interface that the real object would implement - it includes all of the same publicly available methods and attributes. However, the implementations of those methods may take certain shortcuts to mimic pieces of functionality that are not really needed in order to produce valid results. (Many test frameworks use the term mock object for the same concept; however, we’ll use that term on the next page for a slightly different use.)
For example, if we have an object responsible for storing data in a database, we could create a fake version of it that can store data in a hash table instead. It will still be able to store objects and retrieve them, but instead of using a real database with millions of records, it will just store a few items in a hash table that can be reloaded for each unit test.
Likewise, if the object performs a long, complex calculation, a fake version of the object might include precomputed data that can be quickly returned without performing the computation. In that way, the data stored in the object corresponds to the results it provides, without the need to perform any costly computational steps during each unit test.
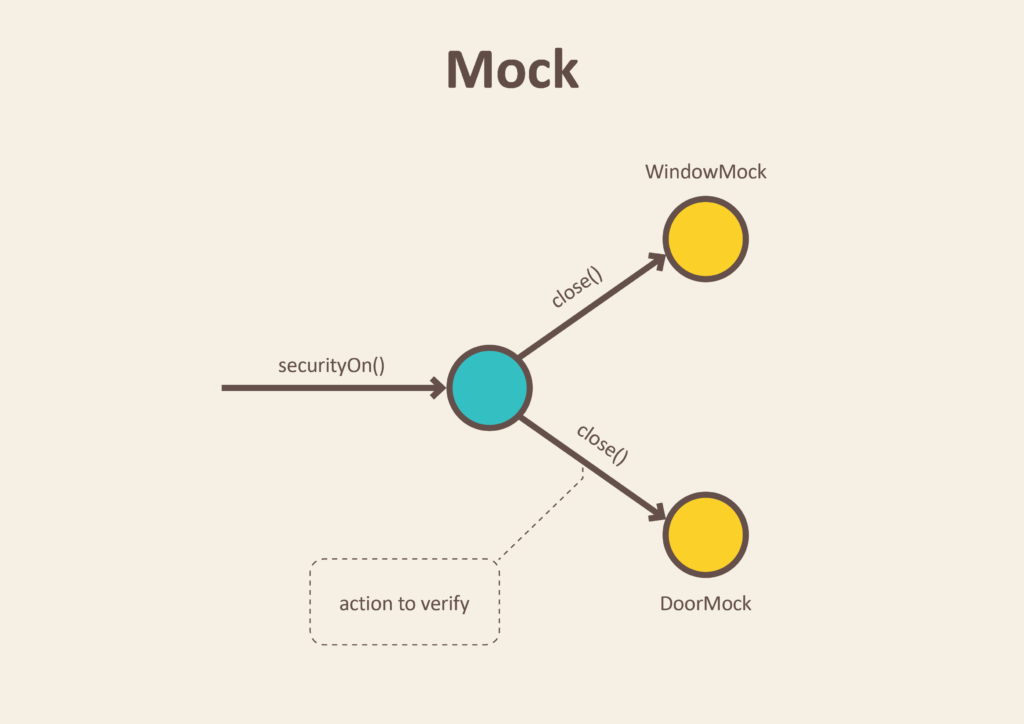
The third type of test double we’ll cover is the mock object, sometimes referred to as a test spy. A mock object is typically used to verify that our code performs the correct actions on other parts of the system. Usually, the mock object will simply listen for any incoming method calls, and then once our action is complete we can verify that the correct methods were called with the correct inputs by examining our mock object.
For example, if the code we are testing is responsible for calling a method in another module to update the GUI for our application, we can replace that GUI with a mock object, run the code, and then verify that the correct method in our mock object was called during the test. Likewise, we can make sure that other methods were not called.
This is another great example of an “indirect output” of our code. However, instead of data being the output, the messages sent as method calls are the data that our code is producing.
As we can see, test doubles are powerful tools we can use to enhance our ability to perform unit tests on our system. On the following pages, we’ll briefly review how to use different test doubles in both Java and Python. As always, feel free to skip to the page for the language you are learning, but both pages may contain helpful information.
To create test doubles in JUnit, we’ll rely on a separate library called Mockito. Mockito is a framework for creating mock objects in Java that works well with JUnit, and has become one of the most commonly used tools for this task.
To install Mockito, we just update the testImplementation line in our build.gradle file to include both the mockito-inline library, as well as the mockito-junit-jupiter library that allows Mockito and JUnit to work together seamlessly.
dependencies {
    // Use JUnit Jupiter API for testing.
    testImplementation 'org.junit.jupiter:junit-jupiter-api:5.6.2', 'org.hamcrest:hamcrest:2.2', 'org.junit.jupiter:junit-jupiter-params', 'org.mockito:mockito-inline:3.8.0', 'org.mockito:mockito-junit-jupiter:3.8.0'

    // Use JUnit Jupiter Engine for testing.
    testRuntimeOnly 'org.junit.jupiter:junit-jupiter-engine'

    // This dependency is used by the application.
    implementation 'com.google.guava:guava:29.0-jre'
}There are many different ways to use Mockito with JUnit. One of the easiest ways that works in the latest versions of Mockito and JUnit is to use the @ExtendWith annotation above our test class:
import static org.junit.jupiter.api.Assertions.assertTrue;
import static org.mockito.Mockito.when;

import org.junit.jupiter.api.Test;
import org.junit.jupiter.api.extension.ExtendWith;
import org.mockito.Mock;
import org.mockito.junit.jupiter.MockitoExtension;

@ExtendWith(MockitoExtension.class)
public class UnitTestClass {
    // tests here
}
By including that annotation above our test class declaration, Mockito will automatically perform any setup steps required. In earlier versions of JUnit and Mockito, we would have to do these steps manually, but this process has been greatly simplified recently.
One thing we can do is modify this a bit to set Mockito to use STRICT_STUBS. This tells Mockito to print errors when we create any test doubles that aren’t used, and the ones that are used are created properly. So, instead of using @ExtendWith, we can instead use @MockitoSettings:
import static org.junit.jupiter.api.Assertions.assertTrue;
import static org.mockito.Mockito.when;

import org.junit.jupiter.api.Test;
import org.mockito.Mock;
import org.mockito.junit.jupiter.MockitoSettings;
import org.mockito.quality.Strictness;

@MockitoSettings(strictness = Strictness.STRICT_STUBS)
public class UnitTestClass {
    // tests here
}
Since this is recommended by the Mockito documentation, we’ll go ahead and use it in our code.
Once we’ve added Mockito to our test class, we can create fake objects using the @Mock annotation above object declarations. This is commonly done on global objects in our test class:
import static org.junit.jupiter.api.Assertions.assertTrue;
import static org.mockito.Mockito.when;

import org.junit.jupiter.api.Test;
import org.mockito.Mock;
import org.mockito.junit.jupiter.MockitoSettings;
import org.mockito.quality.Strictness;

@MockitoSettings(strictness = Strictness.STRICT_STUBS)
public class UnitTestClass {

    @Mock
    Person mockPerson;
    @Mock
    Teacher mockTeacher;

    // tests here
}
This will create fake objects that mimic the attributes and methods contained in the Person and Teacher class. However, by default, those objects won’t do anything, and most methods will just return the default value for the return type of the method.
Without doing anything else, we can use these fake objects in place of the real ones, as in this test:
import static org.junit.jupiter.api.Assertions.assertTrue;
import static org.mockito.Mockito.when;

import org.junit.jupiter.api.Test;
import org.mockito.Mock;
import org.mockito.junit.jupiter.MockitoSettings;
import org.mockito.quality.Strictness;

@MockitoSettings(strictness = Strictness.STRICT_STUBS)
public class ClassroomTest {

    @Mock
    Person mockPerson;
    @Mock
    Teacher mockTeacher;

    public void testClassroomHasTeacher() {
        Classroom classroom = new Classroom()
        assertTrue(classroom.hasTeacher() == false);

        classroom.addTeacher(mockTeacher);
        assertTrue(classroom.hasTeacher() == true);
    }
}
As we can see, we are able to add the mockTeacher object to our classroom, and it is treated just like any other Teacher object, at least as far as the system is concerned thus far.
However, if we want those fake objects to do something, we have to include method stubs as well.
To add a method stub to a fake object, we can use the when method in Mockito. Here’s an example:
import static org.junit.jupiter.api.Assertions.assertTrue;
import static org.mockito.Mockito.when;

import org.junit.jupiter.api.Test;
import org.mockito.Mock;
import org.mockito.junit.jupiter.MockitoSettings;
import org.mockito.quality.Strictness;

@MockitoSettings(strictness = Strictness.STRICT_STUBS)
public class ClassroomTest {

    @Mock
    Person mockPerson;
    @Mock
    Teacher mockTeacher;

    @Test
    public void testClassroomGetTeacherName() {
        // create a method stub for `getName`
        when(mockTeacher.getName()).thenReturn("Teacher Person");

        Classroom classroom = new Classroom();
        classroom.addTeacher(mockTeacher);

        // assert that the classroom returns the teacher's name
        assertTrue(classroom.getTeacherName().equals("Teacher Person"));
    }
}
In this example, we are adding a method stub to our mockTeacher object that will return "Teacher Person" whenever the getName() method is called. Then, we are adding that fake Teacher object to the Classroom class that we are testing, and calling the getTeacherName() method. We’re assuming that the getTeacherName() method in the Classroom class calls the getName() method of the Teacher object contained in the class. However, instead of using a real Teacher instance, we’ve provided a fake object that only knows what to do when that one method is called. So, it returns the value we expect, which passes our test!
There is one more complex use case we may run into in our testing - creating a fake version of a class with static methods. This is a relatively new feature in Mockito, but it allows us to test some functionality that is otherwise very difficult to mimic.
import static org.junit.jupiter.api.Assertions.assertThrows;
import static org.junit.jupiter.api.Assertions.assertTrue;
import static org.mockito.Mockito.when;

import java.lang.IllegalArgumentException;
import org.junit.jupiter.api.Test;
import org.mockito.Mock;
import org.mockito.MockedStatic;
import org.mockito.Mockito;
import org.mockito.junit.jupiter.MockitoSettings;
import org.mockito.quality.Strictness;

@MockitoSettings(strictness = Strictness.STRICT_STUBS)
public class ClassroomTest {

    @Mock
    Person mockPerson;
    @Mock
    Teacher mockTeacher;

    @Test
    public void testTeacherFailsMinimumAgeRequirement() {
        // Create mock static class
        try (MockedStatic<TeacherRules> mockTeacherRules = Mockito.mockStatic(TeacherRules.class)) {

            // Create method stub for static class
            mockTeacherRules.when(() -> TeacherRules.getMinAge()).thenReturn(16);

            // Create method stub for fake Teacher
            when(mockTeacher.getAge()).thenReturn(15);

            // Test functionality
            Classroom classroom = new Classroom();
            assertThrows(IllegalArgumentException.class, () -> classroom.addTeacher(mockTeacher));
        }
    }
}
In this example, we have a TeacherRules class that includes a static method getMinAge() that returns the minimum age allowed for a teacher. To test this, we are creating a fake version of that class using the Mockito.mockStatic() method. We have to do this in a try with resources statement, which makes sure that the fake class does not persist outside of this test.
Once we’ve created the fake class mockTeacherRules, we can add a method stub for the static method. We’ll also add a method stub to return an invalid age on our fake Teacher object. Finally, when we try to add that teacher to a classroom, it should throw an exception since the teacher is not old enough.
This is a very brief introduction to using test doubles made with Mockito, but it should be enough for our use in this class. Feel free to refer to some of the documentation linked below for more examples and information.
To create test doubles in Python, we’ll rely on the built-in unittest.mock library. It includes lots of quick and easy methods for creating fake objects in Python, and it is compatible with the pytest testing framework that we’re already using.
There are many different ways to use the unittest.mock library. One of the easiest ways is to import the patch annotation
from unittest.mock import patch


class TestClassroom:

    # tests here
Once we’ve imported the patch annotation, we can use it to create fake objects for our test methods.
from unittest.mock import patch
from people.Person import Person
from people.Teacher import Teacher
from places.Classroom import Classroom


class TestClassroom:

    @patch('people.Teacher', spec=Teacher)
    @patch('people.Person', spec=Person)
    def test_classroom_has_teacher(self, fake_person, fake_teacher) -> None:
        # test code
This will create fake objects fake_person and fake_teacher that mimic the attributes and methods contained in the Person and Teacher classes, respectively. However, by default, those objects won’t do anything, and most methods will not actually work by default.
Notice that the fake objects are added as parameters to our test method, but they are added in reverse order. This is because method annotations are interpreted “inside-out”, so the one at the bottom, closest to the method, is interpreted first. So, in this example, our fake_person will be created first, followed by our fake_teacher.
Without doing anything else, we can use these fake objects in place of the real ones, as in this test:
from unittest.mock import patch
from people.Person import Person
from people.Teacher import Teacher
from places.Classroom import Classroom


class TestClassroom:

    @patch('people.Teacher', spec=Teacher)
    @patch('people.Person', spec=Person)
    def test_classroom_has_teacher(self, fake_person, fake_teacher) -> None:
        classroom: Classroom = Classroom()
        assert classroom.has_teacher == False

        classroom.add_teacher(fake_teacher)
        assert classroom.has_teacher == True
As we can see, we are able to add the fake_teacher object to our classroom, and it is treated just like any other Teacher object, at least as far as the system is concerned thus far.
However, if we want those fake objects to do something, we have to include method stubs as well.
To add a method stub to a fake object, we can set the return_value of the method:
from unittest.mock import patch
from people.Person import Person
from people.Teacher import Teacher
from places.Classroom import Classroom


class TestClassroom:

    @patch('people.Teacher', spec=Teacher)
    @patch('people.Person', spec=Person)
    def test_classroom_get_teacher_name(self, fake_person, fake_teacher) -> None:
        # create a method stub for `get_name` method
        fake_teacher.get_name.return_value = "Teacher Person"

        classroom: Classroom = Classroom()
        classroom.add_teacher(fake_teacher)

        # assert that the classroom returns the teacher's name
        assert classroom.get_teacher_name() == "Teacher Person"
In this example, we are adding a method stub to our fake_teacher object that will return "Teacher Person" whenever the get_name() method is called. Then, we are adding that fake Teacher object to the Classroom class that we are testing, and calling the get_teacher_name() method. We’re assuming that the get_teacher_name() method in the Classroom class calls the get_name() method of the Teacher object contained in the class. However, instead of using a real Teacher instance, we’ve provided a fake object that only knows what to do when that one method is called. So, it returns the value we expect, which passes our test!
If our classes use properties instead of traditional getter and setter methods, we have to create our property stubs in a slightly different way:
from unittest.mock import patch, PropertyMock
from people.Person import Person
from people.Teacher import Teacher
from places.Classroom import Classroom


class TestClassroom:

    @patch('people.Teacher', spec=Teacher)
    @patch('people.Person', spec=Person)
    def test_classroom_get_teacher_name(self, fake_person, fake_teacher) -> None:
        # create a property stub for `get_name` property
        type(fake_teacher).name = PropertyMock(return_value="Teacher Person")

        classroom: Classroom = Classroom()
        classroom.add_teacher(fake_teacher)

        # assert that the classroom returns the teacher's name
        assert classroom.get_teacher_name() == "Teacher Person"
In this case, we are creating an instance of the PropertyMock class that acts as a fake property for an object. However, because of how fake objects work, we cannot directly attach the PropertyMock instance directly to the fake_teacher object. Instead, we must attach it to the mock type object, which we can access by using the type method. Thankfully, even if we have several fake instances of the same class, these properties will be unique to the fake instance, not to the class they are faking.
There is one more complex use case we may run into in our testing - creating a fake version of a class with static methods.
from unittest.mock import patch, PropertyMock
from people.Person import Person
from people.Teacher import Teacher
from places.Classroom import Classroom
from rules.TeacherRules import TeacherRules
import pytest


class TestClassroom:

    @patch('people.Teacher', spec=Teacher)
    @patch('people.Person', spec=Person)
    def test_teacher_fails_minimum_age_requirement(self, fake_person, fake_teacher) -> None:
        # create a fake version of the static method
        with patch.object(TeacherRules, 'get_minimum_age', return_value=16):

            # Add a fake property to the teacher
            type(fake_teacher).age = PropertyMock(return_value=15)
            classroom: Classroom = Classroom()

            with pytest.raises(ValueError):
                classroom.add_teacher(fake_teacher)
In this example, we have a TeacherRules class that includes a static method get_minimum_age() that returns the minimum age allowed for a teacher. To test this, we are creating a fake version of that static method using the patch.object method. We have to do this in a with statement, which makes sure that the fake method does not persist outside of this test. In this case, we’ll set that method to return a value of 16.
We’ll also add a method stub to return an invalid age on our fake Teacher object. Finally, when we try to add that teacher to a classroom, it should raise an exception since the teacher is not old enough.
This is a very brief introduction to using test doubles made with the unittest.mock library, but it should be enough for our use in this class. Feel free to refer to some of the documentation linked below for more examples and information.
One other important topic to cover in unit tests is dependency injection. In short, dependency injection is a way that we can build our classes so that the objects they depend on can be added to the class from outside. In that way, we can change them as needed in our unit tests as a way to test functionality using test doubles.
Consider the following example:
public class Teacher {

    private Gradebook gradebook;
    private List<Student> studentList;

    public Teacher() {
        this.gradebook = new Gradebook("Course Name");
        this.studentList = new List<>();
    }

    public void addStudent(Student s) {
        this.studentList.add(s);
    }

    public void submitGrades() {
        for (Student s : this.studentList) {
            this.gradebook.gradeStudent(s);
        }
    }
}
class Teacher:
def __init__(self) -> None:
self.__gradebook: Gradebook = Gradebook()
self.__student_list: List[Student] = list()
def add_student(self, s: Student) -> None:
self.__student_list.append(s)
def submit_grades(self) -> None:
for s in self.__student_list:
self.__gradebook.grade_student(s)In this Teacher class, we see a private Gradebook instance. That instance is not accessible outside the class, so we cannot directly interact with it in our unit tests, at least without violating the security principles of the class it is in. So, if we want to test that the submitGrades() method properly grades every student in the studentList, we would need some way to replace the gradebook attribute with a test double.
This is where dependency injection comes in. Instead of allowing this class to instantiate its own gradebook, we can restructure the code to inject our own gradebook instance. There are several ways we can do this.
Of course, one way we could accomplish this, even without dependency injection, would be to simply reduce the security of these objects. In Java, we could make them either public, which is generally a bad idea for something so secure as a gradebook, or package-private, with no modifier. We’ve used the package-private trick in one of the earlier example videos to access some GUI elements, but in this case we probably want something better.
In Python, we know that any attribute can be accessed externally, so this isn’t as big of a concern. However, since we are using a double-underscore in the name, we’d have to get around the name mangling. We could switch it to a single underscore, which is still marked as internal to the class but would at least be more easily accessible to our tests. However, as with the Java example, there are other ways we could accomplish this.
The first method of dependency injection is via the constructor. We could simply pass in a reference to a Gradebook object in the constructor, as in this example:
public Teacher(Gradebook grade) {
    if (grade == null) {
        throw new IllegalArgumentException("Gradebook cannot be null")
    }
    this.gradebook = grade
    this.studentList = new List<>();
}
def __init__(self, grade: Gradebook) -> None:
if grade is None:
raise ValueError("Gradebook cannot be None")
self.__gradebook: Gradebook = grade
self.__student_list: List[Student] = list()The benefit of this approach is that we can easily replace an actual Gradebook instance in our unit tests with any test double we’d like, making it every easy to test the submitGrades() method.
Unfortunately, this does require any class that instantiates a Teacher object to also instantiate a Gradebook along with it, making that process more complex. This complexity can be reduced using some design patterns such as the builder pattern or factory method pattern.
Finally, the class that instantiates the Teacher object would also have a reference to the Gradebook that teacher is using, so it could allow a malicious coder to have access to data that should be kept private. However, typically this isn’t a major concern we worry about, since we must always assume that any programmer on this project could access any data stored in a class, as nothing is truly private as we’ve already discussed.
Alternatively, we can provide a setter method and allow injection via the setter. This could be done either in lieu of building a Gradebook object in the constructor, or in addition to it.
public void setGradebook (Gradebook grade) {
    if (grade == null) {
        throw new IllegalArgumentException("Gradebook cannot be null")
    }
    this.gradebook = grade;
}
def set_gradebook(grade: Gradebook) -> None:
if grade is None:
raise ValueError("Gradebook cannot be None")
self.__gradebook: Gradebook = grade`You may recognize this approach from several earlier courses in this program - we use this technique for grading some of the data structures and programs by injecting our own data and seeing how your code interacts with it. We typically include debug in the name of these methods, to make it clear that they are only for debugging and should be removed from the final code.
In addition to the three methods listed above, there are some other ways we can accomplish this:
Many of these are discussed in greater detail in the dependency injection article on Wikipedia.
In general, we want to build our code in a way that it can easily be tested, and that means providing some way to perform dependency injection that doesn’t interfere with the normal operation of our program.
Here are some quick tips that you may be able to use when you need to implement dependency injection:
Dependency injection is a very powerful testing technique, but one that must be used carefully to prevent introducing additional bugs and complexity to your application.
In this chapter, we learned about test doubles and how they can use them in our unit tests to mimic functionality from other parts of our program. In short, there are three different common types of test doubles:
We also explored how we can use these in our code both Java and Python. Finally, we learned about dependency injection and how we can use that technique to place our test doubles directly in our classes. Now, we’ll be able to update the unit tests in our ongoing project to help separate the classes being tested from other classes that it depends on.
Check your understanding of the new content introduced in this chapter below - this quiz is not graded and you can retake it as many times as you want.