GUI Basics
Making things visible, graphically!
Making things visible, graphically!
Portions of the content in this chapter was adapted from Nathan Bean’s CIS 400 course at K-State, with the author’s permission. That content is licensed under a Creative Commons BY-NC-SA license.
This chapter will introduce concepts related to building a graphical user interface, or GUI (pronounced “gooey”) for our programs. Up to this point, all of our program interaction has been done either through the terminal or via input files. Most non-technical users today, however, are unfamiliar with using the terminal and prefer to interact with programs graphically. So, as developers, we should learn how to build our programs in a way that they are accessible to a wide audience of users.
The next few chapters will give us the background we need to add GUIs to our programs. However, we will focus mostly on the functionality of our interfaces, leaving overall design as an “exercise for the reader” to complete. There are many resources available to learn how to properly style and arrange the controls on our GUIs, and it is simply too much to cover in a course such as this one. In fact, most IDEs, such as NetBeans, Eclipse, and IntelliJ for Java, and PyCharm for Python, all include tools for building GUIs graphically themselves, making it even easier to build GUIs that look the way we imagine them.
Some terms we’ll cover in this chapter:
The key skill to learn in this chapter is the basic background and structure of the Java Swing and Python tkinter GUI libraries.
Java Swing and Python tkinter are libraries and toolkits for creating Graphical User Interfaces - a user interface that is presented as a combination of interactive graphical and text elements, commonly including buttons, menus, and various flavors of editors and inputs. GUIs represent a major step forward in usability from earlier programs that were interacted with by typing commands into a text-based terminal (the EPIC software we looked at in the beginning of this textbook is an example of this earlier form of user interface).
The availability of GUIs and the tools used for creating them have changed over the years, especially as the display technologies themselves have evolved.
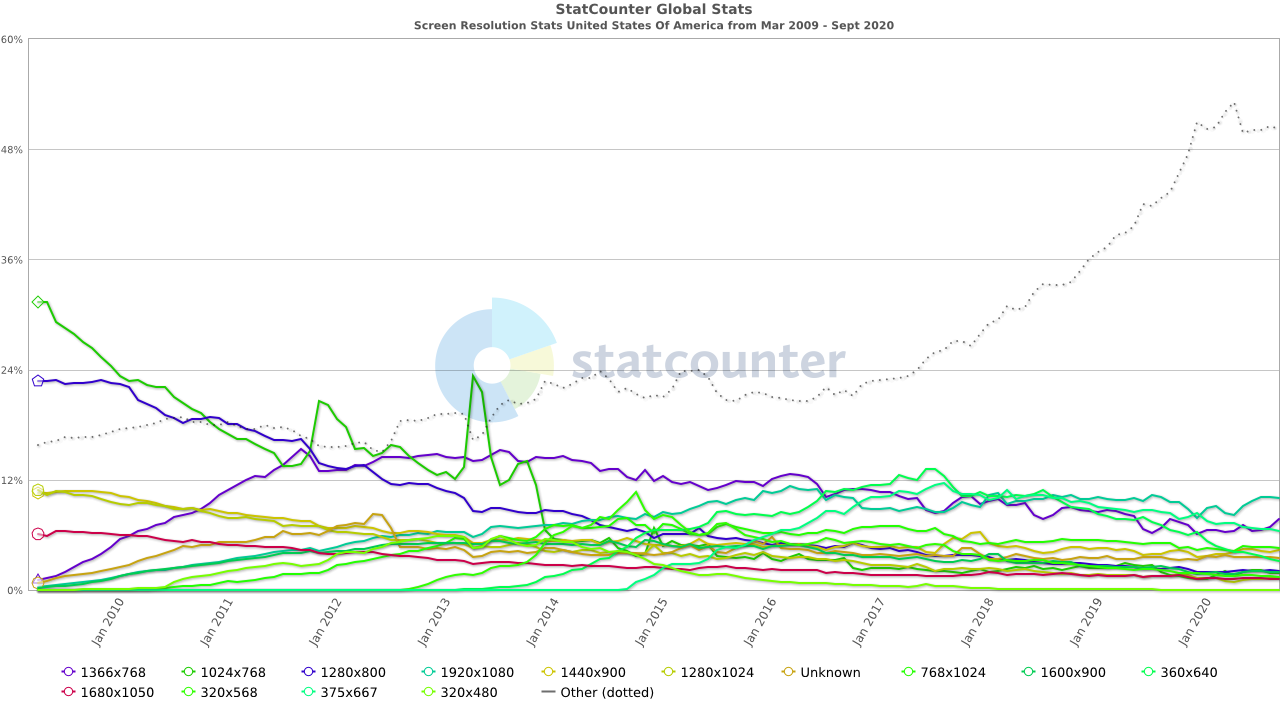
No doubt you are used to having a wide variety of screen resolutions available across a plethora of devices. But this was not always the case. Computer monitors once came in very specific, standardized resolutions, and only gradually were these replaced by newer, higher-resolution monitors. The table below summarizes this time, indicating the approximate period each resolution dominated the market.
| Standard | Size | Peak Years |
|---|---|---|
| VGA | 640x480 | 1987-1990 |
| SVGA | 800x600 | 1990-2003 |
| XGA | 1024x768 | 2007-2015 |
Many of these libraries were introduced in the early 2000s, at a time where the most popular screen resolution in the United States was transitioning from SVGA to XGA, and screen resolutions (especially for business computers running Windows) had remained remarkably consistent for long periods. Moreover, these resolutions were all using the 4:3 aspect ratio (the ratio of width to height of the screen). Contrast that with trends since that time:
There is no longer a clearly dominating resolution, nor even an aspect ratio! Thus, it has become increasingly important for applications to adapt to different screen resolutions. Altering these values in response to different screen resolution requires significant calculations to resize and reposition the elements, and the code to perform these calculations must be written by the programmer. To deal with this, many graphics libraries added additional features and methods for laying out controls on the screen, automatically positioning them much like a web browser will lay out content on a webpage to fit the screen. With careful design, the need for writing code to position and size elements is eliminated, and the resulting GUIs adapt well to the wide range of available screen sizes.
For more information, check out the History of the Graphical User Interface article on Wikipedia for a deep dive into this topic!
Many modern graphics libraries also leverage controls built around graphical representations provided directly by the hosting operating system. This helped keep applications looking and feeling like the operating system they were deployed on, but limits the customizability of the controls. A commonly attempted feature - placing an image on a button - can become an onerous task within some systems. Attempting to customize controls often required the programmer to take over the rendering work entirely, providing the commands to render the raw shapes of the control directly onto the control’s canvas. Unsurprisingly, an entire secondary market for pre-developed custom controls emerged to help counter this issue.
In addition, many graphics libraries include the ability to “skin” or change the overall look and feel of the entire user interface quickly. We won’t get too far into the design aspects of a good GUI in this course, but students are welcome to play around with the tools they find and see what works best for them.
There are many different graphics frameworks available today. Some are limited to a specific language, such as Java Swing, whereas others are cross platform, such as the tkinter library in Python which is based on the Tk GUI framework. Finally, others are limited to particular operating systems, such as the Windows Presentation Framework. Let’s review the two frameworks we’ll be using: Java Swing and Python tkinter.
Swing is a graphical user interface toolkit for Java that was originally created in 1996 by Netscape, but it was later integrated into the core of Java in 1997. It was meant to be an upgrade to the existing Abstract Window Toolkit that was used to create graphical programs in Java at the time, though even today we still use some classes from the awt package along with the newer swing components.
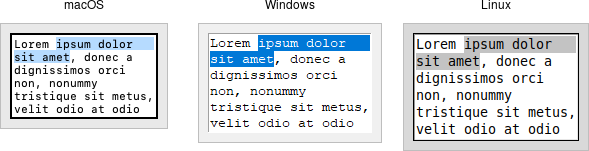
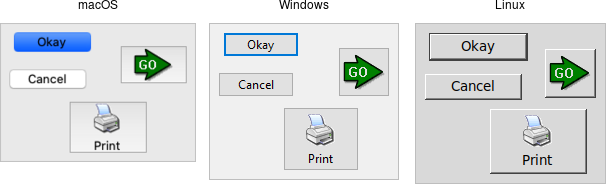
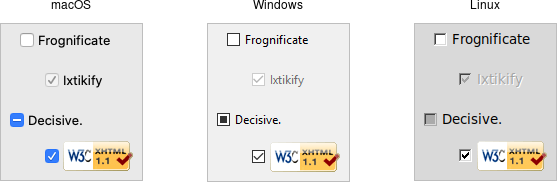
One major benefit of Java Swing is the ability to quickly change the “look and feel” of the application using various different components. In addition, it is cross platform, and applications displayed on Windows will look nearly identical to those displayed on Linux or Mac as well.
In addition, developers can easily customize many components of the Java Swing toolkit using inheritance. We simply must extend an existing component in Swing, such as the JFrame container, and we can provide additional functionality directly in that class.
Python includes a library called tkinter (short for “Tk Interface”), which is a wrapper around the Tk GUI framework. Tk is a cross platform toolkit for building GUIs that was developed in the early 1990s, but is still used today in many different programs. Tk includes a large range of elements, called “widgets,” including buttons, text boxes, and more, that can be used to build interactive GUIs.
In more recent versions of Python, a new “themed Tk” style was introduced, allowing Tk widgets to match the look and feel of programs natively built for the operating system. This helps programs written in Tk “fit in” with other applications running on the same operating system.
Like Java Swing, tkinter allows us to build GUIs by inheriting from the default components such as the Frame widget that can act as a container for other widgets. We can even nest Frame widgets inside other Frame widgets to build more complex layouts.
On the next few pages, we’ll discuss the basic features each of these frameworks has in common, before diving a bit deeper into each one and what makes it unique.
There are many other frameworks available for both of these languages, but there are a few specific reasons we chose to focus on Java Swing and Python tkinter.
In Java, the newer JavaFX platform has been available since the mid 2000’s, but unfortunately it is difficult to use Java FX in Codio since we are reliant on the OpenJDK platform instead of the Oracle JDK due to licensing issues and ease of use. In addition, JavaFX is much more oriented toward web applications than other traditional GUI frameworks like Tk. So, to simplify things and keep the two languages in sync, we choose to use the older Java Swing framework.
For Python, recently many Python developers have been using PySimpleGUI as a simpler wrapper for the tkinter library. It also is compatible with other GUI frameworks such as Qt and WxPython, and in many cases is easier to use than tkinter itself. Unfortunately, as of this writing we felt that PySimpleGUI wasn’t quite mature enough for us to include in this curriculum. So, we chose to continue to use the built-in tkinter library in Python for now.
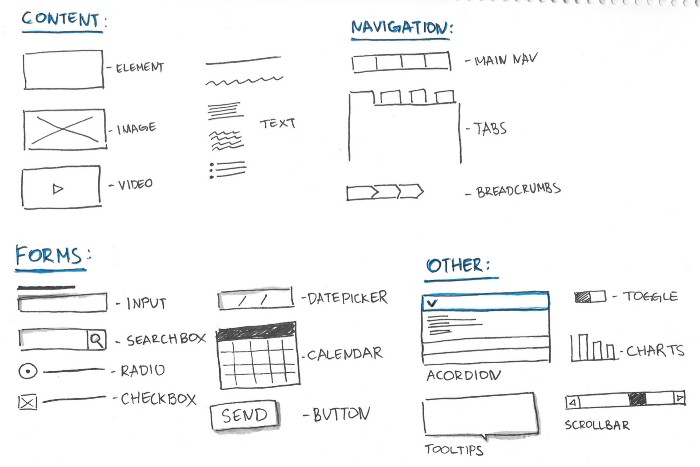
One of the first questions we may consider when adding a GUI to our programs: how do we go about designing a GUI in the first place? There are many ways to go about this, but one of the easiest and most accessible is also the simplest - pen and paper.
A common technique used when developing a GUI for a program is to simply sketch your design on paper. This allows you to quickly see how the overall program would look, and it can help you figure out how you’d like to lay out your content and elements on the screen.
Once you’ve got a basic idea of what you’d like your GUI to look like, there are a couple of next steps that you can follow to further refine your design:

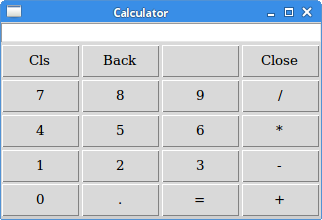
Another type of tool we can use to develop GUI prototypes is a simple drawing tool. Both Microsoft Visio (available through the Azure Student Portal) and the Diagrams.net drawing app are both well suited to develop GUI prototypes. In fact, they even include some items you can use to mimic what a real GUI would look like. The picture above was created using a few of the built-in mockup designs present in Diagrams.net
Once we have a good idea for what our GUI should look like, we can start building it.
Here are a few terms and acronyms that are used in the GUI world that are important to understand.
Here are some helpful resources that discuss GUI design:
To begin building our own GUIs, let’s start at the top and work our way down into the details of each individual element that our applications include. At the top of that list is the window.
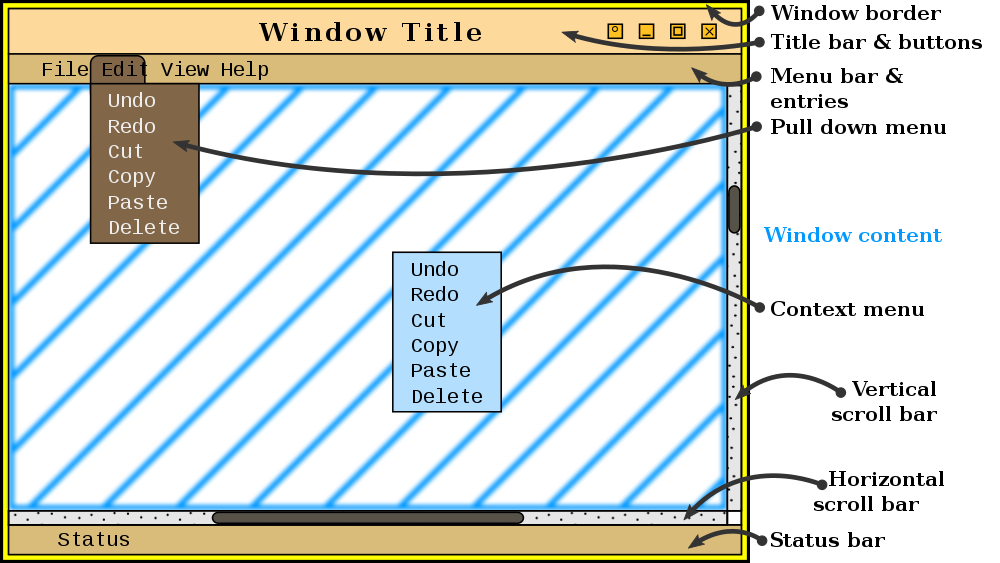
A window is the top most level of the user interface for most programs. Basically, the GUI for each application is contained within one or more windows, that are then displayed on the screen and managed by the operating system. Each time we open an application, a new window appears that contains the application.
We see windows all the time when we work with modern computer interfaces. The window metaphor is the most dominant interface metaphor in use today, used by nearly all operating systems designed for personal computers.
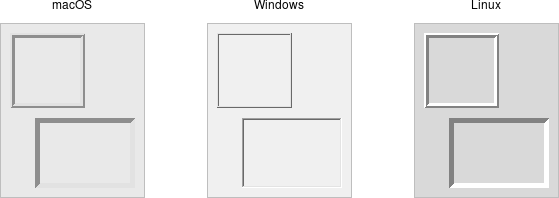
Most windowing systems use a design similar to the one shown above, containing many common elements such as a title bar, menu bar, scroll bars, and more. In fact, look at the web browser you are most likely using to read this content - how many of those elements are present in your browser? Some of them may be there, but others may have been removed or hidden over time.
If you are familiar with web development, you can think of the overall window as the <body> tag in a web page. It is the container that displays all of the content to the user.
Inside of the window itself is a global container that contains all of the elements of our GUI. We typically call this container a panel, but it can also be called a pane or a frame, depending on the GUI toolkit we are using.
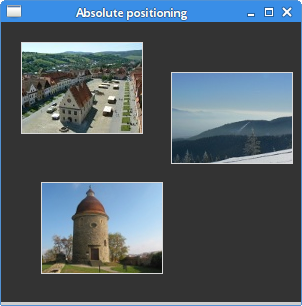
A panel typically doesn’t appear on the GUI itself, but it is simply a container or grouping of other display elements. The panel may use a layout manager to determine how the elements are arranged within its space, or the elements can be placed statically using x-y coordinates.
In web development, we might think of a panel like a <div> tag. The <div> tag itself doesn’t appear on the screen, but it can be used to group similar items together, arrange them within the container, and then the container itself can be placed within a larger container on the screen.
Many different GUI elements can be placed within a frame. For more complex GUIs, there might be dozens of these elements, and each one will need to be positioned on the screen in such a way that the GUI is usable. In addition, if we want to build our GUI for multiple different window sizes and screen resolutions, we might need a way to automatically adjust the size and position of these elements within the frame to fit our screen. All of that can be very tedious and time consuming to do by hand. So, many GUI toolkits include special software called layout managers to help us with that task. Some tools, such as Tk, also refer to these as geometry managers.
A layout manager, put simply, is a piece of code that can automatically resize and position elements within a panel in a GUI. Web browsers make extensive use of layout managers to enable resizing of web pages. Try it yourself - see if you can resize this page, and then watch how the web browser and Codio interface adjust to fit the new screen size. How small of a screen can it handle?
As an example, the Java Swing toolkit includes several different layout managers, and each one can be used to achieve different outcomes. The best resource is A Visual Guide to Layout Managers on the Oracle website, as it shows graphically how each layout manager available in Java Swing operates.
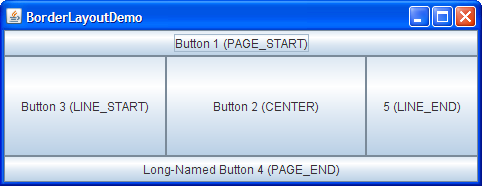
For example, the BorderLayout will attach controls to the borders of the screen, growing and shrinking them as the window is resized.
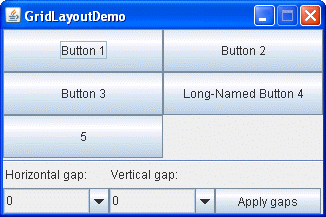
The GridLayout will arrange controls in a grid of rows and columns.
The Python tkinter library includes three layout managers, place, pack, and grid.
The place layout manager can be used to place elements on the screen at specific x-y coordinates.
The pack layout manager is used to fit controls to the screen, expanding them in various directions as needed to fill the available space.
Finally, the grid layout manager works very similar to the GridLayout manager in Java, allowing us to create rows and columns of elements on our screen.
As we develop our GUIs, we’ll be able to choose the layout manager we’d like to use. In the example project for this chapter, we’ll explore how to use these layout managers to create a simple interface that contains a set of buttons and a few other elements.
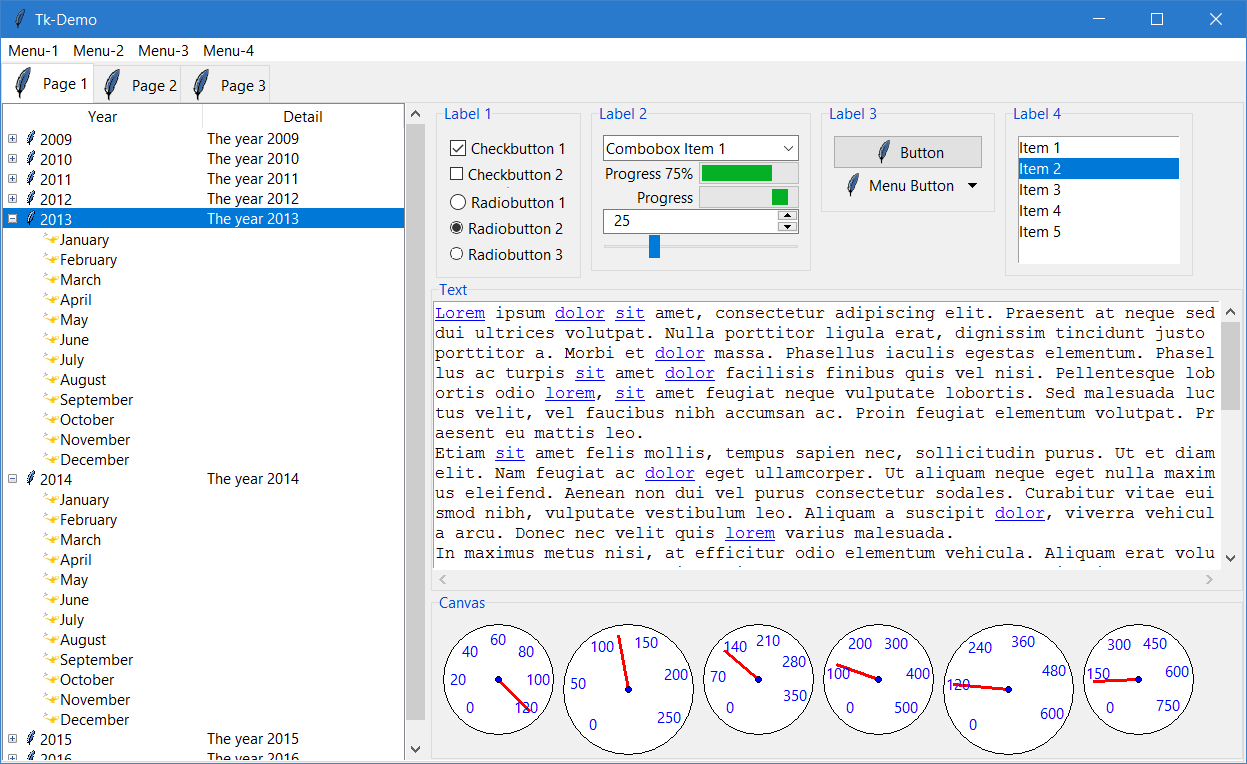
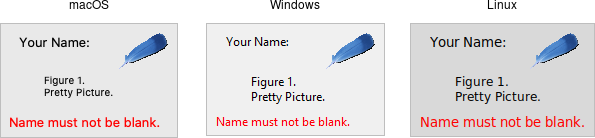
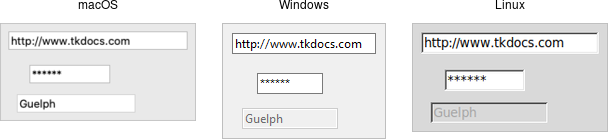
Once we’ve created a window, a panel, and selected our layout manager, we can finally start to add elements to our GUI. This page will list some of the common GUI elements that we can choose, and describe how they can be used best in our applications. Where possible, we’ll also link to official documentation and some tutorial resources so we can learn how to use each of these in our programs. Refer to the links for screenshots and examples of how each of these elements can be used in our programs. Examples below are taken from the TkDocs documentation site.
A panel is the container element in the GUI. It usually doesn’t appear to have any graphical component, though it can be styled as shown in the screenshot above. Other elements are typically added to a panel, which uses a layout manager to determine how the elements are placed within the panel.
A label is simply a piece of text added to the GUI that is not editable by the user. They are typically used to provide information to the user or “label” other controls, such as text boxes.
These controls are used for a single line of text input, such as a username or password field.
These controls handle multiple lines of text input, such as in a word processing program.
A button is one of the simplest controls. When a user clicks on a button in our GUI, we can then call a function in our code to perform any action required.
A checkbox, sometimes referred to as a toggle, allows the user to manipulate a boolean value, such as “on” and “off” by clicking it. Checkboxes typically include their own text label, and don’t need to have a separate label added to them.
A radio button is part of a set of buttons that are similar to checkboxes, but only one option can be selected at a time. The name comes from old radios that had a set of buttons that could be used to recall stations, and pressing one button would cause any other button pressed to pop back out, such that only one button could be pressed at a time.
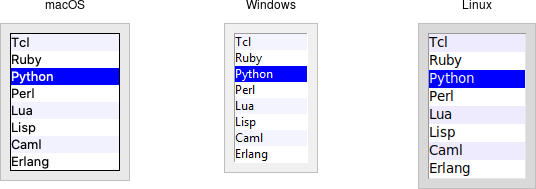
A list box displays a list of options to the user, and then the user can choose one or more options from the list, depending on how it is configured.
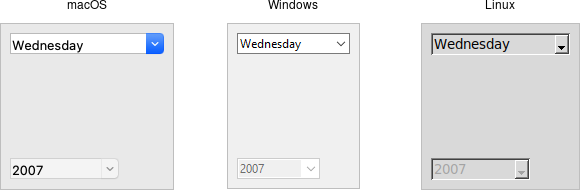
A combo box, sometimes referred to as a drop-down menu, allows a user to select a single option from a list of options, or possibly enter their own option. It is really a combination of a list box and a text input field in one, hence why it is called a “combo” box.
Before we can learn to write our own GUI programs, we should discuss exactly how to access a graphical program in Codio. Thankfully, there is an easy way to do this, but let’s look at the technology behind the scenes that makes this possible.
The X Window System (sometimes referred to as X11 or simply X) is a windowing system that is used on many Linux-based operating systems, including the Ubuntu system that Codio uses in the background. X handles drawing windows on the screen and passing user input back to the application, but that’s about it. Most of the look and feel of the application is handled by the application itself, though different window managers bundled with various operating systems can also provide various themes for applications that are rendered using X.
One of the very powerful features of X is the ability to display graphical programs on a remote system across the network. In this way, programs can be launched on one system and then viewed remotely on another system, providing a rudimentary remote interface similar to Remote Desktop or VNC tools today.
Codio uses this technology to display a graphical program directly in the Codio interface. So, all we have to do is open the Codio X viewer when we run our application, and it will display the output for us. The details for how to do this are covered in the Codio Documentation
There are a few ways to do this:
"Viewer": "https://{{domain3000}}/" to the .codio file present in the root of the project. Here’s an example of what it might look like:{
// Configure your Run and Preview buttons here.
// Run button configuration
// other data here
// Preview button configuration
"preview": {
"Viewer": "https://{{domain3000}}/"
}
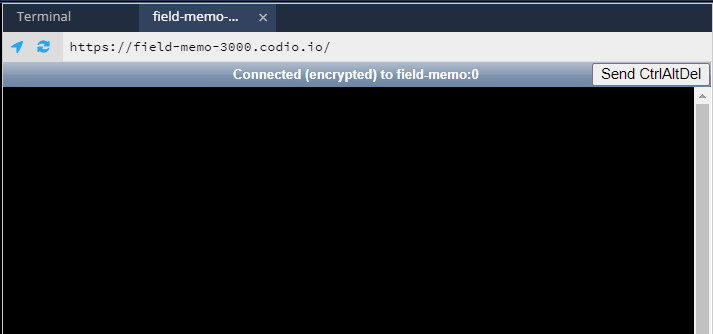
}https://box-name-3000.codio.io/, where you replace box-name with the two word domain name. It can be found in the Project menu under Box Info. It also appears on the terminal:
In this case, the box name is field-memo. Once you load the viewer, you should see a window similar to this:
Then, when you launch any program that has a GUI, it will appear in this window.
On the next pages, we’ll discuss a simple “Hello World” style program for both Java Swing and Python tkinter. As always, you are welcome to just read the pages that correspond to your chosen language, but it may be beneficial to see both languages to learn a bit more how each of them work in different ways.
Now let’s dive into Java Swing and see how to make our very first GUI application in Swing.
At the top of our applications, we’ll need to import elements from three different packages:
import java.awt.*;
import java.awt.event.*;
import javax.swing.*;
The java.awt package includes all of the classes related to the older Abstract Window Toolkit (AWT) in Java, and the java.swing package includes all newer Java Swing packages. Instead of reinventing the wheel, Java Swing reuses many components from AWT, such as the Dimension class that is used to control the size and position of windows. We also include the java.awt.event package to handle events such as button clicks.
Of course, when using these libraries in our project code, we’ll want to import each class individually in order to satisfy the requirements of the Google Style Guide (See 3.3.1 - No Wildcard Imports). That is left as an activity for later, but the example project in this chapter will show some of the imports required.
One of the easiest ways to build a program using Java Swing is to simply inherit from the JFrame class. In that way, our program has access to all of the features of the topmost container in Java Swing, and we can use it just like any other component in the GUI.
Then, within the constructor of that class, we can set our layout manager and add elements to our application. Let’s look at the code of a simple application, and then we’ll go through it piece by piece.
import java.awt.*;
import java.awt.event.*;
import javax.swing.*;
public class MainWindow extends JFrame implements ActionListener {
/**
* Constructor to build the GUI and display elements
*/
public MainWindow() {
// sets the size of this window
this.setSize(new Dimension(200, 100));
// tell the program to exit when this window is closed
this.setDefaultCloseOperation(JFrame.EXIT_ON_CLOSE);
// set the layout manager
this.setLayout(new GridBagLayout());
// Create the constraints for the GridBagLayout manager
GridBagConstraints gbc = new GridBagConstraints();
// set the constraints for the label
gbc.fill = GridBagConstraints.HORIZONTAL;
gbc.gridx = 0;
gbc.gridy = 0;
// add a label
this.add(new JLabel("Hello World!"), gbc);
// reset the constraints for the button
gbc.gridx = 0;
gbc.gridy = 1;
// create a button
JButton button = new JButton("Close");
// set the button's command:
button.setActionCommand("close");
// send the clicked event to this object
button.addActionListener(this);
// add the button
this.add(button, gbc);
}
/**
* actionPerfomed is called when a user interacts with an element
* that lists this class as it's action listener
*
* @param e the event generated by the action
*/
@Override
public void actionPerformed(ActionEvent e) {
if ("close".equals(e.getActionCommand())) {
// close button was clicked, so exit the application
System.exit(0);
}
}
/**
* Main method to start this application
*/
public static void main(String[] args){
SwingUtilities.invokeLater(new Runnable() {
public void run() {
new MainWindow().setVisible(true);
}
});
}
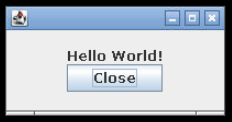
}When we compile and run this code, then open the Codio viewer, we should see this window:
Let’s go through this code and explore what it does. We’ll also cover most of this content in the example project for this chapter.
This application includes two instances of inheritance:
public class MainWindow extends JFrame implements ActionListener {While we don’t need to use inheritance here, it is one of the simplest ways to build our GUI - we can then treat our MainWindow class just like any other JFrame elsewhere in the code. As we’ll see in the example project, this makes it easy for us to create custom controls or entire panels that we can reuse in our code.
Next, we have a few lines of code that help us set up the window for this application and configure the layout manager.
// sets the size of this window
this.setSize(new Dimension(200, 100));

// tell the program to exit when this window is closed
this.setDefaultCloseOperation(JFrame.EXIT_ON_CLOSE);

// set the layout manager
this.setLayout(new GridBagLayout());
// Create the constraints for the GridBagLayout manager
GridBagConstraints gbc = new GridBagConstraints();
First, we set the size of the window to 200 pixels by 100 pixels, using the Dimension class from AWT. Then, we configure the window to exit our application when the window itself is closed. If we don’t do this, then our Java application may continue to run in the background even if the window itself is closed.
Below that, we set our frame’s layout manager to the GridBagLayout layout manager. The Java GridBagLayout allows us to arrange elements in rows and columns, but gives us additional flexibility over the GridLayout manager. In many cases, we’ll want to use GridBagLayout if we are writing the code by hand, as it gives us a good balance between the power of the layout manager and the simplicity of the code. It also works similarly to the grid layout manager in Python tkinter, making it a helpful choice in this class.
Finally, we create an instance of GridBagConstraints, which is used to specify the constraints we wish to apply on an element when we add it to a container that is using the GridBagLayout. In our minimal example, we’ll use it to specify the row (gridx) and column (gridy) of the element, as well as the ability to resize the components horizontally (fill) if the window is stretched, but not vertically.
Once we’ve set up our JFrame, we can add a few components. The first component is a JLabel.
// set the constraints for the label
gbc.fill = GridBagConstraints.HORIZONTAL;
gbc.gridx = 0;
gbc.gridy = 0;

// add a label
this.add(new JLabel("Hello World!"), gbc);
First, we start by setting the constraints in our instance of GridBagConstraints. The fill option as described above allows this component to stretch horizontally, and we are adding it to the 1st row gridx and first column gridy of our application. Finally, we call the add() method, providing an instance of the JLabel class as the element to add, as well as the GridBagConstraints object to describe to the layout manager how we’d like this control placed in the window.
Now we can also add a JButton to our window.
// reset the constraints for the button
gbc.gridx = 0;
gbc.gridy = 1;

// create a button
JButton button = new JButton("Close");
// set the button's command:
button.setActionCommand("close");
// send the clicked event to this object
button.addActionListener(this);
// add the button
this.add(button, gbc);
Here, we first reset the constraints to place the button in the 2nd column gridy of our application. We are reusing our GridBagConstraints object here, but in practice it is often better to create a new instance each time. Otherwise we could introduce bugs that are shared across many elements, making it difficult to debug.
Below, we create an instance of JButton to act as our button, and then set two additional options on that button:
setActionCommand() - this allows us to add a custom command to the button, so that when it is clicked we’ll be able to easily determine the source of the event. We’ll see how we can use this below.addActionListener() - by default, when this button is clicked it won’t do anything. So, we need to tell Java which object should be used to listen for clicks from this button. In this case, our MainWindow class is implementing the ActionListener interface, so we use the this keyword to direct those events back to this object.Finally, we use the add() method to add our button to our JFrame. Our GUI is complete, but we still haven’t defined what action to take when the button is clicked.
The ActionListener defines one abstract method, actionPerformed(), which we must override in this class. Whenever a user interacts with an element that has listed this object as it’s action listener, the actionPerformed() method will be called. The parameter to this method is an ActionEvent, which we can use to determine which element was used and react appropriately.
@Override
public void actionPerformed(ActionEvent e) {
    if ("close".equals(e.getActionCommand())) {
        // close button was clicked, so exit the application
        System.exit(0);
    }
}
In this example, we simply check to see if the action command associated with that event is the "close" action we added to our button earlier. If so, we use System.exit(0) to terminate our program. Notice that we simply can’t use return here, since the application will continue to run even after this method is called. Instead, we have to shut down the entire application itself, and the simplest way to do this in Java is to use the System.exit() method. We provide a 0 as a parameter to indicate that our program terminated normally. If we provide a non-zero value, it indicates that our program crashed in some way - we can even use different values to represent different error conditions!
Finally, we need a main method to actually launch our application.
public static void main(String[] args){
    SwingUtilities.invokeLater(new Runnable() {
        public void run() {
            new MainWindow().setVisible(true);
        }
    });
}
This method is a bit complex, and it does a lot of things in a short amount of time. Basically, we are creating a new thread in Java using the Runnable interface. We haven’t covered threading and parallel programming yet in this course, so don’t worry if you don’t quite understand at this point. A thread is simply like having another application running at the same time, but within our program itself. By doing so, this allows our GUI to run in a different thread than the rest of our application, so they can run side by side. This prevents the GUI from locking up each time our program has to perform a complex task.
You might notice that this code looks somewhat similar to a Java lambda expression. In fact, instead of just creating an anonymous function, here we are creating an entire anonymous class! You can learn more about how to do this in the Anonymous Classes guide from Oracle.
Inside of the run() method of our Runnable object, we simply create a new instance of MainWindow and then set it to be visible.
More information can be found in the Initial Threads document in the Oracle Java Tutorials.
Now let’s dive into Python tkinter and see how to make our very first GUI application in Tk.
At the top of our applications, we’ll need to import the tkinter library:
import tkinter as tkThis allows us to refer to the tkinter library as tk throughout our application.
For some more advanced elements, such as the combo box, we may also need to import the themed Tk (ttk) package as well:
from tkinter import ttkOne of the easiest ways to build a program using tkinter is to simply inherit from the tk.Tk class, which usually represents the main window in an application. In that way, our program has access to all of the features of the topmost container in tkinter, and we can use it just like any other component in the GUI.
Then, within the constructor of that class, we can add elements to our GUI using our chosen layout manager. Let’s look at an example program first, and then we’ll review each part in more detail.
import sys
import tkinter as tk
from typing import List
class MainWindow(tk.Tk):
def __init__(self) -> None:
"""Initializer for GUI."""
# Initialize the parent class
tk.Tk.__init__(self)
# Set the window size
self.minsize(width=200, height=100)
# Allow the grid to expand horizontally to fill the space
self.grid_rowconfigure(0, weight=1)
self.grid_rowconfigure(1, weight=1)
self.grid_columnconfigure(0, weight=1)
# Create a label and add it to the GUI
self.__label = tk.Label(master=self, text="Hello World!")
self.__label.grid(row=0, column=0)
# Create a button and add it to the GUI
self.__button = tk.Button(master=self, text="Close",
command=lambda:
self.action_performed("close"))
self.__button.grid(row=1, column=0)
def action_performed(self, text: str) -> None:
"""Event handler for GUI events.
Args:
text: the text of the event
"""
if text == "close":
sys.exit(0)
@staticmethod
def main(args: List[str]) -> None:
"""Main method."""
MainWindow().mainloop()
# Main Guard
if __name__ == "__main__":
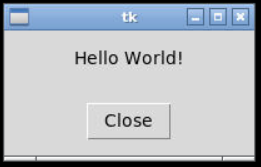
MainWindow.main(sys.argv)When we run this code, then open the Codio viewer, we should see this window:
Let’s go through this code and explore what it does. We’ll also cover most of this content in the example project for this chapter.
This example uses a very object-oriented format, which is different than many other tutorials you may find online for learning tkinter.
The main reason for this is to show you how to build more complex GUIs by taking advantage of object-oriented programming concepts and inheritance. In addition, this example was written to be very similar to the Java Swing example on the previous page.
Since Python doesn’t really have a standard way to do object-oriented GUIs, we figured it was best to at least try to match the Java standard. In that way, the concepts will carry over between languages very easily.
This application includes one instance of inheritance
class MainWindow(tk.Tk):In this example, our MainWindow class is inheriting from the built-in Tk class in tkinter, which is the root class that represents the main window.
While we don’t necessarily have to use inheritance here, and in fact many Python guides don’t use it at all, this help us build our GUI in an object-oriented way. In addition, by using inheritance, we can make our own custom version of elements such as buttons and panels that we can use in our larger GUI projects later on.
Next, we have a few lines of code that help us set up the window for this application and configure the layout manager.
# Initialize the parent class
tk.Tk.__init__(self)

# Set the window size
self.minsize(width=200, height=100)

# Allow the grid to expand horizontally to fill the space
self.grid_rowconfigure(0, weight=1)
self.grid_rowconfigure(1, weight=1)
self.grid_columnconfigure(0, weight=1)
First, we have to explicitly call the constructor of the class we are inheriting from so that Python will actually construct it.
Then, we are setting the minimum size of the window using the minsize() method. This will allow us to make the window bigger, but it won’t go any smaller than 200 pixels wide and 100 pixels tall.
Lastly, we are configuring the rows and columns to each have a weight of 1. This is used to adjust how the rows and columns are resized as the application window is resized. In this case, by setting them each to have the same weight, they will occupy the same amount of space within our application. This has the effect of centering each element within the window itself.
Once we’ve set up our window, we can add a few components. The first component is a Label
# Create a label and add it to the GUI
self.__label = tk.Label(master=self, text="Hello World!")
self.__label.grid(row=0, column=0)
First, we create a new instance of tk.Label and set a few properties:
master - the master property defines which container this element is placed in. In this case, we want it to be placed in the main window represented by this object, so we use self.text - this is the text that is contained in the labelOnce we’ve created an element, we can place it on our GUI using the grid() method. As expected, the grid() method requires two parameter, the row and column that we’d like to place the element within.
Now we can also add a Button to our window.
# Create a button and add it to the GUI
self.__button = tk.Button(master=self, text="Close",
                          command=lambda:
                          self.action_performed("close"))
self.__button.grid(row=1, column=0)
Constructing a button is very similar to constructing a label, but in this case we are populating one additional property - command. The command property is meant to be a function that is called when this button is clicked. In this case, we’ve chosen to use a lambda expression to call a function in this class called action_performed. We provide an argument "close" to help identify the button that was clicked.
The major reason we use a lambda expression here is that it allows us to bind other variables and use them in our function call. We’ll see how to do this in the example project for this chapter.
To handle any events generated when the user interacts with the GUI, we can configure all of our elements to call the action_performed method. Or, if we so choose, we can create any number of methods to handle different actions - it is entirely up to the developer! The parameter to this method is a string, which we can use to determine which element was used and react appropriately.
def action_performed(self, text: str) -> None:
    """Event handler for GUI events.

    Args:
        text: the text of the event
    """
    if text == "close":
        sys.exit(0)
In this example, we simply check to see if the action command associated with that event is the "close" action we added to our button earlier. If so, we use sys.exit(0) to terminate our program. Notice that we simply can’t use return here, since the application will continue to run even after this method is called. Instead, we have to shut down the entire application itself, and the simplest way to do this in Python is to use the sys.exit() method. We provide a 0 as a parameter to indicate that our program terminated normally. If we provide a non-zero value, it indicates that our program crashed in some way - we can even use different values to represent different error conditions!
Finally, we need a main method to actually launch our application.
@staticmethod
def main(args: List[str]) -> None:
    """Main method."""
    MainWindow().mainloop()
This method does two things. First, it creates a new instance of our MainWindow class, which is inheriting from the Tk class that is the base window class in Tk. Then, we are calling the mainloop() method, which actually handles starting a thread that is listening for and reacting to any user interactions with the GUI. We haven’t covered threading and parallel programming yet in this course, so don’t worry if you don’t quite understand at this point. A thread is simply like having another application running at the same time, but within our program itself. By doing so, this allows our GUI to run in a different thread than the rest of our application, so they can run side by side. This prevents the GUI from locking up each time our program has to perform a complex task.
For more information on how this works, consult the Event Loop page in the TkDocs website.
In this chapter, we reviewed the basics of creating graphical user interfaces, or GUIs, for our programs. We learned about GUI frameworks such as Java Swing and Python tkinter, and how to use them.
We saw that applications are contained within windows, which are managed by the window manager, part of the operating system that our applications are running under. Inside of those windows, we can place controls such as panels, labels, text inputs, and more. To arrange those elements, we can use a layout manager.
We then learned how to create a simple “Hello World” GUI in both Java Swing and Python tkinter, which will serve as the basis for the example project attached to this chapter.
In later parts of this course, we’ll learn how to react to the various events that are generated by our GUI using event-driven programming.
Check your understanding of the new content introduced in this chapter below - this quiz is not graded and you can retake it as many times as you want.