Creating a Release
Putting Our Applications Out There in the World!
Putting Our Applications Out There in the World!
At some point, we may decide that the application or library we are developing is ready for release. In that case, there are a few things we can do to help make our application easier to install and use for our potential users.
In this chapter, we’ll briefly discuss some of the steps in that process and the decisions we may need to make along the way. This is not meant to be a full guide to releasing a professional piece of software, but it should help you navigate some of the first steps toward making your application available to a wider audience.
In this chapter, we’ll discuss these topics and terms:
After this chapter, we’ll also have a short example project that goes through these steps, allowing you to create your own software release!
Before we release our software, there are a few steps that we should perform to make sure it is ready for release. Most of these steps are things that we’ve already been doing as part of our development process, but it is always good to review them once again and make sure everything is ready for release.
README.md file giving basic instructions for how to use your application.checkstyle and flake8 are powerful ways to make sure your code is complete, easy to read, and follows standard coding styles.Gradle or pip3, or consider packaging dependencies with your application if the license allows it.dotenv project from the Ruby programming language. Popular options include dotenv-java for Java and python-dotenv for Python.Of course, these are just a few of the things we may want to review before deciding our application is ready for publication. It’s always worth taking the time to think about how useful our application will be to our users before taking the next step.
The next major step in releasing a piece of software is to choose a license. Adding a license to your software allows you to specify what the software can be used for, who can use it, and how they can make use of it either within their own applications or by possibly distributing and building derivative works.
In the previous chapter, we discussed various software licenses and what they mean when we try to use a library under that license. Now, let’s look at what it means to release our software using those licenses.
The information below is my best attempt to help simplify the vastly complex legal documents that make up a software license. However, this simple information may not be enough to fully understand all of the nuances of how a particular software license impacts other users’ ability to interact with your software, and your liabilities when it comes to that use.
In general, choosing to license your software under one of the more permissive licenses listed below will generally make the application available to all users and protect you from any liability. However, it does not give you any control over how the application may be used by others, including commercial use.
However, when in doubt, you should always read the documents carefully and seek competent legal advice if you are ever unsure. It is always best to make sure you understand the consequences of choosing a particular software license.
To help choose a software license that fits your project, GitHub helpfully maintains the site choosealicense.com. It helps developers choose an applicable license by asking a few simple questions. We’ll discuss some of those questions below and the various licenses they lead to.
For starters, if your project is meant to be part of a larger community of projects, consider using the license that is used by other projects in that community. For example, if we are building a library that is meant to be an add-on for an existing application, it makes sense to choose the license that the application is distributed under. In that way, we can guarantee that our project is available to anyone who can use the application it is meant for.
Likewise, if you are working for a company or with a group of developers, they may already have a preferred license for you to use. In those cases, consulting with others in your group is a valuable way to learn what licenses are being used by the group and how your application may fit in.
The first major choice is whether we’d like to place any limitations on how our software is used at all. If the answer is no, then most likely we’ll want to choose one of the public domain licenses available. This is the most open license, which allows anyone the ability to use our application in any way they wish.
GitHub recommends using the Unlicense for this, which effectively will release the software into the public domain and absolve the creator of any liability or warranty concerns related to the software. Similarly, many creative works may also choose to use the Creative Commons CC0 license to release the content into the public comain.
A permissive license is another common choice for software that we’d like to make freely available to users with a minimum set of limitations. Typically, the only limitation we place on software using these licenses is that the original source code itself must be distributed using this license, but derivative works may be licensed under different terms.
By far the most common permissive license for software on GitHub is the MIT License. This license is used by many open-source projects that wish to keep their code as open as possible, while still allowing users to repackage and redistribute the software as part of a larger commercial package.
A copyleft license is a good choice when we want to make sure that our software remains freely available to users, including any major modifications or derivative works. In general, a copyleft license requires any modifications to our application, or any application that makes major use of our application and source code, to be released under the same license.
The most common choice for a copyleft license is the GNU General Public License (GPL), which is used by many projects related to the Linux operating system. Any software licensed using the GPL includes the limitation that any derivative works are also licensed under the GPL. In this way, a commercial entity couldn’t take our application and repackage it or resell it commercially.
A similar choice is the GNU Lesser General Public License (LGPL), which modifies the GPL to explicitly allow software that only make use of the public interface of our software to be distributed under a different license. Put another way, a commercial application that makes use of our library’s API could still be sold, but our library must be distributed with its license intact. Any derivative works will still require licensing under the LGPL.
Of course, if we choose not to include a license with our software, it will be copyrighted by default, at least in the United States. This means that, even though our source code may be available on the Internet, anyone who chooses to use it could be violating our copyright and subject to legal action. This is further complicated by other agreements such as the GitHub Terms of Service, which allows users on that site to view and “fork” any repository available publicly, regardless of the underlying license or lack thereof.
GitHub provides a good overview of what happens when you choose to publish software without a license. That said, it is highly recommended to either choose an open-source license listed above, or make the code private until we are ready to choose a license.
Now that we’ve discussed the various software licenses available, this is a good time to dig deeper into this course and talk about the license attached to various portions of the course. As stated earlier, I am not a lawyer and this is not meant to be a substitute for reading and exploring the licenses yourself, but here is a quick overview of the various licenses used in this course.
The last bullet point above is tricky, because this legally allows you as a student to post your project solutions on GitHub and share them publicly. This is great, as it allows you to use this project as part of your portfolio that you can share with others, and maybe even include it in your resume as you apply for jobs. However, it also means that other students can see your code and possibly submit it as their own, violating the K-State Honor Code. This is made even more difficult because the student sharing a solution could be considered liable in addition to the student who chooses to use it.
While we cannot prevent you from posting these solutions, at least on copyright grounds, here is my recommendation for the best way to protect yourself and others from running into issues:
In this course, we use some tools for detecting plagiarized code, and we also update the projects from time to time to prevent reuse of entire solutions between semesters. In general, a student found to be using a solution that was published online by a previous student will be held liable for violating the K-State Honor Code, but not the student who chose to exercise their rights to publish that solution after the conclusion of the course.
Another major step in creating a software release is to add some metadata to your project. The metadata attached to an application typically includes items such as the version, author, and title. Depending on the format, it may also include additional items such as the main website for the application, and a place where bugs or issues may be reported.
The Java JAR file format includes a file named Manifest.txt that can include this information. The Oracle Java Tutorials website includes a page for Setting Package Version Information that describes the various entries that can be added to that file. In addition, some of this metadata may be added to your project when it is published on one of the repositories available for Java, such as Maven Central.
The Python wheel file format uses a special file called setup.cfg that lists all of the metadata that can be included in the project. There are many different items that can be specified in that file, which are all covered in the Core metadata specifications file in the Python documentation.
In either case, before publishing a release of our application, we should take a minute or two and add any required metadata to our project. This will make it easier for other users to find our application, and it helps us clearly specify items such as the version of our application and any dependency requirements.
As part of the “Hello Real World” project in this course, we learned how to automatically generate documentation for our application based on the documentation comments included in our code. That documentation can be very valuable for anyone who wishes to use or modify our application, so we want to make it available for everyone.
While it is possible for anyone to download our source code and generate this documentation themselves, many times we want to make this even easier by posting the documentation directly on the Internet. In this way, it is always available for anyone who needs it, without any extra steps.
Thankfully, many code repository websites such as GitHub make this process quick and easy. Let’s explore how to make this content available on GitHub using a feature called GitHub Pages
First, we need to prepare our documents to be published on GitHub pages. Thankfully, this is a quick two-step process.
javadoc or pdoc3 tool.docs in our project.Specifically, we want to copy the folder containing the index.html file, as well as any files and folders in that directory, to a new directory at the root of our project named docs. In general, this can easily be done with just a couple of commands on the terminal:
# get to the project folder (this may be different)
cd java
# remove existing docs, if any
rm -rf docs
# copy new docs to that folder
cp -r app/build/docs/javadoc/ docs/
# get to the project folder (this may be different)
cd python
# remove existing docs, if any
rm -rf docs
# copy new docs to that folder (this may be different)
cp -r reports/doc/python/ docs/Once that is done, we should now see a docs folder in our project, and within that folder we should find a file named index.html. We can right-click that file in Codio and choose Preview Static to make sure it is the correct file and that everything is working.
Once we are satisfied, we should commit that docs folder to git, and then push our changes to our GitHub repository.
To enable GitHub pages on our repository, we can follow the instructions on this page to use the newly created docs folder as the publishing source for our website:
main or master branch.docs folder as your publishing source.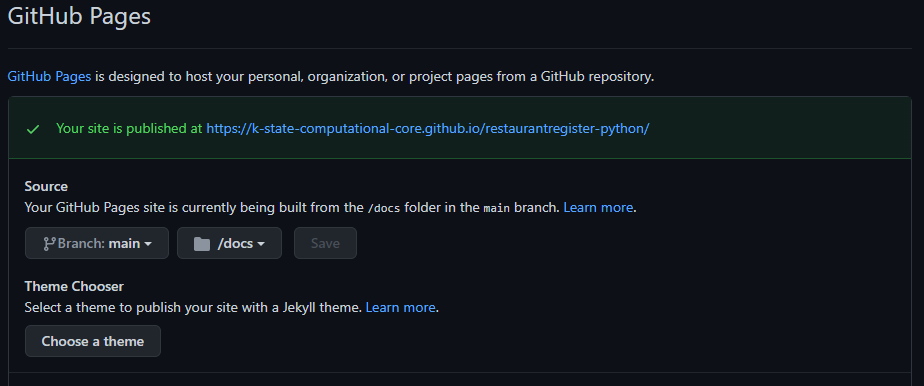
After a minute or so, you should be able to visit the URL listed there and you should see your documentation on the web! You can see some examples of what this looks like by reviewing the public repositories in the K-State Computational Core organization on GitHub and looking for the documentation links in each README.md file.
On the next pages, we’ll review how to build a Java JAR file and a Python wheel file. As always, feel free to skip to the page for your chosen programming language.
Building a JAR file using Gradle is super simple - it handles almost all of the heavy lifting for us. The basic steps are outlined in the Building Java Libraries Simple guide in the Gradle documentation. Below, we’ll go through the steps we’ll need to follow for most of the applications we’ve created in this course.
If we haven’t already, we should first run the Gradle build task. This will automatically create a JAR file for our project, as well as any other required files.
# Change directory to the project directory (this may be different)
cd java
gradle build
Once we’ve done that, we can find our app.jar JAR file in the app/build/libs directory. That’s really all there is to it, but there are a few more things we can add to make it even better.
If we haven’t already done this, now is a great time to create a README.md file in the root directory of our project and include some basic information about our project. Once it is published, we can come back to this file and update it with links to the documentation hosted in GitHub pages.
In addition, we may wish to add a license to our project at this step, before packaging it. We can use the choosealicense.com website to help find a license. We can also easily add a license to an existing GitHub repository following the Adding a license to a repository guide from GitHub, then using the git pull command to pull that license file into our local copy of the project.
In either case, make sure we have a file in the root of our project named LICENSE before continuing.
One major thing we may wish to do in our projects is add some metadata to the project. We can do that by adding various entries to our build.gradle file.
In our build.gradle file, we can define the version of our application by simply adding the following line outside of any other section in that file:
version = 'v0.1.0'When we set the version, we should see the version number appended to the end of our JAR file. If we are following Semantic Versioning in our project, we’ll need to remember to update this version number in our build.gradle file each time we are ready to create a package for release.
We may also wish to set the overall project name. For Gradle, this is in the settings.gradle file, which can be found at the top level of our project. In that document, we should see a setting named rootProject.name, which we can update with our project’s name. For a single project application like the ones we’ve been building, we can set the name of that project as well:
rootProject.name = 'ourprojectname'
include('app')
project(":app").name = 'ourprojectname'
We can also achieve a similar result by simply renaming the app directory in our project to match the name we’d like to use. Either method works well.
Once we’ve set the project name and version in our various Gradle files, we can configure Gradle to include that information in our JAR file. We also need to add the name of the main class to this information if we want our JAR file to be directly executable. To do this, we simply add the following section to our build.gradle file:
tasks.named('jar') {
    manifest {
        attributes('Implementation-Title': project.name,
                   'Implementation-Version': project.version,
                   'Main-Class': 'ourprojectname.Main')
    }
    archivesBaseName = project.name
}
We should replace ourprojectname.Main with the correct name and path to our main class. If we’ve been using Gradle to run our project, it is probably already in the mainClass attribute of the application section of the file.
Notice that we also can add an archivesBaseName setting here to change the base filename of our project’s JAR file to match our project name. With all of this in place, we should now be able to run the gradle build command and find a JAR file named ourprojectname-v0.1.0.jar in the app/build/libs directory.
We can also check that our MANIFEST file contains the correct information by extracting it:
jar xf lib/build/libs/ourprojectname-v0.1.0.jar META-INF/MANIFEST.MFThen, we can open the file named MANIFEST.MF can is found in the META-INF directory and confirm that everything is correct:
Manifest-Version: 1.0
Implementation-Title: ourprojectname
Implementation-Version: v0.1.0
Once we’ve verified that our manifest is correct, we can delete the META-INF directory so it isn’t included in our project.
Sometimes, we may want to publish our original source code in a JAR file. That allows developers to easily download and modify our source code, or they can just explore it and see how it works.
Likewise, in addition to posting our generated Javadoc on the Internet using GitHub Pages, we can also create a JAR file that contains our Javadoc documentation. This JAR file can be imported into many Java IDEs, such as Eclipse, NetBeans, and IntelliJ to allow the IDE to automatically show relevant portions of our documentation to developers as they use our library. To do this, we just need to add the following section to our build.gradle file:
java {
    withSourcesJar()
    withJavadocJar()
}
We’ll also need to add sections to configure those JAR files. These are exactly the same as the one created above, but with different task names:
tasks.named('sourcesJar') {
    manifest {
        attributes('Implementation-Title': project.name,
                   'Implementation-Version': project.version)
    }
    archivesBaseName = project.name
}

tasks.named('javadocJar') {
    manifest {
        attributes('Implementation-Title': project.name,
                   'Implementation-Version': project.version)
    }
    archivesBaseName = project.name
}
Now, when we execute our gradle build command, we should see ourprojectname-v0.1.0.jar as well as both ourprojectname-v0.1.0-sources.jar and ourprojectname-v0.1.0-javadoc.jar. So, when we publish our package, we can also publish these JAR files as well.
There are a few other changes we can make to our project to make everything quick and easy to assemble. Let’s review them now:
Originally, we configured our project to include the Javadoc from our test files in the Javadoc for our entire project. While that may be useful for us internally as we are developing our code, we may not want to include that in our final Javadoc output. So, we can uncomment those lines in our build.gradle file.
In addition, as we saw on a previous page, we can move our Javadoc output to a folder named docs in our root project folder, and then GitHub Pages can automatically publish that documentation along with our project. Thankfully, we can configure our build.gradle file to automatically output the Javadoc files directly to that folder.
With those updates in place, the javadoc section of our build.gradle file may look something like this:
javadoc {
    // classpath += project.sourceSets.test.compileClasspath
    // source += project.sourceSets.test.allJava
    destinationDir = file("${rootDir}/docs/")
}
Now, when we run the gradle build command, we should see our generated Javadoc documentation appear in the docs folder, right where it needs to be.
We’d also like to make sure our generated JAR files are easy for users to find in our repository. It is a common practice to create a folder named dist in our project directory to contain any distributable packages we create and publish. So, we can easily update our build.gradle file to place any JAR files there. We’ll need to do this in all three of the JAR tasks:
tasks.named('jar') {
    manifest {
        attributes('Implementation-Title': project.name,
                   'Implementation-Version': project.version,
                   'Main-Class': 'ourprojectname.Main')
    }
    archivesBaseName = project.name
    destinationDirectory = file("${rootDir}/dist/")
}

tasks.named('sourcesJar') {
    manifest {
        attributes('Implementation-Title': project.name,
                   'Implementation-Version': project.version)
    }
    archivesBaseName = project.name
    destinationDirectory = file("${rootDir}/dist/")
}

tasks.named('javadocJar') {
    manifest {
        attributes('Implementation-Title': project.name,
                   'Implementation-Version': project.version)
    }
    archivesBaseName = project.name
    destinationDirectory = file("${rootDir}/dist/")
}
As before, we can test this by running gradle build and seeing that our JAR files are now placed in the dist directory in our project.
So, in summary, we updated our project configuration in the following ways:
settings.gradle file now includes our root project’s name and updates the name of our single project:rootProject.name = 'ourprojectname'
include('app')
project(":app").name = 'ourprojectname'build.gradle to:
docs folderdist folderjavadoc {
// classpath += project.sourceSets.test.compileClasspath
// source += project.sourceSets.test.allJava
destinationDir = file("${rootDir}/docs/")
}
version = 'v0.1.0'
java {
withSourcesJar()
withJavadocJar()
}
tasks.named('jar') {
manifest {
attributes('Implementation-Title': project.name,
'Implementation-Version': project.version)
}
archivesBaseName = project.name
destinationDirectory = file("${rootDir}/dist/")
}
tasks.named('sourcesJar') {
manifest {
attributes('Implementation-Title': project.name,
'Implementation-Version': project.version)
}
archivesBaseName = project.name
destinationDirectory = file("${rootDir}/dist/")
}
tasks.named('javadocJar') {
manifest {
attributes('Implementation-Title': project.name,
'Implementation-Version': project.version)
}
archivesBaseName = project.name
destinationDirectory = file("${rootDir}/dist/")
}Finally, we can run gradle build one more time, and then commit our changes to our repository.
In this commit, we’ll want to carefully check the output of the git status command to make sure we are only committing the files we want to the repository. Ideally, the only changes should be to the build.gradle and settings.gradle files, as well as all the contents of the new dist and docs directories.
Now, with all of this automation in place, all we have to do to create a new version of our package is update the version number in our build.gradle file, and then run gradle build. It will automatically create a new set of JAR files using the new version, and update our documentation to match.
On the following pages, we’ll discuss the steps for creating a release on GitHub that includes these JAR files for download, and also how to publish these to a repository!
Building a Python wheel file is super simple using the setuptools library - it handles almost all of the heavy lifting for us. The basic steps are outlined in the Packaging Python Projects guide in the Python documentation. Below, we’ll go through the steps we’ll need to follow for most of the applications we’ve created in this course.
First, we’ll need to create a file named pyproject.toml in the root our project directory. This file is responsible for defining the exact tools needed to build this package. We’re just going to use the default file provided in the documentation for now:
[build-system]
requires = [
    "setuptools>=42",
    "wheel"
]
build-backend = "setuptools.build_meta"If we haven’t already done this, now is a great time to create a README.md file in the root directory of our project and include some basic information about our project. Once it is published, we can come back to this file and update it with links to the documentation hosted in GitHub pages.
In addition, we may wish to add a license to our project at this step, before packaging it. We can use the choosealicense.com website to help find a license. We can also easily add a license to an existing GitHub repository following the Adding a license to a repository guide from GitHub, then using the git pull command to pull that license file into v0.1.0r local copy of the project.
In either case, make sure we have a file in the root of our project named LICENSE before continuing.
If our code contains proper typing information that can be used by Mypy, we need to mark that by placing a blank file named py.typed in each package that contains type annotations. So, wherever we see an __init__.py file, we should also add a py.typed file to the same directory.
Next, we need to set some metadata for our project. There are a couple of ways to do this, but the simplest is to create a static setup.cfg file that contains all of the information for our project. Once again, we’ll place this file in the root of our project directory.
The Packaging Python Projects tutorial provides a sample file that we can easily adapt for our needs. We’ve made a few changes below to that file to match our project:
[metadata]
name = <ourprojectname>
version = <0.1.0>
author = <Your Name>
author_email = <your_email@example.com>
description = <A description of our project>
long_description = file: README.md
long_description_content_type = text/markdown
url = https://github.com/<username>/<repo>
    Bug Tracker = https://github.com/<username>/<repo>/issues
classifiers =
    Programming Language :: Python :: 3
    License :: OSI Approved :: <MIT License>
    Operating System :: OS Independent

[options]
packages = find:
python_requires = >=3.9
include-package-data = True

[options.package_data]
<ourprojectname> = py.typed
The portions marked with angle brackets <> should be updated to match our project information. The tutorial linked above provides a great explanation of how to configure these items in our project. We can also refer to one of the public repositories for this course for another example.
Finally, we’ve included a couple of items at the bottom that aren’t included in the tutorial to allow our package to be compliant with PEP 561 so that Mypy can make use of the typing information included in our package. This will include the py.typed files we added earlier to our eventual package. See the Mypy Documentation for details.
One thing we may want to do is include our test files in the output. To do that, we must simply add a __init__.py file to the test directory and any subdirectories of that folder in our project. The Python build process will automatically find those and include them in our package!
When we are ready to create our package, we must first make sure we have the latest version of the build library on our system. So, we can use the pip3 command to install it:
pip3 install --upgrade buildOnce we are ready, we can run the following command from within our project directory to actually create our packages:
python3 -m buildIf all goes well, we should see it create a new folder named dist that contains both a .whl file as well as a .tar.gz file that include our project. That command will also produce a long list of output that contains all of the files that are included in our package. We should review that output closely and make sure it includes all of the correct files.
If we want to automate this process, there are a few things we can do in our tox.ini file to make this process go a bit smoother:
build package to our requirements.txt file so it will be available when we run tox.src based on the src directory in our project. If we want, we can change that to any other name we wish. If we do, we’ll need to update it throughout our source code and also in a few places in our tox.ini file. **You may want to do this before publishing a package so it doesn’t use the name src as the base of the package path.. at the end of our pdoc command, we can replace it with src or the new name of our top-level package.pdoc to the docs folder by adding a few commands to our tox.ini file to copy the generated documentation. To do this, we need to add an allowlist_externals entry that lists the commands we’d like to use.python3 -m build command at the very end of our commands in tox.ini to automatically update our package each time we successfully run tox.ignore_errors line from our tox.ini file. In that way, we’ll only create our package if all of the commands succeed.Below is an updated tox.ini file showing these changes.
[tox]
envlist = py39
skipsdist = True

[testenv]
deps = -rrequirements.txt
allowlist_externals = rm
                      cp
commands = python3 -m mypy -p src --html-report reports/mypy
           python3 -m coverage run --source src -m pytest --html=reports/pytest/index.html
           python3 -m coverage html -d reports/coverage
           python3 -m flake8 --docstring-convention google --format=html --htmldir=reports/flake
           rm -rvf reports/doc
           python3 -m pdoc --html --force --output-dir reports/doc src
           rm -rvf docs
           cp -rv reports/doc/src docs/
           python3 -m build
With everything in place, we can run our tox command to build our project. If we recently changed our requirements.txt file, we’ll need to run tox -r at least once to install the new requirements. If everything works correctly, it should place our built packages in the dist folder and copy our documentation to the docs folder for us.
Finally, before we commit these changes, we may wish to update our git configuration to ignore a few new files or folders created by the build process. Here’s the new .gitignore file that we can use:
__pycache__/
.tox
reports/
.coverage
build
*.egg-info/
It now ignores the build and any .egg-info folders.
If everything looks good, we can save and commit our changes to the git repository for this project.
In this commit, we’ll want to carefully check the output of the git status command to make sure we are only committing the files we want to the repository. Ideally, the only changes should be to the tox.ini and requirements.txt files, the new pyproject.toml and setup.cfg files, as well as all the contents of the new dist and docs directories.
Now, with all of this automation in place, all we have to do to create a new version of our package is update the version number in our setup.cfg file, and then run tox. It will automatically create a new set of package files using the new version, and update our documentation to match.
On the following pages, we’ll discuss the steps for creating a release on GitHub that includes these package files for download, and also how to publish these to a repository!
Finally, we’ve completed creating our package, and we’re ready to publish it. One of the easiest options is to include our package files directly in a GitHub release on GitHub.
In the “Hello Real World” example project, we learned how to create a release on GitHub using a tag. The only thing we’ll do differently this time is upload our packages to the release. Unfortunately, there is no easy way to select them directly from the repository, so we may have to download the package files from the dist directory to our computer first before starting this step.
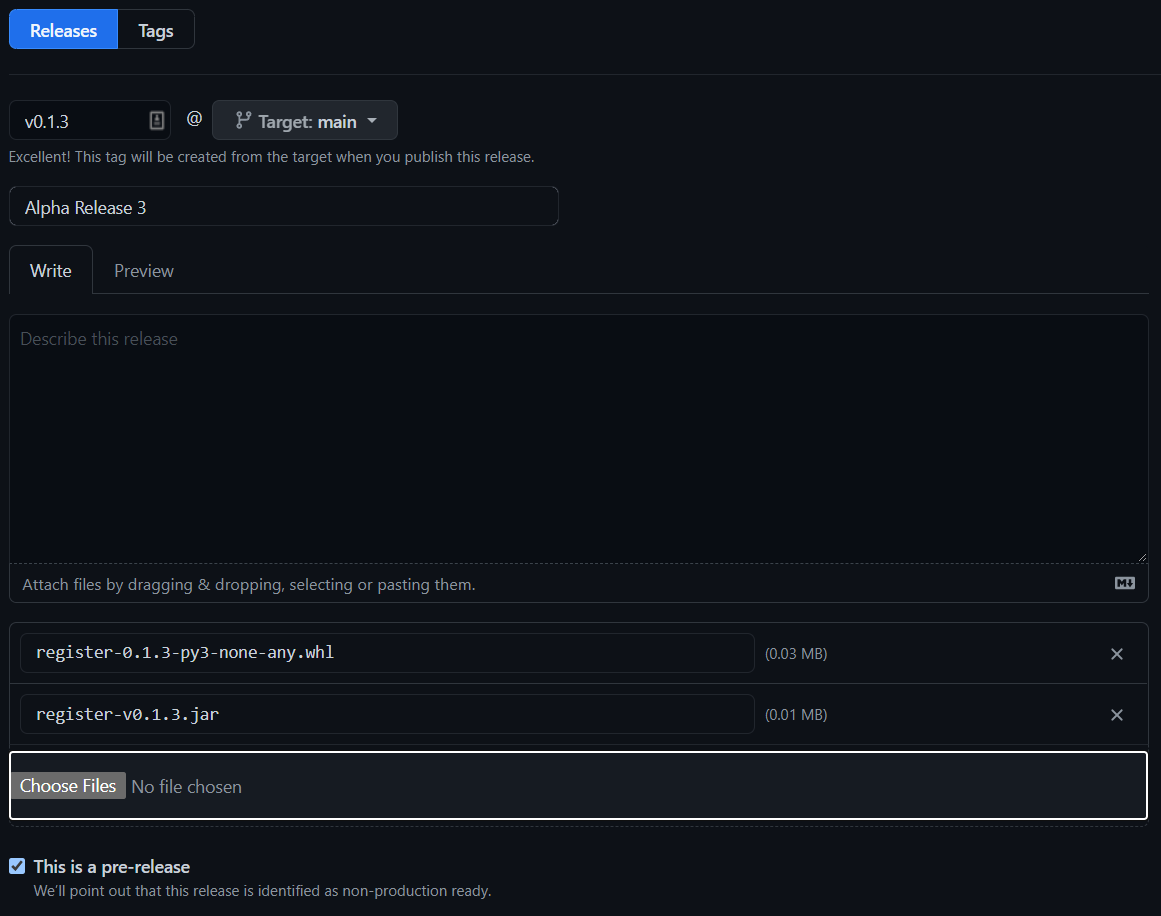
When creating a release on GitHub, there is a spot at the bottom of the page to upload binaries. So, we can upload the package files from our dist directory right here. In the screenshot, I’ve uploaded both a JAR and a wheel file, but we would just use each of the package files created in our dist folder for the current version of our package.
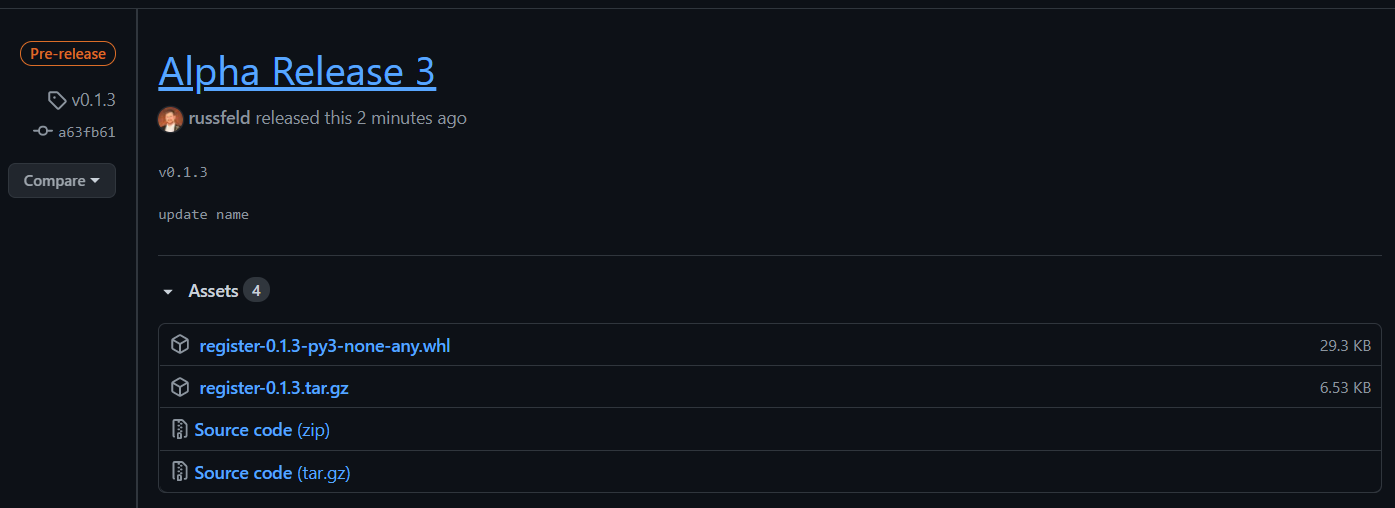
Once the release is published, we’ll see our package files directly on the page ready for anyone to download and use in their own projects!
At long last, we have a package ready to go! The last optional step would be to publish our package to a package repository so others can easily download and use it through their development tools. We won’t directly do that as part of this course, but below are some quick links and basic instructions to follow if you’d like to publish a package to a repository for your language.
Unfortunately, the process of getting a package posted on Maven Central is quite complex. It requires creating the packages as described in this chapter, as well as signing them with a PGP encryption key. Then, we’ll need to create a Project Object Model, or pom file that describes the project and includes some additional metadata. Finally, we’ll need to provide hosting for the actual packages themselves, though much of that can be handled through an open source repository hosted by Sonatype.
While this will make your package easier for other Java developers to discover and use, many smaller developers find this to be overly cumbersome if the project can be easily downloaded as a JAR file.
If you do choose to publish your package to Maven Central, here are some resources to help you get started:
Java packages that are published to a central repository such as Maven Central must use a group ID based on a DNS domain name that you own or have control over. If the project is hosted on GitHub, you can use io.github.<username> as your group ID, since GitHub provides you the website <username>.github.io as part of GitHub pages. Otherwise, you may have to perform additional steps to reserve your group ID.
In addition, typically you will then place your code in a Java package that matches your group ID, which is your DNS domain name in reverse order. For example, the library code for this class uses the domain name cc410.cs.ksu.edu, which is a domain that we host at K-State. In the source code for this project, we place all of our code in the Java package edu.ksu.cs.cc410. In that way, we can guarantee that our package name is unique and no one else can use it.
Thankfully, for Python this process is very simple. The Packaging Projects tutorial from Python includes the steps to publish a package directly to PyPi:
twine package: pip3 install --upgrade twinetwine:python3 -m twine upload --repository testpypy dist/*When you run that command, you’ll be prompted for a username and password. If you created an API Token, use __token__ as the username and then enter your token as the password, including the pypi- prefix.
If everything goes correctly, you should now be able to see your package on test.pypi.org. The tutorial linked above includes instructions on how to test it by installing your package from the test PyPi repository.
Once you are satisfied, you can basically perform the same steps on the real PyPi repository. You may need to update your package name in the setup.cfg file to make sure it is unique.
In this chapter, we learned about the steps we can follow to create packaged released of our applications. We discussed changes we could make to our applications to prepare for a release, as well as the various licenses we can choose to attach to our application.
We also looked at some of the helpful metadata that we may wish to add to our project, and how to deploy our documentation directly to the Internet using GitHub pages.
Finally, we saw how to create a package in both Java and Python, and how to upload those packages to a release on GitHub. We also discussed the basic steps for uploading a package to the repository for our chosen language.
In the example project for this module, we’ll go through some of the steps for creating our own packaged releases and how to upload them to GitHub.
Check your understanding of the new content introduced in this chapter below - this quiz is not graded and you can retake it as many times as you want.