GUI
Panels and Frames for Interaction, Graphically!
Panels and Frames for Interaction, Graphically!
Making things visible, graphically!
Portions of the content in this chapter was adapted from Nathan Bean’s CIS 400 course at K-State, with the author’s permission. That content is licensed under a Creative Commons BY-NC-SA license.
This chapter will introduce concepts related to building a graphical user interface, or GUI (pronounced “gooey”) for our programs. Up to this point, all of our program interaction has been done either through the terminal or via input files. Most non-technical users today, however, are unfamiliar with using the terminal and prefer to interact with programs graphically. So, as developers, we should learn how to build our programs in a way that they are accessible to a wide audience of users.
The next few chapters will give us the background we need to add GUIs to our programs. However, we will focus mostly on the functionality of our interfaces, leaving overall design as an “exercise for the reader” to complete. There are many resources available to learn how to properly style and arrange the controls on our GUIs, and it is simply too much to cover in a course such as this one. In fact, most IDEs, such as NetBeans, Eclipse, and IntelliJ for Java, and PyCharm for Python, all include tools for building GUIs graphically themselves, making it even easier to build GUIs that look the way we imagine them.
Some terms we’ll cover in this chapter:
The key skill to learn in this chapter is the basic background and structure of the Java Swing and Python tkinter GUI libraries.
Java Swing and Python tkinter are libraries and toolkits for creating Graphical User Interfaces - a user interface that is presented as a combination of interactive graphical and text elements, commonly including buttons, menus, and various flavors of editors and inputs. GUIs represent a major step forward in usability from earlier programs that were interacted with by typing commands into a text-based terminal (the EPIC software we looked at in the beginning of this textbook is an example of this earlier form of user interface).
The availability of GUIs and the tools used for creating them have changed over the years, especially as the display technologies themselves have evolved.
No doubt you are used to having a wide variety of screen resolutions available across a plethora of devices. But this was not always the case. Computer monitors once came in very specific, standardized resolutions, and only gradually were these replaced by newer, higher-resolution monitors. The table below summarizes this time, indicating the approximate period each resolution dominated the market.
| Standard | Size | Peak Years |
|---|---|---|
| VGA | 640x480 | 1987-1990 |
| SVGA | 800x600 | 1990-2003 |
| XGA | 1024x768 | 2007-2015 |
Many of these libraries were introduced in the early 2000s, at a time where the most popular screen resolution in the United States was transitioning from SVGA to XGA, and screen resolutions (especially for business computers running Windows) had remained remarkably consistent for long periods. Moreover, these resolutions were all using the 4:3 aspect ratio (the ratio of width to height of the screen). Contrast that with trends since that time:
There is no longer a clearly dominating resolution, nor even an aspect ratio! Thus, it has become increasingly important for applications to adapt to different screen resolutions. Altering these values in response to different screen resolution requires significant calculations to resize and reposition the elements, and the code to perform these calculations must be written by the programmer. To deal with this, many graphics libraries added additional features and methods for laying out controls on the screen, automatically positioning them much like a web browser will lay out content on a webpage to fit the screen. With careful design, the need for writing code to position and size elements is eliminated, and the resulting GUIs adapt well to the wide range of available screen sizes.
For more information, check out the History of the Graphical User Interface article on Wikipedia for a deep dive into this topic!
Many modern graphics libraries also leverage controls built around graphical representations provided directly by the hosting operating system. This helped keep applications looking and feeling like the operating system they were deployed on, but limits the customizability of the controls. A commonly attempted feature - placing an image on a button - can become an onerous task within some systems. Attempting to customize controls often required the programmer to take over the rendering work entirely, providing the commands to render the raw shapes of the control directly onto the control’s canvas. Unsurprisingly, an entire secondary market for pre-developed custom controls emerged to help counter this issue.
In addition, many graphics libraries include the ability to “skin” or change the overall look and feel of the entire user interface quickly. We won’t get too far into the design aspects of a good GUI in this course, but students are welcome to play around with the tools they find and see what works best for them.
There are many different graphics frameworks available today. Some are limited to a specific language, such as Java Swing, whereas others are cross platform, such as the tkinter library in Python which is based on the Tk GUI framework. Finally, others are limited to particular operating systems, such as the Windows Presentation Framework. Let’s review the two frameworks we’ll be using: Java Swing and Python tkinter.
Swing is a graphical user interface toolkit for Java that was originally created in 1996 by Netscape, but it was later integrated into the core of Java in 1997. It was meant to be an upgrade to the existing Abstract Window Toolkit that was used to create graphical programs in Java at the time, though even today we still use some classes from the awt package along with the newer swing components.
One major benefit of Java Swing is the ability to quickly change the “look and feel” of the application using various different components. In addition, it is cross platform, and applications displayed on Windows will look nearly identical to those displayed on Linux or Mac as well.
In addition, developers can easily customize many components of the Java Swing toolkit using inheritance. We simply must extend an existing component in Swing, such as the JFrame container, and we can provide additional functionality directly in that class.
Python includes a library called tkinter (short for “Tk Interface”), which is a wrapper around the Tk GUI framework. Tk is a cross platform toolkit for building GUIs that was developed in the early 1990s, but is still used today in many different programs. Tk includes a large range of elements, called “widgets,” including buttons, text boxes, and more, that can be used to build interactive GUIs.
In more recent versions of Python, a new “themed Tk” style was introduced, allowing Tk widgets to match the look and feel of programs natively built for the operating system. This helps programs written in Tk “fit in” with other applications running on the same operating system.
Like Java Swing, tkinter allows us to build GUIs by inheriting from the default components such as the Frame widget that can act as a container for other widgets. We can even nest Frame widgets inside other Frame widgets to build more complex layouts.
On the next few pages, we’ll discuss the basic features each of these frameworks has in common, before diving a bit deeper into each one and what makes it unique.
There are many other frameworks available for both of these languages, but there are a few specific reasons we chose to focus on Java Swing and Python tkinter.
In Java, the newer JavaFX platform has been available since the mid 2000’s, but unfortunately it is difficult to use Java FX in Codio since we are reliant on the OpenJDK platform instead of the Oracle JDK due to licensing issues and ease of use. In addition, JavaFX is much more oriented toward web applications than other traditional GUI frameworks like Tk. So, to simplify things and keep the two languages in sync, we choose to use the older Java Swing framework.
For Python, recently many Python developers have been using PySimpleGUI as a simpler wrapper for the tkinter library. It also is compatible with other GUI frameworks such as Qt and WxPython, and in many cases is easier to use than tkinter itself. Unfortunately, as of this writing we felt that PySimpleGUI wasn’t quite mature enough for us to include in this curriculum. So, we chose to continue to use the built-in tkinter library in Python for now.
One of the first questions we may consider when adding a GUI to our programs: how do we go about designing a GUI in the first place? There are many ways to go about this, but one of the easiest and most accessible is also the simplest - pen and paper.
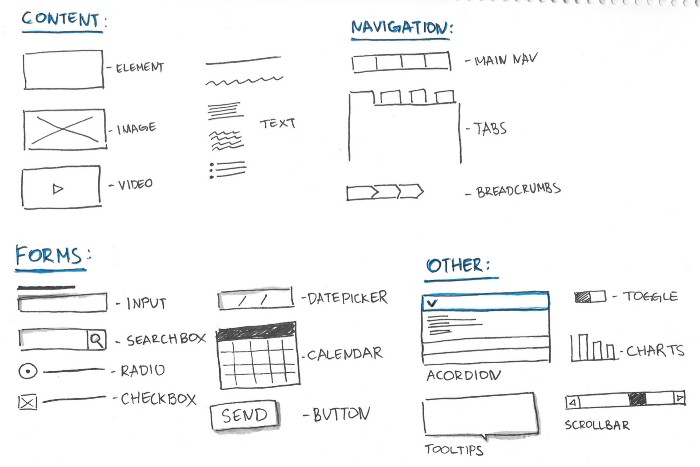
A common technique used when developing a GUI for a program is to simply sketch your design on paper. This allows you to quickly see how the overall program would look, and it can help you figure out how you’d like to lay out your content and elements on the screen.
Once you’ve got a basic idea of what you’d like your GUI to look like, there are a couple of next steps that you can follow to further refine your design:

Another type of tool we can use to develop GUI prototypes is a simple drawing tool. Both Microsoft Visio (available through the Azure Student Portal) and the Diagrams.net drawing app are both well suited to develop GUI prototypes. In fact, they even include some items you can use to mimic what a real GUI would look like. The picture above was created using a few of the built-in mockup designs present in Diagrams.net
Once we have a good idea for what our GUI should look like, we can start building it.
Here are a few terms and acronyms that are used in the GUI world that are important to understand.
Here are some helpful resources that discuss GUI design:
To begin building our own GUIs, let’s start at the top and work our way down into the details of each individual element that our applications include. At the top of that list is the window.
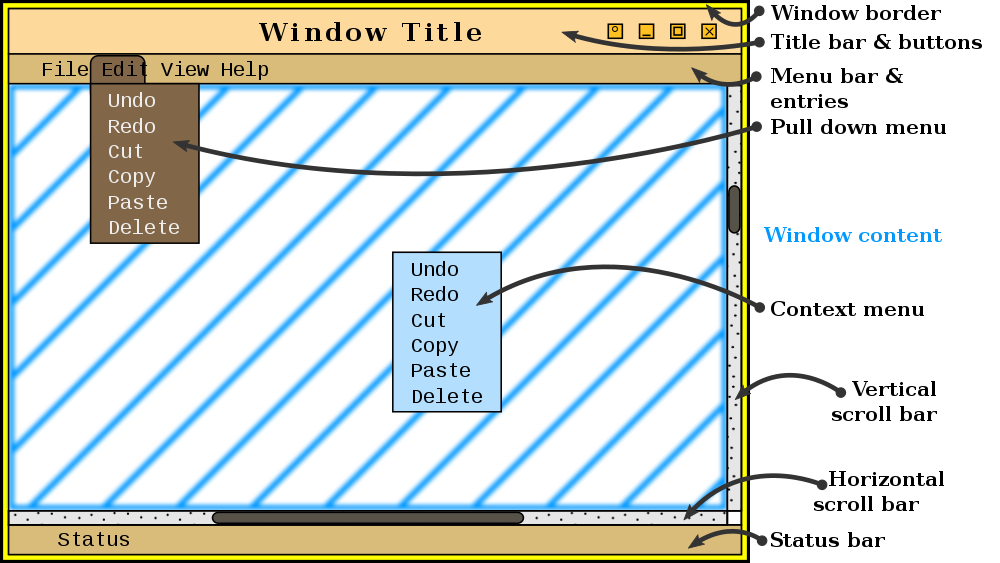
A window is the top most level of the user interface for most programs. Basically, the GUI for each application is contained within one or more windows, that are then displayed on the screen and managed by the operating system. Each time we open an application, a new window appears that contains the application.
We see windows all the time when we work with modern computer interfaces. The window metaphor is the most dominant interface metaphor in use today, used by nearly all operating systems designed for personal computers.
Most windowing systems use a design similar to the one shown above, containing many common elements such as a title bar, menu bar, scroll bars, and more. In fact, look at the web browser you are most likely using to read this content - how many of those elements are present in your browser? Some of them may be there, but others may have been removed or hidden over time.
If you are familiar with web development, you can think of the overall window as the <body> tag in a web page. It is the container that displays all of the content to the user.
Inside of the window itself is a global container that contains all of the elements of our GUI. We typically call this container a panel, but it can also be called a pane or a frame, depending on the GUI toolkit we are using.
A panel typically doesn’t appear on the GUI itself, but it is simply a container or grouping of other display elements. The panel may use a layout manager to determine how the elements are arranged within its space, or the elements can be placed statically using x-y coordinates.
In web development, we might think of a panel like a <div> tag. The <div> tag itself doesn’t appear on the screen, but it can be used to group similar items together, arrange them within the container, and then the container itself can be placed within a larger container on the screen.
Many different GUI elements can be placed within a frame. For more complex GUIs, there might be dozens of these elements, and each one will need to be positioned on the screen in such a way that the GUI is usable. In addition, if we want to build our GUI for multiple different window sizes and screen resolutions, we might need a way to automatically adjust the size and position of these elements within the frame to fit our screen. All of that can be very tedious and time consuming to do by hand. So, many GUI toolkits include special software called layout managers to help us with that task. Some tools, such as Tk, also refer to these as geometry managers.
A layout manager, put simply, is a piece of code that can automatically resize and position elements within a panel in a GUI. Web browsers make extensive use of layout managers to enable resizing of web pages. Try it yourself - see if you can resize this page, and then watch how the web browser and Codio interface adjust to fit the new screen size. How small of a screen can it handle?
As an example, the Java Swing toolkit includes several different layout managers, and each one can be used to achieve different outcomes. The best resource is A Visual Guide to Layout Managers on the Oracle website, as it shows graphically how each layout manager available in Java Swing operates.
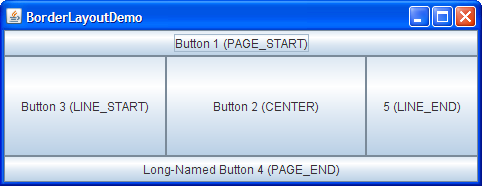
For example, the BorderLayout will attach controls to the borders of the screen, growing and shrinking them as the window is resized.
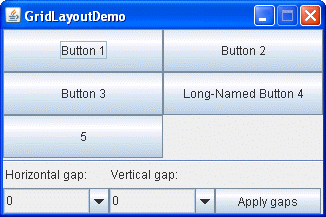
The GridLayout will arrange controls in a grid of rows and columns.
The Python tkinter library includes three layout managers, place, pack, and grid.
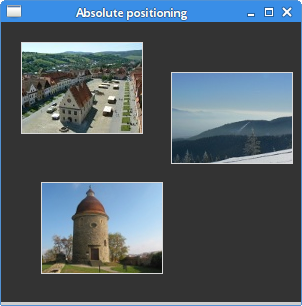
The place layout manager can be used to place elements on the screen at specific x-y coordinates.
The pack layout manager is used to fit controls to the screen, expanding them in various directions as needed to fill the available space.
Finally, the grid layout manager works very similar to the GridLayout manager in Java, allowing us to create rows and columns of elements on our screen.
As we develop our GUIs, we’ll be able to choose the layout manager we’d like to use. In the example project for this chapter, we’ll explore how to use these layout managers to create a simple interface that contains a set of buttons and a few other elements.
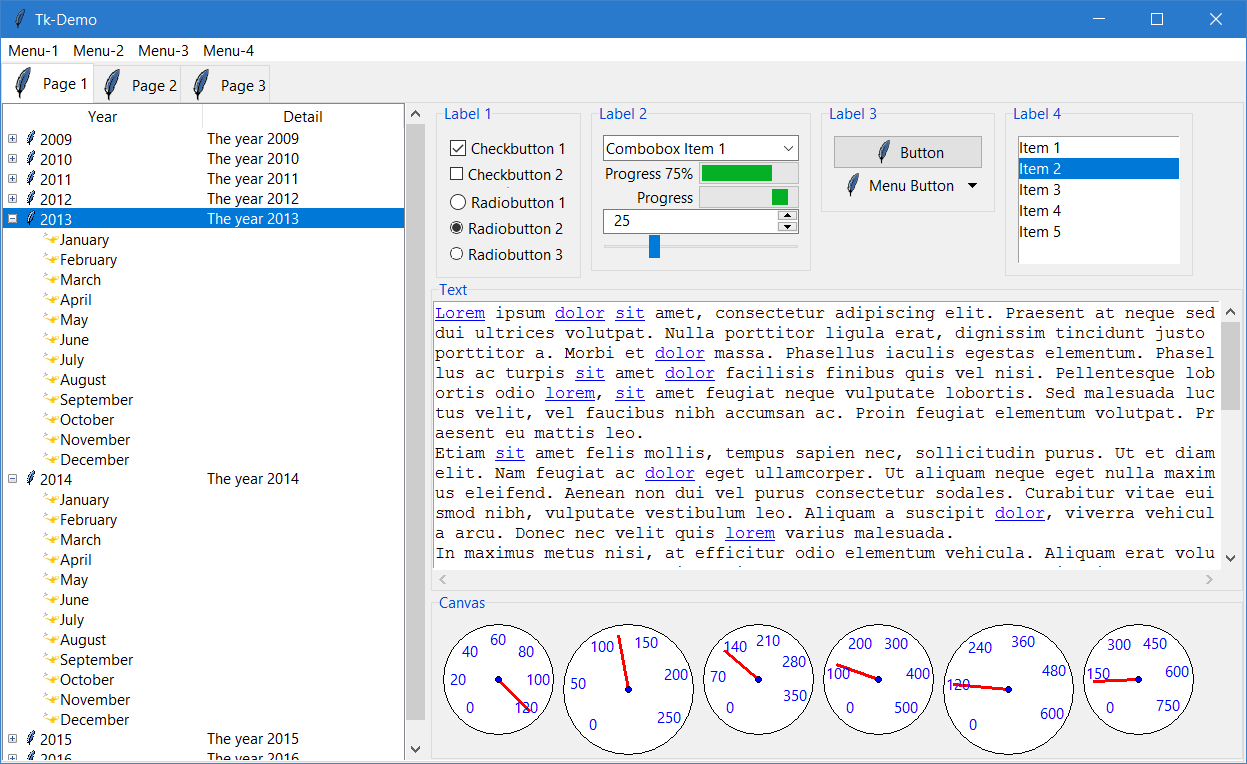
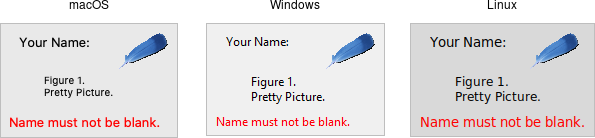
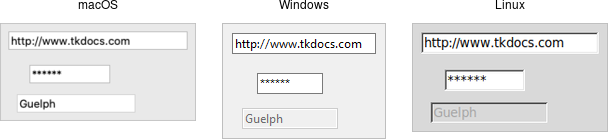
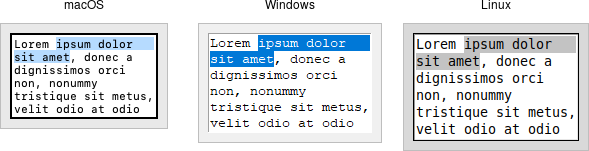
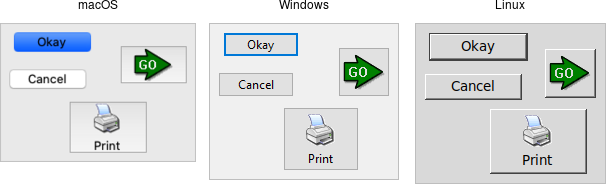
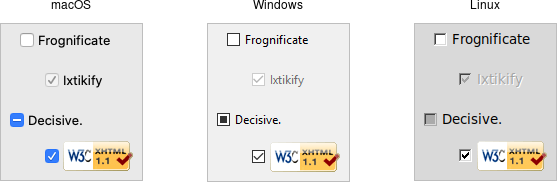
Once we’ve created a window, a panel, and selected our layout manager, we can finally start to add elements to our GUI. This page will list some of the common GUI elements that we can choose, and describe how they can be used best in our applications. Where possible, we’ll also link to official documentation and some tutorial resources so we can learn how to use each of these in our programs. Refer to the links for screenshots and examples of how each of these elements can be used in our programs. Examples below are taken from the TkDocs documentation site.
A panel is the container element in the GUI. It usually doesn’t appear to have any graphical component, though it can be styled as shown in the screenshot above. Other elements are typically added to a panel, which uses a layout manager to determine how the elements are placed within the panel.
A label is simply a piece of text added to the GUI that is not editable by the user. They are typically used to provide information to the user or “label” other controls, such as text boxes.
These controls are used for a single line of text input, such as a username or password field.
These controls handle multiple lines of text input, such as in a word processing program.
A button is one of the simplest controls. When a user clicks on a button in our GUI, we can then call a function in our code to perform any action required.
A checkbox, sometimes referred to as a toggle, allows the user to manipulate a boolean value, such as “on” and “off” by clicking it. Checkboxes typically include their own text label, and don’t need to have a separate label added to them.
A radio button is part of a set of buttons that are similar to checkboxes, but only one option can be selected at a time. The name comes from old radios that had a set of buttons that could be used to recall stations, and pressing one button would cause any other button pressed to pop back out, such that only one button could be pressed at a time.
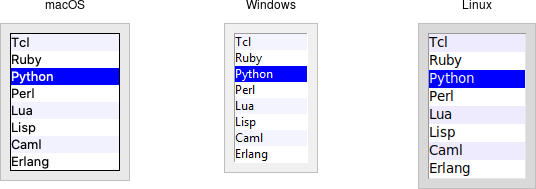
A list box displays a list of options to the user, and then the user can choose one or more options from the list, depending on how it is configured.
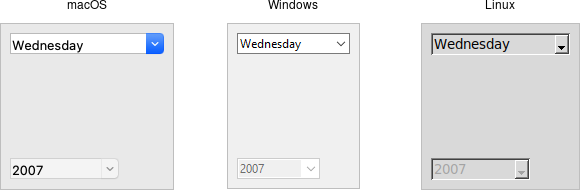
A combo box, sometimes referred to as a drop-down menu, allows a user to select a single option from a list of options, or possibly enter their own option. It is really a combination of a list box and a text input field in one, hence why it is called a “combo” box.
Before we can learn to write our own GUI programs, we should discuss exactly how to access a graphical program in Codio. Thankfully, there is an easy way to do this, but let’s look at the technology behind the scenes that makes this possible.
The X Window System (sometimes referred to as X11 or simply X) is a windowing system that is used on many Linux-based operating systems, including the Ubuntu system that Codio uses in the background. X handles drawing windows on the screen and passing user input back to the application, but that’s about it. Most of the look and feel of the application is handled by the application itself, though different window managers bundled with various operating systems can also provide various themes for applications that are rendered using X.
One of the very powerful features of X is the ability to display graphical programs on a remote system across the network. In this way, programs can be launched on one system and then viewed remotely on another system, providing a rudimentary remote interface similar to Remote Desktop or VNC tools today.
Codio uses this technology to display a graphical program directly in the Codio interface. So, all we have to do is open the Codio X viewer when we run our application, and it will display the output for us. The details for how to do this are covered in the Codio Documentation
There are a few ways to do this:
"Viewer": "https://{{domain3000}}/" to the .codio file present in the root of the project. Here’s an example of what it might look like:{
// Configure your Run and Preview buttons here.
// Run button configuration
// other data here
// Preview button configuration
"preview": {
"Viewer": "https://{{domain3000}}/"
}
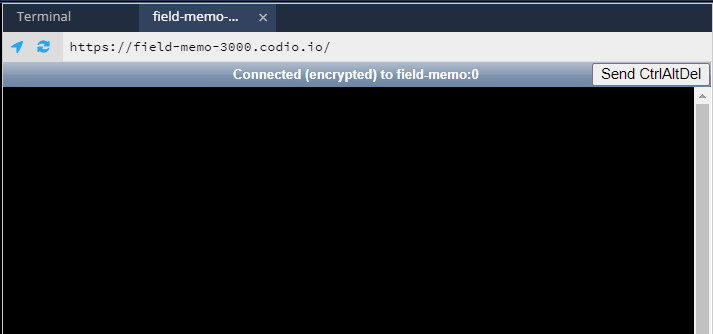
}https://box-name-3000.codio.io/, where you replace box-name with the two word domain name. It can be found in the Project menu under Box Info. It also appears on the terminal:
In this case, the box name is field-memo. Once you load the viewer, you should see a window similar to this:
Then, when you launch any program that has a GUI, it will appear in this window.
On the next pages, we’ll discuss a simple “Hello World” style program for both Java Swing and Python tkinter. As always, you are welcome to just read the pages that correspond to your chosen language, but it may be beneficial to see both languages to learn a bit more how each of them work in different ways.
Now let’s dive into Java Swing and see how to make our very first GUI application in Swing.
At the top of our applications, we’ll need to import elements from three different packages:
import java.awt.*;
import java.awt.event.*;
import javax.swing.*;
The java.awt package includes all of the classes related to the older Abstract Window Toolkit (AWT) in Java, and the java.swing package includes all newer Java Swing packages. Instead of reinventing the wheel, Java Swing reuses many components from AWT, such as the Dimension class that is used to control the size and position of windows. We also include the java.awt.event package to handle events such as button clicks.
Of course, when using these libraries in our project code, we’ll want to import each class individually in order to satisfy the requirements of the Google Style Guide (See 3.3.1 - No Wildcard Imports). That is left as an activity for later, but the example project in this chapter will show some of the imports required.
One of the easiest ways to build a program using Java Swing is to simply inherit from the JFrame class. In that way, our program has access to all of the features of the topmost container in Java Swing, and we can use it just like any other component in the GUI.
Then, within the constructor of that class, we can set our layout manager and add elements to our application. Let’s look at the code of a simple application, and then we’ll go through it piece by piece.
import java.awt.*;
import java.awt.event.*;
import javax.swing.*;
public class MainWindow extends JFrame implements ActionListener {
/**
* Constructor to build the GUI and display elements
*/
public MainWindow() {
// sets the size of this window
this.setSize(new Dimension(200, 100));
// tell the program to exit when this window is closed
this.setDefaultCloseOperation(JFrame.EXIT_ON_CLOSE);
// set the layout manager
this.setLayout(new GridBagLayout());
// Create the constraints for the GridBagLayout manager
GridBagConstraints gbc = new GridBagConstraints();
// set the constraints for the label
gbc.fill = GridBagConstraints.HORIZONTAL;
gbc.gridx = 0;
gbc.gridy = 0;
// add a label
this.add(new JLabel("Hello World!"), gbc);
// reset the constraints for the button
gbc.gridx = 0;
gbc.gridy = 1;
// create a button
JButton button = new JButton("Close");
// set the button's command:
button.setActionCommand("close");
// send the clicked event to this object
button.addActionListener(this);
// add the button
this.add(button, gbc);
}
/**
* actionPerfomed is called when a user interacts with an element
* that lists this class as it's action listener
*
* @param e the event generated by the action
*/
@Override
public void actionPerformed(ActionEvent e) {
if ("close".equals(e.getActionCommand())) {
// close button was clicked, so exit the application
System.exit(0);
}
}
/**
* Main method to start this application
*/
public static void main(String[] args){
SwingUtilities.invokeLater(new Runnable() {
public void run() {
new MainWindow().setVisible(true);
}
});
}
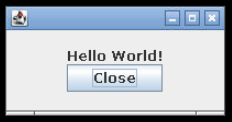
}When we compile and run this code, then open the Codio viewer, we should see this window:
Let’s go through this code and explore what it does. We’ll also cover most of this content in the example project for this chapter.
This application includes two instances of inheritance:
public class MainWindow extends JFrame implements ActionListener {While we don’t need to use inheritance here, it is one of the simplest ways to build our GUI - we can then treat our MainWindow class just like any other JFrame elsewhere in the code. As we’ll see in the example project, this makes it easy for us to create custom controls or entire panels that we can reuse in our code.
Next, we have a few lines of code that help us set up the window for this application and configure the layout manager.
// sets the size of this window
this.setSize(new Dimension(200, 100));

// tell the program to exit when this window is closed
this.setDefaultCloseOperation(JFrame.EXIT_ON_CLOSE);

// set the layout manager
this.setLayout(new GridBagLayout());
// Create the constraints for the GridBagLayout manager
GridBagConstraints gbc = new GridBagConstraints();
First, we set the size of the window to 200 pixels by 100 pixels, using the Dimension class from AWT. Then, we configure the window to exit our application when the window itself is closed. If we don’t do this, then our Java application may continue to run in the background even if the window itself is closed.
Below that, we set our frame’s layout manager to the GridBagLayout layout manager. The Java GridBagLayout allows us to arrange elements in rows and columns, but gives us additional flexibility over the GridLayout manager. In many cases, we’ll want to use GridBagLayout if we are writing the code by hand, as it gives us a good balance between the power of the layout manager and the simplicity of the code. It also works similarly to the grid layout manager in Python tkinter, making it a helpful choice in this class.
Finally, we create an instance of GridBagConstraints, which is used to specify the constraints we wish to apply on an element when we add it to a container that is using the GridBagLayout. In our minimal example, we’ll use it to specify the row (gridx) and column (gridy) of the element, as well as the ability to resize the components horizontally (fill) if the window is stretched, but not vertically.
Once we’ve set up our JFrame, we can add a few components. The first component is a JLabel.
// set the constraints for the label
gbc.fill = GridBagConstraints.HORIZONTAL;
gbc.gridx = 0;
gbc.gridy = 0;

// add a label
this.add(new JLabel("Hello World!"), gbc);
First, we start by setting the constraints in our instance of GridBagConstraints. The fill option as described above allows this component to stretch horizontally, and we are adding it to the 1st row gridx and first column gridy of our application. Finally, we call the add() method, providing an instance of the JLabel class as the element to add, as well as the GridBagConstraints object to describe to the layout manager how we’d like this control placed in the window.
Now we can also add a JButton to our window.
// reset the constraints for the button
gbc.gridx = 0;
gbc.gridy = 1;

// create a button
JButton button = new JButton("Close");
// set the button's command:
button.setActionCommand("close");
// send the clicked event to this object
button.addActionListener(this);
// add the button
this.add(button, gbc);
Here, we first reset the constraints to place the button in the 2nd column gridy of our application. We are reusing our GridBagConstraints object here, but in practice it is often better to create a new instance each time. Otherwise we could introduce bugs that are shared across many elements, making it difficult to debug.
Below, we create an instance of JButton to act as our button, and then set two additional options on that button:
setActionCommand() - this allows us to add a custom command to the button, so that when it is clicked we’ll be able to easily determine the source of the event. We’ll see how we can use this below.addActionListener() - by default, when this button is clicked it won’t do anything. So, we need to tell Java which object should be used to listen for clicks from this button. In this case, our MainWindow class is implementing the ActionListener interface, so we use the this keyword to direct those events back to this object.Finally, we use the add() method to add our button to our JFrame. Our GUI is complete, but we still haven’t defined what action to take when the button is clicked.
The ActionListener defines one abstract method, actionPerformed(), which we must override in this class. Whenever a user interacts with an element that has listed this object as it’s action listener, the actionPerformed() method will be called. The parameter to this method is an ActionEvent, which we can use to determine which element was used and react appropriately.
@Override
public void actionPerformed(ActionEvent e) {
    if ("close".equals(e.getActionCommand())) {
        // close button was clicked, so exit the application
        System.exit(0);
    }
}
In this example, we simply check to see if the action command associated with that event is the "close" action we added to our button earlier. If so, we use System.exit(0) to terminate our program. Notice that we simply can’t use return here, since the application will continue to run even after this method is called. Instead, we have to shut down the entire application itself, and the simplest way to do this in Java is to use the System.exit() method. We provide a 0 as a parameter to indicate that our program terminated normally. If we provide a non-zero value, it indicates that our program crashed in some way - we can even use different values to represent different error conditions!
Finally, we need a main method to actually launch our application.
public static void main(String[] args){
    SwingUtilities.invokeLater(new Runnable() {
        public void run() {
            new MainWindow().setVisible(true);
        }
    });
}
This method is a bit complex, and it does a lot of things in a short amount of time. Basically, we are creating a new thread in Java using the Runnable interface. We haven’t covered threading and parallel programming yet in this course, so don’t worry if you don’t quite understand at this point. A thread is simply like having another application running at the same time, but within our program itself. By doing so, this allows our GUI to run in a different thread than the rest of our application, so they can run side by side. This prevents the GUI from locking up each time our program has to perform a complex task.
You might notice that this code looks somewhat similar to a Java lambda expression. In fact, instead of just creating an anonymous function, here we are creating an entire anonymous class! You can learn more about how to do this in the Anonymous Classes guide from Oracle.
Inside of the run() method of our Runnable object, we simply create a new instance of MainWindow and then set it to be visible.
More information can be found in the Initial Threads document in the Oracle Java Tutorials.
Now let’s dive into Python tkinter and see how to make our very first GUI application in Tk.
At the top of our applications, we’ll need to import the tkinter library:
import tkinter as tkThis allows us to refer to the tkinter library as tk throughout our application.
For some more advanced elements, such as the combo box, we may also need to import the themed Tk (ttk) package as well:
from tkinter import ttkOne of the easiest ways to build a program using tkinter is to simply inherit from the tk.Tk class, which usually represents the main window in an application. In that way, our program has access to all of the features of the topmost container in tkinter, and we can use it just like any other component in the GUI.
Then, within the constructor of that class, we can add elements to our GUI using our chosen layout manager. Let’s look at an example program first, and then we’ll review each part in more detail.
import sys
import tkinter as tk
from typing import List
class MainWindow(tk.Tk):
def __init__(self) -> None:
"""Initializer for GUI."""
# Initialize the parent class
tk.Tk.__init__(self)
# Set the window size
self.minsize(width=200, height=100)
# Allow the grid to expand horizontally to fill the space
self.grid_rowconfigure(0, weight=1)
self.grid_rowconfigure(1, weight=1)
self.grid_columnconfigure(0, weight=1)
# Create a label and add it to the GUI
self.__label = tk.Label(master=self, text="Hello World!")
self.__label.grid(row=0, column=0)
# Create a button and add it to the GUI
self.__button = tk.Button(master=self, text="Close",
command=lambda:
self.action_performed("close"))
self.__button.grid(row=1, column=0)
def action_performed(self, text: str) -> None:
"""Event handler for GUI events.
Args:
text: the text of the event
"""
if text == "close":
sys.exit(0)
@staticmethod
def main(args: List[str]) -> None:
"""Main method."""
MainWindow().mainloop()
# Main Guard
if __name__ == "__main__":
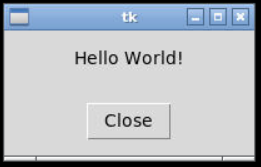
MainWindow.main(sys.argv)When we run this code, then open the Codio viewer, we should see this window:
Let’s go through this code and explore what it does. We’ll also cover most of this content in the example project for this chapter.
This example uses a very object-oriented format, which is different than many other tutorials you may find online for learning tkinter.
The main reason for this is to show you how to build more complex GUIs by taking advantage of object-oriented programming concepts and inheritance. In addition, this example was written to be very similar to the Java Swing example on the previous page.
Since Python doesn’t really have a standard way to do object-oriented GUIs, we figured it was best to at least try to match the Java standard. In that way, the concepts will carry over between languages very easily.
This application includes one instance of inheritance
class MainWindow(tk.Tk):In this example, our MainWindow class is inheriting from the built-in Tk class in tkinter, which is the root class that represents the main window.
While we don’t necessarily have to use inheritance here, and in fact many Python guides don’t use it at all, this help us build our GUI in an object-oriented way. In addition, by using inheritance, we can make our own custom version of elements such as buttons and panels that we can use in our larger GUI projects later on.
Next, we have a few lines of code that help us set up the window for this application and configure the layout manager.
# Initialize the parent class
tk.Tk.__init__(self)

# Set the window size
self.minsize(width=200, height=100)

# Allow the grid to expand horizontally to fill the space
self.grid_rowconfigure(0, weight=1)
self.grid_rowconfigure(1, weight=1)
self.grid_columnconfigure(0, weight=1)
First, we have to explicitly call the constructor of the class we are inheriting from so that Python will actually construct it.
Then, we are setting the minimum size of the window using the minsize() method. This will allow us to make the window bigger, but it won’t go any smaller than 200 pixels wide and 100 pixels tall.
Lastly, we are configuring the rows and columns to each have a weight of 1. This is used to adjust how the rows and columns are resized as the application window is resized. In this case, by setting them each to have the same weight, they will occupy the same amount of space within our application. This has the effect of centering each element within the window itself.
Once we’ve set up our window, we can add a few components. The first component is a Label
# Create a label and add it to the GUI
self.__label = tk.Label(master=self, text="Hello World!")
self.__label.grid(row=0, column=0)
First, we create a new instance of tk.Label and set a few properties:
master - the master property defines which container this element is placed in. In this case, we want it to be placed in the main window represented by this object, so we use self.text - this is the text that is contained in the labelOnce we’ve created an element, we can place it on our GUI using the grid() method. As expected, the grid() method requires two parameter, the row and column that we’d like to place the element within.
Now we can also add a Button to our window.
# Create a button and add it to the GUI
self.__button = tk.Button(master=self, text="Close",
                          command=lambda:
                          self.action_performed("close"))
self.__button.grid(row=1, column=0)
Constructing a button is very similar to constructing a label, but in this case we are populating one additional property - command. The command property is meant to be a function that is called when this button is clicked. In this case, we’ve chosen to use a lambda expression to call a function in this class called action_performed. We provide an argument "close" to help identify the button that was clicked.
The major reason we use a lambda expression here is that it allows us to bind other variables and use them in our function call. We’ll see how to do this in the example project for this chapter.
To handle any events generated when the user interacts with the GUI, we can configure all of our elements to call the action_performed method. Or, if we so choose, we can create any number of methods to handle different actions - it is entirely up to the developer! The parameter to this method is a string, which we can use to determine which element was used and react appropriately.
def action_performed(self, text: str) -> None:
    """Event handler for GUI events.

    Args:
        text: the text of the event
    """
    if text == "close":
        sys.exit(0)
In this example, we simply check to see if the action command associated with that event is the "close" action we added to our button earlier. If so, we use sys.exit(0) to terminate our program. Notice that we simply can’t use return here, since the application will continue to run even after this method is called. Instead, we have to shut down the entire application itself, and the simplest way to do this in Python is to use the sys.exit() method. We provide a 0 as a parameter to indicate that our program terminated normally. If we provide a non-zero value, it indicates that our program crashed in some way - we can even use different values to represent different error conditions!
Finally, we need a main method to actually launch our application.
@staticmethod
def main(args: List[str]) -> None:
    """Main method."""
    MainWindow().mainloop()
This method does two things. First, it creates a new instance of our MainWindow class, which is inheriting from the Tk class that is the base window class in Tk. Then, we are calling the mainloop() method, which actually handles starting a thread that is listening for and reacting to any user interactions with the GUI. We haven’t covered threading and parallel programming yet in this course, so don’t worry if you don’t quite understand at this point. A thread is simply like having another application running at the same time, but within our program itself. By doing so, this allows our GUI to run in a different thread than the rest of our application, so they can run side by side. This prevents the GUI from locking up each time our program has to perform a complex task.
For more information on how this works, consult the Event Loop page in the TkDocs website.
In this chapter, we reviewed the basics of creating graphical user interfaces, or GUIs, for our programs. We learned about GUI frameworks such as Java Swing and Python tkinter, and how to use them.
We saw that applications are contained within windows, which are managed by the window manager, part of the operating system that our applications are running under. Inside of those windows, we can place controls such as panels, labels, text inputs, and more. To arrange those elements, we can use a layout manager.
We then learned how to create a simple “Hello World” GUI in both Java Swing and Python tkinter, which will serve as the basis for the example project attached to this chapter.
In later parts of this course, we’ll learn how to react to the various events that are generated by our GUI using event-driven programming.
Check your understanding of the new content introduced in this chapter below - this quiz is not graded and you can retake it as many times as you want.
Running multiple threads concurrently!
Up to this point, we’ve only been dealing with programs that run within a single thread of execution. That means that we can follow a single path through the code, all the way from the start of the program when it calls the main() method all the way to the end. Unfortunately, while this allows us to create many useful programs, we aren’t able to take advantage of the power of modern computers with multi-core processors, which can handle multiple tasks simultaneously.
In addition, if our application needs to perform multiple tasks at once, such as computing a complex value while also handling user interactions with a GUI, we need a way to develop a program that can have multiple simultaneous paths executing at the same time. Without this, our GUI will appear to freeze anytime the application needs to compute something, frustrating our users and making it very slow to use.
In this chapter, we’ll introduce the concept of multithreaded computing, which involves creating a single program that can perform multiple simultaneous tasks within threads, itself a subset of the larger concept of parallel computing that involves running multiple processess simultaneously, sometimes spread across large supercomputers.
Some key terms we’ll cover in this chapter:
We’ll also explore a short example multithreaded program to see how it works in each of our programming languages.
First, let’s review how modern computers actually handle running multiple applications at once, and what that means for our own programs.
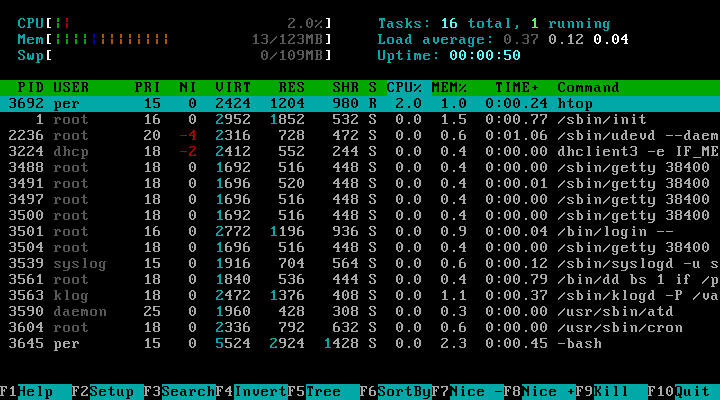
When a program is executed on a computer, the operating system loads its code into memory and creates a process to handle running that program. A process is simply an instance of a computer program that is running, just like an object is an instance of a class. Some programs, such as a web browser, allow us to create multiple processes of the same program, usually represented by multiple windows or tabs. The image above shows the htop command in Linux, which lists all of the processes running on the system. In Codio, we can use the top command in the Terminal to see the running processes - go ahead and try it!
At some point during your experience working with a computer, you may have been told that a computer can only do one thing at a time, and that it appears to run multiple programs at the same time by quickly switching between them. That’s mostly true, though in actuality there is a bit more nuance to it, which we’ll discuss a bit later. For modern computer with multi-core processors, we can typically have one process running per core.
In practice, an operating system may have tens or even hundreds of processes running at any given time. However, the computer it is running on may only have four or eight processor cores available. So, the operating system includes a scheduler that determines which processes should be executed at any given time, and most operating systems will switch between running processes thousands of times per second, making it appear to a user that all running processes are executing at the same time. This process of swapping between running processes is known as context switching.
The diagram above shows the various states a process can be placed in by the scheduler in the operating system. When the process is able to execute, it is in the running state. When the scheduler is ready to pause it, it is placed into the waiting state. However, when it is trying to load a file or waiting on another task, it is instead in the blocked state until that operation has completed.
When a process is waiting or blocked, the operating system could also decide that it needs to reclaim the memory used by this process. In that case, it can be swapped out of the processor’s cache in place of another process. Of course, all of this happens at the microsecond level in modern processors, so a process can be running, waiting, blocked, swapped out of memory, and swapped back in memory, all within a single second.
So, in the simplest version, each program we want to run is loaded into a process by the operating system, which handles scheduling that process to run on one of the cores of our processor. That’s what we need to know for now, as we introduce the next concept, threads.
In most modern operating systems, a process can be further divided into threads, which are individual sequences of instructions that the program can follow. A great way to think of a thread is an individual line of code that you can trace through your program, starting at the beginning and going all the way to the end. Up to this point, we’ve only written programs that contain a single thread, so you should only be able to trace a single line of code all the way through the program.
However, it is possible for our program to create multiple threads, and then have them appear to run simultaneously. Of course, as we said before, they may not actually run simultaneously, especially on a computer with only a single processing core. It is all left up to the scheduler in the operating system to determine how these threads are actually scheduled and executed.
This description leaves out some of the complexity of how threads and processes work within modern operating systems on modern hardware. In the real world, it is possible for a process to consist of multiple threads, and those threads can be scheduled to run at any time on any processor in any order by the operating system.
In addition, many newer processors support running multiple threads simultaneously on a single core, so threads could be running at the exact same time, maybe even on the same processor core itself.
We won’t worry about any of these details in this course, since much of this is handled for us by our programming language and operating system. However, if you plan to develop truly high-performance applications that use threads, you’ll need to learn how to properly deal with the complexity that comes from using modern computer hardware.
Thankfully, because of this, we can write programs that use multiple threads to perform different tasks at (nearly) the same time. To the user, it appears that our program is doing multiple things at once!
For our use, there are two major reasons why we would want to use multiple threads:
In this chapter, we’re going to learn about both uses, but going forward we’re most concerned about the second use, making our GUI appear to be responsive even while our program is performing other tasks. In a later chapter, we’ll learn about event-driven programming, which relies on splitting a program into multiple threads as well.
Now that we’ve learned about threads, let’s discuss how we can work with them in our programs. Writing a multithreaded program can be significantly more difficult than a single threaded program, but with the extra difficulty comes the ability to write programs that are much more flexible and powerful.
Creating a thread is very simple in many modern programming languages. Both Java and Python include libraries for dealing with threads, and to create a new thread, each one simply requires some sort of function or method to serve as the starting point for the new thread. In a way, this is just like the main() method that is the starting point of most programs - we’re just defining a new method to serve as the starting point for a new thread.
Once we’ve created the thread, it is given to the operating system for scheduling. Our main thread can continue to work, and the newly created thread will also start to run as well. So, the theoretical model might look something like this:

Here, it appears that both threads are running simultaneously. However, as we discussed earlier in this chapter, that isn’t really the case. For example, if the system only has one processor core, and these are the only two threads running on the system, then the threads might be interleaved on that processor like this:

If we expand that to two processor cores, then they might actually run simultaneously, like this:

Of course, this is a very simplified view of this process. In practice, there will be many processes and threads that are competing for access across several cores, so the actual model could look something like this:

As we can see, the processors are always executing some code, but many times they are executing code in a thread from some other application. Our application’s code will be scheduled by the operating system in between the other threads, but we cannot guarantee when it will be scheduled or for how long. Also, while this diagram makes it appear that each thread will only be scheduled on one processor, in fact the thread could be scheduled on ANY processor that is available. On a modern personal computer today, there may be as many as 16 or 32 individual threads available, sometimes multiple threads per CPU core, in the processor!
So, the big takeaways here:
Unfortunately, the big takeaways we saw on the previous page have very important consequences for our multithreaded programs. One of the most common errors, and also one of the notoriously most difficult errors to debug, is a race condition.
A race condition occurs when two threads in a program are trying to update the same value at the same time. If the operating system decides to interrupt one thread at just the wrong time, then a race condition occurs and the value could be given an incorrect value.
Let’s look at the simplest form of a race condition. Consider the case where we’d like to read a value from a variable, and then add 1 to that value. In code, it might look something like this:
y = data.x
data.x = y + 1
Here, we have some data object stored in memory, which includes an attribute of x. Notice that we are not just adding 1 to the value of x and immediately updating it. Instead, we read the value of x into y, then use y to increase the value of x by 1. This is a very arbitrary example, but it is reflective of code that we might actually use in our applications. For example, we might read the x coordinate position of a sprite in a video game, perform some calculation on that position, and then update the position. It follows a pattern very similar to this.
So, if we run this code in two separate threads, one way the program could execute is shown below:

In this case, both pieces of code work like we expect. The spawned thread goes first, and reads the value 0 from data.x. Then, it computes the new value 1 and stores that back in data.x. After that, the main thread is scheduled on the other processor, and it reads 1 from data.x, computers the new value 2, and stores it back in place. So far, so good, right?
What if the threads get interrupted during the computation? In that case, the program could instead execute like this:

In this case, the spawned thread reads the value 0 from data.x, then stores it in y. Then, it is interrupted on its CPU, while the main thread is scheduled to execute on the other CPU. So, that main thread will also read the value 0 from data.x and store it in y. After that, the spawned thread will run, updating the value in data.x to 1. Finally, the main thread will execute updating the value in data.x to 1 again, even though it was already 1.
So, as we can see, we’ve run the same program, and it has produced two different results, depending on how the threads themselves are scheduled to run on the system. This is the essence of a race condition in our code.
What if both threads are scheduled to run simultaneously on two different processors, as in this example:

In this case, the main thread is trying to read the value of data.x at the exact same instant that the spawned thread is trying to save that value. In that case, what will the main thread think is stored in data.x? As it turns out, we have no way of predicting what it will read. It could read 0, or 1, or maybe even some intermediate value the CPU uses while it stores the data.
Thankfully, there is a way to deal with this situation, as we’ll learn on the next page.
To deal with race conditions, we have to somehow synchronize our threads so that only one is able to update the value of a shared variable at once. There are many ways to do this, and they all fit under the banner of thread synchronization.
The simplest way to do this is via a special programming construct called a lock. A lock can be thought of as a single object in memory that, when a thread has acquired the lock, it can access the shared memory protected by the lock. Once it is done, then it can release the lock, allowing another thread to acquire it.
A great way to think about this passing a ball around a circle of people, but only the person with the ball can speak. So, if you want to speak, you try to acquire the ball. Once you’ve acquired it, you can speak and everyone else must listen. Then, when you are done, you can release the ball and let someone else acquire it.
Of course, if someone decides to hold on to the ball the entire time and not release it, then nobody else is allowed to speak. When that happens, we call that situation deadlock. The same thing can happen with a multithreaded program.
So, let’s update our program to use a lock. In this case, we’ll assume that data includes another attribute lock which contains a lock that is used to control access to data:
data.lock.acquire()
y = data.x
data.x = y + 1
data.lock.release()
Now, let’s look at our two possible situations and see how they change when we include a lock in our code. First, we have the situation where the programs are properly interleaved:

In this case, the spawned thread is able to acquire the lock when needed, perform its computation, and then release the lock before the other thread needs it. So, the lock really didn’t change anything here.
However, in the next case, where they are interleaved, we’ll see a difference:

Here, the spawned thread immediately acquires the lock and reads the value of data.x into y, but then it is interrupted. At that same time, the main thread wakes up and starts running, and tries to acquire the lock. When this happens, the operating system will block the main thread until the lock has been released. So, instead of waiting, the main thread will be blocked, and the spawned thread will continue to do its work. However, once the spawned thread releases the lock, the operating system will wake up the main thread and allow it to acquire the lock itself. Then, the main thread can perform its computation and update the value in data.x. As we can see, we now get the same value that we had previously. This is good! This means that we’ve come up with a way to defeat the inherent unpredictability in multithreaded programs.
The same holds for the third example on the previous page, when both threads run simultaneously. If both threads try to acquire the lock at the same time, the operating system will determine which thread gets it, and block any other threads trying to access the lock until it is released.
Of course, this introduces another interesting concept - if our threads must share data in this way, then is this any better than just having a single thread? If we look at this example, it seems that the threads can only run sequentially because of the lock, and that is true here. So, to make our multithreaded programs effective, each thread must be able to perform work that is independent of the other threads and any shared memory. Otherwise, the program will be even more inefficient than if we’d just written it as a single thread!
On the next pages, we’ll explore the basics of creating and using threads in both Java and Python. As always, feel free to skip ahead to the language you are learning, but you may wish to review both languages to see how they compare.
Java includes several methods for creating threads. The simplest and most flexible is to implement the Runnable interface in a class, and then create a new Thread that uses an instance of the class implementing Runnable as it’s target.
It is also possible to create a class that inherits from the Thread class, which itself implements the Runnable interface. However, this is not recommended unless you need to perform more advanced work within the thread.
Here’s a quick example of threads in Java:
import java.lang.Runnable;
import java.lang.Thread;
import java.lang.InterruptedException;

public class MyThread implements Runnable {

    private String name;

    /**
     * Constructor.
     *
     * @param name the name of the thread
     */
    public MyThread(String name) {
        this.name = name;
    }

    /**
     * Thread method.
     *
     * <p>This is called when the thread is started.
     */
    @Override
    public void run() {
        for (int i = 0; i < 3; i++) {
            System.out.println(this.name + " : iteration " + i);
            try {
                // tell the OS to wake this thread up after at least 1 second
                Thread.sleep(1000);
            } catch (InterruptedException e) {
                System.out.println(this.name + " was interrupted");
            }
        }
    }

    /**
     * Main Method.
     */
    public static void main(String[] args) {
        // create threads
        Thread thread1 = new Thread(new MyThread("Thread 1"));
        Thread thread2 = new Thread(new MyThread("Thread 2"));
        Thread thread3 = new Thread(new MyThread("Thread 3"));

        // start threads
        System.out.println("main: starting threads");
        thread1.start();
        thread2.start();
        thread3.start();

        // wait until all threads have terminated
        System.out.println("main: joining threads");
        try {
            thread1.join();
            thread2.join();
            thread3.join();
        } catch (InterruptedException e){
            System.out.println("main thread was interrupted");
        }
        System.out.println("main: all threads terminated");
    }
}
Let’s look at this code piece by piece so we fully understand how it works.
import java.lang.Runnable;
import java.lang.Thread;
import java.lang.InterruptedException;
We import both the Runnable interface and the Thread class, as well as the InterruptedException exception class. We have to wrap a few operations in a try-catch block to make sure that the thread isn’t interrupted by the operating system unexpectedly.
public class MyThread implements Runnable {

    private String name;

    public MyThread(String name) {
        this.name = name;
    }

    // ...
}
The class is very simple. It implements the Runnable interface, which allows to wrap it in a Thread as we’ll see later. Inside of the constructor, we are simply setting a name attribute so we can tell our threads apart.
    @Override
    public void run() {
        for (int i = 0; i < 3; i++) {
            System.out.println(this.name + " : iteration " + i);
            try {
                // tell the OS to wake this thread up after at least 1 second
                Thread.sleep(1000);
            } catch (InterruptedException e) {
                System.out.println(this.name + " was interrupted");
            }
        }
    }
The run() method is declared in the Runnable interface, so we must override it in our code. This method is pretty short - it simply iterates 3 times and prints the value of the iteration along with the thread’s name, and then it uses the Thread.sleep(1000) method call. This tells the operating system to put this thread into a waiting state, and to not wake it up until at least 1000 milliseconds (1 second) has elapsed. Of course, we can’t guarantee that the operating system won’t make this thread wait even longer than that, but typically it will happen so fast that we won’t be able to tell the difference.
However, many of the methods in the Thread class can throw an InterruptedException if the thread is interrupted while it is performing this operation. In practice, it happens rarely, but it is always recommended to wrap these operations in a try-catch statement.
    public static void main(String[] args) {
        // create threads
        Thread thread1 = new Thread(new MyThread("Thread 1"));
        Thread thread2 = new Thread(new MyThread("Thread 2"));
        Thread thread3 = new Thread(new MyThread("Thread 3"));

        // start threads
        System.out.println("main: starting threads");
        thread1.start();
        thread2.start();
        thread3.start();

        // wait until all threads have terminated
        System.out.println("main: joining threads");
        try {
            thread1.join();
            thread2.join();
            thread3.join();
        } catch (InterruptedException e){
            System.out.println("main thread was interrupted");
        }
        System.out.println("main: all threads terminated");
    }
Finally, the main() method will create three instances of the Thread class, and provide an instance of our MyThread class, which implements the Runnable interface, as arguments to the constructor. In effect, we are wrapping our runnable class in a thread.
Then, we call the start() method on the thread, which will actually create the thread through the operating system and start it running. Notice that we do not call the run() method directly - that is called for us once the thread is created in the start() method.
Finally, we call the join() method on each thread. The join() method will block this thread until the thread we called it on has terminated. So, by calling the join() method on each of the three threads, we are making sure that they have all finished their work before the main thread continues. Once again, this could throw an InterruptedException, so we’ll use a try-catch statement to handle that.
That’s all there is to this example!
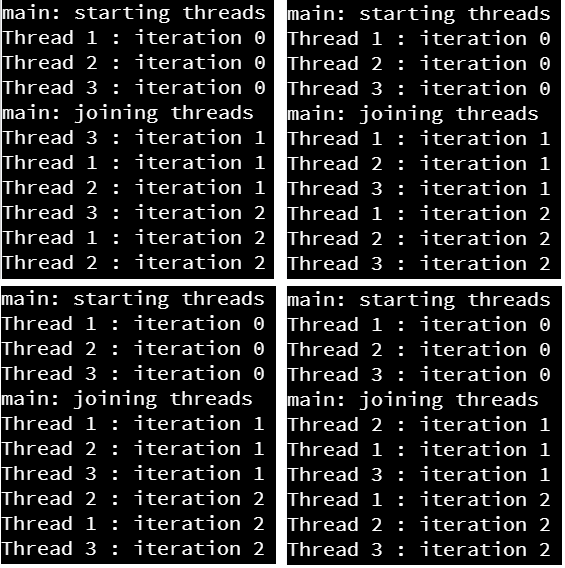
When we execute this example, we can see many different outputs, depending on how the threads are scheduled with the operating system. Below are a few that were observed when this program was executed during testing.

If you look closely at these four lists, no two of them are exactly the same. This is because of how the operating system schedules threads - we cannot predict how it will work, and because of this a multithreaded program could run differently each time it is executed!
Next, let’s look at a quick example of a race condition in Java, just so we can see how it could occur in our code.
First, let’s consider this example:
public class MyData {

    public int x;

}
import java.lang.Runnable;
import java.lang.Thread;
import java.lang.InterruptedException;
public class MyThread implements Runnable {
private String name;
private static MyData data;
/**
* Constructor.
*
* @param name the name of the thread
*/
public MyThread(String name) {
this.name = name;
}
/**
* Thread method.
*
* <p>This is called when the thread is started.
*/
@Override
public void run() {
for (int i = 0; i < 3; i++) {
int y = data.x;
// tell the OS it is ok to switch to another thread here
Thread.yield();
data.x = y + 1;
System.out.println(this.name + " : data.x = " + data.x);
}
}
/**
* Main Method.
*/
public static void main(String[] args) {
// create data
data = new MyData();
// create threads
Thread thread1 = new Thread(new MyThread("Thread 1"));
Thread thread2 = new Thread(new MyThread("Thread 2"));
Thread thread3 = new Thread(new MyThread("Thread 3"));
// start threads
System.out.println("main: starting threads");
thread1.start();
thread2.start();
thread3.start();
// wait until all threads have terminated
System.out.println("main: joining threads");
try {
thread1.join();
thread2.join();
thread3.join();
} catch (InterruptedException e){
System.out.println("main thread was interrupted");
}
System.out.println("main: all threads terminated");
System.out.println("main: data.x = " + data.x);
}
}In this example, we are creating a static instance of the MyData class, which can act as a shared memory object for this example. Then, in each of the threads, we are performing this three-step process:
int y = data.x;
// tell the OS it is ok to switch to another thread here
Thread.yield();
data.x = y + 1;Just as we saw in the earlier example, we are reading the current value stored in data.x into a variable y. Then, we are using the Thread.yield() method to tell the operating system that it is allowed to switch away from this thread at this point. In practice, we typically wouldn’t use this method at all, but it is helpful for testing. In fact, Thread.yield() is effectively the same as calling Thread.sleep(0) - we are telling the operating system to put this thread to sleep, but then immediately add it back to the list of threads to be scheduled on the processor. Finally, we update the value stored in data.x to be one larger than the value we saved earlier.
In effect, this is essentially the Java code needed to reproduce the example we saw earlier in this class.
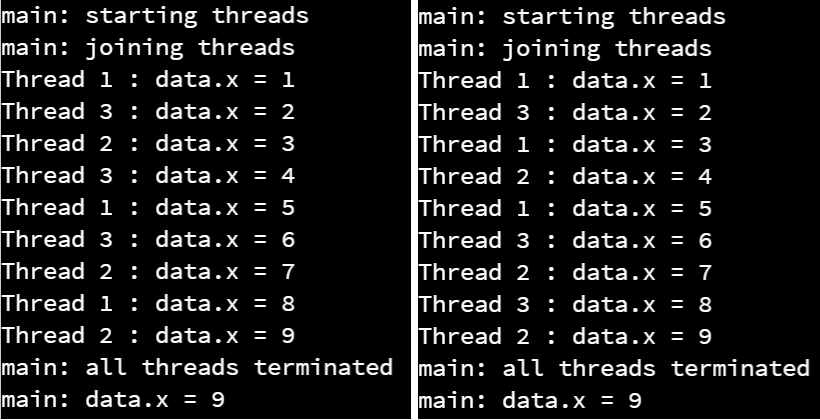
So, what happens when we run this code? As it turns out, sometimes we’ll see it get a different result than the one we expect:
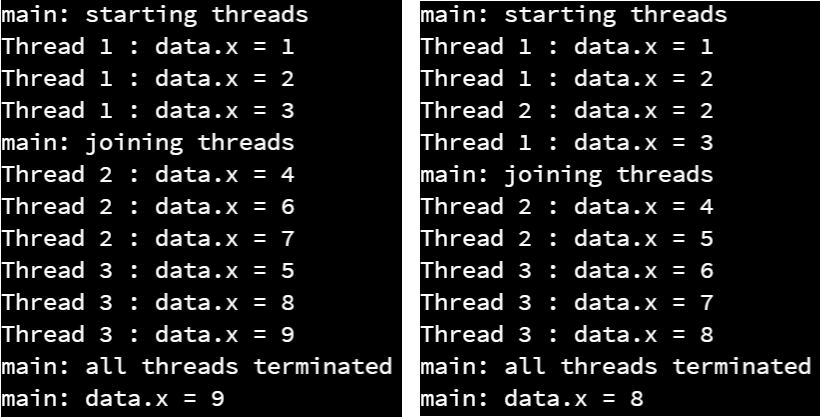
Uh oh! This is exactly what a race condition looks like in practice. In the screenshot on the right, we see that two threads set the same value into data.x, which means that they were running at the same time.
To fix this, Java includes couple of special methods for dealing with synchronization. First, we can use the synchronized statement, which is simply a wrapper around a block of code that we’d like to be atomic. An atomic block is one that shouldn’t be broken apart and interrupted by other threads accessing the same object. In effect, the synchronized statement will handle acquiring and releasing a lock for us, based on the item used in the statement.
So, in this example, we can update the run() method to use a synchronized statement:
    @Override
    public void run() {
        for (int i = 0; i < 3; i++) {
            synchronized(data) {
                int y = data.x;
                Thread.yield();
                data.x = y + 1;
                System.out.println(this.name + " : data.x = " + data.x);
            }
            Thread.yield();
        }
    }
Here, the synchronized statement creates a lock that is associated with the data object in memory. Only one thread can hold that lock at a time, and by associating it with an object, we can easily keep track of which thread is able to access that object.
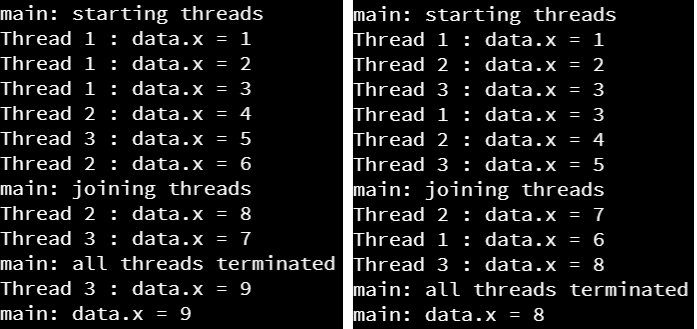
Now, when we execute that program, we’ll always get the correct answer!
In fact, to get the threads interleaved as shown in this screenshot, we had to add additional Thread.sleep() statements to the code! Otherwise, the program always seemed to schedule the threads in the same order on Codio. We cannot guarantee it will always happen like that, but it is an interesting quirk you can observe in multithreaded code. In practice, sometimes race conditions may only happen once in a million operations, making them extremely difficult to debug when they happen.
Python includes several methods for creating threads. The simplest and most flexible is to create a new Thread object using the threading library. When that object is created, we can give it a function to use as a starting point for the thread.
Here’s a quick example of threads in Python:
import threading
import time
import sys


class MyThread:

    def __init__(self, name):
        """Constructor.

        Args:
            name: the name of the thread
        """
        self.__name = name

    def run(self):
        """Thread method."""
        for i in range(0, 3):
            print("{} : iteration {}".format(self.__name, i))
            # tell the OS to wake this thread up after at least 1 second
            time.sleep(1)

    @staticmethod
    def main(args):
        # create threads
        t1_object = MyThread("Thread 1")
        thread1 = threading.Thread(target=t1_object.run)
        t2_object = MyThread("Thread 2")
        thread2 = threading.Thread(target=t2_object.run)
        t3_object = MyThread("Thread 3")
        thread3 = threading.Thread(target=t3_object.run)

        # start threads
        print("main: starting threads")
        thread1.start()
        thread2.start()
        thread3.start()

        # wait until all threads have terminated
        print("main: joining threads")
        thread1.join()
        thread2.join()
        thread3.join()
        print("main: all threads terminated")


# main guard
if __name__ == "__main__":
    MyThread.main(sys.argv)
Let’s look at this code piece by piece so we fully understand how it works.
import threading
import time
import sys
We import both the threading library, which allows us to create threads, as well as the time library to put threads to sleep. We’ll also need the sys library to access command-line arguments, if any are used.
class MyThread:

    def __init__(self, name):
        self.__name = name
The class is very simple. Inside of the constructor, we are simply setting a name attribute so we can tell our threads apart.
    def run(self):
        for i in range(0, 3):
            print("{} : iteration {}".format(self.__name, i))
            # tell the OS to wake this thread up after at least 1 second
            time.sleep(1)
The run() method is the method we’ll use to start our threads. This method is pretty short - it simply iterates 3 times and prints the value of the iteration along with the thread’s name, and then it uses the time.sleep(1) method call. This tells the operating system to put this thread into a waiting state, and to not wake it up until at least 1 second has elapsed. Of course, we can’t guarantee that the operating system won’t make this thread wait even longer than that, but typically it will happen so fast that we won’t be able to tell the difference.
    @staticmethod
    def main(args):
        # create threads
        t1_object = MyThread("Thread 1")
        thread1 = threading.Thread(target=t1_object.run)
        t2_object = MyThread("Thread 2")
        thread2 = threading.Thread(target=t2_object.run)
        t3_object = MyThread("Thread 3")
        thread3 = threading.Thread(target=t3_object.run)

        # start threads
        print("main: starting threads")
        thread1.start()
        thread2.start()
        thread3.start()

        # wait until all threads have terminated
        print("main: joining threads")
        thread1.join()
        thread2.join()
        thread3.join()
        print("main: all threads terminated")
Finally, the main() method will create three instances of the threading.Thread class, and provide an instance of our MyThread class as the target argument to the constructor. In effect, we are wrapping our runnable class in a thread.
Then, we call the start() method on the thread, which will actually create the thread through the operating system and start it running. Notice that we do not call the run() method directly - that is called for us once the thread is created in the start() method.
Finally, we call the join() method on each thread. The join() method will block this thread until the thread we called it on has terminated. So, by calling the join() method on each of the three threads, we are making sure that they have all finished their work before the main thread continues.
That’s all there is to this example!
When we execute this example, we can see many different outputs, depending on how the threads are scheduled with the operating system. Below are a few that were observed when this program was executed during testing.
If you look closely at these four lists, no two of them are exactly the same. This is because of how the operating system schedules threads - we cannot predict how it will work, and because of this a multithreaded program could run differently each time it is executed!
Next, let’s look at a quick example of a race condition in Python, just so we can see how it could occur in our code.
First, let’s consider this example:
import threading
import time
import sys


class MyData:

    def __init__(self):
        self.x = 0

class MyThread:

    data = MyData()

    def __init__(self, name):
        """Constructor.

        Args:
            name: the name of the thread
        """
        self.__name = name

    def run(self):
        """Thread method."""
        for i in range(0, 3):
            y = MyThread.data.x
            # tell the OS it is ok to switch to another thread here
            time.sleep(0)
            MyThread.data.x = y + 1
            print("{} : data.x = {}".format(self.__name, MyThread.data.x))

    @staticmethod
    def main(args):
        # create threads
        t1_object = MyThread("Thread 1")
        thread1 = threading.Thread(target=t1_object.run)
        t2_object = MyThread("Thread 2")
        thread2 = threading.Thread(target=t2_object.run)
        t3_object = MyThread("Thread 3")
        thread3 = threading.Thread(target=t3_object.run)

        # start threads
        print("main: starting threads")
        thread1.start()
        thread2.start()
        thread3.start()

        # wait until all threads have terminated
        print("main: joining threads")
        thread1.join()
        thread2.join()
        thread3.join()
        print("main: all threads terminated")
        print("main: data.x = {}".format(MyThread.data.x))


# main guard
if __name__ == "__main__":
MyThread.main(sys.argv)In this example, we are creating a static instance of the MyData class, attached directly to the MyThread class and not a particular object, which can act as a shared memory object for this example. Then, in each of the threads, we are performing this three-step process:
y = MyThread.data.x
# tell the OS it is ok to switch to another thread here
time.sleep(0)
MyThread.data.x = y + 1
Just as we saw in the earlier example, we are reading the current value stored in data.x into a variable y. Then, we are using the time.sleep(0) method to tell the operating system to put this thread to sleep, but then immediately add it back to the list of threads to be scheduled on the processor. Finally, we update the value stored in data.x to be one larger than the value we saved earlier.
In effect, this is essentially the Python code needed to reproduce the example we saw earlier in this class.
So, what happens when we run this code? As it turns out, sometimes we’ll see it get a different result than the one we expect:
Uh oh! This is exactly what a race condition looks like in practice. In the screenshot on the right, we see that two threads set the same value into data.x, which means that they were running at the same time.
To fix this, Python includes a lock that we can use as part of a with statement, which is simply a wrapper around a block of code that we’d like to be atomic. An atomic block is one that shouldn’t be broken apart and interrupted by other threads accessing the same object. In effect, using a with statement along with a lock will handle acquiring and releasing the lock for us.
So, in this example, we can update the MyThread class to have a lock:
class MyThread:

    data = MyData()
    lock = threading.Lock()
When, we can update the run() method to use a with statement:
    def run(self):
        for i in range(0, 3):
            with MyThread.lock:
                y = MyThread.data.x
                # tell the OS it is ok to switch to another thread here
                time.sleep(0)
                MyThread.data.x = y + 1
                print("{} : data.x = {}".format(self.__name, MyThread.data.x))
            time.sleep(0)
Here, the with statement acquires the lock that is associated with the data object in the MyThread class. Only one thread can hold that lock at a time, and by associating it with an object, we can easily keep track of which thread is able to access that object.
Now, when we execute that program, we’ll always get the correct answer!
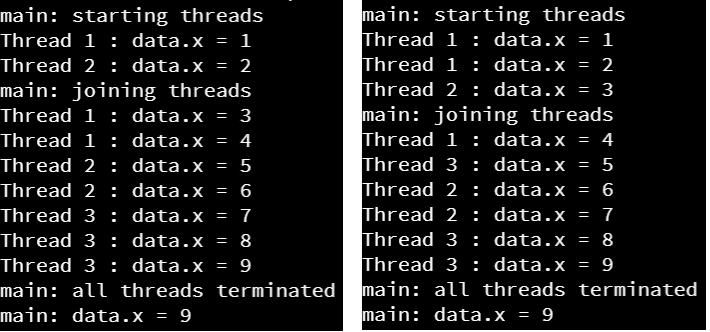
In fact, to get the threads interleaved as shown in this screenshot, we had to add additional time.sleep(0) statements to the code! Otherwise, the program always seemed to schedule the threads in the same order on Codio. We cannot guarantee it will always happen like that, but it is an interesting quirk you can observe in multithreaded code. In practice, sometimes race conditions may only happen once in a million operations, making them extremely difficult to debug when they happen.
In this chapter, we learned about processes and threads. A process is an instance of an application running on our computer, and it can be broken up into multiple threads of execution.
Creating threads is very simple - in most cases, we just need to define a function that is used as the starting point for the thread. However, in multithreaded programs, dealing with shared memory can be tricky, and if done incorrectly we can run into race conditions which cause our programs to possibly lose data.
To combat this, programming languages and our operating system provide methods for thread synchronization, namely locks that prevent multiple threads from running at the same time.
Then, we saw some quick examples for how to create threads in both Java and Python, and how to handle basic race conditions through the use of locks in each language.
In the next chapter, we’ll introduce event-driven programming, which depends on multiple threads to make our GUI responsive to the user even while our application is doing work in the background.
Check your understanding of the new content introduced in this chapter below - this quiz is not graded and you can retake it as many times as you want.
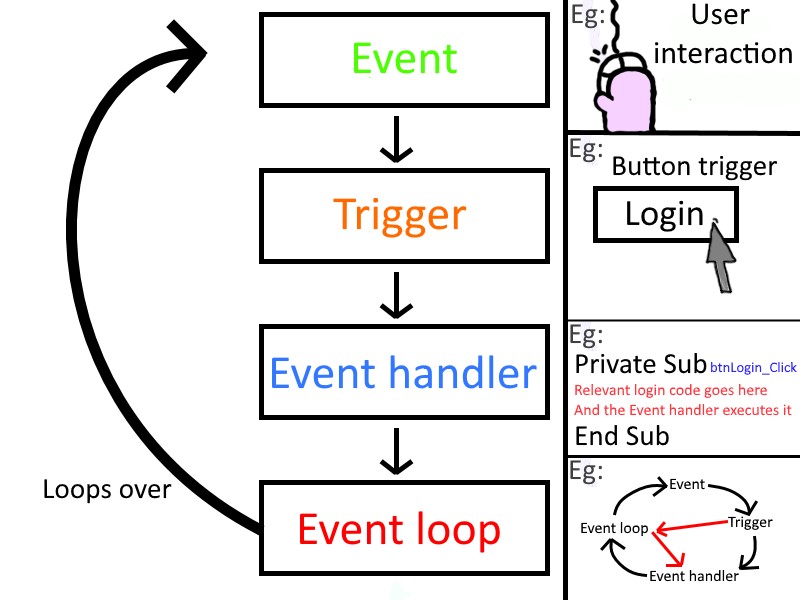
Responding to events within our GUIs!
So far, we’ve learned to create a GUI and switch between panels in the GUI, but we’ve not really looked at how to make our GUI buttons responsive and perform the actions we want when the user clicks on them. In this chapter, we’ll dive into event-driven programming, which is the programming paradigm we use to construct applications that use GUIs and event handlers.
We’ll see how we can build our application to include multiple threads, making our application appear responsive to the user even if the application is performing calculations in another thread. This will build on the parallelism we learned in a prior chapter.
Some key terms we’ll cover in this chapter:
After this chapter, we’ll be able to update our applications to respond to user button clicks and other events.
Up to this point, we’ve only created applications that use a single thread. However, now that we are writing applications that include a GUI, we must start to build applications that use multiple threads to manage its work. Otherwise, if the application is busy working on a particular task while the user clicks a button in the GUI, the GUI won’t respond to the user until our task is complete.
To resolve this, we typically build our GUI applications in a way that the GUI runs in a separate thread from the rest of our application. In that way, the GUI is always responsive to the user, and our application can continue to do whatever it needs in additional threads. Those threads won’t impact the responsiveness of our GUI, at least if they are constructed properly.
This leads to a new programming paradigm called event-driven programming. Event-driven programming can be thought of as an alternative to imperative programming, though in practice both paradigms are used within the same program. In imperative programming, the program follows a set sequence of steps to perform an action, directly as defined in the program’s source code. In event-driven programming, the steps a program takes are determined by an external factor that generates events within the system. The program will receive those events, and then use the event received to decide what steps, if any, to perform. Of course, the process of waiting for events, receiving them, and acting upon them, is usually all done through imperative code.
Consider the diagram above. In it, a user interacts with a button in an application, which is an event. That event triggers some piece of code, which is typically called an event handler, to react to that event. The event handler examines the event, and performs the requested action.
Behind the scenes, there is another piece of code, called the event loop, that is actually watching for these events and calling the appropriate event handlers for us.
On the next few pages, we’ll dive into each of these steps in building a responsive GUI using event-driven programming.
The first step in building a program using event-driven programming is actually creating the events that you’d like to respond to. For a GUI-based program, this is actually handled by the GUI framework itself. It includes a large number of events that are already available for us to use. Instead, we have to bind those events to special functions, called event handlers, within our code. Then, when those events occur, the GUI framework will call the event handler associated with that event.
Most GUI frameworks include a large number of events that we can bind our event handlers to. There are some obvious ones, such as the clicked event for a button, or the value changed event for checkboxes, but there are actually many events that are generated by our GUI that we might not have thought of. Here are just a few events we can typically find in our GUI framework:
x and y coordinates of the cursor at any time through this event.Each GUI framework can handle many different events. You can find a list of some of them at the following resources:
Both Java Swing and Python tkinter include simple ways to bind an event to a function. In fact, we’ve already seen a bit of how to do that in a previous example - we created a few buttons that called a function when clicked! That is a great example of binding the clicked event to a function in our code.
Here’s a more general example in both Java and Python, this time binding the mouse moved event:
Excerpted in part from How to Write a Mouse-Motion Listener from Oracle.
import java.awt.*;
import java.awt.event.*;
import javax.swing.*;

public class MouseDemo extends JFrame implements MouseMotionListener {

    public MouseDemo() {
        this.setMinimumSize(new Dimension(800, 600));
        // ------------------------------
        // This is the **bind** action
        this.addMouseMotionListener(this);
        // ------------------------------
    }

    // ----------------------------------------------
    // These functions are the **event handlers**
    // This is when the mouse is moved but not clicked
    public void mouseMoved(MouseEvent e) {
        this.output("Mouse Moved", e);
    }

    // This is when the mouse is moved while being clicked
    public void mouseDragged(MouseEvent e) {
        // this.output("Mouse Dragged", e);
    }
    // ----------------------------------------------

    private void output(String event, MouseEvent e) {
        System.out.println(event + " : " + e.getX() + "," + e.getY());
    }

    public static void main(String[] args) {
        SwingUtilities.invokeLater(new Runnable() {
            public void run() {
                new MouseDemo().setVisible(true);
            }
        });
    }
}
import sys
import tkinter as tk
from typing import List
class MouseDemo(tk.Tk):
def __init__(self) -> None:
"""Initializer for GUI."""
tk.Tk.__init__(self)
self.minsize(width=800, height=600)
# --------------------------------
# This is the **bind** action
self.bind('<Motion>', motion)
# --------------------------------
def action_performed(self, event) -> None:
"""Event handler for GUI events."""
print("Mouse Moved : {},{}".format(event.x, event.y))
@staticmethod
def main(args: List[str]) -> None:
"""Main method."""
MouseDemo().mainloop()
# Main Guard
if __name__ == "__main__":
MouseDemo.main(sys.argv)In both of these examples, we see how to bind an event to a function. In Java Swing, we need to add a specific type of “listener” to the object, which is an event handler in Java Swing terminology. We then implement the associated interface, which defines the function(s) we must include to react to those events. In this case, we implement the MouseMotionListener interface.
In Python tkinter, we literally use a method called bind along with the name of the event we’d like to bind and the function we’d like to call. This is much more straightforward, but we don’t have the benefit of a compiler and type checker making sure that our events are bound correctly, nor that we’ll get the correct data out of them. So, we have to be a bit more careful as well.
On the next page, we’ll go a bit deeper into event handlers, the functions that are called when the events occur.
At its core, an event handler is simply a piece of code that is called when a particular event happens within the GUI. The function typically receives additional information about the event, such as the source of the event and any relevant details. In some languages, we also refer to event handlers as callbacks.
In Java, most events are handled by special interfaces called “listeners” that we can implement within our code. When we bind to an event in Java Swing, we specify an object that is instantiated from a class that implements the appropriate listener for that event. Then, when the event happens, behind the scenes Java will find the associated object and call the correct method defined as part of the interface. Here’s the example from the previous page:
// ----------------------------------------------
// These functions are the **event handlers**
// This is when the mouse is moved but not clicked
public void mouseMoved(MouseEvent e) {
    this.output("Mouse Moved", e);
}

// This is when the mouse is moved while being clicked
public void mouseDragged(MouseEvent e) {
    // this.output("Mouse Dragged", e);
}
// ----------------------------------------------
These two methods are defined in the MouseMotionListener interface. When the event happens, it sends along an instance of the MouseEvent class that contains the information about the event, such as the location of the mouse and any buttons that are pressed.
In Python, events are typically sent directly to a function that is sometimes referred to as a “callback” function. So, when we bind to an event in Python tkinter, we simply specify the function that’d like to be called when the event happens. If we want to capture some additional data along with the function, we can do that using a lambda expression, which we saw in the earlier GUI example project.
Here’s the example callback function from the previous page:
def action_performed(self, event) -> None:
    """Event handler for GUI events."""
    print("Mouse Moved : {},{}".format(event.x, event.y))
When the '<Motion>' event occurs, Python will call this function and pass along a second parameter, which we’ve named event in this example. The event object contains the x and y coordinates of the mouse, but may also contain different information based on the event that was generated. Unfortunately, there isn’t a good source of documentation for all of these events and what information they contain, so you may have to do a bit of digging to figure out what you can expect from each type of event.
Most GUI frameworks, such as Java Swing and tkinter, handle user interactions through the use of a loop, which runs within the GUI thread and listens for events generated by the user.
When an event is generated by the user, it is first placed in an event queue, which is a queue-based data structure used to keep track of events generated by the user. The events are placed there by a thread in the program, usually part of the GUI framework, that is connected and “listening” for events from the operating system. We use a queue to keep track of events, just in case the user generates events more quickly than our program can handle them.
Then, in the GUI thread of our program, there is a loop of code that is constantly checking if the event queue contains any elements. We typically refer to this code as the event loop. If it does, it will take the first element from the queue and examine it. If that event is bound with a known event handler somewhere in our code, then the event loop will call the event handler, shown in the diagram above as a “callback” function.
Once the event handler has returned, the event loop will take the next event from the queue and act upon it, and it will continue to do so until there are no events left in the queue.
In some GUI frameworks, the event loop is also responsible for updating the GUI on the screen itself, as shown in the diagram above. So, while the event handlers are executing, the GUI screen itself cannot be updated and the application will appear to “freeze.”
So, it is very important for our event handlers to be very short and execute quickly, or else the user might notice that our application is not responsive. If the event requires a large amount of calculation, we may want to create a separate thread to handle that operation. Thankfully, most simple GUI programs will not require this, but it is always something to be aware of in case our application starts running slowly.
On the next two pages, we’ll briefly discuss the event loop for both Java Swing and Python tkinter. As always, you may skip to the language you are learning, but it may be helpful to see how both languages perform a similar task.
The Java Swing GUI toolkit uses a special thread called the Event Dispatch Thread (abbreviated EDT) to handle events. This thread is where most of the code that interacts with a GUI written in Swing actually runs, leaving the main application thread to do other tasks as needed.
In all of our examples so far, we have observed a unique piece of code in the main() method that is used to actually launch our GUI-based programs:
SwingUtilities.invokeLater(new Runnable() {
    public void run() {
        new MouseDemo().setVisible(true);
    }
});
The SwingUtilities.invokeLater() method is used within the application thread to run code within the EDT. So, when we launch our application, the first thing we do is construct a new anonymous class that implements the Runnable interface, which defines an object that can be run as a thread. Inside of that class, we place the to code to construct our GUI and make it visible in the run() method.
In the background, the first time we call SwingUtilities.invokeLater(), Java will see that there is no EDT running and will spawn that thread. Once it is running, then at some time in the future the run() method of our anonymous class will be called, which actually loads the GUI within the EDT.
The other important task performed by the EDT is actually responding to events from the operating system. So, when it isn’t actively running an event handler, the EDT is the thread that is constantly checking the event queue for any new events.
When an event is received, it looks up the event’s associated GUI element, and then checks to see if any listeners are registered with that object for that type of event. If so, then it finds the listener object and calls the appropriate method for that event.
As discussed earlier, we need to make sure our event handlers do not take too long to complete. Otherwise, we’ll end up slowing down the EDT and making it respond more slowly to events. In addition, this will make our entire GUI appear to “lag” for the user, which is definitely something we want to avoid.
In Python tkinter, we have an event loop that runs in the background, handling all of the GUI updates as well as responding to any events in the event queue by calling the appropriate callback function.
In all of our examples so far, we have observed a unique piece of code in the main() method that is used to actually launch our GUI-based programs:
MainWindow().mainloop()The tk.Tk.mainloop() method is used to start the event loop attached to the top-level tk.Tk object in our GUI. This is a blocking function, meaning that it will not return as long as the GUI is running, even when it isn’t visible to the user. So, in effect, any code after this in our main() method that is after this function call will not be executed. Instead, that thread is constantly working to update the GUI on the screen and making sure that events are handled quickly.
Therefore, if we need to create an additional thread for our application, we typically will do so before calling this mainloop() method in our main() method. We can also create new threads from within the event loop thread as needed.
The other important task performed by the event loop is actually responding to events from the operating system. So, when it isn’t actively running a callback, the event loop is the thread that is constantly checking the event queue for any new events.
When an event is received, it looks up the event’s associated GUI element, and then checks to see if any callbacks are registered with that object for that type of event. If so, then it calls the callback function for that event.
As discussed earlier, we need to make sure our event handlers do not take too long to complete. Otherwise, we’ll end up slowing down the event loop and making it respond more slowly to events. In addition, this will make our entire GUI appear to “lag” for the user, which is definitely something we want to avoid.
In this chapter, we learned about event-driven programming and how to configure our GUI-based programs to respond to actions taken by the user.
When the user interacts with our GUI, an event is created by the operating system and placed in the event queue. Then, our program uses an event loop to check the queue for incoming events, and respond to them. When an event is found, our program determines if that event has been bound to a particular event handler, also known as a listener or callback. If so, it calls the appropriate function handle that event.
The event loop is typically run in a separate thread in our program, and we must make sure that any operations performed on that thread are quick enough to prevent any lag in our GUI.
In the example project for this chapter, we’ll explore how to add some event handlers to our GUIs.
Check your understanding of the new content introduced in this chapter below - this quiz is not graded and you can retake it as many times as you want.
Don’t Reinvent the Wheel - Just Use It!
Developing new software can be a very time consuming task. Thankfully, it is very easy to share the code and resources from previously developed software, making it very simple for large numbers of programmers to collectively work together, sometimes completely indirectly, to solve a new problem.
In this chapter, we’re going to explore software libraries and how we can take advantage of easily reusable pieces of software to make our job as programmers even easier. We’ve already used several of these libraries in our programs, but this is a good chance to step back and take a look at the broader software ecosystem and how it all fits together.
In this chapter, we’ll learn about the following concepts:
In the following chapter, we’ll learn how to use the tools we’ve already explored in this class, plus a few additional tools, in order to create our own software libraries that we can distribute based on our code. We’ll also explore how to use an external library in our ongoing project, including how to manually install one that isn’t available in a repository.
The term software library can actually mean several things. In essence, a software library is a collection of resources that can be used by computer program, either while it is running or while it is being developed. As we’ve learned so far in this course, it makes sense to think of a large software program as a few smaller packages or subsystems that work together. With that view in mind, a software library simply is a subsystem or package that is developed outside of our application. In most cases, it is meant to be reused by many different programs.
In fact, one of the major benefits of writing our software in a modular format is to enable this exact kind of code reuse. A program developed for one task may include code that could easily be repurposed for a similar task. A great example is a system for ordering food online at a restaurant. That same system includes many of the same components that would be required for any other e-commerce website, such as one that sells handmade arts and crafts. So, many portions of that software could be turned into general-purpose libraries that can be reused.
The diagram above shows an example of what it might look like for an application to use an external library to handle playing an Ogg Vorbis file, which is an audio file format similar to an MP3. It makes no sense for use to “reinvent the wheel” for playing an Ogg Vorbis file, even though the entire format is published online. Instead, we can find a compatible library for the language we are using, such as the libvorbisfile library shown in this diagram, and include that library in our software.
To play the file, we can call the functions in the library’s API that accomplish that task. When we do, we can provide the Ogg Vorbis file as input, and we’ll receive a decoded audio stream that we can send to yet another library that handles playing audio on our system. So, we can see these libraries as just another set of subsystems that our code interacts with in order to achieve its intended goal.
There are many different types of software libraries available. However, many modern languages such as Java and Python have greatly simplified the task of using these libraries. This is because both Java and Python rely on an underlying program to execute our code (either the Java Runtime Environment, or JRE for Java, or the Python Interpreter for Python), which handles connecting our code to the various libraries available on our system. So as developers we rarely need to worry about the differences in our code.
However, if we develop programs using languages like C or C++ that are designed to be compiled directly to executables that run on the system, these different library types become much more important.
A static library is a software library that is statically linked to our executable file when it is compiled. Linking a library involves combining our application’s code with the libraries it uses into a single executable. So, that library’s code is included directly in our application, and we don’t have to include any additional files in order for our application to function. However, that means that we’ll have to recompile our application completely each time we want to update any of the libraries that it uses. In addition, if many applications on a system all use the same library, they’ll all have to include a copy of that library in their executable, sometimes eating up valuable storage space in the process. Originally, all libraries were static libraries, but eventually developers came up with a new, more flexible system.
A shared library is a software library that can be shared among multiple executable files. Instead of being included in the application when it is compiled, the library code can be dynamically linked when the application is executed. So, when we load our program, the operating system can search for any required shared libraries on the system, load them into memory, and link them to our application so we can use them. Users of the Microsoft Windows operating system may be familiar with the DLL file type, which is the “dynamic-link library” format used by that operating system. So, a DLL file is simply a software library that is meant to be dynamically linked to an application when it executes.
The major benefit of this approach is that the library can be installed on a system just once, and then many different applications can make use of it without including that library’s code in their individual executables. In addition, the library can be updated once on a system and the new version will be available for any application that uses it.
Unfortunately, there are several downsides to this approach as well. One major issue is when applications require different versions of the same library in order to function. In that case, the operating system must maintain several versions of the same library, and if done incorrectly this could lead to one application overwriting the library required by another. In addition, this means that the space savings by sharing libraries among applications can be greatly diminished if applications are not able to share the same version of the library. In fact, there are entire articles on Wikipedia dedicated to the issues with dynamically linked libraries, a problem collectively known as Dependency Hell
As object-oriented programming became more common, many programming languages started to support class libraries as a way to share code between applications. In this case, a class library is simply a set of classes, usually either provided as source code or a compiled version of the code, which can then be integrated into another application. In this way, the library looks just like any other portion of the software, and can easily be used by developers in their applications.
A great example of a class library are the standard libraries included with many programming languages, including Java and Python. We’ve used these libraries extensively in our code, mainly to support reading to and writing from files, storing data in data structures, and even creating GUIs for our applications. Anytime we import something into our code that we didn’t write ourselves, we’re taking advantage of a class library that was written by another developer.
Going forward, when we refer to a software library in this course, we will usually be referring to a class library as described above.
One question that comes up frequently when discussing software libraries is the difference between a library and a framework, as many times the terms are used interchangeably. So, let’s briefly explore the difference between the two and how they interact with each other.
As discussed on the previous page, a library is a reusable software component that has an API that we can make use of in our code. So, our code will call methods in the API to perform the desired actions, and we’ll typically import the library’s code into our own code files.
Structurally, we can think of our code as a wrapper around the library. We’re using the library in our application, so we are in control of what it does.
On the other hand, a framework is a piece of software written to perform a specific task or be used in a specific way. However, the framework includes places where a developer can customize the code to change the actions performed by the framework. Many frameworks can be used without any customization at all, but in most cases the framework will not do anything useful without additional code added by a developer.
Some great examples of a framework are the Python Flask and Java Spring frameworks, which are both designed to create web applications. They provide the overall structure for a web application, including the routing, page templates, receiving requests from a browser and creating a response, and more. Then, the developer can customize the web application by providing code to add individual web pages, API endpoints, and databases to store data. All of the customization to make the application meet the needs of the user is handled by the developer, but the framework itself is responsible for the overall structure and operation of the application.
Put another way, a framework is a wrapper around our code. The framework is in control of what the application does, and it calls our code as needed to create the desired pages and send the correct output back to the user.
A key concept of a software framework is this inversion of control, where the program’s overall structure and operation are determined by the framework itself and not our code. As shown in the diagram above, a framework calls our code, and then our code calls code stored in libraries. That is the easiest way to spot the difference between a framework and a library.
Frameworks also make extensive use of the template method pattern that we learned about in an earlier chapter. Our code will implement parts of the template method, such as a template method for sending a web page to a web browser. We’ll provide one part of the content, and we can override other methods to customize it as needed, but the framework itself will use the template method to actually send the web page to the browser.
In a later chapter in this course, we’ll explore the Python Flask and Java Spring frameworks a bit deeper, and see how we can use them in our ongoing software project in this course to make them available via the internet.
So far, we’ve learned about what software libraries are, and how they differ from other, similar tools such as software frameworks. However, you are probably wondering: “how do I find these libraries and add them to my application?” Let’s discuss the various places you can learn about software libraries and how to use them in your applications.
One of the most common ways to find software libraries to include in your application is to review the libraries available in a repository of libraries for your language. A repository is simply a database of content that you can use, and most languages include a way to automatically find and install libraries that are available in a standard repository. Most of those libraries are provided as packages, which is simply a name for the library and any supporting files or resources all bundled together in a single downloadable file.
For example, in Python we’ve used the pip3 tool to download and install many different tools for Python, such as flake8 and mypy. The pip3 tool downloads packages from a central repository called PyPi (Python Package Index). The PyPi website includes a very robust search tool for finding and learning about the various packages available for Python. In the next chapter, we’ll see how we can package our own applications up and make them ready for submission to PyPi.
In Java, we are using Gradle as our build tool, and it is able to download packages from many different repositories. In most cases, we will be using the Maven Central repository.
In addition to the repositories listed above, many software libraries and packages are available for download directly from the internet, usually from the library developer’s website. For example, many of the Java libraries developed by the Apache Software Foundation can also be downloaded directly from their Distribution Directory. Many Java packages are commonly offered via direct download as well as through repositories, mainly because the popularity of distributing software via a repository is more recent than the development of Java.
For Python, on the other hand, by far the most common method of installing packages is simply via the pip3 command that downloads them directly from PyPi. However, it is possible to download these packages directly from PyPi as a Python Wheel, which we’ll learn about in the next chapter.
In both languages, the ability to download and install these packages directly is important for many reasons. There may be instances where the developer may not have direct access to the Internet, such as in a highly secure computing environment. So, tools such as pip3 and Gradle cannot be used to download the packages.
In fact, many developers working in a secure environment can choose to host their own internal repositories for software packages, making sure that they have access to the packages they need while still being able to control the exact version and contents of those packages.
Finally, many open-source software libraries can be directly built from the source code. The vast majority of open source software today stores their source code in publicly available code repositories such as GitHub, GitLab, or SourceForge. So, a developer can choose to download the source code directly and build the library themselves, or possibly even edit the source code as needed to match a particular use case. In most open-source community, this kind of experimentation and reuse is highly encouraged.
Of course, this can present many hassles as well. Many more advanced software libraries contain thousands of lines of code, and they can be very complex to modify, build, and distribute. Most large scale open-source project has large amounts of automation that handles this process, so doing it ourselves as a single developer can be very daunting. In addition, any time the library is updated we’ll need to manually update our version as well, or else we risk out software becoming obsolete and possibly vulnerable to security issues.
When downloading or installing software libraries, one aspect that should always be considered is the security of your application. There are many instances of open source software libraries containing either security flaws or malicious code, many of which are only discovered months or years after appearing in the application. So, we must always be aware of these risks and how they can impact the overall security of the application we are building.
While there is no way to avoid all security issues, here are some quick things we should keep in mind when reviewing which software libraries to include in our code:
On the next page, we’ll dive a bit deeper into software licenses and the impact that may have on the libraries we can use in our application.
In the world of software, we use the term open-source to refer to any software that has source code that is openly available. This is in contrast to proprietary software, sometimes referred to as closed-source software, which is software with source code that is not publicly available. The software itself may be sold, or even provided for free, but the actual source code is protected by the company.
So, before we can use just any software library we find, we should consider what license it uses and how that impacts our ability to use that library. On this page, we’ll briefly discuss some of the licenses and terminology used in industry today.
The information below is my best attempt to help simplify the vastly complex legal documents that make up a software license. However, this simple information may not be enough to fully understand all of the nuances of how a particular software license impacts your ability to use it or distribute it with your own software.
In general, most software that is licensed under one of the more permissive licenses listed below can be safely used in your application, and many (but not all) of them allow you to distribute that software as part of your application as well.
However, when in doubt, you should always read the documents carefully and seek competent legal advice if you are ever unsure. It is always best to make sure you are properly complying with the license of a piece of software you are using.
First, let’s discuss free software. The term “free” has two different meanings, and they are sometimes applied to software interchangeably:
So, when we say software is “free,” it is always important to know which definition of “free” we are using. For example, the Slack messaging application is available for free, meaning no cost, but with some restrictions applied. Google’s Chrome web browser is also free, meaning no cost, and is based on the open source Chromium project, but Chrome itself is not open source since it contains some proprietary software. These free programs are sometimes referred to as “freeware” - meaning that they are available without cost, but still use proprietary source code.
The Linux Kernel is an example of a piece of software that is free and open source, however even it has some restrictions applied to it. Namely, the license of the Linux Kernel requires that any software built using the source code of the kernel (a derivative work) must also be offered under the same license.
In fact, the Free Software Foundation has developed a set of four “freedoms” that are used to determine if a piece of software can truly be labelled “free”:
Software that meets these four criteria sometimes use the term “libre” software, or FOSS (“Free Open Source Software”) to differentiate themselves from the traditional definition of the word “free”.
So, as we can see, the term “free” really isn’t a great way to discuss software licenses. Instead, we’ll focus in on some more specific licenses and what they mean.
The least restrictive license is the public domain license, meaning that the software can be used by anyone for any purpose, without any restrictions. However, the lack of a license does not mean that the software is in the public domain - quite the opposite in many cases. In the United States, any work, whether published or not, is automatically copyrighted to the original author2 until 70 years after the author’s death. So, to release software into the public domain, a proper license must be attached to the software.
One common public domain license is the Creative Commons CC0 license, with basically waives as many legal rights as possible on any work that the license is applied to. GitHub recommends a similar license called the Unlicense.
Permissive licenses allow few restrictions on the use and distribution of the software.
A permissive license commonly used for software is the MIT License, which grants very little restrictions on the use of the software other than that the license itself should be included in any copies or portions of the software. In addition to granting permission, it also includes a disclaimer stating that the software is offered without any warranty and the authors are not liable for any damages caused by use of the software.
This license is used by a large number of open source projects, and typically is one of the easiest to use.
Some similar licenses are the BSD and Apache licenses.
The next level of licenses are the copyleft licenses. These licenses typically require that any derivative works also be licensed with the same rights. So, if we include a software library that is using a copyleft license in our software, we cannot then make our software proprietary and sell it, as this would violate the copyleft license of that software library.
The most common copyleft license used in software is the GNU General Public License, or GPL, which is used by the Linux Kernel and many other applications typically included as part of a Linux distribution. This requires that any derivative works of the Linux Kernel also be made available under a copyleft license.
One major open question with copyleft licenses - if a piece of software uses a library that is licensed with a copyleft license, but doesn’t distribute that library directly as part of its package, is it still considered a derivative work?
This is a hotly debated question with the Wikipedia Article for the GPL laying out many different points of view on the topic. For example, when a library is statically linked to an application, it is inseparable. However, does the same hold if the library is dynamically linked? Likewise, if a piece of software is just using the public API of a library without modifying the library’s source code, is it a derivative work?
These questions make licensing software that uses libraries under a copyleft license very confusing. Because of this, there is also a GNU Lesser General Public License or GLPL that specifically addresses this issue by allowing other software to link to libraries licensed with the LGPL without it being considered a derivative work.
The last category of software licenses are the unique, proprietary licenses that are attached to software that is not open-source or free. Each one of these licenses can vary widely in the rights given to the users, so we should always read them carefully before using them.
In summary, the licenses of the libraries we use when building our software, as well as any tools or platforms, can all impact the eventual license we can assign to our application if we choose to distribute it. In most cases, we can freely use any open source software for personal use, but as soon as we wish to distribute, or possibly sell, our own software, then we will have to determine what license can be applied to our work. We’ll review that in a later chapter.
The use of software libraries can be complex, as seen in the earlier discussions in this chapter. There are licensing issues to consider, security issues to worry about, and even then we might struggle to find the library that best fits our needs. However, let’s take a step back and review why we should definitely still consider using these libraries wherever possible in our work.
The saying “don’t reinvent the wheel” is a good one to keep in mind when writing new software. In most cases, large parts of any software we wish to write have already been written many times before. So, instead of doing all of the work to recreate that software, we can instead try to find a library or framework that does what we need, and spend our time working on how to make that software fit our needs.
In the article A Padawan Programmer’s Guide to Developing Software Libraries, the authors list a very important lesson as the first lesson any developer should learn when approaching a new project: “Identify a Need for a New Piece of Software.” In essence, whenever we wish to develop something, we should first consider whether it has been done before. If so, it may be worth looking at how we can adapt an existing solution to fit our needs, rather than building a new one from scratch.
A great example of this is building a database-driven website. A naive approach (one taken by this textbook’s author while in college) would be to write all of the code to generate each page by hand, without using any external frameworks or libraries besides the one required to interface with the database. The website would work, but it would be very complex and prone to errors. In addition, maintaining that code could be difficult due to its complexity.
A better solution would be to find a website framework that is able to handle interfacing with the database and generating pages for you, and then customizing those pages to fit our needs.
Likewise, when writing a program to perform statistical analysis or machine learning on some data, we can usually rely on well written, well documented, and typically very efficient libraries to handle the work for us. By doing so, we reduce the risk of our code producing incorrect results due to the algorithm being incorrect (though we could just as easily use the algorithm incorrectly or provide it bad data).
In short, it is always worth taking the time to review the libraries and frameworks available for our programming language. We may find that we can easily combine a few of them together to achieve our desired result.
Of course, relying on a library developed by someone else does have its pitfalls. For example, what if the original developer suddenly decides to “unpublish” the library, making it unavailable for download in the future? That could cause issues for any developer or application that relies on that library, making them also stop working. As libraries are often built on other libraries, such a cascading effect could have dire consequences.
This very thing happened in 2016, when a developer chose to remove his libraries from npm, a large repository of packages for the JavaScript programming language, due to a dispute with another company. One of those libraries was left-pad, a simple library to help align strings of text by adding spaces to the front of them. However, as it turns out, many larger libraries within the JavaScript ecosystem relied on that library as a dependency. Once of these tools was Babel, a compiler for JavaScript that is commonly used by many developers in the field.
In JavaScript, it is very common to constantly get updated versions of libraries from npm, sometimes daily or weekly, just to make sure the latest updates are applied when publishing a new version of a web application. When the left-pad library suddenly disappeared, many other libraries found themselves unable to update and publish new versions because of the missing dependency. It effectively disrupted the entire JavaScript ecosystem!
Thankfully, the left-pad library was restored soon after, and it has since been deprecated in favor of using a function built-in to JavaScript.
For more information on this event, see this article from Ars Technica.
Update 2022: It happened again! This time the colors and faker libraries were broken by the developer. See this article.
On the next pages, we’ll briefly look at how to work with external libraries in both Java and Python. As always, feel free to review the content for your chosen language, but you are welcome to read both sections if desired.
Java typically uses a special type of file called a JAR file, short for “Java Archive” file, to create a downloadable package that may contain Java source code, compiled class files, and additional data. We can even include compiled Javadoc documentation directly in a JAR file.
Most software libraries for Java are distributed as JAR files, including from the major repositories such as Maven Central. In addition, most websites that offer direct downloading of Java libraries typically use the JAR file format.
A JAR file itself is built using the same format as the ZIP file format. The Java Runtime Environment includes a special command jar that can be used to create a JAR file or extract the contents from an existing JAR file.
Finally, a JAR file can include additional information in a manifest file, giving the details such as the version of the software and the developer. The manifest file can also specify the main class of the application included in the JAR file. If so, then the JAR file can effectively be executed as an application, and many operating systems support double-clicking on a JAR file to run it as a Java program.
There are a couple of ways we can install a JAR file into our applications. In effect, we need to add them to our classpath, which is used by the Java compiler and Java runtime environment to locate the resources it needs to operate.
When using Gradle, this process can be greatly simplified. In the build.gradle file, there are two important sections. First, there is a section for repositories that lists the repositories we can use for downloading and installing packages:
repositories {
    // Use Maven Central for resolving dependencies.
    mavenCentral()
}
As shown here, our project will use Maven Central to resolve and install any packages required.
Below that, there is a section for dependencies that lists the packages required by this project:
dependencies {
    // Use JUnit Jupiter API for testing.
    testImplementation 'org.junit.jupiter:junit-jupiter-api:5.6.2', 'org.hamcrest:hamcrest:2.2', 'org.junit.jupiter:junit-jupiter-params', 'org.mockito:mockito-inline:3.8.0', 'org.mockito:mockito-junit-jupiter:3.8.0'

    // Use JUnit Jupiter Engine for testing.
    testRuntimeOnly 'org.junit.jupiter:junit-jupiter-engine'

    // This dependency is used by the application.
    implementation 'com.google.guava:guava:29.0-jre', files('lib/restaurantregister-v0.1.0.jar')
}
The dependencies section contains three lists of packages
testImplementation - packages used for compiling unit teststestRuntimeOnly - packages used for running unit testsimplementation - packages required to compile and run the main source of the applicationTypically, we’ll install most libraries by adding them to the implementation list. In this example, we can see that our application uses two libraries:
restaurantregister, which was manually downloaded as a JAR file that is now contained in the lib folder of our project’s directory. In this way, we can add any manually downloaded JAR files to our application by simply listing them in the build.gradle file.The Java programming language has many different libraries available for developers to use. Below is a list of some of the most common and useful libraries, as well as links for more information about each one. As we continue to develop more complex softwares, we may want to look at some of these libraries for additional information. We can also browse the repository at Maven Central for additional libraries we could use.
First and foremost, the Java Standard Library contains thousands of classes that we can use in our applications for a variety of purposes. So, before looking elsewhere, it is always worth checking to see if the Java Standard Library already includes what we need.
Beyond the Java Standard Library, there are two other general purpose libraries that are commonly used by Java developers:
Here are a few more libraries that are commonly used by Java developers, some of which we are already using in this course:
Python typically uses a special type of file called a Wheel to create a downloadable package that contains Python source code and any additional resources or bundled libraries required for the package. Wheel files replaced the older “egg” file format that Python used for distribution.
Most software libraries for Python are distributed as wheel files, including from the major repositories such as PyPi.
A wheel file itself is built using the same format as the ZIP file format. Typically, wheel files themselves are built by the setuptools library, which is not itself part of the core Python language but can be quickly installed as a package using pip3.
Finally, a wheel file can include additional information about the software, giving the details such as the version of the software and the developer.
Thankfully, installing a Python wheel file is very simple. Most recent versions of the pip3 tool will handle this automatically via one of two methods.
pip3 install <packagename> to find and download the package from PyPi. Most package entries on PyPi give the exact command needed to install them.pip3 install <file>, where <file> is the path and name of a wheel file we downloaded manually.In either case, pip3 will handle downloading, extracting and installing the Python wheel file on our system so it is ready for us to use in our Python applications.
As we learned in the “Hello Real World” project, we can also list these requirements in a requirements.txt file to have them automatically installed by pip3 when we use the tox command to automate checking and testing our application. In that case, we typically store any manually downloaded wheel files in a folder named lib inside of our package directory, and then we can add entries to tox.ini that look like lib/<filename>.whl to make sure the wheel file is installed properly in the virtual environment as well.
The Python programming language has many different libraries available for developers to use. Below is a list of some of the most common and useful libraries, as well as links for more information about each one. As we continue to develop more complex softwares, we may want to look at some of these libraries for additional information. We can also browse the repository at PyPi for additional libraries we could use.
First and foremost, the Python Standard Library contains hundreds of classes that we can use in our applications for a variety of purposes. So, before looking elsewhere, it is always worth checking to see if the Java Standard Library already includes what we need.
Here are a few more libraries that are commonly used by Python developers, some of which we are already using in this course:
In this chapter, we learned about software libraries and how we can use them in our applications. We explored the different types of libraries, including static libraries, shared libraries, and class libraries. We discussed the differences between libraries and frameworks and how to tell the difference. We also covered repositories and how to search for and download helpful software packages we can use.
In addition, we discussed the various licenses that may be attached to software libraries we use in our code, and how that may impact our ability to license and distribute our software in the future. We also looked at why it is worth the hassle of finding and downloading these libraries instead of writing the code ourselves.
Finally, we looked at the Java JAR and Python wheel file formats, and how to install those packages into our applications. We also listed some common software packages for both Java and Python that we may want to use ourselves.
In the example project for this chapter, we’ll look at how to download and install a custom package for our class project and how to integrate it into our code.
Check your understanding of the new content introduced in this chapter below - this quiz is not graded and you can retake it as many times as you want.
Putting Our Applications Out There in the World!
At some point, we may decide that the application or library we are developing is ready for release. In that case, there are a few things we can do to help make our application easier to install and use for our potential users.
In this chapter, we’ll briefly discuss some of the steps in that process and the decisions we may need to make along the way. This is not meant to be a full guide to releasing a professional piece of software, but it should help you navigate some of the first steps toward making your application available to a wider audience.
In this chapter, we’ll discuss these topics and terms:
After this chapter, we’ll also have a short example project that goes through these steps, allowing you to create your own software release!
Before we release our software, there are a few steps that we should perform to make sure it is ready for release. Most of these steps are things that we’ve already been doing as part of our development process, but it is always good to review them once again and make sure everything is ready for release.
README.md file giving basic instructions for how to use your application.checkstyle and flake8 are powerful ways to make sure your code is complete, easy to read, and follows standard coding styles.Gradle or pip3, or consider packaging dependencies with your application if the license allows it.dotenv project from the Ruby programming language. Popular options include dotenv-java for Java and python-dotenv for Python.Of course, these are just a few of the things we may want to review before deciding our application is ready for publication. It’s always worth taking the time to think about how useful our application will be to our users before taking the next step.
The next major step in releasing a piece of software is to choose a license. Adding a license to your software allows you to specify what the software can be used for, who can use it, and how they can make use of it either within their own applications or by possibly distributing and building derivative works.
In the previous chapter, we discussed various software licenses and what they mean when we try to use a library under that license. Now, let’s look at what it means to release our software using those licenses.
The information below is my best attempt to help simplify the vastly complex legal documents that make up a software license. However, this simple information may not be enough to fully understand all of the nuances of how a particular software license impacts other users’ ability to interact with your software, and your liabilities when it comes to that use.
In general, choosing to license your software under one of the more permissive licenses listed below will generally make the application available to all users and protect you from any liability. However, it does not give you any control over how the application may be used by others, including commercial use.
However, when in doubt, you should always read the documents carefully and seek competent legal advice if you are ever unsure. It is always best to make sure you understand the consequences of choosing a particular software license.
To help choose a software license that fits your project, GitHub helpfully maintains the site choosealicense.com. It helps developers choose an applicable license by asking a few simple questions. We’ll discuss some of those questions below and the various licenses they lead to.
For starters, if your project is meant to be part of a larger community of projects, consider using the license that is used by other projects in that community. For example, if we are building a library that is meant to be an add-on for an existing application, it makes sense to choose the license that the application is distributed under. In that way, we can guarantee that our project is available to anyone who can use the application it is meant for.
Likewise, if you are working for a company or with a group of developers, they may already have a preferred license for you to use. In those cases, consulting with others in your group is a valuable way to learn what licenses are being used by the group and how your application may fit in.
The first major choice is whether we’d like to place any limitations on how our software is used at all. If the answer is no, then most likely we’ll want to choose one of the public domain licenses available. This is the most open license, which allows anyone the ability to use our application in any way they wish.
GitHub recommends using the Unlicense for this, which effectively will release the software into the public domain and absolve the creator of any liability or warranty concerns related to the software. Similarly, many creative works may also choose to use the Creative Commons CC0 license to release the content into the public comain.
A permissive license is another common choice for software that we’d like to make freely available to users with a minimum set of limitations. Typically, the only limitation we place on software using these licenses is that the original source code itself must be distributed using this license, but derivative works may be licensed under different terms.
By far the most common permissive license for software on GitHub is the MIT License. This license is used by many open-source projects that wish to keep their code as open as possible, while still allowing users to repackage and redistribute the software as part of a larger commercial package.
A copyleft license is a good choice when we want to make sure that our software remains freely available to users, including any major modifications or derivative works. In general, a copyleft license requires any modifications to our application, or any application that makes major use of our application and source code, to be released under the same license.
The most common choice for a copyleft license is the GNU General Public License (GPL), which is used by many projects related to the Linux operating system. Any software licensed using the GPL includes the limitation that any derivative works are also licensed under the GPL. In this way, a commercial entity couldn’t take our application and repackage it or resell it commercially.
A similar choice is the GNU Lesser General Public License (LGPL), which modifies the GPL to explicitly allow software that only make use of the public interface of our software to be distributed under a different license. Put another way, a commercial application that makes use of our library’s API could still be sold, but our library must be distributed with its license intact. Any derivative works will still require licensing under the LGPL.
Of course, if we choose not to include a license with our software, it will be copyrighted by default, at least in the United States. This means that, even though our source code may be available on the Internet, anyone who chooses to use it could be violating our copyright and subject to legal action. This is further complicated by other agreements such as the GitHub Terms of Service, which allows users on that site to view and “fork” any repository available publicly, regardless of the underlying license or lack thereof.
GitHub provides a good overview of what happens when you choose to publish software without a license. That said, it is highly recommended to either choose an open-source license listed above, or make the code private until we are ready to choose a license.
Now that we’ve discussed the various software licenses available, this is a good time to dig deeper into this course and talk about the license attached to various portions of the course. As stated earlier, I am not a lawyer and this is not meant to be a substitute for reading and exploring the licenses yourself, but here is a quick overview of the various licenses used in this course.
The last bullet point above is tricky, because this legally allows you as a student to post your project solutions on GitHub and share them publicly. This is great, as it allows you to use this project as part of your portfolio that you can share with others, and maybe even include it in your resume as you apply for jobs. However, it also means that other students can see your code and possibly submit it as their own, violating the K-State Honor Code. This is made even more difficult because the student sharing a solution could be considered liable in addition to the student who chooses to use it.
While we cannot prevent you from posting these solutions, at least on copyright grounds, here is my recommendation for the best way to protect yourself and others from running into issues:
In this course, we use some tools for detecting plagiarized code, and we also update the projects from time to time to prevent reuse of entire solutions between semesters. In general, a student found to be using a solution that was published online by a previous student will be held liable for violating the K-State Honor Code, but not the student who chose to exercise their rights to publish that solution after the conclusion of the course.
Another major step in creating a software release is to add some metadata to your project. The metadata attached to an application typically includes items such as the version, author, and title. Depending on the format, it may also include additional items such as the main website for the application, and a place where bugs or issues may be reported.
The Java JAR file format includes a file named Manifest.txt that can include this information. The Oracle Java Tutorials website includes a page for Setting Package Version Information that describes the various entries that can be added to that file. In addition, some of this metadata may be added to your project when it is published on one of the repositories available for Java, such as Maven Central.
The Python wheel file format uses a special file called setup.cfg that lists all of the metadata that can be included in the project. There are many different items that can be specified in that file, which are all covered in the Core metadata specifications file in the Python documentation.
In either case, before publishing a release of our application, we should take a minute or two and add any required metadata to our project. This will make it easier for other users to find our application, and it helps us clearly specify items such as the version of our application and any dependency requirements.
As part of the “Hello Real World” project in this course, we learned how to automatically generate documentation for our application based on the documentation comments included in our code. That documentation can be very valuable for anyone who wishes to use or modify our application, so we want to make it available for everyone.
While it is possible for anyone to download our source code and generate this documentation themselves, many times we want to make this even easier by posting the documentation directly on the Internet. In this way, it is always available for anyone who needs it, without any extra steps.
Thankfully, many code repository websites such as GitHub make this process quick and easy. Let’s explore how to make this content available on GitHub using a feature called GitHub Pages
First, we need to prepare our documents to be published on GitHub pages. Thankfully, this is a quick two-step process.
javadoc or pdoc3 tool.docs in our project.Specifically, we want to copy the folder containing the index.html file, as well as any files and folders in that directory, to a new directory at the root of our project named docs. In general, this can easily be done with just a couple of commands on the terminal:
# get to the project folder (this may be different)
cd java
# remove existing docs, if any
rm -rf docs
# copy new docs to that folder
cp -r app/build/docs/javadoc/ docs/
# get to the project folder (this may be different)
cd python
# remove existing docs, if any
rm -rf docs
# copy new docs to that folder (this may be different)
cp -r reports/doc/python/ docs/Once that is done, we should now see a docs folder in our project, and within that folder we should find a file named index.html. We can right-click that file in Codio and choose Preview Static to make sure it is the correct file and that everything is working.
Once we are satisfied, we should commit that docs folder to git, and then push our changes to our GitHub repository.
To enable GitHub pages on our repository, we can follow the instructions on this page to use the newly created docs folder as the publishing source for our website:
main or master branch.docs folder as your publishing source.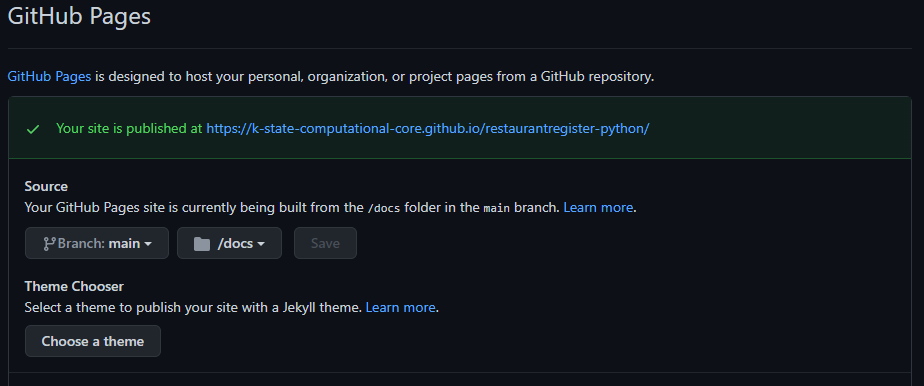
After a minute or so, you should be able to visit the URL listed there and you should see your documentation on the web! You can see some examples of what this looks like by reviewing the public repositories in the K-State Computational Core organization on GitHub and looking for the documentation links in each README.md file.
On the next pages, we’ll review how to build a Java JAR file and a Python wheel file. As always, feel free to skip to the page for your chosen programming language.
Building a JAR file using Gradle is super simple - it handles almost all of the heavy lifting for us. The basic steps are outlined in the Building Java Libraries Simple guide in the Gradle documentation. Below, we’ll go through the steps we’ll need to follow for most of the applications we’ve created in this course.
If we haven’t already, we should first run the Gradle build task. This will automatically create a JAR file for our project, as well as any other required files.
# Change directory to the project directory (this may be different)
cd java
gradle build
Once we’ve done that, we can find our app.jar JAR file in the app/build/libs directory. That’s really all there is to it, but there are a few more things we can add to make it even better.
If we haven’t already done this, now is a great time to create a README.md file in the root directory of our project and include some basic information about our project. Once it is published, we can come back to this file and update it with links to the documentation hosted in GitHub pages.
In addition, we may wish to add a license to our project at this step, before packaging it. We can use the choosealicense.com website to help find a license. We can also easily add a license to an existing GitHub repository following the Adding a license to a repository guide from GitHub, then using the git pull command to pull that license file into our local copy of the project.
In either case, make sure we have a file in the root of our project named LICENSE before continuing.
One major thing we may wish to do in our projects is add some metadata to the project. We can do that by adding various entries to our build.gradle file.
In our build.gradle file, we can define the version of our application by simply adding the following line outside of any other section in that file:
version = 'v0.1.0'When we set the version, we should see the version number appended to the end of our JAR file. If we are following Semantic Versioning in our project, we’ll need to remember to update this version number in our build.gradle file each time we are ready to create a package for release.
We may also wish to set the overall project name. For Gradle, this is in the settings.gradle file, which can be found at the top level of our project. In that document, we should see a setting named rootProject.name, which we can update with our project’s name. For a single project application like the ones we’ve been building, we can set the name of that project as well:
rootProject.name = 'ourprojectname'
include('app')
project(":app").name = 'ourprojectname'
We can also achieve a similar result by simply renaming the app directory in our project to match the name we’d like to use. Either method works well.
Once we’ve set the project name and version in our various Gradle files, we can configure Gradle to include that information in our JAR file. We also need to add the name of the main class to this information if we want our JAR file to be directly executable. To do this, we simply add the following section to our build.gradle file:
tasks.named('jar') {
    manifest {
        attributes('Implementation-Title': project.name,
                   'Implementation-Version': project.version,
                   'Main-Class': 'ourprojectname.Main')
    }
    archivesBaseName = project.name
}
We should replace ourprojectname.Main with the correct name and path to our main class. If we’ve been using Gradle to run our project, it is probably already in the mainClass attribute of the application section of the file.
Notice that we also can add an archivesBaseName setting here to change the base filename of our project’s JAR file to match our project name. With all of this in place, we should now be able to run the gradle build command and find a JAR file named ourprojectname-v0.1.0.jar in the app/build/libs directory.
We can also check that our MANIFEST file contains the correct information by extracting it:
jar xf lib/build/libs/ourprojectname-v0.1.0.jar META-INF/MANIFEST.MFThen, we can open the file named MANIFEST.MF can is found in the META-INF directory and confirm that everything is correct:
Manifest-Version: 1.0
Implementation-Title: ourprojectname
Implementation-Version: v0.1.0
Once we’ve verified that our manifest is correct, we can delete the META-INF directory so it isn’t included in our project.
Sometimes, we may want to publish our original source code in a JAR file. That allows developers to easily download and modify our source code, or they can just explore it and see how it works.
Likewise, in addition to posting our generated Javadoc on the Internet using GitHub Pages, we can also create a JAR file that contains our Javadoc documentation. This JAR file can be imported into many Java IDEs, such as Eclipse, NetBeans, and IntelliJ to allow the IDE to automatically show relevant portions of our documentation to developers as they use our library. To do this, we just need to add the following section to our build.gradle file:
java {
    withSourcesJar()
    withJavadocJar()
}
We’ll also need to add sections to configure those JAR files. These are exactly the same as the one created above, but with different task names:
tasks.named('sourcesJar') {
    manifest {
        attributes('Implementation-Title': project.name,
                   'Implementation-Version': project.version)
    }
    archivesBaseName = project.name
}

tasks.named('javadocJar') {
    manifest {
        attributes('Implementation-Title': project.name,
                   'Implementation-Version': project.version)
    }
    archivesBaseName = project.name
}
Now, when we execute our gradle build command, we should see ourprojectname-v0.1.0.jar as well as both ourprojectname-v0.1.0-sources.jar and ourprojectname-v0.1.0-javadoc.jar. So, when we publish our package, we can also publish these JAR files as well.
There are a few other changes we can make to our project to make everything quick and easy to assemble. Let’s review them now:
Originally, we configured our project to include the Javadoc from our test files in the Javadoc for our entire project. While that may be useful for us internally as we are developing our code, we may not want to include that in our final Javadoc output. So, we can uncomment those lines in our build.gradle file.
In addition, as we saw on a previous page, we can move our Javadoc output to a folder named docs in our root project folder, and then GitHub Pages can automatically publish that documentation along with our project. Thankfully, we can configure our build.gradle file to automatically output the Javadoc files directly to that folder.
With those updates in place, the javadoc section of our build.gradle file may look something like this:
javadoc {
    // classpath += project.sourceSets.test.compileClasspath
    // source += project.sourceSets.test.allJava
    destinationDir = file("${rootDir}/docs/")
}
Now, when we run the gradle build command, we should see our generated Javadoc documentation appear in the docs folder, right where it needs to be.
We’d also like to make sure our generated JAR files are easy for users to find in our repository. It is a common practice to create a folder named dist in our project directory to contain any distributable packages we create and publish. So, we can easily update our build.gradle file to place any JAR files there. We’ll need to do this in all three of the JAR tasks:
tasks.named('jar') {
    manifest {
        attributes('Implementation-Title': project.name,
                   'Implementation-Version': project.version,
                   'Main-Class': 'ourprojectname.Main')
    }
    archivesBaseName = project.name
    destinationDirectory = file("${rootDir}/dist/")
}

tasks.named('sourcesJar') {
    manifest {
        attributes('Implementation-Title': project.name,
                   'Implementation-Version': project.version)
    }
    archivesBaseName = project.name
    destinationDirectory = file("${rootDir}/dist/")
}

tasks.named('javadocJar') {
    manifest {
        attributes('Implementation-Title': project.name,
                   'Implementation-Version': project.version)
    }
    archivesBaseName = project.name
    destinationDirectory = file("${rootDir}/dist/")
}
As before, we can test this by running gradle build and seeing that our JAR files are now placed in the dist directory in our project.
So, in summary, we updated our project configuration in the following ways:
settings.gradle file now includes our root project’s name and updates the name of our single project:rootProject.name = 'ourprojectname'
include('app')
project(":app").name = 'ourprojectname'build.gradle to:
docs folderdist folderjavadoc {
// classpath += project.sourceSets.test.compileClasspath
// source += project.sourceSets.test.allJava
destinationDir = file("${rootDir}/docs/")
}
version = 'v0.1.0'
java {
withSourcesJar()
withJavadocJar()
}
tasks.named('jar') {
manifest {
attributes('Implementation-Title': project.name,
'Implementation-Version': project.version)
}
archivesBaseName = project.name
destinationDirectory = file("${rootDir}/dist/")
}
tasks.named('sourcesJar') {
manifest {
attributes('Implementation-Title': project.name,
'Implementation-Version': project.version)
}
archivesBaseName = project.name
destinationDirectory = file("${rootDir}/dist/")
}
tasks.named('javadocJar') {
manifest {
attributes('Implementation-Title': project.name,
'Implementation-Version': project.version)
}
archivesBaseName = project.name
destinationDirectory = file("${rootDir}/dist/")
}Finally, we can run gradle build one more time, and then commit our changes to our repository.
In this commit, we’ll want to carefully check the output of the git status command to make sure we are only committing the files we want to the repository. Ideally, the only changes should be to the build.gradle and settings.gradle files, as well as all the contents of the new dist and docs directories.
Now, with all of this automation in place, all we have to do to create a new version of our package is update the version number in our build.gradle file, and then run gradle build. It will automatically create a new set of JAR files using the new version, and update our documentation to match.
On the following pages, we’ll discuss the steps for creating a release on GitHub that includes these JAR files for download, and also how to publish these to a repository!
Building a Python wheel file is super simple using the setuptools library - it handles almost all of the heavy lifting for us. The basic steps are outlined in the Packaging Python Projects guide in the Python documentation. Below, we’ll go through the steps we’ll need to follow for most of the applications we’ve created in this course.
First, we’ll need to create a file named pyproject.toml in the root our project directory. This file is responsible for defining the exact tools needed to build this package. We’re just going to use the default file provided in the documentation for now:
[build-system]
requires = [
    "setuptools>=42",
    "wheel"
]
build-backend = "setuptools.build_meta"If we haven’t already done this, now is a great time to create a README.md file in the root directory of our project and include some basic information about our project. Once it is published, we can come back to this file and update it with links to the documentation hosted in GitHub pages.
In addition, we may wish to add a license to our project at this step, before packaging it. We can use the choosealicense.com website to help find a license. We can also easily add a license to an existing GitHub repository following the Adding a license to a repository guide from GitHub, then using the git pull command to pull that license file into v0.1.0r local copy of the project.
In either case, make sure we have a file in the root of our project named LICENSE before continuing.
If our code contains proper typing information that can be used by Mypy, we need to mark that by placing a blank file named py.typed in each package that contains type annotations. So, wherever we see an __init__.py file, we should also add a py.typed file to the same directory.
Next, we need to set some metadata for our project. There are a couple of ways to do this, but the simplest is to create a static setup.cfg file that contains all of the information for our project. Once again, we’ll place this file in the root of our project directory.
The Packaging Python Projects tutorial provides a sample file that we can easily adapt for our needs. We’ve made a few changes below to that file to match our project:
[metadata]
name = <ourprojectname>
version = <0.1.0>
author = <Your Name>
author_email = <your_email@example.com>
description = <A description of our project>
long_description = file: README.md
long_description_content_type = text/markdown
url = https://github.com/<username>/<repo>
    Bug Tracker = https://github.com/<username>/<repo>/issues
classifiers =
    Programming Language :: Python :: 3
    License :: OSI Approved :: <MIT License>
    Operating System :: OS Independent

[options]
packages = find:
python_requires = >=3.9
include-package-data = True

[options.package_data]
<ourprojectname> = py.typed
The portions marked with angle brackets <> should be updated to match our project information. The tutorial linked above provides a great explanation of how to configure these items in our project. We can also refer to one of the public repositories for this course for another example.
Finally, we’ve included a couple of items at the bottom that aren’t included in the tutorial to allow our package to be compliant with PEP 561 so that Mypy can make use of the typing information included in our package. This will include the py.typed files we added earlier to our eventual package. See the Mypy Documentation for details.
One thing we may want to do is include our test files in the output. To do that, we must simply add a __init__.py file to the test directory and any subdirectories of that folder in our project. The Python build process will automatically find those and include them in our package!
When we are ready to create our package, we must first make sure we have the latest version of the build library on our system. So, we can use the pip3 command to install it:
pip3 install --upgrade buildOnce we are ready, we can run the following command from within our project directory to actually create our packages:
python3 -m buildIf all goes well, we should see it create a new folder named dist that contains both a .whl file as well as a .tar.gz file that include our project. That command will also produce a long list of output that contains all of the files that are included in our package. We should review that output closely and make sure it includes all of the correct files.
If we want to automate this process, there are a few things we can do in our tox.ini file to make this process go a bit smoother:
build package to our requirements.txt file so it will be available when we run tox.src based on the src directory in our project. If we want, we can change that to any other name we wish. If we do, we’ll need to update it throughout our source code and also in a few places in our tox.ini file. **You may want to do this before publishing a package so it doesn’t use the name src as the base of the package path.. at the end of our pdoc command, we can replace it with src or the new name of our top-level package.pdoc to the docs folder by adding a few commands to our tox.ini file to copy the generated documentation. To do this, we need to add an allowlist_externals entry that lists the commands we’d like to use.python3 -m build command at the very end of our commands in tox.ini to automatically update our package each time we successfully run tox.ignore_errors line from our tox.ini file. In that way, we’ll only create our package if all of the commands succeed.Below is an updated tox.ini file showing these changes.
[tox]
envlist = py39
skipsdist = True

[testenv]
deps = -rrequirements.txt
allowlist_externals = rm
                      cp
commands = python3 -m mypy -p src --html-report reports/mypy
           python3 -m coverage run --source src -m pytest --html=reports/pytest/index.html
           python3 -m coverage html -d reports/coverage
           python3 -m flake8 --docstring-convention google --format=html --htmldir=reports/flake
           rm -rvf reports/doc
           python3 -m pdoc --html --force --output-dir reports/doc src
           rm -rvf docs
           cp -rv reports/doc/src docs/
           python3 -m build
With everything in place, we can run our tox command to build our project. If we recently changed our requirements.txt file, we’ll need to run tox -r at least once to install the new requirements. If everything works correctly, it should place our built packages in the dist folder and copy our documentation to the docs folder for us.
Finally, before we commit these changes, we may wish to update our git configuration to ignore a few new files or folders created by the build process. Here’s the new .gitignore file that we can use:
__pycache__/
.tox
reports/
.coverage
build
*.egg-info/
It now ignores the build and any .egg-info folders.
If everything looks good, we can save and commit our changes to the git repository for this project.
In this commit, we’ll want to carefully check the output of the git status command to make sure we are only committing the files we want to the repository. Ideally, the only changes should be to the tox.ini and requirements.txt files, the new pyproject.toml and setup.cfg files, as well as all the contents of the new dist and docs directories.
Now, with all of this automation in place, all we have to do to create a new version of our package is update the version number in our setup.cfg file, and then run tox. It will automatically create a new set of package files using the new version, and update our documentation to match.
On the following pages, we’ll discuss the steps for creating a release on GitHub that includes these package files for download, and also how to publish these to a repository!
Finally, we’ve completed creating our package, and we’re ready to publish it. One of the easiest options is to include our package files directly in a GitHub release on GitHub.
In the “Hello Real World” example project, we learned how to create a release on GitHub using a tag. The only thing we’ll do differently this time is upload our packages to the release. Unfortunately, there is no easy way to select them directly from the repository, so we may have to download the package files from the dist directory to our computer first before starting this step.
When creating a release on GitHub, there is a spot at the bottom of the page to upload binaries. So, we can upload the package files from our dist directory right here. In the screenshot, I’ve uploaded both a JAR and a wheel file, but we would just use each of the package files created in our dist folder for the current version of our package.
Once the release is published, we’ll see our package files directly on the page ready for anyone to download and use in their own projects!
At long last, we have a package ready to go! The last optional step would be to publish our package to a package repository so others can easily download and use it through their development tools. We won’t directly do that as part of this course, but below are some quick links and basic instructions to follow if you’d like to publish a package to a repository for your language.
Unfortunately, the process of getting a package posted on Maven Central is quite complex. It requires creating the packages as described in this chapter, as well as signing them with a PGP encryption key. Then, we’ll need to create a Project Object Model, or pom file that describes the project and includes some additional metadata. Finally, we’ll need to provide hosting for the actual packages themselves, though much of that can be handled through an open source repository hosted by Sonatype.
While this will make your package easier for other Java developers to discover and use, many smaller developers find this to be overly cumbersome if the project can be easily downloaded as a JAR file.
If you do choose to publish your package to Maven Central, here are some resources to help you get started:
Java packages that are published to a central repository such as Maven Central must use a group ID based on a DNS domain name that you own or have control over. If the project is hosted on GitHub, you can use io.github.<username> as your group ID, since GitHub provides you the website <username>.github.io as part of GitHub pages. Otherwise, you may have to perform additional steps to reserve your group ID.
In addition, typically you will then place your code in a Java package that matches your group ID, which is your DNS domain name in reverse order. For example, the library code for this class uses the domain name cc410.cs.ksu.edu, which is a domain that we host at K-State. In the source code for this project, we place all of our code in the Java package edu.ksu.cs.cc410. In that way, we can guarantee that our package name is unique and no one else can use it.
Thankfully, for Python this process is very simple. The Packaging Projects tutorial from Python includes the steps to publish a package directly to PyPi:
twine package: pip3 install --upgrade twinetwine:python3 -m twine upload --repository testpypy dist/*When you run that command, you’ll be prompted for a username and password. If you created an API Token, use __token__ as the username and then enter your token as the password, including the pypi- prefix.
If everything goes correctly, you should now be able to see your package on test.pypi.org. The tutorial linked above includes instructions on how to test it by installing your package from the test PyPi repository.
Once you are satisfied, you can basically perform the same steps on the real PyPi repository. You may need to update your package name in the setup.cfg file to make sure it is unique.
In this chapter, we learned about the steps we can follow to create packaged released of our applications. We discussed changes we could make to our applications to prepare for a release, as well as the various licenses we can choose to attach to our application.
We also looked at some of the helpful metadata that we may wish to add to our project, and how to deploy our documentation directly to the Internet using GitHub pages.
Finally, we saw how to create a package in both Java and Python, and how to upload those packages to a release on GitHub. We also discussed the basic steps for uploading a package to the repository for our chosen language.
In the example project for this module, we’ll go through some of the steps for creating our own packaged releases and how to upload them to GitHub.
Check your understanding of the new content introduced in this chapter below - this quiz is not graded and you can retake it as many times as you want.