Java
This section contains content for the Java programming language only.
This section contains content for the Java programming language only.
If you are reviewing this material or are familiar with these concepts, here’s the short version:
# Install tools on Ubuntu if doing this at home
sudo apt update && sudo apt install zip unzip curl sed
# Verify Java SDK version 8 or higher
java -version
# Install SDKMAN!
curl -s "https://get.sdkman.io" | bash
# Install Gradle
sdk install gradle 7.6
Working with Java on the Linux terminal can be complicated, especially as projects become larger and larger. Thankfully, there are many tools that have been developed to simplify this process. For this course, we’re going to use one such tool, called Gradle.
Gradle is a multi-platform build tool that helps automate development and deployment of applications written in a variety of languages. It also includes a very robust set of plugins that allow developers to perform many different tasks, directly through the Gradle command interface.
In the Java ecosystem, similar tools include Ant and Maven. In addition, many desktop IDEs such as IntelliJ IDEA, Eclipse and NetBeans automatically perform many of the same functions as Gradle.
The main reason we’ve chosen to use Gradle in this course is the ease with which it can be used, and the fact that it is available on pretty much any modern platform.
First, let’s install Gradle following the instructions found in the Gradle User Guide. As a developer, you’ll want to get familiar with reading the documentation for various tools you use, and Gradle is no exception.
On that page, the first step is to confirm that we have a version of Java installed. So, we’ll need to open a terminal and run the following command:
java -versionAll of these commands can be executed from any directory, but we recommend using the default location of ~/workspace. We should see output similar to the following:

In this image, we see that we already have Java 8 installed, specifically version 1.8.0_275. This is included in our standard Codio stack, so we won’t have to worry about installing Java. Therefore, we meet the minimum installation requirement.
Next, we’ll need to install the SDKMAN! tool, which is the recommended way to install Gradle on Linux systems such as Codio. To install SDKMAN!, we’ll just follow the installation instructions found online, which calls for us to run the following command:
curl -s "https://get.sdkman.io" | bashWhen we do that, we’ll get output that looks like this:
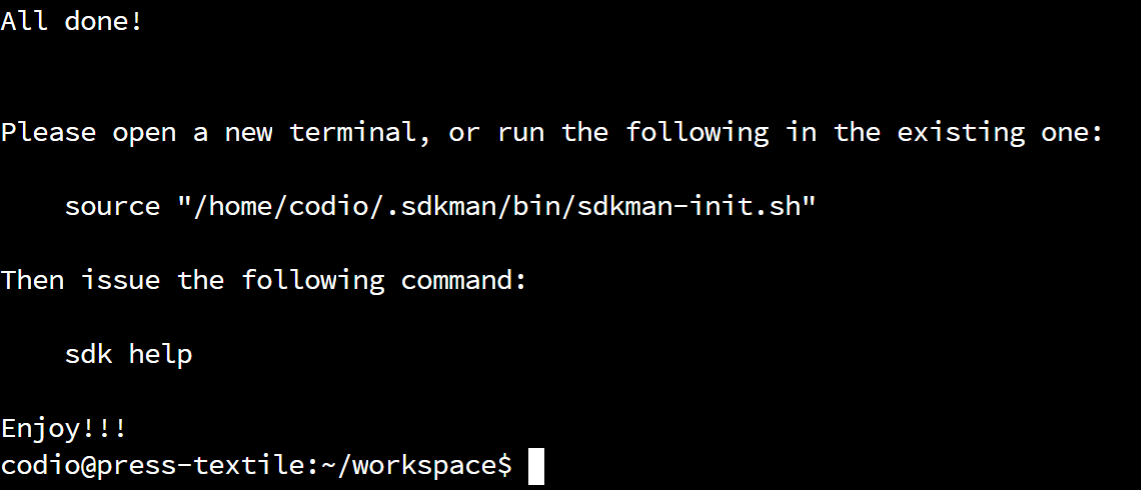
If it was successful, we’ll have to close and reopen the terminal in order to use it.
Here are three quick comments to explain a bit more about what we just did that may be helpful in the future.
One point of confusion for many new developers is the inconsistent way Linux terminal commands are denoted in the documentation of various tools. For example, in the Gradle documentation, Linux terminal commands are prefixed by a greater-than symbol >:

In the SDKMAN! installation instructions, you’ll notice that the installation command includes a dollar sign $ in front of it, as seen below:

However, when we executed those commands, we didn’t include the greater-than symbol or dollar sign. Why is that? Many places that include documentation for the Linux terminal helpfully include either the last symbol of the command prompt before the command, or some other symbol like an arrow, indicating that this is a command to be entered in the terminal. Linux typically uses two different types of command prompts:
$ - indicating that the terminal is logged in to a normal user account# - indicating that the terminal is logged in with administrator permissions (root)Documentation also often uses the > symbol in front of commands to be entered by the user. So, in general, when you see a Linux terminal command in documentation that starts with a >, $ or #, you should omit that character when executing the command. This can be very confusing and frustrating to get used to, especially since it is not standardized. As we’ll learn later in this course, standardized documentation is a very important part of being a good programmer!
The command we executed to install SDKMAN!, curl -s "https://get.sdkman.io" | bash is a somewhat dangerous command to execute, unless you trust the source. In effect, the curl -s command will silently load the webpage at the URL given without presenting any error messages. Then the | bash part tells the command to execute that webpage as if it were a Linux terminal script. This can be especially dangerous if you are logged in with administrator permissions or run the command prefixed with sudo. If the webpage contained a malicious script, your system could easily be compromised.
We point this out simply to encourage you to be wary about any commands you execute in a Linux terminal without fully understanding them. In this case, we’re reasonably confident that the SDKMAN! installation script is safe, we aren’t running it as an administrator, and Codio provides a safe environment to try things without installing them locally.
When in doubt, it is perfectly OK to reach out to the instructors of this course or another, more experienced developer to get help reviewing whether a particular command is safe to execute.
A bit later in this course, we’ll discuss how to do this on your own computer at home. If you are installing SDKMAN! on a Linux system, you’ll need to make sure the following tools are installed:
zip and unzipcurlsedMost of these tools can be easily installed on any Linux system. For example, on Ubuntu you can use the following command to ensure those tools are installed:
sudo apt update && sudo apt install zip unzip curl sedOnce SDKMAN! is installed, we can use it to install Gradle using this command:
sdk install gradle 7.6After that command executes, you should get a message similar to the following:
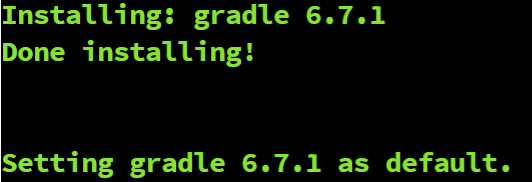
If you receive that message, then Gradle has been successfully installed. You can test this by running the following command:
gradle -versionYou should get a message from Gradle telling you what version is installed. If that works, you can move on to the next page.
If you are having trouble getting Gradle installed, reach out to the course instructors for assistance.
Once we have Gradle installed, we can use Gradle to create a scaffold for our new Java project. This is a great starting point for any Java application, but we’ll customize it a bit to suit our needs.
For this part of the project, we’ll loosely follow this guide on Building Java Applications from the Gradle documentation.
First, we’ll run the Gradle init command. This handy script allows us to create a scaffold for all sorts of different programming languages and frameworks supported by Gradle.
When we run this command, we’ll want to be in the java folder. So, let’s open the Linux terminal and change our directory to that location:
cd ~/workspace/javaOf course, if you are already in the ~/workspace folder, you can just use cd java to get there. In the code above, we include the whole path so that it will always work, regardless of the current working directory.
Next, we’ll run the Gradle init command:
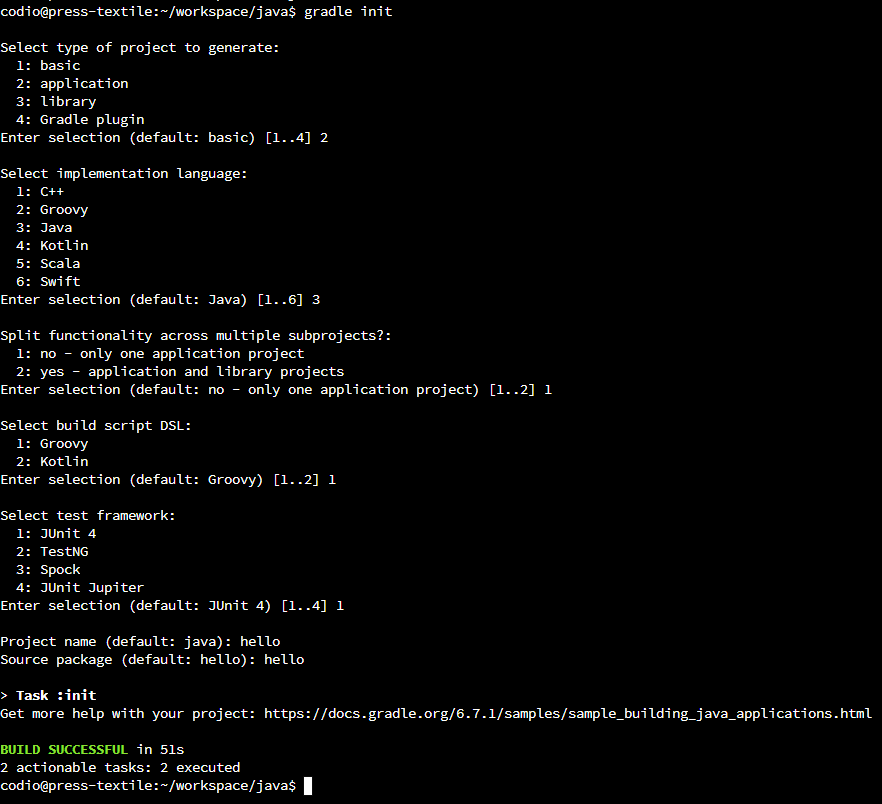
gradle initThis script will ask a few questions about what type of project we’d like to create. We’ll choose the following options:
2: application3: Java1: no - only one application project1: Groovyno4: JUnit JupiterhellohelloIf done correctly, your output should look like this:
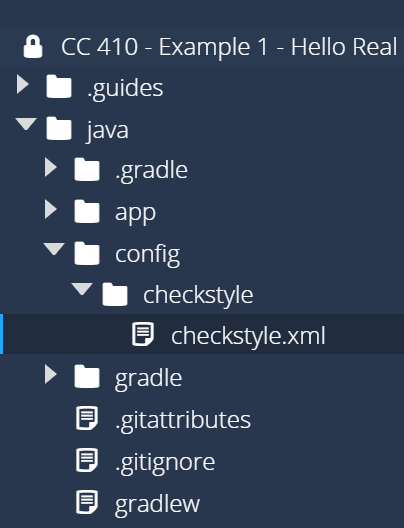
You should also now see a whole bunch of files and directories inside of the java directory, as shown in this screenshot:
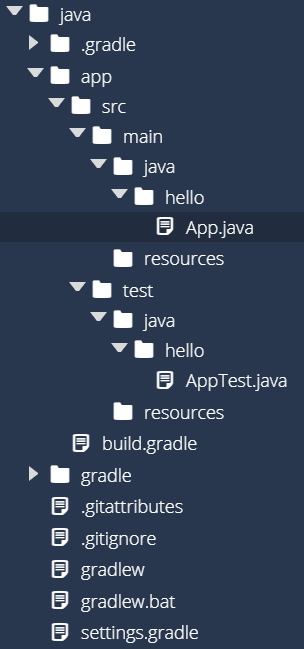
This is already looking quite a bit more complicated than our previous “Hello World” app! Let’s see if we can go through it and clear up a few things.
Here is a quick description of the contents of the java folder that were added by the Gradle init command:
.gradle - This is a working folder for Gradle, and contains information Gradle uses when running commands. You shouldn’t have to do anything with this folder. However, if you run into issues with Gradle, you can safely delete this folder to “reset” Gradle, similar to clearing the cache in a web browser.app - This folder contains the source code for both the application itself as well as its unit tests.
app/build.gradle - This file contains the settings for Gradle for this application. This is the file we’ll need to edit to add additional features to Gradle for this application.app/src/main/java - This folder contains the main source code for the application.app/src/test/java - This folder contains the unit tests for this application.gradle - This folder contains the Gradle “wrapper” that can be distributed along with this project. It allows you to run Gradle quickly and easily on other systems that develop this project. You can leave this folder alone for now..gitattributes - This is a settings file for the Git tool, which we’ll discuss later in this module. For now, we can just leave it as is.gitignore - This is a settings file for the Git tool, which we’ll discuss later in this module. For now, we can just leave it as is.gradlew - This is a script file that can be used to download and install Gradle on a Linux-based system that doesn’t currently have Gradle installed. It is useful for deploying this code on a different system. For now, we won’t worry about it.gradlew.bat - This is the same as gradlew, but for Windows-based systems.settings.gradle - This file tells Gradle what projects to include in our various build tasks. For now, we only have one project, so we can leave it alone. However, for larger applications that contain multiple projects, we’ll edit this file to include those as well.So, as you can see, the files we’ll mostly be concerned about are the ones in the app directory. On the next page, we’ll start working with those files to build our new “Hello Real World” application.
The JCenter package repository was sunset in May 2021, and stopped serving packages in early 2022. Some older versions of Gradle will set the JCenter repository as the default location to find packages, but that should be updated to use Maven Central instead.
To make sure your project will continue to work properly, open the build.gradle file in the app folder and look for the following section:
repositories {
    // Use JCenter for resolving dependencies.
    jcenter()
}
If that section contains jcenter() as shown above, update it to use mavenCentral() instead:
repositories {
    // Use Maven Central for resolving dependencies.
    mavenCentral()
}
This will ensure that the project will continue to work properly after JCenter is shut down.
Now, let’s write the basic source code for our “Hello Real World” application. Thankfully, we can adapt some of the code that is provided by the Gradle init command, but we’ll simplify it a bit to meet our needs.
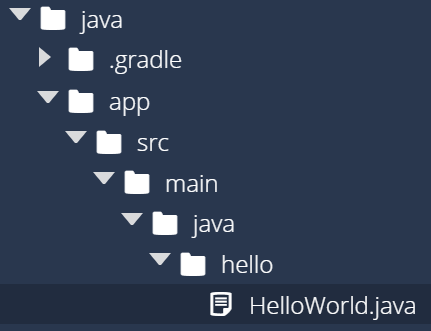
First, let’s rename the App.java file in app/src/main/java/hello to HelloWorld.java. This filename is a better representation of what we want our class to be. Recall that the filenames of .java files must exactly match the name of the Java class contained in the file.
Let’s do this through the Codio interface. Use the file tree to the left to navigate to the file App.java, and then right-click and choose Rename. You can then enter HelloWorld.java in the box. Once you have completed this task, you should now see the following structure in the file tree:
The Gradle init command created some sample code that is still in the renamed HelloWorld.java file. Let’s replace it with this code:
package hello;

public class HelloWorld
{

    public static void main(String[] args)
    {
        System.out.println("Hello World");
    }
}
This is a pretty standard “Hello World” application, and all the code here should be pretty familiar. The only new line of code that you may not have seen before is the very first line, package hello;. That line is used to denote what package this file belongs to, and it corresponds to the folder named hello that contains this file. We’ll discuss what a package is later in this course, but in essence packages are a way to organize large programs by grouping similar classes together.
We’ll also need to update the code in the AppTest.java file, which can be found in app/src/test/java/hello. We’ll change it later, but for now we’ll just replace it with some blank code so that it will compile:
package hello;

public class AppTest {

}
Unfortunately, Gradle will not allow our application to compile if the tests won’t also compile! So, we’ll fix that for now until we get to that part of the project.
Also, since we changed the name of the main class in our application, we’ll also need to change it in the build.gradle file. To do this, open the file app/build.gradle and look for the following section:
application {
    // Define the main class for the application.
    mainClass = 'hello.App'
}
We’ll need to update it to use our new HelloWorld class. So, replace that section with the following:
application {
    // Define the main class for the application.
    mainClass = 'hello.HelloWorld'
}
Recall that our HelloWorld class is in the hello package, so we use the name hello.HelloWorld to refer to the class.
Now we can start to explore what Gradle is really used for - easily compiling and executing our program. Recall that previously we’d need to use the javac command to compile our program, and then java to run it. For small programs, that can be pretty simple. However, as programs become larger and larger, and include more packages and external libraries, it can be extremely difficult to write the correct javac and java commands to get it all working.
Gradle is able to analyze the project’s structure and its configuration files and do this work for us automatically. Let’s see how it works!
First, we’ll need to make sure our terminal is still in the java folder:
cd ~/workspace/javaThen, we can run the Gradle build command to compile our program:
gradle buildThe first time you run this command, it may take a little while as Gradle downloads libraries that it needs. Once it has completed, if everything works correctly you should get the following output:

That means that Gradle has now compiled our program! We should now see a new app/build folder, which contains all of the output of the compilation process:
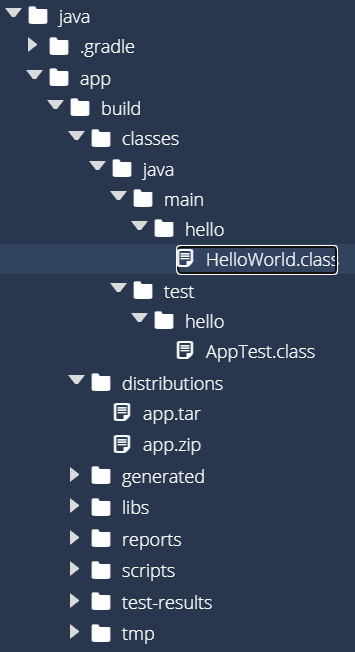
There is a lot of new stuff here that we’ll cover later in this example, but for now there are two folders that we really care about:
app/build/classes - This contains all of the compiled Java class files for both the application and the unit tests.app/build/distributions - This folder contains distributable versions of our application, both as a .zip file and a Java .jar file. If we want to share the compiled version of our application with others, these are the files they’d need.As we can see, Gradle already does a lot more than we could do on our own with just a couple of commands. That’s the power of using a build tool such as Gradle!
Once we’ve compiled our application, we can execute it using the Gradle run command. As before, we’ll do this from inside of the java folder:
gradle runIf everything is set up correctly, we should see the following output:
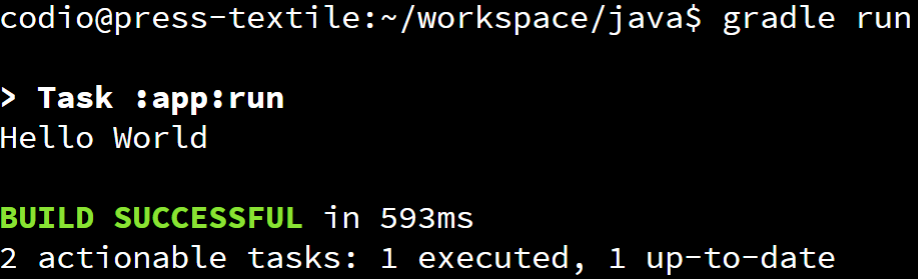
There we go! We’ve successfully built and run our first application in Gradle! If you want, you can test different messages in HelloWorld.java to make sure the program is working correctly.
There are a couple other Gradle commands we should learn. First, from within the java folder, use the following command:
gradle cleanThis command will delete the entire build folder, basically clearing out anything that Gradle created in the previous commands. This is helpful if you want to completely recompile your application from scratch. Gradle is an intelligent build tool that will only compile files that have changed since the last time it compiled the program, but sometimes it can get confused, so using gradle clean is a way to reset it and force it to compile the entire application again.
Now, once we’ve completely cleared out our project, try this command again:
gradle runDoes that work? You might think that Gradle will give you an error saying that you have to build the application before you can run it. However, Gradle is an intelligent build tool, so it will automatically compile the application before running it. In effect, you can simply tell Gradle what you’d like to do, and it will perform any intermediate steps to get you there. It’s really handy!
Finally, if you want to see all the commands that Gradle can perform, use the following command:
gradle tasksThere are lots of other commands available in Gradle that we won’t cover in this course. Feel free to explore the documentation and try them out!
If you are familiar with using Git, here is the short version:
git status
git add .
# check that the correct files are added
git status
# update the commit message below
git commit -m "Commit Message Here"
git push
That will commit and push your changes to GitHub, which can now be found in the repository for this assignment.
At this point, we’ve written some code for our application. Now is a great time to save that code to our git repository and push it to GitHub in the cloud. By doing so, we’ll make sure that our code is not accidentally lost, but we can also make it quick and easy to restore a previous version of our code at any time.
At this point, you might be pretty confused about Git, GitHub, repositories, cloning, and everything that we’ve done so far. That’s fine! We’ve found that one of the best ways to learn how to use Git and GitHub is simply by doing it and observing what it does, then slowly building up your knowledge by trying new things. However, let’s take a few minutes to explain some of the basics so you know what we are talking about.
Git is the name of a “distributed version control system” that was created initially by Linus Torvalds (the originator of the Linux operating system kernel). It was meant to solve a lot of the problems that he experienced when working with other version control systems of the time, such as Subversion and Mercurial.
Git stores data in several different places, and there are several Git commands to transfer the data between those places. It is best summarized in this diagram:
 ^[https://commons.wikimedia.org/w/index.php?title=File:Git_data_flow_simplified.svg&oldid=511614601]
Let’s look at Git from the bottom up and see how it works.
For this project, our working directory in Git is the java folder where we’ve been storing all of our code. This is the folder that we cloned our initial repository from GitHub Classroom into, and its where we’re actually doing all of the coding. At this point, we’ve created several new files and directories, but we’ve not added them to our local Git repository yet. Before we can do that, we must discuss one other thing - the .gitignore file.
You may have noticed already that Gradle created a special file called .gitignore in the java directory, or in the root of our working directory for Git. That file contains information that tells Git what files we want to “ignore” - files that Git shouldn’t try to save. Typically we only want Git to store the source code for our program, and not any compiled classes, reports, or temporary files.
Currently, our .gitignore file contains the following content:
# Ignore Gradle project-specific cache directory
.gradle

# Ignore Gradle build output directory
build
These are simply the names of files or folders, but may also include wildcards like an asterisk * as well. Anytime we want to ignore anything in our project we can just add its file or folder name or path to this file, and Git will dutifully ignore it. So, let’s add one more entry to this file, which may be useful later:
# Ignore Gradle project-specific cache directory
.gradle

# Ignore Gradle build output directory
build

# Ignore project files
.project
Sometimes Gradle will create files named .project in our code, we want Git to ignore them. So, we can just add that entry to our .gitignore file to handle that.
Some of the screenshots in this section were taken later in the creation of this project, so the exact files listed may be a bit different in your version. That’s fine - just use these as a baseline for the overall look and feel of the process, and feel free to ask questions if you aren’t sure things are correct.
The next level of Git is the index, sometimes referred to as the stage. The index contains a list of files that we’ve modified and would like to store in our local repository. We can add and remove items from the index at any time, and it won’t affect our working directory.
To see what is in the index, we can use the following command from within the java folder:
git statusYou should see output similar to this:
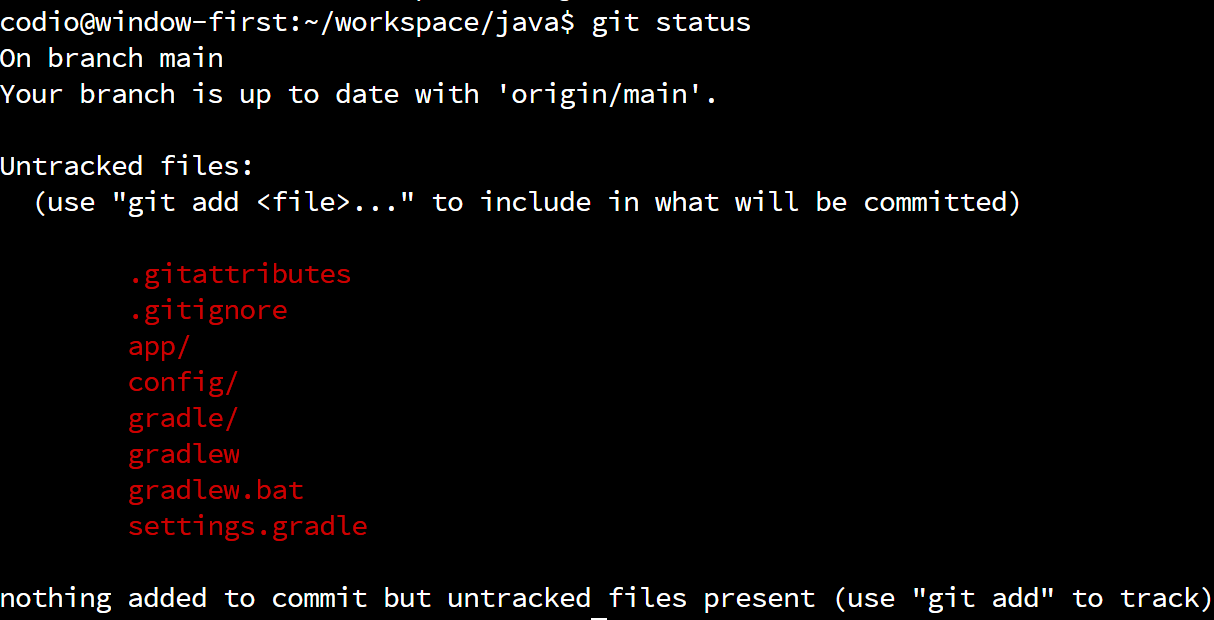
At this point, all of the files are “untracked” and listed in red, which means that they aren’t part of the index. So, we need to add files to the index before we can commit them. To do that, we can use the git add command, followed by the files we’d like to add to the index. Of course, naming each file individually can be time consuming, so we can use the following shortcut to add all of the untracked files in our working directory to the index:
git add .In Linux, a single period . on the command line refers to the current working directory, so in this case it will add all of the files in the java folder to the Git index. When we run that command, we won’t see any output. But, if we run this command again:
git statusWe should now see a whole bunch of files listed as “Changes to be committed”:
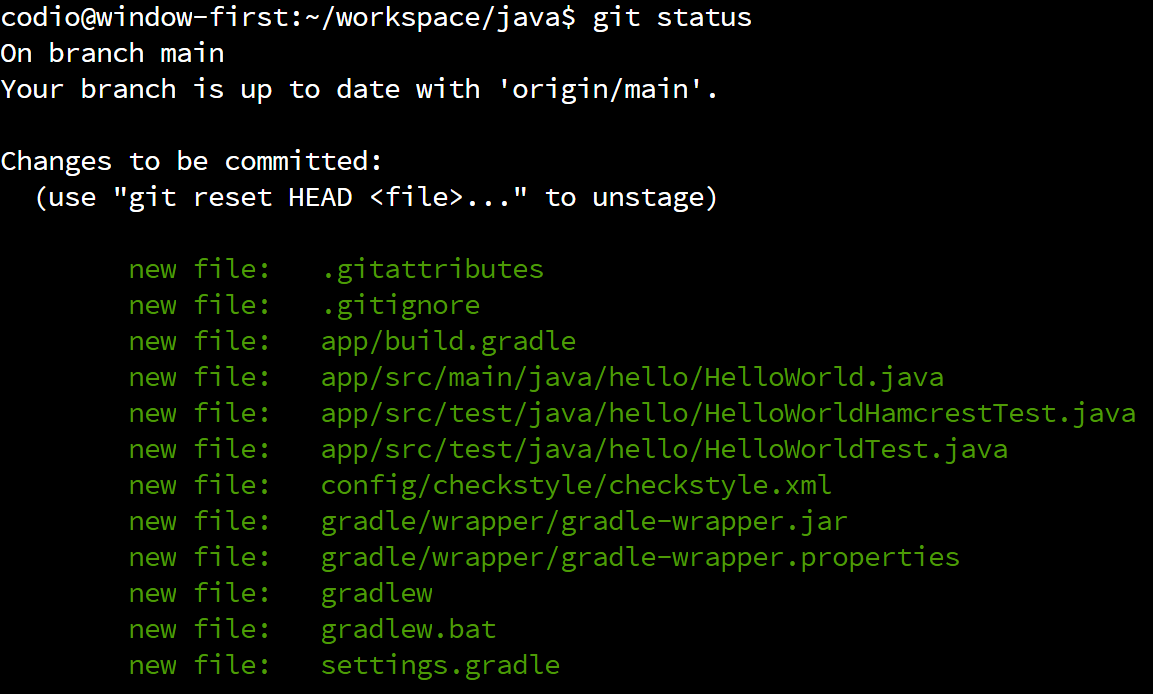
Those files listed in green are now “staged” and ready to commit to our local repository. So, before we move on to the next step, we’ll want to make sure that all the files we changed are included in the list of files to be committed. In this case, we see our HelloWorld.java file, as well as the build.gradle file we modified in the previous step. We may also see additional files that were created by Gradle - we’ll want to make sure those are included as well.
Once we’ve added the new and updated files to the index, the next step is to commit, or save, those files in our local repository. This will permanently^[There are ways to undo a commit once it is made, but in general it is poor practice to do so unless a major mistake has been made. For now, we’ll consider it permanent.] save these changes in our local repository, helping us keep track of the changes we’ve made to the code.
To commit to the local repository, we will use the git commit command. When committing to a repository, you are required to include a message describing the changes you made to the code. At this point, the commit message is just for your use, but it is always a good idea to make your commit messages very concise and descriptive so that it is helpful for you later on if you need to go back and restore this version of the code.
There are two ways to use the git commit command. Let’s briefly cover both of them, just so you can choose your preferred method.
The first method just calls for you to execute the following command:
git commitWhen you do, your terminal will open a text editor program called Nano, which you can use to place your commit message at the top of the file. It will look something like this:
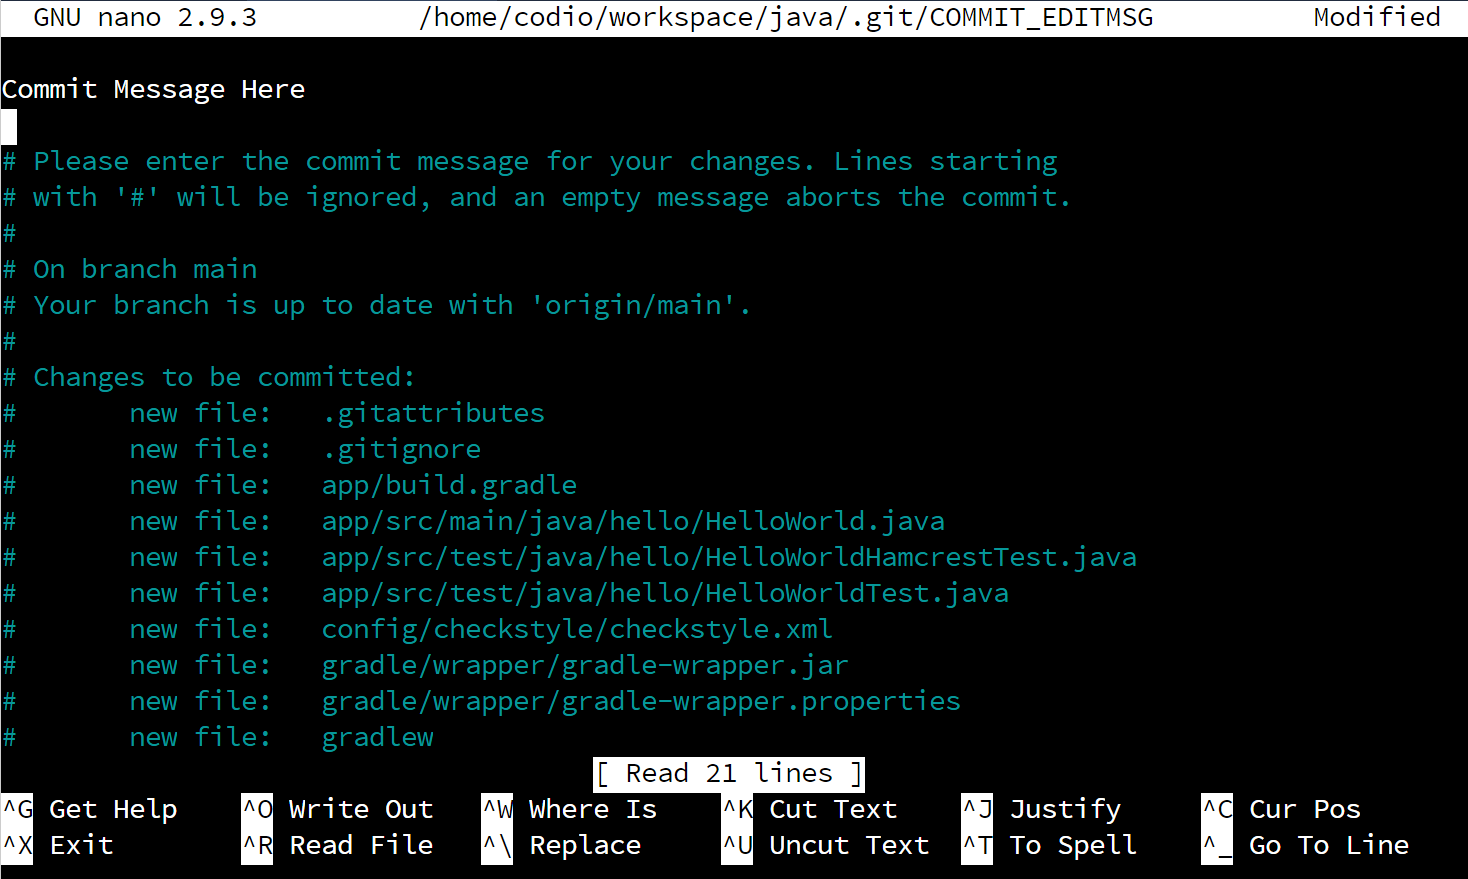
As you can see, we’ve already entered the message “Commit Message Here” at the top of the file. Once we’ve done that, we need to save and close the file. To do that, follow these steps:
Commit messages can also be specified directly on the terminal using the -m command line option. For example, if we wish for our commit message to be “Commit Message Here” we would use the following command:
git commit -m "Commit Message Here"This is a quick and easy way to add a commit message to our commit without using a text editor.
Once we’ve specified our commit message, Git will commit our changes to the local repository. We should see output similar to this if it was successful:
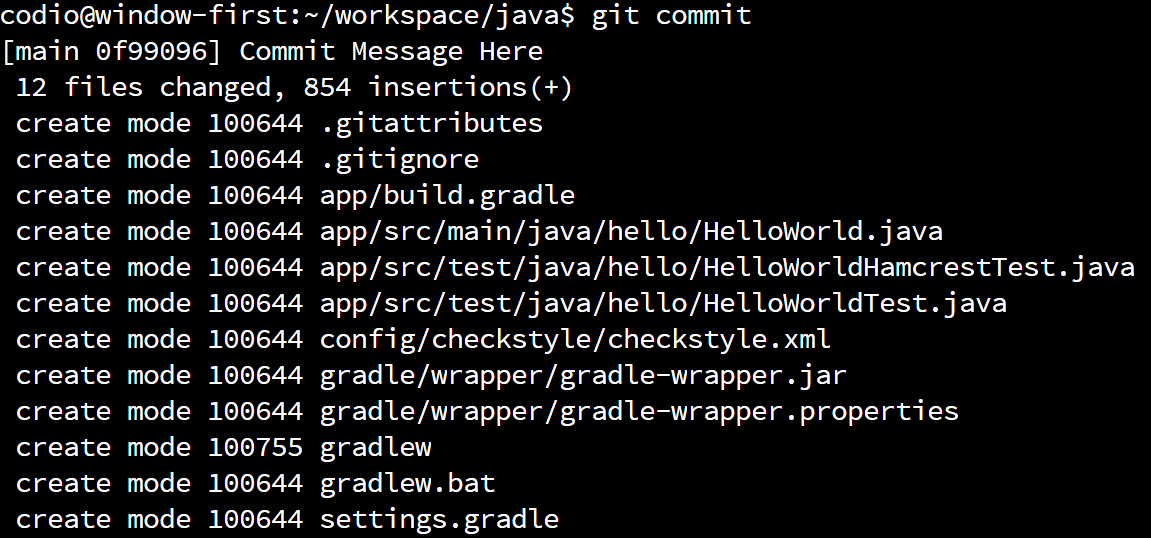
If so, we’ve just made our first commit to our local repository. Now, if we ever need to restore our code back to that point, we can! As we continue to work with Git in this course, we’ll explore some of these more advanced features. For now, we’ll just us it to track our work.
The last step we can take is to push our local repository to a remote location, called a remote. GitHub is a great example of a remote that works with Git, but there are many others as well. For this course, since we are using GitHub Classroom, we’ll be using GitHub as our remote.
Thankfully, because we’ve already cloned this assignment from GitHub Classroom, we don’t have to do anything to be able to use it. In Git, cloning is the term we use for the first time we download a remote repository and store it on our computer. Once we’ve downloaded it the first time, we can get access to any changes by pulling from the remote.
So, to push a copy of our local repository to the remote, we can run this command:
git pushWe should then get output that looks like this:
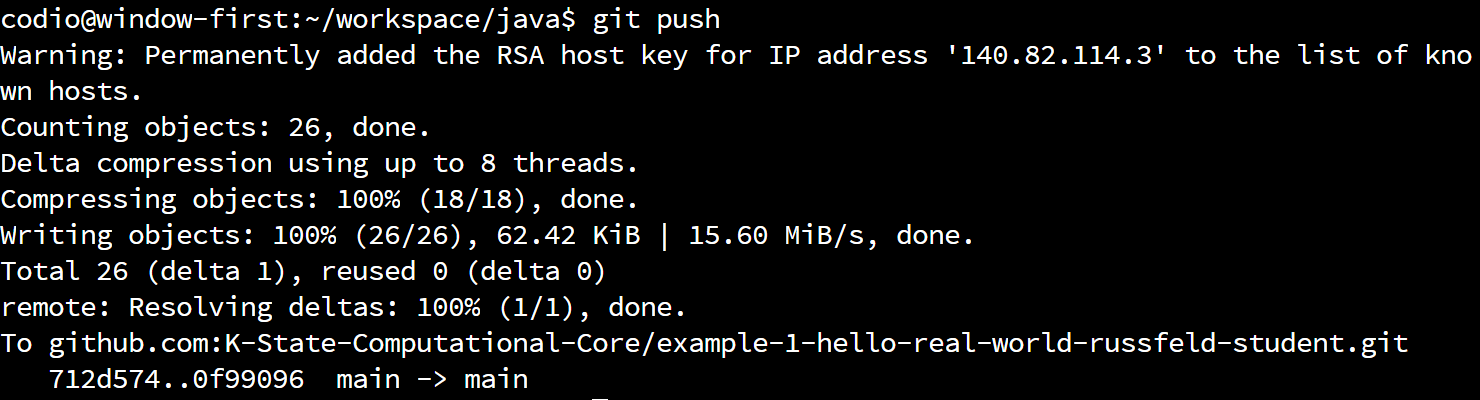
There we go! We’ve now pushed our code to GitHub. Now, let’s go check it out. So, navigate to your repository on GitHub classroom, and refresh the page if needed to see your changes. For me, it now looks like this:
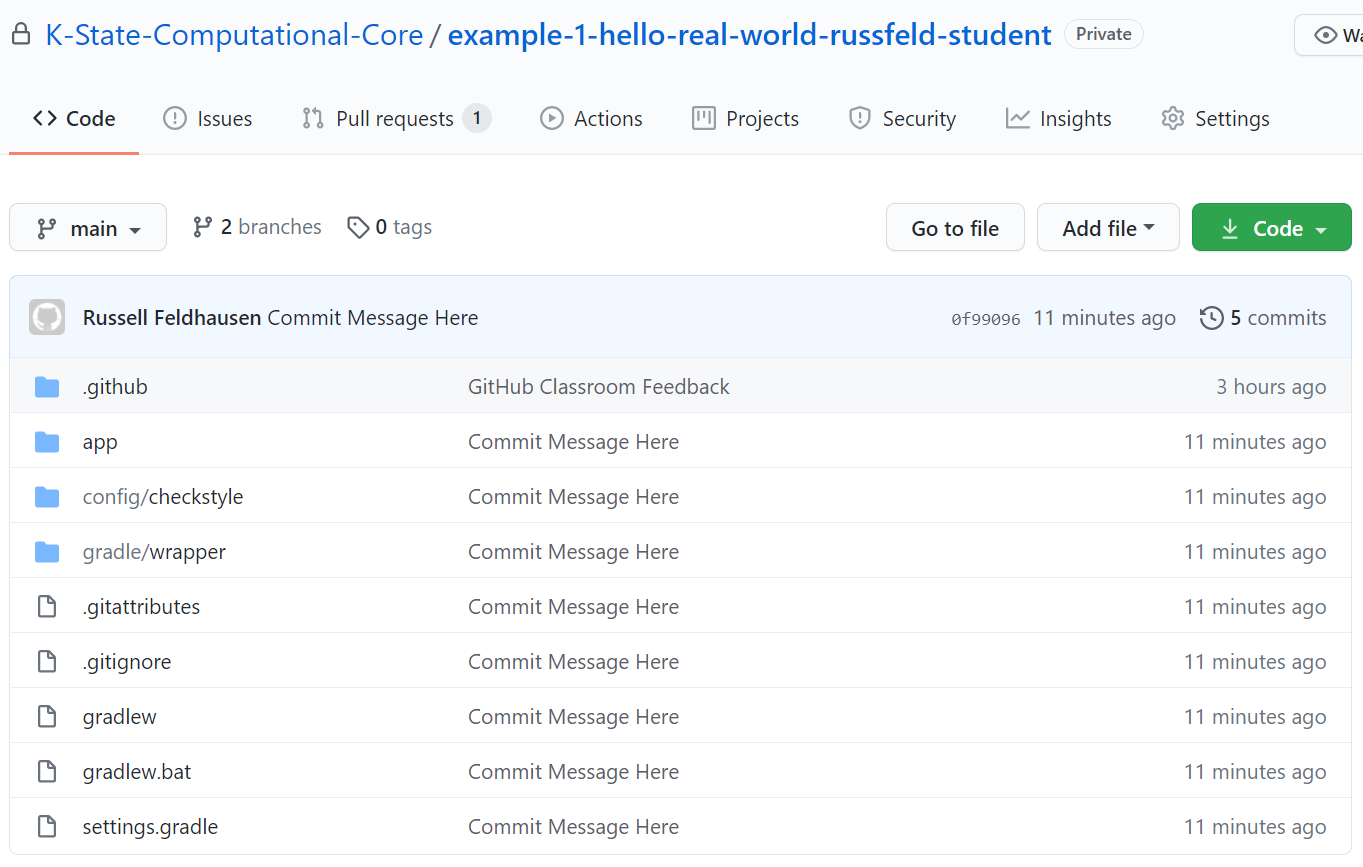
Now all of our code is visible on GitHub, and we can see our commit message next to all of the files that have changed. As we continue to make commits and push them to GitHub, we can use this website to explore the different versions of each file. In addition, the instructors for this course can explore your repository and help you resolve errors and assign grades based on your work here.
At the end of this example project, you’ll create a release on GitHub to signify that you are done with the assignment. We’ll cover how to do that later in this example. For now, let’s forge ahead and learn about unit tests.
At this point, we’ve written the basic code for our “Hello World” program. However, how can we automatically verify that the source code works properly? To do that, we’ll need to create some unit tests that verify our code.
In our Java application, the unit tests are stored in the app/src/test/java directory. In that directory, there is a directory for hello that represents a package, just like the hello directory in the app/src/main/java where our program code lives. It is typically good practice to have packages in our unit tests that match the packages in our source code, so we’ll leave it as is.
However, just like we renamed App.java to HelloWorld.java, let’s do the same with the AppTest.java file, found in app/src/test/java/hello. After you rename it, it should look like this:
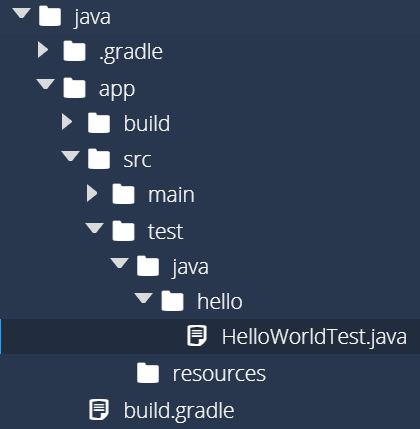
Thankfully, we don’t have to do anything else after renaming this file, because, as we’ll see shortly, Gradle is able to automatically find all of the unit test classes that exist in the app/src/test directory.
Older versions of Gradle will default to JUnit 4 instead of JUnit 5, also known as JUnit Jupiter. If your project is set up this way, you’ll need to upgrade.
To do this, we need to edit a few lines in the build.gradle file, which can be found in the app directory. The instructions for this process can be found in the JUnit 5 User Guide
First, look for the following dependencies section:
dependencies {
    // Use JUnit test framework.
    testImplementation 'junit:junit:4.13'

    // This dependency is used by the application.
    implementation 'com.google.guava:guava:29.0-jre'
}
As we can see, it uses version 4.13 of JUnit. Let’s update to JUnit 5, and also configure Gradle to use the JUnit Jupiter test engine. Replace that dependencies section with this one:
dependencies {
    // Use JUnit Jupiter for testing.
    testImplementation 'org.junit.jupiter:junit-jupiter:5.9.1'

    // This dependency is used by the application.
    implementation 'com.google.guava:guava:31.1-jre'
}
Lastly, we need to configure Gradle to use the JUnit platform for testing. So, at the bottom of our build.gradle file, we’ll add the following section, outside of any other sections:
tasks.named('test') {
    // Use junit platform for unit tests.
    useJUnitPlatform()
}
There we go! Now Gradle is configured to use JUnit 5 properly!
Let’s put some code in the HelloWorldTest.java file to test our “Hello World” application. Here’s a sample of what a unit test for this might look like:
package hello;

import static org.junit.jupiter.api.Assertions.assertEquals;

import java.io.ByteArrayOutputStream;
import java.io.PrintStream;
import org.junit.jupiter.api.Test;

public class HelloWorldTest {

    @Test
    public void testHelloWorldMain() {
        HelloWorld hw = new HelloWorld();
        final PrintStream systemOut = System.out;
        ByteArrayOutputStream testOut = new ByteArrayOutputStream();
        System.setOut(new PrintStream(testOut));
        hw.main(new String[]{});
        System.setOut(systemOut);
        assertEquals("Hello World\n", testOut.toString(), "Unexpected Output");
    }
}
We can break this code down line by line to discuss what it does and how it works. Let’s look at the package and import statements first:
package hello - as we saw before, this line is used to show that this class is part of a package called hello.import static org.junit.jupiter.api.Assertions.assertEquals - this imports one of the tests that we need from the org.junit.jupiter library, the latest version of JUnit. You can find more information about JUnit by reading the JUnit 5 User Guide.import java.io.ByteArrayOutputStream - this is a library used to store data in an array of bytes.import java.io.PrintStream - similarly, this library is used to easily “print” data into another output stream.import org.junit.jupiter.api.Test - this is another class from JUnit that allows us to mark methods as unit tests.Now, let’s look at the testHelloWorldMain() method itself. Here are the first few lines that we’ll need to understand:
@Test - this is an example of an annotation in Java, which allows us to add additional information to a method. In this case, it tells JUnit that this method is a unit test method.testHelloWorldMain() - typically, the method name of a unit test is very descriptive. If possible, try to describe the exact nature of the test in the method name, since the failed unit tests are reported by the name of the method.HelloWorld hw = new HelloWorld() - to begin our test, we instantiate a copy of our HelloWorld class so we can test it. One major theory behind unit tests is that each test should be run in isolation from other tests. So, instead of having a global HelloWorld object that each test can use, we should write each test to create brand new objects. Later on in this course, we’ll see how we can simplify this and avoid code reuse.Next, we have three lines of code that are closely related:
final PrintStream systemOut = System.out;
ByteArrayOutputStream testOut = new ByteArrayOutputStream();
System.setOut(new PrintStream(testOut));
These three lines are used to redirect the output of the HelloWorld application we are testing to a different location. Recall that we use System.out.println to print text to the terminal, so these lines are used to store the existing value of System.out and then replace it with our own stream that we can use.
After that, we have the line hw.main(new String[]{}) which calls the main method of our Hello World class. We have to provide an empty array of strings as an argument, which matches the expected command-line arguments of the program itself. So, if we need to provide command-line arguments to this method, we can place them in this array!
Lastly, we do two more things. First, the line System.setOut(systemOut) will reset the System.out stream back to what it was previously.
Then, we reach the most important line of the program: assertEquals(testOut.toString(), "Hello World\n", "Unexpected Output"). This line is called an assertion, and it is the basis of most unit tests. In this line, we are stating that the output we receive from the program, stored in testOut and accessed via the toString() method, should exactly match "Hello World\n" in order for the test to pass. If it doesn’t, then we can share a helpful error message, in this case “Unexpected Output” when the test fails.
Typically, most unit tests contain several of these assertions, and there are many different assertion methods we can use, but for right now we’ll just use the assertEquals method.
There we go! That’s all it takes to write a simple unit test. However, as you’ve probably noticed, the code for a unit test is much more complex than the code that we are testing. That’s actually pretty typical - many times it is much more difficult to write tests that ensure the code works than writing the code itself. However, the usefulness of those tests will often outweigh the cost, as it can be even more costly to constantly fix bugs and errors that would have been caught by a proper set of unit tests.
Now that we’ve written our unit test, we can use Gradle to execute them. To do that, simply open the Linux terminal, navigate to the java folder, and then run the following command:
gradle testWhen you run this command for the first time, Gradle may take a moment to download the JUnit 5 libraries it needs. Once it is done, you’ll get the usual response that the build was successful, as shown below:

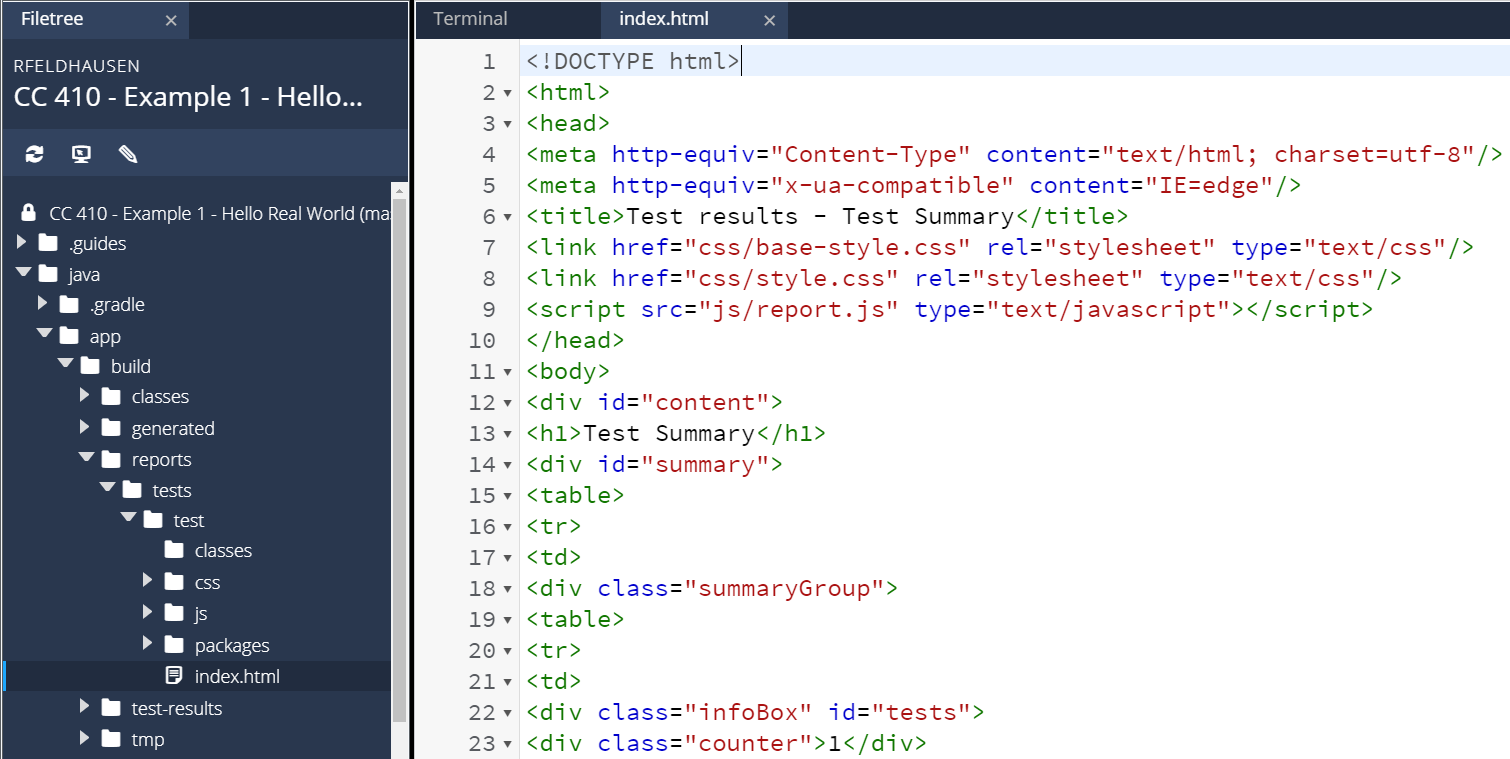
However, we might want to learn a bit more about what tests were executed and make sure it is working properly. So, we can look for the test report in the build folder. Specifically, you’ll find it at app/build/reports/tests/test/index.html. So, find that file in the Codio file tree to the left and open it. When you do, you’ll see a file full of HTML like this one:
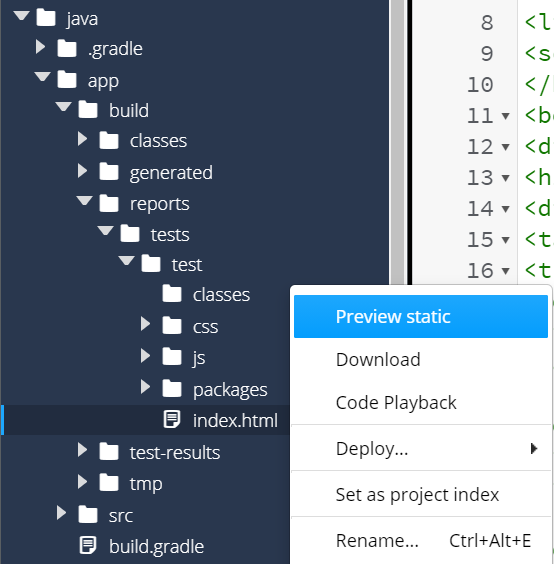
That’s really difficult to read, isn’t it? Thankfully, we can tell Codio to open that HTML file as a webpage by right-clicking on it and selecting Preview Static:
If done correctly, you should see a webpage that looks like this:
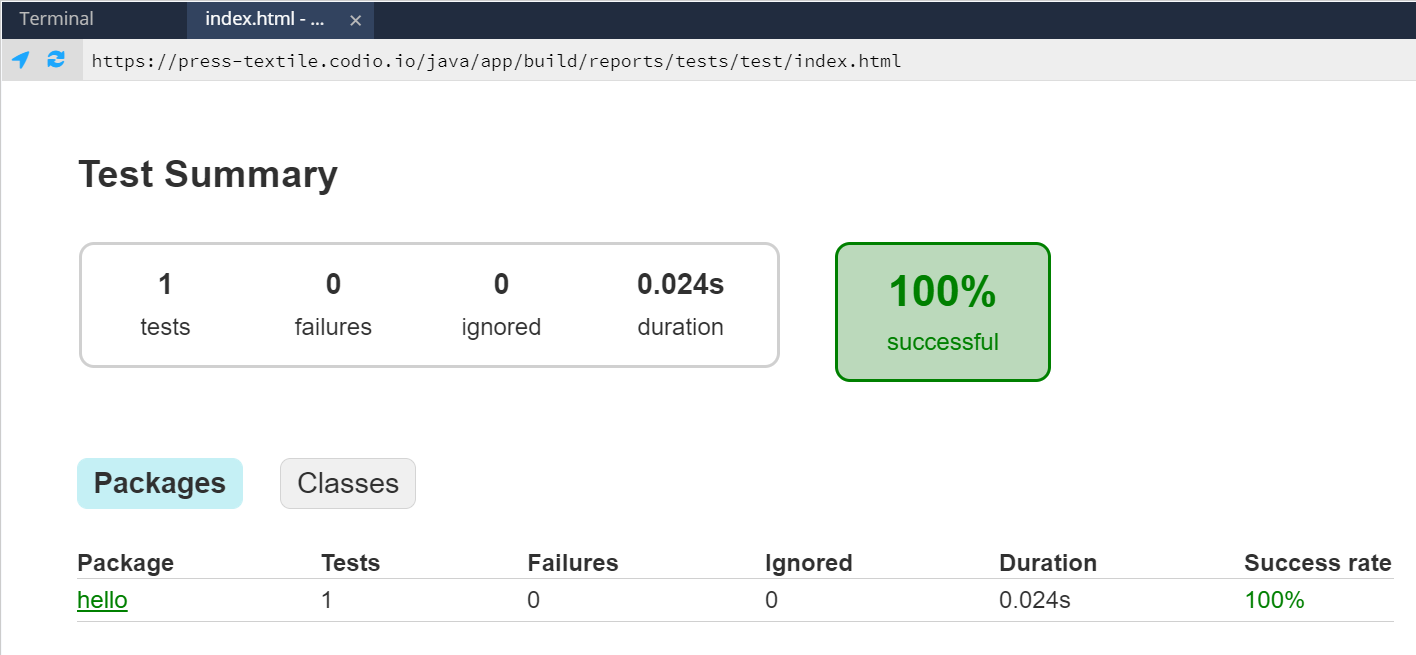
Hopefully, we should see that our code passed the test! We can click on the links on that page to dig deeper and see the results for specific tests classes or even individual tests.
So, let’s explore a bit. First, let’s make a change to the unit test so that the program will fail. A great way to do this is to change the assertion on the last line of the unit test. Once you’ve made that change, re-run the tests using the following command:
gradle testThis time, you’ll get some different output:
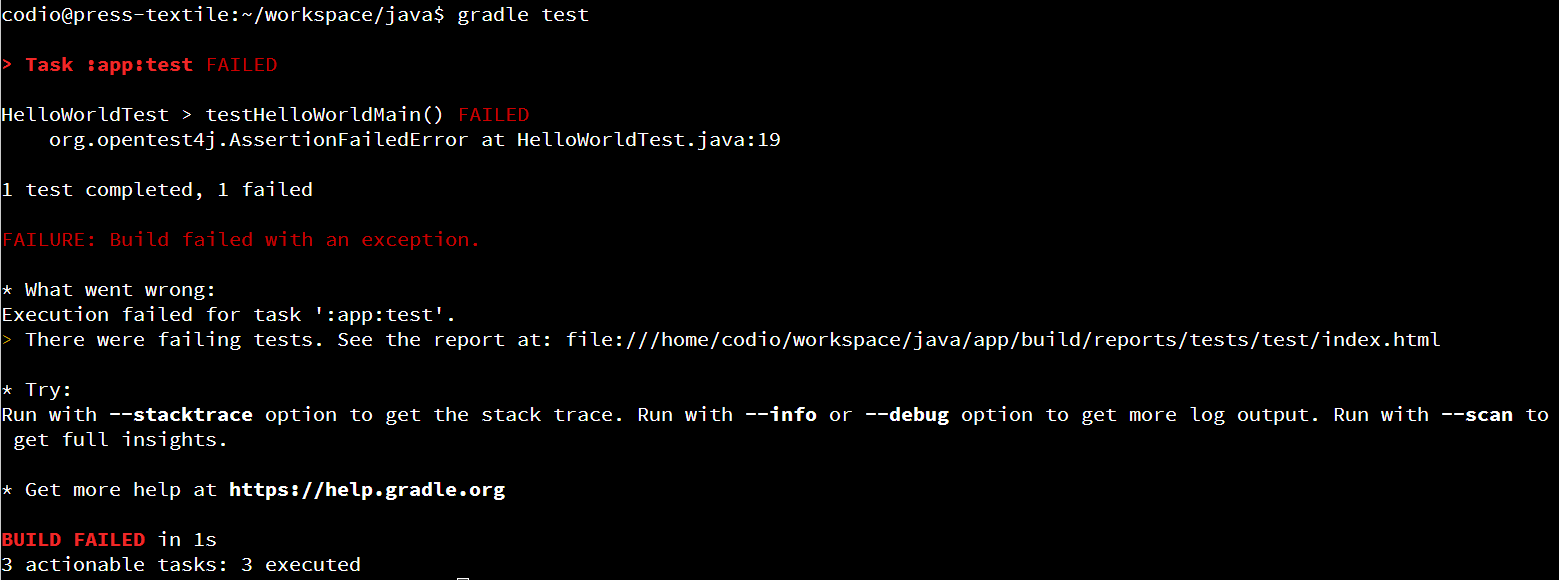
Here, we can see that JUnit will helpfully tell us the method name of each test that failed. We can now open the test report from before and dig into it to find exactly where the test failed and why. Here’s what you might see:

The most important part is at the bottom of that file - it shows the exact assertion that failed and why. Below that, you’ll see a full stack trace of what was happening when it fails. We’ve highlighted the most important parts - the assertion that failed, and the line in the stack trace that shows exactly where in the unit test it failed.
So, when a test fails, you can use that information to work backwards and figure out why it failed. Was the test incorrect? Did the source code of the application have a bug? Either of those could be a reason for a test failure. Hopefully you can use the information from the test report to find it and fix it!
We’ve now written our program, as well as a unit test that runs our program and make sure it works. But, how can we be sure that our unit tests are adequately testing every part of our program? For that, we have to rely on another tool to help us calculate the code coverage of our unit tests.
Thankfully, there are many easy to use tools that will compute the code coverage of a set of tests. For Java, one of the most commonly used tools is JaCoCo. JaCoCo is a free code coverage library designed for Java, and it easily integrates with Gradle via the JaCoCo Plugin.
To install that plugin, all we have to do is open our build.gradle file, which can be found in the app directory. First, find the plugins section at the top of the file:
plugins {
    // Apply the application plugin to add support for building a CLI application in Java.
    id 'application'
}
To install a plugin, we can simply add a new id line to that section, followed by the name of the plugin. For JaCoCo, we would update this section to the following:
plugins {
    // Apply the application plugin to add support for building a CLI application in Java.
    id 'application'
    // JaCoCo plugin for code coverage
    id 'jacoco'
}
Once we’ve added the plugin, we may also want to add some additional information to the build.gradle file to help configure the plugin. In this case, we’ll add a few things. Most of these are taken directly from the JaCoCo Plugin documentation from Gradle. At the bottom of the build.gradle file, add the following sections:
// Configure Jacoco plugin
test {
    finalizedBy jacocoTestReport // report is always generated after tests run
}

jacocoTestReport {
    dependsOn test // tests are required to run before generating the report
    reports {
        xml.enabled false
        csv.enabled false
        html.destination file("${buildDir}/reports/jacoco")
    }
}
As described in the documentation, this will ensure that the JaCoCo report is generated each time the tests are run. In addition, we have configured the reports generated by JaCoCo to only include the HTML version of the report, and it will be placed in the reports folder in a folder called jacoco.
Now that we’ve installed and configured the JaCoCo plugin, let’s use Gradle to run our tests again and see what happens. So, from within the java folder, we can run the following command:
gradle testOnce we do that, Gradle will install everything it needs to use JaCoCo, and in the app/build/reports folder, we should see a new folder called jacoco appear:
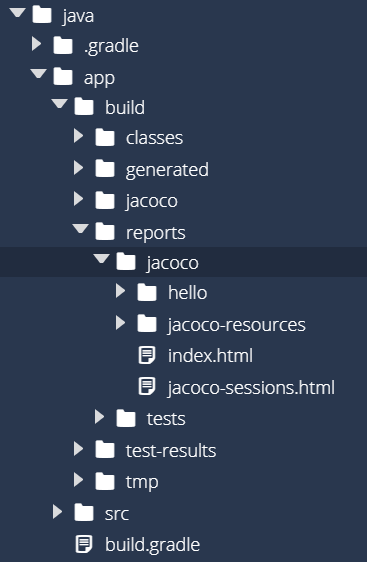
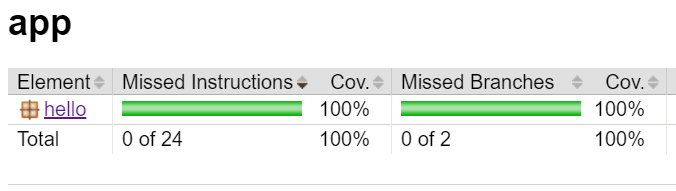
Inside of that folder is another index.html file. So, let’s right-click it and select Preview Static to open it as a webpage. Hopefully we should see something like this:
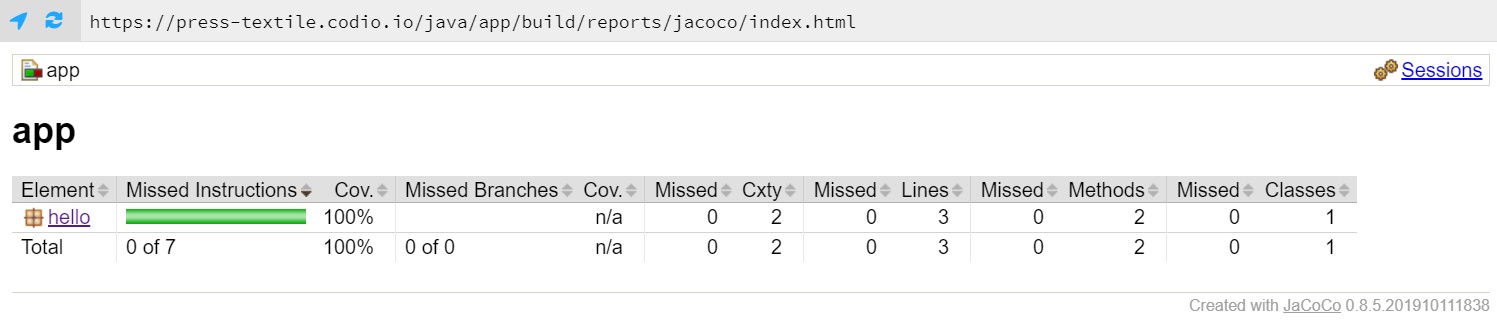
That tells us that we achieved 100% code coverage with our tests! That’s the goal, though it was pretty easy to achieve when our application really only contains one line of code. By clicking the links on the page, we can even see which lines are tested by our program, as shown below:
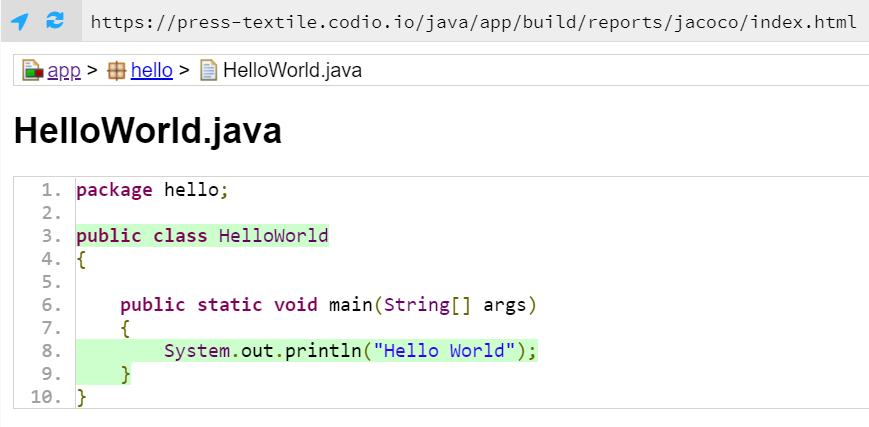
Let’s modify our application a bit and see how we can use JaCoCo to make sure we are really testing everything our application can do. In the HelloWorld.java file, found in app/src/main/java/hello, replace the existing code with this code:
package hello;

public class HelloWorld
{

    public static void main(String[] args)
    {
        if(args.length == 1)
        {
            System.out.println("Hello " + args[0]);
        }
        else
        {
            System.out.println("Hello World");
        }
    }
}
This program will now print “Hello World” if executed without any command line arguments, but if one is provided it will use that argument in the message instead. So, let’s run our program again using this command from within the java folder:
gradle testOnce the tests have finished, we can open the JaCoCo report stored in app/build/reports/jacoco/index.html and we should find that it no longer achieves 100% coverage:
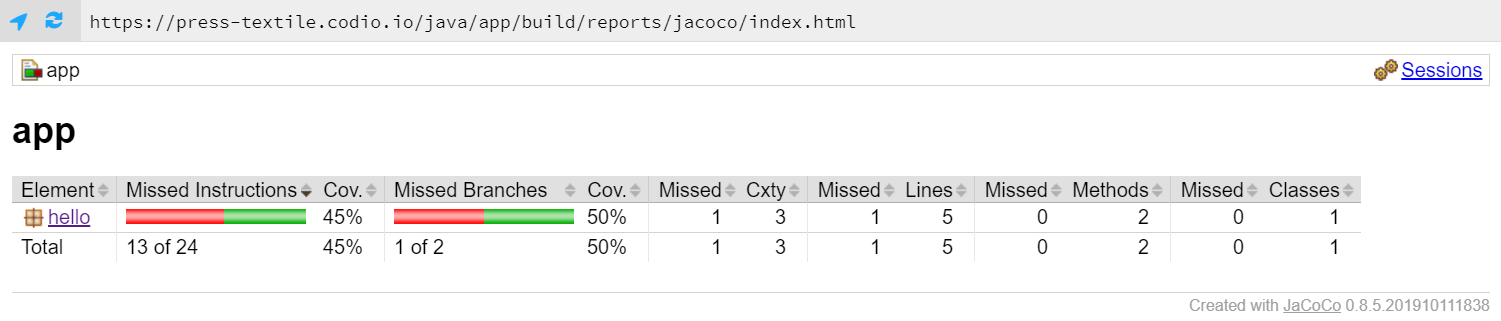
If we drill down deeper, we can find the lines of code that aren’t covered by our tests:
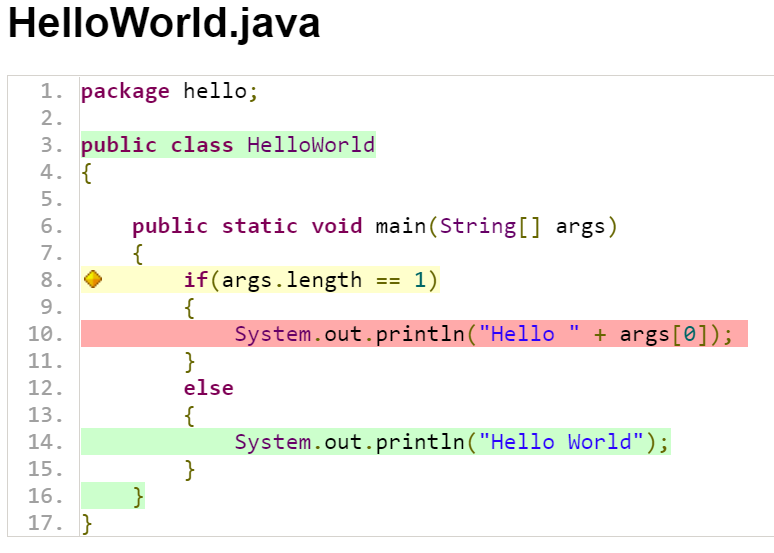
As we expected, our single unit test is not able to test each and every line of code in our application. That’s not good! So, we’ll need to update our tests to account for the change in our code.
As a quick aside, if we were engaging in test-driven development, we would write the new unit test before changing the code. We won’t model that behavior right now, but it is worth noting that you don’t have to do these steps in the order presented here.
So, let’s update our unit tests to account for this new code. There are a couple of ways we can do this:
testHelloWorldMain method to call the method multiple times, both with and without arguments.In general, when working with unit tests, it is always preferred to add additional test methods to test additional functionality in the program. We want to keep our tests as simple and focused as possible, so that we can easily find the source of any errors it finds. If we simply added more code to the existing test, it would be difficult to tell exactly what caused the error. We’ll cover this in more detail when we formally discuss unit testing later in this course.
For now, let’s open the HelloWorldTest.java file stored in app/src/test/java/hello and add the following method to the HelloWorldTest class:
    @Test
    public void testHelloWorldMainArgument() {
        HelloWorld hw = new HelloWorld();
        final PrintStream systemOut = System.out;
        ByteArrayOutputStream testOut = new ByteArrayOutputStream();
        System.setOut(new PrintStream(testOut));
        hw.main(new String[]{"CC 410"});
        System.setOut(systemOut);
        assertEquals("Hello CC 410\n", testOut.toString(), "Unexpected Output");
    }
Notice that this is nearly identical to the previous unit test method - we simply changed the arguments that are provided to the main method, and also updated the assertion to account for the changed output we expect to receive. As discussed earlier, there are things we can do to prevent duplication of code like this in our unit tests, but we won’t worry about that for now.
Once again, let’s rerun our tests using this command:
gradle testOnce that is done, we can open the JaCoCo report and see if we are back to 100% coverage:
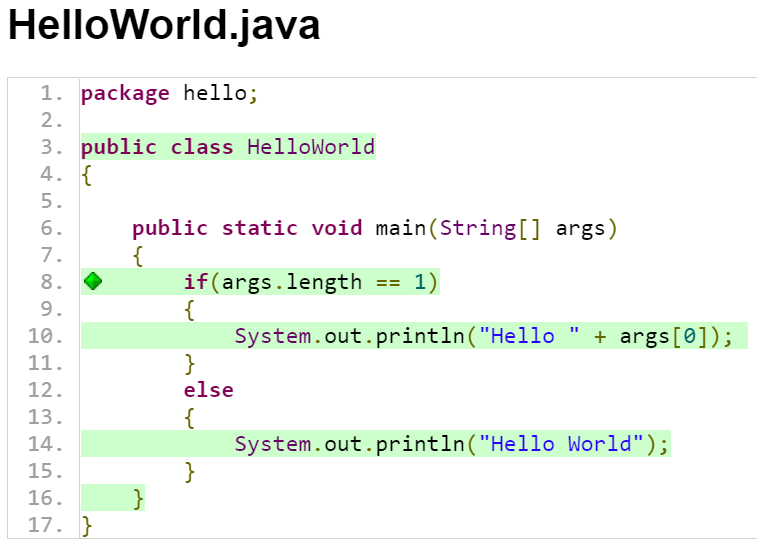
If everything is working correctly, we should see that we are back at 100% coverage, and each line of code in our program is tested.
Of course, achieving 100% code coverage does not mean that you’ve completely tested everything that your application could possibly do - it simply means that you are at least testing every line of code at least once. It’s a great baseline to start with!
This is a good point to stop and commit our code to our Git repository. So, like before, we’ll start by checking the status of our Git repository to see the files we’ve changed:
git statusIn that list, we should see everything we’ve updated listed in red. Next, we’ll add them to our index using this command:
git add .And then we can review our changes using the status command again:
git statusIf we are satisfied that everything looks correctly, we can commit our changes using this command:
git commit -m "Unit Tests and Code Coverage"And finally, we can push those changes to the remote repository on GitHub using this command:
git pushAs you can quickly see, this is a pretty short set of 5 commands that we can use to quickly store our code in our local Git repository and on GitHub. We just have to carefully pay attention to the files we commit and make sure it is correct.
The next step in writing good code is adding proper documentation and comments to describe the code and what it does. By writing good documentation, we can pass on helpful information to other developers who need to maintain this code, including our future selves!
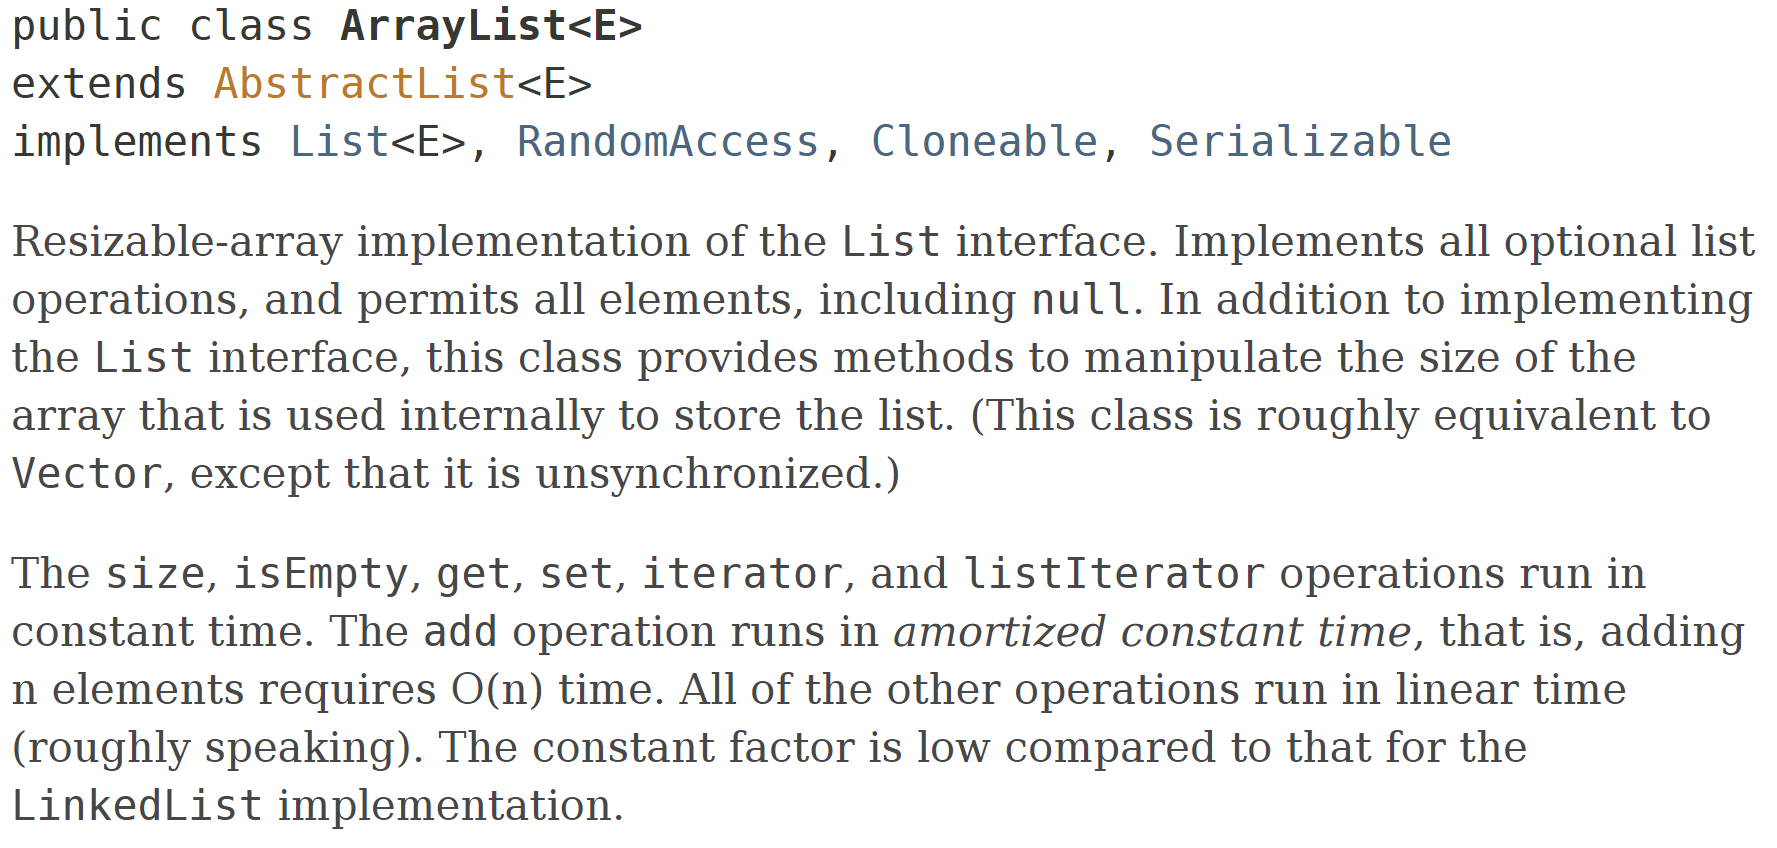
The Java platform includes a tool called Javadoc that can be used to generate documentation directly from the comments in a piece of source code. A great example that we already explored in the textbook is the entire Java API Documentation, which is generated directly from the Java source code using Javadoc. For instance, you can compare the comments at the top of the ArrayList source code file:
/**
 * Resizable-array implementation of the <tt>List</tt> interface.  Implements
 * all optional list operations, and permits all elements, including
 * <tt>null</tt>.  In addition to implementing the <tt>List</tt> interface,
 * this class provides methods to manipulate the size of the array that is
 * used internally to store the list.  (This class is roughly equivalent to
 * <tt>Vector</tt>, except that it is unsynchronized.)
 *
 * <p>The <tt>size</tt>, <tt>isEmpty</tt>, <tt>get</tt>, <tt>set</tt>,
 * <tt>iterator</tt>, and <tt>listIterator</tt> operations run in constant
 * time.  The <tt>add</tt> operation runs in <i>amortized constant time</i>,
 * that is, adding n elements requires O(n) time.  All of the other operations
 * run in linear time (roughly speaking).  The constant factor is low compared
 * to that for the <tt>LinkedList</tt> implementation.
and the top of the ArrayList documentation in the Java API:
So, let’s explore how to create this documentation for our code.
Thankfully, since the Javadoc tool is included as part of the Java software development kit, or SDK, so we won’t have to do anything to use it via Gradle. However, we’ll add one section to our build.gradle file to configure Javadoc. So, let’s open build.gradle again and add the following section to the bottom of that file:
// Add tests to Javadoc
javadoc {
  classpath += project.sourceSets.test.compileClasspath
  source += project.sourceSets.test.allJava
}
This configuration will tell the Javadoc tool to generate documentation for both our main application’s source code, but also the source code for our unit tests. While you may not want to do this for documentation you intend to release publicly, it can be very handy for developers to have an easy to refer to guide for both the unit tests and the source code itself.
The first type of Javadoc comments we’ll review are the comments that go along with classes. Let’s look at an example of comments that we could include at the top of our HelloWorld.java file:
package hello;

/**
 * The HelloWorld class.
 *
 * <p>This is a sample HelloWorld program to demonstrate proper
 * Java coding style, testing, documentation, and more
 *
 * @author Russell Feldhausen russfeld@ksu.edu
 * @version 0.1
 */
public class HelloWorld
{
...
There are lots of new things in this block of comments, so let’s look at each part individually:
/* prior to the comment and */ at the end of the comment./**. This is known as the “begin-comment delimiter.”* and placed such that it is aligned with the first asterisk of the start of the comment. Likewise, the first asterisk of the end of the comment is also aligned with the column of asterisks.<p> tag, but should use complete sentences.<p> tag. Additional paragraphs provide more helpful information about the method or class. However, unlike HTML, no closing </p> tag is required at the end of the paragraph@. They are used to denote important information about the class or method being documented. Classes typically include the following tags at a minimum:
@author - Denoting the author of this code. Multiple authors should be listed on separate lines with additional @author tags@version - The version of the software or source code.In most cases, every public class should include a documentation comment with at least a description, @author, and @version tags. If you haven’t already, go ahead and add comments similar to the example above to the HelloWorld class stored in HelloWorld.java! Make sure you update the @author tag to include your name.
Likewise, let’s look at the comments for a specific method. For example, here are some example comments for the main method in the HelloWorld class:
    /**
     * Prints a hello message to the terminal.
     *
     * @param args    the command-line arguments
     */
    public static void main(String[] args)
    {
    ...
Similar to the class comments above, each method also includes a description, and may include additional paragraphs as needed. Methods use a different set of Javadoc tags to describe their functionality, and they are presented in the order listed below:
@param - Each method parameter should be described using an @param tag, followed by the name of the parameter and a description of what the parameter represents.@return - If the method returns a value, it can be described using an @return tag.@throws - If the method throws any exceptions, they can be described using @throws tags.Similar to classes, most methods should also include a documentation comment. At a minimum, it should include a description, as well as any required @param, @return and @throws tags to describe the method in detail. So, go ahead and include comments for the main method in the HelloWorld class based on the example above.
Finally, individual variables in the source code can also be documented using Javadoc comments. Typically any attributes or fields stored directly within the class itself are documented in this way. We don’t have any attributes in our current program, so we won’t worry about this part for now.
We’ll discuss the creation of Javadoc comments in more detail later in this course. For now, feel free to refer to these resources for additional information:
Let’s briefly look at a documented version of our unit test code as well, just to see what that looks like. Some of the code has been omitted so we can just focus on the comments:
// package and imports omitted

/**
 * The HelloWorldTest class.
 *
 * <p>This is the test class for the HelloWorld program.
 *
 * @author Russell Feldhausen russfeld@ksu.edu
 * @version 0.1
 */

public class HelloWorldTest {

    /**
     * Tests the HelloWorld.main() function with no arguments.
     *
     * @see    HelloWorld#main(String[])
     */
    @Test
    public void testHelloWorldMain() {
        // code omitted
    }

    /**
     * Tests the HelloWorld.main() function with 1 argument.
     *
     * @see    HelloWorld#main(String[])
     */
    @Test
    public void testHelloWorldMainArgument() {
        // code omitted
    }
}
Notice that these comments use the @see tag. That tag allows us to create a link to another part of our documentation. We’ll see how this works once we generate our documentation. For now, go ahead and place comments similar to what you see above in your HelloWorldTest.java file. As before, don’t forget to change the @author tag to your name!
Once we’ve added the comments to all of our files, we can use Gradle to create our documentation. To do that, we’ll simply open a Linux terminal, go to the java directory, and run this command:
gradle javadocThat will create our documentation! Once it is done, we can go to the app/build/docs/javadoc directory to find our documentation. We should see something similar to this:
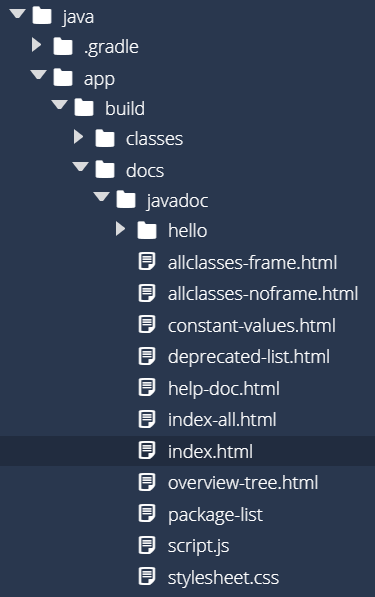
As before, we can find the index.html file, right-click it, and select Preview Static to open our documentation as a webpage. That should open a page that looks like this:
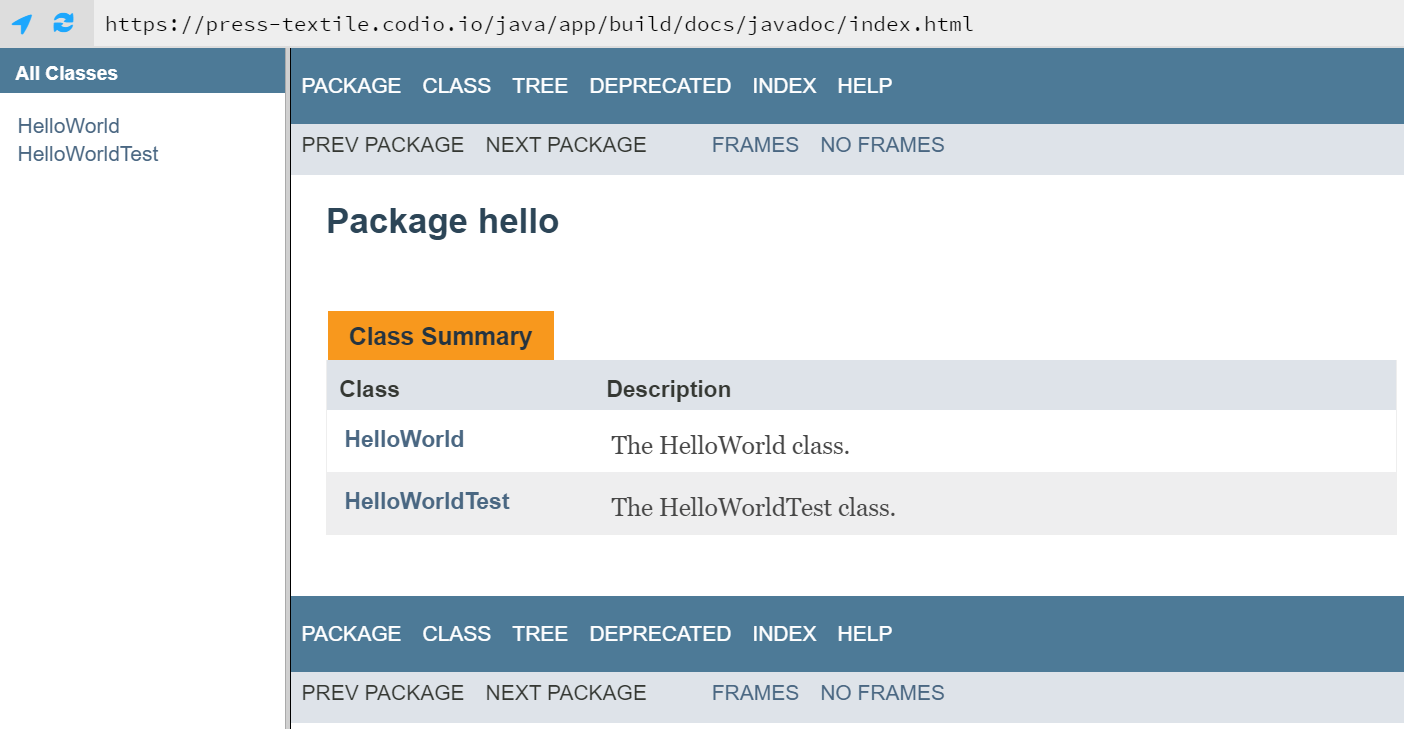
Doesn’t that look familiar? The design should hopefully remind you of the Java API Documentation that you are hopefully very used to working with at this point. From here, we can click through the links to learn more about each class. Let’s take a look at the documentation for our HelloWorldTest class. Toward the bottom of that page, we should see a description for the methods that looks like this:
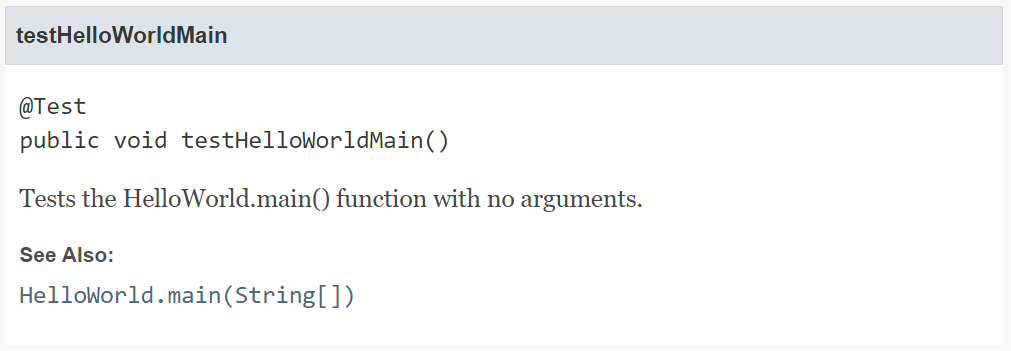
Notice that there is a “See Also” section at the bottom? That was created by the inclusion of the @see tag in the comment! So, we can add some useful information to our documentation comments that make our documentation easy to follow. If you look at the comments in the ArrayList file we’ve been using as an example, you’ll see even more ways to add helpful information to your documentation.
Finally, we’re at the point that we’ve written our application, a couple of unit tests, verified that the unit tests achieve a high level of code coverage, and we’ve written helpful documentation comments in our code. That’s a lot of content we’ve written, especially in our source code files. Now let’s see how good our coding style is by checking it using a linter.
There are many different tools that can be used to check the style of source code. One of the most commonly used tools for Java is called Checkstyle. This tool can be easily integrated into Gradle, so it will be the tool we’ll use for now.
Just like with JaCoCo, we can use the Gradle Checkstyle Plugin to add Checkstyle to our Gradle configuration. First, we’ll need to open build.gradle and find the plugins section:
plugins {
    // Apply the application plugin to add support for building a CLI application in Java.
    id 'application'
    // JaCoCo plugin for code coverage
    id 'jacoco'
}
We’ll add the checkstyle plugin, so our plugins section should now look like this:
plugins {
    // Apply the application plugin to add support for building a CLI application in Java.
    id 'application'
    // JaCoCo plugin for code coverage
    id 'jacoco'
    // Checkstyle plugin for linting
    id 'checkstyle'
}
Unfortunately, the version of Checkstyle that is included with Gradle is bit out of date. So, we’ll also add some quick configuration information to build.gradle to configure the version of Checkstyle used. To do that, we’ll add this block at the bottom of that file:
// Force Checkstyle to be more current version
checkstyle {
    toolVersion '10.6.0'
}
Checkstyle is a very powerful tool, but it requires a configuration file to operate. The configuration file tells Checkstyle what rules to enforce and what rules to ignore. There are a few standard Checkstyle configuration files that are used for Java, but the most common is the one based on the Google Style Guide. So, we’ll need to get a copy of that configuration file and add it to our project.
Here are the steps we’ll follow:
config inside of the java folder in Codio.checkstyle inside of the config folder we just created.google_checks.xml file that was downloaded in step 1 to the config/checkstyle folder in Codio created in step 3.checkstyle.xml.Once you have done those steps, you should see a directory path similar to this:
Finally, for this course we are going to make one modification to the standard Google-based configuration file for Checkstyle. The Google style guide says that Java code should be indented using only 2 spaces per level. However, most IDEs, including Codio, use 4 spaces by default. Instead of changing the configuration in Codio, let’s change the configuration of Checkstyle to account for that. So, we’ll need to open the checkstyle.xml file we just uploaded to the config/checkstyle directory, and search for the following section of the file (look for line 243):
    <module name="Indentation">
      <property name="basicOffset" value="2"/>
      <property name="braceAdjustment" value="2"/>
      <property name="caseIndent" value="2"/>
      <property name="throwsIndent" value="4"/>
      <property name="lineWrappingIndentation" value="4"/>
      <property name="arrayInitIndent" value="2"/>
    </module>
Once we’ve found that section, we’ll simply double each of the values there. So, all the 2s become 4s and 4s become 8s. When we are done, it should look like this:
    <module name="Indentation">
      <property name="basicOffset" value="4"/>
      <property name="braceAdjustment" value="4"/>
      <property name="caseIndent" value="4"/>
      <property name="throwsIndent" value="8"/>
      <property name="lineWrappingIndentation" value="8"/>
      <property name="arrayInitIndent" value="4"/>
    </module>
There we go! We should now be ready to use Checkstyle in our project.
To run Checkstyle, we can use Gradle once again:
gradle checkThe check task in Gradle will run all checks, including Checkstyle. When we run that command, we should get a bunch of errors like this:
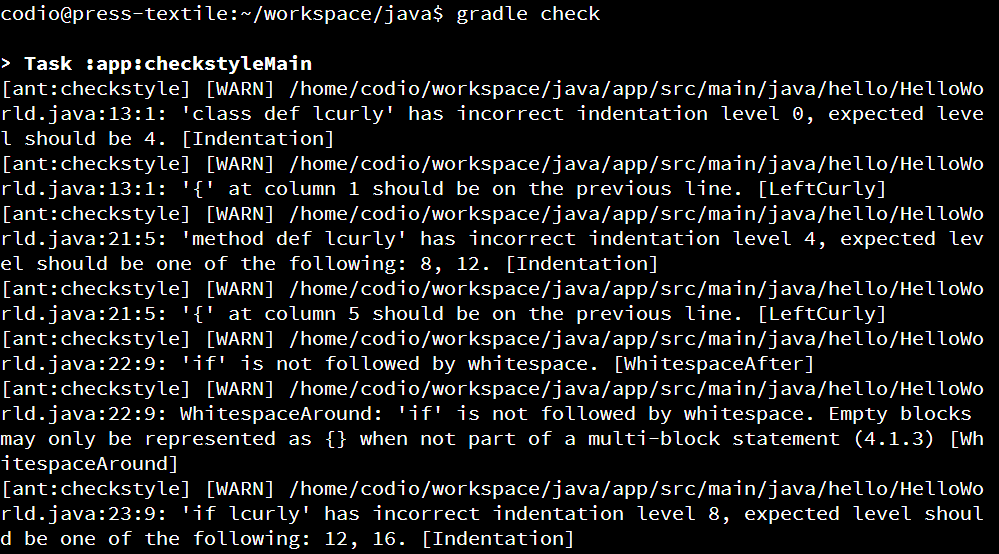
We can also see a friendlier version of this output by going to app/build/reports/checkstyle and opening either main.html or test.html. Remember to right-click and choose Preview Static to open these as webpages. For example, here’s what you might see in main.html:
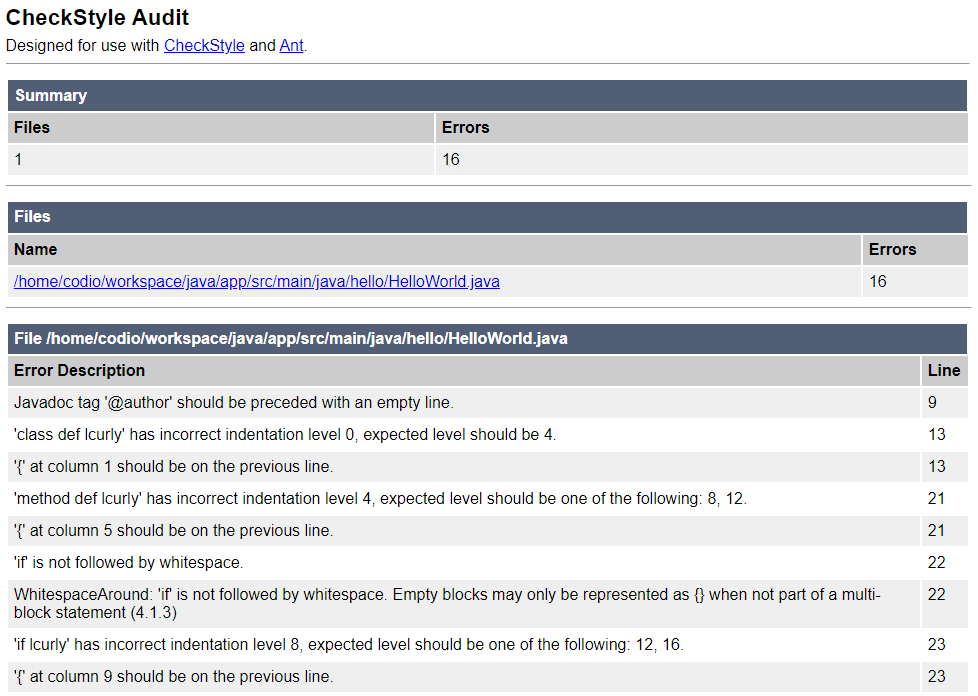
At the bottom of the report is a list of each line of code that contains an error, as well as a description of the error. Let’s look at a couple of these errors and see how we can fix them.
One of the errors we might receive tells us the following:
Javadoc tag ‘@author’ should be preceded with an empty line.
However, if we look at our code, it might appear that we have an empty line there:
/**
 * The HelloWorld class.
 *
 * <p>This is a sample HelloWorld program to demonstrate proper
 * Java coding style, testing, documentation, and more
 *
 * @author Russell Feldhausen russfeld@ksu.edu
 * @version 0.1
 */
However, use your cursor to look closely at that comment block - it turns out that there is a space after the asterisk on the line before @author, but there isn’t a space after the asterisk in the blank line above. According to the style guide, there should not be anything on a blank line in a comment, not even a space. So, we’ll have to remove it.
This can be really frustrating since Codio helpfully adds those spaces for us, but we really don’t want them. So, in order for our code to pass the Checkstyle tool, we’ll have to remove them. Don’t worry - Python developers have the same problem with Codio constantly adding spaces to blank lines, so it affects everyone!
Another error we received gives us this message:
{’ at column 1 should be on the previous line.
There are a couple other errors on that line, but this is the important one. In our code, we see the following use of curly braces around our class declaration:
public class HelloWorld
{
Did you notice that the curly braces were after the class and method declarations instead of on the same line? Checkstyle did! In section 4.1.2. of the Google Style Guide, they discuss the use of “Kernighan and Ritchie” or “K&R” style of curly braces. This refers to the style of braces used in the famous C Programming Language book by those authors, which has become a common standard across many programming languages. In short, the opening curly brace should be on the same line as the previous statement, but the closing curly brace should be on a new line. The Google style guide includes the following visual example:
if (condition()) {
    try {
        something();
    } catch (ProblemException e) {
        recover();
    }
} else if (otherCondition()) {
    somethingElse();
} else {
    lastThing();
}
So, we can modify our code to use K&R style braces to fix this issue.
One more error we might receive is this one:
‘if’ is not followed by whitespace.
As discussed above with K&R braces, part of the standard includes adding a space before the opening curly brace after method and class declarations, as well as conditionals and loop statements. So, anywhere we have an if or else statement, we’ll have to remember to include spaces where appropriate.
Before moving on with this example, modify the code in HelloWorld.java and HelloWorldTest.java to ensure that everything is able to pass the Checkstyle tool. In many professional software development roles, you aren’t even able to save your code unless it passes a style checking tool, so it is a very good habit to get into. In this course, part of your grade will depend on your code following the appropriate style!
This is a good point to stop and commit our code to our Git repository. So, like before, we’ll start by checking the status of our Git repository to see the files we’ve changed:
git statusIn that list, we should see everything we’ve updated listed in red. Next, we’ll add them to our index using this command:
git add .And then we can review our changes using the status command again:
git statusIf we are satisfied that everything looks correctly, we can commit our changes using this command:
git commit -m "Unit Tests and Code Coverage"And finally, we can push those changes to the remote repository on GitHub using this command:
git pushThere we go! We’ve updated our repository once again.
Let’s introduce one more useful tool as part of this example, the Hamcrest assertion library. Hamcrest is a library of unit test assertions that is available for multiple programming languages, including both Java and Python. Hamcrest makes it easy to write very advanced assertions in a way that is both readable and flexible. In fact, most of the autograders in prior CC courses use Hamcrest as the primary assertion library to make them easy to develop. Let’s explore what it takes to add Hamcrest to our project.
To make Hamcrest available, we simply have to add an entry to our build.gradle file. This process is described in the Hamcrest Documentation. In that file, locate the “dependencies” section:
dependencies {
    // Use JUnit Jupiter for testing.
    testImplementation 'org.junit.jupiter:junit-jupiter:5.9.1'

    // This dependency is used by the application.
    implementation 'com.google.guava:guava:31.1-jre'
}
In the line for testImplementation, we’ll add an entry for the latest version of Hamcrest, org.hamcrest:hamcrest:2.2. When we are done, it should look like this:
dependencies {
    // Use JUnit Jupiter for testing.
    testImplementation 'org.junit.jupiter:junit-jupiter:5.9.1', 'org.hamcrest:hamcrest:2.2'

    // This dependency is used by the application.
    implementation 'com.google.guava:guava:31.1-jre'
}
That’s all there is to it! We now can use Hamcrest in our unit tests
Now, let’s build a unit test that uses Hamcrest. So, in the app/src/test/java/hello directory, create a new file called HelloWorldHamcrestTest.java and paste the following code in that file:
package hello;

import static org.hamcrest.MatcherAssert.assertThat;
import static org.hamcrest.Matchers.is;

import java.io.ByteArrayOutputStream;
import java.io.PrintStream;
import org.junit.jupiter.api.Test;

/**
 * The HelloWorldTestHamcrest class.
 *
 * <p>This is the test class for the HelloWorld program using Hamcrest
 *
 * @author Russell Feldhausen russfeld@ksu.edu
 * @version 0.1
 */
public class HelloWorldHamcrestTest {

    /**
     * Tests the HelloWorld.main() function with no arguments.
     *
     * @see    HelloWorld#main(String[])
     */
    @Test
    public void testHelloWorldMain() {
        HelloWorld hw = new HelloWorld();
        final PrintStream systemOut = System.out;
        ByteArrayOutputStream testOut = new ByteArrayOutputStream();
        System.setOut(new PrintStream(testOut));
        hw.main(new String[]{});
        System.setOut(systemOut);
        assertThat("Unexpected Output", testOut.toString(), is("Hello World\n"));
    }

    /**
     * Tests the HelloWorld.main() function with 1 argument.
     *
     * @see    HelloWorld#main(String[])
     */
    @Test
    public void testHelloWorldMainArgument() {
        HelloWorld hw = new HelloWorld();
        final PrintStream systemOut = System.out;
        ByteArrayOutputStream testOut = new ByteArrayOutputStream();
        System.setOut(new PrintStream(testOut));
        hw.main(new String[]{"CC 410"});
        System.setOut(systemOut);
        assertThat("Unexpected Output", testOut.toString(), is("Hello CC 410\n"));
    }
}
The code is nearly identical to the other unit test class, but with two major changes:
assertThat and is methods from Hamcrest.assertEquals the last line of each unit test uses assertThat. The order of the arguments is different, but the idea is the same. Also, note the use of the is method, which is simply stating that it should be equal.Of course, a simple test case such as this doesn’t show the power of using Hamcrest instead of the built-in assertions in JUnit. If you want to know more about Hamcrest, feel free to check out the Hamcrest documentation. We’ll explore more about using Hamcrest in our unit tests later in this course.
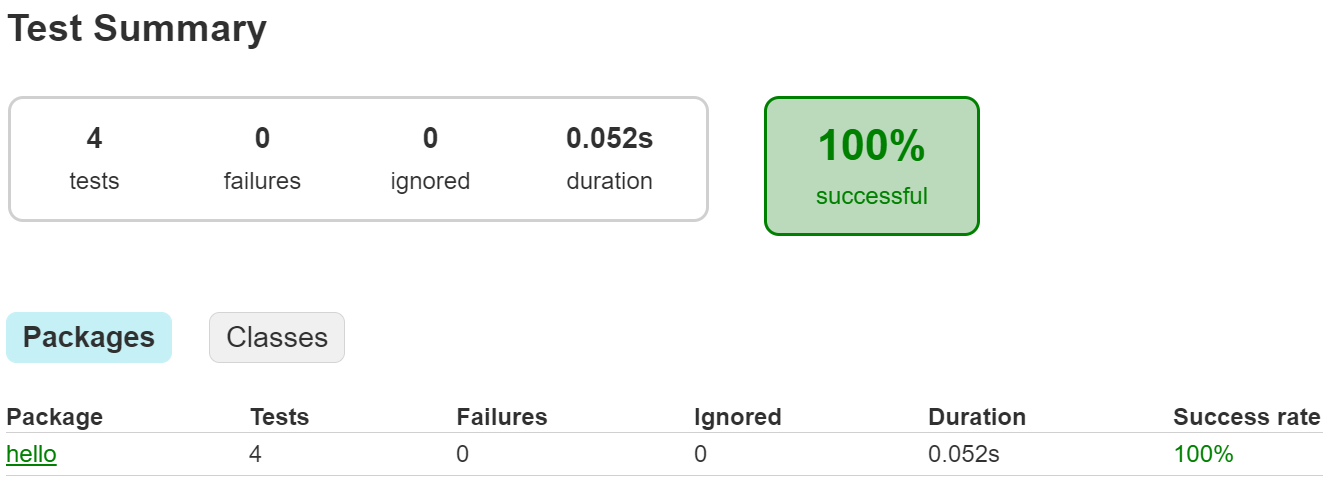
Now that we’ve created a new unit test class, let’s go ahead and run it. Thankfully, we don’t have to do anything else - Gradle will automatically find the new unit test class and execute it along with all the others. So, in a Linux terminal in the java directory, run the following command to execute those tests:
gradle testWhen the tests are complete, we can open the report and we should now see that there are 4 tests that executed successfully:
While we’re at it, since we added new code and unit tests we should also check to make sure that our code coverage is still good:
And that our code passes all style checks by running:
gradle checkAnd finally we can regenerate our documentation by executing:
gradle javadocIf you run into any errors on either of those commands, now is a good time to get them resolved before moving on! This is the last step before we submit our code!
Click the link below to jump to the end where we submit our code.