Python
This section contains content for the Python programming language only.
This section contains content for the Python programming language only.
Prior to this course, most of our Python projects consisted of a few source files, all contained in the same directory. However, as projects get larger, it can be very difficult to keep track of all the various source code files. In addition, we’ll want to keep our source code separate from other files, such as unit tests and the output from various tools we use. So, let’s look at how we can create a more professional structure for our Python “Hello Real World” project.
Python, unlike many other languages, does not really have a standard structure for the source code of a professional project. There are many reasons for this, but most notably is Python’s focus on being completely flexible and not enforcing any particular structure upon developers. However, this flexibility can make it difficult for Python developers to move between projects or organizations if they use vastly different project structures.
So, in this course, we’re going to build a directory structure that is similar to those used by other object-oriented programming languages such as Java and C#. This structure may also be found in many open source projects written in Python.
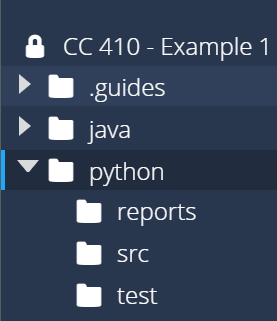
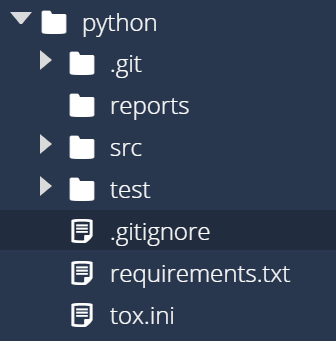
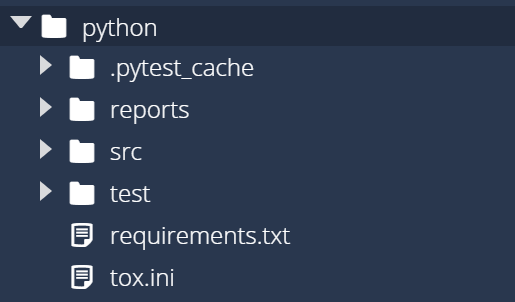
First, find the python folder in the Codio file tree to the left. We’ll create three folders inside of that folder:
src - this folder will store the source code for our application.test - this folder will store the unit tests for our application.reports - this folder will store reports generated by various tools we’ll use later in this module.Once you’ve created those three folders, you should see a structure similar to this:
As we work through this example, we’ll slowly populate these folders to build our application.
Next, let’s create a package to store our Python source code. We’ll discuss what a package is later in this course, but in essence packages are a way to organize large programs by grouping similar classes together.
In Python, to create a package we must simply perform two steps:
src folder to store the Python source files, or modules that will be in this package__init__.py file in that folder to tell Python to treat this directory as a package.So, let’s create a package called hello for our application. First, we’ll need to create a directory called hello in the src directory we created earlier, and then we’ll create a blank file called __init__.py in that directory. Once we are done, we should see this structure:
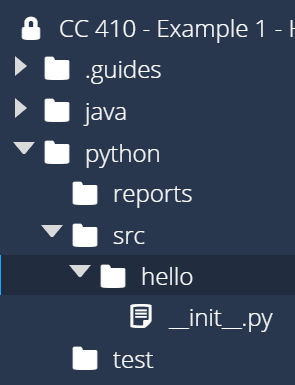
In most cases, the __init__.py file can be left blank. However, it is executed each time the package is used, so we can include some code in that file to help initialize the package. For now, let’s put the following line of code in the __init__.py file in the src/hello directory:
print("In /src/hello/__init__.py")Later, when we execute our application, this will help us see when the package is loaded and how it is used.
You can read more about creating Python packages and modules in the Python Documentation
Now that we’ve created a package for our code, let’s write the code for our “Hello Real World” application. Traditionally, a Python “Hello World” program is a single line of code, but for this example we’ll follow all of the object-oriented standards by creating a class and a method.
First, we need to create a source code file for our application. We’ll place this code inside of the src/hello package we’ve already created. So, let’s create a file called HelloWorld.py in that directory. Once it is created, we should see the following structure:
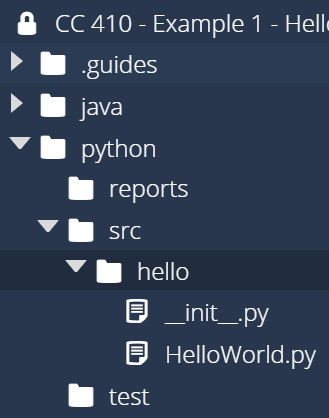
Then, inside of that file, we can place the following code:
class HelloWorld:
    @staticmethod
    def main(args):
        print("Hello World")
This code should be pretty familiar at this point. The one thing to notice is that this file does not include a main guard. We do this for a couple of reasons:
So, by using this structure, we can actually simplify our code a bit by omitting the main guard!
Next, we’ll need to create a couple more files in order to make our application easily executable. In fact, what we’ll end up doing is making the entire src folder act like a “meta package” that includes all of the packages in the application.
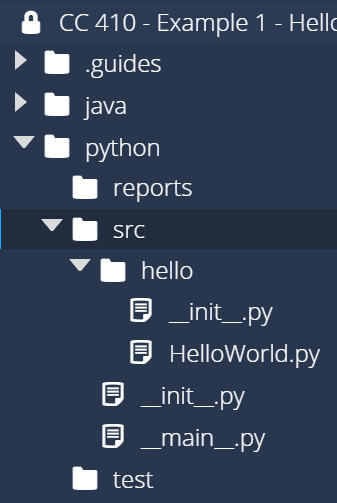
To do this, we’ll need to create two more files directly inside of the src folder:
__init__.py - this will make Python treat the entire src directory as a package__main__.py - this will allow Python to execute that package directly as an applicationOnce those files are created, we should have a structure similar to this image:
Then, we need to populate those files with some code. So, in the __init__.py file in src, enter the following code:
print("In /src/__init__.py")As before, this will just allow us to see when the package is loaded to help us understand how everything works together.
In the __main__.py file, we’ll put the following code:
import sys
from src.hello.HelloWorld import HelloWorld
print("In /src/__main__.py")
HelloWorld.main(sys.argv)
Hopefully this code is also pretty easy to understand. We’ll import the sys library so we can access the command line arguments, and then we’ll also import our HelloWorld class from the src.hello meta package we created. Finally, we’ll print a message stating which file we are in, and then call the main method of our application, passing along the command line arguments.
The __main__.py file is described in the Python Documentation.
That’s all we need to make our application usable. Now, let’s see if we can execute it.
To use our application, we’ll need to use the Linux terminal from within the python folder. So, let’s open the Linux terminal and change our directory to that location:
cd ~/workspace/pythonOf course, if you are already in the ~/workspace folder, you can just use cd python to get there. In the code above, we include the whole path so that it will always work, regardless of the current working directory.
Once we are in that directory, we can execute our application using the following command:
python3 -m srcThat will tell Python to execute the application stored in our src folder as a Python module, or meta package. When we do that, we should receive output like this:

As we can see, our application actually goes through a few steps before it is able to run the main function:
src meta package, which will reach the print statement in __init__.py. It will then find __main__.py and execute it to run the meta package as a program.src.hello package is loaded on line 2 of __main__.py. So, the __init__.py file in that package will be loaded and executed.__main__.py.__main__.py executes the main function of our HelloWorld classThere we go! We’ve successfully built and run our application using Python! If you want, you can test different messages in HelloWorld.py to make sure the program is working correctly.
When Python code is executed, the Python interpreter creates a “compiled” version of the code and stores it in a folder called __pycache__. Those folders can be safely ignored, but they may appear in various directories as you develop and test your application. Later in this module we’ll discuss how to omit those directories from version control applications such as Git.
You can read more about this process in the Python Documentation.
If you are familiar with using Git, here is the short version:
git status
git add .
# check that the correct files are added
git status
# update the commit message below
git commit -m "Commit Message Here"
git push
That will commit and push your changes to GitHub, which can now be found in the repository for this assignment.
At this point, we’ve written some code for our application. Now is a great time to save that code to our git repository and push it to GitHub in the cloud. By doing so, we’ll make sure that our code is not accidentally lost, but we can also make it quick and easy to restore a previous version of our code at any time.
At this point, you might be pretty confused about Git, GitHub, repositories, cloning, and everything that we’ve done so far. That’s fine! We’ve found that one of the best ways to learn how to use Git and GitHub is simply by doing it and observing what it does, then slowly building up your knowledge by trying new things. However, let’s take a few minutes to explain some of the basics so you know what we are talking about.
Git is the name of a “distributed version control system” that was created initially by Linus Torvalds (the originator of the Linux operating system kernel). It was meant to solve a lot of the problems that he experienced when working with other version control systems of the time, such as Subversion and Mercurial.
Git stores data in several different places, and there are several Git commands to transfer the data between those places. It is best summarized in this diagram:
 ^[https://commons.wikimedia.org/w/index.php?title=File:Git_data_flow_simplified.svg&oldid=511614601]
Let’s look at Git from the bottom up and see how it works.
For this project, our working directory in Git is the python folder where we’ve been storing all of our code. This is the folder that we cloned our initial repository from GitHub Classroom into, and its where we’re actually doing all of the coding. At this point, we’ve created several new files and directories, but we’ve not added them to our local Git repository yet. Before we can do that, we must discuss one other thing - the .gitignore file.
First, we’ll need to create a special file called .gitignore in the python directory, or in the root of our working directory for Git. That file contains information that tells Git what files we want to “ignore” - files that Git shouldn’t try to save. Typically we only want Git to store the source code for our program, and not any compiled classes, reports, or temporary files.
Next, let’s place the following content into our .gitignore file:
.mypy_cache
.tox
reports
.coverage
__pycache__/
These are simply the names of files or folders, but may also include wildcards like an asterisk * as well. Anytime we want to ignore anything in our project we can just add its file or folder name or path to this file, and Git will dutifully ignore it.
Some of the screenshots in this section were taken later in the creation of this project, so the exact files listed may be a bit different in your version. That’s fine - just use these as a baseline for the overall look and feel of the process, and feel free to ask questions if you aren’t sure things are correct.
The next level of Git is the index, sometimes referred to as the stage. The index contains a list of files that we’ve modified and would like to store in our local repository. We can add and remove items from the index at any time, and it won’t affect our working directory.
To see what is in the index, we can use the following command from within the python folder:
git statusYou should see output similar to this:
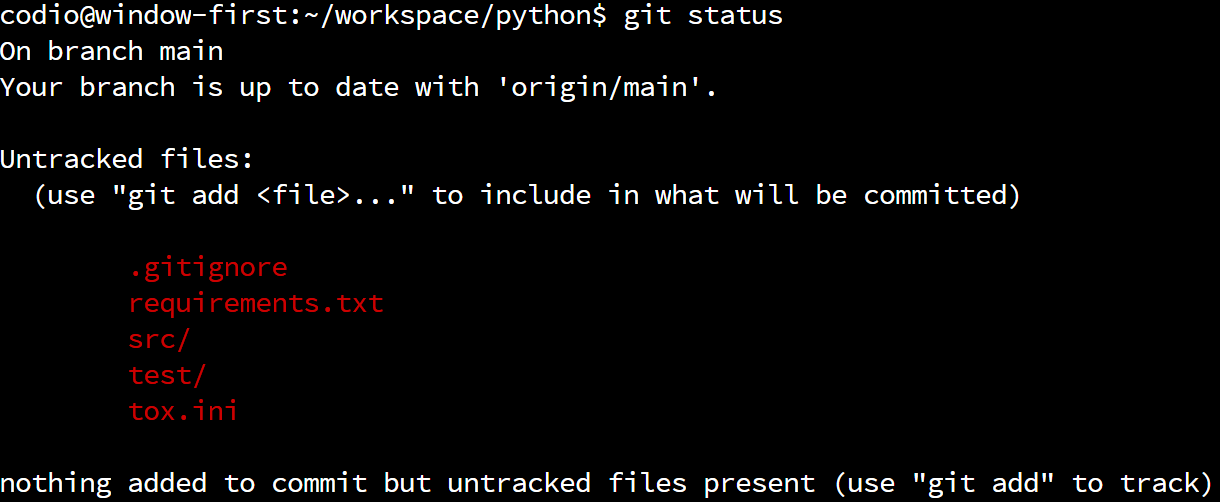
At this point, all of the files are “untracked” and listed in red, which means that they aren’t part of the index. So, we need to add files to the index before we can commit them. To do that, we can use the git add command, followed by the files we’d like to add to the index. Of course, naming each file individually can be time consuming, so we can use the following shortcut to add all of the untracked files in our working directory to the index:
git add .In Linux, a single period . on the command line refers to the current working directory, so in this case it will add all of the files in the python folder to the Git index. When we run that command, we won’t see any output. But, if we run this command again:
git statusWe should now see a whole bunch of files listed as “Changes to be committed”:
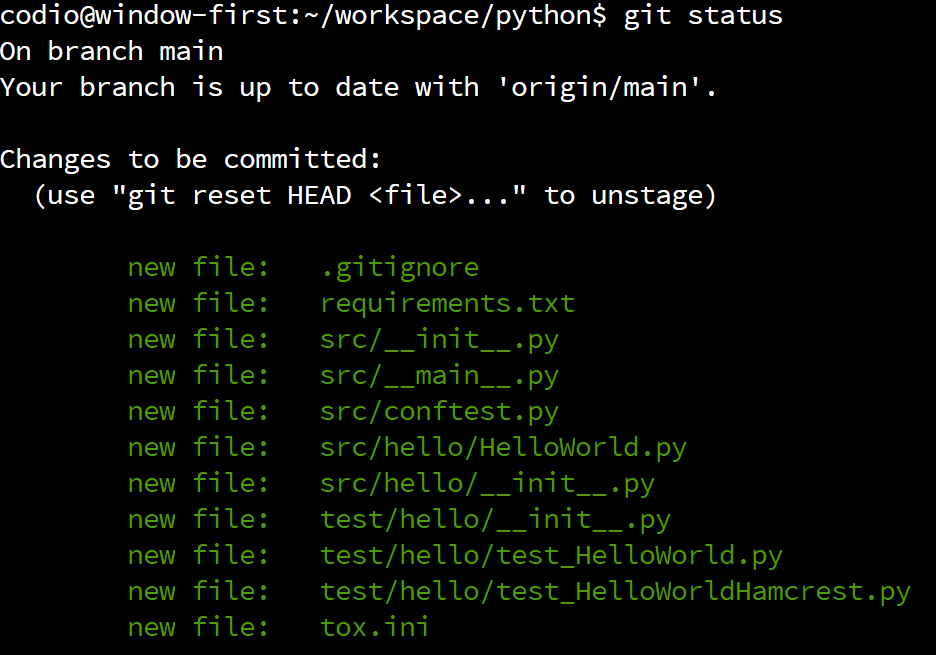
Those files listed in green are now “staged” and ready to commit to our local repository. So, before we move on to the next step, we’ll want to make sure that all the files we changed are included in the list of files to be committed. In this case, we see our HelloWorld.py file, as well as the other file we modified in the previous step.
Once we’ve added the new and updated files to the index, the next step is to commit, or save, those files in our local repository. This will permanently^[There are ways to undo a commit once it is made, but in general it is poor practice to do so unless a major mistake has been made. For now, we’ll consider it permanent.] save these changes in our local repository, helping us keep track of the changes we’ve made to the code.
To commit to the local repository, we will use the git commit command. When committing to a repository, you are required to include a message describing the changes you made to the code. At this point, the commit message is just for your use, but it is always a good idea to make your commit messages very concise and descriptive so that it is helpful for you later on if you need to go back and restore this version of the code.
There are two ways to use the git commit command. Let’s briefly cover both of them, just so you can choose your preferred method.
The first method just calls for you to execute the following command:
git commitWhen you do, your terminal will open a text editor program called Nano, which you can use to place your commit message at the top of the file. It will look something like this:
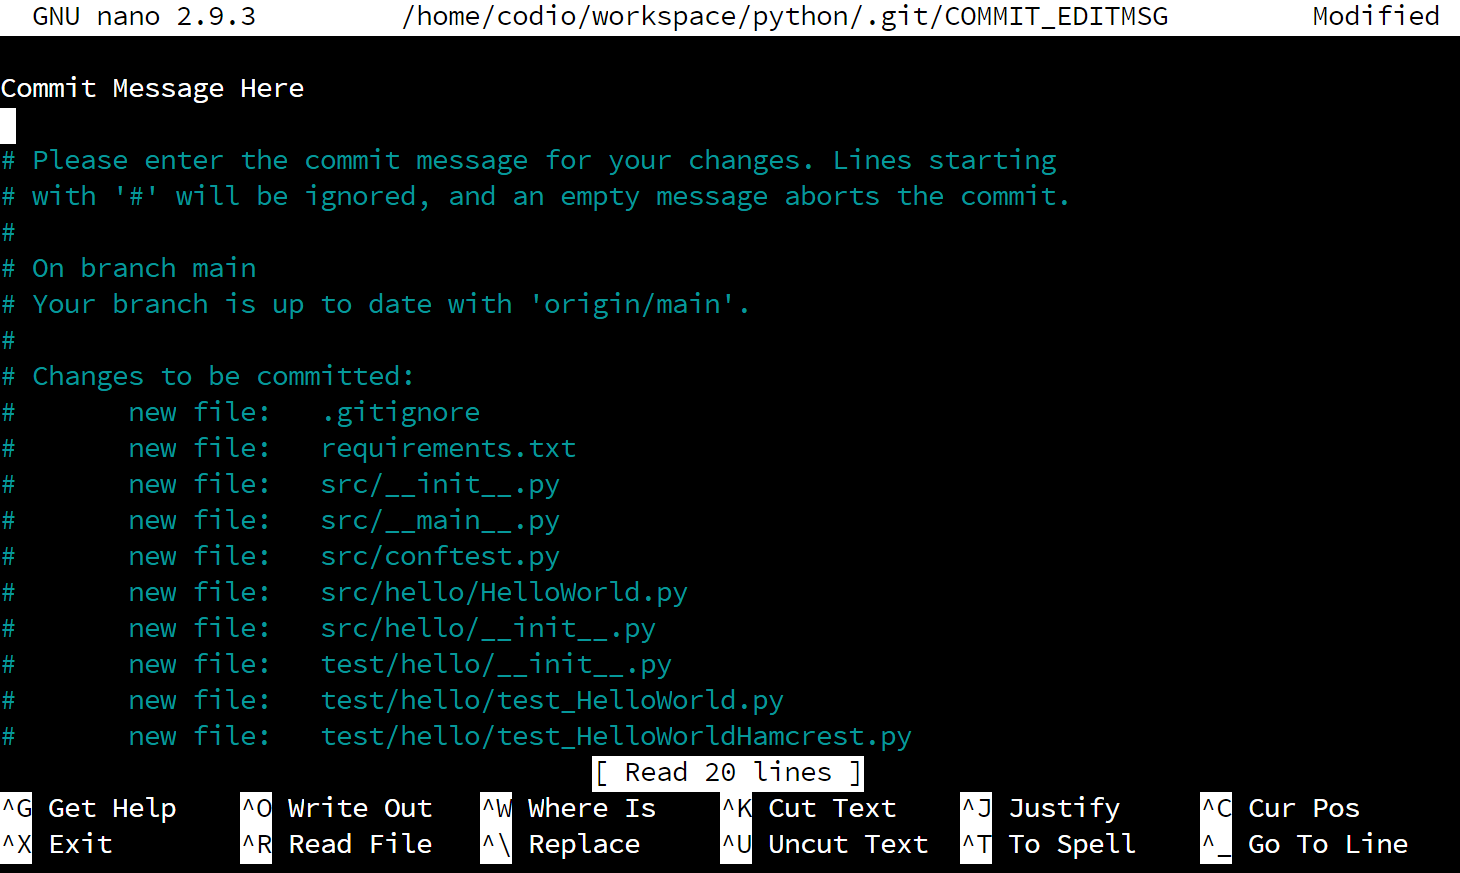
As you can see, we’ve already entered the message “Commit Message Here” at the top of the file. Once we’ve done that, we need to save and close the file. To do that, follow these steps:
Commit messages can also be specified directly on the terminal using the -m command line option. For example, if we wish for our commit message to be “Commit Message Here” we would use the following command:
git commit -m "Commit Message Here"This is a quick and easy way to add a commit message to our commit without using a text editor.
Once we’ve specified our commit message, Git will commit our changes to the local repository. We should see output similar to this if it was successful:

If so, we’ve just made our first commit to our local repository. Now, if we ever need to restore our code back to that point, we can! As we continue to work with Git in this course, we’ll explore some of these more advanced features. For now, we’ll just us it to track our work.
The last step we can take is to push our local repository to a remote location, called a remote. GitHub is a great example of a remote that works with Git, but there are many others as well. For this course, since we are using GitHub Classroom, we’ll be using GitHub as our remote.
Thankfully, because we’ve already cloned this assignment from GitHub Classroom, we don’t have to do anything to be able to use it. In Git, cloning is the term we use for the first time we download a remote repository and store it on our computer. Once we’ve downloaded it the first time, we can get access to any changes by pulling from the remote.
So, to push a copy of our local repository to the remote, we can run this command:
git pushWe should then get output that looks like this:
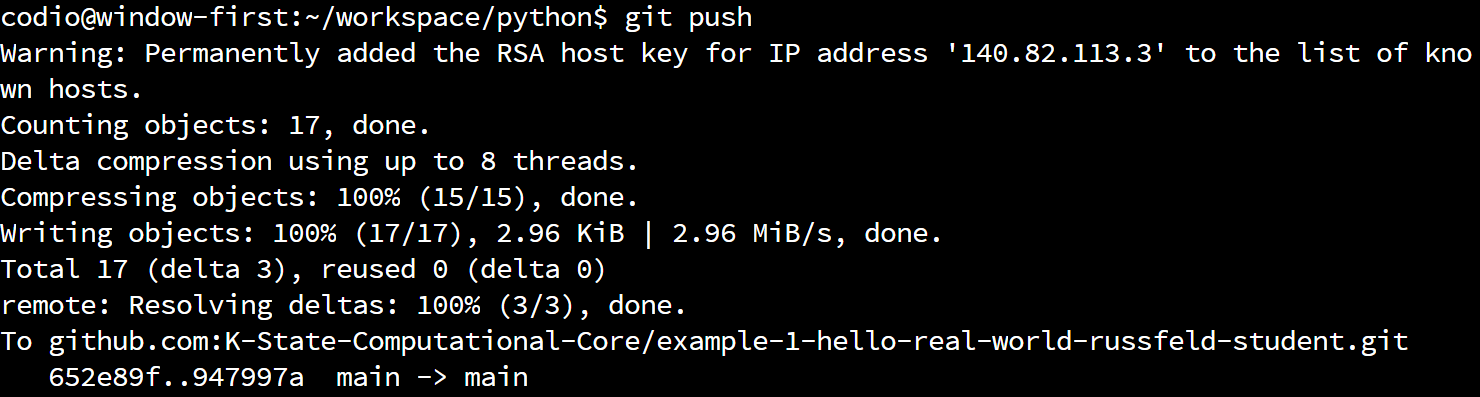
There we go! We’ve now pushed our code to GitHub. Now, let’s go check it out. So, navigate to your repository on GitHub classroom, and refresh the page if needed to see your changes. For me, it now looks like this:
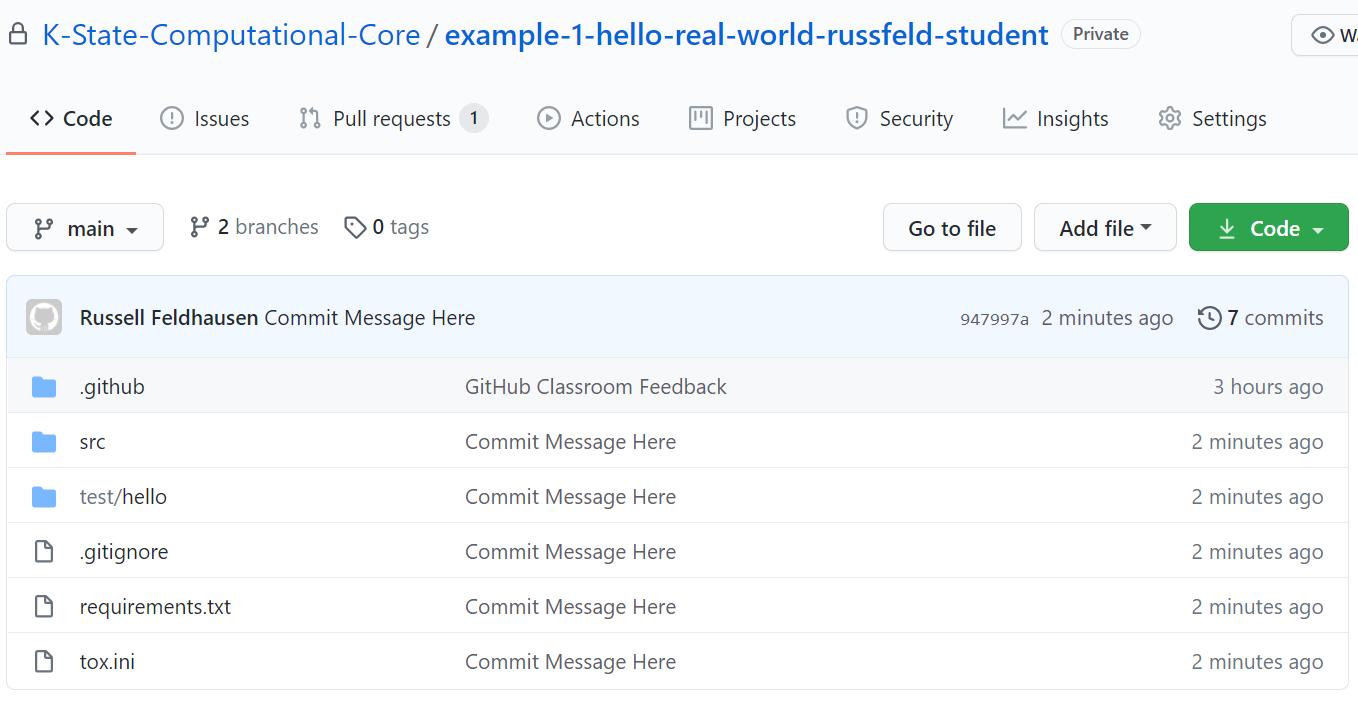
Now all of our code is visible on GitHub, and we can see our commit message next to all of the files that have changed. As we continue to make commits and push them to GitHub, we can use this website to explore the different versions of each file. In addition, the instructors for this course can explore your repository and help you resolve errors and assign grades based on your work here.
At the end of this example project, you’ll create a release on GitHub to signify that you are done with the assignment. We’ll cover how to do that later in this example. For now, let’s forge ahead and learn about unit tests.
At this point, we’ve written the basic code for our “Hello World” program. However, how can we automatically verify that the source code works properly? To do that, we’ll need to create some unit tests that verify our code.
There are many different libraries that can be used to create unit tests for Python. Python itself includes a package called unittest that can serve this purpose. However, many Python developers choose to use an external application called pytest for unit testing. There are many reasons for this, some of which are discussed in this blog post.
To use pytest, we’ll need to install it.
Before we do that, let’s take a step back and discuss installing external libraries via Python. One of the major selling points of the Python programming language is the number of external libraries that can be easily installed. These range from simple game engines all the way to popular scientific and machine learning libraries such as SciPy and scikit-learn.
Thankfully, nearly every external library available for Python can be downloaded and installed from the Python Package Index, also known as PyPI. To do this, we use a tool that is included with Python called the Package Installer for Python or pip.
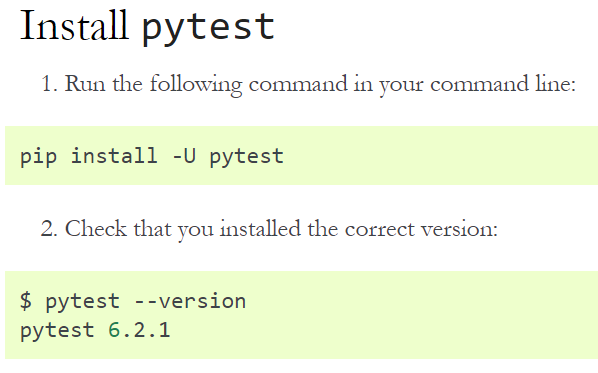
So, when we find an external library we’d like to use in Python, usually all we have to do to install it is to find the library’s name on PyPI, and then use the pip tool to install it. In fact, most libraries include those instructions as part of their documentation, as we can see in the Installation Instructions for pytest.
So, to install pytest, we should run the following command:
pip3 install pytestNotice that this is a little bit different than the command given in the pytest Installation Instructions. First, we will use the command pip3 instead of pip to ensure that we are installing pytest for Python version 3. If we use the pip command instead, it will install pytest for Python 2, which we don’t want.
Additionally, the -U command line flag shown in the documentation simply tells pip to upgrade the package if it is already installed. Since we know it isn’t installed in this case, we’ll just omit it.
When we execute that command, we should get output similar to the following:
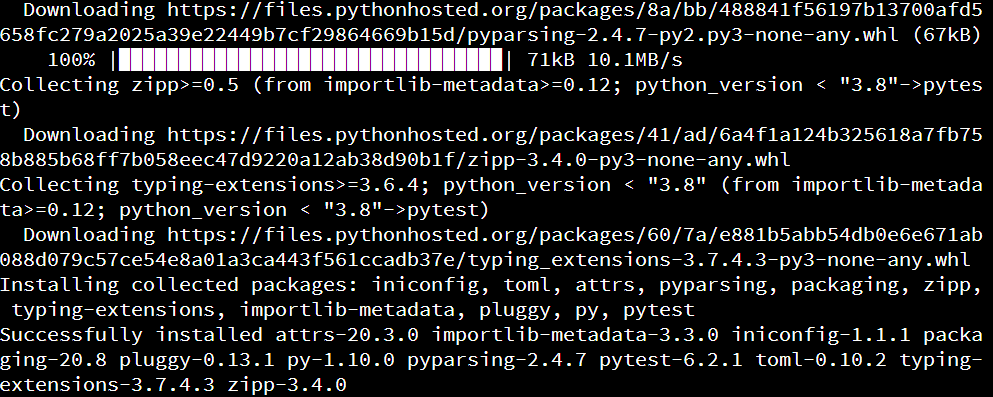
The pip tool will automatically install any additional libraries that are required for pytest, so we might see several items listed. At the bottom of the output, it will list all of the libraries installed. Since we see pytest in that list, we have successfully installed it.
One point of confusion for many new developers is the inconsistent way Linux terminal commands are denoted in the documentation of various tools. For example, in the pytest documentation, Linux terminal commands are sometimes, but not always, prefixed by a dollar sign $:
In other documentation, you might see either a pound sign # or a greater than sign >, as seen in this example:

However, when we execute those commands, we shouldn’t include the greater-than symbol or dollar sign. Why is that? Many places that include documentation for the Linux terminal helpfully include either the last symbol of the command prompt before the command, or some other symbol like an arrow, indicating that this is a command to be entered in the terminal. Linux typically uses two different types of command prompts:
$ - indicating that the terminal is logged in to a normal user account# - indicating that the terminal is logged in with administrator permissions (root)Documentation also often uses the > symbol in front of commands to be entered by the user. So, in general, when you see a Linux terminal command in documentation that starts with a >, $ or #, you should omit that character when executing the command. This can be very confusing and frustrating to get used to, especially since it is not standardized. As we’ll learn later in this course, standardized documentation is a very important part of being a good programmer!
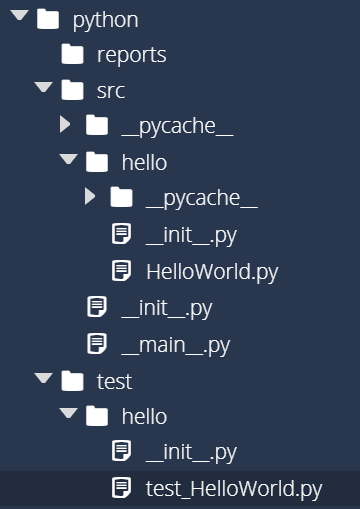
Now that we’ve installed pytest, let’s create a unit test for our “Hello World” application. As you might guess, we’ll use the test directory we created earlier to store all of our unit tests. It is typically good practice to have packages in our unit tests that match the packages in our source code, so we’ll start by creating a package named hello in that directory. To do that, we’ll need to do the following:
hello in the test folder__init__.py in the new test/hello folderprint("In /test/hello/__init__.py") in the test/hello/__init__.py fileOnce we are done, we should see the following structure in our python folder:

Next, let’s create a file called test_HelloWorld.py in our test/hello package. Our file structure should now include that file:
Let’s put some code in the test_HelloWorld.py file to test our “Hello World” application. Here’s a sample of what a unit test for this might look like:
from src.hello.HelloWorld import HelloWorld


class TestHelloWorld():

    def test_hello_world(self, capsys):
        HelloWorld.main(["HelloWorld"])
        captured = capsys.readouterr()
        assert captured.out == "Hello World\n", "Unexpected Output"
We can break this code down line by line to discuss what it does and how it works.
from src.hello.HelloWorld import HelloWorld - in our unit tests, we can import our other packages using the src meta package we created earlierclass TestHelloWorld(): - unlike Java, Python allows us to create classes with names that differ from the filename. For unit tests, our class names should begin with the word Testdef test_hello_world(self, capsys): - Likewise, our test methods should begin with test_. The capsys argument tells pytest that we’d like to capture output printed to the terminal. This is documented in the pytest Documentation.HelloWorld.main(["HelloWorld"]) - this line executes the main method of our HelloWorld class. We must provide a list of strings that represent the expected command line arguments for the program. Recall that Python always includes the name of the script as the first command line argument, so we should simulate that in our unit tests. More about that convention can be found in the Python Documentationcaptured = capsys.readouterr() - this allows us to get the output printed to the terminal by our program. See the pytest Documentation.Then, we reach the most important line of the program: assert captured.out == "Hello World\n", "Unexpected Output". This line is called an assertion, and it is the basis of most unit tests. In this line, we are stating that the output we receive from the program, stored in captured.out, should exactly match "Hello World\n" in order for the test to pass. If it doesn’t, then we can share a helpful error message, in this case “Unexpected Output” when the test fails.
Typically, most unit tests contain several of these assertions, and there are many different assertion methods we can use, but for right now we’ll just use the assert method.
There we go! That’s all it takes to write a simple unit test. However, as you’ve probably noticed, the code for a unit test is much more complex than the code that we are testing. That’s actually pretty typical - many times it is much more difficult to write tests that ensure the code works than writing the code itself. However, the usefulness of those tests will often outweigh the cost, as it can be even more costly to constantly fix bugs and errors that would have been caught by a proper set of unit tests.
One important aspect of the pytest tool is how it uses naming conventions to easily find files that contain unit tests. The naming conventions are fully described in the pytest Documentation. In short, any Python file that matches either test_*.py or *_test.py will be included. For this course, we’ll use the test_*.py convention.
Then, inside of those files, it will look for classes that begin with the name Test, and methods inside of that class that begin with test. This is an example of a convention that dictates how the program functions. So, we’ll need to make sure our unit tests follow this pattern.
Now that we’ve written our unit tests, let’s see if we can execute them. First, we’ll need to open a Linux terminal. Then, we’ll need to navigate to the python directory. Once we are there, we can run pytest using the following command:
pytestWhen we do, we’ll probably get output that looks like this:
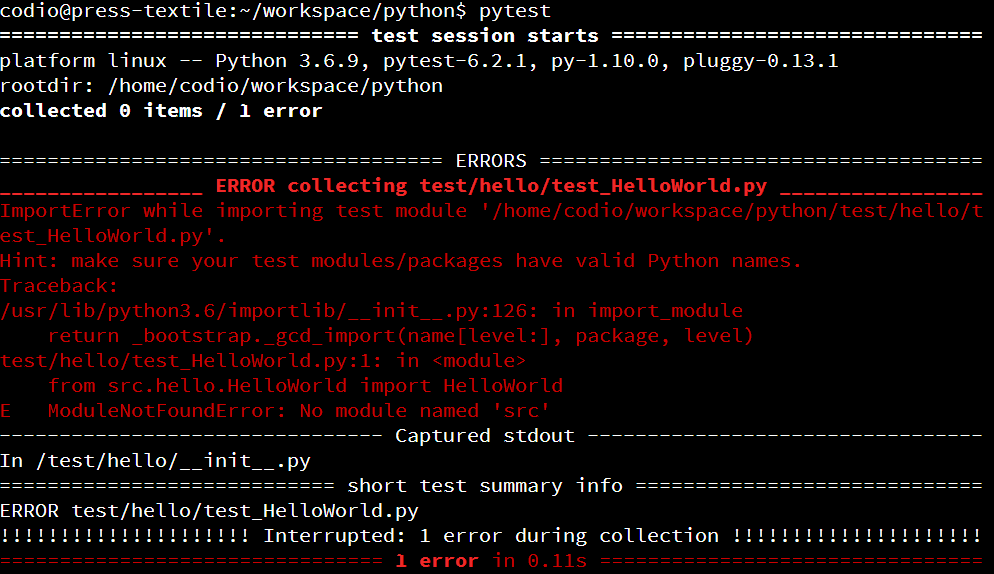
If we read this error closely, we’ll see that it is unable to find our src.hello.HelloWorld class. That’s strange - we were able to find it earlier. Let’s dive into that and see what’s going on.
Since pytest is installed as a library in Python, there is another way we can execute it. Let’s try that and see what happens:
python3 -m pytestWhen we do that, we’ll see that our tests work properly:
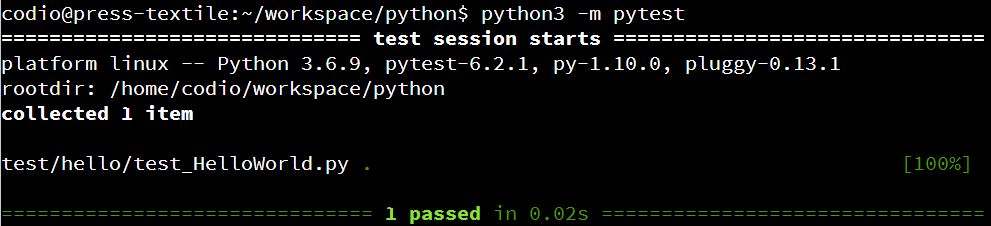
What’s going on here? Well, this gets a bit complicated, but in short the pytest command does not include the current directory as part of the PYTHONPATH, which is a set of locations where Python should look for additional code. However, when we launch pytest using the standard python3 command, Python will add the current directory to the PYTHONPATH. That means that our src meta package will get included, and pytest is able to find it.
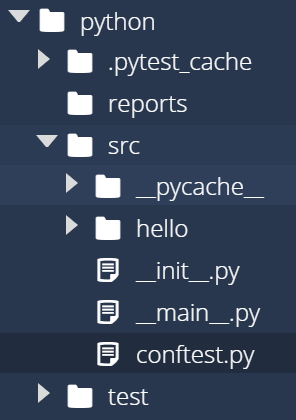
Thankfully, there are a number of ways to fix this. The simplest is actually a bit of a “hack” that involves creating a blank file named conftest.py in the src package. This will tell pytest to include this directory in the PYTHONPATH correctly. This is well described in this StackOverflow Post So, let’s go ahead and create that file:
Then, in that file, we should put a note that explains what’s going on. So, let’s put the following comment in that file:
"""Sample test configuration file.

This file is used to configure testing parameters for PyTest. It is included
as a hack to get PyTest to recognize and include this directory in the Python
path. See https://stackoverflow.com/q/34466027.

Author: Russell Feldhausen russfeld@ksu.edu
Version: 0.1
"""
That will help us remember what that file is for.
Now, let’s try to run our tests again using this command:
pytestIf everything is configured correctly, we should see output similar to this:
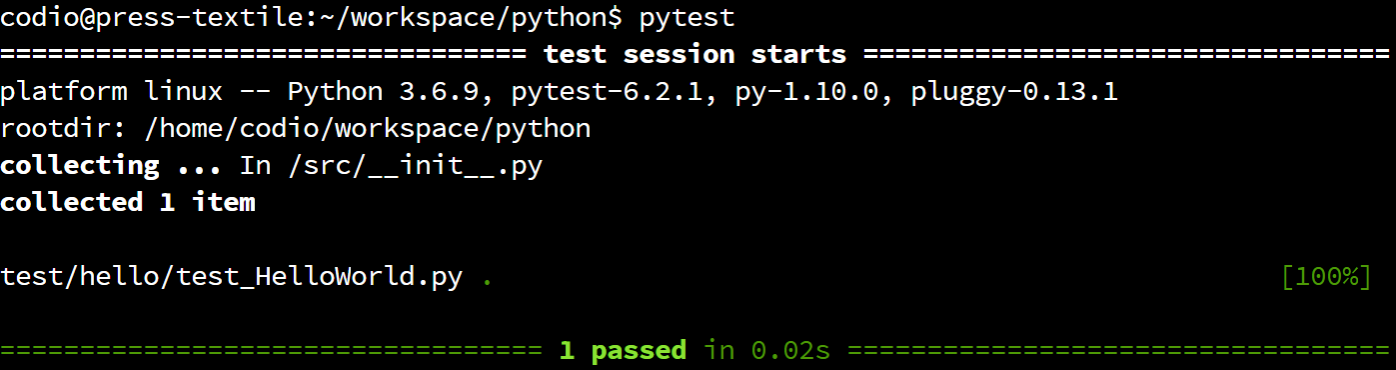
That means our unit tests are working! However, we aren’t getting any useful feedback beyond the number of tests that were executed and whether they succeed.
You might also have noticed a .pytest_cache directory appear after running pytest for the first time. This is simply a folder that pytest uses to cache data that it needs, and you can safely ignore it.
Thankfully, we can install another Python library, pytest-html that will allow us to create HTML reports from our unit test results. So, in a Linux terminal, we can install that library using pip with the following command:
pip3 install pytest-htmlThen, from within the python directory, we can run our tests using this new command to generate a report:
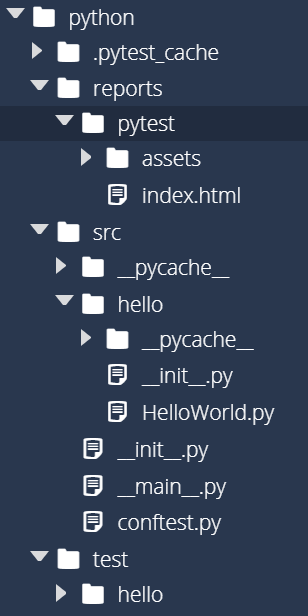
pytest --html=reports/pytest/index.htmlIn that command, we have specified that the report should be created in the reports/pytest/index.html file. So, after running that command, we should see the following folder structure:
So, find that file in the Codio file tree to the left and open it. When you do, you’ll see a file full of HTML like this one:
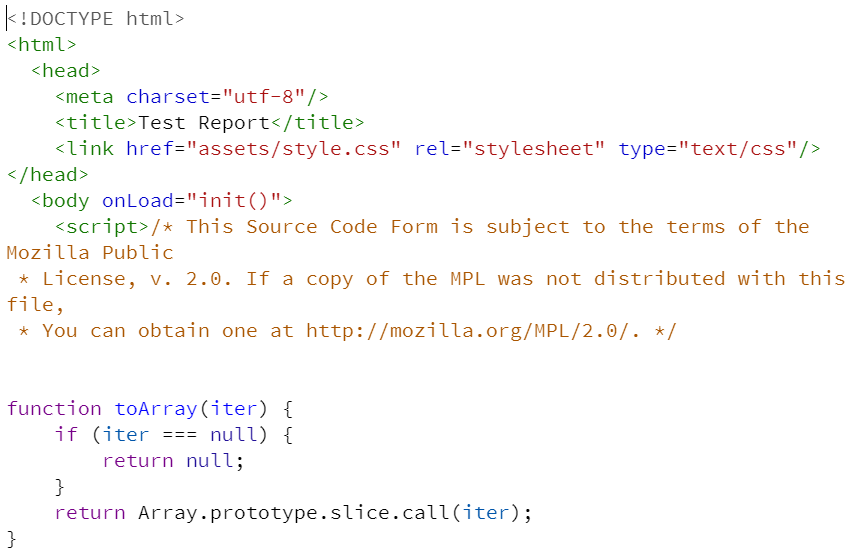
That’s really difficult to read, isn’t it? Thankfully, we can tell Codio to open that HTML file as a webpage by right-clicking on it and selecting Preview Static:

If done correctly, you should see a webpage that looks like this:
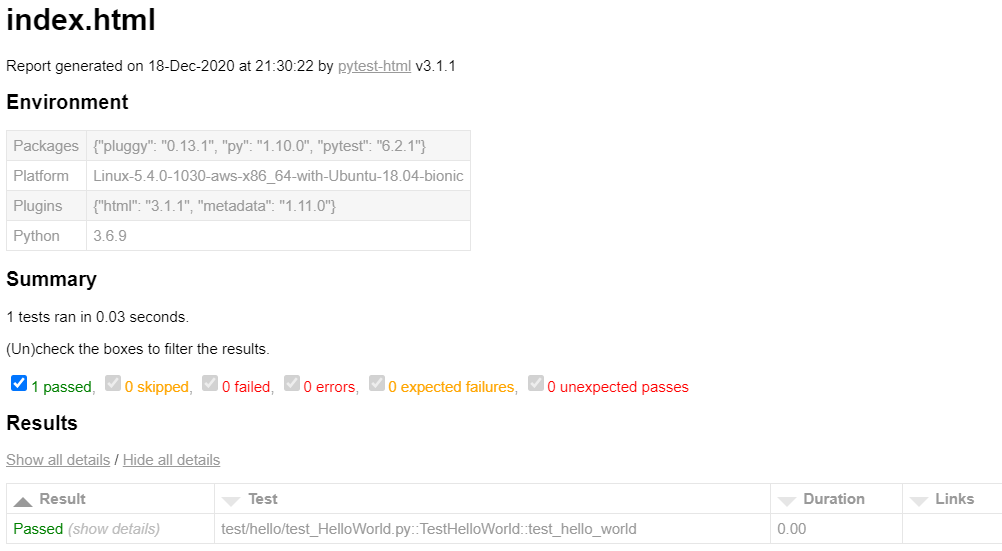
Hopefully, we should see that our code passed the test!
On the next page, we’ll explore how to expand the usefulness of our unit tests and automate this process a bit more.
Working with Python on the Linux terminal can be complicated, especially as projects become larger and larger. Thankfully, there are many tools that have been developed to simplify this process. For this course, we’re going to use one such tool, called tox.
tox is a tool that is developed to help automate and standardize the process of testing applications written in Python. It vastly simplifies many of the steps we’d have to follow to do this in our own project.
tox works by creating virtual test environments and then running our code within those environments. This allows us to test our program using a clean copy of Python with the version and libraries we specify.
The main reason we’ve chosen to use tox in this course is the ease with which it can be used, and the fact that it is available directly as a Python library.
To install tox, we can simply install it using pip. So, in a Linux terminal, enter the following command:
pip3 install toxThat’s all it takes! As we’ll quickly learn, using pip to install Python libraries is quick and easy to do.
One of the things that we’ll need in order to use tox is a requirements file. A requirements file simply lists the libraries that we’ve installed via pip as part of this project. Then, if we decide to work on this project either on a different computer or within a virtual test environment, like the one we’ll create with tox, we can easily reinstall all of those libraries again. You can learn more about requirements files in the pip Documentation
To create a requirements file, navigate to the python directory in the Linux terminal, and then run the following command:
pip3 freeze > requirements.txtThat should create a file called requirements.txt in the python directory. When we open it, we should see contents similar to this:
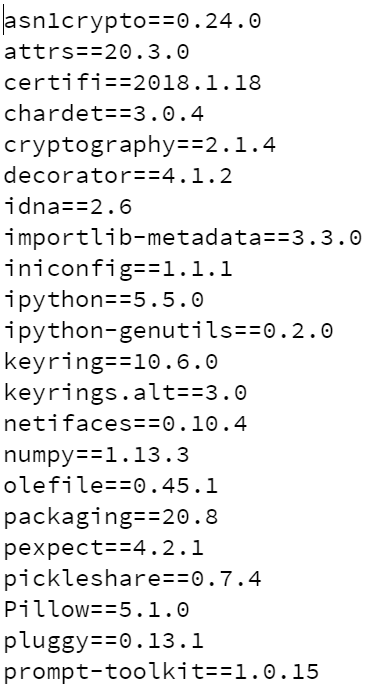
As we can see, there are a lot of libraries already installed - many more than we installed manually. This is because the pip3 freeze command will list all libraries installed, even if they were installed as a dependency for another library.
There are some pros and cons to this approach:
Because of this, we’re going to create our own requirements file that just lists that basic libraries we need. This will make it easier for us to keep track of the libraries we are using for this application.
So, go ahead and open up the requirements.txt file in the python directory, and replace it’s contents with the following:
pytest
pytest-html
tox
Then, whenever we need to reinstall the requirements for our program, we can use the following command when we are in the python directory:
pip3 install -r requirements.txttox will also use this requirements file to set up our test environment, as we’ll see in the next section.
Next, we’ll need to create a configuration file for tox. The tox configuration file should be stored directly in the python directory with the name tox.ini. So, we should have the following structure once that file is created:
The basics of creating a configuration file for tox are detailed in the tox documentation. For now, we can use a quick starter file. So, place the following contents in the tox.ini file:
[tox]
envlist = py310
skipsdist = True

[testenv]
deps = -rrequirements.txt
commands = python3 -m pytest --html=reports/pytest/index.html
Let’s go through the settings in this configuration file to understand what it does
[tox] - the [tox] entry is the header for a section of the file. In this case, it stores the global settings for tox.envlist = py310 - this tells tox to only use Python version 3.10 for testing. If we want tox to test our program using multiple versions of Python, we can add them to this list.skipsdist = True - this tells tox to skip the step of installing our application in the test environment. We do this because we haven’t set configured our application to be installed. We’ll cover how to do this later in this course.[testenv] - this section defines the test environments that tox will createdeps = -rrequirements.txt - this tells tox to install the requirements listed in the requirements.txt file. We include a -r at the beginning to match the pip command. There is no space between -r and requirements for some reason.commands = python3 -m pytest --html=reports/pytest/index.html - this is a list of command that tox should execute to test our application. We’ll use the python -m pytest method to execute pytest here, since that will better match the commands we’ll add to this file as we continue to build our project.That’s a very basic configuration file for tox, but it allows us to begin automating the process of testing our code.
Now that we’ve configured tox, let’s try to run it. Thankfully, running tox is super simple. In a Linux terminal that is in the python directory, simply run this command:
toxIf everything is working correctly, we should get the following output:
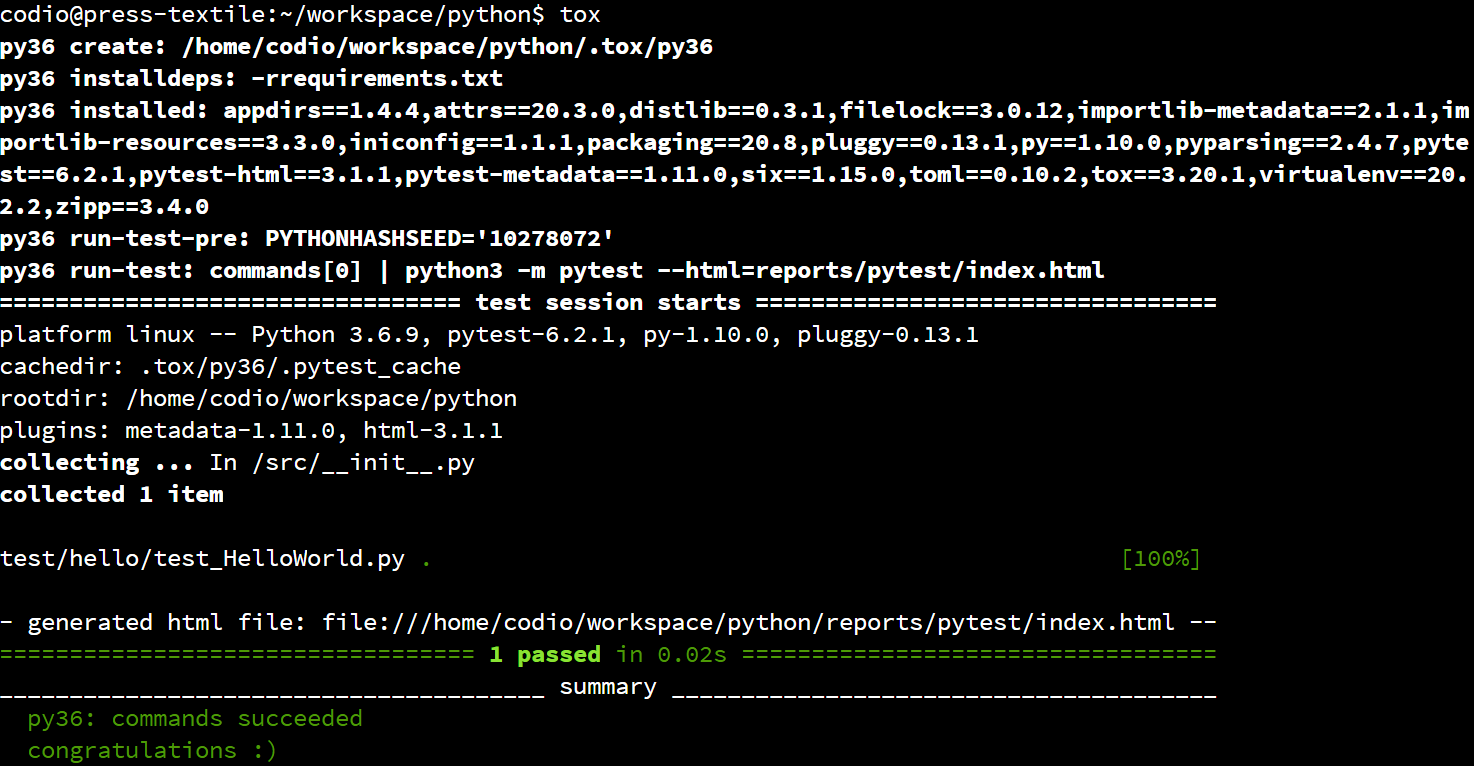
When we execute tox, it performs a few tasks:
.tox folder it creates. This allows it to run tests in isolation, away from the version of Python we are using in Codio.requirements.txt file. This makes sure our application and unit tests can execute.commands list in tox.ini. Right now there is just one command, so it will run our unit tests with pytest.The first time we run tox it may take a little while to set up the virtual environment. Thankfully, subsequent runs will be much faster since the virtual environment is already set up.
However, if we ever want to force tox to completely reset the virtual environment, we can just delete the .tox folder it creates.
Now that we have successfully set up and configured tox, let’s explore some of the other tools we can use with tox.
We’ve now written our program, as well as a unit test that runs our program and make sure it works. But, how can we be sure that our unit tests are adequately testing every part of our program? For that, we have to rely on another tool to help us calculate the code coverage of our unit tests.
Thankfully, there are many easy to use tools that will compute the code coverage of a set of tests. For Python, one of the most commonly used tools is the aptly-named Coverage.py. Coverage.py is a free code coverage library designed for Python, and it is easy to install.
As we’ve already learned, we could easily install it using pip. However, since we are now using tox and a requirements file, we need to make sure that we update our requirements file as well. One easy way to do that is to just update the requirements file to include the new library, then use pip to make sure everything is installed properly.
So, let’s open requirements.txt and make sure it now includes the following content:
coverage
pytest
pytest-html
tox
Once we’ve updated our requirements file, we can then install it by opening a Linux terminal, going to the python folder, and then using pip to install everything from the requirements list:
pip3 install -r requirements.txtAs you might guess, the -r command line argument for pip3 will allow us to install the requirements listed in a requirements file. Once we run that command, the last line of output will list the packages installed, and we should see that Coverage.py is now installed:

Now that we’ve installed and configured Coverage.py, let’s execute it and see what happens. Coverage.py uses a two step process to compute the code coverage from a set of tests - first we must execute the tests using the Coverage.py tool, then we can use another command to generate a report. So, from within the python folder, we can run the following command:
python3 -m coverage run --source src -m pytest --html=reports/pytest/index.htmlThis command is getting pretty complex, so let’s break it down:
python3 - as always, we are running these commands using Python 3. From here onward, we’ll run each library as as module in Python instead of running the commands themselves.-m coverage run - we want to execute the Coverage.py run command. We use -m to tell Python that we are executing the Coverage.py library as a Python module--source src - this tells Coverage.py where our source code is located. It will compute the coverage only for files in that directory-m pytest - we also have to tell Coverage.py how to execute the tests, so we include a second -m followed by pytest. Basically, we are taking our existing command for pytest and adding a few bits in front of it for Coverage.py--html=reports/pytest/index.html - as we saw earlier, this will tell pytest to create and store a report of the test results.When we execute that command, it will tell Python to run our unit tests and generate a test report. Since we are now using Coverage.py to compute code coverage, we’ll also see a new file appear, named .coverage:

This file contains the data the Coverage.py collected from the unit tests. If needed, we can run multiple sets of unit tests and combine the data files using other Coverage.py commands. However, for now we won’t worry about that.
Once we’ve run our unit tests, we need to run one more command to generate a report. So, once again from within the python directory, run the following command:
python3 -m coverage html -d reports/coverageThe coverage html command will generate a report, and the -d command line option sets the directory where the report will be stored. Once we execute this command, we should see the coverage directory structure appear in reports:
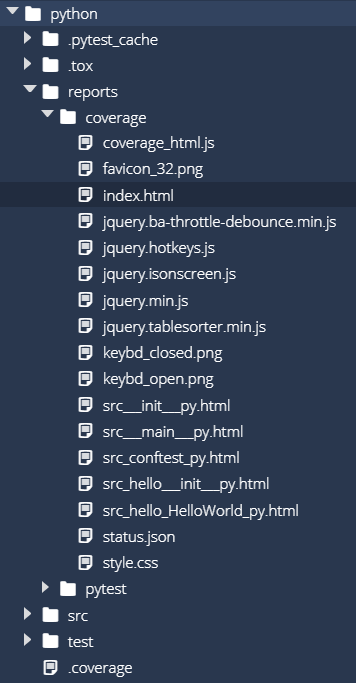
Inside of that folder is another index.html file. So, let’s right-click it and select Preview Static to open it as a webpage. Hopefully we should see something like this:
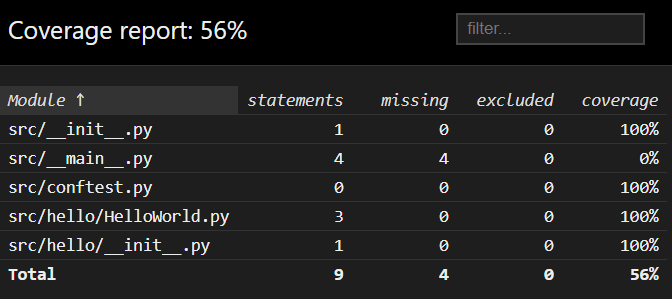
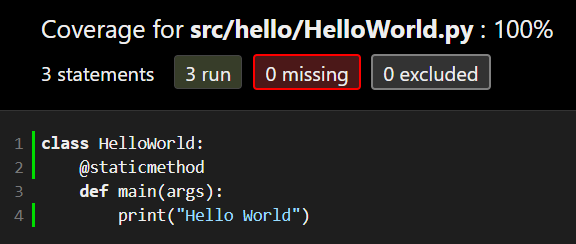
While our test only reports that it achieved 56% code coverage, we can see that it is because the __main__.py file was not executed. If we look at the other source files, we’ll see that we achieved 100% code coverage with our tests! That’s the goal, though it was pretty easy to achieve when our application really only contains one line of code. By clicking the links on the page, we can even see which lines are tested by our program, as shown below:
Now that we have our Coverage.py library working, let’s update our tox configuration file to allow us to run those commands automatically via tox. All we have to do is open tox.ini in the python folder and update the commands section at the end of the file to look like this:
commands = python3 -m coverage run --source src -m pytest --html=reports/pytest/index.html
           python3 -m coverage html -d reports/coverage
Notice that those are the exact same commands we used earlier to execute our tests and generate a report using Coverage.py. That’s one of the most powerful features of tox - you are able to use the same commands within tox that you would use to manually execute the program.
Once we’ve updated tox.ini, let’s run it once to make sure it works. This time, since we’ve installed a new requirement, we’ll need to tell tox to rebuild its environment by using the -r command line flag:
tox -rThat will tell tox to completely rebuild its virtual environment and reinstall any libraries listed in the requirements file.
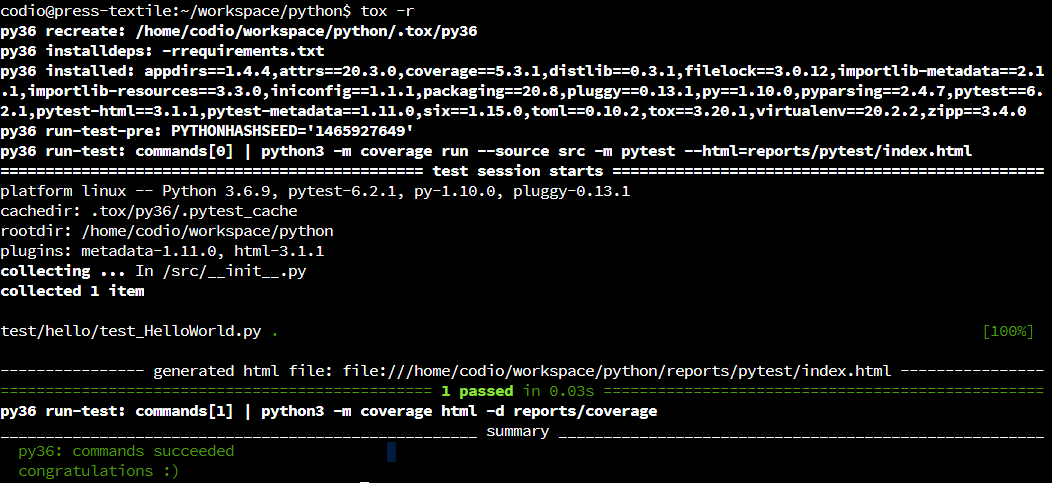
We should once again be able to see tox execute our tests and generate a report:
Let’s modify our application a bit and see how we can use Coverage.py to make sure we are really testing everything our application can do. In the HelloWorld.py file, found in src/hello, replace the existing code with this code:
class HelloWorld:
    @staticmethod
    def main(args):
        if len(args) == 2:
            print("Hello {}".format(args[1]))
        else:
            print("Hello World")
This program will now print “Hello World” if executed without any command line arguments, but if one is provided it will use that argument in the message instead. So, let’s run our program again using this command from within the python folder:
toxOnce the tests have finished, we can open the Coverage.py report stored in reports/coverage/index.html and we should find that it no longer achieves 100% coverage:
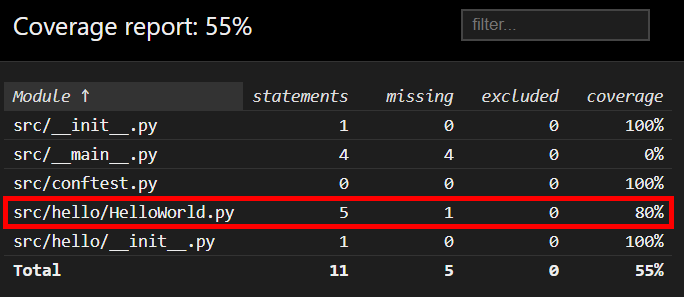
If we drill down deeper, we can find the lines of code that aren’t covered by our tests:
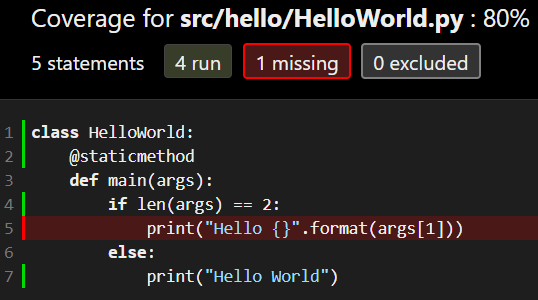
As we expected, our single unit test is not able to test each and every line of code in our application. That’s not good! So, we’ll need to update our tests to account for the change in our code.
As a quick aside, if we were engaging in test-driven development, we would write the new unit test before changing the code. We won’t model that behavior right now, but it is worth noting that you don’t have to do these steps in the order presented here.
So, let’s update our unit tests to account for this new code. There are a couple of ways we can do this:
test_hello_world method to call the method multiple times, both with and without arguments.In general, when working with unit tests, it is always preferred to add additional test methods to test additional functionality in the program. We want to keep our tests as simple and focused as possible, so that we can easily find the source of any errors it finds. If we simply added more code to the existing test, it would be difficult to tell exactly what caused the error. We’ll cover this in more detail when we formally discuss unit testing later in this course.
For now, let’s open the test_HelloWorld.py file stored in test/hello and add the following method to the TestHelloWorld class:
    def test_hello_world_arg(self, capsys):
        HelloWorld.main(["HelloWorld", "CC 410"])
        captured = capsys.readouterr()
        assert captured.out == "Hello CC 410\n", "Unexpected Output"
Notice that this is nearly identical to the previous unit test method - we simply changed the arguments that are provided to the main method, and also updated the assertion to account for the changed output we expect to receive. As discussed earlier, there are things we can do to prevent duplication of code like this in our unit tests, but we won’t worry about that for now.
Once again, let’s rerun our tests using this command:
toxOnce that is done, we can open the JaCoCo report and see if we are back to 100% coverage:
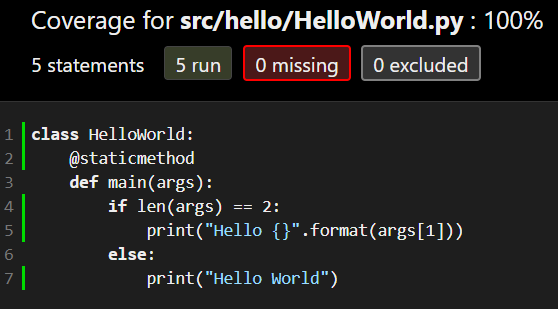
If everything is working correctly, we should see that we are back at 100% coverage, and each line of code in our program is tested.
Of course, achieving 100% code coverage does not mean that you’ve completely tested everything that your application could possibly do - it simply means that you are at least testing every line of code at least once. It’s a great baseline to start with!
This is a good point to stop and commit our code to our Git repository. So, like before, we’ll start by checking the status of our Git repository to see the files we’ve changed:
git statusIn that list, we should see everything we’ve updated listed in red. Next, we’ll add them to our index using this command:
git add .And then we can review our changes using the status command again:
git statusIf we are satisfied that everything looks correctly, we can commit our changes using this command:
git commit -m "Unit Tests and Code Coverage"And finally, we can push those changes to the remote repository on GitHub using this command:
git pushAs you can quickly see, this is a pretty short set of 5 commands that we can use to quickly store our code in our local Git repository and on GitHub. We just have to carefully pay attention to the files we commit and make sure it is correct.
The next step in writing good code is adding proper documentation and comments to describe the code and what it does. By writing good documentation, we can pass on helpful information to other developers who need to maintain this code, including our future selves!
Unlike most other programming languages, which specify that documentation for classes and functions should be in a large comment above the class or function, Python uses a different documentation structure known as docstrings. A docstring is a comment that is surrounded by three sets of double quotation marks """ and can be found starting on the first line of the class or function declaration.
The Python programming language specification doesn’t include a whole lot of information about the specific structure of docstrings, but there are a few resources that developers can look to for examples. The original docstring format was specified in PEP 257. However, many Python developers prefer to follow the Python Style Guide published by Google, which includes examples and specifications for docstrings.
In Python documentation, many times you’ll see references to various “PEP” documents. “PEP” is short for “Python Enhancement Proposal,” and the collected set of PEP documents form the basis for the Python programming language. If you are familiar with the Requests for Comment, or RFCs, that provide the technical information underpinning much of the Internet, PEPs serve a very similar purpose for Python. The full archive of PEPs can be found in PEP 0.
So, let’s explore how to create this documentation for our code.
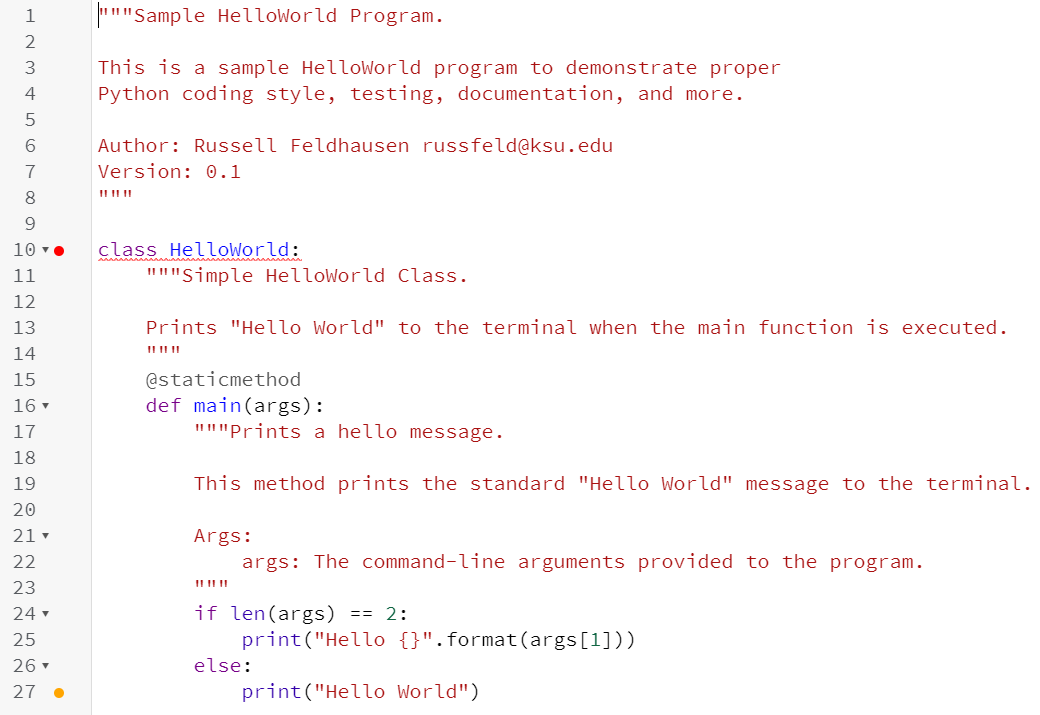
First, let’s look at a docstring that would be placed at the top of a source code file for Python. This is a sample docstring that we would place at the top of our HelloWorld.py file in the src/hello directory:
"""Sample HelloWorld Program.

This is a sample HelloWorld program to demonstrate proper
Python coding style, testing, documentation, and more.

Author: Russell Feldhausen russfeld@ksu.edu
Version: 0.1
"""
There are lots of new things in this block of comments, so let’s look at each part individually:
""".In most cases, it is recommended that every Python source file contain a docstring at the top of the file that describes its purpose. So, let’s look at a few other docstrings we may want to include in our program:
src/__init__.py"""Meta package for all project packages.
This is the __init__ file for this package.
Typically this file can be left blank, but for this example we have
included a print statement so we can see what it does and when.
Usage:
python3 -m src - execute this program (when run from project root).
Author: Russell Feldhausen russfeld@ksu.edu
Version: 0.1
"""src/__main__.py"""Sample Main Project File.
This file is executed when the entire src directory is run using Python
and serves as the main entry point for the application.
Usage:
python3 -m src - execute this program (when run from project root).
Author: Russell Feldhausen russfeld@ksu.edu
Version: 0.1
"""src/conftest.py"""Sample test configuration file.
This file is used to configure testing parameters for PyTest. It is included
as a hack to get PyTest to recognize and include this directory in the Python
path. See https://stackoverflow.com/q/34466027.
Author: Russell Feldhausen russfeld@ksu.edu
Version: 0.1
"""src/hello/__init__.py"""hello Package.
This is the __init__ file for this package.
Typically this file can be left blank, but for this example we have
included a print statement so we can see what it does and when.
Author: Russell Feldhausen russfeld@ksu.edu
Version: 0.1
"""If you haven’t already, go ahead and include the above docstrings in the files specified. Don’t forget to update the author and version information as needed.
Next, we should also include a docstring at the beginning of each class. This will include information about the class itself, including any attributes stored at the class level. Here’s an example of a class docstring for our HelloWorld class:
class HelloWorld:
    """Simple HelloWorld Class.

    Prints "Hello World" to the terminal when the main function is executed.
    """
    # code goes here
It follows the same structure as the file docstring - a one line description first, followed by a period and a blank line, then additional paragraphs as required.
Finally, we should also include a docstring at the beginning of most functions. Here’s an example of a docstring for the main function in our HelloWorld class:
    @staticmethod
    def main(args):
        """Prints a hello message.

        This method prints the standard "Hello World" message to the terminal.

        Args:
            args: The command-line arguments provided to the program.
        """
        # code goes here
Notice that this docstring has a section named “Args:” that describes the parameters for the method. The Google Style Guide describes three sections that could be included in a function docstring:
Feel free to refer to the Google Style Guide for examples as well.
Finally, individual variables and tricky sections in the source code can also be documented using comments. Typically any attributes or fields stored directly within the class itself are documented in this way. We don’t have any attributes in our current program, so we won’t worry about this part for now.
We’ll discuss the creation of Python docstrings in more detail later in this course. For now, feel free to refer to these resources for additional information:
Let’s briefly look at a documented version of our unit test code as well, just to see what that looks like. Some of the code has been omitted so we can just focus on the comments:
test/hello/__init__.py"""test package for hello.
This is the __init__ file for this package.
Typically this file can be left blank, but for this example we have
included a print statement so we can see what it does and when.
Author: Russell Feldhausen russfeld@ksu.edu
Version: 0.1
"""test/hello/test_HelloWorld.py"""Test Class for HelloWorld.
Author: Russell Feldhausen russfeld@ksu.edu
Version: 0.1
"""
# imports omitted
class TestHelloWorld():
"""Test Class for `src.hello.HelloWorld`."""
def test_hello_world(self, capsys):
"""Test Method for `src.hello.HelloWorld.main`.
This will test the main method with no arguments.
Args:
capsys: PyUnit fixture to capture output.
"""
# code omitted
def test_hello_world_arg(self, capsys):
"""Test Method for `src.hello.HelloWorld.main`.
This will test the main method with 1 argument.
Args:
capsys: PyUnit fixture to capture output.
"""
# code omittedGo ahead and place comments similar to what you see above in the appropriate files in the test folder. As before, don’t forget to change the author to your name!
One of the most powerful uses of the docstrings is to generate documentation for users and developers automatically based on the comments stored in the docstrings. This can make it much easier for developers to understand how the code works, even without exploring the code itself.
One of the best tools to create documentation for Python is pdoc3. [pdoc3] makes it quick and easy to generate easy to read documentation based on the docstrings in the source code, and it supports Google style docstrings and even markdown!
To install pdoc3, we’ll simply add it to our requirements.txt file:
coverage
pdoc3
pytest
pytest-html
tox
Make sure it is pdoc3 and not pdoc, which is an older version that pdoc3 is based on.
Once it is there, we can install it by going to the python directory in a Linux terminal and running this command:
pip3 install -r requirements.txtAs before, if everything works correctly we should see that pdoc3 was installed:

Once we’ve installed pdoc3, we can use the following command from within the python directory to generate our documentation:
python3 -m pdoc --html --force --output-dir reports/doc .Let’s look at that command to understand what it does:
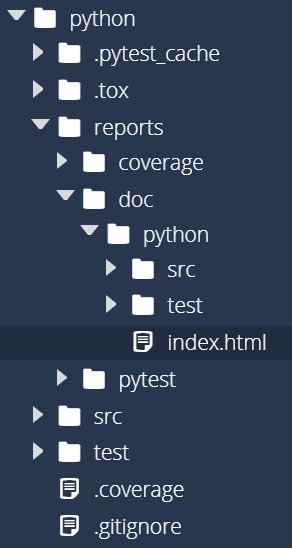
python3 -m pdoc - like always, we are running pdoc as a module using python3.--html - this tells pdoc to create HTML documentation.--force - this tells pdoc to overwrite any existing documentation if needed.--output-dir reports/doc - this tells pdoc where to place the completed documentation.. - the period at the end . represents the current directory in Linux. So, it is telling pdoc to generate documentation starting at the current directory, which should be python. This will make sure that both our src and test folders and all the code they contain are included.Once it has been executed, we should now see a new directory called doc in our reports folder:
To open the report, we can right-click on the reports/doc/python/index.html file and choose Preview Static. We should see a webpage that looks like this:
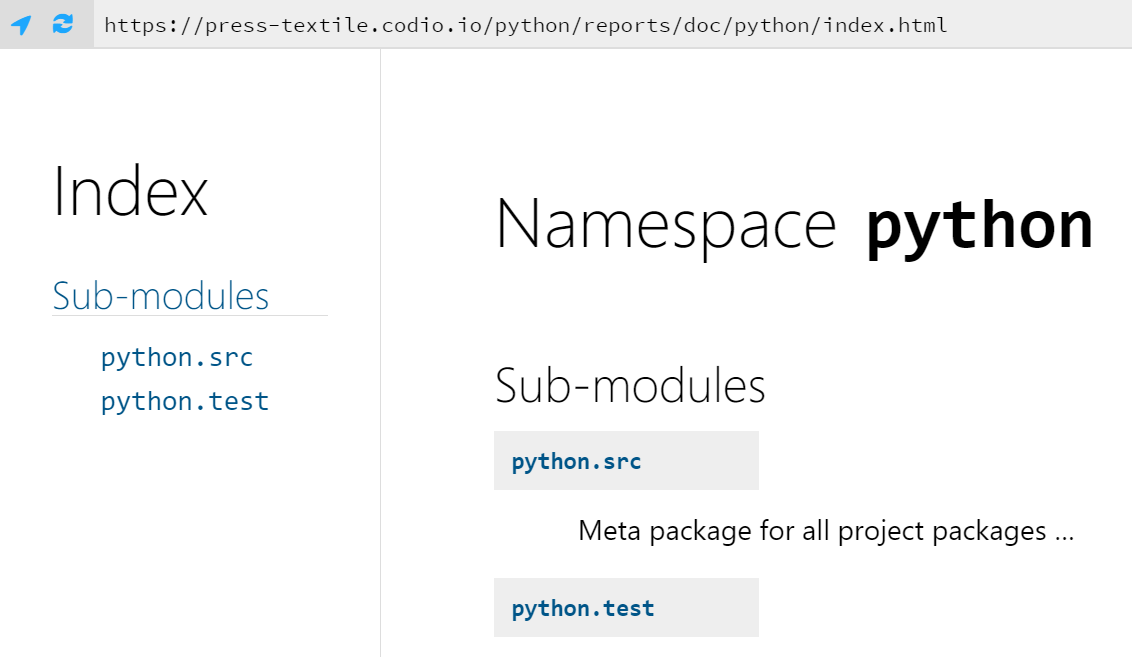
We can follow the links on that page to explore the entirety of our project. For example, if we drill down to the main method in the HelloWorld class, we can see the “Args” section and how it appears in the documentation. We can even show the original source code for the method directly from the documentation:
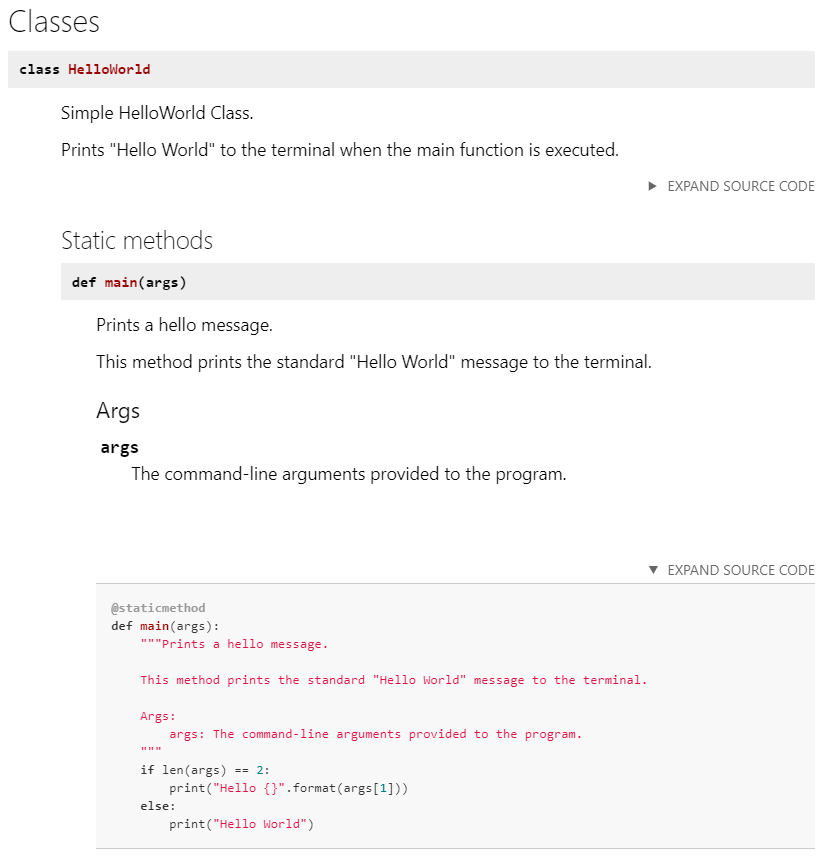
As we can see, this documentation would be very valuable to anyone who wants to explore and learn more about our code. So, we’ll need to make sure we always include helpful docstrings in our Python code!
Integrating pdoc into tox is simple! We’ll just add the command we used above to our commands list in tox.ini. Once we’ve done that, it should look like this:
commands = python3 -m coverage run --source src -m pytest --html=reports/pytest/index.html
           python3 -m coverage html -d reports/coverage
           python3 -m pdoc --html --force --output-dir reports/doc .
Then, we can execute it by using the tox command. Since we’ve installed a new library and updated our requirements file since the last time we executed tox, we’ll need to use the -r flag so it will rebuild its virtual environment:
tox -rOnce we run that command, it should successfully update our documentation.
Finally, we’re at the point that we’ve written our application, a couple of unit tests, verified that the unit tests achieve a high level of code coverage, and we’ve written helpful documentation comments in our code. That’s a lot of content we’ve written, especially in our source code files. Now let’s see how good our coding style is by checking it using a linter.
There are many different tools that can be used to check the style of source code. Python has a very thorough style guide available in PEP 8 that most developers follow. In addition, we’ve already looked at the Google Style Guide for Python. So, we’ll want to find a tool that can help us follow the style guide of our choice.
There are many different linters available for Python. One of the most commonly used tools is called Flake8. Flake8 is a very powerful linter that can be configured to perform all sorts of style checks on our code.
As expected, we can install Flake8 by simply adding it to our requirements.txt file. We’ll also add a few additional plugins for Flake8 that allow us to perform additional checks and generate a helpful HTML report. So, let’s update our requirements.txt to look like this:
coverage
flake8
flake8-docstrings
flake8-html
pdoc3
pep8-naming
pytest
pytest-html
tox
This will install several new items:
Once we’ve updated requirements.txt, we can install those libraries by opening a Linux terminal, navigating to the python folder, and running this command:
pip3 install -r requirements.txtAfter that command executes, we should see that those libraries are now installed:

Once we’ve installed Flake8, we can execute it and see what errors are contained in our code. So, to do this, we can use the following command from within the python directory:
python3 -m flake8 --docstring-convention google --format=html --htmldir=reports/flakeLet’s look at this command and see what it does:
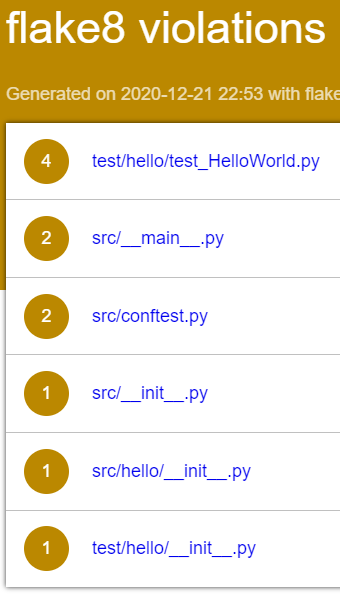
python3 -m flake8 - as always, we’ll execute Flake8 as a module using Python 3.--docstring-convention google - this will configure the flake-docstrings extension to enforce the docstring format specified in the Google Style Guide for Python.--format=html --htmldir=reports/flake - these two arguments will create an HTML report in the reports/flake directory.Once we run that command, we’ll probably get a bunch of output that looks like this:
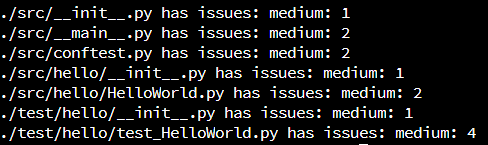
As we can see, our code has several errors in it. So, let’s look at the errors in our HelloWorld.py file and see if we can resolve them. To view the errors, we can right-click the reports/flake/index.html file and select Preview Static to view it as a webpage:
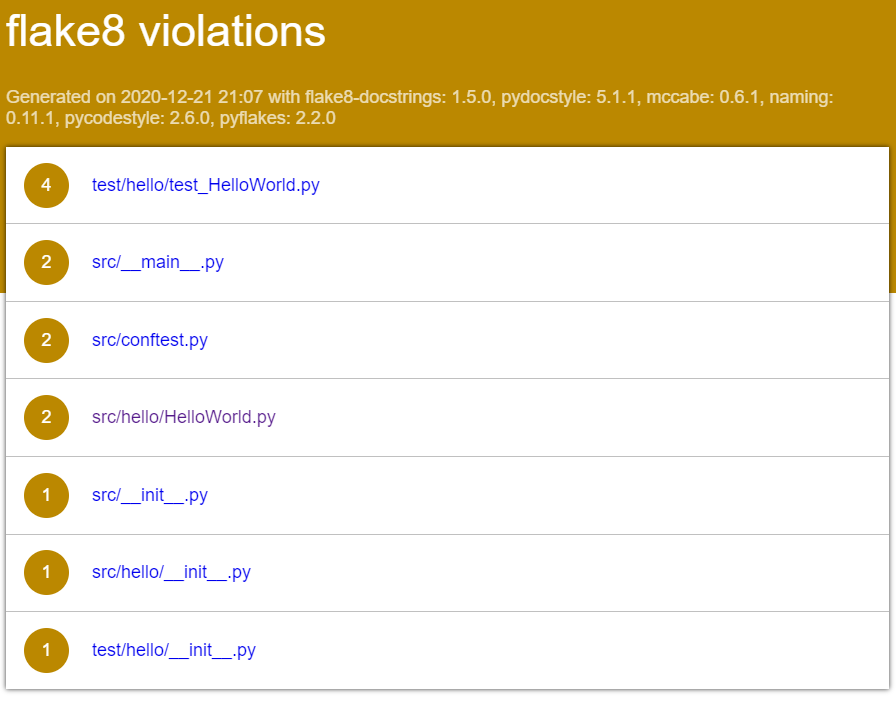
By clicking on the links on that page and expanding the code, we can clearly see the errors in our HelloWorld.py file:
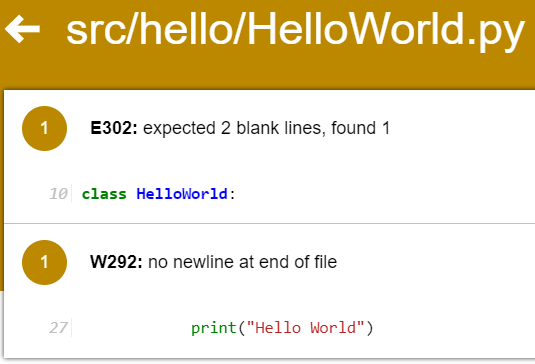
It looks like there are two errors:
If we open that file in the Codio editor, we may also see similar errors:
Thankfully, the Codio editor includes a feature that performs many of the same checks as Flake8, so we can see many of the same messages by looking for yellow or red dots to the left of the code. Of course, Codio isn’t guaranteed to find the same errors as Flake8, so we always have to use the Flake8 tool to be sure we found all the errors.
In this case, we need to resolve two things:
Once we’ve made those changes, we can rerun Flake8:
python3 -m flake8 --docstring-convention google --format=html --htmldir=reports/flakeand then check the report to see if we fixed the problems:
Yup! Since the file is no longer listed, we are good to go.
One other error that is very common with Python code is this one:
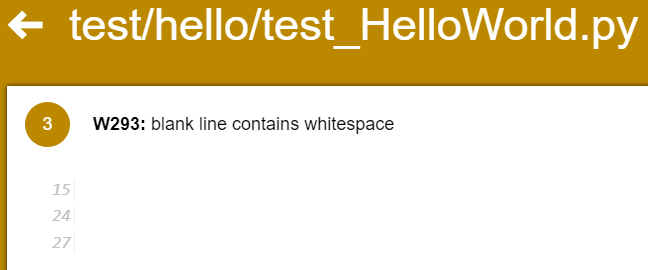
Our Python style guide requires that blank lines be completely blank, without any whitespace in them. However, the Codio editor (and many other IDEs) will try to be helpful and automatically indent a blank line for us, which causes these errors. The Codio editor even highlights them to tell us that it is wrong, but it still does it:
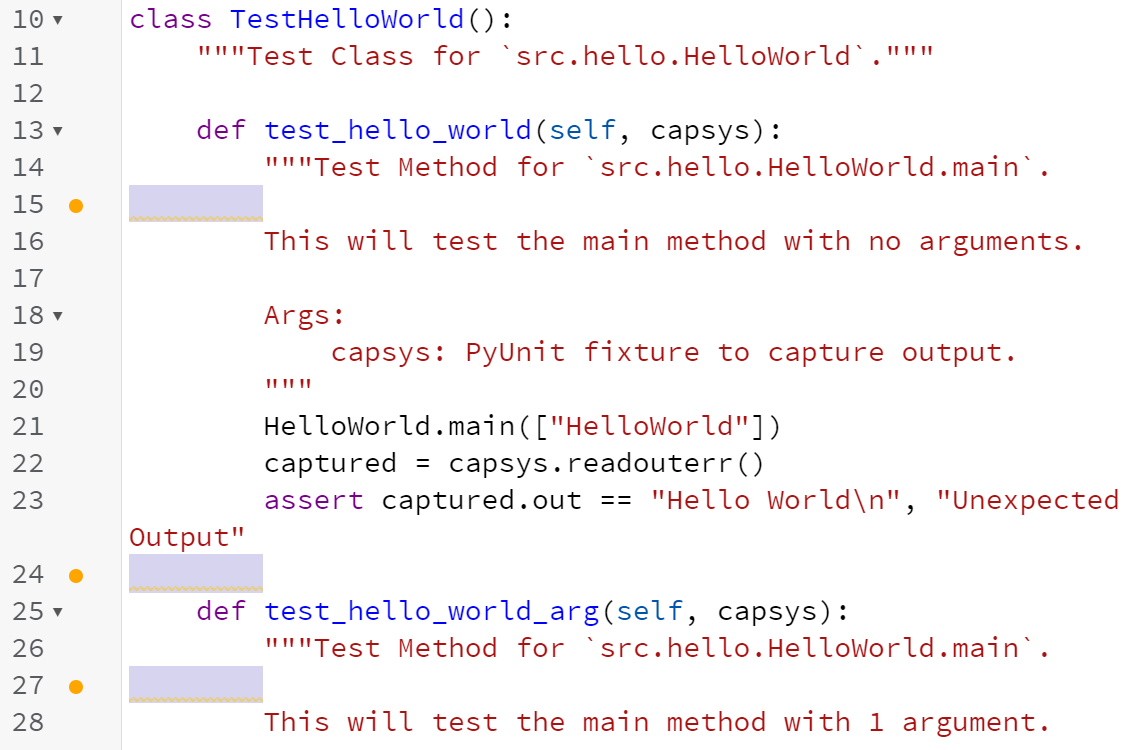
So, we’ll also have to remember to completely remove any whitespace from blank lines in our files in order to pass the Flake8 style checker. Before moving on with this example, modify the code in the various Python source files to ensure that everything is able to pass the Flake8 tool. In many professional software development roles, you aren’t even able to save your code unless it passes a style checking tool, so it is a very good habit to get into. In this course, part of your grade will depend on your code following the appropriate style!
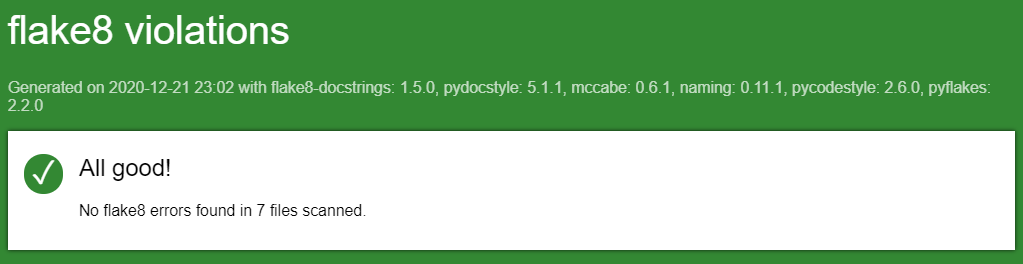
Once you’ve resolved all the errors, you should get the following message in the Flake8 report:
As we’ve already seen, integrating Flake8 with tox is as simple as adding the command to the list of commands in our tox.ini file:
commands = python3 -m coverage run --source src -m pytest --html=reports/pytest/index.html
           python3 -m coverage html -d reports/coverage
           python3 -m flake8 --docstring-convention google --format=html --htmldir=reports/flake
           python3 -m pdoc --html --force --output-dir reports/doc .
In this case, notice that we placed the Flake8 command before pdoc - we want to make sure that our code passes all style checks before generating our documentation. If the Flake8 command exits with any errors, it will stop executing the tests and prevent the documentation from being generated.
As before, we can then rerun tox using the -r flag to reset the virtual environment and install the new libraries:
tox -rThat should allow us to run our tests, check the style of our code, and regenerate our documentation quickly and easily.
This is a good point to stop and commit our code to our Git repository. So, like before, we’ll start by checking the status of our Git repository to see the files we’ve changed:
git statusIn that list, we should see everything we’ve updated listed in red. Next, we’ll add them to our index using this command:
git add .And then we can review our changes using the status command again:
git statusIf we are satisfied that everything looks correctly, we can commit our changes using this command:
git commit -m "Unit Tests and Code Coverage"And finally, we can push those changes to the remote repository on GitHub using this command:
git pushThere we go! We’ve updated our repository once again.
One of the major selling points of Python is that it is dynamically typed. This means that the data type of variables is determined at runtime, and a single variable can store multiple data types throughout the execution of the program.
While this can make development seem quick and easy, it can also cause programmers to make mistakes related to the handling of various data types that wouldn’t be present in statically typed languages such as Java, C++, or C#. Those languages require compilation before they can be executed, and one step that the compiler performs is type checking. Type checking is a process that makes sure each value that is ever assigned to a variable has the correct type - otherwise the program won’t compile properly.
Thankfully, with the addition of type hinting in Python, we can use a tool to perform type checking on our code as well. Let’s see what that would look like!
Let’s review our existing code in HelloWorld.py and see what it would look like with type hints added. The code is shown here without any docstrings just to make it easier to read:
class HelloWorld:

    @staticmethod
    def main(args):
        if len(args) == 2:
            print("Hello {}".format(args[1]))
        else:
            print("Hello World")
To add type hinting, we need to add information to each variable and function at a bare minimum. So, let’s look at the function first.
Recall that functions can return a value using the return keyword. We don’t see that in our main function, so it doesn’t return a value, right? In fact, any Python function that doesn’t explicitly return a value within the code actually returns the value None by default. So, we would say that the “return type” of the function main is None
To annotate that with a type hint, we would modify the code to look like this:
class HelloWorld:

    @staticmethod
    def main(args) -> None:
        if len(args) == 2:
            print("Hello {}".format(args[1]))
        else:
            print("Hello World")
Notice that we simply added -> None after the function name and arguments, but before the colon :. That’s all it takes!
Likewise, we should annotate each variable, including all of the function parameters. So, in our function, we are expecting a parameter named args. What type of data would be stored in args?
Recall that args is a stand in for sys.argv, which are the command line arguments provided to Python when the program is executed. sys.argv is a list of strings, so the type of args would also be a list of strings. Therefore, we can annotate it in this way:
from typing import List


class HelloWorld:

    @staticmethod
    def main(args: List[str]) -> None:
        if len(args) == 2:
            print("Hello {}".format(args[1]))
        else:
            print("Hello World")
In this case, we added two things:
typing library.args, we set the type to List[str], which represents a list of strings.There we go! We’ve added type hints to our source code. If you want to learn more about how to add type hints to your code, here are some great resources:
Unfortunately, the Codio IDE does not properly deal with type hinting in Python, and will tell us that our code contains a syntax error:

We can safely ignore that error, provided that our code passes the Flake8 style checker itself.
Now that we’ve added some type hints to our code, how can we check to make sure our code doesn’t violate those hints? To do that, we can use a static type checker called Mypy. [Mypy] is a powerful tool that allows us to quickly and easily spot typing errors in our Python code. However, it has one major caveat - it will only catch type errors for variables or functions that include type hints. It will not report all type errors in code that does not include type hints, nor will it tell us if some type hints are missing. So, it is up to us as developers to include all of the appropriate type hints ourselves!
To install Mypy, we can simply add the appropriate line to our requirements.txt file. We’ll also install the lxml library, so we can generate HTML reports from Mypy. Once we’ve added those lines, our requirements file should now look like this:
coverage
flake8
flake8-docstrings
flake8-html
lxml
mypy
pdoc3
pep8-naming
pytest
pytest-html
tox
Then, we can make sure those libraries are installed by running this command from within the python directory:
pip3 install -r requirements.txtAs always, once we’ve run that command we can verify that the library was installed by looking at the output:
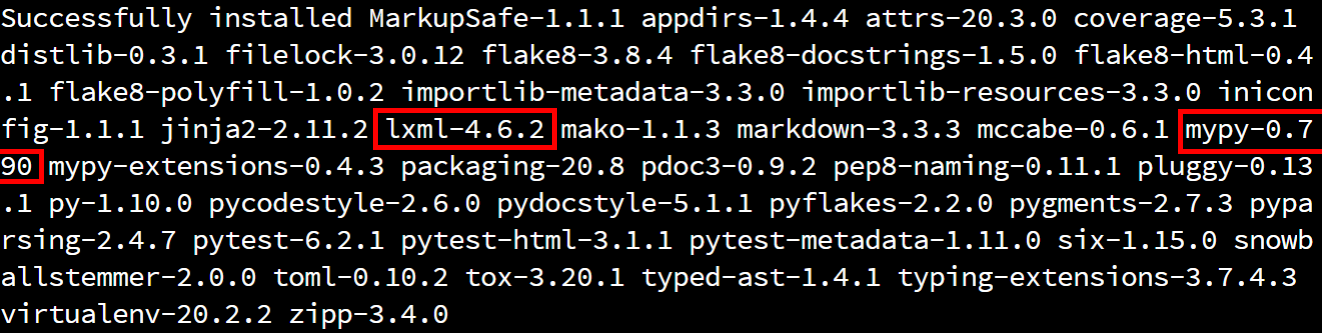
Once we’ve installed Mypy, we can execute it using the following command from within the python directory:
python3 -m mypy -p src --strict --html-report reports/mypyAs always, let’s break this command down into its separate parts:
python3 -m mypy - we want to run the Mypy library as a Python module-p src - this tells Mypy to execute the code in our src meta package, which will include all source code files inside of that directory.--strict - we want to enable all optional checks that Mypy can perform--html-report reports/mypy - this will create an HTML report in the reports/mypy directoryIf everything is working correctly, we should get the following output:

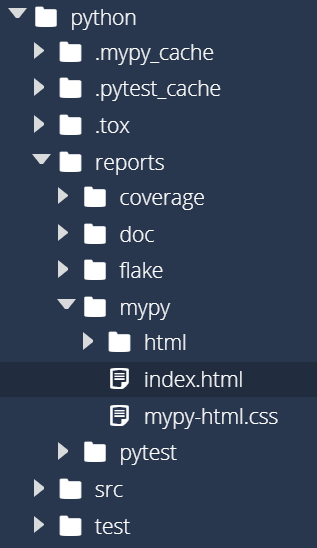
We may notice a new .mypy_cache folder, which can be safely ignored just like the .pytest_cache folder next to it. We can also find an HTML report in reports/mypy/index.html:
To open that file, simply right-click on it and select Preview Static. When we do that, we should get a report that looks like this:
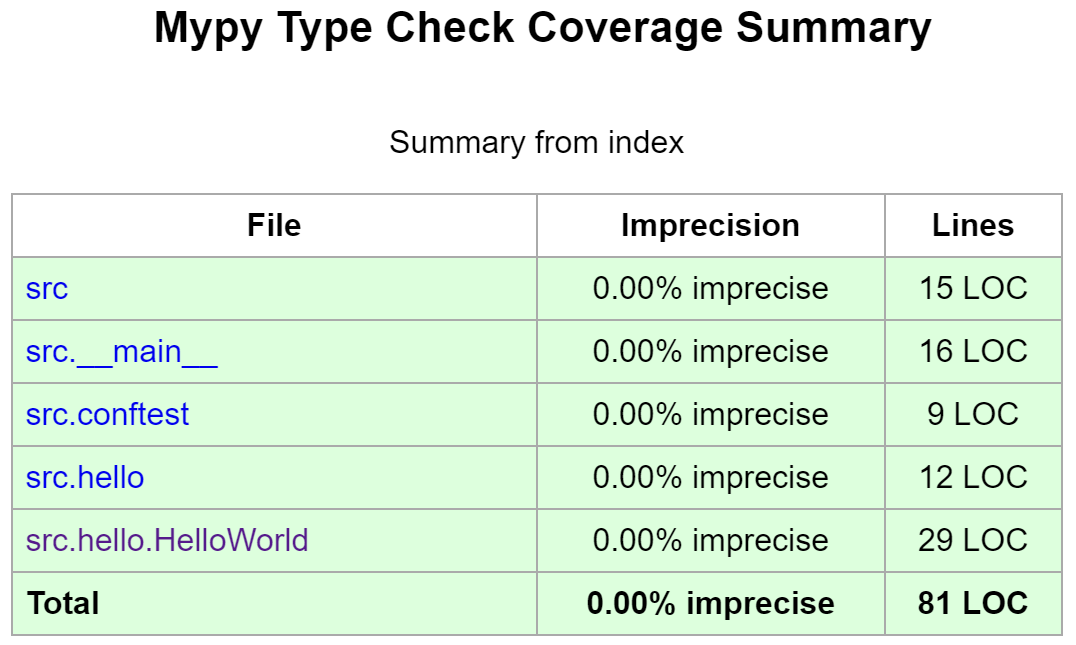
As we can see, Mypy shows that we’ve properly type hinted all of the code! That’s great!
We can also integrate Mypy with tox by simply adding the command above to the tox.ini file in the commands section, which should now look like this:
commands = python3 -m mypy -p src --strict --html-report reports/mypy
           python3 -m coverage run --source src -m pytest --html=reports/pytest/index.html
           python3 -m coverage html -d reports/coverage
           python3 -m flake8 --docstring-convention google --format=html --htmldir=reports/flake
           python3 -m pdoc --html --force --output-dir reports/doc .
Notice that the Mypy command is now first in the list of commands. This mimics what most other programming languages would do - the code must pass the type checker in the compiler before the unit tests can be executed. So, we’ll do the same with our Python code here.
Once we’ve updated tox.ini, we can rerun tox using this command:
tox -rThat should now run all of our test commands at once!
Now, let’s briefly review how to type check our unit tests. This is a much more difficult task, since our unit tests build upon several external libraries. Thankfully, the Mypy library includes a way for us to explore the types that it is able to infer.
So, in our test_HelloWorld.py file, let’s add the line reveal_locals() to the bottom of one of our test methods. We’ll also need to annotate the function’s return type so that Mypy will analyze it, so we’ll set it to None as we did above. As before, the docstrings have been omitted from this code:
from src.hello.HelloWorld import HelloWorld


class TestHelloWorld():

    def test_hello_world(self, capsys) -> None:
        HelloWorld.main(["HelloWorld"])
        captured = capsys.readouterr()
        assert captured.out == "Hello World\n", "Unexpected Output"
reveal_locals()The line reveal_locals() is a handy expression for adding type checking to our Python code. However, the Python interpreter itself won’t recognize that line as valid Python code, so we’ll have to remove it before we can actually execute our tests again. We’re just using it temporarily to help us determine the types that Mypy finds for the variables in our code
Now, let’s analyze the code in our test folder using Mypy:
python3 -m mypy --strict testNotice that we are just giving it the name of the directory test instead of loading it as a Python meta package. This is because we didn’t include an __init__.py file inside of the test directory itself. Don’t worry - Mypy is able to handle it just fine! When we run that command, we’ll see output like this:

In that output, we’ll see that the Mypy library was not able to determine the type of the capsys and captured variables. Instead, it just reports that they could be Any type, which is a special type annotation that matches any possible type. This is due to the fact that we didn’t actually have to import the pytest library to use those variables. This is a powerful feature of Python, but it makes it more difficult to perform proper type checking. It will also complain that we now have method arguments that are missing annotations, so let’s see if we can resolve that.
Unfortunately, figuring out the rest of this required lots of poking around the pytest source code, specifically in the file for capturing system output. Static type checking in Python is simply more difficult than in other languages because of the way it handles dynamic typing and library imports at runtime.
We’ll go ahead and explore what it takes to properly add type hinting to unit tests here, but you will not be required to be this thorough in your own unit tests in this course. That is simply asking too much!
So, let’s import those libraries by adding them to the top of the file. We’ll start by importing the CaptureFixture class from pytest, as well as the AnyStr type from the typing library. Then, we can annotate the capsys parameter with the appropriate type, which is CaptureFixture[Any]:
from pytest import CaptureFixture
from typing import Any
from src.hello.HelloWorld import HelloWorld


class TestHelloWorld():

    def test_hello_world(self, capsys: CaptureFixture[Any]) -> None:
        HelloWorld.main(["HelloWorld"])
        captured = capsys.readouterr()
        assert captured.out == "Hello World\n", "Unexpected Output"
        reveal_locals()
Once that is in place, we can rerun our Mypy check and should get the following output:

That’s closer! Now Mypy is finding the correct types for capsys and was able to use the information in the pytest library to infer the type of the captured variable, which is returned from the capsys.readouterr() function call. So, let’s annotate that variable as well. To do that, we’ll need to import the CaptureResult class from the _pytest.capture library. As you might guess by the underscore at the beginning of the library name, we are importing a class that is meant to be internal to pytest. This is generally considered bad practice, but it helps for type checking, so we’ll do it for now. Our updated code looks like this:
from pytest import CaptureFixture
from _pytest.capture import CaptureResult
from typing import Any
from src.hello.HelloWorld import HelloWorld


class TestHelloWorld():

    def test_hello_world(self, capsys: CaptureFixture[Any]) -> None:
        HelloWorld.main(["HelloWorld"])
        captured: CaptureResult[Any] = capsys.readouterr()
        assert captured.out == "Hello World\n", "Unexpected Output"
        reveal_locals()
Notice that we can easily add a type hint to a variable in the same way we added type hints to method parameters - we just place a colon : after the variable name and then add the type. Now, when we run the Mypy command, we should get the same output, which confirms that we have the correct type hints:

Once we’ve done that, we can remove the reveal_locals() line to make sure the tests will still execute.
Feel free to add the appropriate type hints to your unit tests if you’d like. However you are not required to include type hints in your unit tests, due to the complexity that we encountered here.
Let’s introduce one more useful tool as part of this example, the Hamcrest assertion library. Hamcrest is a library of unit test assertions that is available for multiple programming languages, including both Java and Python. Hamcrest makes it easy to write very advanced assertions in a way that is both readable and flexible. In fact, most of the autograders in prior CC courses use Hamcrest as the primary assertion library to make them easy to develop. Let’s explore what it takes to add Hamcrest to our project.
To make Hamcrest available, we simply have to add an entry for pyhamcrest to our requirements.txt file. Once we update that file, it will look like this:
coverage
flake8
flake8-docstrings
flake8-html
lxml
mypy
pdoc3
pep8-naming
pyhamcrest
pytest
pytest-html
tox
Then we can install it using this command from within the python folder:
pip3 install -r requirements.txtThat’s all there is to it! We now can use Hamcrest in our unit tests
Now, let’s build a unit test that uses Hamcrest. So, in the test/hello directory, create a new file called test_HelloWorldHamcrest.py and paste the following code in that file:
"""Test Class for HelloWorld using Hamcrest.

Author: Russell Feldhausen russfeld@ksu.edu
Version: 0.1
"""

from hamcrest.core.assert_that import assert_that
from hamcrest.core.core.is_ import is_
from pytest import CaptureFixture
from _pytest.capture import CaptureResult
from typing import Any
from src.hello.HelloWorld import HelloWorld


class TestHelloWorldHamcrest():
    """Test Class for `src.hello.HelloWorld`."""

    def test_hello_world(self, capsys: CaptureFixture[Any]) -> None:
        """Test Method for `src.hello.HelloWorld.main`.

        This will test the main method with no arguments.

        Args:
            capsys: PyUnit fixture to capture output.
        """
        HelloWorld.main(["HelloWorld"])
        captured: CaptureResult[Any] = capsys.readouterr()
        assert_that(captured.out, is_("Hello World\n"), "Unexpected Output")

    def test_hello_world_arg(self, capsys: CaptureFixture[Any]) -> None:
        """Test Method for `src.hello.HelloWorld.main`.

        This will test the main method with 1 argument.

        Args:
            capsys: PyUnit fixture to capture output.
        """
        HelloWorld.main(["HelloWorld", "CC 410"])
        captured: CaptureResult[Any] = capsys.readouterr()
        assert_that(captured.out, is_("Hello CC 410\n"), "Unexpected Output")
The code is nearly identical to the other unit test class, but with two major changes:
assert_that and is_ methods from Hamcrest.assert the last line of each unit test uses assert_that. The order of the arguments and the basic idea is pretty much the same. Also, note the use of the is_ method, which is simply stating that it should be equal. That method name includes an underscore to differentiate it from the is keyword in Python.Of course, a simple test case such as this doesn’t show the power of using Hamcrest instead of the built-in assertions in pyunit. If you want to know more about Hamcrest, feel free to check out the Hamcrest documentation. We’ll explore more about using Hamcrest in our unit tests later in this course.
Now that we’ve created a new unit test class, let’s go ahead and run it. Thankfully, we don’t have to do anything else - pyunit will automatically find the new unit test class and execute it along with all the others. So, in a Linux terminal in the python directory, run the following command to execute those tests, along with the rest of our commands:
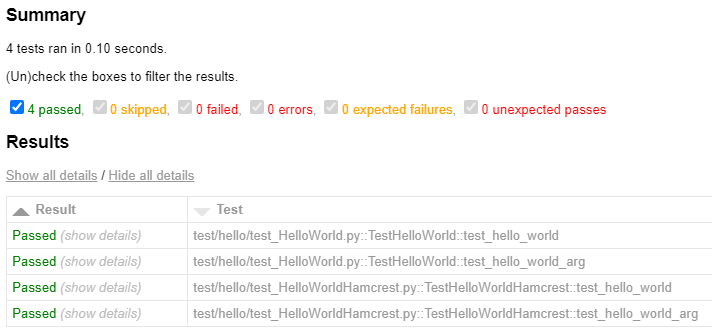
tox -rWhen the tests are complete, we can open the report and we should now see that there are 4 tests that executed successfully:
While we’re at it, since we added new code and unit tests we should also check to make sure that our code coverage is still good:
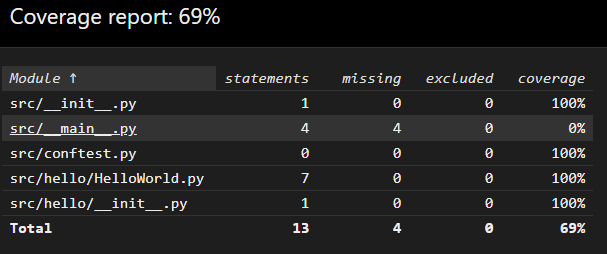
As long as the tox command executes, we also know that the code passed all of our Flake8 style checks, and updated the documentation using pdoc3 as well.

If you run into any errors on any of those commands, now is a good time to get them resolved before moving on! This is the last step before we submit our code!
Click the link below to jump to the end where we submit our code.