Subsections of Tools Guide
Initial Tools Setup
Getting the JDK
Next, you will need to download the Java Development Kit (JDK). We will use the latest long-term support release, JDK 25, but any version newer than JDK 11 is fine too.
JDK for Windows
Go here to download JDK 25 for Windows. Click the download link next to “x64 Installer”. Run the downloaded program to install the JDK on your computer.
Updating Path for Windows
Next, Windows users will need to update their computer’s Path variable so it knows about the Java compiler you installed. Go to:
C:\Program Files\Java\jdk-25Copy the full path location.
(If you have a different version of the JDK, you may find a jdk folder with a different number. If you have an earlier version of the JDK, you may need to go inside the bin folder inside the jdk folder.)
Then, press the Start Windows icon and type “environment variables”. You should see an option that says, “Edit the system environment variables.” In the popup dialog, select “Environment Variables…”
Under “System variables”, select “Path” and then click “Edit”. In the resulting dialog, click “New”.
Paste in the full address of the JDK (something like C:\Program Files\Java\jdk-25). Press OK to finish adding to the path, then OK two more times to dismiss the other two dialogs.
Un-hiding file extensions
Windows will automatically hide extensions of known file types, like .java or .txt. This can sometimes lead to mistakes where it looks like a file is saved as something like Hello.java, but it is actually saved as Hello.java.txt. I highly recommend changing your settings so you can see these file extensions.
Press the Windows Start button, type Control Panel, and hit Enter. Click “Appearance and Personalization” and then “File Explorer Options”. Click “View” in the resulting dialog. Find the option that says “Hide extensions for known file types”. Uncheck that option, and click “Apply”.
JDK for macOS
Go here to download JDK 25 for macOS. Click the download link next to “ARM64 DMG Installer”. From either the browser Downloads window or the File browser, double click the .dmg file. This will open a Finder window with the “JDK 25.pkg” icon – double-click that to start the installation.
Note: if you have an older x64 version of macOS, you will want to use that download link instead.
VS Code
We will use the VS Code text editor to develop and run our Java programs. If you don’t already have VS Code installed, you can download it here. Click the download button associated with your operating system and install the downloaded file. When you install it, I recommend selecting the “Open with code” action for both files and directories.
VS Code extensions
There are several VS Code extensions associated with Java programs – namely, the “Extension pack for Java” and “Java by Red Hat”. We will not use either of these extensions in CIS 200 in order to focus on working with the terminal and the basics of how Java programs are compiled and run. You are welcome to install whatever extensions you want on your own computer, but make sure you test your programs with javac and java from the terminal (as that is how they will be graded).
Folder structure
In order to practice good organization, we will use a particular folder structure in CIS 200:
On the first day of class, you will clone a GitHub repository that contains the following folder structure:
- cis200repo
    - tutorials
    - labs
    - projects
We will use this repository for all class work. When you start on an assigned tutorial, lab, or project, you
will navigate inside the corresondping tutorials, labs, or projects folder and create a new folder for that assignment. (Individual assignments will give more details on naming requirements.) Inside your new assignment folder, you will create the files needed for that assignment.
I recommend that you store the top-level cis200repo folder on your One Drive to be able to easily access it from multiple locations, but you are welcome to store it anywhere.
Using VS Code
VS Code is a text editor designed for programming. You can use VS Code for lightweight development in many programming lanugages.
Opening VS Code
To open VS Code, navigate in a file explorer to the folder you wish to open (most likely, it will be cis200repo). Right click the folder and select “Open with Code”.
Alternatively, you can open VS Code as you would other applications. It will automatically open to the last folder you worked with, which will likely be cis200repo. If it is not opened to the correct folder, you can choose File->Open Folder and select your folder that way.
Disabling Copilot
GitHub Copilot is an AI tool that provides code completion. As one of the purposes of CIS 200 is to learn the fundamentals of computer programming, having an AI tool suggest code before you have a chance to think about the problem can prevent you from learning the basics. In this class, you are expected to disable the Copilot tool.
In VS Code, click the down arrow next to the Copilot icon in the top menu bar (it kind of looks like a little robot head) and select “Hide AI features”:
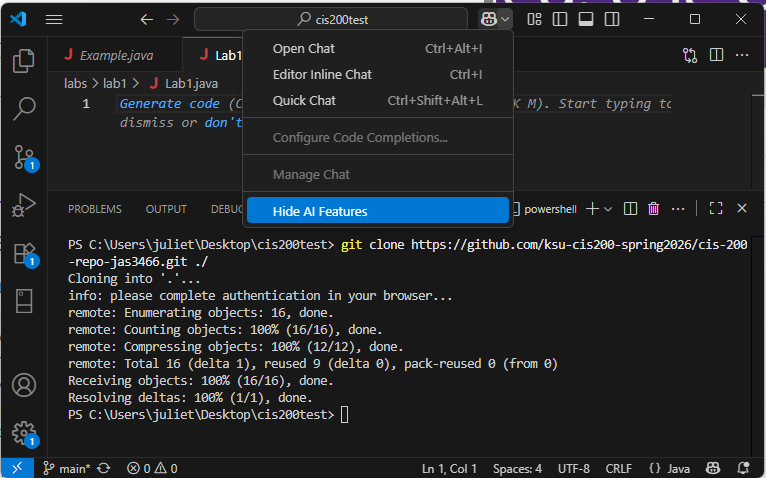
Confirm your choice in the following popup.
Parts of VS Code
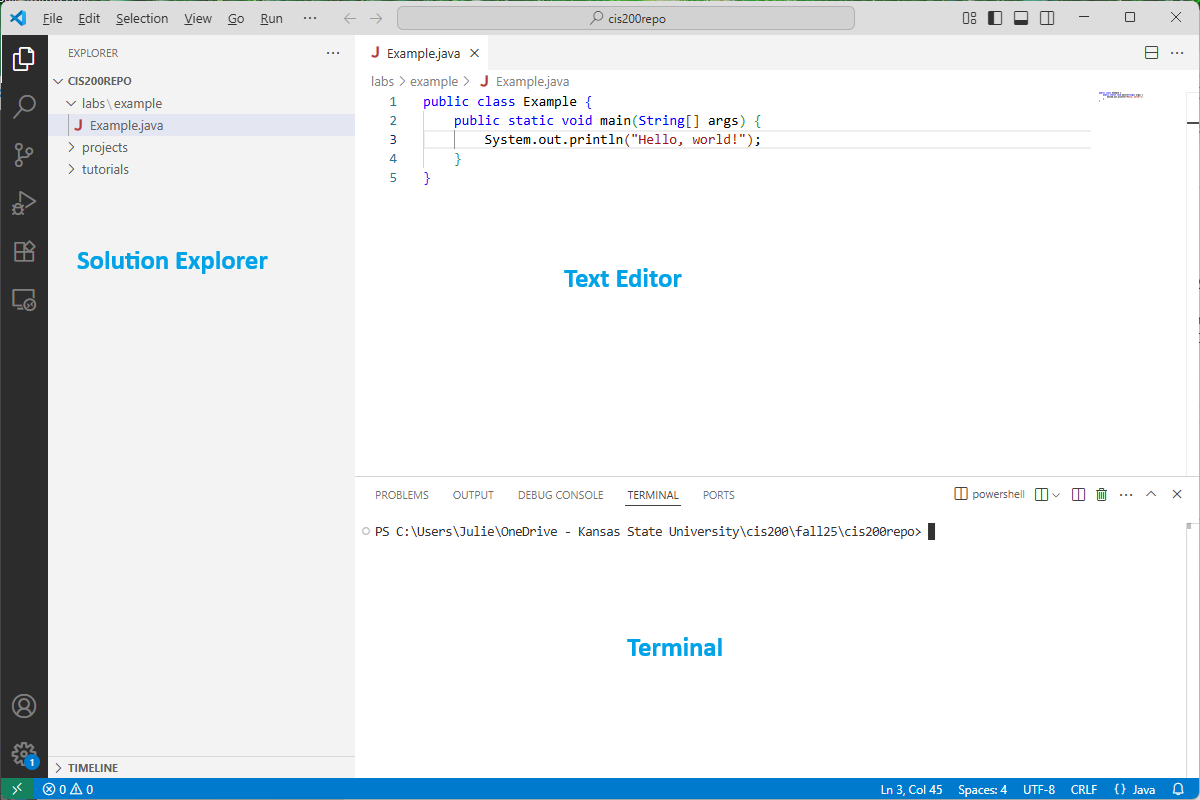
The VS Code user interface includes:
- A text editor display for a current document in the upper-right. There can be multiple document tabs open at once.
- The solution explorer on the left side, which shows all the files and subfolders within the currently open folder.
- A terminal display at the bottom, which is where we will type the instructions for compiling and running our programs. By default, the terminal opens to the same top-level folder as is opened in the solution explorer.
Here is an example:
If the solution explorer does not automatically appear, you can click the icon that looks like sheets of paper in the upper left. If the terminal doesn’t automatically appear, you can choose View->Terminal.
Creating a new subfolder
To create a new subfolder, go to the solution explorer and right-click on what you want to be the containing folder. Select “New Folder…” and enter the name of the folder. For example, I could create the tutorial1 subfolder in tutorials by entering tutorial1 as the name:
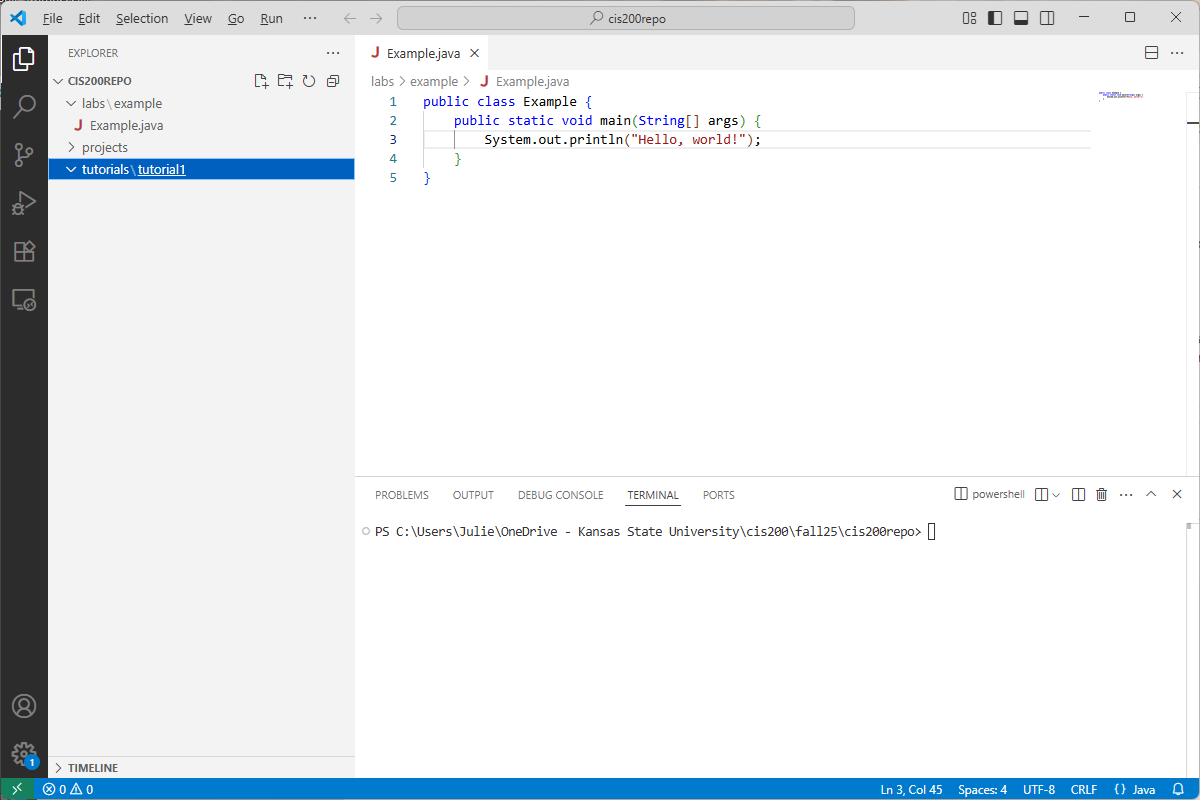
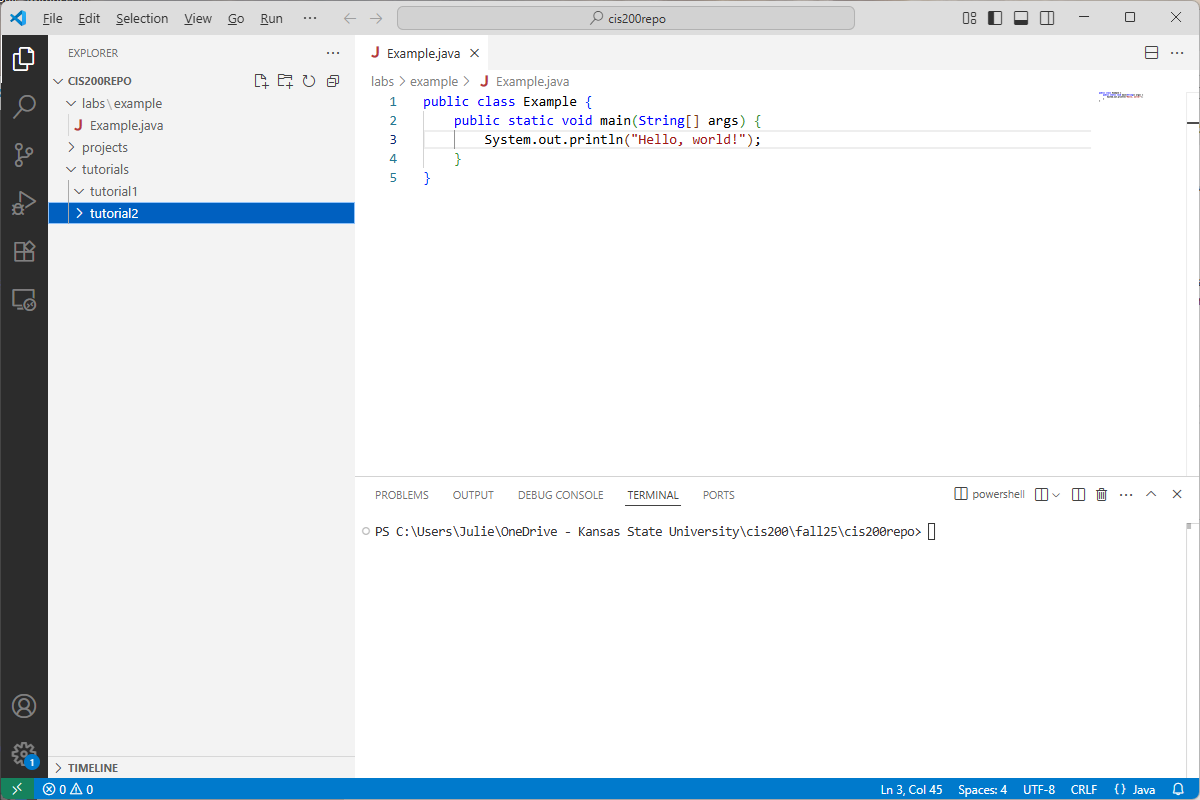
If an outer folder only contains one subfolder, then VS Code will abbreviate the display (as in tutorials\tutorial1). If I added a tutorial2 subfolder inside tutorials, it would display:

Creating a new file
To add a new file, go to the solution explorer and right-click on what you want to be the containing folder. Select “New File” and type the name of your new file (including the extension). For example, here is what I see after creating the file Tutorial1.java inside the tutorial1 folder:
Notice that the new file is opened automatically in the text editor.
Using the terminal
A side goal of this class is for students to become more comfortable with using the terminal. With practice, you will find that you are faster at navigating folders, creating files/folders, compiling/running programs, using tools stuch as git, etc. using the terminal than you are using a GUI. Familiarity with a terminal is especially useful in system administration and web development.
We will use the integrated terminal to compile and run our Java programs, as well as to add/commit/push our changes to our GitHub repository.
If the terminal isn’t already displayed at the bottom of VS Code, you can open it with View->Terminal. It will automatically open to the top-level folder in the solution explorer.
Common terminal commands
Here is a summary table of the most common terminal commands for this course:
| Command | Description |
|---|---|
| dir | Lists the current directory contents (only available in Windows) |
| ls | Lists the current directory contents (not available in Windows command prompt) |
| cd dirName | Changes the current directory in the terminal to be dirName. (Note: dirName must be a subfolder of the current directory.) |
| mkdir dirName | Makes a new, empty directory called dirName |
| ni fileName | Creates a new, empty file called fileName. We can do ni Test.java to create a new Java program called Test.java (only available in Windows) |
| touch fileName | Creates a new, empty file called fileName. We can do touch Test.java to create a new Java program called Test.java (only available in Mac/Linux/Unix) |
| cd .. | Updates the current directory in the terminal to be its parent directory. For example, if the current directory is C:\Users\Julie, then cd .. makes the current directory be C:\Users |
| del fileName | Deletes the file called fileName, which must be in the current directory (only available in Windows) |
| rm fileName | Deletes the file called fileName, which must be in the current directory (only available in Mac/Linux/Unix) |
Other terminal tips
When you are typing a directory name or file name in the terminal, you can type a few letters and hit Tab – the terminal will attempt to autocomplete the rest of the name.
To recall a command you recently typed in the terminal, you can use the up or down arrows. This saves you from typing the same commands over and over.
Opening the terminal to a subfolder
You can open a new terminal to a subfolder by right-clicking the folder in the solution explorer and selecting “Open in integrated terminal”.
Using git
GitHub account
First, you will need to create a GitHub account here. If you already have one, you can use your existing account.
git installation
You will likely already have a command-line version of git installed on your machine. To check, open a folder in VS Code, display the integrated terminal, and type:
git --versionYou should see a version number printing out. If you see that, git is already installed.
If you see an error that git is unrecognized, then you will need to install it. Go here to download and install the latest version.
Windows users may need to add the git.exe location to the system Path environment variables. Most likely, git.exe will be installed to C:\Program Files\Git\bin. Check this location, copy its address, and type “Environment variables” in the Windows search. Click “Environment Variables” and find “Path” under System variables. Click “Edit…”. Verify that C:\Program Files\Git\bin (or whatever your git location) is the last item listed. If it isn’t, add a new entry for C:\Program Files\Git\bin.
Clone class repository
On the first day of class, you will create your initial GitHub repository for CIS 200 and clone it to a “cis200repo” folder on your One Drive. You shouldn’t need to clone your class repository again after that unless you want to store it in a different location.
In the case that you DO want to re-clone your repository, go to your GitHub repository in a browser. Click the green “Code” button and then click the copy icon next to the URL name. This will copy the URL of your GitHub repository.
In a File Explorer, navigate to where you want to store your class work. Create a new folder called “cis200repo”. Right-click that new folder and select “Open with Code”.
Then open the Terminal within VS Code by selecting “Terminal->New Terminal”. The terminal should automatically display the empty cis200 folder you just created.
Clone your GitHub repository to your new, empty cis200 folder by typing in the terminal:
git clone {repository-url} ./Where {repository-url} is the URL you copied from your GitHub repository (leave off the { and } when you insert your URL). The ./ tells git to clone the repository to the current directory.
Adding, committing, pushing changes
I recommend that you add/commit/push your changes to GitHub every time you reach a stopping point in development, even if you’re not finished with the assignment. This will both ensure that you have a backup of your work as well as create a snapshot of your current progress that you can revert back to if you make other unwanted changes.
First, be sure that all your work is saved. All unsaved changes are ignored by git, and won’t be added to your remote repository (and by extension won’t be submitted as part of your assignment). Before adding/committing/pushing, be sure to save all your files (File-Save or Ctrl-S). Make sure none of the open file tabs have a solid circle next to the file name – this is an indication that they are unsaved.
Once everything is saved and you are ready to commit your changes, type the following in the integrated terminal:
git add .This will add all changes to the current commit. Then type:
git commit -m "descriptive message"to create a local commit, where “descriptive message” is replaced with a message describing your changes (you DO need to include the quotations). Finally, push your local commit to the current branch:
git pushIf you go to your GitHub repository URL, you should see the latest changes.
Compiling and Running
Open folder in terminal
First, open your folder in VS Code and ensure the integrated terminal is displayed.
Next, make sure the path listed in the terminal matches the FULL path (including all subfolders!) to the file(s) you want to compile. You can do this either with the cd command or by right-clicking the correct subfolder in the solution explorer and choosing “Open in integrated terminal”.
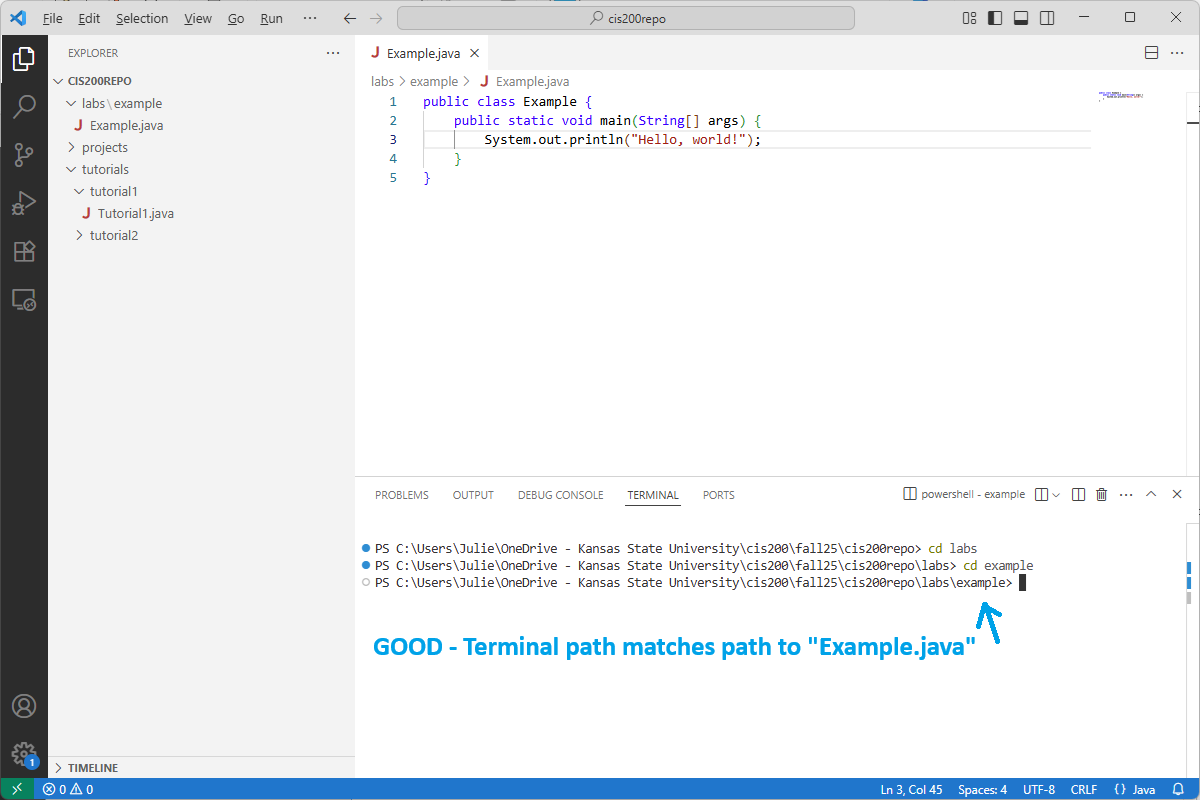
Example
Suppose I want to compile my “Example.java” program:
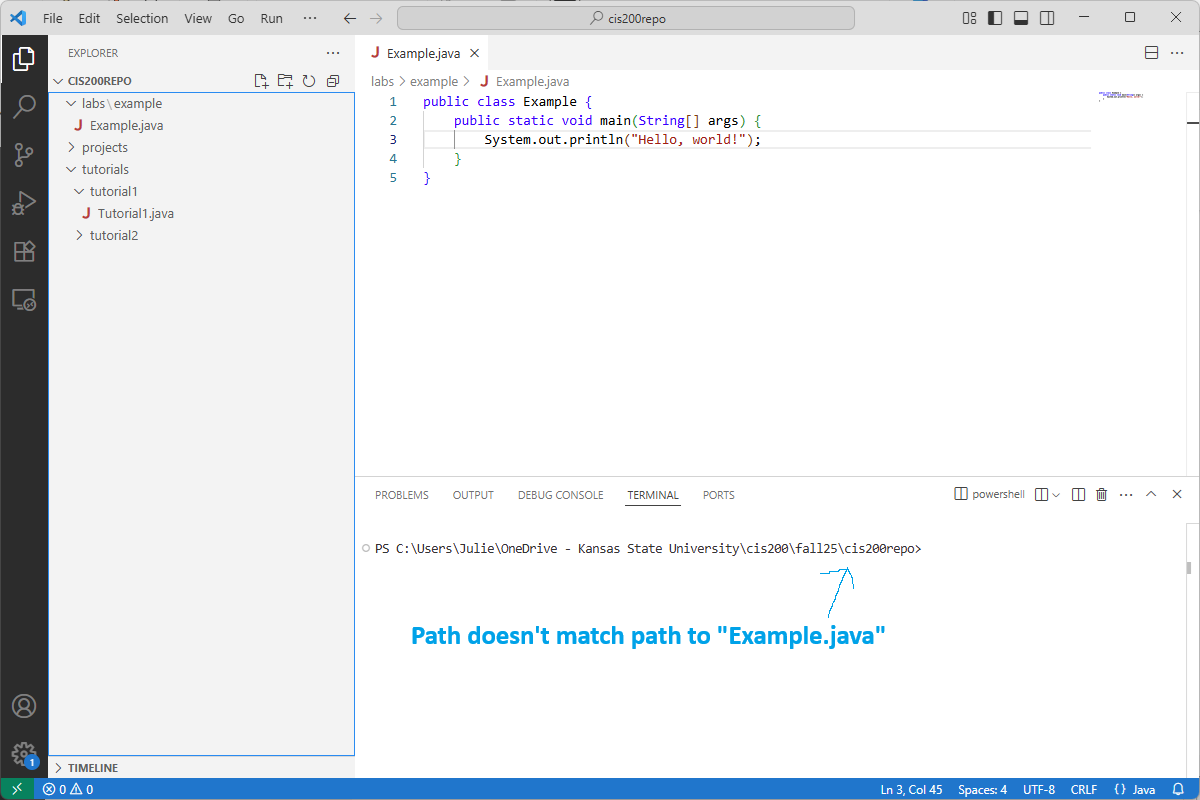
The current path listed in the terminal does NOT match the full path to “Example.java”, as it is missing the labs\example subfolders. I can use cd to change into those two subfolders like this:
Compile your program
To compile a one-file Java program, type in the integrated terminal:
javac Example.javaReplacing Example.java with the name of your Java file. If you get an error that the file is not found, double-check that:
- The path listed in the terminal matches the full path to the Java file
- You spelled the name of the file correctly, including capitalization
If your program compiled correctly, you should see the class file Example.class (or something similar to match the name of your Java file). If you made any mistakes in your program, the compiler will print error messages describing the problems.
If you want to compile a Java program that has several classes in the same folder, do this instead:
javac *.javaThis will compile ALL your classes and will generate class files for every .java file. (NOTE: this compilation command will only work if you have exactly one class that includes a main method in the current folder. We will discuss other compilation options for multiple files later in the semester.)
NOTE: terminal commands interact with the current saved version of a file, NOT with the version that appears in the text editor. If you make changes to a program and then compile it without saving, the compiler will not see any of your recent changes. Before compiling, be sure to save all your files (File-Save or Ctrl-S). Make sure none of the open file tabs have a solid circle next to the file name – this is an indication that they are unsaved.
Running your program
Suppose you just compiled your Example.java program and have the class file Example.class. To run your program, type:
java Examplein the terminal (again, after changing directories to the folder where Example.class is). If you compiled a program with several files, then use the name of the class file that contains the main method.