CIS 200 Textbook
Julie Thornton
Department of Computer Science
Kansas State University
Email: juliet@ksu.edu
This is the textbook for CIS 200, Programming Fundamentals, at Kansas State University.
Julie Thornton
Department of Computer Science
Kansas State University
Email: juliet@ksu.edu
This is the textbook for CIS 200, Programming Fundamentals, at Kansas State University.
Next, you will need to download the Java Development Kit (JDK). We will use the latest long-term support release, JDK 25, but any version newer than JDK 11 is fine too.
Go here to download JDK 25 for Windows. Click the download link next to “x64 Installer”. Run the downloaded program to install the JDK on your computer.
Next, Windows users will need to update their computer’s Path variable so it knows about the Java compiler you installed. Go to:
C:\Program Files\Java\jdk-25Copy the full path location.
(If you have a different version of the JDK, you may find a jdk folder with a different number. If you have an earlier version of the JDK, you may need to go inside the bin folder inside the jdk folder.)
Then, press the Start Windows icon and type “environment variables”. You should see an option that says, “Edit the system environment variables.” In the popup dialog, select “Environment Variables…”
Under “System variables”, select “Path” and then click “Edit”. In the resulting dialog, click “New”.
Paste in the full address of the JDK (something like C:\Program Files\Java\jdk-25). Press OK to finish adding to the path, then OK two more times to dismiss the other two dialogs.
Windows will automatically hide extensions of known file types, like .java or .txt. This can sometimes lead to mistakes where it looks like a file is saved as something like Hello.java, but it is actually saved as Hello.java.txt. I highly recommend changing your settings so you can see these file extensions.
Press the Windows Start button, type Control Panel, and hit Enter. Click “Appearance and Personalization” and then “File Explorer Options”. Click “View” in the resulting dialog. Find the option that says “Hide extensions for known file types”. Uncheck that option, and click “Apply”.
Go here to download JDK 25 for macOS. Click the download link next to “ARM64 DMG Installer”. From either the browser Downloads window or the File browser, double click the .dmg file. This will open a Finder window with the “JDK 25.pkg” icon – double-click that to start the installation.
Note: if you have an older x64 version of macOS, you will want to use that download link instead.
We will use the VS Code text editor to develop and run our Java programs. If you don’t already have VS Code installed, you can download it here. Click the download button associated with your operating system and install the downloaded file. When you install it, I recommend selecting the “Open with code” action for both files and directories.
There are several VS Code extensions associated with Java programs – namely, the “Extension pack for Java” and “Java by Red Hat”. We will not use either of these extensions in CIS 200 in order to focus on working with the terminal and the basics of how Java programs are compiled and run. You are welcome to install whatever extensions you want on your own computer, but make sure you test your programs with javac and java from the terminal (as that is how they will be graded).
In order to practice good organization, we will use a particular folder structure in CIS 200:
On the first day of class, you will clone a GitHub repository that contains the following folder structure:
- cis200repo
    - tutorials
    - labs
    - projects
We will use this repository for all class work. When you start on an assigned tutorial, lab, or project, you
will navigate inside the corresondping tutorials, labs, or projects folder and create a new folder for that assignment. (Individual assignments will give more details on naming requirements.) Inside your new assignment folder, you will create the files needed for that assignment.
I recommend that you store the top-level cis200repo folder on your One Drive to be able to easily access it from multiple locations, but you are welcome to store it anywhere.
VS Code is a text editor designed for programming. You can use VS Code for lightweight development in many programming lanugages.
To open VS Code, navigate in a file explorer to the folder you wish to open (most likely, it will be cis200repo). Right click the folder and select “Open with Code”.
Alternatively, you can open VS Code as you would other applications. It will automatically open to the last folder you worked with, which will likely be cis200repo. If it is not opened to the correct folder, you can choose File->Open Folder and select your folder that way.
GitHub Copilot is an AI tool that provides code completion. As one of the purposes of CIS 200 is to learn the fundamentals of computer programming, having an AI tool suggest code before you have a chance to think about the problem can prevent you from learning the basics. In this class, you are expected to disable the Copilot tool.
In VS Code, click the down arrow next to the Copilot icon in the top menu bar (it kind of looks like a little robot head) and select “Hide AI features”:
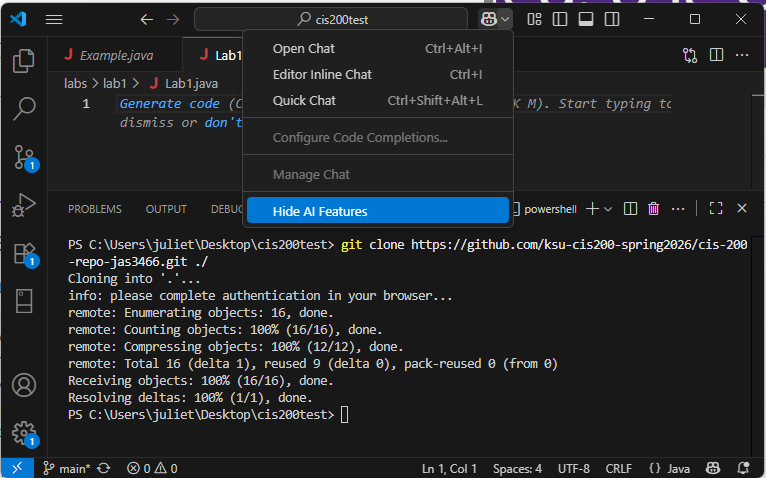
Confirm your choice in the following popup.
The VS Code user interface includes:
Here is an example:
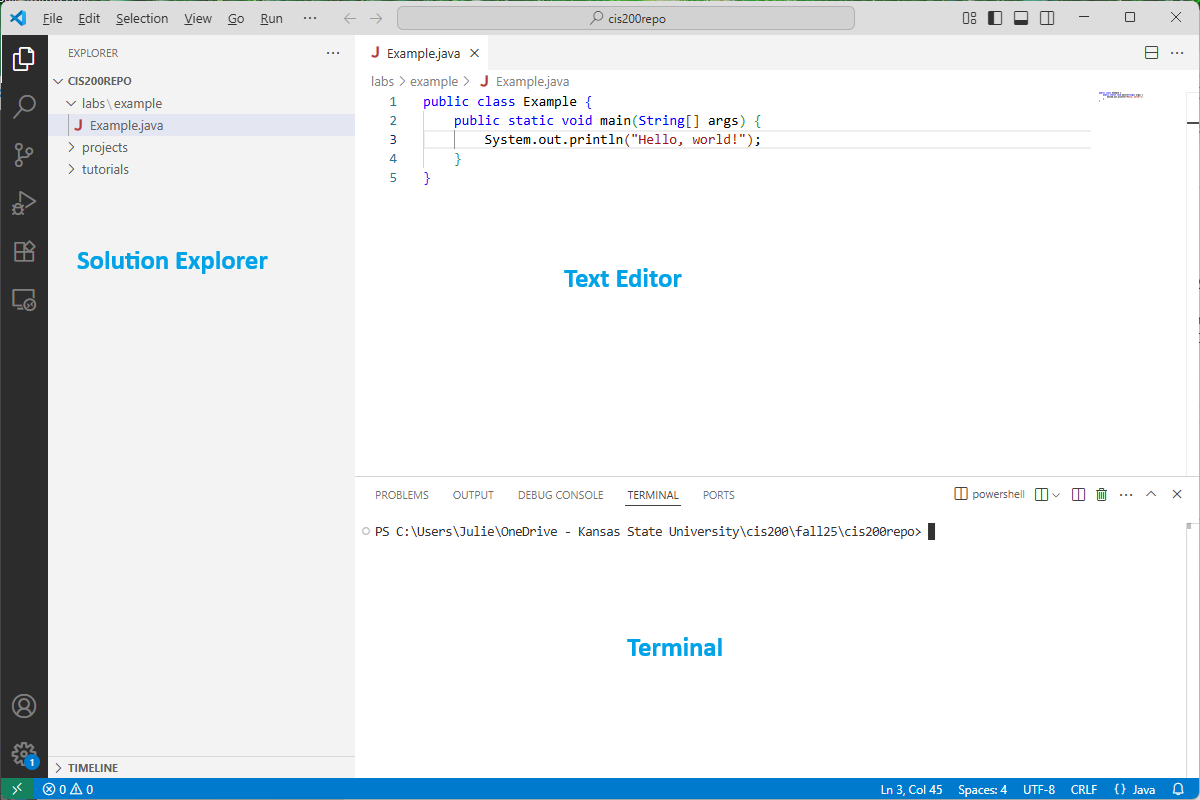
If the solution explorer does not automatically appear, you can click the icon that looks like sheets of paper in the upper left. If the terminal doesn’t automatically appear, you can choose View->Terminal.
To create a new subfolder, go to the solution explorer and right-click on what you want to be the containing folder. Select “New Folder…” and enter the name of the folder. For example, I could create the tutorial1 subfolder in tutorials by entering tutorial1 as the name:
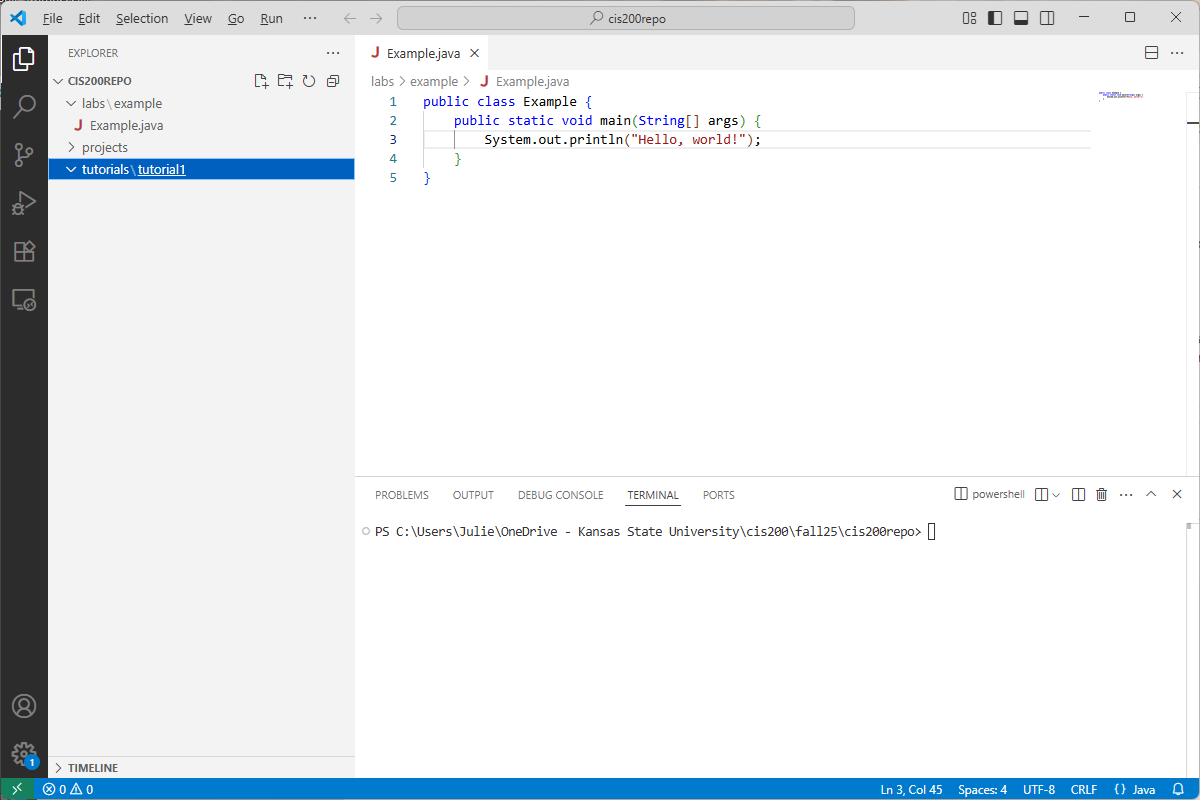
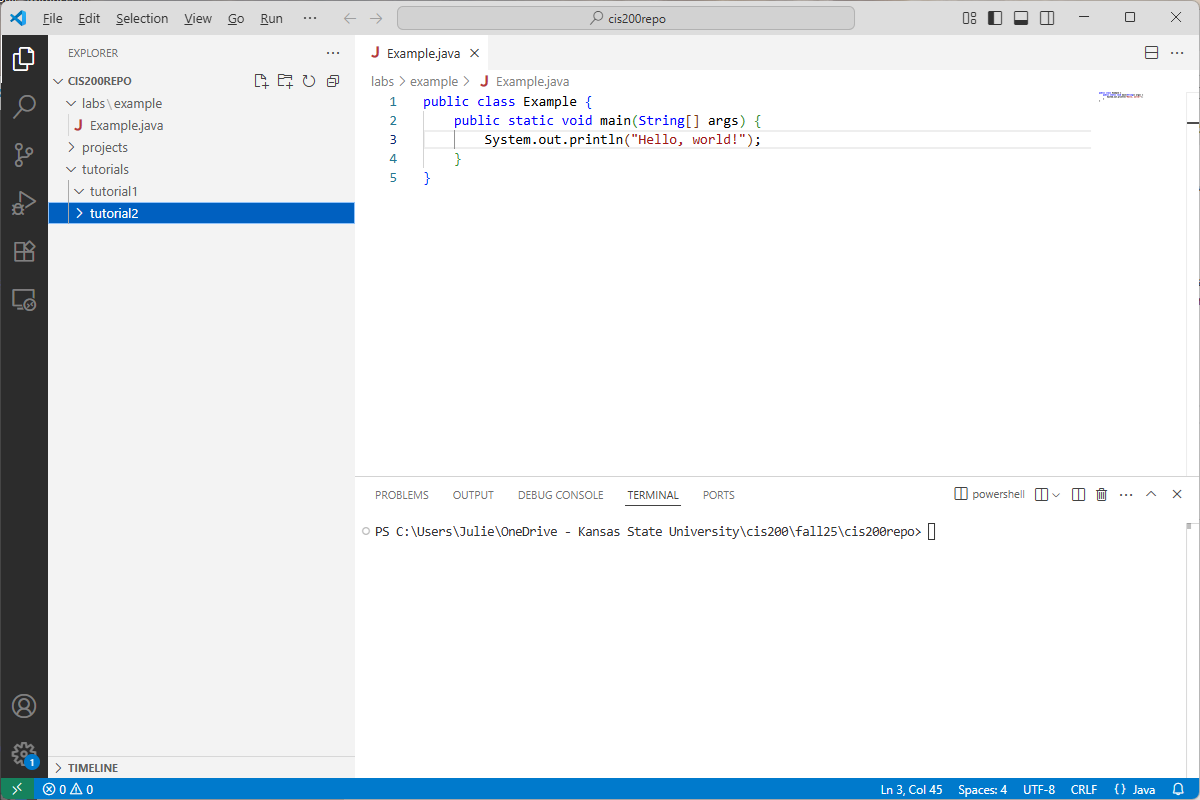
If an outer folder only contains one subfolder, then VS Code will abbreviate the display (as in tutorials\tutorial1). If I added a tutorial2 subfolder inside tutorials, it would display:

To add a new file, go to the solution explorer and right-click on what you want to be the containing folder. Select “New File” and type the name of your new file (including the extension). For example, here is what I see after creating the file Tutorial1.java inside the tutorial1 folder:
Notice that the new file is opened automatically in the text editor.
A side goal of this class is for students to become more comfortable with using the terminal. With practice, you will find that you are faster at navigating folders, creating files/folders, compiling/running programs, using tools stuch as git, etc. using the terminal than you are using a GUI. Familiarity with a terminal is especially useful in system administration and web development.
We will use the integrated terminal to compile and run our Java programs, as well as to add/commit/push our changes to our GitHub repository.
If the terminal isn’t already displayed at the bottom of VS Code, you can open it with View->Terminal. It will automatically open to the top-level folder in the solution explorer.
Here is a summary table of the most common terminal commands for this course:
| Command | Description |
|---|---|
| dir | Lists the current directory contents (only available in Windows) |
| ls | Lists the current directory contents (not available in Windows command prompt) |
| cd dirName | Changes the current directory in the terminal to be dirName. (Note: dirName must be a subfolder of the current directory.) |
| mkdir dirName | Makes a new, empty directory called dirName |
| ni fileName | Creates a new, empty file called fileName. We can do ni Test.java to create a new Java program called Test.java (only available in Windows) |
| touch fileName | Creates a new, empty file called fileName. We can do touch Test.java to create a new Java program called Test.java (only available in Mac/Linux/Unix) |
| cd .. | Updates the current directory in the terminal to be its parent directory. For example, if the current directory is C:\Users\Julie, then cd .. makes the current directory be C:\Users |
| del fileName | Deletes the file called fileName, which must be in the current directory (only available in Windows) |
| rm fileName | Deletes the file called fileName, which must be in the current directory (only available in Mac/Linux/Unix) |
When you are typing a directory name or file name in the terminal, you can type a few letters and hit Tab – the terminal will attempt to autocomplete the rest of the name.
To recall a command you recently typed in the terminal, you can use the up or down arrows. This saves you from typing the same commands over and over.
You can open a new terminal to a subfolder by right-clicking the folder in the solution explorer and selecting “Open in integrated terminal”.
First, you will need to create a GitHub account here. If you already have one, you can use your existing account.
You will likely already have a command-line version of git installed on your machine. To check, open a folder in VS Code, display the integrated terminal, and type:
git --versionYou should see a version number printing out. If you see that, git is already installed.
If you see an error that git is unrecognized, then you will need to install it. Go here to download and install the latest version.
Windows users may need to add the git.exe location to the system Path environment variables. Most likely, git.exe will be installed to C:\Program Files\Git\bin. Check this location, copy its address, and type “Environment variables” in the Windows search. Click “Environment Variables” and find “Path” under System variables. Click “Edit…”. Verify that C:\Program Files\Git\bin (or whatever your git location) is the last item listed. If it isn’t, add a new entry for C:\Program Files\Git\bin.
On the first day of class, you will create your initial GitHub repository for CIS 200 and clone it to a “cis200repo” folder on your One Drive. You shouldn’t need to clone your class repository again after that unless you want to store it in a different location.
In the case that you DO want to re-clone your repository, go to your GitHub repository in a browser. Click the green “Code” button and then click the copy icon next to the URL name. This will copy the URL of your GitHub repository.
In a File Explorer, navigate to where you want to store your class work. Create a new folder called “cis200repo”. Right-click that new folder and select “Open with Code”.
Then open the Terminal within VS Code by selecting “Terminal->New Terminal”. The terminal should automatically display the empty cis200 folder you just created.
Clone your GitHub repository to your new, empty cis200 folder by typing in the terminal:
git clone {repository-url} ./Where {repository-url} is the URL you copied from your GitHub repository (leave off the { and } when you insert your URL). The ./ tells git to clone the repository to the current directory.
I recommend that you add/commit/push your changes to GitHub every time you reach a stopping point in development, even if you’re not finished with the assignment. This will both ensure that you have a backup of your work as well as create a snapshot of your current progress that you can revert back to if you make other unwanted changes.
First, be sure that all your work is saved. All unsaved changes are ignored by git, and won’t be added to your remote repository (and by extension won’t be submitted as part of your assignment). Before adding/committing/pushing, be sure to save all your files (File-Save or Ctrl-S). Make sure none of the open file tabs have a solid circle next to the file name – this is an indication that they are unsaved.
Once everything is saved and you are ready to commit your changes, type the following in the integrated terminal:
git add .This will add all changes to the current commit. Then type:
git commit -m "descriptive message"to create a local commit, where “descriptive message” is replaced with a message describing your changes (you DO need to include the quotations). Finally, push your local commit to the current branch:
git pushIf you go to your GitHub repository URL, you should see the latest changes.
First, open your folder in VS Code and ensure the integrated terminal is displayed.
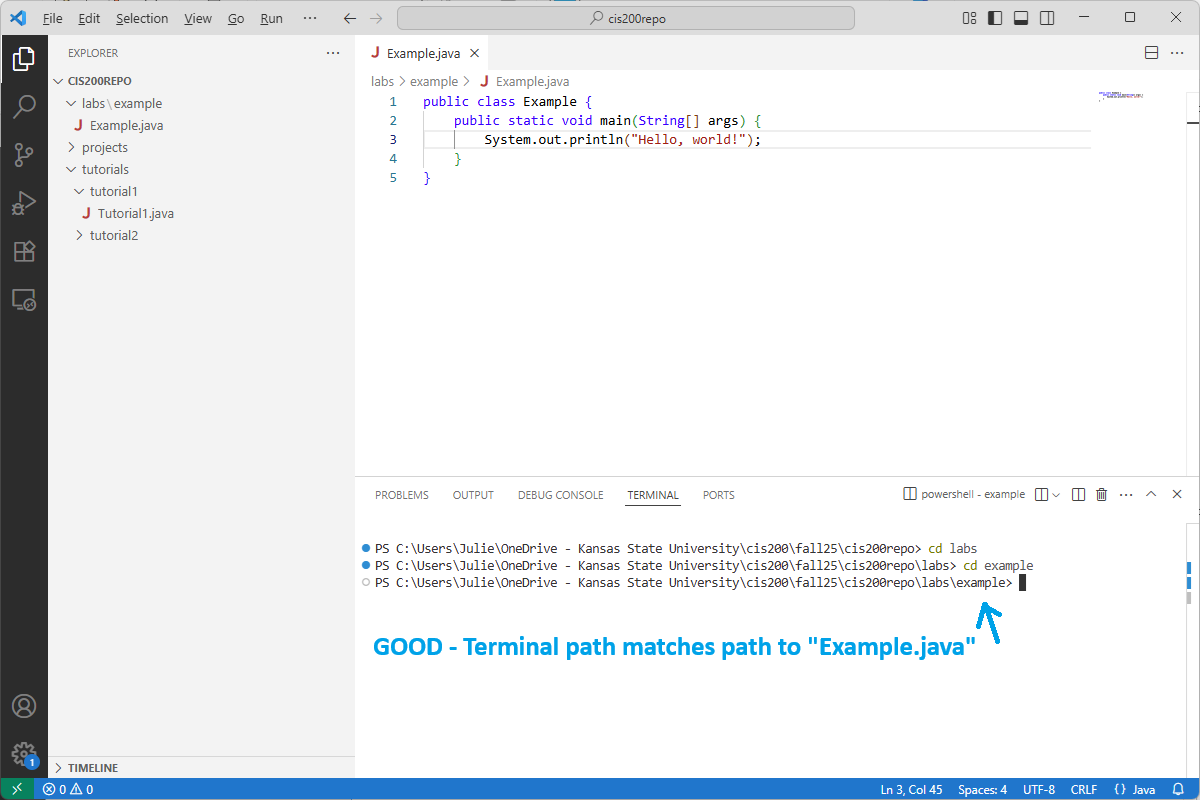
Next, make sure the path listed in the terminal matches the FULL path (including all subfolders!) to the file(s) you want to compile. You can do this either with the cd command or by right-clicking the correct subfolder in the solution explorer and choosing “Open in integrated terminal”.
Suppose I want to compile my “Example.java” program:
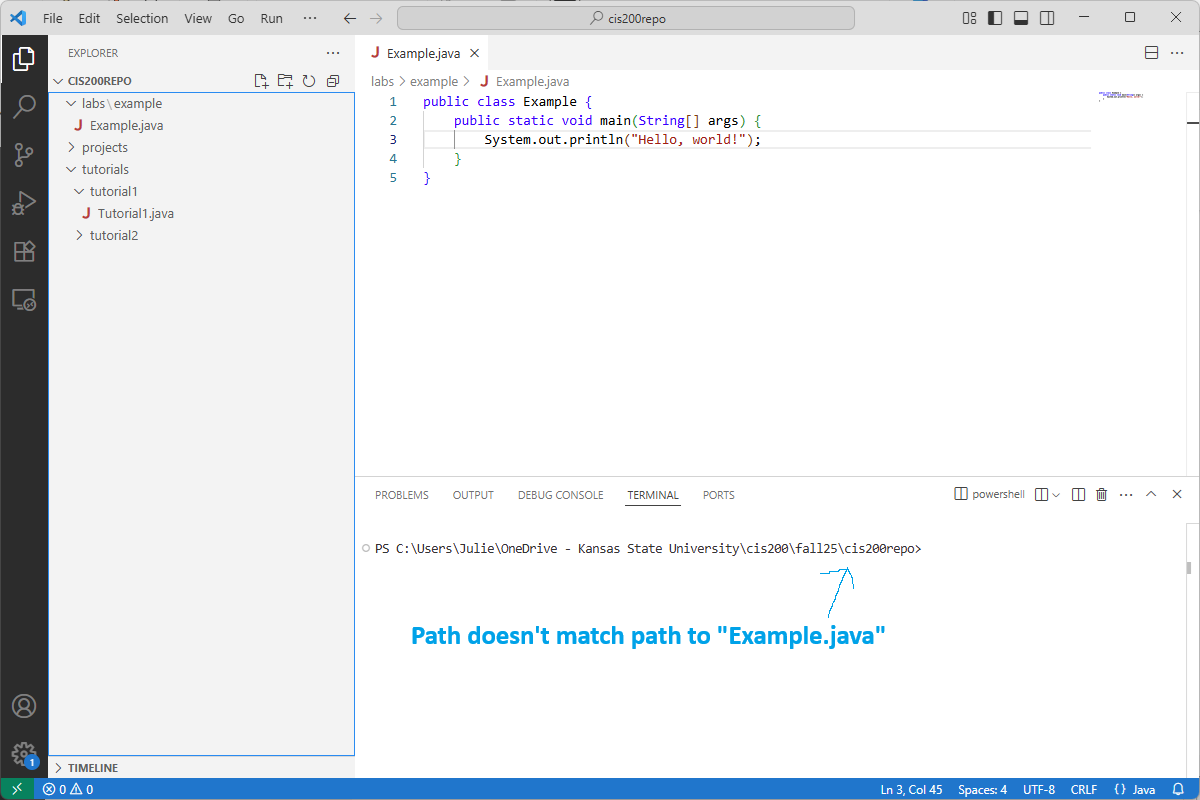
The current path listed in the terminal does NOT match the full path to “Example.java”, as it is missing the labs\example subfolders. I can use cd to change into those two subfolders like this:
To compile a one-file Java program, type in the integrated terminal:
javac Example.javaReplacing Example.java with the name of your Java file. If you get an error that the file is not found, double-check that:
If your program compiled correctly, you should see the class file Example.class (or something similar to match the name of your Java file). If you made any mistakes in your program, the compiler will print error messages describing the problems.
If you want to compile a Java program that has several classes in the same folder, do this instead:
javac *.javaThis will compile ALL your classes and will generate class files for every .java file. (NOTE: this compilation command will only work if you have exactly one class that includes a main method in the current folder. We will discuss other compilation options for multiple files later in the semester.)
NOTE: terminal commands interact with the current saved version of a file, NOT with the version that appears in the text editor. If you make changes to a program and then compile it without saving, the compiler will not see any of your recent changes. Before compiling, be sure to save all your files (File-Save or Ctrl-S). Make sure none of the open file tabs have a solid circle next to the file name – this is an indication that they are unsaved.
Suppose you just compiled your Example.java program and have the class file Example.class. To run your program, type:
java Examplein the terminal (again, after changing directories to the folder where Example.class is). If you compiled a program with several files, then use the name of the class file that contains the main method.
A computer program is a list of specific instructions that the computer can execute. We can tell the computer to print something, to add numbers, to repeat a sequence of instructions, etc. Just like there are rules to writing sentences in English, there are rules we must follow when writing computer programs. If we don’t follow the rules, the computer won’t understand what we want.
Here is a very simple Java program that prints out “Hello, World!” to the screen:
public class Hello
{
    public static void main(String[] args)
    {
        System.out.println("Hello, World!");
    }
}
This text is stored in the file Hello.java. We will learn much more about what everything
means as the course progresses, but for now let’s discuss each line separately:
public class Hello – this line begins a class in our program. For now, just remember that the name you give the class (in this case, “Hello”) must match the name of the file (in this case, “Hello.java”). Capitalization matters – we could not name the class “hello”.
{ – this bracket opens up the class
public static void main(String[] args) – this line declares the main method for our program, which is where the program begins. For now, just copy this line into all your programs.
{ – this bracket opens up the main method
System.out.println("Hello, World!"); – this line prints “Hello, World!” to the console
} – this bracket ends the main method
} – this line ends the class
Once you have written a computer program, you need to compile it. This process does two things:
To compile your program, open the terminal in VS Code (View->Terminal). In the terminal, you can compile your program like this:
javac Name.java(where Name.java is the name of your program). For example, to compile the Hello, World program you would do:
javac Hello.javaIf your program has any errors, the compiler will print a list of what is wrong and where the problem is. If there are no errors, it will create the file Name.class (where Name is the name of the program file). For example when you compile the Hello, World program it will generate
the file Hello.class.
If you get an error saying that the javac command is not recognized, please refer to the Tools guide in chapter 0.
After you have compiled your program in the VS Code terminal and generated a class file, then you are ready to run it. In the terminal, type:
java Namewhere Name.class is the name of your class file. To run the Hello, World program you would type:
java Helloto run the program.
For this class, we will write our programs in the VS Code text editor and compile and run from its terminal. Working with the terminal in particular will be a useful skill in other computer science courses and in the workplace.
However, if you are interested in trying out a more interactive development environment that has additional features such as a debugger, I recommend either IntelliJ or Eclipse.
A comment is text in your program that is not actually part of the program itself.
It is often useful to add comments to explain what different parts of your program are doing. This can be useful to remind you how certain sections work, and can be helpful explanation to any teammates or coworkers who may not have written the code themselves.
Later, we will learn how to write organized comments called documentation that explain both the structure and purpose of different parts of code.
A one-line comment begins with a //. For example:
//This is a one-line commentHere, all the text on the line beginning with // is ignored by the compiler.
A multi-line comment begins with a /* and ends with a */. For example:
/*This comment spans
 multiple lines */
Here, all text after the /* and before the matching */ is ignored by the compiler, even though this might span a number of lines.
We will talk more about the structure of computer programs later on, but for now all your programs should have the following format:
public class Name
{
    public static void main(String[] args)
    {
        //statements, such as printing
    }
}
Again, this program should be stored in the file Name.java. The brackets in programs do not have to be arranged like the example above – there are many different styles that people use.
For example, this is the bracketing style that I prefer:
public class Name {
    public static void main(String[] args) {
        //statements, such as printing
    }
}
Additionally, your program does not have to be spaced like the example above. The following program is also valid Java code:
public class Name
{public static void main(String[] args){
//statements, such as printing
}}
However, this program is much more difficult to read. It is a good idea to always indent (with a tab) every time you open a bracket. When you type the matching closing bracket, do not tab over that line.
In your programs, you can declare variables that help you store information. These storage devices are called variables because you can vary the information stored there.
Java is a strongly typed and statically typed programming language. This means that whenever we declare a variable we must give it a data type, and this type cannot change over the course of the program. The data type specifies what kind of information you plan to store in the variable.
Below is a table of common types in Java and their uses:
| Type | Use |
|---|---|
| int | whole numbers, such as 4 and -23 |
| char | single characters, such as ‘a’ |
| double | numbers with decimals, such as 3.14 |
| boolean | boolean values: either true or false |
| String | a sequence of characters, such as “Hello” |
There are other types in Java, but these are the ones we will use most in CIS 200.
You can declare a variable like this:
type name;Here, type is one of the types in the table above, and name is the name we’re giving the variable. We must follow these rules when we name a variable:
Here are some examples of variable declarations:
int num;
double val1;
char _letter;
String Name;
boolean check_done;
Variables in Java are case-sensitive. This means that if you change the capitalization in a variable name, then it does NOT refer to the same variable. For example, we can do this:
int num;
int Num;
and num and Num will be two different variables. (Note: this practice is not recommended because it causes confusion.)
After we have declared a variable, we can assign it a value. We CANNOT use a variable in any way before it has been declared. A variable assignment looks like this:
name = value;Here, name is the name of the variable that you declared, and value is the value you’re giving
it. The value you assign a variable must have the same type as the variable. (For example, if the
variable is an int, then you can’t store a number like 2.34 in it.)
Here are some examples of valid assignments using the variables declared above:
num = 42;
val1 = 3.21;
_letter = 'A';
Name = "Fred";
check_done = true;
Notice that single characters (chars) must be encolosed in single quotes, while strings must be enclosed in double quotes. We can also declare a variable and assign it a value at the same time. For example, we can do:
double pi = 3.14159;We cannot give a value to a variable if it does not have the appropriate type. For example, we cannot do:
//This is illegal!
int num = 2.3;
However, sometimes we want to convert a value to have the appropriate type. We can do this by putting the type we want in parentheses in front of the value. For example:
int num = (int) 2.3;This statement converts 2.3 into an int, so that num now has the value 2. We can do a similar thing to convert the types of variables:
double x = 6.75;
int y = (int) x;
Now y has the value 6. This conversion of one type to another is called type casting.
A literal is a constant value of a particular type, written the way it would appear in a program.
Here are some examples of literals of different types:
| Type | Sample Literals |
|---|---|
| int | 34, -17, 0 |
| double | 3.42, 12.0, -14.7 |
| char | ‘A’, ‘a’, ‘2’, ‘!’ |
| boolean | true, false |
| String | “apple”, “14”, “a” |
Notice that character literals must be enclosed in single quotes, and string literals must be enclosed in double quotes.
Now that we can declare variables and assign them values, we want to be able to perform calculations with them.
These operations deal with numerical data (ints and doubles). Here are the mathematical operators that you can use:
+: addition
-: subtraction
*: multiplication
/: division
%: modulus (returns the remainder of dividing one whole number by another)
Here are some examples:
//gives num the value 6
int num = 2*3;

//gives x the value 3.3
double x = 6.6/2.0

//this is integer division, so we drop the decimal portion
//gives result the value 2
int result = 7/3;

//7/3 is 2 remainder 1
//gives mod the value 1
int mod = 7%3;
We can also use multiple mathematical operators at once, and we can involve variables in the expressions.
Here are some more examples:
int x = 3;
double y = 4.4;
int z = 10;

//gives result1 the value 29
int result1 = x*z – z%x;

//gives result1 the value 26
result1 = (int)(z/y + 73/x);
Notice that these examples are NOT the same as equations in algebra. In an equation, the expression on the left-hand side equals the expression on the right-hand side. In these examples, we are assigning a variable (the left-hand side) to have the VALUE from the expression on the right-hand side.
We can also do something like this:
int num = 1;
num = num + 1;
This updates the value of num to be one bigger than the old value of num. Now num has the
value 2.
We CANNNOT do things like this:
//Illegal!
num + 1 = num;

//Illegal!
5 = num;
The left-hand side must be a single variable, and we are updating that variable’s value to be the result of the right-hand side.
An expression is a computation of variables and constant values (literals) using mathematical or other operators. When we evaluate an expression, we get a value as a result. For example, variable assignments might look like:
variable = expression;For example:
int x = 7*(3-2)+1;Here, 7*(3-2)+1 is an expression. We evaluate it first, and then the result is stored in the x
variable.
There are several simple operations that you will find yourself doing over and over, such as adding one to a variable or multiplying a variable by a single value.
For example:
int num = 6;

//gives num the value 8
num += 2;
This statement adds 2 to num, so that num now has the value 8. It is equivalent to the statement:
num = num + 2;We can also do something similar with -=, *=, /=, and %=. Here are some examples:
int x = 1;

//gives num the value 7
num -= x;

//gives num the value 35
num *= 5;

//gives num the value 11
num /= 3;

//gives num the value 1
num %= 2;
There are other shortcuts we can use if we want to add one to a variable or subtract one from a variable:
int val = 4;

//adds one to val, now val is 5
val++;

//subtracts one from val, now val is 4
val--;
The statement val++ is equivalent to:
val += 1;It is also equivalent to:
val = val + 1;A similar comparison is true for the statement val--.
There is another group of operators we can apply to boolean variables (variables that can be either true or false). Here is a list of these conditional operators:
| Operator | What it does |
|---|---|
| == | checks whether two values are equal |
| != | checks whether two values are not equal |
| < | checks if the first value is less than the second value |
| > | checks if the first value is greater than the second value |
| <= | checks if the first value is less than or equal to the second value |
| >= | checks if the first value is greater than or equal to the second value |
| && | checks if both variables or expressions are true |
| ! | switches a variable or expression from false to true, or from true to false |
Here are some examples:
boolean a = true;
boolean b = false;
int x = 4;
int y = 3;
int z = 3;

//result is set to false (x does not equal y)
boolean result = (x == y);

//result is set to false (y does equal z)
result = (y != z);

//result is set to false (x is not less than z)
result = (x < z);

//result is set to false (z is less than x, but a does not equal b)

result = (z < x) && (a == b);
//result is set to true (z is less than x – it doesn't matter whether a equals b)

result = (z < x) || (a == b);

//result is set to true (!b is true, and a is true)
result = !b && a;We have already seen how to print text, but this section will review printing and go into more detail about what you can do.
There are two commands for printing text:
System.out.println("Hello");
System.out.print("Hello");
The first command prints “Hello” to the screen, and then moves down to the next line. This way, if you print something else it will appear on the line below. The second command prints “Hello”, but stays on the same line. If we printed something else, it would appear on the same line as “Hello”.
Of course, we can substitute any string we like for “Hello”. The string we want to print must be in "" quotes, but the quotes do not actually get printed.
In addition to printing strings enclosed in “”, we can also print the values of variables. To do
this, we just put the variable name inside the System.out.println or System.out.print parentheses. When that line is executed, the VALUE of the variables
gets printed to the screen.
Here are some examples:
int num = 4;
char c = ‘A';
double val = 7;
boolean flag = true;
String s = "Cat";

//prints 4
System.out.print(num);

//prints A on the same line as 4
System.out.println(c);We can output text that has both variable values and regular strings with a single
System.out.println statement. This can be accomplished by using the concatenation (+)
operator.
Here’s an example:
String name = "Fred";
int age = 20;
System.out.println(name + " is " + age + " years old");
This prints out: “Fred is 20 years old”. Notice that if you want to print the value of a
variable, just list the variable (not in quotes). If you want to print normal text, put the text in
quotes. To combine variables and text, separate them by a +. This plus concatenates the
variables and text by pushing them together to form one big string.
As an alternative to the concatenation approach, we can also use the System.out.printf command to print a combination of text and variable values. This command also allows us to format our output by adding spacing or rounding doubles to some number of decimal places.
Printing variables works a bit differently with the System.out.printf command. In this approach, weneed to use a format specifier to specify the kind of variable that’s going to be printed.
Here are the different format specifiers:
| Type | Format Specifier |
|---|---|
| int | %d |
| double | %f |
| char | %c |
| boolean | %b |
| String | %s |
| newline character | %n |
It’s easiest to see an example to figure out how formatted printing works. Here’s how to print the value of an integer to the terminal:
int num = 4;
System.out.printf("The value of num is %d%n", num);
Notice that where we want to print a variable, we put the format specifier (%d for int). After we’ve listed the entire text we want to print, we put the corresponding variable names in a comma-separated list.
The above example will print:
"The value of num is 4" to the terminal. It will also end with a newline character, so that the next thing we printed would appear on the line below.
We can also print several variables at once:
char letter = 'A';
int val = 27;
System.out.printf("The letter is %c and the number is %d%n", letter, val);
This prints:
"The letter is A and the number is 27"to the screen. Notice that the %c corresponds to the letter variable, and the %d corresponds to the val variable.
The System.out.printf command also allows you some control over formatting your output. For example, if you want a value to take up exactly 6 spaces (padded with space characters on the left, if necessary), put a 6 between the % and the format specifier.
For example:
int num = 4;
System.out.printf("The value of num is %6d%n", num);
This will print:
"The value of num is 4" to the terminal (note the padding on the left of the 4).
You can also only display a certain number of digits for doubles. For example, put a .2 in between the % and the format specifier character to only display two decimal places.
For example:
double val = 3.14159;
System.out.printf("Pi is %.2f%n", val);
This will display:
"Pi is 3.14" You can specify both the width of the output (for example, six spaces) and the number of decimals to display by doing something like this:
double val = 3.14159;
System.out.printf("Pi is %6.2f%n", val);We can get user input by printing a prompt to the command-line, and then having the user type the information right after the prompt.
Here’s how to get user input:
import java.util.*;Scanner to help you read in the input. For now, just add this line ONCE,
before any user input. (Don’t do this again even if you want more input.)Scanner s = new Scanner(System.in);System.out.print so it will be on the same line as the input):System.out.print("Enter name: ");s.nextLine(). This command returns the
String that was typed by the user.String name = s.nextLine();Here’s the full program:
import java.util.*;
public class ConsoleInput {
    public static void main(String[] args) {
        Scanner s = new Scanner(System.in);
        System.out.print("Enter name: ");
        String name = s.nextLine();
        //now the name variable holds the name typed by the user
    }
}We don’t always want to read in strings from the user. We may also want to read in numbers. To do that, we need a way to convert from a string to a type like an int or double. We cannot convert from strings to ints or doubles by using type casting. We will discuss this more later on, but strings are object variables while other types of variables have primitive types. For now, just remember that strings are treated differently.
There are special parsing methods available to turn a string into a double or int. Here’s how to use them:
String str1 = "345";
String str2 = "3.76";
String str3 = "A";

//converts from a string to an int

int num1 = Integer.parseInt(str1);

//converts from a string to a double
double num2 = Double.parseDouble(str2);
Now that we know how to convert strings to different types, we can read in things like numbers and characters. Here is an example:
Scanner s = new Scanner(System.in);
System.out.print("Enter your age: ");
String str = s.nextLine();
int age = Integer.parseInt(str);
At the end of this example, the age variable holds the number typed by the user.
We can also read in the value typed by the user and convert it to the appropriate type all in one line:
Scanner s = new Scaner(System.in);
System.out.print("Enter your age: ");
int age = Integer.parseInt(s.nextLine());We can also use the nextInt() and nextDouble() commands for reading in ints and doubles from the user without doing a separate parsing step.
Here is an example reading in an int from the user:
Scanner s = new Scaner(System.in);
System.out.print("Enter your age: ");
int age = s.nextInt();
And here is an example reading in a double from the user:
Scanner s = new Scaner(System.in);
System.out.print("Enter your GPA: ");
double gpa = s.nextDouble();
NOTE: When you get a number from the user using either nextInt() or nextDouble() and then get a string from the user with nextLine(), the program’s behavior can be unexpected.
When you type a user input number like “4”, you really type the 4 and then hit Enter to submit the input. The “4” gets processed by the nextInt() command, but the newline character that came from hitting Enter stays in the input buffer. When you next do the nextLine() command, the program reads what was left in the input buffer (the newline character)…WITHOUT waiting for you to type any input.
You can avoid this behavior by always using the nextLine() command together with parsing to get your user input, as this will not leave anything in the input buffer.
We have now seen how to perform operations on variables, and how to get user input. Let’s practice with two complete example programs.
Suppose we want to ask the user for the length and width of a rectangle, and then print out the area of the rectangle.
Here are the steps we will need:
Scanner since we will need user input.width variable.length variable.area to be the width times the length (which is how the area of a rectangle is computed)Here is the complete program:
import java.util.*;
public class Rectangle
{
    public static void main(String[] args)
    {
        Scanner s = new Scanner(System.in);
        int length;
        int width;
        int area;
        System.out.print("Enter the width: ");
        width = s.nextInt();
        System.out.print("Enter the length: ");
        length = s.nextInt();
        area = length*width;
        System.out.printf("The area is: %d%n", area);
    }
}Next, suppose we want to ask the user for a temperature in Celsius, and then print out the result in Fahrenheit. Here are the steps we will need:
f)
and the temperature in Celsius (c).Scanner since we will need user input.c variable.f to be 9/5*c + 32 (that is the formula for converting from Celsius to Fahrenheit)f) to the screenHere is the complete program:
import java.util.*;
public class Temperature
{
    public static void main(String[] args)
    {
        Scanner s = new Scanner(System.in);
        double f;
        double c;
        System.out.print("Temperature in Celsius: ");
        c = s.nextDouble();
        f = (9.0/5.0)*c + 32;
        System.out.printf("In Fahrenheit: %f%n", f);
    }
}
Note that we changed the conversion formula to be 9.0/5.0*c + 32 instead of 9/5*c + 32. Can
you think why that would be?
(Remember integer division – if we divide two whole numbers, the decimal portion of the result
is cut off. Since 9 and 5 are both whole numbers, 9/5 is just 1, the whole number portion.
However, 9.0 and 5.0 have decimals, so 9.0/5.0 is 1.8, as we want.)
As we write more complicated programs, we don’t always want them to do the same thing in all cases. We might want them to do one thing in one situation, and another thing in a different one. For example, a computer game does one thing while the game is in progress, but behaves differently when the game is over.
In this chapter, we will look at several kinds of conditional statements that will allow us to different things in different situations.
An if statement allows us to do something only if some condition is true.
Here is the syntax for an if statement:
if (condition)
{
    //statements
}
Here, condition is either a boolean variable or an expression that evaluates to true or false.
The statements inside the if-statement are things that we ONLY want to happen if our
condition is true. Finally, the brackets {} around the body are optional if there is only one
statement inside.
For example, suppose we want to get the user’s name and age as input. In any case, we want to then print out a greeting. We also want to print “You are an adult” if the user is 18 or older.
Here is the full program:
import java.util.*;
public class HelloAdult
{
    public static void main(String[] args)
    {
        Scanner s = new Scanner(System.in);
        System.out.print("Enter your name: ");
        String name = s.nextLine();

        System.out.print("Enter your age: ");
        int age = s.nextInt();

        System.out.printf("Hello, %s%n", name);
        if (age >= 18)
        {
            System.out.println("You are an adult");
        }
    }
}
When the program runs, it will ask the user for their name and age and read those values into the
name and age variables. It will then print Hello and the person’s name. Finally, if the person is
18 or older, the program will print “You are an adult”. If the user is under 18, the program will
not print the “You are an adult” line.
An if…else statement allows us to do one thing if a condition is true, and a different thing if the condition is not true.
Here is the syntax of an if…else statement:
if (condition)
{
    // first set of statements
}
else
{
    //second set of statements
}
Here, we will check condition – if it is true, we will execute the first set of statements. If condition is false, we will execute the second set of statements.
In any case, exactly one set of statements is executed.
For example, suppose we want to print out whether a number is even or odd. We can tell if a
number is even by checking to see if it is divisible by two (i.e, we can use the modulo operator, %, to see if the remainder of a number when dividing by two is 0).
Scanner s = new Scanner(System.in);
System.out.print("Enter a number: ");
int num = s.nextInt();

//If the remainder of num/2 is 0, then num is even
if (num % 2 == 0)
{
    System.out.printf("%d is even%n", num);
}
else
{
    System.out.printf("%d is odd%n", num);
}
(Note: this is not a complete program. We would need to put this code inside a class declaration
and inside the main method.) When this code is executed, it will first ask the user for a number,
and store the result in the num variable. It will then compute num%2 (the remainder of num/2).
If it is 0, then it will print that the number is even. If it is anything else, it will print that the
number is odd. Each time, exactly one of the statements will be printed.
An if…else if statement allows us to do differently things for several cases.
Here is the syntax for an if…else if statement:
if (condition1)
{
    //first set of statements
}
else if (condition2)
{
    //second set of statements
}
...
else
{
    //last set of statements
}
In this structure, we first evaluate condition1. If it is true, then we execute the first set of
statements and leave the if…else if statement. If condition1 is false, then we step down and
evaluate condition2. If it is true, then we execute the second set of statements and move on
in the program. If it is false, we move down to evaluate the next condition. This process
continues until we run out of conditions to check. If none of the conditions were true, then the
statements inside the else are executed.
We can have as many “else if” conditions as we want in this structure (which is denoted by the …). Furthermore, the “else” portion is optional – we don’t have to have a special section that executes if none of the conditions were true.
For example, suppose we want to print out an age category for the user:
Scanner s = new Scanner(System.in);
System.out.print("Enter your age: ");
int age = s.nextInt();

if (age <= 12)
{
    System.out.println("You are a child");
}
else if (age < 19)
{
    System.out.println("You are a teenager");
}
else
{
    System.out.println("You are an adult");
}
In this example, exactly one of the statements will be printed, depending on the user’s age.
As another example, suppose you want to ask the user for 5 tests grades (out of 100) so that you can calculate their overall letter grade (90% and up is an A, 80-90% is a B, etc.) Here is a fragment of the program:
Scanner s = new Scanner(System.in);
System.out.print("Enter a test score: ");
int grade1 = s.nextInt();
System.out.print("Enter a test score: ");
int grade2 = s.nextInt();
System.out.print("Enter a test score: ");
int grade3 = s.nextInt();
System.out.print("Enter a test score: ");
int grade4 = s.nextInt();
System.out.print("Enter a test score: ");
int grade5 = s.nextInt();
double avg = (grade1+grade2+grade3+grade4+grade5)/5.0;

if (avg >= 90.0)
{
    System.out.println("Letter grade: A");
}
else if (avg >= 80.0)
{
    System.out.println("Letter grade: B");
}
else if (avg >= 70.0)
{
    System.out.println("Letter grade: C");
}
else if (avg >= 60.0)
{
    System.out.println("Letter grade: D");
}
else
{
    System.out.println("Letter grade: F");
}Conditional statements are very useful in handling error conditions in programs. You can check to see if the user’s input is what you expected before performing any calculations. For example, in the grade calculator we just wrote, we expect the test scores to be between 0 and 100. As an error condition, we could add this check after getting all the user input:
if (grade1<0 || grade1>100 || grade2<0 || grade2>100 || grade3<0 ||
    grade3>100 || grade4<0 || grade4>100 || grade5<0 || grade5>100)
{
    System.out.println("Invalid input");
}
else
{
    //put the average calculation and the code to print the letter grade here
}
Now, a letter grade will only be printed if all test scores had appropriate values.
There is a second type of conditional statement in Java called a switch statement. These statements can be used as a shortcut over if statements when checking the value of variables or expressions.
Here is the syntax of a switch statement:
switch (expression)
{
    case val1:
        //first set of statements
        break;
    case val2:
        //second set of statements
        break;
    ...
    default:
        //last set of statements
}
Here, expression is either an expression or variable that has type char, int, or String (in more recent versions of Java).
Inside the statement, val1, val2, etc. are possible values for expression. If
expression equals val1, then we execute the statements inside the val1 case. If
expression equals val2, then we execute the statements inside the val2 case. We
can have as many cases as we want (as denoted by the …).
The default case is executed if expression does not evaluate to any of the case values. This default case is optional.
The “break” statements at the end of each case mean that we will leave the switch statement at
the end of a case. They are also optional, but if we leave them out then we will continue on to
the statements in the next case (WITHOUT checking the case value). We will see an example of
this in the next sections.
Here is an example that gets a month number (1-12) from the user and prints the corresponding month name:
Scanner s = new Scanner();
System.out.print("Enter month number (1-12): ");
int monthNum = s.nextInt();

String monthName;

switch(monthNum)
{
    case 1:
        monthName = "January";
        break;
    case 2:
        monthName = "February";
        break;
    case 3:
        monthName = "March";
        break;
    case 4:
        monthName = "April";
        break;
    case 5:
        monthName = "May";
        break;
    case 6:
        monthName = "June";
        break;
    case 7:
        monthName = "July";
        break;
    case 8:
        monthName = "August";
        break;
    case 9:
        monthName = "September";
        break;
    case 10:
        monthName = "October";
        break;
    case 11:
        monthName = "November";
        break;
    case 12:
        monthName = "December";
        break;
    default:
        monthName = "Invalid month";
        break;
}

System.out.println(monthName);
For example, if we ran our code fragment and entered 4 at the prompt, then the program would print “April”. If we ran it again and entered 13, then the program
would print “Invalid month”.
We can always rewrite a switch statement using an if…else if statement that has an else if branch corresponding to each case in the switch. Here is our month name example repeated with an if…else if statement:
Scanner s = new Scanner();
System.out.print("Enter month number (1-12): ");
int monthNum = s.nextInt();

String monthName;

if (monthNum == 1)
{
    monthName = "January";
}
else if (monthNum == 2)
{
    monthName = "February";
}
else if (monthNum == 3)
{
    monthName = "March";
}
else if (monthNum == 4)
{
    monthName = "April";
}
else if (monthNum == 5)
{
    monthName = "May";
}
else if (monthNum == 6)
{
    monthName = "June";
}
else if (monthNum == 7)
{
    monthName = "July";
}
else if (monthNum == 8)
{
    monthName = "August";
}
else if (monthNum == 9)
{
    monthName = "September";
}
else if (monthNum == 10)
{
    monthName = "October";
}
else if (monthNum == 11)
{
    monthName = "November";
}
else if (monthNum == 12)
{
    monthName = "December";
}
else
{
    monthName = "Invalid month";
}

System.out.println(monthName);
However, the structure of an if…else if statement can require more code that a switch statement (the expression we are evaluating must be retyped in each condition, and we often need to include brackets around each case), so switch statements are a convenient shortcut.
Here is an example that uses a switch statement to print out comments about a given letter grade:
Scanner s = new Scanner(System.in);
System.out.print("Enter your letter grade: ");

//this technique converts the string to a char
//by getting the first character from the input string
char grade = (s.nextLine()).charAt(0);

switch (grade)
{
    case 'A':
        System.out.println("Excellent");
        break;
    case 'B':
        System.out.println("Good");
        break;
    case 'C':
        System.out.println("Average");
        break;
    case 'D':
        System.out.println("Poor");
        break;
    case 'F':
        System.out.println("Failure");
        break;
    default:
        System.out.println("Invalid grade");
        break;
}
Depending on what grade the user entered, exactly one of the case statements will be printed.
To see what happens when we leave some break statements out, suppose we want to repeat the letter grade example, but just print out whether the user passed (A, B, or C) or failed (D or F). Here’s what we would do:
switch (grade)
{
    case 'A':
    case 'B':
    case 'C':
        System.out.println("Pass");
        break;
    case 'D':
    case 'F':
        System.out.println("Fail");
        break;
    default:
        System.out.println("Invalid grade");
        break;
}
If the user enters A, for example, then we will first go to case A in the switch statement.
Since there is no break statement, we will go directly to case B (even though the grade entered
doesn’t match that case). There is not a break statement in B either, so we will go to case C.
There we will print “Pass” (which we should for an A grade) and break out of the switch
statement.
In more recent versions of Java, we can also use a switch statement to evaluate a String variable or expression. Here is an example that gets a month name from the user and prints out the corresponding month number:
Scanner s = new Scanner(System.in);
System.out.print("Enter a month name: ");

String monthName = s.nextLine();
int monthNum;

switch (monthName)
{
    case "January":
        monthNum = 1;
        break;
    case "February":
        monthNum = 2;
        break;
    case "March":
        monthNum = 3;
        break;
    case "April":
        monthNum = 4;
        break;
    case "May":
        monthNum = 5;
        break;
    case "June":
        monthNum = 6;
        break;
    case "July":
        monthNum = 7;
        break;
    case "August":
        monthNum = 8;
        break;
    case "September":
        monthNum = 9;
        break;
    case "October":
        monthNum = 10;
        break;
    case "November":
        monthNum = 11;
        break;
    case "December":
        monthNum = 12;
        break;
    default:
        monthNum = -1;
        break;
}

if (monthNum != -1)
{
    System.out.printf("Month number: %d%n", monthNum);
}
else
{
    //monthNum will be -1 if we went in our "default" switch case above
    System.out.println("Invalid month name");
}
The above example will only work correctly if the user types the month name using the format in our cases (capital first letter, lowercase subsequent letters). A trick to repeating this example WITHOUT checking for a specific format is to first convert the input month to lowercase, and then to change our cases to be in lowercase format:
Scanner s = new Scanner(System.in);
System.out.print("Enter a month name: ");

String monthName = s.nextLine();
int monthNum;

switch (monthName.toLowerCase())
{
    case "january":
        monthNum = 1;
        break;
    case "february":
        monthNum = 2;
        break;
    case "march":
        monthNum = 3;
        break;
    case "april":
        monthNum = 4;
        break;
    case "may":
        monthNum = 5;
        break;
    case "june":
        monthNum = 6;
        break;
    case "july":
        monthNum = 7;
        break;
    case "august":
        monthNum = 8;
        break;
    case "september":
        monthNum = 9;
        break;
    case "october":
        monthNum = 10;
        break;
    case "november":
        monthNum = 11;
        break;
    case "december":
        monthNum = 12;
        break;
    default:
        monthNum = -1;
        break;
}

if (monthNum != -1)
{
    System.out.printf("Month number: %d%n", monthNum);
}
else
{
    //monthNum will be -1 if we went in our "default" switch case above
    System.out.println("Invalid month name");
}
Now, whether the user enters “September”, “september”, or “SePTembER”, the program will always print 9 as the month number.
This section includes three examples of full programs using conditional statements.
There are many different formulas for estimating a person’s maximum heart rate using their age and biological sex. Here is one such estimation:
For men: 220 – age
For women: 206 – 88% of age
(Every such formula is only an estimation, and may or may not be accurate for a particular person.) Below is a complete program that asks for a user’s age and sex, and then prints their maximum heart rate according to the estimation above.
import java.util.*;
public class Example1
{
    public static void main(String[] args)
    {
        Scanner s = new Scanner(System.in);
        System.out.print("Enter your age: ");

        int age = s.nextInt();
        System.out.print("Enter (m)ale or (f)emale: ");
        char mOrF = (s.nextLine()).charAt(0);

        if (mOrF == 'm' || mOrF == 'M')
        {
            int max = 220-age;
            System.out.printf("Max HR: %d%n", max);
        }
        else if (mOrF == 'f' || mOrF == 'F')
        {
            double maxF = 206 – 0.88*age;
            System.out.printf("Max HR: %.2f%n" + maxF);
        }
        else
        {
            System.out.println("Invalid input");
        }
    }
}In this example, we will get two numbers as input from the user, and we will print out whichever number is smaller. In the case of a tie, it doesn’t matter which number we print.
import java.util.*;
public class Example2
{
    public static void main(String[] args)
    {
        Scanner s = new Scanner(System.in);
        System.out.print("Enter the first number: ");
        int num1 = s.nextInt();

        System.out.print("Enter the second number: ");
        int num2 = s.nextInt();

        if (num1 < num2)
        {
            System.out.println(num1);
        }
        else
        {
            System.out.println(num2);
        }
    }
}In this example, we will ask the user for a temperature and the system being used (Fahrenheit or Celsius). We will then print the equivalent temperature in the other system (i.e., if we start with Fahrenheit then we will convert to Celsius, and vice versa). Here are the formulas that are used to convert between the two (C is Celsius and F is Fahrenheit):
C = (5/9)*(F-32)
F = (9/5)*C+32
Here is our full program:
import java.util.*;
public class Example3
{
    public static void main(String[] args)
    {
        Scanner s = new Scanner(System.in);
        System.out.print("Enter the temperature: ");

        double temp = s.nextDouble();
        System.out.print("Enter (f)ahrenheit or (c)elsius: ");

        char system = (s.nextLine()).charAt(0);
        double newTemp;

        if (system == 'f' || system == 'F')
        {
            newTemp = (5.0/9.0)*(temp-32);
        }
        //we are assuming that the user typed either f or c
        else
        {
            newTemp = (9.0/5.0)*temp + 32;
        }

        System.out.printf("Converted: %.2f%n", newTemp);
    }
}This chapter will discuss three different kinds of loops in Java. Loops are structures that repeat the same set of actions over and over until a specified condition becomes false. To see why loops are useful, suppose we want to print the sum of 100 numbers entered by the user. With what we’ve seen so far, we’d have to write 100 separate prompts and input statements – this would be a big mess. Really, for each number we want to do exactly the same thing – print a prompt and read in the number. With a loop, we can repeat these two steps a certain number of times without having to write each one out separately.
The simplest kind of loop is a while loop. This loop executes a set of instructions repeatedly until a given condition becomes false.
Here is the syntax of a while loop:
while (condition)
{
    //statements
}
Here, condition is evaluated before anything inside the loop is executed. If the condition is false, we immediately skip to the code after the loop. If the condition is true, we execute the statements inside the loop, and then check the condition again. If the condition is false, we leave the loop. If it is still true, we execute the loop again. We repeat this process until the condition becomes false.
Here is how we can use a while loop to print the sum of 100 numbers entered by the user:
Scanner s = new Scanner(System.in);

//keep track of the sum of the elements we’ve seen so far
int sum = 0;
//keep track of how many elements we’ve asked for
int count = 0;

//keep looping while we haven’t asked for 100 elements
while (count < 100)
{
    //ask for the next number
    System.out.print("Enter a number: ");
    int num = s.nextInt();

    //add the number to the sum we have so far
    sum = sum + num;

    //add one to our count (we’ve asked for one more number)
    count = count + 1;
}

//the loop is over – sum now holds the sum of 100 values
//print the sum
System.out.printf("The sum is: %d%n", sum);We can also put conditional statements inside of loops (or loops inside of conditional statements). In this example, we want to print the sum of 100 positive numbers. If the user enters a negative number, we want to print an error and not add the number to our total:
Scanner s = new Scanner(System.in);

int sum = 0;
int count = 0;

while (count < 100)
{
    System.out.print("Enter a positive number: ");
    int num = s.nextInt();

    //only add the number if it is positive
    if (num > 0)
    {
        sum = sum + num;
        count = count + 1;
    }
    //otherwise, print an error
    else
    {
        System.out.printf("Error: %d is not positive%n", num);
    }
}

//the loop is over – sum now holds the sum of 100 values
//print the sum
System.out.printf("The sum is: %d%n", sum);A do…while loop is similar to a while loop, but its condition is evaluated at the end of the loop instead of at the beginning. This means that a do…while loop will always execute at least once, but a while loop might not (because the condition might be false in the beginning).
Here is the syntax of a do…while loop:
do
{
    //statements
} while (condition); //Notice the semi-colon!
The very first thing that happens when we reach a do…while loop is that we execute the statements inside – even if the condition is initially false. At that point, we check the condition – if it is true, we loop back and repeat the statements. We continue this process until the condition becomes false.
Suppose we want to add up a list of numbers typed by the user until they type a 0. Here’s how we could approach the problem:
Scanner s = new Scanner(System.in);

//this declares several variables of the same type (int)
int num, sum;

sum = 0;
do
{
    System.out.print("Enter an integer: ");
    num = s.nextInt();
    sum = sum + num;
} while (num != 0);

System.out.printf("The sum is %d%n", sum);
This loop immediately asks for a number before checking any kind of condition. Note that the last number typed by the user (a 0, which ends the loop) IS added to the sum. However, this is OK because adding zero to a number does not change the number.
For loops are the most complicated kind of loop, but they are probably used the most often. Many times you use a loop counter to keep track of how many times the loop has executed. If you use a while loop, you initialize the loop counter before the loop, have a while loop with a certain condition, and then update the loop counter somewhere in the loop code. A for loop combines those three steps.
Here is the syntax of a for loop:
for (initialization; condition; update)
{
    //statements
}Here is a while loop that adds the numbers from 1 to 4 and then prints the sum:
int sum = 0;
int count = 1;
while (count < 5)
{
    sum = sum + count;
    count = count + 1;
}
System.out.printf("Sum: %d%n", sum);
In this example, our loop counter is count. We could rewrite our example using a for loop instead:
int sum = 0;
for (int count = 0; count <= 5; count++)
{
    sum += count;
}

System.out.printf("The sum is %d%n", sum);Here’s another example, that prints out all odd numbers between 1 and 100. Notice that we increment the loop counter by 2 so we can immediately step to the next odd number:
for (int num = 1; num <= 100; num+=2)
{
    System.out.println(num);
}This section contains additional information for working with loops.
It is very important that we do something inside the body of the loop that will eventually make the condition false. Otherwise, the loop will execute forever – we call this an infinite loop. For example, consider the loop below, which is supposed to print the sum of the numbers between 1 and 4:
int sum = 0;
int count = 1;
//warning: this is an infinite loop!
while (count < 5)
{
    sum = sum + count;
}
System.out.printf("Sum: %d%n", sum);
This loop will never finish executing. We told the loop to keep going while count < 5 – but
we NEVER change count inside the loop. Thus count is always 1, and the loop never ends.
You can usually tell you have an infinite loop if your program just hangs without completing the
execution.
Here is the corrected version of the loop:
int sum = 0;
int count = 1;
while (count < 5)
{
    sum = sum + count;
    //update count so the condition will eventually be false
    count = count + 1;
}
System.out.printf("Sum: %d%n", sum);Recall that a break statement can be used to leave a switch case statement without evaluating any of the other cases. We can also use a break statement in a loop, which will let us immediately exit the loop without finishing the current iteration or checking the loop condition. For example, suppose we want to add up 10 numbers that the user types – unless the user types a 0, in which case we want to immediately stop and report the sum up to that point. Here’s how:
Scanner s = new Scanner(System.in);

int sum = 0;
int count = 0;

while (count < 10)
{
    System.out.print("Enter a number: ");
    int num = s.nextInt();
    sum += num;

    //Exit loop if num was 0
    if (num == 0) break;
    count++;
}

System.out.printf("Sum: %d%n", sum);
When we run this program, it will ask for numbers either until it has asked 10 times (and the loop ends), or until the user types a 0 (in which case we immediately leave the loop). It then prints the sum.
The continue statement allows us to skip the rest of the code for the current iteration and instead immediately
start on the next iteration. For example, suppose we again want to add up 10 numbers that the
user types – but if they enter a negative number, we don’t want to add it to our sum. Here’s how:
Scanner s = new Scanner(System.in);

int sum = 0;
int count = 0;

while (count < 10)
{
    System.out.print("Enter a number: ");
    int num = s.nextInt();

    //Ask for next number if a negative number was entered
    if (num < 0) continue;

    sum += num;
    count++;
}

System.out.printf("Sum: %d%n", sum);
This will ask for 10 numbers from the user. If a number is negative, we skip the rest of the loop (the part where we add num to our sum) and start on the next iteration (where we ask for another input number).
There are rules about when we can use certain variables in our programs. If we declare a variable inside a set of brackets:
{
    //variable declaration
}
Then we can use that variable anywhere (after its declaration) inside those brackets. However, we cannot use the variable outside of the brackets (either before them or after them). These brackets can belong to a class, the main method, an if statement, or a loop – the rules are always the same.
For example, if we do:
Scanner s = new Scanner(System.in);

int sum = 0;
int count = 0;

while (count < 100)
{
    System.out.print("Enter a number: ");
    int num = s.nextInt();
    sum = sum + num;
    count = count + 1;
}

//illegal – num is not visible here
System.out.printf("The last number was: %d%n", num);
System.out.printf("The sum is: %d%n", sum);
Then we will get a compiler error. The num variable was declared inside the while loop
brackets, and we cannot see it once the while loop has ended. If we did want to be able to print
out the last number the user entered, we would have to declare the num variable before the while
loop:
Scanner s = new Scanner(System.in);

//now num is visible everywhere in this code fragment
int num = 0;
int sum = 0;
int count = 0;

while (count < 100)
{
    System.out.print("Enter a number: ");
    num = s.nextInt();
    sum = sum + num;
    count = count + 1;
}

System.out.printf("The last number was: %d%n", num);
System.out.printf("The sum is: %d%n", sum);
Additionally, declaring the loop variable in a for loop has the same rules as declaring it inside the loop. For example:
for (int i = 0; i < 10; i++)
{
    //do something
}
The i variable is only visible inside the for loop, just as if it was declared at the beginning of
the loop.
These requirements are called scope rules. If we are outside the brackets where a variable was
declared, then we are outside the scope of that variable.
Because we can’t always see variables that we have declared, we can reuse variable names. For example:
int count = 0;
while (count < 10)
{
    int num;
    //do something with num
    count++;
}

count = 0;
while (count < 10)
{
    int num;
    //do something with num
    count++;
}
Here, we have reused the num variable. The first declaration of num is only visible to the first
while loop. If we want to use the name num again in the second while loop, we must redeclare it
(because we can’t see the other variable). It is perfectly fine (and encouraged) to reuse variable
names in this way.
We can also redeclare variables when we CAN still see the original variable, but it has a different result. For example:
int num = 10;
int count = 0;
while (count < 5)
{
    int num = 2;
    count = count + num;
}
System.out.println(num);
Here, we declared num outside the while loop. Thus the num variable would have been visible
inside the while loop as well. However, we declared num AGAIN inside the loop. Now there’s
a conflict – we can see the variable outside the loop and the new variable inside the loop. In this
case, the compiler always assumes you mean the inner-most variable declaration. So in the
while loop, when you add num to your count, it assumes you mean the inner-most num – the
one declared inside the loop. So each time in the loop, 2 is added to your count.
Once you are outside the loop, the while-loop num is no longer visible. So the print statement
prints out the original num value – 10.
This type of variable declaration is confusing and not recommended. In general, if a variable
with some name is visible where you are, don’t reuse the name for a different variable.
We can also put one loop inside of another loop – this is called nesting. We tend to want a nested loop when we want to:
Repeat a series of instructions
    For each repetition, repeat a different series of instructions
In a nested loop, the inner loop is completed (going through ALL its iterations) for each repetition of the outer loop.
Nested loops can be tricky, so we’ll start off with two simple examples. Let’s say we want to print the following pattern:
* * * *
* * * *
* * * *
* * * *
* * * *
Notice that we want 5 rows and 4 columns of stars (asterisks – above the 8 key). We will write a nested loop as if we were dealing with an array – the outer loop will step through each of the 5 rows, and the inner loop will step through each of the 4 columns. Inside the inner loop, we will print the next star (*):
for (int i = 0; i < 5; i++)
{
    for (int j = 0; j < 4; j++) {
        System.out.print("* ");
    }
    System.out.println();
}
We are using the same trick with print statements that we did when printing a two dimensional array. The inner print statement is a print, because we are not done with the current row, and we want to print each row on a single line. The outer statement is a println, because we are done with the current row and want to advance to the next line for the next row.
Let’s continue our printing example, but make it a bit more complicated. Suppose this is what we want to print now:
0 1 2 3 4
0 1 2 3 4
0 1 2 3 4
0 1 2 3 4
0 1 2 3 4
This is very similar to the previous example, except that we now want 5 rows and 5 columns. Also, instead of printing stars, we want to print numbers. Notice that in each case, the number printed is the same as the column number (0 is the leftmost column, then 1, etc.). So, we can change our solution to:
for (int i = 0; i < 5; i++)
{
    for (int j = 0; j < 5; j++)
    {
        System.out.printf("%d ", j);
    }
    System.out.println();
}
The only change to this solution is that we are printing out the value of j instead of a *. The
loop with j steps through the columns, so if we print j it will be the current column number.
And for each row, it will print 0, 1, 2, 3, 4 (because those are the values that j steps through).
This is our third printing pattern, and let’s make it a little more complicated. Suppose now we want to print:
0
0 1
0 1 2 3
0 1 2 3 4
We still want 5 rows, but the columns are a little different. We are still printing the current column number each time, but the number of columns varies with each row. Notice that row 0 has 1 column, row 1 has 2 columns, row 2 has 3 columns, row 3 has 4 columns, and row 4 has all 5 columns. So, the number of columns in each row is the row number + 1. In our for loops, i is keeping track of the current row number. So we can change our code as follows:
for (int i = 0; i < 5; i++)
{
    for (int j = 0; j < i+1; j++)
    {
        System.out.printf("%d ", j);
    }
    System.out.println();
}
The only change to this solution is that the loop with j now steps while j < i+1. This controls
how many numbers we want to print on the current row, which we decided was the row number
plus one. The loop with i counts through the rows, so i+1 is how many elements we want to print on
the current row. (For the first row, i+1 will give us 1 column. For the second row, i+1 will
give us two columns, etc.)
In this example, we want to ask the user for a number, and then print out its prime factors. (If the number is prime, then we want to print that fact instead.) For example, if the user enters 20, we want to print something like this:
20 = 2*2*5We know that we want to loop through possible factors (from 2 up to the number-1) and try seeing if they divide into the number evenly. The trick is that some values will be multiple factors – for example, we need to use 2 twice when factoring 20. So our approach will look something like this:
loop through all possible factors
    factor out the current number as many times as possible
Here is a solution:
import java.util.*;
public class Factor
{
    public static void main(String[] args)
    {
        Scanner s = new Scanner(System.in);
        System.out.print("Enter a number to factor: ");
        int num = s.nextInt();
        System.out.printf("%d = ", num);

        //We will divide factors out of cur as we find them
        int cur = num;
        //for each possible factor i
        for (int i = 2; i <= num-1; i++)
        {
            //as long as i keeps dividing in evenly
            while (cur % i == 0)
            {
                //print the factor and divide it out
                System.out.printf("%d ", i);
                cur = cur / i;
                if (cur != 1) System.out.print("* ");
            }
            if (cur == num)
            {
                System.out.println("prime");
            }
            else
            {
                System.out.println();
            }
        }
    }
}This section includes three examples of full programs using loops.
In this example, we will ask the user for 10 numbers and then print out the smallest number entered.
import java.util.*;
public class Example1
{
    public static void main(String[] args)
    {
        Scanner s = new Scanner(System.in);
        System.out.println("Enter 10 numbers.");
        System.out.println("Press Enter after each one.");

        int min = s.nextInt();
        for (int i = 1; i < 10; i++)
        {
            int next = s.nextInt();
            if (next < min) min = next;
        }
        System.out.printf("Smallest: %d%n", min);
    }
}In the next example, we will use a loop to help compute an exponent. We will ask the user for the base (b) and the exponent (n), and will compute and print $b^n$.
import java.util.*;
public class Example2
{
    public static void main(String[] args)
    {
        Scanner s = new Scanner(System.in);
        System.out.print("Enter base: ");
        int b = s.nextInt();
        System.out.print("Enter exponent: ");
        int n = s.nextInt();

        int exp = 1;
        for (int i = 0; i < n; i++)
        {
            exp *= b;
        }

        System.out.printf("%d^%d = %d%n", b, n, exp);
    }
}In this example, we will ask the user for a positive integer bound (we’ll call it n). Then, we will
calculate and print:
1!
2!
...
n!
The ! means factorial. For example, 5! is calculated as follows:
5! = 5*4*3*2*1 = 120This will require a nested loop. The outer loop will step through the numbers from 1 to n, and the inner loop will find the factorial of the current number.
import java.util.*;
public class Example3
{
    public static void main(String[] args)
    {
        Scanner s = new Scanner(System.in);
        System.out.print("Enter a positive integer bound: ");
        int bound = s.nextInt();

        if (bound >=1)
        {
            for (int i = 1; i <= bound; i++)
            {
                int fact = 1;
                for (int j = i; j >= 1; j--)
                {
                    fact *= j;
                }
                System.out.printf("%d! = %d%n", i, fact);
            }
        }
        else
        {
            System.out.println("Bound must be positive.");
        }
    }
}Suppose we want to store 100 values entered by the user. Knowing what we do so far, we would have to declare 100 different variables to hold the information. This would be doable, but it would be a giant pain.
Next, suppose we want to store a bunch of values entered by the user, but we don’t know how many – it might be 10, it might be 100,000. We could try to declare 100,000 variables, just in case, but even this wouldn’t work if the user decided to store more than that. To solve this problem, we need a convenient to store a list of values. Furthermore, we want this list to be able to hold any number of values, depending on the user’s needs.
Java has a feature called an array that is used to store a variable number of elements.
A single-dimensional array stores a list of elements of the same type. We can make this list be any size that we want.
We can declare a single-dimensional array like this:
type[] name;This will declare an array called name that can hold elements of type type. For example, to
declare an array of ints called nums, we can do:
int[] nums;Before we can add any elements to the array, we need to allocate space for the array (i.e., specify the number of slots we want to reserve). Here’s how:
name = new type[size];Here, name is the name of the array, type is the type of elements the array holds, and size is
a positive integer that specifies how many slots we want in the array. size can be either a
constant value (like 10) or an int variable. Here’s how to make our nums array have 10 slots:
nums = new int[10];We can also declare an array and reserve space for it on the same line, like this:
int[] nums = new int[10];After we have allocated space for an array, all array slots are automatically filled with the default element for the type. In the case of any numeric type, the default
value is 0. Here is what our nums array would look like after allocations space
for 10 integers:
| Array index | 0 | 1 | 2 | 3 | 4 | 5 | 6 | 7 | 8 | 9 |
|---|---|---|---|---|---|---|---|---|---|---|
| Array value | 0 | 0 | 0 | 0 | 0 | 0 | 0 | 0 | 0 | 0 |
Now that we have space for the array elements, we can start putting values in the array slots. Here’s how to access array elements:
name[index]This accesses the element in array name at index index. C# array indices start at 0 and go up
to size-1 (where size is the number of slots we reserved for the array). For example, here’s
how we’d set the first element in our previous nums array to 7:
nums[0] = 7;Here’s how we’d set the last element in nums to 4:
//9 is the last index since the array size is 10
nums[9] = 4;
Here is what our nums array would look like after setting the first element to 7
and the last element to 4 (remembering that all other elements would retain the
default value of 0)
| Array index | 0 | 1 | 2 | 3 | 4 | 5 | 6 | 7 | 8 | 9 |
|---|---|---|---|---|---|---|---|---|---|---|
| Array value | 7 | 0 | 0 | 0 | 0 | 0 | 0 | 0 | 0 | 4 |
Arrays are very naturally processed with for loops. The loop counter is the array index – we start at 0, and we continue looping while the loop counter is less than the array size. Each time, we add one to the loop counter. For example, here’s how we’d use a loop to set every element in the nums array to 10:
for (int i = 0; i < 10; i++)
{
    nums[i] = 10;
}
We can also retrieve the size of the array with the command:
name.lengthwhere name is the name of the array. We could have rewritten the previous example
to use nums.length instead, like this:
for (int i = 0; i < nums.length; i++)
{
    nums[i] = 10;
}
Here is what our nums array would look like after the loop above:
| Array index | 0 | 1 | 2 | 3 | 4 | 5 | 6 | 7 | 8 | 9 |
|---|---|---|---|---|---|---|---|---|---|---|
| Array value | 10 | 10 | 10 | 10 | 10 | 10 | 10 | 10 | 10 | 10 |
Suppose we want to ask the user for 10 numbers, and then we want to print them in reverse order. Here’s how we could do that:
Scanner s = new Scanner(System.in);
int[] nums = new int[10];

for (int i = 0; i < nums.length; i++)
{
    System.out.print("Enter a number: ");
    nums[i] = s.nextInt();
}
for (int i = nums.length-1; i >= 0; i--)
{
    System.out.println(nums[i]);
}When processing arrays, it is sometimes necessary to put a loop inside of another loop – this is called a nested loop.
Suppose we want to ask the user for 10 numbers, store them in an array, and then find and print the mode of the array. (The mode of a list of numbers is the most frequently occurring element. In the case of a tie, we will accept any of the most frequently occurring elements as the mode. For example, the mode of {1,2,4,1,2,1,3} is 1, and the mode of {2,4,1,4,2,4,2} is either 4 or 2.)
Here is the code:
Scanner s = new Scanner(System.in);

//create an array to hold the numbers
int[] nums = new int[10];

//get the input numbers
for (int i = 0; i < nums.length; i++)
{
    System.out.print("Enter a positive number: ");
    nums[i] = s.nextInt();
}

//the index of (one of) the mode values
int modeIndex = 0;

//the number of times our mode value appears in nums
int modeCount = 0;

//for each element in the array, count how many times that element appears
for (int i = 0; i < nums.length; i++)
{
    int count = 0;
    //count how many times the element at position i appears
    for (int j = 0; j < nums.length; j++)
    {
        //did we find another occurrence of the element at nums[i]?
        if (nums[i] == nums[j])
        {
            count++;
        }
    }

    //is our count better than our previous best?
    if (count > modeCount)
    {
        //we have a new best modeCount
        modeCount = count;

        //we have a new mode index
        modeIndex = i;
    }
}

//print the mode
System.out.printf("The mode is %d, which appeared %d times%n", nums[modeIndex], modeCount);
Notice that every time our outer loop executes, we go through each iteration of the inner loop. This allows our outer loop to keep track of which element we are counting, and our inner loop to actually count the number of occurrences of that element.
(Note: the implementation above is not the most efficient way to calculate the mode. We could modify our inner loop to not have to make quite as many iterations, but still compute the correct value. This idea is left as an exercise to the reader. Another even faster implementation is to use a data structure called a hash table, which we will see at the end of the text book.)
The arrays we’ve seen so far have been one-dimensional – that is, just a list of elements. We can also create multi-dimensional arrays, which are really just arrays of arrays. For example, a 2- dimensional array could represent a mathematical matrix, where each element has an associated row and column.
Here’s how to declare a 2-dimensional array:
type[][] name;Here’s how to allocate space for the array spots:
name = new type[numRows][numCols];This creates a two-dimensional array called name, with numRows rows and numCols columns, that holds
elements of type type. Here’s how to create an array called matrix that holds 5 rows and 10 columns of integers:
int[][] matrix = new int[5][10];When we allocate space for an array, all spots are automatically initialized to the default value for the type (which is 0 for integers).
If we want to store different values in our array, we must specify both the row index and the column index. As with single-dimensional arrays, the first row is index 0 and the first column is 0. Here’s how we could set the element at row index 2 and column index 0 to 6 in our matrix example:
matrix[2][0] = 6;If we want to initialize all elements of a two-dimensional array, we need to use a nested for loop. The outer loop will step through each row, and the inner loop will step through each column in that row. Here’s how to use a two-dimensional array to represent a multiplication table (the entry at row i and column j has the value i*j):
//Declare, create space
int[][] multTable = new int[10][10];

//Fill with multiplication values
for (int i = 0; i < 10; i++)
{
    for (int j = 0; j < 10; j++)
    {
        multTable[i][j] = i*j;
    }
}
Now the array looks like this:
| 0 | 0 | 0 | 0 | 0 | 0 | 0 | 0 | 0 | 0 | 0 | | 1 | 0 | 1 | 2 | 3 | 4 | 5 | 6 | 7 | 8 | 9 | | 2 | 0 | 2 | 4 | 6 | 8 | 10 | 12 | 14 | 16 | 18 | | 3 | 0 | 3 | 6 | 9 | 12 | 15 | 18 | 21 | 24 | 27 | | 4 | 0 | 4 | 8 | 12 | 16 | 20 | 24 | 28 | 32 | 36 | | 5 | 0 | 5 | 10 | 15 | 20 | 25 | 30 | 35 | 40 | 45 | | 6 | 0 | 6 | 12 | 18 | 24 | 30 | 36 | 42 | 48 | 54 | | 7 | 0 | 7 | 14 | 21 | 28 | 35 | 42 | 49 | 56 | 63 | | 8 | 0 | 8 | 16 | 24 | 32 | 40 | 48 | 56 | 64 | 72 | | 9 | 0 | 9 | 18 | 27 | 36 | 45 | 54 | 63 | 72 | 81 |
There is a fourth kind of loop in Java that is handy for stepping through collections of elements, such as arrays. The syntax is:
for (type name : list)
{

}
Here, type is the type of elements in the list, name is a variable that will step through each
element, and list is the name of the list or array of elements.
To see how the for-each loop works, suppose we have declared this array:
double[] vals;Further suppose that we have allocated space for the array and filled it with initial values. Here is how we could use a for-each loop to print every element in the array:
for (double num : vals)
{
    System.out.println(num);
}
This loop will step through the array starting at index 0. Each time, num will be given the
value of the next element in the array.
One caveat to using a for-each loop is that you CANNOT use it to change any values in the
array. For example, we might try to set every value in the vals array back to zero:
for (double num : vals)
{
    //Won’t change array
    num = 0.0;
}
This code would compile, but it would not change the array. In that for-each loop, num is
assigned the value of the first element in the array, then the second, etc. What the above loop
does is change the current value of num – not the current array spot. If you want to change
elements in an array, use one of the other types of loops.
We can also use a for-each loop to step through every element in a two-dimensional array. Just like with other loops, we need an outer loop to step through the rows, and an inner loop to step through the elements on that row. For example:
int count = 0;
int[][] arr = new int[4][5];

//use standard for loops to initialize the array
for (int i = 0; i < 4; i++)
{
    for (int j = 0; j < 5; j++)
    {
        arr[i][j] = count;
        count++;
    }
}

/*Now the array looks like:
0 1 2 3 4
5 6 7 8 9
10 11 12 13 14
15 16 17 18 19
*/

//now use a for-each loop to print each element
//elements printed will be 0, 1, 2, etc. ("read" arr like a book)
for (int[] val : arr)
{
    for (int x : val)
    {
        System.out.println(x);
    }
}This section includes a few more examples of full programs that use arrays.
Suppose we want to write a program that asks the user for 20 numbers (doubles), and that calculates and prints the average, minimum, and maximum number from the user.
import java.util.*;

public class Example1
{
    public static void main(String[] args)
    {
        Scanner s = new Scanner(System.in);

        //get 20 numbers from the user
        double[] nums = new double[20];
        for (int i = 0; i < nums.length; i++)
        {
            System.out.print("Enter the next number: ");
            nums[i] = s.nextDouble();
        }

        //find the average
        double sum = 0;
        for (int i = 0; i < nums.length; i++)
        {
            sum += nums[i];
        }
        double average = sum / nums.length;
        System.out.printf("Average: %.2f%n", average);

        //find the minimum
        double min = nums[0];
        for (int i = 1; i < nums.length; i++)
        {
            if (nums[i] < min) min = nums[i];
        }
        System.out.printf("Minimum: %.2f%n", min);

        //find the maximum
        double max = nums[0];
        for (int i = 1; i < nums.length; i++)
        {
            if (nums[i] > max) max = nums[i];
        }
        System.out.printf("Maximum: %.2f%n", max);
    }
}
It turns out that we don’t need to write separate code to calculate the average, minimum, and maximum. We can combine those steps into a single loop. (We also don’t need to store the numbers in an array before doing our calculations, but we’ll keep that part since it’s the focus of this chapter.) Here is a shorter way to write the same program:
import java.util.*;

public class Example1
{
    public static void main(String[] args)
    {
        Scanner s = new Scanner(System.in);

        //get 20 numbers from the user
        double[] nums = new double[20];
        for (int i = 0; i < nums.length; i++)
        {
            System.out.print("Enter the next number: ");
            nums[i] = s.nextDouble();
        }

        //find the average, minimum, and maximum
        double sum = 0;
        double min = nums[0];
        double max = nums[0];

        //for the min/max, it doesn't *hurt* to start at i=0
        for (int i = 0; i < nums.length; i++)
        {
            sum += nums[i];
            if (nums[i] < min) min = nums[i];
            if (nums[i] > max) max = nums[i];
        }

        double average = sum / nums.length;
        System.out.printf("Average: %.2f%n", average);
        System.out.printf("Minimum: %.2f%n", min);
        System.out.printf("Maximum: %.2f%n", max);
    }
}In this example, we will write a full program that reverses an array in place. We will start by filling the array with default values (we could get user input for the array values – the next steps would be the same in either case). Then, we will write the code necessary to switch array elements around so that they’re stored in reverse of the original order. Finally, we’ll print the resulting array to show that it will print in reverse order.
public class Example2
{
    public static void main(String[] args)
    {
        //could be any values, or could have gotten user input
        int[] nums = {2,4,6,8,10,12,14,16,20};

        //now reverse the order of the array elements
        //front starts at the beginning of the array and steps back
        //back starts at the end of the array and steps up
        //why do we only go halfway? Think about this.

        int back = nums.length-1;
        for (int front = 0; front < nums.length/2; front++)
        {
            //at each step, swap the current front and back
            int temp = nums[front];
            nums[front] = nums[back];
            nums[back] = temp;
            back--;
        }
    }
}In this example, we will write a full Tic-Tac-Toe program between two players. We will use a 3x3 array of characters to store the board.
import java.util.*;
public class TicTacToe
{
    public static void main(String[] args)
    {
        Scanner s = new Scanner(System.in);

        char[][] board = new char[3][3];
        //fill with _ for blank spots
        for (int i = 0; i < 3; i++)
        {
            for (int j = 0; j < 3; j++)
            {
                board[i][j] = '_';
            }
        }

        //count how many moves have been made
        int moves = 0;
        //keep track of whose turn it is
        char turn = 'X';

        //print the initial board
        System.out.println("Current board: ");
        for (int i = 0; i < 3; i++)
        {
            for (int j = 0; j < 3; j++)
            {
                System.out.printf("%c ", board[i][j]);
            }
            System.out.println();
        }
        System.out.println();

        //keep playing while less than 9 moves
        while (moves < 9) {
            System.out.printf("%c, enter row: ", turn);
            int row = s.nextInt();
            System.out.printf("%c, enter column: ", turn);
            int col = s.nextInt();

            //check to see if that is a valid move
            if (row < 0 || row > 2 || col < 0 || col > 2)
            {
                System.out.println("Invalid row/column");
            }
            else if (board[row][col] != '_')
            {
                System.out.println("That spot is taken");
            }
            else
            {
                //it was a good move
                board[row][col] = turn;

                //print the board
                System.out.println("Current board: ");
                for (int i = 0; i < 3; i++)
                {
                    for (int j = 0; j < 3; j++)
                    {
                        System.out.printf("%c ", board[i][j]);
                    }
                    System.out.println();
                }
                System.out.println();

                //check for a winner
                boolean win = false;
                for (int i = 0; i < 3; i++)
                {
                    //found 3 on a row
                    if (board[i][0] == board[i][1] &&
                    board[i][1] == board[i][2] &&
                    board[i][0] == turn) win = true;

                    //found 3 on a column
                    if (board[0][i] == board[1][i] &&
                    board[1][i] == board[2][i] &&
                    board[0][i] == turn) win = true;
                }

                //found 3 on a \ diagonal
                if (board[0][0] == board[1][1] &&
                board[1][1] == board[2][2] &&
                board[0][0] == turn) win = true;

                //found 3 on a / diagonal
                if (board[2][0] == board[1][1] &&
                board[1][1] == board[0][2] &&
                board[2][0] == turn) win = true;

                if (win)
                {
                    System.out.printf("%c wins!%n", turn);
                    //end the game
                    break;
                }

                //switch whose turn it is
                if (turn == 'X') turn = 'O';
                else turn = 'X';

                //increment number of moves
                moves++;
            }
        }

        //if moves made it to 9, must be a tie
        if (moves == 9) System.out.println("Tie game.");
    }
}We’ve been using strings in many of our examples, but we haven’t fully explored what we can do with
them. First of all, String is a class defined by Java – we haven’t talked about classes yet, but
we will later one. The Java String class uses a character array to store the individual
characters in the string, and then defines several commands that let us do things with that array.
In this section, we explore some of the basic string operations
Here is how to declare a string variable:
String s1;Just like any other variable that has been declared but not initialized, s1 currently has no value (and we will get a
compilation error if we try to use s1 before initializing it).
We can give s1 an initial value like this:
s1 = "hello";Or, we can declare and initialize a string at the same time like this:
String s1 = "hello";String concatenation is pushing two strings together with the + sign – we’ve seen how to concatenate strings when
printing things out. Here are some more examples:
int age = 7;
char initial = 'L';
String first = "Bob";
String last = "Jones";

String about = first + " " + initial + ". " + last + ", age " + age;
The string about will now hold the value “Bob L. Jones, age 7”.
Notice that we can concatenate types other than strings, like ints and chars. In fact, we can do this with any variable type. The only confusion is when we’re concatenating several ints – does the + mean concatenation or integer addition?
The answer, of course, is that it can mean both. The compiler interprets expressions by reading from left to right. If it sees a + and has only seen primitive types (like int or double) so far, it will assume you mean mathematical addition. If it has seen a string or object already on that line, it will assume you mean string concatenation. Here are some examples:
//evaluates to "11 hi"
String s1 = 4+7+" hi ";

//evaluates to "hi 47"
String s2 = "hi "+4+7;

//evaluates to "11 hi 47"
String s3 = 4+7+" hi "+4+7; You can get the number of characters in a string by accessing its length. Here’s how:
String s = "Hello";

//count will be set to 5
int count = s.length(); A string is backed by an array of characters, but you can’t access a character in a string by using
array notations ( [i] ). Instead, you need to use the charAt command. This returns the
character at a particular index in the string. Like an array, the first index in a string is 0, and the
last one is the length-1. Here’s an example:
String s = "Hello";

//has value e
char c = s.charAt(1);
Now that we know the length and charAt commands, we can step through every character in
a string. Here’s an example that prints every character in a string:
Scanner s = new Scanner(System.in);
System.out.print("Enter a string: ");
String str = s.nextLine();

for (int i = 0; i < str.length(); i++)
{
    System.out.printf("Character: %c%n", str.charAt(i));
}To extract a piece of a string (either a single character or several characters in a row), use the substring command:
String s = "hello";

//has value "lo"
String sub = s.substring(3);
Alternatively, we can specify the starting index (inclusive) and the ending index (non-inclusive):
String s = "hello";

//has value "el"
String sub1 = s.substring(1, 3);

//has value "llo"
String sub2 = s.substring(2, 5);

//has value "h"
String sub3 = s.substring(0, 1);
Note that when we extract a single character with substring as we did with s.substring(0, 1) above, we get the result as the string “h” (which must be stored in a String variable). If we were to instead use s.charAt(0), we would get the result as the CHARACTER ‘h’ (which must be stored in a char variable).
Sometimes we also want to go the other way – get back the index of a character or piece within a
string. We can do this with the indexOf command. Here is an example:
String s = "cake";

//has value 1
int index = s.indexOf("a");
Notice that we get back 1, which is the index of “a” in the string “cake”. We can also search for a bigger piece of a string:
String s = "cake";

//has value 2
int bigIndex = s.indexOf("ke");
Now we get back 2, because the piece “ke” starts at index 2 within “cake”. Here are some more examples:
String second = "hello";

//has value 2
int find1 = second.indexOf("l");

//has value -1
int find2 = second.indexOf("x");
Notice that “l” appears twice in “hello”, but we get back the index of the FIRST “l”. Also, when we search for something that’s not in the string (like “x”), we get back -1.
The Java StringTokenizer class helps you break strings into small pieces. This is helpful if
you have a bunch of data stored in a string, separated by commas or spaces. First, you need to
import the java.util library:
import java.util.*;Then, you need to create a new StringTokenizer:
StringTokenizer st = new StringTokenizer(fullString, delimeters);Here, fullString is the string you want to break into pieces, and delimeters is a string
that contains all the characters that separate the pieces in fullString. For example, if you
had a list of names that were separated by commas and spaces, then delimeters would be
" ,". Here’s an example:
String fullString = "Bob, Joe, Lisa, Katie";
StringTokenizer st = new StringTokenizer(fullString, " ,");
Now, you need to break apart the pieces. You can check if you still have tokens left to process
by calling the hasMoreTokens() method, which will return true while they are still more pieces in the
string. You can get the NEXT piece of the string by calling the nextToken() method. Here’s
an example that prints all the names in fullString:
while (st.hasMoreTokens())
{
    String name = st.nextToken();
    System.out.println(name);
}
This will print:
Bob
Joe
Lisa
KatieThe Java split command also helps you break strings into pieces in a similar manner as
StringTokenizer. You can use either technique to break apart a string. The split
command is similar to the technique we will be using in C# for this process, so it is especially
good to be familiar with both. Suppose you have the following string that you want to break
apart:
String fullString = "Bob, Joe, Lisa, Katie";As before, suppose you want to extract and print each name. We can specify that the names are separated by commas and spaces, and then get a string array of the remaining tokens (in this case, the names:
String[] tokens = fullString.split(", ");Now, we can loop through the tokens array and print each value:
for (int i = 0; i < tokens.length; i++)
{
    System.out.println(tokens[i]);
}
This will print:
Bob
Joe
Lisa
Katie
One key difference between StringTokenizer and split is how the delimeters work. In
StringTokenizer, the delimeters are individual characters that separate the information
we’re interested in. When we reach a delimeter, we keep stepping through the string discarding
characters until we reach a non-delimeter.
In split, we specify what separates the tokens using a regular expression. In the case of our
example, it matched the string “, " to our list of names, and used it as a separator. If we had
put " ,” instead (space then comma), it would not have separated the names at all, because it
would have found no occurrence of a space followed by a comma. So for split, when we
provide a string as a separator, we look for that ENTIRE string.
There is a lot more we can do with split using regular expressions, including a generic way to process all
numbers, or all words matching a particular pattern. That is beyond the scope of this course,
although you will likely use regular expressions in later CIS classes. In this class, we will just
provide an exact string to split that we want to process.
In this section, we will see how to compare strings. This will let us see if two strings have the same
characters (are equal) and how they compare alphabetically (to see if one “comes before”
or “comes after” another). When we have compared other types (like ints), we have used ==, <,
>, <=, >=, etc. – however, these operators will not work the way we want with strings. When we
try to use those operators, we will actually be comparing the memory address of the two strings –
we want to compare their characters.
To see if two strings have the same characters, we will use the equals command. Here is an
example:
String s1 = "hello";
String s2 = "hello";
if (s1.equals(s2))
{
    System.out.println("same");
}
This example compares the strings s1 and s2. If they contain exactly the same characters, the
equals command will evaluate to true. Otherwise, it will evaluate to false. Equals does NOT
ignore the case of characters, so it will think that “hello” and “Hello” are not equal.
To how two strings would be ordered alphabetically, we will use the compareTo command. Here is an example:
String s1 = "apple";
String s2 = "banana";
if (s1.compareTo(s2) < 0)
{
    System.out.printf("%s comes before %s%n", s1, s2);
}
This example is looking to see if s1 comes alphabetically before s2. Since “apple” comes
before “banana”, the if-statement is true. In general, if we do:
s1.compareTo(s2)The result will be:
0, if s1 equals s2
<0, if s1 comes alphabetically before s2
>0, if s1 comes alphabetically after s2In this section, we will work several additional examples of full Java programs that involve string manipulation.
Secret messages (such as secure email, online credit card purchases, online banking, etc.) are often transmitted using encryption. When one of these messages is sent, it is encrypted by altering the message in some way that makes it unrecognizable at face value. The recipient can then “undo” this encryption to get back the original message. The idea is that ONLY the recipient can get back the original message (usually because they know some extra piece of information about how the message was transformed), and that others snooping in will just see gibberish.
In this example, we will write a very basic encryption algorithm. For each letter in the message, we will replace it with the letter that comes three after it in the alphabet. For example, ‘A’ becomes ‘D’, ‘B’ becomes ‘E’, etc. When we get to the end of the alphabet, we will wrap around to the beginning (so ‘Z’ becomes ‘C’, etc.). This program will ask for a message and if the user wants to encrypt or decrypt (““ndo” the encryption), and will then print out the resulting message.
import java.io.*;
public class Encrypt
{
    public static void main(String[] args)
    {
        Scanner s = new Scanner(System.in);
        System.out.print("Enter a message: ");
        String msg = s.nextLine();

        System.out.println("Enter (e)ncrypt or (d)ecrypt: ");
        char eOrD = (s.nextLine()).charAt(0);

        String result = "";
        String alpha = "abcdefghijklmnopqrstuvwxyz";

        //this program assumes all lower-case characters
        if (eOrD == 'e')
        {
            for (int i = 0; i < msg.length(); i++)
            {
                String cur = msg.substring(0,1);

                //get where that letter is in the alphabet
                int index = alpha.indexOf(cur);

                //shift it down 3 (wrapping around)
                index = (index + 3) % 26;

                //get letter at the new spot, add to result
                cur = alpha.substring(index, index+1);
                alpha += cur;
            }
        }
        else if (eOrD == 'd') {
            for (int i = 0; i < msg.length(); i++)
            {
                String cur = msg.substring(0,1);

                //get where that letter is in the alphabet
                int index = alpha.indexOf(cur);

                //shift it back 3 (wrapping, making sure not <0)
                index = (index – 3 + 26) % 26;

                //get letter at the new spot, add to result
                cur = alpha.substring(index, index+1);
                alpha += cur;
            }
        }
        else
        {
            System.out.println("Invalid input");
        }

        System.out.printf("Result: %s%n", result);
    }
}In this example, we will write a program that gets an input string, and then prints all possible substrings of that string.
import java.util.*;
public class Substrings
{
    public static void main(String[] args)
    {
        Scanner s = new Scanner(System.in);
        System.out.print("Enter a string: ");
        String str = s.nextLine();

        //loop through all starting positions
        for (int i = 0; i < str.length(); i++)
        {
            //loop through all STOPPING positions if we start at i
            for (int j = i+1; j <= str.length(); j++)
            {
                //get substring from i up to but not including j
                String piece = str.substring(i,j);
                System.out.println(piece);
            }
        }
    }
}In this example, we will write a Pig Latin converter, where the user enters a sentence and the program translates it to Pig Latin. The rules we’ll use (there are several variations, but we’ll keep it simple) for converting an English word to Pig Latin are as follows:
import java.util.*;
//this program assumes letters are lower-case and that words are separated only by spaces
public class PigLatin
{
    public static void main(String[] args)
    {
        Scanner s = new Scanner(System.in);
        System.out.println("Enter a sentence: ");
        String str = s.nextLine();
        String result = "";

        //y can be a vowel too, but we’re ignoring this case
        String vowels = "aeiou";

        //get each word
        StringTokenizer tok = new StringTokenizer(str, " ");

        while (tok.hasMoreTokens())
        {
            String word = tok.nextToken();
            String first = word.substring(0,1);

            //if word begins with a vowel
            if (vowels.indexOf(first) >= 0)
            {
                //concatenate "way" to end of word
                result += word + "-way ";
            }
            else
            {
                //word is a consonant
                String rest = word.substring(1,word.length());
                result += rest + "-" + first + "ay ";
            }
        }
        System.out.printf("In Pig Latin: %s%n", result);
    }
}
The way we are constructing the result string is somewhat inefficient because strings are an immutable type. This means that any time we concatenate onto a string, we are actually creating memory for a new string and copying all the characters over. In class, we will also learn about the StringBuilder type, which we can use to build string results much more efficiently.
This section will describe how to read from a text file and how to write to a text file.
If we want our program to read from a text file or write to a text file, we need to add two import statements:
import java.io.*;
import java.util.*;
We will also need to add the clause throws IOException to the end of the main method (or, when we start writing multiple methods, to the end of whatever method wants to work with a text file). The main method should instead look like this:
public static void main(String[] args) throws IOException
{

}
(We can similarly put throws IOException at the end of a different method.) The throws IOException clause means that interacting with files can cause some unexpected problems (like if the file isn’t
there), but that we’re not going to handle them. Later in the course we will discuss how to
handle these problems.
If we want to read information from a text file into a program, we first need to open a connection to the file. We do this by creating a Scanner (like we do to
get user input). This time, however, we’ll connect the Scanner to a file:
Scanner s = new Scanner(new File(filename));Here, filename is a string that is the name of the input file. This file should be stored in the
same directory as the class that’s using it. Alternatively, you can specify the absolute path of the
file (e.g., “C:\Documents and Settings...”).
To read a single line in the file, do this:
String line = s.nextLine();The first line of the file will be stored in the line variable. If we call nextLine() again, it
will read the second line, and so on.
To see if you’ve reached the end of the input file, use the hasNext() command. This will
return false if we’re at the end of the file, and true otherwise.
When you’re done reading from a file, you need to close it:
s.close();Here’s an example that opens the file “in.txt” and prints every line from the file to the screen:
Scanner s = new Scanner(new File("in.txt"));
while (s.hasNext())
{
    String line = s.nextLine();
    System.out.println(line);
}
s.close();
If in.txt looked like this:
Hi
Testing
example
Then our program would print to the terminal:
Hi
Testing
example
You will often read files that have a bunch of information on each line – say, a bunch of names
separated by spaces. To process each name, read each line (as shown above), and then use a
StringTokenizer to break apart each line.
If we want our program to print information to a text file, we first need to open a connection to that file.:
PrintWriter pw = new PrintWriter(filename);Here, filename is the name of the text file we want
to print to. If this file doesn’t exist, it will be created in the same directory as your code. If it
does exist, everything in the file will be overwritten.
Now we can write to the file. Here’s how to write a single line of text (and advance to the next line):
pw.println(stuff);Here, stuff is the String, int, char, or double that you want to write to the file. This
function works exactly like System.out.println. To print a line without advancing to the
next line, do:
pw.print(stuff);When you’re done writing to the file, close your connection:
pw.close();Closing the file is especially important after you’ve written information to it. When you write to a file, the information doesn’t get immediately written. Instead, it gets stored in a temporary buffer. When the buffer gets full, the entire buffer is written to the file at once. When you close the file, it writes whatever is in the buffer to the file. If you forget to close it, then whatever information was still in the buffer will not get written to the file.
These arrays will hold people’s names and ages, respectively:
String[] names;
int[] ages;
Suppose those arrays have been initialized and filled with data. Suppose also that they are the
same length, and that names[i] is a person’s name and ages[i] is the same person’s age. We
want to print:
name: ageFor each person to the file info.txt. Here’s how:
//open a connection to the file
PrintWriter pw = new PrintWriter("info.txt");

//print name: age for each person
for (int i = 0; i < names.length; i++)
{
    pw.println(names[i] + ": " + ages[i]);
}

//close the file
pw.close();
Note: we could also use the printf command to print formatted values to an output file, just like we use System.out.printf to print formatted information to the console.
Many times when we are writing programs we find that we want to repeat the same set of actions multiple times. When we put all the code in a single Main method, we must just write the same lines of code over and over. This leads to programs that are longer than they need to be and “ugly” code.
A method is a section of code that does a particular job. When we want to execute those lines of code, we call the method. This means that instead of repeating a bunch of lines of code when we want to perform an action, we just need to include one line to call the appropriate method. This makes our code much easier to read.
This section will discuss the format for declaring a method. All methods must have a return type (the type of result the method is computing and giving back), a name, and a number of parameters (also called arguments – pieces of data that the method needs to perform its calculations).
Methods are declared inside the brackets for the class, but outside the brackets for the main
method. For example:
public class Example
{
    //Can declare method(s) here

    public static void main(String[] args)
    {

    }

    //Can declare method(s) here

    //Can declare as many methods as you want
}
Here is the syntax for declaring a method:
public static returnType name(params)
{
    //code for method goes here
}
For now, don’t worry about what the public static part means – just put that at the
beginning of all your methods.
Next, the returnType is the type of data you want this method to give back. For example, if
we were writing a method that computed the area of a square with integer sides, then we would
want to return an int – the data type of the area. If you do not want your method to give back a
result, then the return type should be void.
The name of method should be descriptive of what the method is doing. For example, a method
that computes the area of a square should be called something like getArea or getAreaSquare. The
rules for naming methods are the same as the rules for naming variables: method names can be
made up of letters, numbers, and underscores, but they cannot start with a number. It is convention
in Java that method names use camel case, where the first word in the method is all lower-case but
each subsequent word in the name is capitalized.
Finally, the params are a comma-separated list of values that the method needs to do its
calculations. Each parameter is listed with a data type and a name. If the method does not need
any values to do its calculations, then the params section is left off the method declaration (but
the () at the end of the method is still there).
Suppose we want to declare a method that computes and returns the area of a rectangle. First, let’s think about what information this method needs to do its computation – these will be the parameters. To compute the area of a rectangle, we need its width and its height. Next, we need to determine the data type of these values. We know that the width and height will be numbers, but they can be either ints or doubles – depending on what kind of values we want to allow. We’ll be more general and make them doubles.
Next, we need to consider what kind of value we’re computing. We want to return the area of a rectangle. Each side of the rectangle is a double, and so the area (and return type) should also be a double.
Here is the declaration for the method that will compute the area of a rectangle:
// This method returns the area of the rectangle with
// length length and width width
public static double getArea(double length, double width)
{
    //we are just declaring the method now, not implementing it
}
As a second example, suppose we want to declare a method that prints all of the values in an array
of integers. This method needs to take in the integer array as a parameter, but it doesn’t need to
return anything (so it will have a void return type). Here is the declaration:
//This method prints every value in the nums array
public static void printArray(int[] nums)
{

}
Finally, suppose we want to declare a method that returns the number of times a particular character appears in a string. This method needs to take the string we’re examining and the letter we’re looking for as parameters. It needs to return a count of how often that letter is in the string – an int. Here is the declaration:
//This method returns the number of times letter appears in str
public static int countLetter(String str, char letter)
{

}Now that we have practiced declaring a method, we are ready to fill in the code for methods.
This code will look very similar to things we have been writing inside our main method (after
all, main is also a method).
We will first look at how to write the code for a void method (a method that does not return a
value). These methods are slightly easier to implement than methods that return values.
Recall the method declaration for printing all the values in an integer array:
//This method prints every value in the nums array
public static void printArray(int[] nums)
{

}
Now, we want to write code inside the brackets ({ }) of the method that will print all values in
the nums array. This works exactly like it would if we were writing it in the main method – we
just treat nums like we would any other variable. Here is the complete method:
//This method prints every value in the nums array
public static void printArray(int[] nums)
{
    for (int i = 0; i < nums.length; i++)
    {
        System.out.println(nums[i]);
    }
}
For another example, suppose we want to write a method that asks the user to input a certain number of integers, and then prints the sum of those numbers. This method needs to take the number of elements we want as an int parameter. It does not need to return anything because it is printing its result. Here is the complete method:
//This method asks the user for n numbers,
//and prints the sum of those numbers
public static void sumN(int n)
{
    int sum = 0;
    Scanner s = new Scanner(System.in);

    for (int i = 0; i < n; i++) {
        System.out.print("Enter an integer: ");
        int val = s.nextInt();
        sum += val;
    }
    System.out.printf("The sum is: %d%n", sum);
}
Methods that return a value look fairly similar to void methods. The only difference is that all paths through a method that returns a value must end with the statement:
return expression;where expression is either the name of a variable, some expression (a math operation, for
example), or a constant value (like 4, true, or “hello”. Furthermore, expression should have the
same data type as the return type for the method.
Recall the method declaration for computing the area of a rectangle:
// This method returns the area of the rectangle with
// length length and width width
public static double getArea(double length, double width)
{

}
The formula for the area of a rectangle is the length times the width, so the completed method looks like this:
// This method returns the area of the rectangle with
// length length and width width
public static double getArea(double length, double width)
{
    return length*width;
}
Notice that length*width is an expression whose data type evaluates to a double – the same
type as the return type.
Next, recall the method declaration for counting the occurrences of a character in a string:
//This method returns the number of times letter appears in str
public static int countLetter(String str, char letter)
{

}
To implement this method, we will have to loop through all the characters in str, and add one
to a count variable every time a character matches letter. After we have finished looping
through the string, we will return our count (which should have an int data type). Here is the
implementation:
//This method returns the number of times letter appears in str
public static int countLetter(String str, char letter)
{
    int count = 0;
    for (int i = 0; i < str.length(); i++)
    {
        if (str.charAt(i) == letter) count++;
    }
    return count;
}
Finally, suppose we want to write a method that determines whether or not a particular letter is a
character in a string. This method will again need to take the string and the character as
parameters. Since it is computing whether or not something is true, its return type should be
boolean. Here is the complete method:
//This method returns true if letter is in str, and false otherwise
public static boolean containsLetter(String str, char letter)
{
    boolean foundIt = false;
    for (int i = 0; i < str.length(); i++)
    {
        if (str.charAt(i) == letter) foundIt = true;
    }

    return foundIt;
}
This method is not as efficient as it could be, though. Suppose the first character in str matches
letter – do we really need to look through the rest of the string? Here is an optimized version
of the same method:
//This method returns true if letter is in str, and false otherwise
public static boolean containsLetter(String str, char letter)
{
    for (int i = 0; i < str.length(); i++)
    {
        //we've found letter -- no need to keep looking
        if (str.charAt(i) == letter) return true;
    }

    //we must not have found letter, or we would have already returned
    return false;
}
Notice that in this version, there is a return statement in the middle of the method. That’s OK – it just means that if we do find a matching character, we immediately leave the method and return true without checking any other characters. If we do happen to make it out of the loop, we must not have found a match (otherwise we would have already returned true). So at this point, we can return false.
There are several rules for how to return values in non-void methods:
Let’s look at a couple of methods and determine whether or not they follow these rules:
//Incorrect: no return statement if num1 != num2
//This method returns whether num1 equals num2
public static boolean equal(int num1, int num2)
{
    if (num1 == num2) return true;
}
The above method is not correct. If num1 does not equal num2, then no value will be returned.
There must be a return statement for every possible scenario.
//Incorrect: print statement will never be reached
//This method returns whether num1 equals num2
public static boolean equal(int num1, int num2) {
    if (num1 == num2) return true;
    else {
        return false;
        System.out.println("Not equal");
    }
}
The above method is not correct. If num1 does not equal num2, we will return false. A return
statement forces us to leave the method, so the print statement will never be executed. This method will give you a compiler error because it has unreachable code.
//Correct
//This method returns whether num1 equals num2
public static boolean equal(int num1, int num2)
{
    if (num1 == num2) return true;
    else return false;
}
The above method is correct. If num1 equals num2, we return true. If num1 does not equal
num2, we return false. Those are the only possible scenarios, and each of them has a return
statement. We also don’t try to do anything else after returning a value.
Now that we can write separate methods, we need to be able to call them (tell the compiler that we want to execute the code in the method). Suppose our program looks like this, which includes some of the methods written above and some new ones:
public class Methods
{
    public static void main(String[] args)
    {
        //The code we write in this section goes here
    }

    //This method prints every value in the nums array
    public static void printArray(int[] nums)
    {
        for (int i = 0; i < nums.length; i++)
        {
            System.out.println(nums[i]);
        }
    }

    //This method returns the number of times letter appears in str
    public static int countLetter(String str, char letter) {
        int count = 0;
        for (int i = 0; i < str.length(); i++) {
            if (str.charAt(i) == letter) count++;
        }

        return count;
    }

    // This method returns the area of the rectangle with
    // length length and width width
    public static double getArea(double length, double width)
    {
        return length*width;
    }

    //This method asks the user for 10 numbers,
    //and prints the sum of those numbers
    public static void sum10()
    {
    int sum = 0;
        Scanner s = new Scanner(System.in);
        for (int i = 0; i < n; i++) {
            System.out.print("Enter an integer: ");
            int val = s.nextInt();
            sum += val;
        }
        System.out.printf("The sum is: %d%n", sum);
    }
}Here is the syntax for calling a method with a void return type:
ClassName.methodName(params);Here, ClassName is the name of the class that we’re using, and methodName is the name of
the method that we want to run. Finally, params is a comma-separated list of values that you
want to pass to the method. Each value can be a variable name, a constant value, or an
expression (like a math operation). You do not list the type of the parameters when you call the
method, but their types should match the parameter types in the method declaration.
Suppose we are inside the main method in the Methods class above. Let’s say we want to call
the printArray method. First, we create an array of integers:
//creates space for the array and initializes the values
int[] vals = {1, 2, 3, 4};
Now, we are ready to call the printArray method. Here’s how:
Methods.printArray(vals);Notice that we just list “vals” as the name of the parameter. This variable has the same type as
the parameter in the printArray method declaration – an int[].
When we call the printArray method, we pass the vals array. The printArray
parameter is named nums, so nums gets initialized to be this vals array. When we print the
elements in nums inside the method, it is really printing the elements from vals.
Suppose we are still inside the main method in the Methods class, and that we now want to
call the sum10 method. Here’s how:
Methods.sum10();This method does not take any parameters, but we still end the method call with (). Now, our
entire main method looks like this:
public static void main(String[] args)
{
    int[] vals = {1, 2, 3, 4};
    Methods.printArray(vals);
    Methods.sum10();
}
When our program is executed, it starts with the very first statement in the main method. This
statement creates our vals array. Next, we execute the call to the printArray method. This
method prints every element in our array. When the printArray method finishes, the program returns back
to the spot in the code where that method was called (which is our main method). So the very next thing that we do is execute
the call to the sum10 method. This asks the user for 10 different numbers, and prints their sum.
When this method finishes, it returns back to the main method. That’s the end of the main
method, so our program ends.
Calling a method that returns a value is a bit trickier. For now, the syntax for calling one of these methods is:
type name = ClassName.methodName(params);Here, we are declaring a variable called name and setting it equal to the result of the method
call. This will store the value returned by the method in the name variable. The type of the
name variable must match the return type of the method.
For example, suppose we are in the main method in the Methods class, and we want to
compute the area of a 3x4 rectangle. Here’s how:
int result = Methods.area(3.0, 4.0);When this method is called, 3.0 is passed into the length parameter, and 4.0 is passed into
the width parameter. The method returns the calculation 3.0 * 4.0, which gets stored in
our result variable.
Next, suppose we want to call the countLetter method from the main method in the
Methods class. Suppose that we first want to ask the user to input a string and character to use,
and then we want to give those values to the countLetter method. Here’s how:
Scanner s = new Scanner(System.in);
System.out.print("Enter a word: ");
String word = s.nextLine();
System.out.print("Enter a letter to search for: ");
char c = (s.nextLine()).charAt(0);
int numTimes = Methods.countLetter(word, c);
When we call countLetter, we pass the value for the word inputted by the user (which gets
stored in the str parameter variable) and the value for the character inputted by the user (which
gets stored in the letter parameter variable). The method returns the number of times that
letter appears in the string, and this result gets stored in the numTimes variable.
Up until this point, we have glossed over exactly what happens when we pass parameters to methods. Suppose our full program looked like this:
import java.util.*;
public class TestParams
{
    public static void main(String[] args)
    {
        int val = 4;

        TestParams.addOne(val);
        System.out.println(val);

        int[] array = {1, 2, 3};
        TestParams.zeroArray(array);

        for (int x : array)
        {
            System.out.println(x);
        }
    }

    public static void addOne(int num)
    {
        num++;
    }

    public static void zeroArray(int[] arr)
    {
        for (int i = 0; i < arr.length; i++)
        {
            arr[i] = 0;
        }
    }
}
It turns out that when we pass parameters that are ints, doubles, chars, or bools, then they are passed by value. This means that when we do something like:
TestParams.addOne(val);Then the VALUE of val is passed – not val itself. This means that the value 4 is passed, and
so the num parameter in the addOne method gets set to 4. We then add one to the num
parameter, so that it has the value 5. When we finish executing this method, we return back to
the main method after the call to addOne. At this point, we print out the value of val. This
print statement will print out 4. Even though we added one to num in addOne, num IS NOT
val – it was just initialized to have the same value that val did.
On the other hand, arrays (and later objects) are passed by reference. This means that when we do something like this:
TestParams.zeroArray(array);Then what we are really passing is the address of array in memory. Then, the arr parameter
will be initialized to reference the same array in memory. When we set every element in arr
(which is the SAME array as array) to zero, then it does change the original array. So when
we print out array in main after the call to zeroArray, it will print out all 0’s for the
elements (because every element is set to zero in the zeroArray method).
Now that we’ve seen how to write separate methods, we need to learn how to reorganize our main method-only programs to use multiple methods. Here are some general rules for organizing your programs:
Suppose we want to write a program that plays a simplified version of Hangman. We will ask the user for a word, and then print out a _ for each letter. We will then repeatedly have the user to guess a letter and then replace each _ with the letter (if it was a correct substitution based on the original word). We will continue this process until the entire word has been guessed.
Here is a main method-only solution to our game:
import java.util.*;
public class Hangman
{
    public static void main(String[] args)
    {
        Scanner s = new Scanner(System.in);

        System.out.print("Enter a word: ");
        String word = s.nextLine();

        String result = "";
        for (int i = 0; i < word.length(); i++)
        {
            result += "_";
        }

        System.out.printf("%nCurrent word: %s%n", result);

        while (!(result.equals(word)))
        {
            System.out.print("\nGuess a letter: ");
            char letter = (s.nextLine()).charAt(0);

            boolean contains = false;
            for (int i = 0; i < word.length(); i++)
            {
                if (word.charAt(i) == letter)
                {
                    contains = true;
                    result = result.substring(0, i) +
                    letter + result.Substring(i+1);
                }
            }

            if (contains == true)
            {
                System.out.printf("%nCurrent word: %s%n", result);
            }
            else
            {
                System.out.printf("%n%c is not in the word%n", letter);
            }
        }

        System.out.println("\nYou guessed it!");
    }
}
Here are some separate methods we might consider writing:
Here is the updated program:
import java.util.*;
public class Hangman
{
    //s can be seen throughout the file, by all methods
    public static Scanner s;

    public static void main(String[] args)
    {
        s = new Scanner(System.in);

        System.out.println("Enter a word: ");
        String word = s.nextLine();

        String result = init(word.length());
        System.out.println("\nCurrent word: " + result);

        while (!(result.equals(word))) {
            String update = guessLetter(word, result);

            //result!=update is true if a letter has changed,
            //and false otherwise
            boolean changed = !(result.equals(update));
            printResults(update, letter, changed);
            result = update;
        }
        System.out.println("\nYou guessed it!");
    }

    //returns a string of size ‘_’ characters
    public static String init(int size)
    {
        String result = "";
        for (int i = 0; i < size; i++)
        {
            result += "_";
        }

        return result;
    }

    //asks the user for a letter
    //replaces all _ characters in cur when the corresponding
    //character in orig matches the input letter
    //return the updated orig string
    public static string guessLetter(String orig, String cur)
    {
        System.out.print("\nGuess a letter: ");
        char letter = (s.nextLine()).charAt(0);

        for (int i = 0; i < orig.length(); i++)
        {
            if (orig.charAt(i) == letter)
            {
                cur = cur.substring(0, i) + letter + cur.substring(i+1);
            }
        }

        return cur;
    }

    //if update is true, print cur
    //otherwise, print that the most recent letter wasn’t in our word
    public static void printResults(String cur, char letter, boolean update) {
        if (update == true)
        {
            System.out.printf("%nCurrent word: %s%n", result);
        }
        else
        {
            System.out.printf("%n%c is not in the word%n", letter);
        }
    }
}
Notice that we can still look at our main method to figure out the flow of the program (the order
in which things happen). However, the main method is now a lot easier to read because the
details have been passed off to other methods.
Recall that the declaration of the main method must look like:
public static void main(String[] args)The String[] args portion of the declaration is a String array of command-line
arguments – values that can be supplied to the program when it is executed. You can then use
these arguments as you would any other String array.
This section will describe how to use command-line arguments when you run your program from the terminal.
Suppose the class with the main method is called Test. Then you would run your program
from the terminal by typing:
java TestTo supply command-line arguments, simply type input values after java Test when you
execute your program. Separate each argument with a space. Each argument will be placed in
the String[] args array. Suppose you want to get a person’s name, age, and GPA as
command-line arguments. Then you might type:
java Test Bob 20 3.45The values “Bob”, “20”, and “3.45” will be placed in the args array. “Bob” will be at index
0, “20” will be at index 1, and “3.45” will be at index 2.
We can access command-line arguments within the main method by saying args[i], where i
is the index of the argument. For example, to store the name, age, and GPA from above:
public static void main(String[] args)
{
    String name = args[0];                      //name = "Bob"
    int age = Integer.parseInt(args[1]);        //age = 20
    double gpa = Double.parseDouble(args[2]);   //gpa = 3.45
}
Of course, this program will crash if the user mistakenly doesn’t enter any command-line
arguments. To tell if they did, we can make sure args.length (the length of the command-line
argument array) is what we expect. If not, we can print an error and exit. Here’s how:
public static void main(String[] args)
{
    if (args.length != 3)
    {
        //print a descriptive error message
        System.out.println("Usage: java Test name age gpa");

        //This command immediately exits the program
        System.exit(0);
    }

    //We know we have 3 command-line arguments
    String name = args[0];
    int age = Integer.parseInt(args[1]);
    double gpa = Double.parseDouble(args[2]);
}In this chapter, we will see how to divide our programs across multiple files, as well as the basics of object-oriented programming.
We can write some fairly complicated programs in a single main method, and we can do just about anything using a bunch of static methods in a single file. However, there is a lot more to programming than just getting it to work – we also want to be able to easily reuse pieces of our code, and for our programs to be easy for other people to read. This requires us to think about good design for our programs instead of just functionality.
Computer programmers almost always work in teams, which means it is vital that all team members can use and understand code written by others in the group. If you think about how a big program (like a popular computer game) would look if it was written in a single file…it would be a nightmare to read. Programs like that tend to have millions of lines of code – it would be very difficult to ever find what you were after.
It is much easier to read code that is divided into many files and many methods by functionality. That way, you could go directly to the section of code you were interested in without having to wade through everything else. When each method solves a small piece of the problem, and each file holds a group of methods that do related things, it’s very easy to figure out what’s going on.
Creating programs with multiple classes also gives us the option to create new specialized data types. Later in this chapter, we will see how to turn these classes into data types, complete with their own fields (pieces of relevant information) and methods to operate on those fields. For example, we will be able to create a Rectangle type that store the width and height for the rectangle, and that has area and perimeter methods that operate on the width and height.
We have already seen how to write several methods within one class. Now, we will learn how to create several classes with different methods. This section will not discuss how to create objects (instances of classes) yet – for now, we’re just dividing methods into different files as an organization trick.
Suppose we want to create a lot of methods that perform mathematical operations (average,
round, max, min, etc.). It would be nice to be able to reuse these methods in other projects, so
we will want to divide them into a separate class. (Actually, there is a Math class in the Java
libraries that contains these methods, but we will create our own.)
Creating a separate class with static methods is exactly like the classes we’ve written in the past
– the only difference is that the separate class will not have a main method. Here is our
MathOps class:
//stored in the file MathOps.java
public class MathOps
{
//assumes arr has at least one element
public static int max(int[] arr)
{
    int m = arr[0];
    for (int i = 1; i < arr.length; i++)
    {
        if (arr[i] > m) m = arr[i];
    }

    return m;
}

//assumes arr has at least one element
public static int min(int[] arr)
{
    int m = arr[0];
    for (int i = 1; i < arr.length; i++)
    {
        if (arr[i] < m) m = arr[i];
    }

    return m;
}

public static int round(double num)
{
    if ((int)(num+0.5) > (int) num)
    {
        //num must have decimal of .5 or higher
        //round up
        return (int)(num+0.5);
    }
    else {
        //round down
        return (int)num;
    }
}

    public static double avg(int[] arr)
    {
        int sum = 0;
        for (int i = 0; i < arr.length; i++)
        {
            sum += arr[i];
        }

        //need to cast to a double to avoid integer division
        return sum / (double) arr.length;
    }
}Now, suppose we want to create a separate class with a main method that uses the MathOps
class. When we call static methods from another class, we will use the format:
ClassName.methodName(params);Here, ClassName is the name of the class that contains the method (in this case, MathOps),
and methodName is the name of the method we want to call. Here is a program that asks the
user for 10 numbers, and then prints the maximum, minimum, and average of those numbers:
//stored in Compute.java
import java.util.*;
public class Compute
{
    public static void main(String[] args)
    {
        Scanner s = new Scanner(System.in);
        int[] nums = int[10];

        for (int i = 0; i < 10; i++)
        {
            System.out.print("Enter a number: ");
            nums[i] = Integer.parseInt(s.nextLine());
        }

        System.out.printf("Maximum: %d%n", MathOps.max(nums));
        System.out.printf("Minimum: %d%n", MathOps.min(nums));
        System.out.printf("Average: %d%n", MathOps.avg(nums));
    }
}
Compiling works differently when we have multiple files, because we need to be sure to compile
all the source code files instead of just the one with the main method. Here’s how:
javac *.javaThis compiles ALL files with the .java extension – all your source code files. You could then
run the program with:
java Computewhich runs your program as usual. Note that you will run your program with the name of the file
that contains the main method.
In this section, we will learn to make classes into our own specialized data types – complete with data fields and methods that operate on the data.
In the previous section, we looked at a specific kind of class – classes that have only static
methods. However, very few classes in Java are written with entirely static methods. In this
section, we will explore a more generic definition of a class. These generic classes in Java are
made up of three parts:
Here is the format of a general class (note that our classes with static methods also fit this syntax
– they are just a specific kind of class):
public class Name
{
    //declare fields
    //constructor(s)
    //methods
}
For now, each class should be stored in a separate file. The name of the file should match the
name of the class (including capitalization), plus the “.java” extension. For example, the class
above should be stored in the file Name.java.
The three parts of a class (fields, constructor, methods) should be preceded by a visibility modifier. This specifies where that field, constructor, or method can be seen. There are three visibility modifiers:
public – visible anywhere the class is visibleprivate – visible only within the classprotected – discussed in the “Inheritance” sectionAgain, fields are special variables that can be used throughout the class. They are defined at the beginning of the class, using the following format:
visibility type name;For example:
private int size;Like typical variables, fields can also be initialized on the same line as their declaration. For example:
private int size = 0;However, initialization of fields in usually done in the constructor.
The constructor is a special section that initializes the fields in a class. It must have the same name as the class. It can either take initial values for the fields as parameters, or it can assign them default values. Here’s the format of a constructor:
public Name(params)
{
    //initialize fields
}
Here, Name is the name of the class, and params are possible parameters to the constructor.
Here is a sample class with a constructor:
public class Dog
{
    //fields
    private String name;
    public String breed;

    //constructor
    public Dog()
    {
        name = "Fido";
        breed = "Mutt";
    }
}
When the constructor is called, the name and breed are set to the default values “Fido” and “Mutt”. We could also
accept initial values for the name and breed as parameters to the constructor:
public Dog(String n, String b)
{
    name = n;
    breed = b;
}
We will look more at methods parameters in the next section. For now, remember that parameters must have a specified type and a name – just like in static methods.
Think of Java classes as a more complicated variable type. For example, we wrote a Dog class,
so now we will be able to create variables of type Dog. These variables are similar to ordinary variables,
but they each have their own methods and fields. These types of variables are called
objects, whereas ints and doubles are primitive types.
Declaring an object variable has the same format as declaring a primitive type variable:
type name;Recall our Dog class from the previous section:
public class Dog
{
    //fields
    private String name;
    public String breed;

    //constructor
    public Dog()
    {
        name = "Fido";
        breed = "Mutt";
    }
}
We can declare a variable of type Dog like this:
Dog d1;Initializing an object variable works a little differently than initializing a primitive type variable. We must call the object’s constructor to set of values for its fields. Here is the format of initializing (also called instantiating) an object:
name = new ClassName(params);Here, name is the name of the object variable, ClassName is the name of the class whose type we are using, and params are the
parameters passed to the constructor. Here’s how we would create a new Dog object:
d1 = new Dog();This calls the no-parameter Dog constructor, and initializes the Dog’s name to “Fido” and its
breed to “Mutt”. Suppose instead the Dog class had this version of the constructor (with parameters for the
name and breed):
public Dog(String n, String b)
{
    name = n;
    breed = b;
}
Here’s how we could create a Dog object now:
Dog d2 = new Dog("Rover", "Labrador");Keep in mind that although the d1 and d2 variables are both of type Dog, and both have values
for the name and breed, they are completely separate in memory. Dog is just a template that
allows us to create variables.
Once we have created an object, we can access any of its public members. In the Dog class, the
breed variable is public, so we can access it. Here’s the format for accessing public fields:
objectName.variableNameFor example, here’s how we would print the breed of both dogs:
System.out.println(d1.breed);
System.out.println(d2.breed);
This would print:
Mutt
LabradorNon-static methods in Java are fairly similar to the static methods we already know about. The difference is that non-static methods are associated with an object of a given class type, not with the class itself. This means that we can call a method for each of our object variables, and that the method will use that object’s fields in its calculations. (This is not always true, but we’ll pretend for now.) Here’s the format of a method:
visibility returnType name(args)
{
    //code
    //possible return statement
}
Let’s discuss each part separately. The visibility can be either public or private,
depending on whether we want to call the method outside this class. (It can later be
protected as well.) The returnType specifies what type of value will be returned. If the
method doesn’t return anything, its return type is void. name is just the name of the method,
which you will use when calling it. args are optional arguments (parameters) for the
method.
If a method has a non-void return type, it must have a return statement. This looks like:
return value/variable;where that value or variable has the same type as returnType.
Here’s a very simple method that just prints “Hello, World!” to the screen:
public void greeting()
{
    System.out.println("Hello, World!");
}
Method arguments (parameters) are just values passed to the method. Each method can have zero or many arguments. Here’s what the argument list should look like:
type1 name1, type2 name2, ...If a method has no arguments, you still need to include the () after the method name (like the
greeting method above). Here’s an example of a method that takes two ints, and prints their
product to the screen:
public void printProduct(int num1, int num2)
{
    int product = num1*num2;
    System.out.printf("The product is %d%n", product);
}So far, we’ve only looked at methods that have a void return type – that don’t return anything.
Here’s a method that returns something:
public int product (int num1, int num2)
{
    int product = num1*num2;
    return product;
}
This method has an int return type, and so it includes a return statement. The variable
returned (product) also has type int.
Now that we can write methods, we need to be able to call them. This will be different depending on whether we’re calling a method that’s in the same class as us, or in a different class. Here’s how we call a method in the same class as us:
methodName(args)Here, methodName is the name of the method we’re calling, and args are the values of the
parameters we’re passing. The parameters must have the same type as the corresponding
arguments in the methods definition. Here’s an example of calling the printProduct method
(from the same class):
int val1 = 5;
int val2 = 7;
printProduct(val1, val2);
The VALUES of val1 and val2 (5 and 7) are passed to printProduct, and stored in the
arguments num1 and num2.
When the method we’re calling returns a value, we need to store that return value when we call
it. Here’s an example of calling the product method (from the same class):
int val1 = 5;
int val2 = 7;
int result = product(val1, val2);
Now the product of val1 and val2 (35) is stored in the result variable.
Notice that this syntax for calling methods is so far similar to what we’ve done to call static methods.
Calling non-static methods from a different class works similarly, expect we first need an object of that class type. Let’s look at an example class:
public class Rectangle
{
    private int length;
    private int width;

    public Rectangle(int l, int w)
    {
        length = l;
        width = w;
    }
    public int area()
    {
        return length*width;
    }

    public int perimeter()
    {
        return length*2 + width*2;
    }
}
Before we can call any of the methods in Rectangle, we need to create a new Rectangle
object. Let’s create two – a 4x6 rectangle and a 3x5 rectangle:
Rectangle r1 = new Rectangle(4, 6);
Rectangle r2 = new Rectangle(3, 5);
Now, here’s the format for calling a non-static method in a different class:
objectName.methodName(args);So, to call the area method on the 4x6 rectangle, we’d do:
r1.area();However, the area method returns a value, so we probably want to store or do something with a
result. We’ll store the area of the 4x6 rectangle, and print the perimeter of the 3x5 rectangle:
int result = r1.area();
System.out.printf("The perimeter is %d%n", r2.perimeter());
Method overloading is when you have two or more versions of the same method, and each version has a different argument list. For example, suppose you wanted to define a method that computed the max of two numbers. You might want to do this for both ints and doubles. Here’s how:
public int max(int num1, int num2)
{
    if (num1 > num2) return num1;
    else return num2;
}

public double max(double num1, double num2)
{
    if (num1 > num2) return num1;
    else return num2;
}
Notice that the two versions of max have the same name, but different argument lists. They also
have different return types, but overloaded methods do not have to work this way. The compiler
can figure out which one you want to call based on what types you pass. For example:
int max1 = max(4, 7)would call the first version of max since the arguments are both ints. On the other hand:
double max2 = max(5.4, 8.76);would call the second version since the arguments are both doubles.
Constructors can also be overloaded. This is done by creating two constructors (both with the name of the class) with different argument lists.
In this section, we will discuss several keywords in Java that relate to classes, objects, and methods.
static keywordClass variables and class methods are defined with the static keyword. We have written
static methods in the past without talking about how they are different from non-static methods.
Variables and methods in a class that are not static are instance variables and instance methods,
which means there is a different version of each method and variable for each object instance of
the class.
Static variables and methods are called class variables and class methods, which means there is only one version of them for all different object instances of the class. Static methods and variables can also be accessed with the class name (as we’ve done before) without having to create an object instance. Regular variables and methods cannot be accessed in this way.
Here’s how to declare a static variable:
visibility static type name;And here’s how to declare a static method:
visibility static returnType name(args);Here’s a sample class with static variables and methods:
public class Circle
{
    public static double pi = 3.14159;

    public static double area(double radius)
    {
        return pi*radius*radius;
    }
}
Now, because pi and area are static, we access them using the class name (Circle). All of
the following are valid:
System.out.println(Circle.pi);      //prints 3.14159
double area = Circle.area(2);       //area = 12.566
Circle c1 = new Circle();
Circle c2 = new Circle();
System.out.println(c1.pi);          //prints 3.14159
double area = c1.area(2);           //area = 12.566
Circle.pi = 3.14;                   //Changes pi for all Circle objects
Static methods cannot refer to any fields. They can only refer to class variables (static variables), method arguments, and local variables.
final keywordThe keyword final in front of a variable denotes that the variable is a constant. Any
variable declared with “final” cannot be modified once it is initialized. For example, the pi
variable in the Circle class could be constant – pi should really always be the same value.
Here’s how we would change the class:
public class Circle {
    public static final double PI = 3.14159;

    public static double area(double radius)
    {
        return PI*radius*radius;
    }
}
Notice that constants are traditionally given names in all capital letters. Also, if I try to change
the value of PI, such as:
Circle.PI = 3.14;I will get a compiler error.
null keywordWhen we declare any variable without assigning it a value, that variable has no value by default. This means if we tried to do something like this:
int val;
val++;
We would get a compiler error, because we can’t add one to a variable with no value. Similarly, if we did this:
Rectangle r;
int a = r.area();
We would also get a compiler error, because we are trying to use r without initializing it to be a new object.
Sometimes you may want to initialize a class type variable, even if you are not ready to create a
new object yet. To do this, you can set the variable to the special value null:
Rectangle r = null;The null value is a valid value for all non-primitive variables (all variables that have a class
type). Primitives like ints, chars, doubles, and booleans cannot be set to null.
this keywordThe keyword this refers to “this object instance”. We can use it inside a class to refer to
fields and methods in this class. The keyword is primarily used to distinguish
fields from local variables. For example:
public class Person
{
    private String name;
    private int age;

    public Person(String name, int age)
    {
        this.name = name;
        this.age = age;
    }
}
Inside the Person constructor, this.name refers to the field called name,
while just name refers to the constructor parameter called name. In general, you can say:
this.nameto refer to a method or field (called name) inside THIS class. However, you cannot use the
this keyword with static methods or variables, since they don’t depend on a particular object
instance.
This section will show how to use objects in combinations with other programming constructs – as elements in an array, as parameters to methods, and as fields in other classes.
We have already seen how to create arrays of things like ints and doubles, but we can also create arrays of objects, where each element has a class type. The format for declaring an array of objects is just like declaring any other array:
type[] name;But here, type should be the name of a class. We can also create space for the array just like
we’ve done before:
name = new type[size];Elements in arrays are initialized to the default value of that type, so elements in an array of
objects are automatically initialized to null.
To see an example, recall the Rectangle class from earlier in the chapter. Suppose that we
want to create an array of 10 rectangles whose values are inputted by the user. Then, we want to
print the area and perimeter of each rectangle. Here’s how:
//Declare the array and allocate space
Rectangle[] rectArray = new Rectangle[10];

Scanner s = new Scanner(System.in);

//Get information about each rectangle
for (int i = 0; i < rectArray.length; i++)
{
    System.out.print("Enter the length: ");
    int length = s.nextInt();
    System.out.print("Enter the width: ");
    int width = s.nextInt();

    //Create a new Rectangle object with the
    //correct dimensions, and store it in the array
    rectArray[i] = new Rectangle(length, width);
}

//Loop to print the area and perimeter of each rectangle
for (int i = 0; i < rectArray.length; i++)
{
    System.out.printf("Rectangle %d: area %d, perimeter %d%n", i, rectArray[i].area(), rectArray[i].perim());
}
Notice that we’re treating each object in the array exactly like we would any other object, but instead of having to create a separate variable to refer to each object, we can store them all in an array.
We can pass objects to methods just like any other type of element. If we pass an object to a
method, the type for that parameter is the type of the object (the name of the class). Suppose we
want to write a printRectangle method that takes a Rectangle object as a parameter and
then prints its area and perimeter. Here’s how the method would look:
public void printRectangle(Rectangle r)
{
    //Now we can treat r just like any other Rectangle object
    System.out.printf("Area: %d%n", r.area());
    System.out.printf("Perimeter: %d%n", r.perim());
}
Now, suppose we’re in the same class as the printRectangle method. Then we could do:
Rectangle rect = new Rectangle(3, 4);
printRectangle(rect);
Notice that passing objects to methods works exactly like passing other types to methods – the only difference is that the parameter type is now the name of a class.
We can also make objects be fields in another class – again, this works just like other
types of fields, but the type for the field will be the name of a class. For
example, suppose we have the following Person class:
public class Person
{
    public String name;
    public int age;

    public Person(String n, int a)
    {
        name = n;
        age = a;
    }
}
Now, suppose we want to write a Child class that holds a child’s name, grade, school, and
parent information. Each parent will be stored as a Person field. Here is the
Child class:
public class Child
{
    private String name;
    private int grade;
    private String school;
    private Person mother;
    private Person father;

    //n: name, g: grade, s: school
    //mn: Mom’s name, ma: Mom’s age
    //fn: Dad’s name, fa: Dad’s age
    public Child(String n, int g, String s, String mn,
    int ma, String fn, int fa)
    {
        name = n;
        grade = g;
        school = s;

        //Initialize fields to be new objects
        //with corresponding names and ages
        mother = new Person(mn, ma);
        father = new Person(fn, fa);
    }
}
Now, suppose we are outside both the Person and Child classes and we want to create a
Child object with the following information:
Here’s what we would do:
Child c = new Child("Fred", 5, "Bluemont Elementary", "Donna", 34, "Frank", 35);There are two ways to call a method – calling by reference and calling by value. While these two approaches can sometimes look the same, passing an array or an object to a method is very different from passing a primitive variable like an int. If you modify an object or array that is a method argument, it will modify the original variable. However, if you modify a primitive method argument, the original variable remains unchanged.
When you pass objects and arrays to methods, you are calling the method by reference. This means that if you change a value in the array, or change a property of the object, then the original variable that you passed to the method will also change.
Consider the following method:
public void setZero(int[] nums) {
for (int i = 0; i < nums.length; i++) {
nums[i] = 0;
}
}
Now, consider this call to setZero:
int[] vals = {1, 2, 3, 4};
setZero(vals);
When we return from setZero, every element in the vals array will be 0. This is because if
an array is changed by a method, the original array (vals) is also changed.
Passing objects is also a type of call by reference. Consider the following class:
public class Person {
    private String name;
    private int age;

    public Person(String name, int age)
    {
        this.name = name;
        this.age = age;
    }

    public void incAge()
    {
    age++;
    }
}
And consider this outside method:
public void changePerson(Person p)
{
    p.incAge();
}
Now we create a Person object and call the changePerson method:
Person pers = new Person("Amy", 26);
changePerson(pers);
When we return from the changePerson call, pers now has age 27 (since changing the
object in the method changed the original object).
However, suppose changePerson looked like this instead:
public void changePerson(Person p)
{
    p = null;
}
If I now created a Person object and called changePerson:
Person pers = new Person("Amy", 26);
changePerson(pers);
Then pers would NOT have the value null after the method call. This is rather confusing
(and makes more sense in C++, which uses pointers), but p and pers are two different variables
that reference the same object in memory. If I change that object’s age (like in the first version
of changePerson), then the age changes for BOTH variables. However, if I set p to null, it
just makes p reference null instead of the Person object. pers still references the Person
object, so it remains unchanged.
When you pass primitive variables (like ints) to a method, whatever changes you make inside the method will not affect the original variable. For example:
public void inc(int x)
{
    x++;
}

//assume this code is somewhere else in the same class
int num = 4;
inc(num);
Even though the inc method adds one to x, it does not affect the value of num. This is because
instead of passing the num variable, only the value is passed. This value (4) is stored in the
method argument (x). When I increment x, it does not change num because they are two
separate variables.
Just remember that if you pass an int, double, or char and change it inside a method – the change won’t stick. If you change an object or array, the change will stick.
There are many different design patterns for programs – ways to organize your code to make it easy to read and easy to change. You will learn much more about these design patterns in a later class, CIS 501. In this chapter, we will look at one such design pattern – the Model-View-Controller (MVC) architecture.
When following the Model-View-Controller (MVC) architecture, you divide your code into three parts:
In this organization, the Model and View components never communicate. Instead, the Controller gets input from the View and gives it to the Model. Then it gets results from the Model and gives them to the View to display.
In larger programs, the Model, View, and Controller component will likely be several classes each. However, in our first examples, we will use one class for each component.
In this section, we will look at a first example that applies the MVC architecture.
Suppose we want to write a program that determines whether a number is divisible by nine. Numbers are divisible by nine if the sum of their digits are divisible by nine. We will write this program using MVC architecture. We will also allow the user to check whether 10 different numbers are divisible by 9.
Below is a list of the classes we’ll need, and which methods and fields will go there. It is a good idea to make a plan like this before you start writing any code.
IO (View component)Scanner field/constructor to initializepublic int getNum()public void displayDivisible(int num, boolean divisible)Calculator (Model component)public boolean getDivisible(int num)Proj (Controller component)main method that will call back and forth between IO and CalculatorNow, here’s the implementation of each class:
//In IO.cs
import java.util.*;

public class IO
{
    private Scanner s;

    public IO()
    {
        s = new Scanner(System.in);
    }

    public int getNum()
    {
        System.out.print("Enter a positive integer: ");
        return s.nextInt();
    }

    public void displayDivisible(int num, boolean divisible)
    {
        System.out.printf("%d is ", num);
        if (!divisible) System.out.print("not ");
        System.out.println("divisible by 9.");
    }
}

//In Calculator.cs
public class Calculator
{
    public boolean getDivisible(int num)
    {
        int sum = 0;
        while (num != 0)
        {
            int digit = num%10;
            num = num/10;
            sum += digit;
        }

        if (sum % 9 == 0) return true;
        else return false;
    }
}

//In Proj.cs
public class Proj
{
    public static void main(String[] args)
    {
        //Create IO, Calculator objects
        IO io = new IO();
        Calculator calc = new Calculator();

        //Test 10 different numbers
        for (int i = 0; i < 10; i++)
        {
            //Get input number
            int num = io.getNum();

            //Get divisibility
            boolean div = calc.getDivisible(num);

            //Display results
            io.displayDivisible(num, div);
        }
    }
}
The first thing you probably noticed on this example is that it is significantly more code than a single-class implementation would be. And you’re absolutely right – for this example, would make much more sense to just use a single class. However, as your programs get bigger, you will need to divide them up like this to be able to keep track of what’s going on. This example illustrates how to break things into several classes so that you’ll know how when you do get a big project.
In this section, we will use the Model-View-Controller architecture to implement a Connect Four game. Again, we will first divide this game into model, view, and controller components, and then implement each piece:
IO (View component)Scanner field/constructor to initializepublic void printBoard(String board)public int getMove(char piece)public void printResults(String msg)Board (Model component)char[][] field/constructor to initializepublic boolean move(int column, char piece)public boolean full()public String toString()public boolean winner(char piece)ConnectFour (Controller component)main method – call back and forth between IO and BoardHere’s the implementation of each class:
import java.util.*;

public class IO
{
    private Scanner s;

    public IO()
    {
        s = new Scanner(System.in);
    }

    public void printBoard(String board)
    {
        System.out.println("\nCurrent board:\n");
        System.out.println(board);
        System.out.println();
    }

    public int getMove(char piece)
    {
        System.out.printf("User %c, enter a column: ", piece);
        return s.nextInt();
    }

    public void printResults(String msg)
    {
     System.out.printf("%s%n%n", msg);
    }
}

public class Board
{
    private char[][] board;

    public Board()
    {
        board = new char[6][7];

        for (int i = 0; i < 6; i++)
        {
            for (int j = 0; j < 7; j++)
            {
                board[i][j] = '_';
            }
        }
    }

    public boolean move(int column, char piece)
    {
        if (column < 0 || column > 6)
        {
            return false;
        }
        else if (board[0][column] != '_')
        {
            return false;
        }
        else
        {
            int i;
            for (i = 5; i>=0 && board[i][column] != '_'; i--)
            {
                board[i][column] = piece;
            }
        }
    }

    public boolean full()
    {
        for (int i = 0; i < 6; i++)
        {
            for (int j = 0; j < 7; j++)
            {
                if (board[i][j] == '_') return false;
            }
        }

        return true;
    }

    //NOTE: a StringBuilder would be much more efficient
    public String toString()
    {
        String result = "";
        for (int i = 0; i < 6; i++)
        {
            for (int j = 0; j < 7; j++)
            {
                result += board[i][j] + " ";
            }

            result += "\n";
        }

        return result;
    }

    public boolean winner(char piece)
    {
        //check row win
        for (int i = 0; i < 6; i++)
        {
            for (int j = 0; j < 3; j++)
            {
                int x;
                for(x = 0; x < 4; x++)
                {
                    if (board[i][j+x] != piece) break;
                }

                if (x == 4) return true;
            }
        }

        //check column win
        for (int j = 0; j < 7; j++)
        {
            for (int i = 0; i < 2; i++)
            {
                int x;
                for (x = 0; x < 4; x++)
                {
                    if (board[i+x][j] != piece) break;
                }

                if (x == 4) return true;
            }
        }

        //check / diagonals
        for (int i = 0; i < 3; i++)
        {
            for (int j = 0; j < 4; j++)
            {
                int x;
                for (x = 0; x < 4; x++)
                {
                    if (board[i+x][j+3-x] != piece) break;
                }

                if (x == 4) return true;
            }
        }

        //check \ diagonals
        for (int i = 0; i < 3; i++)
        {
            for (int j = 0; j < 4; j++)
            {
                int x;
                for (x = 0; x < 4; x++)
                {
                    if (board[i+x][j+x] != piece) break;
                }

                if (x == 4) return true;
            }
        }

        return false;
    }
}

public class ConnectFour
{
    public static void main(String[] args)
    {
        IO io = new IO();
        Board b = new Board();

        char piece = 'X';
        io.printBoard(b.toString());

        while (b.full() == false)
        {
            int col = io.getMove(piece);
            boolean worked = b.move(col, piece);
            if (worked)
            {
                io.printBoard(b.toString());

                if (b.winner(piece) == true)
                {
                    io.printResults(piece + " wins!");

                    //this will leave the program
                    return;
                }

                //switch the turn
                if (piece == 'X') piece = 'O';
                else piece = 'X';
            }
            else
            {
                io.printResults("Invalid move");
            }
        }

        //we would have quit the program if someone had won
        io.printResults("Tie game");
    }
}When writing programs, it’s good to think about all the situations where things could go wrong. For example, if you ask the user to input an integer, you should probably check to see if they actually did.
Java has a special class called Exception that is used when things go wrong in a program. If
you reach a certain error state (such as getting bad input), you can throw an exception that
describes the error. You can also try troublesome code, and then catch (and handle) any
problems that might have happened.
Here’s the format for trying code that might cause problems, and then catching and handling the errors:
try
{
    //code that might cause problems
}
catch (Exception e)
{
    //handle the error
}
Suppose I try to read from a file that doesn’t exist. That could certainly cause problems! To handle this, I’m going to try reading from a file, and then catch any problems:
Scanner console = new Scanner(System.in);
try
{
    System.out.print("Input the name of a file: ");
    String name = console.nextLine();
    Scanner fileIn = new Scanner(new File(name));
    String line = fileIn.nextLine();
    System.out.printf("1st line: %s%n", line);
}
catch (Exception e)
{
    System.out.println("Error reading file.");
    System.exit(1); //exits the program
}
In this example, ask the user for the name of an input file. We try reading and printing the first line of that file. If something goes wrong, we catch the exception, print an error message, and exit the program.
You can also throw your own exceptions if something unexpected happens in your code. To do that, write:
throw new Exception("description of problem");when the unexpected state occurs. If the error occurs in a method, you can throw an exception instead of returning a value. Here’s an example:
public void divide(int a, int b)
{
    if (b == 0)
    {
        throw new Exception("Division by zero");
    }
    else return a/b;
}
When I call divide, it will either return a value or it will throw an exception. I could try/catch
my call to divide as follows:
int a, b;
//get user input for a and b
try
{
int result = divide(a, b);
System.out.println(result);
}
catch(Exception e)
{
//will print "Division by zero"
System.out.println(e.getMessage());
}If I use the try/catch block, the program will not crash if I try to divide by zero. Alternatively, if I call divide without using a try/catch, the program will crash and the exception message (“Division by zero”) will get printed.
The Java Exception class can be used for all types of unexpected problems. However, there
are also a number of specific types of exceptions you can use instead. It’s best to throw
exceptions that are specifically designed for the type of problem you’re having. It’s also best to
catch specific kinds of exceptions so you don’t end up with a catch block that catches a bunch of
different possible problems. Here are the most common Java exceptions:
IOException – input/output problems, or trouble with filesNullPointerException – access method/variable on a variable that has the value
null (the default value for objects)IllegalArgumentException – an unexpected argument value in a methodNumberFormatException – try to convert something that doesn’t have the right
format (like converting “Bob” to an int)ArrayIndexOutOfBoundsException – try to access an element beyond the
bounds of an arrayNow, instead of throwing/catching exceptions, you can throw/catch these more specific
exceptions. For example, if we revisit the divide method:
public void divide(int a, int b)
{
if (b == 0)
{
throw new IllegalArgumentException("Division by zero");
}
else return a/b;
}Since b==0 is a bad value for the divide argument, we throw an
IllegalArgumentException. Now, we can also catch an
IllegalArgumentException:
int a, b;
//get user input for a and b
try
{
int result = divide(a, b);
System.out.println(result);
}
catch(IllegalArgumentException e)
{
//will print a descriptive error message
System.out.println(e.getMessage());
}You can also have more than one catch block if more than one type of problem might occur. For example, if we read in a line from a file and then try to convert it to a number, there are two possible problems: there might be an error reading from the file, and there might be an error converting the input to a number. Here’s how to catch both problems:
try
{
//read the 1st line of nums.txt, convert it to an int
Scanner fileIn = new Scanner(new File("nums.txt"));
String line = fileIn.nextLine();
int val = Integer.parseInt(line);
System.out.printf("First number: %d%n", val);
}
catch (IOException e)
{
System.out.println("Error reading file.");
}
catch (NumberFormatException e)
{
System.out.println("1st line of file not an int.");
}Now, we will get an error message specific to the type of problem that occurs.
In this chapter, we will look at Java library classes that are designed for storing a collection of data.
The collections classes we will look at in this chapter are all part of the Java Collections Framework. We will see that the best way to store data depends on our purpose – how many elements we want to store, whether we need things in sorted order, and how we would like to be able to search for individual elements. In the next course, CIS 300, you will learn much more about these different ways to store data (called data structures) – including how to implement these Java library classes. To use any of these classes, we need the following import statement:
import java.util.*;The Java Collections Framework makes use of a feature in Java called generics. The collections classes are written so that they can hold ANY type of elements we choose to store. When we create a new collections object, we must list the type of element that we’re storing. You will learn more about generics, including how to implement them in your own classes, in CIS 300.
The first collection class we will look at is the ArrayList class. This class is essentially a
resizable array – the class stores the elements in an array, but if that array gets full as elements
are added, it makes it bigger. When we are using the ArrayList class, though, we don’t see
anything about the array. All we see is the ability to add elements, remove elements, find
elements, etc. – but we do all of this through method calls.
ArrayListTo create an ArrayList object, we do:
ArrayList<type> name = new ArrayList<type>();Here, type is the type of elements we want to store, and name is the variable name we’re
giving to this ArrayList. For example, to create an ArrayList that holds a bunch of
names, we might do:
ArrayList<String> namesList = new ArrayList<String>();Once we’ve created a new ArrayList object, we can add elements to our list. This is done
with the syntax:
name.add(elem);Where name is the name of our ArrayList, and elem has the same type we specified when
creating that list. For example, we could add names to our namesList object as follows:
namesList.add("Bob");
namesList.add("Jane");
namesList.add("Joe");
namesList.add("Mary");An ArrayList stores elements in the same way you would expect things to be stored in the
array (because the class itself uses an array to store the elements). After adding those four
names, we can think of “Bob” being at index 0, “Jane” being at index 1, etc.
Once we have stored values in an ArrayList, we can change their value by specifying the
index we’re after and the new value we want to use. Here is the syntax:
name.set(index, elem);Where index is the position we want to change (thinking of the ArrayList like an array),
and elem is the new value we wish to store. For example, if we do:
namesList.set(1, "Allison");Then the new list of values in namesList is: {"Bob", "Allison", "Joe", "Mary"}.
We cannot use this syntax to change a position that has not been added yet. For example, if we
try:
namesList.set(5, "Fred");Then an exception will be thrown, as there is not currently an element at position 5.
We can also access elements in an ArrayList much like we can access elements in an array –
by specifying the index we want. We can do this with the syntax:
name.get(index)Where index is the position of the element we would like to access. This method call returns
the element at that position, so we will usually want to store the result of the method call in a
variable whose type matches the type of elements we’re storing. For example, we could do:
String first = namesList.get(0);To get the first name in namesList. Our first variable will now have the value “Bob”.
We can also use this method to help us access every element in an ArrayList, using the
syntax name.size() to determine how many elements are in the list. For example, we can
print every element in namesList like this:
for (int i = 0; i < namesList.size(); i++)
{
System.out.println(namesList.get(i));
}This will print:
Bob
Allison
Joe
MaryWe can also remove elements from our list by specifying the index of the element we wish to remove. Any element that was behind the one we’re removing will be shifted down to fill the empty spot. The syntax is:
name.remove(index)Where index is the position with the element we wish to remove. This method does return the
element that is removed, so you can optionally store the result of the method call in a variable
with the same type as the elements being stored.
For example, we can do:
namesList.remove(1);This removes “Allison” from our list, and shifts up “Joe” and “Mary” to fill the hole. Now the contents of the list are: Bob at index 0, Joe at index 1, and Mary at index 2.
In Java, variable types such as int, double, char, and boolean are called primitive types. Other
types (which are defined by a Java class or one of our own classes), like String, StringTokenizer,
Random, Person (if we had written a Person class), etc. are called reference types. The
difference between these types is a bit beyond the scope of this class, but it has to do with how
these variables are stored in memory. Memory space for primitive variables is always allocated
before the program runs, but memory space for reference types (objects) is not allocated until the
program is already running. Moreover, a primitive variable actually holds a value, while a
reference variable holds the memory address of where that object is in memory.
In any case, Java Collections are only designed to hold reference types. However, there are
special reference types in Java (called wrapper classes) whose purpose is to turn a primitive type
into a reference type. The three such classes we will look at are: Integer, Double, and
Character. For example, we can do:
int x = 4;
Integer val = new Integer(x);This essentially turns the primitive int 4 into a reference type that wraps around the value 4. So if we want to store primitive types like ints in an `ArrayList’ (or any Java collection), we could try something like this:
ArrayList<Integer> nums = new ArrayList<Integer>();
nums.add(new Integer(4));
nums.add(new Integer(10));
nums.add(new Integer(2));If we wanted to get the value at index 1 (the 10), we could do:
Integer val = nums.get(1);And then if we wanted to turn it back into a regular int, we could use the intValue method:
int x = val.intValue();Now x would have the value 10. We notice, though, that having to deal with primitive types in
this way is cumbersome and annoying. To smooth this process, Java has an auto-boxing/auto-unboxing feature that automatically converts between primitive types like int, double, char and
their wrapper types. For example, we could create our nums list from above like this:
ArrayList<Integer> nums = new ArrayList<Integer>();
nums.add(4);
nums.add(10);
nums.add(2);When we pass in an int to be added to the list, that int is automatically converted to an Integer
(this is called auto-boxing). We can also do:
int x = nums.get(1);And the Integer at position 1 is automatically converted to an int (this is called auto-unboxing). We can do something similar with double/Double and char/Character.
An iterator is a tool in Java to help us step through each element in a collection. With an
ArrayList, it is just as easy to loop through each index (with a for loop) and call get to access
each value, but the same is not true of other collections.
Suppose we have this ArrayList:
ArrayList<Double> vals = new ArrayList<Double>();
Scanner s = new Scanner(System.in);
for (int i = 0; i < 10; i++)
{
System.out.print("Enter a value: ");
double x = s.nextDouble();
vals.add(x);
}Here is how we can access and print each value in the list using an Iterator:
Iterator<Double> it = vals.iterator();
while (it.hasNext())
{
double cur = it.next();
System.out.println(cur);
}We will be able to use this same style of looping through elements with an Iterator in other
Java Collections.
We can also loop over each element in an ArrayList using a for-each loop. For example, we could rewrite our while loop
above that used an iterator to print each element in vals using a for-each loop:
for (Integer cur : vals)
{
System.out.println(cur);
}When we write a for-each loop over a collection, it is automatically translated by the compiler into the previous code that used an iterator.
In this section, we will write a bigger example that uses an ArrayList. Suppose that we want
to read information about a group of people from a file. Each line in the file (info.txt) will
have the format:
name: ageWe would like to store this information, and then allow the user to repeatedly search for a user by name. Each time, we will print out the age of the person with that name. First, we need a way to represent a person:
public class Person
{
private String name;
private int age;
public Person(String n, int a)
{
name = n;
age = a;
}
public String getName()
{
return name;
}
public int getAge()
{
return age;
}
}Now, we will write a class with a main method that creates an ArrayList of type Person.
For each line in the file, we will create a new Person object and store it in our list. Then we
will let the user search the list by name:
import java.util.*;
import java.io.*;
public class PersonLookup
{
public static void main(String[] args)
{
ArrayList<Person> list = new ArrayList<Person>();
try
{
Scanner inFile = new Scanner(new File("info.txt"));
while (inFile.hasNext())
{
String line = inFile.nextLine();
String[] pieces = line.split(": ");
int age = Integer.parseInt(pieces[1]);
Person p = new Person(pieces[0], age);
list.add(p);
}
inFile.close();
}
catch (IOException ioe)
{
System.out.println("Trouble reading file");
}
Scanner s = new Scanner(System.in);
while (true)
{
System.out.print("Enter name (Enter to quit): ");
String name = s.nextLine();
if (name.length() == 0) break;
for (Person p : list)
{
if (p.getName().equals(name))
{
System.out.println(p.getAge());
}
}
}
}
}The next collection class we will look at is the TreeSet class. You will learn much more about
the structure of this class (and tree structures in general) in CIS 300, but for now, all you need to
know is that a TreeSet is an efficient way to store data that needs to be sorted. This data is NOT
stored in a linear way (like an array, with one element after the other), so it will be trickier for us
to look at all the elements.
TreeSetTo create a TreeSet object, we do:
TreeSet<type> name = new TreeSet<type>();Here, type is the type of elements we want to store, and name is the variable name we’re
giving to this TreeSet. For example, to create a TreeSet that holds a bunch of names in
sorted order, we might do:
TreeSet<String> namesTree = new TreeSet<String>();Once we’ve created a new TreeSet object, we can add elements to it. This is done with the
syntax:
name.add(elem);Where name is the name of our TreeSet, and elem has the same type we specified when
creating that tree. For example, we could add names to our namesTree object as follows:
namesTree.add("Fred");
namesTree.add("Amy");
namesTree.add("Sam");
namesTree.add("Katelyn");Again, a TreeSet does not store elements the way you would expect them to be stored in
arrays (with indices corresponding to the different elements). Instead, the elements are stored in
sorted order. To get them back, we will need to use either an Iterator or a for-each loop.
We can use an iterator to access all the elements in our TreeSet in sorted order. Suppose we
have the namesTree TreeSet from above. We can access and print each name like this:
Iterator<String> it = namesTree.iterator();
while (it.hasNext())
{
String cur = it.next();
System.out.println(cur);
}This will print:
Amy
Fred
Katelyn
SamWe can also iterate over the elements in a TreeSet using a for-each loop, because, as we learned in the previous section, a for-each loop over a collection is automatically translated by the compiler to a while loop with a iterator.
For example, we can rewrite the previous while loop that used an iterator to print all the names in the TreeSet using a for-each loop:
for (String cur : namesTree)
{
System.out.println(cur);
}We can remove elements from our TreeSet by passing in which object we want to remove.
The remaining elements in the TreeSet are shifted around to still be in sorted order. The
syntax is:
name.remove(obj)Where obj is the element we wish to remove. This method does return the whether or not it
found that element (boolean) so you can optionally store the result of the method call.
For example, we can do:
namesTree.remove("Katelyn");To remove “Katelyn”. If we were to print each element again, using an iterator or a for-each loop, it would print:
Amy
Fred
SamNotice that it would shift around the elements to still be sorted after removing “Katelyn”.
The last collection class we will look at is the HashMap class. You will again learn much more
about the structure of this class (and hash tables in general) in later classes, but for now, the
purpose is to store information by key. For example, you might want to store information about
a bunch of accounts, and you want to be able to look up information on a particular account
using an account number (the key). Arrays are actually a form of this structure, but the key is
always an array index. Here, we can use ANYTHING as our “lookup” key. Like with a TreeSet, this data is NOT stored in a linear way, so it will again be trickier for us to look at
all the elements.
HashMapTo create a HashMap object, we do:
HashMap<keyType, valueType> name = new HashMap<keyType, valueType>();Here, keyType is the type of the keys, valueType is the type of values that we want to store, and name is the variable name we’re giving to this HashMap. For example,
to create a HashMap that allows us to look up state names (the values) by their two-letter
abbreviations (the keys), we would do:
HashMap<String, String> states = new HashMap<String, String>();Once we’ve created a new HashMap object, we can add (key, value) pairs to it. This is done
with the syntax:
name.put(key, value);Where name is the name of our HashMap, key is the key for the element (and has the same
type as keyType when we created it), and value is the value for the element (and has the
same type as valueType from above). For example, we could add state information to our
states object as follows:
states.put("KS", "Kansas");
states.put("NE", "Nebraska");
states.put("TX", "Texas");
states.put("OR", "Oregon");
states.put("AZ", "Arizona");Again, a HashMap does not store elements the way you would expect them to be stored in
arrays (with indices corresponding to the different elements). Instead, the elements are stored in
a way that makes it very fast for them to be looked up by key.
If we want to change the value associated with a particular key, we can call put with that key and just pass in a different value. It will overwrite the original value stored with that key. Note that this means that each key in a hash map must be unique.
Once we’ve created and filled a HashMap, we can look up the values by key.
valueType val = name.get(key);Where name is the name of our HashMap, key is the key for the element we’re looking up
(and has the same type as keyType when we created it), and valueType is the type of values
that are stored. For example, we could get back state names from our states object as
follows:
String abbrev = states.get("KS");Now, abbrev will be “Kansas” – the value stored with the key “KS”. If we try to get a value
from a key that doesn’t exist:
String anotherAbbrev = states.get("MD");Then we will get back null.
To get back each (key,value) pair in a HashMap, we must first get back an Iterator that lets
us step through each key. We will then call get with each key to get back the corresponding
values. Suppose we have the states HashMap from above. We can access and print each
(key,value) pair like this:
Iterator<String> keysIt = states.keySet().iterator();
while (keysIt.hasNext())
{
String curKey = keysIt.next();
String curValue = states.get(curKey);
System.out.printf("%s: %s%n", curKey, curValue);
}This will print:
TX: Texas
AZ: Arizona
KS: Kansas
OR: Oregon
NE: NebraskaNotice that this information is not being printed in the order we added it, nor is it printed in any kind of sorted order. This has to do with how things are stored in a hash map, and you will learn more about it in CIS 300. For now, just know that while getting elements out of a hash table is very fast, things are not sorted or even stored in their original order.
We can also use a for-each loop to step through each pair in a HashMap. Here is how we could repeat the above example
to print each abbreviation and corresponding state name using a for-each loop instead of an iterator:
for (String curKey : states.keySet())
{
String curValue = states.get(curKey);
System.out.printf("%s: %s%n", curKey, curValue);
}We can remove elements from our HashMap by passing in the key of the (key,value) pair that
we want to remove. The syntax is:
name.remove(key)Where key is the key of the pair we wish to remove. This method does return the value
associated with that key, so you can optionally store the result of the method call.
For example, we can do:
states.remove("KS");To remove the pair (“KS”, “Kansas”) If we were to print each pair again, it would print:
TX: Texas
AZ: Arizona
OR: Oregon
NE: NebraskaIn this example, the remaining elements were shifted up to cover the hole left by “Kansas”, but this is not always the case. You should think of hash maps as storing elements in a fairly random order (it is not actually random, but it looks that way).
We can see if a key currently exists in our HashMap by calling the containsKey
method with a particular key. This method will return true if that key does exist
in the HashMap, and false otherwise. It is commonly used in an if/else statement.
Here is the syntax:
boolean found = name.containsKey(key);Where key is the key we wish to search for. For example, we can do:
if (states.containsKey("KS")) {
//now we know the key "KS" is in our HashMap
}
else {
//now we know the key "KS" is NOT in our HashMap
}Finally, we will look at an application for which a hash table is appropriate. Suppose we have an input file that contains several paragraphs of text. We want to use a hash map to help count the frequency of each word in the document. Here’s how:
public void countOccurrences(String filename)
{
Scanner inFile = new Scanner(new File(filename));
HashMap<String, Integer> h = new HashMap<String, Integer>();
while (inFile.hasNext())
{
String line = inFile.nextLine();
String delims = ",:.;()?! ";
StringTokenizer tok = new StringTokenizer(line, delims);
while (tok.hasMoreTokens())
{
String word = tok.nextToken();
//if we haven’t seen it yet, give it a count of 1
if (!h.containsKey(word))
{
h.put(word, 1);
}
else
{
//otherwise, make its count one bigger
int count = h.get(word);
h.put(word, count+1);
}
}
}
inFile.close();
//now, print all the word frequencies
for (String s : h.keySet())
{
int num = h.get(s);
System.out.printf("%s: %d%n", s, num);
}
}In this chapter, we will study inheritance, which is an object-oriented concept that allows us to represent hierarchies.
For example, you might want a class to represent a person. However, you might also want to represent
students and professors. Well, all students are also people and all professors are also people. It
would be nice to store the more general information (like a person’s name and age) in a Person
class, and then create Student and Professor classes that can use the name and age from
Person, and then define more specific features.
A general class in Java is called a parent class. (It may also be referred to as a super class or a base class). For example, a class that defines a general person might look like this:
public class Person
{
protected String name;
protected int age;
public Person(String name, int age)
{
this.name = name;
this.age = age;
}
public void print()
{
System.out.println("I am a person.");
}
}This class looks pretty typical except for the “protected” keyword. Protected is another
visibility modifier (like private and public), but it’s specifically for inheritance. A
protected variable or method is one that is only visible inside the class or by any child
classes. (So, if we decide to make a more specific type of person, we will be able to see the
name and age.)
A child class is more specific version of a parent class. (A child class may also be called a sub
class or a derived class.) It retains the same features of the parent class, but adds more
detail/functionality. For example, a Student class would retain the name and age from the
Person class, but would add more features unique to students – major and gpa, for example.
To create a child class, you need to extend the parent class. Here’s the format:
public class ChildName extends ParentName
{
//normal class stuff
}The child class automatically inherits any public or protected variables and methods from the
parent class. So if I do:
public class Student extends Person
{
}Then the Student class inherits the name variable, the age variable, and the print method.
This means that we can pretend as if name, age, and print() are in the same class as
Student – we automatically get to use them, but we don’t have to write them again. So, we
only need to declare the major and gpa variables:
public class Student extends Person
{
private String major;
private double gpa;
}Next comes the constructor of the child class. We could simply do:
public Student(String n, int a, string m, double g)
{
this.name = n; //Student inherits name
this.age = a; //Student inherits age
this.major = m;
this.gpa = g;
}However, if you try this, the Student class will not compile. The reason for this is the
compiler will try to call the parent constructor (Person) before executing the code in the
Student constructor. It will try to call Person(), but of course Person does not have a no-argument constructor. To deal with this, we need to call the parent constructor ourselves. Here’s
how:
super(n, a);The super keyword refers to the parent object (similar to “this”). This calls the Person
constructor and passes the name and age. Of course, the Person constructor initializes the
name and age variables itself, so now we don’t have to. Here’s what the Student constructor
looks like now:
public Student(String n, int a, String m, double g)
{
super(n, a);
this.major = m;
this.gpa = g;
}Always include a call to super on the first line of the child constructor.
Suppose we have the Person and Student classes from earlier in the chapter:
public class Person
{
protected String name;
protected int age;
public Person(String name, int age)
{
this.name = name;
this.age = age;
}
public void print()
{
System.out.println("I am a person.");
}
}
public class Student extends Person
{
private String major;
private double gpa;
public Student(String n, int a, String m, double g)
{
super(n, a);
this.major = m;
this.gpa = g;
}
}We can create Person objects just as we’ve done before. For example:
Person p = new Person("Bob", 26);We can also create new Student objects as we’ve done before:
Student s = new Student("Lisa", 18, "PSYCH", 3.25);We can also call the print method for both of these variables. (Student inherits print()
because it extends Person.)
p.print();
s.print();Both of these method calls print “I am a person.”
Since every Student is also a Person (because Student extends Person), a Student
can also be stored in a Person variable:
Person ps = new Student("Fred", 20, "ECE", 3.1);However, not all people are students, so we can’t store a Person in a Student variable:
//NO! This will not compile - not all people are students.
Student bad = new Person("Jane", 30);Suppose again that we have the Person and Student classes from earlier in the chapter:
public class Person
{
protected String name;
protected int age;
public Person(String name, int age)
{
this.name = name;
this.age = age;
}
public void print()
{
System.out.println("I am a person.");
}
}
public class Student extends Person
{
private String major;
private double gpa;
public Student(String n, int a, String m, double g)
{
super(n, a);
this.major = m;
this.gpa = g;
}
}Currently, when we call print with a
Student variable, “I am a person” is printed. However, maybe we want to print “I am a
person” for objects of type Person, and print “I am a student” for objects of type
Student. I can accomplish this by overriding the print method to indicate that we don’t want to
use the inherited method, but would instead like to create our own version of that method.
To do this, I just create another print method in the Student class:
public void print()
{
System.out.println("I am a student.");
}When overriding a method, the version in the child class must have exactly the same header as the version in the parent class. This means the same return type, name, and arguments.
Now, when we call print with a Student object, it will print “I am a student.” For example:
Student s = new Student("Lisa", 18, "PSYCH", 3.25);
Person ps = new Student("Fred", 20, "ECE", 3.1);
s.print(); //prints "I am a student."
ps.print(); //prints "I am a student."Java defines the class Object, which is a parent of every other class. Every class that you
write (and every other class in the Java library) extends Object automatically. In fact, even
primitive variables like ints and chars can be treated as objects. (Primitive variables are NOT
objects, but they can be treated as such because of a feature called auto-boxing. This turns an int
into an Integer object, a double into a Double object, etc.)
For example, we can store all kinds of values in an Object variable:
Object val1 = 4;
Object val2 = "hello";
//Assumes we have our Person class from the previous section
Object val3 = new Person("Bob", 25);This is handy when we want to define classes that can store general types of data. If we let them
store objects, then they can hold any kind of values. All objects can use the method equals,
which compares if two objects are the same. They also all have the method toString, which
converts the object into a string.
With inheritance, we can do something like this (assuming Person and Student were as defined earlier in the chapter):
Person p = null;
if (condition)
{
p = new Person("Bob", 24);
}
else
{
p = new Student("Bob", 24, "ECE", 3.2);
}Here, we either store a Person object OR a Student object in p, depending on some
condition. It might be nice to have a way to tell which type of object we’ve stored. We can do
this with the instanceof command. Here’s how:
if (p instanceof Student)
{
//if we want, convert to a Student variable
Student s = (Student) p;
}This condition will evaluate to true if we stored a Student object inside p. We may then want
to cast p to a Student variable, as we did above.
Sometimes we may want to call the parent version of a method from the child class. As an example, suppose again that we have the Person and Student classes from earlier in the chapter:
public class Person
{
protected String name;
protected int age;
public Person(String name, int age)
{
this.name = name;
this.age = age;
}
public void print()
{
System.out.println("I am a person.");
}
}
public class Student extends Person
{
private String major;
private double gpa;
public Student(String n, int a, String m, double g)
{
super(n, a);
this.major = m;
this.gpa = g;
}
}Suppose we wanted our Student print method to FIRST print “I am a person” and THEN print “I
am a student”. We could do this with two print statements, or we could call the print method
for Person from inside the Student print method. Here’s the format for calling a parent method
from inside the child class:
super.methodName(args)So, here is our revised print method for Student:
public void print()
{
//Will go to Person's print method, and print "I am a person."
super.print();
System.out.println("I am a student.");
}In this chapter, we will learn about interfaces, abstract classes, inner classes, and packages.
An interface in Java is like a class that hasn’t been implemented yet. An interface contains a list of method headers, none of which are implemented. It is a way to list the features you want in a particular class without yet deciding how to implement them. Interfaces are very useful with data structures because we can list the functionality we’d like the data structure to have, and then implement them in several different ways.
Here’s a sample interface:
public interface ArrayCollection
{
void add(Object elem);
void print();
}This interface should be stored in the file ArrayCollection.java. This interface defines
what functionality we’d like a collection of general elements to have. We don’t know exactly
how we’re going to implement this collection, but we do know that we want to be able to add
elements and print elements. Notice that we do not include visibility modifiers in an interface
(they are all public by default).
Of course, we do eventually have to write code for array collections, or we won’t be able to use
the interface. To do this, we write a class that implements the ArrayCollection interface.
If a class implements an interface, then it must implement every method defined in the interface.
The method headers in the class must look EXACTLY like the method headers in the interface.
First, we’ll implement the ArrayCollection interface using the by storing all elements
added in an array (up to the maximum size):
public class ArrayList implements ArrayCollection
{
private Object[] arr;
private int size;
public ArrayList(int max)
{
arr = new Object[max];
size = 0;
}
public void add(Object elem)
{
//Don't add if we've reached our max size
if (size == arr.length) return;
arr[size] = elem;
size++;
}
public void print()
{
for (int i = 0; i < size; i++)
{
System.out.println(arr[i].toString());
}
}
}Similarly, we can implement the ArrayCollection interface using by only storing each
unique element added (up to the maximum size):
public class ArraySet implements ArrayCollection
{
private Object[] arr;
private int size;
public ArrayList(int max)
{
arr = new Object[max];
size = 0;
}
public void add(Object elem)
{
//Don't add if we've reached our max size
if (size == arr.length) return;
//Check if elem is already in array
for (int i = 0; i < size; i++)
{
if (arr[i].equals(elem)) return;
}
//Now add elem (no duplicates)
arr[size] = elem;
size++;
}
public void print()
{
for (int i = 0; i < size; i++)
{
System.out.println(arr[i].toString());
}
}
}Because ArrayCollection is an interface, we can’t create a new ArrayCollection
object. However, we can store either an ArrayList or an ArraySet object in an
ArrayCollection variable:
ArrayCollection coll = new ArrayList();ArrayCollection coll = new ArraySet();Then, we can call the ArrayCollection methods:
coll.add(2);
coll.add(2);If we created an ArrayList object, then the 2 would be added twice. If we created an
ArraySet object, the 2 would only be added once (since no duplicates are allowed). Thus we
can very quickly change our functionality by creating an ArraySet or ArrayList, but the
code using the collection would remain the same.
In example in the previous section, both the ArraySet and ArrayList implementations had the same
fields and the same print method. However, their add methods were different.
Thus it makes sense to define the fields and print methods in a parent class, but to
not implement the add method yet.
An abstract class is halfway between a parent class and an interface. Abstract classes can declare fields, and they can also contain completed methods. However, they must contain at least one unimplemented method (like the method header in an interface). An unimplemented method is called an abstract method.
An abstract class is declared with the keyword abstract:
public abstract class Name
{
}Any abstract methods must also be declared with the keyword abstract:
visibility abstract returnType name(args);Here is ArrayCollection rewritten as an abstract class:
public abstract class ArrayCollection
{
protected Object[] arr;
protected int size; //we can declare fields
//We don’t know how we're storing elements
//So we don't know how to add yet
public abstract void add(Object num);
//We already know how to implement print()
public void print()
{
for (int i = 0; i < size; i++)
{
System.out.println(arr[i].toString());
}
}
}Note that we can now declare fields (arr, size) and have implemented methods
(print()). However, the class is abstract because the add method is not implemented. This
class represents an array of general object elements, but we don’t yet know how to implement
the collection. We know that we would like an add operation, but don’t know how to write the
code for it.
Extending an abstract class is exactly like extending an ordinary class:
public class ChildName extends ParentName
{
}The only difference is that this class must implement every abstract method from the parent class.
Here is how we can implement the abstract class ArrayCollection by allowing duplicates:
public class ArrayList extends ArrayCollection
{
//We inherit size and arr
public ArrayList(int max)
{
arr = new int[max];
size = 0;
}
//add is no longer abstract
public void add(Object elem)
{
if (size == arr.length) return;
arr[size] = elem;
size++;
}
//We inherit print()
}Here are some examples of using the ArrayList class:
ArrayList ac = new ArrayList(10);
//ArrayList extends ArrayCollection
ArrayCollection c = new ArrayList(5);
ac.add(1);
ac.add(2);
c.add("a");
c.add("b");
c.add("c");
ac.print(); //ArrayList inherits print(), prints 1, 2
c.print(); //prints a, b, cAn inner class is a class declared INSIDE another class. This is done when we want the details of the inner class to only be visible to the class it’s inside. In this case, we declare the inner class private. Here’s the format:
public class OuterClass
{
//contents of OuterClass
private class InnerClass
{
//contents of InnerClass
}
}This code should be stored in the file OuterClass.java. No other class (besides
OuterClass) knows that InnerClass exists.
For example, suppose we want to store the names and ages of a bunch of people. We can have
an inner class called Person, that stores a single person’s name and age. Then, the outer class
can have an array of type Person:
public class People
{
private int size = 0;
private Person[] list = new Person[100];
//Add a new person, if there is room in the array
public void add(String name, int age)
{
//If there is room left
if (size < list.length)
{
//Create a new person, and add it to the array
Person p = new Person(name, age);
list[size] = p;
size++;
}
}
//Return the age of the given person
//Return -1 if the person isn’t in our array
public int getAge(String name)
{
//loop through all people
for (int i = 0; i < size; i++)
{
//if this person’s name matches what we’re looking for
if (list[i].name.equals(name))
{
//return this person’s age
return list[i].age;
}
}
//We haven’t returned yet, so we must have not
//found the name in our array. Return -1.
return -1;
}
//our inner class
private class Person
{
public String name;
public int age;
public Person(String name, int age)
{
this.name = name;
this.age = age;
}
}
}Here’s how we might use the People class:
People p = new People();
p.add("Fred", 18);
p.add("James", 20);
System.out.println(p.getAge("Fred")); //prints 18However, we can’t do:
Person pers = new Person("Amy", 26);from outside the People class, since we can’t see Person outside of People.
When you start writing industrial-sized software programs, you will start using hundreds – perhaps thousands – of classes. If all these classes were stored in the same directory, it would be very difficult to keep straight what anything did. A Java package allows us to store related classes and interfaces in a separate directory.
The biggest program we will write in this class will have about 10 classes, which is not big enough to need packages. However, we will separate our files into packages anyway, so as to get practice using them.
When you decide to place a class or interface in a package, first place that class or interface in a directory with the package name. Next, add the line:
package packageName;to the top of the file, where packageName is the name of the package. (Note: most
development environments handle packages for you. If you are using something like Eclipse,
find an “Add Package” option and supply the name of the package. Next, try to add a class or
interface to that package. The development environment will handle all the details for you.)
If you want to use code from a package called packageName, add:
import packageName.*;to the file where you want to use the code. This is exactly like importing Java packages. Now, you will be able to use all the classes and interfaces in that package.