Subsections of Getting Started
VS Code
VS Code
In CIS 308, we will edit our C programs using VS Code with C/C++ extensions. You likely already have Visual Studio (2019 or 2022) installed on your computer from CIS 300 and/or 400 – however, we will not be using Visual Studio in CIS 308. While it does have a C++ compiler, it behaves differently than more widely accepted C compilers (versions of gcc and clang). Finally, this class has a secondary goal of exposing students to a variety of Unix/Linux tools – something that cannot be done as easily in Visual Studio.
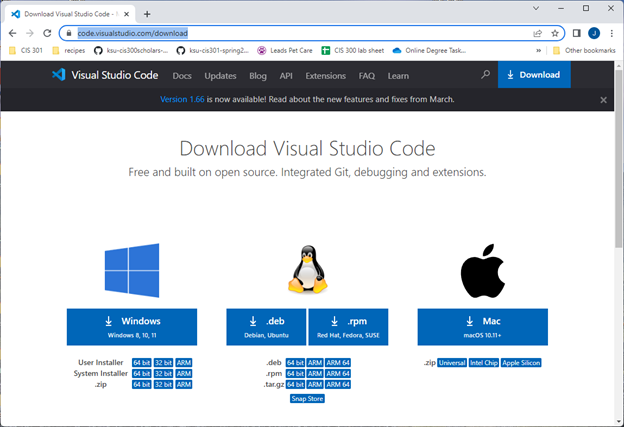
You can download VS Code here:
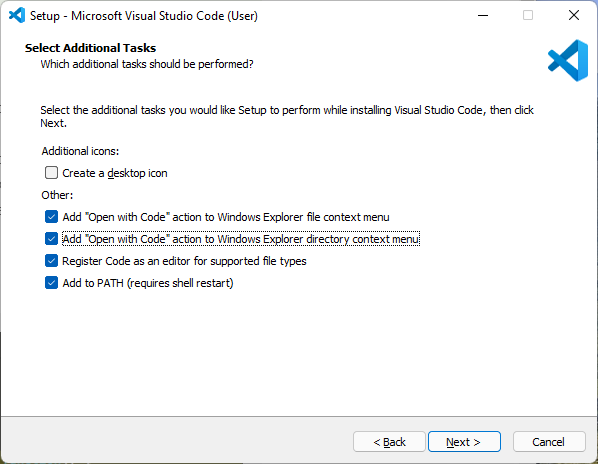
Install VS Code. When you see the prompt below, I recommend adding the “Open with code” action for both files and directories:
C/C++ extensions
If you are prompted to install C/C++, do so. If you are not, launch VS Code and select “Extensions” from the left-hand toolbar. From there, you can find and install “C/C++” (this will add syntax highlighting to our C programs).
We ONLY need C/C++, not the whole extension pack.
VS Code integrated terminal
We will be using the integrated terminal within VS Code, so that we can have the editor and the terminal (for compiling and running) within the same frame. If you do not see the Terminal at the bottom of VS code, select Terminal->New Terminal.
Windows users will want to select powershell as their terminal type, and Mac users will want to select the Mac terminal.
Get the compiler
VS code does not contain a C compiler (even with the C/C++ extensions) – we will need to install one.
Windows users
I recommend using either MSYS2 or WSL. (I prefer WSL, but on some systems it requires a BIOS edit before it will work.) You can download MSYS2 here. Follow the installation instructions.
Then, launch an MSYS2 shell (click Start, type MSYS2, and run the app). In the resulting shell, type:
When prompted, say Y. You should now have both gcc and make installed.
In order to use these commands from the command prompt, you will need to add their location to your Path. Check both C:\msys64\mingw64\bin and C:\msys64\usr\bin – copy the address of whichever location contains gcc.exe.
Next, add that location to your Path. Click Start, type Environment variables, and select “Edit the system environment variables”). Click “Environment Variables..”, then find Path under System variables and click “Edit…”. Click “New”, paste in the address you copied in the previous step, and click OK three times to dismiss each frame.
Open VS Code with an integrated terminal. Try typing:
and then:
You should see an error that no input files were provided (and not that the term is unrecognized).
Mac users
After installing VS Code with C/C++, follow this user guide to get gcc and make.
Open VS Code with an integrated terminal, and type:
If you get an error that gcc is unrecognized, run the command:
If you try gcc --version again, it should give you a version number.
Organizing labs
I recommend that you create a folder specifically for CIS 308, and then create subfolders within that folder for each lab assignment. If you are using the lab machines, you will want to put this folder on the U: drive, as files saved in other locations may be deleted.
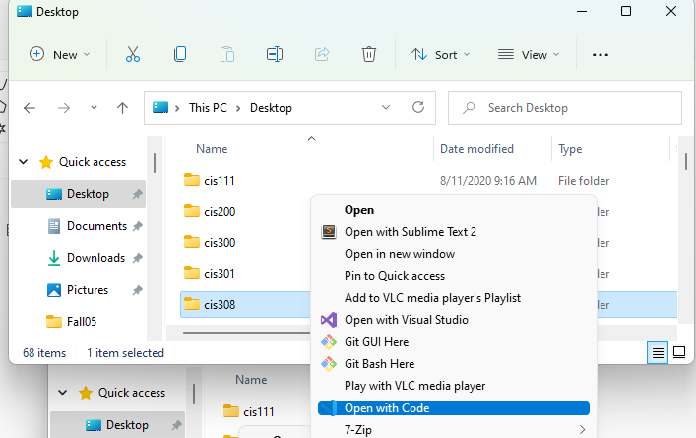
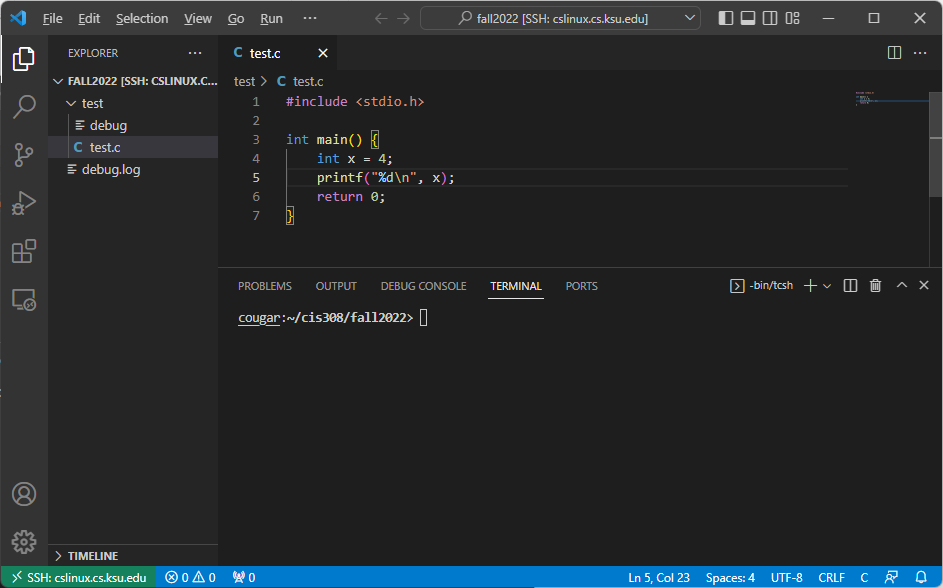
When you are ready to start a lab assignment, right-click your CIS 308 folder and select “Open with Code”:
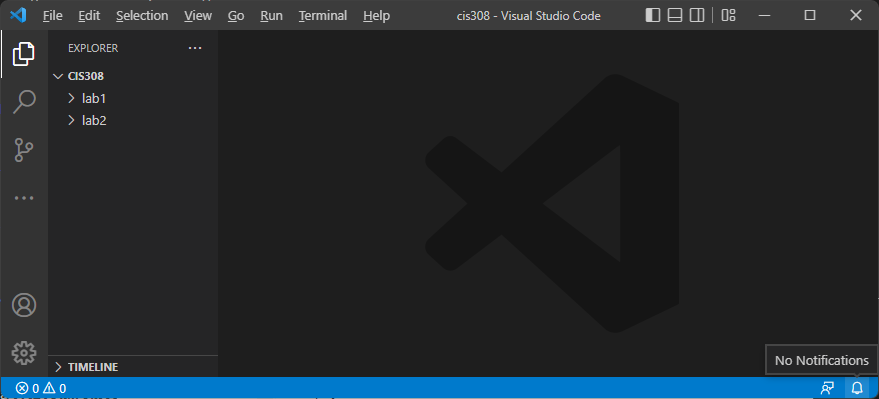
This will open everything within your CIS 308 subfolder in VS Code:
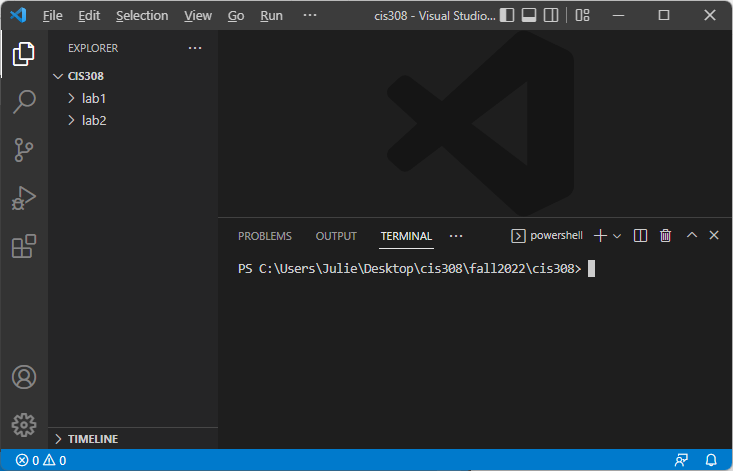
Now, display the integrated terminal in VS Code (Terminal->New Terminal):
(My directory structure might look strange because I created a second CIS 308 folder for the purposes of making these screenshots.)
Starting the next lab
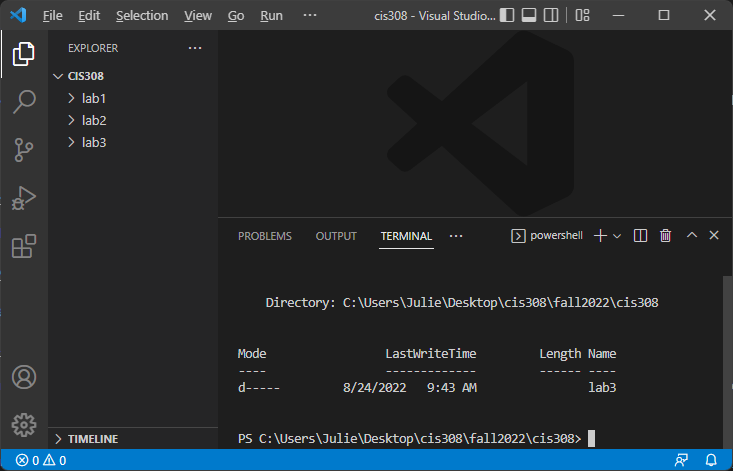
After following the instructions above to open VS Code to your CIS 308 folder with the integrated terminal displayed, you are ready to create a new, empty folder for the current lab. Suppose we are ready for lab 3. In the integrated terminal, type:
You should see a new lab3 folder in the project view on the left:
Next, use the cd command in the integrated terminal to change directories to your new folder. Type:
(or whatever the current lab is). You should notice that the directory listed in the terminal prompt ends with you new folder, like this:

You are now ready to follow the steps in the next section, “Using Git”, to clone the starting repository for your lab.
Using git
This class will use GitHub links to create initial repositories for both labs and programming projects, similarly to what you have done in CIS 300 and 301.
GitHub account
First, you will need to create a GitHub account here. If you already have one, you can use your existing account.
Verify a git install
You will likely already have a command-line version of git installed on your machine. To check, open a folder in VS Code, display the integrated terminal, and type:
You should see a version number printing out. If you see that, git is already installed.
If you see an error that git is unrecognized, then you will need to install it. Go here to download and install the latest version.
Windows users may need to add the git.exe location to the system Path environment variables. Most likely, git.exe will be installed to C:\Program Files\Git\bin. Check this location, copy its address, and type “Environment variables” in the Windows search. Click “Environment Variables” and find “Path” under System variables. Click “Edit…”. Verify that C:\Program Files\Git\bin (or whatever your git location) is the last item listed. If it isn’t, add a new entry for C:\Program Files\Git\bin.
Clone the repository
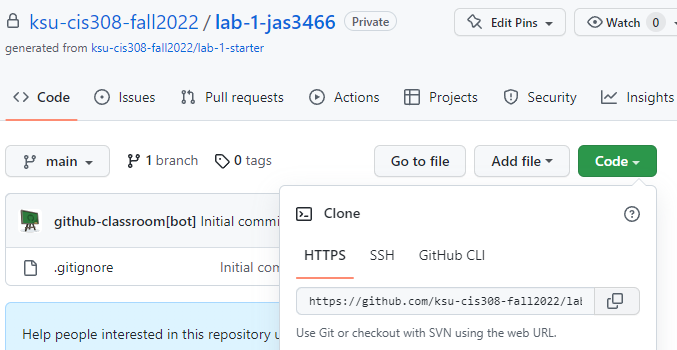
When you get a new assignment, first click the assignment link – this will create an initial GitHub repository.
After opening your GitHub repository, click the green “Code” button and click the copy icon next to the URL name. This will copy the URL of your GitHub repository:
For labs, follow the instructions under “Organizing Labs” in section 0.1 to open your CIS 308 folder in VS Code, create a new lab folder, and change directories to your empty folder.
For projects, create an empty folder on your machine, right-click the folder name, and select “Open with Code”. Then open the Terminal within VS Code by selecting “Terminal->New Terminal”. The terminal should automatically display the empty folder you just created.
Clone your GitHub repository to your new, empty folder by typing in the terminal:
git clone {repository-url} ./
Where {repository-url} is the URL you copied from your GitHub repository (leave off the { and } when you insert your URL). The ./ tells git to clone the repository to the current directory.
Add code and test
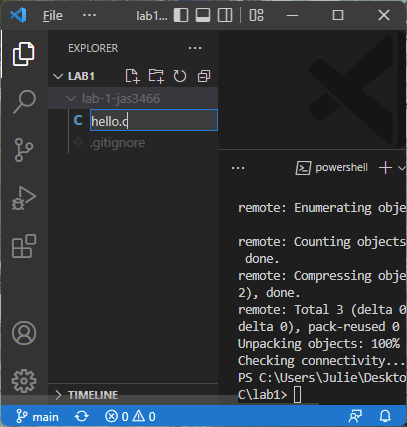
Add the necessary programming files to your project. You can add a file in VS Code by clicking your project name under “Explorer”, and then clicking the icon labeled “New File” (it looks a piece of paper with a plus sign). Type the name of your new file and hit Enter to save it:
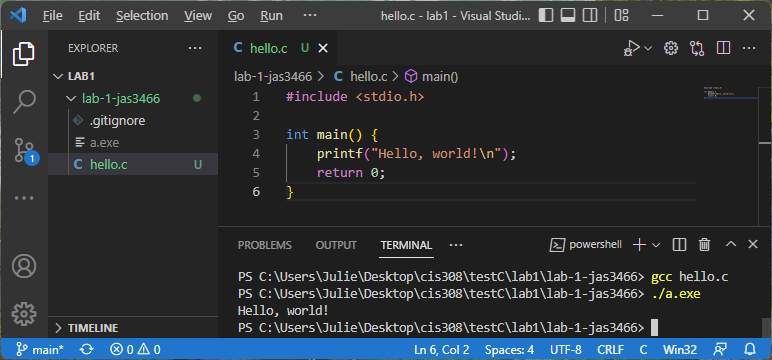
Write the code for your project. As you go, save it and test it with the gcc compiler. If it builds, run the resulting executable (either a.exe or a.out). Here is an example of compiling and running a Hello, World! program:
Commit and push
Once you are ready to commit your changes, type the following in the integrated terminal:
This will add all changes to the current commit. Then type:
git commit -m "descriptive message"
to create a local commit, where “descriptive message” is replaced with a message describing your changes (you DO need to include the quotations). Finally, push your local commit to the current branch:
If you go to your GitHub repository URL, you should see the latest changes.
Compiling and Running
After you have installed VS Code along with gcc, you can write C programs in the VS Code editor and then use the integrated terminal to compile and run.
Hello, World! in VS Code
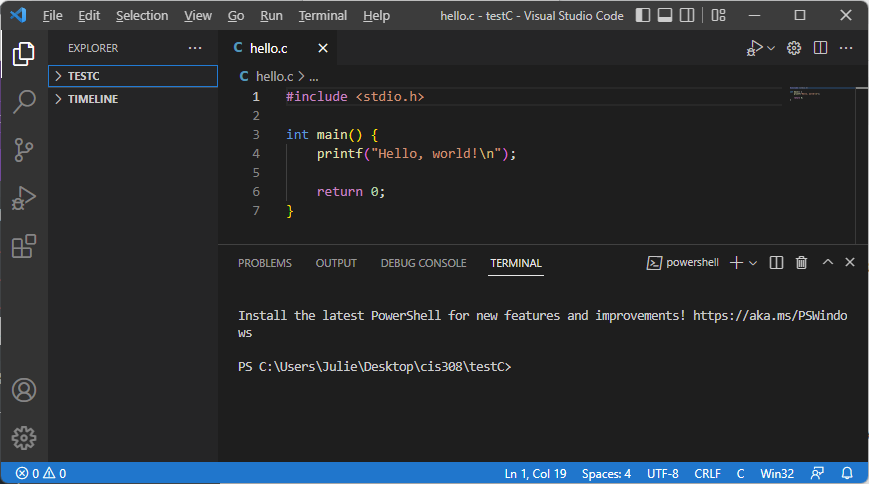
Here is a Hello, World! program written in C using VS Code. It is saved to the file hello.c (note that .c is the extension for C programs):
Find code in terminal
To compile and run a C program, make sure the integrated terminal appears below the code in VS Code (as shown above). If it doesn’t, select “Terminal->New Terminal”. This will open a new terminal in your current directory.
List directory contents
In the integrated terminal, type:
This should list the contents of the current directory, which hopefully includes your hello.c file. If you get an error that ls is unrecognized (which it might be, depending on what kind of terminal you are using), try:
instead.
Change directory
If you do not see your code file displayed after typing ls or dir, then you are likely not in the folder that contains your code. If your code is contained within a subfolder of the current directory path displayed in the terminal, do:
where dir-name is the name of a subfolder within the terminal’s current directory. (Make sure to leave off the { and } when substiting a directory name.) This will change the terminal’s current directory to be: dir-name.
Alternatively, you may need to back out to the parent folder of the current directory. If you do:
Then the terminal’s current directory will update to be its parent folder.
Compile and run
Once you have found the directory with your code (which was most likely the original terminal directory without having to make any changes), you are ready to compile your code. To compile our hello.c program, we type:
(replacing hello.c with the name of our C program file). If there were no errors, it will generate an executable file. If you type:
(or dir), you should see either a.out or a.exe – this is the executable file for your program.
To run your executable, type either:
or:
Depending on the name of your executable file. You should see your program running in the terminal.
Here is an example of compiling and running our Hello, World! program in the VS Code terminal:
Terminal commands
A side goal of this class is for students to become more comfortable with using the terminal. With practice, you will find that you are faster at navigating folders, creating files/folders, compiling/running programs, using tools stuch as git, etc. using the terminal than you are using a GUI. Familiarity with a terminal is especially useful in system administration and web development.
Summary of common terminal commands
Here is a summary table of the most common terminal commands for this course:
| Command | Description |
|---|
| dir | Lists the current directory contents (only available in Windows) |
| ls | Lists the current directory contents (not available in Windows command prompt) |
| cd dirName | Changes the current directory in the terminal to be dirName. (Note: dirName must be a subfolder of the current directory.) |
| mkdir dirName | Makes a new, empty directory called dirName |
| ni fileName | Creates a new, empty file called fileName. We can do ni prog.c to create a new C program called prog.c (only available in Windows) |
| touch fileName | Creates a new, empty file called fileName. We can do touch prog.c to create a new C program called prog.c (only available in Mac/Linux/Unix) |
| cd .. | Updates the current directory in the terminal to be its parent directory. For example, if the current directory is C:\Users\Julie, then cd .. makes the current directory be C:\Users |
| del fileName | Deletes the file called fileName, which must be in the current directory (only available in Windows) |
| rm fileName | Deletes the file called fileName, which must be in the current directory (only available in Mac/Linux/Unix) |
Other terminal tips
When you are typing a directory name or file name in the terminal, you can type a few letters and hit Tab – the terminal will attempt to autocomplete the rest of the name.
To recall a command you recently typed in the terminal, you can use the up or down arrows. This saves you from typing the same commands over and over.
Debugging C programs
gdb is the C debugger. It allows you to create an executable specifically for debugging purposes.
Getting gdb
First, ensure that you have gdb installed.
gdb on Windows
Type in a terminal:
If you see a version number, then you already have gdb installed. If you see an error that gdb is unrecognized, you will need to install it. Launch a MSYS2 prompt (Windows icon->type MSYS2) and then type the following in MSYS2:
pacman -S mingw-w64-x86_64-gdb
This should install gdb. Next, you will need to add the gdb.exe location to your Path. It may be in the same location as gcc, which for me is C:\msys64\mingw64\bin, but it may be in a different location. The gdb.exe file should be in a \bin folder somewhere within the C:\msys64 folder - you may need to search for it. Copy the address where you find the gdb.exe file.
Next, add the location of your gdb.exe file to your Path (if it is a different location than your gcc.exe file). Click Start, type Environment variables, and select “Edit the system environment variables”). Click “Environment Variables..”, then find Path under System variables and click “Edit…”. Look to see if the location of your gdb.exe file is already listed – if it is, you don’t need to add anything. If it’s not, click “New”, paste in the address you copied in the previous step, and click OK three times to dismiss each frame.
gdb on Mac
I recommend following this tutorial to get gdb on your machine.
First tutorial
Suppose we have the following program, test.c. This program is supposed to multiply together the numbers 1 * 2 * 3 * 4 * 5, but it has some problems:
 1
 2
 3
 4
 5
 6
 7
 8
 9
10
11
12
13
| #include <stdio.h>
int main() {
int prod = 0;
for (int i = 1; i < 5; i++) {
prod = prod * i;
}
printf("Product is: %d\n", prod);
return 0;
}
|
First, build an executable with debugging information:
This will create the executable debug. You can run gdb on debug as follows (this will launch gdb, but will not yet start running your program):
You will see something like:
GNU gdb (GDB) 12.1
Copyright (C) 2022 Free Software Foundation, Inc.
License GPLv3+: GNU GPL version 3 or later <http://gnu.org/licenses/gpl.html>
This is free software: you are free to change and redistribute it.
There is NO WARRANTY, to the extent permitted by law.
Type "show copying" and "show warranty" for details.
This GDB was configured as "x86_64-w64-mingw32".
Type "show configuration" for configuration details.
For bug reporting instructions, please see:
<https://www.gnu.org/software/gdb/bugs/>.
Find the GDB manual and other documentation resources online at:
    <http://www.gnu.org/software/gdb/documentation/>.

For help, type "help".
Type "apropos word" to search for commands related to "word"...
Reading symbols from debug...
(gdb)
That last (gdb) at the end is the debugging prompt.
Before you execute your program in the debugger, you’ll want to set a breakpoint (or several). For example, suppose we want to set a breakpoint at the start of the main function. Then we can type:
(We could have also typed break 3, which sets a breakpoint on line 3 – which is the beginning of the main function.) You can add more than one breakpoint in this way.
When we have added our breakpoint(s) and are ready to run our program with debugging, we type at the debugging prompt:
(If our program accepts command-line arguments, we include them after the run command.) We see:
Starting program: C:\...\debug.exe
[New Thread 9144.0x47d8]

Thread 1 hit Breakpoint 1, main () at test.c:4
4           int prod = 0;
Which tells us that our program has stopped at our breakpoint just before executing line 4 (which is the first statement that performs an operation in our main function). From here, we can graphically view the current line in the program by typing:
In this example, we will see:
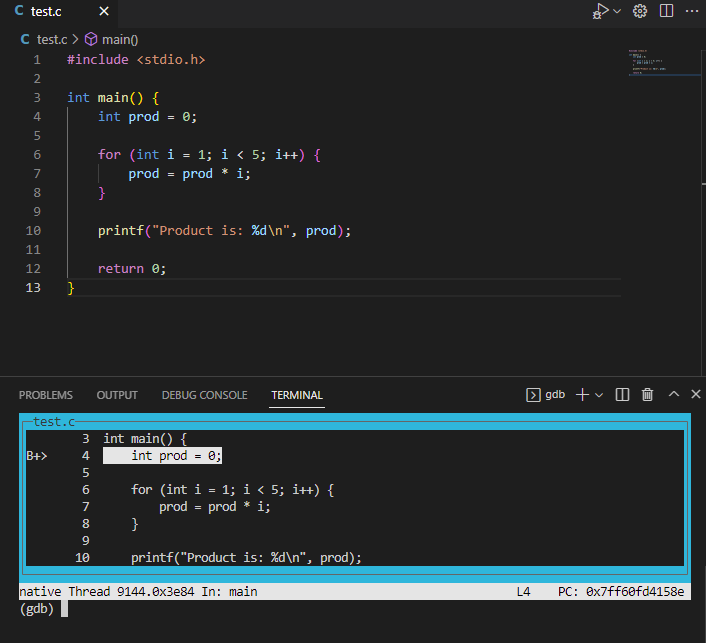
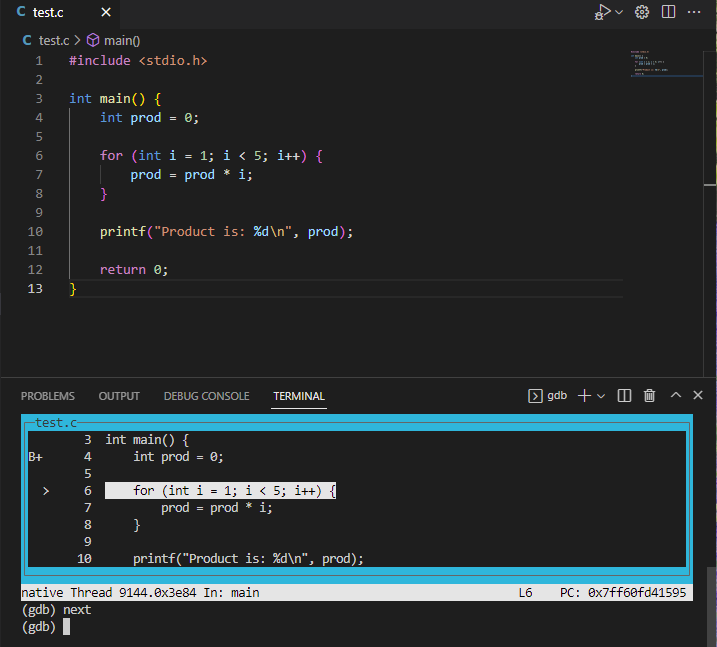
Notice that the line that will be executed next (line 4, where we declare and initialized prod) is highlighted. We can also see our main function breakpoint indicated with a B+. To step line by line through the code, we can use the next command. If we now do:
Then our layout view will highlight the next line in the program (the for loop), like this:
We can also examine the values of different variables. If we enter:
We will see:
Which tells us that i is currently 1. If we do next again (thus executing the prod = prod * i statement) and then do:
We see:
Which tells us that prod is still 0, even after multiplying on the first value of i. We can likely already see the first bug – prod should have been initialized to 1 instead of 0.
We can continuing stepping though the lines of code, printing values as we go. When we step to the end of the for loop, we may realize that we never multiply prod by 5 – and we can see that this is because our for loop condition (i < 5) does not include an iteration when i is 5.
Invalid memory access
As another example, suppose we have this C program (test.c):
 1
 2
 3
 4
 5
 6
 7
 8
 9
10
11
| #include <stdio.h>
int main() {
int arr[10];
int x = arr[100000];
printf("X is: %d\n", x);
return 0;
}
|
If we build our program as usual (gcc test.c) and then run the executable (./a.exe) WITHOUT any debugging, we will likely see nothing at all. It appears as if our program mysteriously never makes it to the print statement.
On the other hand, if we build our program for debugging (gcc -g test.c -o debug) and then run it in the debugger (gdb debug), we can get more information. In gdb, we might first set a breakpoint at our print statement:
And then run the program until it hits our breakpoint:
We will see:
Starting program: C:\...\debug.exe
[New Thread 17448.0x425c]

Thread 1 received signal SIGSEGV, Segmentation fault.
main () at test.c:6
6           int x = arr[100000];
Which tells us that our program had a segmentation fault on line 6. A segmentation fault means we are trying to access memory that does not belong to us, which is very clear in this example – our array only has 10 spots, but we’re trying to access spot 100000. Now we can see where we went wrong in our program. (This was a trivial example, but a similar approach is a great way to debug a program that is not producing any output. Most likely such a program is crashing with a segmentation fault, but without the debugger we have no way of knowing where the program crashed.)
Debugging recursive functions
As a final example, suppose we have this C program in test.c:
 1
 2
 3
 4
 5
 6
 7
 8
 9
10
11
12
13
| #include <stdio.h>
int factorial(int x) {
return x * factorial(x-1);
}
int main() {
int result = factorial(2);
printf("Factorial of 2 is: %d\n", result);
return 0;
}
|
If we build and run this program as usual, it will just hang – suggesting an infinite loop or infinite recursion. (You can kill a program in the terminal with Ctrl-C.) To find the problem, we can build our program with debugging information and run it with gdb. We might set a breakpoint at the factorial function:
And then:
It will pause on line 4 in the first call of the factorial function. We can view the program stack up to this point by typing:
We will see the current program stack:
#0  factorial (x=2) at test.c:4
#1  0x00007ff6956015ba in main () at test.c:8
Which shows us that the main function called the factorial function with parameter x = 2. If we do:
To step INTO the recursive function call, our program will pause again on line 4 in the next call to factorial. If we do:
again, we will see the program stack:
#0  factorial (x=1) at test.c:4
#1  0x00007ff695601599 in factorial (x=2) at test.c:4
#2  0x00007ff6956015ba in main () at test.c:8
Which shows us that our program started in main, then called factorial with parameter x=2, then called factorial again with x=1. Suppose we type s two more times, and then try bt again. We would then see:
factorial (x=-1) at test.c:4
#1  0x00007ff695601599 in factorial (x=0) at test.c:4
#2  0x00007ff695601599 in factorial (x=1) at test.c:4
#3  0x00007ff695601599 in factorial (x=2) at test.c:4
#4  0x00007ff6956015ba in main () at test.c:8
Now we can see that we made a recursive call with a parameter of -1, which is clearly incorrect. This can help us identify our error – we forgot to include a base case.
Summary of gdb commands
Here is a summary table of the most common gdb commands:
| Command | Description |
|---|
break lineNumber (or b lineNumber) | Sets a breakpoint at the given line number. You can add breakpoints at any point – either before running the program in the debugger or in the middle of a debugging session. |
break functionName (or b functioNname) | Sets a breakpoint at the given function name |
run (or r) | Executes your program from the beginning, and lets it run until it hits your first breakpoint |
layout src | Displays a graphical view of your code and highlights the line that will be executed next |
continue (or c) | Runs your program from its current point of execution until it hits the next breakpoint |
print variableName (or p variableName) | Prints the current value of the given variable |
print expression (or p expression) | Prints the result of the given expression using current variable values. For example, print *ptr would print the current value at the memory location held in ptr. Similarly, print arr[2]+10 would print 10 more than the element at position 2 in the arr array. |
next (or n) | Steps to the next line in the program. If the next line is a function call, it steps OVER it (and does not go into the function). |
step (or s) | Steps to the next line in the program. If the next line is a function call, it steps INTO that function. |
disable breakPoint | Disables an existing breakpoint, where breakPoint is either a line number or a function name |
enable breakPoint | Enables an existing breakpoint, where breakPoint is either a line number or a function name |
list (or l) | Prints the 10 lines of source code around the current line in the debugger |
bt | Prints the stack trace leading to the current point of execution |
kill | Kills the program being run in the debugger |
quit | Exits gdb |
Visualizing program memory
I recommend using Python Tutor with C/gcc selected as another tool for debugging. You can paste your C program into the text area and choose “Visualize Execution”. Then you can step line by line through your program. The site shows what memory is allocated on the stack and what is allocated on the heap, and shows how different variables are updated as you progress. It is especially useful for visualizing pointers. The only drawback is that it will only work on programs with no user/file input – but you could always hardcode any input values for debugging purposes.
Remote Access
In the case that you are unable (or uninterested) to install some of the C tools on your own machine (such as gcc, gdb, or make), you can install the Remote - SSH extension in VS Code. This will allow you to remotely connect to the CS Linux server, which already has all the C tools installed. You will be able to use VS Code to edit files that are stored on your CS department U: drive the same way that you would edit local files.
Getting the Remote - SSH extension
In VS Code, find the extensions icon on the left hand side (it looks like four squares with one corner pulled away). Search for remote and find Remote - SSH (the current version is v0.90.1, but install the latest version if you see a newer version number). Click Install.
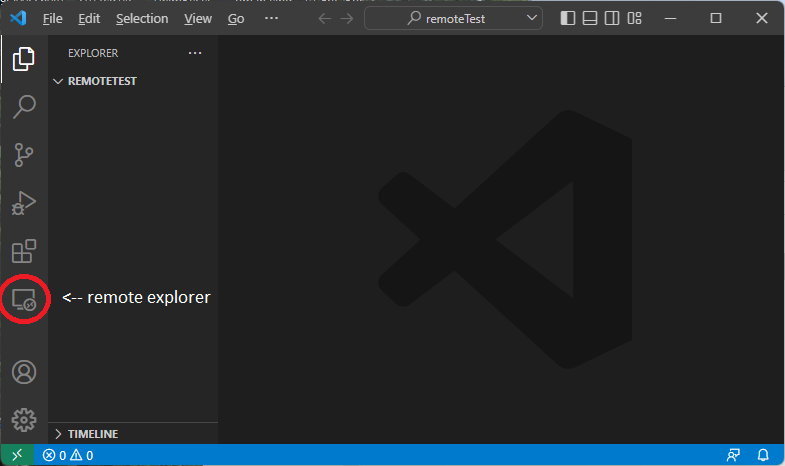
You should now see the remote explorer icon on the left bar in VS code, like this:
K-State VPN
If you are off-campus, you will need to connect to the VPN used by K-State (GlobalProtect) before you can make a remote connection. If you already have GlobalProtect installed, connect to it. If you don’t, go here for installation links.
If you are on-campus (and on a K-State network connection), you do not need to connect to a VPN.
Connecting to CS Linux
To connect to CS Linux, click the remote explorer icon here:
If this is your first time making a remote connection, you will see this page:
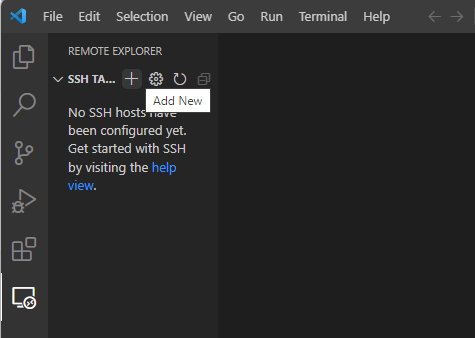
When you hover over SSH Targets, you should see a plus (+) icon that says “Add New” (as shown above). Click it. You will see a prompt that says: *Enter SSH Connection Command". Type:
ssh eID@cslinux.cs.ksu.edu
where eID is your eID. Press Enter to connect.
It may ask you to set up an SSH client, if one isn’t already installed. If so, go here for SSH client installation information.
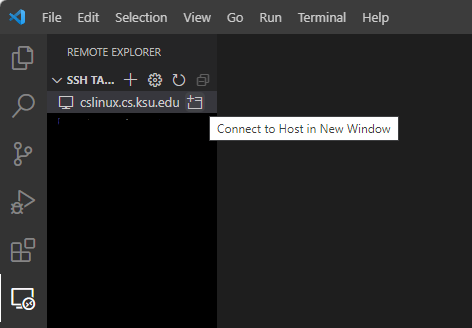
If an SSH client is already installed, it will ask you to select an SSh configuration file. Select one from the menu. At this point, you should see cslinux.cs.ksu.edu under SSH Targets. Hover over the cslinux.cs.ksu.edu name and select Connect to Host in New Window:
Select “Linux” as the platform:
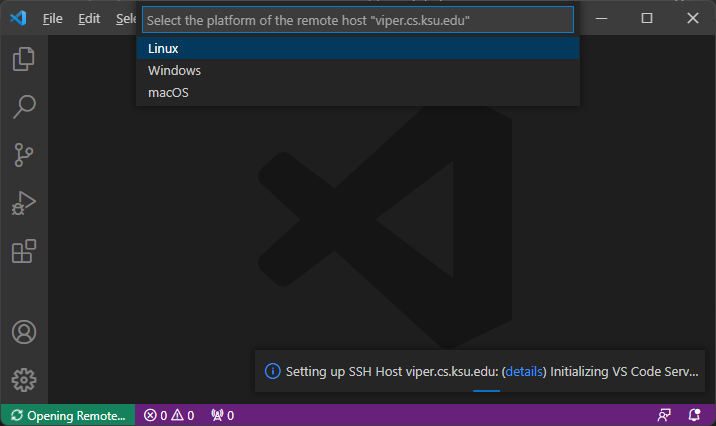
Click Continue when prompted, and then enter your CS password (NOT your eID password) to login. You should see:
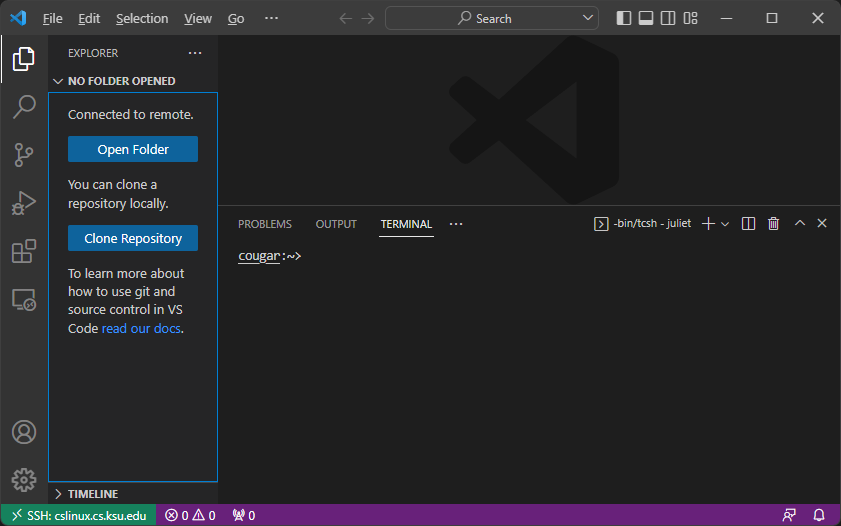
Click Open Folder, and navigate to a folder on your department U: drive. If you are prompted to log in again, do so. You should see the folder on the left side and a Linux terminal in the same directory on the bottom. You can also open files in that directory the same way you might with local files. For example, I might see:
From there, you can use gcc, gdb, or make to compile, debug, or build your projects.
Once you are done with your connection, close the connection by going to File->Close Remote Connection (you might need to scroll down in the menu).
The next time you click *Remote Explorer" to connect to CS Linux, you should see cslinux.cs.ksu.edu already listed under SSH targets.
Subsections of C Basics
Hello, World
The first program students write in any new language is the “Hello, World”
program. Here’s how it looks in C:
#include <stdio.h>
int main()
{
	printf("Hello, World!\n");
	return 0;
}
To write and run this program see the Tools Guide in section 0.1 for more information. It should print “Hello, World!” to the console.
Variables
Declaring Variables
Variables in C are declared exactly like variables in Java or C#. Just say:
where type is the type of the variable, and name is its name. The most common types in C are:
Notice that C does not have a boolean type or a string type. Some examples:
int num;
char c;
double val;
Initializing Variables
To initialize:
Where name is the name of the variable, and value is the value you want to store in it. You can also do:
to declare and initialize all on one line. Some examples:
int num;
char c = ‘A’;
double val;
num = 2;
val = 4.7;
The values of uninitialized variables in C are undefined. Some compilers may give default variables to such variables, but such behavior is not guaranteed. Other copmilers will do nothing, which will cause these uninitialized variables to hold whatever garbage value was left in the memory spot reserved for the variable. (usually a really big or really negative integer). In Java or C#, if you try to use a variable that has not been initialized, you will get a compiler error. The C compiler will NOT complain – it will just use whatever undefined value the variable happens to have.
For example:
int num; //holds some garbage value, say 13145687
num = num+1; //compiler error in Java – num not initialized
//in C, num now has the value 13145688
You will find that C is far more lenient in compilation than Java or C#. Remember that just because your program compiles doesn’t mean that it’s right!
Where to Declare
There are probably a hundred different versions of C compilers. Consequently, a program may compile with one compiler (say, on cslinux) but not compile on another (such as when using Visual Studio .NET). Certain compilers require that variables only be initialized at the beginning of a block
(a block begins when a brace { is opened). Because some compilers have this
requirement, we will uphold this custom in our programs. For example, the following is fine:
int main()
{
	double a;
	char b = 'T'; //all declarations are together
				  //at the beginning of the block
	a = 7.2;
}
But this is not:
int main()
{
	double a;
	a = 7.2; 		//code begins – this is not a declaration
	char b = 'T'; 	//b is declared AFTER the code begins
}
Operations
Mathematical operations in C work exactly like mathematical operations in Java or C#. You can use +, -, *, /, and %. You can also use things like ++ and +=.
Casting in C is also the same as casting in Java or C#:
int num = 7;
double d = (double) num; //casts num to a double, d is now 7.0
Simulating Booleans
As was mentioned, there is no boolean type in C. Instead, ints are used to
simulate booleans. In this simulation, 0 means false, and anything else means
true. For example:
int flag = 0; //flag is false
flag = 6; //flag is true
Printing
printf Function
As you’ve seen, the printf function is used to display output in C. For example, to display a string of text:
Note that you always need to specify the newline character (\n). There is
no println equivalent in C.
Printing Variables
Printing variables works a bit differently. First, you specify the kind of variable that’s going to be printed (called a control string). Then, outside the string, you give the corresponding variable name.
Here are the different control strings:
| Type | Control String |
|---|
| int | %d |
| double | %lf |
| float | %f |
| char | %c |
| char* (string) | %s (see String section) |
It’s easiest to see an example to figure out how printing works. Here’s how to print the value of an integer to the screen:
int num = 4;
printf("The value of num is %d\n", num);
Notice that where we want to print a variable, we put the control string
(%d for int). After we’ve listed the entire string, we put the corresponding variable names as the next arguments to printf. The above example will print:
"The value of num is 4"
to the screen.
We can also print several variables at once:
char letter = 'A';
int val = (int) letter;
printf("The ASCII value of %c is %d\n", letter, val);
This prints:
"The ASCII value of A is 65"
to the screen. Notice that the %c corresponds to the letter argument, and the %d corresponds to the val argument.
The printf function also allows you some control over formatting your output. For example, if you want a value to take up exactly 6 spaces (padded with space characters on the left, if necessary), put a 6 between the % and the control string character.
For example:
int num = 4;
printf("The value of num is %6d\n", num);
This will print:
"The value of num is 4"
to the screen (note the padding on the left of the 4).
You can also only display a certain number of digits for decimal numbers. For
example, put a .2 in between the % and the control string character to only display two decimal places.
For example:
double val = 3.14159;
printf("Pi is %.2lf\n", val);
This will display:
"Pi is 3.14"
You can specify both the width of the output (for example, six spaces) and the number of decimals to display by doing something like this:
double val = 3.14159;
printf("Pi is %6.2lf\n", val);
User input in C is, in short, a pain. There are three major input functions:
getchar(), scanf(...), and fgets(...). To use any of these functions, you must include the stdio.h library.
getchar()
The getchar() function takes no arguments and returns the very next character in the standard input stream. If there are no more characters in the input stream, it returns the constant EOF.
Here’s an example that reads a student’s letter grade and then prints it back to the console.
char grade;
printf("Enter your grade: ");
grade = getchar();
printf("Your grade is %c\n", grade);
Note that if you are using getchar to read characters one at a time from standard input, you will NEVEr reach EOF – instead, the program will wait for you to type new input. If you have piped the contents of a file to be the input stream for the program, though, getchar will return EOF when you have reached the end of that file. If you want to use getchar to read all characters from standard input, a better check is to read until you reach \n (which would signify the user pressing Enter after supplying user input).
scanf(...)
The scanf(...) function allows us to read formatted input, like ints and
doubles.
The first argument to scanf is the format string, which specifies the kind of data you expect to read. To specify the data types you expect, use the same control string characters you used for printf – %d, %f, %lf, %c, and %s. If you want to read an int, the first argument to scanf should be “%d”. If you want to read two ints, put “%d %d”.
The next arguments to scanf are the corresponding variables that you want to store the input in. We won’t go into details now, but scanf needs the memory address of these variables so it can modify their value. To get the address of a variable, put a & in front of the variable name.
Here’s a simple example that prompts the user for an integer, and then reads in the value:
int num;
printf("Enter a number: ");
scanf("%d", &num);
//%d: we're reading in an integer
//&num: we're storing that integer in the num variable
Here’s an example that reads in an integer and a double:
int num1;
double num2;
printf("Enter an int and a double: ");
scanf("%d %lf", &num1, &num2);
The first number typed will get stored in num1, and the second number will get stored in num2. Our format string specified that these numbers should be separated by a space, but they can be separated by any amount of whitespace (multiple spaces, tabs, or newlines).
Suppose that the user is entering a fraction, like 9/5. Here’s how we could read in that information:
int numerator, denominator;
printf("Enter a fraction (like 9/5): ");
scanf("%d/%d", &numerator, &denominator);
By putting the “/” in the format string, we specify that we expect the input to have a / there, but we don’t wish to store it in a variable.
scanf returns the number of variables that were correctly read in.
Here is an (incomplete) list of subtleties when using scanf:
- In most cases,
scanf skips whitespace. However, if you type a space (or tab or newline) where scanf expects a character,
it will read the whitespace into your char variable. - If you use
scanf to read a single character, then the user will type an input character and then hit return. scanf will read the input character, but
the newline will remain in the input buffer. This can cause problems if you
call scanf a second time – the newline character will then be read, and not
any new input. To fix this problem, add a call to getchar() after reading
a char to read the extra newline character. - If
scanf reads input that it does not expect (for example, if it sees a
character but is supposed to be reading an int), it will not discard the bad
input. The bad input will still be in the input buffer if you
call scanf again. To fix this, call getchar() until you reach \n. This
will clear the input buffer.
In the next chapter, we will see that scanf can be very dangerous to use when reading strings from user input. In short, if the user enters a string that is longer than expected, scanf can accidentally overwrite other parts of memory. This can even be exploited using a buffer overflow attack by tricking scanf into reading in program instructions.
When we reach the section on strings (2.2), we will learn about the fgets function, which is a safer option for reading strings from both standard input and files.
Selection Structures
C has if-statements and switch statements that work just like those in Jav and C#.
Here is a sample if-statement:
int age;
//initialize age
//print either Child, Teenager, or Adult, depending on age
if (num < 11)
{
	printf("Child\n");
}
else if (num < 18)
{
	printf("Teenager\n");
}
else printf("Adult\n");
Here is a sample switch statement. The expression in the switch clause must evaluate to either a character or an integer:
char grade;
printf("Enter your grade: ");
grade = getchar();
getchar(); //read and discard newline character

switch (grade)
{
	case 'A':
		printf("Excellent\n");
		break;
	case 'B':
		printf("Good\n");
		break;
	case 'C':
		printf("Average\n");
		break;
	case 'D':
		printf("Poor\n");
		break;
	case 'F':
		printf("Failing\n");
		break;
	default:
		printf("Invalid grade\n");
}
Loops
There are three kinds of loops in C – while, do-while, and for. Their syntax is exactly the same as loops in Java and C#.
While Loop
The code in a while loop executes repeatedly until a specified condition becomes false. If the condition is false before the first execution of the loop, then the entire loop will be skipped.
This example will read and print every character typed by the user (up until they press enter):
char c = ' ';
printf("Type some text: ");
while (c != '\n')
{
	c = getchar();
	printf("%c\n", c);
}
Do-While Loop
Like a while loop, the code in a do-while loop executes repeatedly until a specified condition becomes false. However, the condition in a do-while loop is not checked until after the first iteration of a loop. So, a do-while loop always executes at least once.
Here’s the same example using a do-while loop:
char c;s
printf("Type some text: ");
do
{
	c = getchar();
	printf("%c\n", c);
} while (c != '\n');
Notice that we don’t have to give c a dummy initial value, as we did in the while loop. However, the loop will print the newline character from the user input in its last iteration.
For-Loop
The syntax of a for-loop is just like it is in other languages:
for (initialization; condition; update)
{
	//code
}
The only caveat is that the loop variable should not be declared in the initialization section (like int i = 0), and should instead be declared at the beginning of a block (an opening { ). If you forget, your code may compile for you, but it won’t necessarily compile elsewhere.
Here’s an example that adds together 10 numbers entered by the user:
int i, num;
int sum = 0;
for (i = 0; i < 10; i++)
{
	printf("Enter an integer: ");
	scanf("%d", &num);
	sum += num;
}
printf("Sum is: %d"\n", sum);
Break
The break statement immediately stops execution of a loop. For example, this code allows us to get and print 10 numbers, unless the user types a 0:
int i, num;
for (i = 0; i < 10; i++)
{
	printf("Enter a number: ");
	scanf("%d", &num);
	if (num == 0) break;
	printf("You entered %d\n", num);
}
Continue
The continue statement skips the remaining code inside the loop, and continues with the next iteration. For example, this code allows us to add together 10 numbers inputted by the user, except any numbers that are negative:
int i, num;
int sum = 0;
for (i = 0; i < 10; i++)
{
	printf("Enter a number: ");
	scanf("%d", &num);
	if (num < 0) continue; //Won't add num to sum
	sum+=num;
}
printf("The sum of the positive numbers is %d\n", sum);
Functions
Functions in C are very similar to methods in other languages, except functions are not associated with any class. (They are like static methods in Java and C#.) They take a number of parameters, perform on operation on those parameters, and may or may not return a value.
Function Prototypes
Some C compilers will complain if they see a call to a function before they’ve seen the function itself. To avoid this problem, it’s best to include a prototype for a function at the top of the file, and then to implement it someplace else in the file.
A prototype lists the name, return type, and parameters for a function – but it does not implement the function. Here’s an example:
int max(int num1, int num2);
We list the return type (int), the function name (max), and the parameters with their types (int num1 and int num2). This is a prototype, so we don’t implement the function here. Instead, we end it with a semi-colon. (Note that this already looks very similar to other languages – the only difference is that C functions are not associated with classes, so they don’t need a visibility modifier like private or public.)
Return types can be any valid type (like char, int, double, etc.). If the function does not return a value, its return type should be void.
In a prototype, you don’t have to list the names of the parameters – you just need to list the types. For example, this would also be a valid prototype for the max function:
If you are writing a prototype for a function that takes no parameters, you can leave the parameter list blank, like this:
However, a better way would be to put void in the parameter list, like this:
When the compiler sees a blank parameter list in the prototype, it will allow ANY parameter list in the function implementation. However, if it sees void in the prototype’s parameter list, then the implementation must also have a void parameter list.
Function Implementations
A function implementation starts off the same as a prototype. Instead of ending with a semi-colon, it includes the code for the function in brackets { }.
Here’s the implementation of the max function:
int max(int num1, int num2)
{
	if (num1 >= num2) return num1;
	else return num2;
}
Like in other languages, if a C function has a non-void return type, it must include a return statement that returns a value of the designated type.
Calling Functions
For now, all our programs are in one file, so calling functions is pretty easy. You just put the function name and include appropriate parameters, as if you were calling function from within the same class in Java or C#.
Here’s a full example of a C program that uses the max function:
#include <stdio.h>

//max function prototype
int max(int, int);

int main()
{
	int val1, val2, big;
	printf("Enter two ints, separated by spaces: ");
	scanf("%d %d", &val1, &val2);
	big = max(val1, val2);
	printf("The max is %d\n", big);

	//This indicates the program is ending normally
	return 0;
}

//max function implementation
int max(int num1, int num2)
{
	if (num1 >= num2) return num1;
	else return num2;
}
Global Variables
All the variables we’ve seen so far have been local variables – variables that are defined within a function. These variables are only visible within that function.
Consider this function:
int count(void)
{
	int sum = 0;
	sum++;
	return sum;
}
Each time we call count, the sum variable is set back to 0, and the return value is 1. sum does not retain its value across function calls.
If we did want this function to keep track of how many times it had been called, we could store sum as a global variable. Global variables are declared outside any function, and are visible to any function in the same file:
int sum = 0;
int count(void)
{
	sum++;
	return sum;
}
Now, sum does not get set back to 0 each time the function is called.
Global variables should be declared at the top of the file, near the function
prototypes (but before any function implementation). If a global variable is
declared in the middle of a file, some compilers will not allow you to refer to that variable in any function that comes before its declaration.
Subsections of Arrays, Strings, and Files
Arrays
Arrays in C are, for the most part, the same as arrays in Java or C#. Here are the key differences:
- Arrays in C must be of a constant size (not a variable size from user input, for example)
- Arrays in C do not have an associated length field that keep track of the number of slots in the array (you must keep track of this information yourself)
Declaring
Here is the format for declaring an array:
Here, type is the type of elements you want to store in the array (like int), name is the name of the array, and size is how many slots you want to reserve. Note that size MUST be a constant.
Here is an example:
However, the following will not compile because the size is given by a variable:
//this code will not compile as size is not constant
int size = 10;
int nums[size];
Initializing
Unlike Java, arrays in C are not initialized to any value. Instead, each slot in the array holds some random garbage value that is leftover in that spot in memory.
Here is how you could initialize all the values in the nums array to 0:
int i;
for (i = 0; i < 10; i++) {
	nums[i] = 0;
}
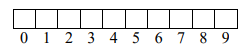
Notice that the first index in the array is 0, and the last index is size-1. Also, recall that arrays do not have a length field – we must remember that we reserved 10 spaces for nums.
Arrays and Functions
Arrays can be passed to functions just like any other variable. Because arrays don’t have a length field, you will almost always want to pass the size of the array and the array itself. Here’s an example:
#include <stdio.h>

//function prototype – takes an array of ints and its size
void print(int[], int);

int main()
{
	int nums[10];
	int i;
	for (i = 0; i < 10; i++)
	{
		nums[i] = i;
	}

	print(nums, 10);

	return 0;
}

void print(int arr[], int size)
{
	int i;
	for (i = 0; i < size; i++)
	{
		printf("%d\n", arr[i]);
	}
}
Multi-Dimensional Arrays
You can create multi-dimensional arrays in C by specifying extra dimensions at the time of declaration. For example, this declares a 5x10 array of characters:
The first dimension is the row and the second dimension is the column. To access an array element, specify the desired row and column number. For example:
//sets element at row 2, column 3 to 'A'
array[2][3] = 'A';
Be Careful!
If you access an array element in Java or C# with an index that is either negative or too big, you will get some kind of array index exception. Those languages will even tell you in what file and on what line the error occurred.
C is not as friendly about this mistake. If you access an element with a bad index, such as:
int nums[10];
nums[10] = 0; //10 is past the bounds of the array
Then one of two things will happen:
- C will allow you to modify the memory that is just past the end of your array (where spot 10 would be if there were that many spots). This memory might belong to one of your other variables!
- Your program will crash with a segmentation fault (seg fault). You will see this error quite a bit when you get started in C – it means that you tried to access memory that isn’t yours. Unfortunately, the error message does not give you any information about where the problem occurred – you will have to find it yourself.
Strings
We saw before that there is no string type in C. This is true – but you can simulate a string by using an array of characters that is terminated with a special end-of-string character, ‘\0’.
String Variables
A string literal can be declared as follows:
After this line, str references the following characters in memory:
We could have created the same string like this:
char str[6] = {'H', 'e', 'l', 'l', 'o', '\0'};
Arrays (and strings) are constant memory addresses. We can change values in strings and arrays, but we can’t change the memory address. So, we can do things like this:
But we can’t change the memory address (the entire string):
str = "hi"; //Compiler error!
Later in this section, you will see a function called strcpy that copies the characters from one string to another.
Strings can be inputted and outputted just like any other variable. To print a string, use printf with the %s control string character. To get a string as input, you can use scanf (again with the %s control string character). When reading in a string, scanf will read characters up to but not including the first whitespace it encounters (’\n’, ’ ‘, ‘\t’, etc.).
Here’s an example:
char name[10];
printf("Enter your name: "); //Suppose you enter "Fred"
scanf("%s", name);
printf("Hello, %s!\n", name); //Will print "Hello, Fred!"
Notice that when you use scanf to read in a string, you do not need to put an & in front of the string variable name. This is because a string is an array of characters, and arrays are already memory addresses. (We’ll learn more about this in the section on Pointers.)
The trouble with using scanf to input strings is that the function doesn’t check the size of the array when it is reading input. So, if you typed the name “George Washington” in the above example (which needs 18 characters of space), scanf wouldn’t stop writing once it reached the end of the array. Instead, it would try to write past the end of the array. This would
cause some of your variables to be overwritten, or a segmentation fault. In the worst case, it could be exploited by a hacker with a buffer overflow attack, where the hacker knowingly inserted program instructions beyond the bounds of the input buffer.
A better choice for reading in strings is the fgets function. Here’s the prototype:
char[] fgets(char s[], int size, FILE *stream);
You pass fgets the string buffer (s), the size of the buffer (size), and the stream you’re reading from (use stdin to read as regular user input). It returns the string it read, or NULL if it was unable to read anything.
It will stop reading user input when either:
- It has read
size-1 characters (it needs the last spot for a ‘\0’) - It has reached the end of the input
- It has reached a newline
Here is same example using fgets:
char name[10];
printf("Enter your name: "); //Suppose you enter "Fred"
fgets(name, 10, stdin);
printf("Hello, %s", name); //Will print "Hello, Fred"
NOTE: if fgets reaches a newline character before reading size-1 characters, it WILL store the newline as its last character (just before the \0). If the user enters “Fred” in the example above, the name array will hold: {'F', 'r', 'e', 'd', '\n', '\0', (garbage), (garbage), (garbage), (garbage)}.
If you want to remove that \n character, you will need to overwrite the \n to hold the end-of-string character instead (\0). We will see a convenient trick for doing this in the strcspn section below.
Conversions
It is sometimes necessary to convert between strings, ints, and doubles.
From string to int/double
There are two conversion functions from a string to an int or double:
atoi: converts from a string to an intatof: converts from a string to a double
To use any of these functions, you need to add:
To the top of the file.
Here is an example of using the conversion functions:
char buff[10];
int num;
double d;

printf("Enter an integer: ");
fgets(buff, 10, stdin); //Suppose you enter "47"
num = atoi(buff); //num = 47

printf("Enter a real number: ");
fgets(buff, 10, stdin); //Suppose you enter "4.75"

d = atof(buff); //d = 4.75
From int/double to string
The easiest way to convert from an int or double to a string is to use the sprintf function, which is part of stdio.h. sprintf works exactly like printf, but lets you “print” to a string instead of to standard out. You can either print a single int or double (thus converting it to a string), or you can print longer a longer string that mixes variable values with other text. Here is an example of using sprintf:
char buff1[10];
char buff2[40];
int num = 7;
double dec = 14.23;

sprintf(buff1, "%d", num);						//buff1 is now "7"
sprintf(buff2, "Decimal value: %lf.", dec);		//buff2 is now "Decimal value: 14.23."
String Functions
Below is a list of common string functions. To use any of these, you need to add:
To to the top of the file.
strcat
char[] strcat(char str1[], char str2[]);
This function copies the characters in str2 onto the end of str1. It returns the newly concatenated string (although str1 also references the concatenated string).
For example:
char str1[20];
char str2[20];
printf("Enter two words: "); //Suppose you entered "hi hello"
scanf("%s %s", str1, str2);
strcat(str1, str2); 		//str1 = "hihello", str2 = "hello"
strcmp
int strcmp(char str1[], char str2[]);
This function compares str1 and str2 to see which string comes alphabetically before the other. It returns:
- A number less than 0, if
str1 comes alphabetically before str2 - 0, if
str1 equals str2 - A number greater than 0, if
str1 comes alphabetically after str2
For example:
char str1[20];
char str2[20];
printf("Enter two words: "); //Suppose you entered "hi hello"
scanf("%s %s", str1, str2);

if (strcmp(str1, str2) < 0) {
	printf("%s comes first\n", str1);
}
else if (strcmp(str1, str2) > 0) {
	printf("%s comes first\n", str2);
}
else {
	printf("The strings are equal\n");
}
The code above would print “hello comes first”.
strcpy
char[] strcpy(char str1[], char str2[]);
This function copies the characters in str2 into str1, overwriting anything that was already in str1. It returns the newly copied string (although str1 also references the copied string).
For example:
char src[20];
char dest[20];

printf("Enter a word: ");
scanf("%s", src); 			//Suppose you entered "hello"

strcpy(dest, src); 			//Now dest also holds "hello"

src[0] = 'B'; 				//Now src is "Bello", and dest is "hello"
strcspn
int strcspn(char str1[], char str2[]);
This function returns the number of characters that appear in str1 before reaching ANY character from str2. (If the first character in str1 also appears in str2, then strcspn returns 0.)
For example:
char str[20];
int index;

printf("Enter a word: ");//Suppose you entered "hello"
scanf("%s", str);

index = strcspn(str, "la"); //index is 2
//2 characters appear in str before finding any character from "la"
strcspn is especially handy for removing the trailing \n that gets added to strings when using fgets. As we saw earlier in this section, if we do:
char name[10];
printf("Enter your name: ");
fgets(name, 10, stdin);
And enter “Fred”, then the name array will hold {'F', 'r', 'e', 'd', '\n', '\0', (garbage), (garbage), (garbage), (garbage)}. We can use strcspn to find the index of \n and then replace it with a \0:
name[strcspn(name, "\n")] = '\0';
When strcspn gives us the number of characters read before reaching a \n, that IS the index of \n. In the same line, we can replace that position to be the end-of-string marker, which effectively deletes the newline from the end of the string.
strlen
This function returns the number of characters in str.
For example:
char str[20];
printf("Enter a word: ");		//Suppose you entered "hello"
scanf("%s", str);

printf("%d\n", strlen(str)); 	//prints 5
strtok
char[] strtok(char str[], char delim[]);
This function returns the first token found in str before the occurrence of any character in delim. (After the first call to strtok, pass NULL as str. This will tell it to continue looking for tokens in the original string.)
For example:
char buff[200];
char *token; //We'll learn about this notation in "Pointers"

printf("Enter names, separated by commas: ");
//Suppose you entered "Fred,James,Jane,Lynn"
scanf("%s", buff);

token = strtok(buff, ",");
while (token != NULL)
{
	printf("%s\n", token);
	token = strtok(NULL, ",");
}
The code above will print:
strncpy
char[] strncpy(char str1[], char str2[], int n);
This function copies the first n characters from str2 to str1, overwriting anything that was already in str1. It returns the newly copied string (although str1 also references the copied string).
strncmp
int strncmp(char str1[], char str2[], int n);
This function compares the first n characters in str1 and str2 to see which length-n prefix comes first alphabetically. It returns:
- A number less than 0, if the first
n characters in str1 come alphabetically before the first n characters in str2 - 0, if the first
n characters in str1 equal the first n characters in str2 - A number greater than 0, if the first
n characters in str1 come alphabetically after the first n characters in str2
strrchr
char[] strrchr(char str[], char c);
This function finds the LAST occurrence of c in str. It returns the suffix of str that begins with the last occurrence of c.
strspn
int strspn(char str1[], char str2[]);
This function returns the number of characters read in str1 before reaching a character that is NOT in str2.
strstr
char[] strstr(char str1[], char str2[]);
This function determines whether str2 is a substring of str1. If str2 is not a substring of str1, it returns NULL. If str2 is a substring of str1, it returns the suffix of str1 beginning with the str2 substring.
Be Careful!
It’s very easy to make a mistake when using strings. Strings are arrays, so you will get in trouble if you try to access memory beyond the end of the array.
For example:
char buff[5];
printf("Enter a word: ");
//Suppose you enter "Hello"
scanf("%s", buff);
scanf will copy the characters ‘H’, ’e’, ’l’, ’l’, ‘o’ into the array. However, it will then try to add the end-of-string character, ‘\0’, into the 6th spot in the array. This is past the end of the array, so your program will either crash with a segmentation fault, or you will overwrite the
value of some other variable. A lot of the string functions involve writing to strings, and none of them will handle an out-of-bounds error gracefully.
When you use the following functions, MAKE SURE you have enough memory allocated:
Files
This section contains information on opening a file, reading from a file, and writing to a file. I only cover how to interact with text files – it is also possible to read from and write to binary files.
Whenever you are doing file I/O, you need to add:
Opening a File
Before we can interact with a file, we need to open it. The fopen function lets us open files for different kinds of input and output. Here’s the prototype:
FILE* fopen(char filename[], char mode[])
The FILE* return type means that the function is returning the address of a FILE object. We’ll learn more about pointers in the next section. If the file could not be opened, fopen returns NULL.
Here, filename is a string representation of the filename, such as “data.txt”. fopen searches the current directory for the file if no absolute path is given. The string mode specifies what type of operations you want to do on the file.
Here are the different options for the mode:
| Mode | Description |
|---|
| “r” | Open for reading (file must exist) |
| “w” | Open for writing (overwrites old data) |
| “a” | Open for appending (creates file if necessary) |
| “r+” | Open for reading and writing (file must exist) |
| “w+” | Open for reading and writing (overwrites old data) |
| “a+” | Open for reading and appending (opens at end of file) |
For example, we can open the file “data.txt” for reading, and print an error if we were unsuccessful:
FILE *fp = fopen("data.txt", "r");
if (fp == NULL) {
  printf("Error opening file\n");
}
After we are done reading from a file or writing to a file, we must close the file with the fclose function. Here’s the prototype:
To close data.txt, we’d do:
Reading from a File
There are two major functions for reading from a file – fscanf and fgets. fgets works exactly like we’ve seen before, except now we specify a FILE* instead of stdin. fscanf works exactly like scanf, except we first specify the FILE*. We’ll start with fscanf:
int fscanf(FILE *stream, char str[], variable addresses...)
fscanf, like scanf, returns the number of variables that were correctly read in. If it was unable to read any more input, the EOF constant is returned. Thus we can compare the return value of fscanf to EOF to see if we’ve reached the end of the file.
Suppose the file data.txt looks like this (a bunch of names and ages, each on separate lines):
Bob 20
Jill 15
Tony 17
Lisa 22
We want to read this file, and print something like “Bob is 20 years old” to the console for each person in the file. Here’s how:
FILE *fp = fopen("data.txt", "r");
char name[20];
int age;
if (fp != NULL) {
  while (fscanf(fp, "%s %d", name, &age) != EOF) {
    printf("%s is %d years old\n", name, age);
  }
  fclose(fp);
}
Now, lets try to do the same thing with the fgets function. Here’s the prototype:
char[] fgets(char s[], int size, FILE *stream)
fgets reads a string from a specified file into the s array. The size parameter specifies the size of the string – it will not write past the end of the array. It returns a reference to the string that was read. If no string was read (specifying an error or the end of file), NULL is returned.
fgets will attempt to read size-1 characters unless it reaches a newline or the end of the file.
Here’s the same example repeated with fgets:
FILE *fp = fopen("data.txt", "r");
char name[20];
char buf[30];
int age;
if (fp != NULL) {
  while (fgets(buf, 30, fp) != NULL) {
    //parse the current line
    char *token = strtok(buf, " ");
    strcpy(name, token);

    //get the age
    token = strtok(buf, " ");
    age = atoi(token);
    printf("%s is %d years old\n", name, age);
  }
  fclose(fp);
}
As we saw when using fgets to read from stdin, it WILL store the newline character at the end of each string when reading from a file (assuming there is still room in the array). You may want to use strcspn to overwrite the \n with a \0.
Reading files with fscanf is usually simpler (since it doesn’t involve parsing lines), but it is more error-prone than fgets.
Writing to a File
The primary function for writing to a file is fprintf. This function works exactly like printf, but the first argument is now a FILE*. Here’s the prototype:
int fprintf(FILE* fp, char str[], variables to print...)
Here is an example that will ask the user to input 10 numbers. Each number will be written on a separate line to the file out.txt:
FILE *fp = fopen("out.txt", "w");
if (fp != NULL) {
  int num, i;
  for (i = 0; i < 10; i++) {
    printf("Type a number: ");
    scanf("%d", num);
    fprintf(fp, "%d\n", num);
  }
  fclose(fp);
}
Subsections of Pointers and Dynamic Memory
Pointers
Pointers in C are variables that store the memory address of some other variable or data. They have an associated type of what kind of value they reference.
Pointers are one of the most difficult concepts in the C language. However, mastering pointers allows you do have a deeper understanding of what actually happens when your program runs. Higher-level languages do not explicitly use pointers, but they do use pointers “behind the scenes”. Learning pointers in C can also help you understand what’s going on in Java/C#/etc. programs.
Declaring
The type of a pointer variable is:
where type is the type of data this pointer will reference. For example:
intPtr can hold the address of an int variable. Another:
charPtr can hold the address of a char variable.
When you are declaring pointers, the * can go any where between the type and the variable name. For example, all of the following are acceptable:
int* intPtr;
int * intPtr;
int*intPtr;
int *intPtr;
Variables in C are not automatically initialized – and this includes pointers. After declaring a pointer, it holds some garbage value that was left in that spot in memory.
& Operator (Address-Of)
The & operator returns the memory address of a variable. For example, if we have:
And the x variable is stored at spot 1714 in memory (every variable is given a certain spot in memory, and these spots have an associated number), then if we do:
this will give us the 1714 spot.
The address-of operator isn’t very useful unless we’re using pointers. Since pointers are supposed to hold memory addresses, we can initialize them to be the address of some other variable.
So, suppose we have the following variable declarations:
int x = 4; //x is given spot 1714 in memory
int *xPtr;
We can make the xPtr variable reference x:
xPtr = &x; //Now xPtr "points to" x – it holds address 1714
Notice that when we DECLARE a pointer, we include the *. However, when we INITIALIZE the pointer, we don’t include the *.
* Operator (Dereferencing)
The * operator is an operator specifically for pointer variables. It returns the value of what is being pointed at.
For example, if we have:
int x = 4; //x is given spot 1714 in memory
int *xPtr;
xPtr = &x;
Then saying *xPtr gets us the value pointed to by xPtr. xPtr holds memory address 1714, so if I say *xPtr, then I get the value stored in spot 1714 – which is a 4. I can also use this operator to modify the value at that spot in memory. For example:
Now the value at spot 1714 is a 6. The x variable is stored in spot 1714, so now x has the value 6.
Example
The following example illustrates how pointers work:
int i;      //i gets a memory location, say 3245, and has some random value
int *ip;    //ip has some random address
i = 36;     //i has the value 36
*ip = 72;   //Most likely, causes a segmentation fault
ip = &i;    //ip references memory address 3245
*ip = 72;   //Memory address 3245 has value 72 (so i = 72)
The reason *ip = 72 will cause problems is that *ip currently holds some random memory address, since it has not been initialized. When we say *ip, we’re trying to access the memory at that random spot. This is most likely not the program’s memory, so we will get a segmentation fault when we try to change it. (The other possibility is that we could end up overwriting one of the other program variables.)
Pointers vs. Arrays
Arrays and pointers have a lot in common. When we do:
Then we get a spot in memory that looks like this:
But what is nums? It is actually a constant pointer to the first spot in the array, nums[0]. So really, the picture looks like this:

So, &nums[0] (the address of the first element in the array) is the same thing as nums.
Pointer Notation
Because pointers and arrays are essentially the same thing (except array addresses cannot be
changed), we can also access elements in an array by treating it as a pointer. In the above
example, nums is a pointer to the first spot in the array. Space for arrays is reserved
contiguously, so the second element in the array is physically next to the first element. This
means that I can say:
to get the memory address of the second element in the array.
Note: an integer uses 4 bytes of space. However, you don’t say nums+4 to move to the next
integer. This is because pointers have a particular type associated with them – like an int – and
the compiler will automatically move over the space of an int when you say +1.
Suppose now that you want to initialize the value at index 4 in the nums array to 7. You could
say:
However, you could do the same thing by treating nums as a pointer. You can get the address of
the array element at index 4 by saying:
This is a pointer, so if we want to change the contents of that location to 7, we need to
dereference it:
Example
Recall that an array is a constant pointer to a block of reserved memory. This means that we can
change the values stored in the array, but we can’t change the array itself (make it reference
another piece of memory). Consider the following statements – which are legal?
int a[10]; 		//OK – a points to a block of 10 ints in memory
a++; 			//NO – The address of an array can’t change
int *xp = a;	//OK – Now xp also points to the beginning of the array
a = xp; 		//NO – The address of an array can’t change
int b[5]; 		//OK – b points to a block of 5 ints in memory
int *bp = b;	//OK – Now b also points to the beginning of the array
xp++; 			//OK – Now xp points to the second element in the array
*xp = 14; 		//OK – The second element in the array is set to 14 (a[1] = 14)
Iteration with Pointers
This is how we have initialized array elements in the past:
int i;
int nums[10];
for (i = 0; i < 10; i++) {
	nums[i] = 0;
}
However, now that we can treat arrays like pointers, there is a different way to initialize array
elements:
int *ip;
int nums[10];
for (ip = nums; ip < nums+10; ip++) {
	*ip = 0;
}
Here, ip is a pointer that starts by pointing to the first element in the array. We loop while the
value of ip (the memory address) is less than nums+10 – which is the address of the last
element in the array. Each time, ip++ advances ip to point at the next element in the array.
Inside the loop, we dereference ip to get the current array element, and set that element to 0.
Pointers to Pointers
Just like a variable can be a pointer, we can also declare pointers to pointers. (We can take it
even further than that, but it starts to get pretty confusing!) You can denote the “level” of the
pointer by how many *’s you use in the declaration.
Here’s an example of using pointers to pointers:
int i; 		//declares the int i
int *ip; 	//declares the int pointer ip
int **ipp; 	//declares a pointer to a pointer to an int, ipp
i = 36; 	//gives i the value 36
ip = &i; 	//now ip points to i
*ip = 72; 	//dereferences ip to get i, and sets it to 72 (now i=72)
ipp = &ip; 	//ipp points to ip, which points to i
**ipp = 24; //dereferences ipp to get ip, then dereferences again to get i,
			//and sets it to 24 (now i = 24)
Call by Reference
C functions are naturally call-by-value, which means that we don’t pass variables themselves –
we pass their value. So, if we modify one of the parameters in our function, it does not modify
the original variable passed to the function. Consider the following example:
//This example doesn’t work!
void swap(int a, int b) {
	int temp = a;
	a = b;
	b = temp;
}

//assume the test code below is in another function
int x = 3;
int y = 4;
swap(x, y);
This code fragment is supposed to swap the values in x and y, so that x == 4 and y == 3.
However, when we call swap, only the VALUES 3 and 4 are passed – not x and y themselves.
The values 3 and 4 get bound to the function parameters a and b. By the end of the function, we
do have that a == 4 and b == 3. However, x and y don’t change because they are completely
different from a and b.
If we do want to change x and y, we need to pass in the address of x and the address of y. Then,
we can update the values at those memory locations. Here is our revised swap function:
//Take two memory addresses (pointers)
void swap(int *a, int *b) {
	int temp = *a; 	//Store the value pointed to by a
	*a = *b; 		//Update the contents of a to be the contents of b
	*b = temp; 		//Update the contents of a to be temp
}
Now, when we call swap, we will need to pass the memory address of the variables we want to
swap. This means we need to use the & operator:
int x = 3;
int y = 4;
swap(&x, &y);
sizeof
The sizeof function in C returns the number of bytes needed to store a specified type. It is
needed for dynamic memory allocation because we need to know how many bytes we want to
allocate.
Here is the prototype:
where type is a defined type in C, like char or int. Here are a few examples:
sizeof(int) 	//evaluates to 4
sizeof(char) 	//evaluates to 1
sizeof(double) 	//evaluates to 8
sizeof(int*) 	//evaluates to 4
sizeof(char*) 	//evaluates to 4
Dynamic Memory
Currently, we can only declare arrays to be of a constant size (like 10). This is not always
convenient – sometimes we want to make the size based on some user input. If we want to
allocate a dynamic amount of space, we need to use C’s dynamic memory functions. Each of
these functions is in <stdlib.h>.
malloc
This function allocates a contiguous block of memory with the specifies size (number of bytes).
It returns a void pointer to the block of memory. (This pointer will be automatically cast to the
correct type when you store it.)
Here is the prototype:
void* malloc(int numBytes);
For example, we could allocate an array like this:
Or we could do the same thing using malloc. If we use malloc, we need to specify the
number of bytes to reserve. We want 5 ints, and each int takes up sizeof(int) bytes. So,
the total needed is 5*sizeof(int):
//The result of malloc is automatically cast to an int*
int* nums2 = malloc(5*sizeof(int));
Now, we can treat nums2 just like an array. For instance, if we wanted to initialize all elements
in nums2 to 0:
int i;
for (i = 0; i < 5; i++) {
	nums2[i] = 0; 	//The compiler converts this to *(nums2+i) = 0
}
Allocating arrays with malloc has several key difference from standard array allocation:
malloc can handle a variable for the desired size; a standard array cannot- The result of
malloc is a pointer; the result of a standard array allocation is a constant pointer malloc memory is allocated on the heap. If there is not enough space to do the allocation, malloc will return NULL. An array is allocated on the program stack – if there is not enough space, the program simply won’t compile.
calloc
The calloc function is very similar to malloc. The only difference is that when arrays are
allocated using calloc, all elements are automatically initialized to 0.
Here is the prototype:
void* calloc(int numElems, int sizePerElem);
The prototype of calloc is also a little different than the one for malloc. It takes two
arguments – the number of elements you want in the array, and the number of bytes needed for
each elements. Like malloc, calloc returns a void pointer to the contiguous block of
memory it allocated. This pointer will be automatically cast to the appropriate type when you
store it.
Here’s how to create an array of 10 ints, all initialized to 0:
int* nums = calloc(10, sizeof(int));
Now you can use nums just like an array. For example:
Like malloc, calloc will return NULL if there is not enough space to do the allocation. In
both cases, it’s a good idea to check if the pointer is NULL before you use it.
For example:
int* nums = calloc(10, sizeof(int));
if (nums == NULL) {
	printf("Not enough space.\n");
}
else {
	//Use nums as usual
}
realloc
The realloc function allows you to easily expand and shrink the space allocated for an array.
Here is the prototype:
void* realloc(void* origPtr, int newSize);
This function takes your original pointer and the desired new size in bytes. It looks for a
contiguous block of memory with the desired size. If it can find one, it copies the contents of the
old array into the new block of memory. Then it releases the space needed for the old array, and
returns a void pointer to the new block of memory.
The realloc function doesn’t always behave as you intend. Here are the possible return
values of realloc:
- NULL (if not enough space is found)
- The original pointer (if there is enough space at that location)
- A new pointer to a different spot in memory
Suppose we allocate the nums array like this:
int* nums = malloc(10*sizeof(int));
Now we decide that we want nums to hold 15 elements instead of 10. Here’s what we might
try:
nums = realloc(nums, 15*sizeof(int));
Suppose that realloc could not find enough space to grant the request – so it returns NULL.
This means that we assign NULL to our original nums pointer. Now nums does not reference
the original array – in fact, nothing does. The original array is stuck in memory with no way to
get at it – this is called a memory leak.
To fix this problem, assign a temporary pointer to the result of realloc. Then, if it’s not
NULL, reassign the original pointer. This keeps you from losing your array:
int *temp = realloc(nums, 15*sizeof(int));
if (temp != NULL) {
	nums = temp;
}
free
In Java and C#, any memory that you’re no longer using will be cleaned up by the garbage collector. C
has no garbage collector, so you are in charge of releasing memory that you’re done with. If you
never release any allocated memory, you will eventually run out of space.
The C function that releases dynamic memory is called free. Here is the prototype:
void free(void* pointer);
Note that even though free takes a void pointer, it can take any type of pointer that has been
dynamically allocated.
Here’s an example of using free:
int* nums = malloc(10*sizeof(int));
int i;
for (i = 0; i < 10; i++) {
	nums[i] = i;
}

//done using nums
free(nums);
Multi-dimensional Dynamic Arrays
We can also create multi-dimensional dynamic arrays using malloc. This section will focus on
creating two-dimensional arrays. You can get more dimensions by adapting the following
process:
- Use
malloc to create an array of pointers. Each pointer in the array will point to a row
in the two-dimensional array.
For example:
//Final array will have 3 rows
int **matrix = malloc(3*sizeof(int*));
- Use
malloc to allocate space for each row:
int i;
for (i = 0; i < 3; i++) {
	//Final array will have 4 columns
	matrix [i] = malloc(4*sizeof(int));
}
- Now we can treat the pointer like a traditional two-dimensional array. For example, we
could set every element to 0:
int j;
for (i = 0; i < 3; i++) {
	for (j = 0; j < 4; j++) {
		matrix [i][j] = 0;
	}
}
- When we are done using a multi-dimensional array, we release the memory in reverse order of
how we allocated it. So, first we release each row:
for (i = 0; i < 3; i++) {
	free(matrix [i]);
}
And then we release the top-level array of pointers:
Returning Pointers from Functions
We can also return pointers from functions via
pointer arguments rather than as the formal return value. To explain this, let’s first step back and
consider the case of returning a simple type, such as int, from a function via a pointer argument.
If we write the function:
void f(int *ip) {
    *ip = 5;
}
And then call it like this:
then f will “return” the value 5 by writing it to the location specified by the pointer passed by the
caller; in this case, to the caller’s variable i. A function might “return” values in this way if it had
multiple things to return, since a function can only have one formal return value (that is, it can only
return one value via the return statement.) The important thing to notice is that for the function to
return a value of type int, it used a parameter of type pointer-to-int.
Now, suppose that a function wants to return a pointer in this way. The corresponding parameter will
then have to be a pointer to a pointer. For example, here is a function which tries to allocate
memory for a string of length n, and which returns zero (false) if it fails and 1 (nonzero, or true)
if it succeeds, returning the actual pointer to the allocated memory via a pointer:
#include <stdlib.h>
int allocstr(int len, char **retptr) {
     //+1 for the \0 character
    char *p = malloc(len + 1);
    if(p == NULL) {
        return 0;
    }

    *retptr = p;
    return 1;
}
The caller can then do something like:
char *string = "Hello, world!";
char *copystr;
if(allocstr(strlen(string), ©str)) {
strcpy(copystr, string);
}
else {
printf(stderr, "out of memory\n");
}
Subsections of Structs
Struct Syntax
C is a procedural programming language, which means that a program is just a collection of
functions – no classes. However, C does have a construct called a struct that is similar to a data
class in Java. A struct is simply a new variable type that is a collection of related data.
Syntax
Here is the format of a struct declaration:
struct name {
    type1 name1;
    type2 name2;
    ...
} objList;
Here, name is the optional name for this structure type. This name is needed if you plan to
created any variables of this struct type.
The type name elements are fields that you want in your struct. For example, if the struct
represented a person, you might want these fields:
Fields in structs are the same idea as fields in a Java or C# class.
Finally, objList is an optional
list of variable names you want constructed with this struct type.
First Example
Here is a simple struct:
struct person {
char name[20];
int age;
} p1, p2;
Now, struct person is a new datatype. p1 and p2 are variables of type struct person.
Declaring Struct Variables
You can automatically declare struct variables by listing variable names at the end of the struct
definition. You can also declare them outside the definition just like you do ordinary variables.
The format for declaring variables in C is:
The type of the above struct, for example, is struct person. So we can declare another
struct variable as follows:
This declaration automatically allocates space for the struct, including space for every field in the
struct.
Accessing Struct Fields
Accessing a field in a struct variable is exactly like accessing a field in a Java or C#
object:
Here, structVar is the name of the struct variable and fieldName is one of the fields in the
struct. This allows us to access or change that field.
Let’s declare another struct person variable, and set the person’s name to “Bob” and age to 20.
Here’s how:
struct person bobPerson;        //declare struct variable
bobPerson.age = 20;             //set person's age to 20
strcpy(bobPerson.name, "Bob");  //set person's name to "Bob"
Notice that if we are initializing a string field, we must use strcpy. The following will NOT
compile since name is an array (a constant pointer):
bobPerson.name = "Bob"; //Will not compile!
Struct Example
Structs can be declared at any point in a C program, but they are usually declared with the global
variables (right after the include statements). This way, the struct type can be used throughout
the file.
Here is an example that uses a struct to store a two-dimensional point (x, y location). It gets two
points as input, and then prints the equation that passes through the points.
#include <stdio.h>
struct point {
    int x;
    int y;
}; //No variables declared here

double getSlope(int, int, int, int);
double getIntercept(int, int, double);

int main() {
    struct point p1;
    struct point p2;
    double slope;
    double intercept;

    printf("Enter point1, e.g. (1, 2): ");
    scanf("(%d, %d)", &(p1.x), &(p1.y));
    printf("Enter point2, e.g. (1, 2): ");
    scanf("(%d, %d)", &(p2.x), &(p2.y));

    slope = getSlope(p1.x, p1.y, p2.x, p2.y);
    intercept = getIntercept(p1.x, p1.y, slope);

    //prints equation in form y = mx + b
    //m: slope, b: y-intercept
    printf("y = %.2lfx + %.2lf\n", slope, intercept);

    return 0;
}

double getSlope(int x1, int x2, int y1, int y2) {
    //slope = change in y / change in x
    return (y2-y1)/(x2-x1);
}

double getIntercept(int x, int y, double slope) {
    //if y = mx + b, b = y - mx
    return y - slope*x;
}
Structs and Functions
We could have also written the point example
by passing the point structs to the getSlope and
getIntercept functions (instead of passing their fields). This works just like passing other
variable types, except struct point will be an argument type.
Here’s the example when we pass the points to the functions:
#include <stdio.h>

struct point {
    int x;
    int y;
}; //No variables declared here

double getSlope(struct point, struct point);
double getIntercept(struct point, double);

int main() {
    struct point p1;
    struct point p2;
    double slope;
    double intercept;

    printf("Enter point1, e.g. (1, 2): ");
    scanf("(%d, %d)", &(p1.x), &(p1.y));
    printf("Enter point2, e.g. (1, 2): ");
    scanf("(%d, %d)", &(p2.x), &(p2.y));

    slope = getSlope(p1, p2);
    intercept = getIntercept(p1, slope);

    //prints equation in form y = mx + b
    //m: slope, b: y-intercept
    printf("y = %.2lfx + %.2lf\n", slope, intercept);

    return 0;
}

double getSlope(struct point p1, struct point p2) {
    //slope = change in y / change in x
    return (p2.y-p1.y)/(p2.x-p1.x);
}

double getIntercept(struct point p, double slope) {
    //if y = mx + b, b = y - mx
    return p.y - slope*p.x;
}
Arrays of Structs
You can create arrays of structs in C just like you can create arrays of any other type. The format for creating constant-sized arrays is:
Consider the person struct again:
struct person {
    char name[20];
    int age;
};
Here’s how to create a 3-slot array of type struct person called group:
//"struct person" is the type; "group" is the array name
struct person group[3];
When you create an array of type struct, C allocates space for each struct element (and its fields)
in the array.
We can get out a particular struct element using an array index:
group[0] //the first struct person in the array
For example, here’s how we could set the first person’s name to “Bob” and age to 20:
strcpy(group[0].name, "Bob");
group[0].age = 20;
Pointers to Structs
You can declare a pointer to a struct just like you declare a pointer to another element type. The
format for declaring a pointer is:
So, to declare a pointer to a struct person element, we could say:
struct person* personPtr;
Suppose we have another struct person variable:
struct person p1;
strcpy(p1.name, "Jill");
p1.age = 18;
Then we can make personPtr point to p1:
Allocating Memory
We can also create struct variables by:
- Declaring a pointer to a struct
- Allocating memory for the struct
This approach (using pointers instead of standard variables) is handy when building data
structures like linked lists.
To create a struct person in this way, we first declare a pointer:
struct person* personPtr;
Then we allocate memory for the struct, and give personPtr the address of that memory. We
can use sizeof(struct person) to get the number of bytes needed to store a variable of
type struct person:
personPtr = malloc(sizeof(struct person));
Now, personPtr points to a struct person, which has space for the name and age fields.
Accessing Fields
We can get at the struct person object itself by dereferencing personPtr:
We can then initialize the fields:
This line does two things:
- Dereferences the pointer to get at the
struct person object - Changes the person’s age to 18
Do NOT write something like this:
*personPtr.age = 18; //BAD!
The compiler will try to resolve the “.” operator first. Because personPtr is a pointer and not
a struct, using a . doesn’t make sense. This line will result in a compiler error. We need to
dereference the pointer before we can access any fields.
Pointers to structs are very common in C, and you’ll often find yourself dereferencing a struct
pointer and then accessing one of the fields. Because of this, there is a shortcut notation:
personPtr->age = 18;

//Is equivalent to:
(*personPtr).age = 18;
Linked Lists
We can use structs to help implement all the common data structures in C. For example,
whereas before we would have created a Node class to help us write a linked list, we will now
create a node struct:
struct node {
    int data;
    struct node *next; //pointer to next node in list
};
Suppose we want to create a linked list with a single node. First, we declare a head variable:
Then, we allocate memory for the node:
head = malloc(sizeof(struct node));
Finally, we initialize the fields in head:
head->data = 4;
head->next = NULL;
Here’s a full C program that inserts values into a linked list and then prints them out:
#include <stdio.h>

struct node {
    int data;
    struct node *next;
};

struct node *head;

void add(int);
void print(void);

int main() {
    head = NULL;
    add(1);
    add(2);
    add(3);
    add(4);

    //prints 1, 2, 3, 4 on separate lines
    print();

    return 0;
}

void add(int num) {
    //create new node
    struct node *newnode = malloc(sizeof(struct node));
    newnode->data = num;
    newnode->next = NULL;

    if (head == NULL) {
        head = newnode;
    }
    else {
        //find end of list
        struct node *cur = head;
        while (cur->next != NULL) {
            cur = cur->next;
        }

        //add newnode after cur
        cur->next = newnode;
    }
}

void print(void) {
    struct node *cur = head;
    while (cur != NULL) {
        printf("%d\n", cur->data);
        cur = cur->next;
    }
}
Linked lists in C work almost exactly the same as linked lists in Java or C#. The only differences are:
- We use a struct instead of a class to represent a node
- We use -> instead of . to access values in the node
Pointers to Pointers in Linked Lists
Let’s look at how pointers to pointers can be used to eliminate a nuisance we’ve had when trying to
insert and delete items in linked lists. For simplicity, we’ll consider lists of integers, built using this
structure:
struct node {
    int data;
    struct node *next;
 };
Suppose we’re trying to write some code to delete a given integer from a list. The straightforward
solution looks like this:
//delete node containing i from list pointed to by lp
struct node *lp, *prevlp;
for(lp = list; lp != NULL; lp = lp->next) {
    if(lp->item == i) {
        if(lp == list)
            list = lp->next;
        else {
            prevlp->next = lp->next;
        }
        break;
    }
    prevlp = lp;
}
This code works, but it has two flaws. One is that it must use an extra variable to keep track of the
node behind the one it’s looking at, and the other is that it must use an extra test to special-case the
situation in which the node being deleted is at the head of the list. Both problems arise because the
deletion of a node from the list involves modifying the previous pointer to point to the next node (that
is, the node before the deleted node to point to the one following). But, depending on whether the node
being deleted is the first node in the list or not, the pointer that needs modifying is either the pointer
that points to the head of the list, or the next pointer in the previous node.
To illustrate this, suppose that we have the list (1, 2, 3) and we’re trying to delete the element 1. After
we’ve found the element 1, lp points to its node, which just happens to be the same node that the
main list pointer points to, as illustrated in (a) below:
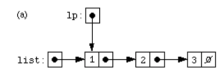
To remove element 1 from the list, then, we must adjust the main list pointer so that it points to 2’s
node, the new head of the list (as shown in (b) below):
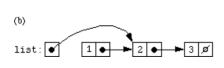
If we were trying to delete node 2, on the other hand (as illustrated in (c) below):
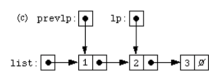
we’d have to adjust node 1’s next pointer to point to 3.
The prevlp pointer keeps track of the previous node we were looking at, since (at other than the first node in the
list) that’s the node whose next pointer will need adjusting. (Notice that if we were to delete node 3, we
would copy its next pointer over to 2, but since 3’s next pointer is the null pointer, copying it to node 2
would make node 2 the end of the list, as desired.)
There is another way to write the list-deletion code, which is (in some ways, at least)
much cleaner, by using a pointer to a pointer to a struct node.
Hint: This pointer will point at the pointer which points at the node we’re looking at; it will either
point at the head pointer or at the next pointer of the node we looked at last time. Since this pointer
points at the pointer that points at the node we’re looking at, it points at the pointer which
we need to modify if the node we’re looking at is the node we’re deleting.
Subsections of Multiple Files
Our first step in writing a program with multiple files is to just
divide related functions into different .c files. However, suppose
we’re in our main function and we call a function from a different
file? This is just like calling a C library function without using any
include statements. The compiler will not know where to find the
outside function.
To solve this within the C libraries, function prototypes are placed
in header files (.h files). The functions themselves are
implemented in corresponding .c files. If I want to use a C library
function, I include the appropriate header file so that the compiler
knows about the function.
This is what we will do with our C programs. First, we will have a
“main file” that contains the main function and any other function
we do not want to reuse. This code will stay in a .c file as we’ve
done before. Then, we will divide other functions among several
.c files (functions that are related in some way are usually put in
the same file). For each of these .c files, we will make a corresponding .h file
with the same name that contains the prototypes of each
function. Finally, we will include these header files from our main
file.
One-File Program
To see how this works, consider the example below, which is in
the file prog.c:
#include <stdio.h>
#include <stdlib.h>

//later, we will move these three prototypes into stats.h
int min(int*, int);
int max(int*, int);
double avg(int*, int);

//main function will stay here
int main() {
    int* nums;
    int i, length;

    printf("Enter size of array: ");
    scanf("%d", &length);

    nums = malloc(length*sizeof(int));
    for (i = 0; i < length; i++) {
        printf("Enter a number: ");
        scanf("%d", nums+i);
    }

    printf("The min is: %d\n", min(nums, length));
    printf("The max is: %d\n", max(nums, length));
    printf("The average is: %.2lf\n", avg(nums, length));

    return 0;
}

//later, we will move these three functions into stats.c
int min(int *vals, int size) {
    int min = vals[0];
    int i;
    for (i = 1; i < size; i++) {
        if (vals[i] < min) {
            min = vals[i];
        }
    }

    return min;
}

int max(int *vals, int size) {
    int max = vals[0];
    int i;
    for (i = 1; i < size; i++) {
        if (vals[i] > max) {
            max = vals[i];
        }
    }

    return max;
}

double avg(int *vals, int size) {
    int sum = 0;
    int i;
    for (i = 0; i < size; i++) {
        sum += vals[i];
    }

    return sum/(double)size;
}
Multiple Files Program
Suppose we want to be able to reuse our min, max, and avg
functions. We would create a new file, stats.h, with the
min, max, and avg prototypes:
// stats.h
#ifndef STATS_H
#define STATS_H

int min(int*, int);
int max(int*, int);
double avg(int*, int);
#endif
(Notice the ifndef statement, and defining the constant
STATS_H. This is standard when writing header files to keep the
same code from being included twice. Just surround your .h file
with a similar statement – changing the STATS_H constant to
match your header file’s name.)
Next, we would create the new file stats.c with the implementations of
the min, max, and avg functions:
//stats.c

//We must include the corresponding header file
#include "stats.h"

int min(int *vals, int size) {
    int min = vals[0];
    int i;
    for (i = 1; i < size; i++) {
        if (vals[i] < min) {
            min = vals[i];
        }
    }

    return min;
}

int max(int *vals, int size) {
    int max = vals[0];
    int i;
    for (i = 1; i < size; i++) {
        if (vals[i] > max) {
            max = vals[i];
        }
    }

    return max;
}

double avg(int *vals, int size) {
    int sum = 0;
    int i;
    for (i = 0; i < size; i++) {
        sum += vals[i];
    }

    return sum/(double)size;
}
Finally, we can rewrite our main file, prog.c:
//prog.c
#include <stdio.h>
#include <stdlib.h>

//include our header file
//use "" since it is in the current directory
#include "stats.h"

int main() {
    int* nums;
    int i, length;

    printf("Enter size of array: ");
    scanf("%d", &length);

    nums = malloc(length*sizeof(int));
    for (i = 0; i < length; i++) {
        printf("Enter a number: ");
        scanf("%d", nums+i);
    }

    printf("The min is: %d\n", min(nums, length));
    printf("The max is: %d\n", max(nums, length));
    printf("The average is: %.2lf\n", avg(nums, length));

    return 0;
}
Header files can also contain definitions of types needed for the
corresponding .c file, like structs, unions, and enums.
Compiling with Multiple Files
The way we would compile the original statistics program (in the file prog.c) is:
Now that our program is in two files, we might try:
or
…but in fact neither of these statements will get our program to
compile. The trouble is that the C compiler first compiles each .c
file, and then tries to link each of the files together into a single
executable. If we don’t tell the compiler how the files are related,
it won’t be able to properly link them.
To compile our new program, we must first compile each file
separately:
gcc –c stats.c
gcc –c prog.c
The –c option forces the compiler to stop after compiling the file,
before trying to link the files or create an executable. These two
instructions will create the object files stats.o and prog.o,
respectively.
Now, we need to link these two compiled files into
an executable:
This line will create the executable a.out, which we can now run
as usual.
Makefiles
It now takes three lines to compile our program, which is a pain to
have to type every time we make a change. We can simplify
compilation by placing all of the compilation instructions in a
single file called a Makefile (with NO extension).
compiler declaration
compiler flags declaration
executable name declaration
header list declaration

object list declaration

compiling/linking instruction
cleaning instruction (removing output files)
(There are many other options for creating Makefiles, but we will use the template above in this class.) Here is the Makefile for our statistics program
//saved in a file name Makefile, with no extension
CC = gcc
CFLAGS = -g -Wall
EXE = nums
HEADERS = stats.h
CODE = stats.c prog.c

OBJECTS = $(CODE:.c=.o)

nums: $(OBJECTS) $(HEADERS)
    $(CC) $(CFLAGS) $(OBJECTS) –o $(EXE)

clean:
    rm -f *.o *.exe *.out
Now, let’s go through the Makefile one line at a time:
This line declares the variable CC, and says that we’re using the
gcc compiler.
This line declares the variable CFLAGS and states that we will use two compiler flags – -g and -Wall. You don’t have to include this line, but it can be useful. The -g option means that our executable is always built with debugging information, so that we can debug it in gdb. The -Wall option tells the compiler to display warnings. Often times these compiler warnings can give insight into why a program isn’t working, as C will let you do many things that you probably don’t intend to do (especially with pointers).
This line declares the variable EXE and states that we wish to name our executable “nums”, instead of the default “a.out” or a.exe". We can replace “nums” with whatever we want to use as our executable name. Again, this line is optional.
This line declared the variable HEADERS and lists all the (user-created) header files used in the program.
This line declares the variable CODE and lists all the code files (.c files) used in the program.
This declares the variable OBJECTS and instructions to create an object file (.o) for every .c file listed in the CODE variable. (An object file is a single file converted to machine code.) So, since we have the files prog.c and stats.c, will we get the object files prog.o and stats.o.
nums: $(OBJECTS) $(HEADERS)
    $(CC) $(CFLAGS) $(OBJECTS) –o $(EXE)
This line describes how to compile our program. Thenums at
the beginning is a name we’re giving this compilation instruction –
we could have called it anything. When we put $(OBJECTS) on the top line (and similarly for other variables), this gets the value out of the OBJECTS variable. The top line, $(OBJECTS) $(HEADERS), states that our program is dependent on all the header files and all the object files. This line says that to compile the program, all the object files must first be made. By listing the header files as a dependency as well, it ensures that if a change was made to a header file then the entire program will be rebuilt.
When we substitute the values of the variables, the second line
becomes:
gcc -g -Wall prog.o stats.o –o nums
This line says to link together the two object files, and rename the
executable to nums. (That’s the –o nums part). It also says to build the executable with debugging information (g) and to display compiler warnings (-Wall).
Next, we have:
clean:
    rm -f *.o *.exe *.out
This line says that to clean our program, we want to delete the
object files (*.o), all executable files (*.exe and *.out). The -f option ensures that we will not see a warning if there are no files to remove that match one of the wildcards.
Using a Makefile
Now that we have a Makefile, we want to use it to compile our
program. To compile a program with a Makefile, type:
This will generate all the object files, link them together, and
create the executable called nums.
To run our program, we do:
This is the same as what we’ve done before to run our program,
but now the executable is named nums instead of a.exe.
To remove all the output files, we type:
This will remove all .o files and executable files.
Makefile Rules
We could spend the rest of the semester talking about exactly how
Makefiles work and different intricacies and still not cover
everything. Makefiles are a very powerful tool – we’ve only
scratched the surface to be able to compile our program in a
specific way.
Here are some rules to follow as you write your own Makefiles:
- You should always define the variables
CC, HEADERS, CODE, and
OBJECTS. The value of HEADERS should be a list of all .h files in your project, and the value of CODE should be a list of all .co files in your program. Your OBJECTS value should always be the same – $(CODE:.c=.o) (create an object file for every .c file). - The
CFLAGS declaration is optional, but recommended - The
EXE declaration is optional – if you leave it off (along with the -o $EXE in the compilation instruction), then your executable will be named a.exe (or a.out). - There should be a tab character at the beginning of the
second line for the
nums: instruction and the clean: instruction. This MUST be a tab – spaces won’t work. - For the most part, your Makefiles will remain the same
from program to program. You’ll just change the
HEADERS and CODE lists and change the name of the executable.
Getting make
The make tool may have already be installed when you installed the gcc compiler. To test, open a terminal and type:
If you see an error that says something about “No targets specified and no makefile found”, then make is correctly installed. If you see an error that says something like: “The term make is not recognized…”, then make is either not installed or the PATH variable does not include its location.
Windows users
For Windows users who don’t already have make, open an MSYS2 terminal and type:
Then, you will need to add the location of make.exe to your PATH environment variable. Look in both C:\msys64\mingw64\bin and C:\msys64\usr\bin – copy the address of whichever location contains make.exe.
Click Start, type Environment variables, and select “Edit the system environment variables”). Click “Environment Variables..”, then find Path under System variables and click “Edit…”. Click “New”, paste in the address you copied in the previous step, and click OK three times to dismiss each frame.
Mac users
For Windows users who don’t already have make, open the terminal and enter:
Extern Variables
Sometimes when our program is in multiple files, we still want to
define variables that are visible to each file. Here’s how to do this:
- Declare the global variable in a .h file. This can either
be done in a .h file with some of your function
prototypes, or in a special file, globals.h, that
contains the declarations of all global variables. If you
do use a special globals header file, it does not need a
corresponding .c file.
- Include the .h file wherever you want to use the
variable
- When you want to use the variable, declare:
where type is the type of the global variable, and
name is its name. The extern keyword tells the
compiler not to create a new variable, but instead to
find the variable name declared in another file.
As an example, suppose we want to make the array size a global
variable in our for our earlier statistics program. Here’s
what we’d do:
//start of stats.h
#ifndef STATS_H
#define STATS_H

//define array size
int size;

//functions no longer need array lengths
int min(int*);
int max(int*);
double avg(int*);

#endif
//end of stats.h

////////////////////////////

//start of stats.c

//We must include the corresponding header file
#include "stats.h"

//say we're going to use the size variable
extern int size;

int min(int *vals) {
    int min = vals[0];
    int i;
    for (i = 1; i < size; i++) {
        if (vals[i] < min) {
            min = vals[i];
        }
    }

    return min;
}

int max(int *vals) {
    int max = vals[0];
    int i;
    for (i = 1; i < size; i++) {
        if (vals[i] > max) {
            max = vals[i];
        }
    }

    return max;
}

double avg(int *vals) {
    int sum = 0;
    int i;
    for (i = 0; i < size; i++) {
        sum += vals[i];
    }

    return sum/(double)size;
}
//end of stats.c

/////////////////////////

//start of prog.c
#include <stdio.h>
#include <stdlib.h>

//include our header file
//use "" since it is in the current directory
#include "stats.h"

//declare that we're using the size variable
extern int size;

int main() {
    int* nums;
    int i, length;

    printf("Enter size of array: ");
    scanf("%d", &length);

    nums = malloc(length*sizeof(int));
    for (i = 0; i < length; i++) {
        printf("Enter a number: ");
        scanf("%d", nums+i);
    }

    printf("The min is: %d\n", min(nums));
    printf("The max is: %d\n", max(nums));
    printf("The average is: %.2lf\n", avg(nums));

    return 0;
}

//end of prog.c
Notice that we declare the variable in a header file. When we want
to use the size variable, we first include that header file. Then,
we declare size as an extern variable.
Subsections of User-Defined Types
Enums
enum provides a way to create integer constants. For instance, in
Java we might declare:
public static final int GOLD = 1;
public static final int SILVER = 2;
public static final int BRONZE = 3;
..but really what we want is to create a “medal” type that can take
on the values GOLD, SILVER, and BRONZE. Moreover, we
want GOLD to mean “1”, SILVER to mean “2”, and BRONZE to
mean “3”.
(Note: Java does have enums available in its latest version, which are
handled very similarly to how they are in C.)
Defining Enums
Here’s the format for defining an enum in C:
enum typeName {
    value1,
    value2,
    ...
    valueN
} objectList;
Here, typeName is the name of the new data type we’re
creating. value1, value2, ..., valueN are the different
values this type can have. Finally, objectList is a list of
variables we want to create of type typeName. In this definition,
typeName and objectList are both optional.
Here’s how we would represent medals using an enum:
enum medal {gold, silver, bronze};
Enum Variables
Now, the type of this enum is enum medal. All variables of
this type can have a value of either gold, silver, or
bronze. Here’s how to declare a variable:
And here’s how to give this variable the value gold:
We can also use the possible values gold, silver, and
bronze in comparisons:
if (medal100m == gold) {
    printf(“You won!\n”);
}
What’s Going On?
When you declare an enum type, what you’re really doing is
making the enum values into integer constants. For example, in
the medal enum, we’re really creating the integer constants:
gold = 0;
silver = 1;
bronze = 2;
So, for instance, to set medal100m to gold, we could also say:
Then the test:
if (medal100m == gold) {...}
would still evaluate to true, since gold holds the value 0.
Changing Enum Values
Our medal example isn’t quite right. It has gold with the value 0,
silver with 1, and bronze with 2. But we would like gold to
have the value 1, silver 2, and bronze 3. Fortunately, there’s
a way to do that:
enum medal {gold = 1, silver, bronze};
Setting gold to 1 resets the numbering in an enum, so that
silver gets set to 2 and bronze to 3. We also could have
explicitly set each value:
enum medal {gold = 1, silver = 2, bronze = 3};
Here’s another example:
enum example {val1, val2 = 9, val3, val4 = 12, val5};
Here’s how the integer values were assigned:
val1 = 0;
val2 = 9;
val3 = 10;
val4 = 12;
val5 = 13;
An enum tries to keep numbering in order, unless we explicitly set
a value. Then, it uses that value to reset the numbering.
Examples
There is no bool type in C. However, we can create our own
bool type using an enum:
(Notice that false has the value 0 and true has the value
1). Now we can use “bool variables” like we do in C#:
enum bool flag;
flag = true;
if (flag == true) {...}
We can also use an enum to represent grade levels in high
school. We’ll start freshman out at 9, and continue the numbering
from there:
enum grade {freshman = 9, sophomore, junior, senior};
Now we can use this type:
enum grade class;
class = freshman;
class = 10;         //same as sophomore
Enums inside Structs
Since an enum is a valid type, we can put an enum field inside a
struct. For example, suppose we want to create a student struct
that has a name and a grade level. Here’s how:
//define the enum type
enum grade {freshman = 9, sophomore, junior, senior};

//define the struct
struct student {
    char name[20];
    enum grade class;
};
This code works, but it’s overkill. Instead of defining the enum
separately, we want to be able to define it inside the struct. In fact,
ALL we want is a variable of that enum type – we don’t even care
about naming the type. The enum name is optional, so we’ll leave
it off. Here’s our revised definition:
struct student {
    char name[20];
    enum {freshman = 9, sophomore, junior, senior} class;
};
Now, suppose we want to create a student named Mary who is a
junior. Here’s how:
struct student mary;
strcpy(mary.name, "Mary");
mary.class = junior;
Unions
A union is a construct in C that can hold one of several types. A
union variable can only hold one value at a time, unlike a struct,
but that value is not restricted to a single type.
Here’s the format for declaring a union:
union modelName {
    type1 name1;
    type2 name2;
    ...
    typeN nameN;
} objectList;
Here, modelName is the name of the type you’re creating, each
type name is a type you want to be able to store in this union
plus a name for it, and objectList is a list of variables you
want to create with this union type. Both modelName and
objectList are optional.
Defining Unions
Suppose I want a type that will allow me to store money as dollars
(in a double field) or as yen (in an int field). Here’s how I’d do
that:
union money {
    double dollars;
    int yen;
} price;
This creates a variable called price that has type union money.
I could also create a variable called price2 like this:
Union Fields
To access a field in a union, use the . notation – just like with a
struct:
(variableName is the name of the union variable, and
fieldName is the name of the field that we want to access.) If
we had a pointer to a union variable, we would use the -> notation
to access a field.
For example, I can make the price variable hold 17 yen:
Or I can make the price variable hold $4.20:
Note that when I change the value of price from 17 yen to $4.20,
I lose the information about 17 yen. A union variable can only
hold one value at a time, but that value can have different types.
Unions and Enums
Suppose we have a variable of type union money, and we want
to print out its value (in either dollars or yen, depending on what is
stored). With what we’ve done so far, there is no way to tell
WHICH type is stored in a union variable – it might be yen and it
might be dollars. If we do:
union money cost;
cost.yen = 17;
printf("Dollars: %lf\n", cost.dollars);
which sets the yen field but then prints the dollars field, the
behavior is undefined. This code is likely to crash or at least have
unpredictable results.
To solve this problem, we need to keep track of which type we’re
storing in a union variable. The most common way to do this is
with an enum. For example, we could declare:
enum costK {dollarsK, yenK};
Then if we did:
union money cost;
cost.yen = 17;
We could also do:
enum costK costEnum;
costEnum = yenK;
Then we could tell which type was stored in our union variable by
checking the value of our enum variable:
if (costEnum == yenK) }
    printf("Yen: %d\n", cost.yen);
}
else if (costEnum == dollarsK) {
    printf("Dollars: %lf\n", cost.dollars);
}
We will print the value of the field that we’re currently using in the
union.
Structs inside Unions
A struct is a valid type, so we can have a struct be a field in a
union. For example, suppose we wanted to create an animal union
that could be either a dog (struct type) or a cat (struct
type). Furthermore, we want to keep track of the name and breed
of the dog, and the name and color of the cat.
Here’s how:
union animal {
    struct {
        char name[20];
        char breed[20];
    } dog;
    struct {
        char name[20];
        char color[20];
    } cat;
};
Notice that we don’t name the dog struct or the cat struct because
we only want a single variable of that type. Instead, we create a
single dog variable and a single cat variable. Here’s how we create
a union variable that holds an orange cat called Tiger:
union animal kitty;
strcpy(kitty.cat.name, "Tiger");
strcpy(kitty.cat.color, "orange");
Unions inside Structs
Similarly, we can put a union inside a struct. For example,
suppose we wanted to keep track of someone’s name, what country
they’re from, and how much their bill is (in the appropriate
currency). We could store the country with an enum, and the bill
(with different currency) as a union. Here’s how:
struct guest {
    char name[20];
    enum {USA, France, Japan} country;
    union {
        double dollars;
        double euro;
        int yen;
    } cost;
};
Now if we want the guest Maria from France, who paid 100 euro,
here’s what we’d do:
struct guest maria;
strcpy(maria.name, "Maria");
maria.country = France;
maria.cost.euro = 100.0;
Unions as Inheritance
The union construct allows us to simulate inheritance from other languages. For
example, suppose we defined the following abstract class in C#:
public abstract class Person {
    public string name;
    public int age;
}
Suppose as well that we have two C# classes, Student and
Employee, which extend Person:
public class Student : Person {
    public string major;
    public double gpa;
}

public class Employee extends Person {
    public string division;
    public int yearsWorked;
}
The equivalent in C would be a person structure that holds a name,
age, and a union field. The union field could hold either a student
struct (which has a major and gpa) or an employee struct
(which has a division and a yearsWorked). We would also
need an enum field that keeps track of which type in the union is
active.
Here’s what it would look like:
struct person {
    char name[20];
    int age;
    union {
        struct {
            char major[20];
            double gpa;
        } student;
        struct {
            char division[20];
            int yearsWorked;
        } employee;
    } type;
    enum {employeeK, studentK} typeK;
};
Suppose a student has the following information:
- Name: Bob Jones
- Age: 18
- Major: CMPEN
- GPA: 3.2
Here’s how we would create a variable to represent that student:
struct person bob;
strcpy(bob.name, "Bob Jones");
bob.age = 18;
strcpy(bob.type.student.major, "CMPEN");
bob.type.student.gpa = 3.2;
bob.typeK = studentK;
typedef
It gets a bit cumbersome to use types called struct person
and enum grade. It would be much nicer to be able to call
them just person or grade. With C’s typedef construct, we
can do just that.
The format of typedef is:
Here, we rename type oldType to the new name newType. We
can now create variables using the name newType. For example:
typedef char letterGrade;
letterGrade g;
g = 'A';
Notice that we treat our new letterGrade type just like it was a
char. The only difference is that when we declare the variable, we
can use letterGrade as the type instead of char.
Typedef with Structs, Unions, and Enums
We can do a similar thing to rename structs, unions, and
enums. For example, consider the following struct:
struct person {
    char name[20];
    int age;
};
The formal type of the struct is struct person. Now, we
want to rename the type to be just person:
//typedef oldType newType
typedef struct person person;
Alternatively, we can declare the struct and rename it with typedef
all on the same line:
//typedef oldType newType
typedef struct person {
    char name[20];
    int age;
} person;
However, we don’t need to name the struct now, since we’re
always going to be using the new type name when creating
variables of this type:
typedef struct {
    char name[20];
    int age;
} person;
Now we can declare and use a person variable:
person p;
strcpy(p.name, "Bill");
p.age = 22;
We can do a similar thing to rename unions and enums. Consider
the following union:
union money {
    double dollars;
    int yen;
};
We can rename the union type to money:
typedef union {
    double dollars;
    int yen;
} money;
Now we can use money as the type name instead of union money. Similarly, consider the following enum:
enum grade{freshman = 9, sophomore, junior, senior};
We can rename the enum type to grade:
typedef enum {freshman = 9, sophomore, junior, senior} grade;
Now we can use grade as the type name instead of enum grade.
Typedef with Linked Lists
Consider the following structure for a node in a linked list:
struct node {
    int data;
    struct node *next;
};
We can try to rename the struct node type to node using
typedef:
typedef struct {
    int data;
    node *next;
} node;
However, this will give us a compiler error. The reason is that this
struct is self-referential. When we declare the field node *next in the struct, the compiler hasn’t yet seen that we’re
renaming the type to node. If instead we list the field as:
we will also get a complaint, as we left off the name of the struct.
If you’re using typedef on a self-referential struct, you need to
include BOTH the name of the struct and the name of the renamed
type. The fixed node struct looks like:
typedef struct node {
    int data;
    struct node *next;
} node;
Here’s how we’d use it:
node *head = malloc(sizeof(node));
head->data = 4;
head->next = malloc(sizeof(node));
head->next->data = 7;
head->next->next = NULL;
This creates the linked list 4->7.
User-Defined Types with Pointers
Consider the following struct:
typedef struct {
    char name[20];
    int age;
    union {
        struct {
            char major[20];
            double gpa;
        } student;
        struct {
            char division[20];
            int yearsWorked;
        } employee;
    } type;
    enum {employeeK, studentK} typeK;
} person;
Suppose we want to create a pointer to a struct variable with the
following information:
- Name: Bob Jones
- Student
- Age: 18
- Major: EECE
- GPA: 3.2
First, we’d declare a pointer of type person:
Then we’d allocate memory:
p = malloc(sizeof(person));
And then we would initialize the fields:
strcpy(p->name, "Bob Jones");
p->age = 18;
strcpy(p->type.student.major, "EECE");
p->type.student.gpa = 3.2;
p->typeK = studentK;
Notice that we use a -> to access any fields in the struct (since our
variable is a pointer). After we are inside an internal field like a
union, we switch to . notation (since the union is not a pointer).
Preprocessor Directives
The C pre-processor is a special program that runs before the C
compiler. It processes every line that begins with a #, such as a
#include statement. The pre-processor may add, remove, or
change your code when handling the # statements.
#include
We’ve been using the #include statement since our first
program in order to get access to C’s library functions (like
printf in stdio.h). When the pre-processor sees a
#include statement, it replaces the #include line with the
contents of the included file. For example, when the pre-processor
sees:
then it replaces that line with the contents of the stdio.h file (which includes definitions for printf,
scanf, fprintf, etc.). Then, when the compiler sees a call to
printf, it knows what you mean because printf is defined in
your file.
Including a file like:
tells the pre-processor to look for stdio.h in the standard
include directory (which is where all the library files live). If
instead you say:
the pre-processor will first look for stdio.h in the current
directory. If it can’t find the file, it will hen look in the standard
include directory.
#define
The #define statement tells the pre-processor to find all
occurrences of one value in your code, and to replace them with
another value. This can be used in two ways: to define constants
and to define macros (simplified functions).
Constants
A constant in C is defined like this:
Here, name is the name we are giving the constant, and value is
the value we would like it to have. Here is an example:
Now, we can use PI in our code when we want the value
3.14159. For example:
int radius = 10;
double area = PI * radius * radius;
When the pre-processor sees a #define constant, it replaces all
occurrences of the constant’s name with it’s specified value. So
by the time the pre-processor gets done with it, the above code
looks like:
int radius = 10;
double area = 3.14159 * radius * radius;
Macros
A macro is simplified function that includes a name and a list of
arguments. They are defined using the #define statement, just
like constants. For example:
When the preprocessor sees a call to the macro, it will replace the
macro call with the macro formula. For example, if we do:
int x = 3;
int y = 4;
int result = SUM(x, y);
Then the pre-processor will change the last line to be:
//Uses x as a and y as b in the macro formula
int result = x + y;
Just like other pre-processor directives, the compiler never sees the
macro itself. It only sees the final result, after the pre-processor
has replaced the macro call with the macro formula.
As another example, let’s try to write a macro that computes the
difference of two squares:
//This is not right!
#define DIFF_SQUARE(a, b) a*a – b*b
This macro may look right (and this is how we would write a
diffSquare function), but it has some problems. For example:
int x = 4;
int y = 3;
int c = 2;
int d = 1;
int result = DIFF_SQUARE(x-c, y-d);
The pre-processor will replace the call to DIFF_SQUARE with the
macro value. It will use x-c as the value for a, and y-d as
the value for b. Here’s what the last line will become:
int result = x-c*x-c – y-d*y-d;
However, what we WANT is:
int result = (x-c)*(x-c) – (y-d)*(y-d);
To get this substitution, we need to add parentheses to the original
macro:
#define DIFF_SQUARE(a, b) (a)*(a) – (b)*(b)
Here is a macro that returns the minimum of two numbers:
#define MIN(a, b) a < b ? a : b
This uses the ternary conditional operator. It means: if a is less
then b, then a is the minimum. Otherwise, b is the minimum.
Here is a macro that eats all input left in the input buffer. This can
be VERY useful as any unexpected input will stay in the input
buffer. It reads one character at a time until it runs out of input.
#define FLUSH() while (getchar() != '\n')
#ifdef, #ifndef
There is also a pre-processor if-statement that checks to see
whether or not a constant has been defined. Here’s the format:
#ifdef (pre-processor constant)
code
#endif
The code inside this #ifdef/#endif block will only be
compiled if the pre-processor constant was defined. For example:
#define SIZE 10

//(elsewhere)
#ifdef SIZE
int nums[SIZE];
#endif
In this example, we only include the int nums[SIZE]; line
in our program if the SIZE constant has already been defined.
There is a similar construct called #ifndef, which evaluates to
true if a constant has NOT been defined. For example:
#ifndef SIZE
printf("Define SIZE!\n");
#endif
The printf statement will only be part of the program if the
SIZE constant has not been defined. The #ifndef statement
will be very useful when we start to break our programs into
several files – it will help ensure that we don’t end up including the
same information twice when we link our files together.
Subsections of Pointers to Functions
Function Pointer Basics
Declaration Syntax
Here is the syntax for declaring a function pointer:
return_type (*ptr_name) (args);
This declares ptr_name as a pointer to a function that returns something of type return_type and that takes the argument types described in args. Here, args is a comma-separated lists of the argument types for a function. For example, args would be (int, double) for a function that took two arguments – an int followed by a double.
The extra parentheses around (*ptr_name) are needed because there are precedence relationships in declarations just as there are in expressions. If instead we did:
//THIS IS INCORRECT FOR DECLARING A FUNCTION POINTER!
return_type *ptr_name (args);
We would be declaring a function (NOT a function pointer) whose return type was return_type*.
Declaration Example
Suppose we wish to declare a pointer to a function that returns an int and takes two parameters – an int followed by a char*. We would write:
int (*fn_ptr) (int, char*);
Now fn_ptr is a variable of type function pointer to a function that returns an int and takes (int, char*) as arguments.
Initialization Syntax
To initialize our fn_ptr variable, we need an existing function whose header matches its declaration – one that returns an int and takes (int, char*) as arguments. Suppose we have the following function:
int addToLength(int num, char* str) {
    return num + strlen(str);
}
Suppose we also have our fn_ptr variable declared in a main method. Now we can initialize fn_ptr to point to the beginning of the executable code in the addToLength function.
int main() {
    char* test = "hello";       //declares string constant "hello"

    int (*fn_ptr)(int, char*);  //declares our function pointer, fn_ptr

    fn_ptr = addToLength;       //now fn_ptr points to the addToLength function

    return 0;
}
Note that when we do:
That we mean: assign to fn_ptr the memory address of the beginning of the executable code in the addToLength function. We could have more pedantically written:
To explicitly get the memory address of the addToLength function, and assign that to fn_ptr. However, the & is optional in this case since there is no other way to interpret assigning to a function pointer variable.
Using Function Pointers
After you have declared and initialized a function pointer variable, you can use it to call the referenced function (passing the necessary arguments). In our example, we could modify our main method to look like:
int main() {
    int result;                 //declare result variable

    char* test = "hello";       //declares string constant "hello"

    int (*fn_ptr)(int, char*);  //declares our function pointer, fn_ptr

    fn_ptr = addToLength;       //now fn_ptr points to the addToLength function

    int ans = fn_ptr(3, test);  //call the function referenced by fn_ptr,
                                //passing 3 and test. Store the returned value
                                //in the ans variable

    printf("%d\n", ans);     //in our example, prints 8
                                //(the length of "hello" plus 3)

    return 0;
}
Note that we use fn_ptr as follows:
int ans = fn_ptr(3, test);
This calls the function referenced by fn_ptr (the addToLength function), passing the arguments 3 and test. The value returned by the referenced (addToLength) function is stored in the ans variable.
The fn_ptr variable holds the memory address of the beginning of the executable code for the addToLength function. When we do int ans = fn_ptr(3, test), we want to go to the memory location stored in fn_ptr, and begin executing that code. In other words, we wish to dereference fn_ptr, which we can do with the * operator. We could more precisely write:
int ans = (*fn_ptr)(3, test);
To first go to the executable code referenced by fn_ptr, and then to start executing that code with arguments 3 and test. As with using the & operator when initializing function pointers, using the dereferencing operator when using a function pointer is optional. There is no other possible meaning of fn_ptr(3, test), so the function pointer is dereferenced whether we explicitly use the operator or not.
If we do choose to explicitly dereference, we need to be careful with order of operations. If we instead did:
//THIS IS INCORRECT FOR USING A FUNCTION POINTER!
int ans = *fn_ptr(3, test);
Then we would first go to the executable code referenced by fn_ptr (the addToLength function), passing our arguments 3 and test. That code would return 8, which is the sum of and the argument 3 and the string length of hello. Finally, we would assign to ans the result of dereferencing the 8. This will lead to either a segmentation fault (the program crashing) or to grabbing an arbirtrary value in memory and claiming it as our answer.
Functions and Function Pointers
Since a function pointer is a valid type, we can pass function pointers as arguments to functions and can also return them from functions.
Passing Function Pointers to Functions
Recall that the syntax for declaring a function ponter is:
return_type (*ptr_name) (args);
Where ptr_name is the new variable name for a function pointer that returns something of type return_type and that takes the argument types described in args. We can similarly accept a function pointer as an argument to a function using the same syntax.
For example, consider the following program:
#include <stdio.h>

int plus(int a, int b) {
    return a + b;
}

int minus(int a, int b) {
    return a - b;
}

int times(int a, int b) {
    return a * b;
}

int divide(int a, int b) {
    return a / b;
}

//op is a function pointer to a function that takes two integer arguments
//and returns an integer result
int doOperation(int (*op)(int, int), int x, int y) {

    //calls the function pointed to by op and returns the result
    return op(x, y);
}

int main() {
    int num1 = 3;
    int num2 = 4;

    printf("Added result: %d\n", doOperation(plus, num1, num2));
    printf("Multiplied result: %d\n", doOperation(times, num1, num2));

    return 0;
}
The code above will print:
Added result: 7
Multiplied result: 12
The above example might seem unnecessarily complicated, as we could have directly called plus and times from main and bypassed the doOperation function altogether. However, using function pointers as arguments can be very powerful – for example, the stdlib library defines a qsort function that accepts a comparator function pointer as an argument. This way, we can use the same sorting function to sort in a variety of ways – ascending order, descending order, by length, etc. – by passing in a different comparator function pointer.
Typedef and Function Pointers
Listing the type of function pointers can be tedious and error-prone. It can be much easier to use typedef once to create a new (more simply named) type representing a particular kind of function pointer, and then use the new type name after that. For example, in our math operations program above, we can first create a new type name for our function pointer type:
typedef int (*function) (int, int);
This creates a new type called function that represents a function pointer to a function that returns an int and takes two int arguments. We can then use the type function in our doOperation method instead of writing out the argument int (*op)(int, int). Here is the new doOperation function:
int doOperation(function op, int x, int y) {

    //calls the function pointed to by op and returns the result
    return op(x, y);
}
Note that the type name function can be anything – this is just the new type name we happened to pick when using typedef.
Returning Function Pointers from Functions
Returning function pointers from functions is exactly the same idea as returning any other other type from a function. Ideally, we would first use typedef to create a new type name for the desired type of function pointer. For example, we could add a new function to our operations example above that returns a pointer to the correct operation function based on a char argument:
function getOperation(char c) {
    if (c == '+') {
        return plus;
    }
    else if (c == '-') {
        return minus;
    }
    else if (c == '*') {
        return times;
    }
    else {
        //will return 'divide' if a non-operation char argument
        //is passed

        return divide;
    }
}
Then, we could use our getOperation function to get the correct operation based on user input:
char op;
int num1, num2;

printf("Enter number op number (no spaces, like 3+2): ");
scanf("%d%c%d", &num1, &op, &num2);

function opResult = getOperation(op);
printf("Result: %d\n", opResult(num1, num2));
By saving the correct operation function in opResult, we could then call opResult (which would call either plus, minus, times, or divide based on the value of op) to get the result of the operation.
Arrays of Function Pointers
We can declare arrays of function pointers using the same syntax we use to create arrays of any other type. As we saw in the previous section, it is often easier to first rename our function pointer using typedef, and then to use that new type when declaring an array.
Consider our operations functions and newly created function type from the previous section:
//'function' is the name of a new function pointer type
//describing a function that returns an int and takes two int arguments
typedef int (*function) (int, int);

int plus(int a, int b) {
    return a + b;
}

int minus(int a, int b) {
    return a - b;
}

int times(int a, int b) {
    return a * b;
}

int divide(int a, int b) {
    return a / b;
}
Since each operation function is the same type, we can create an array of these four function pointers. We can then ask the user to enter an array index corresponding to the desired operation, and access the appropriate function pointer to execute the operation:
int main() {
    int num1 = 3;
    int num2 = 4;

    int choice;

    //declares an array of four function pointers
    function allOps[4] = {plus, minus, times, divide};

    printf("Enter 0 for plus, 1 for minus, 2 for times, and 3 for divide: ");
    scanf("%d", &choice);

    printf("Result: %d\n", (allOps[choice])(num1, num2));

    return 0;
}
Here, allOps[choice] accesses a particular function pointer by array index, and then calls that function (passing num1 and num2). For example, if the user entered 2, then allOps[choice] would access the times function. The code would print:
Since times(num1, num2) would return 12.