Testing
Is it Working Yet?
Is it Working Yet?
A critical part of the software development process is ensuring the software works! We mentioned earlier that it is possible to logically prove that software works by constructing a state transition table for the program, but once a program reaches a certain size this strategy becomes less feasible. Similarly, it is possible to model a program mathematically and construct a theorem that proves it will perform as intended. But in practice, most software is validated through some form of testing. This chapter will discuss the process of testing object-oriented systems.
Some key terms to learn in this chapter are:
The key skill to learn in this chapter is how to write C# unit test code using xUnit and the Visual Studio Test Explorer.
As you’ve developed programs, you’ve probably run them, supplied input, and observed if what happened was what you wanted. This process is known as informal testing. It’s informal, because you don’t have a set procedure you follow, i.e. what specific inputs to use, and what results to expect. Formal testing adds that structure. In a formal test, you would have a written procedure to follow, which specifies exactly what inputs to supply, and what results should be expected. This written procedure is known as a test plan.
Historically, the test plan was often developed at the same time as the design for the software (but before the actual programming). The programmers would then build the software to match the design, and the completed software and the test plan would be passed onto a testing team that would follow the step-by-step testing procedures laid out in the testing plan. When a test failed, they would make a detailed record of the failure, and the software would be sent back to the programmers to fix.
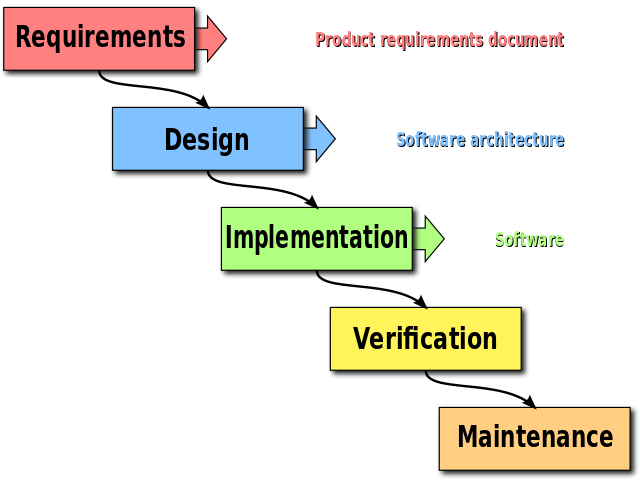
This model of software development has often been referred to as the ‘waterfall model’ as each task depends on the one before it:
Unfortunately, as this model is often implemented, the programmers responsible for writing the software are reassigned to other projects as the software moves into the testing phase. Rather than employ valuable programmers as testers, most companies will hire less expensive workers to carry out the testing. So either a skeleton crew of programmers is left to fix any errors that are found during the tests, or these are passed back to programmers already deeply involved in a new project.
The costs involved in fixing software errors also grow larger the longer the error exists in the software. The table below comes from a NASA report of software error costs throughout the project life cycle: 1

It is clear from the graph and the paper that the cost to fix a software error grows exponentially if the fix is delayed. You probably have instances in your own experience that also speak to this - have you ever had a bug in a program you didn’t realize was there until your project was nearly complete? How hard was it to fix, compared to an error you found and fixed right away?
It was realizations like these, along with growing computing power that led to the development of automated testing, which we’ll discuss next.
Jonette M. Stecklein, Jim Dabney, Brandon Dick, Bill Haskins, Randy Lovell, and Gregory Maroney. “Error Cost Escalation Through the Project Life Cycle”, NASA, June 19, 2014. ↩︎
Automated testing is the practice of using a program to test another program. Much as a compiler is a program that translates a program from a higher-order language into a lower-level form, a test program executes a test plan against the program being tested. And much like you must supply the program to be compiled, for automated testing you must supply the tests that need to be executed. In many ways the process of writing automated tests is like writing a manual test plan - you are writing instructions of what to try, and what the results should be. The difference is with a manual test plan, you are writing these instructions for a human. With an automated test plan, you are writing them for a program.
Automated tests are typically categorized as unit, integration, and system tests:
The complexity of writing tests scales with each of these categories. Emphasis is usually put on writing unit tests, especially as the classes they test are written. By testing these classes early, errors can be located and fixed quickly.
Writing tests is in many ways just as challenging and creative an endeavor as writing programs. Tests usually consist of invoking some portion of program code, and then using assertions to determine that the actual results match the expected results. The results of these assertions are typically reported on a per-test basis, which makes it easy to see where your program is not behaving as expected.
Consider a class that is a software control system for a kitchen stove. It might have properties for four burners, which correspond to what heat output they are currently set to. Let’s assume this is as an integer between 0 (off) and 5 (high). When we first construct this class, we’d probably expect them all to be off! A test to verify that expectation would be:
public class StoveTests {

    [Fact]
    public void BurnersShouldBeOffAtInitialization() {
        Stove stove = new Stove();
        Assert.Equal(0, stove.BurnerOne);
        Assert.Equal(0, stove.BurnerTwo);
        Assert.Equal(0, stove.BurnerThree);
        Assert.Equal(0, stove.BurnerFour);
    }
}
Here we’ve written the test using the C# xUnit test framework, which is being adopted by Microsoft as their preferred framework, replacing the nUnit test framework (there are many other C# test frameworks, but these two are the most used).
Notice that the test is simply a method, defined in a class. This is very common for test frameworks, which tend to be written using the same programming language the programs they test are written in (which makes it easier for one programmer to write both the code unit and the code to test it). Above the class appears an attribute - [Fact]. Attributes are a way of supplying metadata within C# code. This metadata can be used by the compiler and other programs to determine how it works with your code. In this case, it indicates to the xUnit test runner that this method is a test.
Inside the method, we create an instance of stove, and then use the Assert.Equal<T>(T expected, T actual) method to determine that the actual and expected values match. If they do, the assertion is marked as passing, and the test runner will display this pass. If it fails, the test runner will report the failure, along with details to help find and fix the problem (what value was expected, what it actually was, and which test contained the assertion).
The xUnit framework provides for two kinds of tests, Facts, which are written as functions that have no parameters, and Theories, which do have parameters. The values for these parameters are supplied with another attribute, typically [InlineData]. For example, we might test that when we set a burner to a setting within the valid 0-5 range, it is set to that value:
[Theory]
[InlineData(0)]
[InlineData(1)]
[InlineData(2)]
[InlineData(3)]
[InlineData(4)]
[InlineData(5)]
public void ShouldBeAbleToSetBurnerOneToValidRange(int setting) {
    Stove stove = new Stove();
    stove.BurnerOne = setting;
    Assert.Equal(setting, stove.BurnerOne);
}
The values in the parentheses of the InlineData are the values supplied to the parameter list of the theory method. Thus, this test is actually six tests; each test makes sure that one of the settings is working. We could have done all six as separate assignments and assertions within a single fact, but using a theory means that if only one of these settings doesn’t work, we will see that one test fail while the others pass. This level of specificity can be very helpful in finding errors.
So far our tests cover the expected behavior of our stove. But where tests really prove their worth is with the edge cases - those things we as programmers don’t anticipate. For example, what happens if we try setting our range to a setting above 5? Should it simply clamp at 5? Should it not change from its current setting? Or should it shut itself off entirely because its user is clearly a pyromaniac bent on burning down their house? If the specification for our program doesn’t say, it is up to us to decide. Let’s say we expect it to be clamped at 5:
[Theory]
[InlineData(6)]
[InlineData(18)]
[InlineData(1000000)]
public void BurnerOneShouldNotExceedASettingOfFive(int setting) {
    Stove stove = new Stove();
    stove.BurnerOne = setting;
    Assert.Equal(5, stove.BurnerOne);
}
Note that we don’t need to exhaustively test all numbers above 5 - it is sufficient to provide a representative sample, ideally the first value past 5 (6), and a few others. Also, now that we have defined our expected behavior, we should make sure the documentation of our BurnerOne property matches it:
/// <summary>
/// The setting of burner one
/// </summary>
/// <value>
/// An integer between 0 (off) and 5 (high)
/// </value>
/// <remarks>
/// If a value higher than 5 is attempted, the burner will be set to 5
/// </remarks>
public int BurnerOne {get; set;}
This way, other programmers (and ourselves, if we visit this code years later) will know what the expected behavior is. We’d also want to test the other edge cases: i.e. when the burner is set to a negative number.
Recognizing and testing for edge cases is a critical aspect of test writing. But it is also a difficult skill to develop, as we have a tendency to focus on expected values and expected use-cases for our software. But most serious errors occur when values outside these expectations are introduced. Also, remember special values, like double.PositiveInfinity, double.NegativeInfinity, and double.NaN.
Like most testing frameworks, the xUnit framework provides a host of specialized assertions.
For example, xUnit provides two boolean assertions:
Assert.True(bool actual), asserts that the value supplied to the actual parameter is true.Assert.False(bool actual), asserts that the value supplied to the actual parameter is false.While it may be tempting to use Assert.True() for all tests, i.e. Assert.True(stove.BurnerOne == 0), it is better practice to use the specialized assertion that best matches the situation, in this case Assert.Equal<T>(T expected, T actual) as a failing test will supply more details.
The Assert.Equal<T>(T expected, T actual) is the workhorse of the assertion library. Notice it is a template method, so it can be used with any type that is comparable (which is pretty much everything possible in C#). It also has an override, Assert.Equal<T>(T expected, T actual, int precision) which allows you to specify the precision for floating-point numbers. Remember that floating point error can cause two calculated values to be slightly different than one another; specifying a precision allows you to say just how close to the expected an actual value needs to be to be considered ’equal’ for the purposes of the test.
Like most assertions, it is paired with an opposite, Assert.NotEqual<T>(T expected, T actual), which also has an override for supplying precision.
With numeric values, it can be handy to determine if the value falls within a range:
Assert.InRange<T>(T actual, T low, T high) asserts actual falls between low and high (inclusive), andAssert.NotInRange<T>(T actual, T low, T high) asserts actual does not fall between low and high (inclusive)There are special assertions to deal with null references:
Assert.Null(object object) asserts the supplied object is null, andAssert.NotNull(object object) asserts the supplied object is not nullIn addition, two objects may be considered equal, but may or may not be the same object (i.e. not referencing the same memory). This can be asserted with:
Assert.Same(object expected, object actual) asserts the expected and actual object references are to the same object, whileAssert.NotSame(object expected, object actual) asserts the expected and actual object references are not the same objectAt times, you may want to assure it is possible to cast an object to a specific type. This can be done with:
Assert.IsAssignableFrom<T>(object obj)
Where T is the type to cast into.At other times, you may want to assert that the object is exactly the type you expect (.e. T is not an interface or base class of obj). That can be done with:
Assert.IsType<T>(object obj)There are a host of assertions for working with collections:
Assert.Empty(IEnumerable collection) asserts that the collection is empty, whileAssert.NotEmpty(IEnumerable collection) asserts that it is not emptyAssert.Contains<T>(T expected, IEnumerable<T> collection) asserts that the expected item is found in the collection, whileAssert.DoesNotContain<T>(T expected, IEnumerable<T> collection) asserts the expected item is not found in the collectionIn addition to the simple equality check form of Assert.Contains<T>() and Assert.DoesNotContain<T>(), there is a version that takes a filter expression (an expression that evaluates to true or false indicating that an item was found) written as a lambda expression. For example, to determine if a list of Fruit contains an Orange we could use:
List<Fruit> fruits = new List<Fruit>() {
    new Orange(),
    new Apple(),
    new Grape(),
    new Banana() {Overripe = true}
};
Assert.Contains(fruits, item => item is Orange);
The expression item is Orange is run on each item in fruits until it evaluates to true or we run out of fruit to check. We can also supply curly braces with a return statement if we need to perform more complex logic:
Assert.Contains(fruits, item => {
    if(item is Banana banana) {
        if(banana.Overripe) return true;
    }
    return false;
});
Here we only return true for overripe bananas. Using Assert.Contains() with a filter expression can be useful for checking that expected items are in a collection. To check that the collection also does not contain unexpected items, we can test the length of the collection against the expected number of values, i.e.:
Assert.True(fruits.Count == 4, $"Expected 4 items but found {fruits.Count}");Here we use the Assert.True() overload that allows a custom message when the test fails.
Finally, Assert.Collection<T>(IEnumerable<T> collection, Action<T>[] inspectors) can apply specific inspectors against each item in a collection. Using the same fruits list as above:
Assert.Collection(fruits,
    item => Assert.IsType<Orange>(item),
    item => Assert.IsType<Apple>(item),
    item => Assert.IsType<Grape>(item),
    item => {
        Assert.IsType<Banana>(item);
        Assert.True(((Banana)item).Overripe);
    }
);
Here we use an Action
The number of actions should correspond to the expected size of the collection, and the items supplied to the actions must be in the same order as they appear in the collection. Thus, the Assert.Collection() is a good choice when the collection is expected to always be in the same order, while the Assert.Contains() approach allows for variation in the ordering.
Error assertions also use ActionSystem.DivideByZeroException with:
[Fact]
public void DivisionByZeroShouldThrowException() {
    Assert.Throws(System.DivideByZeroException, () => {
        var tmp = 10.0/0.0;
    });
}
Note how we place the code that is expected to throw the exception inside the body of the Action? This allows the assertion to wrap it in a try/catch internally. The exception-related assertions are:
Assert.Throws(System.Exception expectedException, Action testCode) asserts the supplied expectedException is thrown when testCode is executedAssert.Throws<T>(Action testCode) where T : System.Exception the templated version of the aboveAssert.ThrowsAny<T>(Action testCode) where T: System.Exception asserts that any exception will be thrown by the testCode when executedThere are also similar assertions for exceptions being thrown in asynchronous code. These operate nearly identically, except instead of supplying an Action, we supply a Task:
Assert.ThrowsAsync<T>(Task testCode) where T : System.Exception asserts the supplied exception type T is thrown when testCode is executedAssert.ThrowsAnyAsync<T>(Task testCode) where T: System.Exception is the asynchronous version of the previous assertion, asserts the supplied exception type T will be thrown some point after testCode is executed.Asserting that events will be thrown also involves Action
For example, assume we have a class, Emailer, with a method SendEmail(string address, string body) that should have an event handler EmailSent whose event args are EmailSentEventArgs. We could test that this class was actually raising this event with:
[Fact]
public void EmailerShouldRaiseEmailSentWhenSendingEmails()
{
    string address = "test@test.com";
    string body = "this is a test";
    Emailer emailer = new Emailer();
    Assert.Raises<EmailSentEventArgs>(
        listener => emailer += listener, // This action attaches the listener
        listener => emailer -= listener, // This action detaches the listener
        () => {
            emailer.SendEmail(address, body);
        }
    )
}
The various event assertions are:
Assert.Raises<T>(Action attach, Action detach, Action testCode)Assert.RaisesAny<T>(Action attach, Action detach, Action testCode)There are also similar assertions for events being raised by asynchronous code. These operate nearly identically, except instead of supplying an Action, we supply a Task:
Assert.RaisesAsync<T>(Action attach, Action detach, Task testCode)Assert.RaisesAnyAsync<T>(Action attach, Action detach, Task testCode)For examples of these assertions, see section 2.3.10
XUnit does not directly support old-style events - those with a named event handler like CollectionChangedEventHandler, only those that use the templated form: EventHandler<CustomEventArgs> (with the exception of the PropertyChanged event, discussed below). For strategies to handle the older-style events, see section 2.3.11
Because C# has deeply integrated the idea of ‘Property Change’ notifications as part of its GUI frameworks (which we’ll cover in a later chapter), it makes sense to have a special assertion to deal with this notification. Hence, the Assert.PropertyChanged(INotifyPropertyChanged @object, string propertyName, Action testCode). Using it is simple - supply the object that implements the INotifyPropertyChanged interface as the first argument, the name of the property that will be changing as the second, and the Action delegate that will trigger the change as the third.
For example, if we had a Profile object with a StatusMessage property that we knew should trigger a notification when it changes, we could write our test as:
[Fact]
public void ProfileShouldNotifyOfStatusMessageChanges() {
    Profile testProfile = new Profile();
    Assert.PropertyChanged(testProfile, "StatusMessage", () => testProfile.StatusMessage = "Hard at work");
}
There is also a similar assertion for testing if a property is changed in asynchronous code. This operates nearly identically, except instead of supplying an Action, we supply a Task:
Assert.PropertyChangedAsync(INotifyPropertyChanged @object, string propertyName, Task testCode)One of the most important ideas behind unit testing is the idea that you are testing an object in isolation from other objects (This is in direct contrast to integration testing, where you are interested in how objects are working together).
But how do we test a class that has a strong dependency on another class? Let’s consider the case of an Automated Teller Machine (ATM). If we designed its control system using an object-oriented language, one natural architecture would be to have classes representing the cash dispenser, card reader, keyboard, display, and user’s bank accounts. Then we might coordinate each of these into a central object, representing the entire ATM.
Unit testing most of these classes would be straightforward, but how do we unit test the ATM class? It would have dependencies on each of the other classes. If we used normal instances of those, we’d have no idea if the test was failing due to the ATM class or its dependency. This is where mock objects come into play.
We start by replacing each of the dependencies with an interface using the same method signatures, and we pass the dependencies through the ATM constructor. We make sure our existing classes implement the interface, and pass them into the ATM when we create it. Thus, this step doesn’t change much about how our program operates - we’re still using the same classes to do the same things.
But in our unit tests for the ATM class, we can create new classes that implement the interfaces and pass them into the ATM instance we are testing. These are our mock classes, because they “fill in” for the real classes. Typically, a mock class is much simpler than a real class, and exposes information we might need in our test. For example, our Display class might include a DisplayText method, so have it implement an IDisplay interface that lists DisplayText. Then our MockDisplay class might look like:
internal class MockDisplay :IDisplay
{
  public string LastTextDisplayed {get; set;}

  public void DisplayText(string text)
  {
    LastTextDisplayed = text;
  }
}
Note that our mock class implements the required method, DisplayText, but in a very different way than a real display would - it just holds onto the string and makes it accessible with a public property. That way, we could check its value in a test:
[fact]
public void ShouldDisplayGreetingOnStartup()
{
  MockDisplay md = new MockDisplay();
  MockKeyboard mk = new MockKeyboard();
  MockCardReader mcr= new MockCardReader();
  MockCashDispenser mcd = new MockCashDispenser();
  Atm atm = new Atm(md, mk, mcr, mcd);
  Assert.Equal("Hello ATM!", md.LastTextDisplayed);
}
Given our knowledge of C#, the only way md.LastTextDisplayed would be the string specified was if the ATM class asked it to display the message when it was constructed. Thus, we know it will do the same with the real DisplayScreen class. And if we have also thoroughly unit tested the DisplayScreen class, then we have a strong basis for believing our system is built correctly.
This approach also allows us to test things that would normally be very difficult to do - for example, we can write a method to have a MockCardReader trigger a CardInserted event:
internal class MockCardReader : ICardReader
{
  public event EventHandler<CardInsertedEventArgs> CardInserted;

  public void TriggerCardInserted()
  {
    CardInserted.Invoke(this, new CardInsertedEventArgs());
  }
}
Which allows us to check that the ATM prompts a user for a PIN once a card is inserted:
[Fact]
public void ShouldPromptForPinOnCardInsert()
{
  MockDisplay md = new MockDisplay();
  MockKeyboard mk = new MockKeyboard();
  MockCardReader mcr= new MockCardReader();
  MockCashDispenser mcd = new MockCashDispenser();
  Atm atm = new Atm(md, mk, mcr, mcd);
  mcr.TriggerCardInserted();
  Assert.Equal("Please enter your PIN:", md.LastTextDisplayed);
}
Using mock objects like this can greatly simplify the test-writing process, and improve the quality and robustness of your unit tests.
Tests are usually run with a test runner, a program that will execute the test code against the code to be tested. The exact mechanism involved depends on the testing framework.
The xUnit framework is offered as a set of Nuget packages:
xunit package contains the library code defining the Assertion class as well as the [Fact] and [Test] attributes.xunit.runner.visualstudio package contains the actual test runnerAs with other aspects of the .NET framework, the tools can be used at either the command line, or through Visual Studio integrations. The xunit documentation describes the command line approach thoroughly, so we won’t belabor it here. But be aware, if you want to do development in a Linux or Unix environment, you must use the command line, as there is no version of Visual Studio available for those platforms (there is however, a version available for the Mac OS).
When building tests with Visual Studio, you will typically begin by adding an xUnit Test Project to your existing solution. Using the wizard will automatically incorporate the necessary Nuget packages into the project. However, you will need to add the project to be tested to the Dependencies list of the test project to give it access to the assembly to be tested. You do this by right-clicking the ‘Dependencies’ entry under the Test Project in Visual Studio, choosing “Add Project Reference”, and in the dialog that pops up, checking the checkbox next to the name of the project you are testing:
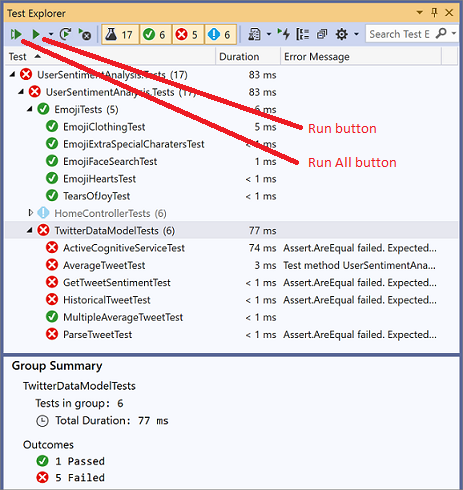
To explore and run your tests, you can open the Test Explorer from the “Test” menu. If no tests appear, you may need to build the test project. This can be done by right-clicking the test project in the Solution Explorer and selecting “Build”, or by clicking the “Run All” button in the Test Explorer. The “Run All” button will run every test in the suite. Alternatively, you can run individual tests by clicking on them, and clicking the “Run” button.
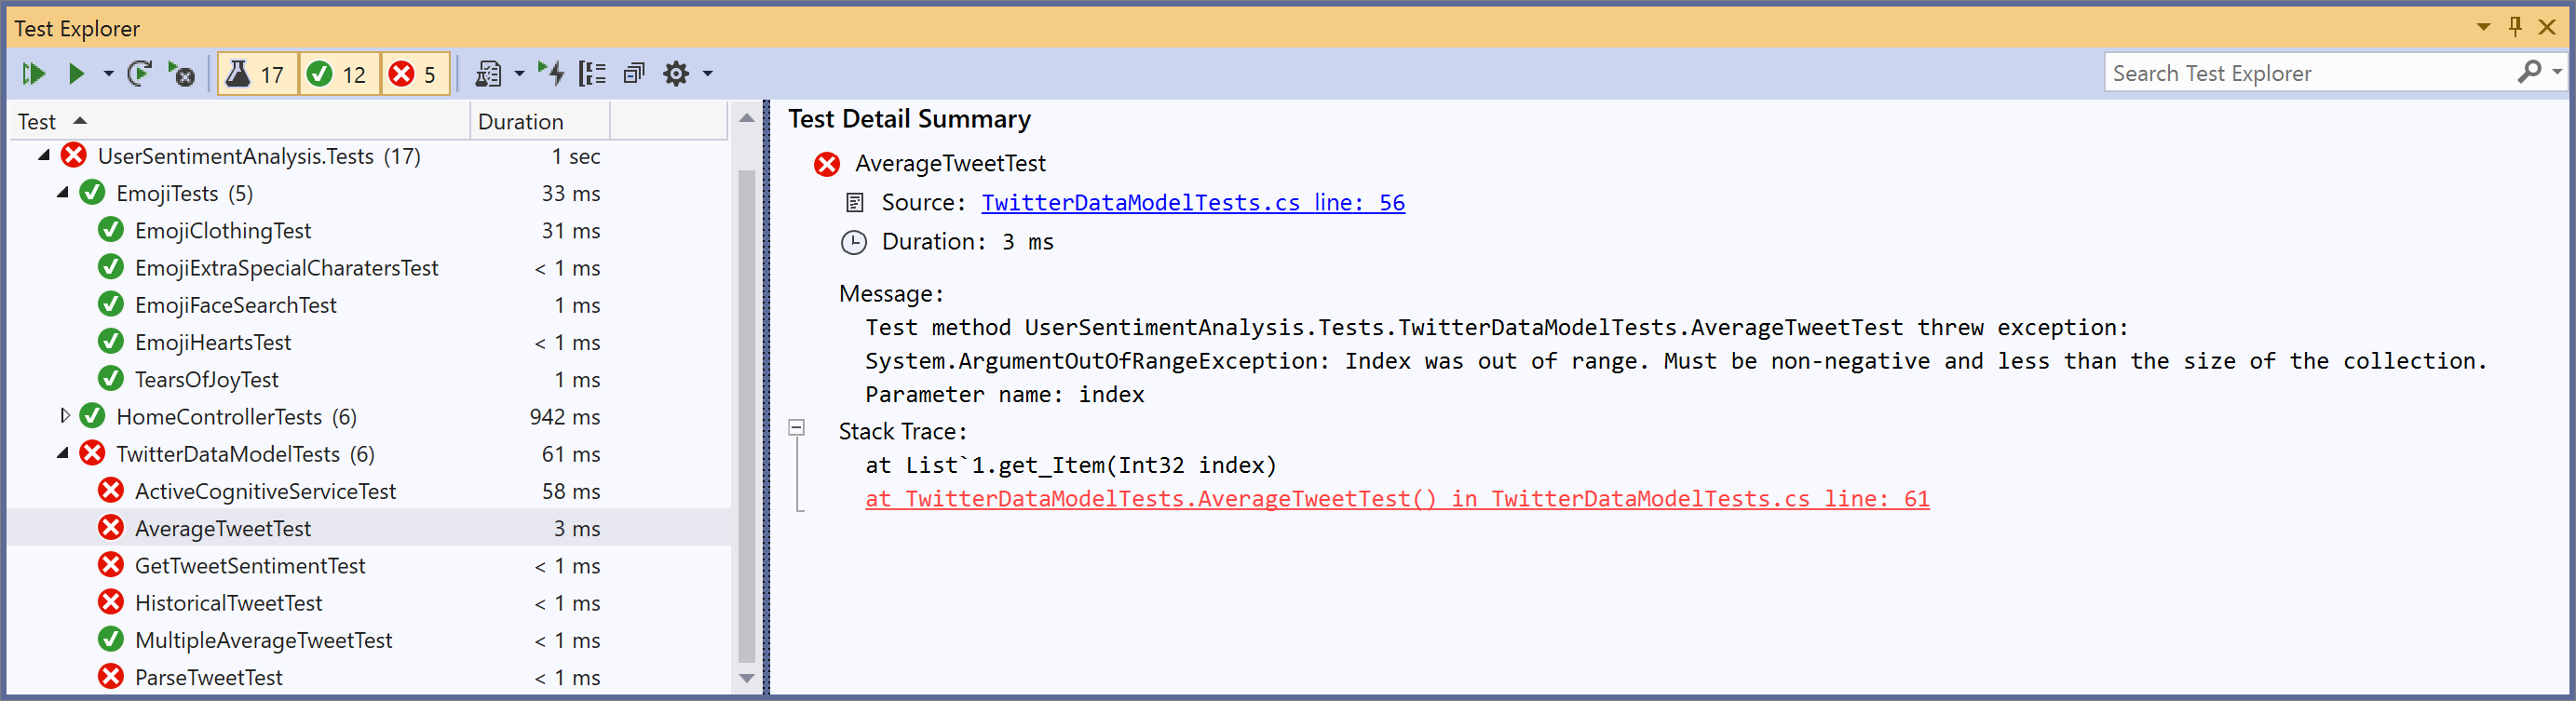
As tests complete, they will report their status - pass or fail - indicated by a green checkmark or red x next to the test name, as well as the time it took to run the test. There will also be a summary available with details about any failures that can be accessed by clicking the test name.
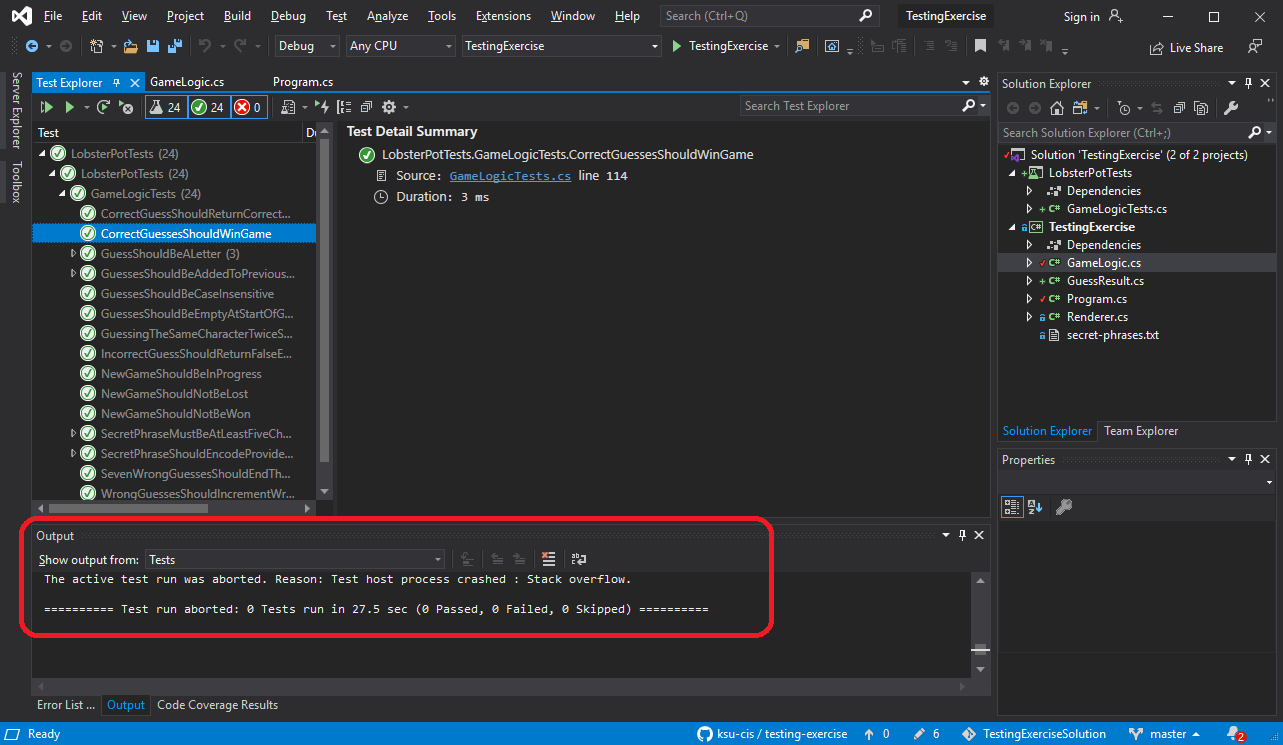
Occasionally, your tests may not seem to finish, but get stuck running. If this happens, check the output panel, switching it from “build” to “tests”. Most likely your test process crashed because of an error in your test code, and the output reporting that error will be reported there.
It is a good idea to run tests you’ve written previously as you add to or refactor your code. This practice is known as regression testing, and can help you identify errors your changes introduce that break what had previously been working code. This is also one of the strongest arguments for writing test code rather than performing ad-hoc testing; automated tests are easy to repeat.
In this chapter we learned about testing, both manually using test plans and automatically using a testing framework. We saw how the cost of fixing errors rises exponentially with how long they go undiscovered. We discussed how writing automated tests during the programming phase can help uncover these errors earlier, and how regression testing can help us find new errors introduced while adding to our programs.
We learned how to use xUnit and Visual Studio’s Test Explorer to write and run tests on .NET programs. We explored a good chunk of xUnit’s assertion library. We saw how to get Visual Studio to analyze our tests for code coverage, discussed this metric’s value to evaluate our tests. We also explored mutation testing, and saw how it can help improve our tests.
As you move forward as a software developer, you’ll want to incorporate testing into your code-writing efforts.
The term test code coverage refers to how much of your program’s code is executed as your tests run. It is a useful metric for evaluating the depth of your test, if not necessarily the quality. Basically, if your code is not executed in the test framework, it is not tested in any way. If it is executed, then at least some tests are looking at it. So aiming for a high code coverage is a good starting point for writing tests.
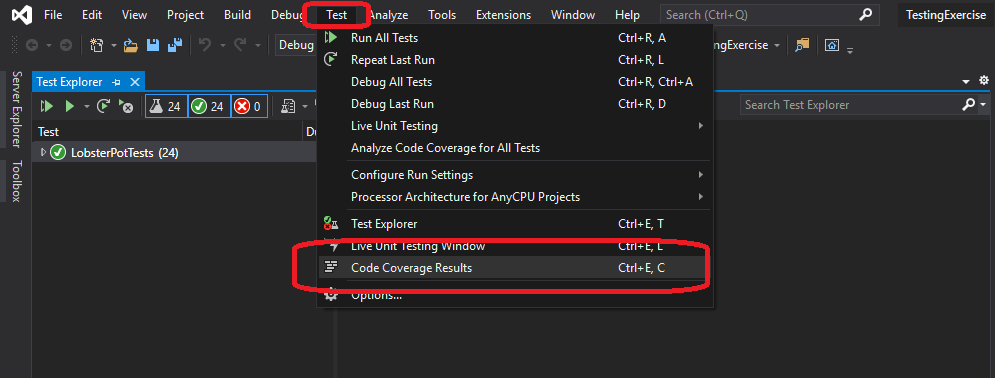
Much like Visual Studio provides a Test Explorer for running tests, it provides support for analyzing test coverage. We can access this from the “Test” menu, where we select the “Analyze Code Coverage for All Tests”.
This will build and run all our tests, and as they run it will collect data about how many blocks of code are or are not executed. The results appear in the Code Coverage Results panel:
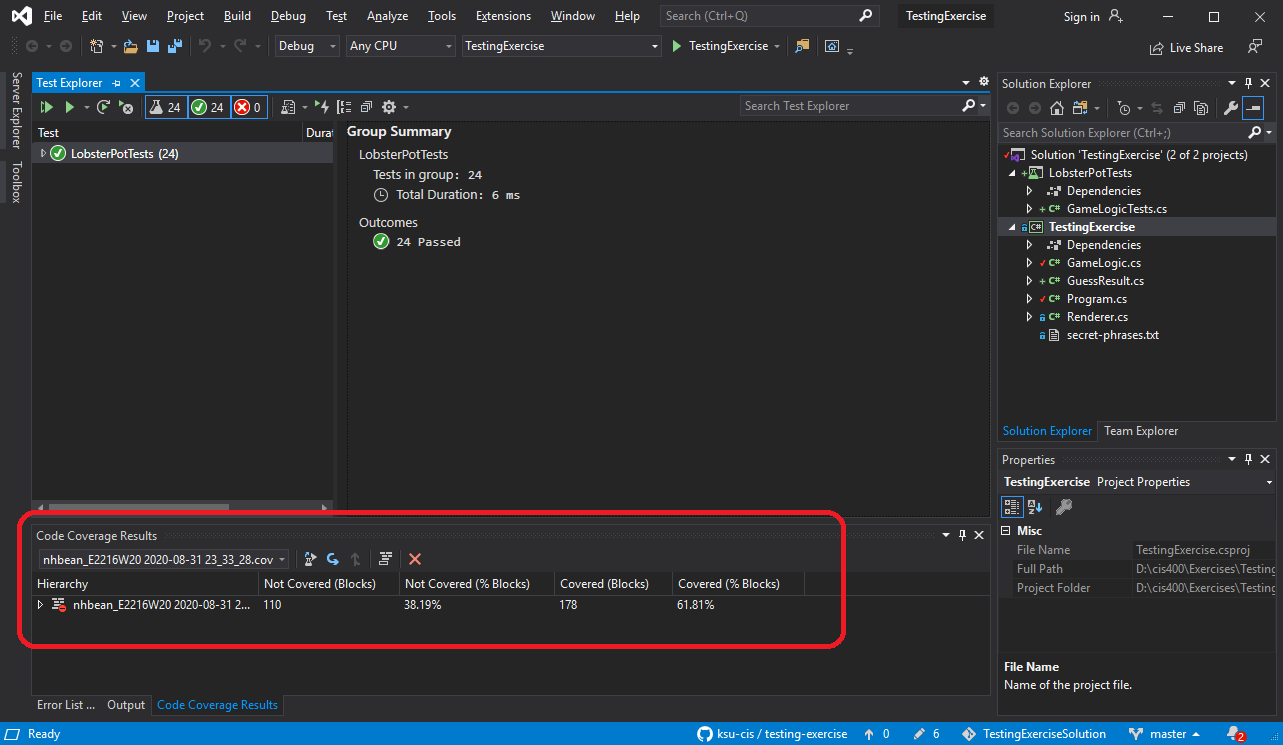
Be aware that there will always be some blocks that are not picked up in this analysis, so it is typical to shoot for a high percentage.
While test code coverage is a good starting point for evaluating your tests, it is simply a measure of quantity, not quality. It is easily possible for you to have all of your code covered by tests, but still miss errors. You need to carefully consider the edge cases - those unexpected and unanticipated ways your code might end up being used.
At this point you may be asking how to determine if your tests are good. Mutation testing is one way of evaluating the quality of your tests. Effectively, mutation testing is a strategy that mutates your program, and then runs your tests. If the test fails against the mutated code, this suggests your test is good.
As a simplistic example, take this extremely simple class:
public void Doll
{
  public string Name {get;} = "Molly";
}
A mutation might change it to:
public void Doll
{
  public string Name {get;} = "Mollycoddle";
}
We would expect that the test TheDollsNameIsAlwaysMolly would fail due to this mutation. If it doesn’t, we probably need to revisit our test. Here is an example of a test that would both normally pass, and pass with this mutation. See if you can spot the problem:
[Fact]
public void TheDollsNameIsAlwaysMolly()
{
  Doll doll = new Doll();
  Assert.Contains(doll.Name, "Molly");
}
Mutation testing is done by a special testing tool that uses reflection to understand and alter the classes being tested in your unit tests. In C#, we use Stryker.NET.
As with code coverage, mutation testing can’t provide all the answers. But it does help ensure that our programs and the tests we write of them are more robust.