Object-Orientation
Every object tells a story
Every object tells a story
Setting the Stage
Before we delve too deeply into how to reason about Object-Orientation and how to utilize it in your programming efforts, it would be useful to understand why object-orientation came to exist. This initial chapter seeks to explore the origins behind object-oriented programming.
Some key terms to learn in this chapter are:
By this point, you should be familiar enough with the history of computers to be aware of the evolution from the massive room-filling vacuum tube implementations of ENIAC, UNIVAC, and other first-generation computers to transistor-based mainframes like the PDP-1, and the eventual introduction of the microcomputer (desktop computers that are the basis of the modern PC) in the late 1970’s. Along with a declining size, each generation of these machines also cost less:
| Machine | Release Year | Cost at Release | Adjusted for Inflation |
|---|---|---|---|
| ENIAC | 1945 | $400,000 | $5,288,143 |
| UNIVAC | 1951 | $159,000 | $1,576,527 |
| PDP-1 | 1963 | $120,000 | $1,010,968 |
| Commodore PET | 1977 | $795 | $5,282 |
| Apple II (4K RAM model) | 1977 | $1,298 | $8,624 |
| IBM PC | 1981 | $1,565 | $4,438 |
| Commodore 64 | 1982 | $595 | $1,589 |
This increase in affordability was also coupled with an increase in computational power. Consider the ENIAC, which computed at 100,000 cycles per second. In contrast, the relatively inexpensive Commodore 64 ran at 1,000,000 cycles per second, while the more pricy IBM PC ran at 4,770,000 cycles per second.
Not surprisingly, governments, corporations, schools, and even individuals purchased computers in larger and larger quantities, and the demand for software to run on these platforms and meet these customers’ needs likewise grew. Moreover, the sophistication expected from this software also grew. Edsger Dijkstra described it in these terms:
The major cause of the software crisis is that the machines have become several orders of magnitude more powerful! To put it quite bluntly: as long as there were no machines, programming was no problem at all; when we had a few weak computers, programming became a mild problem, and now we have gigantic computers, programming has become an equally gigantic problem.Edsger Dijkstra, The Humble Programmer (EWD340), Communications of the ACM
Coupled with this rising demand for programs was a demand for skilled software developers, as reflected in the following table of graduation rates in programming-centric degrees (the dashed line represents the growth of all bachelor degrees, not just computer-related ones):

Unfortunately, this graduation rate often lagged far behind the demand for skilled graduates, and was marked by several periods of intense growth (the period from 1965 to 1985, 1995-2003, and the current surge beginning around 2010). During these surges, it was not uncommon to see students hired directly into the industry after only a course or two of learning programming (coding boot camps are a modern equivalent of this trend).
All of these trends contributed to what we now call the Software Crisis.
At the 1968 NATO Software Engineering Conference held in Garmisch, Germany, the term “Software Crisis” was coined to describe the current state of the software development industry, where common problems included:
The software development industry sought to counter these problems through a variety of efforts:
This course will seek to instill many of these ideas and approaches into your programming practice through adopting them in our everyday work. It is important to understand that unless these practices are used, the same problems that defined the software crisis continue to occur!
In fact, some software engineering experts suggest the software crisis isn’t over, pointing to recent failures like the Denver Airport Baggage System in 1995, the Ariane 5 Rocket Explosion in 1996, the German Toll Collect system cancelled in 2003, the rocky healthcare.gov launch in 2013, and the massive vulnerabilities known as the Meltdown and Spectre exploits discovered in 2018.
One of the strategies that computer scientists employed to counter the software crisis was the development of new programming languages. These new languages would often 1) adopt new techniques intended to make errors harder to make while programming, and 2) remove problematic features that had existed in earlier languages.
Let’s take a look at a working (and in current use) program built using Fortran, one of the most popular programming languages at the onset of the software crisis. This software is the Environmental Policy Integrated Climate (EPIC) Model, created by researchers at Texas A&M:
Environmental Policy Integrated Climate (EPIC) model is a cropping systems model that was developed to estimate soil productivity as affected by erosion as part of the Soil and Water Resources Conservation Act analysis for 1980, which revealed a significant need for improving technology for evaluating the impacts of soil erosion on soil productivity. EPIC simulates approximately eighty crops with one crop growth model using unique parameter values for each crop. It predicts effects of management decisions on soil, water, nutrient and pesticide movements, and their combined impact on soil loss, water quality, and crop yields for areas with homogeneous soils and management. EPIC Homepage
You can download the raw source code here (click “EPIC v.1102” under “Source Code”). Open and unzip the source code, and open a file at random using your favorite code editor. See if you can determine what it does, and how it fits into the overall application.
Try this with a few other files. What do you think of the organization? Would you be comfortable adding a new feature to this program?
You probably found the Fortran code in the example difficult to wrap your mind around - and that’s not surprising, as more recent languages have moved away from many of the practices employed in Fortran. Additionally, our computing environment has dramatically changed since this time.
One clear example is symbol names for variables and procedures (functions) - notice that in the Fortran code they are typically short and cryptic: RT, HU, IEVI, HUSE, and NFALL, for example. You’ve been told since your first class that variable and function names should express clearly what the variable represents or a function does. Would rainFall, dailyHeatUnits, cropLeafAreaIndexDevelopment, CalculateWaterAndNutrientUse(), CalculateConversionOfStandingDeadCropResidueToFlatResidue() be easier to decipher? (Hint: the documentation contains some of the variable notations in a list starting on page 70, and some in-code documentation of global variables occurs in MAIN_1102.f90.).
Believe it or not, there was an actual reason for short names in these early programs. A six character name would fit into a 36-bit register, allowing for fast dictionary lookups - accordingly, early version of FORTRAN enforced a limit of six characters for variable names. However, it is easy to replace a symbol name with an automatically generated symbol during compilation, allowing for both fast lookup and human readability at a cost of some extra computation during compilation. This step is built into the compilation process of most current programming languages, allowing for arbitrary-length symbol names with no runtime performance penalty.
In addition to these less drastic changes, some evolutionary language changes had sweeping effects, changing the way we approach and think about how programs should be written and executed. These “big ideas” of how programming languages should work are often called paradigms. In the early days of computing, we had two common ones: imperative and functional.
At its core, imperative programming simply means the idea of writing a program as a sequence of commands, i.e. this Python script uses a sequence of commands to write to a file:
f = open("example.txt")
f.write("Hello from a file!")
f.close()
An imperative program would start executing the first line of code, and then continue executing line-by-line until the end of the file or a command to stop execution was reached. In addition to moving one line through the program code, imperative programs could jump to a specific spot in the code and continue execution from there, using a GOTO statement. We’ll revisit that aspect shorty.
In contrast, functional programming consisted primarily of functions. One function was designated as the ‘main’ function that would start the execution of the program. It would then call one or more functions, which would in turn call more functions. Thus, the entire program consisted of function definitions. Consider this Python program:
def concatenateList(str, list):
  if(len(list) == 0):
    return str
  elif(len(list) == 1):
    head = list.pop(0)
    return concatenateList(str + head, list)
  else:
    head = list.pop(0)
    return concatenateList(str + head + ", ", list)

def printToFile(filename, body):
  f = open(filename)
  f.write(body)

def printListToFile(filename, list):
  body = concatenateList("", list)
  printToFile(filename, body)

def main():
  printListToFile("list.txt", ["Dog", "Cat", "Mouse"])

main()
You probably see elements of your favorite higher-order programming language in both of these descriptions. That’s not surprising as modern languages often draw from multiple programming paradigms (after all, both the above examples were written in Python). This, too, is part of language evolution - language developers borrow good ideas as they find them.
But as languages continued to evolve and language creators sought ways to make programming easier, more reliable, and more secure to address the software crisis, new ideas emerged that were large enough to be considered new paradigms. Two of the most impactful of these new paradigms these are structured programming and object orientation. We’ll talk about each next.
Another common change to programming languages was the removal of the GOTO statement, which allowed the program execution to jump to an arbitrary point in the code (much like a choose-your-own adventure book will direct you to jump to a page). The GOTO came to be considered too primitive, and too easy for a programmer to misuse 1.
While the GOTO statement is absent from most modern programming languages the actual functionality remains, abstracted into control-flow structures like conditionals, loops, and switch statements. This is the basis of structured programming, a paradigm adopted by all modern higher-order programming languages.
Each of these control-flow structures can be represented by careful use of GOTO statements (and, in fact the resulting assembly code from compiling these languages does just that). The benefit of using structured programming is it promotes “reliability, correctness, and organizational clarity” by clearly defining the circumstances and effects of code jumps 2.
You probably aren’t very familiar with GOTO statements because the structured programming paradigm has become so dominant. Before we move on, let’s see how some familiar structured programming patterns were originally implemented using GOTOs:
In C#, you are probably used to writing if statements with a true branch:
int x = 4;
if(x < 5)
{
  x = x * 2;
}
Console.WriteLine("The value is:" + x);
With GOTOs, it would look something like:
int x = 4;
if(x < 5) goto TrueBranch;

AfterElse:
  Console.WriteLine("The value is:" + x);
  Environment.Exit(0);

TrueBranch:
  x = x * 2;
goto AfterElseSimilarly, a C# if statement with an else branch:
int x = 4;
if(x < 5)
{
  x = x * 2;
}
else
{
  x = 7;
}
Console.WriteLine("The value is:" + x);
And using GOTOs:
int x = 4;
if(x < 5) goto TrueBranch;
goto FalseBranch;

AfterElse:
  Console.WriteLine("The value is:" + x);
  Environment.Exit(0);

TrueBranch:
  x = x * 2;
  goto AfterElse;

FalseBranch:
  x = 7;
  goto AfterElse;
Note that with the goto, we must tell the program to stop running explicitly with Environment.Exit(0) or it will continue on to execute the labeled code (we could also place the TrueBranch and FalseBranch before the main program, and use a goto to jump to the main program).
Loops were also originally constructed entirely from GOTOs, so the familiar while loop:
int times = 5;
while(times > 0)
{
  Console.WriteLine("Counting Down: " + times);
  times = times - 1;
}
Can be written:
int times = 5;
Test:
  if(times > 0) goto Loop;
  Environment.Exit(0);

Loop:
  Console.WriteLine("Counting Down: " + times);
  times = times - 1;
  goto Test;
The do while and for loops are implemented similarly. As you can probably imagine, as more control flow is added to a program, using GOTOs and corresponding labels to jump to becomes very hard to follow.
Interestingly, the C# language does have a goto statement (Java does not). Likely this is because C# was designed to compile to intermediate language like Visual Basic, which is an evolution of BASIC which was old enough to have a goto.
Accordingly, the above examples with the goto statements are valid C# code. You can even compile and run them. However, you should avoid using goto statements in your code.
Dijkstra, Edgar (1968). “Go To Statement Considered Harmful” ↩︎
Wirth, Nicklaus (1974). “On the Composition of Well-Structured Programs” ↩︎
The object-orientation paradigm was similarly developed to make programming large projects easier and less error-prone.
The term “Object Orientation” was coined by Alan Kay while he was a graduate student in the late 60’s. Alan Kay, Dan Ingalls, Adele Goldberg, and others created the first object-oriented language, Smalltalk, which became a very influential language from which many ideas were borrowed. To Alan, the essential core of object-orientation was three properties a language could possess: 1
Let’s break down each of these ideas, and see how they helped address some of the problems we’ve identified in this chapter.
Encapsulation refers to breaking programs into smaller units that are easier to read and reason about. In an object-oriented language these units are classes and objects, and the data contained in these units is protected from being changed by code outside the unit through information hiding.
Message Passing allows us to send well-defined messages between objects. This gives us a well-defined and controlled method for accessing and potentially changing the data contained in an encapsulated unit. In an object oriented language, calling a method on an object is a form of message passing, as are events.
Dynamic Binding means we can have more than one possible way to handle messages and the appropriate one can be determined at run-time. This is the basis for polymorphism, an important idea in many object-oriented languages.
Remember these terms and pay attention to how they are implemented in the languages you are learning. They can help you understand the ideas that inspired the features of these languages.
We’ll take a deeper look at each of these in the next few chapters. But before we do, you might want to see how language popularity has fared since the onset of the software crisis, and how new languages have appeared and grown in popularity in this animated chart from Data is Beautiful:
Interestingly, the four top languages in 2019 (Python, JavaScript, Java, and C#) all adopt the object-oriented paradigm - though the exact details of how they implement it vary dramatically.
Eric Elliot, “The Forgotten History of Object-Oriented Programming,” Medium, Oct. 31, 2018. ↩︎
In this chapter, we’ve discussed the environment in which object-orientation emerged. Early computers were limited in their computational power, and languages and programming techniques had to work around these limitations. Similarly, these computers were very expensive, so their purchasers were very concerned about getting the largest possible return on their investment. In the words of Niklaus Wirth:
Tricks were necessary at this time, simply because machines were built with limitations imposed by a technology in its early development stage, and because even problems that would be termed "simple" nowadays could not be handled in a straightforward way. It was the programmers' very task to push computers to their limits by whatever means available.
As computers became more powerful and less expensive, the demand for programs (and therefore programmers) grew faster than universities could train new programmers. Unskilled programmers, unwieldy programming languages, and programming approaches developed to address the problems of older technology led to what became known as the “software crisis” where many projects failed or floundered.
This led to the development of new programming techniques, languages, and paradigms to make the process of programming easier and less error-prone. Among the many new programming paradigms was structured programming paradigm, which introduced control-flow structures into programming languages to help programmers reason about the order of program execution in a clear and consistent manner.
Also developed during this time was the object-oriented paradigm, which brings together four big ideas: encapsulation & information hiding, message passing, and dynamic binding. We will be studying this paradigm, its ideas, and implementation in the C# language throughout this course.
Getting Object Oriented
A signature aspect of object-oriented languages is (as you might expect from the name), the existence of objects within the language. In this chapter, we take a deep look at objects, exploring why they were created, what they are at both a theoretical and practical level, and how they are used.
Some key terms to learn in this chapter are:
Encapsulation
Information Hiding
Message Passing
State
Class
Object
Field
Method
Constructor
Parameterless Constructor
Property
Public
Private
Static
To begin, we’ll examine the term encapsulation.
The first criteria that Alan Kay set for an object-oriented language was encapsulation. In computer science, the term encapsulation refers to organizing code into units. This provides a mechanism for organizing complex software.
A second related idea is information hiding, which provides mechanisms for controlling access to encapsulated data and how it can be changed.
Think back to the FORTRAN EPIC model we introduced earlier. All of the variables in that program were declared globally, and there were thousands. How easy was it to find where a variable was declared? Initialized? Used? Are you sure you found all the spots it was used?
Also, how easy was it to determine what part of the system a particular block of code belonged to? If I told you the program involved modeling hydrology (how water moves through the soils), weather, erosion, plant growth, plant residue decomposition, soil chemistry, planting, harvesting, and chemical applications, would you be able to find the code for each of those processes?
Remember from our discussion on the growth of computing the idea that as computers grew more powerful, we wanted to use them in more powerful ways? The EPIC project grew from that desire - what if we could model all the aspects influencing how well a crop grows? Then we could use that model to help us make better decisions in agriculture. Or, what if we could model all the processes involved in weather? If we could do so, we could help save lives by predicting dangerous storms! A century ago, you knew a tornado was coming when you heard its roaring winds approaching your home. Now we have warnings that conditions are favorable to produce one hours in advance. This is all thanks to using computers to model some very complex systems.
But how do we go about writing those complex systems? I don’t know about you, but I wouldn’t want to write a model the way the EPIC programmers did. And neither did most software developers at the time - so computer scientists set out to define better ways to write programs. David Parnas formalized some of the best ideas emerging from those efforts in his 1972 paper “On the Criteria To Be Used in Decomposing Systems into Modules”. 1
A data structure, its internal linkings, accessing procedures and modifying procedures are part of a single module.
Here he suggests organizing code into modules that group related variables and the procedures that operate upon them. For the EPIC module, this might mean all the code related to weather modeling would be moved into its own module. That meant that if we needed to understand how weather was being modeled, we only had to look at the weather module.
They are not shared by many modules as is conventionally done.
Here he is laying the foundations for the concept we now call scope - the idea of where a specific symbol (a variable or function name) is accessible within a program’s code. By limiting access to variables to the scope of a particular module, only code in that module can change the value. That way, we can’t accidentally change a variable declared in the weather module from the soil chemistry module (which would be a very hard error to find, as if the weather module doesn’t seem to be working, that’s what we would probably focus on trying to fix).
Programmers of the time referred to this practice as information hiding, as we ‘hid’ parts of the program from other parts of the program. Parnas and his peers pushed for not just hiding the data, but also how the data was manipulated. By hiding these implementation details, they could prevent programmers who were used to the globally accessible variables of early programming languages from looking into our code and using a variable that we might change in the future.
The sequence of instructions necessary to call a given routine and the routine itself are part of the same module.
As the actual implementation of the code is hidden from other parts of the program, a mechanism for sharing controlled access to some part of that module in order to use it needed to be made. An interface, if you will, that describes how the other parts of the program might trigger some behavior or access some value.
D. L. Parnas, “On the criteria to be used in decomposing systems into modules” Communications of the ACM, Dec. 1972. ↩︎
Let’s start by focusing on encapsulation’s benefits to organizing our code by exploring some examples of encapsulation you may already be familiar with.
The C# libraries are organized into discrete units called namespaces. The primary purpose of this is to separate code units that potentially use the same name, which causes name collisions where the interpreter isn’t sure which of the possibilities you mean in your program. This means you can use the same name to refer to two different things in your program, provided they are in different namespaces.
For example, there are two definitions for a Point Struct in the .NET core libraries: System.Drawing.Point and System.Windows.Point. The two have a very different internal structures (the former uses integers and the latter doubles), and we would not want to mix them up. If we needed to create an instance of both in our program, we would use their fully-quantified name to help the interpreter know which we mean:
System.Drawing.Point pointA = new System.Drawing.Point(500, 500);
System.Windows.Point pointB = new System.Windows.Point(300.0, 200.0);
The using directive allows you to reference the type without quantification, i.e.:
using System.Drawing;
Point pointC = new Point(400, 400);
You can also create an alias with the using directive, providing an alternative (and usually abbreviated) name for the type:
using WinPoint = System.Windows.Point;
WinPoint pointD = new WinPoint(100.0, 100.0);
We can also declare our own namespaces, allowing us to use namespaces to organize our own code just as Microsoft has done with its .NET libraries.
Encapsulating code within a namespace helps ensure that the types defined within are only accessible with a fully qualified name, or when the using directive is employed. In either case, the intended type is clear, and knowing the namespace can help other programmers find the type’s definition.
In the discussion of namespaces, we used a struct. A C# struct is what computer scientists refer to as a compound type, a type composed from other types. This too, is a form of encapsulation, as it allows us to collect several values into a single data structure. Consider the concept of a vector from mathematics - if we wanted to store three-dimensional vectors in a program, we could do so in several ways. Perhaps the easiest would be as an array:
double[] vectorA = {3, 4, 5};However, other than the variable name, there is no indication to other programmers that this is intended to be a three-element vector. And, if we were to accept it in a function, say a dot product:
public double DotProduct(double[] a, double[] b) {
    if(a.Length < 3 || b.Length < 3) throw new ArgumentException();
    return a[0] * b[0] + a[1] * b[1] + a[2] * b[2];
}
We would need to check that both arrays were of length three… A struct provides a much cleaner option, by allowing us to define a type that is composed of exactly three doubles:
/// <summary>
/// A 3-element vector
/// </summary>
public struct Vector3 {
    public double x;
    public double y;
    public double z;

    public Vector3(double x, double y, double z) {
        this.x = x;
        this.y = y;
        this.z = z;
    }
}
Then, our DotProduct can take two arguments of the Vector3 struct:
public double DotProduct(Vector3 a, Vector3 b) {
    return a.x * b.x + a.y * b.y + a.z * b.z;
}
There is no longer any concern about having the wrong number of elements in our vectors - it will always be three. We also get the benefit of having unique names for these fields (in this case, x, y, and z).
Thus, a struct allows us to create structure to represent multiple values in one variable, encapsulating the related values into a single data structure. Variables, and compound data types, represent the state of a program. We’ll examine this concept in detail next.
You might think that the kind of modules that Parnas was describing don’t exist in C#, but they actually do - we just don’t call them ‘modules’. Consider how you would raise a number by a power, say 10 to the 8th power:
Math.Pow(10, 8);The Math class in this example is actually used just like a module! We can’t see the underlying implementation of the Pow() method, it provides to us a well-defined interface (i.e. you call it with the symbol Pow and two doubles for parameters), and this method and other related math functions (Sin(), Abs(), Floor(), etc.) are encapsulated within the Math class.
We can define our own module-like classes by using the static keyword, i.e. we could group our vector math functions into a static VectorMath class:
/// <summary>
/// A library of vector math functions
/// </summary>
public static class VectorMath() {

    /// <summary>
    /// Computes the dot product of two vectors
    /// </summary>
    public static double DotProduct(Vector3 a, Vector3 b) {
        return a.x * b.x + a.y * b.y + a.z * b.z;
    }

    /// <summary>
    /// Computes the magnitude of a vector
    /// </summary>
    public static double Magnitude(Vector3 a) {
        return Math.Sqrt(Math.Pow(a.x, 2) + Math.Pow(a.y, 2) + Math.Pow(a.z, 2));
    }

}To duplicate the module behavior with C#, we must declare both the class and its methods static.
But what most distinguishes C# is that it is an object-oriented language, and as such, its primary form of encapsulation is classes and objects. The key idea behind encapsulation in an object-oriented language is that we encapsulate both state and behavior in the class definition. Let’s explore that idea more deeply in the next section.
The data stored in a program at any given moment (in the form of variables, objects, etc.) is the state of the program. Consider a variable:
int a = 5;The state of the variable a after this line is 5. If we then run:
a = a * 3;The state is now 15. Consider the Vector3 struct we defined in the last section:
public struct Vector3 {
    public double x;
    public double y;
    public double z;

    // constructor
    public Vector3(double x, double y, double z) {
        this.x = x;
        this.y = y;
        this.z = z;
    }
}
If we create an instance of that struct in the variable b:
Vector3 b = new Vector3(1.2, 3.7, 5.6);The state of our variable b is $\{1.2, 3.7, 5.6\}$. If we change one of b’s fields:
b.x = 6.0;The state of our variable b is now $\{6.0, 3.7, 5.6\}$.
We can also think about the state of the program, which would be something like: $\{a: 5, b: \{x: 6.0, y: 3.7, z: 5.6\}\}$, or a state vector like: $|5, 6.0, 3.7, 5.6|$. We can therefore think of a program as a state machine. We can in fact, draw our entire program as a state table listing all possible legal states (combinations of variable values) and the transitions between those states. Techniques like this can be used to reason about our programs and even prove them correct!
This way of reasoning about programs is the heart of Automata Theory, a subject you may choose to learn more about if you pursue graduate studies in computer science.
What causes our program to transition between states? If we look at our earlier examples, it is clear that assignment is a strong culprit. Expressions clearly have a role to play, as do control-flow structures decide which transformations take place. In fact, we can say that our program code is what drives state changes - the behavior of the program.
Thus, programs are composed of both state (the values stored in memory at a particular moment in time) and behavior (the instructions to change that state).
Now, can you imagine trying to draw the state table for a large program? Something on the order of EPIC?
On the other hand, with encapsulation we can reason about state and behavior on a much smaller scale. Consider this function working with our Vector3 struct:
/// <summary>
/// Returns the the supplied vector scaled by the provided scalar
/// </summary>
public static Vector3 Scale(Vector3 vec, double scale) {
    double x = vec.x * scale;
    double y = vec.y * scale;
    double z = vec.z * scale;
    return new Vector3(x, y, z);
}
If this method was invoked with a vector $\langle4.0, 1.0, 3.4\rangle$ and a scalar $2.0$ our state table would look something like:
| step | vec.x | vec.y | vec.z | scale | x | y | z | return.x | return.y | return.z |
|---|---|---|---|---|---|---|---|---|---|---|
| 0 | 4.0 | 1.0 | 3.4 | 2.0 | 0.0 | 0.0 | 0.0 | 0.0 | 0.0 | 0.0 |
| 1 | 4.0 | 1.0 | 3.4 | 2.0 | 8.0 | 0.0 | 0.0 | 0.0 | 0.0 | 0.0 |
| 2 | 4.0 | 1.0 | 3.4 | 2.0 | 8.0 | 2.0 | 0.0 | 0.0 | 0.0 | 0.0 |
| 3 | 4.0 | 1.0 | 3.4 | 2.0 | 8.0 | 2.0 | 6.8 | 0.0 | 0.0 | 0.0 |
| 4 | 4.0 | 1.0 | 3.4 | 2.0 | 8.0 | 2.0 | 6.8 | 8.0 | 2.0 | 6.8 |
Because the parameters vec and scale, as well as the variables x, y, z, and the unnamed Vector3 we return are all defined only within the scope of the method, we can reason about them and the associated state changes independently of the rest of the program. Essentially, we have encapsulated a portion of the program state in our Vector3 struct, and encapsulated a portion of the program behavior in the static Vector3 library. This greatly simplifies both writing and debugging programs.
However, we really will only use the Vector3 library in conjunction with Vector3 structures, so it makes a certain amount of sense to define them in the same place. This is where classes and objects come into the picture, which we’ll discuss next.
The module-based encapsulation suggested by Parnas and his contemporaries grouped state and behavior together into smaller, self-contained units. Alan Kay and his co-developers took this concept a step farther. Alan Kay was heavily influenced by ideas from biology, and saw this encapsulation in similar terms to cells.

Biological cells are also encapsulated - the complex structures of the cell and the functions they perform are all within a cell wall. This wall is only bridged in carefully-controlled ways, i.e. cellular pumps that move resources into the cell and waste out. While single-celled organisms do exist, far more complex forms of life are made possible by many similar cells working together.
This idea became embodied in object-orientation in the form of classes and objects. An object is like a specific cell. You can create many, very similar objects that all function identically, but each have their own individual and different state. The class is therefore a definition of that type of object’s structure and behavior. It defines the shape of the object’s state, and how that state can change. But each individual instance of the class (an object) has its own current state.
Let’s re-write our Vector3 struct as a class using this concept:
/// <summary>A class representing a 3-element vector</summary>
public class Vector3 {

    /// <summary>The X component of the vector</summary>
    public double X;
    /// <summary>The Y component of the vector</summary>
    public double Y;
    /// <summary>The Z component of the vector</summary>
    public double Z;

    /// <summary>Constructs a new vector</summary>
    /// <param name="x">The value of the vector's x component</param>
    /// <param name="y">The value of the vector's y component</param>
    /// <param name="z">The value of the vector's z component</param>
    public Vector3(double x, double y, double z) {
        X = x;
        Y = y;
        Z = z;
    }

    /// <summary>Computes the dot product of this and <paramref name="other"/> vector</summary>
    /// <param name="other">The other vector to compute with</param>
    /// <returns>The dot product</returns>
    public double DotProduct(Vector3 other) {
        return X * other.X + Y * other.Y + Z * other.Z;
    }

    /// <summary>Scales this vector by <paramref name="scalar"/></summary>
    /// <paramref name="scalar">The value to scale by</paramref>
    public void Scale(double scalar) {
        X *= scalar;
        Y *= scalar;
        Z *= scalar;
    }
}
Here we have defined:
X, Y, and ZVector3() constructor that takes a value for the object’s initial stateScale() methodWe can create as many objects from this class definition as we might want:
Vector3 one = new Vector3(1.0, 1.0, 1.0);
Vector3 up = new Vector3(0.0, 1.0, 0.0);
Vector3 a = new Vector3(5.4, -21.4, 3.11);
Conceptually, what we are doing is not that different from using a compound data type like a struct and a module of functions that work upon that struct. But practically, it means all the code for working with Vectors appears in one place. This arguably makes it much easier to find all the pertinent parts of working with vectors, and makes the resulting code better organized and easier to maintain and add features to.
Classes also provide additional benefits over structs in the form of polymorphism, which we’ll discuss in Chapter 2.
Now let’s return to the concept of information hiding, and how it applies in object-oriented languages.
Unanticipated changes in state are a major source of errors in programs. Again, think back to the EPIC source code we looked at earlier. It may seem unusual now, but it used a common pattern from the early days of programming, where all the variables the program used were declared in one spot, and were global in scope (i.e. any part of the program could reassign any of those variables).
If we consider the program as a state machine, that means that any part of the program code could change any part of the program state. Provided those changes were intended, everything works fine. But if the wrong part of the state was changed problems would ensue.
For example, if you were to make a typo in the part of the program dealing with water run-off in a field which ends up assigning a new value to a variable that was supposed to be used for crop growth, you’ve just introduced a very subtle and difficult-to-find error. When the crop growth modeling functionality fails to work properly, we’ll probably spend serious time and effort looking for a problem in the crop growth portion of the code… but the problem doesn’t lie there at all!
There are several techniques involved in data hiding in an object-oriented language. One of these is access modifiers, which determine what parts of the program code can access a particular class, field, property, or method. Consider a class representing a student:
public class Student {
    private string _first;
    private string _last;
    private uint _wid;

    public Student(string first, string last, uint wid) {
        this._first = first;
        this._last = last;
        this._wid = wid;
    }
}
By using the access modifier private, we have indicated that our fields _first, _last, and _wid cannot be accessed (seen or assigned to) outside of the code that makes up the Student class. If we were to create a specific student:
Student willie = new Student("Willie", "Wildcat", 888888888);We would not be able to change his name, i.e. willie._first = "Bob" would fail, because the field _first is private. In fact, we cannot even see his name, so Console.WriteLine(willie._first); would also fail.
If we want to allow a field or method to be accessible outside of the object, we must declare it public. While we can declare fields public, this violates the core principles of encapsulation, as any outside code can modify our object’s state in uncontrolled ways.
Instead, in a true object-oriented approach we would write public accessor methods, a.k.a. getters and setters (so called because they get or set the value of a field). These methods allow us to see and change field values in a controlled way. Adding accessors to our Student class might look like:
/// <summary>A class representing a K-State student</summary>
public class Student
{
    private string _first;
    private string _last;
    private uint _wid;

    /// <summary>Constructs a new student object</summary>
    /// <param name="first">The new student's first name</param>
    /// <param name="last">The new student's last name</param>
    /// <param wid="wid">The new student's Wildcat ID number</param>
    public Student(string first, string last, uint wid)
    {
        _first = first;
        _last = last;
        _wid = wid;
    }

    /// <summary>Gets the first name of the student</summary>
    /// <returns>The student's first name</returns>
    public string GetFirst()
    {
        return _first;
    }

    /// <summary>Sets the first name of the student</summary>
    public void SetFirst(string value)
    {
        if (value.Length > 0) _first = value;
    }

    /// <summary>Gets the last name of the student</summary>
    /// <returns>The student's last name</returns>
    public string GetLast()
    {
        return _last;
    }

    /// <summary>Sets the last name of the student</summary>
    /// <param name="value">The new name</summary>
    /// <remarks>The <paramref name="value"/> must be a non-empty string</remarks>
    public void SetLast(string value)
    {
        if (value.Length > 0) _last = value;
    }

    /// <summary>Gets the student's Wildcat ID Number</summary>
    /// <returns>The student's Wildcat ID Number</returns>
    public uint GetWid()
    {
        return _wid;
    }

    /// <summary>Gets the full name of the student</summary>
    /// <returns>The first and last name of the student as a string</returns>
    public string GetFullName()
    {
        return $"{_first} {_last}"
    }
}
Notice how the SetFirst() and SetLast() method check that the provided name has at least one character? We can use setters to make sure that we never allow the object state to be set to something that makes no sense.
Also, notice that the _wid field only has a getter. This effectively means once a student’s Wid is set by the constructor, it cannot be changed. This allows us to share data without allowing it to be changed outside of the class.
Finally, the GetFullName() is also a getter method, but it does not have its own private backing field. Instead it derives its value from the class state. We sometimes call this a derived getter for that reason.
While accessor methods provide a powerful control mechanism in object-oriented languages, they also require a lot of typing the same code syntax over and over (we often call this boilerplate). Many languages therefore introduce a mechanism for quickly defining basic accessors. In C#, we have Properties. Let’s rewrite our Student class with Properties:
public class Student {

    private string _first;
    /// <summary>The student's first name</summary>
    public string First {
        get { return _first; }
        set { if(value.Length > 0) _first = value;}
    }

    private string _last;
    /// <summary>The student's last name</summary>
    public string Last {
        get { return _last; }
        set { if(value.Length > 0) _last = value; }
    }

    private uint _wid;
    /// <summary>The student's Wildcat ID number</summary>
    public uint Wid {
        get { return this._wid; }
    }

    /// <summary>The student's full name</summary>
    public string FullName
    {
      get
      {
        return $"{First} {Last}";
      }
    }

    /// <summary>The student's nickname</summary>
    public string Nickname { get; set; }

    /// <summary>Constructs a new student object</summary>
    /// <param name="first">The new student's first name</param>
    /// <param name="last">The new student's last name</param>
    /// <param name="nick">The new student's nickname</param>
    /// <param wid="wid">The new student's Wildcat ID number</param>
    public Student(string first, string last, string nick, uint wid) {
        _first = first;
        _last = last;
        Nickname = nick;
        _wid = wid;
    }
}
If you compare this example to the previous one, you will note that the code contained in bodies of the get and set are identical to the corresponding getter and setter methods. Essentially, C# properties are shorthand for writing out the accessor methods. In fact, when you compile a C# program it transforms the get and set back into methods, i.e. the get in first is used to generate a method named get_First().
While properties are methods, the syntax for working with them in code is identical to that of fields, i.e. if we were to create and then print a Student’s identifying information, we’d do something like:
Student willie = new Student("Willie", "Wildcat", "WillieCat", 99999999);
Console.Write("Hello, ")
Console.WriteLine(willie.FullName);
Console.Write("Your WID is:");
Console.WriteLine(willie.Wid);
Note too that we can declare properties with only a get or a set body, and that properties can be derived from other state rather than having a private backing field.
While C# properties are used like fields, i.e. Console.WriteLine(willie.Wid) or willie.First = "William", they are actually methods. As such, they do not add structure to hold state, hence the need for a backing variable.
The Nickname property in the example above is special syntax for an implicit backing field - the C# compiler creates the necessary space to hold the value. But we can only access the value stored through that property. If you need direct access to it, you must create a backing variable.
However, we don’t always need a backing variable for a Property getter if the value of a property can be calculated from the current state of the class, e.g., consider our FullName property in our Student class:
public string FullName
    {
        get
        {
            return $"{First} {Last}"
        }
    }
Here we’re effectively generating the value of the FullName property from the First and Last properties every time the FullName property is requested. This does cause a bit more computation, but we also know that it will always reflect the current state of the first and last names.
Not all properties need to do extra logic in the get or set body. Consider our Vector3 class we discussed earlier. We used public fields to represent the X, Y, and Z components, i.e.:
public double X = 0;If we wanted to switch to using properties, the X property would end up like this:
private double _x = 0;
public double X
{
  get
  {
    return _x;
  }
  set
  {
    _x = value;
  }
}
Which seems like a lot more work for the same effect. To counter this perception and encourage programmers to use properties even in cases like this, C# also supports auto-property syntax. An auto-property is written like:
public double X {get; set;} = 0;Note the addition of the {get; set;} - this is what tells the compiler we want a property and not a field. When compiled, this code is transformed into a full getter and setter whose bodies match the basic get and set in the example above. The compiler even creates a private backing field (but we cannot access it in our code, because it is only created at compile time). Any time you don’t need to do any additional logic in a get or set, you can use this syntax.
Note that in the example above, we set a default value of 0. You can omit setting a default value. You can also define a get-only autoproperty that always returns the default value (remember, you cannot access the compiler-generated backing field, so it can never be changed):
public double Pi {get;} = 3.14;In practice, this is effectively a constant field, so consider carefully if it is more appropriate to use that instead:
public const PI = 3.14;While it is possible to create a set-only auto-property, you will not be able access its value, so it is of limited use.
Later versions of C# introduced a concise way of writing functions common to functional languages known as lambda syntax, which C# calls Expression-Bodied Members.
Properties can be written using this concise syntax. For example, our FullName get-only derived property in the Student written as an expression-bodied read-only property would be:
public FullName => $"{FirstName} {LastName}"Note the use of the arrow formed by an equals and greater than symbol =>. Properties with both a getter and setter can also be written as expression-bodied properties. For example, our FirstName property could be rewritten:
public FirstName
{
  get => _first;
  set => if(value.Length > 0) _first = value;
}
This syntax works well if your property bodies are a single expression. However, if you need multiple lines, you should use the regular property syntax instead (you can also mix and match, i.e. use an expression-bodied get with a regular set).
It is possible to declare your property as public and give a different access level to one of the accessors, i.e. if we wanted to add a GPA property to our student:
public double GPA { get; private set; } = 4.0;In this case, we can access the value of the GPA outside of the student class, but we can only set it from code inside the class. This approach works with all ways of defining a property.
C# 9.0 introduced a third accessor, init. This also sets the value of the property, but can only be used when the class is being initialized, and it can only be used once. This allows us to have some properties that are immutable (unable to be changed).
Our student example treats the Wid as immutable, but we can use the init keyword with an auto-property for a more concise representation:
public uint Wid {get; init;}And in the constructor, replace setting the backing field (_wid = wid) with setting the property (Wid = wid). This approach is similar to the public property/private setter, but won’t allow the property to ever change once declared.
The above video and below textbook content cover the same ideas (but are not identical). Feel free to pick one or the other.
Before we move on to our next concept, it is helpful to explore how programs use memory. Remember that modern computers are stored program computers, which means the program as well as the data are stored in the computer’s memory. A Universal Turing Machine, the standard example of a stored program computer, reads the program from the same paper tape that it reads its inputs to and writes its output to. In contrast, to load a program in the ENIAC, the first electronic computer in the United States, programmers had to physically rewire the computer (it was later modified to be a stored-program computer).
When a program is run, the operating system allocates part of the computer’s memory (RAM) for the program to use. This memory is divided into three parts - the static memory, the stack, and the heap.

The program code itself is copied into the static section of that memory, along with any literals (1, "Foo"). Additionally, the space to hold any variables that are declared static is allocated here. The reason this memory space is called static is that it is allocated when the program begins, and remains allocated for as long as the program is running. It does not grow or shrink (though the value of static variables may change).
The stack is where the space for scoped variables is allocated. We often call it the stack because functionally it is used like the stack data structure. The space for global variables is allocated first, at the “bottom” of the stack. Then, every time the program enters a new scope (i.e. a new function, a new loop body, etc.) the variables declared there are allocated on the stack. When the program exits that scope (i.e. the function returns, the loop ends), the memory that had been reserved for those values is released (like the stack pop operation).
Thus, the stack grows and shrinks over the life of the program. The base of the stack is against the static memory section, and it grows towards the heap. If it grows too much, it runs out of space. This is the root cause of the nefarious stack overflow exception. The stack has run out of memory, most often because an infinite recursion or infinite loop.
Finally, the heap is where dynamically allocated memory comes from - memory the programmer specifically reserved for a purpose. In C programming, you use the calloc(), malloc(), or realloc() to allocate space manually. In Object-Oriented languages, the data for individual objects are stored here. Calling a constructor with the new keyword allocates memory on the heap, the constructor then initializes that memory, and then the address of that memory is returned. We’ll explore this process in more depth shortly.
This is also where the difference between a value type and a reference type comes into play. Value types include numeric objects like integers, floating point numbers, and also booleans. Reference types include strings and classes. When you create a variable that represents a value type, the memory to hold its value is created in the stack. When you create a variable to hold a reference type, it also has memory in the stack - but this memory holds a pointer to where the object’s actual data is allocated in the heap. Hence the term reference type, as the variable doesn’t hold the object’s data directly - instead it holds a reference to where that object exists in the heap!
This is also where null comes from - a value of null means that a reference variable is not pointing at anything.
The objects in the heap are not limited to a scope like the variables stored in the stack. Some may exist for the entire running time of the program. Others may be released almost immediately. Accordingly, as this memory is released, it leaves “holes” that can be re-used for other objects (provided they fit). Many modern programming languages use a garbage collector to monitor how fragmented the heap is becoming, and will occasionally reorganize the data in the heap to make more contiguous space available.
We often talk about the class as a blueprint for an object. This is because classes define what properties and methods an object should have, in the form of the class definition. An object is created from this blueprint by invoking the class’ constructor. Consider this class representing a planet:
/// <summary>
/// A class representing a planet
// </summary>
public class Planet {
/// <summary>
/// The planet's mass in Earth Mass units (~5.9722 x 10^24kg)
/// </summary>
private double mass;
public double Mass
{
get { return mass; }
}
/// <summary>
/// The planet's radius in Earth Radius units (~6.738 x 10^6m)
/// </summary>
private double radius;
public double Radius
{
get { return radius; }
}
/// <summary>
/// Constructs a new planet
/// <param name="mass">The planet's mass</param>
/// <param name="radius">The planet's radius</param>
public Planet(double mass, double radius)
{
this.mass = mass;
this.radius = radius;
}
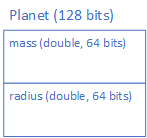
}It describes a planet as having a mass and a radius. But a class does more than just labeling the properties and fields and providing methods to mutate the state they contain. It also specifies how memory needs to be allocated to hold those values as the program runs. In memory, we would need to hold both the mass and radius values. These are stored side-by-side, as a series of bits that are on or off. You probably remember from CIS 115 that a double is stored as a sign bit, mantissa and exponent. This is also the case here - a C# double requires 64 bits to hold these three parts, and we can represent it with a memory diagram:
We can create a specific planet by invoking its constructor, i.e.:
new Planet(1, 1);This allocates (sets aside) the memory to hold the planet, and populates the mass and radius with the supplied values. We can represent this with a memory diagram:
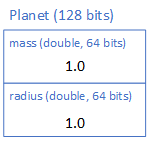
With memory diagrams, we typically write the values of variables in their human-readable form. Technically the values we are storing are in binary, and would each be 0000000000010000000000000000000000000000000000000000000000000001, so our overall object would be the bits: 00000000000100000000000000000000000000000000000000000000000000010000000000010000000000000000000000000000000000000000000000000001.
And this is exactly how it is stored in memory! The nice boxes we drew in our memory diagram are a tool for us to reason about the memory, not something that actually exists in memory. Instead, the compiler determines the starting point for each double by looking at the structure defined in our class, i.e. the first field defined is mass, so it will be the first 64 bits of the object in memory. The second field is radius, so it starts 65 bits into the object and consists of the next (and final) 64 bits.
If we assign the created Planet object to a variable, we allocate memory for that variable:
Planet earth = new Planet(1, 1);Unlike our double and other primitive values, this allocated memory holds a reference (a starting address of the memory where the object was allocated). We indicate this with a box and arrow connecting the variable and object in our memory diagram:
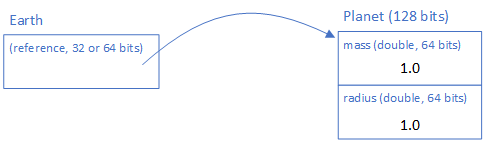
A reference is either 32 bits (on a computer with a 32-bit CPU) or 64 bits (on a computer with a 64-bit CPU), and essentially is an offset from the memory address $0$ indicating where the object will be located in memory (in the computer’s RAM). You’ll see this in far more detail in CIS 450 - Computer Architecture and Operations, but the important idea for now is the variable stores where the object is located in memory not the object’s data itself. This is also why if we define a class variable but don’t assign it an object, i.e.:
Planet mars;
The value of this variable will be null. It’s because it doesn’t point anywhere!
Returning to our Earth example, earth is an instance of the class Planet. We can create other instances, i.e.
Planet mars = new Planet(0.107, 0.53);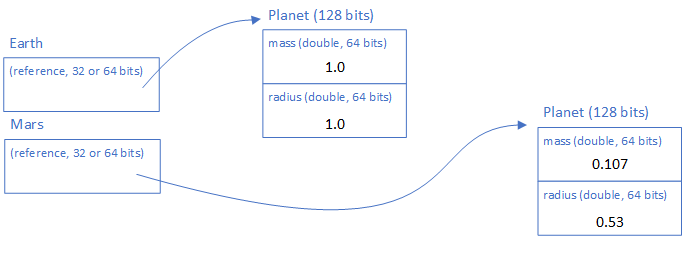
We can even create a Planet instance to represent one of the exoplanets discovered by NASA’s TESS:
Planet hd21749b = new Planet(23.20, 2.836);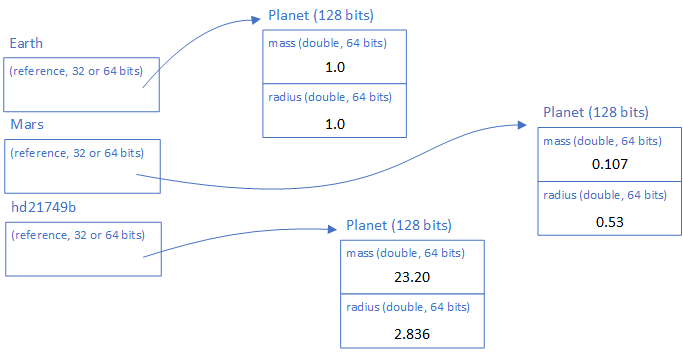
Let’s think more deeply about the idea of a class as a blueprint. A blueprint for what, exactly? For one thing, it serves to describe the state of the object, and helps us label that state. If we were to check our variable mars’ radius, we do so based on the property Radius defined in our class:
mars.RadiusThis would follow the mars reference to the Planet object it represents, and access the second group of 64 bits stored there, interpreting them as a double (basically it adds 64 to the reference address and then reads the next 64 bits)
Incidentally, this is why we start counting at 0 in computer science. The mass bits start at the start of our Planet object, referenced by mars i.e. if mars holds the reference address $5234$, then the bits of mass also begin at $5234$, or $5234+0$. And the radius bits start at $5234 + 64$.
State and memory are clearly related - the current state is what data is stored in memory. It is possible to take that memory’s current state, write it to persistent storage (like the hard drive), and then read it back out at a later point in time and restore the program to exactly the state we left it with. This is actually what Windows does when you put it into hibernation mode.
The process of writing out the state is known as serialization, and it’s a topic we’ll revisit later.
You might have wondered how the static modifier plays into objects. Essentially, the static keyword indicates the field or method it modifies exists in only one memory location. I.e. a static field references the same memory location for all objects that possess it. Hence, if we had a simple class like:
public class Simple {
    public static int A;
    public int B;

    public Simple(int a, int b) {
        this.A = a;
        this.B = b;
    }
}
And created a couple of instances:
Simple first = new Simple(10, 12);
Simple second = new Simple(8, 5);
The value of first.A would be 8 - because first.A and second.A reference the same memory location, and second.A was set after first.A. If we changed it again:
first.A = 3;Then both first.A and second.A would have the value 3, as they share the same memory. first.B would still be 12, and second.B would be 5.
Another way to think about static is that it means the field or method we are modifying belongs to the class and not the individual object. Hence, each object shares a static variable, because it belongs to their class. Used on a method, static indicates that the method belongs to the class definition, not the object instance. Hence, we must invoke it from the class, not an object instance: i.e. Math.Pow(), not Math m = new Math(); m.Pow();.
Finally, when used with a class, static indicates we can’t create objects from the class - the class definition exists on its own. Hence, the Math m = new Math(); is actually an error, as the Math class is declared static.
With our broader understanding of objects in memory, let’s re-examine something you’ve been working with already, how the values in that memory are initialized (set to their initial values). In C#, there are four primary ways a value is initialized:
This also happens to be the order in which these operations occur - i.e. the default value can be overridden by code in the constructor. Only after all of these steps are completed is the initialized object returned from the constructor.
This step is actually done for you - it is a feature of the C# language. Remember, allocated memory is simply a series of bits. Those bits have likely been used previously to represent something else, so they will already be set to 0s or 1s. Once you treat it as a variable, it will have a specific meaning. Consider this statement:
int foo;That statement allocates the space to hold the value of foo. But what is that value? In many older languages, it would be whatever is specified by how the bits were set previously - i.e. it could be any integer within the available range. And each time you ran the program, it would probably be a different value! This is why it is always a good idea to assign a value to a variable immediately after you declare it.
The creators of C# wanted to avoid this potential problem, so in C# any memory that is allocated by a variable declaration is also zeroed (all bits are set to 0). Exactly what this means depends on the variable’s type. Essentially, for numerics (integers, floating points, etc) the value would be 0, for booleans it would be false. And for reference types, the value would be null.
A second way a field’s value can be set is by assigning a default value after it is declared. Thus, if we have a private backing _count in our CardDeck class, we could set it to have a default value of 52:
public class CardDeck
{
  private int _count = 52;

  public int Count
  {
    get
    {
      return _count;
    }
    set
    {
      _count = value;
    }
  }
}
This ensures that _count starts with a value of 52, instead of 0.
We can also set a default value when using auto-property syntax:
public class CardDeck
{
  public int Count {get; set;} = 52;
}It is important to understand that the default value is assigned as the memory is allocated, which means the object doesn’t exist yet. Basically, we cannot use methods, fields, or properties of the class to set a default value. For example:
public class CardDeck
{
  public int Count {get; set;} = 52;
  public int PricePerCard {get;} = 5m / Count;
}
Won’t compile, because we don’t have access to the Count property when setting the default for PricePerCard.
This brings us to the constructor, the standard way for an object-oriented program to initialize the state of the object as it is created. In C#, the constructor always has the same name as the class it constructs and has no return type. For example, if we defined a class Square, we might type:
public class Square {
    public float length;

    public Square(float length) {
        this.length = length;
    }

    public float Area() {
        return length * length;
    }
}
Note that unlike the regular method, Area(), our constructor Square() does not have a return type. In the constructor, we set the length field of the newly constructed object to the value supplied as the parameter length. Note too that we use the this keyword to distinguish between the field length and the parameter length. Since both have the same name, the C# compiler assumes we mean the parameter, unless we use this.length to indicate the field that belongs to this - i.e. this object.
A parameterless constructor is one that does not have any parameters. For example:
public class Ball {
    private int x;
    private int y;

    public Ball() {
        x = 50;
        y = 10;
    }
}
Notice how no parameters are defined for Ball() - the parentheses are empty.
If we don’t provide a constructor for a class the C# compiler automatically creates a parameterless constructor for us, i.e. the class Bat:
public class Bat {
    private bool wood = true;
}
Can be created by invoking new Bat(), even though we did not define a constructor for the class. If we define any constructors, parameterless or otherwise, then the C# compiler will not create an automatic parameterless constructor.
Finally, C# introduces some special syntax for setting initial values after the constructor code has run, but before initialization is completed - Object initializers. For example, if we have a class representing a rectangle:
public class Rectangle
{
  public int Width {get; set;}
  public int Height {get; set;}
}
We could initialize it with:
Rectangle r = new Rectangle() {
  Width = 20,
  Height = 10
};
The resulting rectangle would have its width and height set to 20 and 10 respectively before it was assigned to the variable r.
In addition to the get and set accessor, C# has an init operator that works like the set operator but can only be used during object initialization.
The second criterion Alan Kay set for object-oriented languages was message passing. Message passing is a way to request that a unit of code engage in a behavior, i.e. changing its state, or sharing some aspect of its state.
Consider the real-world analogue of a letter sent via the postal service. Such a message consists of: an address the message needs to be sent to, a return address, the message itself (the letter), and any data that needs to accompany the letter (the enclosures). A specific letter might be a wedding invitation. The message includes the details of the wedding (the host, the location, the time), an enclosure might be a refrigerator magnet with these details duplicated. The recipient should (per custom) send a response to the host addressed to the return address letting them know if they will be attending.
In an object-oriented language, message passing primarily takes the form of methods. Let’s revisit our example Vector3 class:
public class Vector3 {
    public double X {get; set;}
    public double Y {get; set;}
    public double Z {get; set;}

    /// <summary>
    /// Creates a new Vector3 object
    /// </summary>
    public Vector3(double x, double y, double z) {
        this.X = x;
        this.Y = y;
        this.Z = z;
    }

    /// <summary>
    /// Computes the dot product of this vector and another one
    /// </summary>
    /// <param name="other">The other vector</param>
    public double DotProduct(Vector3 other) {
        return this.X * other.X + this.Y * other.Y + this.Z * other.Z;
    }
}
And let’s use its DotProduct() method:
Vector3 a = new Vector3(1, 1, 2);
Vector3 b = new Vector3(4, 2, 1);
double c = a.DotProduct(b);
Consider the invocation of a.DotProduct(b) above. The method name, DotProduct provides the details of what the message is intended to accomplish (the letter). Invoking it on a specific variable, i.e. a, tells us who the message is being sent to (the recipient address). The return type indicates what we need to send back to the recipient (the invoking code), and the parameters provide any data needed by the class to address the task (the enclosures).
Let’s define a new method for our Vector3 class that emphasizes the role message passing plays in mutating object state:
public class Vector3 {
    public double X {get; set;}
    public double Y {get; set;}
    public double Z {get; set;}

    /// <summary>
    /// Creates a new Vector3 object
    /// </summary>
    public Vector3(double x, double y, double z) {
        this.X = x;
        this.Y = y;
        this.Z = z;
    }

    public void Normalize() {
        var magnitude = Math.Sqrt(Math.pow(this.X, 2) + Math.Pow(this.Y, 2) + Math.Pow(this.Z, 2));
        this.X /= magnitude;
        this.Y /= magnitude;
        this.Z /= magnitude;
    }
}
We can now invoke the Normalize() method on a Vector3 to mutate its state, shortening the magnitude of the vector to length 1.
Vector3 f = new Vector3(9.0, 3.0, 2.0);
f.Normalize();
Note how here, f is the object receiving the message Normalize. There is no additional data needed, so there are no parameters being passed in. Our earlier DotProduct() method took a second vector as its argument, and used that vector’s values to mutate its state.
Message passing therefore acts like those special molecular pumps and other gate mechanisms of a cell that control what crosses the cell wall. The methods defined on a class determine how outside code can interact with the object. An extra benefit of this approach is that a method becomes an abstraction for the behavior of the code, and the associated state changes it embodies. As a programmer using the method, we don’t need to know the exact implementation of that behavior - just what data we need to provide, and what it should return or how it will alter the program state. This makes it far easier to reason about our program, and also means we can change the internal details of a class (perhaps to make it run faster) without impacting the other aspects of the program.
This is also the reason we want to use getters and setters (or properties in C#) instead of public fields in an object-oriented language. Getters, setters, and C# properties are all methods, and therefore are a form of message passing, and they ensure that outside code is not modifying the state of the object (rather, the outside code is requesting the object to change its state). It is a fine distinction, but one that can be very important.
You probably have noticed that in many programming languages we speak of functions, but in C# and other object-oriented languages, we’ll often speak of methods. You might be wondering just what is the difference?
Both are forms of message passing, and share many of the same characteristics. Broadly speaking though, methods are functions defined as part of an object. Therefore, their bodies can access the state of the object. In fact, that’s what the this keyword in C# means - it refers to this object, i.e. the instance of the class that the method is currently executing for. For non-object-oriented languages, there is no concept of this (or self as it appears in some other languages).
In this chapter, we looked at how Object-Orientation adopted the concept of encapsulation to combine related state and behavior within a single unit of code, known as a class. We also discussed the three key features found in the implementation of classes and objects in Object-Oriented languages:
We explored how objects are instances of a class created through invoking a constructor method, and how each object has its own independent state but shares behavior definitions with other objects constructed from the same class. We discussed several different ways of looking at and reasoning about objects - as a state machine, and as structured data stored in memory. We saw how the constructor creates the memory to hold the object state and initializes its values. We saw how access modifiers and accessor methods can be used to limit and control access to the internal state of an object through message passing.
Finally, we explored how all of these concepts are implemented in the C# language.
It’s a shapeshifter!
The term polymorphism means many forms. In computer science, it refers to the ability of a single symbol (i.e. a function or class name) to represent multiple types. Some form of polymorphism can be found in nearly all programming languages.
While encapsulation of state and behavior into objects is the most central theoretical idea of object-oriented languages, polymorphism - specifically in the form of inheritance is a close second. In this chapter we’ll look at how polymorphism is commonly implemented in object-oriented languages.
Some key terms to learn in this chapter are:
C# Keywords:
InterfaceprotectedabstractvirtualoverridesealedasisdynamicBefore we can discuss polymorphism in detail, we must first understand the concept of types. In computer science, a type is a way of categorizing a variable by its storage strategy, i.e., how it is represented in the computer’s memory.
You’ve already used types extensively in your programming up to this point. Consider the declaration:
int number = 5;The variable number is declared to have the type int. This lets the .NET interpreter know that the value of number will be stored using a specific scheme. This scheme will use 32 bits and contain the number in Two’s complement binary form. This form, and the number of bytes, allows us to represent numbers in the range -2,147,483,648 to 2,147,483,647. If we need to store larger values, we might instead use a long which uses 64 bits of storage. Or, if we only need positive numbers, we might instead use a uint, which uses 32 bits and stores the number in regular base 2 (binary) form.
This is why languages like C# provide multiple integral and float types. Each provides a different representation, representing a tradeoff between memory required to store the variable and the range or precision that variable can represent.
In addition to integral and float types, most programming languages include types for booleans, characters, arrays, and often strings. C# is no exception - you can read about its built-in value types in the documentation.
In addition to built-in types, most programming languages support user-defined types, that is, new types defined by the programmer. For example, if we were to define a C# enum:
public enum Grade {
  A,
  B,
  C,
  D,
  F
}
Defines the type Grade. We can then create variables with that type:
Grade courseGrade = Grade.A;Similarly, structs provide a way of creating user-defined compound data types.
In an object-oriented programming language, a Class also defines a new type. As we discussed in the previous chapter, the Class defines the structure for the state (what is represented) and memory (how it is represented) for objects implementing that type. Consider the C# class Student:
public class Student {
  // backing variables
  private float creditPoints = 0;
  private uint creditHours = 0;

  /// <summary>
  /// Gets and sets first name.
  /// </summary>
  public string First { get; set; }

  /// <summary>
  /// Gets and sets last name.
  /// </summary>
  public string Last { get; set; }

  /// <summary>
  /// Gets the student's GPA
  /// </summary>
  public float GPA {
    get {
      return creditPoints / creditHours;
    }
  }

  /// <summary>
  /// Adds a final grade for a course to the
  // student's GPA.
  /// </summary>
  /// <param name="grade">The student's final letter grade in the course</param>
  /// <param name="hours">The course's credit hours</param>
  public void AddCourseGrade(Grade grade, uint hours) {
    this.creditHours += hours;
    switch(grade) {
      case Grade.A:
        this.creditPoints += 4.0 * hours;
        break;
      case Grade.B:
        this.creditPoints += 3.0 * hours;
        break;
      case Grade.C:
        this.creditPoints += 2.0 * hours;
        break;
      case Grade.D:
        this.creditPoints += 1.0 * hours;
        break;
      case Grade.F:
        this.creditPoints += 0.0 * hours;
        break;
    }
  }
}
If we want to create a new student, we would create an instance of the class Student which is an object of type Student:
Student willie = new Student("Willie", "Wildcat");Hence, the type of an object is the class it is an instance of. This is a staple across all object-oriented languages.
A final note on types. You may hear languages being referred to as statically or dynamically typed. A statically typed language is one where the type is set by the code itself, either explicitly:
int foo = 5;or implicitly (where the compiler determines the type based on the assigned value):
var bar = 6;In a statically typed language, a variable cannot be assigned a value of a different type, i.e.:
foo = 8.3;Will fail with an error, as a float is a different type than an int. Similarly, because bar has an implied type of int, this code will fail:
bar = 4.3;However, we can cast the value to a new type (changing how it is represented), i.e.:
foo = (int)8.9;For this to work, the language must know how to perform the cast. The cast may also lose some information - in the above example, the resulting value of foo is 8 (the fractional part is discarded).
In contrast, in a dynamically typed language the type of the variable changes when a value of a different type is assigned to it. For example, in JavaScript, this expression is legal:
var a = 5;
a = "foo";
and the type of a changes from int (at the first assignment) to string (at the second assignment).
C#, Java, C, C++, and Kotlin are all statically typed languages, while Python, JavaScript, and Ruby are dynamically typed languages.
If we think back to the concept of message passing in object-oriented languages, it can be useful to think of the collection of public methods available in a class as an interface, i.e., a list of messages you can dispatch to an object created from that class. When you were first learning a language (and probably even now), you find yourself referring to these kinds of lists, either in the language documentation, or via Intellisense in Visual Studio.
Essentially, programmers use these ‘interfaces’ to determine what methods can be invoked on an object. In other words, which messages can be passed to the object. This ‘interface’ (note the lowercase i) is determined by the class definition, specifically what methods it contains.
In dynamically typed programming languages, like Python, JavaScript, and Ruby, if two classes accept the same message, you can treat them interchangeably, i.e. the Kangaroo class and Car class both define a jump() method, you could populate a list with both, and call the jump() method on each:
var jumpables = [new Kangaroo(), new Car(), new Kangaroo()];
for(int i = 0; i < jumpables.length; i++) {
    jumpables[i].jump();
}
This is sometimes called duck typing, from the sense that “if it walks like a duck, and quacks like a duck, it might as well be a duck.”
However, for statically typed languages we must explicitly indicate that two types both possess the same message definition, by making the interface explicit. We do this by declaring an interface. I.e., the interface for classes that possess a parameter-less jump method might be:
/// <summary>
/// An interface indicating an object's ability to jump
/// </summary>
public interface IJumpable {

    /// <summary>
    /// A method that causes the object to jump
    /// </summary>
    void Jump();
}
In C#, it is common practice to preface interface names with the character I. The interface declaration defines an ‘interface’ - the shape of the messages that can be passed to an object implementing the interface - in the form of a method signature. Note that this signature does not include a body, but instead ends in a semicolon (;). An interface simply indicates the message to be sent, not the behavior it will cause! We can specify as many methods in an interface declaration as we want.
Also note that the method signatures in an interface declaration do not have access modifiers. This is because the whole purpose of defining an interface is to signify methods that can be used by other code. In other words, public access is implied by including the method signature in the interface declaration.
This interface can then be implemented by other classes by listing it after the class name, after a colon :. Any Class declaration implementing the interface must define public methods whose signatures match those were specified by the interface:
/// <summary>A class representing a kangaroo</summary>
public class Kangaroo : IJumpable
{
    /// <summary>Causes the Kangaroo to jump into the air</summary>
    public void Jump() {
        // TODO: Implement jumping...
    }
}

/// <summary>A class representing an automobile</summary>
public class Car : IJumpable
{
    /// <summary>Helps a stalled car to start by providing electricity from another car's battery</summary>
    public void Jump() {
        // TODO: Implement jumping a car...
    }

    /// <summary>Starts the car</summary>
    public void Start() {
        // TODO: Implement starting a car...
    }
}
We can then treat these two disparate classes as though they shared the same type, defined by the IJumpable interface:
List<IJumpable> jumpables = new List<IJumpable>() {new Kangaroo(), new Car(), new Kangaroo()};
for(int i = 0; i < jumpables.Count; i++)
{
    jumpables[i].Jump();
}
Note that while we are treating the Kangaroo and Car instances as IJumpable instances, we can only invoke the methods defined in the IJumpable interface, even if these objects have other methods. Essentially, the interface represents a new type that can be shared amongst disparate objects in a statically-typed language. The interface definition serves to assure the static type checker that the objects implementing it can be treated as this new type - i.e. the Interface provides a mechanism for implementing polymorphism.
We often describe the relationship between the interface and the class that implements it as a is-a relationship, i.e. a Kangaroo is an IJumpable (i.e. a Kangaroo is a thing that can jump). We further distinguish this from a related polymorphic mechanism, inheritance, by the strength of the relationship. We consider the relationship between interfaces and classes implementing them to be weak is-a connections. For example, other than the shared interface, a Kangaroo and a Car don’t have much to do with one another.
A C# class can implement as many interfaces as we want, they just need to be separated by commas, i.e.:
public class Frog : IJumpable, ICroakable, ICatchFlies
{
    // TODO: Implement frog class...
}In an object-oriented language, inheritance is a mechanism for deriving part of a class definition from another existing class definition. This allows the programmer to “share” code between classes, reducing the amount of code that must be written.
Consider a Student class:
/// <summary>
/// A class representing a student
/// </summary>
public class Student {

  // private backing variables
  private double hours;
  private double points;

  /// <summary>
  /// Gets the students' GPA
  /// </summary>
  public double GPA {
    get {
      return points / hours;
    }
  }

  /// <summary>
  /// Gets or sets the first name
  /// </summary>
  public string First { get; set; }

  /// <summary>
  /// Gets or sets the last name
  /// </summary>
  public string Last { get; set; }

  /// <summary>
  /// Constructs a new instance of Student
  /// </summary>
  /// <param name="first">The student's first name </param>
  /// <param name="last">The student's last name</param>
  public Student(string first, string last) {
    this.First = first;
    this.Last = last;
  }

  /// <summary>
  /// Adds a new course grade to the student's record.
  /// </summary>
  /// <param name="creditHours">The number of credit hours in the course </param>
  /// <param name="finalGrade">The final grade earned in the course</param>
  ///
  public void AddCourseGrade(uint creditHours, Grade finalGrade) {
    this.hours += creditHours;
    switch(finalGrade) {
      case Grade.A:
        this.points += 4 * creditHours;
        break;
      case Grade.B:
        this.points += 3 * creditHours;
        break;
      case Grade.C:
        this.points += 2 * creditHours;
        break;
      case Grade.D:
        this.points += 1 * creditHours;
        break;
    }
  }
}
This would work well for representing a student. But what if we are representing multiple kinds of students, like undergraduate and graduate students? We’d need separate classes for each, but both would still have names and calculate their GPA the same way. So it would be handy if we could say “an undergraduate is a student, and has all the properties and methods a student has” and “a graduate student is a student, and has all the properties and methods a student has.” This is exactly what inheritance does for us, and we often describe it as a is a relationship. We distinguish this from the interface mechanism we looked at earlier by saying it is a strong is a relationship, as an Undergraduate student is, for all purposes, also a Student.
Let’s define an undergraduate student class:
/// <summary>
/// A class representing an undergraduate student
/// </summary>
public class UndergraduateStudent : Student {

  /// <summary>
  /// Constructs a new instance of UndergraduateStudent
  /// </summary>
  /// <param name="first">The student's first name </param>
  /// <param name="last">The student's last name</param>
  public UndergraduateStudent(string first, string last) : base(first, last) {
  }
}
In C#, the : indicates inheritance - so public class UndergraduateStudent : Student indicates that UndergraduateStudent inherits from (is a) Student. Thus, it has properties First, Last, and GPA that are inherited from Student. Similarly, it inherits the AddCourseGrade() method.
In fact, the only method we need to define in our UndergraduateStudent class is the constructor - and we only need to define this because the base class has a defined constructor taking two parameters, first and last names. This Student constructor must be invoked by the UndergraduateStudent constructor - that’s what the :base(first, last) portion does - it invokes the Student constructor with the first and last parameters passed into the UndergraduateStudent constructor.
Let’s define a GraduateStudent class as well. This will look much like an UndergraduateStudent, but all graduates have a bachelor’s degree:
/// <summary>
/// A class representing a graduate student
/// </summary>
public class GraduateStudent : Student {

  /// <summary>
  /// Gets the student's bachelor degree
  /// </summary>
  public string BachelorDegree {
    get; private set;
  }

  /// <summary>
  /// Constructs a new instance of GraduateStudent
  /// </summary>
  /// <param name="first">The student's first name </param>
  /// <param name="last">The student's last name</param>
  /// <param name="degree">The student's bachelor degree</param>
  public GraduateStudent(string first, string last, string degree) : base(first, last) {
    BachelorDegree = degree;
  }
}
Here we add a property for BachelorDegree. Since it’s setter is marked as private, it can only be written to by the class, as is done in the constructor. To the outside world, it is treated as read-only.
Thus, the GraduateStudent has all the state and behavior encapsulated in Student, plus the additional state of the bachelor’s degree title.
protected KeywordWhat you might not expect is that any fields declared private in the base class are inaccessible in the derived class. Thus, the private fields points and hours cannot be used in a method defined in GraduateStudent. This is again part of the encapsulation and data hiding ideals - we’ve encapsulated and hidden those variables within the base class, and any code outside that assembly, even in a derived class, is not allowed to mess with it.
However, we often will want to allow access to such variables in a derived class. C# uses the access modifier protected to allow for this access in derived classes, but not the wider world.
What happens when we construct an instance of GraduateStudent? First, we invoke the constructor of the GraduateStudent class:
GraduateStudent bobby = new GraduateStudent("Bobby", "TwoSocks", "Economics");This constructor then invokes the constructor of the base class, Student, with the arguments "Bobby" and "TwoSocks". Thus, we allocate space to hold the state of a student, and populate it with the values set by the constructor. Finally, execution returns to the derived class of GraduateStudent, which allocates the additional memory for the reference to the BachelorDegree property. Thus, the memory space of the GraduateStudent contains an instance of the Student, somewhat like nesting dolls.
Because of this, we can treat a GraduateStudent object as a Student object. For example, we can store it in a list of type Student, along with UndergraduateStudent objects:
List<Student> students = new List<Student>();
students.Add(bobby);
students.Add(new UndergraduateStudent("Mary", "Contrary"));
Because of their relationship through inheritance, both GraduateStudent class instances and UndergraduateStudent class instances are considered to be of type Student, as well as their supertypes.
We can go as deep as we like with inheritance - each base type can be a superclass of another base type, and has all the state and behavior of all the inherited base classes.
This said, having too many levels of inheritance can make it difficult to reason about an object. In practice, a good guideline is to limit nested inheritance to two or three levels of depth.
If we have a base class that only exists to inherit from (like our Student class in the example), we can mark it as abstract with the abstract keyword. An abstract class cannot be instantiated (that is, we cannot create an instance of it using the new keyword). It can still define fields and methods, but you can’t construct it. If we were to re-write our Student class as an abstract class:
/// <summary>
/// A class representing a student
/// </summary>
public abstract class Student {

  // private backing variables
  private double hours;
  private double points;

  /// <summary>
  /// Gets the students' GPA
  /// </summary>
  public double GPA {
    get {
      return points / hours;
    }
  }

  /// <summary>
  /// Gets or sets the first name
  /// </summary>
  public string First { get; set; }

  /// <summary>
  /// Gets or sets the last name
  /// </summary>
  public string Last { get; set; }

  /// <summary>
  /// Constructs a new instance of Student
  /// </summary>
  /// <param name="first">The student's first name </param>
  /// <param name="last">The student's last name</param>
  public Student(string first, string last) {
    this.First = first;
    this.Last = last;
  }

  /// <summary>
  /// Adds a new course grade to the student's record.
  /// </summary>
  /// <param name="creditHours">The number of credit hours in the course </param>
  /// <param name="finalGrade">The final grade earned in the course</param>
  ///
  public void AddCourseGrade(uint creditHours, Grade finalGrade) {
    this.hours += creditHours;
    switch(finalGrade) {
      case Grade.A:
        this.points += 4 * creditHours;
        break;
      case Grade.B:
        this.points += 3 * creditHours;
        break;
      case Grade.C:
        this.points += 2 * creditHours;
        break;
      case Grade.D:
        this.points += 1 * creditHours;
        break;
    }
  }
}
Now with Student as an abstract class, attempting to create a Student instance i.e. Student mark = new Student("Mark", "Guy") would fail with an exception. However, we can still create instances of the derived classes GraduateStudent and UndergraduateStudent, and treat them as Student instances. It is best practice to make a class abstract if it serves only as a base class for derived classes and will never be created directly.
Conversely, C# also offers the sealed keyword, which can be used to indicate that a class should not be inheritable. For example:
/// <summary>
/// A class that cannot be inherited from
/// </summary>
public sealed class DoNotDerive {

}
Derived classes can also be sealed. I.e., we could seal our UndergraduateStudent class to prevent further derivation:
/// <summary>
/// A sealed version  of the class representing an undergraduate student
/// </summary>
public sealed class UndergraduateStudent : Student {

  /// <summary>
  /// Constructs a new instance of UndergraduateStudent
  /// </summary>
  /// <param name="first">The student's first name </param>
  /// <param name="last">The student's last name</param>
  public UndergraduateStudent(string first, string last) : base(first, last) {
  }
}
Many of the library classes provided with the C# installation are sealed. This helps prevent developers from making changes to well-known classes that would make their code harder to maintain. It is good practice to seal classes that you expect will never be inherited from.
A class can use both inheritance and interfaces. In C#, a class can only inherit one base class, and it should always be the first after the colon (:). Following that we can have as many interfaces as we want, all separated from each other and the base class by commas (,):
public class UndergraduateStudent : Student, ITeachable, IEmailable
{
  // TODO: Implement student class
}You have probably used casting to convert numeric values from one type to another, i.e.:
int a = 5;
double b = a;
And
int c = (int)b;What you are actually doing when you cast is transforming a value from one type to another. In the first case, you are taking the value of a (5), and converting it to the equivalent double (5.0). If you consider the internal representation of an integer (a 2’s complement binary number) to a double (an IEEE 754 standard representation), we are actually applying a conversion algorithm to the binary representations.
We call the first operation an implicit cast, as we don’t expressly tell the compiler to perform the cast. In contrast, the second assignment is an explicit cast, as we signify the cast by wrapping the type we are casting to in parenthesis before the variable we are casting. We have to perform an explicit cast in the second case, as the conversion has the possibility of losing some precision (i.e. if we cast 7.2 to an integer, it would be truncated to 7). In any case where the conversion may lose precision or possibly throw an error, an explicit cast is required.
We can actually extend the C# language to add additional conversions to provide additional casting operations. Consider if we had Rectangle and Square structs:
/// <summary>A struct representing a rectangle</summary>
public struct Rectangle {

    /// <summary>The length of the short side of the rectangle</summary>
    public int ShortSideLength;

    /// <summary>The length of the long side of the rectangle</summary>
    public int LongSideLength;

    /// <summary>Constructs a new rectangle</summary>
    /// <param name="shortSideLength">The length of the shorter sides of the rectangle</param>
    /// <param name="longSideLength">The length of the longer sides of the rectangle</param>
    public Rectangle(int shortSideLength, int longSideLength){
        ShortSideLength = shortSideLength;
        LongSideLength = longSideLength;
    }
}

/// <summary>A struct representing a square</summary>
public struct Square {

    /// <summary> The length of the square's sides</summary>
    public int SideLength;

    /// <summary>Constructs a new square</summary>
    /// <param name="sideLength">The length of the square's sides</param>
    public Square(int sideLength){
        SideLength = sideLength;
    }
}
Since we know that a square is a special case of a rectangle (where all sides are the same length), we might define an implicit casting operator to convert it into a Rectangle (this would be placed inside the Square struct definition):
    /// <summary>Casts the <paramref name="square"/> into a Rectangle</summary>
    /// <param name="square">The square to cast</param>
    public static implicit operator Rectangle(Square square)
    {
        return new Rectangle(square.SideLength, square.SideLength);
    }
Similarly, we might create a cast operator to convert a rectangle to a square. But as this can only happen when the sides of the rectangle are all the same size, it would need to be an explicit cast operator , and throw an exception when that condition is not met (this method is placed in the Rectangle struct definition):
    /// <summary>Casts the <paramref name="rectangle"/> into a Square</summary>
    /// <param name="rectangle">The rectangle to cast</param>
    /// <exception cref="System.InvalidCastOperation">The rectangle sides must be equal to cast to a square</exception>
    public static explicit operator Square(Rectangle rectangle){
        if(rectangle.LongSideLength != rectangle.ShortSideLength) throw new InvalidCastException("The sides of a square must be of equal lengths");
        return new Square(rectangle.LongSideLength);
    }
Casting becomes a bit more involved when we consider inheritance. As you saw in the previous discussion of inheritance, we can treat derived classes as the base class, i.e. the code:
Student sam = new UndergraduateStudent("Sam", "Malone");Is actually implicitly casting the undergraduate student “Sam Malone” into a student class. Because an UndergraduateStudent is a Student, this cast can be implicit. Moreover, we don’t need to define a casting operator - we can always implicitly cast a class to one of its ancestor classes, it’s built into the inheritance mechanism of C#.
Going the other way requires an explicit cast as there is a chance that the Student we are casting isn’t an undergraduate, i.e.:
UndergraduateStudent u = (UndergraduateStudent)sam;If we tried to cast sam into a graduate student:
GraduateStudent g = (GraduateStudent)sam;The program would throw an InvalidCastException when run.
Casting interacts similarly with interfaces. A class can be implicitly cast to an interface it implements:
IJumpable roo = new Kangaroo();But must be explicitly cast to convert it back into the class that implemented it:
Kangaroo k = (Kangaroo)roo;And if that cast is illegal, we’ll throw an InvalidCastException:
Car c = (Car)roo;as OperatorWhen we are casting reference and nullable types, we have an additional casting option - the as casting operator.
The as operator performs the cast, or evaluates to null if the cast fails (instead of throwing an InvalidCastException), i.e.:
UndergraduateStudent u = sam as UndergraduateStudent; // evaluates to an UndergraduateStudent
GraduateStudent g = sam as GraduateStudent; // evaluates to null
Kangaroo k = roo as Kangaroo; // evaluates to a Kangaroo
Car c = roo as Kangaroo; // evaluates to nullis OperatorRather than performing a cast and catching the exception (or performing a null check when using the as operator), it is often useful to know if a cast is possible. This can be checked for with the is operator. It evaluates to a boolean, true if the cast is possible, false if not:
sam is UndergraduateStudent; // evaluates to true
sam is GraduateStudent; // evaluates to false
roo is Kangaroo; // evaluates to true
roo is Car; // evaluates to falseThe is operator does not work with user-defined casting operators, i.e. when used with the Rectangle/Square cast we defined above:
Square s = new Square(10);
bool test = s is Rectangle;
The value of test will be false, even though we have a user-defined implicit cast that works.
The is operator is commonly used to determine if a cast will succeed before performing it, i.e.:
if(sam is UndergraduateStudent)
{
    Undergraduate samAsUGrad = sam as UndergraduateStudent;
    // TODO: Do something undergraduate-ey with samAsUGrad
}
This pattern was so commonly employed, it led to the addition of the is type pattern matching expression in C# version 7.0:
if(sam is UndergraduateStudent samAsUGrad)
{
    // TODO: Do something undergraduate-y with samAsUGrad
}
If the cast is possible, it is performed and the result assigned to the provided variable name (in this case, samAsUGrad). This is another example of syntactic sugar.
The term dispatch refers to how a language decides which polymorphic operation (a method or function) a message should trigger.
Consider polymorphic functions in C# (aka Method Overloading, where multiple methods use the same name but have different parameters) like this one for calculating the rounded sum of an array of numbers:
int RoundedSum(int[] a) {
  int sum = 0;
  foreach(int i in a) {
    sum += i;
  }
  return sum;
}

int RoundedSum(float[] a) {
    double sum = 0;
    foreach(int i in a) {
        sum += i;
    }
    return (int)Math.Round(sum);
}
How does the interpreter know which version to invoke at runtime? It should not be a surprise that it is determined by the arguments - if an integer array is passed, the first is invoked, if a float array is passed, the second.
However, inheritance can cause some challenges in selecting the appropriate polymorphic form. Consider the following fruit implementations that feature a Blend() method:
/// <summary>
/// A base class representing fruit
/// </summary>
public class Fruit
{
    /// <summary>
    /// Blends the fruit
    /// </summary>
    /// <returns>The result of blending</returns>
    public string Blend() {
      return "A pulpy mess, I guess";
    }
}

/// <summary>
/// A class representing a banana
/// </summary>
public class Banana : Fruit
{
    /// <summary>
    /// Blends the banana
    /// </summary>
    /// <returns>The result of blending the banana</returns>
    public string Blend()
    {
        return "yellow mush";
    }
}

/// <summary>
/// A class representing a Strawberry
/// </summary>
public class Strawberry : Fruit
{
    /// <summary>
    /// Blends the strawberry
    /// </summary>
    /// <returns>The result of blending a strawberry</returns>
    public string Blend()
    {
        return "Gooey Red Sweetness";
    }
}
Let’s add fruit instances to a list, and invoke their Blend() methods:
List<Fruit> toBlend = new List<Fruit>();
toBlend.Add(new Banana());
toBlend.Add(new Strawberry());

foreach(Fruit item in toBlend) {
  Console.WriteLine(item.Blend());
}
You might expect this code to produce the lines:
yellow mush
Gooey Red Sweetness
As these are the return values for the Blend() methods for the Banana and Strawberry classes, respectively. However, we will get:
A pulpy mess, I guess?
A pulpy mess, I guess?
Which is the return value for the Fruit base class Blend() implementation. The line forEach(Fruit item in toBlend) explicitly tells the interpreter to treat the item as a Fruit instance, so of the two available methods (the base or super class implementation), the Fruit base class one is selected.
C# 4.0 introduced a new keyword, dynamic to allow variables like item to be dynamically typed at runtime. Hence, changing the loop to this:
forEach(dynamic item in toBlend) {
  Console.WriteLine(item.Blend());
}
Will give us the first set of results we discussed.
Of course, part of the issue in the above example is that we actually have two implementations for Blend() available to each fruit. If we wanted all bananas to use the Banana class’s Blend() method, even when the banana was being treated as a Fruit, we need to override the base method instead of creating a new one that hides it (in fact, in Visual Studio we should get a warning that our new method hides the base implementation, and be prompted to add the new keyword if that was our intent).
To override a base class method, we first must mark it as abstract or virtual. The first keyword, abstract, indicates that the method does not have an implementation (a body). The second, virtual, indicates that the base class does provide an implementation. We should use abstract when each derived class will define its own implementation, and virtual when some derived classes will want to use a common base implementation. Then, we must mark the method in the derived class with the override keyword.
Considering our Fruit class, since we’re providing a unique implementation of Blend() in each derived class, the abstract keyword is more appropriate:
/// <summary>
/// A base class representing fruit
/// </summary>
public abstract class Fruit : IBlendable
{
    /// <summary>
    /// Blends the fruit
    /// </summary>
    /// <returns>The result of blending</returns>
    public abstract string Blend();
}
As you can see above, the Blend() method does not have a body, only the method signature.
Also, note that if we use an abstract method in a class, the class itself must also be declared abstract. The reason should be clear - an abstract method cannot be called, so we should not create an object that only has the abstract method. The virtual keyword can be used in both abstract and regular classes.
Now we can override the Blend() method in Banana class:
/// <summary>
/// A class representing a banana
/// </summary>
public class Banana : Fruit
{
    /// <summary>
    /// Blends the banana
    /// </summary>
    /// <returns>The result of blending the banana</returns>
    public override string Blend()
    {
        return "yellow mush";
    }
}
Now, even if we go back to our non-dynamic loop that treats our fruit as Fruit instances, we’ll get the result of the Banana class’s Blend() method.
We can override any method marked abstract, virtual, or override (this last will only occur in a derived class whose base class is also derived, as it is overriding an already-overridden method).
We can also apply the sealed keyword to overridden methods, which prevents them from being overridden further. Let’s apply this to the Strawberry class:
/// <summary>
/// A class representing a Strawberry
/// </summary>
public class Strawberry : Fruit
{
    /// <summary>
    /// Blends the strawberry
    /// </summary>
    /// <returns>The result of blending a strawberry</returns>
    public sealed override string Blend()
    {
        return "Gooey Red Sweetness";
    }
}
Now, any class inheriting from Strawberry will not be allowed to override the Blend() method.
Collections in C# are a great example of polymorphism in action. Many collections utilize generics to allow the collection to hold an arbitrary type. For example, the List<T> can be used to hold strings, integers, or even specific objects:
List<string> strings = new List<string>();
List<int> ints = new List<int>();
List<Person> persons = new List<Person>();
We can also use an interface as the type, as we did with the IJumpable interface as we discussed in the generics section, i.e.:
List<IJumpable> jumpables = new List<IJumpable>();
jumpables.Add(new Kangaroo());
jumpables.Add(new Car());
jumpables.Add(new Kangaroo());The C# language and system libraries also define a number of interfaces that apply to custom collections. Implementing these interfaces allows different kinds of data structures to be utilized in a standardized way.
The first of these is the IEnumerable<T> interface, which requires the collection to implement one method:
public IEnumerator<T> GetEnumerator()Implementing this interface allows the collection to be used in a foreach loop.
C# Collections also typically implement the ICollection<T> interface, which extends the IEnumerable<T> interface and adds additional methods:
public void Add<T>(T item) adds item to the collectionpublic void Clear() empties the collectionpublic bool Contains(T item) returns true if item is in the collection, false if not.public void CopyTo(T[] array, int arrayIndex) copies the collection contents into array, starting at arrayIndex.public bool Remove(T item) removes item from the collection, returning true if item was removed, false otherwiseAdditionally, the collection must implement the following properties:
int Count the number of items in the collectionbool IsReadOnly the collection is read-only (can’t be added to or removed from)Finally, collections that have an implied order and are intended to be accessed by a specific index should probably implement the IList<T> interface, which extends ICollection<T> and IEnumerable<T>. This interface adds these additional methods:
public int IndexOf(T item) returns the index of item in the list, or -1 if not foundpublic void Insert(int index, T item) Inserts item into the list at position indexpublic void RemoveAt(int index) Removes the item from the list at position indexThe interface also adds the property:
Item[int index] which gets or sets the item at index.When writing a C# collection, there are three general strategies you can follow to ensure you implement the corresponding interfaces:
Writing collections from scratch was the strategy you utilized in CIS 300 - Data Structures and Algorithms. While this strategy gives you the most control, it is also the most time-consuming.
The pass-through strategy involves creating a system library collection, such as a List<T>, as a private field in your collection class. Then, when you implement the necessary interface methods, you simply pass through the call to the private collection. I.e.:
public class PassThroughList<T> : IList<T>
{
  private List<T> _list = new List<T>;

  public IEnumerator<T> GetEnumerator()
  {
    return _list.GetEnumerator();
  }

  // TODO: Implement remaining methods and properties...
}
Using this approach, you can add whatever additional logic your collection needs into your pass-through methods without needing to re-implement the basic collection functionality.
Using inheritance gives your derived class all of the methods of the base class, so if you extend a class that already implements the collection interfaces, you’ve already got all the methods!
public class InheritedList<T> : List<T>
{
  // All IList<T>, ICollection<T>, and IEnumerable<T> methods
  // from List<T> are already defined on InheritedList<T>
}
However, most system collection class methods are not declared as virtual, so you cannot override them to add custom functionality.
In this chapter, we explored the concept of types and discussed how variables are specific types that can be explicitly or implicitly declared. We saw how in a statically-typed language (like C#), variables are not allowed to change types (though they can do so in a dynamically-typed language). We also discussed how casting can convert a value stored in a variable into a different type. Implicit casts can happen automatically, but explicit casts must be indicated by the programmer using a cast operator, as the cast could result in loss of precision or the throwing of an exception.
We explored how class declarations and interface declarations create new types. We saw how polymorphic mechanisms like interface implementation and inheritance allow objects to be treated as (and cast to) different types. We also introduced the as and is casting operators, which can be used to cast or test the ability to cast, respectively. We saw that if the as cast operator fails, it evaluates to null instead of throwing an exception. We also saw the is type pattern expression, which simplifies a casting test and casting operation into a single expression.
Next, we looked at how C# collections leverage the use of interfaces, inheritance, and generic types to quickly and easily make custom collection objects that interact with the C# language in well-defined ways.
Finally, we explored how messages are dispatched when polymorphism is involved. We saw that the method invoked depends on what Type we are currently treating the object as. We saw how the C# modifiers protected, abstract, virtual, override, and sealed interacted with this message dispatch process. We also saw how the dynamic type could delay determining an object’s type until runtime.
Coding for Humans
As part of the strategy for tackling the challenges of the software crisis, good programming practice came to include writing clear documentation to support both the end-users who will utilize your programs, as well as other programmers (and yourself) in understanding what that code is doing so that it is easy to maintain and improve.
Some key terms to learn in this chapter are:
The key skill to learn in this chapter is how to use C# XML code comments to document the C# code you write.
Documentation refers to the written materials that accompany program code. Documentation plays multiple, and often critical roles. Broadly speaking, we split documentation into two categories based on the intended audience:
As you might expect, the goals for these two styles of documentation are very different. User documentation instructs the user on how to use the software. Developer documentation helps orient the developer so that they can effectively create, maintain, and expand the software.
Historically, documentation was printed separately from the software. This was largely due to the limited memory available on most systems. For example, the EPIC software we discussed had two publications associated with it: a User Manual, which explains how to use it, and Model Documentation which presents the mathematic models that programmers adapted to create the software. There are a few very obvious downsides to printed manuals: they take substantial resources to produce and update, and they are easily misplaced.
As memory became more accessible, it became commonplace to provide digital documentation to the users. For example, with Unix (and Linux) systems, it became commonplace to distribute digital documentation alongside the software it documented. This documentation came to be known as man pages based on the man command (short for manual) that would open the documentation for reading. For example, to learn more about the linux search tool grep, you would type the command:
$ man grep Which would open the documentation distributed with the grep tool. Man pages are written in a specific format; you can read more about it here.
While a staple of the Unix/Linux filesystem, there was no equivalent to man pages in the DOS ecosystem (the foundations of Windows) until Powershell was introduced, which has the Get-Help tool. You can read more about it here.
However, once software began to be written with graphical user interfaces (GUIs), it became commonplace to incorporate the user documentation directly into the GUI, usually under a “Help” menu. This served a similar purpose to man pages of ensuring user documentation was always available with the software. Of course, one of the core goals of software design is to make the software so intuitive that users don’t need to reference the documentation. It is equally clear that developers often fall short of that mark, as there is a thriving market for books to teach certain software.
Not to mention the thousands of YouTube channels devoted to teaching specific programs!
Developer documentation underwent a similar transformation. Early developer documentation was often printed and placed in a three-ring binder, as Neal Stephenson describes in his novel Snow Crash: 1
Fisheye has taken what appears to be an instruction manual from the heavy black suitcase. It is a miniature three-ring binder with pages of laser-printed text. The binder is just a cheap unmarked one bought from a stationery store. In these respects, it is perfectly familiar to Him: it bears the earmarks of a high-tech product that is still under development. All technical devices require documentation of a sort, but this stuff can only be written by the techies who are doing the actual product development, and they absolutely hate it, always put the dox question off to the very last minute. Then they type up some material on a word processor, run it off on the laser printer, send the departmental secretary out for a cheap binder, and that's that.
Shortly after the time this novel was written, the internet became available to the general public, and the tools it spawned would change how software was documented forever. Increasingly, web-based tools are used to create and distribute developer documentation. Wikis, bug trackers, and autodocumentation tools quickly replaced the use of lengthy, and infrequently updated word processor files.
Neal Stephenson, “Snow Crash.” Bantam Books, 1992. ↩︎
Developer documentation often faces a challenge not present in other kinds of documents - the need to be able to display snippets of code. Ideally, we want code to be formatted in a way that preserves indentation. We also don’t want code snippets to be subject to spelling- and grammar-checks, especially auto-correct versions of these algorithms, as they will alter the snippets. Ideally, we might also apply syntax highlighting to these snippets. Accordingly, a number of textual formats have been developed to support writing text with embedded program code, and these are regularly used to present developer documentation. Let’s take a look at several of the most common.
Since its inception, HTML has been uniquely suited for developer documentation. It requires nothing more than a browser to view - a tool that nearly every computer is equipped with (in fact, most have two or three installed). And the <code> element provides a way of styling code snippets to appear differently from the embedded text, and <pre> can be used to preserve the snippet’s formatting. Thus:
<p>This algorithm reverses the contents of the array, <code>nums</code></p>
<pre>
<code>
for(int i = 0; i < nums.Length/2; i++) {
    int tmp = nums[i];
    nums[i] = nums[nums.Length - 1 - i];
    nums[nums.Length - 1 - i] = tmp;
}
</code>
</pre>
Will render in a browser as:
This algorithm reverses the contents of the array, nums
for(int i = 0; i < nums.Length/2; i++) {
    int tmp = nums[i];
    nums[i] = nums[nums.Length - 1 - i];
    nums[nums.Length - 1 - i] = tmp;
}
JavaScript and CSS libraries like highlight.js, prism, and others can provide syntax highlighting functionality without much extra work.
Of course, one of the strongest benefits of HTML is the ability to create hyperlinks between pages. This can be invaluable in documenting software, where the documentation about a particular method could include links to documentation about the classes being supplied as parameters, or being returned from the method. This allows developers to quickly navigate and find the information they need as they work with your code.
However, there is a significant amount of boilerplate involved in writing a webpage (i.e. each page needs a minimum of elements not specific to the documentation to set up the structure of the page). The extensive use of HTML elements also makes it more time-consuming to write and harder for people to read in its raw form. Markdown is a markup language developed to counter these issues. Markdown is written as plain text, with a few special formatting annotations, which indicate how it should be transformed to HTML. Some of the most common annotations are:
#) indicates it should be a <h1> element, two hashes (##) indicates a <h2>, and so on…_) or asterisks (*) indicates it should be wrapped in a <i> element__) or double asterisks (**) indicates it should be wrapped in a <b> element[link text](url), which is transformed to <a href="url">link text</a>, which is transformed to <img alt="alt text" src="url"/>Code snippets are indicated with backtick marks (`). Inline code is written surrounded with single backtick marks, i.e. `int a = 1` and in the generated HTML is wrapped in a <code> element. Code blocks are wrapped in triple backtick marks, and in the generated HTML are enclosed in both <pre> and <code> elements. Thus, to generate the above HTML example, we would use:
This algorithm reverses the contents of the array, `nums`
```
for(int i = 0; i < nums.Count/2; i++) {
    int tmp = nums[i];
    nums[i] = nums[nums.Count - 1 - i];
    nums[nums.Count - 1 - i] = tmp;
}
```
Most markdown compilers also support specifying the language (for language-specific syntax highlighting) by following the first three backticks with the language name, i.e.:
```csharp
List = new List;
```
Nearly every programming language features at least one open-source library for converting Markdown to HTML. Microsoft even includes a C# one in the Windows Community Toolkit. In addition to being faster to write than HTML, and avoiding the necessity to write boilerplate code, Markdown offers some security benefits. Because it generates only a limited set of HTML elements, which specifically excludes some most commonly employed in web-based exploits (like using <script> elements for script injection attacks), it is often safer to allow users to contribute markdown-based content than HTML-based content. Note: this protection is dependent on the settings provided to your HTML generator - most markdown converters can be configured to allow or escape HTML elements in the markdown text
In fact, this book was written using Markdown, and then converted to HTML using the Hugo framework, a static website generator built using the Go programming language.
Additionally, chat servers like RocketChat and Discord support using markdown in posts!
GitHub even incorporates a markdown compiler into its repository displays. If your file ends in a .md extension, GitHub will evaluate it as Markdown and display it as HTML when you navigate your repo. If your repository contains a README.md file at the top level of your project, it will also be displayed as the front page of your repository. GitHub uses an expanded list of annotations known as GitHub-flavored markdown that adds support for tables, task item lists, strikethroughs, and others.
It is best practice to include a README.md file at the top level of a project. This document provides an overview of the project, as well as helpful instructions on how it is to be used and where to go for more information. For open-source projects, you should also include a LICENSE file that contains the terms of the license the software is released under.
Extensible Markup Language (XML) is a close relative of HTML - they share the same ancestor, Standard Generalized Markup Language (SGML). It allows developers to develop their own custom markup languages based on the XML approach, i.e. the use of elements expressed via tags and attributes. XML-based languages are usually used as a data serialization format. For example, this snippet represents a serialized fictional student:
<student>
    <firstName>Willie</firstName>
    <lastName>Wildcat</lastName>
    <wid>8888888</wid>
    <degreeProgram>BCS</degreeProgram>
</student>
While XML is most known for representing data, it is one of Microsoft’s go-to tools. For example, they have used it as the basis of Extensible Application Markup Language (XAML), which is used in Windows Presentation Foundation as well as cross-platform Xamrin development. So it shouldn’t be a surprise that Microsoft also adopted it for their autodocumentation code commenting strategy. We’ll take a look at this next.
One of the biggest innovations in documenting software was the development of autodocumentation tools. These were programs that would read source code files, and combine information parsed from the code itself and information contained in code comments to generate documentation in an easy-to-distribute form (often HTML). One of the earliest examples of this approach came from the programming language Java, whose API specification was generated from the language source files using JavaDoc.
This approach meant that the language of the documentation was embedded within the source code itself, making it far easier to update the documentation as the source code was refactored. Then, every time a release of the software was built (in this case, the Java language), the documentation could be regenerated from the updated comments and source code. This made it far more likely developer documentation would be kept up-to-date.
Microsoft adopted a similar strategy for the .NET languages, known as XML comments. This approach was based on embedding XML tags into comments above classes, methods, fields, properties, structs, enums, and other code objects. These comments are set off with a triple forward slash (///) to indicate the intent of being used for autodoc generation. Comments using double slashes (//) and slash-asterisk notation (/* */) are ignored in this autodoc scheme.
For example, to document an Enum, we would write:
/// <summary>
/// An enumeration of fruits used in pies
/// </summary>
public enum Fruit {
    Cherry,
    Apple,
    Blueberry,
    Peach
}
At a bare minimum, comments should include a <summary> element containing a description of the code structure being described.
Let’s turn our attention to documenting a class:
public class Vector2 {

    public float X {get; set;}

    public float Y {get; set;}

    public Vector2(float x, float y) {
        X = x;
        Y = y;
    }

    public void Scale(float scalar) {
        X *= scalar;
        Y *= scalar;
    }

    public float DotProduct(Vector2 other) {
        return this.X * other.X + this.Y * other.Y;
    }

    public float Normalize() {
        float magnitude = Math.Sqrt(Math.Pow(this.X, 2), Math.Pow(this.Y, 2));
        if(magnitude == 0) throw new DivideByZeroException();
        X /= magnitude;
        Y /= magnitude;
    }
}
We would want to add a <summary> element just above the class declaration, i.e.:
/// <summary>
/// A class representing a two-element vector composed of floats
/// </summary>
Properties should be described using the <summary> element, i.e.:
/// <summary>
/// The x component of the vector
/// </summary>
And methods should use <summary>, plus <param> elements to describe parameters. It has an attribute of name that should be set to match the parameter it describes:
/// <summary>
/// Constructs a new two-element vector
/// </summary>
/// <param name="x">The X component of the new vector</param>
/// <param name="y">The Y component of the new vector</param>
The <paramref> can be used to reference a parameter in the <summary>:
/// <summary>
/// Scales the Vector2 by the provided <paramref name="scalar"/>
/// </summary>
/// <param name="scalar">The value to scale the vector by</param>
If a method returns a value, this should be indicated with the <returns> element:
/// <summary>
/// Computes the dot product of this and an <paramref name="other"> vector
/// </summary>
/// <param name="other">The vector to compute a dot product with</param>
/// <returns>The dot product</returns>
And, if a method might throw an exception, this should be also indicated with the <exception> element, which uses the cref attribute to indicate the specific exception:
/// <summary>
/// Normalizes the vector
/// </summary>
/// <remarks>
/// This changes the length of the vector to one unit.  The direction remains unchanged
/// </remarks>
/// <exception cref="System.DivideByZeroException">
/// Thrown when the length of the vector is 0.
/// </exception>
Note too, the use of the <remarks> element in the above example to add supplemental information. The <example> element can also be used to provide examples of using the class, method, or other code construct. There are more elements available, like <see> and <seealso> that generate links to other documentation, <para>, and <list> which are used to format text, and so on.
Of especial interest are the <code> and <c> elements, which format code blocks and inline code, respectively.
See the official documentation for a complete list and discussion.
Thus, our completely documented class would be:
/// <summary>
/// A class representing a two-element vector composed of floats
/// </summary>
public class Vector2 {

    /// <summary>
    /// The x component of the vector
    /// </summary>
    public float X {get; set;}

    /// <summary>
    /// The y component of the vector
    /// </summary>
    public float Y {get; set;}

    /// <summary>
    /// Constructs a new two-element vector
    /// </summary>
    /// <param name="x">The X component of the new vector</param>
    /// <param name="y">The Y component of the new vector</param>
    public Vector2(float x, float y) {
        X = x;
        Y = y;
    }

    /// <summary>
    /// Scales the Vector2 by the provided <paramref name="scalar"/>
    /// </summary>
    /// <param name="scalar">The value to scale the vector by</param>
    public void Scale(float scalar) {
        X *= scalar;
        Y *= scalar;
    }

    /// <summary>
    /// Computes the dot product of this and an <paramref name="other"> vector
    /// </summary>
    /// <param name="other">The vector to compute a dot product with</param>
    /// <returns>The dot product</returns>
    public float DotProduct(Vector2 other) {
        return this.X * other.X + this.Y * other.Y;
    }

    /// <summary>
    /// Normalizes the vector
    /// </summary>
    /// <remarks>
    /// This changes the length of the vector to one unit.  The direction remains unchanged
    /// </remarks>
    /// <exception cref="System.DivideByZeroException">
    /// Thrown when the length of the vector is 0.
    /// </exception>
    public float Normalize() {
        float magnitude = Math.Sqrt(Math.Pow(this.X, 2), Math.Pow(this.Y, 2));
        if(magnitude == 0) throw new DivideByZeroException();
        X /= magnitude;
        Y /= magnitude;
    }
}
With the exception of the <remarks>, the XML documentation elements used in the above code should be considered the minimum for best practices. That is, every Class, Struct, and Enum should have a <summary>. Every property should have a <summary>. And every method should have a <summary>, a <param> for every parameter, a <returns> if it returns a value (this can be omitted for void) and an <exception> for every exception it might throw.
There are multiple autodoc programs that generate documentation from XML comments embedded in C# code, including open-source Sandcastle Help File Builder and the simple Docu, as well as multiple commercial products.
However, the perhaps more important consumer of XML comments is Visual Studio, which uses these comments to power its Intellisense features, displaying text from the comments as tooltips as you edit code. This intellisense data is automatically built into DLLs built from Visual Studio, making it available in projects that utilize compiled DLLs as well.
In this chapter, we examined the need for software documentation aimed at both end-users and developers (user documentation and developer documentation respectively). We also examined some formats this documentation can be presented in: HTML, Markdown, and XML. We also discussed autodocumentation tools, which generate developer documentation from specially-formatted comments in our code files.
We examined the C# approach to autodocumentation, using Microsoft’s XML code comments formatting strategy. We explored how this data is used by Visual Studio to power its Intellisense features, and provide useful information to programmers as they work with constructs like classes, properties, and methods. For this reason, as well as the ability to produce HTML-based documentation using an autodocumentation tool, it is best practice to use XML code comments in all your C# programs.
Is it Working Yet?
A critical part of the software development process is ensuring the software works! We mentioned earlier that it is possible to logically prove that software works by constructing a state transition table for the program, but once a program reaches a certain size this strategy becomes less feasible. Similarly, it is possible to model a program mathematically and construct a theorem that proves it will perform as intended. But in practice, most software is validated through some form of testing. This chapter will discuss the process of testing object-oriented systems.
Some key terms to learn in this chapter are:
The key skill to learn in this chapter is how to write C# unit test code using xUnit and the Visual Studio Test Explorer.
As you’ve developed programs, you’ve probably run them, supplied input, and observed if what happened was what you wanted. This process is known as informal testing. It’s informal, because you don’t have a set procedure you follow, i.e. what specific inputs to use, and what results to expect. Formal testing adds that structure. In a formal test, you would have a written procedure to follow, which specifies exactly what inputs to supply, and what results should be expected. This written procedure is known as a test plan.
Historically, the test plan was often developed at the same time as the design for the software (but before the actual programming). The programmers would then build the software to match the design, and the completed software and the test plan would be passed onto a testing team that would follow the step-by-step testing procedures laid out in the testing plan. When a test failed, they would make a detailed record of the failure, and the software would be sent back to the programmers to fix.
This model of software development has often been referred to as the ‘waterfall model’ as each task depends on the one before it:
Unfortunately, as this model is often implemented, the programmers responsible for writing the software are reassigned to other projects as the software moves into the testing phase. Rather than employ valuable programmers as testers, most companies will hire less expensive workers to carry out the testing. So either a skeleton crew of programmers is left to fix any errors that are found during the tests, or these are passed back to programmers already deeply involved in a new project.
The costs involved in fixing software errors also grow larger the longer the error exists in the software. The table below comes from a NASA report of software error costs throughout the project life cycle: 1

It is clear from the graph and the paper that the cost to fix a software error grows exponentially if the fix is delayed. You probably have instances in your own experience that also speak to this - have you ever had a bug in a program you didn’t realize was there until your project was nearly complete? How hard was it to fix, compared to an error you found and fixed right away?
It was realizations like these, along with growing computing power that led to the development of automated testing, which we’ll discuss next.
Jonette M. Stecklein, Jim Dabney, Brandon Dick, Bill Haskins, Randy Lovell, and Gregory Maroney. “Error Cost Escalation Through the Project Life Cycle”, NASA, June 19, 2014. ↩︎
Automated testing is the practice of using a program to test another program. Much as a compiler is a program that translates a program from a higher-order language into a lower-level form, a test program executes a test plan against the program being tested. And much like you must supply the program to be compiled, for automated testing you must supply the tests that need to be executed. In many ways the process of writing automated tests is like writing a manual test plan - you are writing instructions of what to try, and what the results should be. The difference is with a manual test plan, you are writing these instructions for a human. With an automated test plan, you are writing them for a program.
Automated tests are typically categorized as unit, integration, and system tests:
The complexity of writing tests scales with each of these categories. Emphasis is usually put on writing unit tests, especially as the classes they test are written. By testing these classes early, errors can be located and fixed quickly.
Writing tests is in many ways just as challenging and creative an endeavor as writing programs. Tests usually consist of invoking some portion of program code, and then using assertions to determine that the actual results match the expected results. The results of these assertions are typically reported on a per-test basis, which makes it easy to see where your program is not behaving as expected.
Consider a class that is a software control system for a kitchen stove. It might have properties for four burners, which correspond to what heat output they are currently set to. Let’s assume this is as an integer between 0 (off) and 5 (high). When we first construct this class, we’d probably expect them all to be off! A test to verify that expectation would be:
public class StoveTests {

    [Fact]
    public void BurnersShouldBeOffAtInitialization() {
        Stove stove = new Stove();
        Assert.Equal(0, stove.BurnerOne);
        Assert.Equal(0, stove.BurnerTwo);
        Assert.Equal(0, stove.BurnerThree);
        Assert.Equal(0, stove.BurnerFour);
    }
}
Here we’ve written the test using the C# xUnit test framework, which is being adopted by Microsoft as their preferred framework, replacing the nUnit test framework (there are many other C# test frameworks, but these two are the most used).
Notice that the test is simply a method, defined in a class. This is very common for test frameworks, which tend to be written using the same programming language the programs they test are written in (which makes it easier for one programmer to write both the code unit and the code to test it). Above the class appears an attribute - [Fact]. Attributes are a way of supplying metadata within C# code. This metadata can be used by the compiler and other programs to determine how it works with your code. In this case, it indicates to the xUnit test runner that this method is a test.
Inside the method, we create an instance of stove, and then use the Assert.Equal<T>(T expected, T actual) method to determine that the actual and expected values match. If they do, the assertion is marked as passing, and the test runner will display this pass. If it fails, the test runner will report the failure, along with details to help find and fix the problem (what value was expected, what it actually was, and which test contained the assertion).
The xUnit framework provides for two kinds of tests, Facts, which are written as functions that have no parameters, and Theories, which do have parameters. The values for these parameters are supplied with another attribute, typically [InlineData]. For example, we might test that when we set a burner to a setting within the valid 0-5 range, it is set to that value:
[Theory]
[InlineData(0)]
[InlineData(1)]
[InlineData(2)]
[InlineData(3)]
[InlineData(4)]
[InlineData(5)]
public void ShouldBeAbleToSetBurnerOneToValidRange(int setting) {
    Stove stove = new Stove();
    stove.BurnerOne = setting;
    Assert.Equal(setting, stove.BurnerOne);
}
The values in the parentheses of the InlineData are the values supplied to the parameter list of the theory method. Thus, this test is actually six tests; each test makes sure that one of the settings is working. We could have done all six as separate assignments and assertions within a single fact, but using a theory means that if only one of these settings doesn’t work, we will see that one test fail while the others pass. This level of specificity can be very helpful in finding errors.
So far our tests cover the expected behavior of our stove. But where tests really prove their worth is with the edge cases - those things we as programmers don’t anticipate. For example, what happens if we try setting our range to a setting above 5? Should it simply clamp at 5? Should it not change from its current setting? Or should it shut itself off entirely because its user is clearly a pyromaniac bent on burning down their house? If the specification for our program doesn’t say, it is up to us to decide. Let’s say we expect it to be clamped at 5:
[Theory]
[InlineData(6)]
[InlineData(18)]
[InlineData(1000000)]
public void BurnerOneShouldNotExceedASettingOfFive(int setting) {
    Stove stove = new Stove();
    stove.BurnerOne = setting;
    Assert.Equal(5, stove.BurnerOne);
}
Note that we don’t need to exhaustively test all numbers above 5 - it is sufficient to provide a representative sample, ideally the first value past 5 (6), and a few others. Also, now that we have defined our expected behavior, we should make sure the documentation of our BurnerOne property matches it:
/// <summary>
/// The setting of burner one
/// </summary>
/// <value>
/// An integer between 0 (off) and 5 (high)
/// </value>
/// <remarks>
/// If a value higher than 5 is attempted, the burner will be set to 5
/// </remarks>
public int BurnerOne {get; set;}
This way, other programmers (and ourselves, if we visit this code years later) will know what the expected behavior is. We’d also want to test the other edge cases: i.e. when the burner is set to a negative number.
Recognizing and testing for edge cases is a critical aspect of test writing. But it is also a difficult skill to develop, as we have a tendency to focus on expected values and expected use-cases for our software. But most serious errors occur when values outside these expectations are introduced. Also, remember special values, like double.PositiveInfinity, double.NegativeInfinity, and double.NaN.
Like most testing frameworks, the xUnit framework provides a host of specialized assertions.
For example, xUnit provides two boolean assertions:
Assert.True(bool actual), asserts that the value supplied to the actual parameter is true.Assert.False(bool actual), asserts that the value supplied to the actual parameter is false.While it may be tempting to use Assert.True() for all tests, i.e. Assert.True(stove.BurnerOne == 0), it is better practice to use the specialized assertion that best matches the situation, in this case Assert.Equal<T>(T expected, T actual) as a failing test will supply more details.
The Assert.Equal<T>(T expected, T actual) is the workhorse of the assertion library. Notice it is a template method, so it can be used with any type that is comparable (which is pretty much everything possible in C#). It also has an override, Assert.Equal<T>(T expected, T actual, int precision) which allows you to specify the precision for floating-point numbers. Remember that floating point error can cause two calculated values to be slightly different than one another; specifying a precision allows you to say just how close to the expected an actual value needs to be to be considered ’equal’ for the purposes of the test.
Like most assertions, it is paired with an opposite, Assert.NotEqual<T>(T expected, T actual), which also has an override for supplying precision.
With numeric values, it can be handy to determine if the value falls within a range:
Assert.InRange<T>(T actual, T low, T high) asserts actual falls between low and high (inclusive), andAssert.NotInRange<T>(T actual, T low, T high) asserts actual does not fall between low and high (inclusive)There are special assertions to deal with null references:
Assert.Null(object object) asserts the supplied object is null, andAssert.NotNull(object object) asserts the supplied object is not nullIn addition, two objects may be considered equal, but may or may not be the same object (i.e. not referencing the same memory). This can be asserted with:
Assert.Same(object expected, object actual) asserts the expected and actual object references are to the same object, whileAssert.NotSame(object expected, object actual) asserts the expected and actual object references are not the same objectAt times, you may want to assure it is possible to cast an object to a specific type. This can be done with:
Assert.IsAssignableFrom<T>(object obj)
Where T is the type to cast into.At other times, you may want to assert that the object is exactly the type you expect (.e. T is not an interface or base class of obj). That can be done with:
Assert.IsType<T>(object obj)There are a host of assertions for working with collections:
Assert.Empty(IEnumerable collection) asserts that the collection is empty, whileAssert.NotEmpty(IEnumerable collection) asserts that it is not emptyAssert.Contains<T>(T expected, IEnumerable<T> collection) asserts that the expected item is found in the collection, whileAssert.DoesNotContain<T>(T expected, IEnumerable<T> collection) asserts the expected item is not found in the collectionIn addition to the simple equality check form of Assert.Contains<T>() and Assert.DoesNotContain<T>(), there is a version that takes a filter expression (an expression that evaluates to true or false indicating that an item was found) written as a lambda expression. For example, to determine if a list of Fruit contains an Orange we could use:
List<Fruit> fruits = new List<Fruit>() {
    new Orange(),
    new Apple(),
    new Grape(),
    new Banana() {Overripe = true}
};
Assert.Contains(fruits, item => item is Orange);
The expression item is Orange is run on each item in fruits until it evaluates to true or we run out of fruit to check. We can also supply curly braces with a return statement if we need to perform more complex logic:
Assert.Contains(fruits, item => {
    if(item is Banana banana) {
        if(banana.Overripe) return true;
    }
    return false;
});
Here we only return true for overripe bananas. Using Assert.Contains() with a filter expression can be useful for checking that expected items are in a collection. To check that the collection also does not contain unexpected items, we can test the length of the collection against the expected number of values, i.e.:
Assert.True(fruits.Count == 4, $"Expected 4 items but found {fruits.Count}");Here we use the Assert.True() overload that allows a custom message when the test fails.
Finally, Assert.Collection<T>(IEnumerable<T> collection, Action<T>[] inspectors) can apply specific inspectors against each item in a collection. Using the same fruits list as above:
Assert.Collection(fruits,
    item => Assert.IsType<Orange>(item),
    item => Assert.IsType<Apple>(item),
    item => Assert.IsType<Grape>(item),
    item => {
        Assert.IsType<Banana>(item);
        Assert.True(((Banana)item).Overripe);
    }
);
Here we use an Action
The number of actions should correspond to the expected size of the collection, and the items supplied to the actions must be in the same order as they appear in the collection. Thus, the Assert.Collection() is a good choice when the collection is expected to always be in the same order, while the Assert.Contains() approach allows for variation in the ordering.
Error assertions also use ActionSystem.DivideByZeroException with:
[Fact]
public void DivisionByZeroShouldThrowException() {
    Assert.Throws(System.DivideByZeroException, () => {
        var tmp = 10.0/0.0;
    });
}
Note how we place the code that is expected to throw the exception inside the body of the Action? This allows the assertion to wrap it in a try/catch internally. The exception-related assertions are:
Assert.Throws(System.Exception expectedException, Action testCode) asserts the supplied expectedException is thrown when testCode is executedAssert.Throws<T>(Action testCode) where T : System.Exception the templated version of the aboveAssert.ThrowsAny<T>(Action testCode) where T: System.Exception asserts that any exception will be thrown by the testCode when executedThere are also similar assertions for exceptions being thrown in asynchronous code. These operate nearly identically, except instead of supplying an Action, we supply a Task:
Assert.ThrowsAsync<T>(Task testCode) where T : System.Exception asserts the supplied exception type T is thrown when testCode is executedAssert.ThrowsAnyAsync<T>(Task testCode) where T: System.Exception is the asynchronous version of the previous assertion, asserts the supplied exception type T will be thrown some point after testCode is executed.Asserting that events will be thrown also involves Action
For example, assume we have a class, Emailer, with a method SendEmail(string address, string body) that should have an event handler EmailSent whose event args are EmailSentEventArgs. We could test that this class was actually raising this event with:
[Fact]
public void EmailerShouldRaiseEmailSentWhenSendingEmails()
{
    string address = "test@test.com";
    string body = "this is a test";
    Emailer emailer = new Emailer();
    Assert.Raises<EmailSentEventArgs>(
        listener => emailer += listener, // This action attaches the listener
        listener => emailer -= listener, // This action detaches the listener
        () => {
            emailer.SendEmail(address, body);
        }
    )
}
The various event assertions are:
Assert.Raises<T>(Action attach, Action detach, Action testCode)Assert.RaisesAny<T>(Action attach, Action detach, Action testCode)There are also similar assertions for events being raised by asynchronous code. These operate nearly identically, except instead of supplying an Action, we supply a Task:
Assert.RaisesAsync<T>(Action attach, Action detach, Task testCode)Assert.RaisesAnyAsync<T>(Action attach, Action detach, Task testCode)For examples of these assertions, see section 2.3.10
XUnit does not directly support old-style events - those with a named event handler like CollectionChangedEventHandler, only those that use the templated form: EventHandler<CustomEventArgs> (with the exception of the PropertyChanged event, discussed below). For strategies to handle the older-style events, see section 2.3.11
Because C# has deeply integrated the idea of ‘Property Change’ notifications as part of its GUI frameworks (which we’ll cover in a later chapter), it makes sense to have a special assertion to deal with this notification. Hence, the Assert.PropertyChanged(INotifyPropertyChanged @object, string propertyName, Action testCode). Using it is simple - supply the object that implements the INotifyPropertyChanged interface as the first argument, the name of the property that will be changing as the second, and the Action delegate that will trigger the change as the third.
For example, if we had a Profile object with a StatusMessage property that we knew should trigger a notification when it changes, we could write our test as:
[Fact]
public void ProfileShouldNotifyOfStatusMessageChanges() {
    Profile testProfile = new Profile();
    Assert.PropertyChanged(testProfile, "StatusMessage", () => testProfile.StatusMessage = "Hard at work");
}
There is also a similar assertion for testing if a property is changed in asynchronous code. This operates nearly identically, except instead of supplying an Action, we supply a Task:
Assert.PropertyChangedAsync(INotifyPropertyChanged @object, string propertyName, Task testCode)One of the most important ideas behind unit testing is the idea that you are testing an object in isolation from other objects (This is in direct contrast to integration testing, where you are interested in how objects are working together).
But how do we test a class that has a strong dependency on another class? Let’s consider the case of an Automated Teller Machine (ATM). If we designed its control system using an object-oriented language, one natural architecture would be to have classes representing the cash dispenser, card reader, keyboard, display, and user’s bank accounts. Then we might coordinate each of these into a central object, representing the entire ATM.
Unit testing most of these classes would be straightforward, but how do we unit test the ATM class? It would have dependencies on each of the other classes. If we used normal instances of those, we’d have no idea if the test was failing due to the ATM class or its dependency. This is where mock objects come into play.
We start by replacing each of the dependencies with an interface using the same method signatures, and we pass the dependencies through the ATM constructor. We make sure our existing classes implement the interface, and pass them into the ATM when we create it. Thus, this step doesn’t change much about how our program operates - we’re still using the same classes to do the same things.
But in our unit tests for the ATM class, we can create new classes that implement the interfaces and pass them into the ATM instance we are testing. These are our mock classes, because they “fill in” for the real classes. Typically, a mock class is much simpler than a real class, and exposes information we might need in our test. For example, our Display class might include a DisplayText method, so have it implement an IDisplay interface that lists DisplayText. Then our MockDisplay class might look like:
internal class MockDisplay :IDisplay
{
  public string LastTextDisplayed {get; set;}

  public void DisplayText(string text)
  {
    LastTextDisplayed = text;
  }
}
Note that our mock class implements the required method, DisplayText, but in a very different way than a real display would - it just holds onto the string and makes it accessible with a public property. That way, we could check its value in a test:
[fact]
public void ShouldDisplayGreetingOnStartup()
{
  MockDisplay md = new MockDisplay();
  MockKeyboard mk = new MockKeyboard();
  MockCardReader mcr= new MockCardReader();
  MockCashDispenser mcd = new MockCashDispenser();
  Atm atm = new Atm(md, mk, mcr, mcd);
  Assert.Equal("Hello ATM!", md.LastTextDisplayed);
}
Given our knowledge of C#, the only way md.LastTextDisplayed would be the string specified was if the ATM class asked it to display the message when it was constructed. Thus, we know it will do the same with the real DisplayScreen class. And if we have also thoroughly unit tested the DisplayScreen class, then we have a strong basis for believing our system is built correctly.
This approach also allows us to test things that would normally be very difficult to do - for example, we can write a method to have a MockCardReader trigger a CardInserted event:
internal class MockCardReader : ICardReader
{
  public event EventHandler<CardInsertedEventArgs> CardInserted;

  public void TriggerCardInserted()
  {
    CardInserted.Invoke(this, new CardInsertedEventArgs());
  }
}
Which allows us to check that the ATM prompts a user for a PIN once a card is inserted:
[Fact]
public void ShouldPromptForPinOnCardInsert()
{
  MockDisplay md = new MockDisplay();
  MockKeyboard mk = new MockKeyboard();
  MockCardReader mcr= new MockCardReader();
  MockCashDispenser mcd = new MockCashDispenser();
  Atm atm = new Atm(md, mk, mcr, mcd);
  mcr.TriggerCardInserted();
  Assert.Equal("Please enter your PIN:", md.LastTextDisplayed);
}
Using mock objects like this can greatly simplify the test-writing process, and improve the quality and robustness of your unit tests.
Tests are usually run with a test runner, a program that will execute the test code against the code to be tested. The exact mechanism involved depends on the testing framework.
The xUnit framework is offered as a set of Nuget packages:
xunit package contains the library code defining the Assertion class as well as the [Fact] and [Test] attributes.xunit.runner.visualstudio package contains the actual test runnerAs with other aspects of the .NET framework, the tools can be used at either the command line, or through Visual Studio integrations. The xunit documentation describes the command line approach thoroughly, so we won’t belabor it here. But be aware, if you want to do development in a Linux or Unix environment, you must use the command line, as there is no version of Visual Studio available for those platforms (there is however, a version available for the Mac OS).
When building tests with Visual Studio, you will typically begin by adding an xUnit Test Project to your existing solution. Using the wizard will automatically incorporate the necessary Nuget packages into the project. However, you will need to add the project to be tested to the Dependencies list of the test project to give it access to the assembly to be tested. You do this by right-clicking the ‘Dependencies’ entry under the Test Project in Visual Studio, choosing “Add Project Reference”, and in the dialog that pops up, checking the checkbox next to the name of the project you are testing:
To explore and run your tests, you can open the Test Explorer from the “Test” menu. If no tests appear, you may need to build the test project. This can be done by right-clicking the test project in the Solution Explorer and selecting “Build”, or by clicking the “Run All” button in the Test Explorer. The “Run All” button will run every test in the suite. Alternatively, you can run individual tests by clicking on them, and clicking the “Run” button.
As tests complete, they will report their status - pass or fail - indicated by a green checkmark or red x next to the test name, as well as the time it took to run the test. There will also be a summary available with details about any failures that can be accessed by clicking the test name.
Occasionally, your tests may not seem to finish, but get stuck running. If this happens, check the output panel, switching it from “build” to “tests”. Most likely your test process crashed because of an error in your test code, and the output reporting that error will be reported there.
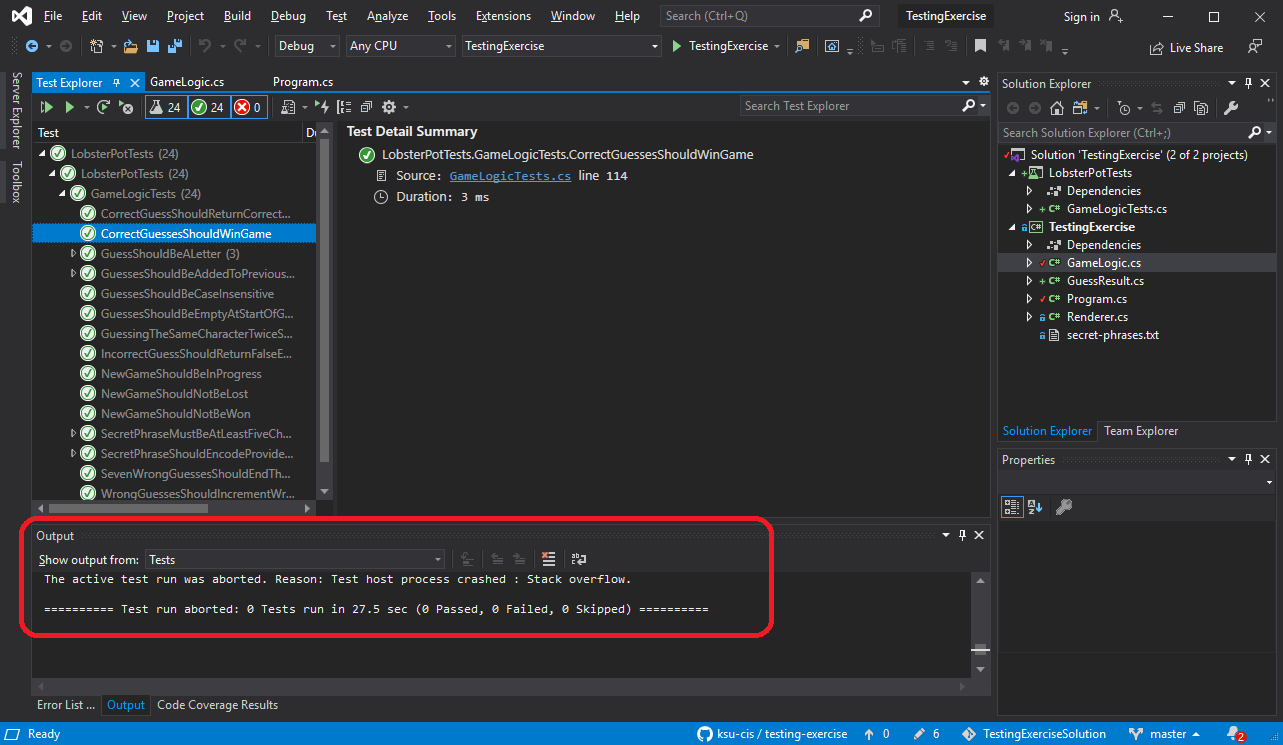
It is a good idea to run tests you’ve written previously as you add to or refactor your code. This practice is known as regression testing, and can help you identify errors your changes introduce that break what had previously been working code. This is also one of the strongest arguments for writing test code rather than performing ad-hoc testing; automated tests are easy to repeat.
In this chapter we learned about testing, both manually using test plans and automatically using a testing framework. We saw how the cost of fixing errors rises exponentially with how long they go undiscovered. We discussed how writing automated tests during the programming phase can help uncover these errors earlier, and how regression testing can help us find new errors introduced while adding to our programs.
We learned how to use xUnit and Visual Studio’s Test Explorer to write and run tests on .NET programs. We explored a good chunk of xUnit’s assertion library. We saw how to get Visual Studio to analyze our tests for code coverage, discussed this metric’s value to evaluate our tests. We also explored mutation testing, and saw how it can help improve our tests.
As you move forward as a software developer, you’ll want to incorporate testing into your code-writing efforts.
The term test code coverage refers to how much of your program’s code is executed as your tests run. It is a useful metric for evaluating the depth of your test, if not necessarily the quality. Basically, if your code is not executed in the test framework, it is not tested in any way. If it is executed, then at least some tests are looking at it. So aiming for a high code coverage is a good starting point for writing tests.
Much like Visual Studio provides a Test Explorer for running tests, it provides support for analyzing test coverage. We can access this from the “Test” menu, where we select the “Analyze Code Coverage for All Tests”.
This will build and run all our tests, and as they run it will collect data about how many blocks of code are or are not executed. The results appear in the Code Coverage Results panel:
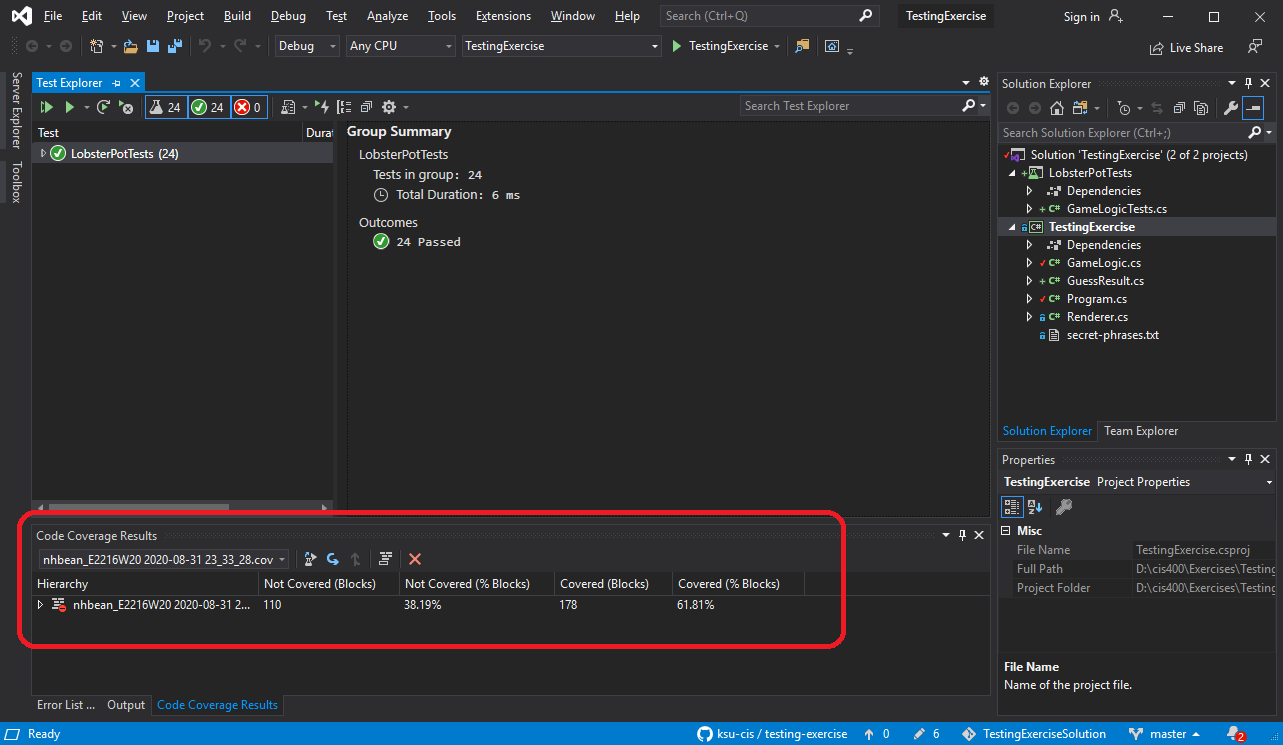
Be aware that there will always be some blocks that are not picked up in this analysis, so it is typical to shoot for a high percentage.
While test code coverage is a good starting point for evaluating your tests, it is simply a measure of quantity, not quality. It is easily possible for you to have all of your code covered by tests, but still miss errors. You need to carefully consider the edge cases - those unexpected and unanticipated ways your code might end up being used.
At this point you may be asking how to determine if your tests are good. Mutation testing is one way of evaluating the quality of your tests. Effectively, mutation testing is a strategy that mutates your program, and then runs your tests. If the test fails against the mutated code, this suggests your test is good.
As a simplistic example, take this extremely simple class:
public void Doll
{
  public string Name {get;} = "Molly";
}
A mutation might change it to:
public void Doll
{
  public string Name {get;} = "Mollycoddle";
}
We would expect that the test TheDollsNameIsAlwaysMolly would fail due to this mutation. If it doesn’t, we probably need to revisit our test. Here is an example of a test that would both normally pass, and pass with this mutation. See if you can spot the problem:
[Fact]
public void TheDollsNameIsAlwaysMolly()
{
  Doll doll = new Doll();
  Assert.Contains(doll.Name, "Molly");
}
Mutation testing is done by a special testing tool that uses reflection to understand and alter the classes being tested in your unit tests. In C#, we use Stryker.NET.
As with code coverage, mutation testing can’t provide all the answers. But it does help ensure that our programs and the tests we write of them are more robust.
The Standard Model of Object-Orientation
As software systems became more complex, it became harder to talk and reason about them. Unified Modeling Language (UML) attempted to correct for this by providing a visual, diagrammatic approach to communicate the structure and function of a program. If a picture is worth a thousand words, a UML diagram might be worth a thousand lines of code…
Some key terms to learn in this chapter are:
The key skill to learn in this chapter is how to draw UML class diagrams.
Unified Modeling Language (UML) was introduced to create a standardized way of visualizing a software system design. It was developed by Grady Booch, Ivar Jacobson, and James Rumbah at Rational Software in the mid-nineties. It was adopted as a standard by the Object Management Group in 1997, and also by the International Organization for Standardization (ISO) as an approved ISO standard in 2005.
The UML standard actually provides many different kinds of diagrams for describing a software system - both structure and behavior:
The full UML specification is 754 pages long, so there is a lot of information packed into it. For the purposes of this class, we’re focusing on a single kind of diagram - the class diagram.
UML class diagrams are largely composed of boxes - basically a rectangular border containing text. UML class diagrams use boxes to represent units of code - i.e. classes, structs, and enumerations. These boxes are broken into compartments. For example, an Enum is broken into two compartments:
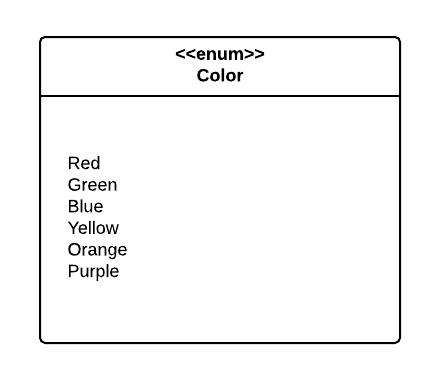
UML is intended to be language-agnostic. But we often find ourselves in situations where we want to convey language-specific ideas, and the UML specification leaves room for this with stereotypes. Stereotypes consist of text enclosed in double less than and greater than symbols. In the example above, we indicate the box represents an enumeration with the $ \texttt{<<enum>>}$ stereotype.
A second basic building block for UML diagrams is a typed element. Typed elements (as you might expect from the name) have a type. Fields and parameters are typed elements, as are method parameters and return values.
The pattern for defining a typed element is:
$$ \texttt{[visibility] element : type [constraint]} $$The optional $\texttt{[visibility]}$ indicates the visibility of the element, the $\texttt{element}$ is the name of the typed element, and the $\texttt{type}$ is its type, and the $\texttt{[constraint]}$ is an optional constraint.
In UML visibility (what we would call access level in C#) is indicated with symbols, i.e.:
publicprivateprotectedI.e. the field:
protected int Size;Would be expressed:
$$ \texttt{# Size : int} $$A typed element can include a constraint indicating some restriction for the element. The constraints are contained in a pair of curly braces after the typed element, and follow the pattern:
$$ \texttt{ {element: boolean expression} } $$For example:
$$ \texttt{- age: int {age: >= 0}} $$Indicates the private variable age must be greater than or equal to 0.
In a UML class diagram, individual classes are represented with a box divided into three compartments, each of which is for displaying specific information:
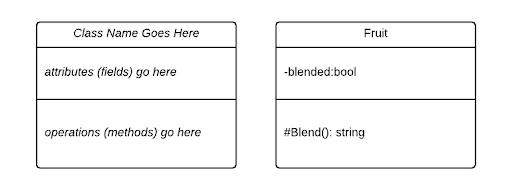
The first compartment identifies the class - it contains the name of the class. The second compartment holds the attributes of the class (in C#, these are the fields and properties). And the third compartment holds the operations of the class (in C#, these are the methods).
In the diagram above, we can see the Fruit class modeled on the right side.
The attributes in UML represent the state of an object. For C#, this would correspond to the fields and properties of the class.
We indicate fields with a typed element, i.e. in the example above, the blended field is represented with:
Indicating it should be declared private with the type bool.
For properties, we add a stereotype containing either get, set, or both. I.e. if we were to expose the private field bool with a public accessor, we would add a line to our class diagram with:
In C#, properties are technically methods. But we use the same syntax to utilize them as we do fields, and they serve the same role - to expose aspects of the class state. So for the purposes of this class we’ll classify them as attributes.
The operators in UML represent the behavior of the object, i.e. the methods we can invoke upon it. These are declared using the pattern:
$$ \texttt{visibility name([parameter list])[:return type]} $$The $\texttt{[visibility]}$ uses the same symbols as typed elements, with the same correspondences. The $\texttt{name}$ is the name of the method, and the $\texttt{[parameter list]}$ is a comma-separated list of typed elements, corresponding to the parameters. The $\texttt{[:return type]}$ indicates the return type for the method (it can be omitted for void).
Thus, in the example above, the protected method Blend has no parameters and returns a string. Similarly, the method:
public int Add(int a, int b)
{
    return a + b;
}
Would be expressed:
$$ \texttt{+Add(a:int, b:int):int} $$In UML, we indicate a class is static by underlining its name in the first compartment of the class diagram. We can similarly indicate static operators and methods by underlining the entire line referring to them.
To indicate a class is abstract, we italicize its name. Abstract methods are also indicated by italicizing the entire line referring to them.
Class diagrams also express the associations between classes by drawing lines between the boxes representing them.

There are two basic types of associations we model with UML: has-a and is-a associations. We break these into two further categories, based on the strength of the association, which is either strong or weak. These associations are:
| Association Name | Association Type |
|---|---|
| Realization | weak is-a |
| Generalization | strong is-a |
| Aggregation | weak has-a |
| Composition | strong has-a |
Is-a associations indicate a relationship where one class is a instance of another class. Thus, these associations represent polymorphism, where a class can be treated as another class, i.e. it has both its own, and the associated classes’ types.
Realization refers to making an interface “real” by implementing the methods it defines. For C#, this corresponds to a class that is implementing an Interface. We call this a is-a relationship, because the class is treated as being the type of the Interface. It is also a weak relationship as the same interface can be implemented by otherwise unrelated classes. In UML, realization is indicated by a dashed arrow in the direction of implementation:

Generalization refers to extracting the shared parts from different classes to make a general base class of what they have in common. For C# this corresponds to inheritance. We call this a strong is-a relationship, because the class has all the same state and behavior as the base class. In UML, generalization is indicated by a solid arrow in the direction of inheritance:

Also notice that we show that Fruit and its Blend() method are abstract by italicizing them.
Has-a associations indicates that a class holds one or more references to instances of another class. In C#, this corresponds to having a variable or collection with the type of the associated class. This is true for both kinds of has-a associations. The difference between the two is how strong the association is.
Aggregation refers to collecting references to other classes. As the aggregating class has references to the other classes, we call this a has-a relationship. It is considered weak because the aggregated classes are only collected by the aggregating class, and can exist on their own. It is indicated in UML by a solid line from the aggregating class to the one it aggregates, with an open diamond “fletching” on the opposite side of the arrow (the arrowhead is optional).

Composition refers to assembling a class from other classes, “composing” it. As the composed class has references to the other classes, we call this a has-a relationship. However, the composing class typically creates the instances of the classes composing it, and they are likewise destroyed when the composing class is destroyed. For this reason, we call it a strong relationship. It is indicated in UML by a solid line from the composing class to those it is composed of, with a solid diamond “fletching” on the opposite side of the arrow (the arrowhead is optional).
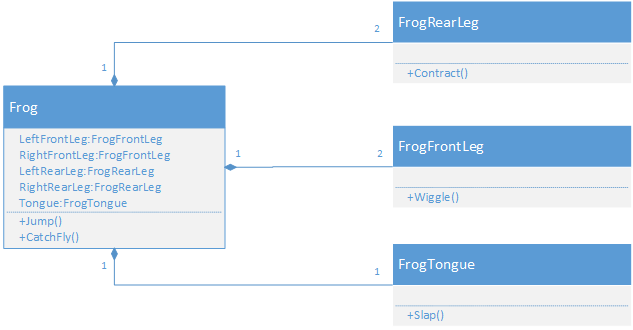
Aggregation and composition are commonly confused, especially given they both are defined by holding a variable or collection of another class type. An analogy I like to use to help students reason about the difference is this:
Aggregation is like a shopping cart. When you go shopping, you place groceries into the shopping cart, and it holds them as you push it around the store. Thus, a ShoppingCart class might have a List<Grocery> named Contents, and you would add the items to it. When you reach the checkout, you would then take the items back out. The individual Grocery objects existed before they were aggregated by the ShoppingCart, and also after they were removed from it.
In contrast, Composition is like an organism. Say we create a class representing a Dog. It might be composed of classes like Tongue, Ear, Leg, and Tail. We would probably construct these in the Dog class’s constructor, and when we dispose of the Dog object, we wouldn’t expect these component classes to stick around.
With aggregation and composition, we may also place numbers on either end of the association, indicating the number of objects involved. We call these numbers the multiplicity of the association.
For example, the Frog class in the composition example has two instances of front and rear legs, so we indicate that each Frog instance (by a 1 on the Frog side of the association) has exactly two (by the 2 on the leg side of the association) legs. The tongue has a 1 to 1 multiplicity as each frog has one tongue.
Multiplicities can also be represented as a range (indicated by the start and end of the range separated by ..). We see this in the ShoppingCart example above, where the count of GroceryItems in the cart ranges from 0 to infinity (infinity is indicated by an asterisk *).
Generalization and realization are always one-to-one multiplicities, so multiplicities are typically omitted for these associations.
One of the many tools we can use to create UML diagrams is Microsoft Visio. For Kansas State University Computer Science students, this can be downloaded through your Azure Student Portal.
Visio is a vector graphics editor for creating flowcharts and diagrams. it comes preloaded with a UML class diagram template, which can be selected when creating a new file:
Class diagrams are built by dragging shapes from the shape toolbox onto the drawing surface. Notice that the shapes include classes, interfaces, enumerations, and all the associations we have discussed. Once in the drawing surface, these can be resized and edited.
Right-clicking on an association will open a context menu, allowing you to turn on multiplicities. These can be edited by double-clicking on them. Unneeded multiplicities can be deleted.
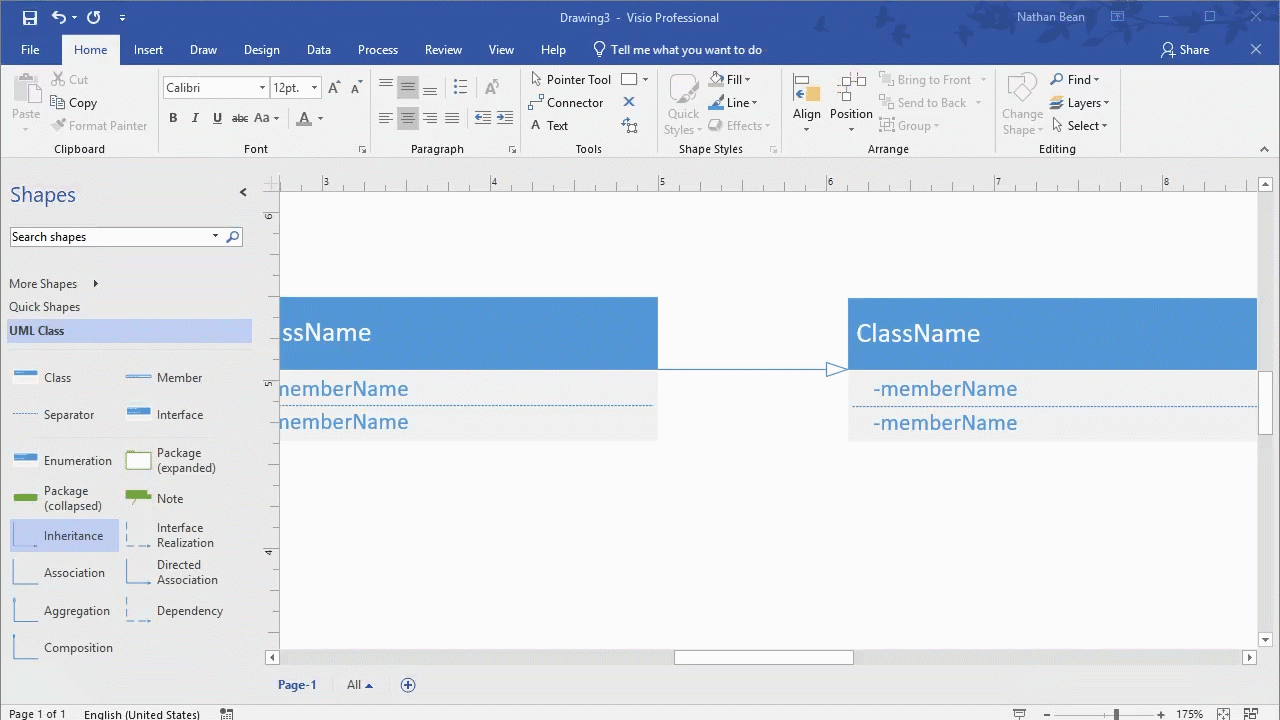
To export a Visio project in PDF or other form, choose the “Export” option from the file menu.
In this section, we learned about UML class diagrams, a language-agnostic approach to visualizing the structure of an object-oriented software system. We saw how individual classes are represented by boxes divided into three compartments; the first for the identity of the class, the second for its attributes, and the third for its operators. We learned that italics are used to indicate abstract classes and operators, and underlining static classes, attributes, and operators.
We also saw how associations between classes can be represented by arrows with specific characteristics, and examined four of these in detail: aggregation, composition, generalization, and realization. We also learned how multiplicities can show the number of instances involved in these associations.
Finally, we saw how C# classes, interfaces, and enumerations are modeled using UML. We saw how the stereotype can be used to indicate language-specific features like C# properties. We also looked at creating UML Class diagrams using Microsoft Visio.
For a Sharper Language
Throughout the earlier chapters, we’ve focused on the theoretical aspects of Object-Orientation, and discussed how those are embodied in the C# language. Before we close this section though, it would be a good idea to recognize that C# is not just an object-oriented language, but actually draws upon many ideas and syntax approaches that are not very object-oriented at all!
In this chapter, we’ll examine many aspects of C# that fall outside of the object-oriented mold. Understanding how and why these constructs have entered C# will help make you a better .NET programmer, and hopefully alleviate any confusion you might have.
Some key terms to learn in this chapter are:
static keywordIt is important to understand that C# is a production language - i.e. one intended to be used to create real-world software. To support this goal, the developers of the C# language have made many efforts to make C# code easier to write, read, and reason about. Each new version of C# has added additional syntax and features to make the language more powerful and easier to use. In some cases, these are entirely new things the language couldn’t do previously, and in others they are syntactic sugar - a kind of abbreviation of an existing syntax. Consider the following if statement:
if(someTestFlag)
{
    DoThing();
}
else
{
    DoOtherThing();
}
As the branches only execute a single expression each, this can be abbreviated as:
if(someTestFlag) DoThing();
else DoOtherThing();
Similarly, Visual Studio has evolved side-by-side with the language. For example, you have probably come to like Intellisense - Visual Studio’s ability to offer descriptions of classes and methods as you type them, as well as code completion, where it offers to complete the statement you have been typing with a likely target. As we mentioned in our section on learning programming, these powerful features can be great for a professional, but can interfere with a novice programmer’s learning.
Let’s take a look at some of the features of C# that we haven’t examined in detail yet.
To start, let’s revisit one more keyword that causes a lot of confusion for new programmers, static. We mentioned it briefly when talking about encapsulation and modules, and said we could mimic a module in C# with a static class. We offered this example:
/// <summary>
/// A library of vector math functions
/// </summary>
public static class VectorMath
{

    /// <summary>
    /// Computes the dot product of two vectors
    /// </summary>
    public static double DotProduct(Vector3 a, Vector3 b) {
        return a.x * b.x + a.y * b.y + a.z * b.z;
    }

    /// <summary>
    /// Computes the magnitude of a vector
    /// </summary>
    public static double Magnitude(Vector3 a) {
        return Math.Sqrt(Math.Pow(a.x, 2) + Math.Pow(a.y, 2) + Math.Pow(a.z, 2));
    }

}
You’ve probably worked with the C# Math class before, which is declared the same way - as a static class containing static methods. For example, to compute 8 cubed, you might have used:
Math.Pow(8, 3);Notice how we didn’t construct an object from the Math class? In C# we cannot construct static classes - they simply exist as a container for static fields and methods. If you’re thinking that doesn’t sound very object-oriented, you’re absolutely right. The static keyword allows for some very non-object-oriented behavior more in line with imperative languages like C. Bringing the idea of static classes into C# let programmers with an imperative background use similar techniques to what they were used to, which is why static classes have been a part of C# from the beginning.
You can also create static methods within a non-static class. For example, we could refactor our Vector3 class to add a static DotProduct() within it:
public struct Vector3 {
    public double X {get; set;}
    public double Y {get; set;}
    public double Z {get; set;}

    /// <summary>
    /// Creates a new Vector3 object
    /// </summary>
    public Vector3(double x, double y, double z) {
        this.X = x;
        this.Y = y;
        this.Z = z;
    }

    /// <summary>
    /// Computes the dot product of this vector and another one
    /// </summary>
    /// <param name="other">The other vector</param>
    public double DotProduct(Vector3 other) {
        return this.X * other.X + this.Y * other.Y + this.Z * other.Z;
    }

    /// <summary>
    /// Computes the dot product of two vectors
    /// </summary>
    /// <param name="a">The first vector<param>
    /// <param name="b">The second vector</param>
    public static DotProduct(Vector3 a, Vector3 b)
    {
        return a.DotProduct(b);
    }
}
This method would be invoked like any other static method, i.e.:
Vector3 a = new Vector3(1,3,4);
Vector3 b = new Vector3(4,3,1);
Vector3.DotProduct(a, b);
You can see we’re doing the same thing as the instance method DotProduct(Vector3 other), but in a library-like way.
We can also declare fields as static, which has a meaning slightly different than static methods. Specifically, the field is shared amongst all instances of the class. Consider the following class:
public class Tribble
{
    private static int count = 1;

    public Tribble()
    {
        count *= 2;
    }

    public int TotalTribbles
    {
        get
        {
            return count;
        }
    }
}
If we create a single Tribble, and then ask how many total Tribbles there are:
var t = new Tribble();
t.TotalTribbles; // expect this to be 2
We would expect the value to be 2, as count was initialized to 1 and then multiplied by 2 in the Tribble constructor. But if we construct two Tribbles:
var t = new Tribble();
var u = new Tribble();
t.TotalTribbles; // will be 4
u.TotalTribbles; // will be 4
This is because all instances of Tribble share the count field. So it is initialized to 1, multiplied by 2 when tribble a was constructed, and multiplied by 2 again when tribble b was constructed. Hence $1 * 2 * 2 = 4$. Every additional Tribble we construct will double the total population (which is the trouble with Tribbles).
Which brings us to a point of confusion for most students, why call this static? After all, doesn’t the word static indicate unchanging?
The answer lies in how memory is allocated in a program. Sometimes we know in advance how much memory we need to hold a variable, i.e. a double in C# requires 64 bits of memory. We call these types value types in C#, as the value is stored directly in memory where our variable is allocated. Other types, i.e. a List<T>, we may not know exactly how much memory will be required. We call these reference types. Instead of the variable holding a binary value, it holds a binary address to another location in memory where the list data is stored (hence, it is a reference).
When your program runs, it gets assigned a big chunk of memory from the operating system. Your program is loaded into the first part of this memory, and the remaining memory is used to hold variable values as the program runs. If you imagine that memory as a long shelf, we put the program instructions and any literal values to the far left of this shelf. Then, as the program runs and we need to create space for variables, we either put them on the left side or right side of the remaining shelf space. Value types, which we know will only exist for the duration of their scope (i.e. the method they are defined in) go to the left, and once we’ve ended that scope we remove them. Similarly, the references we create (holding the address of memory of reference types) go on the left. The data of the reference types however, go on the right, because we don’t know when we’ll be done with them.
We call the kind of memory allocation that happens on the left static, as we know it should exist as long as the variable is in scope. Hence, the static keyword. In lower-level languages like C, we have to manually allocate space for our reference types (hence, not static). C# is a memory managed language in that we don’t need to manually allocate and deallocate space for reference types, but we do allocate space every time we use the new keyword, and the garbage collector frees any space it decides we’re done with (because we no longer have references pointing at it). So pointers do exist in C#, they are just “under the hood”.
By the way, the left side of the shelf we call the Stack, and the right the Heap. This is the source of the name for a Stack Overflow Exception - it means your program used up all the available space in the Stack, but still needs more. This is why it typically happens with infinite loops or recursion - they keep allocating variables on the stack until they run out of space.
Memory allocation and pointers is covered in detail in CIS 308 - C Language Lab, and you’ll learn more about how programs run and the heap and stack in CIS 450 - Computer Architecture and Operations.
C# allows you to override most of the language’s operators to provide class-specific functionality. The user-defined casts we discussed earlier are one example of this.
Perhaps the most obvious of these are the arithmetic operators, i.e. +, -, \, *. Consider our Vector3 class we defined earlier. If we wanted to overload the + operator to allow for vector addition, we could add it to the class definition:
/// <summary>
/// A class representing a 3-element vector
/// </summary>
public class Vector3
{
    /// <summary>The x-coordinate</summary>
    public double X { get; set;}

    /// <summary>The y-coordinate</summary>
    public double Y { get; set;}

    /// <summary>The z-coordinate</summary>
    public double Z { get; set;}

    /// <summary>
    /// Constructs a new vector
    /// </summary>
    public Vector3(double x, double y, double z)
    {
        X = x;
        Y = y;
        Z = z;
    }

    /// Adds two vectors using vector addition
    public static Vector3 operator +(Vector3 v1, Vector3 v2)
    {
        return new Vector3(v1.X + v2.X, v1.Y + v2.Y, v1.Z + v2.Z);
    }
}
Note that we have to make the method static, and include the operator keyword, along with the symbol of the operation. This vector addition we are performing here is also a binary operation (meaning it takes two parameters). We can also define unary operations, like negation:
/// Negates a vector
public static Vector3 operator -(Vector3 v)
{
    return new Vector3(-v.X, -v.Y, -v.Z);
}
The full list of overloadable operators is found in the C# documentation
Generics expand the type system of C# by allowing classes and structs to be defined with a generic type parameter, which will be instantiated when it is used in code. This avoids the necessity of writing similar specialized classes that each work with a different data type. You’ve used examples of this extensively in your CIS 300 - Data Structures course.
For example, the generic List<T> can be used to create a list of any type. If we want a list of integers, we declare it using List<int>, and if we want a list of booleans we declare it using List<bool>. Both use the same generic list class.
You can declare your own generics as well. Say you need a binary tree, but want to be able to support different types. We can declare a generic BinaryTreeNode<T> class:
/// <summary>
/// A class representing a node in a binary tree
/// <summary>
/// <typeparam name="T">The type to hold in the tree</typeparam>
public class BinaryTreeNode<T>
{
    /// <summary>
    /// The value held in this node of the tree
    /// </summary>
    public T Value { get; set; }

    /// <summary>
    /// The left branch of this node
    /// </summary>
    public BinaryTreeNode<T> Left { get; set; }

    /// <summary>
    /// The right branch of this node
    /// </summary>
    public BinaryTreeNode<T> Right { get; set; }
}
Note the use of <typeparam> in the XML comments. You should always document your generic type parameters when using them.
Returning to the distinction between value and reference types, a value type stores its value directly in the variable, while a reference type stores an address to another location in memory that has been allocated to hold the value. This is why reference types can be null - this indicates they aren’t pointing at anything. In contrast, value types cannot be null - they always contain a value. However, there are times it would be convenient to have a value type be allowed to be null.
For these circumstances, we can use the Nullablenull. It does this by wrapping the value in a simple structure that stores the value in its Value property, and also has a boolean property for HasValue. More importantly, it supports explicit casting into the template type, so we can still use it in expressions, i.e.:
Nullable<int> a = 5;
int b = 6;
int c = (int)a + b;
// This evaluates to 11.
However, if the value is null, we’ll get an InvalidOperationException with the message “Nullable object must have a value”.
There is also syntactic sugar for declaring nullable types. We can follow the type with a question mark (?), i.e.:
int? a = 5;Which works the same as Nullable<int> a = 5;, but is less typing.
Another new addition to C# is anonymous types. These are read-only objects whose type is created by the compiler rather than being defined in code. They are created using syntax very similar to object initializer syntax.
For example, the line:
var name = new { First="Jack", Last="Sprat" };Creates an anonymous object with properties First and Last and assigns it to the variable name. Note we have to use var, because the object does not have a defined type. Anonymous types are primarily used with LINQ, which we’ll cover in the future.
The next topic we’ll cover is lambda syntax. You may remember from CIS 115 the Turing Machine, which was Alan Turing’s theoretical computer he used to prove a lot of theoretical computer science ideas. Another mathematician of the day, Alan Church, created his own equivalent of the Turing machine expressed as a formal logic system, Lambda calculus. Broadly speaking, the two approaches do the same thing, but are expressed very differently - the Turing machine is an (imaginary) hardware-based system, while Lambda Calculus is a formal symbolic system grounded in mathematical logic. Computer scientists develop familiarity with both conceptions, and some of the most important work in our field is the result of putting them together.
But they do represent two different perspectives, which influenced different programming language paradigms. The Turing machine you worked with in CIS 115 is very similar to assembly language, and the imperative programming paradigm draws strongly upon this approach. In contrast, the logical and functional programming paradigms were more influenced by Lambda calculus. This difference in perspective also appears in how functions are commonly written in these different paradigms. An imperative language tends to define functions something like:
Add(param1, param2)
{
    return param1 + param2;
}
While a functional language might express the same idea as:
(param1, param2) => param1 + param2This “arrow” or “lambda” syntax has since been adopted as an alternative way of writing functions in many modern languages, including C#. In C#, it is primarily used as syntactic sugar, to replace what would otherwise be a lot of typing to express a simple idea.
Consider the case where we want to search a List<string> AnimalList for a string containing the substring "kitten". The List.Find() takes a predicate - a static method that can be invoked to find an item in the list. We have to define a static method, i.e.:
private static bool FindKittenSubstring(string fullString)
{
    return fullString.Contains("kitten");
}
From this method, we create a predicate:
Predicate<string> findKittenPredicate = FindKittenSubstring;Then we can pass that predicate into our Find:
bool containsKitten = AnimalList.Find(findKittenPredicate);This is quite a lot of work to express a simple idea. C# introduced lambda syntax as a way to streamline it. The same operation using lambda syntax is:
bool containsKitten = AnimalList.Find((fullString) => fullString.Contains("kitten"));Much cleaner to write. The C# compiler is converting this lambda expression into a predicate as it compiles, but we no longer have to write it! You’ll see this syntax in your xUnit tests as well as when we cover LINQ. It has also been adapted to simplify writing getters and setters. Consider this case:
public class Person
{
    public string LastName { get; set; }

    public string FirstName { get; set; }

    public string FullName
    {
        get
        {
            return FirstName + " " + LastName;

        }
    }
}
We could instead express this as:
public class Person
{
    public string LastName { get; set; }

    public string FirstName { get; set; }

    public string FullName => FirstName + " " + LastName;
}
In fact, all methods that return the result of a single expression can be written this way:
public class VectorMath
{
    public double Add(Vector a, Vector b) => new Vector(a.X + b.X, a.Y + b.Y, a.Z + b.Z);
}
Pattern matching is another idea common to functional languages that has gradually crept into C#. Pattern matching refers to extracting information from structured data by matching the shape of that data.
We’ve already seen the pattern-matching is operator in our discussion of casting. This allows us to extract the cast version of a variable and assign it to a new one:
if(oldVariable is SpecificType newVariable)
{
    // within this block newVariable is (SpecificType)oldVariable
}
The switch statement is also an example of pattern matching. The traditional version only matched constant values, i.e.:
switch(choice)
{
    case "1":
        // Do something
        break;
    case "2":
        // Do something else
        break;
    case "3":
        // Do a third thing
        break;
    default:
        // Do a default action
        break;
}
However, in C# version 7.0, this has been expanded to also match patterns. For example, given a Square, Circle, and Rectangle class that all extend a Shape class, we can write a method to find the area using a switch:
public static double ComputeCircumference(Shape shape)
{
    switch(shape)
    {
        case Square s:
            return 4 * s.Side;
        case Circle c:
            return c.Radius * 2 * Math.PI;
        case Rectangle r:
            return 2 * r.Length + 2 * r.Height;
        default:
            throw new ArgumentException(
                message: "shape is not a recognized shape",
                paramName: nameof(shape)
            );
    }
}
Note that here we match the type of the shape and cast it to that type making it available in the provided variable, i.e. case Square s: matches if shape can be cast to a Square, and s is the result of that cast operation.
This is further expanded upon with the use of when clauses, i.e. we could add a special case for a circle or square with a circumference of 0:
public static double ComputeCircumference(Shape shape)
{
    switch(shape)
    {
        case Square s when s.Side == 0:
        case Circle c when c.Radius == 0:
            return 0;
        case Square s:
            return 4 * s.Side;
        case Circle c:
            return c.Radius * 2 * Math.PI;
        case Rectangle r:
            return 2 * r.Length + 2 * r.Height;
        default:
            throw new ArgumentException(
                message: "shape is not a recognized shape",
                paramName: nameof(shape)
            );
    }
}
The when applies conditions to the match that only allow a match when the corresponding condition is true.
C# 8.0, which is currently in preview, has expanded greatly upon pattern matching, adding exciting new features, such as the switch expression, tuples, and deconstruction operator.
In this chapter we looked at some of the features of C# that aren’t directly related to object-orientation, including many drawn from imperative or functional paradigms. Some have been with the language since the beginning, such as the static keyword, while others have recently been added, like pattern matching.
Each addition has greatly expanded the power and usability of C# - consider generics, whose introduction brought entirely new (and much more performant) library collections like List<T>, Dictionary<T>, and HashSet<T>. Others have lead to simpler and cleaner code, like the use of Lambda expressions. Perhaps most important is the realization that programming languages often continue to evolve beyond their original conceptions.