Component-Based Design
WPF and XAML lend themselves to a design approach known as Component-Based Design or Component-Based Development, which rather than focusing on developing the entire GUI in one go, focuses on decomposing user experiences (UX) into individual, focused, and potentially reusable components. These can, in turn, be used to build larger components, and eventually, the entire GUI (see “UX Principles for Designing Component Based Systems” for more details).
Let’s dig deeper by focusing on a specific example. Let’s say we want to build an application for keeping track of multiple shopping lists. So our core component is a displayed list, plus a mechanism for adding to it. Let’s create a UserComponent to represent this.
For laying out the component, let’s say at the very top, we place the text “Shopping List For”, and directly below that we have an editable text box where the user can enter a store name. On the bottom, we’ll have a text box to enter a new item, and a button to add that item to the list. And in the space between, we’ll show the list in its current form. This sounds like an ideal fit for the DockPanel:
<UserControl x:Class="ShopEasy.ShoppingList"
             xmlns="http://schemas.microsoft.com/winfx/2006/xaml/presentation"
             xmlns:x="http://schemas.microsoft.com/winfx/2006/xaml"
             xmlns:mc="http://schemas.openxmlformats.org/markup-compatibility/2006"
             xmlns:d="http://schemas.microsoft.com/expression/blend/2008"
             xmlns:local="clr-namespace:ShopEasy"
             mc:Ignorable="d"
             d:DesignHeight="450" d:DesignWidth="200">
    <DockPanel>
        <TextBlock DockPanel.Dock="Top" FontWeight="Bold" TextAlignment="Center">
            Shopping List For:
        </TextBlock>
        <TextBox DockPanel.Dock="Top" FontWeight="Bold" TextAlignment="Center" />
        <Button DockPanel.Dock="Bottom" Click="AddItemToList">Add Item To List</Button>
        <TextBox Name="itemTextBox" DockPanel.Dock="Bottom"/>
        <ListView Name="itemsListView" />
    </DockPanel>
</UserControl>
Now in our codebehind, we’ll need to define the AddItemToList event handler:
using System.Windows;
using System.Windows.Controls;

namespace ShopEasy
{
    /// <summary>
    /// Interaction logic for ShoppingList.xaml
    /// </summary>
    public partial class ShoppingList : UserControl
    {
        /// <summary>
        /// Constructs a new ShoppingList
        /// </summary>
        public ShoppingList()
        {
            InitializeComponent();
        }

        /// <summary>
        /// Adds the item in the itemTextBox to the itemsListView
        /// </summary>
        /// <param name="sender">The object sending the event</param>
        /// <param name="e">The events describing the event</param>
        void AddItemToList(object sender, RoutedEventArgs e)
        {
            // Make sure there's an item to add
            if (itemTextBox.Text.Length == 0) return;
            // Add the item to the list
            itemsListView.Items.Add(itemTextBox.Text);
            // Clear the text box
            itemTextBox.Clear();
        }
    }
}
This particular component is pretty much self-contained. We can use it in other components that need a shopping list. In our case, we’ll add it to a collection of shopping lists we can flip through with a couple of buttons, as well as create new lists in. Let’s call this control ListSwitcher.
This time, let’s use a Grid layout and divide the available space into three columns and two rows. The columns we’ll leave with the default width ("1*"), but the bottom row we’ll set as 100 units high, leaving the top row to expand to fill the remaining space. Along the bottom we’ll create three buttons to navigate between shopping lists. On the top, we’ll use the Grid.ColumnSpan property on a Border to span the three columns, creating a container where we’ll display the current ShoppingList:
<UserControl x:Class="ShopEasy.ListSwitcher"
xmlns="http://schemas.microsoft.com/winfx/2006/xaml/presentation"
xmlns:x="http://schemas.microsoft.com/winfx/2006/xaml"
xmlns:mc="http://schemas.openxmlformats.org/markup-compatibility/2006"
xmlns:d="http://schemas.microsoft.com/expression/blend/2008"
xmlns:local="clr-namespace:ShopEasy"
mc:Ignorable="d"
d:DesignHeight="450" d:DesignWidth="200">
<Grid>
<Grid.ColumnDefinitions>
<ColumnDefinition/>
<ColumnDefinition/>
<ColumnDefinition/>
</Grid.ColumnDefinitions>
<Grid.RowDefinitions>
<RowDefinition/>
<RowDefinition Height="100"/>
</Grid.RowDefinitions>
<Border Name="listContainer" Grid.ColumnSpan="3">
</Border>
<Button Grid.Row="1" Click="OnPriorList">
< Prior List
</Button>
<Button Grid.Row="1" Grid.Column="1" Click="OnNewList">
New List
</Button>
<Button Grid.Row="1" Grid.Column="2" Click="OnNextList">
Next List >
</Button>
</Grid>
</UserControl>Now we’ll implement the three button Click event handlers in the codebehind, as well as creating a List<ShoppingList> to store all of our lists:
using System.Collections.Generic;
using System.Windows;
using System.Windows.Controls;

namespace ShopEasy
{
    /// <summary>
    /// Interaction logic for ListSwitcher.xaml
    /// </summary>
    public partial class ListSwitcher : UserControl
    {
        /// <summary>
        /// The list of shopping lists managed by this control
        /// </summary>
        List<ShoppingList> lists = new List<ShoppingList>();

        /// <summary>
        /// The index of the currently displayed shopping list
        /// </summary>
        int currentListIndex = 0;

        /// <summary>
        /// Constructs a new ListSwitcher
        /// </summary>
        public ListSwitcher()
        {
            InitializeComponent();
        }

        /// <summary>
        /// Creates a new ShoppingList and displays it
        /// </summary>
        /// <param name="sender">What triggered this event</param>
        /// <param name="e">The parameters of this event</param>
        void OnNewList(object sender, RoutedEventArgs e)
        {
            // Create a new shopping list
            var list = new ShoppingList();
            // The current count of lists will be the index of the next list added
            currentListIndex = lists.Count;
            // Add the list to the list of shopping lists
            lists.Add(list);
            // Display the list on the control
            listContainer.Child = list;
        }

        /// <summary>
        /// Displays the prior shopping list
        /// </summary>
        /// <param name="sender">What triggered this event</param>
        /// <param name="e">The parameters of this event</param>
        void OnPriorList(object sender, RoutedEventArgs e)
        {
            // don't try to access an empty list
            if (lists.Count == 0) return;
            // decrement the currentListIndex
            currentListIndex--;
            // make sure we don't go below the first index in the list (0)
            if (currentListIndex < 0) currentListIndex = 0;
            // display the indexed list
            listContainer.Child = lists[currentListIndex];
        }

        /// <summary>
        /// Displays the next shopping list
        /// </summary>
        /// <param name="sender">What triggered this event</param>
        /// <param name="e">The parameters of this event</param>
        void OnNextList(object sender, RoutedEventArgs e)
        {
            // don't try to access an empty list
            if (lists.Count == 0) return;
            // increment the currentListIndex
            currentListIndex++;
            // make sure we don't go above the last index in the list (Count - 1)
            if (currentListIndex > lists.Count - 1) currentListIndex = lists.Count - 1;
            // display the indexed list
            listContainer.Child = lists[currentListIndex];
        }
    }
}
And finally, we’ll modify our MainWindow XAML to display a ListSwitcher:
<Window x:Class="ShopEasy.MainWindow"
xmlns="http://schemas.microsoft.com/winfx/2006/xaml/presentation"
xmlns:x="http://schemas.microsoft.com/winfx/2006/xaml"
xmlns:d="http://schemas.microsoft.com/expression/blend/2008"
xmlns:mc="http://schemas.openxmlformats.org/markup-compatibility/2006"
xmlns:local="clr-namespace:ShopEasy"
mc:Ignorable="d"
Title="MainWindow" Height="450" Width="200">
<Grid>
<local:ListSwitcher/>
</Grid>
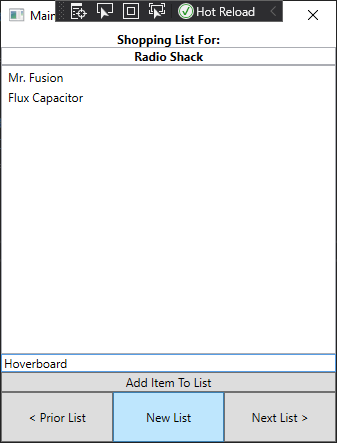
</Window>The resulting app allows us to create multiple shopping lists, and swap between them using the buttons:
Much like we can use objects to break program functionality into smaller, more focused units, we can use component-based design to break GUIs into smaller, more focused units. Both reflect one of the principles of good programming practice - the Single Responsibility Principle. This principle suggests each unit of code should focus on a single responsibility, and more complex behaviors be achieved by using multiple units together. As we see here, this principle extends across multiple programming paradigms.