Resources
The <Style> element represents just one kind of resource. We can provide other kinds of resources, like raw data. Say we want to provide a string to display in our program, but want that string declared somewhere easy to find and change (perhaps our customers change their mind frequently). We could declare the string in the Application resources:
<Application x:Class="WpfTutorialSamples.App"
             xmlns="http://schemas.microsoft.com/winfx/2006/xaml/presentation"
             xmlns:x="http://schemas.microsoft.com/winfx/2006/xaml"
             xmlns:sys="clr-namespace:System;assembly=mscorlib"
             StartupUri="WPF application/ExtendedResourceSample.xaml">
    <Application.Resources>
        <sys:String x:Key="StringToDisplay">Hello World!</sys:String>
    </Application.Resources>
</Application>
Then, in our actual control we can use that string as a static resource:
<TextBlock Text="{StaticResource StringToDisplay}">As long as that element is a descendant of the element the resource is declared on, it will be used in the property. In this case, we’ll display the string “Hello World!” in the TextBlock. Note that we have to use the x:Key property to identify the resource, and repeat the key in the "{StaticResource StringToDisplay}". The curly braces and the StaticResource both need to be there (technically, they are setting up a data binding, which we’ll talk about in a future chapter).
We can declare any kind of type as a resource and make it available in our XAML this way.
For example, we could create a LinearGradientBrush:
<Application x:Class="WpfTutorialSamples.App"
             xmlns="http://schemas.microsoft.com/winfx/2006/xaml/presentation"
             xmlns:x="http://schemas.microsoft.com/winfx/2006/xaml"
             xmlns:sys="clr-namespace:System;assembly=mscorlib"
             StartupUri="WPF application/ExtendedResourceSample.xaml">
    <Application.Resources>
        <LinearGradientBrush x:Key="Rainbow">
            <LinearGradientBrush.GradientStops>
                <GradientStop Color="Red" Offset="0.0"/>
                <GradientStop Color="Yellow" Offset="0.25"/>
                <GradientStop Color="Green" Offset="0.50"/>
                <GradientStop Color="Blue" Offset="0.75"/>
                <GradientStop Color="Violet" Offset="1.0"/>
            </LinearGradientBrush.GradientStops>
        </LinearGradientBrush>
    </Application.Resources>
</Application>
And then use it as a Background or Foreground property in our controls:
<Grid Background="{StaticResource Rainbow}">Since it is only defined in one place, it is now easier to reuse, and if we ever need to change it, we only need to change it in one location.
Finally, we can create static resources from images and other media. First, we have to set its build action to “Resource” in the “Properties” window after adding it to our project:
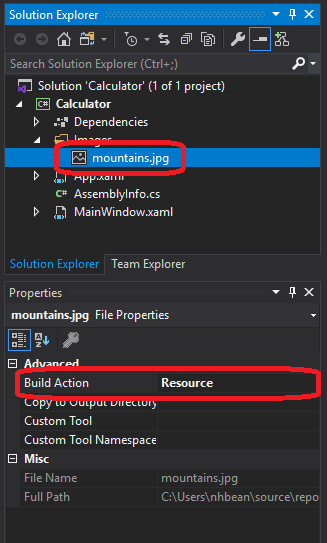
Then we can declare a <BitmapImage> resource using a UriSource property that matches the path to the image within our project:
<Application x:Class="WpfTutorialSamples.App"
             xmlns="http://schemas.microsoft.com/winfx/2006/xaml/presentation"
             xmlns:x="http://schemas.microsoft.com/winfx/2006/xaml"
             xmlns:sys="clr-namespace:System;assembly=mscorlib"
             StartupUri="WPF application/ExtendedResourceSample.xaml">
    <Application.Resources>
        <BitmapImage x:Key="MountainImage" UriSource="Images/mountains.jpg"/>
    </Applicaton.Resources>
</Application>
And then we can use this as the ImageSource for an ImageBrush:
<Grid>
    <Grid.Background>
        <ImageBrush ImageSource="{StaticResource MountainImage}"/>
    </Grid.Background>
</Grid>
The benefit of using images and other media as resources is that they are compiled into the binary assembly (the .dll or .exe file). This means they don’t need to be copied separately when we distribute our application.