Event-Driven Programming
I Fight for the Users!
I Fight for the Users!
Event-Driven programming is a programming paradigm where the program primarily responds to events - typically generated by a user, but also potentially from sensors, network connections, or other sources. We cover it here because event-driven programming is a staple of graphical user interfaces. These typically display a fairly static screen until the user interacts with the program in some meaningful way - moving or clicking the mouse, hitting a key, or the like.
As you might suspect, event-driven programming is often used alongside other programming paradigms, including structured programming and object-orientation. We’ll be exploring how event-driven programming is implemented in C# in this chapter, especially how it interacts with Windows Presentation Foundation.
eventEventArgs+=-=?.The key skills to learn in this chapter are how to write event listeners, attach event listeners to event handlers, and how to define custom event handlers.
At the heart of every Windows program (and most operating systems), is an infinitely repeating loop we call the message loop and a data structure we call a message queue (some languages/operating systems use the term event instead of message). The message queue is managed by the operating system - it adds new events that the GUI needs to know about (i.e. a mouse click that occurred within the GUI) to this queue. The message loop is often embedded in the main function of the program, and continuously checks for new messages in the queue. When it finds one, it processes the message. Once the message is processed, the message loop again checks for a new message. The basic code for such a loop looks something like this:
function main
    initialize()
    while message != quit
        message := get_next_message()
        process_message(message)
    end while
end function
This approach works well for most GUIs as once the program is drawn initially (during the initialize() function), the appearance of the GUI will not change until it responds to some user action.
In a WPF or Windows Forms application, this loop is buried in the Application class that the App inherits from. Instead of writing the code to process these system messages directly, this class converts these messages into C# events, which are then consumed by the event listeners the programmer provides. We’ll look at these next.
In C#, we use event handlers (sometimes called event listeners in other languages) to register the behavior we want to happen in response to specific events. You’ve probably already used these, i.e. declaring a handler:
private void OnEvent(object sender, EventArgs e) {
    // TODO: Respond to the event
}
Most event handlers follow the same pattern. They do not have a return value (their return type is void), and take two parameters. The first is always an object, and it is the source of the event (hence “sender”). The second is an EventArgs object, or a class descended from EventArgs, which provides details about the event.
For example, the various events dealing with mouse input (MouseMove, MouseDown, MouseUp) supply a MouseEventArgs object. This object includes properties defining the mouse location, number of clicks, mouse wheel rotations, and which button was involved in the event.
You’ve probably attached event handlers using the “Properties” panel in Visual Studio, but you can also attach them in code:
Button button = new Button();
button.Click += OnClick;
Note you don’t include parenthesis after the name of the event handler. You aren’t invoking the event handler, you’re attaching it (so it can be invoked in the future when the event happens). Also, note that we use the += operator to signify attaching an event handler.
This syntax is a deliberate choice to help reinforce the idea that we can attach multiple event handlers in C#, i.e.:
Button button = new Button();
button.Click += onClick1;
button.Click += onClick2;
In this case, both onClick1 and onClick2 will be invoked when the button is clicked. This is also one reason to attach event handlers programmatically rather than through the “Properties” window (it can only attach one).
We can also remove an event handler if we no longer want it to be invoked when the event happens. We do this with the -= operator:
button.Click -= onClick1;Again, note we use the handler’s name without parenthesis.
Up to this point, you’ve probably only used events that were defined on library objects, like the Button’s Click event. However, you can also declare events in your own classes, and even create new event types.
In order to attach an event handler to an object in C#, we must first declare that that object has the corresponding event. To do so, we need both a name for the event, and a delegate.
In C# a Delegate is a special type that represents a method with a specific method signature and return type. A delegate allows us to associate the delegate with any method that matches that signature and return type. For example, the Click event handler we discussed earlier is a delegate which matches a method that takes two arguments: an object and an EventArgs, and returns void. Any event listener that we write that matches this specification can be attached to the button.Click. In a way, a Delegate is like an Interface, only for methods instead of objects.
Consider a class representing an egg. What if we wanted to define an event to represent when it hatched? We’d need a delegate for that event, which can be declared a couple of ways. The traditional method would be:
public delegate void HatchHandler(object sender, EventArgs args);And then in our class we’d declare the corresponding event. In C#, these are written much like a field, but with the addition of the event keyword:
public event HatchHandler Hatch;Like a field declaration, an event declaration can have an access modifier (public, private, or protected), a name (in this case Hatch), and a type (the delegate). It also gets marked with the event keyword.
When C# introduced generics, it became possible to use a generic delegate as well, EventHandler<T>, where the T is the type for the event arguments. This simplifies writing an event, because we no longer need to define the delegate ourselves. So instead of the two lines above, we can just use:
public event EventHandler<EventArgs> Hatch;The second form is increasingly preferred, as it makes testing our code much easier (we’ll see this soon), and it’s less code to write.
We might also want to create our own custom event arguments to accompany the event. Perhaps we want to provide a reference to an object representing the baby chick that hatched. To do so we can create a new class that inherits from EventArgs:
/// <summary>
/// A class representing the hatching of a chick
/// </summary>
public class HatchEventArgs : EventArgs
{
    /// <summary>
    /// The chick that hatched
    /// </summary>
    public Chick Chick { get; protected set; }

    /// <summary>
    /// Constructs a new HatchEventArgs
    /// </summary>
    /// <param name="chick">The chick that hatched</param>
    public HatchEventArgs(Chick chick)
    {
        this.Chick = chick;
    }
}
And we use this custom event args in our event declaration as the type for the generic EventHandler<T> generic:
public event EventHandler<HatchEventArgs> Hatch;Now let’s say we set up our Egg constructor to start a timer to determine when the egg will hatch:
public Egg()
{
    // Set a timer to go off in 20 days
    // (ms = 20 days * 24 hours/day * 60 minutes/hour * 60 seconds/minute * 1000 milliseconds/seconds)
    var timer = new System.Timers.Timer(20 * 24 * 60 * 60 * 1000);
    timer.Elapsed += StartHatching;
}
In the event handler StartHatching, we’ll want to create our new baby chick, and then trigger the Hatch event. To do this, we need to raise the event to pass to any attached handlers with Hatch.Invoke(), passing in both the event arguments and the source of the event (our egg):
private void StartHatching(object source, ElapsedEventArgs e)
{
    var chick = new Chick();
    var args = new HatchEventArgs(chick);
    Hatch.Invoke(this, args);
}
However we might have the case where there are no registered event handlers, in which case Hatch evaluates to null, and attempting to call Invoke() will cause an error. We can prevent this by wrapping our Invoke() within a conditional:
if(Hatch != null) {
    Hatch.Invoke(this, args);
}
However, there is a handy shorthand form for doing this (more syntactic sugar):
Hatch?.Invoke(this, args);Using the question mark (?) before the method invocation is known as the Null-condition operator. We use this to avoid calling the Invoke() method if PropertyChanged is null (which is the case if no event handlers have been assigned to it). It tests the object to see if it is null. If it is null, the method is not invoked.
You might be wondering why an event with no assigned event handlers is Null instead of some form of empty collection. The answer is rooted in efficiency - remember that each object (even empty collection) requires a certain amount of memory to hold its details. Now think about all the possible events we might want to listen for in a GUI. The System.Windows.Controls.Control Class (a base class for all WPF controls) defines around 100 events. Now multiply that by all the controls used in a single GUI, and you’ll see that small amount of memory consumption adds up quickly. By leaving unused events null, C# saves significant memory!
Thus, our complete egg class would be:
/// <summary>
/// A class representing an egg
/// </summary>
public class Egg
{
    /// <summary>
    /// An event triggered when the egg hatches
    /// </summary>
    public event EventHandler<HatchEventArgs> Hatch;

    /// <summary>
    /// Constructs a new Egg instance
    /// </summary>
    public Egg()
    {
        // Set a timer to go off in 20 days
        // (ms = 20 days * 24 hours/day * 60 minutes/hour * 60 seconds/minute * 1000 milliseconds/seconds)
        var timer = new System.Timers.Timer(20 * 24 * 60 * 60 * 1000);
        timer.Elapsed += StartHatching;
    }

    /// <summary>
    /// Handles the end of the incubation period
    /// by triggering a Hatch event
    /// </summary>
    private void StartHatching(object source, ElapsedEventArgs e)
    {
        var chick = new Chick();
        var args = new HatchEventArgs(chick);
        Hatch?.Invoke(this, args);
    }
}It might be becoming clear that in many ways, events are another form of message passing, much like methods are. In fact, they are processed much the same way: the Invoke() method of the event calls each attached event handler in turn.
Regular event invocation in C# is synchronous, just as is method calling - invoking an event passes execution to the event handlers one at a time the same way calling a method hands program execution to the method. Once they have finished executing, program execution continues back in the code that invoked the event. Let’s see a practical example based on our discussion of the Hatch event. If we were to give our chick a name:
private void StartHatching(object source, ElapsedEventArgs e)
{
    var chick = new Chick();
    var args = new HatchEventArgs(chick);
    Hatch?.Invoke(this, args);
    chick.Name = "Cluckzilla";
}
And in our event handler, we tried to print that name:
private void OnHatch(object sender, HatchEventArgs e)
{
    Console.WriteLine($"Welcome to the world, {e.Chick.Name}!");
}
The OnHatch event handler would be triggered by the Hatch?.Invoke() line before the name was set, so the Chick.Name property would be null! We would need to move the name assignment to before the Invoke() call for it to be available in any attached event handlers.
The EventArgs define what the message contains, the sender specifies which object is sending the event, and the objects defining the event handlers are the ones receiving it.
That last bit is the biggest difference between using an event to pass a message and using a method to pass the same message. With a method, we always have one object sending and one object receiving. In contrast, an event can have no objects receiving, one object receiving, or many objects receiving.
An event is therefore more flexible and open-ended. We can determine which object(s) should receive the message at any point - even at runtime. In contrast, with a method we need to know what object we are sending the message to (i.e invoking the method of) as we write the code to do so.
Let’s look at a concrete example of where this can come into play.
We often have classes which encapsulate data we might need to look at. For example, we might have a “Smart” dog dish, which keeps track of the amount of food it contains in ounces. So it exposes a Weight property.
Now let’s assume we have a few possible add-on products that can be combined with that smart bowl. One is a “dinner bell”, which makes noises when the bowl is filled (ostensibly to attract the dog, but mostly just to annoy your neighbors). Another is a wireless device that sends texts to your phone to let you know when the bowl is empty.
How can the software running on these devices determine when the bowl is empty or full? One possibility would be to check the bowl’s weight constantly, or at a set interval. We call this strategy polling:
/// <summary>
/// The run button for the Dinner Bell add-on
/// </summary>
public void Run()
{
    while(bowl.Weight != 0) {
        // Do nothing
    }
    // If we reach here, the bowl is empty!
    sendEmptyText();
}
The problem with this approach is that it means our program is running full-bore all the time. If this is a battery-operated device, those batteries will drain quickly. It might be better if we let the smart bowl notify the Dinner Bell, but if we did this using methods, the Smart Bowl would need a reference to that dinner bell… and any other accessories we plug in.
This was a common problem in GUI design - sometimes we need to know when a property changes because we are displaying that property’s value in the GUI, possibly in multiple places. But if that property is not part of a GUI display, we may not care when it changes.
The standard answer to this dilemma in .NET is the INotifyPropertyChanged interface - an interface defined in the System.ComponentModel namespace that requires you to implement a single event PropertyChanged on the class that is changing. You can define this event as:
public event PropertyChangedEventHandler? PropertyChanged;This sets up the PropertyChanged event handler on your class. Let’s first look at writing event listeners to take advantage of this event.
In our example, we would do this with the smart dog bowl, and add listeners to the dinner bell and empty notification tools. The PropertyChangedEventArgs includes the name of the property that is changing (PropertyName) - so we can check that 1) the property changing is the weight, and 2) that the weight meets our criteria, i.e.:
/// <summary>
/// A SmartBowl accessory that sends text notifications when the SmartBowl is empty
/// </summary>
public class EmptyTexter
{
    /// <summary>
    /// Constructs a new EmptyTexter object
    /// </summary>
    /// <param Name="bowl">The SmartBowl to listen to</param>
    public EmptyTexter(SmartBowl bowl)
    {
        bowl.PropertyChanged += onBowlPropertyChanged;
    }

    /// <summary>
    /// Responds to changes in the Weight property of the bowl
    /// </summary>
    /// <param Name="Sender">The bowl sending the event</param>
    /// <param Name="e">The event arguments (specifying which property changed)</param>
    private void onBowlPropertyChanged(object sender, PropertyChangedEventArgs e)
    {
        // Only move forward if the property changing is the weight
        if (e.PropertyName == "Weight")
        {
            if (sender is SmartBowl)
            {
                var bowl = sender as SmartBowl;
                if (bowl.Weight == 0) textBowlIsEmpty();
            }
        }
    }

    /// <summary>
    /// Helper method to notify bowl is empty
    /// </summary>
    private void textBowlIsEmpty()
    {
        // TODO: Implement texting
    }
}
Note that in our event listener, we need to check the specific property that is changing is the one we care about - the Weight. We also cast the source of the event back into a SmartBowl, but only after checking the cast is possible. Alternatively, we could have stored the SmartBowl instance in a class variable rather than casting.
Or, we can use the new is type pattern expression:
if(sender is SmartBowl bowl) {
    // Inside this body, bowl is the sender cast as a SmartBowl
    // TODO: logic goes here
}
This is syntactic sugar for:
if(sender is SmartBowl) {
    var bowl = sender as SmartBowl;
    // TODO: logic goes here
}
Notice how the is type pattern expression merges the if test and variable assignment?
Also, notice that the only extra information supplied by our PropertyChangedEventArgs is the name of the property - not its prior value, or any other info. This helps keep the event lightweight, but it does mean if we need to keep track of prior values, we must implement that ourselves, as we do in the DinnerBell implementation:
/// <summary>
/// A SmartBowl accessory that makes noise when the bowl is filled
/// </summary>
public class DinnerBell
{
    /// <summary>
    /// Caches the previous weight measurement
    /// </summary>
    private double lastWeight;

    /// <summary>
    /// Constructs a new DinnerBell object
    /// </summary>
    /// <param Name="bowl">The SmartBowl to listen to</param>
    public DinnerBell(SmartBowl bowl)
    {
        lastWeight = bowl.Weight;
        bowl.PropertyChanged += onBowlPropertyChanged;
    }

    /// <summary>
    /// Responds to changes in the Weight property of the bowl
    /// </summary>
    /// <param Name="Sender">The bowl sending the event</param>
    /// <param Name="e">The event arguments (specifying which property changed)</param>
    private void onBowlPropertyChanged(object sender, PropertyChangedEventArgs e)
    {
        // Only move forward if the property changing is the weight
        if (e.PropertyName == "Weight")
        {
            // Cast the sender to a smart bowl using the is type expression
            if (sender is SmartBowl bowl)
            {
                // Ring the dinner bell if the bowl is now heavier
                // (i.e. food has been added)
                if (bowl.Weight > lastWeight) ringTheBell();
                // Cache the new weight
                lastWeight = bowl.Weight;
            }
        }
    }

    /// <summary>
    /// Helper method to make noise
    /// </summary>
    private void ringTheBell()
    {
        // TODO: Implement noisemaking
    }
}For the event listeners to work as expected, we need to implement the PropertyChanged event in our SmartBowl class with:
public event PropertyChangedEventHandler? PropertyChanged;Which makes it available for the event handlers to attach to. But this is only part of the process, we also need to invoke this event when it happens. This is done with the Invoke(object sender, EventArgs e) method defined for every event handler. It takes two parameters, an object which is the source of the event, and the EventArgs defining the event. The specific kind of EventArgs corresponds to the event declaration - in our case, PropertyChangedEventArgs.
Let’s start with a straightforward example. Assume we have a Name property in the SmartBowl that is a customizable string, allowing us to identify the bowl, i.e. “Water” or “Food”. When we change it, we need to invoke the PropertyChanged event, i.e.:
private string name = "Bowl";
public string Name {
    get {return name;}
    set
    {
        name = value;
        PropertyChanged?.Invoke(this, new PropertyChangedEventArgs("Name"));
    }
}
Notice how we use the setter for Name to invoke the PropertyChanged event handler, after the change to the property has been made. This invocation needs to be done after the change, or the responding event listener may grab the old value (remember, event listeners are triggered synchronously).
Also note that we use the null-conditional operator ?. to avoid calling the Invoke() method if PropertyChanged is null (which is the case if no event listeners have been assigned).
Now let’s tackle a more complex example. Since our SmartBowl uses a sensor to measure the weight of its contents, we might be able to read the sensor data - probably through a driver or a class representing the sensor. Rather than doing this constantly, let’s set a polling interval of 1 minute:
/// <summary>
/// A class representing a "smart" dog bowl.
/// </summary>
public class SmartBowl : INotifyPropertyChanged
{
    /// <summary>
    /// Event triggered when a property changes
    /// </summary>
    public event PropertyChangedEventHandler? PropertyChanged;

    /// <summary>
    /// The weight sensor installed in the bowl
    /// </summary>
    Sensor sensor;

    private string name = "Bowl";
    /// <summary>
    /// The name of this bowl
    /// </summary>
    public string Name
    {
        get { return name; }
        set
        {
            name = value;
            PropertyChanged?.Invoke(this, new PropertyChangedEventArgs("Name"));
        }
    }

    private double weight;
    /// <summary>
    /// The weight of the bowl contents, measured in ounces
    /// </summary>
    public double Weight
    {
        get { return weight; }
        set
        {
            // We only want to treat the weight as changing
            // if the change is more than a 16th of an ounce
            if (Math.Abs(weight - value) > 1 / 16)
            {
                weight = value;
                // Notify of the property changing
                PropertyChanged?.Invoke(this, new PropertyChangedEventArgs("Weight"));
            }
        }
    }

    /// <summary>
    /// Constructs a new SmartBowl
    /// </summary>
    /// <param Name="sensor">the weight sensor</param>
    public SmartBowl(Sensor sensor)
    {
        this.sensor = sensor;
        // Set the initial weight
        weight = sensor.Value;
        // Set a timer to go off in 1 minute
        // (ms = 60 seconds/minute * 1000 milliseconds/seconds)
        var timer = new System.Timers.Timer(60 * 1000);
        // Set the timer to reset when it goes off
        timer.AutoReset = true;
        // Trigger a sensor read each time the timer elapses
        timer.Elapsed += readSensor;
    }

    /// <summary>
    /// Handles the elapsing of the polling timer by updating the weight
    /// </summary>
    private void readSensor(object Sender, System.Timers.ElapsedEventArgs e)
    {
        this.Weight = sensor.Value;
    }

}
Notice in this code, we use the setter of the Weight property to trigger the PropertyChanged event. Because we’re dealing with a real-world sensor that may have slight variations in the readings, we also only treat changes of more than 1/16th of an ounce as significant enough to change the property.
With the INotifyPropertyChanged interface, the only aspect Visual Studio checks is that the PropertyChanged event is declared. There is no built-in check that the programmer is using it as expected. Therefore it is upon you, the programmer, to ensure that you meet the expectation that comes with implementing this interface: that any public or protected property that changes will invoke the PropertyChanged event.
Finally, we should write unit tests to confirm that our PropertyChanged event works as expected:
public class SmartBowlUnitTests {

    /// <summary>
    /// A mock sensor that increases its reading by one ounce
    /// every time its Value property is invoked.
    /// </summary>
    class MockChangingWeightSensor : Sensor
    {
        double value = 0.0;

        public double Value {
            get {
                value += 1;
                return value;
            }
        }
    }

    [Fact]
    public void NameChangeShouldTriggerPropertyChanged()
    {
        var bowl = new SmartBowl(new MockChangingWeightSensor());
        Assert.PropertyChanged(bowl, "Name", () => {
            bowl.Name = "New Name";
        });
    }

    [Fact]
    public void WeightChangeShouldTriggerPropertyChanged()
    {
        var bowl = new SmartBowl(new MockChangingWeightSensor());
        Assert.PropertyChangedAsync(bowl, "Weight", () => {
            return Task.Delay(2 * 60 * 1000);
        });
    }
}
The PropertyChanged interface is so common in C# programming that we have two assertions dealing with it. The first we use to test the Name property:
[Fact]
public void NameChangeShouldTriggerPropertyChanged()
{
    var bowl = new SmartBowl(new MockChangingWeightSensor());
    Assert.PropertyChanged(bowl, "Name", () => {
        bowl.Name = "New Name";
    });
}
Notice that Assert.PropertyChanged(@object obj, string propertyName, Action action) takes three arguments - first the object with the property that should be changing, second the name of the property we expect to change, and third an action that should trigger the event. In this case, we change the name property.
The second is a bit more involved, as we have an event that happens based on a timer. To test it therefore, we have to wait for the timer to have had an opportunity to trigger. We do this with an asynchronous action, so we use the Assert.PropertyChangedAsync(@object obj, string propertyName, Func<Task> action). The first two arguments are the same, but the last one is a Func (a function) that returns an asynchronous Task object. The simplest one to use here is Task.Delay, which delays for the supplied period of time (in our case, two minutes). Since our property should change on one-minute intervals, we’ll know if there was a problem if it doesn’t change after two minutes.
Considering that C# was developed as an object-oriented language from the ground up, you would expect that events would be inheritable just like properties, fields, and methods. Unfortunately this is not the case. Remember, the C# language is compiled into intermediate language to run on the .NET Runtime, and this Runtime proceeded C# (it is also used to compile Visual Basic), and the way events are implemented in intermediate language does not lend itself to inheritance patterns.
This has some important implications for writing C# events:
virtual and override keywords used with events do not actually create an overridden event - you instead end up with two separate implementations.The standard way programmers have adapted to this issue is to:
protected helper method to that base class that will invoke the event, taking whatever parameters are neededFor example, the PropertyChanged event we discussed previously is often invoked from a helper method named OnPropertyChanged() that is defined like this:
protected virtual void OnPropertyChanged(string propertyName)
{
    this.PropertyChanged?.Invoke(this, new PropertyChangedEventArgs(propertyName));
}
In derived classes, you can indicate a property is changing by calling this event, and passing in the property name, i.e.:
private object _tag = null;

/// <summary>
/// An object to represent whatever you need
/// </summary>
public object Tag {
  get => _tag;
  set
  {
    if(value != _tag)
    {
      _tag = value;
      OnPropertyChanged(nameof(this.Tag));
    }
  }
}
Note the call to OnPropertyChanged() - this will trigger the PropertyChanged event handler on the base class.
You might have noticed the use of nameof(this.Tag) in the example code above. The nameof expression returns the name of a property as a string. This approach is preferred over just writing the string, as it makes it less likely a typo will result in your code not working as expected.
While events exist in Windows Forms, Windows Presentation Foundation adds a twist with their concept of routed events. Routed events are similar to regular C# events, but provide additional functionality. One of the most important of these is the ability of the routed event to “bubble” up the elements tree. Essentially, the event will be passed up each successive WPF element until one chooses to “handle” it, or the top of the tree is reached (in which case the event is ignored).
Consider a Click event handler for a button. In Windows Forms, we have to attach our listener directly to the button, i.e:
namespace WindowsFormsApp1
{
    public partial class Form1 : Form
    {
        public Form1()
        {
            InitializeComponent();
            IncrementButton.Click += HandleClick;
        }

        private void HandleClick(object sender, EventArgs e)
        {
            // TODO: Handle our click
        }
    }
}
With WPF we can also attach an event listener directly to the button, but we can also attach an event listener to an ancestor of the button (a component further up the element tree). The click event will “bubble” up the element tree, and each successive parent will have the opportunity to handle it. I.e. we can define a button in the ChildControl:
<UserControl x:Class="WpfApp1.ChildControl"
             xmlns="http://schemas.microsoft.com/winfx/2006/xaml/presentation"
             xmlns:x="http://schemas.microsoft.com/winfx/2006/xaml"
             xmlns:mc="http://schemas.openxmlformats.org/markup-compatibility/2006"
             xmlns:d="http://schemas.microsoft.com/expression/blend/2008"
             xmlns:local="clr-namespace:WpfApp1"
             mc:Ignorable="d"
             d:DesignHeight="450" d:DesignWidth="800">
    <Grid>
        <Button Name="IncrementButton">Count</Button>
    </Grid>
</UserControl>
And add an instance of ChildControl to our MainWindow:
<Window x:Class="WpfApp1.MainWindow"
        xmlns="http://schemas.microsoft.com/winfx/2006/xaml/presentation"
        xmlns:x="http://schemas.microsoft.com/winfx/2006/xaml"
        xmlns:d="http://schemas.microsoft.com/expression/blend/2008"
        xmlns:mc="http://schemas.openxmlformats.org/markup-compatibility/2006"
        xmlns:local="clr-namespace:WpfApp1"
        mc:Ignorable="d"
        Title="MainWindow" Height="450" Width="800">
    <Grid Button.Click="HandleClick">
        <local:ChildControl/>
    </Grid>
</Window>
Note that in our <Grid> we attached a Button.Click handler? The attached listener, HandleClick, will be invoked for all Click events arising from Buttons that are nested under the <Grid> in the elements tree. We can then write this event handler in the codebehind of our MainWindow:
namespace WpfApp1
{
    /// <summary>
    /// Interaction logic for MainWindow.xaml
    /// </summary>
    public partial class MainWindow : Window
    {
        public MainWindow()
        {
            InitializeComponent();
        }

        private void HandleClick(Object sender, RoutedEventArgs e)
        {
            if(e.OriginalSource is Button button && button.Name == "IncrementButton")
            {
                // TODO: Handle increment;

                e.Handled = true;
            }
        }
    }
}
Note that because this event listener will be triggered for all buttons, we need to make sure it’s a button we care about - so we cast the OriginalSource of the event to be a button and check its Name property. We use the RoutedEventArgs.OriginalSource because the sender won’t necessarily be the specific control the event originated in - in this case it actually is the Grid containing the button. Also, note that we mark e.Handled as true. This tells WPF it can stop “bubbling” the event, as we have taken care of it.
We’ll cover routed events in more detail in the upcoming Dependency Objects chapter, but for now you need to know that the GUI events you know from Windows Forms (Click, Select, Focus, Blur), are all routed events in WPF, and therefore take a RoutedEventArgs object instead of the event arguments you may be used to.
The PropertyChanged event notifies us when a property of an object changes, which covers most of our GUI notification needs. However, there are some concepts that aren’t covered by it - specifically, when an item is added or removed from a collection. We use a different event, NotifyCollectionChanged to convey when this occurs.
The INotifyCollectionChanged interface defined in the System.Collections.Specialized namespace indicates the collection implements the NotifyCollectionChangedEventHandler, i.e.:
public event NotifyCollectionChangedEventHandler? NotifyCollectionChanged;And, as you would expect, this event is triggered any time the collection’s contents change, much like the PropertyChanged event we discussed earlier was triggered when a property changed. However, the NotifyCollectionChangedEventArgs provides a lot more information than we saw with the PropertyChangedEventArgs,as you can see in the UML diagram below:
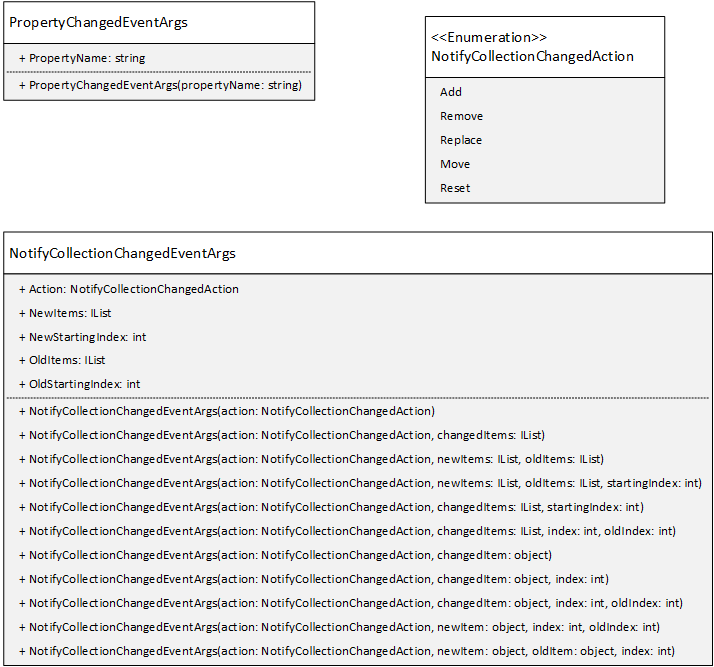
With PropertyChangedEventArgs we simply provide the name of the property that is changing. But with NotifyCollectionChangedEventArgs, we are describing both what the change is (i.e. an Add, Remove, Replace, Move, or Reset), and what item(s) we affected. So if the action was adding an item, the NotifyCollectionChangedEventArgs will let us know what item was added to the collection, and possibly at what position it was added at.
When implementing the INotifyCollectionChanged interface, you must supply a NotifyCollectionChangedEventArgs object that describes the change to the collection. This class has multiple constructors, and you must select the correct one, or your code will cause a runtime error when the event is invoked.
You might be wondering why PropertyChangedEventArgs contains so little information compared to NotifyCollectionChangedEventArgs. Most notably, the old and new values of the property could have been included. I suspect the reason they were not is that there are many times where you don’t actually need to know what the property value is - just that it changed, and you can always retrieve that value once you know you need to.
In contrast, there are situations where a GUI displaying a collection may have hundreds of entries. Identifying exactly which ones have changed means that only those entries need to be modified in the GUI. If we didn’t have that information, we’d have to retrieve the entire collection and re-render it, which can be a very computationally expensive process.
But ultimately, the two interfaces were developed by different teams at different times, which probably accounts for most of the differences.
The only property of the NotifyCollectionChangedArgs that will always be populated is the Action property. The type of This property is the NotifyCollectionChangedAction enumeration, and its values (and what they represent) are:
NotifyCollectionChangedAction.Add - one or more items were added to the collectionNotifyCollectionChangedAction.Move - an item was moved in the collectionNotifyCollectionChangedAction.Remove - one or more items were removed from the collectionNotifyCollectionChangedAction.Replace - an item was replaced in the collectionNotifyCollectionChangedAction.Reset - drastic changes were made to the collectionA second feature you probably noticed from the UML is that there are a lot of constructors for the NotifyCollectionChangedEventArgs. Each represents a different situation, and you must pick the appropriate one.
For example, the NotifyCollectionChangedEventArgs(NotifyCollectionChangedAction) constructor represents a NotifyCollectionChangedAction.Reset change. This indicates the collection’s content changed dramatically, and the best recourse for a GUI is to ask for the full collection again and rebuild the display. You should only use this one-argument constructor for a Reset action.
In C#, there is no mechanism for limiting a constructor to specific argument values. So you actually can call the above constructor for a different kind of event, i.e.:
new NotifyCollectionChangedEventArgs(NotifyCollectionChangedAction.Add);However, doing so will throw a InvalidArgumentException when the code is actually executed.
In general, if you are adding or removing an object, you need to provide the object to the constructor. If you are adding or removing multiple objects, you will need to provide an IList of the affected objects. And you may also need to provide the object’s index in the collection. You can read more about the available constructors and their uses in the Microsoft Documentation.
In the testing chapter, we introduced the XUnit assertion for testing events, Assert.Raises<T>. Let’s imagine a doorbell class that raises a Ring event when it is pressed, with information about the door, which can be used to do things like ring a physical bell, or send a text notification:
/// <summary>
/// A class representing details of a ring event
/// </summary>
public class RingEventArgs : EventArgs
{
    private string _door;

    /// <summary>
    /// The identity of the door for which the doorbell was activated
    public string Door => _door;

    /// <summary>
    /// Constructs a new RingEventArgs
    /// </summary>
    public RingEventArgs(string door)
    {
      _door = door;
    }
}

/// <summary>
/// A class representing a doorbell
/// </summary>
public class Doorbell
{
    /// <summary>
    /// An event triggered when the doorbell rings
    /// </summary>
    public event EventHandler<RingEventArgs> Ring;

    /// <summary>
    /// The name of the door where this doorbell is mounted
    /// </summary>
    public string Identifier {get; set;}

    /// <summary>
    /// Handles the push of a doorbell
    /// by triggering a Ring event
    /// </summary>
    public void Push()
    {
        Ring?.Invoke(this, new RingEventArgs(Identifier));
    }
}
To test this doorbell, we’d want to make sure that the Ring event is invoked when the Push() method is called. The Assert.Raises<T> does exactly this:
[Fact]
public void PressingDoorbellShouldRaiseRingEvent
Doorbell db = new Doorbell();
Assert.Raises<RingEventArgs>(
  handler => db.Ring += handler,
  handler => db.Ring -= handler,
  () => {
    db.Push();
  });
This code may be a bit confusing at first, so let’s step through it. The <T> is the type of event arguments we expect to receive, in this case, RingEventArgs. The first argument is a lambda expression that attaches an event handler handler (provided by the Assert.Raises method) to our object to test, db. The second argument is a lambda expression that removes the event handler handler. The third is an action (also written as a lambda expression) that should trigger the event if the code we are testing is correct.
This approach allows us to test events declared with the generic EventHandler<T>, which is one of the reasons we prefer it. It will not work with custom event handlers though; for those we’ll need a different approach.
In the previous section, we discussed using XUnit’s Assert.Raises<T> to test generic events (events declared with the EventHandler<T> generic). However, this approach does not work with non-generic events, like PropertyChanged and CollectionChanged. That is why XUnit provides an Assert.PropertyChanged() method. Unfortunately, it does not offer a corresponding test for CollectionChanged. So to test for this expectation we will need to write our own assertions.
To do that, we need to understand how assertions in the XUnit framework work. Essentially, they test the truthfulness of what is being asserted (i.e. two values are equal, a collection contains an item, etc.). If the assertion is not true, then the code raises an exception - specifically, a XunitException or a class derived from it. This class provides a UserMessage (the message you get when the test fails) and a StackTrace (the lines describing where the error was thrown). With this in mind, we can write our own assertion method. Let’s start with a simple example that asserts the value of a string is “Hello World”:
public static class MyAssert
{
  public class HelloWorldAssertionException: XunitException
  {
      public HelloWorldAssertionException(string actual) : base($"Expected \"Hello World\" but instead saw \"{actual}\"") {}
  }

  public static void HelloWorld(string phrase)
  {
    if(phrase != "Hello World") throw new HelloWorldAssertionException(phrase);
  }
}
Note that we use the base keyword to execute the XunitException constructor as part of the HelloWorldAssertionException, and pass along the string parameter actual. Then the body of the XunitException constructor does all the work of setting values, so the body of our constructor is empty.
Now we can use this assertion in our own tests:
[Theory]
[InlineData("Hello World")]
[InlineData("Hello Bob")]
public void ShouldBeHelloWorld(string phrase)
{
  MyAssert.HelloWorld(phrase);
}
The first InlineData will pass, and the second will fail with the report Expected "Hello World" but instead saw "Hello Bob".
This was of course, a silly example, but it shows the basic concepts. We would probably never use this in our own work, as Assert.Equal() can do the same thing. Now let’s look at a more complex example that we would use.
As we discussed previously, the CollectionChanged event cannot be tested with the Xunit Assert.Throws. So this is a great candidate for custom assertions. To be thorough, we should test all the possible actions (and we would do this if expanding the Xunit library). But for how we plan to use it, we really only need two actions covered - adding and removing items one at a time from the collection. Let’s start with our exception definitions:
public static class MyAssert
{
  public class NotifyCollectionChangedNotTriggeredException: XunitException
  {
      public NotifyCollectionChangedNotTriggeredException(NotifyCollectionChangedAction expectedAction) : base($"Expected a NotifyCollectionChanged event with an action of {expectedAction} to be invoked, but saw none.") {}
  }

  public class NotifyCollectionChangedWrongActionException: XunitException
  {
      public NotifyCollectionChangedWrongActionException(NotifyCollectionChangedAction expectedAction, NotifyCollectionChangedAction actualAction) : base($"Expected a NotifyCollectionChanged event with an action of {expectedAction} to be invoked, but saw {actualAction}") {}
  }

  public class NotifyCollectionChangedAddException: XunitException
  {
      public NotifyCollectionChangedAddException(object expected, object actual) : base($"Expected a NotifyCollectionChanged event with an action of Add and object {expected} but instead saw {actual}") {}
  }

  public class NotifyCollectionChangedRemoveException : XunitException
  {
    public NotifyCollectionChangedRemoveException(object expectedItem, int expectedIndex, object actualItem, int actualIndex) : base($"Expected a NotifyCollectionChanged event with an action of Remove and object {expectedItem} at index {expectedIndex} but instead saw {actualItem} at index  {actualIndex}") {}
  }
}
We have four different exceptions, each with a very specific message conveying what the failure was due to - no event being triggered, an event with the wrong action being triggered, or an event with the wrong information being triggered. We could also handle this with one exception class using multiple constructors (much like the NotifyCollectionChangedEventArgs does).
Then we need to write our assertions, which are more involved than our previous example as 1) the event uses a generic type, so our assertion also must be a generic, and 2) we need to handle an event - so we need to attach an event handler, and trigger code that should make that event occur. Let’s start with defining the signature of the Add method:
public static class MyAssert {

  public static void NotifyCollectionChangedAdd<T>(INotifyCollectionChanged collection, T item, Action testCode)
  {
    // Assertion tests here.
  }
}
We use the generic type T to allow our assertion to be used with any kind of collection - and the second parameter item is also this type. That is the object we are trying to add to the collection. Finally, the Action is the code the test will execute that would, in theory, add item to collection. Let’s flesh out the method body now:
public static class MyAssert
{
  public static void NotifyCollectionChangedAdd<T>(INotifyCollectionChanged collection, T newItem, Action testCode)
  {
    // A flag to indicate if the event triggered successfully
    bool notifySucceeded = false;

    // An event handler to attach to the INotifyCollectionChanged and be
    // notified when the Add event occurs.
    NotifyCollectionChangedEventHandler handler = (sender, args) =>
    {
      // Make sure the event is an Add event
      if (args.Action != NotifyCollectionChangedAction.Add)
      {
        throw new NotifyCollectionChangedWrongActionException(NotifyCollectionChangedAction.Add, args.Action);
      }

      // Make sure we added just one item
      if (args.NewItems?.Count != 1)
      {
        // We'll use the collection of added items as the second argument
        throw new NotifyCollectionChangedAddException(newItem, args.NewItems);
      }

      // Make sure the added item is what we expected
      if (!args.NewItems[0].Equals(newItem))
      {
        // Here we only have one item in the changed collection, so we'll report it directly
        throw new NotifyCollectionChangedAddException(newItem, args.NewItems[0]);
      }

      // If we reach this point, the NotifyCollectionChanged event was triggered successfully
      // and contains the correct item! We'll set the flag to true so we know.
      notifySucceeded = true;
    };

    // Now we connect the event handler
    collection.CollectionChanged += handler;

    // And attempt to trigger the event by running the actionCode
    // We place this in a try/catch to be able to utilize the finally
    // clause, but don't actually catch any exceptions
    try
    {
      testCode();
      // After this code has been run, our handler should have
      // triggered, and if all went well, the notifySucceed is true
      if (!notifySucceeded)
      {
        // If notifySucceed is false, the event was not triggered
        // We throw an exception denoting that
        throw new NotifyCollectionChangedNotTriggeredException(NotifyCollectionChangedAction.Add);
      }
    }
    // We don't actually want to catch an exception - we want it to
    // bubble up and be reported as a failing test.  So we don't
    // have a catch () {} clause to this try/catch.
    finally
    {
      // However, we *do* want to remove the event handler. We do
      // this in a finally block so it will happen even if we do
      // have an exception occur.
      collection.CollectionChanged -= handler;
    }
  }
}
Now we can test this in our code. For example, if we had a collection of ShoppingList objects named shoppingLists that implemented INotifyCollectionChanged, we could test adding a new shopping list, shoppingList, to it with:
var newList = new ShoppingList();
MyAssert.NotifyCollectionChangedAdd(shoppingLists, newList, () => {
  shoppingLists.Add(newList);
});
Note that we didn’t need to explicitly state T in this case is ShoppingList - the compiler infers this from the arguments supplied to the method.
Our assertion method handles adding a single item. We can use method overloading providing another method of the same name with different arguments to handle when multiple items are added. For that case, the signature might look like:
public static void NotifyCollectionChangedAdd<T>(INotifyCollectionChanged collection, ICollection<T> items, Action testCode)
{
  // Assertion tests here.
}
We’d also want to write assertion methods for handling removing items, and any other actions we might need to test. I’ll leave these as exercises for the reader.
In this chapter we discussed the Windows Message Loop and Queue, and how messages provided to this loop are transformed into C# events by the Application class. We examined C#’s approach to events, which is a more flexible form of message passing. We learned how to write both C# event listeners and handlers, and how to invoke event handlers with Invoke(). We also learned how to create and trigger our own custom events with custom event arguments.
In addition, we learned about the INotifyPropertyChanged interface, and how it can be used to notify listeners that one of an Object’s properties have changed through a NotifyPropertyChanged event handler. We also saw how to test our implementations of INotifyPropertyChanged using xUnit. In our next chapter on Data Binding, we will see how this interface is used by Windows Presentation Foundation to update user interfaces automatically when bound data objects change.
We saw that Windows Presentation Foundation also uses Routed Events, which can bubble up the elements tree and be handled by any ancestor element. This approach replaces many of the familiar UI events from Windows Forms. We’ll take a deeper look at this approach, including defining our own Routed Events and alternative behaviors like “tunnelling” down the elements tree in the upcoming Dependency Objects chapter.
Finally, we discussed testing strategies for testing if our events work as expected. We revisited the Xunit Assert.Raises<t>() and discussed how it works with generic event handlers. We also saw how for non-generic event handlers, we may have to author our own assertions, and even created one for the CollectionChanged event.