Dependency Objects
The Bedrock of WPF
The Bedrock of WPF
You’ve now worked with a variety of WPF controls, laid out components using containers, traversed the elements tree, performed data binding,and worked with routed events. Each of these is made possible through the use of several classes: DependencyObject, UIElement, and FrameworkElement, which serve as a base classes for all WPF controls. In this chapter we’ll dig deeper into how these base classes implement dependency properties and routed events.
Some key terms to learn in this chapter are:
Some key skills you need to develop in this chapter are:
Perhaps the most important aspect of the DependencyObject is its support for hosting dependency properties. While these appear and can be used much like the C# properties we have previously worked with, internally they are managed very differently. Consider when we place a <TextBox> in a <Grid>:
<Grid>
    <Grid.ColumnDefinitions>
        <ColumnDefinition/>
        <ColumnDefinition/>
    </Grid.ColumnDefinitions>
    <Grid.RowDefinitions>
        <RowDefinition/>
        <RowDefinition/>
    </Grid.RowDefinitions>
    <TextBox Name="textBox" Grid.Column="1" Grid.Row="1"/>
</Grid>
Where do the Column and Row properties come from? They aren’t defined on the TextBox class - you can check the documentation. The answer is they are made available through the dependency property system.
At the heart of this system is a collection of key/value pairs much like the Dictionary. When the XAML code Grid.Column="1" is processed, this key and value are added to the TextBox’s dependency properties collection, and is thereafter accessible by the WPF rendering algorithm.
The DependencyObject exposes these stored values with the GetValue(DependencyProperty) and SetValue(DependencyProperty, value) methods. For example, we can set the Column property to 2 with:
textBox.SetValue(Grid.ColumnProperty, 2);We can also create new dependency properties on our own custom classes extending the DependencyObject (which is also a base class for all WPF controls). Let’s say we are making a custom control for entering number values on a touch screen, which we’ll call NumberBox. We can extend a UserControl to create a textbox centered between two buttons, one to increase the value, and one to decrease it:
<UserControl x:Class="CustomDependencyObjectExample.NumberBox"
             xmlns="http://schemas.microsoft.com/winfx/2006/xaml/presentation"
             xmlns:x="http://schemas.microsoft.com/winfx/2006/xaml"
             xmlns:mc="http://schemas.openxmlformats.org/markup-compatibility/2006"
             xmlns:d="http://schemas.microsoft.com/expression/blend/2008"
             xmlns:local="clr-namespace:CustomDependencyObjectExample"
             mc:Ignorable="d"
             d:DesignHeight="50" d:DesignWidth="200">
    <Grid>
        <Grid.ColumnDefinitions>
            <ColumnDefinition/>
            <ColumnDefinition Width="2*"/>
            <ColumnDefinition/>
        </Grid.ColumnDefinitions>
        <Button Grid.Column="0">+</Button>
        <TextBox Grid.Column="1" />
        <Button Grid.Column="2">-</Button>
    </Grid>
</UserControl>
Now, let’s assume we want to provide a property Step of type double, which is the amount the number should be incremented when the “+” or “-” button is pressed.
The first step is to register the dependency property by creating a DependencyProperty instance. This will serve as the key to setting and retrieving the dependency property on a dependency object. We register new dependency properties with DependencyProperty.Register(string propertyName, Type propertyType, Type dependencyObjectType). The string is the name of the property, the first type is the type of the property, and the second is the class we want to associate this property with. So our Step property would be registered with:
DependencyProperty.Register(nameof(Step), typeof(double), typeof(NumberBox));There is an optional fourth property to DependencyProperty.Register() which is a PropertyMetadata. This is used to set the default value of the property. We probably should specify a default step, so let’s add a PropertyMetadata object with a default value of 1:
DependencyProperty.Register(nameof(Step), typeof(double), typeof(NumberBox), new PropertyMetadata(1.0));The DependencyProperty.Register() method returns a registered DependencyObject to serve as a key for accessing our new property. To make sure we can access this key from other classes, we define it as a field that is public, static, and readonly. The naming convention for DependencyProperties is to name this field by appending “Property” to the name of the property.
Thus, the complete registration, including saving the result to the public static field is:
/// <summary>
/// Identifies the NumberBox.Step XAML attached property
/// </summary>
public static readonly DependencyProperty StepProperty = DependencyProperty.Register(nameof(Step), typeof(double), typeof(NumberBox), new PropertyMetadata(1.0));
We also want to declare a traditional property with the name “Step”. But instead of declaring a backing field, we will use the key/value pair stored in our DependencyObject using GetValue() and SetValue():
/// <summary>
/// The amount each increment or decrement operation should change the value by
/// </summary>
public double Step
{
    get { return (double)GetValue(StepProperty); }
    set { SetValue(StepProperty, value); }
}
As dependency property values are stored as an object, we need to cast the value to a the appropriate type when it is returned.
One of the great benefits of dependency properties is that they can be set using XAML. I.e. we could declare an instance of our <NumberBox> and set its Step using an attribute:
<StackPanel>
    <NumberBox Step="3.0"/>
</StackPanel>WPF controls are built on the foundation of dependency objects - the DependencyObject is at the bottom of their inheritance chain. But they also add additional functionality on top of that through another common base class, FrameworkElement. The FrameworkElement is involved in the layout algorithm, as well as helping to define the elements tree. Let’s add a second dependency property to our <NumberBox>, a Value property that will represent the value the <NumberBox> currently represents, which will be displayed in the <TextBox>.
We register this dependency property in much the same way as our Step. But instead of supplying the DependencyProperty.Register() method a PropertyMetadata, we’ll instead supply a FrameworkPropertyMetadata, which extends PropertyMetadata to include additional data about how the property interacts with the WPF rendering and layout algorithms. This additional data is in the form of a bitmask defined in FrameworkPropertyMetadataOptions enumeration.
Some of the possible options are:
FrameworkPropertyMetadataOptions.AffectsMeasure - changes to the property may affect the size of the controlFrameworkPropertyMetadataOptions.AffectsArrange - changes to the property may affect the layout of the controlFrameworkPropertyMetadataOptions.AffectsRender - changes to the property may affect the appearance of the controlFrameworkPropertyMetadataOptions.BindsTwoWayByDefault - This property uses two-way bindings by default (i.e. the control is an editable control)FrameworkPropertyMetadataOptions.NotDataBindable - This property does not allow data bindingIn this case, we want a two-way binding by default, so we’ll include that flag, and also we’ll note that it affects the rendering process. Multiple flags can be combined with a bitwise OR. Constructing our FrameworkPropertyMetadata object would then look like:
new FrameworkPropertyMetadata(0, FrameworkPropertyMetadataOptions.AffectsRender | FrameworkPropertyMetadataOptions.BindsTwoWayByDefault)And registering the dependency property would be:
/// <summary>
/// Identifies the NumberBox.Value XAML attached property
/// </summary>
public static readonly DependencyProperty ValueProperty = DependencyProperty.Register(nameof(Value), typeof(double), typeof(NumberBox), new FrameworkPropertyMetadata(0, FrameworkPropertyMetadataOptions.AffectsRender | FrameworkPropertyMetadataOptions.BindsTwoWayByDefault));
As with the Step, we also want to declare a traditional property with the name “Value”. But instead of declaring a backing field, we will use the key/value pair stored in our DependencyObject using GetValue() and SetValue():
/// <summary>
/// The NumberBox's displayed value
/// </summary>
public double Value {
    get { return (double)GetValue(ValueProperty); }
    set { SetValue(ValueProperty, value); }
}
If we want to display the current value of Value in the textbox of our NumberBox control, we’ll need to bind the <TextBox> element’s Text property. This is accomplished in a similar fashion to the other bindings we’ve done previously, only we need to specify a RelativeSource. This is a source relative to the control in the elements tree. We’ll specify two properties on the RelativeSource: the Mode which we set to FindAncestor to search up the tree, and the AncestorType which we set to our NumberBox. Thus, instead of binding to the DataContext, we’ll bind to the NumberBox the <TextBox> is located within. The full declaration would be:
<TextBox Grid.Column="1" Text="{Binding Path=Value, RelativeSource={RelativeSource Mode=FindAncestor, AncestorType=local:NumberBox}}"/>Now a two-way binding exists between the Value of the <NumberBox> and the Text value of the textbox. Updating either one will update the other. We’ve in effect made an editable control!
Another aspect of WPF elements are routed events. Just as dependency properties are similar to regular C# properties, but add additional functionality, routed events are similar to regular C# events, but provide additional functionality. One of the most important of these is the ability of the routed event to “bubble” up the elements tree. Essentially, the event will be passed up each successive WPF element until one chooses to “handle” it, or the top of the tree is reached (in which case the event is ignored). This routed event functionality is managed by the UIElement base class, a third base class shared by all WPF elements.
Let’s consider the two buttons we declared in our <NumberBox>. When clicked, these each trigger a Click routed event. We could attach a handler to each button, but it is also possible to instead attach it to any other element up the tree; for example, our <Grid>:
<UserControl x:Class="CustomDependencyObjectExample.NumberBox"
             xmlns="http://schemas.microsoft.com/winfx/2006/xaml/presentation"
             xmlns:x="http://schemas.microsoft.com/winfx/2006/xaml"
             xmlns:mc="http://schemas.openxmlformats.org/markup-compatibility/2006"
             xmlns:d="http://schemas.microsoft.com/expression/blend/2008"
             xmlns:local="clr-namespace:CustomDependencyObjectExample"
             mc:Ignorable="d"
             d:DesignHeight="50" d:DesignWidth="200">
    <Grid Button.Click="HandleButtonClick">
        <Grid.ColumnDefinitions>
            <ColumnDefinition/>
            <ColumnDefinition Width="2*"/>
            <ColumnDefinition/>
        </Grid.ColumnDefinitions>
        <Button Grid.Column="0" Name="Increment">+</Button>
        <TextBox Grid.Column="1" Text="{Binding Path=Value, RelativeSource={RelativeSource Mode=FindAncestor, AncestorType=local:NumberBox}}"/>
        <Button Grid.Column="2" Name="Decrement">-</Button>
    </Grid>
</UserControl>
We’d need to define HandleButtonClick in our codebehind:
/// <summary>
/// Handles the click of the increment or decrement button
/// </summary>
/// <param name="sender">The button clicked</param>
/// <param name="e">The event arguments</param>
void HandleButtonClick(object sender, RoutedEventArgs e)
{
    if(sender is Button button)
    {
        switch(button.Name)
        {
            case "Increment":
                Value += Step;
                break;
            case "Decrement":
                Value -= Step;
                break;
        }
    }
    e.Handled = true;
}
When either button is clicked, it creates a Button.Click event. As the buttons don’t handle it, the event bubbles to the next element in the elements tree - in this case, the <Grid>. As the <Grid> does attach a Button.Click listener, the event is passed to HandleButtonClick. In this method we use the button’s Name property to decide the correct action to take. Also, note that we set the RoutedEventArgs.Handled property to true. This lets WPF know that we’ve taken care of the event, and it does not need to bubble up any farther (if we didn’t, we could process the event again further up the elements tree).
Much like dependency properties, we can declare our own routed events. These also use a Register() method, but for events this is a static method of the EventHandler class: EventManager.Register(string eventName, RoutingStrategy routing, Type eventHandlerType, Type controlType). The first argument is a string, which is the name of the event, the second is one of the values from the RoutingStrategy enum, the third is the type of event handler, and the fourth is the type of the control it is declared in. This Register() method returns a RoutedEvent that is used as a key when registering event listeners, which we typically store in a public static readonly RoutedEvent field.
The RoutingStrategy options are
RoutingStrategy.Bubble - which travels up the elements tree through ancestor nodesRoutingStrategy.Tunnel - which travels down the elements tree through descendant nodesRoutingStrategy.Direct - which can only be handled by the source elementLet’s create an example routed event for our NumberBox. Let’s assume we define two more routed properties MinValue and MaxValue, and that any time we change the value of our NumberBox it must fall within this range, or be clamped to one of those values. To make it easer for UI designers to provide user feedback, we’ll create a NumberBox.ValueClamped event that will trigger in these circumstances. We need to register our new routed event:
/// <summary>
/// Identifies the NumberBox.ValueClamped event
/// </summary>
public static readonly RoutedEvent ValueClampedEvent = EventManager.RegisterRoutedEvent(nameof(ValueClamped), RoutingStrategy.Bubble, typeof(RoutedEventHandler), typeof(NumberBox));
Also like dependency properties also need to declare a corresponding C# property, routed events need to declare a corresponding C# event:
/// <summary>
/// Event that is triggered when the value of this NumberBox changes
/// </summary>
public event RoutedEventHandler ValueClamped
{
    add { AddHandler(ValueClampedEvent, value); }
    remove { RemoveHandler(ValueClampedEvent, value); }
}
Finally, we would want to raise this event whenever the value is clamped. This can be done with the RaiseEvent(RoutedEventArgs) method defined on the UIElement base class that we inherit in our custom controls. But where should we place this call?
You might think we would do this in the HandleButtonClick() method, and we could, but that misses when a user types a number directly into the textbox, as well as when Value is updated through a two-way binding. Instead, we’ll utilize the callback functionality available in the FrameworkPropertyMetadata for the Value property. Since the dependency property and its metadata are both static, our callback also needs to be declared static:
/// <summary>
/// Callback for the ValueProperty, which clamps the Value to the range
/// defined by MinValue and MaxValue
/// </summary>
/// <param name="sender">The NumberBox whose value is changing</param>
/// <param name="e">The event args</param>
static void HandleValueChanged(DependencyObject sender, DependencyPropertyChangedEventArgs e)
{
    if(e.Property.Name == "Value" && sender is NumberBox box)
    {
        if(box.Value < box.MinValue)
        {
            box.Value = box.MinValue;
            box.RaiseEvent(new RoutedEventArgs(ValueClampedEvent));
        }
        if(box.Value > box.MaxValue)
        {
            box.Value = box.MaxValue;
            box.RaiseEvent(new RoutedEventArgs(ValueClampedEvent));
        }
    }
}
Note that since this method is static, we must get the instance of the NumberBox by casting the sender. We also double-check the property name, though this is not strictly necessary as the method is private and only we should be invoking it from within this class.
Now we need to refactor our Value dependency property registration to use this callback:
/// <summary>
/// Identifies the NumberBox.Value XAML attached property
/// </summary>
public static readonly DependencyProperty ValueProperty = DependencyProperty.Register("Value", typeof(double), typeof(NumberBox), new FrameworkPropertyMetadata(0, FrameworkPropertyMetadataOptions.AffectsRender | FrameworkPropertyMetadataOptions.BindsTwoWayByDefault, HandleValueChanged));
By adding the callback to the dependency property, we ensure that any time it changes, regardless of the method the change occurs by, we will ensure the value is clamped to the specified range.
There are additional options for dependency property callbacks, including validation callbacks and the ability to coerce values. See the documentation for details.
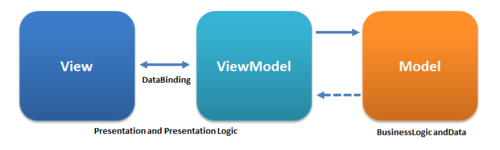
You have probably noticed that as our use of WPF grows more sophisticated, our controls start getting large, and often filled with complex logic. You are not alone in noticing this trend. Microsoft architects Ken Cooper and Ted Peters also struggled with the idea, and introduced a new software architectural pattern to help alleviate it: Model-View-ViewModel. This approach splits the user interface code into two classes: the View (the XAML + codebehind), and a ViewModel, which applies any logic needed to format the data from the model object into a form more easily bound and consumed by the view.
There are several benefits to this pattern:
Essentially, this pattern is an application of the Single-Responsibility Principle (that each class in your project should bear a single responsibility).
In this chapter we examined how dependency properties and routed events are implemented in WPF. The DependencyObject, which serves as a base class for WPF elements, provides a collection of key/value pairs, where the key is a DependencyProperty and the value is the object it is set to. This collection can be accessed through the GetValue() and SetValue() methods, and is also used as a backing store for regular C# properties. We also saw that we can register callbacks on dependency properties to execute logic when the property is changed. The UIElement, which also serves as a base class for WPF elements, provided similar functionality for registering routed event listeners, whose key is RoutedEvent. We saw how these routed events could “bubble” up the elements tree, or “tunnel” down it, and how marking the event Handled property would stop it. Finally, we discussed the MVVM architecture, which works well with WPF applications to keep our code manageable.
We also created an example control using these ideas. The full project can be found here.