Testing Plans
A testing plan is simply a step-by-step guide for a human tester to follow when testing software. You may remember that we mentioned them back on our testing chapter’s discussion on manual testing. Indeed, we can use a test plan to test all aspects of software, not just the GUI. However, automated testing is usually cheaper and more effective in many aspects of software design, which is why we prefer it when possible. So what does a GUI application testing plan look like?
It usually consists of a description of the test to perform, broken down into tasks, and populated with annotated screenshots. Here is an example:
Launch the application
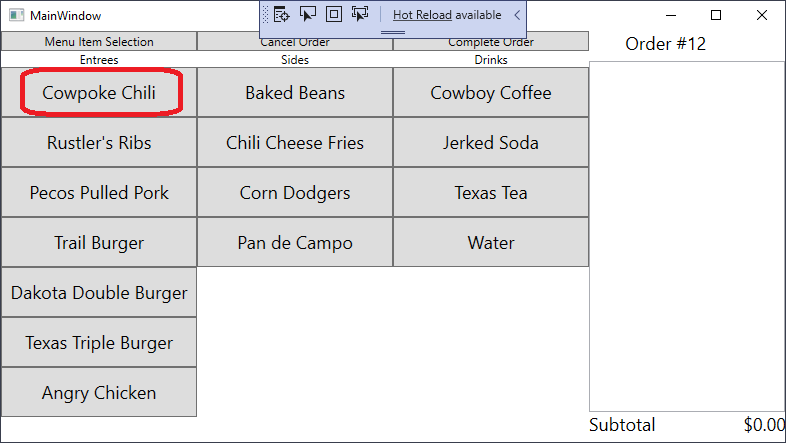
Select the “Cowpoke Chili” button from the “Entrees” menu
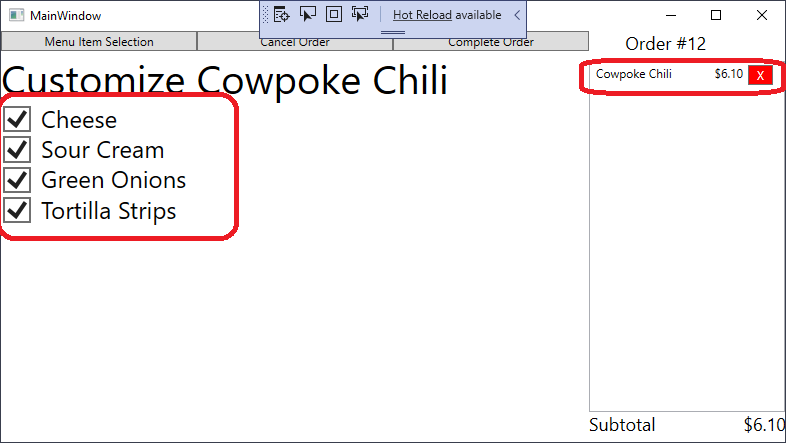
The app should switch to a customization screen that looks like this:
There should be a checkbox for “Cheese”, “Sour Cream”, “Green Onions”, and “Tortilla Strips”
Initial Test Item Cheese Sour Cream Green Onion Tortilla Strips A Cowpoke Chili entry should appear in the order, with a cost of $6.10
Initial Test Item Chili Entry in the order Price of $6.10
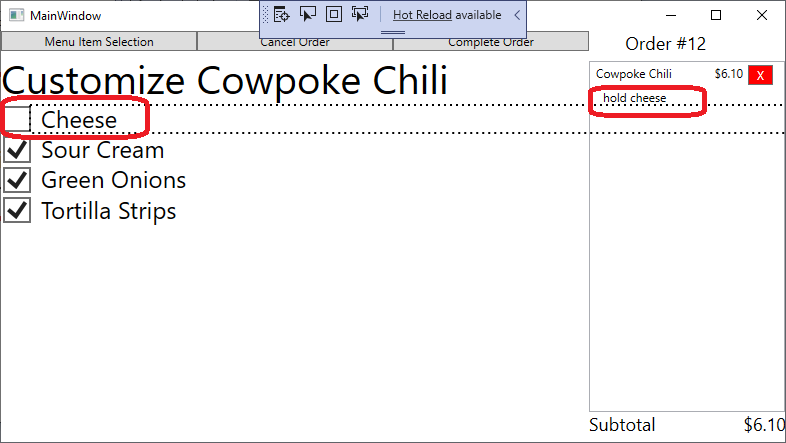
- Uncheck the checkboxes, and a corresponding “Hold” detail should appear in the order, i.e. un-checking cheese should cause the order to look like:
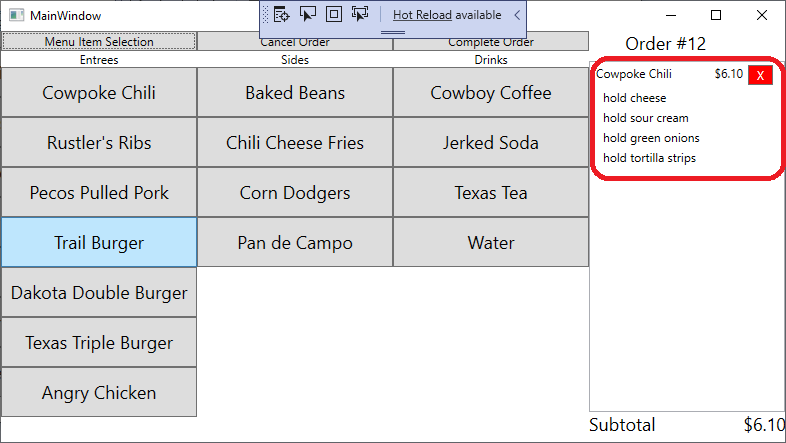
4. Click the "Menu Item Selection" Button. This should return you to the main menu screen, with the order still containing the details about the Cowpoke Chili:
Initial Test Item Cheese checkbox appears and functions Sour Cream checkbox appears and functions Green Onion checkbox appears and functions Tortilla Strips checkbox appears and functions
Initial Test Item Chili Entry in the order Price of $6.10 with "Hold Cheese" with "Hold Sour Cream" with "Hold Green Onion" with "Hold Tortilla Strips" If you encountered problems with this test, please describe:
The essential parts of the test plan are clear instructions of what the tester should do, and what they should see, and a mechanism for reporting issues. Note the tables in this testing plan, where the tester can initial next to each “passing” test, as well as the area for describing issues at the bottom. This reporting can either be integrated into the test document, or, it can be a separate form used with the test document (allowing the printed instructional part of the test documents to be reused). Additionally, some test documents are created in spreadsheet software or specialized testing documentation software for ease of collection and processing.
Test plans like this one are then executed by people (often titled “Tester” or “Software Tester”) by opening the application, following the steps outlined in the plan, and documenting the results. This documentation then goes back to the software developers so that they can address any issues found.
Tip
Taking screen shots of your running program is an easy way to quickly generate visuals for your testing documentation.
In Windows, CTRL + SHIFT + ALT + PRINT SCREEN takes a screen shot and copies it to the clipboard (from which you can paste it into a text editor of your choice).
On a Mac, you can take a screenshot with COMMAND + SHIFT + 4. This launches a utility that changes the mouse cursor and allows you to drag a rectangle across a section of the screen. When you release the mouse, a capture will be taken of the area, and saved as a picture to the desktop.


