Testing WPF
How do we test this stuff?
How do we test this stuff?
Now that you’ve learned how to build a WPF application, how do you test that it is working? For that matter, how do you test any GUI-based application? In this chapter, we’ll explore some common techniques used to test GUIs. We’ll also explore the MVVM architecture developed in parallel with WPF to make unit-testing WPF apps easier.
Some key terms to learn in this chapter are:
Some key skills you need to develop in this chapter are:
Testing a GUI-based application presents some serious challenges. A GUI has a strong dependence on the environment it is running in - the operating system is ultimately responsible for displaying the GUI components, and this is also influenced by the hardware it runs on. As we noted in our discussion of WPF, screen resolution can vary dramatically. So how our GUI appears on one machine may be completely acceptable, but unusable on another.
For example, I once had an installer that used a fixed-size dialog that was so large, on my laptop the “accept” button was off-screen below the bottom of the screen - and there was no way to click it. This is clearly a problem, but the developer failed to recognize it because on their development machine (with nice large monitors) everything fit! So how do we test a GUI application in this uncertain environment?
One possibility is to fire the application up on as many different hardware platforms as we can, and check that each one performs acceptably. This, of course, requires a lot of different computers, so increasingly we see companies instead turning to virtual machines - a program that emulates the hardware of a different computer, possibly even running a different operating system! In either case, we need a way to go through a series of checks to ensure that on each platform, our application is usable.
How can we ensure rigor in this process? Ideally we’d like to automate it, just as we do with our Unit tests… and while there have been some steps in this direction, the honest truth is we’re just not there yet. Currently, there is no substitute for human eyes - and human judgement - on the problem. But humans are also notorious for losing focus when doing the same thing repeatedly… which is exactly what this kind of testing is. Thus, we develop test plans to help with this process. We’ll take a look at those next.
A testing plan is simply a step-by-step guide for a human tester to follow when testing software. You may remember that we mentioned them back on our testing chapter’s discussion on manual testing. Indeed, we can use a test plan to test all aspects of software, not just the GUI. However, automated testing is usually cheaper and more effective in many aspects of software design, which is why we prefer it when possible. So what does a GUI application testing plan look like?
It usually consists of a description of the test to perform, broken down into tasks, and populated with annotated screenshots. Here is an example:
Launch the application
Select the “Cowpoke Chili” button from the “Entrees” menu
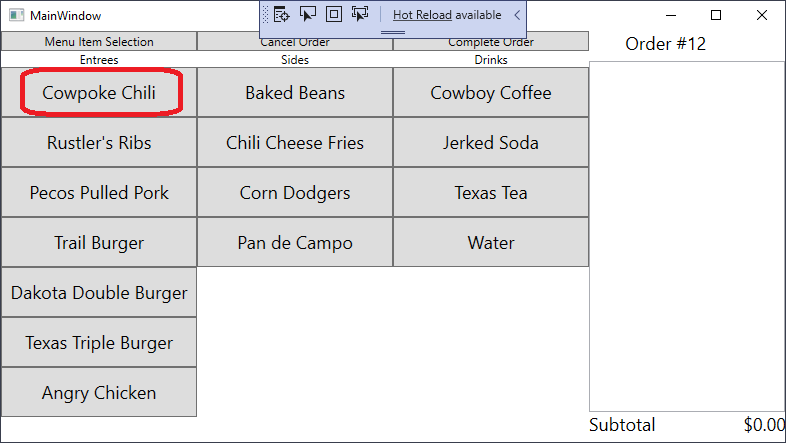
The app should switch to a customization screen that looks like this:
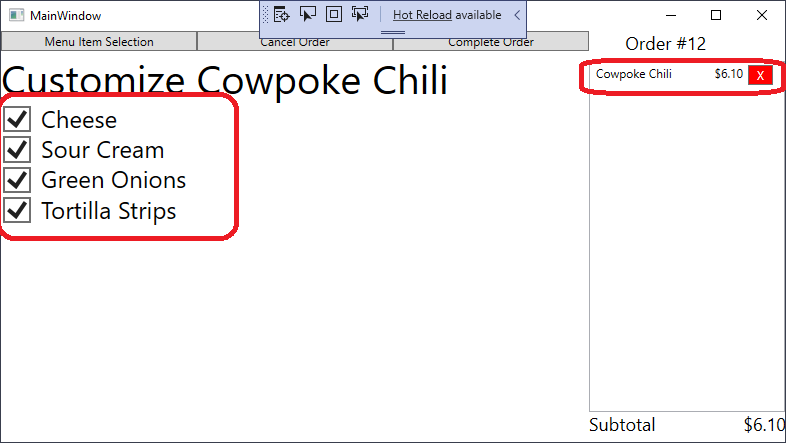
There should be a checkbox for “Cheese”, “Sour Cream”, “Green Onions”, and “Tortilla Strips”
Initial Test Item Cheese Sour Cream Green Onion Tortilla Strips A Cowpoke Chili entry should appear in the order, with a cost of $6.10
Initial Test Item Chili Entry in the order Price of $6.10
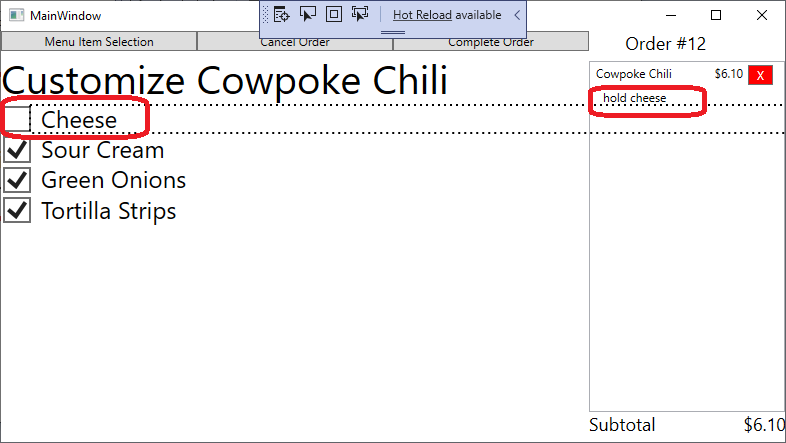
- Uncheck the checkboxes, and a corresponding “Hold” detail should appear in the order, i.e. un-checking cheese should cause the order to look like:
4. Click the "Menu Item Selection" Button. This should return you to the main menu screen, with the order still containing the details about the Cowpoke Chili:
Initial Test Item Cheese checkbox appears and functions Sour Cream checkbox appears and functions Green Onion checkbox appears and functions Tortilla Strips checkbox appears and functions

Initial Test Item Chili Entry in the order Price of $6.10 with "Hold Cheese" with "Hold Sour Cream" with "Hold Green Onion" with "Hold Tortilla Strips" If you encountered problems with this test, please describe:
The essential parts of the test plan are clear instructions of what the tester should do, and what they should see, and a mechanism for reporting issues. Note the tables in this testing plan, where the tester can initial next to each “passing” test, as well as the area for describing issues at the bottom. This reporting can either be integrated into the test document, or, it can be a separate form used with the test document (allowing the printed instructional part of the test documents to be reused). Additionally, some test documents are created in spreadsheet software or specialized testing documentation software for ease of collection and processing.
Test plans like this one are then executed by people (often titled “Tester” or “Software Tester”) by opening the application, following the steps outlined in the plan, and documenting the results. This documentation then goes back to the software developers so that they can address any issues found.
Taking screen shots of your running program is an easy way to quickly generate visuals for your testing documentation.
In Windows, CTRL + SHIFT + ALT + PRINT SCREEN takes a screen shot and copies it to the clipboard (from which you can paste it into a text editor of your choice).
On a Mac, you can take a screenshot with COMMAND + SHIFT + 4. This launches a utility that changes the mouse cursor and allows you to drag a rectangle across a section of the screen. When you release the mouse, a capture will be taken of the area, and saved as a picture to the desktop.
Compared to automated tests, using a testing plan with human testers is both slow and expensive. It should not be surprising then that Microsoft developers sought ways to shift as much of the testing burden for WPF projects to automated tests. Their solution was to develop a new architectural approach known as Model-View-ViewModel.
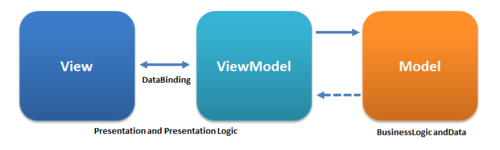
This approach expands upon the usual Model-View relationship in a GUI. A Model class is a class that represents some data, i.e. a Student, and the View is the GUI exposing that object’s data, i.e. a WPF <StudentControl>. Thus, we might have our Student class:
public class Student : INotifyPropertyChanged
{
    /// <summary>Notifies when a property changes</summary>
    public event PropertyChangedEventHandler? PropertyChanged;

    /// <summary>The student's course-taking history</summary>
    private List<CourseRecord> _courseRecords = new();

    /// <summary>The student's first name</summary>
    public string FirstName { get; init; }

    /// <summary>The student's last name</summary>
    public string LastName { get; init; }

    /// <summary>The student's course records</summary>
    /// <remarks>We return a copy of the course records to prevent modifications</remarks>
    public IEnumerable<CourseRecord> CourseRecords => _courseRecords.ToArray();

    /// <summary>The student's GPA</summary>
    public double GPA
    {
        get
        {
            var points = 0.0;
            var hours = 0.0;
            foreach (var cr in CourseRecords)
            {
                points += (double)cr.Grade * cr.CreditHours;
                hours += cr.CreditHours;
            }
            return points / hours;
        }
    }

    /// <summary>
    /// Adds <paramref name="cr"/> to the students' course history
    /// </summary>
    /// <param name="cr">The course record to add</param>
    public void AddCourseRecord(CourseRecord cr)
    {
        _courseRecords.Add(cr);
        PropertyChanged?.Invoke(this, new PropertyChangedEventArgs(nameof(CourseRecords)));
        PropertyChanged?.Invoke(this, new PropertyChangedEventArgs(nameof(GPA)));
    }

    /// <summary>
    /// Constructs the student object
    /// </summary>
    /// <param name="firstName">The student's first name</param>
    /// <param name="lastName">The student's last name</param>
    public Student(string firstName, string lastName)
    {
        FirstName = firstName;
        LastName = lastName;
    }
}
And our <ComputerScienceStudentControl>:
<UserControl x:Class="MvvmExample.ComputerScienceStudentControl"
             xmlns="http://schemas.microsoft.com/winfx/2006/xaml/presentation"
             xmlns:x="http://schemas.microsoft.com/winfx/2006/xaml"
             xmlns:mc="http://schemas.openxmlformats.org/markup-compatibility/2006"
             xmlns:d="http://schemas.microsoft.com/expression/blend/2008"
             xmlns:local="clr-namespace:MvvmExample"
             mc:Ignorable="d"
             d:DesignHeight="450" d:DesignWidth="300">
    <StackPanel Orientation="Vertical">
        <StackPanel Orientation="Horizontal">
            <TextBlock FontWeight="Bold" Margin="0,0,10,0">Name</TextBlock>
            <TextBlock Text="{Binding Path=FirstName}"/>
            <TextBlock Text="{Binding Path=LastName}"/>
        </StackPanel>
        <StackPanel Orientation="Horizontal">
            <TextBlock Margin="0,0,10,0" FontWeight="Bold">GPA</TextBlock>
            <TextBlock Text="{Binding Path=GPA, StringFormat={}{0:N2}}"/>
        </StackPanel>
        <TextBlock FontWeight="Bold">Course History</TextBlock>
        <ListView ItemsSource="{Binding Path=CourseRecords}" Margin="2,0,2,0"/>
    </StackPanel>
</UserControl>
Now, this control is simply a thin layer using data binding to connect it to the model class. But what if we needed to add some complex logic? Let’s say we want to display the student’s GPA calculated for only their computer science courses. We could put this in the Student class, but if every department in the university added their own custom logic and properties to that class, it would get very bloated very quickly. Instead, we might create a <ComputerScienceStudentControl> that would be used for this purpose, and compute the Computer Science GPA in its codebehind, but now we have complex logic that we’d prefer to test using automated tests.
Instead, we could create two new classes, our <ComputerScienceStudentControl> (a new View), and a ComputerScienceStudentViewModel (a ViewModel), as well as our existing Student (the Model).
Our ViewModel can now incorporate the custom logic for calculating a students’ computer science GPA, as well holding a reference to the Student class it is computed from:
public class ComputerScienceStudentViewModel : INotifyPropertyChanged
{
    /// <summary>
    /// The PropertyChanged event reports when properties change
    /// </summary>
    public event PropertyChangedEventHandler? PropertyChanged;

    /// <summary>
    /// The student this model represents
    /// </summary>
    /// <remarks>
    /// We require the student to be set in the constructor, and use
    /// the init accessor to prevent changing out the student object
    /// </remarks>
    public Student Student { get; init; }

    /// <summary>
    /// THe first name of the student
    /// </summary>
    public string FirstName => Student.FirstName;

    /// <summary>
    /// The last name of the student
    /// </summary>
    public string LastName => Student.LastName;

    /// <summary>
    /// The course history of the student
    /// </summary>
    public IEnumerable<CourseRecord> CourseRecords => Student.CourseRecords;

    /// <summary>
    /// The university GPA of the student
    /// </summary>
    public double GPA => Student.GPA;

    /// <summary>
    /// The student's Computer Science GPA
    /// </summary>
    public double ComputerScienceGPA
    {
        get
        {
            var points = 0.0;
            var hours = 0.0;
            foreach (var cr in Student.CourseRecords)
            {
                if (cr.CourseName.Contains("CIS"))
                {
                    points += (double)cr.Grade * cr.CreditHours;
                    hours += cr.CreditHours;
                }
            }
            return points / hours;
        }
    }

    /// <summary>
    /// An event handler for passing forward PropertyChanged events from the student object
    /// </summary>
    /// <param name="sender">The student object</param>
    /// <param name="e">The eventargs describing the property that is changing</param>
    private void HandleStudentPropertyChanged(object sender, PropertyChangedEventArgs e)
    {
        switch (e.PropertyName)
        {
            // Both first and last names map to properties of the same name,
            // so we can reuse the PropertyChangedEventARgs
            case nameof(FirstName):
            case nameof(LastName):
                PropertyChanged?.Invoke(this, e);
                break;
            // The Student.GPA maps to GPA, and changes to it may
            // also signal a change to the CIS GPA
            case nameof(Student.GPA):
                PropertyChanged?.Invoke(this, e);
                PropertyChanged?.Invoke(this, new PropertyChangedEventArgs(nameof(ComputerScienceGPA)));
                break;
            // We don't care about any other properites of the Student, as they
            // are not present in this ViewModel, so ignore them
            default:
                break;
        }
    }

    /// <summary>
    /// Constructs a new ComputerScienceStudentViewModel, which wraps around the
    /// <paramref name="student"/> object and provides some additional functionality.
    /// </summary>
    /// <param name="student">The student who is this view model</param>
    public ComputerScienceStudentViewModel(Student student)
    {
        Student = student;
        Student.PropertyChanged += HandleStudentPropertyChanged;
    }
}
And a control to display it:
<UserControl x:Class="MvvmExample.StudentControl"
             xmlns="http://schemas.microsoft.com/winfx/2006/xaml/presentation"
             xmlns:x="http://schemas.microsoft.com/winfx/2006/xaml"
             xmlns:mc="http://schemas.openxmlformats.org/markup-compatibility/2006"
             xmlns:d="http://schemas.microsoft.com/expression/blend/2008"
             xmlns:local="clr-namespace:MvvmExample"
             mc:Ignorable="d"
             d:DesignHeight="450" d:DesignWidth="300">
    <StackPanel Orientation="Vertical">
        <StackPanel Orientation="Horizontal">
            <TextBlock FontWeight="Bold" Margin="0,0,10,0">Name</TextBlock>
            <TextBlock Text="{Binding Path=FirstName}"/>
            <TextBlock Text="{Binding Path=LastName}"/>
        </StackPanel>
        <StackPanel Orientation="Horizontal">
            <TextBlock Margin="0,0,10,0" FontWeight="Bold">GPA</TextBlock>
            <TextBlock Text="{Binding Path=GPA, StringFormat={}{0:N2}}"/>
        </StackPanel>
        <TextBlock FontWeight="Bold">Course History</TextBlock>
        <ListView ItemsSource="{Binding Path=CourseRecords}" Margin="2,0,2,0"/>
    </StackPanel>
</UserControl>
The ComputerScienceViewModel can then be used interchangeably with the Student model class, as both have the same properties (though the view model has one additional one). We could then either tweak the student control or create a new one that binds to this new property, i.e.:
<StackPanel Orientation="Horizontal">
    <TextBlock Margin="0,0,10,0" FontWeight="Bold">Computer Science GPA</TextBlock>
    <TextBlock Text="{Binding Path=ComputerScienceGPA, StringFormat={}{0:N2}}"/>
</StackPanel>
This represents just one of the ways a ViewModel can be used. A View Model can also be leveraged to combine multiple data classes into a single object that can serve as a DataContext. One can also be utilized to create a wrapper object around a web-based API or other data source to provide the ability to data bind that source to GUI controls.
Finally, because a ViewModel is simply another data class, it can be unit tested just like any other. This helps make sure that complex logic which we want thoroughly tested is not embedded in a GUI component, and simplifies our testing strategies.
We’ve really only scratched the surface of the MVVM architecture as it is used in WPF applications. In addition to providing properties to bind to, a WPF MVVM can also define commands that decouple event handlers from their effects. When using commands, the GUI event handler simply signals the command, which is consumed by a ViewModel to perform the requested action.
Commands are outside the scope of this course, but you can refer to the Microsoft documentation and books from the O’Riley Learning Library if you would like to explore this concept in more depth.
In this chapter we looked at some of the challenges of testing GUIs, and saw why most GUI applications are still manually tested. We also explored the process of writing a test plan, a step-by-step process for a human tester to follow to provide rigor in the testing process.
We also explored the Model View ViewModel architecture in more depth, especially how it can allow us to move complex logic out of our GUI into a simple class that can be unit tested.