Core Web Technologies
The Big Three plus HTTP
The Big Three plus HTTP
The World-Wide-Web is a tool that you likely use every day - and it’s being used to deliver you this textbook. There are several core technologies that enable the web to work, and these are the focus of this chapter.
Some key terms to learn in this chapter are:
The World-Wide Web was the brainchild of Sir Tim Berners-Lee. It was conceived as a way to share information across the Internet; in Sir Berners-Lee’s own words describing the idea as he first conceived it:
This project is experimental and of course comes without any warranty whatsoever. However, it could start a revolution in information access.
Clearly that revolution has come to pass. The web has become part of our daily lives.
There were three key technologies that Sir Tim Berners-Lee proposed and developed. These remain the foundations upon which the web runs even today. Two are client-side, and determine how web pages are interpreted by browsers. These are:
They are joined with a third key client-side technology, which began as a scripting language developed by Brendan Eich to add interactivity to web pages in the Netscape Navigator.
You have already studied each of these core client-side web technologies in CIS 115, and used them to create your own personal web pages.
The other foundational web technology created by Sir Tim Berners-Lee is the communication protocol used to request and transmit web pages and other files across the Internet:
We will review each of these technologies briefly, before we see how ASP.NET builds upon them to deliver web applications.
Hyper-Text Markup Language (HTML), is one of the three core technologies of the world-wide-web, along with Cascading Style Sheets (CSS) and Javascript (JS). Each of these technologies has a specific role to play in delivering a website. HTML defines the structure and contents of the web page. It is a markup language, similar to XML and the XAML you have been working with (indeed, HTML is based on the SGML (Standardized General Markup Language) standard, which XML is also based on, and XAML is an extension of XML).
Thus, it uses the same kind of element structure, consisting of tags. For example, a button in HTML looks like this:
<button onclick="doSomething">
    Do Something
</button>
You likely notice how similar this definition is to buttons in XAML. As with XAML elements, HTML elements have an opening and closing tag, and can have additional HTML content nested inside these tags. HTML tags can also be self-closing, as is the case with the line break tag:
<br/>Let’s explore the parts of an HTML element in more detail.

The start tag is enclosed in angle brackets (< and >). The angle brackets differentiate the text inside them as being HTML elements, rather than text. This guides the browser to interpret them correctly.
Because angle brackets are interpreted as defining HTML tags, you cannot use those characters to represent greater than and less than signs. Instead, HTML defines escape character sequences to represent these and other special characters. Greater than is >, less than is <. A full list can be found on mdn.
Immediately after the < is the tag name. In HTML, tag names like button should be expressed in lowercase letters (unlike XAML where they are expressed in Pascal case - each word starting with a capital letter). This is a convention (as most browsers will happily accept any mixture of uppercase and lowercase letters), but is very important when using popular modern web technologies like Razor and React, as these use Pascal case tag names to differentiate between HTML and components they inject into the web page.
After the tag name comes optional attributes, which are key-value pairs expressed as key="value". Attributes should be separated from each other and the tag name by whitespace characters (any whitespace will do, but traditionally spaces are used). As with XAML, different elements have different attributes available - and you can read up on what these are by visiting the MDN article about the specific element.
However, several attributes bear special mention:
The id attribute is used to assign a unique id to an element, i.e. <button id="that-one-button">. The element can thereafter be referenced by that id in both CSS and JavaScript code. An element ID must be unique in an HTML page, or unexpected behavior may result!
The class attribute is also used to assign an identifier used by CSS and JavaScript. However, classes don’t need to be unique; many elements can have the same class. Further, each element can be assigned multiple classes, as a space-delimited string, i.e. <button class="large warning"> assigns both the classes “large” and “warning” to the button.
Also, some web technologies (like Angular) introduce new attributes specific to their framework, taking advantage of the fact that a browser will ignore any attributes it does not recognize.
The content nested inside the tag can be plain text, or another HTML element (or collection of elements). Unlike XAML elements, which usually can have only one child, HTML elements can have multiple children. Indentation should be used to keep your code legible by indenting any nested content, i.e.:
<div>
    <h1>A Title</h1>
    <p>This is a paragraph of text that is nested inside the div</p>
    <p>And this is another paragraph of text</p>
</div>
The end tag is also enclosed in angle brackets (< and >). Immediately after the < is a forward slash /, and then the tag name. You do not include attributes in an end tag.
If the element has no content, the end tag can be combined with the start tag in a self-closing tag, i.e. the input tag is typically written as self-closing:
<input id="first-name" type="text" placeholder="Your first name"/>
Text in HTML works a bit differently than you might expect. Most notably, all white space is converted into a single space. Thus, the lines:
<blockquote>
    If you can keep your head when all about you
        Are losing theirs and blaming it on you,
    If you can trust yourself when all men doubt you,
        But make allowance for their doubting too;
    If you can wait and not be tired by waiting,
        Or being lied about, don’t deal in lies,
    Or being hated, don’t give way to hating,
        And yet don’t look too good, nor talk too wise:
    <i>-Rudyard Kipling, excerpt from "If"</i>
</blockquote>
Would be rendered:
If you can keep your head when all about you Are losing theirs and blaming it on you, If you can trust yourself when all men doubt you, But make allowance for their doubting too; If you can wait and not be tired by waiting, Or being lied about, don’t deal in lies, Or being hated, don’t give way to hating, And yet don’t look too good, nor talk too wise: -Rudyard Kipling, excerpt from "If"
If, for some reason you need to maintain formatting of the included text, you can use the <pre> element (which indicates the text is preformatted):
<blockquote>
    <pre>
If you can keep your head when all about you
    Are losing theirs and blaming it on you,
If you can trust yourself when all men doubt you,
    But make allowance for their doubting too;
If you can wait and not be tired by waiting,
    Or being lied about, don’t deal in lies,
Or being hated, don’t give way to hating,
    And yet don’t look too good, nor talk too wise:
    </pre>
    <i>-Rudyard Kipling, excerpt from "If"</i>
</blockquote>
Which would be rendered:
If you can keep your head when all about you
    Are losing theirs and blaming it on you,
If you can trust yourself when all men doubt you,
    But make allowance for their doubting too;
If you can wait and not be tired by waiting,
    Or being lied about, don’t deal in lies,
Or being hated, don’t give way to hating,
    And yet don’t look too good, nor talk too wise:
-Rudyard Kipling, excerpt from "If"
Note that the <pre> preserves all formatting, so it is necessary not to indent its contents.
Alternatively, you can denote line breaks with <br/>, and non-breaking spaces with :
<blockquote>
If you can keep your head when all about you<br/>
Are losing theirs and blaming it on you,<br/>
If you can trust yourself when all men doubt you,<br/>
But make allowance for their doubting too;<br/>
If you can wait and not be tired by waiting,<br/>
Or being lied about, don’t deal in lies,<br/>
Or being hated, don’t give way to hating,<br/>
And yet don’t look too good, nor talk too wise:<br/>
<i>-Rudyard Kipling, excerpt from "If"</i>
</blockquote>Which renders:
If you can keep your head when all about you
Are losing theirs and blaming it on you,
If you can trust yourself when all men doubt you,
But make allowance for their doubting too;
If you can wait and not be tired by waiting,
Or being lied about, don’t deal in lies,
Or being hated, don’t give way to hating,
And yet don’t look too good, nor talk too wise:
-Rudyard Kipling, excerpt from "If"
Additionally, as a programmer you may want to use the the code element in conjunction with the pre element to display preformatted code snippets in your pages.
HTML comments are identical to XAML comments (as both inherited from SGML). Comments start with the sequence <!-- and end with the sequence -->, i.e.:
<!-- This is an example of a HTML comment -->HTML5.0 (the current HTML standard) pages have an expected structure that you should follow. This is:
<!DOCTYPE html>
<html>
    <head>
        <title><!-- The title of your page goes here --></title>
        <!-- other metadata about your page goes here -->
    </head>
    <body>
        <!-- The contents of your page go here -->
    </body>
</html>Rather than include an exhaustive list of HTML elements, I will direct you to the list provided by MDN. However, it is useful to recognize that elements can serve different purposes:
Some organize the page into sections like the header and footer - MDN calls these the Content Section elements
Some define the meaning, structure or style of text - MDN calls these the Inline text semantics elements
Some present images, audio, video, or other embedded multimedia content - MDN calls these the Image and multimedia elements and Embedded content elements
Tables are composed of Table content elements
User input is collected with Forms
There are more tags than this, but these are the most commonly employed, and the ones you should be familiar with.
The MDN HTML Docs are recommended reading for learning more about HTML.
Cascading Style Sheets (CSS) is the second core web technology of the web. It defines the appearance of web pages by applying stylistic rules to matching HTML elements. CSS is normally declared in a file with the .css extension, separate from the HTML files it is modifying, though it can also be declared within the page using the <style> element, or directly on an element using the style attribute.
A CSS rule consists of a selector and a definition block, i.e.:
h1
{
    color: red;
    font-weight: bold;
}A CSS selector determines which elements the associated definition block apply to. In the above example, the h1 selector indicates that the style definition supplied applies to all <h1> elements. The selectors can be:
p applies to all <p> elements.#. I.e. the selector #foo applies to the element <span id="foo">... I.e. the selector .bar applies to the elements <div class="bar">, <span class="bar none">, and <p class="alert bar warning">.CSS selectors can also be combined in a number of ways, and pseudo-selectors can be applied under certain circumstances, like the :hover pseudo-selector which applies only when the mouse cursor is over the element.
You can read more on MDN’s CSS Selectors Page.
A CSS definition block is bracketed by curly braces and contains a series of key-value pairs in the format key=value;. Each key is a property that defines how an HTML Element should be displayed, and the value needs to be a valid value for that property.
Measurements can be expressed in a number of units, from pixels (px), points (pt), the font size of the parent (em), the font size of the root element (rem), a percentage of the available space (%), or a percentage of the viewport width (vw) or height (vh). See MDN’s CSS values and units for more details.
Other values are specific to the property. For example, the cursor property has possible values help, wait, crosshair, not-allowed, zoom-in, and grab. You should use the MDN documentation for a reference.
One common use for CSS is to change properties about how the text in an element is rendered. This can include changing attributes of the font (font-style, font-weight, font-size, font-family), the color, and the text (text-align, line-break, word-wrap, text-indent, text-justify). These are just a sampling of some of the most commonly used properties.
A second common use for CSS is to change properties of the element itself. This can include setting dimensions (width, height), adding margins, borders, and padding.
These values provide additional space around the content of the element, following the CSS Box Model:

The third common use for CSS is to change how elements are laid out on the page. By default HTML elements follow the flow model, where each element appears on the page after the one before it. Some elements are block level elements, which stretch across the entire page (so the next element appears below it), and others are inline and are only as wide as they need to be to hold their contents, so the next element can appear to the right, if there is room.
The float property can make an element float to the left or right of its container, allowing the rest of the page to flow around it.
Or you can swap out the layout model entirely by changing the display property to flex (for flexbox, similar to the XAML StackPanel) or grid (similar to the XAML Grid). For learning about these two display models, the CSS-Tricks A Complete Guide to Flexbox and A Complete Guide to Grid are recommended reading. These can provide quite powerful layout tools to the developer.
This is just the tip of the iceberg of what is possible with CSS. Using CSS media queries can change the rules applied to elements based on the size of the device it is viewed on, allowing for responsive design. CSS Animation can allow properties to change over time, making stunning visual animations easy to implement. And CSS can also carry out calculations and store values, leading some computer scientists to argue that it is a Turing Complete language.
The MDN Cascading Stylesheets Docs and CSS Tricks are recommended reading to learn more about CSS and its uses.
Javascript (or ECMAScript, which is the standard Javascript is derived from), was originally developed for Netscape Navigator by Brendon Eich. The original version was completed in just 10 days. The name “javascript” was a marketing move by Netscape as they had just secured the rights to use Java Applets in their browser, and wanted to tie the two languages together. Similarly, they pushed for a Java-like syntax, which Brandon accommodated. However, he also incorporated functional behaviors based on the Scheme and drew upon Self’s implementation of object-orientation. The result is a language that may look familiar to you, but often works in unexpected ways.
Unlike the statically-typed C# we’ve been working with, Javascript has dynamic types. This means that we always declare variables using the var keyword, i.e.:
var i = 0;
var story = "Jack and Jill went up a hill...";
var pi = 3.14;
Much like the var type in C#, the type of the variable is inferred when it is set. Unlike C# though, the type can change with a new assignment, i.e.:
var i = 0; // i is an integer
i = "The sky is blue"; // now i is a string
i = true; // now i is a boolean
This would cause an error in C#, but is perfectly legal in Javascript. Because Javascript is dynamically typed, it is impossible to determine type errors until the program is run.
In addition to var, variables can be declared with the const keyword (for constants that cannot be re-assigned), or the let keyword (discussed below).
While the type of a variable is inferred, Javascript still supports types. You can determine the type of a variable with the typeof() function. The available types in Javascript are:
true or false)"I'm a string"), single quotes 'Me too!', or backticks `I'm a template string ${2 + 3}`) which indicate a template string and can execute and concatenate embedded Javascript expressions.["I am", 2, "listy", 4, "u"]), which are a generic catch-all data structure, which can be treated as an array, list, queue, or stack.new keyword, discussed later)In Javascript, there are two keywords that represent a null value, undefined and null. These have a different meaning: undefined refers to values that have not yet been initialized, while null must be explicitly set by the programmer (and thus intentionally meaning nothing).
As suggested in the description, Javascript is a functional language incorporating many ideas from Scheme. In JavaScript we declare functions using the function keyword, i.e.:
function add(a, b) {
  return a + b;
}
We can also declare an anonymous function (one without a name):
function (a, b) {
  return a + b;
}
or with the lambda syntax:
(a,b) => {
  return a + b;
}
In Javascript, functions are first-class objects, which means they can be stored as variables, i.e.:
var add = function(a,b) {
  return a + b;
}
Added to arrays:
var math = [
  add,
  (a,b) => {return a - b;},
  function(a,b) { a * b; },
]
Or passed as function arguments.
Variable scope in Javascript is bound to functions. Blocks like the body of an if or for loop do not declare a new scope. Thus, this code:
for(var i = 0; i < 3; i++;)
{
  console.log("Counting i=" + i);
}
console.log("Final value of i is: " + i);
Will print:
Counting i=0
Counting i=1
Counting i=2
Final value of i is: 3
Because the i variable is not scoped to the block of the for loop, but rather, the function that contains it.
The keyword let was introduced in ECMAScript version 6 as an alternative for var that enforces block scope. Using let in the example above would result in a reference error being thrown, as i is not defined outside of the for loop block.
Javascript was written to run within the browser, and was therefore event-driven from the start. It uses the event loop and queue pattern we saw in C#. For example, we can set an event to occur in the future with setTimeout():
setTimeout(function(){console.log("Hello, future!")}, 2000);This will cause “Hello, future!” to be printed 2 seconds (2000 milliseconds) in the future (notice too that we can pass a function to a function).
As suggested above, Javascript is object-oriented, but in a manner more similar to Self than to C#. For example, we can declare objects literally:
var student = {
  first: "Mark",
  last: "Delaney"
}
Or we can write a constructor, which in Javascript is simply a function we capitalize by convention:
function Student(first, last){
  this.first = first;
  this.last = last;
}
And invoke with the new keyword:
var js = new Student("Jack", "Sprat");Objects constructed from classes have a prototype, which can be used to attach methods:
Student.prototype.greet = function(){
  console.log(`Hello, my name is ${this.first} ${this.last}`);
}
Thus, js.greet() would print Hello, my name is Jack Sprat;
ECMAScript 6 introduced a more familiar form of class definition:
class Student{
  constructor(first, last) {
    this.first = first;
    this.last = last;
    this.greet = this.greet.bind(this);
  }
  greet(){
    console.log(`Hello, my name is ${this.first} ${this.last}`);
  }
}
However, because JavaScript uses function scope, the this in the method greet would not refer to the student constructed in the constructor, but the greet() method itself. The constructor line this.greet = this.greet.bind(this); fixes that issue by binding the greet() method to the this of the constructor.
The Document Object Model (DOM) is a tree-like structure that the browser constructs from parsed HTML to determine size, placement, and appearance of the elements on-screen. In this, it is much like the elements tree we used with Windows Presentation Foundation (which was most likely inspired by the DOM). The DOM is also accessible to Javascript - in fact, one of the most important uses of Javascript is to manipulate the DOM.
You can learn more about the DOM from MDN’s Document Object Model documentation entry.
At the heart of the world wide web is the Hyper-Text Transfer Protocol (HTTP). This is a protocol defining how HTTP servers (which host web pages) interact with HTTP clients (which display web pages).
It starts with a request initiated from the web browser (the client). This request is sent over the Internet using the TCP protocol to a web server. Once the web server receives the request, it must decide the appropriate response - ideally sending the requested resource back to the browser to be displayed. The following diagram displays this typical request-response pattern.
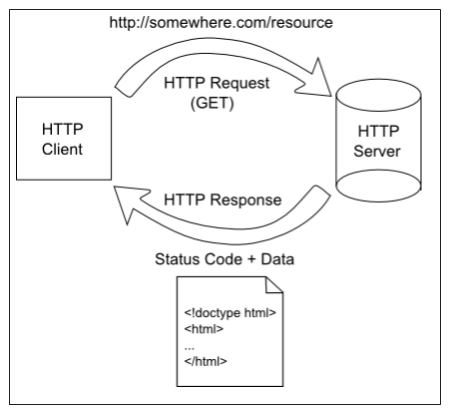
This HTTP request-response pattern is at the core of how all web applications communicate. Even those that use websockets begin with an HTTP request.
A HTTP Request is just text that follows a specific format and sent from a client to a server. It consists of one or more lines terminated by a CRLF (a carriage return and a line feed character, typically written \r\n in most programming languages).
Similar to an HTTP Request, an HTTP response consists of one or more lines of text, terminated by a CRLF (sequential carriage return and line feed characters):
With our new understanding of HTTP requests and responses as consisting of streams of text that match a well-defined format, we can try manually making our own requests, using a Linux command line tool netcat.
Open a PowerShell instance (Windows) or a terminal (Mac/Linux) and enter the command:
$ ssh [eid]@cslinux.cs.ksu.edu
Alternatively, you can use Putty to connect to cslinux. Detailed instructions on both approaches can be found on the Computer Science support pages.
If you are connecting from off-campus, you will also need to connect through the K-State VPN to access the Computer Science Linux server. You can find more information about the K-State VPN on the K-State IT pages
The $ indicates a terminal prompt; you don’t need to type it. The [eid] should be replaced with your eid. This should ssh you into the CS Linux system. It will prompt you for your CS password, unless you’ve set up public/private key access.
Once in, type the command:
$ nc google.com 80
The nc is the netcat executable - we’re asking Linux to run netcat for us, and providing two command-line arguments, google.com and 80, which are the webserver we want to talk to and the port we want to connect to (port 80 is the default port for HTTP requests).
Now that a connection is established, we can stream our request to Google’s server:
GET / HTTP/1.1
The GET indicates we are making a GET request, i.e. requesting a resource from the server. The / indicates the resource on the server we are requesting (at this point, just the top-level page). Finally, the HTTP/1.1 indicates the version of HTTP we are using.
Note that you need to press the return key twice after the GET line, once to end the line, and the second time to end the HTTP request. Pressing the return key in the terminal enters the CRLF character sequence (Carriage Return & Line Feed) the HTTP protocol uses to separate lines
Once the second return is pressed, a whole bunch of text will appear in the terminal. This is the HTTP Response from Google’s server. We’ll take a look at that next.
Scroll up to the top of the request, and you should see something like:
HTTP/1.1 200 OK
Date: Wed, 16 Jan 2019 15:39:33 GMT
Expires: -1
Cache-Control: private, max-age=0
Content-Type: text/html; charset=ISO-8859-1
P3P: CP="This is not a P3P policy! See g.co/p3phelp for more info."
Server: gws
X-XSS-Protection: 1; mode=block
X-Frame-Options: SAMEORIGIN
Set-Cookie: 1P_JAR=2019-01-16-15; expires=Fri, 15-Feb-2019 15:39:33 GMT; path=/; domain=.google.com
Set-Cookie: NID=154=XyALfeRzT9rj_55NNa006-Mmszh7T4rIp9Pgr4AVk4zZuQMZIDAj2hWYoYkKU6Etbmjkft5YPW8Fens07MvfxRSw1D9mKZckUiQ--RZJWZyurfJUyRtoJyTfSOMSaniZTtffEBNK7hY2M23GAMyFIRpyQYQtMpCv2D6xHqpKjb4; expires=Thu, 18-Jul-2019 15:39:33 GMT; path=/; domain=.google.com; HttpOnly
Accept-Ranges: none
Vary: Accept-Encoding

<!doctype html>...
The first line indicates that the server responded using the HTTP 1.1 protocol, the status of the response is a 200 code, which corresponds to the human meaning “OK”. In other words, the request worked. The remaining lines are headers describing aspects of the request - the Date, for example, indicates when the request was made, and the path indicates what was requested. Most important of these headers, though, is the Content-Type header, which indicates what the body of the response consists of. The content type text/html means the body consists of text, which is formatted as HTML – in other words, a webpage.
Everything after the blank line is the body of the response - in this case, the page content as HTML text. If you scroll far enough through it, you should be able to locate all of the HTML elements in Google’s search page.
That’s really all there is with a HTTP request and response. They’re just streams of data. A webserver just receives a request, processes it, and sends a response.
In this chapter we explored the three client-side core web technologies: HTML, which defines the content of a web page; CSS, which defines the appearance of the web page; and Javascript, which adds interactivity to the web page. We also examined Hyper-Text Transfer Protocol (HTTP) which is used to transmit web pages from the server to the client. We learned that HTTP always follows a request-response pattern, and how both requests and responses are simply streams of data that follow a specific layout.
With this basic understanding of the web client files, and the means to transmit them to the client, we are ready to tackle creating a web server, which we will do in the next chapter.