Web Development
Taking Objects Online
Taking Objects Online
The Big Three plus HTTP
The World-Wide-Web is a tool that you likely use every day - and it’s being used to deliver you this textbook. There are several core technologies that enable the web to work, and these are the focus of this chapter.
Some key terms to learn in this chapter are:
The World-Wide Web was the brainchild of Sir Tim Berners-Lee. It was conceived as a way to share information across the Internet; in Sir Berners-Lee’s own words describing the idea as he first conceived it:
This project is experimental and of course comes without any warranty whatsoever. However, it could start a revolution in information access.
Clearly that revolution has come to pass. The web has become part of our daily lives.
There were three key technologies that Sir Tim Berners-Lee proposed and developed. These remain the foundations upon which the web runs even today. Two are client-side, and determine how web pages are interpreted by browsers. These are:
They are joined with a third key client-side technology, which began as a scripting language developed by Brendan Eich to add interactivity to web pages in the Netscape Navigator.
You have already studied each of these core client-side web technologies in CIS 115, and used them to create your own personal web pages.
The other foundational web technology created by Sir Tim Berners-Lee is the communication protocol used to request and transmit web pages and other files across the Internet:
We will review each of these technologies briefly, before we see how ASP.NET builds upon them to deliver web applications.
Hyper-Text Markup Language (HTML), is one of the three core technologies of the world-wide-web, along with Cascading Style Sheets (CSS) and Javascript (JS). Each of these technologies has a specific role to play in delivering a website. HTML defines the structure and contents of the web page. It is a markup language, similar to XML and the XAML you have been working with (indeed, HTML is based on the SGML (Standardized General Markup Language) standard, which XML is also based on, and XAML is an extension of XML).
Thus, it uses the same kind of element structure, consisting of tags. For example, a button in HTML looks like this:
<button onclick="doSomething">
    Do Something
</button>
You likely notice how similar this definition is to buttons in XAML. As with XAML elements, HTML elements have an opening and closing tag, and can have additional HTML content nested inside these tags. HTML tags can also be self-closing, as is the case with the line break tag:
<br/>Let’s explore the parts of an HTML element in more detail.

The start tag is enclosed in angle brackets (< and >). The angle brackets differentiate the text inside them as being HTML elements, rather than text. This guides the browser to interpret them correctly.
Because angle brackets are interpreted as defining HTML tags, you cannot use those characters to represent greater than and less than signs. Instead, HTML defines escape character sequences to represent these and other special characters. Greater than is >, less than is <. A full list can be found on mdn.
Immediately after the < is the tag name. In HTML, tag names like button should be expressed in lowercase letters (unlike XAML where they are expressed in Pascal case - each word starting with a capital letter). This is a convention (as most browsers will happily accept any mixture of uppercase and lowercase letters), but is very important when using popular modern web technologies like Razor and React, as these use Pascal case tag names to differentiate between HTML and components they inject into the web page.
After the tag name comes optional attributes, which are key-value pairs expressed as key="value". Attributes should be separated from each other and the tag name by whitespace characters (any whitespace will do, but traditionally spaces are used). As with XAML, different elements have different attributes available - and you can read up on what these are by visiting the MDN article about the specific element.
However, several attributes bear special mention:
The id attribute is used to assign a unique id to an element, i.e. <button id="that-one-button">. The element can thereafter be referenced by that id in both CSS and JavaScript code. An element ID must be unique in an HTML page, or unexpected behavior may result!
The class attribute is also used to assign an identifier used by CSS and JavaScript. However, classes don’t need to be unique; many elements can have the same class. Further, each element can be assigned multiple classes, as a space-delimited string, i.e. <button class="large warning"> assigns both the classes “large” and “warning” to the button.
Also, some web technologies (like Angular) introduce new attributes specific to their framework, taking advantage of the fact that a browser will ignore any attributes it does not recognize.
The content nested inside the tag can be plain text, or another HTML element (or collection of elements). Unlike XAML elements, which usually can have only one child, HTML elements can have multiple children. Indentation should be used to keep your code legible by indenting any nested content, i.e.:
<div>
    <h1>A Title</h1>
    <p>This is a paragraph of text that is nested inside the div</p>
    <p>And this is another paragraph of text</p>
</div>
The end tag is also enclosed in angle brackets (< and >). Immediately after the < is a forward slash /, and then the tag name. You do not include attributes in an end tag.
If the element has no content, the end tag can be combined with the start tag in a self-closing tag, i.e. the input tag is typically written as self-closing:
<input id="first-name" type="text" placeholder="Your first name"/>
Text in HTML works a bit differently than you might expect. Most notably, all white space is converted into a single space. Thus, the lines:
<blockquote>
    If you can keep your head when all about you
        Are losing theirs and blaming it on you,
    If you can trust yourself when all men doubt you,
        But make allowance for their doubting too;
    If you can wait and not be tired by waiting,
        Or being lied about, don’t deal in lies,
    Or being hated, don’t give way to hating,
        And yet don’t look too good, nor talk too wise:
    <i>-Rudyard Kipling, excerpt from "If"</i>
</blockquote>
Would be rendered:
If you can keep your head when all about you Are losing theirs and blaming it on you, If you can trust yourself when all men doubt you, But make allowance for their doubting too; If you can wait and not be tired by waiting, Or being lied about, don’t deal in lies, Or being hated, don’t give way to hating, And yet don’t look too good, nor talk too wise: -Rudyard Kipling, excerpt from "If"
If, for some reason you need to maintain formatting of the included text, you can use the <pre> element (which indicates the text is preformatted):
<blockquote>
    <pre>
If you can keep your head when all about you
    Are losing theirs and blaming it on you,
If you can trust yourself when all men doubt you,
    But make allowance for their doubting too;
If you can wait and not be tired by waiting,
    Or being lied about, don’t deal in lies,
Or being hated, don’t give way to hating,
    And yet don’t look too good, nor talk too wise:
    </pre>
    <i>-Rudyard Kipling, excerpt from "If"</i>
</blockquote>
Which would be rendered:
If you can keep your head when all about you
    Are losing theirs and blaming it on you,
If you can trust yourself when all men doubt you,
    But make allowance for their doubting too;
If you can wait and not be tired by waiting,
    Or being lied about, don’t deal in lies,
Or being hated, don’t give way to hating,
    And yet don’t look too good, nor talk too wise:
-Rudyard Kipling, excerpt from "If"
Note that the <pre> preserves all formatting, so it is necessary not to indent its contents.
Alternatively, you can denote line breaks with <br/>, and non-breaking spaces with :
<blockquote>
If you can keep your head when all about you<br/>
Are losing theirs and blaming it on you,<br/>
If you can trust yourself when all men doubt you,<br/>
But make allowance for their doubting too;<br/>
If you can wait and not be tired by waiting,<br/>
Or being lied about, don’t deal in lies,<br/>
Or being hated, don’t give way to hating,<br/>
And yet don’t look too good, nor talk too wise:<br/>
<i>-Rudyard Kipling, excerpt from "If"</i>
</blockquote>Which renders:
If you can keep your head when all about you
Are losing theirs and blaming it on you,
If you can trust yourself when all men doubt you,
But make allowance for their doubting too;
If you can wait and not be tired by waiting,
Or being lied about, don’t deal in lies,
Or being hated, don’t give way to hating,
And yet don’t look too good, nor talk too wise:
-Rudyard Kipling, excerpt from "If"
Additionally, as a programmer you may want to use the the code element in conjunction with the pre element to display preformatted code snippets in your pages.
HTML comments are identical to XAML comments (as both inherited from SGML). Comments start with the sequence <!-- and end with the sequence -->, i.e.:
<!-- This is an example of a HTML comment -->HTML5.0 (the current HTML standard) pages have an expected structure that you should follow. This is:
<!DOCTYPE html>
<html>
    <head>
        <title><!-- The title of your page goes here --></title>
        <!-- other metadata about your page goes here -->
    </head>
    <body>
        <!-- The contents of your page go here -->
    </body>
</html>Rather than include an exhaustive list of HTML elements, I will direct you to the list provided by MDN. However, it is useful to recognize that elements can serve different purposes:
Some organize the page into sections like the header and footer - MDN calls these the Content Section elements
Some define the meaning, structure or style of text - MDN calls these the Inline text semantics elements
Some present images, audio, video, or other embedded multimedia content - MDN calls these the Image and multimedia elements and Embedded content elements
Tables are composed of Table content elements
User input is collected with Forms
There are more tags than this, but these are the most commonly employed, and the ones you should be familiar with.
The MDN HTML Docs are recommended reading for learning more about HTML.
Cascading Style Sheets (CSS) is the second core web technology of the web. It defines the appearance of web pages by applying stylistic rules to matching HTML elements. CSS is normally declared in a file with the .css extension, separate from the HTML files it is modifying, though it can also be declared within the page using the <style> element, or directly on an element using the style attribute.
A CSS rule consists of a selector and a definition block, i.e.:
h1
{
    color: red;
    font-weight: bold;
}A CSS selector determines which elements the associated definition block apply to. In the above example, the h1 selector indicates that the style definition supplied applies to all <h1> elements. The selectors can be:
p applies to all <p> elements.#. I.e. the selector #foo applies to the element <span id="foo">... I.e. the selector .bar applies to the elements <div class="bar">, <span class="bar none">, and <p class="alert bar warning">.CSS selectors can also be combined in a number of ways, and pseudo-selectors can be applied under certain circumstances, like the :hover pseudo-selector which applies only when the mouse cursor is over the element.
You can read more on MDN’s CSS Selectors Page.
A CSS definition block is bracketed by curly braces and contains a series of key-value pairs in the format key=value;. Each key is a property that defines how an HTML Element should be displayed, and the value needs to be a valid value for that property.
Measurements can be expressed in a number of units, from pixels (px), points (pt), the font size of the parent (em), the font size of the root element (rem), a percentage of the available space (%), or a percentage of the viewport width (vw) or height (vh). See MDN’s CSS values and units for more details.
Other values are specific to the property. For example, the cursor property has possible values help, wait, crosshair, not-allowed, zoom-in, and grab. You should use the MDN documentation for a reference.
One common use for CSS is to change properties about how the text in an element is rendered. This can include changing attributes of the font (font-style, font-weight, font-size, font-family), the color, and the text (text-align, line-break, word-wrap, text-indent, text-justify). These are just a sampling of some of the most commonly used properties.
A second common use for CSS is to change properties of the element itself. This can include setting dimensions (width, height), adding margins, borders, and padding.
These values provide additional space around the content of the element, following the CSS Box Model:

The third common use for CSS is to change how elements are laid out on the page. By default HTML elements follow the flow model, where each element appears on the page after the one before it. Some elements are block level elements, which stretch across the entire page (so the next element appears below it), and others are inline and are only as wide as they need to be to hold their contents, so the next element can appear to the right, if there is room.
The float property can make an element float to the left or right of its container, allowing the rest of the page to flow around it.
Or you can swap out the layout model entirely by changing the display property to flex (for flexbox, similar to the XAML StackPanel) or grid (similar to the XAML Grid). For learning about these two display models, the CSS-Tricks A Complete Guide to Flexbox and A Complete Guide to Grid are recommended reading. These can provide quite powerful layout tools to the developer.
This is just the tip of the iceberg of what is possible with CSS. Using CSS media queries can change the rules applied to elements based on the size of the device it is viewed on, allowing for responsive design. CSS Animation can allow properties to change over time, making stunning visual animations easy to implement. And CSS can also carry out calculations and store values, leading some computer scientists to argue that it is a Turing Complete language.
The MDN Cascading Stylesheets Docs and CSS Tricks are recommended reading to learn more about CSS and its uses.
Javascript (or ECMAScript, which is the standard Javascript is derived from), was originally developed for Netscape Navigator by Brendon Eich. The original version was completed in just 10 days. The name “javascript” was a marketing move by Netscape as they had just secured the rights to use Java Applets in their browser, and wanted to tie the two languages together. Similarly, they pushed for a Java-like syntax, which Brandon accommodated. However, he also incorporated functional behaviors based on the Scheme and drew upon Self’s implementation of object-orientation. The result is a language that may look familiar to you, but often works in unexpected ways.
Unlike the statically-typed C# we’ve been working with, Javascript has dynamic types. This means that we always declare variables using the var keyword, i.e.:
var i = 0;
var story = "Jack and Jill went up a hill...";
var pi = 3.14;
Much like the var type in C#, the type of the variable is inferred when it is set. Unlike C# though, the type can change with a new assignment, i.e.:
var i = 0; // i is an integer
i = "The sky is blue"; // now i is a string
i = true; // now i is a boolean
This would cause an error in C#, but is perfectly legal in Javascript. Because Javascript is dynamically typed, it is impossible to determine type errors until the program is run.
In addition to var, variables can be declared with the const keyword (for constants that cannot be re-assigned), or the let keyword (discussed below).
While the type of a variable is inferred, Javascript still supports types. You can determine the type of a variable with the typeof() function. The available types in Javascript are:
true or false)"I'm a string"), single quotes 'Me too!', or backticks `I'm a template string ${2 + 3}`) which indicate a template string and can execute and concatenate embedded Javascript expressions.["I am", 2, "listy", 4, "u"]), which are a generic catch-all data structure, which can be treated as an array, list, queue, or stack.new keyword, discussed later)In Javascript, there are two keywords that represent a null value, undefined and null. These have a different meaning: undefined refers to values that have not yet been initialized, while null must be explicitly set by the programmer (and thus intentionally meaning nothing).
As suggested in the description, Javascript is a functional language incorporating many ideas from Scheme. In JavaScript we declare functions using the function keyword, i.e.:
function add(a, b) {
  return a + b;
}
We can also declare an anonymous function (one without a name):
function (a, b) {
  return a + b;
}
or with the lambda syntax:
(a,b) => {
  return a + b;
}
In Javascript, functions are first-class objects, which means they can be stored as variables, i.e.:
var add = function(a,b) {
  return a + b;
}
Added to arrays:
var math = [
  add,
  (a,b) => {return a - b;},
  function(a,b) { a * b; },
]
Or passed as function arguments.
Variable scope in Javascript is bound to functions. Blocks like the body of an if or for loop do not declare a new scope. Thus, this code:
for(var i = 0; i < 3; i++;)
{
  console.log("Counting i=" + i);
}
console.log("Final value of i is: " + i);
Will print:
Counting i=0
Counting i=1
Counting i=2
Final value of i is: 3
Because the i variable is not scoped to the block of the for loop, but rather, the function that contains it.
The keyword let was introduced in ECMAScript version 6 as an alternative for var that enforces block scope. Using let in the example above would result in a reference error being thrown, as i is not defined outside of the for loop block.
Javascript was written to run within the browser, and was therefore event-driven from the start. It uses the event loop and queue pattern we saw in C#. For example, we can set an event to occur in the future with setTimeout():
setTimeout(function(){console.log("Hello, future!")}, 2000);This will cause “Hello, future!” to be printed 2 seconds (2000 milliseconds) in the future (notice too that we can pass a function to a function).
As suggested above, Javascript is object-oriented, but in a manner more similar to Self than to C#. For example, we can declare objects literally:
var student = {
  first: "Mark",
  last: "Delaney"
}
Or we can write a constructor, which in Javascript is simply a function we capitalize by convention:
function Student(first, last){
  this.first = first;
  this.last = last;
}
And invoke with the new keyword:
var js = new Student("Jack", "Sprat");Objects constructed from classes have a prototype, which can be used to attach methods:
Student.prototype.greet = function(){
  console.log(`Hello, my name is ${this.first} ${this.last}`);
}
Thus, js.greet() would print Hello, my name is Jack Sprat;
ECMAScript 6 introduced a more familiar form of class definition:
class Student{
  constructor(first, last) {
    this.first = first;
    this.last = last;
    this.greet = this.greet.bind(this);
  }
  greet(){
    console.log(`Hello, my name is ${this.first} ${this.last}`);
  }
}
However, because JavaScript uses function scope, the this in the method greet would not refer to the student constructed in the constructor, but the greet() method itself. The constructor line this.greet = this.greet.bind(this); fixes that issue by binding the greet() method to the this of the constructor.
The Document Object Model (DOM) is a tree-like structure that the browser constructs from parsed HTML to determine size, placement, and appearance of the elements on-screen. In this, it is much like the elements tree we used with Windows Presentation Foundation (which was most likely inspired by the DOM). The DOM is also accessible to Javascript - in fact, one of the most important uses of Javascript is to manipulate the DOM.
You can learn more about the DOM from MDN’s Document Object Model documentation entry.
At the heart of the world wide web is the Hyper-Text Transfer Protocol (HTTP). This is a protocol defining how HTTP servers (which host web pages) interact with HTTP clients (which display web pages).
It starts with a request initiated from the web browser (the client). This request is sent over the Internet using the TCP protocol to a web server. Once the web server receives the request, it must decide the appropriate response - ideally sending the requested resource back to the browser to be displayed. The following diagram displays this typical request-response pattern.
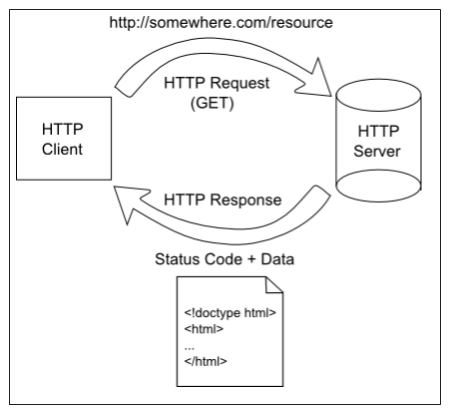
This HTTP request-response pattern is at the core of how all web applications communicate. Even those that use websockets begin with an HTTP request.
A HTTP Request is just text that follows a specific format and sent from a client to a server. It consists of one or more lines terminated by a CRLF (a carriage return and a line feed character, typically written \r\n in most programming languages).
Similar to an HTTP Request, an HTTP response consists of one or more lines of text, terminated by a CRLF (sequential carriage return and line feed characters):
With our new understanding of HTTP requests and responses as consisting of streams of text that match a well-defined format, we can try manually making our own requests, using a Linux command line tool netcat.
Open a PowerShell instance (Windows) or a terminal (Mac/Linux) and enter the command:
$ ssh [eid]@cslinux.cs.ksu.edu
Alternatively, you can use Putty to connect to cslinux. Detailed instructions on both approaches can be found on the Computer Science support pages.
If you are connecting from off-campus, you will also need to connect through the K-State VPN to access the Computer Science Linux server. You can find more information about the K-State VPN on the K-State IT pages
The $ indicates a terminal prompt; you don’t need to type it. The [eid] should be replaced with your eid. This should ssh you into the CS Linux system. It will prompt you for your CS password, unless you’ve set up public/private key access.
Once in, type the command:
$ nc google.com 80
The nc is the netcat executable - we’re asking Linux to run netcat for us, and providing two command-line arguments, google.com and 80, which are the webserver we want to talk to and the port we want to connect to (port 80 is the default port for HTTP requests).
Now that a connection is established, we can stream our request to Google’s server:
GET / HTTP/1.1
The GET indicates we are making a GET request, i.e. requesting a resource from the server. The / indicates the resource on the server we are requesting (at this point, just the top-level page). Finally, the HTTP/1.1 indicates the version of HTTP we are using.
Note that you need to press the return key twice after the GET line, once to end the line, and the second time to end the HTTP request. Pressing the return key in the terminal enters the CRLF character sequence (Carriage Return & Line Feed) the HTTP protocol uses to separate lines
Once the second return is pressed, a whole bunch of text will appear in the terminal. This is the HTTP Response from Google’s server. We’ll take a look at that next.
Scroll up to the top of the request, and you should see something like:
HTTP/1.1 200 OK
Date: Wed, 16 Jan 2019 15:39:33 GMT
Expires: -1
Cache-Control: private, max-age=0
Content-Type: text/html; charset=ISO-8859-1
P3P: CP="This is not a P3P policy! See g.co/p3phelp for more info."
Server: gws
X-XSS-Protection: 1; mode=block
X-Frame-Options: SAMEORIGIN
Set-Cookie: 1P_JAR=2019-01-16-15; expires=Fri, 15-Feb-2019 15:39:33 GMT; path=/; domain=.google.com
Set-Cookie: NID=154=XyALfeRzT9rj_55NNa006-Mmszh7T4rIp9Pgr4AVk4zZuQMZIDAj2hWYoYkKU6Etbmjkft5YPW8Fens07MvfxRSw1D9mKZckUiQ--RZJWZyurfJUyRtoJyTfSOMSaniZTtffEBNK7hY2M23GAMyFIRpyQYQtMpCv2D6xHqpKjb4; expires=Thu, 18-Jul-2019 15:39:33 GMT; path=/; domain=.google.com; HttpOnly
Accept-Ranges: none
Vary: Accept-Encoding

<!doctype html>...
The first line indicates that the server responded using the HTTP 1.1 protocol, the status of the response is a 200 code, which corresponds to the human meaning “OK”. In other words, the request worked. The remaining lines are headers describing aspects of the request - the Date, for example, indicates when the request was made, and the path indicates what was requested. Most important of these headers, though, is the Content-Type header, which indicates what the body of the response consists of. The content type text/html means the body consists of text, which is formatted as HTML – in other words, a webpage.
Everything after the blank line is the body of the response - in this case, the page content as HTML text. If you scroll far enough through it, you should be able to locate all of the HTML elements in Google’s search page.
That’s really all there is with a HTTP request and response. They’re just streams of data. A webserver just receives a request, processes it, and sends a response.
In this chapter we explored the three client-side core web technologies: HTML, which defines the content of a web page; CSS, which defines the appearance of the web page; and Javascript, which adds interactivity to the web page. We also examined Hyper-Text Transfer Protocol (HTTP) which is used to transmit web pages from the server to the client. We learned that HTTP always follows a request-response pattern, and how both requests and responses are simply streams of data that follow a specific layout.
With this basic understanding of the web client files, and the means to transmit them to the client, we are ready to tackle creating a web server, which we will do in the next chapter.
.NET Goes Online
While web browsers request resources (including HTTP, CSS, and JavaScript) files over HTTP, the other end of this connection, and what supplies those files, is a web server. Unlike web clients, which are limited by what technologies a browser understands (namely HTML, CSS, and JS), a web server can be written in any programming language. In this chapter, we will explore writing web servers in C#, using aspects of the ASP.NET framework.
Some key terms to learn in this chapter are:
The key skills you will be developing in this chapter are:
The earliest web servers simply served files held in a directory. If you think back to your web development assignment from CIS 115, this is exactly what you did - you created some HTML, CSS, and JS files and placed them in the public_html directory in your user directory on the CS Linux server. Anything placed in this folder is automatically served by an instance of the Apache web server running on the Linux server, at the address https://people.cs.ksu.edu/~[eid]/ where [eid] is your K-State eid.
Apache is one of the oldest and most popular open-source web servers in the world. Microsoft introduced their own web server, Internet Information Services (IIS) around the same time. Unlike Apache, which can be installed on most operating systems, IIS only runs on the Windows Server OS.
While Apache installations typically serve static files from either a html or public_html directory, IIS serves files from a wwwroot directory.
As the web grew in popularity, there was tremendous demand to supplement static pages with pages created on the fly in response to requests - allowing pages to be customized to a user, or displaying the most up-to-date information from a database. In other words, dynamic pages. We’ll take a look at these next.
Modern websites are more often full-fledged applications than collections of static files. But these applications remain built upon the foundations of the core web technologies of HTML, CSS, and JavaScript. In fact, the client-side application is typically built of exactly these three kinds of files! So how can we create a dynamic web application?
One of the earliest approaches was to write a program to dynamically create the HTML file that was being served. Consider this method:
public string GeneratePage()
{
    StringBuilder sb = new StringBuilder();
    sb.Append("<!DOCTYPE html>");
    sb.Append("<html>");
    sb.Append("<head>");
    sb.Append("<title>My Dynamic Page</title>");
    sb.Append("</head>");
    sb.Append("<body>");
    sb.Append("<h1>Hello, world!</h1>");
    sb.Append("<p>Time on the server is ");
    sb.Append(DateTime.Now);
    sb.Append("</p>");
    sb.Append("</body>");
    sb.Append("</html>");
    return sb.ToString();
}
It generates the HTML of a page showing the current date and time. Remember too that HTTP responses are simply text, so we can generate a response as a string as well:
public string GenerateResponse()
{
    string page = GeneratePage();
    StringBuilder sb = new StringBuilder();
    sb.AppendLine("HTTP/1.1 200");
    sb.AppendLine("Content-Type: text/html; charset=utf-8");
    sb.AppendLine("ContentLength:" + page.Length);
    sb.AppendLine("");
    sb.Append(page);
    return sb.ToString();
}
The resulting string could then be streamed back to the requesting web browser. This is the basic technique used in all server-side web frameworks: they dynamically assemble the response to a request by assembling strings into an HTML page. Where they differ is what language they use to do so, and how much of the process they’ve abstracted.
This approach was adopted by Microsoft and implemented as Active Server Pages (ASP). By placing files with the .asp extension among those served by an IIS server, C# or Visual Basic code written on that page would be executed, and the resulting string would be served as a file. This would happen on each request - so a request for http://somesite.com/somepage.asp would execute the code in the somepage.asp file, and the resulting text would be served.
You might have looked at the above examples and shuddered. After all, who wants to assemble text like that? And when you assemble HTML using raw string concatenation, you don’t have the benefit of syntax highlighting, code completion, or any of the other modern development tools we’ve grown to rely on. Thankfully, most web development frameworks provide some abstraction around this process, and by and large have adopted some form of template syntax to make the process of writing a page easier.
It was not long before new technologies sprang up to replace the ad-hoc string concatenation approach to creating dynamic pages. These template approaches allow you to write a page using primarily HTML, but embed snippets of another language to execute and concatenate into the final page. This is very similar to the template strings we have used in C#, i.e.:
string time = $"The time is {DateTime.Now}";Which concatenates the invoking of the DateTime.Now property’s ToString() method into the string time. While the C# template string above uses curly braces to call out the script snippets, most HTML template libraries initially used some variation of angle brackets + additional characters. As browsers interpret anything within angle brackets (<>) as HTML tags, these would not be rendered if the template was accidentally served as HTML without executing and concatenating scripts. Two early examples are:
<?php echo "This is a PHP example" ?><% Response.Write("This is a classic ASP example) %>And abbreviated versions:
<?= "This is the short form for PHP" ?><%= "This is the short form for classic ASP" %>Template rendering proved such a popular and powerful tool that rendering libraries were written for most programming languages, and could be used for more than just HTML files - really any kind of text file can be rendered with a template. Thus, you can find template rendering libraries for JavaScript, Python, Ruby, and pretty much any language you care to (and they aren’t that hard to write either).
Microsoft’s classic ASP implementation was limited to the Visual Basic programming language. As the C# language gained in popularity, they replaced classic ASP with ASP.NET web pages. Like classic ASP, each page file (named with a .aspx extension) generates a corresponding HTML page. The script could be either Visual Basic or C#, and a new syntax using the at symbol (@) to proceed the code snippets was adopted. Thus the page:
<html>
    <body>
        <h1>Hello Web Pages</h1>
        <p>The time is @DateTime.Now</p>
    </body>
</html>
Would render the current time. You can run (and modify) this example on the w3schools.com.
This template syntax is the Razor syntax, and used throughout Microsoft’s ASP.NET platform. Additionally it can be used outside of ASP.NET with the open-source RazorEngine.
Classic PHP, Classic ASP, and ASP.NET web pages all use a single-page model, where the client (the browser) requests a specific file, and as that file is interpreted, the dynamic page is generated. This approach worked well in the early days of the world-wide-web, where web sites were essentially a collection of pages. However, as the web grew increasingly interactive, many web sites grew into full-fledged web applications, full-blown programs that did lend themselves to a page-based structure. This new need resulted in new technologies to fill the void - web frameworks. We’ll talk about these next.
As web sites became web applications, developers began looking to use ideas and techniques drawn from traditional software development. These included architectural patterns like Model-View-Controller (MVC) and Pipeline that simply were not possible with the server page model. The result was the development of a host of web frameworks across multiple programming languages, including:
This is only a sampling of the many frameworks and languages used in the modern web. Microsoft adapted to the new approach by creating their own frameworks within the ASP.NET family:
While ASP.NET applications are traditionally hosted on IIS running on the Windows Server operating system, the introduction of .NET Core made it possible to run .NET programs on Linux machines. As Linux operating systems are typically free and dominate the web server market (W3Cook1 reports 98.1% of web servers worldwide run on a Linux OS).
Microsoft has accordingly migrated its ASP.NET family to a new implementation can run on .NET Core or IIS: ASP.NET Core. When you build a ASP.NET Core application, you can choose your deployment target: IIS, .NET Core, or even Microsoft’s cloud service, Azure. The same application can run on any of these platforms.
ASP.NET Core adds a project type to Visual Studio’s new project wizard, ASP.NET Core web application which uses Razor Pages. The Razor Page approach represents a hybrid approach between a MVC and Pipeline architecture and leverages some of the ideas of component-based design that we saw with WPF applications.
The program entry point is Program.cs, which creates the web server our application will run on. In it, we initialize and configure the server based on the Startup.cs class, which details what aspects of the ASP.NET program we want to use. The wizard does the initial configuration for us, and for now we’ll leave the defaults:
Under this architecture, any file we want to serve as-is (i.e. our CSS and JavaScript files), we’ll place in wwwroot folder. Any route we want to serve dynamically, we’ll create a corresponding Razor page for in the Pages folder.
Let’s look at an example Razor page, index.cshtml, and then break down its components:
@page
@model IndexModel
@{
    ViewData["Title"] = "Home page";
}
<div class="text-center">
    <h1 class="display-4">Welcome</h1>
    <p>Learn about <a href="https://docs.microsoft.com/aspnet/core">building Web apps with ASP.NET Core</a>.</p>
</div>
The @page line indicates to the compiler that this file represents a Razor page. This is necessary for the page to be interpreted correctly, and for setting up the mapping from a request for the route /index to be mapped to this page (Index.cshtml).
The @model line indicates the model class to use with this page. Conventionally, the model class has the same name as the Razor page, plus a .cs extension, though we can use a different model file if needed. If we follow the convention, the model file is grouped with the Razor page file, much like the codebehind files in WPF and Forms. The model class provides the data for the web page, in a manner somewhat like the ViewModel classes we worked with in WPF. We’ll talk more about model classes shortly.
The @{} section is a place to define variables. In this case, we add a key/value pair to the ViewData dictionary. This dictionary is available in both the page and the layout, and is an easy way to pass values between them (in this case, we are providing a title to the layout). The layout is discussed below.
Finally, the page content itself is presented in Razor syntax - a mixture of HTML and embedded C# preceded by the @ symbol. Note that we do not need to provide termination to the C# code - the compiler will automatically determine when we switch from code back to HTML based on the grammar of the C# language.
If you remember from our discussions of HTML, a valid HTML page must have a <!DOCTYPE html> element, and <html>, <head>, <title>, and <body> elements. But where are these in our Razor page? It exists in the _Pages/Shared/Layout.cshtml file:
<!DOCTYPE html>
<html lang="en">
<head>
<meta charset="utf-8" />
<meta name="viewport" content="width=device-width, initial-scale=1.0" />
<title>@ViewData["Title"] - ExampleWebApplication</title>
<link rel="stylesheet" href="~/lib/bootstrap/dist/css/bootstrap.min.css" />
<link rel="stylesheet" href="~/css/site.css" />
</head>
<body>
<header>
<nav class="navbar navbar-expand-sm navbar-toggleable-sm navbar-light bg-white border-bottom box-shadow mb-3">
<div class="container">
<a class="navbar-brand" asp-area="" asp-page="/Index">ExampleWebApplication</a>
<button class="navbar-toggler" type="button" data-toggle="collapse" data-target=".navbar-collapse" aria-controls="navbarSupportedContent"
aria-expanded="false" aria-label="Toggle navigation">
<span class="navbar-toggler-icon"></span>
</button>
<div class="navbar-collapse collapse d-sm-inline-flex flex-sm-row-reverse">
<ul class="navbar-nav flex-grow-1">
<li class="nav-item">
<a class="nav-link text-dark" asp-area="" asp-page="/Index">Home</a>
</li>
<li class="nav-item">
<a class="nav-link text-dark" asp-area="" asp-page="/Privacy">Privacy</a>
</li>
</ul>
</div>
</div>
</nav>
</header>
<div class="container">
<main role="main" class="pb-3">
@RenderBody()
</main>
</div>
<footer class="border-top footer text-muted">
<div class="container">
© 2020 - ExampleWebApplication - <a asp-area="" asp-page="/Privacy">Privacy</a>
</div>
</footer>
<script src="~/lib/jquery/dist/jquery.min.js"></script>
<script src="~/lib/bootstrap/dist/js/bootstrap.bundle.min.js"></script>
<script src="~/js/site.js" asp-append-version="true"></script>
@RenderSection("Scripts", required: false)
</body>
</html>Using a layout file allows us to place boilerplate HTML (code that is repeated on every page of our site) in a single location, and share it amongst all pages in our application. The @RenderBody() line indicates where the content of the Razor page will be rendered.
Note that we also implement a navigation menu in this layout. Instead of giving the links in this navigation page a href element, we use asp-page, which converts into an appropriate href linking to one of our Razor pages on compilation. Thus asp-page="/Index" will point to our Index.cshtml.cs page. The asp-page is an example of a TagHelper, syntax that provides extra details to be processed by the Razor rendering engine.
We can include other sections within the layout with @RenderSection() For example, the @RenderSection("Scripts", required: false) will render a “Scripts” section, if there is one defined in our Razor page. We define such sections with the @section syntax, i.e.:
@section Scripts{
    <script src="my-script.js"></script>
}
Would place the additional <script> element in the rendered Razor page. You can define as many sections as you want.
While the _Pages/Shared/Layout.cshtml file is the default layout, you can define your own layout files. These should also be placed in the Pages/Shared folder, and their name should begin with an underscore. You can then set it to be used as the layout for your page by setting the page’s Layout property:
@{
    Layout = "_YourLayout";
}
Where the string you set the property to is the name of your layout.
The model class serves a similar role to the codebehind classes of your WPF and Windows Forms applications. Any public properties defined in the model class are accessible in the Razor page. I.e. if we defined a property:
public class IndexModel:PageModel {

    public DateTime CurrentTime
    {
        get
        {
            return DateTime.Now;
        }
    }

    public IActionResult OnGet()
    {

    }
}
We could use it in the corresponding Razor page:
@page
@model IndexModel

<p>The current time is @Model.CurrentTime</p>
In addition, the model class can define a method to be triggered on each HTTP Request, i.e. the OnGet() method will be triggered with each HTTP GET request, and OnPost() will be called with each HTTP POST request. You can define a method for any of the valid HTTP request verbs that will be invoked on each corresponding request.
In this chapter we explored how server-side web technologies have evolved to create dynamic web sites and web applications. The ASP.NET Core platform is Microsoft’s answer to this evolution. It can run on either Microsoft’s flagship IIS server, or as a stand-alone server on a variety of platforms. It brings together a suite of technologies to build web pages and web applications. We took an in-depth look at one of these - Razor pages, and learned how to build our own Razor pages app.
Talk Back to your Server
Now that we have explored some ideas about getting data from the web server, let’s turn our attention to sending data to the webserver. One of the earliest approaches for doing so is to use a HTML form sent as a HTTP Request, which we’ll take a look at in this chapter.
Some key terms to learn in this chapter are:
Nullable<T> and ?And the HTML tags:
<form><input><textarea>One of the earliest (and still widely used) mechanisms for transferring data from a browser (client) to the server is a form. The <form> is a specific HTML element that contains input fields and buttons the user can interact with.
<input> ElementPerhaps the most important - and versatile - of these is the <input> element. By setting its type attribute, we can represent a wide range of possible inputs, as is demonstrated by this table taken from the MDN Web Docs:
| Type | Description | Basic Examples | |
|---|---|---|---|
| button | A push button with no default behavior displaying the value of the value attribute, empty by default. | | |
| checkbox | A check box allowing single values to be selected/deselected. | | |
| color | A control for specifying a color; opening a color picker when active in supporting browsers. | | |
| date | A control for entering a date (year, month, and day, with no time). Opens a date picker or numeric wheels for year, month, day when active in supporting browsers. | | |
| datetime-local | A control for entering a date and time, with no time zone. Opens a date picker or numeric wheels for date- and time-components when active in supporting browsers. | | |
A field for editing an email address. Looks like a text input, but has validation parameters and relevant keyboard in supporting browsers and devices with dynamic keyboards. | | ||
| file | A control that lets the user select a file. Use the accept attribute to define the types of files that the control can select. | | |
| hidden | A control that is not displayed but whose value is submitted to the server. There is an example in the last column, but it's hidden! | | ← It’s here! |
| image | A graphical submit button. Displays an image defined by the src attribute. The alt attribute displays if the image src is missing. | | }}"/> |
| number | A control for entering a number. Displays a spinner and adds default validation when supported. Displays a numeric keypad in some devices with dynamic keypads. | | |
| password | A single-line text field whose value is obscured. Will alert user if site is not secure. | | |
| radio | A radio button, allowing a single value to be selected out of multiple choices with the same name value. | | |
| range | A control for entering a number whose exact value is not important. Displays as a range widget defaulting to the middle value. Used in conjunction min and max to define the range of acceptable values. | | |
| reset | A button that resets the contents of the form to default values. Not recommended. | | |
| search | A single-line text field for entering search strings. Line-breaks are automatically removed from the input value. May include a delete icon in supporting browsers that can be used to clear the field. Displays a search icon instead of enter key on some devices with dynamic keypads. | | |
| submit | A button that submits the form. | | |
| tel | A control for entering a telephone number. Displays a telephone keypad in some devices with dynamic keypads. | | |
| text | The default value. A single-line text field. Line-breaks are automatically removed from the input value. | | |
| time | A control for entering a time value with no time zone. | | |
| url | A field for entering a URL. Looks like a text input, but has validation parameters and relevant keyboard in supporting browsers and devices with dynamic keyboards. | | |
Regardless of the type, the <input> element also has a name and value property. The name is similar to a variable name, in that it is used to identify the input’s value when we serialize the form (more about that later), and the value is the value the input currently is (this starts as the value you specify in the HTML, but it changes when the user edits it).
Additionally, checkboxes and radio buttons have a boolean ischecked property. These indicate if the box/button is checked or not (and that the box/button’s value should be submitted).
<textarea> ElementThe <textarea> element represents a multi-line text input. Similar to terminal programs, this is represented by columns and rows, the numbers of which are set by the cols and rows attributes, respectively. Thus:
<textarea cols=40 rows=5></textarea>Would look like:
As with inputs, a <textarea> has a name and value attribute.
<select> ElementThe <select> element, along with <option> and <optgroup> make drop-down selection boxes. The <select> takes a name attribute, while each <option> provides a different value. The <options> can further be nested in <optgroup>s with their own labels. The <select> also has a multiple attribute (to allow selecting multiple options), and size which determines how many options should be displayed at once (with scrolling if more are available).
For example:
<select id="dino-select">
    <optgroup label="Theropods">
        <option>Tyrannosaurus</option>
        <option>Velociraptor</option>
        <option>Deinonychus</option>
    </optgroup>
    <optgroup label="Sauropods">
        <option>Diplodocus</option>
        <option>Saltasaurus</option>
        <option>Apatosaurus</option>
    </optgroup>
</select>
Displays as:
<label> ElementA <label> element represents a caption for an element in the form. It can be tied to a specific input using its for attribute, by setting its value to the id attribute of the associated input. This allows screen readers to identify the label as belonging to the input, and also allows browsers to give focus or activate the input element when the label is clicked.
For example, if you create a checkbox with a label:
<fieldset style="display:flex; align-items:center;">
  <input type="checkbox" id="example"/>
  <label for="example">Is Checked</label>
</fieldset>Clicking the label will toggle the checkbox!
<fieldset> ElementThe <fieldset> element is used to group related form parts together, which can be captioned with a <legend>. It also has a for attribute which can be set to the id of a form on the page to associate with, so that the fieldset will be serialized with the form (this is not necessary if the fieldset is inside the form). Setting the fieldset’s disabled attribute will also disable all elements inside of it.
For example:
<fieldset>
  <legend>Who is your favorite muppet?</legend>
  <input type="radio" name="muppet" id="kermit">
    <label for="kermit">Kermit</label>
  </input>
  <input type="radio" name="muppet" id="animal">
    <label for="animal">Animal</label>
  </input>
  <input type="radio" name="muppet" id="piggy">
    <label for="piggy">Miss Piggy</label>
  </input>
  <input type="radio" name="muppet" id="gonzo">
    <label for="gonzo">Gonzo</label>
  </input>
</fieldset>
Would render:
<form> ElementFinally, the <form> element wraps around all the <input>, <textarea>, and <select> elements, and gathers them along with any contained within associated <fieldset>s to submit in a serialized form. This is done when an <input type="submit"> is clicked within the form, when the enter key is pressed and the form has focus, or by calling the submit() method on the form with JavaScript.
There are a couple of special attributes we should know for the <form> element:
action - the URL this form should be submitted to. Defaults to the URL the form was served from.enctype - the encoding strategy used, discussed in the next section. Possible values are:application/x-www-form-urlencoded - the defaultmultipart/form-data - must be used to submit filestext/plain - useful for debuggingmethod - the HTTP method to submit the form using, most often GET or POSTWhen the form is submitted, the form is serialized using the enctype attribute and submitted using the HTTP method to the URL specified by the action attribute. Let’s take a deeper look at this process next.
Form data is simply serialized key/value pairs pulled from a form and encoded using one of the three possible encoding strategies, and submitted using the specified method (usually GET or POST).
So when we submit a form containing two text inputs for first and last name:
<form method="post">
    <label for="First">First Name:</label>
    <input type="text" name="First"/>
    <label for="Last">Last Name:</label>
    <input type="text" name="Last"/>
    <input type="Submit" value="Save Name"/>
</form>
And enter the values “Frank” and “Jones”, the form is serialized as the key-value pairs:
{
    "First": "Frank",
    "Last": "Jones"
}Here we are displaying the key-value pairs as JSON for legibility, but how the pairs are encoded depends on the encoding strategy as discussed below.
If a form contains multiple inputs with the same name, they are serialized as an array, i.e. the form:
<form method="post">
    <label>Enter three numbers:</label>
    <input type="number" name="Number"/>
    <input type="number" name="Number"/>
    <input type="number" name="Number"/>
    <input type="Submit" value="Save Numbers"/>
</form>
Would be serialized as:
{
    "Number" : [2, 3, 4]
}
Finally, toggle inputs like checkboxes and radio buttons only submit a value when checked, i.e. given the following form:
<form method="post">
    <label>Do the thing:</label>
    <input type="checkbox" name="DoTheThing" value="thing"/>
    <input type="Submit" value="Save Numbers"/>
</form>
Would serialize as:
{}When the checkbox is not checked, or:
{
    "DoTheThing": "thing"
}
When the checkbox is checked.
Now that we’ve discussed how inputs are serialized into key/value or key/array of value pairs, let’s turn our attention to the method used to submit the form, and then look at each encoding strategy in turn.
The HTTP method determines if the form data is sent as part of the url of the request, or in the body of the request.
With a GET request, the serialized form data is appended to the url as a query or search parameter. This takes the form of a question mark: ? followed by the serialized form data. In addition, the serialized data must be url-encoded to ensure the URL remains valid, as it may contain reserved characters (i.e. the characters :,/,?,#, &, and =) have special meanings in URLs, so the encoded data can’t contain them).
For example, searching using Google uses a GET request, so when we type “Razor Pages” into Google and click search, it makes a request against the URL: https://www.google.com/search?q=razor+pages (Note it adds additional form data fields for a variety of purposes).
A GET request is appropriate when the data you are submitting is small, like search terms or filter values. Once you start submitting larger amounts of data (like parameters to build an object from), you’ll probably want to switch to POST requests. Also, remember the form data for GET requests are visible in the URL, so you’ll want to use POST requests when seeing those values might be confusing or annoying to users.
Finally, passwords should NEVER be sent using a GET request, as doing so makes them visible in the URL.
The default method for form submission is a GET request, so if you don’t specify the method parameter, the form will be submitted using this method.
A POST request is submitted as the body of the request. This is the most appropriate method for large submissions, submissions with data you don’t want visibly displayed in the browser, and it is the only way to submit form data including files (which must be encoded using “multipart/form-data” as described below).
There are two primary strategies for submitting data to a server from HTML forms (note that you can submit data to servers using other strategies when submitting from a program - we’ll discuss some of these in the next chapter). These strategies are x-www-form-urlencoded and multipart/form-data. We’ll take a look at how these encode data next.
The default encoding method is application/x-www-form-urlencoded, which encodes the form data as a string consisting of key/value pairs. Each pair is joined by a = symbol, and pairs are in turn joined by & symbols. The key and value strings are further encoded using percent encoding (URL encoding), which replaces special characters with a code beginning with a percent sign (i.e. & is encoded to %26). This prevents misinterpretations of the key and value as additional pairs, etc. Percent encoding is also used to encode URL segments (hence the name URL encoding).
Thus, the form:
<form>
    <input type="text" name="Name" value="Grover"/>
    <select name="Color">
        <option value="Red">Red</option>
        <option selected="true" value="Blue">Blue</option>
        <option value="Green">Green</option>
    </select>
    <input type="number" name="Age" value="36"/>
</form>
Would be encoded as:
Name=Grover&Color=Blue&Age=36The HTTPUtility class in the System.Web namespace contains helpful methods for encoding and decoding URL strings.
URL-Encoded form data can be submitted with either a GET or POST request. With a GET request, the form data is included in the URL’s query (search) string, i.e. our form above might be sent to:
www.sesamestreet.com/muppets/find?Name=Grover&Color=Blue&Age=36Which helps explain why the entire seralized form data needs to be URL encoded - it is included as part of the url!
When submitted as a post request, the string of form data is the body of the request.
The encoding for multipart/form-data is a bit more involved, as it needs to deal with encoding both regular form values and binary file data. It deals with this challenge by separating each key/value pair by a sequence of bytes known as a boundary, which does not appear in any of the files. This boundary can then be used to split the body back into its constituent parts when parsing. Each part of the body consists of its own head and body sections, with the body of most elements simply their value, while the body of file inputs is the file data encoded in base64. Thus, the form:
<form>
    <input type="text" name="Name" value="Grover"/>
    <select name="Color">
        <option value="Red">Red</option>
        <option selected="true" value="Blue">Blue</option>
        <option value="Green">Green</option>
    </select>
    <input type="number" name="Age" value="36"/>
    <input type="file" name="Image" value="Grover.jpg" />
</form>
Would be encoded into a POST request as:
POST /test HTTP/1.1
Host: foo.example
Content-Type: multipart/form-data;boundary="boundary"

--boundary
Content-Disposition: form-data; name="Name"

Grover
--boundary
Content-Disposition: form-data; name="Color"

Blue
--boundary
Content-Disposition: form-data; name="Age"

36
--boundary
Content-Disposition: form-data; name="Image"; filename="Grover.jpg"

/9j/4AAQSkZJRgABAQEAYABgAAD/2wBDAAgGBgcGBQgHBwcJCQgKDBQNDAsLDBkSEw8UHRofHh0aHBwgJC4nICIsIxwcKDcpLDAxNDQ0Hyc5PTgyPC4zNDL/2wBDAQkJCQwLDBgNDRgyIRwhMjIyMjIyMjIyMjIyMjIyMjIyMjIyMjIyMjIyMjIyMjIyMjI...
--boundary--
Files can only be submitted using multipart/form-data encoding. If you attempt to use application/x-www-form-urlencoded, only the file name will be submitted as the value. Also, as multipart/form-data is always submitted as the body of the request, it can only be submitted as part of a POST request, never a GET. So a form containing a file input should always specify:
<form enctype="multipart/form-data" method="POST">While C# does provide utilities for parsing URL-encoded strings, the functionality of parsing incoming form data is built into the ASP.NET response handling. Thus, when writing a Razor page application, we don’t need to perform decoding on the form data - it has already been done for us. There are several strategies built into Razor Pages to access this information:
The first of these is the HttpRequest object, which is available as the Request property within a Page. This object provides access to the QueryString and Form, as well as Cookies, ServerVariables and more.
If the form was submitted as a GET request, then the Request.QueryString is a collection of key-value pairs used like a dictionary, i.e. to access the value of the input with name “Color”, we would use: Request.QueryString["Color"].
Similarly, the Form also exposes the form content as a collection of key-value pairs, so we could access a POST request’s input with the name “Color” value with Request.Form["Color"].
Finally, the request also allows for checking both collections using its own accessor property, i.e. Request["Color"] would provide the submitted value for the input “Color” if it was sent with either a GET or POST request.
A second approach to accessing form data in ASP.NET is Parameter Binding. You’ve already seen the OnGet() method of the PageModel class. This is invoked every time a GET request to our server matches the page it is associated with. We can also supply methods for other HTTP actions, i.e. POST, PUT, DELETE map to OnPost(), OnPut(), and OnDelete() respectively. For each of these methods, we can use parameter binding to automatically parse and convert form data into parameter variables.
In its simplest form, we simply declare parameters whose type and name match those of our form. Thus, for the form:
<form>
    <input type="text" name="Name" value="Grover"/>
    <select name="Color">
        <option value="Red">Red</option>
        <option selected="true" value="Blue">Blue</option>
        <option value="Green">Green</option>
    </select>
    <input type="number" name="Age" value="36"/>
</form>
We could add several parameters to our OnGet() corresponding the names and types of the form fields:
OnGet(string Name, string Color, int Age){
    // Name would be "Grover"
    // Color would be "Blue"
    // Number would be 36
}
The form values are automatically converted and bound to the corresponding parameters of the OnGet method. If the form does not contain the corresponding parameter, then it is assigned the default value (for value types) or null (for reference types).
There are times you may not want to use default values for value types. For example, in the form above, if the Age property is not specified, it will default to 0. If we instead wanted it to be null, we could use the Nullable<T> type:
OnGet(string Name, string Color, Nullable<int> Age) {...}This allows Age to be null, in addition to all its normal possible values. You can also specify a nullable type with the ? shorthand, i.e.:
OnGet(string Name, string Color, int? Age) {...}A third approach is Model Binding, where decorators are used on public properties of the PageModel class to indicate that they should be bound to form data, i.e.:
public class Muppet : PageModel {

    /// <summary>The muppet's name</summary>
    [BindProperty]
    public string Name { get; set; }

    /// <summary>The muppet's color</summary>
    [BindProperty]
    public string Color { get; set; }

    ///<summary>The muppet's age</summary>
    [BindProperty]
    public int Age {get; set;}
}
When set up this way, the properties will be populated with the corresponding form data on POST, PUT, and PATCH requests. By default, they will not be populated on GET requests, though you can override this behavior with SupportsGet:
    /// <summary>The muppet's name</summary>
    [BindProperty(SupportGet = true)]
    public string Name { get; set; }
Finally, we can indicate all properties of the model class should be bound with a single [BindsProperties] decorator on the class, i.e.:
[BindProperties(SupportsGet = true)]
public class Muppet : PageModel {

    /// <summary>The muppet's name</summary>
    public string Name { get; set; }

    /// <summary>The muppet's color</summary>
    public string Color { get; set; }

    ///<summary>The muppet's age</summary>
    public int Age {get; set;}
}You might be wondering why ModelBinding does not work with GET requests by default. In the previous section, we discussed when to use GET or POST requests to submit form data - we use GET requests for smaller data we don’t mind displaying the URL, like search terms or filter values. We use POST requests for large data, especially data we will use to populate an object. So when using Model Binding, using the POST method is most appropriate. Microsoft chose to reinforce this practice through the choice to not bind GET requests by default.
Validation refers to the process of making sure the submitted data matches our expectations. Validation can be done client-side or server-side. For example, we can use the built-in HTML form validation properties to enforce rules, like a number that must be positive:
<input type="number" min="0" name="Age" required>If a user attempts to submit a form containing this input, and the value is less than 0, the browser will display an error message instead of submitting. In addition, the psuedo-css class :invalid will be applied to the element.
We can also mark inputs as required using the required attribute. The browser will refuse to submit the form until all required inputs are completed. Inputs with a required attribute also receive the :required pseudo-class, allowing you to assign specific styles to them.
You can read more about HTML Form validation on MDN.
Client-side validation is a good idea, because is minimizes invalid requests against our web application. However, we cannot always depend on it, so we also need to implement server-side validation. We can write custom logic for doing this, but Razor Pages also supports special validation decorators for bound properties. For example, the corresponding validation for the input above would be:
[BindProperty]
[Required]
[Range(0, int.MaxValue)]
public int Age { get; set; }
The available validation decorators are:
[CreditCard]: Validates that the property has a credit card format. Requires jQuery Validation Additional Methods.[Compare]: Validates that two properties in a model match.[EmailAddress]: Validates that the property has an email format.[Phone]: Validates that the property has a telephone number format.[Range]: Validates that the property value falls within a specified range.[RegularExpression]: Validates that the property value matches a specified regular expression.[Required]: Validates that the field is not null. See [Required] attribute for details about this attribute’s behavior.[StringLength]: Validates that a string property value doesn’t exceed a specified length limit.[Url]: Validates that the property has a URL format.If validation fails, then the PageModel’s IsValid attribute is false.
You can read more about server-side validation with Razor pages in the Microsoft Documentation.
In this chapter we looked at how data is handled in web applications. We saw how forms can be used to submit data to our server, and examined several common encoding strategies. We also saw how we can retrieve this data in our Razor Pages - through the Request object, or by parameter or model binding. Finally, we discussed validating submitted values, on both the client and server side of a HTTP request.
You should now be able to handle creating web forms and processing the submitted data.
Making the Web Accessible - for Programs
Not all web applications are built to be viewed in a browser. Many are built to be used by other programs. We call these web applications Web APIs (Application Programming Interfaces). These also make HTTP or HTTPS requests against our apps, but usually instead of serving HTML, we serve some form of serialized data instead - most commonly XML or JSON.
Making a HTTP request is a multi-step process. First you must establish a connection with the server, then create the request data, then you must stream that data to your server through the connection. Once the server has received and processed your request data, it should stream a response back to you.
You can write code to handle each step, but most programming languages provide one or more libraries that provide a level of abstraction to this process. The C# language actually offers several options in its system libraries, and there are multiple open-source options as well.
The simplest of these is the WebRequest object. It represents and carries out a single HTTP request and provides the response. Let’s take a look at an example, which retrieves a “Joke of the Day” from a web API at https://jokes.one:
WebRequest request = WebRequest.Create("http://api.jokes.one/jod");This one line of code creates the WebRequest object. Notice that we are not using a constructor. Instead, we invoke a Create() method. This is an example of the Factory Method Pattern, which you will learn more about in CIS 501. But to briefly introduce the concept, the WebRequest class is actually a base class for a multiple different classes, each representing a specific kind of web request (i.e. using HTTP, HTTPS, FTP and so on). Based on the URI supplied to WebRequest.Create(Uri uri), the method will determine the appropriate kind of request to make, and create and return the corresponding object.
Now that we have our request, we can send it and obtain a response with:
WebResponse response = request.GetResponse();This opens the connection to the server, streams the request to it, and then captures the sever’s response. We can access this response as a stream (similar to how we would read a file):
using Stream responseStream = response.GetStream()
{
  StreamReader reader = new StreamReader(responseStream);
  string responseText= reader.ReadToEnd();
  Console.WriteLine(responseText);
}
You likely are wondering what the using and curly braces {} are doing in this code. They are there because the Stream object implements the IDisposable interface. We’ll discuss this in detail in the next section. But for now, let’s focus on how we use the stream. First we create a StreamReader to read it:
StreamReader reader = new StreamReader(responseStream);Then read to the end of the stream:
string responseFromServer = reader.ReadToEnd();And write the response’s text to the console:
Console.WriteLine(responseText);Finally, we must close the WebResponse object’s connection to the server once we are done:
response.Close();This last step is important, as the open connection is actually managed by our operating system, and unless we close it, our system resources will be tied up, making our computer slower and potentially unable to make web requests for other programs (including your browser)!
In the previous section, we looked at a line of code that included the keyword using in a way you haven’t probably seen it before:
using Stream responseStream = response.GetStream()
{
  // TODO: Use the responseStream
}
Let’s examine this statement in more detail. This use of using is a using statement, not to be confused with a using directive.
When you put a statement like using System.Text, you are using the using directive, which instructs the compiler to use types in the corresponding namespace without needing to provide the fully qualified namespace. You’ve been using this technique for some time, so it should be familiar to you.
In contrast, the using statement is used in the body of your code in conjunction with an object implementing the IDisposable interface. Objects that implement this interface have a Dispose() method, which needs to be called when you are done with them. These kinds of objects typically access some resource from outside of the program, which needs to be released when you are done with it.
To understand this better, let’s talk about managed vs. unmanaged resources. We say a resource is managed when obtaining and releasing it is handled by the language. Memory is a great example of this. In C#, we are using managed memory. When we invoke a constructor or declare an array, the interpreter automatically creates the memory we need to hold them.
In contrast, C uses unmanaged memory. When we want to create an array, we must allocate that memory with alloc(), calloc(), or malloc() function call.
This might not seem very different, until we are done with the array. In C#, we can simply let it fall out of scope, knowing the garbage collector should eventually free that memory. But in a C program, we must manually free the memory with a call to free().
Sometimes in C#, we need to access some resource in a way that is unmanaged - in which case, we must be sure to free the resource when we are done with it.
The IDisposable() interface provides a standard way of handling this kind of situation. It requires any class implementing it to define a Dispose() method that frees any unmanaged resources. A stream (the data being read in from a file, the network, or a terminal) is a good example of an unmanaged resource - the stream is actually created by the operating system, and the Stream object (a FileStream, BufferedStream, etc) is a C# object providing access to it.
Let’s focus on a FileStream for a moment. One is created every time you ask the operating system to open a file, i.e.:
FileStream fs = File.OpenRead("somefile.txt");The File.OpenRead() method asks the operating system to provide a stream to the file named "somefile.txt". We can then read that stream until we reach the end of file marker (indicating we’ve read the entire file):
byte data = fs.ReadByte();
// Invariant: while there are bytes in the file to read
while(data != -1)
{
  // Write the current byte to the console
  System.Out.Write(data);
  // Read the next byte
  data = fs.ReadByte();
}
Once we’ve finished reading the file, we need to call Dispose() on the stream to tell the operating system that we’re done with it:
fs.Dispose();If we don’t, then the operating system will assume we’re still working with the file, and refuse to let any other program read it. Including our own program, if we were to run it again.
But what happens if an error occurs while reading the file? We’ll never reach the call to Dispose(), so we’ll never free the file! In order to access it, we’d have to restart the computer. Not great.
We could manage this with a try/catch/finally, i.e.:
try
{
  FileStream fs = File.OpenRead("somefile.txt");
  byte data = fs.ReadByte();
  // Invariant: while there are bytes in the file to read
  while(data != -1)
  {
    // Write the current byte to the console
    System.Out.Write(data);
    // Read the next byte
    data = fs.ReadByte();
  }
  fs.Dispose();
}
catch(Exception e)
{
  // Do something with e
}
finally
{
  fs.Dispose();
}
But you have to catch all exceptions.
A using statement operates similarly, but takes far less typing:
using FileStream fs = File.OpenRead("somefile.txt")
{
  byte data = fs.ReadByte();
  // Invariant: while there are bytes in the file to read
  while(data != -1)
  {
    // Write the current byte to the console
    System.Out.Write(data);
    // Read the next byte
    data = fs.ReadByte();
  }
}
It also comes with some benefits. One, it creates a new scope (within the {} following the using statement). If for some reason the stream can’t be opened, this scope is skipped over. Similarly it jumps execution to the end of the scope if an error occurs. Finally, it automatically calls Dispose() when the scope ends.
As of C# 8.0, a shorthand for the using statement that omits the scope markers (the {}) is available. In this case, the scope is from the start of the using statement to the end of its containing scope (usually a method):
using FileStream fs = File.OpenRead("somefile.txt");
byte data = fs.ReadByte();
// Invariant: while there are bytes in the file to read
while(data != -1)
{
  // Write the current byte to the console
  System.Out.Write(data);
  // Read the next byte
  data = fs.ReadByte();
}
This format can be nice when you need to nest multiple using statements, but I would suggest sticking with the scoped version until you are comfortable with the concepts involved.
Web APIs typically provide their data in a structured format, i.e. XML or JSON. To use this within a C# program you’ll need to either parse it or convert it into an object or objects.
The Joke of the Day API can provide either - we just need to specify our preference with a Accept header in our HTTP request. This header lets the server know what format(s) of data we are ready to process. XML is signified by the MIME type application/xml and JSON by application/json.
To set this (or any other header) in our WebRequest object, we use the Header property’s Add() method:
WebRequest request = WebRequest.Create("http://api.jokes.one/jod");
request.Headers.Add("Accept", "application/json");
For JSON, or:
WebRequest request = WebRequest.Create("http://api.jokes.one/jod");
request.Headers.Add("Accept", "application/xml");
For XML.
Let’s start by examining the older format, XML. Assuming you have set the Accept header as discussed above, you will receive a response similar to (but with a different joke):
<response>
  <success>
    <total>1</total>
  </success>
  <contents>
    <jokes>
      <description>Joke of the day </description>
      <language>en</language>
      <background/>
      <category>jod</category>
      <date>2021-11-29</date>
      <joke>
        <title>Signs for every job</title>
        <lang>en</lang>
        <length>1749</length>
        <clean>0</clean>
        <racial>0</racial>
        <date>2021-11-29</date>
        <id>HqJ1i9L1ujVCcZmS5C4nhAeF</id>
        <text>
        In the front yard of a funeral home, "Drive carefully, we'll wait." On an electrician's truck, "Let us remove your shorts." Outside a radiator repair shop, "Best place in town to take a leak." In a non-smoking area, "If we see you smoking, we will assume you are on fire and take appropriate action." On a maternity room door, "Push, Push, Push." On a front door, "Everyone on the premises is a vegetarian except the dog." At an optometrist's office, "If you don't see what you're looking for, you've come to the right place." On a taxidermist's window, "We really know our stuff." On a butcher's window, "Let me meat your needs." On a butcher's window, "You can beat our prices, but you can't beat our meat." On a fence, "Salesmen welcome. Dog food is expensive." At a car dealership, "The best way to get back on your feet - miss a car payment." Outside a muffler shop, "No appointment necessary. We'll hear you coming." In a dry cleaner's emporium, "Drop your pants here." On a desk in a reception room, "We shoot every 3rd salesman, and the 2nd one just left." In a veterinarian's waiting room, "Be back in 5 minutes. Sit! Stay!" At the electric company, "We would be delighted if you send in your bill. However, if you don't, you will be." In a Beauty Shop, "Dye now!" In a Beauty Shop, "We curl up and Dye for you." On the side of a garbage truck, "We've got what it takes to take what you've got." (Burglars please copy.) In a restaurant window, "Don't stand there and be hungry, come in and get fed up." Inside a bowling alley, "Please be quiet. We need to hear a pin drop." In a cafeteria, "Shoes are required to eat in the cafeteria. Socks can eat any place they want."
        </text>
      </joke>
    </jokes>
    <copyright>2019-20 https://jokes.one</copyright>
  </contents>
</response>
We can parse this response with C#’s XmlDocument Class from the System.Xml namespace. First, we create an instance of the class, using our response text. We can use one of the XmlDocument.Load() overrides, which takes a stream, to process our response stream directly:
using Stream responseStream = response.GetStream()
{
  XmlDocument xDoc = new XmlDocument();
  xDoc.Load(responseStream);
  // TODO: get our joke!
}
Then we can query the XmlDocument for the tag we care about, i.e. response > contents > jokes > joke > text (the text of the joke). We use XPath syntax for this:
var node = xDoc.SelectSingleNode("/response/contents/jokes/joke/text");XPath is a query language, much like CSS selectors, which allow you to navigate a XML document in a lot of different ways. In this case, we are just finding the exact element based on its path. Then we can pull its value, and do something with it (such as logging it to the console):
Console.WriteLine(node.InnerText);JavaScript Object Notation (JSON) has become a popular format for web APIs, as it usually requires less characters than the corresponding XML, and is natively serializable from JavaScript making it extremely compatible with client-side web applications.
Assuming you have set the Accept header as discussed above, you will receive a response similar to (but with a different joke):
{
  "success":{
    "total":1
  },
  "contents":{
    "jokes":[
      {
        "description":"Joke of the day ",
        "language":"en",
        "background":"",
        "category":"jod",
        "date":"2021-11-30",
        "joke":{
          "title":"Class With Claus",
          "lang":"en",
          "length":"78",
          "clean":null,
          "racial":null,
          "date":"2021-11-30",
          "id":"LuVeRJsEIzCzvTnRmBTHXweF",
          "text":"Q: What do you say to Santa when he's taking attendance at school?\nA: Present."
        }
      }
    ],
    "copyright":"2019-20 https:\/\/jokes.one"
  }
}
The C# system libraries provide JSON support in the System.Text.Json namespace using the JsonSerializer class. The default behavior of the deserializer is to deserialize into a JsonDocument composed of nested JsonElement objects - essentially, dictionaries of dictionaries. As with the XDocument, we can deserialize JSON directly from a Stream:
using Stream responseStream = response.GetStream()
{
  JsonDocument jDoc = JsonSerializer.Deserialize(responseStream);
  // TODO: get our joke!
}
Then we can navigate from the root element (a JsonElement instance) down the nested path of key/value pairs, by calling GetProperty() to access each successive property, and then print the joke text to the console:
  var contents = jDoc.RootElement.GetProperty("contents");
  var jokes = contents.GetProperty("jokes");
  var jokeData = jokes[0];
  var joke = jokeData.GetProperty("joke");
  var text = joke.GetProperty("text");
Console.WriteLine(text);Now that we’re more comfortable with using statements, let’s return to our request-making code:
WebRequest request = WebRequest.Create("http://api.jokes.one/jod");
using Stream responseStream = response.GetStream()
{
  StreamReader reader = new StreamReader(responseStream);
  string responseText= reader.ReadToEnd();
  Console.WriteLine(responseText);
}
response.Close();
The response.GetStream() triggers the http request, which hits the API and returns its result. Remember a HTTP request is streamed across the internet, then processed by the server, and the response streamed back. That can take some time (at least to a computer). While the program waits on it to finish, it cannot do anything else. For some programs, like one that only displays jokes, this is fine. But what if our program needs to also be responding to the user’s events - like typing or moving the mouse? While the program is waiting, it is effectively paused, and nothing the user does will cause the program to change.
This is where asynchronous methods come in. An asynchronous method operates on a separate thread, allowing execution of the program to continue.
let’s revisit our WebRequest example:
WebRequest request = WebRequest.Create("http://api.jokes.one/jod");We can then make the request asynchronously by calling the asynchronous version of GetResponse() - GetResponseAsync():
WebResponse response = await request.GetResponseAsync();The await keyword effectively pauses this thread of execution until the response is received. Effectively, the subsequent code is set aside to be processed when the asynchronous method finishes or encounters an error. This allows the main thread of the program to continue responding to user input and other events. The rest of the process is handled exactly as before:
using Stream responseStream = response.GetStream()
{
  StreamReader reader = new StreamReader(responseStream);
  string responseText= reader.ReadToEnd();
  Console.WriteLine(responseText);
}Normally we would wrap the asynchronous method calls within our own asynchronous method. Thus, we might define a method, GetJoke():
public string async GetJoke()
{
  WebRequest request = WebRequest.Create("http://api.jokes.one/jod");
  WebResponse response = await request.GetResponseAsync();
  using Stream responseStream = response.GetStream()
  {
    XmlDocument xDoc = new XmlDocument();
    xDoc.Load(responseStream);
    var node = xDoc.SelectSingleNode("/response/contents/jokes/joke/text");
    return node.InnerText;
  }
  return "";
}ASP.Net includes built-in support for asynchronous request handling. You just need to add the async keyword to your OnGet() or OnPost() method, and the ASP.NET server will process it asynchronously.
For example, we could invoke our GetJoke() method in a OnGet():
public class JokeModel : PageModel
{
    public async IActionResult OnGet()
    {
        var joke = await GetJoke();
        return Content(joke);
    }
}
This will cause the text of the joke to be sent as the response, and allow other pages to be served while this one request is awaiting a response from the Joke API.
Many web applications deal with some kind of resource, i.e. people, widgets, records. Much like in object-orientation we have organized the program around objects, many web applications are organized around resources. And as we have specialized ways to construct, access, and destroy objects, web applications need to create, read, update, and destroy resource records (we call these CRUD operations).
In his 2000 PhD. dissertation, Roy Fielding defined Representational State Transfer (REST), a way of mapping HTTP routes to the CRUD operations for a specific resource. This practice came to be known as RESTful routing, and has become one common strategy for structuring a web application’s routes. Consider the case where we have an online directory of students. The students would be our resource, and we would define routes to create, read, update and destroy them by a combination of HTTP action and route:
| CRUD Operation | HTTP Action | Route |
|---|---|---|
| Create | POST | /students |
| Read (all) | GET | /students |
| Read (one) | GET | /students/[ID] |
| Update | PUT or POST | /students/[ID] |
| Destroy | DELETE | /students/[ID] |
Here the [ID] is a unique identifier for the individual student. Note too that we have two routes for reading - one for getting a list of all students, and one for getting the details of an individual student.
REST is a remarkably straightforward implementation of very common functionality, no doubt driving its wide adoption. Razor pages supports REST implicitly - the RESTful resource is the PageModel object. This is the reason model binding does not bind properties on GET requests by default - because a GET request is used to retrieve, not update a resource. However, properties derived from the route (such as :ID in our example, will be bound and available on GET requests).
With Razor Pages, you can specify a route parameter after the @page directive. I.e. to add our ID parameter, we would use:
@page "{ID?}"We can use any parameter name; it doesn’t have to be ID (though this is common). The ? indicates that the ID parameter is optional - so we can still visit /students. Without it, we only can visit specific students, i.e. /students/2.
Route parameters can be bound using any of the binding methods we discussed previously - parameter binding, model binding, or be accessed directly from the @RouteData.Values dictionary. When we are using these parameters to create or update new resources, we often want to take an additional step - validating the supplied data.
In this chapter we explored using web APIs to retrieve data from remote servers. We saw how to use the WebRequest object to make this task approachable. We also revisited ideas you’ve seen in prior courses like the IDisposable interface and using statements to work with unmanaged objects. We saw how to consume XML data we receive as a response from a web API.
We also discussed using async methods to allow our programs to continue to respond to user input and incoming web requests while processing long-running tasks in parallel. Finally, we discussed RESTful routes, a standardized way of determining the routes for your web API.
Bridging the Gap Between Databases and Data Structures
We saw in the last chapter how many web applications are built around the concept of resources. An online store has products to sell. A social media application has people with accounts. Resource-oriented web applications therefore need to store these resources in some fashion - possibly as objects in some kind of collection, or possibly with a database.
Some key terms to learn in this chapter are:
The key skills to develop in this chapter are:
We use the term “Database” to describe a program primarily designed to efficiently store and retrieve data. These are often used in conjunction with other kinds of applications - such as web applications or desktop applications. Why use a separate program rather than building this storage and retrieval into the application we are building? There are a lot of possible reasons, but some common ones are:
Centralized access. Consider a desktop application that tracks inventory for a large company. You might want to have the application installed on every computer in the sales department, and you want the inventory to stay up-to-date for all of these. If each desktop app connects to the same centralized database, they will all be kept up-to-date.
Efficiency of specialization. By designing a database program for the sole purpose of storing and retrieving data, it can be designed by programmers who specialize in this area, and be designed to be as efficient as possible… often far more than we would be able to build into our own applications.
The most common type of database in use today are relational databases. These are databases that organize data into structured tables consisting of columns with a specific data type. Each record is therefore a row in the database. Visually, such a database appears much like a spreadsheet. These databases are typically communicated with using Structured Query Language (SQL). This is a special programming language developed specifically to express the kinds of operations we need to carry out on these databases.
For example, to retrieve the first and last names of all students in the students table who are earning above a 3.0, we would use the query:
SELECT first, last FROM students WHERE gpa > 3.0;And the results would be provided as a stream of text:
first | last
Mike | Rowe
Jan | Herting
Sam | Sprat
You’ll learn more about these databases in CIS 560.
Relational databases were developed in the 60’s and 70’s to deal with the specific challenges of computer systems in those days. The way they organize data lends itself to large, flat files, and SQL and its results are handled as streams of data. When object-orientation became a popular programming language paradigm, object-oriented databases - databases that store data as objects, were also developed. However, while object-oriented programming languages became quite popular, the corresponding databases failed to. As a result, object-oriented databases remain quite niche.
The popularity of JSON and XML with the web led to another category of databases being developed, document-based databases (sometimes called No-SQL databases). These databases store records in a serialized format like JSON or XML, and downplay relationships between records. Unlike relational databases, document-based databases can be flexible in what data exists for an individual record.
For example, if we were to create a Student table in a relational database, and wanted to hold the student’s degree plan, we’d need two columns to represent a dual-major. All students in the table would have two columns, even if they only had one degree plan. In contrast, with a document-based database most students would only have one degree plan, but dual major would have two, and if we had a rare triple major, they could have three!
Thus, document-based databases add flexibility at the cost of some efficiency in retrieval.
Despite the growing popularity of Document-Based Databases, the vast majority of databases remain relational (MySql, MSSQL, PostgreSQL, Oracle, SQLite). Yet, most of the programs that utilize them are now object-oriented. This creates a bit of a disconnect for many programmers working with both. One of the solutions devised to help with this challenge are object-relational mappers (ORMs). These are libraries that are written for object-oriented languages that facilitate talking to the relational database. When a query is run against the database with an ORM, the results are provided as a collection of objects instead of the normal text (basically, the ORM parses the results and transforms them into an object representation). This simplifies working with databases for the programmer.
One solution that Microsoft has developed to tackle the disconnect between relational databases and C# is Language Integrated Query (LINQ). This technology integrates querying directly into the C# language. It can act as a bridge to a MS SQL server, replacing the need for writing SQL queries and processing the results. But it can also be used to query collections that implement the IEnumerable interface, as well as XML files. As such, we can design the logic of our program to use LINQ, and change out the data source for any of these options with minimal refactoring.
LINQ queries are written as either query expressions or by using query operators. Let’s examine the two.
LINQ query expressions appear much like SQL statements. For example, the query from the last section, selecting the names of students whose GPA is greater than 3.0 as a LINQ query expression would be:
var highGPAStudents = from student in students where student.GPA > 3.0 select new { First = student.First, Last = student.Last};This format looks much like SQL, and is often more comfortable for programmers who come from a SQL background.
LINQ queries are actually implemented through C# operators. Query expressions, like the one above, are compiled into an equivalent series of query operators. Programmers can also use these operators directly. For example, the above query expressed using operators would be:
var highGPAStudents = students.Where(student => student.GPA > 3.0).Select(student => new {First = student.First, Last = student.Last});Programmers from an object-oriented background often find the operators (which are essentially methods that take lambda expressions as parameters) more comfortable.
Queries are not actually executed until you start iterating over their results. This allows you to chain additional queries on an existing query, and allows the compiler to optimize queries by grouping query expressions together. Consider this compound query to select half of low-performing students to assign to an advisor:
var strugglingStudents = from student in students where student.GPA < 2.0 select student;
var strugglingStudentsAtoN = from strugglingStudents where student.Last.CharAt(0) >= 'A' && student.Last.CharAt(0) < 'N' select student;
If we wrote this as C# algorithm, we might do something like:
var strugglingStudents = new List<Student>();
foreach(var student in students) {
    if(student.GPA < 2.0) strugglingStudents.Add(student);
}
var strugglingStudentsAtoN = new List<Student>();
foreach(var student in strugglingStudents) {
    if(student.Last.CharAt(0) >= 'A' && student.Last.CharAt(0) < 'N') strugglingStudentsAtoN.Add(student);
}
As you can see, this results in two iterations over lists of students. In the worst case (when every student is struggling) this requires 2*n operations.
On the other hand, by delaying the execution of the query until the first time its values are used, LINQ can refactor the query into a form like:
var strugglingStudentsAtoN = new List<Student>();
foreach(var student in students) {
    if(student.GPA < 2.0 && student.Last.CharAt(0) >= 'A' && student.Last.CharAt(0) < 'N')
        strugglingStudents.Add(student);
}
With this refactoring, we only need one iteration over our list - our query would run twice as fast! Also, if we never use strugglingStudentsAtoN, the query is never executed, so the cost is constant time. This might seem nonsensical, but consider if we have some kind of conditional, i.e.:
switch(advisor.Number) {
    case 1:
        ReportStudents(strugglingStudentsAtoN);
        break;
    case 2:
        ReportStudents(strugglingStudentsNtoZ);
        break;
}
We only end up executing the query necessary for the logged-in advisor.
LINQ uses a programming pattern known as method chaining, where each query method returns an object upon which additional query operations can be performed. Thus, it is perfectly legal to write a query like:
var query = students.Where(s => s.GPA > 2.0).Where(s => s.Age > 25).Where(s => s.Last.CharAt(0) == 'C');While this may seem silly (as we could have expressed this with one where clause), it makes more sense when we have user interface filters that may or may not have a value, i.e.:
var query = students.All();
if(minGPA != null) query = query.Where(s => s.GPA >= minGPA);
if(maxGPA != null) query = query.Where(s => s.GPA <= maxGPA);
if(first != null) query = query.Where(s => s.First == first);
if(last != null) query = query.Where(s => s.Last == last);The result of the query is therefore a specialized object created by LINQ that implements the IEnumerable<T> interface. The type of T depends on the query (queries are always strongly typed, though the type can be inferred). For example, in our strugglingStudents query, the result type is IEnumerable<Student>:
var strugglingStudents = from student in students where student.GPA < 2.0 select student;In contrast, the highGPAStudents result uses an anonymous type:
var highGPAStudents = from student in students where student.GPA > 3.0 select new { First = student.First, Last = student.Last};The anonymous type is created by the expression new { First = student.First, Last = student.Last}. Basically, it’s an object with a First and Last property (and no methods or other properties). Anonymous types are created by the interpreter at runtime (much like an auto-Property’s backing field). As such, we aren’t able to use its type in our code.
If we want the query to return a specific type, we can instead declare a struct or object to return, i.e.:
class StudentName {
    public string First;
    public string Last;
    public StudentName(string first, string last) {
        First = first;
        Last = last;
    }
}
And then set this as the projection type:
var highGPAStudents = from student in students where student.GPA > 3.0 select new StudentName(student.First, student.Last);Let’s take a deeper look at LINQ syntax next.
Let’s discuss some of the more common operations we might want to perform with LINQ. Please note that this is not an exhaustive list - just some of the most common operations you will be encountering at this time.
For these examples, we’ll be using a data source consisting of Student objects. These are defined by the class:
public class Student {
    public string EID;
    public string First;
    public string Last;
    public double GPA;
    public int Age;
    public string Major;
}
And the variable students is a List<Student> that we can assume is populated with initialized student objects.
We select this as our data source with the LINQ from operator. In query syntax, this would be:
var query = from student in students ...And with method syntax, we would simply use the students list:
var query = students.SomeQueryMethod(student => ...)To create a query from a data source using method syntax without applying any query methods (useful for chaining optional queries), we can invoke All() on the collection:
var query = students.All();To use a different data source, we would just swap students for that source, an object that supports either the IEnumerable (usually data structures) or IQueryable (typically SQL or XML data sources) interface.
Projecting refers to selecting specific data from a data source. For example, if we wanted to select the full name of every Student, we could do so with this query syntax:
var studentNames = from student in students select $"{student.First} {student.Last}";Or with method syntax:
var studentNames = students.Select(student => $"{student.First} {student.Last}");As the name is simply a string, the select above simply constructs the string, and the type of studentNames is inferred to be IEnumerable<string>.
We can also project an anonymous type. This is a special kind of object whose type is created at runtime. Anonymous types are basically collections of properties and nothing more (they cannot have methods). For example, if we wanted just the student’s full name and age, we would use this query syntax:
var studentInfo = from student in students select new {FullName = $"{student.First} {student.Last}", Age = student.Age};or this method syntax:
var studentInfo = students.Select(student => new {FullName = $"{student.First} {student.Last}", Age = student.Age});Finally, we could also define a new data type (i.e. class) and create an instance of it as our projection:
class StudentInfo {
    public string FullName {get; set;}
    public int Age {get; set;}
    public StudentInfo(string fullName, int age)
    {
        FullName = fullName;
        Age = age;
    }
}
Using query syntax:
var studentInfo = from student in students select new StudentInfo($"{student.First} {student.Last}", student.Age);or this method syntax:
var studentInfo = students.Select(student => new StudentInfo($"{student.First} {student.Last}", student.Age));One of the most common operations you will do with a query is filter the data, so the results contain only part of the original data. This is done with the where operator takes a statement that resolves to a boolean. If this boolean expression resolves to true, then the data is included in the results; if it is false, it is excluded. For example, to find all students older than 25, we would use this query syntax:
var olderStudents = from student in students where student.Age > 25 select student;or this method syntax:
var olderStudents = students.Where(student => student.Age > 25);If we have a list that contains multiple types, we can filter for specific types with the where operator or the OfType operator (this is an instance where query and operator syntax vary more greatly). Consider the case where our Student class is a base class to GraduateStudent and UndergraduateStudent classes. If we wanted to get a list of only the undergraduates, we could use a where query syntax combined with an is casting test:
var undergraduates = from student in students where student is UndergraduateStudent select student;In this case, the result would be an IEnumerable<UndergraduateStudent>. But the corresponding where in operator syntax would result in an IEnumerable<Student> that contained only UndergraduateStudent objects. To perform a cast as part of the filtering, we would instead use the OfType<T>() method:
var undergraduates = students.OfType<UndergraduateStudent>();Often we want to apply some form of sorting to our results, i.e. we might want to sort students by GPA. This can be done with an orderby operator. In query syntax it would be:
var studentsByGPA = from student in students orderby student.GPA select student;And in method syntax:
var studentsByGPA = students.OrderBy(student => student.GPA);The orderby operator sorts in ascending order (so students with the lowest grades would come first in the list). If we wanted to sort in descending order, we would need to specify descending order in our query syntax:
var studentsByGPA = from student in students orderby student.GPA descending select student;There is also an ascending keyword you can use. This is helpful if you can’t remember the default or want to make it clear to other programmers that the list will be sorted in ascending order:
var studentsByGPA = from student in students orderby student.GPA ascending select student;However, in method syntax this is accomplished by a separate operator, the OrderByDescending() method:
var studentsByGPA = students.OrderByDescending(student => student.GPA);If we need to order by multiple properties, i.e. first and last names, this is accomplished by a comma-separated list in query syntax:
var studentsByName = from student in students orderby student.Last, student.First select student;But in method syntax, we need to use a ThenBy() operator for subsequent sorting options:
var studentsByName = students.OrderBy(student => student.Last).ThenBy(student => student.First);We can mix and match ascending and descending sorting as well - for example, to sort students by descending GPA, then by names in alphabetical order we would use the query syntax:
var studentsByGPAAndName = from student in students orderby student.GPA descending, student.Last, student.First select student;The corresponding method syntax would need separate operators for each sorting:
var studentsByGPAAndName = students.OrderByDescending(student => student.GPA).ThenBy(student => student.Last).ThenBy(student => student.First);There is also a ThenByDescending() operator for chaining descending sorts.
Finally, there is also a Reverse() operator which simply reverses the order of items in the collection without sorting.
We often want to split our results into groups, which can be accomplished with the group by operator. Consider the case where we want to split our students by the value of their Major field. We can accomplish this with query syntax:
var studentsByMajor = from student in students group student by student.Major select student;or using method syntax:
var studentsByMajor = students.GroupBy(student => student.Major);The result type of a grouping operation is an IEnumerable<IGrouping<TKey, TSource>>; the IGrouping is essentially a key/value pair with the key being the type we were grouping by. In the example it would be IEnumerable<IGrouping<string, Student>> (Seeing this, you can probably begin to appreciate why we normally use var for query variables).
To print out each student in each category, we’d need to iterate over this collection, and then over the groupings:
foreach(var group in studentsByMajor) {
    Console.WriteLine($"{group.Key} Students");
    foreach(var student in group) {
        Console.WriteLine($"{student.First} {student.Last}");
    }
}A common strategy with large data sets is to separate them into pages, i.e. the first 20 items might appear on page 1, and by clicking the page 2 link, the user could view the next twenty items, and so on. This paging functionality is implemented in LINQ using the Skip() and Take() operators. The Skip() operator specifies how many records to skip over, while the Take() operator indicates how many records to include. Thus, to take the second page of students when each page displays twenty students, we would use:
var pagedStudents = students.Skip(20).Take(20);Note that there is no query syntax corresponding to the Skip() and Take() operations, so to use them with query syntax, we wrap the query in parenthesis and invoke the methods on the result. I.e. sorting students alphabetically and then taking the third page of twenty would be:
var pagedSortedStudents = (from student in students orderby last, first select student).Skip(40).Take(20);Sometimes we want to know if a particular record exists in our data source. The Any() operator can be used to perform such a check. It evaluates to true if the query has any results, or false if it does not. Like the Skip() and Take(), it does not have a query syntax form, so it must be invoked using the method syntax. For example, to determine if we have at least one student named Bob Smith, we could use:
var bobSmithExists = (from student in students where student.First == "Bob" && student.Last == "Smith" select student).Any();Or, in method syntax:
var bobSmithExists = students.Any(student => student.First == "Bob" && student.Last == "Smith");Alternatively, if we wanted to retrieve Bob Smith’s record instead of simply determining if we had one, we could use First():
var bobSmith = (from student in students where student.First == "Bob" && student.Last == "Smith" select student).First();or in method syntax:
var bobSmith = students.First(student => student.First == "Bob" && student.Last == "Smith");This evaluates to the first matching result of the query (if we have multiple Bob Smiths, we’ll only get the first one). If there is no matching record, an InvalidOperationException is thrown. Alternatively, we can use FirstOrDefault() which returns a default value corresponding to the query data type. For classes, this would be null, so given this query:
var bobSmith = students.FirstOrDefault(student => student.First == "Bob" && student.Last == "Smith");The value of bobSmith would be his record (if he is in the collection) or null (if he was not).
Sometimes we want to perform aggregate operations upon a data source, i.e. counting, summing, or averaging. As with paging, these are accomplished via method-only operators. For example, to count all students in our data source, we could use:
var studentCount = students.Count();This can be combined with any LINQ query, i.e. the count of students with a GPA above 3.0 in query syntax would be:
var studentsAbove3GPA = (from student in students where student.GPA > 3.0 select student).Count();or in method syntax:
var studentsAbove3GPA = students.Where(student => student.GPA > 3.0).Count();Similarly, to compute the average GPA we would use the Average() method in conjunction with a projection. In query syntax:
var averageGPA = (from student in students select student.GPA).Average();or in method syntax:
var averageGPA = students.Select(student => student.GPA).Average();or we can move the selector Predicate into the Average() directly:
var averageGPA = students.Average(student => student.GPA);We can create more complex queries to address specific questions. For example, with a group by we could compute the average GPA by major:
var gpaByMajor = from student in students group student by student.Major into majorGroup select new
    {
        Major = majorGroup.Key,
        AverageGPA = majorGroup.Average(student => student.GPA);
    }
The Sum() operator works similarly, summing a value. To sum the ages of all students, we could use:
var sumOfAges = (from student in students select student.Age).Sum();or
var sumOfAges = students.Select(student => student.Age).Sum();or
var sumOfAges = students.Sum(student => student.Age);There are also Min() and Max() aggregate operators which select the minimum and maximum values, respectively. For example, we could find the maximum and minimum earned GPAs with:
var minGPA = students.Min(student => student.GPA);
var maxGPA = students.Max(student => student.GPA);
Finally, there is a generic Aggregate() method which provides an aggregator variable that we can use to build any kind of aggregate function. Let’s first see how it can be used to duplicate the functionality of the Sum() method:
var sumOfAges = students.Aggregate((sum, student) => sum + student.Age);Here, sum is inferred to be an int, as student.Age is an int. So it starts at 0, and each time the Aggregate method processes a student, it adds that student’s Age into the sum.
Now let’s use this method for something new - generating a string of email addresses for a bulk mailing. Assume our email application needs a list of semicolon-separated email addresses. In that case, we could generate the emails for all students from:
var emails = students.Aggregate((emails, student) => emails + $"; {student.EID}@k-state.edu");If we had students with EIDs “mary”, “brb30”, and “stan”, the resulting string would be:
mary@k-state.edu; brb30@k-state.edu; stan@ksu.eduYou may have heard the term map/reduce in the context of functional programming or big data. This is an algorithmic approach to processing data. This pattern can be duplicated in LINQ using a query as the mapping function, and Aggregate() as the reduce function.
In order to use LINQ with your IEnumerable collections, you must include this using statement:
using System.LINQ Without it, the LINQ collection methods will not be available. You might be wondering why, as your collections are mostly defined in the System.Collections or System.Collections.Generic namespaces.
The answer is that LINQ on collections is implemented using extension methods. This is a C# feature that allows you to add methods to any class, even a sealed class. But how can we add methods to a sealed class? Isn’t the point of sealing a class to prevent altering it?
The answer is that extension methods don’t actually modify the class itself. Instead, they make available additional methods that the compiler “pretends” are a part of the class. But these are defined separate from the class, and cannot modify it, nor access private or protected members of the class. As the LINQ extension methods are defined in the System.LINQ namespace, we must make them available with a using statement before the compiler and intellisense will let us use them.
Let’s see an example of creating our own extension methods. As programmers, we often use class names in Pascal case, that might be useful to convert into human-readable strings. Let’s write an extension method to do this transformation:
using System.Text;

namespace StringExtensions {

    /// <summary>
    /// Converts a camel-case or pascal case string into a human-readable one
    /// </summary>
    public static string Humanize(this String s)
    {
        StringBuilder sb = new StringBuilder();
        int start = 0;
        for(int i = 1; i < s.Length; i++)
        {
            // An upper case character is the start of a new word
            if(Char.IsUpper(s[i]))
            {
                // So we'll add the last word to the StringBuilder
                string word = s.Substring(start, i - start);
                sb.Append(word);
                // Since that wasn't the last word, add a space
                sb.Append(" ");
                // Mark the start of the new word
                start = i;
            }
        }
        // We should have one more word left
        sb.Append(s.Substring(start));
        return sb.ToString();
    }

}
Notice a couple of important features. First, the method is defined as static. All extension methods are static methods. Second, note the use of this in the first parameter, this string s. The use of the this keyword is what tells C# the method is an extension method. Moreover, it indicates the class that is being extended - String (which is equivalent to string).
Other than these two details, the rest of the method looks much like any other method. But any time this method is in scope (i.e. within the StringExtensions namespace, or in any file with a using StringExtensions statement), there will be an additional method available on string, Humanize().
That’s all there is to writing an extension method. Go ahead and try writing your own to convert human-readable strings into Pascal or Camel case!
In this chapter we learned about LINQ, Microsoft’s query technology for querying collections, relational databases, and XML files (along with community implementations for many other queryable things). We saw how to use both query and method syntax provided by LINQ to perform common query operations. Finally, we examined the mechanism LINQ uses to provide new functionality to IEnumerable collections - extension methods. We even implemented a few extension methods of our own!
Now you should be ready to use LINQ in your own projects, as well as define your own custom extension methods.
Putting your work out there
Now that we’ve explored building web applications and writing web servers, we’ll explore in more detail how to make them available on the web, a process known as deployment.
Some key terms to learn in this chapter are:
The key skills to develop in this chapter are:
As we discussed previously, when we visit web pages in our browser, the browser makes a HTTP or HTTPS request against the web server for the resource. For this request to be sent to the right server, we must first determine the server’s address. This address takes the form of an Internet Protocol (IP) address. There are currently two ways these IP addresses are specified, IPv4 and IPv6. An IPv4 address consists of 32 bits split into 8 bit chunks, and is typically expressed as four integers between 0 and 255 separated by periods. For example, the IP address for Kansas State University is:
129.130.200.56Consider that an IPv4 address consists of 32 bits. This means we can represent 2^{32} unique values, or 4,294,967,296 different addresses. You can see how many websites are currently online at https://www.internetlivestats.com/watch/websites/, as of this writing it was nearly 2 million. Combine that with the fact that every computer connecting to the interent, not just those hosting, must have an ip address, and you can see that we are running out of possible addresses.
This is the issue that IPv6 was created to counter. IPv6 addresses are 128 bits, so we can represent 2^{128} different values, or 340,282,366,920,938,463,463,374,607,431,768,211,456 possible addresses (quite a few more than IPv4)! An IPv6 address is typically expressed as eight groups of four hexidecimal digits, each representing 16 bits. For example, Google’s IPv6 address is:
2607:f8b0:4000:813::200eIPv6 adoption requires changes to the internet infrastructure as well as all connected machines, and is typically done on a volunteer basis. Thus, it is a gradual process. The United States is at rougly a 47% adoption level; you can see current adoption statistics for all countries at Akamai’s IPv6 Adoption Tool.
In addition to the address, requests are sent to a port, a specific communication endpoint for the computer. Different applications “listen” at specific ports on your computer - this allows your computer to have multiple applications communicating across the network or interent at the same time. You might think of your computer as an apartment complex; the IP address is its street address, and the ports are individual apartment numbers. Different applications then live in different apartments. Many of these ports are unused (the apartments are vacant), as most computers are only running a few network-facing applications at any given time.
Many applications and communication services have a “default” port they are expected to use. This makes it easy to connect to a remote computer. For example, a webserver uses port 80 by default for HTTP requests, and port 433 for HTTPS requests. If your server is listening at these ports, there is no need to specify the port number in HTTP/HTTPS requests targeting your IP address. You can also run a program on a non-standard port. For example, with our Razor Page applications, we have typically been running our debug version on port 44344 (with IIS Express) or 5001 (when running as a console application). If you know the IP address of your computer, you can visit your running debug server by using the address http://[ip address]:[port] from another computer on your network.
Some of the most common services and thier associated default ports are:
| Port | Protocol | Use |
|---|---|---|
| 22 | Secure Shell (ssh) | Used to communicate between computers via a comand line interface |
| 25 | Simple Mail Transfer Protocol (SMTP) | A common email routing protocol |
| 53 | Domain Name System (DNS) Service | IP lookup by domain name |
| 80 | Hyper-Text Transfer Protocol (HTTP) | Servicing WWW requests |
| 143 | Post Office Protocol (POP) | Retrieving email |
| 143 | Interent Message Access Protocol (IMAP) | Managing email |
| 193 | Interent Relay Chat (IRC) | Chat messages |
| 443 | Secure Hyper-Text Transfer Protocol (HTTPS) | Servicing secure WWW requests |
Of course, you don’t normally type 129.130.200.56 into your browser to visit K-State’s website. Instead, you type k-state.edu or ksu.edu, which are domain names owned by the university. A Domain Name is simply a human-readable name that maps to an IP address. This mapping is accomplished by the Domain Name System (DNS), a lookup service composed of a hierarchial network of servers, with the root servers maintained by the Internet Corporation for Assigned Names and Numbers (ICANN).
When you enter a domain name into your browser, it requests the corresponding IP address from its local DNS server (typically maintained by your ISP). If it does not know it, this server can make a request against the broader DNS system. If a matching IP address exists, it is returned to the local DNS server and through that server, your browser. Then your browser makes the request using the supplied IP address. Your browser, as well as your local DNS server, cache these mappings to minimize the amount of requests made against the DNS system.
To get a domain name, you must purchase it from a domain name reseller. These resellers work with ICANN to establish ownership of specific domain names - each domain name can have only one owner, and map to an IP address. Once you’ve purchased your domain name (which is actually leased on an annual basis), you work with the reseller to target the domain name at your preferred IP address(es). This entire process is typically handled through a web application.
The localhost domain name is a special loopback domain. It always points at IP address 127.0.0.1, which is always the local machine (i.e. the computer you are using).
We have talked several times about HTTP and HTTPS, without really discussing what is different about these two approaches other than that HTTPS is “secure”. Essentially, HTTPS uses the same protocol as HTTP, but requests and responses are encrypted rather than being sent as plain text. This encryption is handled at a level below HTTP, in the communication layer (currently this uses TLS - Transport Layer Security). This encryption is done through symmetric crypography using a shared secret. You may remember studying this approach in CIS 115. Remember this Computerphile video demonstrating a Diffie-Hellman key exchange by mixing paint colors?
By using this encryption scheme, we make it impossible (or at least very difficult) for third parties intercepting our HTTP requests and responses to determine exactly what they contain. Hence, credit card information, passwords, and other personal information is protected, as are search terms, etc. However, this is only half of the process of HTTPS. The second half involves establishing that the web server you are making requests to is the one you want, and not an impersonator. This requires an authentication process, to ensure you are communicating to the correct server.
This authentication aspect of TLS is managed through security certificates. These are built around public/private key encryption and the X.509 certificate standard. A certificate provides proof the server serving the certificate is the one of the domain address in question. Think of it as a driver’s license or your student ID card - it lists identifying information, and you carry it with you to prove you are who you say you are. And much like a drivers’ license or a student ID card, it is issued by an authoritative source - one of several “trusted” certificate authorites, or an authority whose own certificate is signed by one of these authorities.
Anyone can issue a security certificate, but only one with a chain of signed certificates that goes back to a root trusted certificate authority will be considered “trusted” by your browser. This is why you may have had issues running your web applications using HTTPS - when launching the project in debug mode, it uses a self-signed certificate (i.e. your application creates its own certificate), which the browser reports as untrustworthy. Depending on your browser, you may be able to allow this “untrusted” site to be served, or it may be disallowed completely. Visual Studio and ASP.NET projects typically offer to install a “dev certificate” that allows your localhost communications to treated as trusted.
Traditionally, security certificates are issued from a trusted authority using annual fees, and often accompanied by insurance that pays for legal issues if the certificate is ever violated. However, the Let’s Encrypt Security Group, launched in April 2016, offers free security certificates with the goal of making HTTPS ubiquitious on the web. This easy availablility means there is no reason to not host your websites using HTTPS instead of vulnerable HTTP. You can visit the Let’s Encrypt website at letsencrypt.org.
To host your website, you will need:
While you have been running your website in debug mode on your development computer, you probably won’t use it to host your actual website on the Internet. First, your machine would need to be running the web server application constantly. Any time your computer was turned off, or the web server was not running, your website would be inaccessible.
Also, in most residental setups, you probably won’t be able to access the running program across the Internet anyway. This is especially if you have multiple computers connected through a router. In that case, only your router has a unique IP address, and all communications are routed through it using that address. The router also assigns “internal” addresses to the computers networked to it, and handles distributing request results to those computers that made them (kind of like a mailroom for a very large institution). To make your website available, you would probably need to set up port forwarding or a similar technique with your router to have it forward requests to the computer running your web server. You probably would also need to modify your firewall settings (firewalls prevent connections against ports that you don’t mean to have open to the Internet).
A third challenge is that you most likely do not have a static IP address, i.e. one that will always point to your computer. Most Internet Service Providers instead typically assign a dynamic IP address to your router or modem when you estabish a connection, drawn from a pool of IP addresses they maintain for this purpose. This address is yours until the next time you connect (i.e. after a power loss or rebooting your router), at which point the ISP assigns you a different IP address from the pool. This simplifies the configuration for their network, and allows them to share IP addresses amongst infrequently-connecting users. Further, most residential ISP plans specifically forbid hosting web applications using their connection - instead you must sign up for a commercial plan that includes a static IP address.
Instead, you will probably host your websites on a remote machine running in a server farm (similar to how the CIS Linux servers that you put your personal web pages on in CIS 115). There are several benefits to using a machine in a server farm: typically they are very good machines, optimized for hosting web applications, the server farm has ideal operating conditions (good air conditioning, a backup power system), better uptime, and on-staff IT professionals that keep the equipment in good repair. Of course, you will have to pay fees to have access to a machine. There are typically several options offered by these service providers:
public_html where they can place files to be served statically). This is the approach our department uses for your access to the CS Linux server.We’ll take a deeper look at virtual machines next.
A virtual machine is a simulated computing device. Let’s start with a simple example. You can play classic NES and Super NES games using the Switch. How is this done? Does the Switch contain the same hardware as the original NES or SNES? No. It uses a NVIDA Tegra processor, which utilizes the 64-bit ARM architecture. The NES used an 8-bit CPU, and the SNES used a 16-bit CPU. These are very different architectures. Of course, you may note the service I referenced is an online service. So do they hook up thousands of NES and SNES units to a web server processing input and output? Also no, but also yes.
What they actually do is emulate that hardware with software. Thus, they have a program that pretends to be the NES hardware, and the load into that program the actual NES game (the software) you wish to play. This emulator is a part of a web server that streams the resulting game images to the Switch, and the Switch likewise streams the player’s input back to the server. This is essentially the same approach used by any video game console emulator (sans the use of a web server).
In the same way, we can use a virtual machine to emulate another kind of computer within our own computers. For example, the VMWare platform you have access to as a CS student allows you to install VMWare on your computer. Once installed, you can create virtual Linux or Windows PCs that run within the program. Essentially, VMWare pretends to be a separate computer and shares your computer’s real resources through interfaces that make it seem to be the hardware the program emulates. Another approach to running a Linux VM within a Windows environment is the Windows Subsystem for Linux (WSL). This is essentailly a virtual machine that runs a Linux kernel (of your choice) within Windows. It offers better performance than VMWare as the VM plugs directly into Windows OS procedures.
Most Internet hosting services offer Virtual Machines that you can rent. Typically you specify the amount of RAM and storage, as well as the number of CPUs you wish to utilize. These represent a portion of the real machine’s resources that are assigned to your specific VM. You then are granted root access to the VM, and can install whatever software you need; for example, installing Linux, Dotnet Core, and a relational database to run your web application. Once you have your application set up, you launch it as a constantly running service, and it begins to listen for HTTP and HTTPS requests on port 80 and 443. The service usually provides you with a static IP address, which you can then hook up to your domain name.
The computing device being emulated does not have to equate to hardware analogues. In CIS 200 you worked with a VM extensively that does not correspond to physical hardware - the Java Virtual Machine (JVM). The JVM is a virtual machine that does not correspond to any real-world hardware, but provides a similar computing environment that can process Java Byte Code (which is similar to the assembly code run by hardware-based processors). A different JVM exists for every hardware platform that Java can be run on, mapping the virtual system procedures to the specific platform’s hardware and operating system.
You may be asking yourself “is .NET also a virtual machine?” In one sense, yes, as it works from a similar concept as Java, but the reality is a bit more complex. The DOTNET languages are compiled into Intermediate Langauge, a format similar to Java’s Bytecode. And the DOTNET runtime has specific builds for different operating systems and hardware platforms, much like the JVM. But rather than the DOTNET runtime running the IL in a virutal environment, when you execute a DOTNET program, it is further compiled by the DOTNET runtime into assembly for the specific platform using a Just-in-Time compiler. So ultimately, DOTNET code is run in actual machine, not a virtual machine.
In recent years, containerized applications have become increasingly popular, especially for web-based deployments. This is a variant on the Virtual Machine idea, where the application and the execution environment are separated into two parts - the container (an image file containing the binary code and resources of an application) and an execution environment (a virtual machine, often emulating a Linux or Windows machine, but possibly more specialized). The containerized application is then run within this execution environment. The chief benefits of containerized approaches are portability and scaleability. As the execution environment can be installed on a variety of platforms, much like the JVM, the container can be run on different hardware - a development PC, a development Mac, a production server, or someting more esoteric like a cloud server.
As the emulated execution environment is the same across each of these platforms, the same containerized application should run identically on each. Moreover, to create additional instances of a containerized application, you just launch another copy of the container - a process that takes milliseconds. Compare this to adding another traditonal server or VM - you have to intialize the VM, install the necessary supporting environment, libraries, and other dependencies, and then install your application and launch it. This process can take minutes to hours, and often requires an IT professional to work through the steps. Cloud services like Amazon Web Services, Microsoft’s Azure, and Google Cloud all utilize container-based approaches to allow rapid upscaling and downscaling of web servers to meet the actual demand for a web application. These platforms typically handle load balancing (directing traffic evenly amongst the containers running instances of your web server) automatically, making the process of hosting large-volume web traffic much easier. And for small, limited-demand web applications, many of these cloud services offer a free tier with a limited amount of bandwith a month. The speed at which a containerized application can be spun up means that these free tier applications can be shut down most of the time, and only run when requests are coming in.
In this chapter we discussed what is necessary for hosting a web application: a computer running your web server, a static Internet Protocol address, a domain name that maps to your IP addresss, and a security certificate for using HTTPS. Each of these concepts we explored in some detail. We saw how using HTTPS allows encrypted end-to-end communication between the web client and server, as well as providing assurance that the server we are communicating with is the one we intended to make requests from. We also discussed the differences between self-signed certificates and those signed by a certificate authority, and introduced the nonprofit letsencrypt.org which provides free certificates to help secure the web.
We also described several options for the computing environment running your web server: a dedicated machine in your home or office, a dedicated machine in a server farm, a virtual machine, or a containerized cloud service. We discussed the benefits and drawbacks of each approach. As you prepare to host your own applications, you’ll want to consider these, along with the costs of the various services, to decide how you want to deploy your production application.