Exercises
Doing the Work
Doing the Work
Follow the tutorial in the following video:
YouTube VideoThen add the remaining static methods to the VectorMath class (Scale, DotProduct, CrossProduct, Magnitude, Normalize) following the structure laid out in this UML class diagram:

The vector operations these methods should compute are:
$$\vec{a}+\vec{b}= \langle a_x + b_x, a_y + b_y, a_z + b_z \rangle \tag{Vector Addition}$$ $$\vec{a}-\vec{b}= \langle a_x - b_x, a_y - b_y, a_z - b_z \rangle \tag{Vector Subtraction}$$ $$\vec{a} \cdot s= \langle a_x \cdot s, a_y \cdot s, a_z \cdot s \rangle \tag{Vector Scaling}$$ $$\vec{a} \cdot \vec{b} = \langle a_x b_x + a_y b_y + a_z b_z \rangle \tag{Vector Dot Product}$$ $$\vec{a} \times \vec{b} = \langle a_y b_z - a_z b_y, a_z b_x - a_x b_z, a_x b_y - a_y b_x \rangle \tag{Vector Cross Product}$$ $$||\vec{a}|| = \sqrt{a_x^2 + a_y^2 + a_z^2} \tag{Vector Magnitude}$$ $$\hat{u} = \frac{\vec{u}}{||\vec{u}||} \tag{Vector Normalization}$$You can uncomment the tests in the VectorMathUnitTests class and then run them to verify your work.
Create a release of your project code on GitHub and submit its URL.
Now that you know how to create Razor pages, let’s see what makes them useful for creating dynamic web pages.
We’ll start with a simple ASP.NET web app using Razor Pages to display a database of movies. This app consists of a single page, Index that will be used to display the details of the movies in the database. It also contains classes representing an individual movie (Movie) and the movie database (MovieDatabase).
You can clone the starting project from the GitHub Classroom url provided in the Canvas Assignment (for students in the CIS 400 course), or directly from the GitHub repo (for other readers).
Here is the starting point of a class representing a movie:
    /// <summary>
    /// A class representing a Movie
    /// </summary>
    public class Movie
    {
        /// <summary>
        /// Gets and sets the title of the movie
        /// </summary>
        public string Title { get; set; }

        /// <summary>
        /// Gets and sets the Motion Picture Association of America Rating
        /// </summary>
        public string MPAARating { get; set; }

        /// <summary>
        /// Gets and sets the primary genre of the movie
        /// </summary>
        public string MajorGenre { get; set; }

        /// <summary>
        /// Gets and sets the Internet Movie Database rating of the movie
        /// </summary>
        public float? IMDBRating { get; set; }

        /// <summary>
        /// Gets and sets the Rotten Tomatoes rating of the movie
        /// </summary>
        public float? RottenTomatoesRating { get; set; }
    }
As you can see, it’s a pretty simple data class.
However, we do have one new thing we haven’t seen before - a new use of the question mark symbol (?) in float?. This indicates a nullable type, i.e. in addition to the possible float values, the variable can also be null.
Remember, a float is a value type, and normally you cannot set a value type to null. By making it a nullable type, we effectively have wrapped it in an object (technically, a Nullable<T> object). So instead of RottenTomatoesRating referencing the memory where the value of the float is stored, it is now storing a reference to that location in memory. This reference can itself be null if it isn’t pointing anywhere.
We need all of these properties to have the possibility to be null, as the data we are working with does not have values for all of them. Let’s look at that data next.
The movies.json file contains data in a JSON format. JSON stands for Javascript Serialization Object Notation. As the name suggests, it is a serialization format - a way of expressing the state of a data object in text. While it originates with JavaScript, JSON has become a popular format for exchanging data in many programming languages. Let’s take a closer look at this file’s structure.
The first movie in the file is The Land Girls:
[
  {
    "Title": "The Land Girls",
    "USGross": 146083,
    "WorldWideGross": 146083,
    "USDVDSales": null,
    "ProductionBudget": 8000000,
    "ReleaseDate": "Jun 12 1998",
    "MPAARating": "R",
    "RunningTime": null,
    "Distributor": "Gramercy",
    "Source": null,
    "MajorGenre": null,
    "CreativeType": null,
    "Director": null,
    "RottenTomatoesRating": null,
    "IMDBRating": 6.1,
    "IMDBVotes": 1071
  },
  ...
]
The outer square brackets ([, ]) indicate that the file contents represent an array. The curly braces ({, }) indicate an object - thus the file represents an array of objects. Each object consists of key/value pairs, i.e. "Title": "The Land Girls" indicates the title of the film. We’re using a library to deserialize these JSON objects into our C# Movie object structure, so we need the keys to match the property names in that structure.
As you can see with this entry, many of the values are null. This is why we needed to introduce nullables into our data object - otherwise when we deserialized this object in our C# code, our program would crash when it tried to set one of the value properties to null.
Now let’s look at the MovieDatabase class:
    /// <summary>
    /// A class representing a database of movies
    /// </summary>
    public static class MovieDatabase
    {
        private static List<Movie> movies = new List<Movie>();

        /// <summary>
        /// Loads the movie database from the JSON file
        /// </summary>
        static MovieDatabase() {

            using (StreamReader file = System.IO.File.OpenText("movies.json"))
            {
                string json = file.ReadToEnd();
                movies = JsonConvert.DeserializeObject<List<Movie>>(json);
            }
        }

        /// <summary>
        /// Gets all movies in the database
        /// </summary>
        public static IEnumerable<Movie> All { get { return movies; } }
    }
}
There are a couple of interesting features. First, the class is static, which means we cannot construct an instance of it - there will only ever be one instance, and we’ll reference it directly from its class name, MovieDatabase. As a static class, all of its fields, methods, and properties must likewise be declared static. If these are public, then we can access them directly from the class name, i.e. to access the All property, we would invoke MovieDatabase.All.
Notice that we have declared a static constructor for the class. This will be invoked the first time the class is used in the program, and only that one time (as after that, the one static instance of the class exists). Since we cannot construct a static class directly, there is no reason to add an access modifier (public, protected, or private).
The usual reason to have a static constructor is to do some kind of initialization, and that is what we are doing here. We are loading the JSON file, and using the JsonConvert.DeserializeObject<T>() method to convert the JSON into a List<Movie>. This method is part of the JSON.net library from Newtonsoft - which is provided to us through a Nuget package. If you look under the Dependencies entry in the solution explorer, you can find a Packages list that contains Newtonsoft.JSON, this library.
Nuget is a package manager that allows developers to publish .NET libraries they have created for other developers to use. It is a source of many useful libraries, and if you become a professional .NET developer, it is probably a resource you will find yourself using often.
Okay, now that we’re familiar with the starter code, let’s turn our attention to the task at hand - we’d like to display all the movies in our database on the Index razor page.
Let’s start by looking at our Page class, Index.cshtml:
@page
@model IndexModel
@{
ViewData["Title"] = "Home page";
}
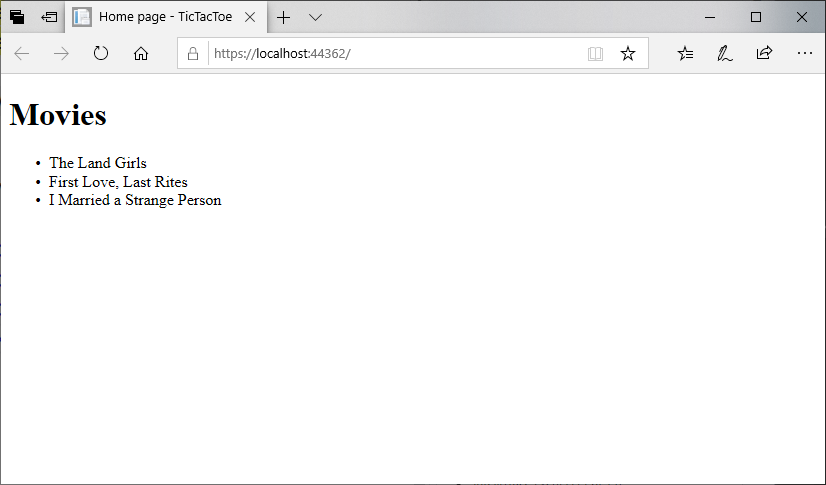
<h1>Hello World</h1>Let’s change the header Hello World to say Movies. And below that, let’s declare an unordered list of movie titles, and put the first few titles in list items:
<h1>Movies</h1>
<ul>
    <li>The Land Girls</li>
    <li>First Love, Last Rites</li>
    <li>I Married a Strange Person</li>
</ul>
Go ahead and run your program. Your page should look like:
This approach would work fine, but there are 3,201 entries in our database - do you really want to do that by hand?
Instead, let’s leverage the power of Razor templates, and use some C# code to iterate through each entry in the database. We can do this with a foreach loop, just like you might do in a regular C# class:
<h1>Movies</h1>
<ul>
    @foreach(Movie movie in MovieDatabase.All)
    {
        <li>@movie.Title</li>
    }
</ul>
Notice that inside the body of the foreach loop, we use regular HTML to declare a list item element (<li>). But for the content of that element, we are using the movie.Title property. As this is prefaced with an at symbol (@), the Razor template engine evaluates it as a C# expression, and concatenates the result (the movie’s title) into the list item. Thus, for the first item in the database, <li>The Land Girls</li>.
Each of these is in turn concatenated into the page as the foreach loop is processed, resulting in a list of all the movie titles in the database. Run the program and see for yourself:
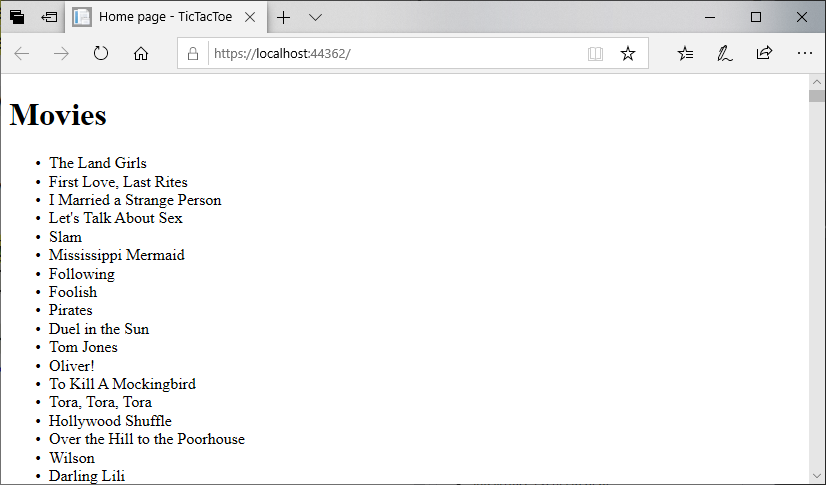
They’re all there. You can scroll all the way to the bottom.
It might be interesting to see more information about the movies than just the title. Let’s take advantage of the details in our Movie class by expanding what is shown:
<h1>Movies</h1>
<ul>
    @foreach(Movie movie in MovieDatabase.All)
    {
        <li>
            <h3>@movie.Title</h3>
            <div>@movie.MPAARating</div>
            <div>@movie.MajorGenre</div>
        </li>
    }
</ul>
Notice that unlike our WPF XAML, we can nest as many children in an HTML element as we want! If we run the program now:
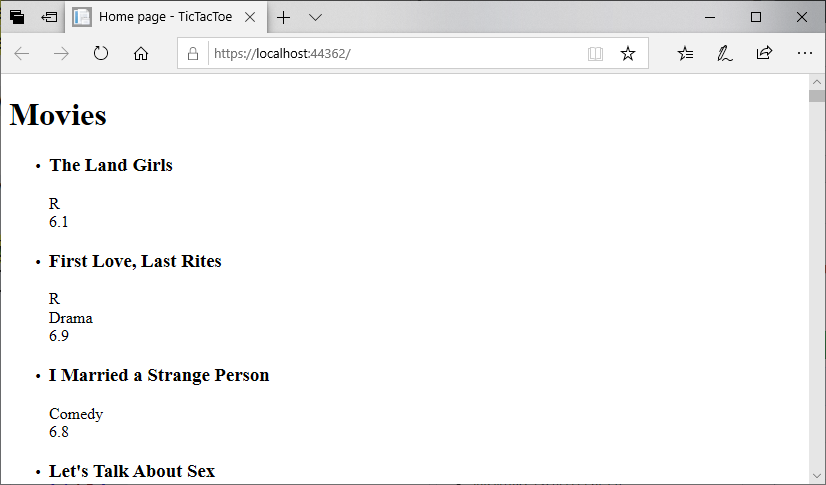
Well, it works, but it’s also underwhelming (and a bit difficult to interpret). Notice that our first few movies don’t have all the rating properties, so there are large blank spaces.
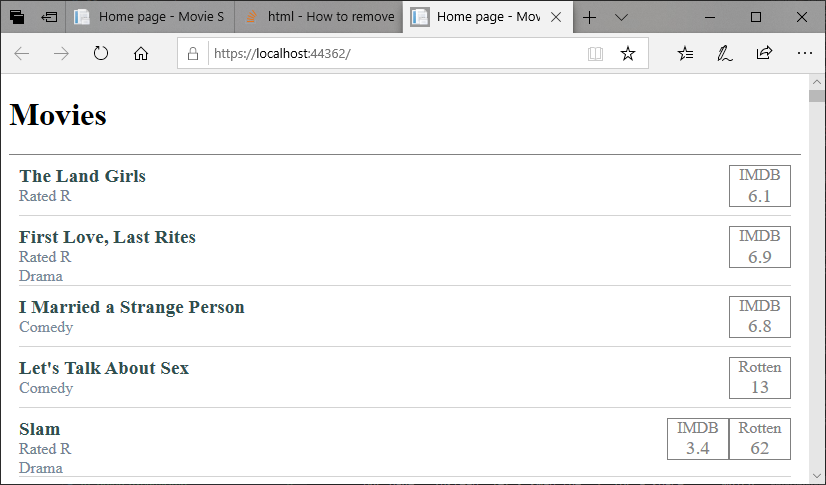
Let’s take advantage of Razor’s ability to use conditionals to leave those blanks out:
<h1>Movies</h1>
<ul class="movie-list">
    @foreach(Movie movie in MovieDatabase.All)
    {
        <li>
            <h3 class="title">@movie.Title</h3>
            @if (movie.MPAARating != null)
            {
                <div class="mpaa">
                    Rated @movie.MPAARating
                </div>
            }
            @if (movie.MajorGenre != null)
            {
                <div class="genre">
                    @movie.MajorGenre
                </div>
            }
        </li>
    }
</ul>
We’ve also added the text “Rated” before our MPAARating, so the entry will now read “Rated R” for an R-rated movie, “Rated G” for a g-rated movie, and so on.
We also added class attributes to the <h3> and each <div>, as well as the movie list itself. We’ll use these to style our elements.
We can find our CSS rules for the project in wwwroot/css/site.js.
Let’s start with the unordered list itself. We can select it with the ul.movie-list selector. We’ll remove any padding and margins, and add a solid line above it:
ul.movie-list {
    padding: 0;
    margin: 0;
    border-top: 1px solid gray;
}
We’ll then select each list item that is a child of that list with ul.movie-list > li. We’ll remove the bullet, add a lighter border at the bottom to separate our items, and put a 10-pixel margin all the way around:
ul.movie-list > li {
    list-style-type: none;
    border-bottom: 1px solid lightgray;
    margin: 10px;
}
You might wonder why we put the list in an unordered list at all, if we’re just going to change all its default styles. Remember, HTML provides the structure as well as the content. By putting the items in a list, we’re signifying that the items are a list. We are conveying semantic meaning with the structure we use.
Remember, it’s not just humans that read the internet. Many bots and algorithms do as well, and they typically won’t use the lens of CSS styling - they’ll be reading the raw HTML.
We’ll make our title headers a dark slate gray, have a slightly larger-then-normal text, and remove the margins so that there are no large space between the header and the text is directly above and beneath them:
.title {
    color: darkslategray;
    font-size: 1.2rem;
    margin: 0;
}
Finally, let’s lighten the color of the MPAA rating and genre:
.mpaa {
    color: slategray;
}

.genre {
    color: lightslategray;
}While the MPAA ratings convey the age-appropriateness of a movie, the IMDB and Rotten Tomatoes ratings provide a sense of how much people enjoy the films. Since this probably information our readers might want to see to help them judge what films to look at, it might be nice to call attention to them in some way.
What if we put them into their own boxes, and position them on the right side of the screen, opposite the title? Something like:

There are many ways of accomplishing this look, including the float property or using a <table> element. But let’s turn to one of the newer and more powerful css layout features, the flexbox layout.
We’ll start by refactoring our HTML slightly, to divide our <li> into two <div>s, one containing our current details for the movie, and one for the viewer ratings:
      <li>
        <div class="details">
            <h3>@movie.Title</h3>
            @if (movie.MPAARating != null)
            {
                <div class="mpaa">
                    Rated @movie.MPAARating
                </div>
            }
            @if (movie.MajorGenre != null)
            {
                <div class="genre">
                    @movie.MajorGenre
                </div>
            }
        </div>
        <div class="ratings">
            @if (movie.IMDBRating != null)
            {
                <div class="imdb">
                    @movie.IMDBRating
                </div>
            }
            @if (movie.RottenTomatoesRating != null)
            {
                <div class="rotten-tomatoes">
                    @movie.RottenTomatoesRating
                </div>
            }
        </div>
    </li>
Now we’ll apply the flexbox properties and a minimum height to the list item:
ul.movie-list > li {
    display: flex;
    flex-direction: row;
    align-items: flex-start;
    justify-content: space-between;
    min-height: 50px;
}
These can be combined with our earlier rule block with the same selector, or they can be declared separately.
We’ll also use flexbox to make our ratings appear side-by-side:
.ratings {
    display: flex;
    flex-direction: row;
}
And use some styles to add the border, center the text, and use gray for the text and border colors:
.imdb, .rotten-tomatoes {
    color: gray;
    border: 1px solid gray;
    width: 60px;
    text-align: center;
    font-size: 1.2rem;
}
Notice that we can use the comma to allow more than one selector to share a rule.
It might be nice to label the two ratings, as Rotten Tomatoes is on a 100-point scale, and IMDB uses a 10-point scale. We could go back and apply this in the HTML, but it is a good opportunity to show off the ::before pseduo-selector, which allows us to create HTML elements using css:
.imdb::before {
    content: "IMDB";
    display: block;
    font-size: 1rem;
}

.rotten-tomatoes::before {
    content: "Rotten";
    display: block;
    font-size: 1rem;
}
If you run your code at this point, you may notice your <h3> styles have stopped applying. If we look at the selector, we’ll see why. It is currently: ul.movie-list > li > h3, which indicates the <h3> it applies to should be a direct child of the <li> tag. We could swap to using h3 instead, but this would apply to all <h3> tags on our page. Instead, let’s swap the > for a space , which indicates a descendant instead of a direct child. In fact, we could drop the li as well:
ul.movie-list  h3 {
    font-size: 1.2rem;
    margin-bottom: 0;
    color: darkslategray;
}
The end result is very close to our sketch:
Clearly, CSS is a powerful tool. It can be challenging to learn, but if you are going to be involved in web development, it is time well spent.
The MDN CSS documentation and the CSS-Tricks site are both excellent references for learning CSS.
Fitting the Screen
The @media rule was originally introduced in CSS version 2. It was used to differentiate between different kinds of devices, i.e. a computer screen, printer, etc. Only the print type saw broad adoption, but it remains useful. Let’s see how we can use it.
If we look at our Pages/Index.cshtml page, we can find an <aside> element that contains a banner advertisement for Bernie’s. The <aside> element is a semantic element - one that implies a specific meaning for what it contains. The meaning it implies is something ’extra’ to the page that isn’t part of its main thrust - in this case, an advertisement.
Beyond implying a meaning, it’s equivalent to a <div> element, it is simply a block-level element that divides up the page and can be used to attach CSS rules.
Let’s assume that we don’t want this to appear on the page when we print it. Let’s add a class of "advertisement" to it:
<aside class="advertisement">
    <img src="~/img/ad.png" alt="Eat at Bernies!"/>
</aside>
And in our wwwroot/css/site.css, let’s create an @media rule for printing:
@media print {
    .advertisement {
        display: none;
    }
}
Any CSS enclosed in the curly braces following @media print will only be applied when the page is printed. In that case, we set any element with the class advertisement to not display. Try running the program, and in the browser, select print preview.
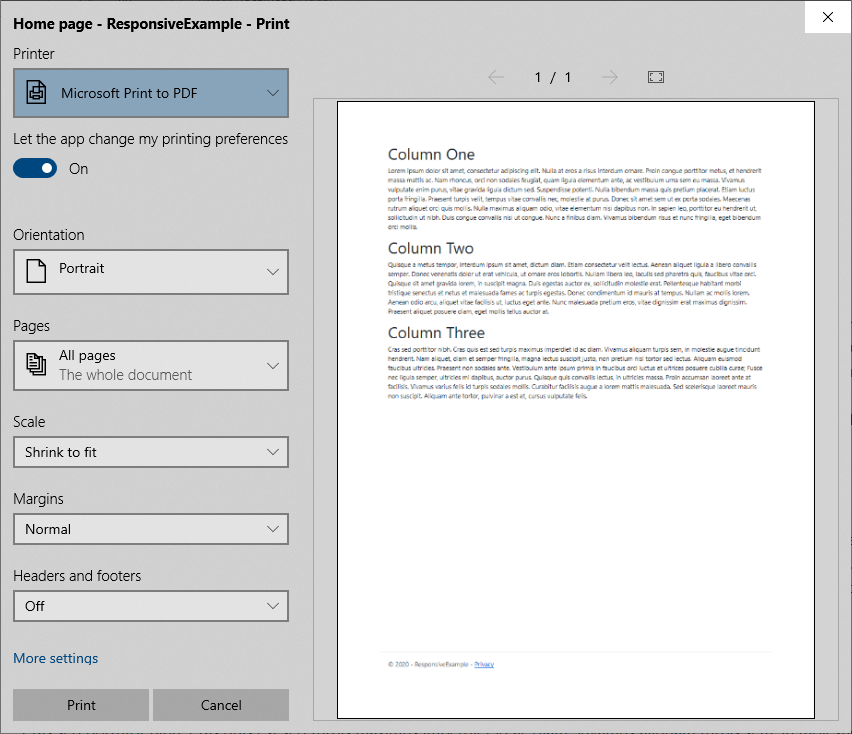
The advertisement does not appear! But it still shows up in the browser.
This simple technique can be used to easily create printer-friendly versions of your webpage by changing colors to gray tones, replacing fonts, and removing elements that will require a lot of ink to print.
But the media @ rule is also the basis for an even more powerful mechanism, media queries, which we’ll look at next.
In CSS3, the @media rule was extended to include the concept of media queries, a technique that allows us to conditionally apply CSS rules using a broader range of values. Some of the most commonly used are:
Media queries are primarily used to enable responsive design, which refers to your page re-arranging itself for display on different devices.
A media query expands the @media rule that we used previously. It consists of the @media keyword followed by an optional media type (all, print, screen, or speech), and then any media features we want to query for within parenthesis.
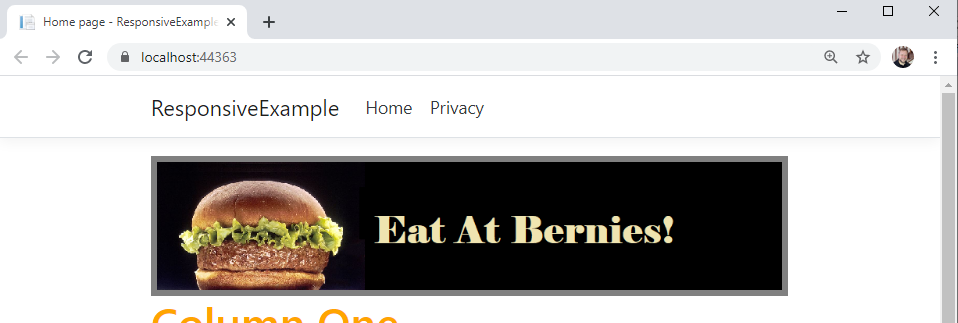
Let’s start with a simple example. Let’s change the color of our h1 elements based on the orientation of the screen. Add these two rules to your wwwroot/css/site.css:
@media (orientation: landscape) {
    h1 { color: green; }
}

@media (orientation: portrait) {
    h1 { color: orange; }
}
Now if you run your server, the <h1> elements will probably be green. Resize your window until it is taller than it is wide, and they will turn orange.
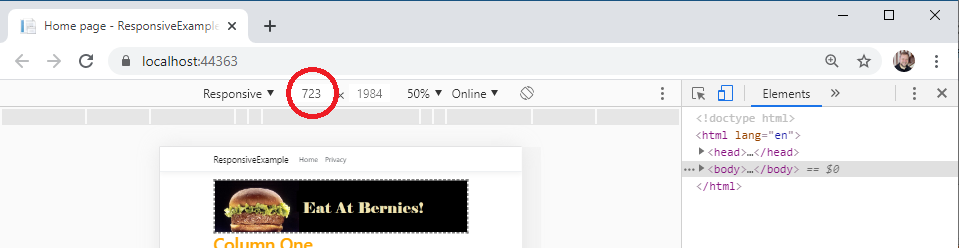
While we can definitely stretch our browser window to try different sizes, there are far better tools available. Let’s see how Chrome’s Developer Tools can make our lives as a developer easier.
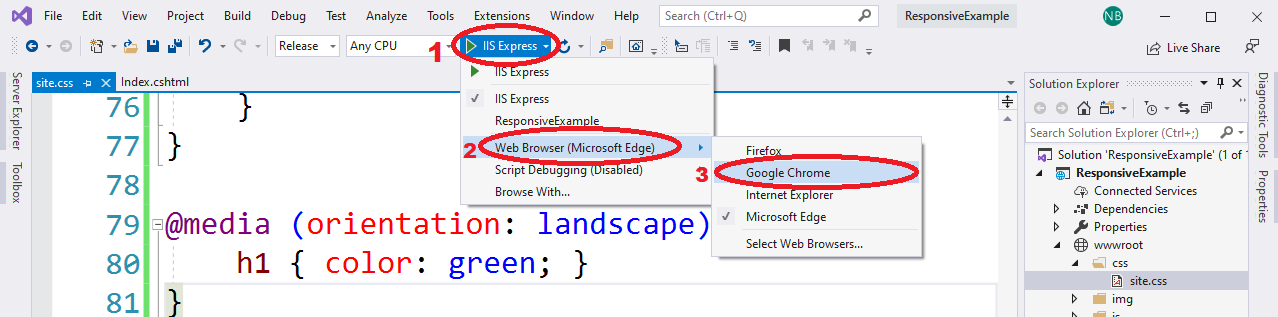
First, set Visual Studio to use Chrome as the browser it launches your website with. From the build target dropdown, select the ‘Web Browser’ option, and select ‘Google Chrome’:
Now run your program. When Chrome loads, turn on developer tools by either pressing CTRL + SHIFT + I or right-clicking on the page and selecting ‘Inspect’. This launches the developer tools in their own pane in the window. At the top of the developer pane is an icon that resembles a cellphone in front of a screen.

Clicking it will toggle the device toolbar, which allows you to emulate different devices, choosing from several common phones and tables, or use the ‘responsive’ category to set a custom size:
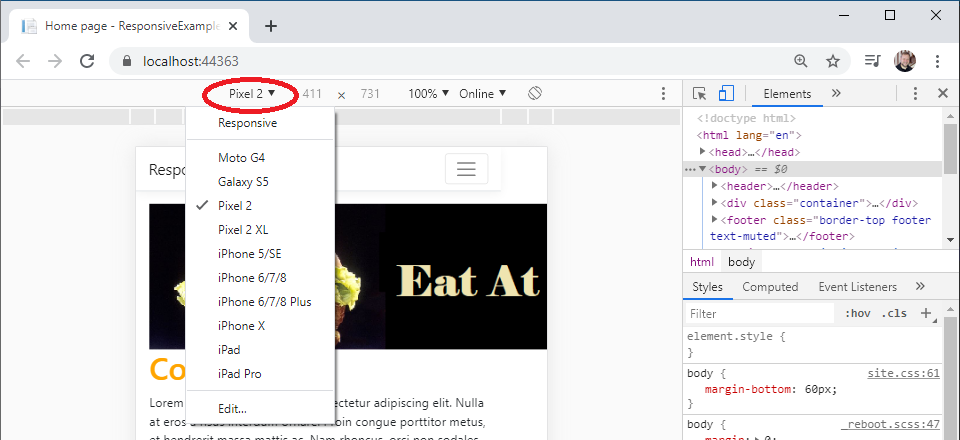
In addition, you can change the orientation of the device with the rotate button:
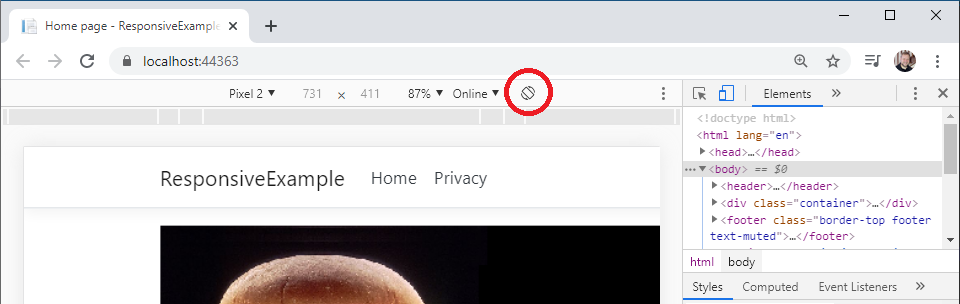
Try selecting a mobile phone and then using the rotate button to change the orientation. Watch how your <h1> elements change color!
Next we’ll look at how we use media queries in responsive design.
Developer tools are actually a part of all modern web browsers, so if you prefer to use a different browser you can learn its tools instead. Here are links to the documentation for the major browsers:
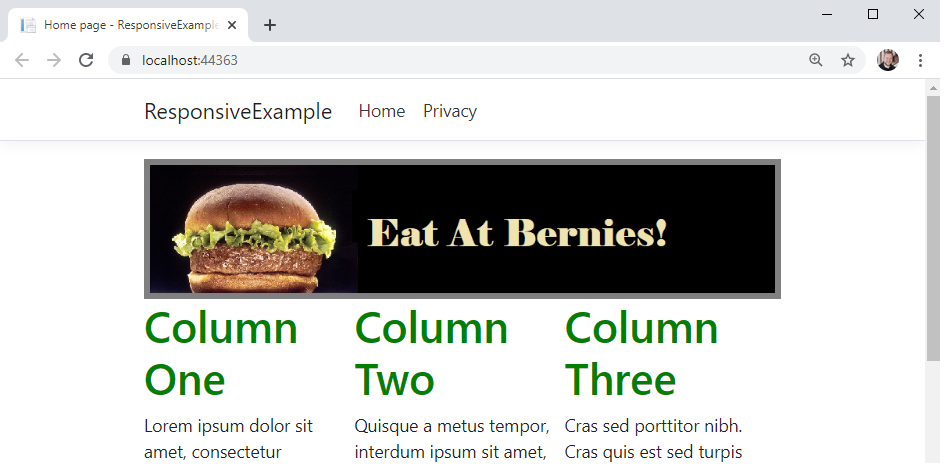
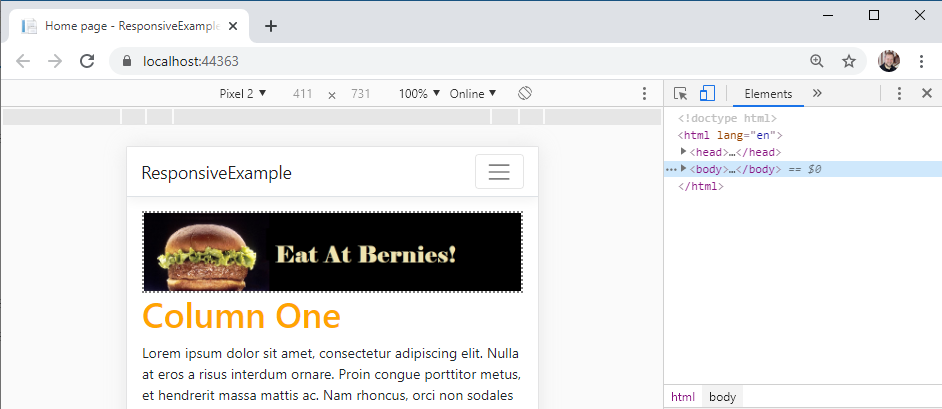
Now that we have seen the concept of responsive breakpoints, let’s put them to use creating a layout for our web page. Currently we have three <div> elements, each with a header and placeholder text. We’d like to arrange these into a row of three columns if the screen is large enough, and collapse them into a single column on smaller screens, such as a mobile phone.
We’re going to explore several strategies for accomplishing this. First, we’ll look at float-based layouts. This is an older strategy for creating columns, and it is based on the float css property which is traditionally used to float images and figures to the right or left of a body of text.
We can instead leverage it to create columns by setting each <div> we intend to behave as a column to have a float: left; property. This makes each column float to the left of the one after it. Let’s give it a try.
First, in your Pages/Index.cshtml, we’ll add a class to the outermost div, just under the <aside> we manipulated previously:
<aside class="advertisement">
    <img src="~/img/ad.png" alt="Eat at Bernies!"/>
</aside>
<div class="float-columns">
    <div>
        <h1>Column One</h1>
        ...
Then we’ll add setting the float property in our wwwroot/css/site.css:
.float-columns > div {
    float: left;
    width: 33%;
}
We use the child selection operator > to apply the css rules to all <div> elements that are a direct child of the <div> we gave the class of float-columns to. We’ll make each of those children <div> elements behave like columns by making them float to the left of the column declared after them, and set them each to be roughly 1/3 the width of the page with width: 33%.
If we run the page now, we’ll see that we have our columns:
But when you scroll down, you’ll also see a problem:

Because the use of float takes elements out of the usual flow layout algorithm, the elements that follow them often end up in unexpected positions. We have to explicitly turn the normal flow layout back on when we’re done with our floating elements with a clear property, which can be left, right, or both.
This normally is done by adding an empty div with the clear: both rule applied after the last column; a technique called a clearfix. Let’s go ahead and declare our clearfix class in wwwroot/css/site.css:
.clearfix {
    clear: both;
}
And then in our Pages/Index.cshtml, we’ll add a <div> element with that class, just after our containing <div> (it will be the last element in the file):
<div class="clearfix"></div>Now when we render the page, we’ll see the columns behave as expected:
!The float error fixed](/images/3.3.5.3.png)
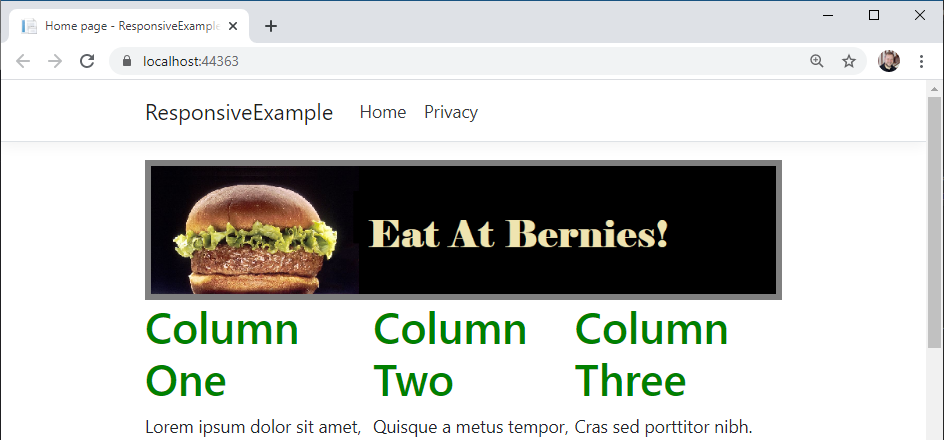
However, our page is not responsive at this point. So we’ll need to add a media query to establish a responsive breakpoint for smaller screens. Let’s use 490 pixels as our breakpoint. We’ll need to add this new rule below the ones we created for our .float-columns in wwwroot/css/site.css, as we will be overriding those when the media query is true:
@media (max-width: 490px) {
    /* Reset the columns to render with the flow of the page */
    .float-columns > div {
        float: none;
        width: 100%;
    }
}
We simply reverse the rules we applied to the columns by setting the properties back to their defaults. Now the columns will change to their stacked appearance when we look at the site on a smaller screen.
In web development, Responsive Design means making your webpages adjust to the device they are displayed on. This is especially important today, where a user might be browsing the web from a desktop, a tablet, a phone, or even a console built into a refrigerator, a car, or an airplane seat!
Before we go farther, there are a couple of concepts we need to understand. The first is the device width and device height, which are the actual size of the device’s screen. Next is the viewport, which is the area of the screen that the web browser actually gets to render into, and has its own width and height. The viewport width and height can be smaller than the device width and height, as is the case when the browser is displayed in a window that is not maximized. In that case, only the area of the browser window (less the toolbars) is the viewport.
A viewport can also be larger than the device width and height. When mobile phones first started allowing users to browse the web, they had tiny screens. Phone manufacturers had to decide how to display webpages that were never designed for these devices. They settled on an approach of setting the viewport to a size consistent with computer monitors of the day, and then scaling the entire page down to fit onto the actual screen. The result was you could see the entire webpage, but it was tiny.

This remains the default behavior of mobile browsers to this day - and because the viewport is not aligned with the device size, media queries targeting the viewport also do not correctly account for device size.
However, this can be overridden through the use of a <meta> element. The <meta> element must be placed in the <head> of a webpage, and applies some kind of metadata to the webpage. Historically, it was used to supply key words to search engines, but this practice was routinely abused and search engines have ceased to rely on it. However, other kinds of metadata can be added with a <meta> element, and one of the most important for responsive design overrides the default viewport settings. Thus, a responsive webpage should always declare the following <meta> tag:
<meta name="viewport" content="width=device-width, initial-scale=1">This tells the browser to set the width of the viewport to the width of the device, and to not scale the final rendering of the webpage (scale is on a range of 0 to 1, where 1 is 100%). This ensures that the viewport and the device sizes are the same.
If you look in your project’s _Pages/Shared/Layout.cshtml file, you will notice that this <meta> tag is already defined. In fact, it is included as biolerplate in all ASP.NET projects generated by Visual Studio that include Razor pages. But if you find yourself writing pages from scratch that you want to be responsive, you’ll need to add this. You can read more about it on MDN.
Once we know our viewport is set up to be the same size as our device, we can turn our attention to using media queries to respond to different widths of screens. For example, we can define all the CSS rules we would normally use, and then a media query that would limit those for a smaller screen - say under 750 pixels. Let’s try this out by adding a border to our aside, and changing its appearance in a smaller screen:
aside { border: 5px solid gray; }

@media (max-width: 750px) {
    /* applies when the screen is under 750 pixels wide */
    aside { border: 3px dashed gray; }
}
Now when the viewport is wider than 750 pixels, you’ll see a solid gray border around the banner ad:
And if you size down your viewport, you’ll see that banner go to a smaller dashed gray:
We can extend this approach by adding another media query for even smaller screens, say those under 490 pixels:
@media (max-width: 490px) {
    /* applies when the screen is under 490 pixels wide */
    aside { border: 2px dotted gray; }
}
As this rule is declared after the first two border rules, it will override them both, replacing the values for the border (note, any previously declared rules that have not been overridden will continue to apply). Now if you size your screen even smaller:
Image missing
This strategy of using successively smaller media queries to override CSS styles at different screen widths is known as responsive breakpoints, because at those widths you specify, the appearance of your page changes.
It is a good idea to have the starting point of your page (when no media queries are applied) be a normal desktop resolution so that your site appears normal in very old browsers.
Now, the float-based layout is really a bit of a hack, as the intent of the float property is really for the embedding of images and callouts to the sides of text content. Unfortunately, floats and tables were the only mechanisms in earlier versions of CSS to allow for more nuanced layouts.
However, that has changed with CSS3, which has introduced several new layout algorithms to supplement the traditional flow and table ones. One of these is flexbox, which we will explore now.
Flexbox provides an alternative means for laying out HTML elements within a containing element. You set the containing element’s display property to flex, and choose a flex-direction (row, column, row-reverse, or column-reverse).
It is very easy to set up our three-column layout with flexbox. Let’s do so now.
First, we’ll change the class we are applying to our containing div element in Pages/Index.cshtml. Let’s use "flex-columns" instead of our previous "float-columns":
<aside class="advertisement">
    <img src="~/img/ad.png" alt="Eat at Bernies!"/>
</aside>
<div class="flex-columns">
    <div>
        <h1>Column One</h1>
        ...
We can then add additional CSS rules to our wwwroot/css/site.css to apply the flex layout:
.flex-columns {
    display: flex;
    flex-direction: row;
}
Now if we run our program and look at our page, we’ll see that the flex algorithm has automatically arranged the children <div> elements into three equally-sized columns for us!
Moreover, if we were to add or remove columns, the layout would automatically change to keep them balanced. You can also apply a number of additional properties to provide more fine-grained control of the layout; the CSS Tricks A Complete Guide to Flexbox offers a great guide to the details.
Now to make our layout responsive, we just need to switch the direction of our container:
@media (max-width: 490px) {
    .flex-columns {
        flex-direction: column;
    }
}
Now when we view our page on a smaller screen, it will use columns instead of rows!
We also no longer need to bother with a clearfix <div>, though leaving the one we created in the prior example in place won’t cause any problems.
TODO: float based responsive layouts
TODO: float based responsive layouts
Now that we’ve seen how to dynamically create the content of a Razor Page on the server, we should turn our attention to how we can do so based on our user’s needs. Consider the example application we have been developing - it exposes a database of movie information to the user. How might a user want to use this database? They might want to find the details for a specific movie - who directed it, when was it released, etc. They might be looking for a movie they want to watch in a favorite genre. They might be looking to find all the movies directed by a favorite director… there are a lot of possibilities.
As software developers, we need to anticipate how our users will likely want to use the software we are developing. And with that in mind, we need to develop user interfaces that allow the user to communicate those needs to the software we are writing as concisely as possible. Remember that in HTTP, all communication between the client (and its user) and the server (our web application), is mediated through the request-response mechanism:
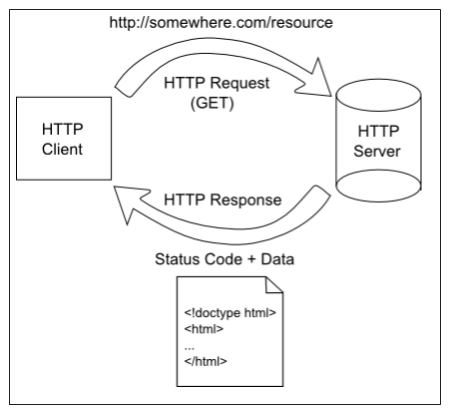
Thus, any information the user wants to supply the server is typically communicated through a request. HTML provides a mechanism for enabling this communication in a structured way - forms. A <form> element, when submitted, serializes the values of all <input> elements contained within it and submits them to the server in the request.
The values in the form are serialized (converted into text) and submitted with the request. Exactly how this serialization happens depends on the kind of request. For GET requests the serialized data is added to the url as the query string. For POST requests, the serialized data is sent as the body of the request.
You can usually use either form (except when uploading files, which must be POSTed). However, you might think about the semantics of each action. A GET request is for retrieving something from the server, so any data your sending is about modifying that request. Thus, search and filter requests make sense as a GET request. A POST request is about sending something to the server, thus account creation, blog posts, and so on make sense as a POST request.
When sent using secure HTTP (HTTPS), both the query string portion of the URL and the request body are encrypted, so there is no difference in the in-transit security. However, browsers typically store the full URL in the history, so if sensitive information is being sent, you might want to use POST requests.
Let’s add a search form and functionality to our movie website. We’ll add this to our Index.cshtml page, just above the <h1> element:
    <form>
        <input type="text" name="SearchTerms"/>
        <input type="submit" value="Search">
    </form>
    <h1>Movie Results</h1>
We’ll also change the <h1> contents to “Movie Results”.
Try typing a search term into the search box, and click the search button. Has anything changed?
When you click the search button, the browser serializes your form, and makes a request against your server including the search terms. By default this request is a GET request, and the contents of the form are serialized using urlencoding (aka percent encoding), a special string format. This string is then appended to the requested url as the query string (aka search string) - a series of key-value pairs proceeded by the question mark symbol(?) and separated by the ampersand (&).
This data is made available to us in our PageModel Index.cshtml.cs by ASP.NET. Let’s take a look at it now. Notice the method public void OnGet()? This method is invoked every time the page is requested using a GET request. Thus, if we need to do some initialization and/or processing, this would be the place to do it.
Inside the PageModel, we can access the request data using the Request object. The exact string can be accessed with Request.QueryString, or the parsed and deserialized results can be accessed from Request.Query. Let’s use the latter to pull out the search terms:
    public void OnGet()
    {
        String terms = Request.Query["SearchTerms"];
    }
We can store that value, and make it available to the page itself, by creating a public property. Let’s create one named SearchTerms:
public string SearchTerms { get; set; }And we’ll refactor our OnGet() to store the search terms coming in from the request:
    public void OnGet()
    {
        SearchTerms = Request.Query["SearchTerms"];
    }
Now we can refactor our input element to use that public property from our model as its default value:
<input type="text" name="SearchTerms" value="@Model.SearchTerms"/>The first time we visit the index page, the SearchTerms value will be null, so our input would have value="". The browser interprets this as empty. If we add a search term and click the search button, we’ll see the page reload. And since @Model.SearchTerms has a value this time, we’ll see that string appear in search box!
Now we just need to search for those terms…
We’ll start by defining a new static method in our MovieDatabase.cs file to search for movies using the search terms:
    /// <summary>
    /// Searches the database for matching movies
    /// </summary>
    /// <param name="terms">The terms to search for</param>
    /// <returns>A collection of movies</returns>
    public static IEnumerable<Movie> Search(string terms)
    {
        // TODO: Search database
    }
We’ll need a collection of results that implements the IEnumerable<T> interface. Let’s use the familiar List<T>:
List<Movie> results = new List<Movie>();Now, there is a chance that the search terms we receive are null. If that’s the case, we would either 1) return all the movies, or 2) return no movies. You can choose either option, but for now, I’ll return all movies
    // Return all movies if there are no search terms
    if(terms == null) return All;
If we do have search terms, we need to add any movies from our database that include those terms in the title. This requires us to check each movie in our database:
    // return each movie in the database containing the terms substring
    foreach(Movie movie in All)
    {
        if(movie.Title.Contains(terms, StringComparison.InvariantCultureIgnoreCase))
        {
            results.Add(movie);
        }
    }
We’ll use String.Contains() to determine if our terms are a substring within the title, ignoring case differences. If we find it, we’ll add the movie to our results list.
Finally, we’ll return that list:
return results;Now, we can refactor our Index.cshtml.cs to use this new search method:
    /// <summary>
    /// The movies to display on the index page
    /// </summary>
    public IEnumerable<Movie> Movies { get; protected set; }

    /// <summary>
    /// The current search terms
    /// </summary>
    public string SearchTerms { get; set; }

    /// <summary>
    /// Gets the search results for display on the page
    /// </summary>
    public void OnGet()
    {
        SearchTerms = Request.Query["SearchTerms"];
        Movies = MovieDatabase.Search(SearchTerms);
    }
We’ll also need ot refactor our Index.cshtml.cs to use the search results, instead of the entire database:
<ul class="movie-list">
    @foreach(Movie movie in @Model.Movies)
    {
        <li>
            <div class="details">
                <h3 class="title">@movie.Title</h3>
                <div class="mpaa">@movie.MPAARating</div>
                <div class="genre">@movie.MajorGenre</div>
            </div>
            <div class="ratings">
                @if(movie.IMDBRating != null)
                {
                    <div class="imdb">
                        @movie.IMDBRating
                    </div>
                }
                @if(movie.RottenTomatoesRating != null)
                {
                    <div class="rotten-tomatoes">
                        @movie.RottenTomatoesRating
                    </div>
                }
            </div>
        </li>
    }
</ul>
If we try running the project again, and searching for the term “Love”… it crashes? What is going on?
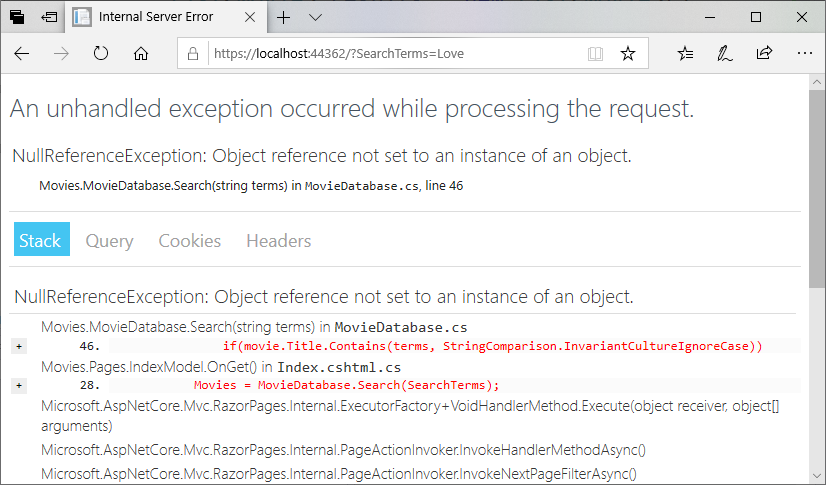
Notice that the error is a NullReferenceException, and occurs in our if statement checking the title.
If we think about what variables are involved in the line if(movie.Title.Contains(terms, StringComparison.InvariantCultureIgnoreCase)), we have:
moviemovie.TitletermsWhich of these three values can be null? We know for certain terms is not, as we test for the null value and return if it exists just before this portion of our code. Similarly, movie cannot be null, as it is an entry in the list provided by All, and if it were null, our page would have crashed before we added searching. That leaves movie.Title as a possibility.
If we comb through the data in movies.json, we find on line 54957 a movie with null for a title:
  {
    "Title": null,
    "USGross": 26403,
    "WorldwideGross": 3080493,
    "USDVDSales": null,
    "ProductionBudget": 3700000,
    "ReleaseDate": "Nov 03 2006",
    "MPAARating": "Not Rated",
    "RunningTime": 85,
    "Distributor": "IFC Films",
    "Source": "Original Screenplay",
    "MajorGenre": "Thriller/Suspense",
    "CreativeType": "Contemporary Fiction",
    "Director": null,
    "RottenTomatoesRating": 39,
    "IMDBRating": 6.6,
    "IMDBVotes": 11986
  },
Working from the provided metadata, we can eventually identify the film as one titled Unknown. It would seem that whomever wrote the script to create this JSON file interpreted “Unknown” to mean the title was unknown (hence null), rather than the literal word “Unknown”.
If we dig deeper into the JSON file, we can find other issues. For example, the JSON identifies the controversial film Birth of a Nation as being released in 2015, when it was actually the first full-length theatrical film ever released, in 1915! Most likely the original database from which these entries were derived only used two digits for the year, i.e. 15, and the scripter who converted it to JSON chose a threshold date to determine if it was released in the 20 or 21st century, i.e.:
if(date < 28)
{
    date += 2000;
}
else {
    date += 1900;
}
The earliest movie release date in the JSON is 1928, for “The Broadway Melody”, which suggests that all the movies released between 1915 and 1928 have been mislabeled as being released in the 21st century!
Unfortunately, these kinds of errors are rampant in databases, so as software developers we must be aware that our data may well be dirty - containing erroneous values, and anticipate these errors much like we do with user input. It is a good idea to clean up and fix these errors in our database so that it will be more reliable, but we also need to check for potential errors in our own code, as the database could be updated with more junk data in the future. Thus, we’ll add a null check to our if statement in MovieDatabase.cs:
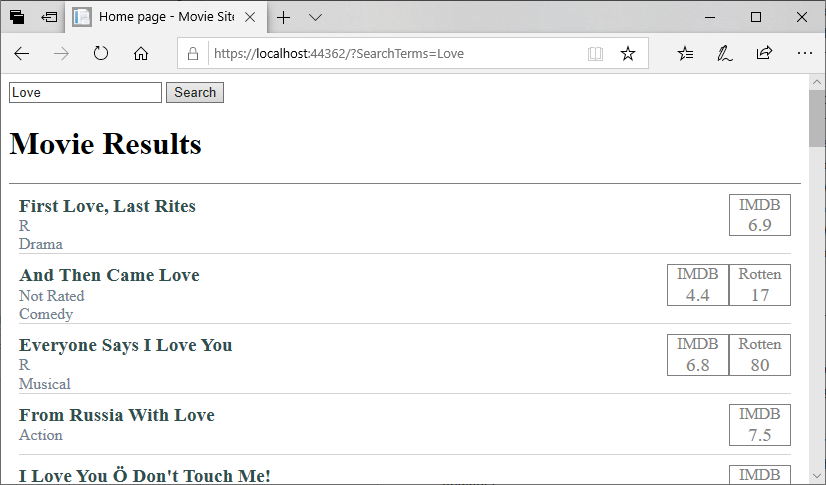
if(movie.Title != null && movie.Title.Contains(terms, StringComparison.InvariantCultureIgnoreCase)) This will protect us against a NullReferenceException when our movie titles are null. Now if you try the search again, you should see the results:
Let’s add some filters to the page as well. We’ll start with categorical filters, i.e. filtering by category. Let’s start by filtering for MPAA Rating. We know that there are only a handful of ratings issued by the Motion Picture Association of America - G, PG, PG-13, R, and NC-17. We might be tempted to use an enumeration to represent these values, but in C# an enumeration cannot have strings for values. Nor can we use the hyphen (-) in an enumeration name.
So let’s define a string array with our MPAA values, and make it accessible from our MovieDatabase class:
    /// <summary>
    /// Gets the possible MPAARatings
    /// </summary>
    public static string[] MPAARatings
    {
        get => new string[]
        {
            "G",
            "PG",
            "PG-13",
            "R",
            "NC-17"
        };
    }
Now in our <form> in Index.cshtml we can add a checkbox for each of these possible values:
<form>
   <input type="text" name="SearchTerms" value="@Model.SearchTerms"/>
    <input type="submit" value="Search">
    @foreach  (string rating in MovieDatabase.MPAARating)
    {
        <label>
            <input type="checkbox" name="MPAARatings" value="@rating"/>
            @rating
        </label>
    }
</form>
If you try running the project now, and check a few boxes, you’ll see the query string results look something like:
?SearchTerms=&MPAARatings=G&MPAARatings=PG-13Notice how the key MPAARatings is repeated twice? What would that look like in our PageModel? We can find out; declare a var to hold the value in the OnGet() method of Index.cshtml.cs:
var MPAARatings = Request.Query["MPAARatings"];If we add a breakpoint on this line, and run our code, then check several boxes (you’ll have to continue the first time you hit the breakpoint), then step over the line, we’ll see that the var MPAA rating is set to a string collection. We could therefore store it in an array property in Index.cshtml.cs, much like we did with our SearchTerms:
    /// <summary>
    /// The filtered MPAA Ratings
    /// </summary>
    public string[] MPAARatings { get; set; }
And we can refactor the line we just added to OnGet() to use this new property:
MPAARatings = Request.Query["MPAARatings"];Then, in our Index.cshtml Razor Page, we can refactor the checkbox to be checked if we filtered against this rating in our last request:
<input type="checkbox" name="MPAARatings" value="@rating" checked="@Model.MPAARatings.Contains(rating)"/>Now our filters stick around when we submit the search request. That just leaves making the filters actually work.
Let’s add another method to our MovieDatabase class, FilterByMPAARating():
    /// <summary>
    /// Filters the provided collection of movies
    /// </summary>
    /// <param name="movies">The collection of movies to filter</param>
    /// <param name="ratings">The ratings to include</param>
    /// <returns>A collection containing only movies that match the filter</returns>
    public static IEnumerable<Movie> FilterByMPAARating(IEnumerable<Movie> movies, IEnumerable<string> ratings)
    {
        // TODO: Filter the list

    }
Notice that in this method, we accept an IEnumerable<Movie> parameter. This is the list of movies we want to filter. We use this, instead of the All() we did in the Search() method, as we would want to filter the results of a search.
Let’s do a null/empty check, and just return this shortlist if no filters are specified:
    // If no filter is specified, just return the provided collection
    if (ratings == null || ratings.Count() == 0) return movies;
Otherwise, we’ll use the same process we did before. Start with an empty list of movies, and iterate over the collection seeing if any match. However, as we have two collections (the movies and the ratings), we’ll see if the ratings collection contains the supplied movie’s rating.
    // Filter the supplied collection of movies
    List<Movie> results = new List<Movie>();
    foreach(Movie movie in movies)
    {
        if(movie.MPAARating != null && ratings.Contains(movie.MPAARating))
        {
            results.Add(movie);
        }
    }
Finally, we’ll return our results:
return results;Now, back in our PageModel Index.cshtml.cs, we’ll apply our filter to the results of our search. The refactored OnGet() should then be:
    public void OnGet()
    {
        SearchTerms = Request.Query["SearchTerms"];
        MPAARatings = Request.Query["MPAARatings"];
        Movies = MovieDatabase.Search(SearchTerms);
        Movies = MovieDatabase.FilterByMPAARating(Movies, MPAARatings);
    }
Now we can run a search with filters applied. For example, searching for the word “Love” and movies that are PG or PG-13 yields:
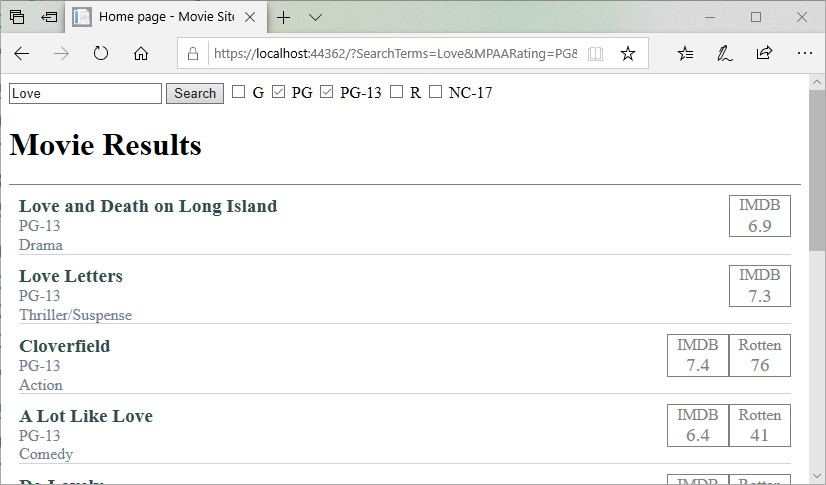
You might be wondering why Cloverfield is listed. But remember, we’re searching by substring, and C LOVE rfield contains love!
Let’s add filters for genre next. But what genres should be included? This is not as clear-cut as our MPAA rating, as there is no standards organization that says “these are the only offical genres that exist.” In fact, new genres emerge from time to time. So a better source of this info might just be to see what Genres are defined in our data, i.e.:
    HashSet<string> genres = new HashSet<string>();
    foreach(Movie movie in All) {
        if(movie.MajorGenre != null)
        {
            genres.Add(movie.MajorGenre);
        }
    }
Here we use a HashSet instead of a list, as it only adds each unique item once. Duplicates are ignored.
But where would this code go? We could place it in a getter for MovieDatabase.Genres:
    public IEnumerable<string> Genres
    {
        get
        {
            HashSet<string> genres = new HashSet<string>();
            foreach(Movie movie in All) {
                if(movie.MajorGenre != null)
                {
                    genres.Add(movie.MajorGenre);
                }
            }
        }
    }
But this means that every time we want to access it, we’ll search through all the movies… This is an O(n) operation, and will make our website slower.
Instead, let’s create a private static variable in the MovieDatabase class to cache this collection as an array of strings:
    // The genres represented in the database
    private static string[] _genres;
And expose it with a public static property:
    /// <summary>
    /// Gets the movie genres represented in the database
    /// </summary>
    public static string[] Genres => _genres;
And finally, we’ll populate this array in the static constructor of MovieDatabase, after the JSON file has been processed:
    HashSet<string> genreSet = new HashSet<string>();
    foreach(Movie movie in _movies) {
        if(movie.MajorGenre != null)
        {
            genreSet.Add(movie.MajorGenre);
        }
    }
    _genres = genreSet.ToArray();
This approach means the finding of genres only happens once, and getting the Genre property is a constant-time O(1) operation.
We can implement the filters for the genres in the same way as we did for the MPAA filters; I’ll leave that as an exercise for the reader.
Let’s add some filters to the page as well. We’ll start with categorical filters, i.e. filtering by category. Let’s start by filtering for MPAA Rating. We know that there are only a handful of ratings issued by the Motion Picture Association of America - G, PG, PG-13, R, and NC-17. We might be tempted to use an enumeration to represent these values, but in C# an enumeration cannot have strings for values. Nor can we use the hyphen (-) in an enumeration name.
So let’s define a string array with our MPAA values, and make it accessible from our MovieDatabase class:
    /// <summary>
    /// Gets the possible MPAARatings
    /// </summary>
    public static string[] MPAARatings
    {
        get => new string[]
        {
            "G",
            "PG",
            "PG-13",
            "R",
            "NC-17"
        };
    }
Now in our <form> in Index.cshtml we can add a checkbox for each of these possible values:
<form>
   <input type="text" name="SearchTerms" value="@Model.SearchTerms"/>
    <input type="submit" value="Search">
    @foreach  (string rating in MovieDatabase.MPAARating)
    {
        <label>
            <input type="checkbox" name="MPAARatings" value="@rating"/>
            @rating
        </label>
    }
</form>
If you try running the project now, and check a few boxes, you’ll see the query string results look something like:
?SearchTerms=&MPAARatings=G&MPAARatings=PG-13Notice how the key MPAARatings is repeated twice? What would that look like in our PageModel? We can find out; declare a var to hold the value in the OnGet() method of Index.cshtml.cs:
var MPAARatings = Request.Query["MPAARatings"];If we add a breakpoint on this line, and run our code, then check several boxes (you’ll have to continue the first time you hit the breakpoint), then step over the line, we’ll see that the var MPAA rating is set to a string collection. We could therefore store it in an array property in Index.cshtml.cs, much like we did with our SearchTerms:
    /// <summary>
    /// The filtered MPAA Ratings
    /// </summary>
    public string[] MPAARatings { get; set; }
And we can refactor the line we just added to OnGet() to use this new property:
MPAARatings = Request.Query["MPAARatings"];Then, in our Index.cshtml Razor Page, we can refactor the checkbox to be checked if we filtered against this rating in our last request:
<input type="checkbox" name="MPAARatings" value="@rating" checked="@Model.MPAARatings.Contains(rating)"/>Now our filters stick around when we submit the search request. That just leaves making the filters actually work.
Let’s add another method to our MovieDatabase class, FilterByMPAARating():
    /// <summary>
    /// Filters the provided collection of movies
    /// </summary>
    /// <param name="movies">The collection of movies to filter</param>
    /// <param name="ratings">The ratings to include</param>
    /// <returns>A collection containing only movies that match the filter</returns>
    public static IEnumerable<Movie> FilterByMPAARating(IEnumerable<Movie> movies, IEnumerable<string> ratings)
    {
        // TODO: Filter the list

    }
Notice that in this method, we accept an IEnumerable<Movie> parameter. This is the list of movies we want to filter. We use this, instead of the All() we did in the Search() method, as we would want to filter the results of a search.
Let’s do a null/empty check, and just return this shortlist if no filters are specified:
    // If no filter is specified, just return the provided collection
    if (ratings == null || ratings.Count() == 0) return movies;
Otherwise, we’ll use the same process we did before. Start with an empty list of movies, and iterate over the collection seeing if any match. However, as we have two collections (the movies and the ratings), we’ll see if the ratings collection contains the supplied movie’s rating.
    // Filter the supplied collection of movies
    List<Movie> results = new List<Movie>();
    foreach(Movie movie in movies)
    {
        if(movie.MPAARating != null && ratings.Contains(movie.MPAARating))
        {
            results.Add(movie);
        }
    }
Finally, we’ll return our results:
return results;Now, back in our PageModel Index.cshtml.cs, we’ll apply our filter to the results of our search. The refactored OnGet() should then be:
    public void OnGet()
    {
        SearchTerms = Request.Query["SearchTerms"];
        MPAARatings = Request.Query["MPAARatings"];
        Movies = MovieDatabase.Search(SearchTerms);
        Movies = MovieDatabase.FilterByMPAARating(Movies, MPAARatings);
    }
Now we can run a search with filters applied. For example, searching for the word “Love” and movies that are PG or PG-13 yields:
You might be wondering why Cloverfield is listed. But remember, we’re searching by substring, and C LOVE rfield contains love!
Let’s add filters for genre next. But what genres should be included? This is not as clear-cut as our MPAA rating, as there is no standards organization that says “these are the only offical genres that exist.” In fact, new genres emerge from time to time. So a better source of this info might just be to see what Genres are defined in our data, i.e.:
    HashSet<string> genres = new HashSet<string>();
    foreach(Movie movie in All) {
        if(movie.MajorGenre != null)
        {
            genres.Add(movie.MajorGenre);
        }
    }
Here we use a HashSet instead of a list, as it only adds each unique item once. Duplicates are ignored.
But where would this code go? We could place it in a getter for MovieDatabase.Genres:
    public IEnumerable<string> Genres
    {
        get
        {
            HashSet<string> genres = new HashSet<string>();
            foreach(Movie movie in All) {
                if(movie.MajorGenre != null)
                {
                    genres.Add(movie.MajorGenre);
                }
            }
        }
    }
But this means that every time we want to access it, we’ll search through all the movies… This is an O(n) operation, and will make our website slower.
Instead, let’s create a private static variable in the MovieDatabase class to cache this collection as an array of strings:
    // The genres represented in the database
    private static string[] _genres;
And expose it with a public static property:
    /// <summary>
    /// Gets the movie genres represented in the database
    /// </summary>
    public static string[] Genres => _genres;
And finally, we’ll populate this array in the static constructor of MovieDatabase, after the JSON file has been processed:
    HashSet<string> genreSet = new HashSet<string>();
    foreach(Movie movie in _movies) {
        if(movie.MajorGenre != null)
        {
            genreSet.Add(movie.MajorGenre);
        }
    }
    _genres = genreSet.ToArray();
This approach means the finding of genres only happens once, and getting the Genre property is a constant-time O(1) operation.
We can implement the filters for the genres in the same way as we did for the MPAA filters; I’ll leave that as an exercise for the reader.
Let’s add some filters to the page as well. We’ll start with categorical filters, i.e. filtering by category. Let’s start by filtering for MPAA Rating. We know that there are only a handful of ratings issued by the Motion Picture Association of America - G, PG, PG-13, R, and NC-17. We might be tempted to use an enumeration to represent these values, but in C# an enumeration cannot have strings for values. Nor can we use the hyphen (-) in an enumeration name.
So let’s define a string array with our MPAA values, and make it accessible from our MovieDatabase class:
    /// <summary>
    /// Gets the possible MPAARatings
    /// </summary>
    public static string[] MPAARatings
    {
        get => new string[]
        {
            "G",
            "PG",
            "PG-13",
            "R",
            "NC-17"
        };
    }
Now in our <form> in Index.cshtml we can add a checkbox for each of these possible values:
<form>
   <input type="text" name="SearchTerms" value="@Model.SearchTerms"/>
    <input type="submit" value="Search">
    @foreach  (string rating in MovieDatabase.MPAARatings)
    {
        <label>
            <input type="checkbox" name="MPAARatings" value="@rating"/>
            @rating
        </label>
    }
</form>
If you try running the project now, and check a few boxes, you’ll see the query string results look something like:
?SearchTerms=&MPAARatings=G&MPAARatings=PG-13Notice how the key MPAARatings is repeated twice? What would that look like in our PageModel? We can find out; declare a var to hold the value in the OnGet() method of Index.cshtml.cs:
var MPAARatings = Request.Query["MPAARatings"];If we add a breakpoint on this line, and run our code, then check several boxes (you’ll have to continue the first time you hit the breakpoint), then step over the line, we’ll see that the var MPAA rating is set to a string collection. We could therefore store it in an array property in Index.cshtml.cs, much like we did with our SearchTerms:
    /// <summary>
    /// The filtered MPAA Ratings
    /// </summary>
    public string[] MPAARatings { get; set; }
And we can refactor the line we just added to OnGet() to use this new property:
MPAARatings = Request.Query["MPAARatings"];Then, in our Index.cshtml Razor Page, we can refactor the checkbox to be checked if we filtered against this rating in our last request:
<input type="checkbox" name="MPAARatings" value="@rating" checked="@Model.MPAARatings.Contains(rating)"/>Now our filters stick around when we submit the search request. That just leaves making the filters actually work.
Let’s add another method to our MovieDatabase class, FilterByMPAARating():
    /// <summary>
    /// Filters the provided collection of movies
    /// </summary>
    /// <param name="movies">The collection of movies to filter</param>
    /// <param name="ratings">The ratings to include</param>
    /// <returns>A collection containing only movies that match the filter</returns>
    public static IEnumerable<Movie> FilterByMPAARating(IEnumerable<Movie> movies, IEnumerable<string> ratings)
    {
        // TODO: Filter the list

    }
Notice that in this method, we accept an IEnumerable<Movie> parameter. This is the list of movies we want to filter. We use this, instead of the All() we did in the Search() method, as we would want to filter the results of a search.
Let’s do a null/empty check, and just return this shortlist if no filters are specified:
    // If no filter is specified, just return the provided collection
    if (ratings == null || ratings.Count() == 0) return movies;
Otherwise, we’ll use the same process we did before. Start with an empty list of movies, and iterate over the collection seeing if any match. However, as we have two collections (the movies and the ratings), we’ll see if the ratings collection contains the supplied movie’s rating.
    // Filter the supplied collection of movies
    List<Movie> results = new List<Movie>();
    foreach(Movie movie in movies)
    {
        if(movie.MPAARating != null && ratings.Contains(movie.MPAARating))
        {
            results.Add(movie);
        }
    }
Finally, we’ll return our results:
return results;Now, back in our PageModel Index.cshtml.cs, we’ll apply our filter to the results of our search. The refactored OnGet() should then be:
    public void OnGet()
    {
        SearchTerms = Request.Query["SearchTerms"];
        MPAARatings = Request.Query["MPAARatings"];
        Movies = MovieDatabase.Search(SearchTerms);
        Movies = MovieDatabase.FilterByMPAARating(Movies, MPAARatings);
    }
Now we can run a search with filters applied. For example, searching for the word “Love” and movies that are PG or PG-13 yields:
You might be wondering why Cloverfield is listed. But remember, we’re searching by substring, and C LOVE rfield contains love!
Let’s add filters for genre next. But what genres should be included? This is not as clear-cut as our MPAA rating, as there is no standards organization that says “these are the only offical genres that exist.” In fact, new genres emerge from time to time. So a better source of this info might just be to see what Genres are defined in our data, i.e.:
    HashSet<string> genres = new HashSet<string>();
    foreach(Movie movie in All) {
        if(movie.MajorGenre != null)
        {
            genres.Add(movie.MajorGenre);
        }
    }
Here we use a HashSet instead of a list, as it only adds each unique item once. Duplicates are ignored.
But where would this code go? We could place it in a getter for MovieDatabase.Genres:
    public IEnumerable<string> Genres
    {
        get
        {
            HashSet<string> genres = new HashSet<string>();
            foreach(Movie movie in All) {
                if(movie.MajorGenre != null)
                {
                    genres.Add(movie.MajorGenre);
                }
            }

            return genres;
        }
    }
But this means that every time we want to access it, we’ll search through all the movies… This is an O(n) operation, and will make our website slower.
Instead, let’s create a private static variable in the MovieDatabase class to cache this collection as an array of strings:
    // The genres represented in the database
    private static string[] _genres;
And expose it with a public static property:
    /// <summary>
    /// Gets the movie genres represented in the database
    /// </summary>
    public static string[] Genres => _genres;
And finally, we’ll populate this array in the static constructor of MovieDatabase, after the JSON file has been processed:
    HashSet<string> genreSet = new HashSet<string>();
    foreach(Movie movie in _movies) {
        if(movie.MajorGenre != null)
        {
            genreSet.Add(movie.MajorGenre);
        }
    }
    _genres = genreSet.ToArray();
This approach means the finding of genres only happens once, and getting the Genre property is a constant-time O(1) operation.
We can implement the filters for the genres in the same way as we did for the MPAA filters; I’ll leave that as an exercise for the reader.
Let’s add some filters to the page as well. We’ll start with categorical filters, i.e. filtering by category. Let’s start by filtering for MPAA Rating. We know that there are only a handful of ratings issued by the Motion Picture Association of America - G, PG, PG-13, R, and NC-17. We might be tempted to use an enumeration to represent these values, but in C# an enumeration cannot have strings for values. Nor can we use the hyphen (-) in an enumeration name.
So let’s define a string array with our MPAA values, and make it accessible from our MovieDatabase class:
    /// <summary>
    /// Gets the possible MPAARatings
    /// </summary>
    public static string[] MPAARatings
    {
        get => new string[]
        {
            "G",
            "PG",
            "PG-13",
            "R",
            "NC-17"
        };
    }
Now in our <form> in Index.cshtml we can add a checkbox for each of these possible values:
<form>
   <input type="text" name="SearchTerms" value="@Model.SearchTerms"/>
    <input type="submit" value="Search">
    @foreach  (string rating in MovieDatabase.MPAARatings)
    {
        <label>
            <input type="checkbox" name="MPAARatings" value="@rating"/>
            @rating
        </label>
    }
</form>
If you try running the project now, and check a few boxes, you’ll see the query string results look something like:
?SearchTerms=&MPAARatings=G&MPAARatings=PG-13Notice how the key MPAARatings is repeated twice? What would that look like in our PageModel? We can find out; declare a var to hold the value in the OnGet() method of Index.cshtml.cs:
var MPAARatings = Request.Query["MPAARatings"];If we add a breakpoint on this line, and run our code, then check several boxes (you’ll have to continue the first time you hit the breakpoint), then step over the line, we’ll see that the var MPAA rating is set to a string collection. We could therefore store it in an array property in Index.cshtml.cs, much like we did with our SearchTerms:
    /// <summary>
    /// The filtered MPAA Ratings
    /// </summary>
    public string[] MPAARatings { get; set; }
And we can refactor the line we just added to OnGet() to use this new property:
MPAARatings = Request.Query["MPAARatings"];Then, in our Index.cshtml Razor Page, we can refactor the checkbox to be checked if we filtered against this rating in our last request:
<input type="checkbox" name="MPAARatings" value="@rating" checked="@Model.MPAARatings.Contains(rating)"/>Now our filters stick around when we submit the search request. That just leaves making the filters actually work.
Let’s add another method to our MovieDatabase class, FilterByMPAARating():
    /// <summary>
    /// Filters the provided collection of movies
    /// </summary>
    /// <param name="movies">The collection of movies to filter</param>
    /// <param name="ratings">The ratings to include</param>
    /// <returns>A collection containing only movies that match the filter</returns>
    public static IEnumerable<Movie> FilterByMPAARating(IEnumerable<Movie> movies, IEnumerable<string> ratings)
    {
        // TODO: Filter the list

    }
Notice that in this method, we accept an IEnumerable<Movie> parameter. This is the list of movies we want to filter. We use this, instead of the All() we did in the Search() method, as we would want to filter the results of a search.
Let’s do a null/empty check, and just return this shortlist if no filters are specified:
    // If no filter is specified, just return the provided collection
    if (ratings == null || ratings.Count() == 0) return movies;
Otherwise, we’ll use the same process we did before. Start with an empty list of movies, and iterate over the collection seeing if any match. However, as we have two collections (the movies and the ratings), we’ll see if the ratings collection contains the supplied movie’s rating.
    // Filter the supplied collection of movies
    List<Movie> results = new List<Movie>();
    foreach(Movie movie in movies)
    {
        if(movie.MPAARating != null && ratings.Contains(movie.MPAARating))
        {
            results.Add(movie);
        }
    }
Finally, we’ll return our results:
return results;Now, back in our PageModel Index.cshtml.cs, we’ll apply our filter to the results of our search. The refactored OnGet() should then be:
    public void OnGet()
    {
        SearchTerms = Request.Query["SearchTerms"];
        MPAARatings = Request.Query["MPAARatings"];
        Movies = MovieDatabase.Search(SearchTerms);
        Movies = MovieDatabase.FilterByMPAARating(Movies, MPAARatings);
    }
Now we can run a search with filters applied. For example, searching for the word “Love” and movies that are PG or PG-13 yields:
You might be wondering why Cloverfield is listed. But remember, we’re searching by substring, and C LOVE rfield contains love!
Let’s add filters for genre next. But what genres should be included? This is not as clear-cut as our MPAA rating, as there is no standards organization that says “these are the only offical genres that exist.” In fact, new genres emerge from time to time. So a better source of this info might just be to see what Genres are defined in our data, i.e.:
    HashSet<string> genres = new HashSet<string>();
    foreach(Movie movie in All) {
        if(movie.MajorGenre != null)
        {
            genres.Add(movie.MajorGenre);
        }
    }
Here we use a HashSet instead of a list, as it only adds each unique item once. Duplicates are ignored.
But where would this code go? We could place it in a getter for MovieDatabase.Genres:
    public static IEnumerable<string> Genres
    {
        get
        {
            HashSet<string> genres = new HashSet<string>();
            foreach(Movie movie in All) {
                if(movie.MajorGenre != null)
                {
                    genres.Add(movie.MajorGenre);
                }
            }

            return genres;
        }
    }
But this means that every time we want to access it, we’ll search through all the movies… This is an O(n) operation, and will make our website slower.
Instead, let’s create a private static variable in the MovieDatabase class to cache this collection as an array of strings:
    // The genres represented in the database
    private static string[] _genres;
And expose it with a public static property:
    /// <summary>
    /// Gets the movie genres represented in the database
    /// </summary>
    public static string[] Genres => _genres;
And finally, we’ll populate this array in the static constructor of MovieDatabase, after the JSON file has been processed:
    HashSet<string> genreSet = new HashSet<string>();
    foreach(Movie movie in _movies) {
        if(movie.MajorGenre != null)
        {
            genreSet.Add(movie.MajorGenre);
        }
    }
    _genres = genreSet.ToArray();
This approach means the finding of genres only happens once, and getting the Genre property is a constant-time O(1) operation.
We can implement the filters for the genres in the same way as we did for the MPAA filters; I’ll leave that as an exercise for the reader.
Let’s add some filters to the page as well. We’ll start with categorical filters, i.e. filtering by category. Let’s start by filtering for MPAA Rating. We know that there are only a handful of ratings issued by the Motion Picture Association of America - G, PG, PG-13, R, and NC-17. We might be tempted to use an enumeration to represent these values, but in C# an enumeration cannot have strings for values. Nor can we use the hyphen (-) in an enumeration name.
So let’s define a string array with our MPAA values, and make it accessible from our MovieDatabase class:
    /// <summary>
    /// Gets the possible MPAARatings
    /// </summary>
    public static string[] MPAARatings
    {
        get => new string[]
        {
            "G",
            "PG",
            "PG-13",
            "R",
            "NC-17"
        };
    }
Now in our <form> in Index.cshtml we can add a checkbox for each of these possible values:
<form>
    @foreach  (string rating in MovieDatabase.MPAARatings)
    {
        <label>
            <input type="checkbox" name="MPAARatings" value="@rating"/>
            @rating
        </label>
    }

    <input type="text" name="SearchTerms" value="@Model.SearchTerms"/>
    <input type="submit" value="Search">
</form>
If you try running the project now, and check a few boxes, you’ll see the query string results look something like:
?SearchTerms=&MPAARatings=G&MPAARatings=PG-13Notice how the key MPAARatings is repeated twice? What would that look like in our PageModel? We can find out; declare a var to hold the value in the OnGet() method of Index.cshtml.cs:
var MPAARatings = Request.Query["MPAARatings"];If we add a breakpoint on this line, and run our code, then check several boxes (you’ll have to continue the first time you hit the breakpoint), then step over the line, we’ll see that the var MPAA rating is set to a string collection. We could therefore store it in an array property in Index.cshtml.cs, much like we did with our SearchTerms:
    /// <summary>
    /// The filtered MPAA Ratings
    /// </summary>
    public string[] MPAARatings { get; set; }
And we can refactor the line we just added to OnGet() to use this new property:
MPAARatings = Request.Query["MPAARatings"];Then, in our Index.cshtml Razor Page, we can refactor the checkbox to be checked if we filtered against this rating in our last request:
<input type="checkbox" name="MPAARatings" value="@rating" checked="@Model.MPAARatings.Contains(rating)"/>Now our filters stick around when we submit the search request. That just leaves making the filters actually work.
Let’s add another method to our MovieDatabase class, FilterByMPAARating():
    /// <summary>
    /// Filters the provided collection of movies
    /// </summary>
    /// <param name="movies">The collection of movies to filter</param>
    /// <param name="ratings">The ratings to include</param>
    /// <returns>A collection containing only movies that match the filter</returns>
    public static IEnumerable<Movie> FilterByMPAARating(IEnumerable<Movie> movies, IEnumerable<string> ratings)
    {
        // TODO: Filter the list

    }
Notice that in this method, we accept an IEnumerable<Movie> parameter. This is the list of movies we want to filter. We use this, instead of the All() we did in the Search() method, as we would want to filter the results of a search.
Let’s do a null/empty check, and just return this shortlist if no filters are specified:
    // If no filter is specified, just return the provided collection
    if (ratings == null || ratings.Count() == 0) return movies;
Otherwise, we’ll use the same process we did before. Start with an empty list of movies, and iterate over the collection seeing if any match. However, as we have two collections (the movies and the ratings), we’ll see if the ratings collection contains the supplied movie’s rating.
    // Filter the supplied collection of movies
    List<Movie> results = new List<Movie>();
    foreach(Movie movie in movies)
    {
        if(movie.MPAARatings != null && ratings.Contains(movie.MPAARatings))
        {
            results.Add(movie);
        }
    }
Finally, we’ll return our results:
return results;Now, back in our PageModel Index.cshtml.cs, we’ll apply our filter to the results of our search. The refactored OnGet() should then be:
    public void OnGet()
    {
        SearchTerms = Request.Query["SearchTerms"];
        MPAARatings = Request.Query["MPAARatings"];
        Movies = MovieDatabase.Search(SearchTerms);
        Movies = MovieDatabase.FilterByMPAARating(Movies, MPAARatings);
    }
Now we can run a search with filters applied. For example, searching for the word “Love” and movies that are PG or PG-13 yields:
You might be wondering why Cloverfield is listed. But remember, we’re searching by substring, and C LOVE rfield contains love!
Let’s add filters for genre next. But what genres should be included? This is not as clear-cut as our MPAA rating, as there is no standards organization that says “these are the only offical genres that exist.” In fact, new genres emerge from time to time. So a better source of this info might just be to see what Genres are defined in our data, i.e.:
    HashSet<string> genres = new HashSet<string>();
    foreach(Movie movie in All) {
        if(movie.MajorGenre != null)
        {
            genres.Add(movie.MajorGenre);
        }
    }
Here we use a HashSet instead of a list, as it only adds each unique item once. Duplicates are ignored.
But where would this code go? We could place it in a getter for MovieDatabase.Genres:
    public IEnumerable<string> Genres
    {
        get
        {
            HashSet<string> genres = new HashSet<string>();
            foreach(Movie movie in All) {
                if(movie.MajorGenre != null)
                {
                    genres.Add(movie.MajorGenre);
                }
            }
        }
    }
But this means that every time we want to access it, we’ll search through all the movies… This is an O(n) operation, and will make our website slower.
Instead, let’s create a private static variable in the MovieDatabase class to cache this collection as an array of strings:
    // The genres represented in the database
    private static string[] _genres;
And expose it with a public static property:
    /// <summary>
    /// Gets the movie genres represented in the database
    /// </summary>
    public static string[] Genres => _genres;
And finally, we’ll populate this array in the static constructor of MovieDatabase, after the JSON file has been processed:
    HashSet<string> genreSet = new HashSet<string>();
    foreach(Movie movie in _movies) {
        if(movie.MajorGenre != null)
        {
            genreSet.Add(movie.MajorGenre);
        }
    }
    _genres = genreSet.ToArray();
This approach means the finding of genres only happens once, and getting the Genre property is a constant-time O(1) operation.
We can implement the filters for the genres in the same way as we did for the MPAA filters; I’ll leave that as an exercise for the reader.
Let’s tackle one of the critics ratings next. While we could create categories and use checkboxes, this doesn’t capture the incremental values (i.e. 4.3), and it would be a lot of checkboxes for Rotten Tomatoes ratings! Instead, we’ll use a numerical filter, which limits our possible results to a range - between a minimum and maximum value.
Moreover, let’s clean up our Index page, as it is getting difficult to determine what filter(s) go together, and and are adding more.
Let’s move the filters to a column on the left, leave the search bar above, and show our results on the right. This will require refactoring our Index.cshtml file:
    <form id="movie-database">

        <div id="search">
            <input type="text" name="SearchTerms" value="@Model.SearchTerms" />
            <input type="submit" value="Search">
        </div>

        <div id="filters">

            <h4>MPAA Rating</h4>
            @foreach (string rating in MovieDatabase.MPAARating)
            {
                <label>
                    <input type="checkbox" name="MPAARatings" value="@rating" checked="@Model.MPAARatings.Contains(rating)" />
                    @rating
                </label>
            }

            <h4>Genre</h4>
            @foreach (string genre in MovieDatabase.Genres)
            {
                <label>
                    <input type="checkbox" name="Genres" value="@genre" />
                    @genre
                </label>
            }

            <h4>IMDB Rating</h4>
            <div>
                Between
                <input name="IMDBMin" type="number" min="0" max="10" step="0.1" placeholder="min"/>
                and
                <input name="IMDBMax" type="number" min="0" max="10" step="0.1" placeholder="max"/>
            </div>

        </div>

        <div id="results">
            <h1>Movie Results</h1>

            <ul class="movie-list">
                @foreach (Movie movie in @Model.Movies)
                {
                    <li>
                        <div class="details">
                            <h3 class="title">@movie.Title</h3>
                            <div class="mpaa">@movie.MPAARating</div>
                            <div class="genre">@movie.MajorGenre</div>
                        </div>
                        <div class="ratings">
                            @if (movie.IMDBRating != null)
                            {
                                <div class="imdb">
                                    @movie.IMDBRating
                                </div>
                            }
                            @if (movie.RottenTomatoesRating != null)
                            {
                                <div class="rotten-tomatoes">
                                    @movie.RottenTomatoesRating
                                </div>
                            }
                        </div>
                    </li>
                }
            </ul>
        </div>

    </form>
Most of this is simply moving elements around the page, but note that we are using inputs of type=number to represent our range of IMDB values. We can specify a minimum and maximum for this range, as well as an allowable increment. Also, we use the placeholder attribute to put text into the input until a value is added.
Now we’ll need to add some rules to our wwwroot/css/styles.css. First, we’ll use a grid for the layout of the form:
form#movie-database {
    display: grid;
    grid-template-columns: 1fr 3fr;
    grid-template-rows: auto auto;
}
The right column will be three times as big as the right.
We can make our search bar span both columns with grid-column-start and grid-column-end:
#search {
    grid-column-start: 1;
    grid-column-end: 3;
    text-align: center;
}
Notice too that for CSS, we start counting at 1, not 0. The filters and the results will fall in the next row automatically, each taking up their own respective grid cell. You can read more about the grid layout in A Complete Guide to Grid.
Let’s go ahead and use flexbox to lay out our filters in a column:
#filters {
    display: flex;
    flex-direction: column;
}
And make our number inputs bigger:
#filters input[type=number] {
    width: 4rem;
}
Notice the use of square brackets in our CSS Selector to only apply to inputs with type number.
Also, let’s add a margin above and remove most of the margin below our <h4> elements:
#filters h4 {
    margin-bottom: 0.2rem;
    margin-top: 2rem;
}
The resulting page looks much cleaner:
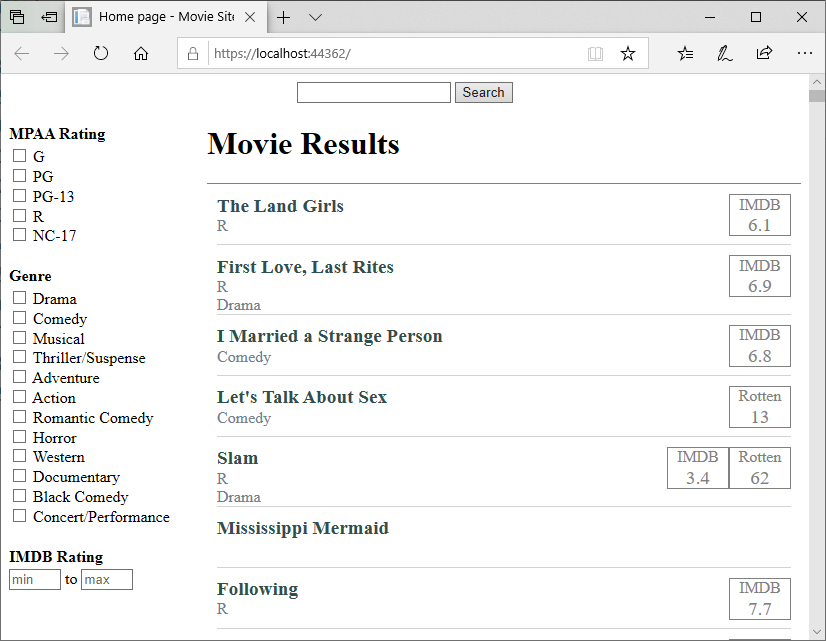
Now we need to get the filter values from our GET request query string. We could do this like we’ve been doing before, with:
Request.Query["IMDBMin"];But the returned value would be a string, so we’d need to parse it:
IMDBMin = double.Parse(Request.Query["IMDBMin"]);If the query was null, then this would evaluate to NaN, which we wouldn’t want to set our <input> to…
Instead, we’ll look at some options built into the PageModel.
The first of these options is Parameter Binding. In this approach, we define parameters to our OnGet() method to be parsed out of the request automatically, i.e.:
    /// <summary>
    /// Gets the search results for display on the page
    /// </summary>
    public void OnGet(string SearchTerms, string[] MPAARatings, string[] Genres, double? IMDBMin, double? IMDBMax) {
        this.SearchTerms = SearchTerms;
        this.MPAARatings = MPAARatings;
        this.Genres = Genres;
        this.IMDBMin = IMDBMin;
        this.IMDBMax = IMDBMax;
        Movies = MovieDatabase.Search(SearchTerms);
        Movies = MovieDatabase.FilterByMPAARating(Movies, MPAARatings);
        Movies = MovieDatabase.FilterByGenre(Movies, Genres);
        Movies = MovieDatabase.FilterByIMDBRating(Movies, IMDBMin, IMDBMax);
    }
The benefit of this approach is that as long as C# knows a conversion into the type we specify, the conversion is done automatically. Note that the parameter name matches the name property of the corresponding <input> - this must be the case for the Razor Page to bind the parameter to the corresponding input value.
Note that we still need to assign these parameter values to the corresponding properties of our PageModel. If we don’t, then those properties will all be null, and the <inputs> rendered on our page will always be blank.
A second option is to use Model Binding. Model binding also automatically converts incoming form data, but in this case it binds directly to the properties of our PageModel. We indicate this form of binding with a [BindProperty] attribute, i.e.:
public class IndexModel : PageModel {

    [BindProperty(SupportsGet=true)]
    public string SearchTerms {get; set;}

    [BindProperty(SupportsGet=true)]
    public string[] MPAARatings {get; set;}

    [BindProperty(SupportsGet=true)]
    public string[] Genres {get; set;}

    [BindProperty(SupportsGet=true)]
    public double? IMDBMin {get; set;}

    [BindProperty(SupportsGet=true)]
    public double? IMDBMax {get; set;}

    /// <summary>
    /// Gets the search results for display on the page
    /// </summary>
    public void OnGet() {
        Movies = MovieDatabase.Search(SearchTerms);
        Movies = MovieDatabase.FilterByMPAARating(Movies, MPAARatings);
        Movies = MovieDatabase.FilterByGenre(Movies, Genres);
        Movies = MovieDatabase.FilterByIMDBRating(Movies, IMDBMin, IMDBMax);
    }
}
Note that with this approach, the incoming data is directly bound to the properties, so we don’t need to do any special assignments within our OnGet() method. Also, note that we have to use SupportsGet=true in order for this binding to occur on GET requests (by default, model binding only happens with POST requests).
You only need to do one binding approach per property in a PageModel. I.e. you can just use the property decorator:
public class SomePageModel : PageModel
{
    [BindProperty(SupportsGet=true)]
    public float SomeProperty { get; set; }

    public void OnGet() {
        DoSomething(SomeProperty);
    }
}
or you might use parameter binding:
public class SomePageModel : PageModel
{
    public void OnGet(float SomeProperty) {
        DoSomething(SomeProperty);
    }
}
or you can parse it from the request:
public class SomePageModel : PageModel
{
    public void OnGet() {
        var someProperty = float.Parse(Request.Query["SomeProperty"]);
        DoSomething(someProperty);
    }
}
These are all different means of accessing the same data from the incoming request.
Now all we need to do is implement the actual filter.
We’ll define the new filter in our MovieDatabase class as another static method:
    /// <summary>
    /// Filters the provided collection of movies
    /// to those with IMDB ratings falling within
    /// the specified range
    /// </summary>
    /// <param name="movies">The collection of movies to filter</param>
    /// <param name="min">The minimum range value</param>
    /// <param name="max">The maximum range value</param>
    /// <returns>The filtered movie collection</returns>
    public static IEnumerable<Movie> FilterByIMDBRating(IEnumerable<Movie> movies, double? min, double? max)
    {
        // TODO: Filter movies
    }
Notice that here too we use the nullable double value. So our first step is probably to do a null check:
if (min == null && max == null) return movies;But what if only one is null? Should we filter for that part of the range? It wouldn’t be hard to do:
    var results = new List<Movie>();

    // only a maximum specified
    if(min == null)
    {
        foreach(Movie movie in movies)
        {
            if (movie.IMDBRating <= max) results.Add(movie);
        }
        return results;
    }
And the minimum would mirror that:
    // only a minimum specified
    if(max == null)
    {
        foreach(Movie movie in movies)
        {
            if (movie.IMDBRating >= min) results.Add(movie);
        }
        return results;
    }
Finally, we could handle the case where we have both a min and max value to our range:
    // Both minimum and maximum specified
    foreach(Movie movie in movies)
    {
        if(movie.IMDBRating >= min && movie.IMDBRating <= max)
        {
            results.Add(movie);
        }
    }
    return results;
Notice too, that in each of these cases we’re treating the range as inclusive (including the specified minimum and maximum). This is the behavior most casual internet users will expect. If the database and user expectations are different for your audience, you’d want your code to match that expectation.
Now we can filter by IMDB rating:

Since we’re displaying the Rotten Tomatoes rating, we should probably also have a filter for it. This will work almost exactly like the IMDB rating - but with the range from 0 to 100. I’ll leave this as an exercise for the reader.
Let’s tackle one of the critics ratings next. While we could create categories and use checkboxes, this doesn’t capture the incremental values (i.e. 4.3), and it would be a lot of checkboxes for Rotten Tomatoes ratings! Instead, we’ll use a numerical filter, which limits our possible results to a range - between a minimum and maximum value.
Moreover, let’s clean up our Index page, as it is getting difficult to determine what filter(s) go together, and and are adding more.
Let’s move the filters to a column on the left, leave the search bar above, and show our results on the right. This will require refactoring our Index.cshtml file:
    <form id="movie-database">

        <div id="search">
            <input type="text" name="SearchTerms" value="@Model.SearchTerms" />
            <input type="submit" value="Search">
        </div>

        <div id="filters">

            <h4>MPAA Rating</h4>
            @foreach (string rating in MovieDatabase.MPAARating)
            {
                <label>
                    <input type="checkbox" name="MPAARatings" value="@rating" checked="@Model.MPAARatings.Contains(rating)" />
                    @rating
                </label>
            }

            <h4>Genre</h4>
            @foreach (string genre in MovieDatabase.Genres)
            {
                <label>
                    <input type="checkbox" name="Genres" value="@genre" />
                    @genre
                </label>
            }

            <h4>IMDB Rating</h4>
            <div>
                Between
                <input name="IMDBMin" type="number" min="0" max="10" step="0.1" placeholder="min"/>
                and
                <input name="IMDBMax" type="number" min="0" max="10" step="0.1" placeholder="max"/>
            </div>

        </div>

        <div id="results">
            <h1>Movie Results</h1>

            <ul class="movie-list">
                @foreach (Movie movie in @Model.Movies)
                {
                    <li>
                        <div class="details">
                            <h3 class="title">@movie.Title</h3>
                            <div class="mpaa">@movie.MPAARating</div>
                            <div class="genre">@movie.MajorGenre</div>
                        </div>
                        <div class="ratings">
                            @if (movie.IMDBRating != null)
                            {
                                <div class="imdb">
                                    @movie.IMDBRating
                                </div>
                            }
                            @if (movie.RottenTomatoesRating != null)
                            {
                                <div class="rotten-tomatoes">
                                    @movie.RottenTomatoesRating
                                </div>
                            }
                        </div>
                    </li>
                }
            </ul>
        </div>

    </form>
Most of this is simply moving elements around the page, but note that we are using inputs of type=number to represent our range of IMDB values. We can specify a minimum and maximum for this range, as well as an allowable increment. Also, we use the placeholder attribute to put text into the input until a value is added.
Now we’ll need to add some rules to our wwwroot/css/styles.css. First, we’ll use a grid for the layout of the form:
form#movie-database {
    display: grid;
    grid-template-columns: 1fr 3fr;
    grid-template-rows: auto auto;
}
The right column will be three times as big as the left.
We can make our search bar span both columns with grid-column-start and grid-column-end:
#search {
    grid-column-start: 1;
    grid-column-end: 3;
    text-align: center;
}
Notice too that for CSS, we start counting at 1, not 0. The filters and the results will fall in the next row automatically, each taking up their own respective grid cell. You can read more about the grid layout in A Complete Guide to Grid.
Let’s go ahead and use flexbox to lay out our filters in a column:
#filters {
    display: flex;
    flex-direction: column;
}
And make our number inputs bigger:
#filters input[type=number] {
    width: 4rem;
}
Notice the use of square brackets in our CSS Selector to only apply to inputs with type number.
Also, let’s add a margin above and remove most of the margin below our <h4> elements:
#filters h4 {
    margin-bottom: 0.2rem;
    margin-top: 2rem;
}
The resulting page looks much cleaner:
Now we need to get the filter values from our GET request query string. We could do this like we’ve been doing before, with:
Request.Query["IMDBMin"];But the returned value would be a string, so we’d need to parse it:
IMDBMin = double.Parse(Request.Query["IMDBMin"]);If the query was null, then this would evaluate to NaN, which we wouldn’t want to set our <input> to…
Instead, we’ll look at some options built into the PageModel.
The first of these options is Parameter Binding. In this approach, we define parameters to our OnGet() method to be parsed out of the request automatically, i.e.:
    /// <summary>
    /// Gets the search results for display on the page
    /// </summary>
    public void OnGet(string SearchTerms, string[] MPAARatings, string[] Genres, double? IMDBMin, double? IMDBMax) {
        this.SearchTerms = SearchTerms;
        this.MPAARatings = MPAARatings;
        this.Genres = Genres;
        this.IMDBMin = IMDBMin;
        this.IMDBMax = IMDBMax;
        Movies = MovieDatabase.Search(SearchTerms);
        Movies = MovieDatabase.FilterByMPAARating(Movies, MPAARatings);
        Movies = MovieDatabase.FilterByGenre(Movies, Genres);
        Movies = MovieDatabase.FilterByIMDBRating(Movies, IMDBMin, IMDBMax);
    }
The benefit of this approach is that as long as C# knows a conversion into the type we specify, the conversion is done automatically. Note that the parameter name matches the name property of the corresponding <input> - this must be the case for the Razor Page to bind the parameter to the corresponding input value.
Note that we still need to assign these parameter values to the corresponding properties of our PageModel. If we don’t, then those properties will all be null, and the <inputs> rendered on our page will always be blank.
A second option is to use Model Binding. Model binding also automatically converts incoming form data, but in this case it binds directly to the properties of our PageModel. We indicate this form of binding with a [BindProperty] attribute, i.e.:
public class IndexModel : PageModel {

    [BindProperty(SupportsGet=true)]
    public string SearchTerms {get; set;}

    [BindProperty(SupportsGet=true)]
    public string[] MPAARatings {get; set;}

    [BindProperty(SupportsGet=true)]
    public string[] Genres {get; set;}

    [BindProperty(SupportsGet=true)]
    public double? IMDBMin {get; set;}

    [BindProperty(SupportsGet=true)]
    public double? IMDBMax {get; set;}

    /// <summary>
    /// Gets the search results for display on the page
    /// </summary>
    public void OnGet() {
        Movies = MovieDatabase.Search(SearchTerms);
        Movies = MovieDatabase.FilterByMPAARating(Movies, MPAARatings);
        Movies = MovieDatabase.FilterByGenre(Movies, Genres);
        Movies = MovieDatabase.FilterByIMDBRating(Movies, IMDBMin, IMDBMax);
    }
}
Note that with this approach, the incoming data is directly bound to the properties, so we don’t need to do any special assignments within our OnGet() method. Also, note that we have to use SupportsGet=true in order for this binding to occur on GET requests (by default, model binding only happens with POST requests).
You only need to do one binding approach per property in a PageModel. I.e. you can just use the property decorator:
public class SomePageModel : PageModel
{
    [BindProperty(SupportsGet=true)]
    public float SomeProperty { get; set; }

    public void OnGet() {
        DoSomething(SomeProperty);
    }
}
or you might use parameter binding:
public class SomePageModel : PageModel
{
    public void OnGet(float SomeProperty) {
        DoSomething(SomeProperty);
    }
}
or you can parse it from the request:
public class SomePageModel : PageModel
{
    public void OnGet() {
        var someProperty = float.Parse(Request.Query["SomeProperty"]);
        DoSomething(someProperty);
    }
}
These are all different means of accessing the same data from the incoming request.
Now all we need to do is implement the actual filter.
We’ll define the new filter in our MovieDatabase class as another static method:
    /// <summary>
    /// Filters the provided collection of movies
    /// to those with IMDB ratings falling within
    /// the specified range
    /// </summary>
    /// <param name="movies">The collection of movies to filter</param>
    /// <param name="min">The minimum range value</param>
    /// <param name="max">The maximum range value</param>
    /// <returns>The filtered movie collection</returns>
    public static IEnumerable<Movie> FilterByIMDBRating(IEnumerable<Movie> movies, double? min, double? max)
    {
        // TODO: Filter movies
    }
Notice that here too we use the nullable double value. So our first step is probably to do a null check:
if (min == null && max == null) return movies;But what if only one is null? Should we filter for that part of the range? It wouldn’t be hard to do:
    var results = new List<Movie>();

    // only a maximum specified
    if(min == null)
    {
        foreach(Movie movie in movies)
        {
            if (movie.IMDBRating <= max) results.Add(movie);
        }
        return results;
    }
And the minimum would mirror that:
    // only a minimum specified
    if(max == null)
    {
        foreach(Movie movie in movies)
        {
            if (movie.IMDBRating >= min) results.Add(movie);
        }
        return results;
    }
Finally, we could handle the case where we have both a min and max value to our range:
    // Both minimum and maximum specified
    foreach(Movie movie in movies)
    {
        if(movie.IMDBRating >= min && movie.IMDBRating <= max)
        {
            results.Add(movie);
        }
    }
    return results;
Notice too, that in each of these cases we’re treating the range as inclusive (including the specified minimum and maximum). This is the behavior most casual internet users will expect. If the database and user expectations are different for your audience, you’d want your code to match that expectation.
Now we can filter by IMDB rating:
Since we’re displaying the Rotten Tomatoes rating, we should probably also have a filter for it. This will work almost exactly like the IMDB rating - but with the range from 0 to 100. I’ll leave this as an exercise for the reader.
Let’s tackle one of the critics ratings next. While we could create categories and use checkboxes, this doesn’t capture the incremental values (i.e. 4.3), and it would be a lot of checkboxes for Rotten Tomatoes ratings! Instead, we’ll use a numerical filter, which limits our possible results to a range - between a minimum and maximum value.
Moreover, let’s clean up our Index page, as it is getting difficult to determine what filter(s) go together, and and are adding more.
Let’s move the filters to a column on the left, leave the search bar above, and show our results on the right. This will require refactoring our Index.cshtml file:
    <form id="movie-database">

        <div id="search">
            <input type="text" name="SearchTerms" value="@Model.SearchTerms" />
            <input type="submit" value="Search">
        </div>

        <div id="filters">

            <h4>MPAA Rating</h4>
            @foreach (string rating in MovieDatabase.MPAARatings)
            {
                <label>
                    <input type="checkbox" name="MPAARatings" value="@rating" checked="@Model.MPAARatings.Contains(rating)" />
                    @rating
                </label>
            }

            <h4>Genre</h4>
            @foreach (string genre in MovieDatabase.Genres)
            {
                <label>
                    <input type="checkbox" name="Genres" value="@genre" checked="@Model.Genres.Contains(genre)" />
                    @genre
                </label>
            }

            <h4>IMDB Rating</h4>
            <div>
                <input name="IMDBMin" type="number" min="0" max="10" step="0.1" placeholder="min"/>
                to
                <input name="IMDBMax" type="number" min="0" max="10" step="0.1" placeholder="max"/>
            </div>

        </div>

        <div id="results">
            <h1>Movie Results</h1>

            <ul class="movie-list">
                @foreach (Movie movie in @Model.Movies)
                {
                    <li>
                        <div class="details">
                            <h3 class="title">@movie.Title</h3>
                            <div class="mpaa">@movie.MPAARating</div>
                            <div class="genre">@movie.MajorGenre</div>
                        </div>
                        <div class="ratings">
                            @if (movie.IMDBRating != null)
                            {
                                <div class="imdb">
                                    @movie.IMDBRating
                                </div>
                            }
                            @if (movie.RottenTomatoesRating != null)
                            {
                                <div class="rotten-tomatoes">
                                    @movie.RottenTomatoesRating
                                </div>
                            }
                        </div>
                    </li>
                }
            </ul>
        </div>

    </form>
Most of this is simply moving elements around the page, but note that we are using inputs of type=number to represent our range of IMDB values. We can specify a minimum and maximum for this range, as well as an allowable increment. Also, we use the placeholder attribute to put text into the input until a value is added.
Now we’ll need to add some rules to our wwwroot/css/styles.css. First, we’ll use a grid for the layout of the form:
form#movie-database {
    display: grid;
    grid-template-columns: 1fr 3fr;
    grid-template-rows: auto auto;
}
The right column will be three times as big as the left.
We can make our search bar span both columns with grid-column-start and grid-column-end:
#search {
    grid-column-start: 1;
    grid-column-end: 3;
    text-align: center;
}
Notice too that for CSS, we start counting at 1, not 0. The filters and the results will fall in the next row automatically, each taking up their own respective grid cell. You can read more about the grid layout in A Complete Guide to Grid.
Let’s go ahead and use flexbox to lay out our filters in a column:
#filters {
    display: flex;
    flex-direction: column;
}
And make our number inputs bigger:
#filters input[type=number] {
    width: 4rem;
}
Notice the use of square brackets in our CSS Selector to only apply to inputs with type number.
Also, let’s add a margin above and remove most of the margin below our <h4> elements:
#filters h4 {
    margin-bottom: 0.2rem;
    margin-top: 2rem;
}
The resulting page looks much cleaner:
Now we need to get the filter values from our GET request query string. We could do this like we’ve been doing before, with:
Request.Query["IMDBMin"];But the returned value would be a string, so we’d need to parse it:
IMDBMin = double.Parse(Request.Query["IMDBMin"]);If the query was null, then this would evaluate to NaN, which we wouldn’t want to set our <input> to…
Instead, we’ll look at some options built into the PageModel.
The first of these options is Parameter Binding. In this approach, we define parameters to our OnGet() method to be parsed out of the request automatically, i.e.:
    /// <summary>
    /// Gets the search results for display on the page
    /// </summary>
    public void OnGet(string SearchTerms, string[] MPAARatings, string[] Genres, double? IMDBMin, double? IMDBMax) {
        this.SearchTerms = SearchTerms;
        this.MPAARatings = MPAARatings;
        this.Genres = Genres;
        this.IMDBMin = IMDBMin;
        this.IMDBMax = IMDBMax;
        Movies = MovieDatabase.Search(SearchTerms);
        Movies = MovieDatabase.FilterByMPAARating(Movies, MPAARatings);
        Movies = MovieDatabase.FilterByGenre(Movies, Genres);
        Movies = MovieDatabase.FilterByIMDBRating(Movies, IMDBMin, IMDBMax);
    }
The benefit of this approach is that as long as C# knows a conversion into the type we specify, the conversion is done automatically. Note that the parameter name matches the name property of the corresponding <input> - this must be the case for the Razor Page to bind the parameter to the corresponding input value.
Note that we still need to assign these parameter values to the corresponding properties of our PageModel. If we don’t, then those properties will all be null, and the <inputs> rendered on our page will always be blank.
A second option is to use Model Binding. Model binding also automatically converts incoming form data, but in this case it binds directly to the properties of our PageModel. We indicate this form of binding with a [BindProperty] attribute, i.e.:
public class IndexModel : PageModel {

    [BindProperty(SupportsGet=true)]
    public string SearchTerms {get; set;}

    [BindProperty(SupportsGet=true)]
    public string[] MPAARatings {get; set;}

    [BindProperty(SupportsGet=true)]
    public string[] Genres {get; set;}

    [BindProperty(SupportsGet=true)]
    public double? IMDBMin {get; set;}

    [BindProperty(SupportsGet=true)]
    public double? IMDBMax {get; set;}

    /// <summary>
    /// Gets the search results for display on the page
    /// </summary>
    public void OnGet() {
        Movies = MovieDatabase.Search(SearchTerms);
        Movies = MovieDatabase.FilterByMPAARating(Movies, MPAARatings);
        Movies = MovieDatabase.FilterByGenre(Movies, Genres);
        Movies = MovieDatabase.FilterByIMDBRating(Movies, IMDBMin, IMDBMax);
    }
}
Note that with this approach, the incoming data is directly bound to the properties, so we don’t need to do any special assignments within our OnGet() method. Also, note that we have to use SupportsGet=true in order for this binding to occur on GET requests (by default, model binding only happens with POST requests).
You only need to do one binding approach per property in a PageModel. I.e. you can just use the property decorator:
public class SomePageModel : PageModel
{
    [BindProperty(SupportsGet=true)]
    public float SomeProperty { get; set; }

    public void OnGet() {
        DoSomething(SomeProperty);
    }
}
or you might use parameter binding:
public class SomePageModel : PageModel
{
    public void OnGet(float SomeProperty) {
        DoSomething(SomeProperty);
    }
}
or you can parse it from the request:
public class SomePageModel : PageModel
{
    public void OnGet() {
        var someProperty = float.Parse(Request.Query["SomeProperty"]);
        DoSomething(someProperty);
    }
}
These are all different means of accessing the same data from the incoming request.
Now all we need to do is implement the actual filter.
We’ll define the new filter in our MovieDatabase class as another static method:
    /// <summary>
    /// Filters the provided collection of movies
    /// to those with IMDB ratings falling within
    /// the specified range
    /// </summary>
    /// <param name="movies">The collection of movies to filter</param>
    /// <param name="min">The minimum range value</param>
    /// <param name="max">The maximum range value</param>
    /// <returns>The filtered movie collection</returns>
    public static IEnumerable<Movie> FilterByIMDBRating(IEnumerable<Movie> movies, double? min, double? max)
    {
        // TODO: Filter movies
    }
Notice that here too we use the nullable double value. So our first step is probably to do a null check:
if (min == null && max == null) return movies;But what if only one is null? Should we filter for that part of the range? It wouldn’t be hard to do:
    var results = new List<Movie>();

    // only a maximum specified
    if(min == null)
    {
        foreach(Movie movie in movies)
        {
            if (movie.IMDBRating <= max) results.Add(movie);
        }
        return results;
    }
And the minimum would mirror that:
    // only a minimum specified
    if(max == null)
    {
        foreach(Movie movie in movies)
        {
            if (movie.IMDBRating >= min) results.Add(movie);
        }
        return results;
    }
Finally, we could handle the case where we have both a min and max value to our range:
    // Both minimum and maximum specified
    foreach(Movie movie in movies)
    {
        if(movie.IMDBRating >= min && movie.IMDBRating <= max)
        {
            results.Add(movie);
        }
    }
    return results;
Notice too, that in each of these cases we’re treating the range as inclusive (including the specified minimum and maximum). This is the behavior most casual internet users will expect. If the database and user expectations are different for your audience, you’d want your code to match that expectation.
Now we can filter by IMDB rating:
Since we’re displaying the Rotten Tomatoes rating, we should probably also have a filter for it. This will work almost exactly like the IMDB rating - but with the range from 0 to 100. I’ll leave this as an exercise for the reader.
Let’s tackle one of the critics ratings next. While we could create categories and use checkboxes, this doesn’t capture the incremental values (i.e. 4.3), and it would be a lot of checkboxes for Rotten Tomatoes ratings! Instead, we’ll use a numerical filter, which limits our possible results to a range - between a minimum and maximum value.
Moreover, let’s clean up our Index page, as it is getting difficult to determine what filter(s) go together, and are adding more.
Let’s move the filters to a column on the left, leave the search bar above, and show our results on the right. This will require refactoring our Index.cshtml file:
    <form id="movie-database">

        <div id="search">
            <input type="text" name="SearchTerms" value="@Model.SearchTerms" />
            <input type="submit" value="Search">
        </div>

        <div id="filters">

            <h4>MPAA Rating</h4>
            @foreach (string rating in MovieDatabase.MPAARatings)
            {
                <label>
                    <input type="checkbox" name="MPAARatings" value="@rating" checked="@Model.MPAARatings.Contains(rating)" />
                    @rating
                </label>
            }

            <h4>Genre</h4>
            @foreach (string genre in MovieDatabase.Genres)
            {
                <label>
                    <input type="checkbox" name="Genres" value="@genre" checked="@Model.Genres.Contains(genre)" />
                    @genre
                </label>
            }

            <h4>IMDB Rating</h4>
            <div>
                <input name="IMDBMin" type="number" min="0" max="10" step="0.1" placeholder="min"/>
                to
                <input name="IMDBMax" type="number" min="0" max="10" step="0.1" placeholder="max"/>
            </div>

        </div>

        <div id="results">
            <h1>Movie Results</h1>

            <ul class="movie-list">
                @foreach (Movie movie in @Model.Movies)
                {
                    <li>
                        <div class="details">
                            <h3 class="title">@movie.Title</h3>
                            <div class="mpaa">@movie.MPAARating</div>
                            <div class="genre">@movie.MajorGenre</div>
                        </div>
                        <div class="ratings">
                            @if (movie.IMDBRating != null)
                            {
                                <div class="imdb">
                                    @movie.IMDBRating
                                </div>
                            }
                            @if (movie.RottenTomatoesRating != null)
                            {
                                <div class="rotten-tomatoes">
                                    @movie.RottenTomatoesRating
                                </div>
                            }
                        </div>
                    </li>
                }
            </ul>
        </div>

    </form>
Most of this is simply moving elements around the page, but note that we are using inputs of type=number to represent our range of IMDB values. We can specify a minimum and maximum for this range, as well as an allowable increment. Also, we use the placeholder attribute to put text into the input until a value is added.
Now we’ll need to add some rules to our wwwroot/css/site.css. First, we’ll use a grid for the layout of the form:
form#movie-database {
    display: grid;
    grid-template-columns: 1fr 3fr;
    grid-template-rows: auto auto;
}
The right column will be three times as big as the left.
We can make our search bar span both columns with grid-column-start and grid-column-end:
#search {
    grid-column-start: 1;
    grid-column-end: 3;
    text-align: center;
}
Notice too that for CSS, we start counting at 1, not 0. The filters and the results will fall in the next row automatically, each taking up their own respective grid cell. You can read more about the grid layout in A Complete Guide to Grid.
Let’s go ahead and use flexbox to lay out our filters in a column:
#filters {
    display: flex;
    flex-direction: column;
}
And make our number inputs bigger:
#filters input[type=number] {
    width: 4rem;
}
Notice the use of square brackets in our CSS Selector to only apply to inputs with type number.
Also, let’s add a margin above and remove most of the margin below our <h4> elements:
#filters h4 {
    margin-bottom: 0.2rem;
    margin-top: 2rem;
}
The resulting page looks much cleaner:
Now we need to get the filter values from our GET request query string. We could do this like we’ve been doing before, with:
Request.Query["IMDBMin"];But the returned value would be a string, so we’d need to parse it:
IMDBMin = double.Parse(Request.Query["IMDBMin"]);If the query was null, then this would evaluate to NaN, which we wouldn’t want to set our <input> to…
Instead, we’ll look at some options built into the PageModel.
The first of these options is Parameter Binding. In this approach, we define parameters to our OnGet() method to be parsed out of the request automatically, i.e.:
    /// <summary>
    /// Gets the search results for display on the page
    /// </summary>
    public void OnGet(string SearchTerms, string[] MPAARatings, string[] Genres, double? IMDBMin, double? IMDBMax) {
        this.SearchTerms = SearchTerms;
        this.MPAARatings = MPAARatings;
        this.Genres = Genres;
        this.IMDBMin = IMDBMin;
        this.IMDBMax = IMDBMax;
        Movies = MovieDatabase.Search(SearchTerms);
        Movies = MovieDatabase.FilterByMPAARating(Movies, MPAARatings);
        Movies = MovieDatabase.FilterByGenre(Movies, Genres);
        Movies = MovieDatabase.FilterByIMDBRating(Movies, IMDBMin, IMDBMax);
    }
The benefit of this approach is that as long as C# knows a conversion into the type we specify, the conversion is done automatically. Note that the parameter name matches the name property of the corresponding <input> - this must be the case for the Razor Page to bind the parameter to the corresponding input value.
Note that we still need to assign these parameter values to the corresponding properties of our PageModel. If we don’t, then those properties will all be null, and the <inputs> rendered on our page will always be blank.
A second option is to use Model Binding. Model binding also automatically converts incoming form data, but in this case it binds directly to the properties of our PageModel. We indicate this form of binding with a [BindProperty] attribute, i.e.:
public class IndexModel : PageModel {

    [BindProperty(SupportsGet=true)]
    public string SearchTerms {get; set;}

    [BindProperty(SupportsGet=true)]
    public string[] MPAARatings {get; set;}

    [BindProperty(SupportsGet=true)]
    public string[] Genres {get; set;}

    [BindProperty(SupportsGet=true)]
    public double? IMDBMin {get; set;}

    [BindProperty(SupportsGet=true)]
    public double? IMDBMax {get; set;}

    /// <summary>
    /// Gets the search results for display on the page
    /// </summary>
    public void OnGet() {
        Movies = MovieDatabase.Search(SearchTerms);
        Movies = MovieDatabase.FilterByMPAARating(Movies, MPAARatings);
        Movies = MovieDatabase.FilterByGenre(Movies, Genres);
        Movies = MovieDatabase.FilterByIMDBRating(Movies, IMDBMin, IMDBMax);
    }
}
Note that with this approach, the incoming data is directly bound to the properties, so we don’t need to do any special assignments within our OnGet() method. Also, note that we have to use SupportsGet=true in order for this binding to occur on GET requests (by default, model binding only happens with POST requests).
You only need to do one binding approach per property in a PageModel. I.e. you can just use the property decorator:
public class SomePageModel : PageModel
{
    [BindProperty(SupportsGet=true)]
    public float SomeProperty { get; set; }

    public void OnGet() {
        DoSomething(SomeProperty);
    }
}
or you might use parameter binding:
public class SomePageModel : PageModel
{
    public void OnGet(float SomeProperty) {
        DoSomething(SomeProperty);
    }
}
or you can parse it from the request:
public class SomePageModel : PageModel
{
    public void OnGet() {
        var someProperty = float.Parse(Request.Query["SomeProperty"]);
        DoSomething(someProperty);
    }
}
These are all different means of accessing the same data from the incoming request.
Now all we need to do is implement the actual filter.
We’ll define the new filter in our MovieDatabase class as another static method:
    /// <summary>
    /// Filters the provided collection of movies
    /// to those with IMDB ratings falling within
    /// the specified range
    /// </summary>
    /// <param name="movies">The collection of movies to filter</param>
    /// <param name="min">The minimum range value</param>
    /// <param name="max">The maximum range value</param>
    /// <returns>The filtered movie collection</returns>
    public static IEnumerable<Movie> FilterByIMDBRating(IEnumerable<Movie> movies, double? min, double? max)
    {
        // TODO: Filter movies
    }
Notice that here too we use the nullable double value. So our first step is probably to do a null check:
if (min == null && max == null) return movies;But what if only one is null? Should we filter for that part of the range? It wouldn’t be hard to do:
    var results = new List<Movie>();

    // only a maximum specified
    if(min == null)
    {
        foreach(Movie movie in movies)
        {
            if (movie.IMDBRating <= max) results.Add(movie);
        }
        return results;
    }
And the minimum would mirror that:
// only a minimum specified
if(max == null)
{
foreach(Movie movie in movies)
{
if (movie.IMDBRating >= min) results.Add(movie);
}
return results;
}Finally, we could handle the case where we have both a min and max value to our range:
// Both minimum and maximum specified
foreach(Movie movie in movies)
{
if(movie.IMDBRating >= min && movie.IMDBRating <= max)
{
results.Add(movie);
}
}
return results;Notice too, that in each of these cases we’re treating the range as inclusive (including the specified minimum and maximum). This is the behavior most casual internet users will expect. If the database and user expectations are different for your audience, you’d want your code to match that expectation.
Now we can filter by IMDB rating:
Since we’re displaying the Rotten Tomatoes rating, we should probably also have a filter for it. This will work almost exactly like the IMDB rating - but with the range from 0 to 100. I’ll leave this as an exercise for the reader.
In our movie website, we’ve been using a custom “database” object, MovieDatabase to provide the movie data and search and filter functionality. In professional practice, we would probably replace this with an external database program. These programs have been developed specifically for persisting and accessing data, and leverage specialized data structures like B+ trees that allow them to do searches and filters much more efficiently.
Some of the most widely adopted database programs are relational databases like MySQL, MsSQL, Postgres, and SQLLite. These predate object-orientation, and accept requests for data in the form of SQL (Structured Query Language). You will learn more about these databases and how to use them in CIS560.
Microsoft, inspired by SQL, introduced Language Integrated Query (LINQ) in 2007 to bring the concept of a query language into .NET. LINQ allows you to construct queries in either chained method calls or in a syntax similar to SQL that can operate on collections or relational databases.
For relational databases, LINQ queries are converted internally to SQL queries, and dispatched to the database. But their real power is that they can also be used with any collection that supports either the IEnumerable or IEnumerable<T> interfaces. LINQ can be used to replace the kinds of filter and search functions we wrote for our MovieDatabase. Let’s try it out with our movie website.
LINQ operates through extension methods, so we need to be sure to add the LINQ namespace to our CS files where we are going to employ them. We’ll be adding our LINQ commands to our page model, so sure that is the case with your Pages/Index.cshtml.cs:
using System.Linq;Adding this using statement will bring in all the extension methods for LINQ, and will also prompt Visual Studio to recognize the query-style syntax.
One of the most useful extension methods in LINQ is Where(). It can be invoked on any IEnumerable and accepts a Func (a delegate type). This delegate takes a single argument - the current item being enumerated over, and its body should return a boolean value - true if the item should be included in the results, and false if it should not.
We can thus use our existing SearchTerms property as the basis for our test: movie => movie.Title != null && movie.Title.Contains(SearchTerms) (note that with lambda expressions, if the result is single expression we can omit the {} and the return is implied). Also note that we incorporate the null check directly into the expression using the boolean and && operator.
We can replace our current search with a Where() call invoking this method:
Movies = MovieDatabase.All.Where(movie => movie.Title != null && movie.Title.Contains(SearchTerms, String));However if we run the program we will encounter a null exception. On our first GET request, the value of SearchTerms is null, which is not a legal argument for String.Contains().
If the SearchTerms is null, that indicates that the user did not enter a search term - accordingly, we probably don’t want to search. We can wrap our filter in an if test to prevent applying the filter when there is no search term. Thus, we would refactor our filtering expression to:
Movies = MovieDatabase.All;
// Search movie titles for the SearchTerms
if(SearchTerms != null) {
Movies = Movies.Where(movie => movie.Title != null && movie.Title.Contains(SearchTerms, StringComparison.InvariantCultureIgnoreCase));
}Now if we run the program, and search for a specific term, we’ll see our results is modified to contain only those movies with the terms in their title!
We can also use the query syntax instead of the extension method syntax, which is similar to SQL:
Movies = MovieDatabase.All;
// Search movie titles for the SearchTerms
if(SerchTerms != null)
{
Movies = from movie in Movies
where movie.Title != null && movie.Title.Contains(SearchTerms, StringComparison.InvariantCultureIgnoreCase)
select movie;
}This syntax is converted by the C# compiler to use the extension methods as part of the compilation process.
The search approach listed above will only find the exact search terms, i.e. searching for “Clear Present Danger” will not match the film “Clear and Present Danger”. How might you tweak the search approach so that terms would be found individually?
You can use either form for writing your queries, though it is best to stay consistent within a single program.
Filtering is also accomplished through the Where(). We can add additional tests within our search Where(), but it is more legible to add additional Where calls:
Movies = MovieDatabase.All
// Search movie titles for the SearchTerms
if(SearchTerms != null) {
Movies = Movies.Where(movie => movie.Title != null && movie.Title.Contains(SearchTerms, StringComparison.InvariantCultureIgnoreCase));
}
// Filter by MPAA Rating
if(MPAARatings != null && MPAARatings.Length != 0)
{
Movies = Movies.Where(movie =>
movie.MPAARating != null &&
MPAARatings.Contains(movie.MPAARating)
);
}The numerical filters are handled the same way - with additional Where clauses. I leave this as an exercise for the reader to complete.
While LINQ is a bit less code for us to write, there is another big benefit - the actual filtering is only applied when we start iterating through the results. This means that LINQ queries with multiple Where() invocations can combine them into a single iteration.
Consider our movie website example. We have four filters - the search, the MPAA Ratings, the IMDB Ratings, and the Rotten Tomato Rating. In the worst case, each movie in the database would pass each filter, so that our list never got smaller. With the filter functions we wrote in MovieDatabase, we would have to iterate over that full list four times. In terms of complexity, that’s $O(4n)$.
In contrast, because LINQ doesn’t actually run the filters until we start iterating, it can combine all the While tests into a single boolean expression. The result is it only has to iterate through the list once. Hence, its complexity becomes $O(n)$. There is a little additional overhead for holding onto the query information that way, but it’s small compared to the benefit.
Also, we could have done the same kind of optimization ourselves, but it takes a lot of work to set up, and may not be worth it for a single web app. But LINQ provides us that benefit for free.
Now that we have a well-functioning web application, we are ready to publish it to a production environment, where eveyrone on the web will have access to it! This exercise walks you through deploying your new application using Microsoft’s Azure Web Services, utilizing the built-in support for this deployment process in Visual Studio.
Before you start this exercise, you should:
Open your Movie Site project from your previous web data exercises. If you right-click on the project name in the Solution Explorer, you can choose publish from the context menu:
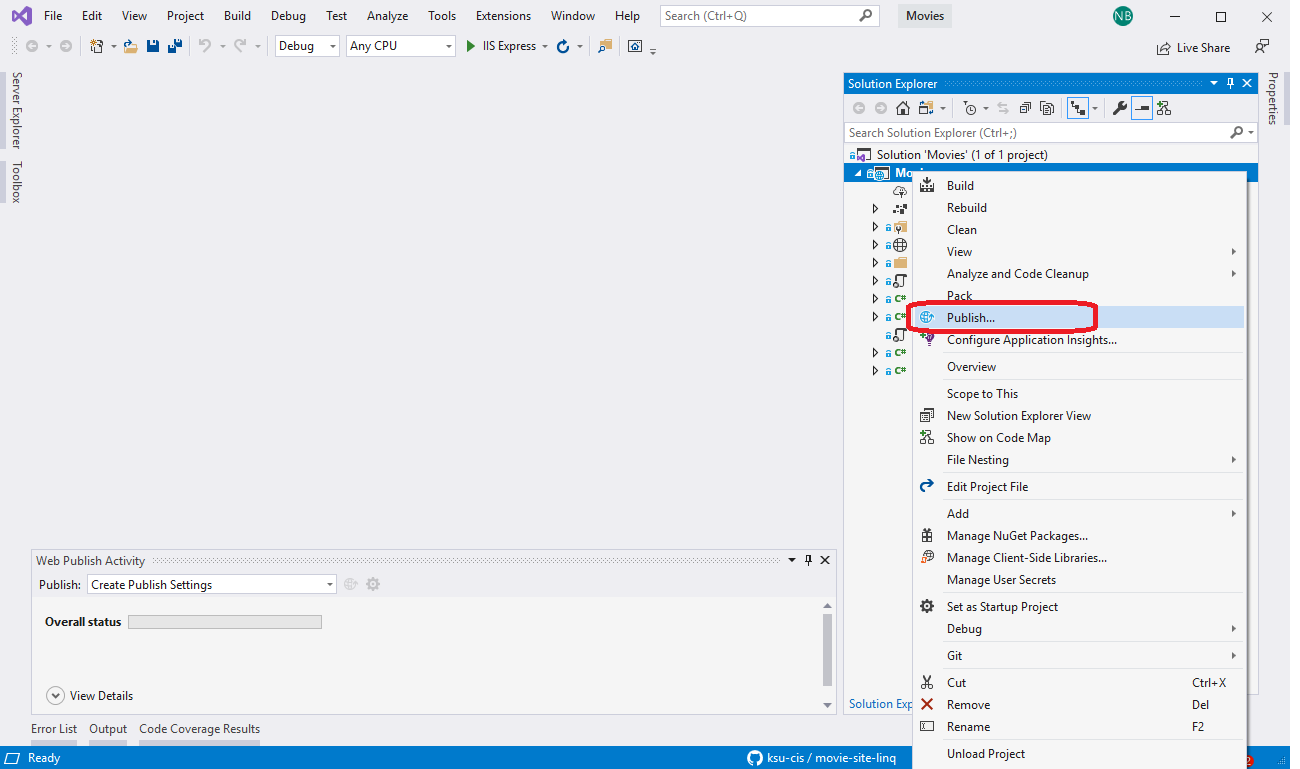
The first time you choose this option in a project, it will launch a publish wizard. The first step is to choose your deployment target:
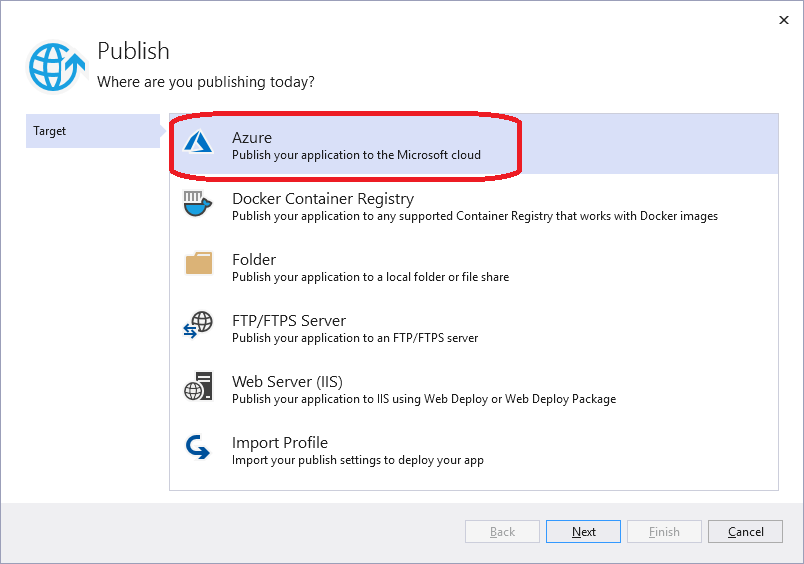
For this exercise, we’ll choose “Azure”, but feel free to explore the other options. Once you’ve chosen Azure and clicked the Next button, you’ll see the second step of the wizard, which seeks more detail on your deployment target:
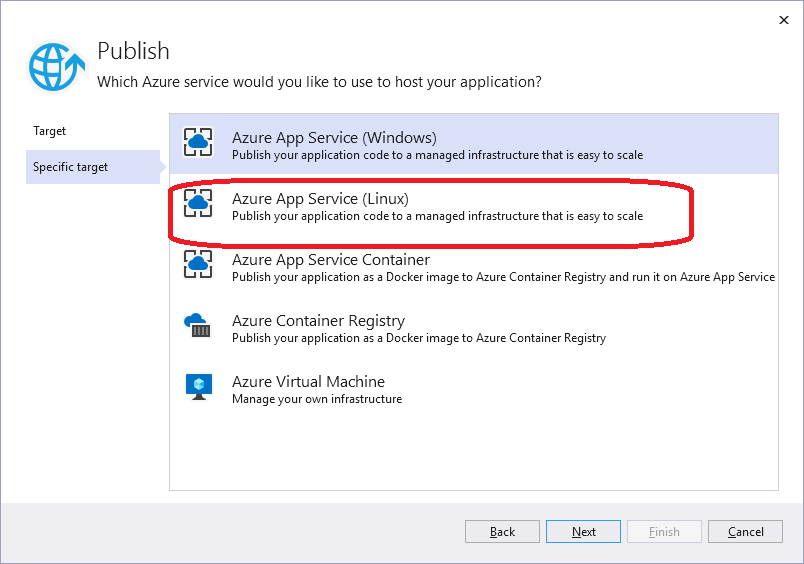
The options here include deploying to a Windows or Linux infrastructure, or as a Docker image, or as an Azure VM (in which case you would need to set up the OS and environment). Let’s choose the “Linux” option and click Next to reach the next step in the wizard.
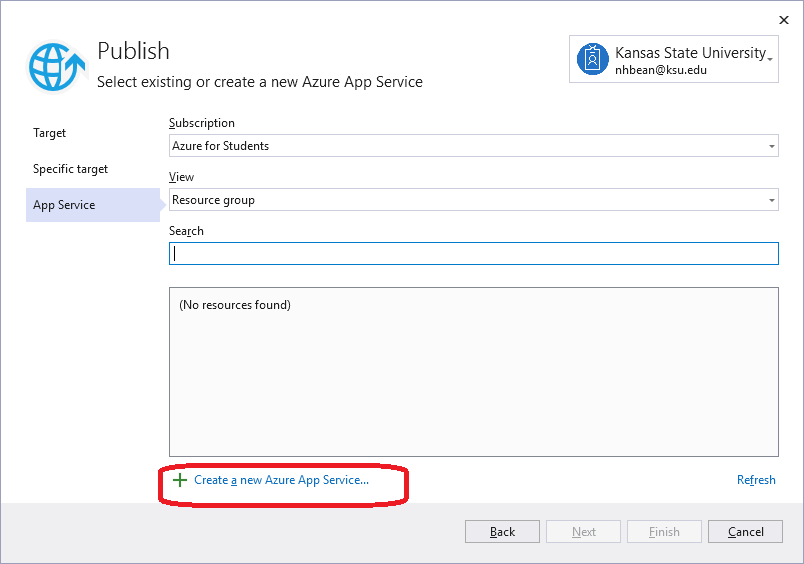
This step lists the subscription(s) available to your account, as well as any Resource Groups and App Services you have created. Most likely the latter two are empty, and your Subscription will be “Azure for Students” (this is the $100 of credit you receive as a K-State student). If you have used Azure previously, you may have additional options. For this project, choose the “Create a new Azure App Service…”
This launches another dialog, for creating a new App Service:

You may change the name to any available name (by default it will be your project name followed by a timestamp). When you’re happy with your name, click the Create button. It will take a few minutes to create your App Service, so please be patient. Once it finishes, you’ll be back in the Wizard with your new app service selected:
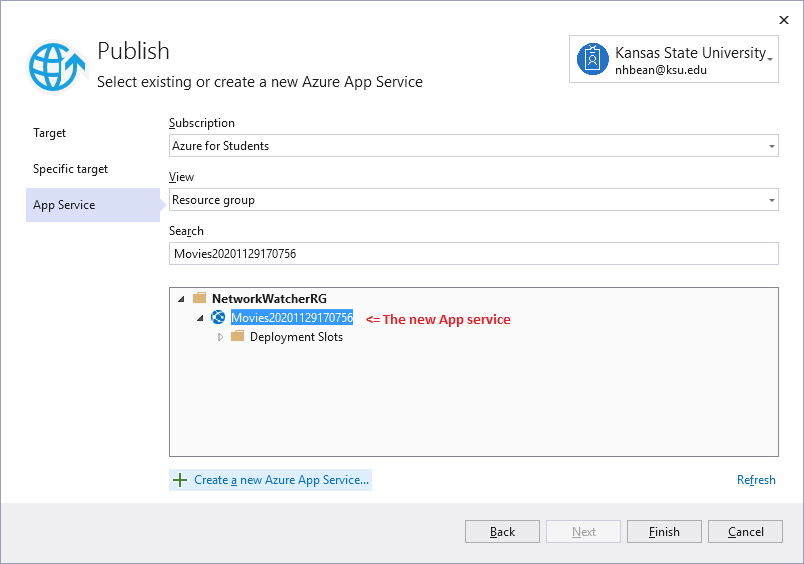
Go ahead and click the Finish button. This will close the wizard and return you to Visual Studio, where the Publish configuration screen is now visible:
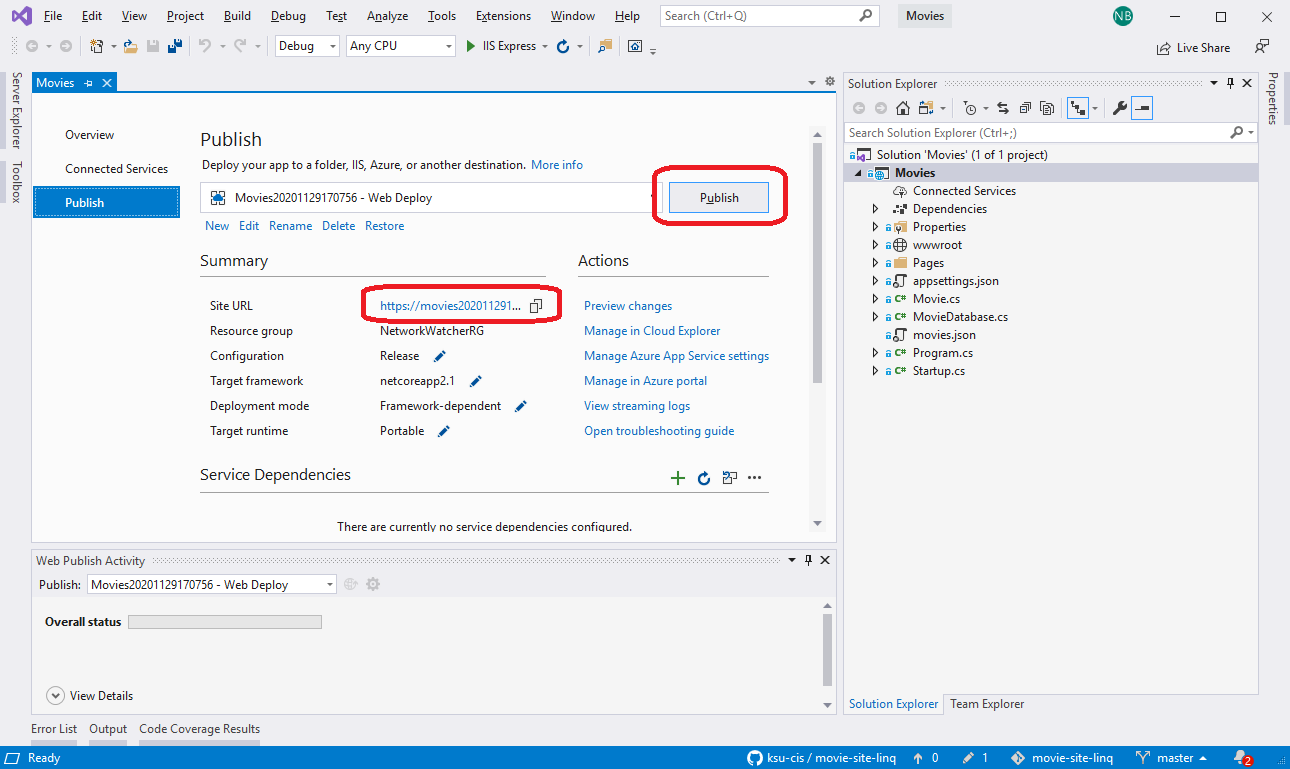
Two elements are important here - the Site URL is the URL where you will be able to visit your published web application (after you publish it), and the Publish button launches the publishing process. Go ahead and click the Publish button. It will take a few minutes, but you’ll see the project is built and deployed to the Azure service. When the process completes, it will open your site in the default web browser (or you can navigate there using the supplied URL).
Your published website will now look something like this:
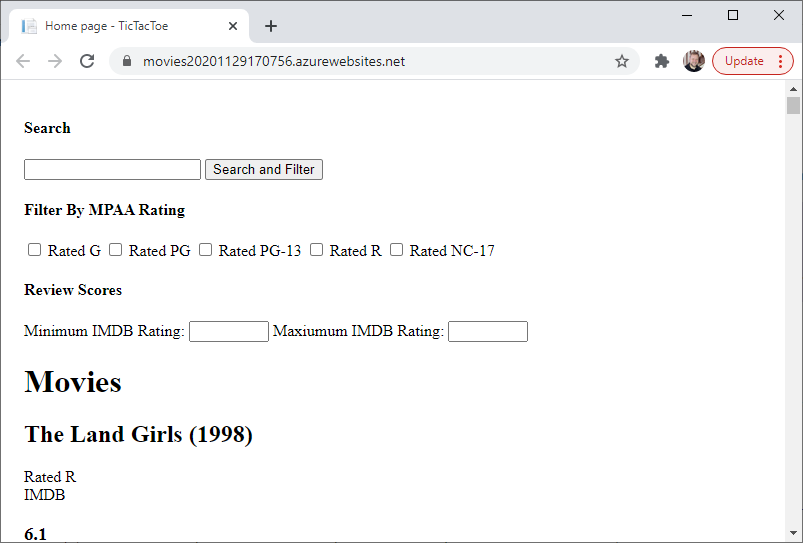
While the website is now loaded and functional, it does not look like our debug build - it seems to be missing all of our styles! If we inspect the CSS in the browser development tools, we’ll see that it is loading site.min.css, and this file contains the minified boilerplate CSS from the original site template, but none of the changes we made! If we examine our Layout.csthml template file, we can find the lines where the <link> element for the CSS is defined:
<environment include="Development">
<link rel="stylesheet" href="~/css/site.css" asp-append-version="true" />
</environment>
<environment exclude="Development">
<link rel="stylesheet" href="~/css/site.min.css" asp-append-version="true" />
</environment>Notice the use of the ASP.NET-specific <environment> element? This conditionally includes its children based on the environment the web server is running in. Debug mode corresponds to our “Development” environment, so in debug we are including site.css. However, when we run it in “Production” mode, i.e. in our Azure service, we’re instead using site.min.css. This is intended to be a minified and bundled version of site.css. Minification is a transpiling process where we strip out unnecessary content, i.e. whitespace and comments. Bundling refers to gathering multiple files - i.e. multiple CSS files, and combining them into a single file (this is helpful if we like to keep our CSS rules separated according to what pages they correspond to).
The issue is that the site.min.css file is not currently being updated when we build our project - instead we’re still using the example file that came with the project template. We’ll need to install and configure a NuGet package within the Movie project to enable this extra building step. You can read more about bundling and minification within ASP.NET Core here.
Start by selecting Tools > NuGet Package Manager > Manage Nuget Packages for Solution... from the Tools menu:
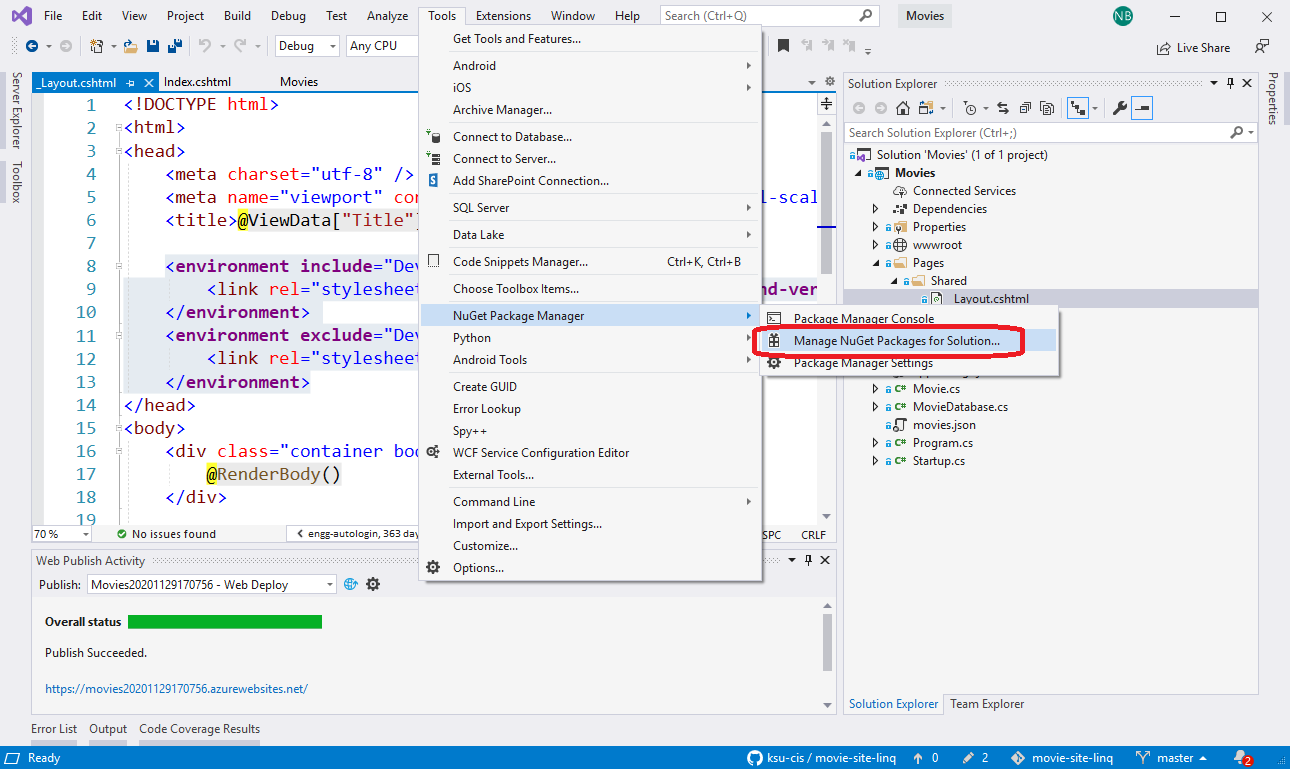
This loads the NuGet Package Manager, which allows us to install additional components into our project. By default it starts with the “Installed” tab, which shows which packages are currently installed. Not surprisingly, we have several Microsoft.NETCore packages - these contain the library code for .NETCore and for procesing Razor pages. We also have a third-party library, Newtonsoft.Json, which is used to parse the JSON database file. We’ll want to install a new package, so select the “Browse” tab:
Then type into the search box “BuildBundlerMinifier”. The corresponding package should show up in the results below. This tool will add the bundling and minification step to the build process of Visual Studio. Clicking on the project will open a checklist allowing you to choose which projects you want to install the package into. Check the box next to the Movies project, and then click the Install button.
Image missing
YOu will need to click Ok in the confirmation dialog, and then the package will be installed. Visual Studio will report that the bundleconfig.json files does not exist. This file configures the new package to create the minified bundle file - we’ll need to add it. It should be created at the root of the Move project, and it consists of a simple JSON structure:
[
{
"outputFileName": "wwwroot/css/site.min.css",
"inputFiles": [
"wwwroot/css/site.css"
]
}
]The "outputFileName" is the name of the file we want to write to (in this case, _site.min.css), and the "inputFiles" is an array containing file names of all the files we want to bundle (in this case, site.css). If we had additional CSS files in our project, we could also list those here as well, and all of the listed files would be combined into the single output file.
We can bundle and minify Javascript files the same way, by adding a second JSON object defining the "outputFileName" for the minified and bundled Javascript file (which we conventionally give the extension .min.js), and an "inputFiles" array consisting of all the JavaScript files we want to bundle.
With this change, now whenever we build our project, we will also rebuild the minified site.min.css file. Click the Publish button in the Publish screen again, and when the project finishes loading, you’ll now see the CSS rules being applied to your site:
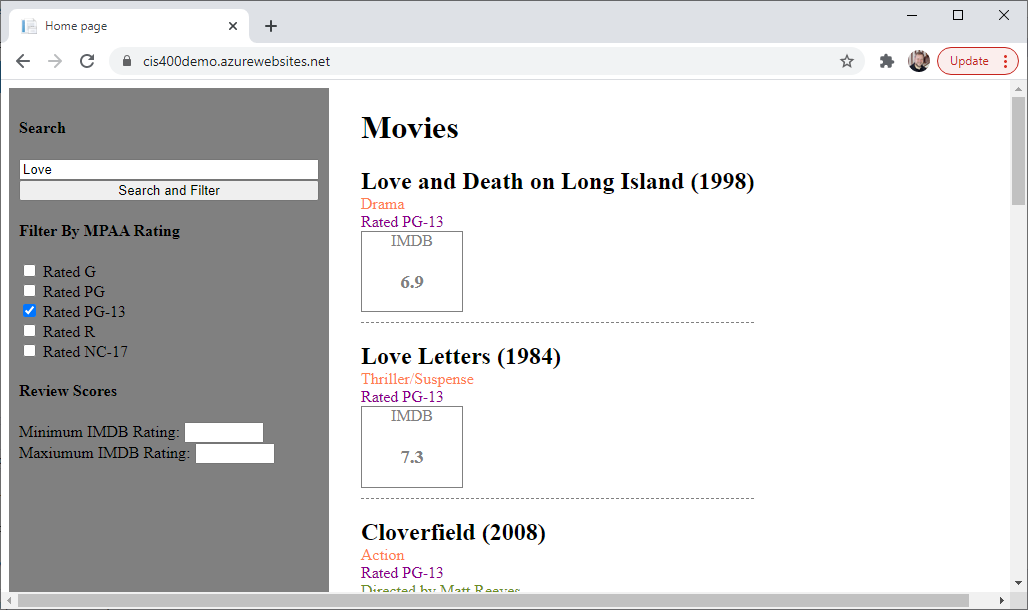
That’s all there is to it! You now have a published ASP.NET Core Web Application that can be accessed from any internet-connected browser!
Turn in the URL to your published site. After it is graded, feel free to take down your Azure service.