Milestone 6 Requirements
Web Only
This textbook was authored for the CIS 400 - Object-Oriented Design, Implementation, and Testing course at Kansas State University. This section describes assignments specific to the Spring 2023 offering of that course.
General requirements:
You will need to follow the style laid out in the C# Coding Conventions
You will need to comment your code using XML comments
You will need to update your UML to reflect your current code
You will need to update your tests to reflect changes to your Data project
Assignment requirements:
Refactor the
Orderclass for data binding- Implement the
INotifyPropertyChangedinterface - Implement the
INotifyCollectionChangedinterface - Add
NumberandPlacedAtproperties
- Implement the
Write tests for all changes to the
Orderclass- Test
PropertyChangednotifications - Test
CollectionChangednotifications - Test
Numberproperty - Test
Dateproperty
- Test
Data bind the
OrderSummaryControl- Use data binding to display order details (Number, Date, Subtotal, Tax, Total)
- Use a custom
DataTemplateto display items in the order
Update your UML Class Diagrams for:
- Data Library
- Point of Sale
(You don’t need to create a UML of your test project, though you can if you like)
Purpose:
This assignment is intended to familiarize you with the concept of data binding, especially:
- How it depends on
PropertyChangedandCollectionChangedevents to work. - How data binding is expressed in XAML (the Binding syntax)
- How the
DataContextproperty in WPF controls can be used to share a bound object
Assignment Details
Refactor the Order class for data binding
In order to prepare the Order class to work with data binding, you will need to make the following changes:
Implement INotifyCollectionChanged
As your Order class is a collection, it will need to implement the INotifyCollectionChanged interface to be able to serve as a data source for the ListView in the OrderSummaryControl. You will need to implement the interface and invoke the CollectionChanged event any time an item is added or removed from the order (note this includes when the order’s contents are cleared).
Implement INotifyPropertyChanged
Likewise, your Order class needs to implement the INotifyPropertyChanged interface in order to bind its properties to the OrderSummaryControl. You will need to implement the interface and invoke the PropertyChanged event any time a property of the order changes (i.e. Subtotal, Tax, and Total).
Note that these properties change when 1) items are added or removed from the order.
Add Number and PlacedAt Properties
You will also need to add two new properties to your Order class, Number and PlacedAt.
The Number should be a unique integer identifying an individual order. It should be different for each order you create. An easy way to do this is increment the number each time. Hint - you can leverage a static variable to keep track of the last number used. Once assigned, the Number property should not be changed.
The PlacedAt should be a DateTime corresponding to when the order was started. Like the Number property, it should not change once set. A good strategy to ensure this is to use an init accessor instead of a set, and set the initial values in the Order constructor. Note too, that because these values do not change, you don’t need worry about invoking PropertyChanged for them.
Testing the Refactored Order Class
Once you have made the changes to the Order class, it is a good idea to test them and make sure they work as expected. Your OrderUnitTest class should be expanded with additional test methods to cover the new events and properties.
Testing Your INotifyPropertyChanged Implementation
To verify that you have correctly implemented these properties, you need to write additional tests to check that the property does, indeed trigger the PropertyChanged event when its value changes. The PropertyChange Assertion we discussed in the testing chapter is used for this purpose.
Here is an example testing updating the TaxRate property:
[Fact]
public void ChangingTaxRateShouldNotifyOfPropertyChange()
{
  Order order = new Order();
  Assert.PropertyChanged(order, "TaxRate", ()=>{
    order.TaxRate = 0.15;
  });
}
Info
Remember that calculated properties will change based on the property they are calculated from, and you must also test for these. I.e. changing the TaxRate will not only change the TaxRate property, but it will also cause the value of the Tax property to change, as it is calculated from the Tax property. So you should have a test method to verify that changing the TaxRate notifies that Tax has changed. Likewise, changing the TaxRate also affects the Total, as it is derived from the Tax property.
Additionally, it is important to test that the Order class itself implements the INotifyPropertyChanged interface. This can be accomplished with the IsAssignableFrom<T>(object obj) Type Assertion, i.e.:
public void ShouldImplementINotifyChanged()
{
  Order order = new Order();
  Assert.IsAssignableFrom<INotifyPropertyChanged>(order);
}
Info
You might be wondering why it is important to test for if the class actually implements INotifyPropertyChanged. Property binding only works if the class can be cast to be an instance of INotifyPropertyChanged, so even if you have correctly set up the PropertyChanged event, your GUI will not update unless you have explicitly implemented the interface.
Testing your INotifyCollectionChanged Implementation
You also need to test that you have implemented INotifyCollectionChanged. At a minimum, this should include: 1) a test method to verify that adding a IMenuItem to the Order triggers the CollectionChanged event, 2) a test method to verify that removing an IMenuItem from the Order triggers the CollectionChanged event, and 3) a test method to verify that the Order can be cast into an INotifyCollectionChanged instance.
Tip
You will likely want to closely read the section on Testing Custom Events in the testing chapter. It walks you through how to add custom assertions for testing the CollectionChanged event.
Testing Your New Order Properties
You will also need to test the properties added to your Order. You will want to make sure that:
- The order
Numberproperty updates for each subsequentOrderyou create (i.e. the first should be 1, the second should be 2, the third should be 3, and so on…), - That the
PlacedAtdate and time reflect when the order is created (hint: they don’t have to be an exact match), and - that neither of these properties change when you request them more than once.
Data bind the OrderSummaryControl
You will want to update your placeholders for the order details (the Number, Date, Subtotal, Tax, and Total) to bind to the corresponding properties of the Order class.
In addition, you will want to add a DataTemplate to the ListView in your OrderSummaryControl so that instead of displaying the name of the item, it displays both the name and the price.
Updating your UML
Finally, update your UML to reflect the current state of your Data and PointOfSale projects.
The INotifyPropertyInterface can be added like so:
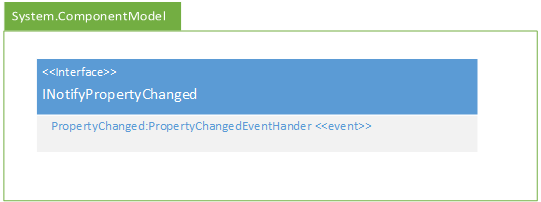
Because this is a realization relationship, you will also need to add the event to your class boxes. It should be placed in the second box (with your properties) and use the event stereotype, i.e.:
+PropertyChanged:PropertyChangedEventHandler <<event>>Also, remember that any event listeners you have defined in your code behind in the PointOfSale project must be represented in your UML. Also, any properties you have given a x:Name attribute in your XAML, i.e.:
<MainWindow>
  <Border x:Name="SwitchBorder">
  </Border>
</MainWindow>
Are public properties and should therefore show up in your UML, i.e.:
+SwitchBorder:Border <<get, set>>You do not need to show components defined in the XAML that do not have a x:Name property.
Note: You do not need to create a UML diagram of your DataTest project, though you can if you want.
Submitting the Assignment
Once your project is complete, merge your feature branch back into the main branch and create a release tagged v0.6.0 with name "Milestone 6". Copy the URL for the release page and submit it to the Canvas assignment.
Grading Rubric
The grading rubric for this assignment will be:
20% Structure Did you implement the structure as laid out in the specification? Are the correct names used for classes, enums, properties, methods, events, etc? Do classes inherit from expected base classes?
20% Documentation Does every class, method, property, and field use the correct XML-style documentation? Does every XML comment tag contain explanatory text?
20% Design Are you appropriately using C# to create reasonably efficient, secure, and usable software? Does your code contain bugs that will cause issues at runtime?
20% Functionality Does the program do what the assignment asks? Do properties return the expected values? Do methods perform the expected actions?
20% UML Diagrams Does your UML diagram reflect the code actually in your release? Are all classes, enums, etc. included? Are associations correctly identified?
Warning
Projects that do not compile will receive an automatic grade of 0.