Milestone 7 Requirements

Web Only

This textbook was authored for the CIS 400 - Object-Oriented Design, Implementation, and Testing course at Kansas State University. This section describes assignments specific to the Spring 2023 offering of that course. Prior semester offerings can be found here. If you are not enrolled in the course, please disregard this section.

In this assignment, we will be modifying the Point of Sale application to allow the user taking an order to modify individual items in an order. This will involve creating more custom controls, implementing data binding on all menu items, and adding the ability to display different controls in our app as needed.

General requirements:

  • You will need to follow the style laid out in the C# Coding Conventions

Assignment requirements:

  • Create custom controls for count, size, etc.

  • Create custom controls for modifying specific menu items

  • Implement IPropertyChanged on all menu items

  • Data bind menu items

  • Refactor Order to pass forward property changes

  • Create/expand your unit tests for any new classes, properties, or methods (at this point, you do not need to test custom WPF control classes)

  • Update UML Diagrams

Purpose:

This assignment is intended to help you gain a greater grasp of using composition to create complex controls from simpler ones, and to gain more practice utilizing data binding.

Creating Custom Controls for Common Properties

Several of your menu items have aspects in common, such as a count of some kind (i.e. FlyingSaucer.StackSize), or a ServingSize. Instead of re-implementing controls for these properties over and over again, you can instead create a simpler control that only sets the count or allows for selection from the enumerated values.

This is both good DRY (do not repeat yourself) practice and simplifies the creation of more complex controls that can be composed using these basic controls. For this milestone, you should create (at a minimum):

  1. A custom control for displaying and updating a count value
  2. A custom control for displaying and updating enumerated values (such as a ServingSize value)

You may create additional controls as you see fit.

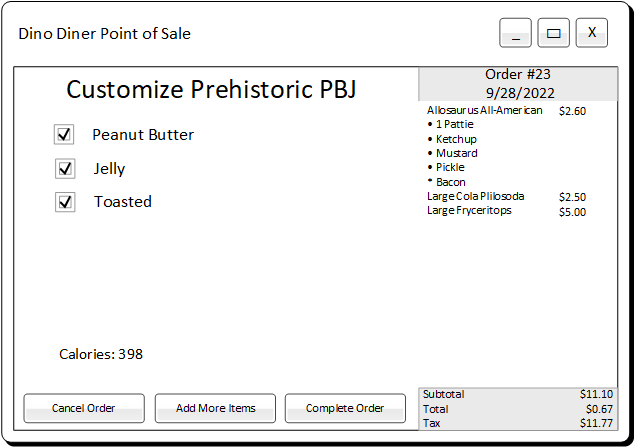
Create Menu Item Customization Controls

Once you have your basic controls created, you should turn your attention to creating controls that will allow the user to modify an item in the order. These should be specific to a menu item, i.e. a FlyingSaucerCustomizationControl should be used to customize a FlyingSaucer. You will need a control for each menu item served at The Flying Saucer.

Your customization controls should:

  • Display the name of the menu item, i.e. “Flying Saucer”.
  • Display and allow changing any boolean properties (i.e. FlyingSaucer.Syrup) - a <CheckBox> or <ToggleButton> is appropriate for this task
  • Display and allow changing of any numeric properties (i.e. FlyingSaucer.StackSize) - you should use a common custom control (as described above) for this.
  • Displaying and allow changing of any enumerated properties (i.e. SaucerFuel.Size) - you should use a common custom control (as described above) for this.
  • Displaying the Calories property - this should not be an editable control, i.e. a <TextBlock> would be appropriate.

Implement IPropertyChanged on all menu items

The INotifyPropertyChanged interface needs to be implemented on every menu item (Note that this can be done through inheritance, so you might only have to implement it in a common base class - though see the warning below for a common gotcha). Implementing the interface requires you to declare an event of type PropertyChangedEventHandler named PropertyChanged. Doing this much satisfies the letter of the INotifyPropertyChanged interface, but not the intent.

To satisfy the intent, you should also invoke any event listeners registered with your PropertyChanged event handler when one of the properties of the object changes, with the details about that change. You must do this for ALL properties that can change in your menu item classes (Hint: you can skip properties like the OuterOmlette.Price, which cannot change).

Tip

Think carefully about the requirement of invoking PropertyChanged when and where the property changes. Consider the Price property of a CrashedSacucer. Where does it change? It (depending on your implementation) has no setter! Remember, it is a calculated value, and its value is dependent on the Size property. So when the Size property changes, so does the Price property! You must account for all the possible places in your class’ code that trigger a property might change when you implement INotifyPropertyChanged.

Warning

An odd side effect of the nature of the .NET platform is that events cannot be invoked from a different class than they are defined in. This includes inherited events. The standard practice to get around this issue is to declare a protected helper method to do the invocation in a base class that also implements the event, i.e.:

protected virtual void OnPropertyChanged(string propertyName)
{
    this.PropertyChanged?.Invoke(this, new PropertyChangedEventArgs(propertyName));
}

This method can then be called in derived classes to indicate a property is changing.

Testing your INotifyPropertyChanged Implementation

To verify that you have correctly implemented these properties, you need to write additional tests to check that the property does, indeed change. The PropertyChange Assertion we discussed in the testing chapter is used for this purpose. These tests should be placed in the unit test class corresponding to the menu item being tested.

Here is an example using the SaucerFuel:

[Theory]
[InlineData(ServingSize.Small, "Size")]
[InlineData(ServingSize.Medium, "Size")]
[InlineData(ServingSize.Large, "Size")]
[InlineData(ServingSize.Small, "Price")]
[InlineData(ServingSize.Medium, "Price")]
[InlineData(ServingSize.Large, "Price")]
[InlineData(ServingSize.Small, "Calories")]
[InlineData(ServingSize.Medium, "Calories")]
[InlineData(ServingSize.Large, "Calories")]
public void ChangingSizeShouldNotifyOfPropertyChanges(ServingSize size, string propertyName)
{
  SaucerFuel saucerFuel = new();
  Assert.PropertyChanged(saucerFuel, propertyName, ()=>{
    saucerFuel.Size = size;
  });
}
Info

Remember that calculated properties will change based on the property they are calculated from, and you must also test for these. I.e. on the sides, you might have a test method PricePropertyChangedWhenSizeChanges(Size size). Alternatively, you could combine multiple property checks into one test, i.e. ShouldNotifyOfPropertyChangedWhenSizeChanges(Size size, string propertyName) (as in the example above) and supply the names of the separate properties through [InlineData].

Additionally, it is important to test that the menu item classes implements the INotifyPropertyChanged interface. This can be accomplished with the IsAssignableFrom<T>(object obj) Type Assertion, i.e.:

public void ShouldImplementINotifyChanged()
{
  SaucerFuel saucerFuel = new();
  Assert.IsAssignableFrom<INotifyPropertyChanged>(saucerFuel);
}

Info

You might be wondering why it is important to test for if the class actually implements INotifyPropertyChanged. Property binding only works if the class can be cast to be an instance of INotifyPropertyChanged, so even if you have correctly set up the PropertyChanged event, your GUI will not update unless you have explicitly implemented the interface.

For the various Menu Items to serve as targets of data binding, you must also implement the INotifyPropertyChanged interface on each of them.

Display bound customization controls when adding or editing an item in the order

When an item is added to an order, or an item already in the order is selected to be customized, you should display a customization control to the user:

Example POS Customization Control Example POS Customization Control

For the control to be usable, you will need to temporarily replace or cover your MenuItemSelectionControl. Two common strategies for accomplishing this are:

  1. Swapping the Child property of a <Border> or other WPF control between a <MenuItemSelectionControl> and the various customization screens you will need, or
  2. Having all controls pre-loaded into the <MainWindow>, but using their Visibility property to hide or show them as needed.
Binding the menu item to the customization control

In either case, when you display one of your item customization controls, you will also want to set its DataContext property to the specific menu item you want to customize. This will apply any changes made through the customization control to the bound menu item object.

Editing or Removing Items from the Order

In addition to allowing the user to customize items as they are added to the order, you need to allow them to edit items previously added. In addition, you will want to provide a mechanism for removing items from the order.

A common approach is to add edit and remove buttons to your <DataTemplate> displayed in the OrderSummaryControl’s <ListView>. Because the DataTemplate used as the ItemTemplate has the individual order item as its DataContext, placing the buttons within the <DataTemplate> means those buttons also have the individual IMenuItem object as their DataContext, while the OrderSummaryControl itself has the Order as its DataContext.

You can leverage this to use the Remove() method of your Order class without needing to pass a lot of variables around. For customization, you’ll also need to display the appropriate customization control, and bind the item to its DataContext.

Update Order properties when Menu Item properties change

Finally, now that your menu items implement IPropertyChanged, you can handle the issue of when a property of an item in an order changes that also affects a property of the Order class. For example, changing the Size of a SaucerFuel changes its price, so the Order containing it should update its own Subtotal, Tax, and Total. Think carefully about how your menu items can communicate this change to the order class that contains them. Hint: we did something very similar in our Data Binding Exercise.

Update Your UML Diagrams

You will need to update your UML diagrams to reflect the changes you have made to the Data and Point of Sale projects. Remember to mark the associations between your Order and its various Menu Item instances.

Submitting the Assignment

Once your project is complete create a release tagged v0.7.0 with name "Milestone 7". Copy the URL for the release page and submit it to the Canvas assignment.

Grading Rubric

The grading rubric for this assignment will be:

15% Structure Did you implement the structure as laid out in the specification? Are the correct names used for classes, enums, properties, methods, events, etc? Do classes inherit from expected base classes?

15% Documentation Does every class, method, property, and field use the correct XML-style documentation? Does every XML comment tag contain explanatory text?

15% Design Are you appropriately using C# to create reasonably efficient, secure, and usable software? Does your code contain bugs that will cause issues at runtime?

15% UML Diagrams Does your UML diagram reflect the code actually in your release? Are all classes, enums, etc. included? Are associations correctly identified?

20% Functionality Does the program do what the assignment asks? Do properties return the expected values? Do methods perform the expected actions?

20% Testing Do you have unit tests for all classes? Do your unit tests cover all the functionality of those classes? Do you have a written test plan for your GUI? Do you have a record of employing the test plan in your release?

Warning

Projects that do not compile will receive an automatic grade of 0.

–>

Subsections of Milestone 7 Requirements

Subsections of Previous Versions

Milestone 7 Requirements (Fall 2022)

Web Only

This textbook was authored for the CIS 400 - Object-Oriented Design, Implementation, and Testing course at Kansas State University. This section describes assignments specific to the Fall 2022 offering of that course.

General requirements:

  • You will need to follow the style laid out in the C# Coding Conventions

  • Implement functionality for a creating and updating an order

Assignment requirements:

  • Implement a base class or interface to provide a common type for all of your menu items

  • Implement a class Order representing an order

  • Write unit tests for the Order class

  • Add the functionality for creating, updating, and displaying the order in the Point of Sale GUI

  • Create automated tests for your GUI

  • Update UML Diagrams

Purpose:

This assignment is intended to help you gain a greater grasp of creating complex objects and collections, data binding, customizing controls, and more complex relationships between objects. It also revisits testing in the context of GUI applications.

A Common Type for your Menu Items

An order needs to hold all kinds of items - drinks, entrees, sides, etc. To put all of those different types into a collection, ideally they will share a common type. That could be done through an interface they all inherit (i.e. IMenuItem) or a common base class (MenuItem). You can choose which strategy you prefer, but you need to write one of these, and make sure that all of your menu items can be treated as it.

You’ll also want to have that base class or interface define all the properties that all menu items have in common; namely a Name, Price, and Calories. You’ll also want to add a new property, SpecialInstructions, of type ICollection<String> (this can be satisfied by a List<string> or string[]) that will be used to indicate when a change from the normal way of preparing the menu item has been asked for. For example, if a PrehistoricPBJ is ordered without peanut butter, it should contain “Hold Peanut Butter”. If a AllosaurusAllAmerican is ordered with american cheese and bacon, it should contain “Add American Cheese” and “Add Bacon”.

You will need to refactor your menu item classes to support these additional requirements, and add the corresponding unit tests.

Implement functionality for the Order class

In the Data project, create an Order class to represent an order, which is a collection of IMenuItems. You will need to create public Add(IMenuItem item) and Remove(IMenuItem item) methods, which add or remove IMenuItems respectively. Additionally, you should implement a getter and setter for SalesTaxRate (a decimal, default 0.09) and getter-only properties for Subtotal (a decimal), Tax (a decimal), and Total (a decimal). The Subtotal is the total price for all items in the order, the Tax is the Subtotal multiplied by the SalesTaxRate, and Total is the sum of the Subtotal and Tax. It should also provide a property Calories which is a unsigned integer, and the sum of all the calories of the items in the order.

Additionally, the Order should have an identifying Number getter property, which is unique to each order. An easy way to ensure uniqueness is to have a private static field, i.e. nextOrderNumber, which is initialized to 1. In the Order constructor, set this order’s Number property to nextOrderNumber and then increment nextOrderNumber. When your next order is created, it will use the incremented value, and increment it again. Technically this only ensures a single Point of Sale terminal is using unique order numbers (as multiple terminals will have duplicate values), but it is sufficient for now.

Also, the Order should have a get-only DateTime property PlacedAt identifying the date and time the order was placed.

Finally, this class should implement the ICollection, INotifyCollectionChanged, and INotifyPropertyChanged interfaces. Each of these requires you to add specific properties and methods to the Order class. This also means triggering a host of events when specific actions are taken, i.e.:

  • Adding an IMenuItem to the Order should trigger:
    1. A CollectionChanged event noting the addition of a new item
    2. A PropertyChanged event noting the Subtotal property has changed
    3. A PropertyChanged event noting the Tax property has changed
    4. A PropertyChanged event noting the Total property has changed
    5. A PropertyChanged event noting the Calories property has changed
  • Removing an IMenuItem from the Order should trigger:
    1. A CollectionChanged event noting the removal of the item
    2. A PropertyChanged event noting the Subtotal property has changed
    3. A PropertyChanged event noting the Tax property has changed
    4. A PropertyChanged event noting the Total property has changed
    5. A PropertyChanged event noting the Calories property has changed
  • Changing an item already in the order should trigger:
    1. PropertyChanged events for Subtotal, Tax, and Total when the item’s Price changes
    2. A PropertyChanged event for Calories when the item’s Calories changes

You may either write your collection class from scratch, use a private collection field and expose some of its methods through pass-through methods, or inherit from one of the existing collections and provide the extra functionality (such as ObservableCollection). Each of these approaches has its strengths and drawbacks.

Tip

Approaches Writing a Collection

As mentioned, there are three primary strategies you might use to write your Order class. Regardless of which you choose, you will need to implement the ICollection, INotifyCollectionChanged, and INotifyPropertyChanged interfaces.

First, you could write it from scratch much as you did in CIS 300 (you can review the textbook here). In this approach, you need to provide your own Enumerator, and must provide implementations for all of the methods required by your interfaces.

Second, you can use a private variable and pass-through methods. What that means is you have a private field that is a collection (i.e. a List) and your methods like GetEnumerator() call its methods, i.e.:

  private List<IMenuItem> _items = new List<IMenuItem>();

  public IEnumerator<IMenuItem> GetEnumerator()
  {
    return _items.GetEnumerator();
  }

This approach means you have to write out each of the interface methods, but you have a lot of control about adding custom additional functionality (like triggering those PropertyChanged events).

Third, you can inherit from a collection class, which means you don’t have to write the collection methods at all! The ObservableCollection already implements all three required interfaces. However, its Add() and Remove() methods are not declared virtual - so you cannot override them to handle your PropertyChanged events. You’ll need to do this in a different way (hint - you can attach an event handler to your own CollectionChanged event).

Warning

When implementing the INotifyCollectionChanged interface, you must supply a NotifyCollectionChangedEventArgs object that describes the change to the collection. This class has multiple constructors, and you must select the correct one, or your code will cause a runtime error when the event is invoked.

The possible events are represented by the NotifyCollectionChangedAction enumeration, and are:

  • NotifyCollectionChangedAction.Add - one or more items were added to the collection
  • NotifyCollectionChangedAction.Move - an item was moved in the collection
  • NotifyCollectionChangedAction.Remove - one or more items were removed from the collection
  • NotifyCollectionChangedAction.Replace - an item was replaced in the collection
  • NotifyCollectionChangedAction.Reset - drastic changes were made to the collection

When representing an add action, you must use the two-parameter constructor and supply the item being added as the second argument.

When representing an remove action, you must use the three-parameter constructor. The second argument is the item to be removed, and the third is the index of the item in the collection before it is removed.

Order Unit Tests

Additionally, you should write unit tests to verify all of the expected functionality:

  • Adding an item to the Order results in that item being included in the order
  • Removing an item from the Order results in that item being removed from the order
  • The order implements the INotifyCollectionChanged and INotifyPropertyChanged interfaces
  • That adding an an item triggers a CollectionChanged event
  • That removing an item triggers a CollectionChanged event
  • That and that each of the CollectionChanged and PropertyChanged events described above occur in the described circumstances.
Info

Currently XUnit does not have an assertion that can be used with the CollectionChanged event. You will have to write your own - see the section on testing custom events.

Integrate the Order into the Point of Sale Project

The Point of Sale GUI’s primary role is to build Order objects to match the customers’ requests. Thus, you will want to integrate your new Order class into the GUI to provide this functionality. The easiest way to accomplish this is to set your Order as the DataContext of one of your WPF elements - ideally towards the top of the tree. Then, all of the descendant elements will also have it as their DataContext.

You should replace this Order object any time the “New Order” or “Cancel Order” button (depending on your implementation) are clicked.

Clicking on one of the “Add to Order” buttons you implemented should add an instance of the associated order item to the current Order object.

The contents of the current Order should be displayed prominently in your GUI, for example, by using a <ListView>. You will want to display:

  • The Menu Item’s name
  • The Menu Item’s price
  • The Menu Item’s special instructions

Hint: You can add a StringFormat attribute to a binding to display it as currency, i.e.: <TextBlock Text={Binding Path=Total, StringFormat={}{0:c}}>. This approach can also be used to add bullets or extra text to a bound string before it is displayed. See the docs for more details.

In addition, you will need to show:

  • The Order’s Number property, formatted for readability, i.e. “Order #2”
  • The Order’s PlacedDate property, formatted for readability, i.e. “3/20/2021 10:32 pm”
  • The Order’s Subtotal property, formatted for readability, i.e. “Subtotal: $10.00”
  • The Order’s Tax property, formatted for readability, i.e. “Tax: $1.20”
  • The Order’s Total property, formatted for readability, i.e. “Total: $11.20”

One possible layout appears below:

Suggested Order control layout Suggested Order control layout

The displayed order should update all of this displayed information as it changes. If you use data binding for binding the Order properties, and have implemented the CollectionChanged and PropertyChanged events as described above, this should happen automatically, with no further code required from you.

You should also allow the user to select an item already in the order display to customize, i.e. if they have a Prehistoric PB&J and a Cretaceous Coffee in the Order, and then need to change the PeanutButter property for the PrehistoricPBJ instance, they should be able to do so. There several approaches you might consider:

  1. Putting the order items in a <ListView> and using its OnSelectionChanged event to swap to the customization screen. You can then either: a. Listen for the ListView.SelectionChanged routed event and use the SelectedChangedEventArgs.SelectedItem for the item to customize, or b. Setting the List’s IsSynchronizedWithCurrentItem property to true allows you to bind your customization screens to the CurrentItem Path of the Order, i.e. the item just selected in the <ListView>, or
  2. Adding an edit button to the item in the <ListView>, following the same strategy detailed for the “Remove” button (below)

Finally, you should provide a means for removing an item from the Order. This is most commonly accomplished by adding a button to the ListBoxItem data template displaying the items in the <ListBox>, so that there is a delete button for each row in the order. Another approach would be to have a single “Remove Selected Item from Order” which removes the item currently selected in the <ListBox>. A third approach would be to put a “Remove from Order” button in the customization screen, that when clicked removes the item from the order an switches back to the menu item selection screen. Other approaches are possible, but should be easy for the user to intuit.

Update Your UML Diagrams

You will need to update your UML diagrams to reflect the changes you have made to the Data and Point of Sale projects. Remember to mark the associations between your Order and its various Menu Item instances.

Submitting the Assignment

Once your project is complete create a release tagged v0.7.0 with name "Milestone 7". Copy the URL for the release page and submit it to the Canvas assignment.

Grading Rubric

The grading rubric for this assignment will be:

15% Structure Did you implement the structure as laid out in the specification? Are the correct names used for classes, enums, properties, methods, events, etc? Do classes inherit from expected base classes?

15% Documentation Does every class, method, property, and field use the correct XML-style documentation? Does every XML comment tag contain explanatory text?

15% Design Are you appropriately using C# to create reasonably efficient, secure, and usable software? Does your code contain bugs that will cause issues at runtime?

15% UML Diagrams Does your UML diagram reflect the code actually in your release? Are all classes, enums, etc. included? Are associations correctly identified?

20% Functionality Does the program do what the assignment asks? Do properties return the expected values? Do methods perform the expected actions?

20% Testing Do you have unit tests for all classes? Do your unit tests cover all the functionality of those classes?

Warning

Projects that do not compile will receive an automatic grade of 0.

Milestone 7 Requirements (Spring 2022)

Web Only

This textbook was authored for the CIS 400 - Object-Oriented Design, Implementation, and Testing course at Kansas State University. This section describes assignments specific to the Fall 2022 offering of that course. If you are not enrolled in the course, please disregard this section.

General requirements:

  • You will need to follow the style laid out in the C# Coding Conventions

  • Implement functionality for a creating and updating an order

Assignment requirements:

  • Implement a class representing an order

  • Write unit tests for the order

  • Add the functionality for creating, updating, and displaying the order to the point of sale

  • Create automated tests and a testing plan for your GUI

  • Update UML Diagrams

Purpose:

This assignment is intended to help you gain a greater grasp of creating complex objects and collections, data binding, customizing controls, and more complex relationships between objects. It also revisits testing in the context of GUI applications.

Implement functionality for the Order class

In the Data project, create an Order class to represent an order, which is a collection of IMenuItems. You will need to create public Add(IMenuItem item) and Remove(IMenuItem item) methods, which add or remove IMenuItems respectively. Additionally, you should implement a getter and setter for SalesTaxRate (a decimal, default 0.09) and getter-only properties for Subtotal (a decimal), Tax (a decimal), and Total (a decimal). The Subtotal is the total price for all items in the order, the Tax is the Subtotal multiplied by the SalesTaxRate, and Total is the sum of the Subtotal and Tax. It should also provide a property Calories which is a unsigned integer, and the sum of all the calories of the items in the order.

Additionally, the Order should have an identifying Number getter property, which is unique to each order. An easy way to ensure uniqueness is to have a private static field, i.e. nextOrderNumber, which is initialized to 1. In the Order constructor, set this order’s Number property to nextOrderNumber and then increment nextOrderNumber. When your next order is created, it will use the incremented value, and increment it again. Technically this only ensures a single Point of Sale terminal is using unique order numbers (as multiple terminals will have duplicate values), but it is sufficient for now.

Also, the Order should have a get-only DateTime property PlacedAt identifying the date and time the order was placed.

Finally, this class should implement the ICollection, INotifyCollectionChanged, and INotifyPropertyChanged interfaces. Each of these requires you to add specific properties and methods to the Order class. This also means triggering a host of events when specific actions are taken, i.e.:

  • Adding an IMenuItem to the Order should trigger:
    1. A CollectionChanged event noting the addition of a new item
    2. A PropertyChanged event noting the Subtotal property has changed
    3. A PropertyChanged event noting the Tax property has changed
    4. A PropertyChanged event noting the Total property has changed
    5. A PropertyChanged event noting the Calories property has changed
  • Removing an IMenuItem from the Order should trigger:
    1. A CollectionChanged event noting the removal of the item
    2. A PropertyChanged event noting the Subtotal property has changed
    3. A PropertyChanged event noting the Tax property has changed
    4. A PropertyChanged event noting the Total property has changed
    5. A PropertyChanged event noting the Calories property has changed
  • Changing an item already in the order should trigger:
    1. PropertyChanged events for Subtotal, Tax, and Total when the item’s Price changes
    2. A PropertyChanged event for Calories when the item’s Calories changes

You may either write your collection class from scratch, or inherit from one of the existing collections and provide the extra functionality (such as ObservableCollection). Each of these approaches has its strengths and drawbacks.

Warning

When implementing the INotifyCollectionChanged interface, you must supply a NotifyCollectionChangedEventArgs object that describes the change to the collection. This class has multiple constructors, and you must select the correct one, or your code will cause a runtime error when the event is invoked.

The possible events are represented by the NotifyCollectionChangedAction enumeration, and are:

  • NotifyCollectionChangedAction.Add - one or more items were added to the collection
  • NotifyCollectionChangedAction.Move - an item was moved in the collection
  • NotifyCollectionChangedAction.Remove - one or more items were removed from the collection
  • NotifyCollectionChangedAction.Replace - an item was replaced in the collection
  • NotifyCollectionChangedAction.Reset - drastic changes were made to the collection

When representing an add action, you must use the two-parameter constructor and supply the item being added as the second argument.

When representing an remove action, you must use the three-parameter constructor. The second argument is the item to be removed, and the third is the index of the item in the collection before it is removed.

Order Unit Tests

Additionally, you should write unit tests to verify all of the expected functionality:

  • Adding an item to the Order results in that item being included in the order
  • Removing an item from the Order results in that item being removed from the order
  • The order implements the INotifyCollectionChanged and INotifyPropertyChanged interfaces
  • That adding an an item triggers a CollectionChanged event
  • That removing an item triggers a CollectionChanged event
  • That and that each of the CollectionChanged and PropertyChanged events described above occur in the described circumstances.
Info

Currently XUnit does not have an assertion that can be used with the CollectionChanged event, so we are not requiring that it be tested at the moment. That it works will be covered by your manual GUI tests.

Integrate the Order into the Point of Sale Project

The Point of Sale GUI’s primary role is to build Order objects to match the customers’ requests. Thus, you will want to integrate your new Order class into the GUI to provide this functionality. The easiest way to accomplish this is to set your Order as the DataContext of one of your WPF elements - ideally towards the top of the tree. Then, all of the descendant elements will also have it as their DataContext.

You should replace this Order object any time the “New Order” or “Cancel Order” button (depending on your implementation) are clicked.

Clicking on one of the “Add to Order” buttons you implemented should add an instance of the associated order item to the current Order object.

The contents of the current Order should be displayed prominently in your GUI, for example, by using a <ListView>. You will want to display:

  • The IMenuItem’s name (what you get when you invoke ToString() upon it)
  • The IMenuItem’s price
  • The IMenuItem’s special instructions

Hint: You can add a StringFormat attribute to a binding to display it as currency, i.e.: <TextBlock Text={Binding Path=Total, StringFormat={}{0:c}}>. This approach can also be used to add bullets or extra text to a bound string before it is displayed. See the docs for more details.

In addition, you will need to show:

  • The Order’s Number property, formatted for readability, i.e. “Order #2”
  • The Order’s PlacedDate property, formatted for readability, i.e. “3/20/2021 10:32 pm”
  • The Order’s Subtotal property, formatted for readability, i.e. “Subtotal: $10.00”
  • The Order’s Tax property, formatted for readability, i.e. “Tax: $1.20”
  • The Order’s Total property, formatted for readability, i.e. “Total: $11.20”

One possible layout appears below:

Suggested Order control layout Suggested Order control layout

The displayed order should update all of this displayed information as it changes. If you use data binding for binding the Order properties, and have implemented the CollectionChanged and PropertyChanged events as described above, this should happen automatically, with no further code required from you.

You should also allow the user to select an item already in the order display to customize, i.e. if they have a Apple Fritters and a Fried Pie in the Order, and then need to change the Glazed property for the Apple Fritters, they should be able to do so. There several approaches you might consider:

  1. Putting the order items in a <ListView> and using its OnSelectionChanged event to swap to the customization screen. You can then either: a. Listen for the ListView.SelectionChanged routed event and use the SelectedChangedEventArgs.SelectedItem for the item to customize, or b. Setting the List’s IsSynchronizedWithCurrentItem property to true allows you to bind your customization screens to the CurrentItem Path of the Order, i.e. the item just selected in the <ListView>, or
  2. Adding an edit button to the item in the <ListView>, following the same strategy detailed for the “Remove” button (below)

Finally, you should provide a means for removing an item from the Order. This is most commonly accomplished by adding a button to the ListBoxItem data template displaying the items in the <ListBox>, so that there is a delete button for each row in the order. Another approach would be to have a single “Remove Selected Item from Order” which removes the item currently selected in the <ListBox>. A third approach would be to put a “Remove from Order” button in the customization screen, that when clicked removes the item from the order an switches back to the menu item selection screen. Other approaches are possible, but should be easy for the user to intuit.

Writing Tests for your GUI

Graphical user interfaces are notoriously difficult to test in an automated fashion. For this reason, most software developers fall back on manual testing routines. To ensure that these have the same rigor as automated tests, a test plan document is written that tells a tester step-by-step what they should do in the interface, and what the expected result should be.

You will need to write one for your GUI that takes the user through adding each menu item to the order, and changing each of hte the menu item customization options. At each step, you should call out for the user what the expected values appearing in the various GUI controls should be - especially the information in the order. The testing plan should be saved in an editable format (Word is recommended) in the documentation folder of your project, and committed to GitHub with your source files.

In addition to writing your test plan, you must use it every milestone, and submit your records of its results. A common approach for this is to create a spreadsheet with the first column labeling each test from the test plan, and each subsequent column representing an instance of working through the test plan and recording results. This can be a simple “pass” for passing tests, but should have detailed notes of a failure (and you should go back and fix that issue, then re-run all your GUI tests).

A second strategy for testing GUIs in WPF is the MVVM (Model-View-ViewModel) architecture encouraged by WPF. In this architecture, the GUI becomes little more than a thin layer for displaying and updating data-bound values. If your control is doing significant logic, this instead is pushed to a ModelView class, which can be unit tested like any other non-GUI class. If your controls contain significant logic (i.e. calculations, or creating the WPF controls programmatically), you should consider refactoring to adopt this approach.

Update Your UML Diagrams

You will need to update your UML diagrams to reflect the changes you have made to the Data and Point of Sale projects. Remember to mark the associations between your Order and its various IMenuItem instances.

Submitting the Assignment

Once your project is complete create a release tagged v0.7.0 with name "Milestone 7". Copy the URL for the release page and submit it to the Canvas assignment.

Grading Rubric

The grading rubric for this assignment will be:

15% Structure Did you implement the structure as laid out in the specification? Are the correct names used for classes, enums, properties, methods, events, etc? Do classes inherit from expected base classes?

15% Documentation Does every class, method, property, and field use the correct XML-style documentation? Does every XML comment tag contain explanatory text?

15% Design Are you appropriately using C# to create reasonably efficient, secure, and usable software? Does your code contain bugs that will cause issues at runtime?

15% UML Diagrams Does your UML diagram reflect the code actually in your release? Are all classes, enums, etc. included? Are associations correctly identified?

20% Functionality Does the program do what the assignment asks? Do properties return the expected values? Do methods perform the expected actions?

20% Testing Do you have unit tests for all classes? Do your unit tests cover all the functionality of those classes? Do you have a written test plan for your GUI? Do you have a record of employing the test plan in your release?

Warning

Projects that do not compile will receive an automatic grade of 0.