Milestone 7 Requirements (Fall 2022)
Web Only
This textbook was authored for the CIS 400 - Object-Oriented Design, Implementation, and Testing course at Kansas State University. This section describes assignments specific to the Fall 2022 offering of that course.
General requirements:
You will need to follow the style laid out in the C# Coding Conventions
Implement functionality for a creating and updating an order
Assignment requirements:
Implement a base class or interface to provide a common type for all of your menu items
Implement a class
Orderrepresenting an orderWrite unit tests for the
OrderclassAdd the functionality for creating, updating, and displaying the order in the Point of Sale GUI
Create automated tests for your GUI
Update UML Diagrams
Purpose:
This assignment is intended to help you gain a greater grasp of creating complex objects and collections, data binding, customizing controls, and more complex relationships between objects. It also revisits testing in the context of GUI applications.
A Common Type for your Menu Items
An order needs to hold all kinds of items - drinks, entrees, sides, etc. To put all of those different types into a collection, ideally they will share a common type. That could be done through an interface they all inherit (i.e. IMenuItem) or a common base class (MenuItem). You can choose which strategy you prefer, but you need to write one of these, and make sure that all of your menu items can be treated as it.
You’ll also want to have that base class or interface define all the properties that all menu items have in common; namely a Name, Price, and Calories. You’ll also want to add a new property, SpecialInstructions, of type ICollection<String> (this can be satisfied by a List<string> or string[]) that will be used to indicate when a change from the normal way of preparing the menu item has been asked for. For example, if a PrehistoricPBJ is ordered without peanut butter, it should contain “Hold Peanut Butter”. If a AllosaurusAllAmerican is ordered with american cheese and bacon, it should contain “Add American Cheese” and “Add Bacon”.
You will need to refactor your menu item classes to support these additional requirements, and add the corresponding unit tests.
Implement functionality for the Order class
In the Data project, create an Order class to represent an order, which is a collection of IMenuItems. You will need to create public Add(IMenuItem item) and Remove(IMenuItem item) methods, which add or remove IMenuItems respectively. Additionally, you should implement a getter and setter for SalesTaxRate (a decimal, default 0.09) and getter-only properties for Subtotal (a decimal), Tax (a decimal), and Total (a decimal). The Subtotal is the total price for all items in the order, the Tax is the Subtotal multiplied by the SalesTaxRate, and Total is the sum of the Subtotal and Tax. It should also provide a property Calories which is a unsigned integer, and the sum of all the calories of the items in the order.
Additionally, the Order should have an identifying Number getter property, which is unique to each order. An easy way to ensure uniqueness is to have a private static field, i.e. nextOrderNumber, which is initialized to 1. In the Order constructor, set this order’s Number property to nextOrderNumber and then increment nextOrderNumber. When your next order is created, it will use the incremented value, and increment it again. Technically this only ensures a single Point of Sale terminal is using unique order numbers (as multiple terminals will have duplicate values), but it is sufficient for now.
Also, the Order should have a get-only DateTime property PlacedAt identifying the date and time the order was placed.
Finally, this class should implement the ICollection, INotifyCollectionChanged, and INotifyPropertyChanged interfaces. Each of these requires you to add specific properties and methods to the Order class. This also means triggering a host of events when specific actions are taken, i.e.:
- Adding an
IMenuItemto theOrdershould trigger:- A
CollectionChangedevent noting the addition of a new item - A
PropertyChangedevent noting theSubtotalproperty has changed - A
PropertyChangedevent noting theTaxproperty has changed - A
PropertyChangedevent noting theTotalproperty has changed - A
PropertyChangedevent noting theCaloriesproperty has changed
- A
- Removing an
IMenuItemfrom theOrdershould trigger:- A
CollectionChangedevent noting the removal of the item - A
PropertyChangedevent noting theSubtotalproperty has changed - A
PropertyChangedevent noting theTaxproperty has changed - A
PropertyChangedevent noting theTotalproperty has changed - A
PropertyChangedevent noting theCaloriesproperty has changed
- A
- Changing an item already in the order should trigger:
PropertyChangedevents forSubtotal,Tax, andTotalwhen the item’sPricechanges- A
PropertyChangedevent forCalorieswhen the item’sCalorieschanges
You may either write your collection class from scratch, use a private collection field and expose some of its methods through pass-through methods, or inherit from one of the existing collections and provide the extra functionality (such as ObservableCollection). Each of these approaches has its strengths and drawbacks.
Tip
Approaches Writing a Collection
As mentioned, there are three primary strategies you might use to write your Order class. Regardless of which you choose, you will need to implement the ICollection, INotifyCollectionChanged, and INotifyPropertyChanged interfaces.
First, you could write it from scratch much as you did in CIS 300 (you can review the textbook here). In this approach, you need to provide your own Enumerator, and must provide implementations for all of the methods required by your interfaces.
Second, you can use a private variable and pass-through methods. What that means is you have a private field that is a collection (i.e. a List) and your methods like GetEnumerator() call its methods, i.e.:
  private List<IMenuItem> _items = new List<IMenuItem>();

  public IEnumerator<IMenuItem> GetEnumerator()
  {
    return _items.GetEnumerator();
  }
This approach means you have to write out each of the interface methods, but you have a lot of control about adding custom additional functionality (like triggering those PropertyChanged events).
Third, you can inherit from a collection class, which means you don’t have to write the collection methods at all! The ObservableCollection already implements all three required interfaces. However, its Add() and Remove() methods are not declared virtual - so you cannot override them to handle your PropertyChanged events. You’ll need to do this in a different way (hint - you can attach an event handler to your own CollectionChanged event).
Warning
When implementing the INotifyCollectionChanged interface, you must supply a NotifyCollectionChangedEventArgs object that describes the change to the collection. This class has multiple constructors, and you must select the correct one, or your code will cause a runtime error when the event is invoked.
The possible events are represented by the NotifyCollectionChangedAction enumeration, and are:
NotifyCollectionChangedAction.Add- one or more items were added to the collectionNotifyCollectionChangedAction.Move- an item was moved in the collectionNotifyCollectionChangedAction.Remove- one or more items were removed from the collectionNotifyCollectionChangedAction.Replace- an item was replaced in the collectionNotifyCollectionChangedAction.Reset- drastic changes were made to the collection
When representing an add action, you must use the two-parameter constructor and supply the item being added as the second argument.
When representing an remove action, you must use the three-parameter constructor. The second argument is the item to be removed, and the third is the index of the item in the collection before it is removed.
Order Unit Tests
Additionally, you should write unit tests to verify all of the expected functionality:
- Adding an item to the
Orderresults in that item being included in the order - Removing an item from the
Orderresults in that item being removed from the order - The order implements the
INotifyCollectionChangedandINotifyPropertyChangedinterfaces - That adding an an item triggers a
CollectionChangedevent - That removing an item triggers a
CollectionChangedevent - That and that each of the
CollectionChangedandPropertyChangedevents described above occur in the described circumstances.
Info
Currently XUnit does not have an assertion that can be used with the CollectionChanged event. You will have to write your own - see the section on testing custom events.
Integrate the Order into the Point of Sale Project
The Point of Sale GUI’s primary role is to build Order objects to match the customers’ requests. Thus, you will want to integrate your new Order class into the GUI to provide this functionality. The easiest way to accomplish this is to set your Order as the DataContext of one of your WPF elements - ideally towards the top of the tree. Then, all of the descendant elements will also have it as their DataContext.
You should replace this Order object any time the “New Order” or “Cancel Order” button (depending on your implementation) are clicked.
Clicking on one of the “Add to Order” buttons you implemented should add an instance of the associated order item to the current Order object.
The contents of the current Order should be displayed prominently in your GUI, for example, by using a <ListView>. You will want to display:
- The Menu Item’s name
- The Menu Item’s price
- The Menu Item’s special instructions
Hint: You can add a StringFormat attribute to a binding to display it as currency, i.e.: <TextBlock Text={Binding Path=Total, StringFormat={}{0:c}}>. This approach can also be used to add bullets or extra text to a bound string before it is displayed. See the docs for more details.
In addition, you will need to show:
- The
Order’sNumberproperty, formatted for readability, i.e. “Order #2” - The
Order’sPlacedDateproperty, formatted for readability, i.e. “3/20/2021 10:32 pm” - The
Order’sSubtotalproperty, formatted for readability, i.e. “Subtotal: $10.00” - The
Order’sTaxproperty, formatted for readability, i.e. “Tax: $1.20” - The
Order’sTotalproperty, formatted for readability, i.e. “Total: $11.20”
One possible layout appears below:
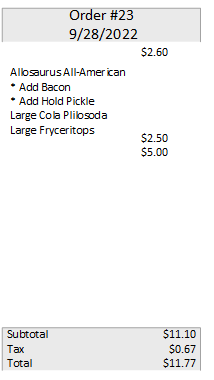
The displayed order should update all of this displayed information as it changes. If you use data binding for binding the Order properties, and have implemented the CollectionChanged and PropertyChanged events as described above, this should happen automatically, with no further code required from you.
You should also allow the user to select an item already in the order display to customize, i.e. if they have a Prehistoric PB&J and a Cretaceous Coffee in the Order, and then need to change the PeanutButter property for the PrehistoricPBJ instance, they should be able to do so. There several approaches you might consider:
- Putting the order items in a
<ListView>and using itsOnSelectionChangedevent to swap to the customization screen. You can then either: a. Listen for theListView.SelectionChangedrouted event and use theSelectedChangedEventArgs.SelectedItemfor the item to customize, or b. Setting the List’sIsSynchronizedWithCurrentItemproperty to true allows you to bind your customization screens to theCurrentItemPath of theOrder, i.e. the item just selected in the<ListView>, or - Adding an edit button to the item in the
<ListView>, following the same strategy detailed for the “Remove” button (below)
Finally, you should provide a means for removing an item from the Order. This is most commonly accomplished by adding a button to the ListBoxItem data template displaying the items in the <ListBox>, so that there is a delete button for each row in the order. Another approach would be to have a single “Remove Selected Item from Order” which removes the item currently selected in the <ListBox>. A third approach would be to put a “Remove from Order” button in the customization screen, that when clicked removes the item from the order an switches back to the menu item selection screen. Other approaches are possible, but should be easy for the user to intuit.
Update Your UML Diagrams
You will need to update your UML diagrams to reflect the changes you have made to the Data and Point of Sale projects. Remember to mark the associations between your Order and its various Menu Item instances.
Submitting the Assignment
Once your project is complete create a release tagged v0.7.0 with name "Milestone 7". Copy the URL for the release page and submit it to the Canvas assignment.
Grading Rubric
The grading rubric for this assignment will be:
15% Structure Did you implement the structure as laid out in the specification? Are the correct names used for classes, enums, properties, methods, events, etc? Do classes inherit from expected base classes?
15% Documentation Does every class, method, property, and field use the correct XML-style documentation? Does every XML comment tag contain explanatory text?
15% Design Are you appropriately using C# to create reasonably efficient, secure, and usable software? Does your code contain bugs that will cause issues at runtime?
15% UML Diagrams Does your UML diagram reflect the code actually in your release? Are all classes, enums, etc. included? Are associations correctly identified?
20% Functionality Does the program do what the assignment asks? Do properties return the expected values? Do methods perform the expected actions?
20% Testing Do you have unit tests for all classes? Do your unit tests cover all the functionality of those classes?
Warning
Projects that do not compile will receive an automatic grade of 0.