Milestone 8 Requirements
This textbook was authored for the CIS 400 - Object-Oriented Design, Implementation, and Testing course at Kansas State University. This section describes assignments specific to the Fall 2022 offering of that course. If you are not enrolled in the course, please disregard this section.
For this milestone you are going to be adding the functionality for taking payments from customers to your PointOfSale project. This will involve working with a compiled code library which you cannot see the code for!. Instead, you must utilize the library’s documentation to determine how to interact with it. You will also be writing custom UI controls that support data binding and a ModelView class to handle communication with this “dumb” library.
General requirements:
-
You will need to follow the style laid out in the C# Coding Conventions
-
You will need to comment your code using XML comments
-
You will need to update your UML to reflect your current code
-
You will need to write appropriate unit tests for your code
Assignment requirements:
-
Add the RoundRegister.dll as a dependency to your project
-
Implement the functionality for the “complete order” and “cancel order” buttons.
-
Process the payment providing options for credit, debit, or cash using the provided
RoundRegisterclasses. -
Implement a GUI to support the cashier in collecting a customer’s cash payment and making the correct change.
-
Print the receipt using the provided RoundRegister class.
-
Update your UML Class Diagrams for:
- Data Library
- Point of Sale
(You don’t need to create a UML of your test project, though you can if you like)
Purpose:
This assignment is to simulate working with an outside DotNET library - in this case a library for communicating with a cash register, card reader, and receipt printer.
In addition, this assignment will require you to implement the Model-View-ViewModel architecture and create custom controls with dependency properties.
Assignment Details
Canceling the Order
The “Cancel Order” button should be available somewhere in the GUI at every step of taking the order.
Clicking this button should dispose of the current order and start a new one. This is most easily accomplished by replacing the Order object bound to the DataContext of your top-level order control with a new Order instance. If your databinding is set up correctly, this will empty the displayed order, zero the displayed subtotal, tax, and total, and a new order number will be displayed.
Completing the Order
The “Complete Order” button should also be available somewhere in the GUI at every step of taking the order. Clicking it should display the payment options screen.
Payment Options Screen
The three payment options should be prominently displayed using appropriate controls. These options are “Cash” and “Credit/Debit”. In addition, the order details should continue to be visible, in case the customer wants to confirm any details. There should also be a “Return to Order” button that returns to the active order to allow for additional changes to be made.
Choosing the “Credit/Debit” option should invoke the CardReader.RunCard() method defined in RoundRegister.dll with the amount of the transaction. This will return one of five options (also defined in RoundRegister.dll’s RoundRegister namespace):
CardTransactionResult.ApprovedCardTransactionResult.DeclinedCardTransactionResult.ReadErrorCardTransactionResult.InsufficientFundsCardTransactionResult.IncorrectPin
If the result is CardTransactionResult.Approved, the order receipt should print. Then a new order should begin (see the details on Canceling the Order above for details).
Choosing the “Cash” option should display a special GUI for taking a cash payment from the customer, as detailed in the Cash Payment Processing below.
Cash Payment Processing
The Round Register includes a cash drawer which initially contains a set amount of bills and coins. The static CashDrawer class in the RoundRegister.dll represents this drawer, and keeps track of each of the number of each kind of currency it contains. As customer payments are taken, and change given, the drawer’s values need to be updated to reflect the changing amounts of currency.
Unfortunately, the developers of Round Payments, Inc. did not provide a class that will integrate with a WPF form easily. You will therefore need to create an intermediary class to update the RoundRegister.CashDrawer and serve as the DataContext for your cash payment control. This intermediary class will need to provide properties for the GUI to bind. These properties need to include:
- Properties to represent the quantity of each kind of currency in the drawer
- Properties to represent the quantity of each kind of currency the customer is using to pay
- Properties to represent the quantity of each kind of currency that should be provided to the customer as change for the transaction.
This intermediate class also needs to incorporate the logic for making appropriate change. Hint: Always start with the largest currency possible, and make use of the modulus operator or Math.Floor().
Finally, you need to provide a method for finalizing the transaction which invokes the CashDrawer.Open() method, adds the quantity of currency the customer paid to the CashDrawer’s fields, and deducts the quantity given as change.
If you set up this intermediate control correctly, your codebehind for the cash payment control should be minimal - you will need to bind the intermediate class as the DataContext, and all your controls should be set up as bindings.
Thus, the RoundRegister.CashDrawer is the Model, your intermediary class is the ModelView, and the custom WPF user control is the View of the MVVM architectural pattern.
A possible configuration for the cash payment control might be:
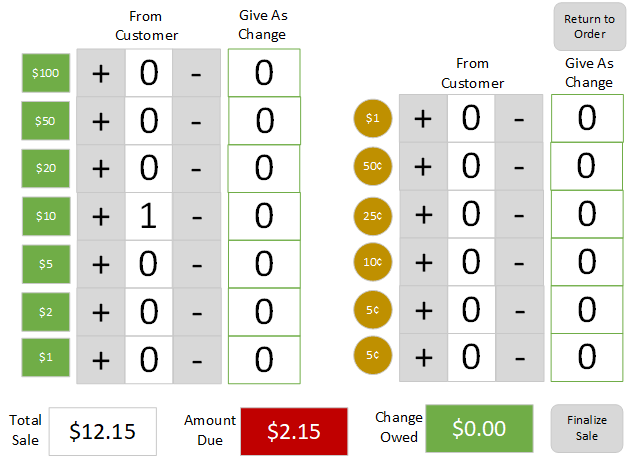
Note that this kind of control could be composed of other custom controls, i.e. a CurrencyControl that exposes a Label, CustomerQuantity, ChangeQuantity dependency properties and looks something like:

While the exact appearance and functionality of the GUI is up to you, it should provide a “Return to Order” button (this can alternatively be labeled as “Select Items” or something similar) which returns to the order to allow changes to be made, as well as a “Finalize Sale” which should invoke the method you defined in your intermediate class for finalizing the sale. Once this has finished, you should print the receipt and begin a new order (see the details on Canceling the Order above for details).
Printing the Receipt
The RoundRegister.dll contains a ReceiptPrinter class that exposes two methods:
PrintLine(string text)prints a single line of text onto the receipt tape.CutTape()cuts the register tape, so the printed receipt can be removed.
You should add to your PointOfSale project a method or class that manages printing a receipt based on an order and payment method. The printed receipt must contain:
- The order number
- The date and time the order was finalized
- A complete list of all items in the order, including their price and any customization instructions
- The subtotal for the order
- The tax for the order
- The total for the order
- The payment method (i.e. cash or card)
- The change owed
The arrangement of these items and their labels should be such that a customer would reasonably be able to understand the entire receipt. You will need to print the receipt one line at a time with PrintLine(string text) and finish with a CutTape() call. Also, note that each line in the receipt cannot be longer than 40 characters. The PrintLine() method does not account for this hardware limitation - so you will need to ensure that no line exceeds this limit!
To make it easier for you to check your work, the printed results are saved in a file, receipts.txt, which should end up in your debug folder.
You should print a receipt for each completed sale.
Testing the Cash Payment Processing
One of the primary benefits of the MVVM architecture is it allows you to push logic that would otherwise be in the View classes into the ViewModel, and create unit tests for this ViewModel. You should write unit tests for the intermediate class that test the ability to make correct change, finalize the sale, and update properties correctly.
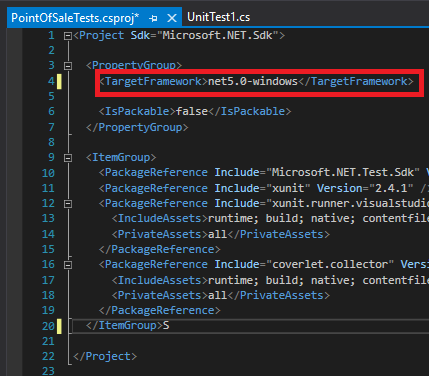
Because the PointOfSale is targeting the net5.0-windows framework, you cannot set PointOfSale as a dependency of your DataTests project. Instead, you will need to create a new XUnit test project named PointOfSaleTests to place your unit tests in. There is not a .net5.0-windows XUnit test project template, so use the normal XUnit template and choose the .Net 5.0 option in the “Additional information” dialog:

Once your project is added, open the PointOfSaleTests.csproj file by double-clicking it in Visual Studio. This should open it as an XML file. Change the <TargetFramework> entry to net5.0-windows:
Now you can add the PointOfSale project as a project dependency to PointOfSaleTests, allowing you to add a unit test for any ModelView classes you need to write to test your PointOfSale project.
Since you will not be able to replace the CashDrawer with a mock instance, you should invoke its Reset() method at the start of each test to ensure that each test starts with the drawer in the same state.
Testing the Payment GUI
While you will be able to unit-test any ViewModel classes you have written programmatically, the GUI functionality must still be hand-tested. Update your test document to include tests for:
- Taking a Credit Card Payment
- Taking a Cash Payment
- Stopping taking a payment early to return to the order and adding additional items
- Canceling the order and starting a new one
Update Your UML Diagrams
You will need to update your UML diagrams to reflect the changes you have made to the Data and PointOfSale projects. Remember to mark the associations between your Order and its various IMenuItem instances.
Submitting the Assignment
Once your project is complete, merge your feature branch back into the main branch and create a release tagged v0.8.0 with name "Milestone 8". Copy the URL for the release page and submit it to the Canvas assignment.
Grading Rubric
The grading rubric for this assignment will be:
15% Structure Did you implement the structure as laid out in the specification? Are the correct names used for classes, enums, properties, methods, events, etc? Do classes inherit from expected base classes?
15% Documentation Does every class, method, property, and field use the correct XML-style documentation? Does every XML comment tag contain explanatory text?
15% Design Are you appropriately using C# to create reasonably efficient, secure, and usable software? Does your code contain bugs that will cause issues at runtime?
15% UML Diagrams Does your UML diagram reflect the code actually in your release? Are all classes, enums, etc. included? Are associations correctly identified?
20% Functionality Does the program do what the assignment asks? Do properties return the expected values? Do methods perform the expected actions?
20% Testing Do you have unit tests for all classes? Do your unit tests cover all the functionality of those classes? Do you have a written test plan for your GUI? Do you have a record of employing the test plan in your release?
Projects that do not compile will receive an automatic grade of 0.