The Document Object Model
HTML, CSS, and JavaScript in the Browser
HTML, CSS, and JavaScript in the Browser
At this point, you should be familiar with the big three technologies of the world-wide-web HTML, CSS, and JavaScript (Feel free to visit the appendices for a quick review). These three technologies work together to create the web pages you interact with every day. Each has a role to play in defining the final appearance of a web page:
We often refer to this division of responsibility as the separation of concerns. By placing all responsibility for appearance on a CSS file, we can refresh the look of a web application simply by replacing the old CSS file with a new one. Similarly, we can create a new page in our site that looks and feels like the rest of the site by creating a new HTML page that links to the site’s existing CSS files.
While you have written HTML, CSS, and JavaScript files in your prior learning experiences, you might not have thought about just how these files are processed, and those styling rules applied. In this chapter we will explore this topic in detail, while introducing some more advanced uses for each.
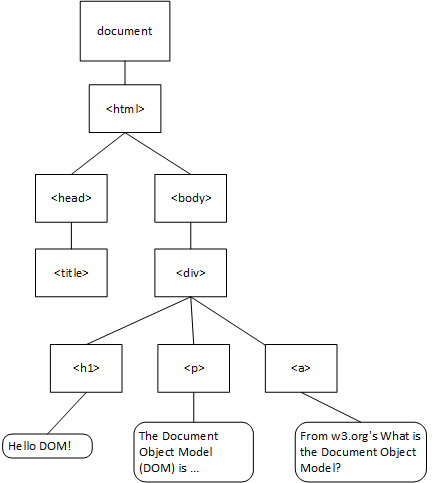
The Document Object Model (or DOM) is a data structure representing the content of a web page, created by the browser as it parses the website. The browser then makes this data structure accessible to scripts running on the page. The DOM is essentially a tree composed of objects representing the HTML elements and text on the page.
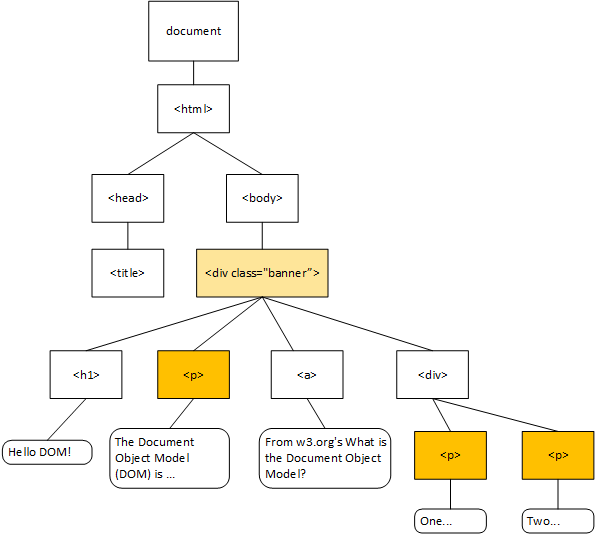
Consider this HTML:
<!DOCTYPE html>
<html>
    <head>
        <title>Hello DOM!</title>
        <link href="site.css"/>
    </head>
    <body>
        <div class="banner">
            <h1>Hello DOM!</h1>
            <p>
                The Document Object Model (DOM) is a programming API for HTML and XML documents. It defines the logical structure of documents and the way a document is accessed and manipulated. In the DOM specification, the term "document" is used in the broad sense - increasingly, XML is being used as a way of representing many different kinds of information that may be stored in diverse systems, and much of this would traditionally be seen as data rather than as documents. Nevertheless, XML presents this data as documents, and the DOM may be used to manage this data.
            </p>
            <a href="https://www.w3.org/TR/WD-DOM/introduction.html">From w3.org's What is the Document Object Model?</a>
        </div>
    </body>
<html>
When it is parsed by the browser, it is transformed into this tree:
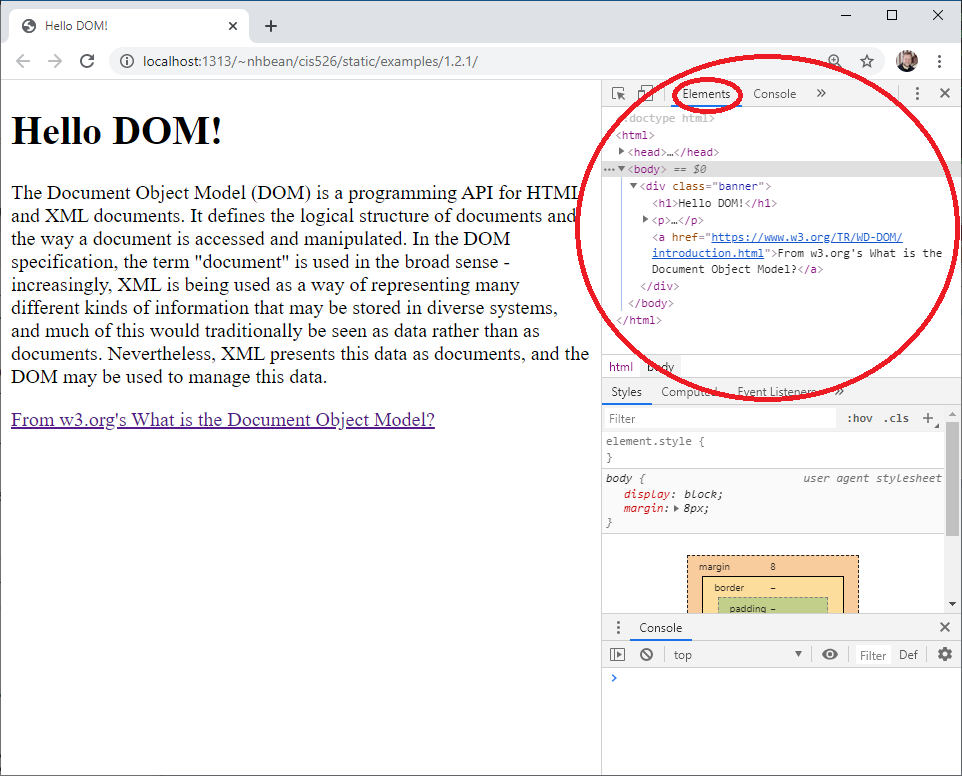
Most browsers also expose the DOM tree through their developer tools. Try opening the example page in Chrome or your favorite browser using this link.
Now open the developer tools for your browser:
CTRL + SHIFT + i or right-click and select ‘Inspect’ from the context menu.CTRL + SHIFT + i or right-click and select ‘Inspect element’ from the context menu.CTRL + SHIFT + i or right-click and select ‘Inspect Element’ from the context menu.You should see a new panel open in your browser, and under its ’elements’ tab the DOM tree is displayed:
Collapsed nodes can be expanded by clicking on the arrow next to them. Try moving your mouse around the nodes in the DOM tree, and you’ll see the corresponding element highlighted in the page. You can also dynamically edit the DOM tree from the elements tab by right-clicking on a node.
Try right-clicking on the <h1> node and selecting ’edit text’. Change the text to “Hello Browser DOM”. See how it changes the page?
The page is rendered from the DOM, so editing the DOM changes how the page appears. However, the initial structure of the DOM is derived from the loaded HTML. This means if we refresh the page, any changes we made to the DOM using the developer tools will be lost, and the page will return to its original state. Give it a try - hit the refresh button.
For convenience, this textbook will use the Chrome browser for all developer tool reference images and discussions, but the other browsers offer much of the same functionality. If you prefer to use a different browser’s web tools, look up the details in that browser’s documentation.
You’ve now seen how the browser creates the DOM tree by parsing the HTML document and that DOM tree is used to render the page. Next, we’ll look at how styles interact with the DOM to modify how it is displayed.
Cascading style sheets (CSS) also interact with the DOM. Consider this CSS code:
.banner {
    border: 4px solid gold;
    border-radius: 5rem;
    background-color: goldenrod;
    padding: 5rem;
    color: #754907;
}

.banner > h1 {
    font-style: italic;
}

.banner p {
    text-decoration: line-through;
    font-size: 1.2rem;
}
When it is placed in the site.css file referenced by the HTML we discussed in the last section, the rules it defines are evaluated in terms of the DOM tree. The result is the page now looks like this:

Now let’s talk about how this CSS code and the DOM interact.
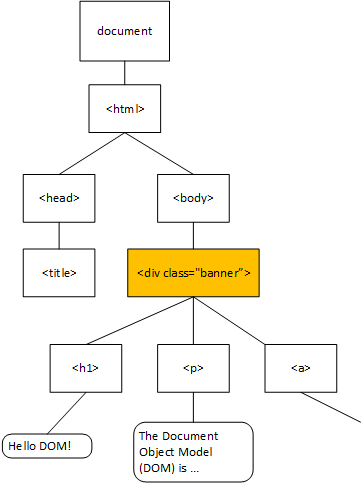
Consider the selector .banner. It looks for any element whose class attribute includes the string "banner". Hence, it matches the <div> element, adding a color, background color, border, and padding. This visualization of the DOM tree indicates the selected node in yellow:
Notice how the text in both the <h1> element and the <p> element are a reddish color? That color is the one defined in the .banner rule: color: #754907. The rule applies not only to the selected node, but to all its descendants in the DOM tree. This is the ‘cascading’ part of cascading style sheets - the rules flow down the DOM tree until they are overridden by more specific css rules in descendant nodes.
The second way CSS interacts with the DOM tree is through the CSS selectors themselves.
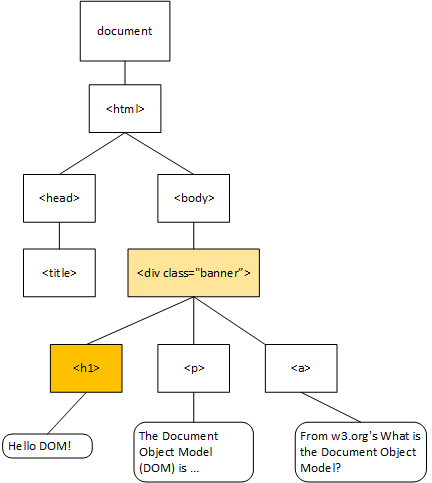
For example, the selector .banner > h1 uses the child combinator - the > symbol between .banner and h1. This indicates that the rule will be applied to any <h1> nodes that are direct children of the node with the class of "banner". As we can see from the DOM tree, the sole <h1> tag is a child of the <div.banner> node, so this rule is applied to it:
Similarly, the .banner p tag uses the descendant combinator - the space between the .banner and p. This indicates that the rule will be applied to any <p> nodes that are descended from the node with the class of "banner". This will apply no matter how far down the tree those nodes appear. Thus, if we added more <p> elements inside of a <div> that was a child of the <div.banner> node, it would apply to them as well.
You can see the example with the styling applied by following this link. Try adding the div and two paragraphs with the developer tools. See how the styles are automatically applied to the new nodes in the DOM tree?
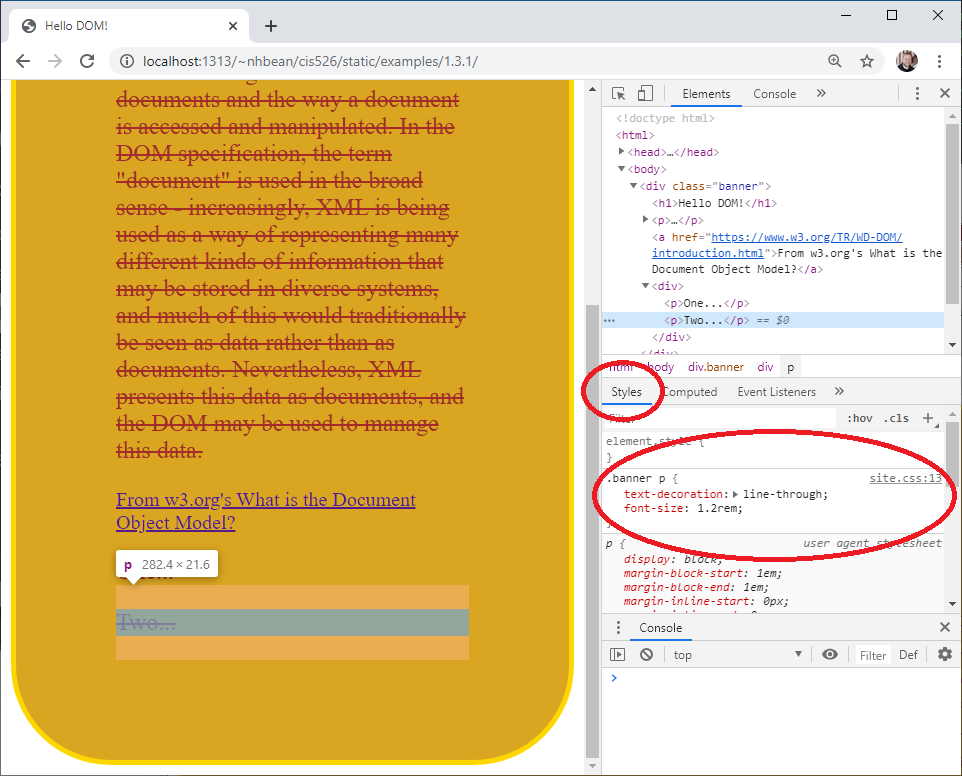
Speaking of developer tools, there is another handy tab that deals with CSS, the ‘Styles’ tab. It displays all the css rules applied to a specific node. Select one of your new <p> elements. Notice how the styles tab shows the css rule .banner p that we’ve been discussing? Moreover, it tells you which CSS file and which line in that file the rule is found on.
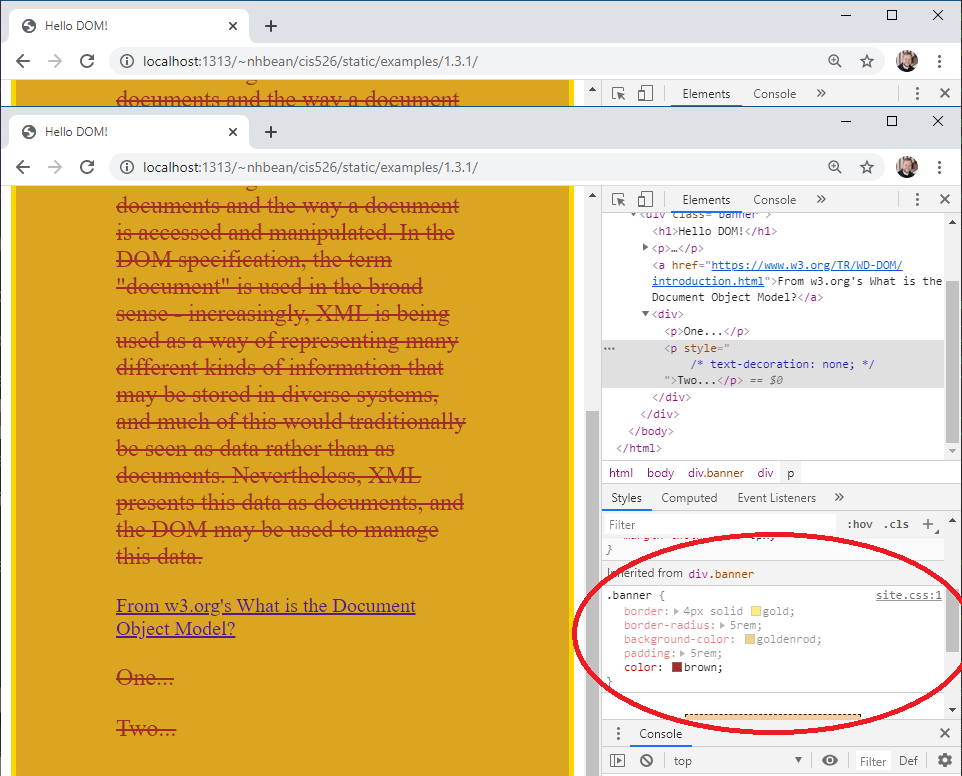
If you scroll down, it also shows you the rules inherited (cascaded) from the .banner rule:
If you scroll clear to the bottom, you will also see a visualization of the box model as it is applied to this element.
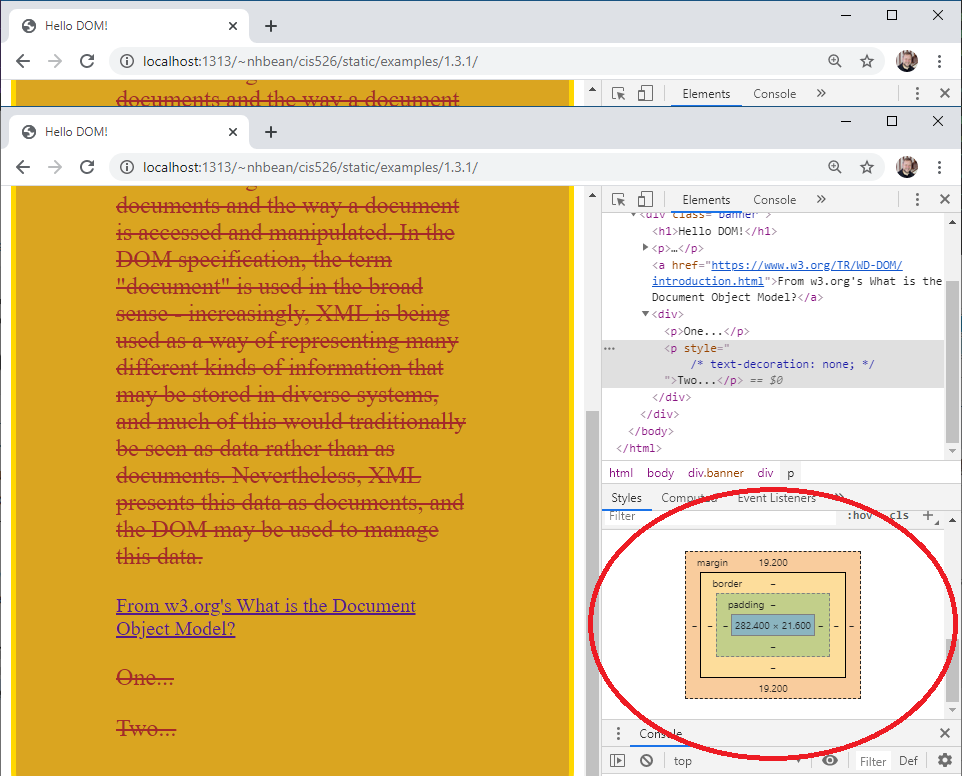
This can be very handy for debugging margin/padding/border issues.
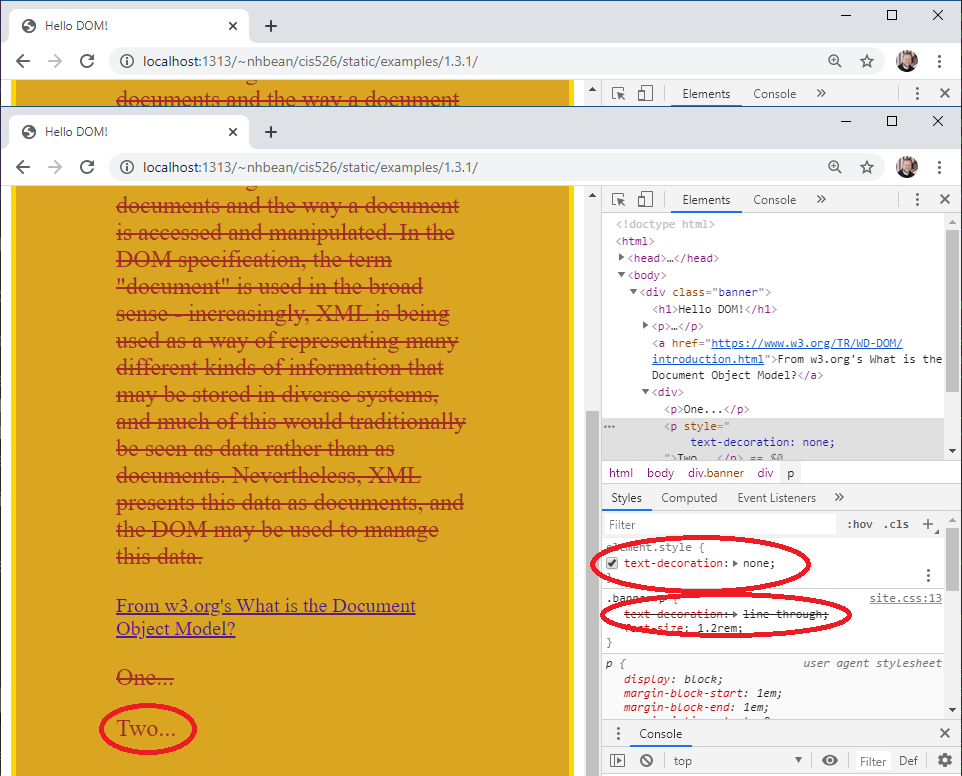
Now scroll back up to the top of the styles tab. Notice the element.style {} rule? This displays inline CSS on the element, and we can also add our own inline CSS directly from the developer tools. Add the property key/value pair text-decoration: none. Notice what happens to the paragraph’s text? Also, notice how the now overridden rule has been struck through in the rule below.
This can be very handy for quickly trying out different style combinations without needing to add them to the CSS file. Much like changes to the DOM, these are not saved - refresh the page and they are gone.
Finally, notice that when the mouse hovers over a CSS property key/value pair, a checkbox appears next to it? If you uncheck the box, the property ceases to be applied. This can also be very handy for debugging CSS problems.
Now that we’ve seen how CSS interacts with the DOM tree, it’s time to turn our attention to the third web technology - JavaScript.
The DOM tree is also accessible from JavaScript running in the page. It is accessed through the global window object, i.e. window.document or document.
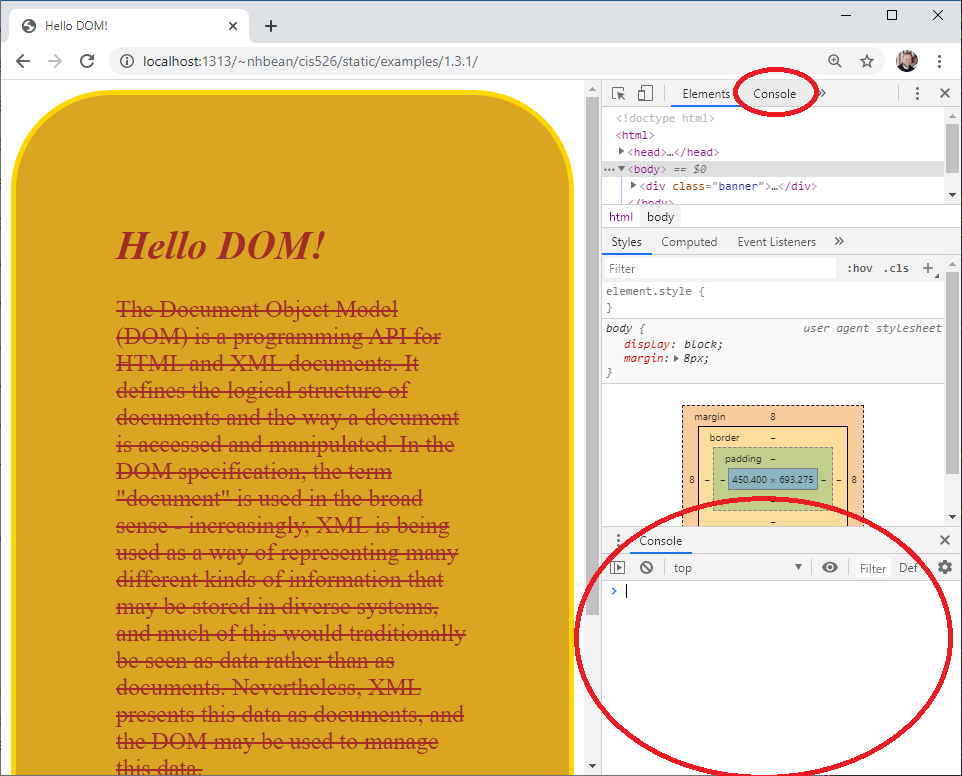
Let’s use the ‘Console’ tab of the developer tools to access this object. Open the previous example page again from this link. Click the console tab to open the expanded console, or use the console area in the bottom panel of the elements tab:
With the console open, type:
> documentWhen instructed to type something into the console, I will use the > symbol to represent the cursor prompt. You do not need to type it.
Once you hit the enter key, the console will report the value of the expression document, which exposes the document object. You can click the arrow next to the #document to expose its properties:
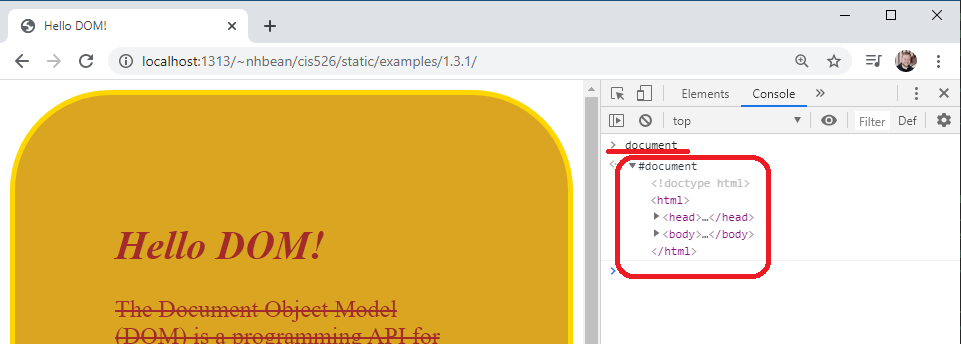
The document is an instance of the Document class. It is the entry point (and the root) of the DOM tree data structure. It also implements the Node and EventTarget interfaces, which we’ll discuss next.
All nodes in the DOM tree implement the Node interface. This interface provides methods for traversing and manipulating the DOM tree. For example, each node has a property parentElement that references is parent in the DOM tree, a property childNodes that returns a NodeList of all the Node’s children, as well as properties referencing the firstChild, lastChild, previousSibling, and nextSibling.
Let’s try walking the tree manually. In the console, type:
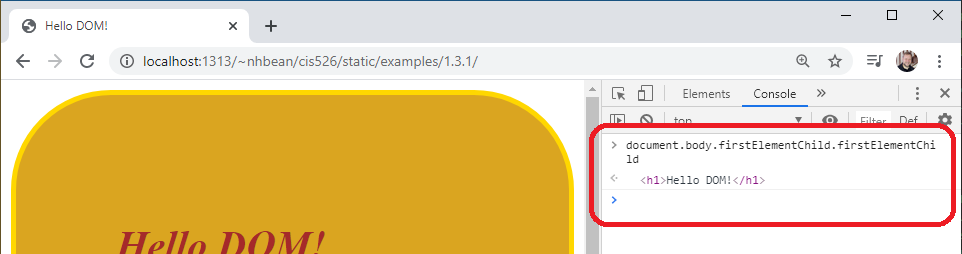
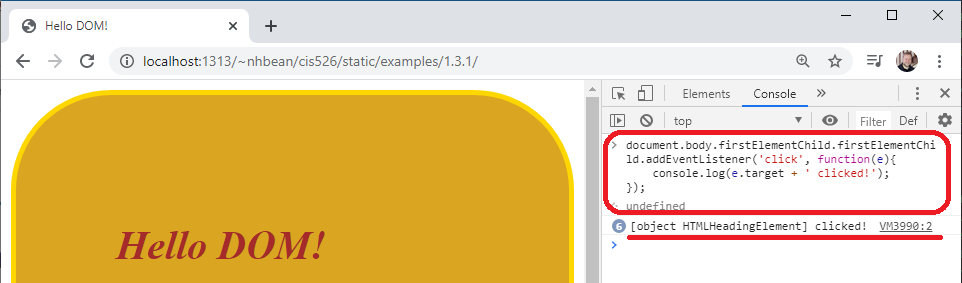
> document.body.firstElementChild.firstElementChildThe body property of the document directly references the <body> element of the webpage, which also implements the Node interface. The firstElementChild references the first HTML element that is a child of the node, so in using that twice, we are drilling down to the <h1> element.
Each node in the DOM tree also implements the EventTarget interface. This allows arbitrary events to be attached to any element on the page. For example, we can add a click event to the <h1> element. In the console, type:
> document.body.firstElementChild.firstElementChild.addEventListener('click', function(e){
    console.log(e.target + ' clicked!');
});
The first argument to EventTarget.addEventListener is the event to listen for, and the second is a function to execute when the event happens. Here we’ll just log the event to the console.
Now try clicking on the Hello DOM! <h1> element. You should see the event being logged:
We can also remove event listeners with EventTarget.removeEventListener and trigger them programmatically with EventTarget.dispatchEvent.
While we can use the properties of a node to walk the DOM tree manually, this can result in some very ugly code. Instead, the Document object provides a number of methods that allow you to search the DOM tree for a specific value. For example:
document.getElementsByTagName('p') will return a list of all <p> elements in the DOM.document.getElementsByClassName('banner') will return a list containing the <div.banner> element.In addition to those methods, the Document object also supplies two methods that take a CSS selector. These are:
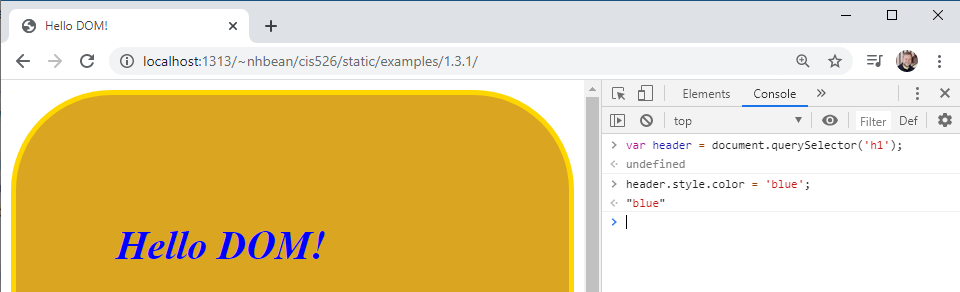
Let’s try selecting the <h1> tag using the querySelector method:
> var header = document.querySelector('h1');Much easier than document.body.firstElementChild.firstElementChild isn’t it?
All HTML elements in the DOM also implement the HTMLElement interface, which also provides access to the element’s attributes and styling. So when we retrieve an element from the DOM tree, we can modify these.
Let’s tweak the color of the <h1> element we saved a reference to in the header variable:
> header.style.color = 'blue';This will turn the header blue:
All of the CSS properties can be manipulated through the style property.
In addition, we can access the element’s classList property, which provides an add() and remove() methods that add/remove class names from the element. This way we can define a set of CSS properties for a specific class, and turn that class on and off for an element in the DOM tree, effectively applying all those properties at once.
We can create new elements with the Document.createElement method. It takes the name of the new tag to create as a string, and an optional options map (a JavaScript object). Let’s create a new <p> tag. In the console:
> var p = document.createElement('p');Now let’s give it some text:
> p.textContent = "Tra-la-la";Up to this point, our new <p> tag isn’t rendered, because it isn’t part of the DOM tree. But we can use the Node.appendChild method to add it to an existing node in the tree. Let’s add it to the <div.banner> element. Type this command into the console:
document.querySelector('div.banner').appendChild(p);As soon as it is appended, it appears on the page:
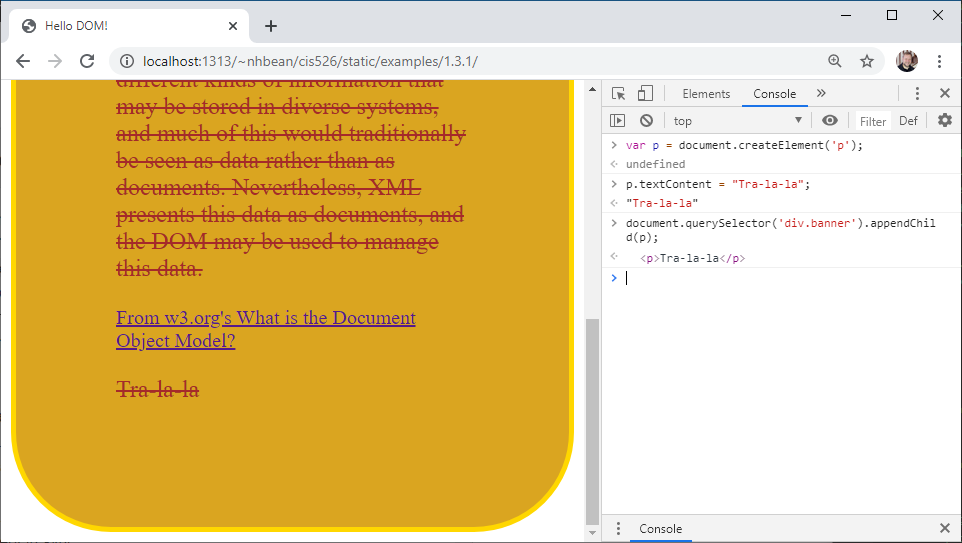
Note too that the CSS rules already in place are automatically applied!
The popular JQuery library was created primarily as a tool to make DOM querying and manipulation easier at a time when browsers were not all adopting the w3c standards consistently. It provided a simple interface that worked identically in all commonly used browsers.
The JQuery function (commonly aliased to $()) operates much like the querySelectorAll(), taking a CSS selector as an argument and returning a collection of matching elements wrapped in a JQuery helper object. The helper object provided methods to access and alter the attributes, style, events, and content of the element, each returning the updated object allowing for functions to be ‘chained’ into a single expression.
The above example, rewritten in JQuery, might be:
$('p').text('Tra-la-la').appendTo('div.banner');While modern browsers are much more consistent at supporting standardized JavaScript, JQuery remains a popular library and one you will likely encounter. Thus, while this text focuses on ‘vanilla’ JavaScript, we’ll also occasionally call out JQuery approaches in blocks like this one.
It should be no surprise that JavaScript features events - after all, we’ve already seen how the EventTarget interface allows us to attach event listeners to elements in the DOM tree. What might not be clear yet is how events are handled by JavaScript. JavaScript uses an event loop to process events. This is similar to Windows and other operating systems also handle events.
An event loop expressed in code looks something like:
function main
    initialize()
    while message != quit
        message := get_next_message()
        process_message(message)
    end while
end function
It’s basically an infinite loop that responds to messages, one message at a time. It might be more useful to see a visual representation:
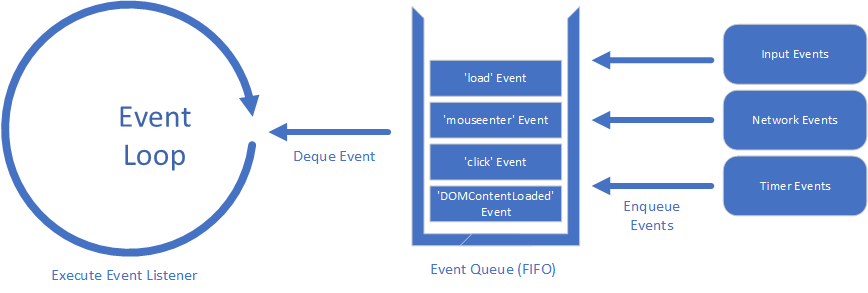
Here we see not just the event loop, but also the event queue. This is a queue that holds events until the event loop is ready to process them. It works like the first-in-first-out queues you built in your data structures course (although it may also consider priorities of events).
On the far right are some common sources for JavaScript events - user input, the network, and timers. These are often managed by the operating system, and with modern multiple-processor computers can happen concurrently, i.e. at the same time. This is one reason the queue is so important - it allows JavaScript to process the events one at a time.
When the JavaScript VM has finished executing its current work, it pulls the next event from the event queue. This event is processed by the corresponding event listener function that either 1) you wrote, or 2) is the default action. If neither exists, the event is discarded.
Consider when the user clicks on a link on your page, let’s say <a id="demo" href="https://google.com">Google it!</a>. This creates a ‘click’ event for the <a> tag clicked on. Now let’s assume you’ve written an event handler and attached it to that anchor tag:
document.getElementById('demo').addEventListener('click', function(e) {
    e.preventDefault();
    alert('You clicked the "Google it!" link.');
});
The anonymous function function(e) {...} attached to the <a>’s ‘click’ event is invoked, with the event details being passed as the parameter e. Anchor tags have a default behavior - they open the linked page. So the line e.preventDefault(); informs JavaScript not to use this default behavior. Then we trigger an alert with the string 'You clicked the "Google it!" link.'.
If we hadn’t attached the event listener, then the page would have used the default response - loading a new page into the browser in the place of our current page.
If we clicked on an element that didn’t have a default action (like a <p> element) and you haven’t attached a listener the event is discarded and does nothing.
An important takeaway from the discussion of the event loop is that the actual processing of JavaScript code is always single-threaded. This avoids many of the common challenges of multi-threaded code. You don’t need to create semaphores, locks, and other multi-threading synchronization tools as your code will always be executing in a single thread.
However, JavaScript does retain many of the benefits of concurrency within its model. For example, when the DOM is loading and encounters an element referencing an external resource (i.e. a video, img, link, or script element), it triggers a request to retrieve that resource through the browser. The browser does so while the JavaScript code continues executing. When the resource is fully downloaded by the browser, it creates a 'load' event with the details, and adds it to the JavaScript event queue. Multiple files are therefore downloaded concurrently, but our JavaScript handles the results one-by-one in a single-threaded manner.
Think of the JavaScript event loop as a busy manager that only works on one thing at a time. The manager might send several workers out to get information. When they return, they form a line in front of the manager’s desk and wait patiently. Once the manager is finished with the task they have been working on, they take the report from the first worker in line, and starts doing what is needed to be done with the returned information. Once the manager finishes that, the next employee will report, and so on.
Although the JavaScript execution model is single-threaded, there are ways of introducing multi-threaded programming in JavaScript - specifically, the Web Workers in the browser and Worker Threads in Node. These technologies essentially run additional JavaScript interpreters in parallel and enable communiation between them using events.
There are many kinds of events in JavaScript; you can find a complete list in the MDN docs. However some of the ones you will likely find yourself using are:
load - Triggered when a resource (i.e. an image, video, stylesheet, script) has finished loading. You can also listen for the load event on the document itself; here it will be triggered after all the resources on the page are loaded.
change The value of an <input>, <textarea>, or <select> has changed
focus triggered when an input gains focus (is the currently selected input)
blur triggered when an input loses focus
click The primary mouse button was clicked. On old browsers this might trigger for any button
contextmenu The right mouse button was clicked
mousedown A mouse button was pressed
mouseup A mouse button was released
Timers play a special role in JavaScript’s concurrency model, and in many ways behave like events. For example, to cause the phrase “Hello time!” to be logged to the console in three seconds, you would write the code:
setTimeout(function() { console.log("Hello time!")}, 3000);You will notice that the setTimeout() method takes a function to execute at that future point in time, much like attaching an event handler. The second argument is the number of milliseconds in the future for this event to occur. The timer works like an event, when the time expires, a corresponding event is added to the event queue, to trigger the delayed function.
An important side-effect of this approach is that you only know the timer’s result won’t happen before the delay you specify, but if the JavaScript virtual machine is engaged in a long-running process, it may be longer before your timer event is triggered.
For events you need to do on a regular interval, use setInterval() instead. This will invoke the supplied function at each elapsing of the supplied interval. It also returns a unique id that can be supplied to clearInterval() to stop the timed event.
You may find yourself reading code that uses a value of 0 milliseconds with setTimeout(), i.e.:
setTimeout(doSomething, 0);You might be wondering why. You might wonder if it is equivalent to:
doSomething();And while it might appear that way, the answer is no. Remember, setTimeout() creates an event in the event queue that executes after the specified delay. Thus, doSomething() will execute immediately, but setTimeout(doSomething()) will continue to execute all code after the line until execution finishes, and then will invoke doSomething().
Thus, JavaScript programmers often use this technique to trigger an action immediately after the current code finishes executing.
One of the important aspects of working with HTML is understanding that an HTML page is more than just the HTML. It also involves a collection of resources that are external to the HTML document, but displayed or utilized by the document. These include elements like <link>, <script>, <video>, <img>, and <source> with src or href attributes set.
As the DOM tree is parsed and loaded and these external resources are encountered, the browser requests those resources as well. Modern browsers typically make these requests in parallel for faster loading times.
Once the HTML document has been completely parsed, the window triggers the DOMContentLoaded event. This means the HTML document has been completely parsed and added to the DOM tree. However, the external resources may not have all been loaded at this point.
Once those resources are loaded, a separate Load event is triggered, also on the window.
Thus, if you have JavaScript that should only be invoked after the page has fully loaded, you can place it inside an event listener tied to the load event, i.e.:
window.addEventListener('load', function(event) {
    // TODO: Add your code here ...
});
Or, if you want it invoked after the DOM is fully parsed, but external resources may still be loading:
window.addEventListener('DOMContentLoaded', function(event) {
    // TODO: Add your code here ...
});
The former - waiting for all resources to load - tends to be the most common. The reason is simple, if you are loading multiple JavaScript files, i.e. a couple of libraries and your own custom code, using the 'load' event ensures they have all loaded before you start executing your logic.
Consider the popular JQuery library, which provides shorthand methods for querying and modifying the DOM. It provides a JQuery() function that is also aliased to the $. The JQuery code to show a popup element might be:
$('#popup').show();But if the JQuery library isn’t loaded yet, the $ is not defined, and this logic will crash the JavaScript interpreter. Any remaining JavaScript will be ignored, and your page won’t work as expected. But re-writing that to trigger after all resources have loaded, i.e.:
window.addEventListener('load', function(event) {
    // This code only is executed once all resources have been loaded
    $('#popup').show();
});
Ensures the JQuery library is available before your code is run.
JavaScript is an extremely flexible language that has evolved over time. One side effect of this evolution is that there are often multiple ways to express the same idea. For example, listening for the window’s 'load' event can be written many different ways:
// Using the onload property
window.onload = function(event) {...}

// Using onload property and lambda syntax
window.onload = (event) => {...}

// Using the addEventListener and lambda syntax
window.addEventListener('load', (event) => {
    ...
});

// Using the JQuery library
JQuery(function(){...});

// Using the JQuery library with lambda syntax
JQuery(() => {...});

// Using the JQuery library with $ alias
$(function(){...});
You are free to use whichever approach you like, but need to be able to interpret other programmers’ code when they use a different approach.
There are really two ways to load resources into an HTML page from your JavaScript code. One is indirect, and the other direct. The indirect method simply involves creating DOM elements linked to an outside resource, i.e.:
var image = document.createElement('img');
image.src = 'smile.png';
document.body.appendChild(img);
In this case, when the new <img> element has its src attribute set, the image is requested by the browser. Attaching it to the DOM will result in the image being displayed once it loads.
If we want to know when the image is loaded, we can use the load event:
var image = document.createElement('img');
image.addEventListener('load', function(event){
    console.log('loaded image');
});
image.src = 'smile.png';
Notice too that we add the event listener before we set the src attribute. If we did it the other way around, the resource may already be loaded before the listener takes effect - and it would never be invoked!
However, this approach can be cumbersome, and limits us to what resources can be bound to HTML elements. For more flexibility, we need to make the request directly, using AJAX. We’ll take a look at doing so after we cover HTTP in more depth.
In this chapter, we reviewed the Document Object Model (the DOM), the tree-like structure of HTML elements built by the browser as it parses an HTML document. We discussed how CSS rules are applied to nodes in this tree to determine how the final webpage will be rendered, and how JavaScript can be used to manipulate and transform the DOM (and the resulting webpage appearance).
We also discussed how JavaScript events work, and how this event-driven approach is the basis for implementing concurrency within the language. We’ll see this more as we delve into Node.js, which utilizes the same event-based concurrency model, in future chapters.
Finally, we discussed how supplemental files (images, videos, CSS files, JavaScript files) are loaded by the browser concurrently. We saw how this can affect the functioning of JavaScript that depends on certain parts of the page already having been loaded, and saw how we can use the load event to delay running scripts until these extra files have completed loading.