Introduction to Node
JavaScript on the Server
JavaScript on the Server
Node is an open-source, cross-platform JavaScript runtime environment build on Google’s V8 engine. It was created by Ryan Dahl in 2009 to allow for server-side scripting in JavaScript.

Node supports most of the features of ECMAScript 2015 (ES6). However, Node dopated the CommonJS module approach before ES6 modules were proposed, and as a result uses CommonJS modules by default. To use ES6 modules instead, you must either:
"type":"module" to your package.json file, orExamples in this text will use CommonJS modules, but feel free to switch to ES6 modules if you prefer.
You can learn more about Node’s ES6 support here.
While JavaScript in the browser has been deliberately sandboxed and is only allowed to interact with the current document and the Internet, Node can interact with the file system and operating system of the hosting computer. Also, because Node is not hosted in a browser, it has no Document Object Model (DOM), and no document or window global variables. To reflect this, the global namespace for Node is global instead of window.
Node can be downloaded for Windows, Linux, and MacOS at https://nodejs.org/en/. Documentation for Node is found at https://nodejs.org/en/docs/. On many Linux and Mac systems, multiple versions of Node can be installed and managed using Node Version Manager (nvm). Using nvm may be preferred on those systems since most package repositories include older and outdated versions of Node.
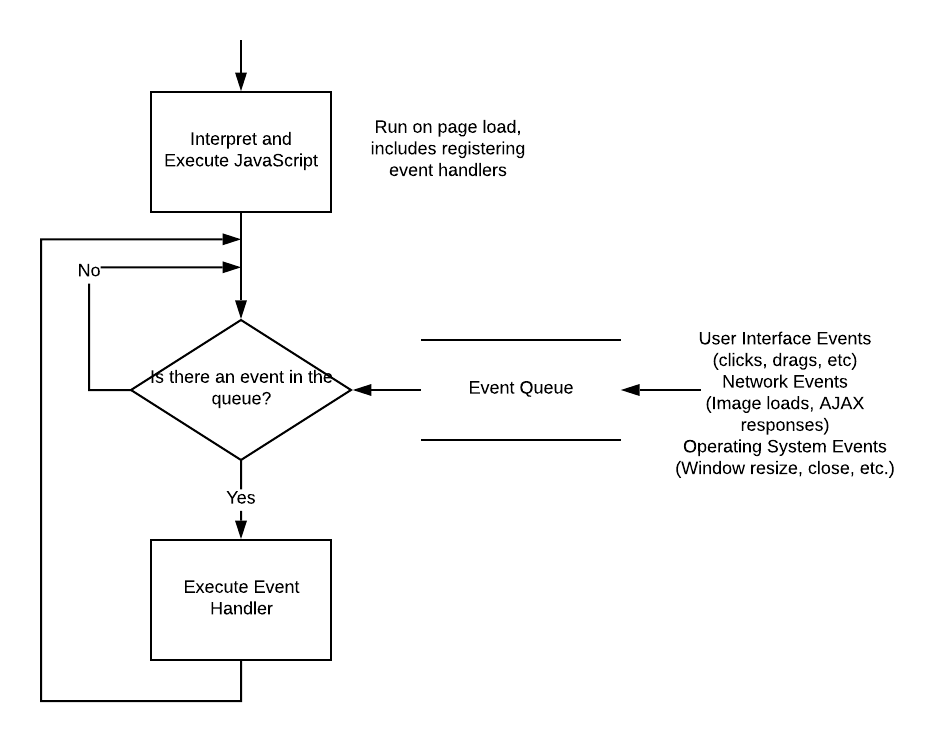
Node adopts an asynchronous event-driven approach to computing, much like JavaScript does in the browser. For example, when we set up a HTTP server in Node, we define a function to call when a HTTP request (an event) is received. As requests come in, they are added to a queue which is processed in a FIFO (first-in, first-out) manner.
In addition to events, Node implements many asynchronous functions for potentially blocking operations. For example, consider file I/O. If you write a program that needs to read a file, but when it attempts to do so the file is already open in another program, your program must wait for it to become available. In the meantime, your program is blocked, and its execution pauses. A real-world analogue would be a checkout line at a store. If the cashier is ringing up a customer and finds an item without a price tag, they may leave their station to go find the item on the shelves. While they are away, the line is blocked, everyone in line must wait for the cashier to return.
There are two basic strategies to deal with potentially blocking operations - multi-threading and asynchronous processing. A multi-threading strategy involves parallelizing the task; in our store example, we’d have additional cash registers, cashiers, and lines. Even if one line is blocked, the others continue to ring up customers. In contrast, asynchronous processing moves the potentially blocking task into another process, and continues with the task at hand. When the asynchronous process finishes, it queues its results for the main process to resume. In our store example, this would be the cashier sending another employee to find the price, suspending the sale on the register, and continuing to check out other customers while the first customer waits. When the other employee returns with a price, the cashier finishes checking out the current customer, then resumes the first customer’s transactions.
Node uses this asynchronous model to handle most potentially blocking operations (and often provides a synchronous approach as well). When possible, the asynchronous process is handled by the operating system, but the Node runtime also maintains a pool of threads to farm tasks out to.
The Node event loop is divided into a series of phases - each queues the associated kinds of events and processes them in a round-robin fashion. This helps ensure that one kind of event can’t overwhelm the system:
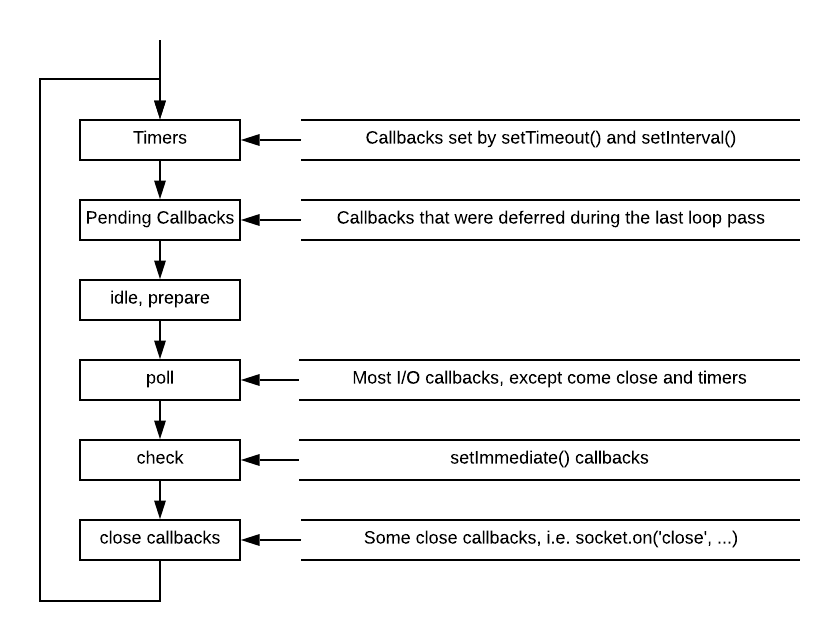
For a more detailed breakdown of the Node event loop, check out this blog post by Daniel Khan or the Node Event Loop Documentation.
To produce output on the terminal, Node provides a global instance of a Console called console that is accessible throughout the code. The typical way to produce text output on the terminal in Node is using the console.log() method.
Node actually defines multiple log functions corresponding to different log levels, indicating the importance of the message. These are (in order of severity, least to most):
console.debug()console.info()console.warn()console.error()These are all aliases for console.log() (console.debug() and console.info()) or console.error() (console.warn() and console.error()). They don’t really do anything different, which might lead you to wonder why they exist…
But remember, JavaScript is a dynamic language, so we can re-define the console object with our own custom implementation that does do something unique with these various versions. But because they exist, they can also be used with the built-in console. This way our code can be compatible with both approaches!
The benefit of the asynchronous approach is that all user-written code runs in a single-threaded environment while avoiding blocking. This means for the most part, we can write code the way we are used to, with a few tweaks for asynchronous functions.
Consider the two approaches for reading and printing the contents of a file, below:
const fs = require('fs');

// Synchronous approach
var data = fs.readFileSync('file.txt');
console.log(data);


// Asynchronous approach
fs.readFile('file.txt', function(err, data){
  console.log(data);
});
In the synchronous function, the contents of the file are returned, and assigned to the variable data. Conversely, in the asynchronous approach the file contents are passed into a callback function that is invoked when the asynchronous process finishes (and when the callback phase of the Node event loop is reached). The function itself returns nothing (undefined in Node). The important difference between the two is in the first approach, the program waits for the file to be read. In the second, the program keeps executing lines of code after the asynchronous call, even though the file hasn’t been read yet.
In most Node libraries, the callback function provided to the asynchronous function follows the same format - the first parameter is an error value, which will be populated with text or object if an error occurred, and otherwise will be a falsy value (a value that evaluates to false, like false, null, undefined, or 0). Successive arguments are the data the function was intended to retrieve - i.e. the contents of the file in the above example. Of course, if an error was encountered, the later values may be wrong. Thus, most programmers follow the pattern of checking for an error at the start of the callback, and halting execution if one is encountered. Rewriting the example above, we would see:
fs.readFile("file.txt", function(err, data){
  if(err) return console.error(err);
  console.log(data);
});
If err is a truthy value (any non-falsy value, in this case an Exception object or a string), we log the error to the console and return, halting execution of the rest of the function.
It is very important to understand that the callback is executed at a future point in time, and execution continues to further lines of code. Consider this example:
var contents;
fs.readFile("example.txt", function(err, data) {
  contents = data;
});
console.log(contents);
Assuming the file example.txt contains only the line "hello world", what do you think is printed?
You might think that it would be "hello world", but the console.log(data) happens before the callback function is executed, so it will be undefined. If you wanted to print the file contents, you would have to instead do something like:
var contents;
fs.readFile("example.txt", function(err, data) {
  contents = data;
  console.log(contents);
});
Because the logging now happens inside the callback value, it will only occur after the file has been read, and the results added to the event queue, which is where the contents variable is initialized.
Promises and the async/await keywords covered in the previous chapter are both attempts to sidestep these misconceptions by introducing new objects and syntax that provide more familiar abstractions to programmers.
One major feature Node introduced to JavaScript was the ability to encapsulate code into separate files using modules. The approach adopted by Node is the CommonJS module pattern.
Node’s use of modules predates ECMA6’s adoption of modules, and the CommonJS approach Node adopted is fundamentally different than the ECMA6 version. For Node 16 (installed on your Codio Box), ECMA6 modules are an optional feature that has to be enabled with a flag when invoking the node command, i.e.:
$ node --input-type=module <file>We can also enable ECMA6 module support by using the .mjs file extension, or by setting an option in the package.json file present in our project. See the NodeJS Documentation for more information.
A module is simply a JavaScript file (typically saved with a js extension). Code within the module is locally scoped to the module; code intended to be accessed outside of the module must be explicitly exported by assigning it to the module.exports parameter. This example exports a function to print “Hello World”:
/* hello.js */

function helloWorld() {
  console.log("Hello World");
}

module.exports = helloWorld;
You can export a value, function, or object from a module. If you don’t specify an export, a module exports undefined.
CommonJS Modules are loaded using the require() function, which loads the JavaScript in the module and returns any exports from the module. Objects, functions, or even values can be exported, i.e. this example loads our earlier module, assigns the result to the variable greet, and invokes it:
var greet = require('./hello');
greet();
This example will print “Hello World” to the console.
There are three kinds of modules you can load in Node: 1) core libraries, 2) npm packages, and 3) user-authored modules.
Core libraries are part of Node. Examples are the fs (file system) library, the http library, and the crypto library. A full list of libraries can be found in the Node documentation. Node libraries are required using their name as as the argument, i.e. require('fs') will require the filesystem library.
Npm packages are typically open-source libraries created by the community and are downloaded using the Node Package Manager (npm). These are installed either globally, or within a node_modules folder created by npm within your project. Npm modules are required by their package name, i.e. require('webpack') will load the webpack package.
User-written modules are loaded from the filesystem, and are typically located in your project directory or subdirectories within it. They are required using the filepath to their file, i.e. require('./hello.js). It is important to use the period-slash (./) indicating current directory to distinguish files from npm packages.
The Node Package Manager allows you to create a package representing your project. This is similar to Visual Studio’s idea of a project - a package is a complete Node program.
Just as Visual Studio adds solution and project files, a Node package adds a file named package.json and a directory named node_modules.
Every node package has in its top-level directory a file named package.json. This JSON file provides important information about the project, including:
Most of the properties of the package.json are optional, and there are options I have listed above are not comprehensive. The package.json object format is described in great detail in the npm documentation.
Node packages use semantic versioning, a numbering scheme that uses three numbers separated by periods in the pattern MAJOR.MINOR.PATCH. For example, your Codio Box is likely running Ubuntu 18.04.3 - that is Ubuntu, major release 18, minor release 4, patch 3. If its developers found a bug or security vulnerability and fixed it, they would release a new patch version, i.e. Ubuntu 18.04.4. If they made some improvements that don’t change the way you work with the operating system, those might be a minor release, i.e. Ubuntu 18.05.0 (note that the patch release number starts over at 0). And if a major change in the way the software works was made, that would be a major release, i.e. Ubuntu 19.0.0. Additionally, you probably have seen the program listed as Ubuntu 18.04.4 LTS. The LTS is not part of semantic versioning, but indicates this is a long term support release, i.e. one the developers have committed to fixing problems with for a specific duration of time.
When releasing your own Node packages, you should strive to practice using semantic versioning. That way you get into the habit, and it will be easier when you become a professional developer. Another good practice is to have a changelog - a text or markdown file that lists the changes made in each successive version of the program, usually as a bulleted list.
You can manually create the package.json file, but npm also provides a wizard to make this process easier. From the terminal, while at the root directory of your project, enter the command:
$ npm initThis will launch the wizard, asking you a series of questions used to create the project. It will also offer default options for many of the values; you can simply press the space bar to accept these. Moreover, if your directory contains an already-initialized git repository, it will use that repository’s origin as the basis for the repository option. The wizard will create the package.json file in the project’s root directory.
Next we’ll look at some aspects of the package in more detail.
A second great benefit of creating your project as a Node package is that dependencies can be managed using the Node Package Manager (npm). You can install any Node package with the command $npm install [package name]. This command looks for the corresponding package in an online repository, and if it is found, downloads it and saves it to the subdirectory node_modules in your package directory.
It also creates an entry in the package.json file corresponding to the package you installed, and also an entry in the package.lock.json file. The entry in your package.json file may specify a specific version, i.e.:
{
    "name": "example-package",
    "version": "1.0.0",
    "dependencies": {
        "foo": "2.1.3",
        "bar": "^1.1.0",
        "doh": "~4.3.2"
    }
}
The ^ before the "bar" dependency indicates that npm can use any minor release after this version, i.e. we could use bar 1.2.1 but not bar 2.1.1. The ~ before the "doh" dependency indicates that npm can use any patch release after this version, i.e. doh 4.3.4 but not doh 4.4.0. Because we specified the exact version for "foo", it will always install foo 2.1.3. We could also indicate we will accept any major version with an *, but this is rarely used. Additionally, we can specify a git repo or a location on our hard drive, though these approaches are also not commonly used.
The reason we want the dependency information specified this way is that when we commit our package to source control, we typically exclude the dependencies found in node_modules. As this folder can get quite large, this saves us significant space in our repository. When you clone your package to a new location, you can re-install the dependencies with the command:
$ npm install This will pull the latest version of each dependency package allowable. Additionally, some modules may have their own dependencies, in which case npm will strive to find a version that works for all requirements.
Finally, the package.lock.json contains the exact version of the dependencies installed. It is intended to be committed to your repository, and if it exists it will make the npm install command install the exact same packages. This can help avoid problems where two versions of a package are slightly different.
In addition to regular dependencies, we can specify dependencies we only need during development. Adding the --save-dev flag to the command will add the package to a development dependency list in your package.json file. Development dependencies are only installed in the development environment; they are left out in a production environment.
There are many ways to connect with dependencies, but one of the easiest and most popular is to use the NPM Registry, a searchable, online directory of npm packages maintained by npm, Inc. You can search for keywords and (hopefully) find a project that fits your needs.
Most Node packages are made available as git repositories, and npm has built-in support for using git.
In your package.json file, you can specify a "repository" property, which specifies where the repository for this project exists. Consider the following example of the npm command-line interface package:
"repository": {
  "type" : "git",
  "url" : "https://github.com/npm/cli.git"
}
For many open-source projects, the repository is located on Github, a GitHub gist, BitBucket, or a GitLab instance. These can be specified with a shorthand, which matches the corresponding npm install argument:
"repository": "npm/npm"

"repository": "github:user/repo"

"repository": "gist:11081aaa281"

"repository": "bitbucket:user/repo"

"repository": "gitlab:user/repo"
If your project folder already is set up as a git repo before you run $npm init, then the wizard will suggest using the existing repository.
Like any git repo, there are some files you will want to exclude from version control. The most important of these is the node_modules folder, which we exclude for two reasons:
$npm install avoids this.Therefore, you should include at least this line in your .gitignore file:
node_modules/It’s also a good idea to leave out any logging files:
logs
*.log
You may also want to look at GitHub’s boilerplate Node .gitignore template, which adds additional rules based on many popular Node frameworks (adding an ignore for a file or directory that doesn’t exist in your project is harmless).
The .gitignore file should ideally be added before the repository has been created, as files already under version control override .gitignore rules.
Now we can initialize our repository with the $git init command in the terminal:
$ git init Note how a .git directory is added to our project? This is where git stores the diff information that allows it to track versions of our code.
The init command adds the current directory structure (less that specified in the .gitignore file) to the staging list. Otherwise, we’d need to stage these files ourselves for version tracking with the git command, add .:
$git add .Once staged, we can commit the initial version of our package with a git commit command:
$ git commit -a -m "Initial commit"The -a flag indicates we are committing all currently staged files, alternatively you can commit files one-at-a-time, if you only want to commit one or a few files. The -m file indicates we are also adding a commit message, which follows in quotes (""). If we don’t use this flag, then git will open a text editor to write the commit message in. For the Linux platform, the default is vi, a powerful command line text editor that has a bit of a learning curve. If you find vi has launched on you and you are uncertain how to proceed, follow these steps:
:wq. Vi commands always start with a colon (:), and can be grouped. The w indicates the file should be written (saved), and the q indicates we want to quit the editor.If you want to host your repository on GitHub or another hosting tool (such as BitBucket or GitLab), you will need to add that repository’s url as a remote origin for your local repository. You can do so with the command:
$ git remote add origin [repo url]Where [repo url] is the url of the remote repo. If you want to use GitHub, create an empty repository, and copy the created repository’s link.
If you clone a repository from GitHub or another tool, the remote origin is automatically set to that parent repository. If you ever need to change the remote origin, it’s a two-step process:
$git remote rm origin$git remote add originYou can also add other targets than origin (origin is a generic target meaning the originating repository). To see all remote repositories, use the command $git remote -v, which lists all registered remote repositories (the -v flag is for verbose).
The $git push and $git pull commands are shorthand for pushing and pulling the master branch to and from the origin repository. The full commands can be used to push an alternate branch or to reach an alternate remote repository: $git push [remote repo name] [branch name], $git pull [remote repo name] [branch name]
Pushing your code to a remote repository is a good way to move it between Codio boxes. You can clone such a repository after you create it with the command:
$ git clone [git clone url]Where the [git clone url] is the URL of your remote repository. Cloning a repository automatically sets its remote origin repo to the repository it was cloned from.
Node, and its package manager, npm, are powerful tools for developing server-side applications in JavaScript. In the past chapter, we’ve discussed the event loop that drives Node’s asynchronous, event-driven approach, and the asynchronous function pattern employed by many node libraries. We’ve also talked about how Node.js code can be organized into modules, how those modules can be imported with a require() call, and how the node package manager (npm) can be used to download and install open-source packages locally. Finally, we’ve discussed how to create our own local packages from our projects.
Node can be downloaded from nodejs.org or installed using Node Version Manager (nvm).
The latest Node documentation can be found at https://nodejs.org/en/docs/