Basic Web Servers
Serving Content via the World-Wide-Web
Serving Content via the World-Wide-Web
The first web servers were developed to fulfill a simple role - they responded to requests for HTML documents that were (hopefully) located in their physical storage by streaming the contents of those documents to the client.

This is embodied in our request-response pattern. The client requests a resource (such as a HTML document), and receives either a status 200 response (containing the document), or an error status code explaining why it couldn’t be retrieved.
Node was written primarily to provide tools to develop web servers. So it should come as no surprise that it supports HTTP through a built-in library, the http module. This module provides support for creating both web servers and web clients, as well as working with http requests and responses. Let’s start by examining the latter.
Remember that a HTTP request is nothing more than a stream of text formatted according to the HTTP standards, as we discussed in Chapter 2. Node makes this information easier to work with in your server code by parsing it into an object, an instance of http.IncomingMessage. Its properties expose the data of the request, and include:
'GET', 'POST', 'PUT', 'PATCH', or 'DELETE'You typically won’t create an http.IncomingMessage, rather it will be provided to you by an instance of http.Server, which we’ll talk about shortly.
The HTTP response is also nothing more than a stream of text formatted according to the HTTP standards, as laid out in Chapter 2. Node also wraps the response with an object, an instance of http.ServerResponse. However, this object is used to build the response (which is the primary job of a web server). This process proceeds in several steps:
Not all of these steps are required for all responses, with the exception of the sending of the response. We’ll discuss the process of generating a response in more detail later. As with the http.IncomingMessage, you won’t directly create http.ServerResponse objects, instead they will be created by an instance of http.Server, which we’ll look at next.
The http.Server class embodies the basic operating core of a webserver, which you can build upon to create your own web server implementations. Instances of http.Server are created with the factory method http.createServer(). This method takes two parameters, the first is an optional JavaScript object with options for the server, and the second (or first, if the options parameter is omitted) is a callback function to invoke every time the server receives a request. As you might expect, the method returns the created http.Server instance.
The callback function always takes two parameters. The first is an instance of http.IncomingMessage (often assigned to a variable named req) that represents the request the server has received, and the second is an instance of http.ServerResponse (often assigned to available named res) that represents the response the server will send back to the client, once you have set all its properties. This callback is often called the request handler, for it decides what to do with incoming requests. Each incoming request is handled asynchronously, much like any event.
Once the server has been created, it needs to be told to listen for incoming requests. It will do so on a specific port. This port is represented by a number between 0 and 65535. You can think of your computer as an apartment complex, and each port number corresponding to an apartment number where a specific program “lives”. Thus, to send a message to that particular program, you would address your letter to the apartment address using the apartment number. In this analogy, the apartment address is the host address, i.e. the IP address of your computer, and the specific apartment is the port. Certain port numbers are commonly used by specific applications or families of applications, i.e. web servers typically use port 80 for HTTP and port 443 for HTTPS connections. However, when you are developing a webserver, you’ll typically use a non-standard port, often an address 3000 and up.
Thus, to start your webserver running on port 3000, you would invoke [server.Listen()] with that port as the first argument. An optional second argument is a callback function invoked once the server is up and running - it is usually used to log a message saying the server is running.
A quick example of a server that only responds with the message “Hello web!” would be:
const http = require('http');
const server = http.createServer((req, res) => {
    req.end("Hello web!");
});
server.listen(3000, () => {
    console.log("Server listening at port 3000");
});
Once the server is running, you can visit http://localhost:3000 on the same computer to see the phrase “Hello web!” printed in your browser.
The localhost hostname is a special loopback host, which indicates instead of looking for a computer on the web, you’re wanting to access the computer you’re currently on. The :3000 specifies the browser should make the request to the non-standard port of 3000. If we instead used port 80, we could omit the port in the URL, as by default the browser will use port 80 for http requests.
An important aspect to recognize about how Node’s http library operates is that all requests to the server are passed to the request handler function. Thus, you need to determine what to do with the incoming request as part of that function.
You will most likely use the information contained within the http.IncomingMessage object supplied as the first parameter to your request handler. We often use the name req for this parameter, short for request, as it represents the incoming HTTP request.
Some of its properties we might use:
The req.method parameter indicates what HTTP method the request is using. For example, if the method is "GET", we would expect that the client is requesting a resource like an HTML page or image file. If it were a "POST" request, we would think they are submitting something.
The req.url parameter indicates the specific resource path the client is requesting, i.e. "/about.html" suggests they are looking for the “about” page. The url can have more parts than just the path. It also can contain a query string and a hash string. We’ll talk more about these soon.
The req.headers parameter contains all the headers that were set on this particular request. Of specific interest are authentication headers (which help say who is behind the request and determine if the server should allow the request), and cookie headers. We’ll talk more about this a bit further into the course, when we introduce the associated concepts.
Generally, we use properties in combination to determine what the correct response is. As a programmer, you probably already realize that this decision-making process must involve some sort of control flow structure, like an if statement or switch case statement.
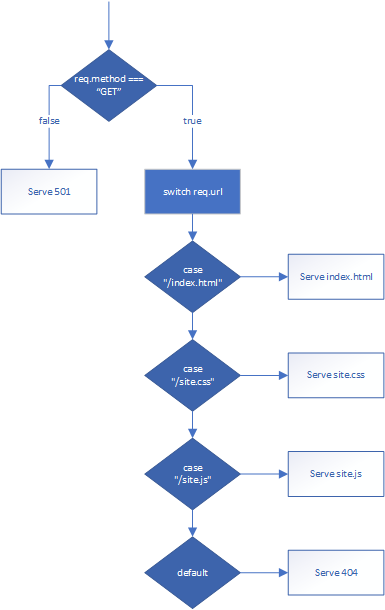
Let’s say we only want to handle "GET" requests for the files index.html, site.css, and site.js. We could write our request handler using both an if else statement and a switch statement:
function handleRequest(req, res) {
    if(req.method === "GET") {
        switch(req.url) {
            case "/index.html":
                // TODO: Serve the index page
                break;
            case "/site.css":
                // TODO: Serve the css file
                break;
            case "/site.js":
                // TODO: Serve the js file
                break;
            default:
                // TODO: Serve a 404 Not Found response
        }
    } else {
        // TODO: Serve a 501 Not Implemented response
    }
}
Notice that at each branching point of our control flow, we serve some kind of response to the requesting web client. Every request should be sent a response - even unsuccessful ones. If we do not, then the browser will timeout, and report a timeout error to the user.
The second half of responding to requests is putting together the response. You will use the http.ServerResponse object to assemble and send the response. This response consists of a status code and message, response headers, and a body which could be text, binary data, or nothing.
There are a number of properties and methods defined in the http.ServerResponse to help with this, including:
Consider the 501 Not Implemented response in our example above. We need to send the 501 status code, but there is no need for a body or additional headers. We could use the req.statusCode property to set the property, and the req.end() method to send it:
    // TODO: Serve a 501 Not Implemented response
    res.status = 501;
    res.end();
The sending of a response with a body is a bit more involved. For example, to send the index.html file, we would need to retrieve it from the hard drive and send it as the body of a request. But as the default status code is 200, we don’t need to specify it. However, it is a good idea to specify the Content-Type header with the appropriate mime-type, and then we can use the res.end() method with the file body once we’ve loaded it, i.e.:
    // TODO: Serve the index page
    fs.readFile('index.html', (err, body) => {
        if(err) {
            res.status = 500;
            res.end();
            return;
        }
        res.setHeader("Content-Type", "text/html");
        res.setHeader("Content-Length", body.length);
        res.end(body, "utf8");
    });
Notice too, that we need to account for the possibility of an error while loading the file index.html. If this happens, we send a 500 Server Error status code indicating that something went wrong, and it happened on our end, not because of a problem in the way the client formatted the request. Notice too that we use a return to prevent executing the rest of our code.
We also supply the length of the response body, which will be the same as the buffer length or the length of a string sent as the body. Binary data for the web is counted in octets (eight bits) which conveniently is also how Node buffers are sized and the size of a JavaScript character.
The http.ServerResponse object also has a method writeHead() which combines the writing of status code, message, and headers into a single step, and returns the modified object so its end() method can be chained. In this way, you can write the entire sending of a response on a single line. The parameters to response.writeHead() are the status code, an optional status message, and an optional JavaScript object representing the headers, using the keys as the header names and values as values.
Serving the css file using this approach would look like:
    // TODO: Serve the site css file
    fs.readFile('site.css', (err, body) => {
        if(err) return res.writeHead(500).end();
        res.writeHead(200, {
            "Content-Type": "text/html",
            "Content-Length": body.length
        }).end(body, "utf8");
    });
You can use any combination of these approaches to send responses. Some important considerations:
Warning
response.end() has been invoked, it will log an error if it is attempted again.response.writeHead() method actually streams the head to the client. Thus, you cannot run response.setHeader() or set response.statusCode or response.statusMessage after it has been set.response.end() has been invoked will log an error, as you cannot change the response once it’s sent.
You may have noticed that we used the asynchronous version of fs.readFile() in our response handler. This is critical to good performance with a Node-based webserver - any potentially blocking action taken in the request handler should be asynchronous, because all incoming requests must be processed on the same thread. If our event loop gets bogged down handling a blocked process, then nobody gets a response!
Consider if we implemented one of the file serving options using the synchronous fs.readFileSync():
    // TODO: Serve the site js file
    try {
      var body = fs.readFileSync('site.js');
      res.writeHead(200, {
        "Content-Type": "application/javascript",
        "Content-Length": body.length
      }).end(body, "utf8");
    } catch(err) {
        res.writeHead(500).end();
    }
It does not look that different from the asynchronous version, but consider what happens if site.js cannot be opened immediately (perhaps it is locked by a system process that is modifying it). With the synchronous version, we wait for the file to become available. While we wait, incoming requests are added to our event queue… and none are processed, as the event loop is paused while we are waiting for fs.readFileSync('site.js') to resolve. If it takes more than three seconds, the clients that are waiting will start seeing timeouts in their browsers, and will probably assume our site is down.
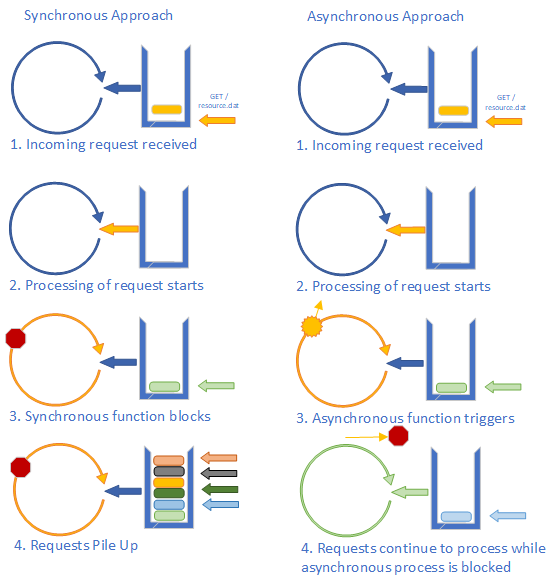
In contrast, if we used the asynchronous version, the reading of the file is handed off to another thread when fs.readFile() is invoked. Any additional processing to do within the event loop for this request is finished, and the next task is pulled from the event queue. Even if our request for the original file never completes, we still are serving requests as quickly as we get them.
This asynchronous approach is key to making a Node-based website perform and scale well. But it is vitally important that you, as a web developer, understand both why using asynchronous processes is important, and how to use them correctly. Because if you don’t, your application performance can be much, much worse than with other approaches.
In our example web server, we argued that asynchronous file reading was better than synchronous because reading from a file is a potentially blocking operation that can take a long time to perform. But even when it doesn’t block, it can still take a lot of time, making it the most expensive part of our request handling operation in terms of the time it takes to perform.
If we really want to squeeze all the performance we can out of our server (and therefore handle as many users as possible), we need to consider the strategy of caching. This means storing our file content in a location where access is faster - say in memory rather than on the disk. Variables in our application are stored in RAM, even variables whose contents were initialized from disk files. Thus, assigning the contents of a file to a variable effectively caches it for faster access.
Moreover, because Node variables are only accessible from the Node process, which from our perspective in the event loop is single-threaded, we don’t have to worry about blocking once the file has been loaded. One strategy we can employ is to pre-load our files using synchronous operations, i.e.:
const http = require('http');
const fs = require('fs');

const html = fs.readFileSync('index.html');
const css = fs.readFileSync('site.css');
const js = fs.readFileSync('site.js');
Now we can define our revised event handler, which uses the cached versions:
function handleRequest(req, res) {
    if(req.method === "GET") {
        switch(req.url) {
            case "/index.html":
                // Serve the index page
                res.writeHead(200, {'Content-Type': 'text/html', 'Content-Length': html.length}).end(html);
                break;
            case "/site.css":
                // Serve the css file
                res.writeHead(200, {'Content-Type': 'text/html', 'Content-Length': css.length}).end(css);
                break;
            case "/site.js":
                // Serve the js file
                res.writeHead(200, {'Content-Type': 'text/html', 'Content-Length': js.length}).end(js);
                break;
            default:
                // Serve a 404 Not Found response
                res.writeHead(404).end();
        }
    } else {
        // Serve a 501 Not Implemented response
        res.writeHead(501).end();
    }
}
Finally, we create and start the server:
var server = http.createServer(handleRequest);
server.listen(80, ()=>{
    console.log("Server listening on port 80");
});
Notice in this server implementation we use the synchronous fs.readFileSync(), and we don’t wrap it in a try ... catch. That means if there is a problem loading one of the files, our Node process will crash. But as these files are loaded first, before the server starts, we should see the error, and realize there is a problem with our site files that needs fixed. This is one instance where it does make sense to use synchronous file calls.
While caching works well in this instance, like everything in computer science it doesn’t work well in all instances. Consider if we had a server with thousands of files - maybe images that were each 500 Megabytes. With only a thousand images, we’d have 500 Gigabytes to cache… which would mean our server would need a lot of expensive RAM. In a case like that, asynchronous file access when the file is requested makes far more sense.
Also, depending on the use pattern it may make sense to cache some of the most frequently requested images. With careful design, this caching can be dynamic, changing which images are cached based on how frequently they are requested while the server is running.
The original purpose of the World-Wide-Web was to share webpages and other digital resources across the Internet. In many ways, an early web server was like a hard drive that was open to the world. Think about the HTTP methods, "GET" is like a file read, "POST" is like a write, "PUT" and "PATCH" like a file modification, and "DELETE" was a file erasure.
So, just like when you browse your hard drive using Windows Explorer or other software, it was necessary for these early web pages to display an index - a listing of all the contents of a directory. You’ve seen similar in Codio if you ever used the “Project Index” option in the run menu - it displays an index of the project directory:

This is a pretty standard auto-generated directory listing - it provides the path to the directory being displayed, and all the contents of the directory as hyperlinks. Clicking on a file will open or download it, and clicking a directory will open that directory’s auto-generated directory listing.
As the use of the web expanded into commercial and public life, many web developers wanted to replace auto-generated directory listing pages with a carefully designed home page. But auto-generated directory listing pages remained an important feature for many sites that served as a more traditional file server.
The compromise adopted by most web servers was that if the directory contained an HTML file named index.html (or sometimes index with any extension, i.e. index.php), that page would be served in leu of an auto-generated index page. Most also allow disabling the directory listing as a configuration option.
You might be wondering about security if a web server starts exposing directory structure and files willy-nilly. Most web servers will only serve files in a specific directory (often called the root directory) and its subdirectories. In a typical configuration, this root directory is named public or public_html to reinforce the idea that it is available to anyone browsing the web.
Files that need to have access restricted to certain people should not be placed in this directory, but be placed behind an authentication mechanism (sometimes referred to as an auth wall or pay wall for subscription-based sites). We’ll talk about this more in our chapter on authentication.
While we normally think of downloading an entire file from the web, there are some situations where it makes sense to download only part of a file. One case is with a large file download that gets interrupted - it makes a lot of sense to start downloading the remaining bytes from where you left off, rather than starting over again. A second case is when you are streaming media; often the user may not watch or listen to the entire media file, so why download the bytes they don’t need? Or if it is a live stream, we explicitly can’t download the entire thing, because later parts do not yet exist!
HTTP explicitly supports requesting only a part of a resource with the Range header. This allows us to specify the unit of measure (typically bytes), a starting point, and an optional end. This header is structured:
Range: <unit>=<range-start>-<range-end>Where <unit> is the unit of measure, the <range-start> is the start of the range to send, measured in the provided unit, and <range-end> is the end of the range to send.
Thus, a real-world Range header might look like:
Range: bytes=200-300You can also specify only the starting point (useful for resuming downloads):
Range: <unit>=<range-start>-Finally, you can specify multiple ranges separated by commas:
Range: <unit>=<range1-start>-<range1-end>, <range2-start>-<range2-end>, <range3-start>-Of course, as with all request headers, this indicates a desire by the web client. It is up to the web server to determine if it will be honored.
Which brings us to the 206 Partial Content response status code. If the server chooses to honor a range specified in the request header, it should respond with this status code, and the body of the response should be just the bytes requested.
In addition, the response Content-Range header should be included with the response, specifying the actual range of bytes returned. This is similar to the Range header, but includes a the total size:
Content-Range: <unit> <range-start>-<range-end>/<size>An asterisk (*) can be used for an unknown size.
Also, the Content-Type header should also be included, and match the type of file being streamed.
If multiple ranges are included in the response, the Content-Type is "multipart/byteranges" and the response body is formatted similarly to multipart form data.