Authentication
Who are you?
Who are you?
An important part of any dynamic web server is controlling how, and by whom, it is used. This is the domain of authentication and authorization. Authentication refers to mechanisms used to establish the identity of a user, and authorization refers to determining if an authenticated user has permission to do the requested action in the system. Collectively, these two concepts are often referred to by the abbreviation auth.
Consider a content management system (CMS) - a dynamic website for hosting content created by authorized users. The K-State website is an example of this kind of site - the events, articles, and pages are written by various contributors throughout the university. It is important that only authorized agents of the university (i.e. staff and faculty) are allowed to publish this content. Can you imagine what would happen if anyone could post anything on the K-State website?
In this chapter, we’ll examine strategies for performing both authentication and authorization.
The recognition of a need for authentication is not new to the web - it’s been there since the earliest standards. In fact, the original URL specification included an optional username and password as part of its format (specified as [username]:[password]@ between the protocol and host). I.e. to make a HTTP authenticated request against the CS departmental server you might use:
https://willie:purpleandwhite@cs.ksu.edu/However, the use of authentication URLS is now highly discouraged and has been stripped from most browsers, as it is considered a security risk. Instead, if you are using HTTP-based authentication the server needs to issue a challenge 401 Unauthorized response, along with a WWW-Authenticate header specifying the challenge. This will prompt the browser to display a username/password form and will re-submit the request with the credentials using an Authorization header. The process looks something like this:
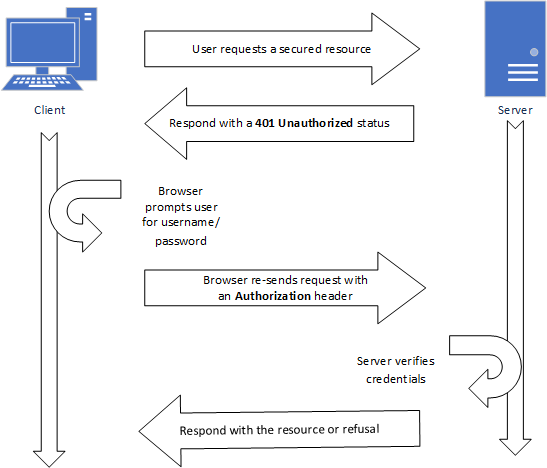
As you can see, when the client makes a request that requires authentication, the server issues a 401 Unauthorized status code, along with an WWW-Authenticate header specifying the authentication scheme. This prompts the browser to request the user credentials via a dialog (much like the one created by the JavaScript functions alert(), confirm(), and prompt()). If the user supplies credentials, the request is re-sent, with those credentials included in an Authentication header. The server then decides, based on the credentials, if it will allow the request (typically a 200 response), or refuse (a 403 Unauthorized response).
The WWW-Authenticate header looks like:
WWW-Authenticate: [type] realm=[realm]Where [type] is the authentication scheme (Basic being the most common), and realm describing the protected part of the server.
In the Basic authentication scheme, the content of the Authorization header is the string [username]:[password] encoded in base64, where [username] is the users’ username, and [password] is their password.
Base64 encoding is easy to undo, so you should only use HTTP Basic Authentication with the https protocol, which encrypts the request headers. Otherwise, anyone along the path the user’s request travels can capture and decrypt the user’s credentials.
The standard also defines other authorization schemes, but none are widely used today. Instead, most web developers have opted to build authentication directly into their web application. We’ll discuss several of the most common approaches next.
One of the more common approaches used in modern dynamic webservers - especially those that are already using a database - is to have each user create an account and log in with a username and password. The primary difference in this approach from the HTTP Basic one is that:
Authentication headerThe actual difference in your server code between the two approaches is not that large.
In either case, it is necessary for the server to be able to verify that the user’s supplied credentials are correct. For most database-backed dynamic webservers, this is accomplished by having a users table that stores the username, and an transformed version of the password. This transformation is usually accomplished through the use of a cryptographic hash function. This is a function that converts a string into a sequence of bytes that are very different from the source string. It is also a function that is extremely difficult to reverse i.e. it is difficult to figure out what the original string was from the hashed results.
When authenticating the user, the password supplied by the user is hashed using the same function, and the resulting hash is compared to the one stored in the database. If they match, the user is confirmed, and can be logged in.
The reason we store passwords only in this encrypted form is that if an adversary was able to compromise our database and obtain the users table, they still wouldn’t know the users’ passwords. Even with the contents of the database, the adversary would not be able to log in to our server as the user. And, as most users use the same password and email for multiple sites, this gives them some additional protection.
In fact, current best practice is to do more than just encrypt the password - we also use salt and multiple hashing rounds.
Salting a password simply means to append a series of characters to the user’s password before hashing it. This helps avoid rainbow table attacks, where an adversary uses a list of prehashed commonly-used passwords. Since many users adopt simple passwords like 1234, secret, etc., it is a good bet that if you do obtain a list of usernames and their hashed passwords, you can find some matches. Appending the additional characters (usually in the form of random bytes) can prevent this. For an even stronger approach, two salts can be used - one stored as an server or environment variable, and one randomly generated per user and stored in the users table. Thus, the adversary would need to obtain access to both the database and the source code or server environment, making attacks more difficult.
Unfortunately, computing hardware has advanced to the point that brute force attacks have become more than plausible. In a brute-force approach, permutations of characters are hashed until a match is found. A cluster of off-the-shelf graphics cards can make as many as 350 billion guesses each second. The defense against this approach is to make it take longer. Cryptographic hash functions like Bcrypt allow the hashing to be performed in multiple iterations. Adding more iterations makes the encryption process take longer - and therefore slows down any brute-force attack replicating the hashing function.
The downside is that it takes longer to log a user in using this strategy, but it provides about the best protection that we as web developers can offer. Incidentally, this is another reason to only authenticate the user once, rather than on every request (as is the case with HTTP authentication). To be able to store the user’s authentication however, we must maintain some form of session.
This brings us to the second half of the username/password approach - we have to implement some form of user session. To do user sessions, we must also employ cookies. By their nature, cookies are not as secure as we might like, but there are some strategies we can use to make them more secure. First, we should specify the cookies using the Secure and HttpOnly attributes, and the SameSite attribute set to Strict. Moreover, the values set in the cookie should also be encrypted before being set (in this case, with a two-way encryption). Commonly, only the session id or user id will be included in the cookie, while the actual session data will be stored server-side in memory or in a sessions table.
As with HTTP Authentication (and indeed, all authentication approaches) password-based authentication should only be used with HTTPS connections.
Now that we’ve discussed how to build a password-based authentication system as securely as possible, we should take a moment to understand what makes a good password. While we can’t force users to use good passwords, we can encourage them to do so, and potentially build some requirements/guidance into our sign up forms.
You’ve likely been told multiple times that a good password is a mix of numbers, upper- and lower-case letters, and special symbols. While this is indeed marginally better than a password of the same length that uses only letters, it isn’t much. Remember that with some clever programming and a graphics card, passwords can be brute-forced. The amount of time this takes is more dependent on the length of the password than the combination of characters. This XKCD comic sums up the issue succinctly:

In short, the best passwords are actually pass phrases - a combination of words that is easy to remember and of significant length. Given this is mathematically demonstrable, why do so many authentication services insist on a complex scheme for making short passwords? I suspect it is a legacy from when storage space was at a premium, as well as a nod to database performance.
Think back to our SQL discussions - we can declare text in two ways - a VARCHAR (which has a set maximum length), or TEXT (which can be any size). These roughly correspond to value and reference types in a programming language - VARCHARS are stored inline with table data, while TEXT entries are stored separately, and an address of their location is stored in the table. If we’re retrieving thousands or millions of rows including TEXT values, we have to pull those values from their disparate locations - adding overhead to the query. VARCHARS we get with the row for no extra time cost. So storing passwords as a VARCHAR would give better performance, and limiting them to a small size (by imposing a character limit) would save on storage requirements.
In the modern web, with storage costs as low as they are, there is no excuse for clinging to short passwords with arcane requirements. If you are going to force your users to meet any rules for your password system, it should be a minimum length.
Or, we can side-step the issue entirely, by passing responsibility for authentication to a third party. We’ll look at these strategies next.
It should be clear from our earlier discussion that there are some very real challenges to writing a good authentication approach. These challenges can be broken into two categories, those that face us as the programmer, and those that arise from our users:
For us as the programmer, there are a lot of steps in creating an authentication strategy that we must get right. We also must be very careful about how we store the authentication data - i.e. passwords should always be stored encrypted, never as plain text. And having actual authentication data in our site makes us a juicer target for adversaries, and potentially ups the stakes if our site is compromised.
Finally, what constitutes best practice in authentication is constantly changing. And to make sure we are doing everything as securely as possible we should be updating our apps to follow current best practices. This is obviously a lot of work.
For the user, having yet another login and password contributes to a number of problems. Users struggle to remember multiple passwords, and often default to using the same login and password across multiple sites. This means their credentials are only as secure as the worst-implemented security of those sites. While your app might have stellar security, your user might be compromised by a completely different site you have no influence over. Also, users often resort to writing down credentials - leaving them open to being found and used by others.
Single-sign on is a solution to both sets of challenges. The basic idea is to have one authentication service that is used for multiple, often completely independent applications. A user only needs to remember one login and password for all the applications, and authentication is done on one special-built server that can be updated to the latest best practices with ease.
Of course, to implement single-sign on, we need a way to establish trust between the authenticating server and the other web apps that use it. Thus, we need a standardized process to draw upon. We’ll discuss several in the next couple of sections.
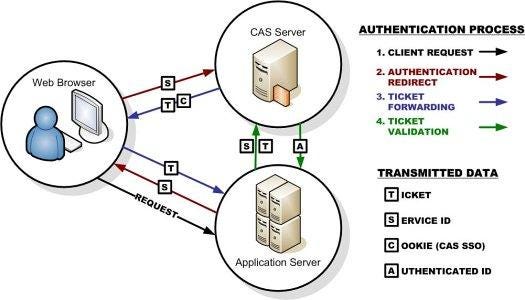
Let’s start our discussion of single-sign on strategies with Central Authentication Service (CAS). We’ll do this because it is one of the more straightforward approaches to Single Sign On, and one you’ve probably used every day as a K-State student, as it is the basis of Kansas State University’s eid login system.
CAS is a standard protocol that involves two servers and the client computer. One server is the host of the app and the other is the authentication server. The flow is fairly straightforward:
The user visits the app server, which determines the user is not logged in
The app server redirects the browser to the authentication server, providing in the url as a query parameter URL to return the authenticated user to
The authentication server sends the browser a login form
The user fills out and submits the form, which goes back to the authentication server
If the authentication is unsuccessful, the authentication server re-sends the form (returning to step 3). If it is successful, the authentication server redirects the user to the app server, using the URL it provided in the first redirect. It also sends a ticket (a string of cryptographic random bytes) that corresponds to the login attempt as a query parameter
The app server now has to verify that the ticket it received is valid (i.e. it is not counterfeit or an re-used one captured from an earlier login attempt). To do this, the app server sends a request to validate the ticket to the authentication server
If the authentication server sends an XML response indicating if the ticket was valid. If it is valid, this XML also includes information about the user (at a minimum the username, but it can contain additional information like email, first and last names, etc).
Once the app server is sure the ticket is valid, it finishes logging in the user (typically by saving their identity in a session) and sends a welcome page or the page they were attempting to access.
The diagram below visually shows this process:
You can learn more about the CAS approach at https://www.apereo.org/projects/cas.
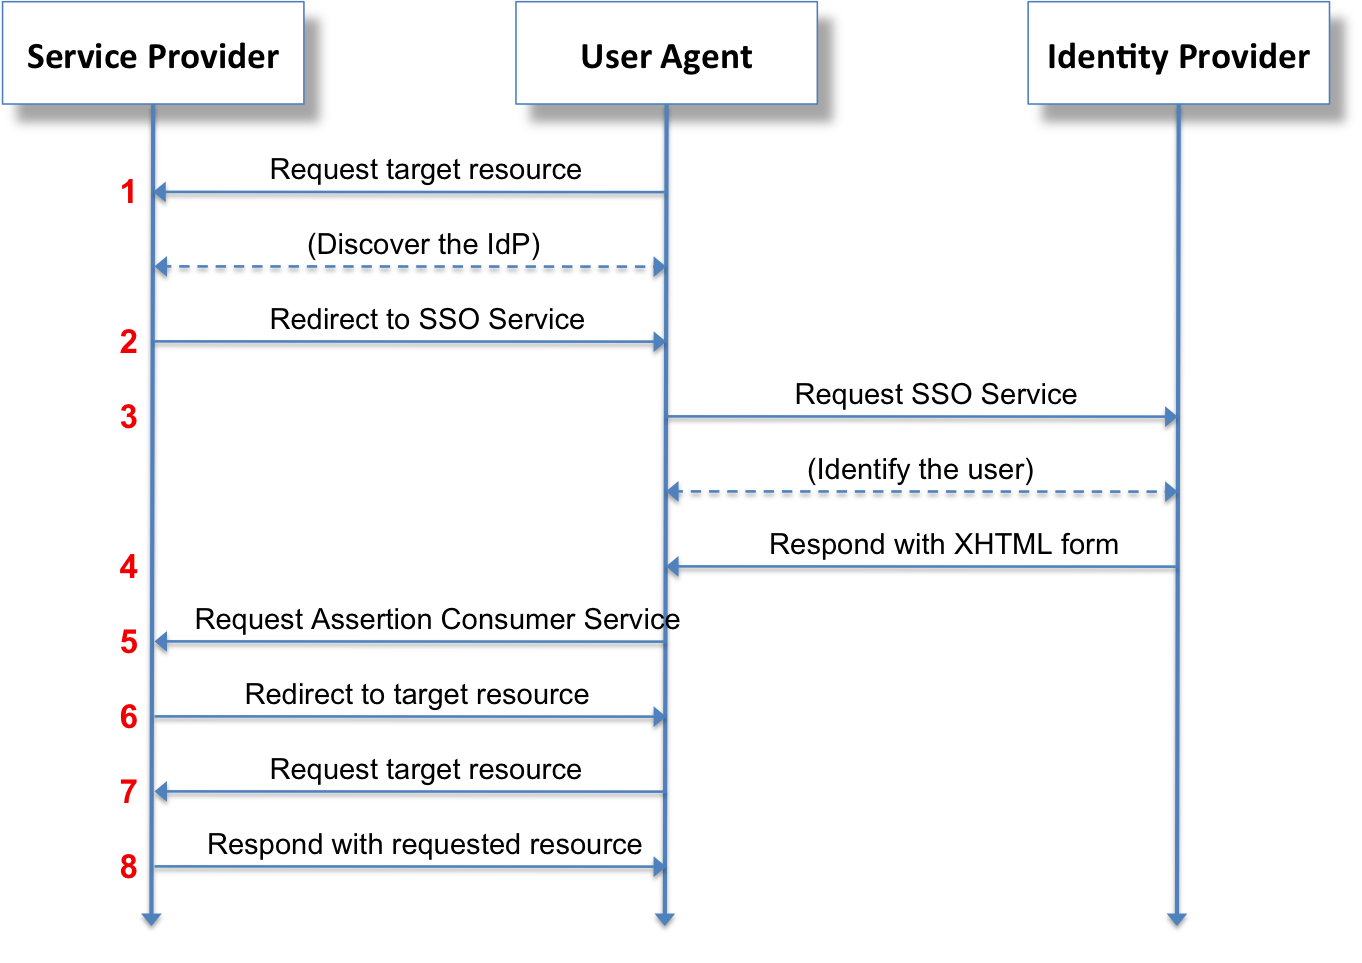
Security Assertion Markup Language (SAML) is a similar single-sign-on strategy to CAS, but one that has a wider adoption in the business world. The process is quite similar, with the addition that the user agent identifies the user before requesting access. How it does so is left to the implementer, but it can be an IP address, stored token, or other means.
Much like CAS, SAML provides its response in the form of XML. And like CAS, the SAML standard primarily works with traditional, server-based web apps. We’ll turn to some alternatives next.
File:Saml2-browser-sso-redirect-post.png. (2021, October 17). Wikimedia Commons, the free media repository. Retrieved 15:33, June 2, 2022 from https://commons.wikimedia.org/w/index.php?title=File:Saml2-browser-sso-redirect-post.png&oldid=599388084. ↩︎
A common thread across single-sign-on approaches is the issuing of some kind of ticket or certificate to identify the signed-in user. This is often stored within a cookie (which means it can be used to persist a connection with a web app). However, as the web matured, a more robust identity token became a standard: the JSON Web Token (JWT).
A JSON Web Token (JWT) consists of three parts:
The JWT puts the user information directly into a token that is served by the authentication server. So if we want to identify a user by email, their email is in the payload. The header provides information like when the JWT will expire, and what cryptographic algorithm was used to generate the signature. And the signature was created using the specified cryptographic algorithm on the header and payload. This signature is what gives a JWT its robustness; when used correctly makes it impossible to modify the payload without the tampering being evident.
How trust is established is based on the cryptographic function, which uses a public and private key pair (much like TLS). The hash is created with the private key on the authentication server on a successful login. It can be decoded by an application using the public key. The decoded data should match that of the header and payload exactly. If it does, this proves the JWT was created by the authentication server (as you can’t create one without the private key) and hasn’t been tampered with. If it is tampered with, i.e someone changes the payload, the signature will no longer match.
Because of this tamper-resistant nature, JWT has quickly become a standard form for authentication tokens.
You can learn more about the JWT approach at https://jwt.io/.
OAuth 2.0 is perhaps the best-known single-sign-on solution. Many of the big internet players provide OAuth services: Google, Microsoft, Facebook, Twitter, etc. However, OAuth is significantly more complex than the other approaches we’ve talked about, as it really a standard for access delegation, i.e. a way for users to authorize third-party apps to access their information stored with the identity provider.
I.e. if you write an app that works with the Facebook API and needs access to a users’ friends list, then OAuth allows you to authorize Facebook to share that info with your app. This authorization is done by the user through Facebook, and can be revoked at any time.
Despite being built to help with access delegation, OAuth 2.0 can (and often is) used soley for the purpose of single-sign-on.
The OAuth protocol flow
Notice the big difference here between CAS and SAML is that the app server doesn’t need to contact the identity server directly to authenticate the user. This is because the app server is registered with the identity server, which provides it both an client id and secret. The client id is a public identifier used to uniquely identify the web app amongst all those that use the identity service, and the secret should be known only to the web app and the identity server. This client id, secret, and user’s token are sent to the authenticating server when requests are made for its services.
OAuth is sometimes referred to as pseudo-identity, as its real purpose is to provide access to the services of the identity provider. OpenID is another standard built on top of OAuth that goes one step farther - issuing an authentication certificate certifying the identity of the user. A comparison of the two processes appears in the graphic below:
File:OpenIDvs.Pseudo-AuthenticationusingOAuth.svg. (2020, October 22). Wikimedia Commons, the free media repository. Retrieved 15:38, June 2, 2022 from https://commons.wikimedia.org/w/index.php?title=File:OpenIDvs.Pseudo-AuthenticationusingOAuth.svg&oldid=496954680. ↩︎
In this chapter we discussed many of the possible authentication strategies for web applications, as well as the strengths and drawbacks. To reiterate the most salient points:
Following these guidelines can help keep your users safe and secure. Or you can use a singe-sign-on solution to allow another service to take on the responsibility for authentication. But if you do, you must follow the standard exactly, and protect any secrets or private keys involved. Failing to do so will expose your users’ data.