Express Starter
YouTube VideoGenerating an Express Application
Now that we have our dev container configured, we can start setting up an Express application. The recommended method in the documentation is to use the Express application generator, so we’ll use that method. You may want to refer to the documentation for this command to see what options are available.
Express Documentation
You may also want to bookmark the Express Documentation website as well, since it contains lots of helpful information about how Express works that may not be covered in this tutorial.
For this project, we’ll use the following command to build our application:
$ npx express-generator --no-view --git serverLet’s break down that command to see what it is doing:
npx- The npx command is included with Node.js andnpmand allows us to run a command from annpmpackage, including packages that aren’t currently installed!. This is the preferred way to run commands that are available in anynpmpackages.express-generator- This is the express-generator package innpmthat contains the command we are using to build our Express application.--no-view- This option will generate a project without a built-in view engine.--git- This option will add a.gitignorefile to our projectserver- This is the name of the directory where we would like to create our application.
When we run that command, we may be prompted to install the express-generator package, so we can press y to install it.
That command will produce a large amount of output, similar to what is shown below:
Need to install the following packages:
express-generator@4.16.1
Ok to proceed? (y) y

npm warn deprecated mkdirp@0.5.1: Legacy versions of mkdirp are no longer supported. Please update to mkdirp 1.x. (Note that the API surface has changed to use Promises in 1.x.)

   create : server/
   create : server/public/
   create : server/public/javascripts/
   create : server/public/images/
   create : server/public/stylesheets/
   create : server/public/stylesheets/style.css
   create : server/routes/
   create : server/routes/index.js
   create : server/routes/users.js
   create : server/public/index.html
   create : server/.gitignore
   create : server/app.js
   create : server/package.json
   create : server/bin/
   create : server/bin/www

   change directory:
     $ cd server

   install dependencies:
     $ npm install

   run the app:
     $ DEBUG=server:* npm start
As we can see, it created quite a few files for us! Let’s briefly review what each of these files and folders are for:
public- this folder contains the static HTML, CSS, and JavaScript files that will be served from our application. Much later down the road, we’ll place the compiled version of our Vue frontend application in this folder. For now, it just serves as a placeholder for where those files will be placed.routes- this folder contains the Express application routers for our application. There are currently only two routers, theindex.jsrouter connected to the/path, and theusers.jsrouter connected to the/userspath..gitignore- this file tells git which files or folders can be ignored when committing to the repository. We’ll discuss this file in detail below.app.js- this is the main file for our Express application. It loads all of the libraries, configurations, and routers and puts them all together into a single Express application.package.json- this file contains information about the project, including some metadata, scripts, and the list of external dependencies. More information on the structure and content of that file can be found in the documentation.bin/www- this file is the actual entrypoint for our web application. It loads the Express application defined inapp.js, and then creates anhttpserver to listen for incoming connections and sends them to the Express application. It also handles figuring out which port the application should listen on, as well as some common errors.
Since we are only building a RESTful API application, there are a few files that we can delete or quickly modify:
- Delete everything in the
publicfolder except the fileindex.html - Inside of the
public/index.htmlfile, remove the line referencing the stylesheet:<link rel="stylesheet" href="/stylesheets/style.css">since it has been deleted.
At this point, we should also update the contents of the package.json file to describe our project. It currently contains information similar to this:
{
  "name": "server",
  "version": "0.0.0",
  "private": true,
  "scripts": {
    "start": "node ./bin/www"
  },
  "dependencies": {
    "cookie-parser": "~1.4.4",
    "debug": "~2.6.9",
    "express": "~4.16.1",
    "morgan": "~1.9.1"
  }
}
For now, let’s update the name and version entries to match our project:
{
  "name": "example-project",
  "version": "0.0.1",
  "private": true,
  "scripts": {
    "start": "node ./bin/www"
  },
  "dependencies": {
    "cookie-parser": "~1.4.4",
    "debug": "~2.6.9",
    "express": "~4.16.1",
    "morgan": "~1.9.1"
  }
}
In a stand-alone application like ours, these values really don’t matter, but if we do decide to publish this application as an npm module in the future, these values will be used to build the module itself.
Exploring App.js
Let’s quickly take a look at the contents of the app.js file to get an idea of what this application does:
var express = require('express');
var path = require('path');
var cookieParser = require('cookie-parser');
var logger = require('morgan');

var indexRouter = require('./routes/index');
var usersRouter = require('./routes/users');

var app = express();

app.use(logger('dev'));
app.use(express.json());
app.use(express.urlencoded({ extended: false }));
app.use(cookieParser());
app.use(express.static(path.join(__dirname, 'public')));

app.use('/', indexRouter);
app.use('/users', usersRouter);

module.exports = app;
At the top, the file loads several libraries, including cookie-parser for parsing cookies sent from the browser, and morgan for logging requests. It then also loads the two routers, index and users.
Next, we see the line var app = express() - this line actually creates the Express application and stores a reference to it in the app variable.
The next few lines add various middlewares to the Express application using the app.use() function. Each of these is effectively a function that is called each time the application receives a request, one after the other, until a response is generated and sent. See Using middleware in the Express documentation for more details.
The last line of that group uses the express.static middleware to serve static files from the public directory (it uses the path library and the __dirname global variable to construct the correct absolute path to those files). So, if the user requests any path that matches a static file, that file will be sent to the user. This will happen even if a static file matches an existing route, since this middleware is added to the application before the routes. So, there are some instances where we may want to connect this middleware to the application after adding some important routes - we’ll discuss that in the future as we continue to build this application.
After that, the two routers are added as well. Each router is given a base path - the index router is given the / path, then the users router is given the /users path. These are the URL paths that are used to determine where each incoming request should be sent in the application. See routing in the Express documentation for more details.
Finally, the Express application referenced in app is exported from this file. It is used by the bin/www file and attached to an http server to listen for incoming requests.
Order Matters
Because Express is a routing and middleware framework, the order in which you add middlewares and routers determines how the application functions. So, we must be very thoughtful about the order in which we add middlewares and routers to our application. In this example, notice, that we add the logger first, then parse any incoming JSON requests, then decode any URL encoded requests, then parse any cookies, before doing anything else.
This is a common error that trips up many first-time Express developers, so be mindful as you add and adjust content in this file!
Installing Dependencies
Now that we’ve generated a basic Express web application, we need to install all of the dependencies. This is also the first step we’ll need to do anytime we clone this project for the first time or if we rebuild our GitHub codespace or dev container.
To do this, we need to go to the terminal and change directory to the server folder:
$ cd serverWorking Directory
Remember that we can always see the current working directory by looking at the command prompt in the terminal, or by typing the pwd command:


Once inside of the server folder, we can install all our dependencies using the following command:
$ npm installWhen we run that command, we’ll see output similar to the following:
added 53 packages, and audited 54 packages in 4s

7 vulnerabilities (3 low, 4 high)

To address all issues, run:
  npm audit fix --force

Run `npm audit` for details.
It looks like we have some out of date packages and vulnerabilities to fix!
Updating Dependencies
Thankfully, there is a very useful command called npm-check-updates that we can use to update our dependencies anytime there is a problem. We can run that package’s command using npx as we saw earlier:
$ npx npm-check-updatesAs before, we’ll be prompted to install the package if it isn’t installed already. Once it is done, we’ll see output like this:
Need to install the following packages:
npm-check-updates@17.1.14
Ok to proceed? (y) y

Checking /workspaces/example-project/server/package.json
[====================] 4/4 100%

 cookie-parser   ~1.4.4  →   ~1.4.7
 debug           ~2.6.9  →   ~4.4.0
 express        ~4.16.1  →  ~4.21.2
 morgan          ~1.9.1  →  ~1.10.0

Run npx npm-check-updates -u to upgrade package.json
When we run the command, it tells us which packages are out of date and lists a newer version of the package we can install.
Tread Carefully!
In an actual production application, it is important to make sure your dependencies are kept up to date. At the same time, you’ll want to carefully read the documentation for these dependencies and test your project after any dependency updates, just to ensure that your application works correctly using the new versions.
For example, in the output above, we see this:
debug ~2.6.9 → ~4.4.0This means that the debug library is two major versions out of date (see Semantic Versioning for more information on how to interpret version numbers)! If we check the debug versions list on npm, we can see that version 2.6.9 was released in September 2017 - a very long time ago.
When a package undergoes a major version change, it often comes with incompatible API changes. So, we may want to consult the documentation for each major version or find release notes or upgrade guides to refer to. In this case, we can refer to the release notes for each version on GitHub:
- 3.0.0: https://github.com/debug-js/debug/releases/tag/3.0.0
- 4.0.0: https://github.com/debug-js/debug/releases/tag/4.0.0
We may even need to check some of the release notes for minor releases as well.
Thankfully, the latest version of the debug library is compatible with our existing code, and later in this project we’ll replace it with a better logging infrastructure anyway.
Now that we know which dependencies can be updated, we can use the same command with the -u option to update our package.json file easily:
$ npx npm-check-updates -uWe should see output similar to this:
Upgrading /workspaces/example-project/server/package.json
[====================] 4/4 100%

 cookie-parser   ~1.4.4  →   ~1.4.7
 debug           ~2.6.9  →   ~4.4.0
 express        ~4.16.1  →  ~4.21.2
 morgan          ~1.9.1  →  ~1.10.0

Run npm install to install new versions.
We can also check our package.json file to see the changes:
{
  "name": "example-project",
  "version": "0.0.1",
  "private": true,
  "scripts": {
    "start": "node ./bin/www"
  },
  "dependencies": {
    "cookie-parser": "~1.4.7",
    "debug": "~4.4.0",
    "express": "~4.21.2",
    "morgan": "~1.10.0"
  }
}
Finally, we can install those dependencies:
$ npm installNow when we run that command, we should see that everything is up to date!
added 36 packages, changed 24 packages, and audited 90 packages in 4s

14 packages are looking for funding
  run `npm fund` for details

found 0 vulnerabilities
There we go! We now have a sample Express application configured with updated dependencies.
Testing the Application
At this point, we are ready to actually test our application. To do this, we can run the following command from within the server directory in our project:
$ npm startWhen we do, we’ll see a bit of information on the terminal:
> example-project@0.0.1 start
> node ./bin/www
We’ll also see a small popup in the bottom right corner of the screen, telling us that it has detected that our application is listening on port 3000.
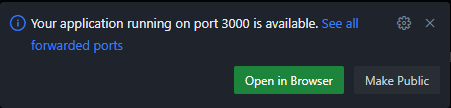
So, to access our application, we can click on the Open in Browser button on that popup. If everything works correctly, we should be able to see our application running in our web browser:
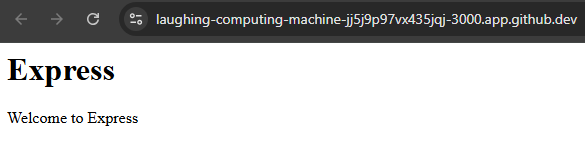
Take a look at the long URL in the browser - that URL includes the name of the GitHub Codespace (laughing-computing-machine in this example), followed by a random Codespace ID (jj5j9p97vx435jqj), followed by the port our application is listening on (3000). We’ll look at ways we can build this URL inside of our application in the future, but for now it is just worth noting.
Finding Listening Ports
If you didn’t see the popup appear, or you cannot find where your application is running, check the PORTS tab above the console in GitHub Codespaces:

We can click on the URL under the Forwarded Addresses heading to access the port in our web browser. We can also use this interface to configure additional ports that we want to be able to access outside of the GitHub Codespace.
We can also access any routes that are configured in our application. For example, the default Express application includes a /users route, so we can just add /users to the end of the URL in our web browser to access it. We should see this page when we do:

Great! It looks like our example application in running correctly.
Committing to GitHub
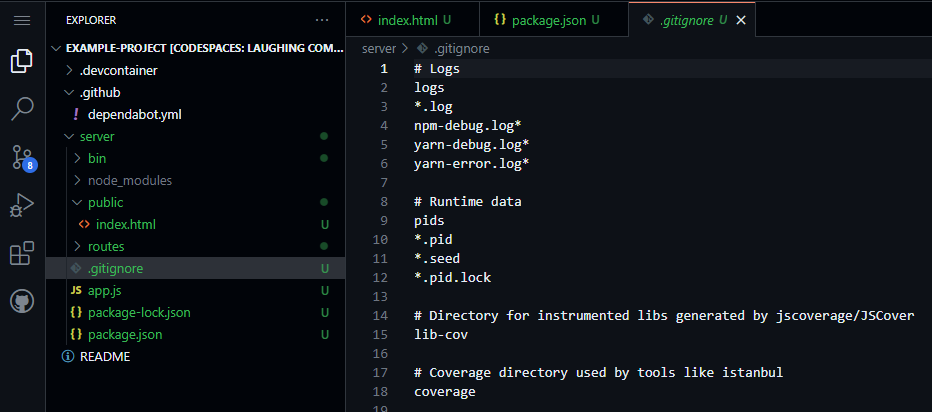
Now is a great time to commit and push our project to GitHub. Before we do, however, we should double-check that our project has a proper server/.gitignore file. It should have been created by the Express application generator if we used the --git option, but it is always important to double-check that it is there before trying to commit a new project.
A .gitignore file is used to tell git which files should not be committed to a repository. For a project using Node.js, we especially don’t want to commit our node_modules folder. This folder contains all of the dependencies for our project, and can often be very large.
Why don’t we want to commit it? Because it contains lots of code that isn’t ours, and it is much better to just install the dependencies locally whenever we develop or use our application. That is the whole function of the package.json file and the npm command - it lets us focus on only developing our own code, and it will find and manage all other external dependencies for us.
So, as a general rule of thumb, we should NEVER commit the node_modules folder to our repository.
Missing gitignore file?
If your project does not have a .gitignore file, you can usually find one for the language or framework you are using in the excellent gitignore GitHub Repository. Just look for the appropriate file and add the contents to a .gitignore file in your project. For example, you can find a Node.gitignore file to use in this project.
At long last, we are ready to commit and push all of our changes to this project. If it works correctly, it should only commit the code files we’ve created, but none of the files that are ignored in the .gitignore file.