Other Libraries
Other Useful Libraries
Before we move on, let’s install a few other useful libraries that perform various tasks in our Express application.
Compression
The compression middleware library does exactly what it says it will - it compresses any responses generated by the server and sent through the network. This can be helpful in many situations, but not all. Recall that compression is really just trading more processing time in exchange for less network bandwidth, so we may need to consider which of those we are more concerned about. Thankfully, adding or removing the compression middleware library is simple.
First, let’s install it using npm:
$ npm install compressionThen, we can add it to our app.js file, generally early in the chain of middlewares since it will impact all responses after that point in the chain.
import express from 'express';
import path from 'path';
import cookieParser from 'cookie-parser';
import compression from 'compression';
import requestLogger from './middlewares/request-logger.js';

import indexRouter from './routes/index.js';
import usersRouter from './routes/users.js';

var app = express();

app.use(compression());
app.use(requestLogger);
app.use(express.json());
app.use(express.urlencoded({ extended: false }));
app.use(cookieParser());
app.use(express.static(path.join(import.meta.dirname, 'public')));

app.use('/', indexRouter);
app.use('/users', usersRouter);

export default app;
To test this library, we can run our application with all built-in debugging enabled through the debug library as documented in the Express Documentation:
$ DEBUG=* npm run devWe’ll see a bunch of output as our Express application is initialized. Once it is done, we can open the home page in our web browser to send an HTTP GET request to the server. This will produce the following log output:
  express:router dispatching GET / +1m
  express:router query  : / +0ms
  express:router expressInit  : / +1ms
  express:router compression  : / +0ms
  express:router logger  : / +0ms
  express:router urlencodedParser  : / +0ms
  body-parser:urlencoded skip empty body +1ms
  express:router cookieParser  : / +0ms
  express:router serveStatic  : / +0ms
  send stat "/workspaces/example-project/server/public/index.html" +0ms
  send pipe "/workspaces/example-project/server/public/index.html" +1ms
  send accept ranges +0ms
  send cache-control public, max-age=0 +0ms
  send modified Thu, 16 Jan 2025 23:17:14 GMT +0ms
  send etag W/"78-1947168173e" +1ms
  send content-type text/html +0ms
  compression no compression: size below threshold +1ms
  morgan log request +2ms
[2025-01-25 07:00:35.013 PM] http:      GET / 200 3.166 ms - 120
We can see in the highlighted line that the compression library did not apply any compression to the response because it was below the minium size threshold. This is set to 1kb by default according to the compression documentation.
So, to really see what it does, let’s generate a much larger response by adding some additional text to our public/index.html file (this text was generated using Lorem Ipsum):
<html>

<head>
  <title>Express</title>
</head>

<body>
  <h1>Express</h1>
  <p>Welcome to Express</p>

  <p>Lorem ipsum dolor sit amet, consectetur adipiscing elit. Aliquam sed arcu tincidunt, porttitor diam a, porta nibh. Duis pretium tellus euismod, imperdiet elit id, gravida turpis. Fusce vitae pulvinar tellus. Donec cursus pretium justo, sed vehicula erat iaculis lobortis. Mauris dapibus scelerisque aliquet. Nullam posuere, magna vitae viverra lacinia, sapien magna imperdiet erat, ac sagittis ante ante tristique eros. Phasellus eget fermentum mauris. Integer justo lorem, finibus a ullamcorper in, feugiat in nunc. Etiam ut felis a magna aliquam consectetur. Duis eu mauris ut leo vehicula fringilla scelerisque vel mi. Donec placerat quam nulla, at commodo orci maximus sit amet. Curabitur tincidunt euismod enim, non feugiat nulla eleifend sed. Sed finibus metus sit amet metus congue commodo. Cras ullamcorper turpis sed mi scelerisque porta.</p>

  <p>Sed maximus diam in blandit elementum. Integer diam ante, tincidunt in pulvinar at, luctus in dui. Fusce tincidunt hendrerit dolor in suscipit. Nullam vitae tellus at justo bibendum blandit a vel ligula. Nunc sed augue blandit, finibus nisi nec, posuere orci. Maecenas ut egestas diam. Donec non orci nec ex rhoncus malesuada at eget ante. Proin ultricies cursus nunc eu mollis. Donec vel ligula vel eros luctus pulvinar. Proin vitae dui imperdiet, rutrum risus non, maximus purus. Vivamus fringilla augue tincidunt, venenatis arcu eu, dictum nunc. Mauris eu ullamcorper orci. Cras efficitur egestas ligula. Maecenas a nisl bibendum turpis tristique lobortis.</p>

</body>

</html>
Now, when we request that file, we should see this line in our debug output:
express:router dispatching GET / +24s
express:router query : / +1ms
express:router expressInit : / +0ms
express:router compression : / +0ms
express:router logger : / +0ms
express:router urlencodedParser : / +0ms
body-parser:urlencoded skip empty body +0ms
express:router cookieParser : / +1ms
express:router serveStatic : / +0ms
send stat "/workspaces/example-project/server/public/index.html" +0ms
send pipe "/workspaces/example-project/server/public/index.html" +0ms
send accept ranges +0ms
send cache-control public, max-age=0 +0ms
send modified Sat, 25 Jan 2025 19:05:18 GMT +0ms
send etag W/"678-1949edaaa4c" +0ms
send content-type text/html +0ms
compression gzip compression +1ms
morgan log request +1ms
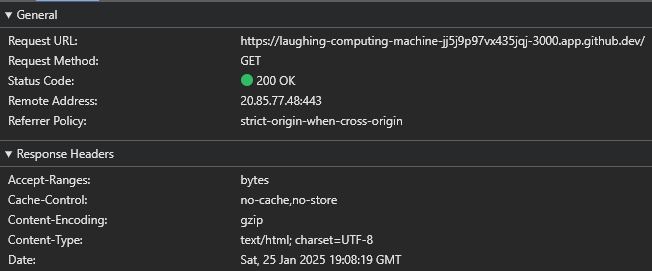
[2025-01-25 07:05:20.234 PM] http: GET / 200 1.232 ms - -As we can see, the compression middleware is now compressing the response before it is sent to the server using the gzip compression algorithm. We can also see this in our web browser’s debugging tools - in Google Chrome, we notice that the Content-Encoding header is set to gzip as shown below:
We’ll go ahead and integrate the compression middleware into our project for this course, but as discussed above, it is always worth considering whether the tradeoff of additional processing time to save network bandwidth is truly worth it.
Helmet
Another very useful Express library is helmet. Helmet sets several headers in the HTTP response from an Express application to help improve security. This includes things such as setting an appropriate Content-Security-Policy and removing information about the web server that could be leaked in the X-Powered-By header.
To install helmet we can simply use npm as always:
$ npm install helmetSimilar to the compression library above, we can simply add helmet to our Express application’s app.js file:
import express from 'express';
import path from 'path';
import cookieParser from 'cookie-parser';
import compression from 'compression';
import helmet from 'helmet';
import requestLogger from './middlewares/request-logger.js';
import indexRouter from './routes/index.js';
import usersRouter from './routes/users.js';
var app = express();
app.use(helmet());
app.use(compression());
app.use(requestLogger);
app.use(express.json());
app.use(express.urlencoded({ extended: false }));
app.use(cookieParser());
app.use(express.static(path.join(import.meta.dirname, 'public')));
app.use('/', indexRouter);
app.use('/users', usersRouter);
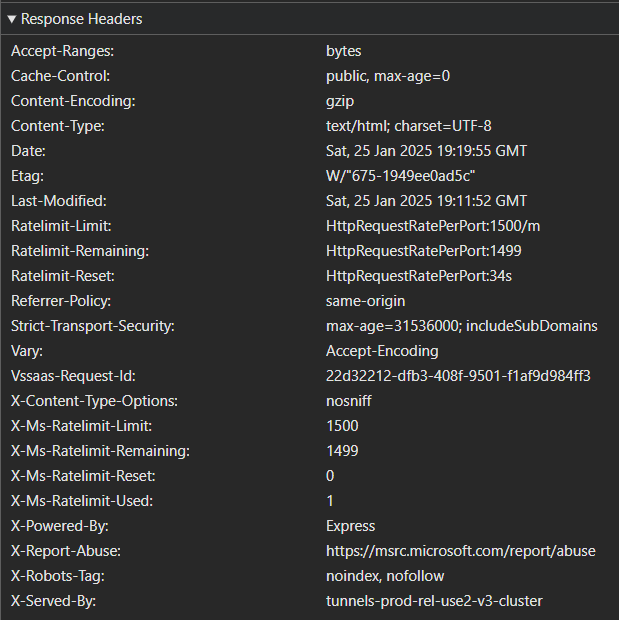
export default app;To really see what the helmet library does, we can examine the headers sent by the server with and without helmet enabled.
First, here are the headers sent by the server without helmet enabled:
When helmet is enabled, we see an entirely different set of headers:
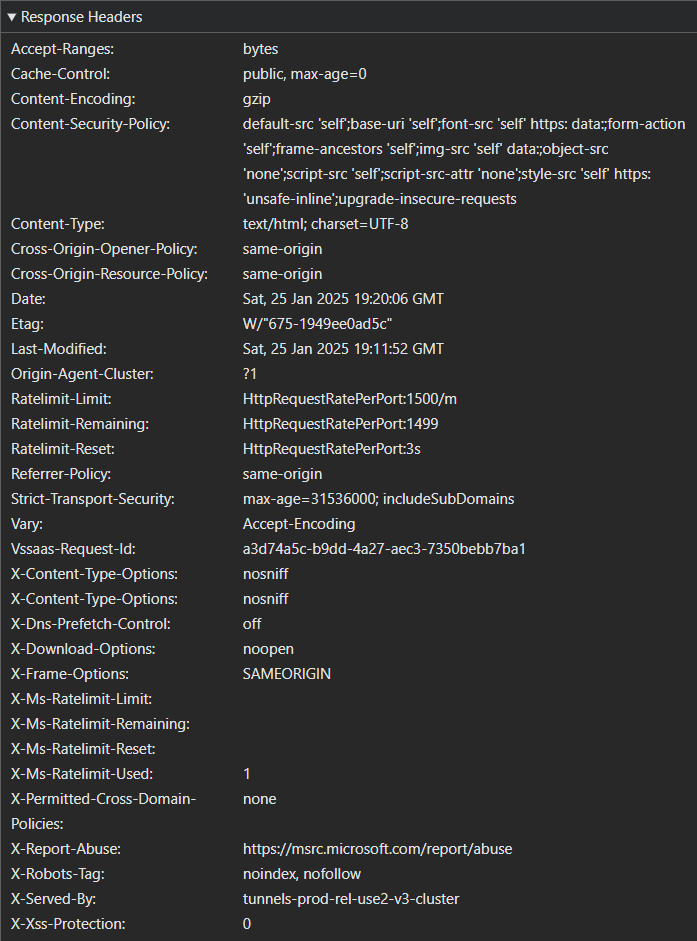
In the second screenshot, notice that the Content-Security-Policy header is now present, but the X-Powered-By header is not? Those changes, along with many others, are provided by the helmet library.
In general, it is always a good idea to review the security of the headers sent by our application. Installing helmet is a good start, but as we continue to develop applications we may learn additional ways we can configure helmet to provide even more security for our applications.
Nodemon
Finally, let’s also install the nodemon package to make developing our application a bit easier. At its core, nodemon is a simple tool that will auotmatically restart our application anytime it detects that a file has changed. In this way, we can just leave our application running in the background, and any changes we make to the code will immediately be availbale for us to test without having to manually restart the server.
To begin, let’s install nodemon as a development dependency using npm with the --save-dev flag:
$ npm install nodemon --save-devNotice that this will cause that library to be installed in a new section of our package.json file called devDependencies:
{
  ...
  "dependencies": {
    "compression": "^1.7.5",
    "cookie-parser": "~1.4.7",
    "express": "~4.21.2",
    "helmet": "^8.0.0",
    "morgan": "~1.10.0",
    "winston": "^3.17.0"
  },
  "devDependencies": {
    "nodemon": "^3.1.9"
  }
}
These dependencies are only installed by npm when we are developing our application. The default npm install command will install all dependencies, including development dependencies. However, we can instead either use npm install --omit=dev or set the NODE_ENV environment variable to production to avoid installing development dependencies.
Next, we can simply update our package.json file to use the nodemon command instead of node in the dev script:
{
  "name": "example-project",
  "version": "0.0.1",
  "type": "module",
  "private": true,
  "scripts": {
    "start": "LOG_LEVEL=http node ./bin/www",
    "dev": "LOG_LEVEL=debug nodemon ./bin/www"
  },
  ...
}
Now, when we execute our application:
$ npm run devWe should see additional output from nodemon to see that it is working:
> example-project@0.0.1 dev
> LOG_LEVEL=debug nodemon ./bin/www

[nodemon] 3.1.9
[nodemon] to restart at any time, enter `rs`
[nodemon] watching path(s): *.*
[nodemon] watching extensions: js,mjs,cjs,json
[nodemon] starting `node ./bin/www`
[2025-01-25 09:37:24.734 PM] info:      Listening on port 3000
Now, with our application running, we can make any change to a file in our application, such as app.js, and it will automatically restart our application:
[nodemon] restarting due to changes...
[nodemon] starting `node ./bin/www`
[2025-01-25 09:39:02.858 PM] info:      Listening on port 3000
We can also always manually type rs in the terminal to restart the application when it is running inside of nodemon.
In general, using nodemon to develop a Node.js application is recommended, but we don’t want to use that in a production environment. So, we are careful to install nodemon as a development dependency only.
This is a good point to commit and push our work!