OpenAPI Documentation
OpenAPI Documentation
There are many different ways to document the features of a RESTful web application. One of the most commonly used methods is the OpenAPI Specification (OAS). OpenAPI was originally based on the Swagger specification, so we’ll sometimes still see references to the name Swagger in online resources.
At its core, the OpenAPI Specification defines a way to describe the functionality of a RESTful web application in a simple document format, typically structured as a JSON or YAML file. For example, we can find an example YAML file for a Petstore API that is commonly cited as an example project for understanding the OpenAPI Specification format.
That file can then be parsed and rendered as an interactive documentation website for developers and users of the API itself. So, we can find a current version of the Petstore API Documentation online and compare it to the YAML document to see how it works.
For more information on the OpenAPI Specification, consult their Getting Started page.
Configuration OpenAPI
For our project, we are going to take advantage of two helpful libraries to automatically generate and serve OpenAPI documentation for our code using documentation comments:
- swagger-jsdoc - generates OpenAPI Specification based on JSDoc comments.
- swagger-ui-express - serves an OpenAPI Documentation page based on the specification generated by other tools.
First, let’s install both of those libraries into our project:
$ npm install swagger-jsdoc swagger-ui-expressNext, we should create a configuration file for the swagger-jsdoc library that contains some basic information about our API. We can store that in the configs/openapi.js file with the following content:
import swaggerJSDoc from 'swagger-jsdoc'

function url() {
  if (process.env.OPENAPI_HOST) {
    return process.env.OPENAPI_HOST
  } else {
    const port = process.env.PORT || '3000'
    return`http://localhost:${port}`
  }
}

const options = {
  definition: {
    openapi: '3.1.0',
    info: {
      title: 'Example Project',
      version: '0.0.1',
      description: 'Example Project',
    },
    servers: [
      {
        url: url(),
      },
    ],
  },
  apis: ['./routes/*.js'],
}

export default swaggerJSDoc(options)
Let’s look at a few items in this file to see what it does:
url()- this function checks for theOPENAPI_HOSTenvironment variable. If that is set, then it will use that value. Otherwise, it uses a sensible default value ofhttp://localhost:3000or whatever port is set in the environment.options- theoptionsobject is used to configure theswagger-jsdoclibrary. We can read more about how to configure that library in the documentation. At a minimum, it provides some basic information about the API, as well as the URL where the API is located, and a list of source files to read information from. For now, we only want to read from the routes stored in theroutesfolder, so we include that path along with a wildcard filename.
We should also take a minute to add the OPENAPI_HOST environment variable to our .env and .env.example files. If we are running our application locally, we can figure out what this value should be pretty easily (usually it will look similar to http://localhost:3000 or similar). However, when we are running in GitHub Codespaces, our URL changes each time. Thankfully, we can find all the information we need in the environment variables provided by GitHub Codespaces (see the previous page for a full list).
So, the item we need to add to our .env file will look something like this:
LOG_LEVEL=debug
PORT=3000
OPENAPI_HOST=https://$CODESPACE_NAME-$PORT.$GITHUB_CODESPACES_PORT_FORWARDING_DOMAIN
This is one of the key features of the dotenvx library we are using - it will expand environment variables based on the existing environment. So, we are using the values stored in the CODESPACE_NAME, PORT, and GITHUB_CODESPACES_PORT_FORWARDING_DOMAIN environment variables to construct the appropriate URL for our application.
In our .env.example file, we might want to make a note of this in a comment, just to be helpful for future developers. Comments in the .env file format are prefixed with hashes #.
LOG_LEVEL=debug
PORT=3000
OPENAPI_HOST=http://localhost:3000
# For GitHub Codespaces
# OPENAPI_HOST=https://$CODESPACE_NAME-$PORT.$GITHUB_CODESPACES_PORT_FORWARDING_DOMAIN
Once that configuration is created, we can add it to our app.js file, along with a few lines to actually make the documentation visible:
import '@dotenvx/dotenvx/config';
import express from 'express';
import path from 'path';
import cookieParser from 'cookie-parser';
import compression from 'compression';
import helmet from 'helmet';
import requestLogger from './middlewares/request-logger.js';
import logger from './configs/logger.js';
import openapi from './configs/openapi.js'
import swaggerUi from 'swagger-ui-express'

import indexRouter from './routes/index.js';
import usersRouter from './routes/users.js';

var app = express();

app.use(helmet());
app.use(compression());
app.use(requestLogger);
app.use(express.json());
app.use(express.urlencoded({ extended: false }));
app.use(cookieParser());
app.use(express.static(path.join(import.meta.dirname, 'public')));

app.use('/', indexRouter);
app.use('/users', usersRouter);

if (process.env.OPENAPI_VISIBLE === 'true') {
    logger.warn('OpenAPI documentation visible!');
    app.use('/docs', swaggerUi.serve, swaggerUi.setup(openapi, {explorer: true}));
}

export default app;
Notice that we are using the OPENAPI_VISIBLE environment variable to control whether the documentation is visible or not, and we print a warning to the terminal if it is enabled. This is because it is often considered very insecure to make the details of our API visible to users unless that is the explicit intent, so it is better to be cautious.
Of course, to make the documentation appear, we’ll have to set the OPENAPI_VISIBLE value to true in our .env file, and also add a default entry to the .env.example file as well:
LOG_LEVEL=debug
PORT=3000
OPENAPI_HOST=https://$CODESPACE_NAME-$PORT.$GITHUB_CODESPACES_PORT_FORWARDING_DOMAIN
OPENAPI_VISIBLE=true
Now, let’s run our application and see what happens:
$ npm run devWe should see the following output when our application initializes:
> example-project@0.0.1 dev
> nodemon ./bin/www

[nodemon] 3.1.9
[nodemon] to restart at any time, enter `rs`
[nodemon] watching path(s): *.*
[nodemon] watching extensions: js,mjs,cjs,json
[nodemon] starting `node ./bin/www`
[dotenvx@1.34.0] injecting env (4) from .env
[2025-01-25 09:10:37.646 PM] warn:      OpenAPI documentation visible!
[2025-01-25 09:10:37.649 PM] info:      Listening on port 3000
Now, let’s load our application in a web browser, and go to the /docs path. We should see our OpenAPI Documentation website!
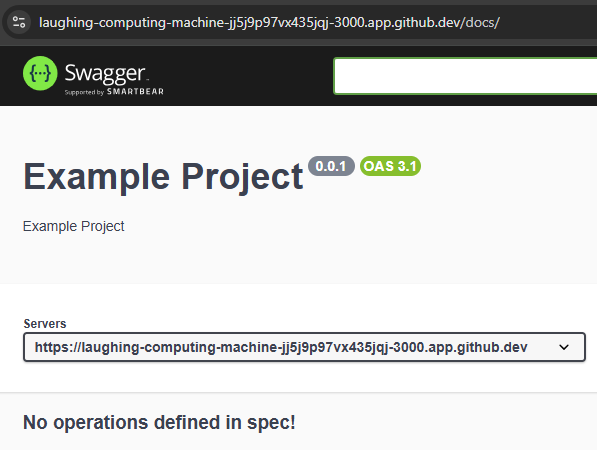
Notice that the Servers URL matches the URL at the top of the page! That means our complex OPENAPI_HOST environment variable is working correctly.
However, we notice that our server does not have any operations defined yet, so we need to add those before we can really make use of this documentation website.
Documenting Routes
To document our routes using the OpenAPI Specification, we can add a simple JSDoc comment above each route function with some basic information, prefixed by the @swagger tag.
/**
 * @swagger
 * tags:
 *   name: index
 *   description: Index Routes
 */
import express from 'express';

const router = express.Router();

/**
 * @swagger
 * /:
 *   get:
 *     summary: index page
 *     description: Gets the index page for the application
 *     tags: [index]
 *     responses:
 *       200:
 *         description: success
 */
router.get('/', function(req, res, next) {
  res.render('index', { title: 'Express' });
});

export default router;/**
* @swagger
* tags:
* name: users
* description: Users Routes
*/
import express from 'express';
const router = express.Router();
/**
* @swagger
* /users:
* get:
* summary: users list page
* description: Gets the list of all users in the application
* tags: [users]
* responses:
* 200:
* description: a resource
*/
router.get('/', function(req, res, next) {
res.send('respond with a resource');
});
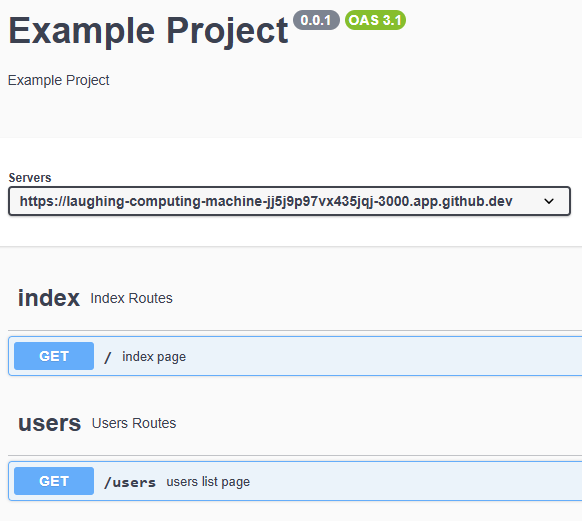
export default router;Now, when we run our application and view the documentation, we see two operations:
We can expand the operation to learn more about it, and even test it on a running server if our URL is set correctly:
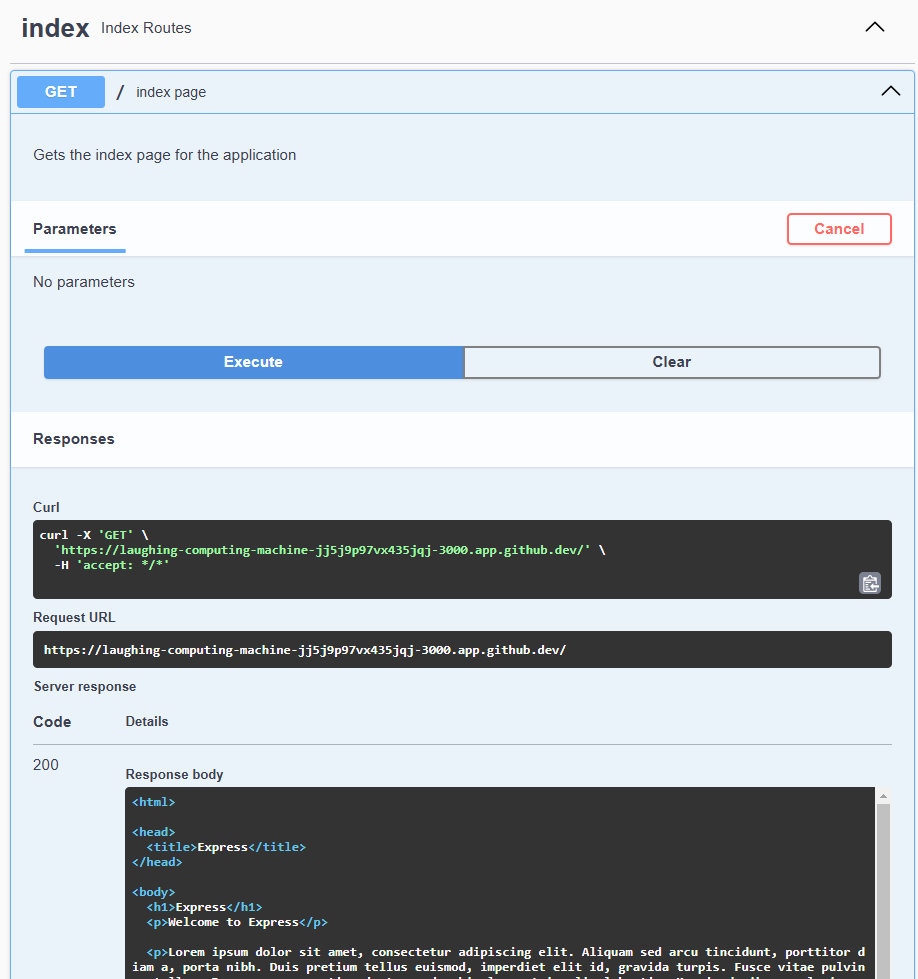
As we develop our RESTful API, this documentation tool will be a very powerful way for us to understand our own API’s design, and it will help us communicate easily with other developers who wish to use our API as well.
This is a good point to commit and push our work!