Migrations
Umzug
Now that we have a database configured in our application, we need to create some way to actually populate that database with the tables and information our app requires. We could obviously do that manually, but that really makes it difficult (if not impossible) to automatically build, test, and deploy this application.
Thankfully, most database libraries also have a way to automate building the database structure. This is known as schema migration or often just migration. We call it migration because it allows us to update the database schema along with new versions of the application, effectively migrating our data to new versions as we go.
The sequelize library recommends using another library, named Umzug, as the preferred way to manage database migrations. It is actually completely framework agnostic, and would even work with ORMs other than Sequelize.
Setting up Umzug
To begin, let’s install umzug using npm:
$ npm install umzugNext, we can create a configuration file to handle our migrations, named configs/migrations.js, with the following content as described in the Umzug Documentation:
/**
 * @file Configuration information for Umzug migration engine
 * @author Russell Feldhausen <russfeld@ksu.edu>
 * @exports umzug an Umzug instance
 */

// Import Libraries
import { Umzug, SequelizeStorage } from 'umzug';

// Import database configuration
import database from "./database.js";
import logger from "./logger.js";

// Create Umzug instance
const umzug = new Umzug({
    migrations: {glob: 'migrations/*.js'},
    context: database.getQueryInterface(),
    storage: new SequelizeStorage({
        sequelize: database,
        modelName: 'migrations'
    }),
    logger: logger
})

export default umzug;
Notice that this configuration uses our existing sequelize database configuration, and also uses an instance of our logger as well. It is set to look for any migrations stored in the migrations/ folder.
The umzug library also has a very handy way to run migrations directly from the terminal using a simple JavaScript file, so let’s create a new file named migrate.js in the root of the server directory as well with this content:
// Load environment (must be first)
import "@dotenvx/dotenvx/config";

// Import configurations
import migrations from './configs/migrations.js'

// Run Umzug as CLI application
migrations.runAsCLI();
This file will simply load our environment configuration as well as the umzug instance for migrations, and then instruct it to run as a command-line interface (CLI) application. This is very handy, as we’ll see shortly.
Creating a Migration
Now we can create a new migration to actually start building our database structure for our application. For this simple example, we’ll build a users table with four fields:
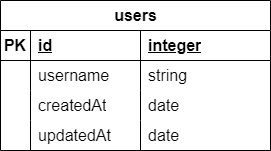
We can refer to both the Umzug Documentation and Examples as well as the Sequelize Documentation. So, let’s create a new folder named migrations to match our configuration above, then a new file named 00_users.js to hold the migration for our users table:
/**
 * @file Users table migration
 * @author Russell Feldhausen <russfeld@ksu.edu>
 * @exports up the Up migration
 * @exports down the Down migration
 */

// Import Libraries
import {Sequelize} from 'sequelize';

/**
 * Apply the migration
 *
 * @param {queryInterface} context the database context to use
 */
export async function up({context: queryInterface}) {
    await queryInterface.createTable('users', {
        id: {
            type: Sequelize.INTEGER,
            primaryKey: true,
            autoIncrement: true,
        },
        username: {
            type: Sequelize.STRING,
            unique: true,
            allowNull: false,
        },
        createdAt: {
            type: Sequelize.DATE,
            allowNull: false,
        },
        updatedAt: {
            type: Sequelize.DATE,
            allowNull: false,
        },
    })
}

/**
 * Roll back the migration
 *
 * @param {queryInterface} context the database context to use
 */
export async function down({context: queryInterface}) {
    await queryInterface.dropTable('users');
}
A migration consists of two functions. First, the up function is called when the migration is applied, and it should define or modify the database structure as desired. In this case, since this is the first migration, we can assume we are starting with a blank database and go from there. The other function, down, is called whenever we want to undo, or rollback, the migration. It should effectively undo any changes made by the up function, leaving the database in the state it was before the migration was applied.
Sequential File Names
Most migration systems, including umzug, apply the migrations in order according to the filenames of the migrations. Some systems automatically append a timestamp to the name of the migration file when it is created, such as 20250203112345_users.js. For our application, we will simply number them sequentially, starting with 00.
Finally, we can use the migrate.js file we created to run umzug from the command line to apply the migration:
$ node migrate upIf everything works correctly, we should receive some output showing that our migration succeeded:
[dotenvx@1.34.0] injecting env (5) from .env
[2025-02-03 10:59:35.066 PM] info: { event: 'migrating', name: '00_users.js' }
[2025-02-03 10:59:35.080 PM] info: { event: 'migrated', name: '00_users.js', durationSeconds: 0.014 }
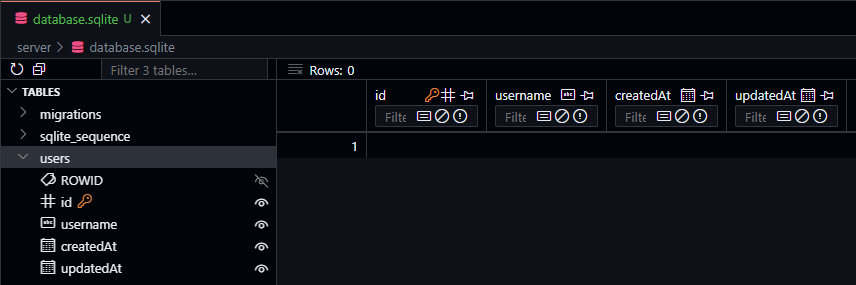
[2025-02-03 10:59:35.080 PM] info: applied 1 migrations.We should also see a file named database.sqlite added to our file structure. If desired, we can install the SQLite Viewer extension in VS Code to explore the contents of that file to confirm it is working correctly.
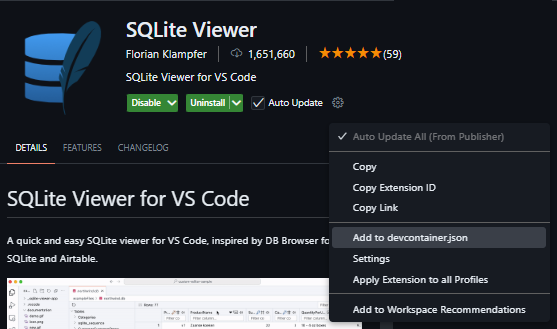
Add Extension to Dev Container
When installing a VS Code extension, we can also choose to have it added directly to our devcontainer.json file so it is available automatically whenever we close this repository into a new codespace or dev container. Just click the gear icon on the marketplace page and choose “Add to devcontainer.json” from the menu!
If we need to roll back that migration, we can use a similar command:
$ node migrate downThere are many more commands available to apply migrations individually and more. Check the Umzug Documentation for more details.