Another Table
YouTube VideoAdding Another Table
Now that we have a working database, let’s explore what it takes to add a new table to our application to represent additional models and data in our database.
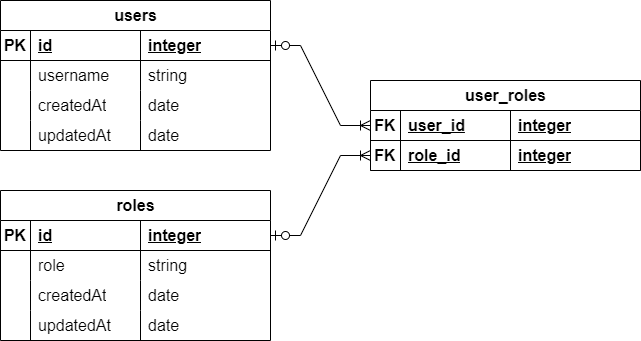
We’ve already created a users table, which contains information about the users of our application. Now we want to add a roles table to contain all of the possible roles that our users can hold. In addition, we need some way to associate a user with a number of roles. Each user can have multiple roles, and each role can be assigned to multiple users. This is known as a many to many database relation, and requires an additional junction table to implement it properly. The end goal is to create the database schema represented in this diagram:
To do this, we’ll go through three steps:
- Create a migration to modify the database schema
- Create a model for each table
- Add additional seed data for these tables
Migration
First, we need to create a new migration to modify the database schema to include the two new tables. So, we’ll create a file named 01_roles.js in the migrations folder and add content to it to represent the two new tables we need to create:
/**
 * @file Roles table migration
 * @author Russell Feldhausen <russfeld@ksu.edu>
 * @exports up the Up migration
 * @exports down the Down migration
 */

// Import Libraries
import {Sequelize} from 'sequelize';

/**
 * Apply the migration
 *
 * @param {queryInterface} context the database context to use
 */
export async function up({context: queryInterface}) {
    await queryInterface.createTable('roles', {
        id: {
            type: Sequelize.INTEGER,
            primaryKey: true,
            autoIncrement: true,
        },
        role: {
            type: Sequelize.STRING,
            allowNull: false,
        },
        createdAt: {
            type: Sequelize.DATE,
            allowNull: false,
        },
        updatedAt: {
            type: Sequelize.DATE,
            allowNull: false,
        },
    })

    await queryInterface.createTable('user_roles', {
        user_id: {
            type: Sequelize.INTEGER,
            primaryKey: true,
            references: { model: 'users', key: 'id' },
            onDelete: "cascade"
        },
        role_id: {
            type: Sequelize.INTEGER,
            primaryKey: true,
            references: { model: 'roles', key: 'id' },
            onDelete: "cascade"
        }
    })
}

/**
 * Roll back the migration
 *
 * @param {queryInterface} context the database context to use
 */
export async function down({context: queryInterface}) {
    await queryInterface.dropTable('user_roles');
    await queryInterface.dropTable('roles');
}
In this migration, we are creating two tables. The first, named roles, stores the list of roles in the application. The second, named user_roles, is the junction table used for the many-to-many relationship between the users and roles table. Notice that we have to add the tables in the correct order, and also in the down method we have to remove them in reverse order. Finally, it is important to include the onDelete: "cascade" option for each of our reference fields in the user_roles table, as that will handle deleting associated entries in the junction table when a user or role is deleted.
The user_roles table also includes a great example for adding a foreign key reference between two tables. More information can be found in the Sequelize Documentation.
Models
Next, we need to create two models to represent these tables. The first is the role model schema, stored in models/role.js with the following content:
/**
 * @file Role model
 * @author Russell Feldhausen <russfeld@ksu.edu>
 * @exports RoleSchema the schema for the Role model
 */

// Import libraries
import Sequelize from 'sequelize';

/**
 * @swagger
 * components:
 *   schemas:
 *     Role:
 *       type: object
 *       required:
 *         - role
 *       properties:
 *         id:
 *           type: integer
 *           description: autogenerated id
 *         role:
 *           type: string
 *           description: name of the role
 *         createdAt:
 *           type: string
 *           format: date-time
 *           description: when the user was created
 *         updatedAt:
 *           type: string
 *           format: date-time
 *           description: when the user was last updated
 *       example:
 *           id: 1
 *           role: manage_users
 *           createdAt: 2025-02-04T15:36:32.000Z
 *           updatedAt: 2025-02-04T15:36:32.000Z
 */
const RoleSchema = {
    id: {
        type: Sequelize.INTEGER,
        primaryKey: true,
        autoIncrement: true,
    },
    role: {
        type: Sequelize.STRING,
        allowNull: false,
    },
    createdAt: {
        type: Sequelize.DATE,
        allowNull: false,
    },
    updatedAt: {
        type: Sequelize.DATE,
        allowNull: false,
    },
}

export default RoleSchema
Notice that this file is very similar to the models/user.js file created earlier, with a few careful changes made to match the table schema.
We also need to create a model schema for the user_roles table, which we will store in the models/user_role.js file with the following content:
/**
 * @file User role junction model
 * @author Russell Feldhausen <russfeld@ksu.edu>
 * @exports RoleSchema the schema for the UserRole model
 */

// Import libraries
import Sequelize from 'sequelize';

const UserRoleSchema = {
    userId: {
        type: Sequelize.INTEGER,
        primaryKey: true,
        references: { model: 'User', key: 'id' },
        onDelete: "cascade"
    },
    roleId: {
        type: Sequelize.INTEGER,
        primaryKey: true,
        references: { model: 'Role', key: 'id' },
        onDelete: "cascade"
    }
}

export default UserRoleSchema
Finally, we can now update our models/models.js file to create the Role and UserRole models, and also to define the associations between them and the User model.
/**
 * @file Database models
 * @author Russell Feldhausen <russfeld@ksu.edu>
 * @exports User a Sequelize User model
 * @exports Role a Sequelize Role model
 * @exports UserRole a Sequelize UserRole model
 */

// Import database connection
import database from "../configs/database.js";

// Import Schemas
import UserSchema from './user.js';
import RoleSchema from "./role.js";
import UserRoleSchema from "./user_role.js";

// Create User Model
const User = database.define(
    // Model Name
    'User',
    // Schema
    UserSchema,
    // Other options
    {
        tableName: 'users'
    }
)

// Create Role Model
const Role = database.define(
    // Model Name
    'Role',
    // Schema
    RoleSchema,
    // Other options
    {
        tableName: 'roles'
    }
)

// Create UserRole Model
const UserRole = database.define(
    // Model Name
    'UserRole',
    // Schema
    UserRoleSchema,
    // Other options
    {
        tableName: 'user_roles',
        timestamps: false,
        underscored: true
    }
)

// Define Associations
Role.belongsToMany(User, { through: UserRole, unique: false, as: "users" })
User.belongsToMany(Role, { through: UserRole, unique: false, as: "roles" })

export {
    User,
    Role,
    UserRole,
}
Notice that this file contains two lines at the bottom to define the associations included as part of this table, so that sequelize will know how to handle it. This will instruct sequelize to add additional attributes and features to the User and Role models for querying the related data, as we’ll see shortly.
We also added the line timestamps: false to the other options for the User_roles table to disable the creation and management of timestamps (the createdAt and updatedAt attributes), since they may not be needed for this relation.
Finally, we added the underscored: true line to tell sequelize that it should interpret the userId and roleId attributes (written in camel case as preferred by Sequelize) as user_id and role_id, respectively (written in snake case as we did in the migration).
Camel Case vs. Snake Case
The choice of either CamelCase or snake_case naming for database attributes is a matter of preference. In this example, we show both methods, and it is up to each developer to select their own preferred style.
Seed
Finally, let’s create a new seed file in seeds/01_roles.js to add some default data to the roles and user_roles tables:
/**
 * @file Roles seed
 * @author Russell Feldhausen <russfeld@ksu.edu>
 * @exports up the Up migration
 * @exports down the Down migration
 */

// Timestamp in the appropriate format for the database
const now = new Date().toISOString().slice(0, 23).replace("T", " ") + " +00:00";

// Array of objects to add to the database
const roles = [
    {
        id: 1,
        role: 'manage_users',
        createdAt: now,
        updatedAt: now
    },
    {
        id: 2,
        role: 'manage_documents',
        createdAt: now,
        updatedAt: now
    },
    {
        id: 3,
        role: 'add_documents',
        createdAt: now,
        updatedAt: now
    },
    {
        id: 4,
        role: 'manage_communities',
        createdAt: now,
        updatedAt: now
    },
    {
        id: 5,
        role: 'add_communities',
        createdAt: now,
        updatedAt: now
    },
    {
        id: 6,
        role: 'view_documents',
        createdAt: now,
        updatedAt: now
    },
    {
        id: 7,
        role: 'view_communities',
        createdAt: now,
        updatedAt: now
    }
];

const user_roles = [
    {
        user_id: 1,
        role_id: 1
    },
    {
        user_id: 1,
        role_id: 2
    },
    {
        user_id: 1,
        role_id: 4
    },
    {
        user_id: 2,
        role_id: 3
    },
    {
        user_id: 2,
        role_id: 5
    },
    {
        user_id: 3,
        role_id: 2
    },
    {
        user_id: 3,
        role_id: 4
    },
    {
        user_id: 4,
        role_id: 6
    },
    {
        user_id: 4,
        role_id: 7
    }
]

/**
 * Apply the migration
 *
 * @param {queryInterface} context the database context to use
 */
export async function up({context: queryInterface}) {
    await queryInterface.bulkInsert('roles', roles);
    await queryInterface.bulkInsert('user_roles', user_roles);
}

/**
 * Roll back the migration
 *
 * @param {queryInterface} context the database context to use
 */
export async function down({context: queryInterface}) {
    await queryInterface.bulkDelete('user_roles', {} , { truncate: true });
  await queryInterface.bulkDelete("roles", {}, { truncate: true });
}
Once again, this seed is very similar to what we’ve seen before. Notice that we use the truncate option to remove all entries in the user_roles table when we undo this seed as well as the roles table.
Seeding from a CSV File
It is also possible to seed the database from a CSV or other data file using a bit of JavaScript code. Here’s an example for seeding a table that contains all of the counties in Kansas using a CSV file with that data that is read with the convert-csv-to-json library:
// Import libraries
const csvToJson = import("convert-csv-to-json");

// Timestamp in the appropriate format for the database
const now = new Date().toISOString().slice(0, 23).replace("T", " ") + " +00:00";

export async function up({ context: queryInterface }) {
  // Read data from CSV file
  // id,name,code,seat,population,est_year
  // 1,Allen,AL,Iola,"12,464",1855
  let counties = (await csvToJson)
    .formatValueByType()
    .supportQuotedField(true)
    .fieldDelimiter(",")
    .getJsonFromCsv("./seeds/counties.csv");

  // append timestamps and parse fields
  counties.map((c) => {
    // handle parsing numbers with comma separators
    c.population = parseInt(c.population.replace(/,/g, ""));
    c.createdAt = now;
    c.updatedAt = now;
    return c;
  });

  // insert into database
  await queryInterface.bulkInsert("counties", counties);
}

export async function down({ context: queryInterface }) {
  await queryInterface.bulkDelete("counties", {}, { truncate: true });
}
Update User Model
Finally, let’s update the User model schema to include related roles. At this point, we just have to update the Open API documentation to match:
// -=-=- other code omitted here -=-=-
/**
 * @swagger
 * components:
 *   schemas:
 *     User:
 *       type: object
 *       required:
 *         - username
 *       properties:
 *         id:
 *           type: integer
 *           description: autogenerated id
 *         username:
 *           type: string
 *           description: username for the user
 *         createdAt:
 *           type: string
 *           format: date-time
 *           description: when the user was created
 *         updatedAt:
 *           type: string
 *           format: date-time
 *           description: when the user was last updated
 *         roles:
 *           type: array
 *           items:
 *             $ref: '#/components/schemas/Role'
 *       example:
 *           id: 1
 *           username: admin
 *           createdAt: 2025-02-04T15:36:32.000Z
 *           updatedAt: 2025-02-04T15:36:32.000Z
 *           roles:
 *             - id: 1
 *               role: manage_users
 *             - id: 2
 *               role: manage_documents
 *             - id: 4
 *               role: manage_communities
 */
// -=-=- other code omitted here -=-=-
Now we can modify our route in routes/users.js to include the data from the related Role model in our query:
/**
 * @file Users router
 * @author Russell Feldhausen <russfeld@ksu.edu>
 * @exports router an Express router
 *
 * @swagger
 * tags:
 *   name: users
 *   description: Users Routes
 */

// Import libraries
import express from "express";

// Create Express router
const router = express.Router();

// Import models
import { User, Role } from '../models/models.js'

/**
 * Gets the list of users
 *
 * @param {Object} req - Express request object
 * @param {Object} res - Express response object
 * @param {Function} next - Express next middleware function
 *
 * @swagger
 * /users:
 *   get:
 *     summary: users list page
 *     description: Gets the list of all users in the application
 *     tags: [users]
 *     responses:
 *       200:
 *         description: the list of users
 *         content:
 *           application/json:
 *             schema:
 *               type: array
 *               items:
 *                 $ref: '#/components/schemas/User'
 */
router.get("/", async function (req, res, next) {
  const users = await User.findAll({
    include: {
      model: Role,
      as: "roles",
      attributes: ['id', 'role'],
      through: {
        attributes: [],
      },
    },
  });
  res.json(users)
});

export default router;
You can learn more about querying associations in the Sequelize Documentation.
If everything works, we should see our roles now included in our JSON output when we navigate to the /users route:
[
  {
    "id": 1,
    "username": "admin",
    "createdAt": "2025-01-28T23:06:01.000Z",
    "updatedAt": "2025-01-28T23:06:01.000Z",
    "roles": [
      {
        "id": 1,
        "role": "manage_users"
      },
      {
        "id": 2,
        "role": "manage_documents"
      },
      {
        "id": 4,
        "role": "manage_communities"
      }
    ]
  },
  {
    "id": 2,
    "username": "contributor",
    "createdAt": "2025-01-28T23:06:01.000Z",
    "updatedAt": "2025-01-28T23:06:01.000Z",
    "roles": [
      {
        "id": 3,
        "role": "add_documents"
      },
      {
        "id": 5,
        "role": "add_communities"
      }
    ]
  },
  {
    "id": 3,
    "username": "manager",
    "createdAt": "2025-01-28T23:06:01.000Z",
    "updatedAt": "2025-01-28T23:06:01.000Z",
    "roles": [
      {
        "id": 2,
        "role": "manage_documents"
      },
      {
        "id": 4,
        "role": "manage_communities"
      }
    ]
  },
  {
    "id": 4,
    "username": "user",
    "createdAt": "2025-01-28T23:06:01.000Z",
    "updatedAt": "2025-01-28T23:06:01.000Z",
    "roles": [
      {
        "id": 6,
        "role": "view_documents"
      },
      {
        "id": 7,
        "role": "view_communities"
      }
    ]
  }
]
That should also exactly match the schema and route information in our Open API documentation provided at the /docs route.
There we go! That’s a quick example of adding an additional table to our application, including a relationship and more.
As a last step before finalizing our code, we should run the lint and format commands and deal with any errors they find. Finally, we can commit and push our work.