Subsections of Adding a Database
Sequelize
YouTube VideoDatabase Libraries
To begin, we must first select a library to use when interfacing with our database. There are many different types of libraries, and many different options to choose from.
First and foremost, we can always just write raw SQL queries directly in our code. This is often very straightforward, but also can lead to very complex code and security issues. It also doesn’t offer many of the more advanced features such as mapping database results to object types and automatically managing database schemas.
Another option is an SQL query library, such as Knex.js or Kysely. These libraries provide a helpful abstraction on top of SQL, allowing developers to build queries using syntax that is more comfortable and familiar to them. These libraries also have additional features to manage database schemas and sample data
The final option is an Object-Relational Mapping (ORM) library such as Objection or Sequelize. These libraries provide the most abstraction away from raw SQL, often allowing developers to store and retrieve data in a database as if it were stored in a list or dictionary data structure.
For this project, we’re going to use the Sequelize ORM, coupled with the Umzug migration tool. Both of these libraries are very commonly used in Node.js projects, and are actively maintained.
Database Engines
We also have many choices for the database engine we want to use for our web projects. Some common options include PostgreSQL, MySQL, MariaDB, MongoDB, Firebase, and many more.
For this project, we’re going to use SQLite. SQLite is unique because it is a database engine that only requires a single file, so it is self-contained and easy to work with. It doesn’t require any external database servers or software, making it perfect for a small development project. In fact, SQLite may be one of the most widely deployed software modules in the whole world!
Naturally, if wer plan on growing a web application beyond a simple hobby project with a few users, we should spend some time researching a reliable database solution. Thankfully, the Sequelize ORM supports many different database engines so it is easy to switch.
Installing Sequelize
To begin, let’s install both sequelize as well as the sqlite3 library using npm:
$ npm install sqlite3 sequelize
Once those libraries are installed, we can now configure sequelize following the information in the Sequelize Documentation. Let’s create a new file configs/database.js to store our database configuration:
/**
 * @file Configuration information for Sequelize database ORM
 * @author Russell Feldhausen <russfeld@ksu.edu>
 * @exports sequelize a Sequelize instance
 */

// Import libraries
import Sequelize from 'sequelize';

// Import logger configuration
import logger from "./logger.js";

// Create Sequelize instance
const sequelize = new Sequelize({
    dialect: 'sqlite',
    storage: process.env.DATABASE_FILE || ":memory:",
    logging: logger.sql.bind(logger)
})

export default sequelize;
This file creates a very simple configuration for sequelize that uses the sqlite dialect. It uses the DATABASE_FILE environment variable to control the location of the database in the file system, and it also uses the logger.sql log level to log any data produced by the library. If a DATABASE_FILE environment variable is not provided, it will default to storing data in the SQLite In-Memory Database, which is great for testing and quick development.
Of course, a couple of those items don’t actually exist yet, so let’s add those in before we move on! First, we need to add a DATABASE_FILE environment variable to both our .env and .env.example files:
LOG_LEVEL=debug
PORT=3000
OPENAPI_HOST=https://$CODESPACE_NAME-$PORT.$GITHUB_CODESPACES_PORT_FORWARDING_DOMAIN
OPENAPI_VISIBLE=true
DATABASE_FILE=database.sqlite
LOG_LEVEL=debug
PORT=3000
OPENAPI_HOST=http://localhost:3000
# For GitHub Codespaces
# OPENAPI_HOST=https://$CODESPACE_NAME-$PORT.$GITHUB_CODESPACES_PORT_FORWARDING_DOMAIN
OPENAPI_VISIBLE=false
DATABASE_FILE=database.sqlite
We also need to add a new logging level called sql to our logger configuration in configs/logger.js. This is a bit more involved, because it means we have to now list all intended logging levels explicitly. See the highlighted lines below for what has been changed, but the entire file is included for convenience:
/**
 * @file Configuration information for Winston logger
 * @author Russell Feldhausen <russfeld@ksu.edu>
 * @exports logger a Winston logger object
 */

// Import libraries
import winston from "winston";

// Extract format options
const { combine, timestamp, printf, colorize, align, errors } = winston.format;

/**
 * Determines the correct logging level based on the Node environment
 *
 * @returns {string} the desired log level
 */
function level () {
  if (process.env.LOG_LEVEL) {
    if (process.env.LOG_LEVEL === '0' || process.env.LOG_LEVEL === 'error') {
      return 'error';
    }
    if (process.env.LOG_LEVEL === '1' || process.env.LOG_LEVEL === 'warn') {
      return 'warn';
    }
    if (process.env.LOG_LEVEL === '2' || process.env.LOG_LEVEL === 'info') {
      return 'info';
    }
    if (process.env.LOG_LEVEL === '3' || process.env.LOG_LEVEL === 'http') {
      return 'http';
    }
    if (process.env.LOG_LEVEL === '4' || process.env.LOG_LEVEL === 'verbose') {
      return 'verbose';
    }
    if (process.env.LOG_LEVEL === '5' || process.env.LOG_LEVEL === 'debug') {
      return 'debug';
    }
    if (process.env.LOG_LEVEL === '6' || process.env.LOG_LEVEL === 'sql') {
      return 'sql';
    }
    if (process.env.LOG_LEVEL === '7' || process.env.LOG_LEVEL === 'silly') {
      return 'silly';
    }
  }
  return 'http';
}

// Custom logging levels for the application
const levels = {
  error: 0,
  warn: 1,
  info: 2,
  http: 3,
  verbose: 4,
  debug: 5,
  sql: 6,
  silly: 7
}

// Custom colors
const colors = {
  error: 'red',
  warn: 'yellow',
  info: 'green',
  http: 'green',
  verbose: 'cyan',
  debug: 'blue',
  sql: 'gray',
  silly: 'magenta'
}

winston.addColors(colors)

// Creates the Winston instance with the desired configuration
const logger = winston.createLogger({
  // call `level` function to get default log level
  level: level(),
  levels: levels,
  // Format configuration
  // See https://github.com/winstonjs/logform
  format: combine(
    colorize({ all: true }),
    errors({ stack: true }),
    timestamp({
      format: "YYYY-MM-DD hh:mm:ss.SSS A",
    }),
    align(),
    printf(
      (info) =>
        `[${info.timestamp}] ${info.level}: ${info.stack ? info.message + "\n" + info.stack : info.message}`,
    ),
  ),
  // Output configuration
  transports: [new winston.transports.Console()],
});

export default logger;
We have added a new sql logging level that is now part of our logging setup. One of the unique features of sequelize is that it will actually allow us to log all SQL queries run against our database, so we can enable and disable that level of logging by adjusting the LOG_LEVEL environment variable as desired.
There! We now have a working database configuration. Before we can make use of it, however, we need to add additional code to create and populate our database. So, we’ll need to continue on in this tutorial before we can actually test our application.
Migrations
YouTube VideoUmzug
Now that we have a database configured in our application, we need to create some way to actually populate that database with the tables and information our app requires. We could obviously do that manually, but that really makes it difficult (if not impossible) to automatically build, test, and deploy this application.
Thankfully, most database libraries also have a way to automate building the database structure. This is known as schema migration or often just migration. We call it migration because it allows us to update the database schema along with new versions of the application, effectively migrating our data to new versions as we go.
The sequelize library recommends using another library, named Umzug, as the preferred way to manage database migrations. It is actually completely framework agnostic, and would even work with ORMs other than Sequelize.
Setting up Umzug
To begin, let’s install umzug using npm:
Next, we can create a configuration file to handle our migrations, named configs/migrations.js, with the following content as described in the Umzug Documentation:
/**
 * @file Configuration information for Umzug migration engine
 * @author Russell Feldhausen <russfeld@ksu.edu>
 * @exports umzug an Umzug instance
 */

// Import Libraries
import { Umzug, SequelizeStorage } from 'umzug';

// Import database configuration
import database from "./database.js";
import logger from "./logger.js";

// Create Umzug instance
const umzug = new Umzug({
    migrations: {glob: 'migrations/*.js'},
    context: database.getQueryInterface(),
    storage: new SequelizeStorage({
        sequelize: database,
        modelName: 'migrations'
    }),
    logger: logger
})

export default umzug;
Notice that this configuration uses our existing sequelize database configuration, and also uses an instance of our logger as well. It is set to look for any migrations stored in the migrations/ folder.
The umzug library also has a very handy way to run migrations directly from the terminal using a simple JavaScript file, so let’s create a new file named migrate.js in the root of the server directory as well with this content:
// Load environment (must be first)
import "@dotenvx/dotenvx/config";

// Import configurations
import migrations from './configs/migrations.js'

// Run Umzug as CLI application
migrations.runAsCLI();
This file will simply load our environment configuration as well as the umzug instance for migrations, and then instruct it to run as a command-line interface (CLI) application. This is very handy, as we’ll see shortly.
Creating a Migration
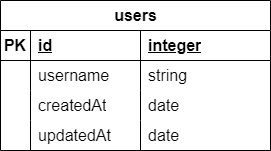
Now we can create a new migration to actually start building our database structure for our application. For this simple example, we’ll build a users table with four fields:
We can refer to both the Umzug Documentation and Examples as well as the Sequelize Documentation. So, let’s create a new folder named migrations to match our configuration above, then a new file named 00_users.js to hold the migration for our users table:
/**
 * @file Users table migration
 * @author Russell Feldhausen <russfeld@ksu.edu>
 * @exports up the Up migration
 * @exports down the Down migration
 */

// Import Libraries
import {Sequelize} from 'sequelize';

/**
 * Apply the migration
 *
 * @param {queryInterface} context the database context to use
 */
export async function up({context: queryInterface}) {
    await queryInterface.createTable('users', {
        id: {
            type: Sequelize.INTEGER,
            primaryKey: true,
            autoIncrement: true,
        },
        username: {
            type: Sequelize.STRING,
            unique: true,
            allowNull: false,
        },
        createdAt: {
            type: Sequelize.DATE,
            allowNull: false,
        },
        updatedAt: {
            type: Sequelize.DATE,
            allowNull: false,
        },
    })
}

/**
 * Roll back the migration
 *
 * @param {queryInterface} context the database context to use
 */
export async function down({context: queryInterface}) {
    await queryInterface.dropTable('users');
}
A migration consists of two functions. First, the up function is called when the migration is applied, and it should define or modify the database structure as desired. In this case, since this is the first migration, we can assume we are starting with a blank database and go from there. The other function, down, is called whenever we want to undo, or rollback, the migration. It should effectively undo any changes made by the up function, leaving the database in the state it was before the migration was applied.
Sequential File Names
Most migration systems, including umzug, apply the migrations in order according to the filenames of the migrations. Some systems automatically append a timestamp to the name of the migration file when it is created, such as 20250203112345_users.js. For our application, we will simply number them sequentially, starting with 00.
Finally, we can use the migrate.js file we created to run umzug from the command line to apply the migration:
If everything works correctly, we should receive some output showing that our migration succeeded:
[dotenvx@1.34.0] injecting env (5) from .env
[2025-02-03 10:59:35.066 PM] info:      { event: 'migrating', name: '00_users.js' }
[2025-02-03 10:59:35.080 PM] info:      { event: 'migrated', name: '00_users.js', durationSeconds: 0.014 }
[2025-02-03 10:59:35.080 PM] info:      applied 1 migrations.
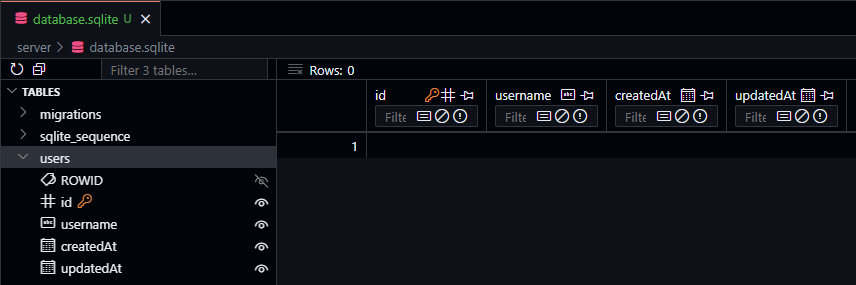
We should also see a file named database.sqlite added to our file structure. If desired, we can install the SQLite Viewer extension in VS Code to explore the contents of that file to confirm it is working correctly.
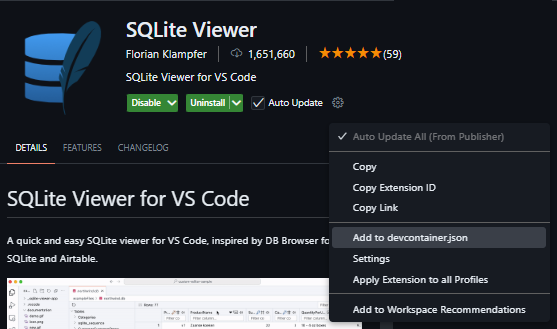
Add Extension to Dev Container
When installing a VS Code extension, we can also choose to have it added directly to our devcontainer.json file so it is available automatically whenever we close this repository into a new codespace or dev container. Just click the gear icon on the marketplace page and choose “Add to devcontainer.json” from the menu!
If we need to roll back that migration, we can use a similar command:
There are many more commands available to apply migrations individually and more. Check the Umzug Documentation for more details.
Seeds
YouTube VideoDatabase Seeding
Another useful task that umzug can handle is adding some initial data to a new database. This process is known as seeding the database. Thankfully, the process for seeding is nearly identical to the process for migrations - in fact, it uses the same operations in different ways! So, let’s explore how to set that up.
First, we’ll create a new configuration file at configs/seeds.js that contains nearly the same content as configs/migrations.js with a couple of important changes on the highlighted lines:
/**
 * @file Configuration information for Umzug seed engine
 * @author Russell Feldhausen <russfeld@ksu.edu>
 * @exports umzug an Umzug instance
 */

// Import Libraries
import { Umzug, SequelizeStorage } from 'umzug';

// Import database configuration
import database from "./database.js";
import logger from "./logger.js";

// Create Umzug instance
const umzug = new Umzug({
    migrations: {glob: 'seeds/*.js'},
    context: database.getQueryInterface(),
    storage: new SequelizeStorage({
        sequelize: database,
        modelName: 'seeds'
    }),
    logger: logger
})

export default umzug;
All we really have to do is change the folder where the migrations (in this case, the seeds) are stored, and we also change the name of the model, or table, where that information will be kept in the database.
Next, we’ll create a seed.js file that allows us to run the seeds from the command line. Again, this file is nearly identical to the migrate.js file from earlier, with a couple of simple changes:
// Load environment (must be first)
import "@dotenvx/dotenvx/config";

// Import configurations
import seeds from './configs/seeds.js'

// Run Umzug as CLI application
seeds.runAsCLI();
Finally, we can create a new folder seeds to store our seeds, and then create the first seed also called 00_users.js to add a few default users to our database:
/**
 * @file Users seed
 * @author Russell Feldhausen <russfeld@ksu.edu>
 * @exports up the Up migration
 * @exports down the Down migration
 */

// Timestamp in the appropriate format for the database
const now = new Date().toISOString().slice(0, 23).replace("T", " ") + " +00:00";

// Array of objects to add to the database
const users = [
    {
        id: 1,
        username: 'admin',
        createdAt: now,
        updatedAt: now
    },
    {
        id: 2,
        username: 'contributor',
        createdAt: now,
        updatedAt: now
    },
    {
        id: 3,
        username: 'manager',
        createdAt: now,
        updatedAt: now
    },
    {
        id: 4,
        username: 'user',
        createdAt: now,
        updatedAt: now
    },
];

/**
 * Apply the seed
 *
 * @param {queryInterface} context the database context to use
 */
export async function up({context: queryInterface}) {
    await queryInterface.bulkInsert('users', users);
}

/**
 * Roll back the seed
 *
 * @param {queryInterface} context the database context to use
 */
export async function down({context: queryInterface}) {
    await queryInterface.bulkDelete("users", {}, { truncate: true });
}
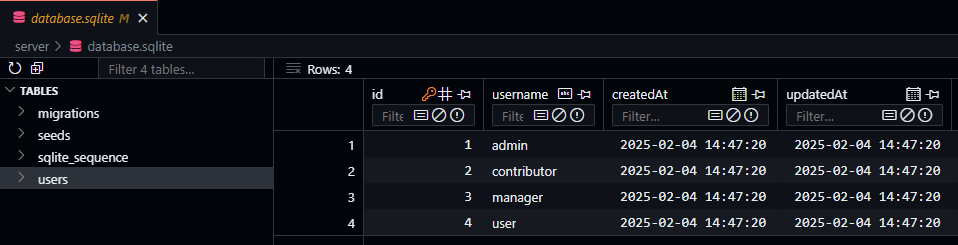
This seed will add 4 users to the database. Notice that we are setting both the createdAt and updatedAt fields manually - while the sequelize library will manage those for us in certain situations, we must handle them manually when doing a bulk insert directly to the database.
At this point we can insert our seeds into the database using the command line interface:
[dotenvx@1.34.0] injecting env (5) from .env
[2025-02-04 02:47:20.702 PM] info:      { event: 'migrating', name: '00_users.js' }
[2025-02-04 02:47:20.716 PM] info:      { event: 'migrated', name: '00_users.js', durationSeconds: 0.013 }
[2025-02-04 02:47:20.716 PM] info:      applied 1 migrations.
Now, once we’ve done that, we can go back to the SQLite Viewer extension in VS Code to confirm that our data was properly inserted into the database.
Migrate Before Seeding
One common mistake that is very easy to do is to try and seed the database without first migrating it.
[2025-02-04 02:51:39.452 PM] info:      { event: 'migrating', name: '00_users.js' }

Error: Migration 00_users.js (up) failed: Original error: SQLITE_ERROR: no such table: users
Thankfully umzug gives a pretty helpful error in this case.
Another common error is to forget to roll back seeds before rolling back and resetting any migrations. In that case, when you try to apply your seeds again, they will not be applied since the database thinks the data is still present. So, remember to roll back your seeds before rolling back any migrations!
We’re almost ready to test our app! The last step is to create a model for our data, which we’ll cover on the next page.
Models
YouTube VideoDatabase Models
Now that we have our database table structure and sample data set up, we can finally configure sequelize to query our database by defining a model representing that data. At its core, a model is simply an abstraction that represents the structure of the data in a table of our database. We can equate this to a class in object-oriented programming - each row or record in our database can be thought of as an instance of our model class. You can learn more about models in the Sequelize Documentation
To create a model, let’s first create a models folder in our app, then we can create a file user.js that contains the schema for the User model, based on the users table.
Singular vs. Plural
By convention, model names are usually singular like “user” while table names are typically pluralized like “users.” This is not a rule that must be followed, but many web frameworks use this convention so we’ll also follow it.
The User model schema should look very similar to the table definition used in the migration created earlier in this example:
/**
 * @file User schema
 * @author Russell Feldhausen <russfeld@ksu.edu>
 * @exports UserSchema the schema for the User model
 */

// Import libraries
import Sequelize from 'sequelize';

const UserSchema = {
    id: {
        type: Sequelize.INTEGER,
        primaryKey: true,
        autoIncrement: true,
    },
    username: {
        type: Sequelize.STRING,
        unique: true,
        allowNull: false,
    },
    createdAt: {
        type: Sequelize.DATE,
        allowNull: false,
    },
    updatedAt: {
        type: Sequelize.DATE,
        allowNull: false,
    },
}

export default UserSchema
At a minimum, a model schema defines the attributes that are stored in the database, but there are many more features that can be added over time, such as additional computed fields (for example, a fullName field that concatenates the giveName and familyName fields stored in the database). We’ll explore ways to improve our models in later examples.
Once we have the model schema created, we’ll create a second file named models.js that will pull together all of our schemas and actually build the sequelize models that can be used throughout our application.
/**
 * @file Database models
 * @author Russell Feldhausen <russfeld@ksu.edu>
 * @exports User a Sequelize User model
 */

// Import database connection
import database from "../configs/database.js";

// Import Schemas
import UserSchema from './user.js';

// Create User Model
const User = database.define(
    // Model Name
    'User',
    // Schema
    UserSchema,
    // Other options
    {
        tableName: 'users'
    }
)

export {
    User
}
It is also important to note that we can define the name of the table that stores instances of the model in the tableName option.
We will see why it is important to use this models.js file (instead of just defining the model itself and not just the schema in the users.js file) once we start adding relations between the models. For now, we’ll start with this simple scaffold that we can expand upon in the future.
Models vs. Migrations
One of the more interesting features of sequelize is that it can use just the models themselves to define the structure of the tables in the database. It has features such as Model Synchronization to keep the database structure updated to match the given models.
However, even in the documentation, sequelize recommends using migrations for more complex database structures. So, in our application, the migrations will represent the incremental steps required over time to construct our application’s database tables, whereas the models will represent the full structure of the database tables at this point in time. As we add new features to our application, this difference will become more apparent.
Model Querying
Finally, we are at the point where we can actually use our database in our application! So, let’s update the route for the users endpoint to actually return a list of the users of our application in a JSON format:
/**
 * @file Users router
 * @author Russell Feldhausen <russfeld@ksu.edu>
 * @exports router an Express router
 *
 * @swagger
 * tags:
 *   name: users
 *   description: Users Routes
 */

// Import libraries
import express from "express";

// Create Express router
const router = express.Router();

// Import models
import { User } from '../models/models.js'

/**
 * Gets the list of users
 *
 * @param {Object} req - Express request object
 * @param {Object} res - Express response object
 * @param {Function} next - Express next middleware function
 *
 * @swagger
 * /users:
 *   get:
 *     summary: users list page
 *     description: Gets the list of all users in the application
 *     tags: [users]
 *     responses:
 *       200:
 *         description: a resource
 */
router.get("/", async function (req, res, next) {
  const users = await User.findAll();
  res.json(users)
});

export default router;
The only change we need to make is to import our User model we just created in the models/models.js file, and then use the User.findAll() query method inside of our first route method. A full list of all the querying functions in sequelize can be found in the Sequelize Documentation
Now, let’s start our application and see if it works! We should make sure we have migrated and seeded the database recently before starting. If everything works correctly, we should be able to navigate to the /users path and see the following JSON output on the page:
[
  {
    "id": 1,
    "username": "admin",
    "createdAt": "2025-02-04T15:36:32.000Z",
    "updatedAt": "2025-02-04T15:36:32.000Z"
  },
  {
    "id": 2,
    "username": "contributor",
    "createdAt": "2025-02-04T15:36:32.000Z",
    "updatedAt": "2025-02-04T15:36:32.000Z"
  },
  {
    "id": 3,
    "username": "manager",
    "createdAt": "2025-02-04T15:36:32.000Z",
    "updatedAt": "2025-02-04T15:36:32.000Z"
  },
  {
    "id": 4,
    "username": "user",
    "createdAt": "2025-02-04T15:36:32.000Z",
    "updatedAt": "2025-02-04T15:36:32.000Z"
  }
]
Awesome! We have now developed a basic web application that is able to query a database and present data to the user in a JSON format. This is the first big step toward actually building a RESTful API application.
This is a good point to commit and push our work!
Committing Database Files
One thing we might notice is that our database.sqlite file is in the list of files to be committed to our GitHub repository for this project. In many cases, you may or may not want to do this, depending on what type of data you are storing in the database and how you are using it.
For this application, and the projects in this course, we’ll go ahead and commit our database to GitHub since that is the simplest way to share that information.
Documenting Models
YouTube VideoDocumenting Models with Open API
Before we move ahead, let’s quickly take a minute to add some documentation to our models using the Open API specification. The details can be found in the Open API Specification Document
First, let’s update our configuration in the configs/openapi.js file to include the models directory:
// -=-=- other code omitted here -=-=-

// Configure SwaggerJSDoc options
const options = {
  definition: {
    openapi: "3.1.0",
    info: {
      title: "Example Project",
      version: "0.0.1",
      description: "Example Project",
    },
    servers: [
      {
        url: url(),
      },
    ],
  },
  apis: ["./routes/*.js", "./models/*.js"],
};

// -=-=- other code omitted here -=-=-
Next, at the top of our models/user.js file, we can add information in an @swagger tag about our newly created User model, usually placed right above the model definition itself:
// -=-=- other code omitted here -=-=-

/**
 * @swagger
 * components:
 *   schemas:
 *     User:
 *       type: object
 *       required:
 *         - username
 *       properties:
 *         id:
 *           type: integer
 *           description: autogenerated id
 *         username:
 *           type: string
 *           description: username for the user
 *         createdAt:
 *           type: string
 *           format: date-time
 *           description: when the user was created
 *         updatedAt:
 *           type: string
 *           format: date-time
 *           description: when the user was last updated
 *       example:
 *           id: 1
 *           username: admin
 *           createdAt: 2025-02-04T15:36:32.000Z
 *           updatedAt: 2025-02-04T15:36:32.000Z
 */
const UserSchema = {

// -=-=- other code omitted here -=-=-
Finally, we can now update our route in the routes/users.js file to show that it is outputting an array of User objects:
// -=-=- other code omitted here -=-=-

/**
 * Gets the list of users
 *
 * @param {Object} req - Express request object
 * @param {Object} res - Express response object
 * @param {Function} next - Express next middleware function
 *
 * @swagger
 * /users:
 *   get:
 *     summary: users list page
 *     description: Gets the list of all users in the application
 *     tags: [users]
 *     responses:
 *       200:
 *         description: the list of users
 *         content:
 *           application/json:
 *             schema:
 *               type: array
 *               items:
 *                 $ref: '#/components/schemas/User'
 */
router.get("/", async function (req, res, next) {
  const users = await User.findAll();
  res.json(users)
});

// -=-=- other code omitted here -=-=-
With all of that in place, we can start our application with the Open API documentation enabled, then navigate to the /docs route to see our updated documentation. We should now see our User model listed as a schema at the bottom of the page:
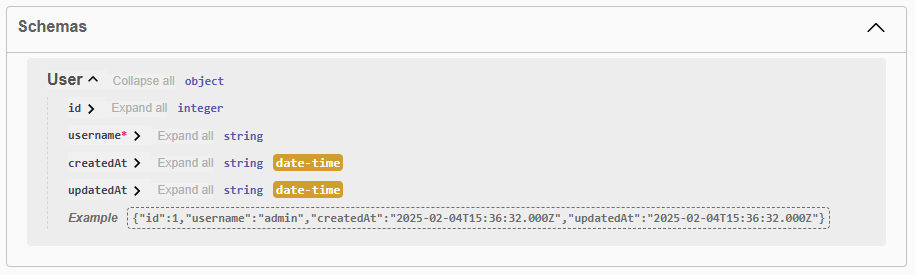
In addition, we can see that the /users route has also been updated to show that it returns an array of User objects, along with the relevant data:
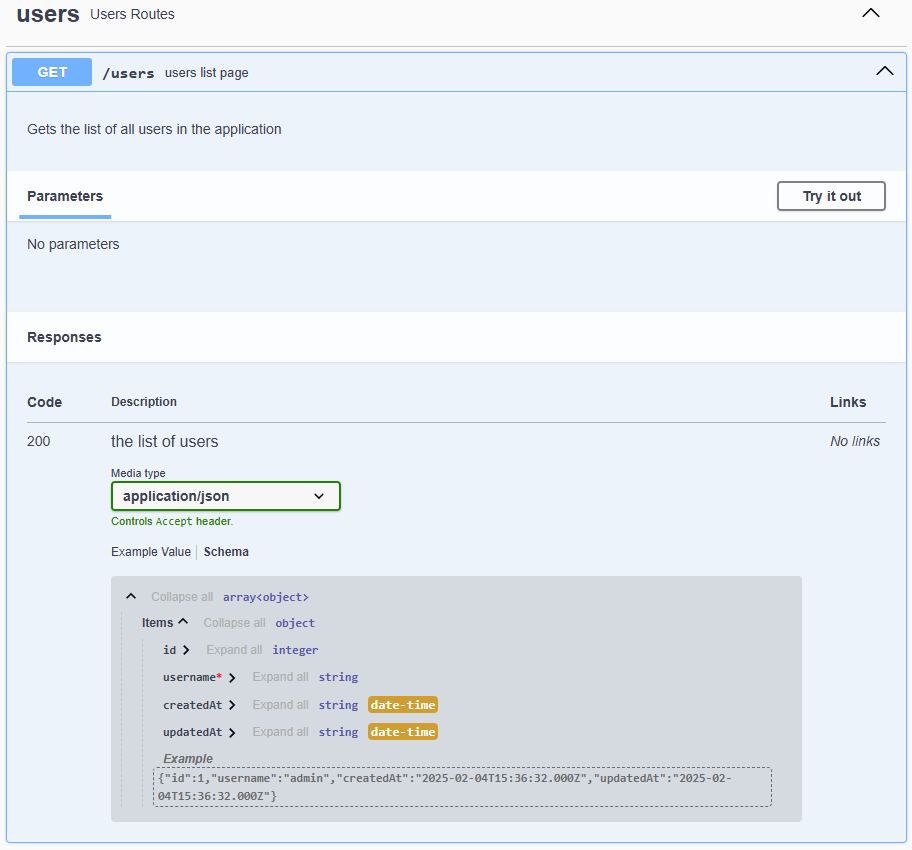
As we continue to add models and routes to our application, we should also make sure our Open API documentation is kept up to date with the latest information.
This is a good point to commit and push our work!
Automation
YouTube VideoAutomating Database Deployment
One very helpful feature we can add to our application is the ability to automatically migrate and seed the database when the application first starts. This can be especially helpful when deploying this application in a container.
To do this, let’s add some additional code to our bin/www file that is executed when our project starts:
/**
 * @file Executable entrypoint for the web application
 * @author Russell Feldhausen <russfeld@ksu.edu>
 */

// Import libraries
import http from 'http';

// Import Express application
import app from '../app.js';

// Import configurations
import database from '../configs/database.js';
import logger from '../configs/logger.js';
import migrations from '../configs/migrations.js';
import seeds from '../configs/seeds.js';

// Get port from environment and store in Express.
var port = normalizePort(process.env.PORT || '3000');
app.set('port', port);

// Create HTTP server.
var server = http.createServer(app);

// Attach event handlers
server.on('error', onError);
server.on('listening', onListening);

// Call startup function
startup();

/**
 * Server startup function
 */
function startup() {
  try {
    // Test database connection
    database.authenticate().then(() => {
      logger.debug("Database connection successful")
      // Run migrations
      migrations.up().then(() => {
        logger.debug("Database migrations complete")
        if (process.env.SEED_DATA === 'true') {
          logger.warn("Database data seeding is enabled!")
          seeds.up().then(() => {
            logger.debug("Database seeding complete")
            server.listen(port)
          })
        } else {
          // Listen on provided port, on all network interfaces.
          server.listen(port)
        }
      })
    })
  } catch (error){
    logger.error(error)
  }
}

// -=-=- other code omitted here -=-=-
We now have a new startup function that will first test the database connection, then run the migrations, and finally it will seed the database if the SEED_DATA environment variable is set to true. Once all that is done, it will start the application by calling server.listen using the port.
Notice that this code uses the then() function to resolve promises instead of the async and await keywords. This is because it is running at the top level, and cannot include any await keywords.
To enable this, let’s add the SEED_DATA environment variable to both .env and .env.example:
LOG_LEVEL=debug
PORT=3000
OPENAPI_HOST=https://$CODESPACE_NAME-$PORT.$GITHUB_CODESPACES_PORT_FORWARDING_DOMAIN
OPENAPI_VISIBLE=true
DATABASE_FILE=database.sqlite
SEED_DATA=true
LOG_LEVEL=debug
PORT=3000
OPENAPI_HOST=http://localhost:3000
# For GitHub Codespaces
# OPENAPI_HOST=https://$CODESPACE_NAME-$PORT.$GITHUB_CODESPACES_PORT_FORWARDING_DOMAIN
OPENAPI_VISIBLE=false
DATABASE_FILE=database.sqlite
SEED_DATA=false
To test this, we can delete the database.sqlite file in our repository, then start our project:
If it works correctly, we should see that our application is able to connect to the database, migrate the schema, and add the seed data, before fully starting:
> example-project@0.0.1 dev
> nodemon ./bin/www

[nodemon] 3.1.9
[nodemon] to restart at any time, enter `rs`
[nodemon] watching path(s): *.*
[nodemon] watching extensions: js,mjs,cjs,json
[nodemon] starting `node ./bin/www`
[dotenvx@1.34.0] injecting env (6) from .env
[2025-02-04 06:56:11.823 PM] warn:      OpenAPI documentation visible!
[2025-02-04 06:56:12.163 PM] debug:     Database connection successful
[2025-02-04 06:56:12.208 PM] info:      { event: 'migrating', name: '00_users.js' }
[2025-02-04 06:56:12.265 PM] info:      { event: 'migrated', name: '00_users.js', durationSeconds: 0.058 }
[2025-02-04 06:56:12.266 PM] debug:     Database migrations complete
[2025-02-04 06:56:12.266 PM] warn:      Database data seeding is enabled!
[2025-02-04 06:56:12.296 PM] info:      { event: 'migrating', name: '00_users.js' }
[2025-02-04 06:56:12.321 PM] info:      { event: 'migrated', name: '00_users.js', durationSeconds: 0.024 }
[2025-02-04 06:56:12.321 PM] debug:     Database seeding complete
[2025-02-04 06:56:12.323 PM] info:      Listening on port 3000
There we go! Our application will now always make sure the database is properly migrated, and optionally seeded, before it starts. Now, when another developer or user starts our application, it will be sure to have a working database.
This is a good point to commit and push our work!
Another Table
YouTube VideoAdding Another Table
Now that we have a working database, let’s explore what it takes to add a new table to our application to represent additional models and data in our database.
We’ve already created a users table, which contains information about the users of our application. Now we want to add a roles table to contain all of the possible roles that our users can hold. In addition, we need some way to associate a user with a number of roles. Each user can have multiple roles, and each role can be assigned to multiple users. This is known as a many to many database relation, and requires an additional junction table to implement it properly. The end goal is to create the database schema represented in this diagram:
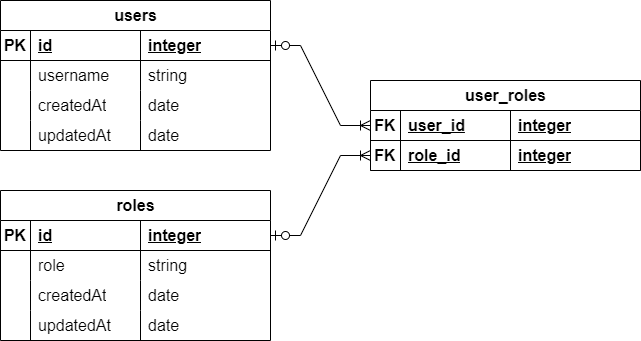
To do this, we’ll go through three steps:
- Create a migration to modify the database schema
- Create a model for each table
- Add additional seed data for these tables
Migration
First, we need to create a new migration to modify the database schema to include the two new tables. So, we’ll create a file named 01_roles.js in the migrations folder and add content to it to represent the two new tables we need to create:
/**
 * @file Roles table migration
 * @author Russell Feldhausen <russfeld@ksu.edu>
 * @exports up the Up migration
 * @exports down the Down migration
 */

// Import Libraries
import {Sequelize} from 'sequelize';

/**
 * Apply the migration
 *
 * @param {queryInterface} context the database context to use
 */
export async function up({context: queryInterface}) {
    await queryInterface.createTable('roles', {
        id: {
            type: Sequelize.INTEGER,
            primaryKey: true,
            autoIncrement: true,
        },
        role: {
            type: Sequelize.STRING,
            allowNull: false,
        },
        createdAt: {
            type: Sequelize.DATE,
            allowNull: false,
        },
        updatedAt: {
            type: Sequelize.DATE,
            allowNull: false,
        },
    })

    await queryInterface.createTable('user_roles', {
        user_id: {
            type: Sequelize.INTEGER,
            primaryKey: true,
            references: { model: 'users', key: 'id' },
            onDelete: "cascade"
        },
        role_id: {
            type: Sequelize.INTEGER,
            primaryKey: true,
            references: { model: 'roles', key: 'id' },
            onDelete: "cascade"
        }
    })
}

/**
 * Roll back the migration
 *
 * @param {queryInterface} context the database context to use
 */
export async function down({context: queryInterface}) {
    await queryInterface.dropTable('user_roles');
    await queryInterface.dropTable('roles');
}
In this migration, we are creating two tables. The first, named roles, stores the list of roles in the application. The second, named user_roles, is the junction table used for the many-to-many relationship between the users and roles table. Notice that we have to add the tables in the correct order, and also in the down method we have to remove them in reverse order. Finally, it is important to include the onDelete: "cascade" option for each of our reference fields in the user_roles table, as that will handle deleting associated entries in the junction table when a user or role is deleted.
The user_roles table also includes a great example for adding a foreign key reference between two tables. More information can be found in the Sequelize Documentation.
Models
Next, we need to create two models to represent these tables. The first is the role model schema, stored in models/role.js with the following content:
/**
 * @file Role model
 * @author Russell Feldhausen <russfeld@ksu.edu>
 * @exports RoleSchema the schema for the Role model
 */

// Import libraries
import Sequelize from 'sequelize';

/**
 * @swagger
 * components:
 *   schemas:
 *     Role:
 *       type: object
 *       required:
 *         - role
 *       properties:
 *         id:
 *           type: integer
 *           description: autogenerated id
 *         role:
 *           type: string
 *           description: name of the role
 *         createdAt:
 *           type: string
 *           format: date-time
 *           description: when the user was created
 *         updatedAt:
 *           type: string
 *           format: date-time
 *           description: when the user was last updated
 *       example:
 *           id: 1
 *           role: manage_users
 *           createdAt: 2025-02-04T15:36:32.000Z
 *           updatedAt: 2025-02-04T15:36:32.000Z
 */
const RoleSchema = {
    id: {
        type: Sequelize.INTEGER,
        primaryKey: true,
        autoIncrement: true,
    },
    role: {
        type: Sequelize.STRING,
        allowNull: false,
    },
    createdAt: {
        type: Sequelize.DATE,
        allowNull: false,
    },
    updatedAt: {
        type: Sequelize.DATE,
        allowNull: false,
    },
}

export default RoleSchema
Notice that this file is very similar to the models/user.js file created earlier, with a few careful changes made to match the table schema.
We also need to create a model schema for the user_roles table, which we will store in the models/user_role.js file with the following content:
/**
 * @file User role junction model
 * @author Russell Feldhausen <russfeld@ksu.edu>
 * @exports RoleSchema the schema for the UserRole model
 */

// Import libraries
import Sequelize from 'sequelize';

const UserRoleSchema = {
    userId: {
        type: Sequelize.INTEGER,
        primaryKey: true,
        references: { model: 'User', key: 'id' },
        onDelete: "cascade"
    },
    roleId: {
        type: Sequelize.INTEGER,
        primaryKey: true,
        references: { model: 'Role', key: 'id' },
        onDelete: "cascade"
    }
}

export default UserRoleSchema
Finally, we can now update our models/models.js file to create the Role and UserRole models, and also to define the associations between them and the User model.
/**
 * @file Database models
 * @author Russell Feldhausen <russfeld@ksu.edu>
 * @exports User a Sequelize User model
 * @exports Role a Sequelize Role model
 * @exports UserRole a Sequelize UserRole model
 */

// Import database connection
import database from "../configs/database.js";

// Import Schemas
import UserSchema from './user.js';
import RoleSchema from "./role.js";
import UserRoleSchema from "./user_role.js";

// Create User Model
const User = database.define(
    // Model Name
    'User',
    // Schema
    UserSchema,
    // Other options
    {
        tableName: 'users'
    }
)

// Create Role Model
const Role = database.define(
    // Model Name
    'Role',
    // Schema
    RoleSchema,
    // Other options
    {
        tableName: 'roles'
    }
)

// Create UserRole Model
const UserRole = database.define(
    // Model Name
    'UserRole',
    // Schema
    UserRoleSchema,
    // Other options
    {
        tableName: 'user_roles',
        timestamps: false,
        underscored: true
    }
)

// Define Associations
Role.belongsToMany(User, { through: UserRole, unique: false, as: "users" })
User.belongsToMany(Role, { through: UserRole, unique: false, as: "roles" })

export {
    User,
    Role,
    UserRole,
}
Notice that this file contains two lines at the bottom to define the associations included as part of this table, so that sequelize will know how to handle it. This will instruct sequelize to add additional attributes and features to the User and Role models for querying the related data, as we’ll see shortly.
We also added the line timestamps: false to the other options for the User_roles table to disable the creation and management of timestamps (the createdAt and updatedAt attributes), since they may not be needed for this relation.
Finally, we added the underscored: true line to tell sequelize that it should interpret the userId and roleId attributes (written in camel case as preferred by Sequelize) as user_id and role_id, respectively (written in snake case as we did in the migration).
Camel Case vs. Snake Case
The choice of either CamelCase or snake_case naming for database attributes is a matter of preference. In this example, we show both methods, and it is up to each developer to select their own preferred style.
Seed
Finally, let’s create a new seed file in seeds/01_roles.js to add some default data to the roles and user_roles tables:
/**
 * @file Roles seed
 * @author Russell Feldhausen <russfeld@ksu.edu>
 * @exports up the Up migration
 * @exports down the Down migration
 */

// Timestamp in the appropriate format for the database
const now = new Date().toISOString().slice(0, 23).replace("T", " ") + " +00:00";

// Array of objects to add to the database
const roles = [
    {
        id: 1,
        role: 'manage_users',
        createdAt: now,
        updatedAt: now
    },
    {
        id: 2,
        role: 'manage_documents',
        createdAt: now,
        updatedAt: now
    },
    {
        id: 3,
        role: 'add_documents',
        createdAt: now,
        updatedAt: now
    },
    {
        id: 4,
        role: 'manage_communities',
        createdAt: now,
        updatedAt: now
    },
    {
        id: 5,
        role: 'add_communities',
        createdAt: now,
        updatedAt: now
    },
    {
        id: 6,
        role: 'view_documents',
        createdAt: now,
        updatedAt: now
    },
    {
        id: 7,
        role: 'view_communities',
        createdAt: now,
        updatedAt: now
    }
];

const user_roles = [
    {
        user_id: 1,
        role_id: 1
    },
    {
        user_id: 1,
        role_id: 2
    },
    {
        user_id: 1,
        role_id: 4
    },
    {
        user_id: 2,
        role_id: 3
    },
    {
        user_id: 2,
        role_id: 5
    },
    {
        user_id: 3,
        role_id: 2
    },
    {
        user_id: 3,
        role_id: 4
    },
    {
        user_id: 4,
        role_id: 6
    },
    {
        user_id: 4,
        role_id: 7
    }
]

/**
 * Apply the migration
 *
 * @param {queryInterface} context the database context to use
 */
export async function up({context: queryInterface}) {
    await queryInterface.bulkInsert('roles', roles);
    await queryInterface.bulkInsert('user_roles', user_roles);
}

/**
 * Roll back the migration
 *
 * @param {queryInterface} context the database context to use
 */
export async function down({context: queryInterface}) {
    await queryInterface.bulkDelete('user_roles', {} , { truncate: true });
  await queryInterface.bulkDelete("roles", {}, { truncate: true });
}
Once again, this seed is very similar to what we’ve seen before. Notice that we use the truncate option to remove all entries in the user_roles table when we undo this seed as well as the roles table.
Seeding from a CSV File
It is also possible to seed the database from a CSV or other data file using a bit of JavaScript code. Here’s an example for seeding a table that contains all of the counties in Kansas using a CSV file with that data that is read with the convert-csv-to-json library:
// Import libraries
const csvToJson = import("convert-csv-to-json");

// Timestamp in the appropriate format for the database
const now = new Date().toISOString().slice(0, 23).replace("T", " ") + " +00:00";

export async function up({ context: queryInterface }) {
  // Read data from CSV file
  // id,name,code,seat,population,est_year
  // 1,Allen,AL,Iola,"12,464",1855
  let counties = (await csvToJson)
    .formatValueByType()
    .supportQuotedField(true)
    .fieldDelimiter(",")
    .getJsonFromCsv("./seeds/counties.csv");

  // append timestamps and parse fields
  counties.map((c) => {
    // handle parsing numbers with comma separators
    c.population = parseInt(c.population.replace(/,/g, ""));
    c.createdAt = now;
    c.updatedAt = now;
    return c;
  });

  // insert into database
  await queryInterface.bulkInsert("counties", counties);
}

export async function down({ context: queryInterface }) {
  await queryInterface.bulkDelete("counties", {}, { truncate: true });
}
Update User Model
Finally, let’s update the User model schema to include related roles. At this point, we just have to update the Open API documentation to match:
// -=-=- other code omitted here -=-=-
/**
 * @swagger
 * components:
 *   schemas:
 *     User:
 *       type: object
 *       required:
 *         - username
 *       properties:
 *         id:
 *           type: integer
 *           description: autogenerated id
 *         username:
 *           type: string
 *           description: username for the user
 *         createdAt:
 *           type: string
 *           format: date-time
 *           description: when the user was created
 *         updatedAt:
 *           type: string
 *           format: date-time
 *           description: when the user was last updated
 *         roles:
 *           type: array
 *           items:
 *             $ref: '#/components/schemas/Role'
 *       example:
 *           id: 1
 *           username: admin
 *           createdAt: 2025-02-04T15:36:32.000Z
 *           updatedAt: 2025-02-04T15:36:32.000Z
 *           roles:
 *             - id: 1
 *               role: manage_users
 *             - id: 2
 *               role: manage_documents
 *             - id: 4
 *               role: manage_communities
 */
// -=-=- other code omitted here -=-=-
Now we can modify our route in routes/users.js to include the data from the related Role model in our query:
/**
 * @file Users router
 * @author Russell Feldhausen <russfeld@ksu.edu>
 * @exports router an Express router
 *
 * @swagger
 * tags:
 *   name: users
 *   description: Users Routes
 */

// Import libraries
import express from "express";

// Create Express router
const router = express.Router();

// Import models
import { User, Role } from '../models/models.js'

/**
 * Gets the list of users
 *
 * @param {Object} req - Express request object
 * @param {Object} res - Express response object
 * @param {Function} next - Express next middleware function
 *
 * @swagger
 * /users:
 *   get:
 *     summary: users list page
 *     description: Gets the list of all users in the application
 *     tags: [users]
 *     responses:
 *       200:
 *         description: the list of users
 *         content:
 *           application/json:
 *             schema:
 *               type: array
 *               items:
 *                 $ref: '#/components/schemas/User'
 */
router.get("/", async function (req, res, next) {
  const users = await User.findAll({
    include: {
      model: Role,
      as: "roles",
      attributes: ['id', 'role'],
      through: {
        attributes: [],
      },
    },
  });
  res.json(users)
});

export default router;
You can learn more about querying associations in the Sequelize Documentation.
If everything works, we should see our roles now included in our JSON output when we navigate to the /users route:
[
  {
    "id": 1,
    "username": "admin",
    "createdAt": "2025-01-28T23:06:01.000Z",
    "updatedAt": "2025-01-28T23:06:01.000Z",
    "roles": [
      {
        "id": 1,
        "role": "manage_users"
      },
      {
        "id": 2,
        "role": "manage_documents"
      },
      {
        "id": 4,
        "role": "manage_communities"
      }
    ]
  },
  {
    "id": 2,
    "username": "contributor",
    "createdAt": "2025-01-28T23:06:01.000Z",
    "updatedAt": "2025-01-28T23:06:01.000Z",
    "roles": [
      {
        "id": 3,
        "role": "add_documents"
      },
      {
        "id": 5,
        "role": "add_communities"
      }
    ]
  },
  {
    "id": 3,
    "username": "manager",
    "createdAt": "2025-01-28T23:06:01.000Z",
    "updatedAt": "2025-01-28T23:06:01.000Z",
    "roles": [
      {
        "id": 2,
        "role": "manage_documents"
      },
      {
        "id": 4,
        "role": "manage_communities"
      }
    ]
  },
  {
    "id": 4,
    "username": "user",
    "createdAt": "2025-01-28T23:06:01.000Z",
    "updatedAt": "2025-01-28T23:06:01.000Z",
    "roles": [
      {
        "id": 6,
        "role": "view_documents"
      },
      {
        "id": 7,
        "role": "view_communities"
      }
    ]
  }
]
That should also exactly match the schema and route information in our Open API documentation provided at the /docs route.
There we go! That’s a quick example of adding an additional table to our application, including a relationship and more.
As a last step before finalizing our code, we should run the lint and format commands and deal with any errors they find. Finally, we can commit and push our work.